1
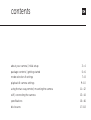
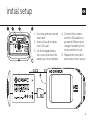
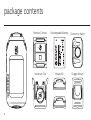
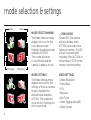
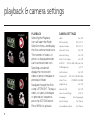
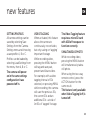
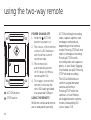
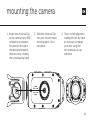
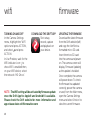
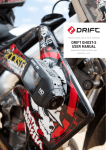
follow us
facebook.com/driftinnovation
vimeo.com/driftinnovation
twitter.com/driftinnovation
DRIFTINNOVATION.COM
quick guide
Thank you for purchasing the Drift HD Ghost
CUSTOMER SUPPORT
Check our official website for firmware updates, customer
support, news about our products and videos from our users.
If you have any suggestions, comments or concerns, please
contact our customer support team at:
[email protected]
WARRANTY
To obtain our warranty service, register your product at:
driftinnovation.com/warranty
contents
about your camera | initial setup
3—4
package contents | getting started
5—6
mode selection & settings
playback & camera settings
7—8
9—10
using the two-way remote | mounting the camera
11—12
wifi | connecting the camera
13—14
specifications15—16
disclosures17—18
about your camera
A
B
C
D
E
MENU / Tag / Back Button
LEFT Button / Zoom Out
RIGHT Button / Zoom In
ACTION Button
(On/Off/Rec/Stop)
F
3
G
H
Status LED
Rear Hatch
2.0” LCD Screen
300° Rotating Lens
USB Port (Mini-B)
HDMI Port (Mini-C)
3.5mm Microphone Input
Micro SD Card Slot
Battery Slot Cover
initial setup
I
J
K
L
1. Unscrew and remove the
rear hatch
2. Insert a Class 6 or higher
micro SD card
3. Lift the hinged battery
slot cover and insert the
battery as shown (below)
4. Connect the camera
via mini USB cable to a
powered USB port and
charge the battery for 4
hours before first use
5. Replace the rear hatch
and screw shut to secure
4
package contents
5
Remote Control
Rechargeable Battery
Connector Hatch
Universal Clip
Mount Kit
Goggle Mount
getting started
Wrist Strap
USB Cable (Mini-B)
Microphone Extension Cable
POWER ON AND OFF
1. Press and hold the
ACTION button to
power on
2. The screen will power
on, show the welcome
display, then Live Preview
3. The camera is now ready
to record video, or take
still photos
4. The current camera mode
is indicated by the icon in
the top left of the display
and by the LED indicator
(for details, see p7-8)
5. To power off, press
and hold the ACTION
button for 3 seconds
MAIN MENU
Press the MENU button to
enter the Main Menu. The
screen will display the icons
of the four menu options.
Use the LEFT/RIGHT buttons
to highlight menu options;
press the ACTION button to
select an option.
Mode Selection
Playback
Mode Settings
Settings
6
mode selection & settings
Video
Timelapse
7
Photo
MODE SELECTION MENU
The Mode Selection menu
displays the icons for the
four camera modes.
Highlight the desired mode
and press ACTION.
The screen will return
to Live Preview and the
camera is ready to record.
VIDEO MODE
(Green LED) The camera
will record video when
ACTION is pressed on the
camera or remote. The LED
will turn solid red while
recording. Press ACTION on
the camera, or STOP on the
remote, to end recording.
MODE SETTINGS
The Mode Settings menu
displays the icons for the
settings of the four camera
modes. Highlight the
desired mode and press
ACTION. The screen will
show the list of settings for
the chosen mode.
VIDEO SETTINGS
• Video Resolution
• Frame Rate
• FOV
• Exposure
• Self-Timer
• Video Tagging (see p10)
• Video Format
Photoburst
PHOTO MODE
(Yellow LED) The camera
will capture still images
when ACTION is pressed
on the camera or remote.
The LED will blink red every
time a photo is taken (this
applies for Timelapse and
Photoburst modes also).
TIMELAPSE MODE
(Purple LED) The camera
will capture a series of still
images at a specified rate
when ACTION is pressed
on the camera or remote.
To stop recording, press
ACTION on the camera or
STOP on the remote.
PHOTOBURST MODE
(Cyan LED) The camera
will capture a burst of still
images for an allotted
duration, at a specified
rate, when ACTION on the
camera or remote is pressed
(for best results, use a Class
6 or higher micro SD card).
PHOTO SETTINGS
• Photo Resolution
• FOV
• Exposure
• Self-Timer
TIMELAPSE SETTINGS
• Photo Resolution
• FOV
• Exposure
• Sequence Interval
• Self-Timer
PHOTOBURST SETTINGS
• Photo Resolution
• FOV
• Capture Rate
• Burst Duration
• Exposure
• Self-Timer
• Default Settings
8
playback & camera settings
Playback
Settings
9
PLAYBACK
Selecting the Playback
icon will open the Mode
Selection menu, and display
the four camera mode icons.
The number of videos or
photos is displayed beside
each camera mode icon.
Selecting a mode will
display the most recent
video or photo, timelapse or
photoburst folder.
Navigate through the files
using LEFT/RIGHT. To play a
video, or open a timelapse
or photoburst sequence,
press the ACTION button.
Press MENU to go back.
CAMERA SETTINGS
• WiFi
On / Off
• Mic Sensitivity
Off / 1 / 2 / 3
• Speaker Volume
Off / 1 / 2 / 3
• Remote Control
On / Off
• Remote Pairing
On / Off
• Date / Time Stamp
On / Off
• LCD Off
Off / 5s / 10s / 20s / 1m / 5m
• LCD Brightness
1/2/3
• LED Indicator
On / Off
• Camera Off
Off / 1 / 5 / 10 / 20 / 30m
• Date / Time
YY:MM:DD / HH:MM
• Digital Zoom
On / Off
• Remote LED
On / Off
• Save / Load Settings
• Language
A/B/C
(list of languages)
• Reset Settings
Yes / Cancel
• Format Memory Card
Yes / Cancel
new features
SETTING PROFILES
All camera settings can be
saved by selecting Save
Settings from the Camera
Settings menu and choosing
a save profile: A, B or C.
Profiles can be loaded by
selecting Load Settings from
the menu, then A, B or C.
The camera will power
on in the same settings
configuration it was
powered off in.
VIDEO TAGGING
When activated, this feature
allows the camera to
continuously record video,
but only saving on ‘tagging’
important footage.
While recording video,
pressing the MENU button
will tag and save past,
present and future video.
For example, with a video
tagging interval of 30s
selected, on pressing MENU
while recording, the camera
will save the previous 30s,
the current 30s and an
additional 30s—a total of
1m30s of ‘tagged’ footage.
The Video Tagging feature
requires a micro SD card
with 4GB of free space to
function correctly.
SIMULTANEOUS PHOTO
While recording video,
pressing the MENU button
will simultaneously take a
still photo.
When using the two-way
remote control, press the
ACTION button for the
same result.
This feature is only available
when Video Tagging (left) is
turned off.
10
using the two-way remote
A
B
ACTION button
STOP button
11
POWER ON AND OFF
1. Hold the ACTION
button to power on
2. The colour of the remote
control’s LED indicator
will show the current
camera mode
3. The remote will
automatically power
off if it does not find a
camera after 15s
4. To charge, connect the
remote control via the
mini USB cable provided
to a powered USB port
USING THE REMOTE
While the camera and remote
are on and paired, pressing
ACTION will begin recording
video, capture a photo, start
timelapse or photoburst,
depending on the camera
mode. Pressing STOP will end
video or timelapse recording.
Pressing ACTION while
recording video will capture a
photo, or start Video Tagging
(if activated, see p10). Pressing
STOP will end recording.
The LED will blink blue to
confirm a signal between
camera and remote.
Pressing STOP while the
camera is in Live Preview
will toggle between camera
modes, indicated by LED
colour (see p 7-8).
mounting the camera
1. Attach the Universal Clip
to the camera in any 360°
orientation as needed—
first position the clip in
the desired orientation,
then secure by rotating
the screw base by hand
2. Slide the Universal Clip
into your chosen mount,
ensuring that it ‘clicks’
into place
3. Check screen alignment,
rotating the lens by hand
as necessary to realign
your shot, using the
lens marker as an ‘up’
reference
12
wifi
TURNING ON AND OFF
In the Camera Settings
menu, highlight the ‘WiFi’
option and press ACTION,
and select P and press
ACTION.
In Live Preview, wait for the
WiFi indicator icon @ to
show WiFi is enabled then,
on your WiFi device, select
the network ‘HD Ghost’.
firmware
DOWNLOAD THE DRIFT APP
Shot setup,
record, capture
and playback on
your device.
NOTE - The WiFi setting will be activated by firmware update
once the Drift App for Apple® and Android® is available.
Please check the Drift website for more information and
app release dates: driftinnovation.com
13
UPDATING THE FIRMWARE
Download the latest firmware
from the Drift website (left)
and copy the .bin file to a
formatted micro SD card.
Insert the micro SD card
into the camera and power
on. The camera screen will
display ‘Firmware Updating’
as the update is installed.
Once complete, the camera
will power down. To check
the firmware has updated
correctly, power the camera
on and, from the Main menu,
open the Camera Settings
menu and select ‘Version’ to
view the current firmware.
connecting the camera
CONNECTING TO A PC
1. Connect the camera
using the USB cable
(provided); the camera
screen will show a USB
icon
2. The camera’s folder may
open automatically; if
not, open My Computer
3. The camera should
be recognised as a
removable disk; doubleclick to open
4. Open the DCIM folder to
access your files
CONNECTING TO A MAC
1. Connect the camera
using the USB cable
(provided); the camera
screen will show a USB
icon
2. The camera’s folder may
open automatically; if
not, open Finder
3. The camera should be
recognised as a external
device; double-click to
open
4. Open the DCIM folder to
access your files
CONNECTING TO A TV
1. While the camera is
powered off, connect
the camera using a mini
HDMI (Type C) to full
HDMI cable, available
from Drift retailers.
2. Power on the camera
3. The camera’s display will
now show on the TV
and playback of video
or photos will show on
screen; video sound
will come out of the TV
speakers
! While charging only (not through a computer), press ACTION to return to Live Preview
14
specifications
Video resolution:
1080p, 720p and WVGA (16:9); 960p (4:3)
File format:
.MP4 / .MOV (H.264 codec)
Sensor type:
CMOS
Frame rate:1080p:
25 / 30 fps
960p:
25 / 30 / 48 fps
720p:
25 / 30 / 50 / 60 fps
WVGA:
25 / 30 / 50 / 60 / 100 / 120 fps
Field of view:1080p:
90° / 127° / 170°
720p:170°
WVGA:
170°
Lens focal range:
0.5m to infinity
Lens rotation:
300°
Zoom:
×10 (digital)
Photo mode:
5 / 8 / 11 megapixels
Exposure:
Auto / Manual (advanced users)
LCD Screen:
2.0” colour TFT
15
Waterproof
3m (9.84ft)
Microphone:
Built-in, noise reducing microphone
Built-in memory:
256MB (not user accessible)
Memory capacity:
Micro SD memory cards up to 32GB
Inputs:
3.5mm external microphone (extension included)
Outputs:
HDMI connector type C (cable not included)
Connectivity:
USB Plug and Play, mini-B USB connector
Compatibility:
Windows XP and up / Mac OS 10.2 and up
Remote range:
5m (32.81ft)
Radio frequency:
2.4G
Camera:Dimensions:
105 (L) × 52 (W) × 33 (D) mm
Weight:167g
Power:
1700mAh rechargeable lithium-ion battery (included) (DC 3.7V)
Remote control:Dimensions:
59 (L) × 48 (W) × 12 (D) mm
Weight:22g
Power:
350mAh rechargeable lithium-ion battery (DC 3.7V)
16
disclosures
FCC Information
This device complies with Part
15 of the FCC Rules.
Operation is subject to the
following two conditions:
(1) this device may not cause
harmful interference, and
(2) this device must accept
interference received, including
interference that may cause
undesired operation.
WARNING
Changes or modifications to
this unit not expressly approved
by the party responsible for
compliance could void the
user’s authority to operate the
equipment.
17
The equipment has been
tested and found to comply
with the limits for a Class B
digital device, pursuant to Part
15 of the FCC Rules. These
limits are designed to provide
reasonable protection against
harmful interference in a
residential installation. This
equipment generates, uses,
and can radiate radio frequency
energy and, if not installed
and used in accordance with
the instructions, may cause
harmful interference to radio
communications. However,
there is no guarantee that
interference will not occur
in a particular installation. If
this equipment does cause
harmful interference to radio or
television reception, which can
be determined by powering the
equipment on and off, the user
is encouraged to try to correct
the interference by one or more
of the following measures:
Reorient or relocate the
receiving antenna;
Increase the separation
between the equipment and the
receiver;
Connect the equipment into
an outlet on a circuit different
from that which the receiver is
connected;
Consult the dealer or an
experienced radio / TV
technician for help.
This device complies with
Industry Canada licenseexempt RSS standard(s).
de l’intervention, y compris
l’intervention qui peut causer
l’opération non désirée de.
Operation is subject to the
following two conditions:
(1) this device may not cause
interference, and
(2) this device must accept
any interference, including
interference that may cause
undesired operation of the device.
Cet appareil numérique de la
classe [B] est conforme à la
norme NMB-003 du Canada.
This Class [B] digital apparatus
complies with Canadian
ICES-003.
Son fonctionnement est soumis
aux deux conditions suivantes:
(1) cet appareil ne peut pas
causer l’intervention, et
(2) cet appareil doit accepter
Cet appareil s’accorde avec
Industrie Canada licenceexempte RSS standard.
FCC RADIATION EXPOSURE
This equipment complies with
FCC radiation exposure limits
set forth for an uncontrolled
environment . This equipment
should be installed and
operated with minimum
distance 20cm between the
radiator & your body.
This transmitter must not be
co-located or operating in
conjunction with any other
antenna or transmitter.
MOTORCYCLE DISCLAIMER
Interacting with the camera
while riding could cause a
crash and you or others may be
seriously injured or killed.
• Keep your eyes and mind on
the road;
• Avoid looking at the camera
for too long;
• Stop the vehicle in a safe
location before adjusting the
camera.
18