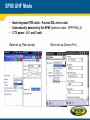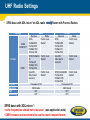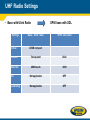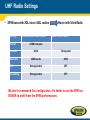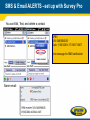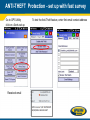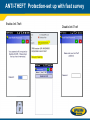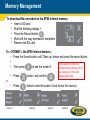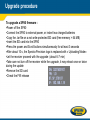
1
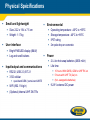
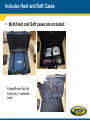
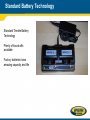
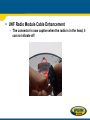
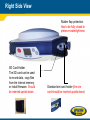
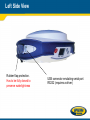
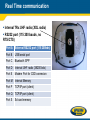
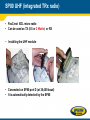
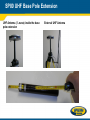
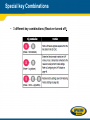
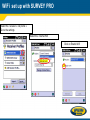
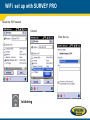
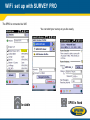
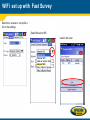
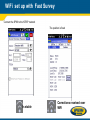
SP80: Technical Product Presentation Author: Charleine Potin Editor: Mark Silver SP80 GNSS SYSTEM SP 80 Sensor – Multi-Constellation and Multi-frequency receiver – Z-BLADE™ Technology Data collectors – Spectra Precision T41, Ranger 3,Nomad – Ashtech MM10,MM20, ProMark 100& 120 FW Release FAST Survey, Survey Pro, SurvCE 4 SP80 1.2 – Complete suite of field applications Survey Pro 5.4.1 – Real-time and raw data collection Fast Survey 4.0.7 Spectra Precision Office Survey Pro 2.96 – Real-time and raw data processing Office or 3.11 (PC 64 bits only) – Network solutions RINEX Convertor for use with other processing schemes & OPUS. GNSS Signals New “6G” ASIC with 240 GNSS channels – – – – – – GPS L1 C/A, L1P (Y),L2P(Y), L2C, L5 GLONASS L1 C/A ,L2 C/A,L3 GALILEO E1, E5a, E5b BEIDOU B1(phase 2),B2 SBAS (WASS/EGNOS/MSAS/GAGAN) L1C/A QZSS L1C/A,L2C,L1SAIF,L5 Tracking and using of every combination of 6 GNSS systems Including GLONASS-only or BeiDou-only modes Enhanced acquisition of weak GNSS signals Fast Search engine for quick GNSS acquisition (TTFF) Supports the recently approved RTCM 3.2 Multiple Signal Messages (MSM) - Standardized definition for broadcasting all GNSS signals. (Useful only if base and rover support these new messages) GNSS Performance GNSS Performance Real-time accuracy RTK: 8 mm + 1 ppm HRMS / 15 mm + 1 ppm VRMS DGPS: 25 cm + 1 ppm HRMS / 5 cm + 1 ppm VRMS Post-processing accuracy Static: 3 mm + 0.5 ppm HRMS / 5 mm + 0.5 ppm VRMS High-precision static: 3 mm + 0.1 ppm HRMS / 3.5 mm + 0.4 ppm VRMS OPERATION modes RTK network rover RTK UHF rover& Base NTRIP / DIRECT IP Rover (Base with Fast Survey) CSD Mode Post-processing GNSS Characteristics Initializations – Typically 2 seconds for baselines < 20 km (12.4 miles) – RTK Initialization range : over 40 km (24.8 miles) Data characteristics – Update rates to 20 Hz – Recording intervals 0.05 to 999 seconds – 2 GB internal memory (~1.5 GB available for data) (Over a year of 15 sec raw GNSS data from 14 satellites – Removable SD/SDHC memory card (up to 32 GB) – Supported data formats: RTCM 3.2 RTCM 3.1 RTCM 2.3 ATOM CMR/CMR + NMEA 0183 messages output Physical Spécifications Small and lightweight Size: 22.2 x 19.4 x 7.5 cm Weight: 1.17 kg User interface Bright PMOLED display (B&W) Log and scroll buttons Input/output and communications RS232, USB 2.0, BT 2.1 3.5G cellular quad-band GSM / penta-band UMTS WiFi (802.11 b/g/n) (Optional) internal UHF 2W TRx Environmental Operating temperature: -40ºC to +65ºC Storage temperature: -40ºC to +85ºC IP67 rating 2m pole drop on concrete Power 2 Li-Ion hot-swap batteries (2600 mAh) Life time: 10 hours :With GNSS, GSM or UHF RX on 5 hours with UHF TX (2w) on (hot –swappable batteries) 9-28 V external DC power Standard 2-year Warranty Receivers have standard 2-year Warranty Can be extended to 3-years for $1,150 / head Extension can occur anytime during the first 24months Includes Hard and Soft Cases Both Hard and Soft cases are included: A Base/Rover Pair fits nicely into 1 combined case! Standard Battery Technology Standard Trimble Battery Technology Plenty of knock-offs available Factory batteries have amazing capacity and life Front View Bright display screen Impact-resistant glass-fiber reinforced casing Shock absorber Power button Battery A LED indicators Scroll buttons Log buttons Battery B LED indicators Sunlight-readable display High contrast, operates in low temperature Possibility to modify the backlight timeout ($PASHS,command) PMark & Pflex 800 buttons location Bottom View Battery B compartment Battery A compartment 5/8ʺ thread insert Dual hot-swappable batteries Easy, one-hand battery exchange process Full day, interruption-free operation Removable plate Power/data connector (DC/RS232). Same as EPOCH 50 Different than previous Ashtech Connecters Now includes power for the GPS in same cable that connects to external radio! Optional UHF module UHF Radio Module Cable Enhancement – The connector is now captive when the radio is in the head, it can not vibrate off: Right Side View Rubber flap protection. Has to be fully closed to preserve waterlightness SD Card Holder The SD card can be used to record data, copy files from the internal memory, or install firmware. Should be inserted upside down. Standard sim card holder (the sim card should be inserted upside down) Left Side View Rubber flap protection. Has to be fully closed to preserve waterlightness USB connector emulating serial port RS232 (requires a driver) Real Time communication 3.5G quad-band GSM Built-in WiFi (802.11b/g/n) No More External Antennas communication Bluetooth 2.1 +EDR GSM antenna WIFI & BT antenna Real Time communication Internal TRx UHF radio (XDL radio) RS232 port (115 200 bauds, no RTS/CTS) Port A External RS232 port (115 200bds) Port B USB serial port Port C Bluetooth SPP Port D Internal UHF radio (38200 bds) Port E Modem Port for CSD connexion Port M Internal Memory Port P TCP/IP port (client) Port Q TCP/IP port (client) Port S Sd card memory SP80 UHF (integrated TRx radio) • PacCrest XDL micro radio • Can be used as TX (0.5 or 2 Watts) or RX • Installing the UHF module • Connected on SP80 port D (at 38,400 baud) • It is automatically detected by the SP80 Phase center Location Without UHF module Antenna name :SPP91564_1 With UHF module Antenna name :SPP91564_2 • The antenna phase center offset is reduced by 2mm • The delta is automatically applied by the receiver (different antenna name) SP80 UHF Rover Inside-the-rod mounted UHF antenna design Patented UHF antenna / pole design Physical UHF antenna protection Cleaner design Extends RTK radio range, shorter RF cable length internally Typical external UHF antenna radiation pattern The radiated pattern is asymmetric A real degradation of the reception level when the unit is oriented at 0º, and 120º azimuth This is why reception on most rovers changes when you rotate the pole. Inside-the-rod UHF antenna radiation pattern The radiation pattern does not suffer of any directional issues The Rx level is almost flat whatever the azimuth is Fiberglass Range pole, NOT Carbon Fiber! SP80 UHF Base Pole Extension UHF Antenna (¼ wave) inside the base pole extension External UHF Antenna FRONT PANEL DISPLAY FRONT PANEL : General status ROVER • 3 New icons : • Wifi (11) : BASE WiFi connection active Data being transmitted over Wifi 1 to 3 waves depending on the signal level • Anti-theft protection (1) • SD card (12) Antitheft protection active SD Card Present FRONT PANEL DISPLAY Memory /SD Card System Information Position Solution Radio Rover Base FRONT PANEL DISPLAY Modem WiFi ATL recording Memory Management NO YES Monitoring Batteries The battery A is used battery B level Battery is missing The receiver is powered from the AC/DC power block, not by one of its batteries. « battery low » alarm is raised when the battery is < 10 - 15 % (T). The batteries can be charged inside the receiver with the external AC/DC power If the receiver is off and cool. Special key Combinations • 3 different key combinations (Receiver turned off) Operating Modes • SP80 Operating modes : • • • • • NRTIP/DIP ROVER NTRIP/DIP BASE (Fast Survey Only) CSD BASE & ROVER UHF BASE & ROVER POST-Processing • No new operating modes • NTRIP/DIP connections can be supplied with GPRS or WiFI • New UHF radio module (XDL radio) WiFi set up with SURVEY PRO Select the receiver « net profile » Go to the settings Select the internal Wifi • Click on Enable Wifi WiFi set up with SURVEY PRO Select the WiFi network Connect Enter the key Is blinking WiFi set up with SURVEY PRO The SP80 is connected via Wifi You can start your survey as you do usualy Is stable SP80 is fixed WiFi set up with Fast Survey Select the receiver « net profile » Go to the settings Select Receiver Wifi Launch the scan WiFi set up with Fast Survey Select the WiFi network Enter the WiFi key Connect… WiFi set up with Fast Survey Connect the SP80 to the NTRIP network The position is fixed Is stable Corrections received over WiFi SP80 UHF Mode • New integrated TRX radio : Pacrest XDL micro radio • Automatically detected by the SP80 (antenna name : SPP91564_2) • 2 TX power : 0.5 and 2 watt Base set up (Fast survey) Rover set up (Survey Pro) UHF Radio Settings • SP80 base with XDL micro* or ADL radio Settings ATOM COMPACT Format CMR+* Protocol Baud rate FEC Scrambling Rover with Pacrest Radios BASE Receiver SP80, ProMark800 ProFlex 800 ProMark 500 ProFlex 500 SP80,ProMark8 00 ProFlex 00 ProMark 500 ProFlex 500 Epoch50 , Other brand receivers Radio Pacific Crest Radios* Pacific Crest Radios* Pacific Crest Radios* Transparent FST 9600 bauds OFF OFF ROVER Reciever SP80, ProMark800 ProFlex 800 ProMark 50 ProFlex 500 Epoch50 , Other brand receivers Radio Pacific Crest Radios* Pacific Crest Radios* SP80,ProMark800 Pacific Crest ProFlex 800, Radios* ProMark 500, ProFlex 500 Transparent FST 9600 bauds OFF OFF SP80 base with XDL micro* : •some frequencies should not to be used (see application note) •CMR+ because we recommend to use the most compact format UHF Radio Settings • Base with Ulink Radio Settings Format Base - Ulink radio SP80 base with XDL SP80 - XDL radio ATOM compact Protocol Transparent Ulink Baud rate 4800 bauds 4800 FEC Not applicable OFF Scrambling Not applicable OFF UHF Radio Settings • SP80 base with XDL micro /ADL radios Settings Format SP80 with XDL or ADL radios Rover with Ulink Radio Rover - Ulink radio ATOM compact Protocol Ulink Transparent Baud rate 4800 bauds 4800 FEC Not applicable OFF Scrambling Not applicable OFF We don’t recommend this configuration: It’s better to use the SP80 as ROVER to profit from the SP80 performances UHF Radio Settings (Dealer only) • ADLCONF PC software & ADLCONF dealer dongle • ConfRadio supports when set to direct cable PROCEDURE • Power ON the SP 80 by pressing simultaneously these 2 buttons until you can read on the SP80 display : • Connect the SP80 to your PC via serial cable (38,400 bau) • Launch ADL CONF (don’t forget to connect the ADLCONF dealer dongle to the computer) • Configure the radio SMS & Email ALERTS The receiver can be set up to send via SMS (Text Messages) and / or email raised alarms 2 alarms categories : Standard (high priority alarms) : E.g. Low battery, Connection lost, Memory full, Anti-theft alarm… Full alarms (all alarms) : not recommended Remark : with CSD (GSM data) sim card, only SMS can be sent With WiFi, only email can be sent SMS & Email ALERTS –set up with Survey Pro Make sure that the Modem or WiFi is On ( if not, the modem has to be powered on via the “SP80 net” profile) SMS Set Up Go To the SP80 profile/settings and ALERTS menu Select Phone Enter the phone number SMS & Email ALERTS –set up with Survey Pro EMail Set Up Enter your email Settings Add contact SMS & Email ALERTS –set up with Survey Pro You can Edit, Test, and delete a contact SP80 S/N: 5405900035 Date : 18/03/2014 17:39:07 GMT Test message for SMS verification Alarm email : SMS & Email ALERTS –set up with Fast Survey Go to GPS Utility click on Alerts set up Check that the GPRS or the WiFI is on Enter the email address With Fast Survey, when the radio is power on, the GPRS or the WiFi is automatically power Off. ANTI-THEFT Protection Purpose : Locks the base receiver to a specific location (remote or public places) Allows tracking of the SP80 position if moved Makes receiver useless without the antitheft password How it works : At the time the antitheft is enabled, the computed position is saved in memory and if the receiver has been configured for that, an SMS/Email containing the antitheft password is sending to the antitheft contacts . If the receiver computes a position distant by more than 100 M (can be modified by $PASHS command) or if the position has not been computed for the last 20 s, a theft condition is detected. ANTI-THEFT Protection What happens : The buzzer regularly emits a sound alarm SP80 front panel alarm > All output messages are stopped the SP80 configuration cannot be changed (input commands are rejected) The 3 front panel buttons are inactive (upgrade, reset, power off no more possible) If the receiver has been configured for anti-theft, SMS and/or emails are sent every minute to the contacts indicated in the antitheft menu Both SMS and emails contain the base’s last computed position to help you track the thief If the batteries are removed before the thief takes the receiver, next time the receiver is powered on, the theft alarm will be set and the receiver will remain completely unusable. ANTI-THEFT Protection Antitheft Disable : • Enter the antitheft password (you have defined and received when you have enable the antitheft feature) • If the antitheft protection is still active when you power off the receiver, the following screen is displayed on the SP80 front panel • By pressing the Scroll button to reject the power off, you can disable the antitheft protection. Antitheft password lost • Call the technical support which will provide you a specific password computed for the specific SP80 Serial Number ANTI-THEFT Protection - set up with fast survey Go to GPS Utility click on Alerts set up Received email To test the Anti-Theft feature, enter first email contact address ANTI-THEFT Protection-set up with fast survey Enable Anti-Theft Disable Anti-Theft ANTI-THEFT Protection-set up with Survey Pro • Make sure that the GPRS or WiFi is ON • Go To Survey Anti-Theft Menu (under Survey view by default) ANTI-THEFT Protection-set up with Survey Pro To test the Anti-theft feature, you have to go back on the receiver settings/Alerts menu Memory Management To download files recorded on the SP80 internal memory: • Insert a SD card • Wait the following display > • Press the Record button • Wait until the copy annimation completes • Remove the SD card To « FORMAT » the SP80 internal memory: • Press the Scrool button until ‘Clean up’ shown and press the record button • It can usefull to format the • Then press to see the screen 3 internal memory when the % of free memory is <99% after deleting all the files • Press button and confirm • Press button to see the screen 4 and format the memory or screen 1 screen 2 screen 3 screen 4 Upgrade procedure To upgrade a SP80 firmware : •Power off the SP80 •Connect the SP80 to external power, or instert two charged batteries •Copy the .tar file on a not write-protected SD card (free memory > 64 MB) •Insert the SD card into the SP80 •Press the power and Scroll buttons simultaneously for at least 3 seconds •After about 10 s, the Spectra Precision logo is replaced with « Uploading Mode» •Let the receiver proceed with the upgrade (about 6-7 min) •Take care not turn off the receiver while the upgrade, it may reboot once or twice during the update •Remove the SD card •Check the FW release SP80 ICD ($PASHS COMMANDs) • New useful commands : • $PASHS,BKL,d1 to set the timeout for the OLED backlight d1 = 0 NO timeout (useful for demo), default value = 10s • PASHS,ATH,LEN,d to set the anti-theft protection distance default value = 100 meters: could be useful to reduce it for demo • « Reset to factory settings » • $PASHS,INI,1 to reset the receiver configuration • $PASHS,TST,CONFIG,DEL reset the receiver configuration & permanent data (APN…) • Commands for new features (WiFi, Antitheft…) • Few commands have disappeared: • • $PASHS, PAR,SAV, or LOD to save or load the receiver configuration $PASHS,MDM,INI…. • And some have been modified… TO send $PASHS Commands, • • You can use : Fast Survey, ASHCOM, WINCOM…. Via : Bluetooth, USB * USB: the USB link is an RS2323 emulator. To use it, you need first to install a driver (USB driver installer). You have to do it before connecting the SP80 to your computer and after each receiver power off, you have to disconnect the usb cable and reconnect it)