1
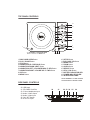
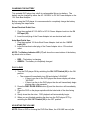
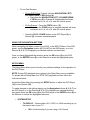
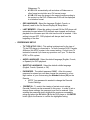
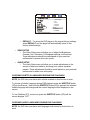
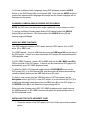
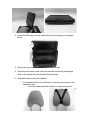
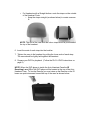
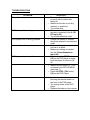
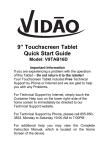
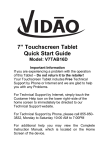
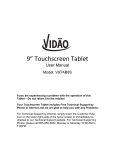
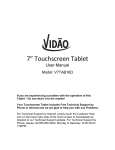
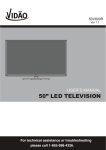
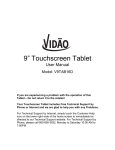
PORTABLE DVD PLAYER INSTRUCTION MANUAL Model: PDV707KIT / PDV909KIT For technical assistance or troubleshooting please call 1-855-998-4326. WARNINGS To reduce the risk of fire or electric shock, do not expose this appliance to rain or moisture. To reduce the risk of electric shock, do not open the cabinet. No user serviceable parts are inside. Refer servicing to qualified personnel. This appliance uses a Laser System. To prevent direct exposure to the laser beam do not open the cabinet. Visible and invisible laser radiation is present when the cabinet is open. Avoid direct exposure and do not stare into the beam. Batteries should not be exposed to excessive heat such as direct sunlight, fire, or other heat sources. Caution: Do not expose this appliance to dripping or splashing liquids. Do not put objects filled with liquid, such as vases on or near the appliance. Caution: To turn this appliance off completely, the POWER cord must be unplugged from the wall outlet. The power cord must be easily accessible at all times. • • • • • • CAUTION DO NOT OPEN THE LIGHTNING FLASH WITH ARROWHEAD SYMBOL, WITHIN AN EQUILATERAL TRIANGLE, IS INTENDED TO ALERT THE USER TO THE PRESENCE OF NON-INSULATED "DANGEROUS VOLTAGE" WITHIN THE PRODUCT'S ENCLOSURE THAT MAY BE OF SUFFICIENT MAGNITUDE TO CONSTITUTE A RISK OF ELECTRIC SHOCK TO PERSONS. WARNING: TO REDUCE THE RISK OF ELECTRIC SHOCK, DO NOT REMOVE THE FRONT OR REAR COVER. NO USER SERVICEABLE PARTS ARE INSIDE. REFER SERVICING TO QUALIFIED SERVICE PERSONNEL. THE EXCLAMATION POINT WITHIN AN EQUILATERAL TRIANGLE IS INTENDED TO ALERT THE USER TO THE PRESENCE OF IMPORTANT OPERATING AND MAINTENANCE (SERVICING) INSTRUCTIONS IN THE LITERATURE ACCOMPANYING THE APPLIANCE. FCC WARNINGS WARNING: Changes or modifications to this unit not expressly approved in this manual could void the user’s authority to operate the equipment. NOTE: This equipment has been tested and found to comply with the limits for a Class B digital device, pursuant to Part 15 of the FCC Rules. These limits are designed to provide reasonable protection against harmful interference in a residential installation. This equipment generates, uses, and can radiate radio frequency energy and, if not installed and used in accordance with the instructions, may cause harmful interference to radio communications. However, there is no guarantee that interference will not occur in a particular installation. If this equipment does cause harmful interference to radio or television reception, which can be determined by turning the equipment off and on, the user is encouraged to try to correct the interference by one or more of the following measures: • Reorient or relocate the receiving antenna. • Increase the separation between the equipment and receiver. • Connect the equipment into an outlet on a circuit different from that to which the receiver is connected. • Consult the dealer or an experienced radio/TV technician for help. IMPORTANT SAFETY INSTRUCTIONS 1) 2) 3) 4) 5) 6) 7) 8) 9) 10) 11) 12) 13) 14) Read these instructions. Keep these instructions. Heed all warnings. Follow all instructions. Do not use this apparatus near water. Clean only with dry cloth. Do not block any ventilation openings. Install in accordance with the manufacturer's instructions. Do not install near any heat sources such as radiators, heat registers, stoves, or other apparatus (including amplifiers) that produce heat. Do not defeat the safety purpose of the polarized or grounding-type plug. A polarized plug has two blades with one wider than the other. A grounding type plug has two blades and a third grounding prong. The wide blade and/or the third prong are provided for your safety. If the provided plug does not fit into your outlet, consult an electrician for replacement of the obsolete outlet. Protect the POWER cord from being walked on or pinched particularly at plugs, convenience receptacles, and the point where they exit from the apparatus. Only use attachments/accessories specified by the manufacturer. Use only with the cart, stand, tripod, bracket, or table specified by the manufacturer, or sold with the apparatus. When a cart is used, use caution when moving the cart/apparatus combination to avoid injury from tip-over. Unplug this apparatus during lightning storms or when unused for long periods of time. Refer all servicing to qualified service personnel. Servicing is required when the apparatus has been damaged in any way, such as POWER-supply cord or plug is damaged, liquid has been spilled or objects have fallen into the apparatus, the apparatus has been exposed to rain or moisture, does not operate normally, or has been dropped. S3125A TOP PANEL CONTROLS 13 12 14 9 10 VOL- VOL+ 4 8 6 OK 7 5 15 16 3 2 1 11 IR *For PDV909KIT the DISC DOOR OPEN Button is located on the RIGHT side 17 19 18 10. SETUP Button 11. DVD / USB / SD Button 12. MODE Button 13. ZOOM Button 14. AUDIO Button 15. REPEAT Button 16. NTSC / PAL Button 17. BATTERY INDICATOR LED* 18. POWER INDICATOR LED* 19. IR RECEIVING LENS* 1. DISC DOOR OPEN Button 2. PLAY / PAUSE Button 3. STOP Button 4. NAVIGATION UP / PREVIOUS Button 5. NAVIGATION DOWN / NEXT Button 6. NAVIGATION LEFT / VOLUME DOWN / F. REV Button 7. NAVIGATION RIGHT / VOLUME UP / F. FWD Button 8. OK Button 9. MENU Button * NOTE: NUMBERS 17-19 ARE LOCATED ON THE FRONT OF THE DVD PLAYER SIDE PANEL CONTROLS 20. USB Input 21. SD / MMC Card Slot 22. 3.5mm Headphone Input 23. Audio / Video Output 24. Audio / Video Input 25. ON / OFF Switch 26. 9-12V DC Input 20 21 22 23 24 25 26 REMOTE CONTROL IDENTIFICATION 1 30 20 21 18 17 22 19 26 4 8 5 25 16 28 6 29 23 2 24 14 11 12 10 1. POWER Button 2. PLAY / PAUSE Button 3. STOP Button 4. NAVIGATION UP Button 5. NAVIGATION DOWN Button 6. NAVIGATION LEFT Button 7. NAVIGATION RIGHT Button 8. ENTER Button 9. MENU Button 10. NEXT Button 11. PREVIOUS Button 12. F. FWD Button 13. F. REV Button 14. VOLUME UP Button 15. VOLUME DOWN Button 27 9 7 3 15 13 16. SETUP Button 17. SUBTITLE Button 18. AUDIO Button 19. ANGLE Button 20. DVD / USB / SD Button 21. MODE Button 22. NUMBER (0 to +10) Buttons 23. SLOW Button 24. REPEAT Button 25. MUTE Button 26. TITLE Button 27. RETURN Button 28. ZOOM Button 29. GOTO Button 30. OSD (On Screen Display) Button CHARGING THE BATTERY This portable DVD player has a built-in rechargeable lithium-ion battery. The battery can be charged by either the AC 120-240V to DC 9V Power Adapter or the 12V Auto-Boat Adapter. Before using the DVD player it is recommended to completely charge the battery by following the steps below. Home Electrical Outlet Use: 1. Plug the supplied AC 120-240V to DC 9V Power Adapter Jack into the 9V DC Input (26). 2. Insert the wall plug of the Power Adapter into an electrical wall outlet. Auto-Boat Outlet Use: 1. Plug the supplied 12V Auto-Boat Power Adapter Jack into the 12V DC Input (26). 2. Insert the car-boat outlet plug of the Power Adapter into a 12V car-boat outlet. NOTE: The Battery Indicator LED (17) will show the current status of the battery by which color is shown. • • RED – The battery is charging GREEN – The battery is completely charged PLAY A DVD 1. Turn the DVD player ON by switching the ON / OFF Switch (25) to the ON position. • The screen will immediately turn ON and display “LOADING” o If there is no disc in the DVD player the screen display will show “NO DISC” o If there is a disc in the DVD player the disc will immediately begin playing after a few seconds. 2. Press the DISC DOOR OPEN button (1) and the disc door will immediately open. 3. Place the DVD on the player spindle with the label-side of the disc facing UP. 4. Gently close the disc door. DVD playback will automatically begin. 5. When you are finished watching the disc turn the DVD player OFF by switching the ON / OFF Switch (25) to the OFF position. ADJUSTING THE VOLUME NOTE: When a DVD is showing the DVD Disc Menu, the VOLUME can only be adjusted by the Remote. Once normal DVD playback begins, you can adjust the VOLUME using the buttons on either the DVD Player or the Remote • To Increase the Volume: o Using the DVD Player: Press the NAVIGATION RIGHT / VOLUME UP / F.FWD button (7) o Using the Remote: Press the VOLUME UP button (14) • To Decrease the Volume: o Using the DVD Player: Press the NAVIGATION LEFT / VOLUME DOWN / F.REV button (6) o Using the Remote: Press the VOLUME DOWN button (15) SKIPPING TO THE NEXT OR PREVIOUS SCENE/TRACK • To Skip Forward to the next Scene/Track on a disc: o On the DVD Player: Press the NAVIGATION DOWN / NEXT button (5) o On the Remote: Press the NEXT button (10) • To Skip Backward to the previous Scene/Track on a disc: o On the DVD Player: Press the NAVIGATION UP / PREVIOUS button (4) o On the Remote: Press the PREVIOUS button (11) FAST FORWARD OR FAST REVERSE • To use Fast Forward: o On the DVD Player: Press & Hold the NAVIGATION RIGHT / VOLUME UP / F.FWD button (7) until the screen display reads “2X” § Each time the NAVIGATION RIGHT / VOLUME UP / F.FWD button (7) is Pressed & Held playback will scan forward at x2, x4, x8, x16, and x32 normal speed. o On the Remote: Press the F.FWD button (12) § Each time the F.FWD button (12) is pressed playback will scan forward at x2, x4, x8, x16, and x32 normal speed. o Press the PLAY / PAUSE button on the DVD Player (2) or Remote (2) to resume normal playback. • To use Fast Reverse: o On the DVD Player: Press & Hold the NAVIGATION LEFT / VOLUME DOWN / F.REV button (6) § Each time the NAVIGATION LEFT / VOLUME DOWN / F.REV button (6) is Pressed & Held playback will scan backward at x2, x4, x8, x16, and x32 normal speed. o On the Remote: Press the F.REV button (13) § Each time the F.REV button is pressed playback will scan backward at x2, x4, x8, x16, and x32 normal speed. o Press the PLAY / PAUSE button on the DVD Player (2) or Remote (2) to resume normal playback. USING THE NAVIGATION BUTTONS When navigating the Menu screen of your DVD, or the SETUP Menu of the DVD player, use the Navigation buttons (4, 5, 6, & 7) on the DVD player, or on the Remote (4, 5, 6, 7) to highlight your desired selection on the screen. Once you have highlighted the selection press the OK button (8) on the DVD player, or the ENTER button (8) on the Remote to select the highlighted option. SETUP MENU The Setup Menu allows you to choose your preferred settings for the operation of the DVD Player. NOTE: During DVD playback some options in the Setup Menu are not available. To access the full Setup Menu first STOP DVD playback and then follow the instructions below. Access the Setup Menu by pressing the SETUP button on either the DVD Player (10), or the Remote (16). To make changes to the settings simply use the Navigation buttons (4, 5, 6, 7) on the DVD player or on the Remote (4, 5, 6, 7) to highlight your desired selection, then press either the OK button (8) on the DVD player or the ENTER button (8) on the Remote to confirm the highlighted selection. • SYSTEM SETUP o TV DISPLAY - Choose either 16:9, 4:3PS, or 4:3LB according to you the aspect ratio of your TV. § 16:9: Use this setting if you are using a 16:9 format § § Widescreen TV 4:3 PS: Will automatically edit and show a Widescreen or other format movie/video as a Full screen image 4:3 LB: Will keep the image in the same format according to the content on the DVD. Widescreen DVDs will be displayed in a letterbox format. o OSD LANGUAGE - Select the language (English, French, or Spanish) used for the On Screen Displays & Setup Menu. o LAST MEMORY - When this setting is turned ON the DVD player will remember the spot where DVD playback was stopped, and resume playback from the same spot the next time the disc is inserted. If this setting is turned OFF, DVD playback will always start from the beginning of the disc. • PREFERENCE SETUP o TV TYPE (NTSC / PAL) - This setting is determined by the type of TV the DVD player is connected to. In North America (USA, Canada, & Mexico) the NTSC system is the correct setting. Consult your TV instruction manual if you have any questions on if your TV uses the NTSC or PAL system. o AUDIO LANGUAGE - Select the default language (English, French, or Spanish) for DVD playback. o SUBTITLE LANGUAGE - Select the default subtitle language (English, French, Spanish, or Off). o PASSWORD - The default password “0000”. After this correct password is entered you can then change the password to a four digit number of your choice using the Number buttons (22) on the Remote. § NOTE: Your password is needed to change the Parental Control Settings. o PARENTAL - To restrict the viewing of certain movie ratings, Parental Controls can be accessed on this menu. In order to set or change these settings, the password must first be entered. After entering the password simply highlight the maximum acceptable rating and press the OK button (8) on the DVD player or the ENTER button (8) on the Remote to confirm the highlighted rating. 1. KID SAFE 2. G 3. PG 4. PG13 5. PG-R 6. R 7. NC-17 8. ADULT Set Parental Control o DEFAULT – To return the DVD player to the original factory settings, select DEFAULT and the player will automatically return to the factory default settings. • VIDEO SETUP o The Video Setup menu will allow you to adjust the Brightness, Contrast, Hue, Saturation, & Sharpness settings for the picture. These adjustments should be made based on your personal preferences for picture and color quality. • AUDIO SETUP o The Audio Setup menu will allow you to make adjustments to the amount of bass and treble by choosing from various equalizer presets. These adjustments should be made based on your personal preferences for audio tone and quality. CHOOSING SUBTITLE LANGUAGES DURING DVD PLAYBACK NOTE: the DVD disc must have multi-subtitle enabled for this function to work. To choose a Subtitle Language during DVD playback press the SUBTITLE button (17) on the Remote. Each time the SUBTITLE button (17) is pressed the selected subtitle language will change and the current language will be displayed on the screen. To turn Subtitles OFF, continue to press the SUBTITLE button (17) until the screen displays “OFF”. CHOOSING AUDIO LANGUAGES DURING DVD PLAYBACK NOTE: the DVD disc must have multi-language audio tracks for this function to work. To choose a different Audio Language during DVD playback press the AUDIO button on the DVD Player (14) or the Remote (18). Each time the AUDIO button is pressed the selected audio language will change and the current language will be displayed on the screen. CHANGING CAMERA ANGLES DURING DVD PLAYBACK NOTE: the DVD disc must have multi-angle capabilities for this function to work. To choose a different Camera Angle during DVD playback press the ANGLE button (19) on the Remote. With each press of the ANGLE button (19) the camera angle will change. USB & SD / MMC PLAYBACK This DVD supports playback of MP3 audio files and JPEG photos from a USB drive, SD or MMC card. For USB Playback - Insert a USB flash drive into the USB Input (20) on the side of the DVD player. If there is no disc inserted the DVD player will automatically enter USB playback mode. For SD / MMC Playback - Insert a SD or MMC card into the SD / MMC Card Slot (21) on the side of the DVD player. If there is no disc inserted the DVD player will automatically enter SD / MMC playback mode. To enter the USB or SD playback mode press the DVD/USB/SD button on the DVD player (11), or on the Remote (20), and the screen will display automatically switch to display the files on the USB flash drive or SD card. To play or view content from the USB flash drive or SD Card simply use the Navigation buttons (4, 5, 6, 7) on the DVD player, or on the Remote (4, 5, 6, 7) to highlight the desired file and press either the OK button (8) on the DVD player, or the ENTER button (8) on the Remote to begin playing the file. When you have finished using USB / SD / MMC playback mode, simply remove the USB flash drive or SD / MMC card and the player will automatically return to the DVD playback mode. INSTALLING THE AUTO HEADREST CASE 1. Rotate the screen of the DVD player 180° and fold the screen flat as shown below. 2. Insert the DVD player into the case with the screen facing out as shown below. 3. Secure the top of the case by closing the velcro straps. 4. Locate the two straps of the case and undo the buckles by pressing the sides of the buckle with your thumb and index finger. 5. Wrap each strap around the Headrest. • For Headrests with a Curved bottom: route the straps between the Headrest Posts. o Cross the straps (as shown below) to create a secure fit. • For Headrests with a Straight bottom: route the straps on the outside of the Headrest Posts. o Keep the straps straight (as shown below) to create a secure fit. NOTE: The end of the case with the velcro straps must be positioned at the top of the headrest. 6. Insert the ends of each strap into the buckles. 7. Tighten the case to the headrest by pulling the loose ends of each strap. The case should be tightly held against the headrest. 8. Prepare your DVD for playback. (Follow the PLAY A DVD instructions on page 5) NOTE: When the DVD player is inside the Auto Headrest Case the IR Receiving Lens (19) of the DVD player will be located at the top of the Auto Headrest Case. To use the Remote you must raise up the Remote so the IR beam can point downward toward the top of the case as shown below. TROUBLESHOOTING PROBLEM Disc will not play • • DVD battery will not charge • • DVD player shut off during playback • • No sound from the speakers • • DVD player only shows a blue screen • No picture when connected to a TV • • Remote does not work • • • SOLUTION Make sure the disc is loaded correctly with the label side facing up Make sure the disc is not dirty, cracked, or scratched Try another disc Make sure the AC adapter is securely connected to the 9-12V DC Input (26) Try another electrical outlet Charge the battery or connect the power adapter to an electrical outlet Make sure the volume is not set too low or on Mute Make sure nothing is inserted into the 3.5mm Headphone Input (22) Try pressing the MODE button (12) on the DVD player to make sure the player is not set to AV IN. Make sure the correct TV TYPE is chosen in the SETUP MENU (see page 7) Press the NTSC / PAL button (16) on the DVD Player Make sure there is nothing blocking the remote sensor on the front of the DVD player Try moving closer to the DVD player Replace the battery in the remote LIMITED 90-DAY WARRANTY We warrant this product to be free from defects in material and workmanship under normal use for a ninety-day period from the original date of purchase from an authorized VIDAO dealer. Should you be missing any of the included accessories or other components (screws, pieces, etc.), please contact the Customer Support Center to secure a replacement. It is not necessary to bring the unit back to the store. When calling, please reference the parts list found in the Instruction Manual to help us accurately identify the missing parts and promptly provide replacements. We will replace the unit free of charge should it become defective under this warranty, providing you, the original purchaser, have your original dated sales receipt. To obtain warranty service or replacement within the ninety-day warranty period, please return the product with all parts and accessories along with your original dated store receipt to the original place of purchase and the unit will be exchanged at no charge. It is not necessary to contact the manufacturer for warranty replacement. Our Customer Support Center is available Monday - Saturday (10:00AM to 7:00PM EST) for technical assistance or troubleshooting. To contact us, please call 1-855-998-4326. This warranty applies only under conditions of normal use. Our products are not intended for outdoor use. There are no consumer serviceable parts contained in this product and any attempt by the owner to service or repair the unit will immediately void all warranty coverage. This warranty does not cover any product which has been subject to damage due to an act of nature, misuse, neglect, accident, abuse, commercial use, or modification of, or to, any part of the product, including the antenna. Damage to any external media such as DVD & CD discs, and/or USB or other memory devices are not covered nor is the cost incurred in shipping the unit for warranty repair or exchange. Under no circumstances shall VIDAO be liable for any loss (direct, indirect, incidental, foreseen, unforeseen, special or consequential) or for any damage arising out of, or in connection with, the use of this product. UNDER NO CIRCUMSTANCES WILL VIDAO BE LIABLE FOR ANY INCIDENTAL OR CONSEQUENTIAL DAMAGES. This warranty does not cover re-manufactured, refurbished, or repaired units, or any products sold 'As Is'. This warranty is valid only to the original purchaser of the Product in the United States and Canada and grants specific legal rights. Schoenfeld International Inc. and VIDAO 5001 American Boulevard West Suite 275 Bloomington, MN 55437 ©Schoenfeld International Inc. 2014 PN: PDV707KIT/PDV909KIT Rev. 1.0 August, 2014