1
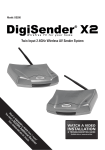
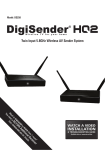
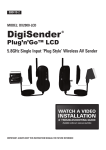
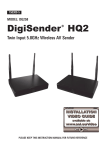
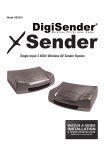
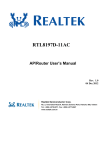
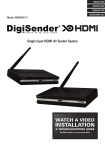
Model: DG458
Quad Input 5.8GHz Wireless AV Sender System
m?
o e
ro eiv
n 1 ec
ha R
e t al ils
or tion deta
o m i or
t t dd u f
mi X A i.e
ns R ae
ra 45 w.
ot G w
tt D w
an d a it:
W nee Vis
u
Yo
WATCH A VIDEO
INSTALLATION
&
& TROUBLESHOOTING
TROUBLESHOOTING GUIDE
GUIDE
Available
Available online
online at:
at: www.aei.eu/video
www.aei.eu/video
r!
DG458 - DigiSender ZX7 - Quad Input 5.8GHz Wireless AV Sender System
Contents
Introduction
03
Installing your DigiSender
Step 1 - Unpack your DigiSender®
Step 2 - Install the Transmitter
Step 3 - Install the IR Systeme Technik™ Remote Relay Kit
Step 4 - Install the Receiver
04 - 08
04
05 - 06
07
08
Using your DigiSender
Standard Operation
DigiSender® Advanced Functions
The DigiSender® Remote Control
09 - 11
09
10
11
Troubleshooting
Picture Problems
Sound Problems
Remote Relay Problems
Technical Support & Accessories
12 - 16
12 - 13
14
15
16
Page 02
Please read the instructions carefully prior to installation
DG458 - DigiSender ZX7 - Quad Input 5.8GHz Wireless AV Sender System
Introduction
Congratulations on purchasing the DigiSender® ZX7 - Quad Input 5.8GHz Wireless AV Sender System. This product represents state of the art wireless audio and video technology and the most
advanced Infra-Red relay technology at exceptional value for money.
You can now enjoy DVD quality video and Hi-Fi stereo sound from your Satellite, Cable, Freeview,
DVD or VCR in another room in your home.
The DigiSender® ZX7 is a Quad Input wireless AV sender with a difference. Because it uses 5.8GHz
to transmit rather than the much more common 2.4GHz, you can use the DigiSender® ZX7 without
the worry of interference from wireless routers, Bluetooth devices and other wireless products
operating on 2.4GHz. It also incorporates our advanced DigiEye™ remote relay technology allowing
flawless operation with every set top box ever made.
Benefit from 5.8GHz transmission, 4x Inputs, 4x Audio/Video Channels, 16x Remote Relay
Channels and unsurpassed compatibility with the new DigiSender® ZX7!
Please read the instructions carefully prior to installation
Page 03
DG458 - DigiSender ZX7 - Quad Input 5.8GHz Wireless AV Sender System
Installing your DigiSender®
Step 1 - Unpack your DigiSender®
Aux 2
Input 4
Aux 1
Input 3
DigiConnector™ 2
Input 2
DigiConnector™ 1
Input 1
POWER
All DigiSender® orders are computer weight checked when packed. However, it is a good idea to
check all kit contents are present before proceeding with the installation.
DigiSender® Remote Control
IR Systeme Technik™ Kit
2x Power Supply Units
1
2
3
4
Transmitter
POWER
T R A N S M I T T E R
1
2
3
4
Receiver
POWER
R E C E I V E R
Page 04
Please read the instructions carefully prior to installation
DG458 - DigiSender ZX7 - Quad Input 5.8GHz Wireless AV Sender System
Installing your DigiSender®
Step 2 - Install the Transmitter
The Transmitter will send the audio and video from up to four connected sources (your Satellite
receiver and DVD Player for example) to the Receiver, located in another room in your home.
4.
1.
4.
2.
Connect DigiConnector™ 1 to your Satellite, Cable
Obis aut et pe nisin pre nonectius ipis ipicit eum
or Freeview box. Use the SCART socket labelled
dem nos net etur modipissi alit in eumet ipsunto te
‘TV’ or ‘OUT’. Connect any existing SCART lead
nobitatur sunt, et, sandae ratur sincimus.
into the rear of the DigiConnector™.
Connect DigiConnector™ 2 to your DVD Player,
Obis aut et pe nisin pre nonectius ipis ipicit eum
HDD Recorder or VCR. Use the SCART socket ladem nos net etur modipissi alit in eumet ipsunto te
belled ‘TV’ or ‘OUT’. Connect any existing SCART
nobitatur sunt, et, sandae ratur sincimus.
lead into the rear of the DigiConnector™.
4.
3.
4.
Ensure
thenisin
Audio/Video
and ipis
Remote
Obis autthat
et pe
pre nonectius
ipicitRelay
eum
Channel
switches
on the back
the Transmitter
dem nos net
etur modipissi
alit inofeumet
ipsunto te
are
set to sunt,
1. et, sandae ratur sincimus.
nobitatur
Connect the IR Emitter to the socket labelled ‘IR’
Obis aut et pe nisin pre nonectius ipis ipicit eum
on the back of the Transmitter. See Page 07 for
dem nos net etur modipissi alit in eumet ipsunto te
more information on installing the IR Systeme
nobitatur sunt, et, sandae ratur sincimus.
Technik™.
Please read the instructions carefully prior to installation
Page 05
DG458 - DigiSender ZX7 - Quad Input 5.8GHz Wireless AV Sender System
Installing your DigiSender®
continued...
Note: Try to avoid positioning the Transmitter directly on top of other electrical devices as this could
lead to a poor picture.
5.
6
Connect the Power Supply Unit (PSU) to the socket
labelled ‘PSU’ on the rear of the Transmitter.
Connect the Power Supply Unit (PSU) to an available mains socket.
What’s the A/B switch for?
The Contrast (A/B) switch is present to compensate for differences in equipment set-ups.
If you experience a
poor picture after
installation is
complete, try
adjusting the
A/B setting.
Page 06
Please read the instructions carefully prior to installation
DG458 - DigiSender ZX7 - Quad Input 5.8GHz Wireless AV Sender System
Installing your DigiSender®
Step 3 - Install the IR Systeme Technik Remote Relay Kit™
Once set up correctly, the IR Systeme Technik™ Remote Relay Kit will enable you to control your
source equipment from the receiving location in your home.
Because everyone’s set up is different there are many ways you can install the IR Systeme Technik™
Remote Relay Kit and the various included accessories will help you in setting it up correctly.
Accessory #1
Extension Pieces
Accessory #2
IR Emitter
Example 1: Mount the IR Emitter vertically using
accessories 1 and 2. Ensure the LED is facing the
IR sensor on your source equipment.
Example 2: Mount the IR Emitter horizontally using the supplied sticky pad. Ensure the LED is facing the IR sensor on your source equipment.
Please read the instructions carefully prior to installation
Page 07
DG458 - DigiSender ZX7 - Quad Input 5.8GHz Wireless AV Sender System
Installing your DigiSender®
Step 4 - Install the Receiver
The Receiver will pick up the signals being sent by your Transmitter and output them to a connected
TV.
1.
3.
4.
Locate a vacant SCART socket on the back of your
receiving TV and insert the DigiSender® SCART
cable.
Ensure
Obis
autthat
et pe
thenisin
Audio/Video
pre nonectius
and ipis
Remote
ipicitRelay
eum
dem nos switches
Channel
net etur modipissi
on the back
alit in
of eumet
the Receiver
ipsuntoare
te
nobitatur
set
to 1. sunt, et, sandae ratur sincimus.
3.
4.
Connect the Power Supply Unit (PSU) to the socket
labelled ‘PSU’ on the Receiver.
Connect the Power Supply Unit (PSU) to an available mains socket.
Page 08
Please read the instructions carefully prior to installation
DG458 - DigiSender ZX7 - Quad Input 5.8GHz Wireless AV Sender System
Using your DigiSender®
Standard Operation
The steps below should be followed every time you use the DigiSender®.
1.
2.
Switch on the source equipment (Satellite, Freeview, DVD, VCR, etc.).
Turn on the Transmitter and Receiver by pushing
the Power button on the front of the units. The
Power LED will change from red to green to indicate the unit is switched on. Alternatively press the
Power button on the DigiSender® Remote Control.
3.
Select the desired Input by pressing the Power
button on the front of the Transmitter. The green
Input LEDs will light up to indicate which source
is active. Alternatively press the ‘Input’ buttons on the
DigiSender® Remote Control.
4.
On the receiving TV, select the SCART channel assigned to the SCART socket that you plugged the
DigiSender® Receiver in to. This may be labelled as
SCART, AUX, AV, VIDEO, VCR or
.
Please read the instructions carefully prior to installation
Page 09
DG458 - DigiSender ZX7 - Quad Input 5.8GHz Wireless AV Sender System
Using your DigiSender®
Advanced Functions
Changing the Audio/Video Channel
The DigiSender® ZX7 features 4 Audio/Video Channels. Each of these Audio/Video Channels slightly
changes the frequency on which the DigiSender® ZX7 operates. Because the Audio/Video Channel
switch allows you to ‘fine tune’ the frequency on which your DigiSender® ZX7 operates, it is possible
to overcome most interference and reception troubles that may occur.
To change the Audio/Video Channel on your DigiSender® ZX7, simply change the position of the
Audio/Video Channel switches as shown below.
CHANNEL 1
CHANNEL 2
CHANNEL 3
CHANNEL 4
For your DigiSender® ZX7 to function correctly it is very important that the Audio/Video Channel
settings are the same on both the Transmitter and Receiver.
Changing the Remote Relay Channel
The DigiSender® ZX7 combines our advanced DigiEye™ technology with the IR Systeme Technik™
Remote Relay kit and features 16 digital Remote Relay Channels.
To change the Remote Relay Channel on your DigiSender® ZX7, simply change the position of the
Remote Relay Channel switches. Any combination of up and down switches can be used.
For your DigiSender® ZX7 to function correctly it is very important that the Remote Relay Channel
settings are the same on both the Transmitter and Receiver.
Page 10
Please read the instructions carefully prior to installation
DG458 - DigiSender ZX7 - Quad Input 5.8GHz Wireless AV Sender System
Using your DigiSender®
The DigiSender® Remote Control
1. POWER
The POWER button will turn your DigiSender® Transmitter or
Receiver On or Off.
2. Input 1
The Input 1 button will select Input 1 on the Transmitter
and Receiver. Input 1 will be what ever source equipment is
connected to DigiConnector™ 1. For example, your Satellite,
Cable or Freeview box.
3. Input 2
The Input 2 button will select Input 2 on the Transmitter and
Receiver. Input 2 will be what ever source equipment is connected to DigiConnector™ 2. For example, your DVD Player or
HDD Recorder.
1.
POWER
2.
Input 1
3.
Input 2
4.
Input 3
5.
Input 4
DigiConnector™ 1
DigiConnector™ 2
Aux 1
Aux 2
4. Input 3
The Input 3 button will select Input 3 on the Transmitter and
Receiver. Input 3 will be what ever source equipment is connected to the VCR socket. For example, your VCR.
5. Input 4
The Input 4 button will select Input 4 on the Transmitter and
Receiver. Input 4 will be what ever source equipment is connected to the AUX socket. For example, your Hi-Fi.
Please read the instructions carefully prior to installation
Page 11
DG458 - DigiSender ZX7 - Quad Input 5.8GHz Wireless AV Sender System
Troubleshooting
Picture Problems
What do you see on the second TV?
The picture is present but
poor quality...
POOR RANGE
1. The picture & sound quality
is affected by the Transmitter
and Receiver’s location. Try
positioning them in different
locations. The Transmitter and
Receiver should be connected
to a mains extension lead that
can be moved.
2. Try the other 3 available Audio/Video channels ensuring
that the Audio/Video Channel
setting is the same on both
the Transmitter and Receiver.
3. Ensure the units are within
the usable range, normally
this would be 40m when passing through 2 average internal
walls. Thicker or stone/granite
walls may lower the usable
range of this device.
Page 12
I see a black screen...
Switch OFF your DigiSender® TRANSMITTER.
What do you now see on the second TV?
I still see a black screen...
WRONG AV CHANNEL
SELECTED
1. Switch the Transmitter back
on.
2. Ensure the correct SCART
channel is selected on your
second television. Some
televisions feature multiple
AV channels for one or more
SCART, phono and S-Video
inputs.
3. If available try another
SCART socket on the second
television.
I now see a snowstorm or
blue screen...
RECEIVING BLANK SIGNAL
1. Switch the Transmitter on.
2. Ensure the Transmitter is
connected to your source device (such as your Satellite,
Cable, Freeview, DVD or VCR).
3. Ensure that your source device is switched on.
4. Use the supplied DigiSender® Remote Control to select
the correct Input. This can be
done at either the Transmitter
or Receiver.
Please read the instructions carefully prior to installation
DG458 - DigiSender ZX7 - Quad Input 5.8GHz Wireless AV Sender System
Troubleshooting
What do you see on the second TV?
I see a snowstorm or blue
screen...
Switch OFF your DigiSender® RECEIVER.
What do you now see on the second TV?
I now see a black screen...
NOT RECEIVING SIGNAL
1. Switch the DigiSender® Receiver back on.
2. Ensure the DigiSender®
Transmitter is switched on.
3. Try the other 3 available Audio/Video channels ensuring
that the Audio/Video Channel
is set the same on both the
Transmitter and Receiver.
I still see a snowstorm or
blue screen...
WRONG TV CHANNEL
SELECTED
This indicates that the correct SCART Channel has NOT
been selected on the second
television. Look for buttons
on this televisions remote
control which could select the
AV Channel such as EXT, AV,
VIDEO, VCR, AUX, Channel 0
AND
.
Please read the instructions carefully prior to installation
Picture Problems
I see lines over the picture...
INTERFERENCE
This indicates one or more
electrical devices are interfering with the DigiSender®.
Make sure the Transmitter
and Receiver are not directly
on top of other electrical devices. Try all 4 Audio/Video
Channels on your DigiSender®
as one or more may still be
available. Visit digisender.net
or contact our helpline for information on configuring your
equipment to work together.
Page 13
DG458 - DigiSender ZX7 - Quad Input 5.8GHz Wireless AV Sender System
Troubleshooting
Sound Problems
I can see the picture but can’t
hear anything.
1. Disconnect both the Transmitter AND Receiver SCART
cables. Reconnect the cables
ensuring they are pushed into
the sockets firmly.
2. If you are using a home cinema DVD player with surround
sound, please ensure the analogue audio output on SCART
is switched on.
The sound is distorted.
Turn down the volume on
your source device (Satellite,
Cable, Freeview, DVD or VCR).
There is a buzzing sound present. It seems to get worse during on-screen menus or bright
pictures.
Change the Contrast A/B setting on the Transmitter DigiConnector™ connected to the
offending equipment.
There is a hissing sound and
the volume must be turned up
high on the second TV to hear
anything.
1. Turn the output volume UP
(if possible) on your source
device (Satellite, Cable, Freeview, DVD or VCR).
2. Ensure the Transmitter and
Receiver are within the usable
range (40m avg).
3. Switch off your microwave
oven if present.
Q: What seems
to be the problem
with the sound?
Page 14
Please read the instructions carefully prior to installation
DG458 - DigiSender ZX7 - Quad Input 5.8GHz Wireless AV Sender System
Troubleshooting
Remote Relay Problems
If you have any difficulty operating your source equipment remote control in your second room
please follow the advice below below:
1. Ensure the IR Emitter is connected to the socket labelled ‘IR’ on the Transmitter.
2. Ensure you are using the correct remote control in the second room. For instance, if you are trying
to control your Satellite box you will need to use the Satellite remote control.
3. Ensure the IR Emitter is facing the IR sensor on your source equipment.
4. Move the IR Emitter further away from the source equipment.
5. Move the Transmitter AND Receiver further away from other electrical devices.
6. Try operating your source remote control closer to the Receiver.
7. Replace the batteries in your source remote control.
8. Change the Remote Relay Channel on both the Transmitter AND Receiver.
WATCH A VIDEO
INSTALLATION
&
& TROUBLESHOOTING
TROUBLESHOOTING GUIDE
GUIDE
Available
Available online
online at:
at: www.aei.eu/video
www.aei.eu/video
Please read the instructions carefully prior to installation
Page 15
DG458 - DigiSender ZX7 - Quad Input 5.8GHz Wireless AV Sender System
Troubleshooting
Technical Support & Accessories
Technical Support
AEI Security & Communications Ltd is dedicated to providing our customers with first class customer
care and technical support.
1. Website
Free technical advice is available online 24/7 at our dedicated support web site: www.aei.eu
2. Online Videos
Watch online Installation and Troubleshooting Video Guides at: www.aei.eu/video
3. Live Chat
Chat to one of our technical advisors live. See website for details.
4. Telephone
We have a dedicated helpline, open Monday to Friday, 8.30am - 4pm. Call
02071 931 413.
Accessories
If you wish to transmit your source to more than 1 room, this can be achieved by using the additional
receiver below.
To purchase visit us online at: www.easylife.com or call us on: 02071 931 413.
DG45RX - DigiSender ZX7 Additional Receiver
•
•
•
Page 16
Get your Satellite channels to additional TV’s in your home!
Add as many Receivers to your DigiSender® system as you require.
Requires existing DigiSender® ZX7 Transmitter
Please read the instructions carefully prior to installation
DG458 - DigiSender ZX7 - Quad Input 5.8GHz Wireless AV Sender System
Notes
Please read the instructions carefully prior to installation
Page 17
DG458 - DigiSender ZX7 - Quad Input 5.8GHz Wireless AV Sender System
Notes
Page 18
Please read the instructions carefully prior to installation
D E CL AR AT I O N O F CO NF O R MI T Y
01022007/01/DG-DV-DX
We,
AEI Security & Communications Ltd.
Weslake Industrial Park, Harbour Road, Rye, East Sussex, TN31 7TE, United Kingdom
declare under our sole responsibility that the products bearing the series code prefixed:
DGx, DVx, DXx (x refers to the specific model number)
are in conformity with the essential requirements of Directive 1995/5/EC. These products have been tested against the following
standards and specifications:
Low Voltage Directive
EN60950:2000
Safety of information technology equipment.
Electromagnetic Compatibility Directive
EN 301 489-3 V1.3.1: 11-2001
Specific conditions for Short-Range Devices (SRD) operating on frequencies between 9 KHz
and 40 GHz.
EN 301 489-1 V1.3.1: 09-2001
Electromagnetic compatibility and Radio spectrum Matters (ERM); Electromagnetic
Compatibility (EMC) standard for radio equipment and services; Part 1: Common technical
requirements.
Radio Spectrum
EN 300 440-1 V1.3.1: 09-2001
Electromagnetic compatibility and Radio spectrum Matters (ERM); Short Range Devices;
Radio equipment to be used in the 1 GHz to 40 GHz frequency range; Part 1: Technical
characteristics and test methods.
Power Supply
EN55022: 2003
Information technology equipment. Radio disturbance characteristics. Limits and methods
of measurement.
EN55024: 2003
Information technology equipment. Immunity characteristics. Limits and methods of
measurement.
IEC 61000-3-2: 2001
Electromagnetic Compatibility (EMC) - Part 3-2: Limits - Limits for harmonic current
emissions (equipment input current <= 16 A per phase).
IEC 61000-3-3: 2001
Electromagnetic Compatibility (EMC) - Part 3-3: Limits - Limitations of voltage changes,
voltage fluctuations and flicker in public low-voltage supply systems, equipment with rated
current <= 16 A per phase and not subject to conditional connection.
The product is marked with the CE marking and Notified Body Number according to directive 1999/5/EC.
Original Document of Conformity has been signed.
SPECIFICATIONS
Transmitter Inputs
Receiver Outputs
Audio/Video Frequency
Remote Control Compatiblity
Video Input Level
Video Input Colour
Audio Input Level
Audio Bandwidth
Range
Power
Dimensions
Weight
2x DigiConnector™ SCART, 2x A/V
1x SCART, 1x Composite
5.7250GHz ~ 5.8750GHz
RC5, RC6, IrDA
1V Peak-Peak 75Ω
PAL (Phase Alternate Line)
1.0v PP (Mod 1KHz, Dev 15KHz)
20Hz - 22KHz (-3dB)
100m (Free-Air), 40m (Nominal)
12V DC, 300mA
L: 100mm, W: 160mm, H: 40mm
0.32kg
CW220711-1
©2011 AEI Security & Communications Ltd. All rights reserved.
Registered in England: 02831823
AEI Security & Communications Ltd
Weslake Industrial Park
Rye Harbour Road, Rye
East Sussex
TN31 7TE
United Kingdom
IR Systeme Technik, DigiEye and DigiConnector are trademarks of AEI Security & Communications Ltd.
DigiSender is a registered trademark of AEI Security & Communications Ltd.