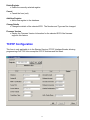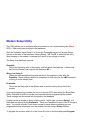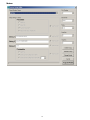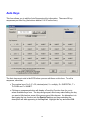
1
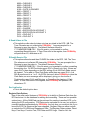
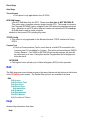
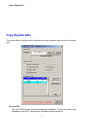
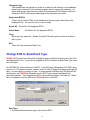
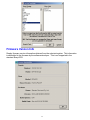
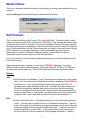
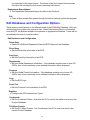
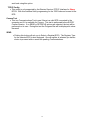
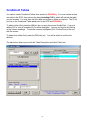
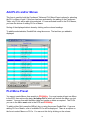
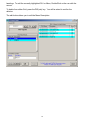
TRAINING MANUAL
MODEL
POS UTILITY
Contents
Page No
Description
2.
2.
3.
4.
4.
5,6
7.
7.
8.-12
13.
13.
14.
15.
16.
18.
19,20
21,
22,
23,
23,24,25
26,27
28,
29,
30,
31,
32.33
34,
35,
36,37
38,39
40,
40,
Managing Databases
Communications Test
Trouble Shooting
Configuration File
Delete Data
Edit Register Logo
Register models supported
Pos utility
Retrieve from register options
Edit
Help
Copy Register Data
Change ECR to Smartcard Type
Register Communication settings
TCP/ip
Modem Setup Utility
Auto keys
Firmware Version
Modem Status
Edit Products
Edit Departments
Tools
File
Edit Databases and Configuration options
Progress
Edit Direct Keys
Edit function text
Edit Free keys
Send to register options
Condiment Tables
Add Plus and or menus
Plu Preset
1
Managing Databases
There is only one database name supported by POSUtility, this is 'POSUtility.mdb'. This
file must exist in the program directory (where POSUtility was installed), for POSUtility to
start. If you wish to access multiple databases, use the Create Customer Database under
the File Menu. This allows you to organise Folders under a starting path of
\CUSTOMERS. This option creates the Folder and copies an empty 'POSUtility.mdb' to it.
Using the Open Database option of the File Menu you can make a different database
current by selecting a new directory. An input box will open allowing you to enter a
directory name created above, or if left blank will display the directory tree, allowing you to
select the directory. A POSUtility database must exist in this directory, otherwise and
error message will be displayed. The current database is shown as part of the caption at
the top of the screen.
NB. The Sales Files and the Log File will also be written to this directory!
Example:
You have two Users or a Bar and Bottle Shop. The Bar has a number of ER-A440's
and the Bottle Shop an ER-A570. The PLU's and Departments may be the same for
the Bar and Bottle Shop, but the prices are different.
First RETRIEVE the data from one of the ER-A440's. If the keyboards are to be the
same, you can use the Copy Register Data option. Modify/Create the PLU's and send
all the appropriate data files to the other ER-A440's. Now create directories for each
location, change to these in turn and copy the locations registers back.
Communications Test
This is performed before each SEND or RETRIEVE operation. If communications is
established, a Green Light will show with the message 'Comms OK', else a Red light will
show with the message 'Comms Failed'.
The obvious things to check are;
• Cables plugged in.
• ECR turned on.
• ECR is not busy (in the middle of a transaction).
• The On-Line settings are correct.
• The ECR On-Line number is correct.
• The correct baud rate etc are selected in POSUtility.
• The correct COM Port is selected in POSUtility.
• If you are using a Broadcast Multiplexor, you cannot have leads attached to it that
are not connected to an ECR at the other end.
Troubleshooting
Communications
2
ER-A750 and UP-3300
• If an ER-A750 or UP-3300, passes a Communications Test, but then fails doing
other operations, or appears to stop for an extended length of time, check that a
printer is configured but NOT physically attached to the ECR. The most common
cause of this effect is the ECR trying to print to a Journal Printer without one being
present.
All ECR's
• POSUtility will only update its copy of the ECR File Structure when (a) the ECR
has just been created, (b) when data is retreived from the ECR, (c) when asked to
do so by using the Retreive FDS Option and (d) when it has trouble fitting the
PLU/EAN/Department data into the ECR. The most common cause of failure,
(other than actual communication problems) when sending PLU/EAN/Department
Data to the ECR is because you have modified the ECR File Structure after
POSUtility has already updated the File Structure. The first thing to do is is use the
retrieve function to Update FDS Data.
ER-A770
• This ECR allows you to have weird combinations of prices and descriptions. While
POSUtility allows most combinations, it is good policy to use the same number of
prices and descriptions.
ER-A440S and ER-A450S
• Communication an speeds above 9600 baud can be unreliable.
Modem Support
POSUtility will use a modem to connect to the selected ECR, if this ECR has a phone
number associated with it. The number and other settings relevant to modems, is entered
on the Register Communications Settings form.
You have the choice on the Register Communications Settings form to disconnect the
modem after the current operation(s). The default here is to stay connected. Whilst the
modem is connected, information about duration and number connected to is displayed as
well as a Hangup button. This button is used to disconnect the modem if you chose to
stay connected when you selected the ECR.
The modem will be automatically disconnected if you select another ECR which has no
phone number associated with it, or if it has a phone number that is different to the one
currently connected.
Modem programming can be accomplished by using the Modem Setup Utility form.
Configuration File
When starting, POSUtility looks for a file called POSUtility.cfg' in the default directory.
This file, which is a text file editable with Notepad, can contain a number of configuration
settings, which if present will be processed. These are;
UseTermFile = y
3
If set to 'y' then the Reading (X) and Clearing (Z) options will access the Term Files.
i.e. the readings will now be X2/Z2. The default is to do X1/Z1's. Obviously the Term
Files must be configured in the ECR!
ReportPrintControl = ?
With this set, printing during a Z Read can be controlled. The default is Not to print.
The options for ? here are;
0
=
print on Receipt and Journal
1
=
print on Receipt only
2
=
print on Journal only
3
=
no printing
If the 'POSUtility.cfg' file is missing the default values are assumed. The entries in the
configuration file are not case sensitive.
Delete Data
As POSUtility has been designed as a Maintenance Tool for a range of SHARP ECR's,
from time to time it will be necessary to remove some ECR's and/or the PLU and
Department Data from the Database. It would be wise to backup the Current Database
before doing this.
If you are using multiple databases in sub-directories, these should be backed up.
There are a number of warnings issued by POSUtility before any deletion takes place. If
you delete ALL of the ECR's, you will be advised that this has happened and the ECR
related controls will be disabled. Once at least one ECR is added these controls will be
enabled again.
Delete Data Options
Register & Its Data
• Delete Register from database
PLU & Department Data
4
• Delete Departments & Products from database
Current ECR
• The Register to be deleted. This is selected using the control on the form.
Delete
• Deletes the selected Register or Data Files. The data files are both the PLU/EAN
Data and the Department Data.
Cancel
• Cancel this operation and exit the Delete Data form.
Edit Register Logo
This form displays the ECR Logo information. This can be up to 6 lines, the actual number
of characters being determined by the ECR/Printer Type. The number of characters for
the Current ECR is displayed at the bottom of the Form. The Logo is centred on the line
automatically and sent to the ECR centred.
To make a character Double Width, use the following key combination [SHIFT+6]. This
will insert a ^. Each character that you want to make Double Width must be preceded with
one of these characters. A look at what is retrieved from the ECR will give a better idea of
what is required.
5
Current ECR
• Information displayed is for this Register and Type
Logo Lines
• The six lines of the ECR Logo.
Add
• If the Logo hasn't been retrieved from the ECR, you can Add it for the current ECR.
This option isn't available if there is already data.
Edit
• Edit the currently displayed Logo text. At the bottom of the form there is a message
advising the number of characters for the Logo Line which is dependant on the
ECR Type and in the case of ECR's without in-built printers, it can be 30 or 40
characters for the external printer. In this case the width is set on the Register
Settings Form.
Cancel
• Cancel your current edits.
Close
• Close the Logo form.
Register Models Supported
POSUtility currently supports the following SHARP ECR Types;
• ER-A220
• ER-A440
• ER-A440S
• ER-A450S
• ER-A460
• ER-A470
• ER-A550
• ER-A570
• ER-A570
• ER-A610
• ER-A610
• ER-A750
• ER-A750
• ER-A750
• ER-A770
• ER-A770
• ER-A770
• UP-600
• UP-700
• UP-3300
• UP-3300
(SharpSmart)
(SharpSmart)
(SharpSmart)
(PRS Scanning)
(SharpSmart)
(PRS Scanning)
(SharpSmart)
6
• UP-3300
(PRS Scanning)
POSUtility
POSUtility was developed with the sole purpose of allowing users to easily duplicate and
change SHARP ECR configurations. This means that Data from a current ECR needs to
be RETRIEVED to the POSUtility Database before it can be edited and resent. This may
be as simple as doing a Master Reset on the ECR and then retrieving all the data, or
retrieving all the data from an ECR which is programmed the way you like. The only
exception here is that PLU and Department Data can be created using the appropriate edit
function, without having any ECR's configured.
POSUtility is NOT a Stock Control program. It is an ECR Maintenance program with
some added features which allow the ECR to be 'X' and 'Z' Read back to a text file.
Edit Databases and Configuration
• Actions which affect the POSUtility Database and default settings.
SEND TO REGISTER
• Options for sending data to ECR's from the POSUtility Database.
RETRIEVE FROM REGISTER
• Options for the retrieving of data from ECR's to the POSUtility Database.
File
• Drop-Down Menu that allows access to opening the Log Files (*.txt) and the Sales
Files (*.csv).
Edit
• Drop-Down Menu that allows access to all the Database Editing functions.
Tools
• Drop-Down Menu that has selections to Compact the Database, Delete the Log and
Sales Files, and Delete All Data Files.
Help
• Drop-Down Menu with selections for Help and About POSUtility.
Exit POSUtility
• Close all files and exit the program.
7
Retrieve from Register options.
These options control what data is extracted from the ECR.
Calling Sales Options
There are three choices for calling sales back into a file. The file used has a
default name supplied by POSUtility which is made up of the date, ECR Number
and either an 'X' or a 'Z'. The file is a comma delimited text file and has an
extension of 'CSV'. This file will be placed into the directory where the current
database is. This can be accessed using a text editor, spreadsheet or database.
Whilst in POSUtility this file can be opened with a text editor from the File Menu.
Each line of the file has the same number of fields. This has been done to simplify
Importing and manipulation of the data to other programs. Because of this feature,
some lines will have blank fields. Appended to the start of each line is the system
date when the sales were called, followed by a number representing the Type of
Sales. A list of these types can also be found in a text file called
'SalesRecordTypes.txt' supplied with POSUtility. The fields in the Sales File are;
Date (DD/MM/YYYY)
Type
Clerk/Cashier Number
Code (PLU, EAN, Dept, Transaction, Hour)
Description
Qty 1
Dlrs 1
Qty 2
Dlrs 2
Qty 3
Dlrs 3
N.B. The quantity shown for PLU, EAN and Department sales will include the
decimal places set with the SRV 906 Job. If 3 decimal places are set, a sale of
1 item will show as 1000! The 3 Qty and Dlrs (Dollars) fields are for sales up to
3 price levels. If the Type of sale only supports one price level, this will be
shown under Qty 1 and Dlrs 1. The ER-A750, ER-A770 and UP-3300 handle
sales in a different way from other ECR's. For these ECR's the column between
the type and Qty1 will have the price level of the sold item. In this case only
Qty1 and Dlr1 will be used and there will be no description for the sold PLU.
Other ECR's will have a '0' in this column and the sales at different levels will be
in the Qty1 and Dlr1 to Qty3 and Qty3.
The Types are;
(1) PLUs & EANs
(2) Departments
(3) Transactions & Finalising Keys
See list below for transaction types.
8
(4) Hourly Sales
The number appearing in field three of the hourly sales records relates to the
'Memory Type'. This is the number of periods since Midnight. This period is 15
Minutes for a 12 Hour System and 30 Minutes for a 24 Hour System. e.g. 11 on
a 12 Hour System would be the period from 2:30am to 2:45am.
(5) Clerks
Sales are by Clerk number and transaction number. See list below for
transaction types.
(6) Cashiers
Sales are by Cashier number and transaction number. See list below for
transaction types.
Transaction Types:
The following numbers, relating to the type of transaction, appear in field four of
Type 3 and Type 5 Sales. The list shown is not a complete list of all the
transaction types.
1001 = %1
1002 = %2
1003 = %3
1004 = %4
1201 = (-)1
1202 = (-)2
1203 = (-)3
1204 = (-)4
2001 = TAXABLE SUB-TOTAL 1
3001 = NET 1
3002 = NET 2
3100 = ORDER TOTAL
3200 = PAID TOTAL
3600 = NON-COMMISSION SALE
4000 = REFUND
4001 = RETURN
4100 = VOID
4101 = VOID 2
4200 = VOID MODE
4300 = MANAGER VOID
4400 = SUB-TOTAL VOID
5000 = CUSTOMERS
5100 = NO SALE
6000 = PREVIOUS BALANCE
6001 = PREVIOUS BALANCE 2 (DRIVE THRU)
6100 = NEW BALANCE
6101 = NEW BALANCE 2 (DRIVE THRU)
7001 = CASH 1
7002 = CASH 2
7100 = CASH IN DRAWER
7200 = CASH/CHIT IN DRAWER
8001 = CHEQUE 1
9
8002 = CHEQUE 2
8003 = CHEQUE 3
8004 = CHEQUE 4
8100 = CHITS IN DRAWER
9001 = CREDIT 1
9002 = CREDIT 2
9003 = CREDIT 3
9004 = CREDIT 4
9005 = CREDIT 5
9006 = CREDIT 6
9007 = CREDIT 7
9008 = CREDIT 8
A101 = CHARGE
D001 = RECEIVED ON ACCOUNT 1
D002 = RECEIVED ON ACCOUNT 2
D101 = PAID OUT 1
D102 = PAID OUT 2
X Read & Save to File
• This selection calls sales but does not clear any totals in the ECR. NB. The
Term File sales are not collected by POSUtility. You are prompted for a
filename to save the sales to. The default filename offered is
YYYYMMDD[ECR#]X.CSV. If the file exists, you be asked to confirm
overwriting the existing one. If Term Files exist in the register, then POSUtility
will perform an X2, otherwise an X1.
Z Read & Save to File
• This option calls sales and then CLEARS the totals in the ECR. NB. The Term
File sales are not collected OR cleared by POSUtility. You are prompted for a
filename to save the sales to. The default filename offered is
YYYYMMDD[ECR#]Z.CSV. If the file exists, you be asked to confirm overwriting
the existing one. On ECR's which support GLU's (Guest Look Ups), if there are
open GLU's, then depending on the SRV setting of Job 929 Clerk Sales cannot
be cleared. To be able to Clear Clerk Sales while there are open GLU's, Job
929-B must be set to a 1 or 3. On ECR's that won't allow POSUtility to clear the
Clerk Sales, an error message will be displayed, giving you the choice of
Finalising the open GLU's and Retrying, or Cancelling the clearing of Clerk
sales. If Term Files exist in the register, then POSUtility will perform a Z2,
otherwise a Z1.
Don't call sales
• This is the default option here.
Register Data Options
One of the most useful features of POSUtility is its ability to Retrieve Data from the
ECR and store it in the database for editing and resending. There are four possible
options here. All the RAM Data can be retrieved for sending to another ECR, or for
saving the ECR configuration. FDS Data can be uploaded on its own, but as this is
normally handled automatically by POSUtility, the only time you would do this if you
know the ECR File Structure has been changed. Register Data can either include
or exclude the PLU/EAN and Department Data. The Register Data contains, Direct
Keys, Free Keys, Function Text, FDS Data and ECR Logo. Data for ALL the
10
configured registers is held in the POSUtility Database. See Managing Databases
for information on keeping multiple copies of the Database.
Include Plu's & Dept's
• Ticks all the CheckBoxes on the ECR Files tab, as well as PLU's, EAN's and
Departments on the Products tab, for retrieval from the ECR.
Exclude Plu's & Dept's
• Ticks all the CheckBoxes on the ECR Files tab, but nothing on the Products
tab, for retrieval from the ECR.
Don't get register data
• This is the default option here.
You can retrieve the following files from the ECR, as well as those described above.
File Data Structure (FDS)
• Get FDS data from the ECR. This is not normally needed, as the FDS data is
updated as required by POSUtility. The obvious time to use this is if you have
changed the File Structure of the ECR. Use this option if you change the file
structure of an ECR, otherwise you will experience problems sending
PLU/EAN/Department Data.
Receipt Logo
Function Text
SRV Parameters
• This data is not editable, but can be saved in the current database with other files
for the ECR.
Condiment Tables
PLU Menu Presets
Free Key Table
11
Direct Keys
Auto Keys
Touch Screen
• This option is only applicable to the UP-3300.
ECR RAM Image
• Get ALL RAM data from the ECR. Please note this data is NOT EDITABLE!
This option gets a complete memory image from the ECR. This image is unique to
the Firmware (EPROM) Version installed in the ECR where the data was retreived
from. Sending it to an ECR with a different version can cause the ECR to lock up.
All RAM data is used to create a register
identical to the source ECR including any sales.
TCP/IP Config
• This option is only applicable to the Starrtec Services TCP/IP Interface for Sharp
ECR's.
Comms Test
• This is a Communications Test to see if there is a va lid ECR connected to the
computer and if it is available for Comms. This test is performed before EVERY
Comms Session. If no SEND or RETRIEVE options are selected, the test will
be performed on its own. During this test the Progress Bar will be displayed to
show the result.
RETRIEVE
• Clicking this button will ask you to Select a Register (ECR) for this operation.
Edit
The Edit drop-down menu allows access to the same features as the buttons at the bottom
of the POSUtility main screen. The Delete Data option is not available from here.
Edit
Edit Logos
Edit Function Text
Edit Free Keys
Edit Direct Keys
Edit Auto Keys
Edit Products
Edit Departments
Edit PLU Menus
Edit Condiment Tables
Help
Access Help information from here.
Help
12
About SharpLink...
Copy Register Data
This option allows copying various data files from one register to one or more of the same
type.
Source ECR
This is the ECR that will have its selected data duplicated. If there is no data in the
database for this ECR, the selection Checkbox will be greyed out.
13
Things to Copy
If the checkboxes are greyed out, there is no data for this selection in the database
(hasn't been retrieved), or the selected register doesn't support the selection. As
some data can be copied across models (Condiments and PLU Menus), the list of
Destination ECR's will change depending on the selections you make.
Destination ECR(s)
If there are any other ECR's in the database of the same type, then they will be
displayed here. You can tick one or more of these.
Select All
Select ALL the displayed ECR's.
Select None
De-Select ALL the displayed ECR's.
Copy
Starts the copy operation. Details of which ECR was copied to which is written to
the Log File.
.
Exit
Close the Copy Keyboard Data Form.
Change ECR to SmartCard Type
SHARP ECR's which have SmartCard capability have a different file structure for the PLU
and Department Files. If you wish to upgrade an ECR to become a SmartCard Type, then
use this option.
First RETRIEVE all the data from the ECR. If the ECR was a SharpSmart UP-3300 using
Version 1.0.1 Firmware or earlier, create it as a UP-3300 in Sharp-link before retrieving the
data. Use this option to change its type. In the process the AllRam and FDS Data will be
deleted from the POSUtility Database and the ECR Type changed the SmartCard
equivelant number. Then Upgrade the ECR, setup the file structure, 900 jobs etc. When
this is completed, send the data from POSUtility back to the ECR.
New Type
• The SmartCard equivelant type for the current ECR.
14
Convert
• Make the Change
Current ECR Type
• Will only display ECR's which are capable of being upgraded to SmartCard
operation.
Register
• The ECR to be converted.
Exit
• Close the Change Type form.
Register Communication Settings
This is where you configure the settings for On-Line Communications. Each ECR has
separate settings in the database.
This form is used for a number of tasks; Sending, Retrieving and Exporting Data. The
caption on the button shown as Get on the sample below, will change to reflect the
operation about to be performed on the selected ECR.
Control Descriptions:
Port
• This is the Computer Port to use for ECR Communications. Normally this would
be set to either 1 or 2, but Comm Ports up to COM16 are supported. You will not
be allowed to select an invalid Comm Port.
15
Baud Rate
• The Baud Rate for ECR Communications is selected here. The range available is
from 1200 to 38400 baud. The standard setting for Sharp ECR's is 9600. This
corresponds to a 5 setting with the 6112 PGM2 Job. The ER-A750, ER-A770, UP600/700 and UP-3300 can communicate at up to 38400 baud. A setting of 19200
gives good results providing the cabling is not of excessive length and in a noisy
(electrically), environment.
Register Type
• Select the type of the ECR.
Modem Number
• If there is a modem number, this number will be dialed if a modem is found on the
selected comm port, instead of normal communications.I
Comms Logging
• Select 'ON' to log all ECR communications to file POSUtilityLog.txt. Using this
option is useful when trying to resolve a problem communicating to the ECR.
• Information written to the file includes; Date & Time, Port & Settings, ECR Number
& Type, what has been sent and the reply from the ECR.
• This obviously takes up Hard Disk space, so it should be deleted at regular intervals
if you choose to leave it selected.
• The options are;
On
Comms Logging On
Off
Comms Logging Off
Logo Width
• The ER-A750, ER-A770, UP-600/700 and UP-3300 can use a number of
Receipt/Kitchen Printers. These printers can have different number of columns.
The ER-01PU is 30 columns, but these ECR's can use up to 40 characters for the
Receipt Logo. The default setting is selected here.
Comms Retries
• There can be various reasons for Communications to fail. The number of times to
retry is selected here. A setting of 2 should suit most applications, but a range from
0 to 20 is available.
Register Name
• You can give each ECR in the database a name to help identify it. This name along
with the ECR number will be displayed on all forms that refer to specific ECR's.
Realm Name and Password
• For communicating to the Starrtec TCP/IP Interface for Sharp ECR's, you must
supply a name and password, which has been set in the ECR, before
communications is possible.
Buttons:
16
Delete Register
• Delete the currently selected register.
Cancel
• Cancel the form (exit).
Add New Register
• Add a new register to the database.
Change Details
• Change the details of the selected ECR. The Number and Type can't be changed.
Firmware Version
• Display the Firmware Version Information for the selected ECR if the firmware
supports this feature.
TCP/IP Configuration
This form is only applicable to to the Starrtec Services TCP/IP Interface Boards, allowing
programming of all 7000 Jobs except the ECR IP Address and Net Mask.
17
Modem Setup Utility
This Utility allows you to configure different modems to suit communicating with Sharp
ECR's. Each setup can be stored in the database.
After the Preamble, each String (1 to 3) and the Postamble there is a Carriage Return
(except in the case of the Netcomm Factory Reset). NB The AT is added by the utility
when sending to the modem, so please don't add it to any strings you enter.
The Setup form has three sections;
Preamble:
This is the first string sent to the modem, and has some fixed settings - a Reset and
two Factory Resets (one supports the Netcomm &F.)
String 1 to String 3:
These are three separate strings that are sent to the register in order after the
Preamble. Some settings need to be completed on their own like the +MS command
in String 2 on the sample form.
Postamble:
This is the last thing sent to the Modem and is used for storing the profile in the
modem.
If you are programming a modem for use on a remote ECR, then setting the Baud Rate,
Parity, Data and Stop Bits is can be very important before programming the modem.
These settings are also stored with the setup in the database.
A setup can be as simple as doing a factory reset. In this case you leave String 1 to 3
blank and set nothing for the Postamble. There is a CheckBox for each of the 5 Strings to
send. You would normally Check these, except in cases where something you are
programming stops responses from the modem, like the string in String 3 below.
To program the modem, attach it to the Comm Port set on the form and press Program
18
Modem.
19
Auto Keys
This form allows you to edit the Auto Sequencing Key information. There are 25 key
sequences per Auto Key (the buttons labeled 1 to 25 on the form).
The Auto keys must exist in the ECR before you can edit them on this form. To edit a
sequence, use either;
• The number keys 0 to 9, Z = 00, decimal point, X = multiply, S = SUBTOTAL, T =
TL/CASH and I = INHIBIT.
• Clicking on a sequence button will display a Free Key Function form for you to
select available keys from. The keys are grouped, which may make finding the key
you want a little hard as some of the groups are a little obscure. An alternative is to
start typing the key function into the Search Text box and keys matching the
description will start appearing in the Key List. Highlight this key and select OK.
20
Firmware Version Info
Display firmware version information obtained from the selected register. This information
is embedded in the firmware by the software developer. This is not supported in the
standard Sharp ECR.
21
Modem Status
This form is displayed while the modem is being dialed, providing some feedback from the
process.
Selecting Hangup will stop the dialing and disconnect the modem.
Edit Products
This Form allows Editing of the Product (PLU and EAN) Data. This data is global, which
means it is common to all ECR's configured in POSUtility. This data can be entered here,
or retrieved from an ECR. Obviously, if you retrieve the data from an ECR it will overwrite
the data currently held in the database. Also be aware that if you have an ECR configured
for a 16 Alpha description for the Product Name and you send it to and call it back from an
ECR configured for an 8 Alpha Description, then your database will now have the
descriptions truncated to 8 Alphas! Please be careful. Product Data can then be
maintained using this forms options of Add, Edit and Delete.
If you try to Add a Product without any Departments existing, you will be advised and this
Form will be closed.
Depending on the type of registers in the current POSUtility Database, one of two
different Product Forms will be displayed. If there are either ER-A770's or UP-3300's an
extended form will be displayed. These ECR's have extra price and description fields.
Buttons:
Add
Edit
• Add Products to the database. Code, Description and Department must contain
data. If you try to leave any of these blank or enter a duplicate Code POSUtility
will advise you. Also, only Departments which exist can be used. A list of
available ones will be displayed in this field. The Add button will change to an
Ok button to accept the entered data, which can be done by either pressing
Enter or clicking the Ok with the mouse. Another record can then be added by
simply pressing Enter or clicking Add. Pressing Cancel of the ESC buttons will
cancel the Add. Other data fields that are left blank will be defaulted to 0.
• Edit the selected Product. Everything except the Code can be edited using this
button. The only way to change a Code is to Delete the Department. The Edit
button will change to an Ok button to accept the changes, which can be done by
either pressing Enter or clicking the Ok with the mouse. To edit the next record,
simply press Enter or click on Edit. To assist with editing, the cursor will go to
the Price field first as this is usually the most changed information. Pressing
22
Cancel of the ESC buttons will cancel the Editing.
Delete
Print
Cancel
Close
• Delete the selected Product. You will be asked to confirm the deletion.
• A simple report can be sent to the printer. Note that if the extended Product
Form is displayed, then each PLU will take up 7 lines on the paper - you could
use a lot of paper if there are a lot of PLU's.
• Cancel the current operation. Pressing the ESC button has the same effect.
• Exit the Product Form.
Data Fields:
Code
• The Product Code (PLU or EAN). PLU Codes are between 1 and 999999.
Numbers bigger than this are assumed to be EAN's. Note that POSUtility does
not check that the EAN (Barcode) you enter is valid. This field cannot be left
blank or contain a duplicate.
Description
• The Product Description. This can be up to 16 characters and cannot be left
blank. If you wish to use expanded characters (Double Size), do a 'SHIFT+^'
before the character you want expanded. Note that this character takes up two
places.
Dept
• The Product Department Number. This cannot be left blank and must exist in
the Department Database. A list of available Departments will drop-down when
you enter this field.
Dept Description
• The Department Description the Product is linked to. This is displayed only and
cannot be edited.
Price
• The Product Prices. When Products are sent to an ECR, only the number of
Prices that the ECR will accept will be sent.
Kitchen Printer
• The Kitchen Printer number. These can be between 0 and 9.
Points
• The SharpSmart Points. These can be between 0 and 9999.
Promo Group
• The SharpSmart Promotional Group. This can be either 0, 1 or 2.
23
Data grid (List)
• This displays a list of Products from the database. These can be sorted by clicking
on the Column Headings. The Column Heading Text will change to Blue to show
the sort order. The Modified column identifies records which are new, or have been
modified. This is used for the Send PLU Options.
Key Colour
• The Key Colour can be selected for ECR's which support this feature e.g. The UP3300.
Condiment Programming
• Settings for the PLU related to its use as a Condiment can be selected here. The
table it belongs to, whether is is only a Condiment only and its entry type.
Tax Status
• The Tax Status for the Department can be set here.
Other Fields
• For information on usage of the other selections for the Products, please consult
the appropriate Sharp User Manual. As the Product Data is common to all ECR's
in the current database, not all selections are applicable to all models. POSUtility
will only send information to the ECR that it will accept, so setting a Key Colour for
instance will have no affect on ECR's other than the Touch Screen Models.
File Menu:
• Product data can be printed from an option on the file Menu.
Tools Menu:
• Options on this menu allow you to 'Tick' ALL products as modified and also to 'UnTick' them. This is useful if you wish to send modified products to the ECR, as this
operation doesn't delete the product file first. Deleting the product file also deletes
and sales for the products.
Whilst this is not a complete list of settings available on the ECR for Products, a feature of
POSUtility is its ability not to destroy the other settings if you first retrieve the Product
Data from the ECR.
24
Edit Departments
This Form allows editing of the Department Data. This data is global, which means it is
common to all ECR's configured in POSUtility. The data can be retrieved from an ECR or
entered using this form. Obviously, if you retrieve the data from an ECR it will overwrite
the data currently held in the database. Also be aware that if you have an ECR configured
for a 16 Alpha description for the Department Name and you send it to and call it back
from an ECR configured for an 8 Alpha Description, then your database will now have the
descriptions truncated to 8 Alphas! Please be careful. Department Data can then be
maintained using this forms options of Add, Edit and Delete.
The data is displayed as a list on the left side of the form, with the current record being
shown in detail on the right side. To move through the database, the Data Control at the
bottom can be used or the Up/Down Arrow keys and the PgUp/PgDn keys. If these keys
don't work, use the mouse to Click on the list or Data Control as either of these must have
the focus for this to work. The Data Control also has buttons for First/Last record,
Bookmarks and Find.
Buttons:
Add
• Add Departments to the database. Code, Description and Group must contain
data. If you try to leave any of these blank or enter a duplicate Code POSUtility will
advise you. The Group can be between 1 and 17. Group 10 is a 'minus'
Department and groups 11 to 17 are only available if the ECR is configured
appropriately. The Add button will change to an Ok button to accept the entered
data, which can be done by either pressing Enter or clicking the Ok with the mouse.
Another record can then be added by simply pressing Enter or clicking Add.
Pressing Cancel of the ESC buttons will cancel the Add. Other data fields that are
left blank will be defaulted to 0.
Edit
• Edit the selected Department. Everything except the Code can be edited using this
button. The only way to change a Code is to Delete the Department. The Edit
button will change to an Ok button to accept the changes, which can be done by
either pressing Enter or clicking the Ok with the mouse. To edit the next record,
simply press Enter or click on Edit. To assist with editing, the cursor will go to the
Price field first as this is usually the most changed information. Pressing Cancel of
the ESC buttons will cancel the Editing.
Delete
• Delete the selected Department. You will be asked to confirm the deletion as well
as not being able to Delete a Department that is being used by a Product.
Cancel
• Cancel the current operation. Pressing the ESC button has the same effect.
Close
25
• Exit the Department form.
Data Fields:
Code
• The Department Number between 1 and 99. This field cannot be blank or contain a
duplicate.
Description
• The Department Description. If you leave it blank, you will be asked to confirm this.
If you wish to use expanded characters (Double Size), do a 'SHIFT+^' before the
character you want expanded. Note that this character takes up two places.
Group
• The Department Group. Valid Groups are between 1 and 17. Group 10 is a Minus
Department and Groups 11 to 17 are only available if the ECR has been configured
appropriately.
Price & Sign
• The price for the Department.
• By selecting Minus the Department Group will change to 10, a discount. This
Check Box will also be ticked if the Group is changed to 10.
Kitchen Printer
• The Kitchen Printer number. These can be between 0 and 9.
Promo Group
• The SharpSmart Promotional Group. This can be either 0, 1 or 2.
Data Grid (List)
• This displays a list of Departments from the database. These can be sorted by
clicking on the Column Headings. The Column Heading Text will change to Blue to
show the sort order.
Key Colour
• The Key Colour can be selected for ECR's which support this feature e.g. The UP3300.
Tax Status
• The Tax Status for the Department can be set here.
Other Fields
• For information on usage of the other selections for the Departments, please
consult the appropriate Sharp User Manual. As the Department Data is common to
all ECR's in the current database, not all selections are applicable to all models.
POSUtility will only send information to the ECR that it will accept, so setting a Key
Colour for instance will have no affect on ECR's other than the Touch Screen
Models.
26
Tools
Options available here are all destructive except the Compact Database. Please be
careful.
Compact Database
• POSUtility being an ECR Maintenance Tool will create waste space in
the Access Database which it uses. This is created by deleting data from
it. To reclaim this space this option can be run. The active database is
backed up before the compaction takes place. If the result is successful
you will be notified. If it fails for some reason, then the backup will be
restored.
Repair Database
• This option repairs the current database.
Delete Files
• The following options all destroy data of some sort.
Delete Log File
• POSUtilityLog.txt will be deleted.
Delete ALL Sales Files
• (*.csv) will be deleted.
Delete Data Files
• This option will allow you to delete ECR's and the Product and
Department Data from the database.
Delete AllRam Export Files
• (*.are) will be deleted. These are text files created by the Export AllRam
option of the File Menu.
Utilities
Change ECR Type
• Allows changing the type, of registers that support the feature, to the
SmartCard equivelant.
Copy Register Data
• Allows various data files to be copied from one register in the database to
one or more of compatible type types. Various CheckBoxes will be
enabled depending on available data for the selected ECR. As these
boxes are checked, the list of target ECR's will be modified to ensure
reasonable compatibility. NB. The responsibility is on the user to
ensure they understand the capabilities of the target ECR.
Modem Configuration
27
TCP/IP Configuration
File
This menu allows viewing of the Log and Sales Files, Open a different Database and
Exiting from the program.
Open Log & Sales Files
• Selecting this option will display the Open File Dialog. The two choices of file types
available are 'TXT' and 'CSV'. The POSUtilityLog.txt is the Log File for the program
and is also the default filename displayed. To view Sales Files, select 'CSV' as the
file type. These files are by default opened with Notepad.
Open Database
• Allows you to open a database in a different directory. Note that the database
MUST be named 'POSUtility.mdb'. Selecting this option will display an input form
asking you for a Customer Name. This is the name of the folder where the
database is. If the Folder was created with the Create Customer Database option,
then it will be under \CUSTOMERS. If a folder doesn't exist by that name, then a
Directory Selection Dialog will be displayed to assist you in finding the correct
Folder.
N.B. POSUtility will not start if a 'POSUtility.mdb' does not exist in the program
directory.
Create Customer Database
• This option allows you to create and organise different databases. The starting
path for POSUtility is \CUSTOMERS. NB. This will be created on the drive where
POSUtility was installed. An entry form will be displayed into which you can enter
a name for the Folder to be created under the starting path. An empty
'POSUtility.mdb' will be copied to this Folder. For further information, see Managing
Databases.
Export All RAM Data
• The All RAM Data (this is a memory image of the ECR and Doesn't contain any
editable data!), that already exists in the database for an ECR can be exported to a
text file for easy emailing and duplication of the ECR. The file created has a name
of the following format, XT<ecr_type>R<ecr_number>.ARE
Import All RAM Data
• The data exported with the Export function above can be imported into the current
database. You are given a choice of target ECR numbers. The original number
(from the filename) is offered as a default. You can change this number, making it
easy to duplicate ECR's having the same memory image.
Products Export/Import
• The Product Data can be exported from the current database to a 'csv' file for
importing into other programs. A subset of fields is exported, with the first record
containing the field names for your reference. Default values are supplied for fields
28
not supported in the export format. The format of the file to import is the same as
the export file including the first record containing field names.
Departments Export/Import
• The Department Data export/import is similar to the Products.
Exit
• Close all files (except files opened through the above method) and exit the program.
Edit Databases and Configuration Options.
These buttons control access to the different areas of the POSUtility Database. Only one
of these functions is able to be open at a time. When Data is being Sent to or Retrieved
from the ECR, the Buttons related to the operation in progress are disabled. These will be
re-enabled at the end of communications.
Edit Databases and Configuration
Delete Data
• Delete PLU/EAN and Department Data and ECR Data from the Database.
Direct Keys
• Edit the Direct Key information of an ECR.
Free Keys
• Edit the Free Key information of an ECR.
Departments
• Edit the Global Department Information. If the database contains one or more UP3300's, then a form containing more detailed information will be displayed.
Products
• Edit the Global Product Information. If the database contains one or more UP3300's, then a form containing more detailed information will be displayed.
Logo
• Edit the ECR Logo.
Funct Text
• Edit the Function Text information of an ECR.
Registers
• Configure the ECR numbers and Types.
Condiments
• Edit the Condiment Tables. Note that the PLU's used in the tables must exist in the
Product Database.
PLU Menu Presets
• Edit the PLU Menu Presets. Like Condiments, the PLU's used must exist in the
current Product Database.
29
Progress
The Progress Bar is displayed whenever ECR Communications is in progress. This gives
you some indication of how long a Job will take. Also displayed, depending on what is
being done, is a number of information messages. These will show the Product and
Department Codes and Descriptions, what Sales are being read etc.
Preceding the start of each Communications Session, POSUtility performs a 'Comms
Test' (Shown as 'Comms Test' on the Main Form). The result of this test is displayed on
the Progress Bar as a coloured light; Green = OK and Red = Failed.
While Comms is established the Green Light will stay on.
STOP COMMS
• This button is visible when it is allowable to Stop ECR Communications. If a
RETRIEVING Job is in progress and Comms is Stopped, then the changes to the
Database are undone (i.e. The original Database is restored). Stopping a SEND
Job is a bit more unpredictable from the ECR's point of view. This option is enabled
during SEND Jobs as it does have a use at times. Please make sure that you ReProgram the ECR again if you Stop a SEND Job.
After the Communications has completed, a summary of the results will be displayed
like the sample below.
30
Edit Direct Keys
Direct Keys refer to buttons which have a Department Number or PLU Number associated
with them. These keys can also be referred to as 'Fast Keys' or 'Presets'. This screen
shows the information that you would get from a PGM2 2119 Report. The actual Direct
Keys are defined in Edit Free Keys.
Editing of Direct Keys is not allowed on some ECR Types. The number of levels varies
depending on ECR Type. POSUtility only allows editing of levels 1 to 3 eventhough some
ECR's can have up to 10 levels. Levels 7 to 10 are saved in POSUtility and will be sent
back with the changes you have made to levels 1 to 3. The form displays the appropriate
number of Levels to suit the selected ECR Type.
You are only able to put Departments on Level 1.
The three columns on this form are;
Direct Key Number
Type (L1-L3)
Value (L1-L3)
The Preset Number
selected in Free Keys.
The Key Type by
Level.
The Department or
PLU Number.
31
Clicking the mouse in the Type Cell, will drop-down a selection list for the Level. On Level
one, the available Types are;
• PLU
• Inhibited
• Department
On Level 2 and 3, the available Types are;
• PLU
• Inhibited
N.B.
The Key Type can also be changed by selecting the first letter of the type
while in the cell. e.g. I = Inhibit, P = PLU, D = Department. If Inhibit is selected then
the Value is set to 0..
The desired Department or PLU Number is entered in the Value Cell.
Current ECR
• Information displayed is for this Register and Type.
Print
• Print ALL the data from the Direct Key Grid for the selected ECR.
32
Close•
Close the Direct Key form
Edit Function Text
This Form allows editing of the Function Text or 'Text Programming for Misc Keys'. Editing
of 'Message Text' cannot be done by this version of POSUtility.
Editing of Function Text is not available for all ECR Types.
There are two columns on this form; ECR Original and Function Text. The ECR Original is
as it has been retrieved from the ECR and cannot be changed. This is for your reference if
you want to return some text to what is was before. The Function Text column is the one
you can edit and also send back to the ECR. NB. that when you send the changed
Function Text to the ECR and Retrieve it again, the 'ECR Original' will be your changed
version.
The Default Text can be changed selecting the desired Cell. To make a character Double
Width, use the following key combination [SHIFT+6], which is actually a [^]. This will insert
the character that SHARP uses for this purpose. Each character that you want to make
Double Width must be preceded with one of these special characters. A look at what is
retrieved from the ECR will give a better idea of what is required.
33
Current ECR
• Information displayed is for this Register and Type.
Close
• Close the Function Text form.
Edit Free Keys
Free Keys refer to all the available types of keys that the ECR supports except the Receipt
and Journal Feed keys. The information displayed here is a combination of the SRV 950
and 951 Reports. Similarly, the programming functions of the SRV 950 and 951 Jobs can
be performed on this form. Note editing of Free Keys is not available for all ECR Types.
N.B.
The changes do not take effect until the Free Keys are sent back to the
ECR and retrieved again. This means that you can't create a Direct Key here and go
straight to Edit Direct Keys and expect to find it.
The three columns shown on this form are;
Key
Function
Value
The actual key position. The current Function of
the Key
The Key value
To change the Function of a Key, click the mouse on the applicable Value Cell. This will
drop-down a list of available Functions for the ECR Type. Select the required Function.
N.B.
The Key is NOT the Key Number shown on the Left-Hand-Side of the 950
Report, but the number shown in the Right-Hand-Column of same.
Example:
On an ER-A570, after an MRS the RF (Refund) Function is on Key 1. This is the
bottom left key on the keyboard. To change this to a NS (No Sale) Function, click
the mouse on the Value Cell of Key 1 and select NO SALE from the dropped-down
list. This list is in alphabetical order.
Current ECR
• Information displayed is for this Register and Type.
Print
• Print ALL the data from the Free Keys Grid for the selected ECR..
Close
• Close the Free Key Form.
34
About POSUtility
This form displays general information about POSUtility , where you can obtain support
and other software for SHARP Cash Registers.
System Info...
• Show System Information for your computer.
Ok
• Close the About form.
Send to Register options.
These options control what data is sent to the ECR. You may select any number of these
options for sending to the ECR with one exception -- Sending ALL RAM Data can only be
done on its own.
Send PLU EAN Options
There are four options for sending PLU/EAN's to the ECR. If this data has been
retrieved from the register before modifying, then ALL the register PLU and EAN
settings which will be affected by sending this data will remain unchanged on the
ECR. These are things like Recipes, Condiments etc. Beside two of the options
are text boxes which display how many records are in the PLU/EAN Database.
One shows ALL the records and the other the MODIFIED records. Using Modified
Records is useful when you have made a small number of changes to the Product
Data, as the changes can be quickly sent to the ECR. If you have deleted some
Products, then use the ALL option.
ALL
Checking this option will allow sending of All the PLU's and EAN's in the
POSUtility Database. Depending on the ECR Type, some of this data will may
not be sent. Using this option will first delete all PLU/EAN Data in the ECR
before sending the new data. If the number of records you are trying to send
35
exceeds the number the ECR is able to accept, then you will receive a
notification message. Using this option sets the 'Modified Flag' on the PLU/EAN
Record OFF.
MODIFIED only
• Modified PLU's and EAN's are those which have been edited since the last time
they were retrieved from the ECR or sent to the ECR.
MODIFIED only & clear Flag
• Modified PLU's and EAN's are those which have been edited since the last time
they were retrieved from the ECR or sent to the ECR. This operation will also set
the 'Modified Flag' on the PLU/EAN Record OFF.
Don't send Plu's or EAN's
• This is the default option here.
Departments
• Send all the Department information to the ECR. The file in the ECR is deleted
first (and hence deletes and sales). If you try to send more Departments than
the ECR has been configured to accept, then you will receive a message to the
effect.
ALL RAM Data
• Send ALL RAM Data. Note that if you send All RAM Data belonging to an ECR
with a different Firmware (EPROM) Version can cause the target ECR to lock
up. Selecting this option with deselect all other send options. Conversely,
selecting other options will deselect this option.
PCs Date Time
• Sends the PCs date & time.
Receipt Logo
Function Text
SRV Parameters
• This data is not editable, and is sent back to the ECR the same as it was
Retrieved.
Condiment Tables
PLU Menu Presets
Free Key Table
Direct Keys
Auto Keys
Touch Screen
• While you can't edit the UP-3300 Touch Screen Keyboard in POSUtility, these files
are saved back to the database when data is retrieved from the ECR and an be
36
sent back using this option.
TCP/IP Config
• This option is only supported by the Starrtec Services TCP/IP Interface for Sharp
ECR's. With this interface fitted, programming for the 7000 Jobs can be sent to the
ECR.
Comms Test
• This is a Communications Test to see if there is a valid ECR connected to the
computer and if it is available for Comms. This test is performed before EVERY
Comms Session. If no SEND or RETRIEVE options are selected, the test will be
performed on its own. During this test the Progress Bar will be displayed to show
the result.
SEND
• Clicking this button will ask you to Select a Register(ECR). The Register Type
for the selected ECR is also displayed. Once a register is selected you have a
choice to proceed with or cancel the pending Communications.
37
Condiment Tables
You cannot create Condiment Tables from scratch in POSUtility. You must create at least
one table in the ECR, then retrieve the data (including PLU's) which will include the table
you just created. You may then edit this table and create or delete as required. The PLU's
you use in the Condiment Table must exist in the ECR and POSUtility.
To add to either Grid, press the INS(ert) key or using the mouse DoubleClick. If you are
adding PLU's, a list of available PLU's will be displayed. You can sort this list by clicking
on the column headings. To add the currently highlighted PLU, DoubleClick on the row
with the mouse.
To delete from either Grid, press the DEL(ete) key. You will be asked to confirm the
deletion.
The edit button allows you to edit the Table Description and Next Table Link.
38
Add PLU's and/or Menus
This form is used by both the Condiment Table and PLU Menu Preset options for selecting
the PLU or Menu to add. If this form has been activated by the adding to the Condiment
Table, only PLU's will be able to be selected. If it was activated to add to the PLU Menus,
you have the choice of adding PLU's or Menus.
Sorting of the displayed data is done by clicking on the column headings.
To add the selected data, DoubleClick using the mouse. The last item you added is
displayed.
PLU Menu Preset
You cannot create Menus from scratch in POSUtility. You must create at least one Menu
in the ECR, then retrieve the data (including PLU's) which will include the Menu you just
created. You may then edit the Menu table and create or delete as required. The PLU's
you use in the Menu must exist in the ECR and POSUtility.
To add to either Grid, press the INS(ert) key or using the mouse DoubleClick. If you are
adding PLU's or Menus, a list of available PLU's will be displayed. There is an option on
the form to select Menus or PLU's. You can sort this list by clicking on the column
39
headings. To add the currently highlighted PLU or Menu, DoubleClick on the row with the
mouse.
To delete from either Grid, press the DEL(ete) key. You will be asked to confirm the
deletion.
The edit button allows you to edit the Menu Description.
40
POS Utility Cable
PC to POS
POS 9 way D type Female
PC 9 way D type Female
Function
Pin No.
Pin No.
DCD (Data Carrier Detect)
1
1
DCD (Data Carrier Detect)
DTR (Data Terminal Ready)
4
4
DTR (Data Terminal Ready)
DSR (Data Set Ready)
6
6
DSR (Data Set Ready)
RX (Receive Data)
2
3
RX (Receive Data)
TX (Transmit Data)
3
2
TX (Transmit Data)
GND (Signal Ground)
5
5
GND (Signal Ground)
RTS (Request To Send)
7
7
RTS (Request To Send)
CTS (Clear To Send)
8
8
CTS (Clear To Send)
RI (Ring Indicator)
9
9
RI (Ring Indicator)
Not Used
41
Function