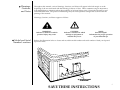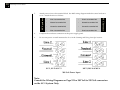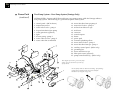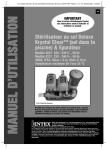
1
Introduction
Congratulations on your purchase of the finest spa on the market today. Emerald Spa Corporation
welcomes you to the Emerald Spa life-style! We are confident that this purchase will fulfill all your
comfort, therapy and relaxation needs.
With proper care, your spa will provide many years of comfort and pleasure. Please take the time to
read all of the instructions before you install your Emerald or Cygnus Series Spa. This Owner's Manual
will help you understand all the features of your spa and ensure that you get the most from your investment.
Remember, your beautiful new spa is a powerful appliance! You owe it to yourself, your family and
friends, to make sure that the spa is installed correctly and safely.
This manual explains safety precautions, installation instructions, operating directions, and maintenance
procedures. If you have questions after reading this manual, please call your Emerald Spa Service
Representative at 1-800-766-7727.
Read and understand all safety, installation, operating instructions and all warnings
and cautions before adding water or attaching electrical power.
Information on Your Spa
Spa Model:
Power Pack Model:
Serial #:
(rev. 1/04)
copyright 2004
Emerald Spa Corporation
All Rights Reserved
Warnings,
Cautions,
and Notes
Throughout this manual, various Warnings, Cautions, and Notes will appear in the left margin or at the
beginning of the text associated with the Warning, Caution, or Note. These comments range in importance
from helpful hints to situations where the possibility of personal injury exists. Please take the time to read
and understand them. The pictures and drawings may not reflect product changes that occurred after the
printing of this manual.
Warnings, Cautions, and Notes appear as follows:
WARNING:
Indicates a situation in which
personal injury may occur.
Model and Serial
Number Locations
CAUTION:
Indicates a situation in which
damage to equipment or
material may occur.
NOTE:
Provides helpful
information for proper operation
of your Emerald spa.
Refer to the illustration below to locate and record the model number and serial number of both your Spa and
Spa Power Pack.
SAVE THESE INSTRUCTIONS
Table of Contents
INTRODUCTION ....................................................................................2
IMPORTANT SAFETY INSTRUCTIONS ...................................................4-5
IMPORTANT USER SAFETY INSTRUCTIONS .......................................6-7
SPA LOCATION .........................................................................................8
INSTALLATION INSTRUCTIONS ...............................................................9
General Procedures ......................................................................9
240V Systems.................................................................................10-12
FEATURES AND CONTROLS......................................................................13
Spa At-A-Glance................................................................................... 13
Equipment Compartment...................................................................14
Power Pack...................................................................................15-16
Features and controls...........................................................................................17
Spa Side Control..........................................................................................18-36
SC-1, SC-2 & SC-3.........................................................................18-23
MC-2 & MC-4.................................................................................24-29
MC-6.....................................................................................30-36
In-Spa Features ............................................................................................37-40
STARTING AND USING YOUR SPA...................................................................41
Installation of Filter Element....................................................................41
Proper Water Level...............................................................................42
Bleeding Air for dual filter & single filter..........................................................42
Testing the Ground Fault Circuit Interrupter (GFCI)......................43
Pump Priming........................................................................................44-45
SPA WATER CHEMISTRY.......................................................................................46
Chemical Safety Tips.............................................................................46
Spa Capacity.............................................................................................46
pH Control.............................................................................................47
Disinfecting Your Spa............................................................................48
Ozone Generator....................................................................................49
Other Water Chemistry Considerations.......................................................49
MAINTAINING YOUR SPA......................................................................................50
Draining the Water....................................................................................50
Cleaning the Spa Shell..............................................................................51
Cleaning the Filter....................................................................................51
Relamping the Underwater Light............................................................52
Winterizing Your Spa..............................................................................52
The Spa Cabinet.................................................................................53
TROUBLESHOOTING................................................................................................54
ELECTRICAL SCHEMATICS .......................................................................55-57
SC-1, SC-2 & SC-3.................................................................................................55
MC-2 & MC-4 .......................................................................................................56
MC-6.............................................................................................................57
4
Emerald Spa Owner's Manual
IMPORTANT SAFETY
INSTRUCTIONS
General
When installing and using this electrical equipment, basic safety precautions should always be adhered to,
including the following:
1.
READ AND FOLLOW ALL INSTRUCTIONS.
2.
WARNING: To Reduce the risk of injury, do not permit children to use this product unless they are
closely supervised at all times.
3.
A wire connector is provided on this unit to connect a minimum No. 8 AWG (8.4mm2) solid copper
conductor between this unit and any metal equipment, metal enclosures of electrical equipment,
metal siding, metal sliding doors, metal rails, metal water pipe, or conduit within 5 feet (1.5m) of
the unit.
4.
DANGER: Risk of accidental drowning. Extreme caution must be exercised to prevent
unauthorized access by children. To avoid accidents, ensure that children cannot use this spa
unless they are supervised at all times.
5.
DANGER: Risk of injury. The suction fittings in this spa are sized to match the specific water flow
created by the pump. Should the need arise to replace the suction fittings or the pump, be sure that
the flow rates are compatible. Never operate your spa if the suction fittings are broken or missing.
Never replace a suction fitting with one rated less than the flow rate marked on the original suction
fitting.
6.
DANGER: Risk of electric shock. Install at least 5 feet (1.5m) from all metal surfaces. As an
alternative, a spa may be installed within 5 feet of metal surfaces if each metal surface is
permanently connected by a minimum No. 8 AWG (8.4mm2) solid copper conductor to the wire
connector on the terminal box that is provided for this purpose.
7.
DANGER: Risk of electric shock. Do not permit any electric appliance, such as a light, telephone,
or television within 5 feet (1.5m) of a spa.
SAVE THESE INSTRUCTIONS
Important Safety Instructions
IMPORTANT SAFETY
INSTRUCTIONS
240V Hard Wired
Connected
Systems
When installing and using this electrical equipment, basic safety precautions should always be adhered to,
including the following:
1.
READ AND FOLLOW ALL INSTRUCTIONS.
2.
Read and follow all General Safety Instructions provided on pg. 4.
3.
A terminal marked "GROUND" is provided within the motor control enclosure. To reduce the risk
of electrical shock, connect this terminal to the grounding terminal of the electric supply panel with
a continuous green insulated copper wire equivalent in size to the circuit conductors supplying this
equipment.
4.
This equipment must be provided with a ground fault circuit interrupter located in the power
supply panel as installed by an electrician. Before each use of your spa, with the power turned on,
push the test button. A red indicator should appear. Push the reset button, and the red indicator
should disappear. IF THE INTERRUPTER FAILS TO OPERATE IN THIS MANNER, THERE IS A
GROUND CURRENT FLOWING, INDICATING THE POSSIBILITY OF AN ELECTRIC SHOCK.
Shut off the power to the spa until the source of the breakdown has been identified and
corrected.
5.
The electrical service panel should be equipped with a 50-amp GFCI overcurrent protective device.
6.
The minimum supply conductor capacity is 50 Amp and should be sized as follows:
No. 6 AWG, or No. 8 AWG 75o C.
7.
The electrical supply for the spa must include a suitably rated switch or circuit breaker to open all
ungrounded supply conductors, to comply with section 422-30 of the National Electrical Code,
ANSI/NFPA 70-2002. The disconnecting means must be readily accessible to the spa occupant but
must not be within 5 feet of the spa.
SAVE THESE INSTRUCTIONS
5
6
Emerald Spa Owner's Manual
IMPORTANT USER SAFETY
INSTRUCTIONS
To Reduce the
Risk of Injury
When using this spa, basic safety precautions should always be followed.
WARNING:
As a spa owner, you should always review these instructions with first time or occasional users of the spa.
Remember, they may not be aware of the possible risks associated with spa water temperature.
1.
READ AND FOLLOW ALL INSTRUCTIONS.
2.
WARNING: TO REDUCE THE RISK OF INJURY, do not permit children to use this product unless
they are closely supervised at all times.
3.
DANGER: RISK OF ACCIDENTAL DROWNING. Extreme caution must be exercised to prevent
unauthorized access by children. To avoid accidents, ensure that children cannot use the spa unless
they are supervised at all times.
4.
WARNING: TO REDUCE THE RISK OF INJURY, the water in a spa should never exceed 104o F
[40 o C]. Water temperatures between 100o F [38o C] and 104o F [40o C] are considered safe for a
healthy adult for a 10 to 15 minute time period. Lower water temperatures are recommended for
extended use [exceeding 10-15 minutes] and for young children.
5.
Since excessive water temperatures have a high potential for causing fetal damage during the early
months of pregnancy, pregnant or possibly pregnant women should limit spa water temperatures
to 100o F [38o C].
6.
Before entering a spa, the user should measure the water temperature with an accurate thermometer such as a medical thermometer, since the tolerance of temperature regulating devices vary.
7.
The use of alcohol, drugs, or medication before or during spa use may lead to unconsciousness with
the possibility of drowning.
SAVE THESE INSTRUCTIONS
Important User Safety Instructions
IMPORTANT USER SAFETY
INSTRUCTIONS (Continued)
8.
Persons suffering from obesity or with a medical history of heart disease, low or high blood
pressure, circulatory system problems, or diabetes should consult a physician before using a spa.
9.
Persons using medication should consult a physician before using a spa, since some medications
may induce drowsiness while other medications may affect heart rate, blood pressure and
circulation.
10.
Extended use of your spa in water temperatures between 100o F and 104o F may cause
HYPERTHERMIA (elevated body temperature). Hyperthermia occurs when the internal
temperature of the body reaches a level several degrees above the normal body temperature of
98.6 o F. The symptoms include dizziness, fainting, drowsiness, lethargy, and an increase in the
internal temperature of the body. The effects of hyperthermia include (1) unawareness of impending
hazard, (2) failure to perceive heat, (3) failure to recognize the need to exit the spa, (4) physical
inability to exit the spa, (5) fetal damage in pregnant women, and (6) unconsciousness, resulting in
a danger of drowning.
11.
WARNING: The use of alcohol, drugs, or medication can greatly increase the risk of fatal
hyperthermia in spas.
12.
During Winter months where the temperature is consistently below freezing, check your spa
periodically to assure that it is operating correctly and that the power to the spa has not been
interrupted as to assure that the water lines are not in danger of feezing.
13.
Do not use your spa alone.
14.
Make sure that the following emergency telephone numbers are listed at the nearest telephone:
physician, hospital, ambulance, and police.
15.
Have at least one person in the family learn CPR (cardio-pulminary resuscitation). It could save a
life!
SAVE THESE INSTRUCTIONS
7
8
Emerald Spa Owner's Manual
SPA LOCATION
Outdoor Considerations
Indoor Considerations
Outdoor Considerations
Indoor Considerations
There are many things to consider prior to locating your spa. The following lists cover some of the more
common factors involved in choosing the ideal location.
✓
Local fencing and enclosure codes.
✓
Local electrical and plumbing codes.
✓
The view from your house.
✓
Your ability to supervise the spa.
✓
Wind direction and exposure to sunlight.
✓
Location relative to trees (falling leaves and shade).
✓
Dressing and bathroom location.
✓
Storage area for maintenance equipment and chemicals (storing chemicals inside your spa cabinet
will void the warranty).
✓
Landscaping and evening lighting.
✓
Spa must be placed on a flat, level surface.
✓
Water is heavy (approx. 8 lbs per gallon). If a spa is placed on flooring or decking, be sure the structure
is strong enough to support the added weight.
✓
Walls, ceiling, flooring, and woodwork must be able to withstand high humidity.
✓
You may need cross-ventilation fans or oversized dehumidifiers (or both) to remove excess humidity.
✓
Spa chemicals in the air may corrode certain metals in your home.
✓
Floor drains are needed to carry off water splashed from the spa.
✓
Recessed spas must be positioned to permit servicing from above or below floor.
✓
Water is heavy (approx. 8 lbs per gallon). Be sure the flooring or decking is strong enough to support
the added weight.
✓
Due to the many precautions that must be taken to avoid damage to the surrounding environment from
humidity and water inherent with spa use, it is usually prudent to avoid a second story location that
may be above finished living space.
Installation Instructions
9
INSTALLATION INSTRUCTIONS
General Procedures
240V Systems
General Procedures
This section covers the installation of your spa. All electrical steps must be performed by a licensed electrician.
The spa must be connected to a proper power supply and meet all National Electrical Code (N.E.C.) and local
code requirements. The connection must include the conductors necessary for operation and bonding, as
required by N.E.C.
1.
Remove the spa from its shipping container and retain all safety, operation, and warranty information.
2.
Position the spa on a flat, level surface such as concrete, or a wood deck which provides adequate
drainage.
3.
Position the spa at least 5 feet from all metal surfaces unless each metal surface is permanently
connected to a bonding wire, as indicated in step 4.
4.
The spa may be installed within 5 feet of metal surfaces as follows:
- Installation must be in accordance with Article 680-(40-44) of the
National Electrical Code, ANSI/NFPA 70-2002.
- Each metal surface must be permanently connected to a bonding
wire which is attached to a pressure wire connector provided for
that purpose.
- The pressure wire connector is located on the equipment system
control enclosure.
- The bonding wire must be at least No. 8 AWG (8.4 mm2) solid
copper wire, in accordance with article 680-43E.
- The bonding wire must be attached to the pressure wire connector
and all metal equipment, metal enclosures of electrical equipment,
metal water pipe, or conduit within 5 feet of the spa.
At least No. 8 AWG (8.4mm 2)
solid copper wire
Located on the side of the spa pack box
for M Class Equipment Systems and on
the heater for S Class Equipment Systems
10
Emerald Spa Owner's Manual
240V Systems
(SC-1 240V,
SC-2, SC-3,
MC-2, MC-4, MC-6)
1.
Install a 50-amp, GFCI overcurrent protective device in the electrical service panel.
2.
The electrical supply for the spa must include a suitable rated switch or circuit breaker to shut off
the power supply (to comply with section 422-30 of the National Electrical Code, ANSI/NFPA 702002). This disconnecting means must be readily accessible to the spa occupant, however it must
not be within 5 feet of the spa. (see diagram below)
3.
With the spa placed in its final location, power can be routed in two ways:
Under the spa cabinet- See figure 1 on pg. 11
- Determine placement of hole in floor so that conduit may enter between the spa shell and the
wooden cabinet.
- Move the spa to allow working room. Cut off the conduit above the floor surface.
- Use an LB on the conduit to permit wire pulling if required.
Through a power entrance opening drilled by an electrician - See figure 2 on pg. 11
- Move the spa to allow working room. Use nonmetallic conduit and fittings. Cut off the conduit
above the floor surface to permit the installation of an LB at the power entrance opening height.
Installation Instructions
240V Systems
[Continued]
11
4.
Pull 4 copper current carrying conductors (one each: black, red, white, green). Use either No. 6 AWG
60 o C, No. 8 AWG 75 o C, or No. 8 AWG 90o C wire, if spa is 100 feet or less away from its power supply.
Note: the ground must be equal to or larger than the largest power conductor.
5.
Reposition the spa at its final location and route the flexible conduit.
6.
Using a 1" conduit connector at the end of the flexible conduit, route wires through an entrance hole cut
by your electrician in the control enclosure, and attach the conduit connector to the control enclosure.
Under Spa
Cabinet
Figure 1
Figure 2
Emerald Spa Owner's Manual
7.
Attach power wires to the terminal block. See 240V wiring diagram inside the control enclosure
cover. Attach the wires as follows:
-
Line 2 to terminal #4
-
Line 1 to terminal #4
-
Neutral to terminal #3
-
Neutral to terminal #3
-
Ground to terminal #2
-
Ground to terminal #2
-
Line 1 to terminal #1
-
Line 2 to terminal #1
MC Systems
SC Systems
12
8.
Complete the conductor connections at the power supply panel.
9.
Do not turn power on until instructed to do so in the "Starting and Using Your Spa" section.
SC-1, SC-2 & SC-3
MC-2, MC-4 & MC-6
240-Volt Power Input
Note:
Consult the Wiring Diagrams on Page 55 for 240 Volt to 120 Volt conversion
on the SC-1 System Only.
Features and Controls
FEATURES AND CONTROLS
Spa At-A-Glance
Spa At-A-Glance
Equipment Compartment
Power Pack
Spa Side Control
In-Spa Features
Your Emerald Spa may be equipped with a variety of user controls and optional features. This section
locates and describes each. Please take the time to recognize and understand the functions of these components and controls.
Spa At-A-Glance provides a pictorial overview of key user components.
75 Sq. Ft
Filter
75 Sq. Ft
or Space Saver
Filter
1 - Pump System
(Base, Classic, SE)
2 - Pump System
(Elite, Cygnus, SE dlx)
4 - Pump System
(Vantage)
(These diagrams represent generic one pump, two pump & 4 pump systems. They are not intended to represent any specific model.)
13
14
Emerald Spa Owner's Manual
Equipment
Compartment
The equipment compartment houses the "nerve center" of the spa and includes the following system components.
Pump(s)
Emerald Spas have different pump systems, depending on the spa model. Emerald Base, Classic and Special
Edition spas have a two-speed (circulation/jets) pump and provide:
- Filtration, circulation and heat on low speed from electric heater.
- Hydrotherapy jet action on high speed for 120V. For 240V, the spa will also heat from electric heater
in high speed.
The Emerald Elite, Cygnus and Special Edition DLX spa have a two pump system which uses an additional
booster pump to enhance jet action.
Finally, the Vantage utilizes a four pump system which uses a one-speed circulation pump along with three one
speed jet pumps.
Blower
Emerald Classic, Elite, Special Edition, Cygnus and Vantage spas include a blower to provide bubble therapy and
an enhanced force of air to the water jets called High Performance Jet Select.
Caution:
T-valves must be open when spa is in use. See Fig. 1.
T-valves must be in closed position before any plumbing is disassembled for service. See Fig. 2.
T-valves
All one-pump systems have two T-valves, located in the water circulation lines on either side of the power pack.
Some models have two pumps, which include two additional T-valves located on either side of the booster pump.
Lock Position
(Twist handle
to Lock)
To operate T-Valve:
- To close, temporarily remove security clip and push
T-handle down.
- To open, pull T-handle up and secure
with security clip.
Unlock Position
(Twist handle
to Unlock)
Open, Detent
Closed
Closed, Locked
Position
Fig. 2
Fig. 1
Open, Detent
Position
Features and Controls
Power Pack
One-Pump System
Below is a general description for the one pump system of the SC-1, SC-2 & SC-3 spa systems
used in your Emerald spa.
1.
2.
3.
4.
5.
6.
7.
8.
control panel
temperature sensor
ozone generator (optional)
light
2-speed circulation/jets pump
water inlet T-valve
water inlet line from spa
air line from blower to spa
(not on Base Models)
9. air blower
(not on Base Models)
(Inside the
box on the
heater)
This diagram represents a generic one pump
system. It is not intended to represent any
specific model.
10. heater
11. control outputs
12. power pack
13. water outlet T-valve
14. water outlet line to spa
15. ozone tee
16. grounding wire
17. fiber optic source (optional on SC-3)
15
16
Emerald Spa Owner's Manual
Power Pack
(continued)
Two-Pump System - Four-Pump System (Vantage Only)
All Emerald Elite, Cygnus and SE dlx models use a two pump system, while the Vantage utilizes a
four pump system. The following is a general description of this system.
1.
2.
3.
4.
5.
6.
7.
8.
9.
control panel - (MC-4 shown)
temperature sensor
water inlet T-valve - pump 1
2-speed circulation/jets pump
ozone generator (optional)
light
booster pump - pump 2
water outlet T-valve - pump 2
water outlet line to manifold
10.
11.
12.
13.
14.
15.
16.
17.
18.
19.
20.
21.
22.
23.
24.
25.
water inlet line from spa-pump 2
water inlet T-valve - pump 2
air line from blower to spa
air blower
ozone tee
control outputs
heater
power pack
connector plumbing elbow
water outlet T-valve - pump 1
water inlet line from spa - pump 1
auxiliary control panel - (MC-4 only)
grounding bar
water outlet line to spa
fiber optic source (optional)
pump control button (3) - (MC-6 only)
This diagram represents a generic two pump
system. It is not intended to represent any
specific model.
The two pumps below are added to the Vantage Spa plumbing
system and are plumbed to their own water manifold
distribution (see diagram on page 13)
The Features of each Power Pack are Summarized in the Following Chart:
SC-1
SC-2
Features and Controls
SC-3
MC-2/MC-4
MC-6
Pump
1.5 hp, 2speed
4.8 hp, 2speed
4.8 hp, 2speed
(1) 4.8hp & (1) 2hp
(1) 4.8hp & (1) 4.8hp
Heater
1.0/4.0KW
4.0 KW
4.0 KW
4.0 KW
4.0 KW
Blower
No
No
Yes
Yes
Yes
Light
Yes
Yes
Yes
Yes
Yes
Control Panel
Digital
Digital
Digital
Digital
Digital
Ozonator (optional) 120V
Ready
Ready
Ready
Ready
Ready
240V(120v opt.)
240V
240V
240V
240V
Voltage Requirement
Temperature Adjustment
Keypad
Keypad
Keypad
Keypad
Keypad
Automatic Time Outs
Yes
Yes
Yes
Yes
Yes
Preset Filter Cycles
Yes
Yes
Yes
Yes
Yes
Yes:Topside
Yes:Topside
Yes:Topside
Yes:Topside
Yes:Topside
Sensor Failure Detection
Yes
Yes
Yes
Yes
Yes
Flow Switch Error Detection
Yes
Yes
Yes
Yes
Yes
Smart Winter Mode
Yes
Yes
Yes
Yes
Yes
High Limit Protection with Reset
Yes
Yes
Yes
Yes
Yes
Heater/Status Indicator
Yes
Yes
Yes
Yes
Yes
Night Vision Backlight
Yes
Yes
Yes
Yes
Yes
Continuous Digital H O Temperature Display
Yes
Yes
Yes
Yes
Yes
Digital Time Display
No
No
No
Yes
Yes
Icon Representation of Functions
No
No
No
Yes
Yes
Programmable Filter Cycles
2
Digital Operational Status Display
No
No
No
Yes
Yes
Digital Diagnostic Display
Yes
Yes
Yes
Yes
Yes
Automatic Filtration
Yes
Yes
Yes
Yes
Yes
Automatic Blower Purge
No
No
Yes
Yes
Yes
Automatic Pump Purge (Aux)
No
No
No
Yes
Yes
Temperature Lock (LocP)
No
No
No
Yes
Yes
Panel Lock (LocF)
No
No
No
Yes
Yes
Battery Back-Up Program Saver
No
No
No
Yes
Yes
Remote Control Panel (Option)
No
No
No
Yes
Yes
High Performance Jet Select
No
No
Yes
Yes
Yes
Standby Mode (Pump disable) (OFF)
No
No
No
Yes
Yes
Inverted Display
No
No
No
Yes
Yes
Fiber Optic Lighting Capable
No
No
Yes
Yes
Yes
Economy Mode
No
No
No
Yes
Yes
17
18
Emerald Spa Owner's Manual
Spa Side Control
SC-1 & SC-2
for EMERALD BASE
Start-up for SC-1 & SC-2 Controls
Your spa control has been specifically designed so that by simply connecting the spa to its properly grounded
source, the spa will automatically heat to the set temperature. (note: your spa equipped with the SC-1 is shipped in the
240V configuration. See the SC-1 schematics on page 55 if you plan to convert the SC-1 power system to a 120V configuration.)
Starting the pump:
Press Pump key to turn pump on. Press a second time to change pump speed. A third time turns pump off. A
built-in timer automatically turns pump off after 15 minutes, unless it has been manually deactivated first.
The "Pump" indicator lights up when pump is on.
Turning the light on:
Press Light key to turn light on. Press a second time to turn light off. A built-in timer
automatically turns light off after 2 hours, unless it has been manually deactivated first.
The "Light" indicator lights up when light is on.
Setting water temperature:
Use Up or Down arrow key to regulate water temperature. Press and hold key to increase (or decrease)
current temperature setting. The temperature setting will be displayed for 5 seconds to confirm your
new selection.
The "Set Point" indicator displays the desired temperature, NOT the current water temperature!
Water temperature can be adjusted by 1° increments from 59 to 104°F (15 to 40°C).
Features and Controls
Spa Side Control
SC-1 & SC-2
for EMERALD BASE
[continued]
19
Automatic water heater start:
When water temperature is 1°F (0.5°C) lower than the Set Point, the heater will automatically turn on
until water temperature reaches Set Point plus 1°F (0.5°C).
The "Heater" indicator lights up when the heater is on.
Programming the filter cycle duration:
The system automatically performs two filter cycles per day, at 12-hour intervals. During a filter cycle, pump
is activated for a programmed number of hours. To set the filter cycle duration:
Press and hold Light key for
5 seconds. The display will show
a value that represents the filter
cycle duration in hours.
Use Up or Down arrow key to
change setting.
0 = no filtration
12 = continuous filtration
When the desired setting is displayed,
press Light key again. The filter cycle will
start. The "Filter" indicator lights up when
a filter cycle is on.
Note that after a power failure, the filter cycle duration will return to its default value (6 hours). In this case,
the first filter cycle will start 12 hours after power has been restored. Note also that to prevent excessive
water temperature caused by too long filter cycles, the system will cancel a filter cycle after 3 hours if water
temperature raises more than 2°F (1°C) above Set Point. In this case, the "Filter" indicator will flash.
20
Emerald Spa Owner's Manual
Spa Side Control
SC-1 & SC-2
for EMERALD BASE
[continued]
Troubleshooting:
The pump has started up for
1 minute on several occasions
and "Filter" indicator is flashing.
3 flashing dots are displayed.
Water temperature is flashing.
A problem has been detected.
Water temperature in the spa
has reached 112°F (44°C).
Not a bug but a feature!
Do not enter the water! Check
and open water valves. Clean
filter if necessary. Check water
level. Add water if needed.
Our Smart Winter Mode
protects your spa from the
cold by turning the pump on
for 1 minute several times a
day to prevent water from
freezing in pipes.
Shut power off and power
your spa up again to reset
the system.
Call your dealer or service
supplier if problem persists.
The display is flashing.
A power failure must have
occurred. Press any key to
stop the flashing and reprogram the filter cycle.
Do not enter the water!
Remove spa cover and allow
the water to cool down.
The system will reset itself
when water reaches 109°F
(43°C).
Call your dealer or service
supplier if problem persists.
Features and Controls
Spa Side Control
SC-3
for EMERALD CLASSIC
or EMERALD SE Series
21
Start-up for SC-3 Control
Your spa control has been specifically designed so that by simply connecting the spa to its properly grounded
source, the spa will automatically heat to the set temperature.
Starting the pump:
Press Pump key to turn pump on. Press a second time to change pump speed. A third time turns pump off.
A built-in timer automatically turns pump off after 15 minutes, unless it has been manually deactivated
first.
The "Pump" indicator lights up when pump is on.
Starting blower:
Press Blower key to turn blower on. Pressing a second time turns blower off. A built-in timer automatically
turns blower off after 15 minutes, unless it has been manually deactivated.
The "blower" indicator lights up when blower is on.
Turning the light(s) on:
(depending on your spa configuration)
Spa Light Only: Press Light key to turn light on. Press a second time to turn light off. A built-in timer
automatically turns light off after 2 hours, unless it has been manually deactivated first.
Fiber Light Only: Press Light key to turn fiber light and light wheel on. Press a second time to turn light
wheel off. A third time turns fiber light off. A built-in timer automatically turns fiber light off after 2
hours, unless it has been manually deactivated first.
Spa Light: The "Light indicator lights up when light is on.
Fiber Light: The "Light" indicator flashes when fiber light and light wheel are on. It will be solid when
only the fiber light is on.
22
Emerald Spa Owner's Manual
Spa Side Control
SC-3
for EMERALD CLASSIC
& EMERALD SE Series
[continued]
Setting water temperature:
Use Up or Down arrow key to regulate water temperature. To increase (decrease) current temperature
setting hold keypad until desired setting. When keypad is released and pressed again the setting will
decrease (increase) the temperature. The temperature setting will be displayed for 5 seconds to confirm
your new selection.
The "Set Point" indicator displays the desired temperature, NOT the current water temperature!
Water temperature can be adjusted by 1° increments from 59 to 104°F (15 to 40°C).
Automatic water heater start:
When water temperature is 1°F (0.5°C) lower than the Set Point, the heater will automatically turn on
until water temperature reaches Set Point plus 1°F (0.5°C).
The "Heater" indicator lights up when the heater is on.
Programming the filter cycle duration:
The system automatically performs two filter cycles per day, at 12-hour intervals. During a filter cycle, pump is
activated for a programmed number of hours. To set the filter cycle duration:
Press and hold Light key for
5 seconds. The display will show
a value that represents the filter
cycle duration in hours.
Use Up or Down arrow key to
change setting.
0 = no filtration
12 = continuous filtration
When the desired setting is displayed,
press Light key again. The filter cycle will
start. The "Filter" indicator lights up when
a filter cycle is on.
Features and Controls
Spa Side Control
SC-3
EMERALD CLASSIC
& EMERALD SE Series
[continued]
Programming the filter cycle duration (continued):
Note that after a power failure, the filter cycle duration will return to its default value (6 hours). In this
case, the first filter cycle will start 12 hours after power has been restored. Note also that to prevent
excessive water temperature caused by too long filter cycles, the system will cancel a filter cycle after 3
hours if water temperature raises more than 2°F (1°C) above Set Point. In this case, the "Filter" indicator
will flash.
Troubleshooting:
The pump has started up for
1 minute on several occasions
and "Filter" indicator is flashing.
3 flashing dots are displayed.
Water temperature is flashing.
A problem has been detected.
Water temperature in the spa
has reached 112°F (44°C).
Not a bug but a feature!
Do not enter the water! Check
and open water valves. Clean
filter if necessary. Check water
level. Add water if needed.
Our Smart Winter Mode
protects your spa from the
cold by turning the pump on
for 1 minute several times a
day to prevent water from
freezing in pipes.
Shut power off and power
your spa up again to reset
the system.
Call your dealer or service
supplier if problem persists.
The display is flashing.
A power failure must have
occurred. Press any key to
stop the flashing and reprogram the filter cycle.
Do not enter the water!
Remove spa cover and allow
the water to cool down.
The system will reset itself
when water reaches 109°F
(43°C).
Call your dealer or service
supplier if problem persists.
23
24
Emerald Spa Owner's Manual
Spa Side Control
MC-2 & MC-4
for ELITE, SE deluxe
or Cygnus Spas
Start-up for MC-2 & MC-4 Controls
Your spa control has been specifically designed so that by simply connecting the spa to its properly grounded
source, the spa will automatically heat to the set temperature.
Starting the pumps:
Press Pump(s) to turn Pump 1 on at low speed. Pressing a second time turns Pump 1 to high speed. A third time
turns Pump 1 & Pump 2 to high speed, then a fourth press turns both pumps off. A built-in timer turns pumps off
after 15 minutes, unless it has been manually deactivated first.
The "Pump 1" icon lights up when Pump 1 is on at high speed. It flashes when Pump 1 is on at low speed.
The "Pump 2" icon lights up when Pump 2 is on.
Starting blower:
Press Blower once to turn blower on at high speed. Pressing a second time turns blower to low speed. A third time
turns blower off. A built-in timer turns blower off after 15 minutes, unless manually deactivated first.
The "Blower" icon lights up when blower is on at high speed. It flashes when blower is on at low speed.
Turning the light on:
Pressing Light key turns light on at high intensity. Pressing a second and third time changes its intensity. Press a
forth time to turn light off. A built-in timer turns light off after 2 hours, unless it has been manually deactivated
first.
The "Light" icon is displayed when light is on at high intensity. It flashes when light is on at medium and
low intensity.
Features and Controls
Spa Side Control
MC-2 & MC-4
for ELITE, SE deluxe
or Cygnus Spas
[continued]
25
Setting water temperature:
Use Up or Down arrow key to regulate water temperature. The temperature setting will be displayed for 5
seconds to confirm your new selection.
The "Set Point" symbol indicates the desired temperature, NOT the current water temperature!
Water temperature can be adjusted by 1˚ increments from 59 to 104˚F (15 to 40˚C).
Automatic water heater start:
Note:
The filter cycle is suspended if the
water temperature raises more than
2˚F (1˚C) above Set Point.
The "Filter" icon will blink
(on 0.5 second, off 0.5 second,
on 0.5 second, off 1.5 seconds).
When water temperature is 1˚F (0.5˚C) lower than the Set Point, the heater will automatically turn on until water
temperature reaches Set Point plus 1˚F (0.5˚C).
The "Heater" icon lights up when the heater is on. It flashes when there is a request for more heat
but the heater has not yet started.
Inverted display:
Press and hold Blower for 5 seconds to invert the display. Note that the ˚F or ˚C icon is not displayed in reverse
mode. Follow the same procedure to return to default mode. If a power-up occurs, the display always returns to
default mode.
Temperature display unit:
Press and hold Light key for 5 seconds to display water temperature in either Fahrenheit (˚F) or Celsius (˚C).
Turning the fiber optic light on (option):
Pressing Light key turns fiber box (motor & light) on. Pressing again turns fiber box motor off but leaves light
on. A third time turns both motor and light off. A built-in timer turns fiber box off after 2 hours, unless it has
been manually deactivated.
The "Light" icon is displayed when fiber box light is on. It flashes when fiber box motor and light
are on at the same time.
Time & temperature display:
The display toggles every 5 seconds alternately showing the hourly time and the current water temperature.
26
Emerald Spa Owner's Manual
Temperature
unit
Spa Side Control
MC-2 & MC-4
for ELITE, SE deluxe
or Cygnus Spas
Programming
7 Step
Programming
Sequence
Setting the time - Step 1:
10:25 am
11:43 pm
Filter Cycle
icon
Programming Mode
icon
Heater
icon
Up & Down
arrows
Economy Mode
Lock
icon
icon
1- Enter Programming mode by holding Prog. key pressed down for 2 seconds.
2- The display will show the current setting.
3- Use Up and Down arrows to change setting.
Setting filter cycle start time & duration - Steps 2 & 3:
The system automatically performs two filter cycles per day, at 12-hour intervals. During the filter cycle,
Pump 2 and blower will run in high speed for one minute. Pump 1 will then run for a programmed number
of hours. The "Filter Cycle" icon lights up when a filter cycle is on.
To program a filter cycle, you must enter: 1) the time you want the cycle to start and 2) the duration of the
cycle. If no filtering is required, the duration should be set to "0". For continuous filtering, the filter cycle
duration should be set to "12:00".
Setting filter cycle start time:
FS01
FS12
1- Press Prog. key a second time.
2- The display will show FSxx, with "xx" representing the starting hour.
3- Use Up and Down arrows to change setting.
Setting filter cycle duration:
Fd00
Fd12
1- Press Prog. key a third time.
2- The display will show Fdxx, with "xx" representing the duration in hours.
3- Use Up and Down arrows to change setting.
Features and Controls
Spa Side Control
MC-2 & MC-4
for ELITE, SE deluxe
or Cygnus Spas
Programming
[continued]
27
Setting filter cycle frequency - Step 4:
FF01
FF04
1- Press Prog. key a fourth time.
2- The display will show FFxx, with "xx" representing the frequency per day.
3- Use Up and Down arrows to change setting.
Setting economy mode start time & duration - Steps 5 & 6:
Setting economy mode start time:
Economy Mode Notes:
• Use economy mode when
your spa will have long
periods of non-use.
In Economy mode, the spa
system will maintain the heat at
20oF below the set temperature.
• Depending on the ambient air
temperature, your water temperature may not cool to 20% below
the set temperature.
ES10
ES08
1- Press Prog. key a fifth time.
2- The display will show ESxx, with "xx" representing the starting hour.
3- Use Up and Down arrows to change setting.
Setting economy mode duration:
Ed01
Ed04
1- Press Prog. key a sixth time.
2- The display will show Edxx, with "xx" representing the duration in hours.
3- Use Up and Down arrows to change setting.
Storing settings in memory - Step 7
Press Prog. key a seventh time to store settings in the system's non-volatile memory and to return to
Normal mode.
Other Programming Features
Digital control pad lockout
This function allows you to prevent unauthorized parameter setting of the unit. This feature is especially
helpful when young children have access to the keypad.
There are two modes you can choose from: Full lock or Partial lock. Full lock means that all keypad functions are locked. Partial lock means that the basic functions of the spa will remain accessible (pumps,
blower and light), but it will be impossible to change the temperature Set Point, to override the Economy
mode or to enter the Programming mode. When control pad is locked, the "Lock" icon will be displayed.
28
Emerald Spa Owner's Manual
Spa Side Control
MC-2 & MC-4
for ELITE, SE deluxe
or Cygnus Spas
Programming
[continued]
Digital control pad lockout (continued)
Locking your digital control pad:
LocP
LocF
1- Press and hold Pump 1 key for 5 seconds.
2- The display will show LocP, with "P" representing Partial lock.
3- Release the key and the keypad will be in Partial lock mode. Keep key pressed
down for 5 more seconds if you want to be in Full lock mode. The "LocF"
message will then be displayed.
When control pad is locked, all automatic functions of the system run as usual. If a key is pressed
down, a "LocP" or "LocF" message will be displayed for 1 second. To unlock the keypad, simply
press and hold Pump 1 key again for 5 seconds.
Economy mode
Press Mode key to switch from Normal mode to Economy mode. To save energy, the Economy
mode Set Point is 20˚F (11˚C) below the Normal mode Set Point.
The "Economy Mode" icon lights up when Economy mode is on.
There are 2 available Economy operating modes:
noEc: No Economy mode
Mode: Economy mode on during a programmed number of hours (see Steps 5 & 6)
Selecting the desired Economy mode:
1- Press and hold Mode key for more than 2 seconds.
2- The display will show the current mode (noEc or Econ ).
3- Keep key pressed down until the desired mode is displayed.
After 5 seconds, the new setting will be programmed.
Features and Controls
Spa Side Control
MC-2 & MC-4
for ELITE, SE deluxe
or Cygnus Spas
Programming
[continued]
29
Summary of control panel parameters:
FSxx Filter cycle start time
Fdxx Filter cycle duration
FFxx Filter cycle frequency
ESxx Economy mode start time
Edxx Economy mode duration
Troubleshooting:
Pumps have started up for one minute
on several occasions and "Filter Cycle"
icon is flashing.
Not a bug but a feature!
Our Smart Winter Mode protects your
system from the cold by automatically
turning the pumps on for one minute
several times a day to prevent water
from freezing in pipes.
The display is flashing.
A power failure has occurred. Press
any key to reset the system.
Water temperature is
displayed.
3 flashing dots are displayed.
A problem has been detected.
Water temperature in the spa has
reached 112˚F (44˚C).
Do not enter the water! Allow water
to cool down. The system will
reset automatically when water
reaches 109˚F (43˚C).
Call your dealer or service supplier if
problem persists.
Do not enter the water! Check and open
water valves. Clean filters if necessary.
Check water level. Add water if needed.
Shut power off and power your spa up
again to reset the system.
Call your dealer or service supplier if
problem persists.
30
Emerald Spa Owner's Manual
Spa Side Control
MC-6
VANTAGE SPA
Start-up for MC-6 Control
Your spa control has been specifically designed so that by simply connecting the spa to its properly
grounded source, the spa will automatically heat to the set temperature.
Starting the pumps:
Press Pump 1 to turn Pump 1 on. Pressing a second time turns Pump 1 off. A built-in timer turns pump off
after 15 minutes, unless it has been manually deactivated first.
The "Pump 1" icon lights up when Pump 1 is on.
Press Pump 2 once to turn Pump 2 on. Pressing a second time turns Pump 2 to off. A built-in timer turns
pump off after 15 minutes, unless manually deactivated first.
The "Pump 2" icon lights up when Pump 2 is on.
Press Pump 3 to turn Pump 3 on. Pressing a second time turns Pump 3 off. A built-in timer automatically
turns pump off after 15 minutes, unless manually deactivated first.
The "Pump 2" icon will flash when Pump 3 is on. (note: if pump 2 and pump 3 are on the Pump 2
icon will be on solid)
Starting blower:
Press Blower once to turn blower on at high speed. Pressing a second time turns blower to low speed. A
third time turns blower off. A built-in timer turns blower off after 15 minutes, unless manually deactivated
first.
The "Blower" icon lights up when blower is on at high speed. It flashes when blower is on at low
speed.
Features and Controls
Spa Side Control
MC-6
VANTAGE SPA
[continued]
31
Turning the light on:
Pressing Light key turns light on at high intensity. Pressing a second and third time changes its intensity. Press a
forth time to turn light off. A built-in timer turns light off after 2 hours, unless it has been manually deactivated
first.
The "Light" icon is displayed when light is on at high intensity. It flashes when light is on at medium
and low intensity.
Note:
The filter cycle is suspended if the
water temperature raises more than
2˚F (1˚C) above Set Point.
The "Filter" icon will blink
(on 0.5 second, off 0.5 second, on 0.5
second, off 1.5 seconds).
Setting water temperature:
Use Up or Down arrow key to regulate water temperature. The temperature setting will be displayed for 5
seconds to confirm your new selection.
The "Set Point" symbol indicates the desired temperature, NOT the current water temperature!
Water temperature can be adjusted by 1˚ increments from 59 to 104˚F (15 to 40˚C).
Automatic water heater start:
When water temperature is 1˚F (0.5˚C) lower than the Set Point, the heater will automatically turn on until water
temperature reaches Set Point plus 1˚F (0.5˚C).
The "Heater" icon lights up when the heater is on. It flashes when there is a request for more heat
but the heater has not yet started.
Inverted display:
Press and hold Blower for 5 seconds to invert the display. Note that the ˚F or ˚C icon is not displayed in reverse
mode. Follow the same procedure to return to default mode. If a power-up occurs, the display always returns to
default mode.
Temperature display unit:
Press and hold Light key for 5 seconds to display water temperature in either Fahrenheit (˚F) or Celsius (˚C).
32
Emerald Spa Owner's Manual
Spa Side Control
MC-6
VANTAGE SPA
[continued]
Turning the fiber optic light on (option):
Pressing Light key turns fiber box (motor & light) on. Pressing again turns fiber box motor off but leaves
light on. A third time turns both motor and light off. A built-in timer turns fiber box off after 2 hours, unless
it has been manually deactivated.
The "Light" icon is displayed when fiber box light is on. It flashes when fiber box motor and light
are on at the same time.
Time & temperature display:
The display toggles every 5 seconds alternately showing the hourly time and the current water temperature.
Features and Controls
Temperature
unit
Spa Side Control
MC-6
VANTAGE SPA
Programming
7 Step
Programming
Sequence
Filter Cycle
icon
Programming Mode
icon
Setting the time - Step 1:
10:25 am
11:43 pm
Heater
icon
Up & Down
arrows
Economy Mode
Lock
icon
icon
1- Enter Programming mode by holding Prog. key pressed down for 2 seconds.
2- The display will show the current setting.
3- Use Up and Down arrows to change setting.
Setting filter cycle start time & duration - Steps 2 & 3:
The system automatically performs two filter cycles per day, at 12-hour intervals. During the filter cycle,
Pump 2 and blower will run in high speed for one minute. Pump 1 will then run for a programmed number
of hours. The "Filter Cycle" icon lights up when a filter cycle is on.
To program a filter cycle, you must enter: 1) the time you want the cycle to start and 2) the duration of the
cycle. If no filtering is required, the duration should be set to "0". For continuous filtering, the filter cycle
duration should be set to "12:00".
Setting filter cycle start time:
FS01
FS12
1- Press Prog. key a second time.
2- The display will show FSxx, with "xx" representing the starting hour.
3- Use Up and Down arrows to change setting.
Setting filter cycle duration:
Fd00
Fd12
1- Press Prog. key a third time.
2- The display will show Fdxx, with "xx" representing the duration in hours.
3- Use Up and Down arrows to change setting.
33
34
Emerald Spa Owner's Manual
Spa Side Control
MC-6
VANTAGE SPA
Programming
[continued]
Setting filter cycle frequency - Step 4:
FF01
1- Press Prog. key a fourth time.
2- The display will show FFxx, with "xx" representing the frequency per day.
3- Use Up and Down arrows to change setting.
FF04
Setting economy mode start time & duration - Steps 5 & 6:
Setting economy mode start time:
ES10
ES08
1- Press Prog. key a fifth time.
2- The display will show ESxx, with "xx" representing the starting hour.
3- Use Up and Down arrows to change setting.
Setting economy mode duration:
Ed01
Ed04
1- Press Prog. key a sixth time.
2- The display will show Edxx, with "xx" representing the duration in hours.
3- Use Up and Down arrows to change setting.
Storing settings in memory - Step 7
Press Prog. key a seventh time to store settings in the system's non-volatile memory and to return to
Normal mode.
Other Programming Features
Digital control pad lockout
This function allows you to prevent unauthorized parameter setting of the unit. This feature is especially
helpful when young children have access to the keypad.
There are two modes you can choose from: Full lock or Partial lock. Full lock means that all keypad functions are locked. Partial lock means that the basic functions of the spa will remain accessible (pumps,
blower and light), but it will be impossible to change the temperature Set Point, to override the Economy
mode or to enter the Programming mode. When control pad is locked, the "Lock" icon will be displayed.
Features and Controls
Spa Side Control
MC-6
VANTAGE SPA
Programming
[continued]
35
Digital control pad lockout (continued)
Locking your digital control pad:
LocP
LocF
1- Press and hold Pump 1 key for 5 seconds.
2- The display will show LocP, with "P" representing Partial lock.
3- Release the key and the keypad will be in Partial lock mode. Keep key
pressed down for 5 more seconds if you want to be in Full lock mode.
The "LocF" message will then be displayed.
When control pad is locked, all automatic functions of the system run as usual. If a key is pressed
down, a "LocP" or "LocF" message will be displayed for 1 second. To unlock the keypad, simply
press and hold Pump 1 key again for 5 seconds.
Economy Mode Notes:
• Use economy mode when
your spa will have long
periods of non-use.
In Economy mode, the spa system
will maintain the heat at 20oF below
the set temperature.
Economy mode
Press Mode key to switch from Normal mode to Economy mode. To save energy, the Economy
mode Set Point is 20˚F (11˚C) below the Normal mode Set Point.
The "Economy Mode" icon lights up when Economy mode is on.
There are 2 available Economy operating modes:
noEc: No Economy mode
Mode: Economy mode on during a programmed number of hours (see Steps 5 & 6)
Selecting the desired Economy mode:
noEc
1- Press and hold Mode key for more than 2 seconds.
2- The display will show the current mode (noEc or Econ ).
3- Keep key pressed down until the desired mode is displayed.
Econ
After 5 seconds, the new setting will be programmed.
36
Emerald Spa Owner's Manual
Spa Side Control
MC-6
VANTAGE SPA
Programming
[continued]
Summary of control panel parameters:
FSxx Filter cycle start time
Fdxx Filter cycle duration
FFxx Filter cycle frequency
ESxx Economy mode start time
Edxx Economy mode duration
Troubleshooting:
Pumps have started up for one minute
on several occasions and "Filter Cycle"
icon is flashing.
Not a bug but a feature!
Our Smart Winter Mode protects your
system from the cold by automatically
turning the pumps on for one minute
several times a day to prevent water
from freezing in pipes.
The display is flashing.
A power failure has occurred. Press
any key to reset the system.
Water temperature is
displayed.
3 flashing dots are displayed.
A problem has been detected.
Water temperature in the spa has
reached 112˚F (44˚C).
Do not enter the water! Allow water
to cool down. The system will
reset automatically when water
reaches 109˚F (43˚C).
Call your dealer or service supplier if
problem persists.
Do not enter the water! Check and open
water valves. Clean filters if necessary.
Check water level. Add water if needed.
Shut power off and power your spa up
again to reset the system.
Call your dealer or service supplier if
problem persists.
In-Spa Features
In-Spa Features
Your spa may be equipped with a variety of therapy jets, controls, and fixtures. Refer to the following charts and identify those
features installed on your spa. NOTE: take care not to turn the jet face beyond the natural stopping point. If this does occur it may
prevent the jet from functioning properly.
Therapy Jets and Controls
Euro Jet *
Micro Cyclone Jet *
Luxury Cyclone Swirl Jet *
Luxury Cyclone
Directional Jet *
Adjustable Swirl
Cyclone Jet *
3-way Turbo Jet
Turbo Air Control
(Cygnus & Vantage only)
Note:
Other jets may not operate
when the turbo-jet is on.
Euro jets are fully adjustable and are used in the
Emerald Captain's chair, and various other locations
in some Emerald models.
The Micro allows the barrel to be positioned to deliver
pinpoint therapy to a location. Turn the outer ring to
also moderate the water flowing through the jet.
The Cyclone swirl jet rotates 360 degrees at a rapid
rate thus massaging a larger area. Turn the outer ring
to also moderate the water flowing through the jet.
The Cyclone directional allows the barrel to be positioned to deliver a broad therapy to a specific location.
Turn the outer ring to also moderate the water flowing
through the jet.
The Super Cyclone features a controllable velocity of
water in either a straight position or in a rotation.
Simply take your finger and click the barrel of the jet
down to cause the nozzle to move in a rotational
pattern.
The function of this diverting jet is as follows:
1. When both pumps are engaged and the jet is turned all the
way to the right (the 3 o'clock position) the Turbo and all
other jets except the Tsunami (see next page) are functioning.
2. Whenever pumps are activated and the jet is in the middle
(12 o'clock position), water pressure is realized in all the jets
except the Turbo and Tsunami.
3. When both pumps are engaged and the jet is all the way to
the left (the 9 o'clock position) all the jets in the spa are
working.
Picture Unavailable Due to .pdf Size Constraints
ON
OFF
Picture Unavailable Due to .pdf Size Constraints
ON
OFF
Picture Unavailable Due to .pdf Size Constraints
ON
OFF
Picture Unavailable Due to .pdf Size Constraints
Pictures Unavailable Due
to .pdf Size Constraints
Air Control
for Turbo Jet
Jet face appearance may be subject to change at any time.
* Stainless steel jet option
37
38
Emerald Spa Owner's Manual
Therapy Jets, Control and Drain
Waterfall Jet
Cygnus & Vantage Only
Super Cyclone Jet
(Tsunami Jet)
Cygnus &
Vantage Only
Air Control
for Tsunami Jet
Individual
Neck Jet Control
Cygnus & Vantage Only
A standard feature on all Cygnus & Vantage spas, the waterfall jet is
located above the waterline. Utilizing the valve installed on the
interior side wall of the spa, you can control the intensity of the
water stream. Use for ambiance, relaxation or therapy for the neck
and shoulders. (Note: the 1209 se comes equipped with a 6" straight
waterfall)
A standard feature on all Cygnus & Vantage spas, the Tsunami jet is
located just above the footwell. This jet works in coordination with
the 3-way Turbo jet (see previous page). By turning the turbo jet to
the 9 o'clock position with both pumps running a large degree of
water is forced into the Tsunami allowing a high volume of water to
appear. Jet action is further enhanced by the Tsunami's own air
control (labeled on top) installed on the top coping of the spa.
Picture Unavailable Due
to .pdf Size Constraints
Installed on all Cygnus & Vantage models is a separate valve
controlling the intensity of the water pressure for the neck jets.
Pressure is controlled by turning the face of the jet and/or by the
use of this control valve (location on the side of the arm rest).
Pictures Unavailable Due
to .pdf Size Constraints
Drain
This feature is found on all models near the base of the cabinet is
for the use of draining your spa. To operate:
1. Unscrew the cap and attach a garden hose.
2. Turn the black nozzle (the part just behind where the cap
screws on) counter-clockwise and pull out to drain the water
from your spa.
3. When finished draining detach the garden hose, screw the cap
back on and then push in and turn clockwise (the part just
behind where the cap screws on).
In-Spa Features
Cup Holders and Options
Cup Holders
Located along the top edge of every Emerald and Cygnus spa are
two areas to set a cup or soda can. These cup holders are strictly for
your convenience when you seek refreshments during use of your
spa.
Picture Unavailable Due
to .pdf Size Constraints
DANGER: Alcoholic beverages are strictly prohibited in a spa
Towel Warmer
Option
Optional on Cygnus spas is a special compartment built into a
corner of the Cygnus cabinet identifiable with a handle for opening. Simply place your towel or robe in the compartment and the
vented heat from the interior of the spa will keep it warm.
DANGER: Do NOT use for chemical storage!
Fiber Optics
Option
Hydro Vibe
Stereo System
Option
Note: Includes a Towel
Warmer Area
Optional on Emerald Classic, Elite, Cygnus and Special Edition DLX
models is a fiber optic light package. This option allows for an eightcolor light selection to emit from the spa light, light nodes installed
around the top perimeter of the spa coping and the Emerald logo
installed on one side of the cabinet. To operate the Fiber Optic lights (if
installed) see page 25 for Classic/Elite or Cygnus spas or page 32 if you
own a Vantage Spa.
Picture Unavailable Due
to .pdf Size Constraints
Picture Unavailable Due
to .pdf Size Constraints
The manufacturer’s instruction manual for Emerald’s Hydro Vibe Sound System
is in the warranty bag located next to the power pack inside the spa cabinet.
Consult this manual for important user instructions and proper operation of
the system.
The major components of Emerald’s Elite stereo system are the "pop-up" stereo
speakers, and the stereo panel installed on the side of the cabinet. Please consult
the enclosed stereo owners manual for instructions on how to use your Emerald
Elite Stereo. To activate the speakers, simply press gently on the top when the
speaker is in the closed position and the speaker will then "pop-up". To close,
gently push down until the top engages.
The Emerald Hydro Vibe Stereo System includes a mounted stereo in the
towel warmer area (below right picture), two flush mounted speakers,
and a special remote panel that controls the operations HydroVibe Stereo
mounted on the top coping. The HydroVibe uses transducer technology that
allows for listening pleasure from inside the spa. The four transducers mounted
to the underside of the spa shell create a unique speaker effect. Controlling
the sound balance between these transducers and the external cabinet
mounted speakers is achieved using the stereo’s fade control. Please
consult the enclosed stereo owners manual for proper operation.
OPEN
Position
CLOSED
Position
Pictures Unavailable Due
to .pdf Size Constraints
39
40
Emerald Spa Owner's Manual
Other Controls and Fixtures
Air Control Valves
The air intake valves are located in various locations along the top
coping of the spa. Turn to increase or decrease the amount of air
mixed with the water flow. More air adds to the massage effect.
Light
This fixture is controlled by the "Light" button on all controllers.
(Optional Fiber Optics pictured to the right).
Air Injectors
When the blower is on, air bubbles are released from the injectors
primarily located on the lounger seat and the footwell. These
injectors create a mild vibrating effect that massages the body.
(Not available on Base)
Strip Skimmer
(Emerald Base &
Emerald Classic)
Weir Skimmer
(Emerald Special Edition,
Elite, Cygnus Series & Vantage)
Aromatherapy Option
(NOT an option
on the Emerald Base)
Suction Grate
Warning:
Never block or remove
the suction grate. Do not
use spa if suction grate is
removed!
Picture Unavailable Due
to .pdf Size Constraints
This skimmer is found on Emerald Base and Classic models. Its
purpose is to skim the water surface. Always keep the water level
at least 2/3 high on the skimmer or damage to the system may
result.
This skimmer is found on Emerald Elite, Special Edition, Cygnus
Series and the Vantage Spa. Its purpose is to skim the water surface.
Always keep the water level at 2/3 high on the opening of the skimmer or damage to the system may result.
To use the aromatherapy feature, unscrew the cap and, as the
picture to the right demonstrates, place special aromatherapy
pellet bags inside. The scent will be disbursed primarily while the
blower is operating.
The suction grate is the intake opening for the water circulating
system. This grate protects you from the powerful suction
created by the pump(s) that power your spa.
Picture Unavailable Due
to .pdf Size Constraints
Picture Unavailable Due
to .pdf Size Constraints
Starting and Using Your Spa
41
Starting And Using Your Spa
Install Filter Elements
Proper Water Level
Bleeding Air
Testing the GFCI
One-Pump Priming
Two-Pump Priming
Install Filter
Elements
Note:
The Filter Key allows
the loosening/tightening
of the filter caps for filter/
spa maintenance on Dual
Filter Systems only. The
filter key's two parallel
pegs are inserted into the
filter cap and turned to
the desired open/closed
operation. The removal
hook aids in lifting the
elements from the interior
of the filter.
Placing elements in the Filter
1.
Unpackage the filter element(s) located inside the
cabinet to be inserted into the filter.
2.
Unscrew the top of the filter canister located on
the top of the coping and insert the element with the
largest hole into the appropriate filter housing.
3.
Insert the element with the smaller hole into the filter
housing that accepts it.
4.
Insert the Filtering Assist Plug into the middle
of the filter element with the smallest hole.
(This procedure allows for water to penetrate
into the interior pleats of the element allowing
for optimal filtration.)
Space Saver II found on 199, 499,
509, 595 & Special Edition units
75 Sq. Ft Filter
found on Cygnus,
Vantage, Emerald
599, 699, 799 & 899
models.
42
Emerald Spa Owner's Manual
Proper Water Level
Caution:
Low water level can damage the water circulating system and
void your warranty. Read and understand all safety,
location, and installation instructions before proceeding.
Add water until level is at appropriate level for your model's
skimmer (see page 40) or damage to system may result.
Bleeding Air
Caution: Air must be bled from the system. Air in the system can damage the spa and void the warranty.
Dual Filter
1.
2.
3.
While the spa is off use the filter key to unscrew and remove the filter caps. This allows for the
large pocket of air naturally formed when the spa was filled with water to escape from the filter cavity.
Once the water level inside the filter housing has reached the same level as the water inside the spa you
can then replace the filter caps.
Tighten the filter cap snuggly using the filter key. Be sure not to overtighten. When the spa is running,
you should not see or hear any water leaking from the spot where the filter top meets the housing. If
you see or hear water escaping turn the spa off and retighten the filter lid.
Single Filter
1.
2.
While the spa is operating in low speed, turn the bleeder screw located on the top of the filter lid
counter-clockwise one half turn. This will allow air to escape.
When water appears turn the screw clockwise to shut the valve until the water no longer is seen
coming out. Be sure not to over-tighten as to not crack the valve.
Bleeder Valve
Dual Filter
Single Filter
Starting and Using Your Spa
Testing the GFCI
[for spas equipped
with SC-1 (240V)
SC-2, SC-3, MC-2,
MC-4 & MC-6]
43
Your spa must be provided with a GFCI-circuit breaker located in the power supply panel as installed by
your electrician. Turn on the circuit breaker and test the GFCI by pushing the test button. A red indicator
should appear and your spa should stop operating. Push the reset button and the red indicator should
disappear. The spa should begin to operate normally.
WARNING:
If the GFCI fails to operate in this manner, there is a risk of electric shock! Shut off the main power source.
Identify and correct problem before using the spa.
Carry out a visual inspection to check
for signs of miswiring.
Refer to supplied wiring diagrams at
the back of this manual.
44
Emerald Spa Owner's Manual
One pump Priming
[for spas equipped
with SC-1, SC-2 & SC-3]
Caution:
Never run the system without circulating water. Doing so can damage the pump and void the warranty.
1.
Press the "Pump" key pad. The pump will begin to operate in the high-speed mode; this will
facilitate pump priming.
2.
When your jets begin to operate vigorously, the pump is primed.
Note:
If water does not flow within a minute or two, turn off power to the spa and repeat steps for bleeding
the air on the page 42.
Starting and Using Your Spa
Two-Pump Priming
[for spas equipped
with MC-2,
MC-4 & MC-6]
Note:
If water does not flow within a
minute or two, turn off all power
to the spa and repeat steps for
bleeding air.
45
Caution:
Never run the system without circulating water! Doing so can damage pumps and void the warranty.
Each pump must be primed separately. To accomplish this, follow these steps.
1.
For MC-2 & MC-4 Press the Pump(s) key pad twice (For the Vantage MC-6 press Pump 1 once).
The circulating/jets pump will operate in the low speed mode on the first press and in the high
speed mode on the second press (MC-2 & MC-4). The high speed mode will facilitate pump priming.
Press the Pump(s) key pad a third time will turn the 2nd pump on.
2.
When the jets begin to operate moderately, the circulating/jets pump is completely primed.
3.
Now press the "Pump 2" (Vantage only) key pad. The jets booster pump will now operate. (note: if you
own a Vantage Spa be sure to press the "Pump 3" key pad to engage the last pump.)
4.
When the jets begin to operate more vigorously, the jets booster pump is completely primed. If you
do not see any distinguishing difference in jet flow when pressing the "Pump 2" (and Pump 3 if
Vantage spa) button then the booster pump(s) may require direct priming.
A.
B.
C.
Remove the equipment panel and locate the booster pump (see 2-pump system diagram on
page 16).
With the booster pump running turn the pump drain plug counterclockwise until a steady
stream of water appears. Once water appears quickly tighten the plug and you should
notice a more intense flow of water through the jets.
If no noticeable difference has occured repeat step B.
Water Line Connection goes to the jet
46
Emerald Spa Owner's Manual
SPA WATER CHEMISTRY
Chemical Safety Tips
Spa Capacity
pH Control
Disinfecting Your Spa
Ozone Generator
Other Water Chemistry Considerations
Chemical Safety Tips
Note:
Check and maintain your water
chemistry at least twice a week for
proper levels (see page 47).
Spa Capacity
Note:
Useable: at the level
noted on skimmer
full level (see page 40)
✓
✓
✓
✓
✓
✓
✓
✓
✓
✓
Never mix different types of chemicals or contaminate them in any way.
Do not exceed recommended dosages.
After supercholorinating/brominating, wait until the disinfectant level is down to 3-5 parts per
million [ppm] before using the spa.
Keep chemicals out of reach of children and pets.
Keep containers closed when not in use.
Do not use contents of unlabeled containers.
Never add water to chemicals. If called for by the instructions, add chemicals to water.
Dispose of empty containers as instructed on the label.
Never handle chemicals with your bare hands.
Store chemicals in a cool, dry, clean place [not under spa].
The following table lists the total water system capacity for all Emerald Spas and will help you to determine the
dosage of chemicals.
Spa Series
199
499
509
595
599/2009
699/3009
799/5009
899/7009
1009SE
1209SE
1409SE
Vantage
Max. Capacity
210
290
390
400
465
440
450
640
235
460
350
500
[gal.]
Useable [gal.] Dry Weight [lbs.] Useable Weight [lbs.]
170
200
340
300
370
330
340
500
180
370
280
400
400
450
680
700
800
800
820
830
450
600
650
1000
1,360
1,600
2,720
2,400
2,960
2,640
2,720
4,000
1,440
2,960
2,240
3,200
Spa Water Chemistry
47
pH Control
pH
Level
8.2
7.8
7.6
7.2
6.8
Caution:
Do not use your spa until the pH level of the water is between 7.2 and 7.6. A pH level below 7.2 or above 7.6
may damage the spa shell and power pack, and void your warranty.
above 7.6
Add
Acid
}
Ideal
Below 6.8
Add
Soda Ash
All water is either acidic, alkaline, or neutral. pH is defined as a method of measuring this characteristic. A
pH level of 7.0 would be neutral. A pH level above 7.0 would be alkaline while a pH level below 7.0 would
be acidic. The pH level of your spa water must be kept between 7.2 and 7.6. Above 7.6 the water will
become discolored and cloudy. pH levels below 7.2 will cause corrosion to metals in the circulation system.
Both high and low pH levels will cause eye irritation. Improper pH levels also reduce the effectiveness of
disinfectants.
Maintain an ideal pH level as follows:
1.
2.
3.
4.
5.
6.
Test the pH level of the water regularly with a reliable test kit.
Adjust the pH level as required.
- Increase pH by adding soda ash.
- Decrease pH by adding sodium bisulfate.
Refer to the table below and determine the dosage level per 100 gallons.
Add chemicals to at least one gallon of water.
Pour the mixture into the spa with circulation system on.
Wait at least 3 hours. Recheck the pH level.
High pH - Add Sodium Bisulfate (pH down)
Test Reading
Dosage [per 100 gal.]
Note:
If the instructions that
accompany the pH
adjusting chemicals differ
from those given here,
follow the instructions
that come with the
chemicals.
Above 8.4
.24 oz. [1 teaspoon]
8.0 to 8.4
7.8 to 8.0
.16 oz. [.7 teaspoon]
.08 oz. [.4 teaspoon]
7.2 to 7.6
Ideal
Low pH- Add Soda Ash (pH up)
Test Reading
Dosage [per 100 gal.]
Less than 6.5
.6 oz. [3.6 teaspoons]
6.5 to 6.8
6.8 to 7.2
7.2 to 7.6
.45 oz. [3 teaspoons]
.12 oz. [.7 teaspoons]
Ideal
48
Emerald Spa Owner's Manual
Disinfecting Your Spa
Warning:
Risk of fire and/or explosion. Under no circumstance should you mix trichloro-striazinetrione with bromine or other chemicals. Use one chemical only. Never mix.
Never switch from one chemical to the other without thoroughly cleaning out the
previously used chemicals.
Dispenser Adjustment
for both dual &
single filters
The higher the setting,
the more disinfectent
will be dispensed.
Disinfectants [chlorine or bromine] have strong oxidizing properties that kill bacteria and destroy other
materials.
Your spa is equipped with a disinfectant dispenser, enabling you to keep your spa clean and healthful
with a minimum of effort. This dispenser is designed to use bromine or trichloro-s-triazinetrione tablets of
the slow dissolving type.
Adjust your disinfectant dispenser as follows:
1.
2.
3.
4.
Verify proper disinfectant level by checking the spa water with an appropriate test kit. A level
between 3-5 ppm should be maintained.
Start by adjusting the control valve on the dispenser to position 3.
Make small gradual changes in the setting until your test kit verifies the proper setting. [The
higher the setting, the more disinfectant will be dispensed].
Increase the disinfectant level to 5 - 10 ppm once a week. This is called "superchlorination" or
"superbromination". This procedure aids in the formation of active disinfectant.
Recharge your disinfectant dispenser as follows:
(Not used in
most cases)
1.
2.
3.
4.
5.
6.
7.
Recharging Your
Dispenser
Turn off power at GFCI or circuit breaker before performing any service. (Note: MC-2, MC-4 &
MC-6 you can press Mode key holding for 10 seconds. The controller display will read OFF to let
user know that it is safe to perform steps 2-4).
Remove disinfectant dispenser from filter housing.
Remove check valve assembly by turning counterclockwise.
Fill with trichloro-s-triazinetrione or bromine tablets or sticks which are 1" in diameter.
Install check valve assembly. Do not overtighten.
Install dispenser on filter.
Turn on at GFCI or circuit breaker. (Note: To resume MC-2, MC-4 & MC-6 spa operation
once again, press Mode key holding for 10 seconds. Spa will automatically resume after 30 minutes
if user neglects to resume operation).
Spa Water Chemistry
Ozone Generator
[optional]
49
An Ozone generator will supplement disinfectants and provide the following benefits:
-
kills bacteria and viruses
destroys matter which might discolor water
does not affect the pH level of the water
safe for bathers and equipment
has no "chemical" smell
automatic and requires little or no maintenance
reduces the need for disinfectants
Refer to your ozone generator owner's manual for information on service and maintenance.
Other Water
Chemistry
Considerations
Note:
When water evaporates,
minerals from the water
and the chemicals are left
behind. As the level of
these minerals increases,
water treatment becomes
more and more difficult.
Therefore, at some point
(between 4-12 weeks,
depending on use), it is
easier and less costly to
drain and refill the spa
instead of continuing
to treat the same water.
Total AlkalinityTotal Alkalinity is important because it helps to keep the pH in the proper range. Test with an appropriate
test kit, and adjust as needed following the instructions supplied with the test kit. If you are using
trichloro-s-triazinetrione as a disinfectant, adjust to 60-100 ppm. If you are using bromine as a disinfectant,
adjust to 100-150 ppm. Higher levels may cause cloudy water and scale formations, while lower levels may
lead to corrosion and uncontrollable pH variations.
Calcium HardnessProper calcium hardness levels will help you to maintain other water quality values such as pH and total
alkalinity, and help to avoid cloudy water and/or scaling on the tub surfaces, equipment, and piping.
Maintain the calcium hardness of your spa at 200 ppm when using trichloro-s-triazinetrione as a disinfectant. For bromine, maintain the calcium hardness between 150-300 ppm. Test with an appropriate test kit
and adjust as needed, following the instructions supplied with the test kit.
Total Dissolved SolidsTap water contains 50-300 ppm total dissolved solids [TDS]. When the level goes above 1500 ppm in a spa,
the efficiency of sanitizers is reduced and corrosion is accelerated. To reduce TDS levels, replace some or
all of the spa water.
50
Emerald Spa Owner's Manual
MAINTAINING YOUR SPA
Draining the Water
Cleaning the Spa Shell
Cleaning the Filter
Relamping the Underwater Light
Winterizing Your Spa
The Spa Cabinet
Draining the Water
Note:
Chemically treated water
may damage plants.
Place the garden hose
in a safe discharge area.
Note:
Some water will be left in the
bottom of the spa and in your
plumbing lines. This small
amount of water can be mixed
with fresh water without consequence. If 100% draining is
required, a small submersible
pump or a wet/dry shop vac
should be used. If winterizing
your spa please turn to
page 53 for complete
instructions. Always call
your dealer for assistance
Caution:
Do not allow the pump to run without water. Running the pump without water will cause pump
damage and void the warranty.
To drain your spa without taking access panel off:
1.
2.
3.
Unscrew the cap and attach a garden hose.
Turn the black nozzle (the part just behind where the cap screws on) counter-clockwise and pull out to
drain the water from your spa.
When finished draining detach the garden hose, screw the cap back on and then push in and turn
clockwise (the part just behind where the cap screws on).
Maintaining Your Spa
Cleaning the
Spa Shell
Note:
Do not use scouring
cleansers or solvents;
damage to the acrylic
finish will result.
Note:
Do not use strong
solvents such as
gasoline, acetone, or
denatured alcohol;
damage to the acrylic
Use a nonabrasive household cleaner to clean all spa shell surfaces and fixtures. Do not use scouring
cleansers or solvents; damage to the acrylic finish will result.
Your Emerald Spa is manufactured using LUCITE XL 1000 continuous-cast cross-linked acrylic sheet. This
material provides a strong chemical-resistant high gloss surface that is hard, nonporous, and impermeable
to water.
Given proper care, the polished, lustrous surface of LUCITE XL 1000 sheet will retain its appearance for
many years. To clean your spa be sure to use a soft absorbent cloth with any of the commercially available
nonabrasive foam or liquid agents in general cleaning concentrations. Always rinse thoroughly with clean
water and a soft chamois or moist cellulose sponge.
Cleaning agents containing strong abrasives such as scouring powders or strong solvents such as gasoline,
acetone, or denatured alcohol should not be used to clean the acrylic surface of your spa.
Fine scratches may be minimized by the use of a mild automobile cleaner-polish. The cleaner-polish has a
fine abrasive action, and its wax content tends to fill small scratches to make them less visible.
finish will result.
Cleaning the Filter
1.
Turn off power at GFCI, circuit breaker before performing any service. (Note: MC-2, MC-4 & MC-6
you can press Mode key holding for 10 seconds. The controller display will read OFF to let user
know that it is safe to perform steps 2-4).
2.
Using a filter key (for the Space Saver II Filter), open filters and remove elements. For larger filter,
hold down lock mechanism and spin the outer ring counter-clockwise.
3.
Clean the filter element(s) as required:
- Spray with a garden hose to remove trapped dirt.
- Soak in a solution of water and filter cleaner solution to remove body oils
and other contaminants or see your dealer for recommended cleaning supplies.
- Inspect the elements for damage and replace as required.
- Rinse thoroughly.
4.
Place clean filter element(s) in housing and install filter tops.
5.
Turn the power on at GFCI, circuit breaker. (Note: To resume MC-2, MC-4 & MC-6 spa operation
once again, press Mode key holding for 10 seconds. Spa will automatically resume after 30 minutes
if user neglects to resume operation).
51
52
Emerald Spa Owner's Manual
Relamping the
Underwater Light
Winterizing Your Spa
The underwater light should be relamped from the under side of the spa as follows:
1.
2.
3.
Disconnect the power from the spa.
Locate the light fixture on the back of the spa inside the cabinet.
Remove the old bulb and install a new bulb.
The following procedure should be followed if you choose to deactivate your spa for the winter months.
1. Drain all water from spa using drain hose.
2.
Unplug the pump power cords from the control outputs.
Caution:
3.
Press the blower keypad and run blower until all air lines are dry.
Do not use automobile
type radiator antifreeze.
4.
Open and vacuum the filter canisters and each jet and air injector with a shop vac.
5.
Remove any remaining water in the spa with a sponge or cloth.
6.
Turn power off at main power supply panel.
7.
Disconnect all plumbing from power pack at unions. Open T-valves to allow water to drain, and
vacuum out each open union
8.
Open drain valve and filter tops and vacuum out thoroughly.
9.
Connected to the manifold is a hose that allows drainage of the manifold. Connect a hose to the
spigot and drain the manifold.
Note:
It is possible to use the air
blower (if equipped) to purge
the air lines. Ask your dealer
for assistance if you want
to use this procedure.
Note:
If you cannot drain all the
water, especially from the blower
air injector lines, add an inhibited
propylene glycol type antifreeze
to any remaining water. Propylene
Glycol can be purchased most
commonly in a store with a
Recreational Vehicle section.
Always call your dealer
for assistance.
10.
Clean spa as instructed in maintenance section.
11.
Use a locking spa cover to keep water out and prevent unauthorized use.
12.
Please see side notes for adding the proper antifreeze.
Maintaining Your Spa
The Spa Cabinet
Note:
Do not apply varnish,
shellac, or surface sealants
to the wood. They
tend to react with
chemicals in the wood
and the UV rays of
the sun to cause yellowing,
peeling, and flaking.
53
The red cedar cabinet of your spa is protected with a wood sealer. It is normal for the cabinet to take on a
weathered appearance with time and exposure to the elements.
Protect and revive the wood surface with a light sanding and the application of a wood preservative or
tongue oil. Since Emerald uses only decay-resistant woods in its spa construction, you may choose to allow
your cabinet to age with time and weather.
Durabilt Cabinet
If you have purchased an optional Durabilt cabinet, know that the outer surface of the Durabilt Cabinet is
made completely of a synthetic material. To clean, take a dampened rag with mild dish soap and wash the
outside panels.
54
Emerald Spa Owner's Manual
Troubleshooting
WARNING:
Risk of electrical shock. Electrical
troubleshooting should be done
by qualified technicians.
WARNING:
TROUBLESHOOTING
Problems
Things to Check
Power system inoperative
(No LED display on the panel).
1. Not plugged in (120v).
2. Circuit breaker tripped or not turned on.
3. Ground fault circuit interrupter tripped.
4. Fuse in power system blown.
Fault indicated by spa
control display message.
Please refer to the individual pages in this owner's
manual that reference your particular controller.
Pump does not prime.
1. Circulation T-valve closed.
2. Not enough water in the spa.
3. Air locked. Bleed air as described previously
in this manual. (pg. 42 (filter) and/or pg. 44-45 (pump)
Hydrotherapy jets do
not operate.
1. Filter clogged.
2. Pump not primed.
3. Air intake valve(s) closed.
4. Jet venturi nozzles plugged or missing.
Spa does not heat.
1. Thermostat set too low.
2. Low flow, pump not primed, or water level
too low.
3. Pressure switch not sensing enough pressure.
4. Heater element defective.
Risk of electrical shock. Disconnect
power cord from receptacle or
turn power off at main service
panel before removing fuse.
Spa heats, but not to set
temperature.
1. Spa not covered or not covered properly sealing
the spa cover to the top edge of the spa. Heat loss
is greater for an uncovered spa. High wind,
low humidity also increase heat loss.
Electrical Schematics
Electrical Schematics
SC-1, SC-2 & SC-3
55
56
Emerald Spa Owner's Manual
MC-2 & MC-4 System Wiring Diagram
MC-6 System Wiring Diagram
Electrical Schematics
57
Notes: