1
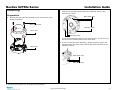
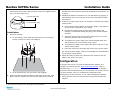
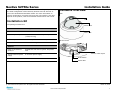
Nextiva S2750e Series Installation Guide This installation guide provides instructions for installing and performing the initial configuration of the Nextiva® S2750e series IP cameras. It covers the S2750eN and S2750eP models. For more information on specific configuration, accessing and using the web interface, and other aspects of the product, refer to the Nextiva S2750e Series User Guide. Hardware Overview Side: Lens Installation Kit The package contents are: Dome cover Item Description Camera S2750eN or S2750eP Video output adaptor A 2.5 mm to BNC video output adaptor (3 foot/1m long) Rubber cap A rubber cap for the cable entry Printed material This installation guide Outer case Service board: Options Power-over-Ethernet (PoE) kit An IEEE 802.3af class 3 injector and power cord 12V DC external power supply A universal power supply Dome cover A smoked dome cover Jack for video output Reset button Status LED © 2007-2009 Verint Systems Inc. All Rights Reserved Worldwide. March 12, 2009 www.verint.com/manuals 1 Nextiva S2750e Series Installation Guide Mounting 2. If you are mounting the camera on the ceiling or wall, mark the four positions for fixing the dome base on the mounting surface, then make the four holes. Preparation Base cable entry 1. Remove the outer case by loosening the two case screws with a Phillips screwdriver. Outer case screw Mounting holes Outer case Mounting holes If you are mounting the camera on an electrical box, you will use only two of the four mounting holes on the dome base. Dome base 3. If you are using the base cable entry, replace the plastic cap by the supplied rubber cap, then make a hole at the desired location on the mounting surface. Base cable entry Side cable entry © 2007-2009 Verint Systems Inc. All Rights Reserved Worldwide. www.verint.com/manuals 2 Nextiva S2750e Series Installation Guide 4. If you are using the side cable entry on the dome base, open the desired hole on the outer case with pliers. Insert the supplied rubber cap in the dome cable entry. 3. If the camera uses power-over-Ethernet, refer to the Nextiva S2750e Series User Guide for the power and Ethernet connections. Go to step 6. 4. Establish the Ethernet connection of a 12V DC camera by plugging a cable between the RJ-45 connector at the end of the Ethernet cable and a device. 0.5 inch side entry 5. Power the 12V DC camera. If you are using the universal power supply sold by Verint: 0.75 inch side entry a. If the electrical plug installed on the power supply is the right one for the country of operation, go to step d. b. Remove the installed plug by pushing the PUSH button and keeping it pushed while turning the plug in the counterclockwise direction. Installation 1. Mount the camera: On the ceiling or wall, install the dome base on the mounting surface, using four screws (not supplied). c. Insert the required plug on the power supply then turn it in the clockwise direction until you hear a click. d. Tie together the power supply wire with the dashed white lines and the black wire on the camera using a splice. e. Tie together the other power supply wire and the red wire on the camera using a splice. f. Power the camera by connecting the electric plug into the outlet. For any other power supply, refer to the manufacturer documentation for the proper wiring scheme. 6. Adjust the image to point to the location to be monitored. For the details, refer to the user guide. Configuration To configure the device, you need the SConfigurator software. It is included on the Verint web site: www.verint.com/manuals. Copy its executable file (SConfigurator.exe) to the hard disk of your computer. On an electrical box, use two screws (not supplied). 2. Feed the cables through the bottom or side hole on the outer case. Ensure that the cables exit out of the hole without being crushed. To make the camera operational in your environment, you need to connect it to the IP network. Then you complete the configuration with SConfigurator, the web interface, or your video management software. 1. Ensure that the camera is powered and connected to the Ethernet network. © 2007-2009 Verint Systems Inc. All Rights Reserved Worldwide. www.verint.com/manuals 3 Nextiva S2750e Series Installation Guide 2. Start SConfigurator by double-clicking SConfigurator.exe on your hard disk. 3. In the General tab, click Program Options. 8. Select the Units tab, then click Discover. A device of type “Unknown” with a 169.254.X.Y IP address appears in the Units box; it corresponds to your new device. 9. Select the unknown device, then click Configure. 10. In the Reconfigure unit? confirmation window, click Yes. 4. Check Detect All Units on LAN. 5. Ensure that the VSIP Port is 5510; otherwise, click Default. 6. Ensure that the Discovery IP Address is 255.255.255.255; otherwise, click Reset to Broadcast. 7. Click OK. 11. If you have a DHCP server on your network, check Use DHCP. Otherwise, enter the IP address, subnet mask, and gateway of the device, as provided by your network administrator. 12. Click OK. The device reboots with its new network settings. 13. In the Units tab, click Discover to update the list of devices and see the S2750e with its new settings. The S2750e initial configuration is now complete. For more information, refer to the Nextiva S2750e Series User Guide, which is available on www.verint.com/manuals. © 2007-2009 Verint Systems Inc. All Rights Reserved Worldwide. www.verint.com/manuals 23-500-0027-002 4