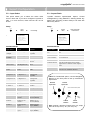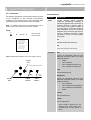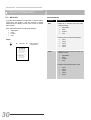
1
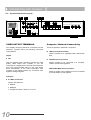
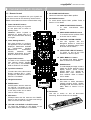
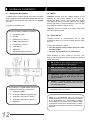
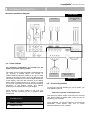
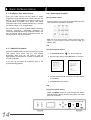
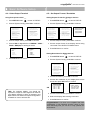
VPS-2300 User Guide
HDTV Video Scaler / Processor VPS-2300
Over the years, Pixel Magic Systems Ltd. has devoted itself to the
creation of a modular, expandable and network ready video
processing solution using the best of breed components, with a
view to delivering a cinema-class visual experience at an
affordable price level.
We are glad to have achieved this with Crystalio, the video
processor of excellence.
USER GUIDE
2
VPS-2300 User Guide
Welcome
Thank you for purchasing Crystalio, the next generation
of video processors! This unit will bring you a
breathtaking visual experience by exploiting the utmost
capability of your display devices.
Before we start, let us first check that you have all of the
following contents with you:
1. Crystalio VPS-2300 Video Processor
2. Remote Control
3. Mains power lead
4. Pixel Magic DVD
5. Crystalio User Guide
6. Crystalio Installation & Setup Quick Guide
7. USB Firmware upgrade thumb disk
8. Rack mounting brackets
If any items are missing, please contact your Crystalio
retailer immediately.
If everything is ready, you may now:
1
Connect your Crystalio to your AV devices with
reference to the section 3, Hardware Installation.
2
Configure your Crystalio with reference to
section 4, System Setup, and section 5, Expert
Configuration.
3
Register your Crystalio to enjoy official warranty,
technical support, and software update from
Pixel Magic Systems Ltd.
4
Upgrade your Crystalio with the USB Firmware
upgrade thumb disk as provided. Also check
Crystalio’s website (http://www.crystalio.com)
regularly to download the latest firmware.
Enjoy!
!!Caution: Make sure you read and follow the
instructions of the Crystalio User Guide or Installation &
Setup Quick Guide to connect the Crystalio to your AV
system.
Contents
Welcome..................................................................3
Contents..................................................................4
1. About Crystalio ...................................................5
1.1 Why do I need Crystalio? ....................................5
1.2 Video Processing History ....................................5
1.3 Video Processing Technology Primer..................6
2 Familiarizing with Crystalio .................................8
2.1 Crystalio Front Panel...........................................8
2.2 Crystalio Rear Panel ...........................................9
2.3 Remote Control.................................................11
3 Hardware Installation.........................................12
3.1 Compatible Equipment ......................................12
3.2 Mains................................................................12
3.3 Video Inputs......................................................12
3.4 Video Outputs ...................................................13
3.5 Product Registration..........................................13
4 Basic Software Setup ........................................14
4.1 Configure Your Video Source............................14
4.2 Switch on Crystalio............................................14
4.3 Select Input Terminal ........................................14
4.4 Select Output Terminal......................................15
4.5 Set Output Format / Resolution .........................15
5 Expert Configuration .........................................16
5.1 Overview...........................................................16
5.2 Input Select.......................................................17
5.3 Aspect Ratio .....................................................17
5.4 Video Settings...................................................18
5.5 Advanced..........................................................19
5.6 System Config...................................................24
5.7 AR Profile .........................................................30
5.8 Video Profile .....................................................31
5.9 Pixel Magic System...........................................32
6 Troubleshooting.................................................33
7 Specifications ....................................................34
8 Safety Information..............................................35
4
9 Support and Warranty Information ...................36
VPS-2300 User Guide
1
About Crystalio
Crystalio is the realization of a dream long held by many engineers and product designers but accomplished by few.
Over the years, Pixel Magic Systems Ltd. has devoted itself to the creation of a modular, expandable and network
ready video processing solution by adopting the best of breed components, with a passion to delivering a cinemaclass video image performance at an affordable price level.
“We envisaged a product that would be powerful enough and configurable for the Videophile, while at the same time
accessible to film enthusiasts who care about the picture, not the technology. More importantly, it should be so
st
designed that integration with the new breed of 21 Century ‘connected homes’ could readily be accomplished. We
take pleasure and pride to have achieved these goals with Crystalio.”
1.1 – Why do I need Crystalio?
Crystalio is designed to deliver the best viewing
experience from your video sources and video display
device. This is made possible by the use of the award
®
winning technology introduced by Faroudja , inventor
®
of the DCDi technology which is widely used in a
diverse range of domestic and professional AV
components.
You may wonder why you need a separate video
processor, if you can simply purchase a projector or a
®
DVD player with DCDi technology built in. The reason
is performance and flexibility. Crystalio allows you to
have the sophisticated control over every aspect of
video processing, so that you can control the
performance of the entire video system to a far greater
extent. Crystalio also gives you the flexibility to enjoy
this feature from many different types of source
devices, from basic composite video sources right
through to pure digital SDI and DVI video. SDI (Serial
Digital Interface) is a specialist video distribution
standard for video transmission in the broadcast
industry at maximum quality over long distance by
using inexpensive co-axial cable. While this is not
available for domestic equipment, it is possible to
purchase modified domestic equipment that is SDI
enabled. DVI (Digital Video Interface) on the other
hand is a technology used by the computer industry to
connect digital displays (e.g. plasma panels, LCD
monitors etc.) to PC video cards, and this is only
suitable for relatively short distances of a few feet.
In a nutshell, Crystalio is able to maximize the
performance of any video sources, from traditional
SVHS recordings, video games consoles to high
definition TV broadcast and DVD players.
The following will give you an in-depth evolution of the
video processing history that has led to the innovation
of Crystalio. You may skip these paragraphs and go
directly to Section 1.3 for an overview of the most
cutting-edge technologies that Crystalio has embodied.
1.2 – Video Processing History
®
Faroudja ’s technology began in the early 1970s
when Yves Faroudja and a group of videophiles
invented
state-of-the-art
video
processing
technologies and began licensing them to other
companies. In the 1990s, Faroudja became involved
in the specification of High-Definition TV (HDTV).
This is a new television standard which is being
introduced at different rates worldwide, and vastly
improves the quality of the image that is displayed.
How is this achieved? Well, simply by increasing the
amount of picture detail used to make the image.
To put this into perspective, a standard definition
(SDTV) image is made up of around ¼ million pixels
or points of light. This sounds like an awful lot of
information, more than it would ever be required to
display a good quality TV image. However, when
this standard was defined, the maximum screen
sizes that could be used in a domestic environment
were much smaller than those available today.
Consider that a 50” screen has four times the area
of a 25” display, with the increased use of projection
systems meaning that 100” or even 200” screen
sizes are commonplace (16 times of the visible
area). Suddenly, ¼ million is not a lot of detail at all,
and the result is any problems in the image are now
magnified to such an extent that the viewing
pleasure is reduced. The solution is to use more
pixels to make up the image, and HD increases this
by a factor of eight to 2 million. This makes a huge
difference to the quality of the image, which has
been likened to ‘looking through a window’ – it really
is that good.
However, while the hardware industry has now
started to produce affordable HD capable displays,
the availability of source devices and programming
to use with HD devices has been limited. The
amount of HD programming material is miniscule
compared to the availability of SD material, which
means that if you simply connect your SD video
source to your high quality display, you will often be
very disappointed with the results.
reference information
1
About Crystalio
From SD to HD
Engineers at Faroudja realized that to find an entry
point for the new HD programming into a
broadcasting industry where HD programmes were
yet to be available, they had to develop a device
capable of ‘up-conversion’, i.e. increasing the detail
of the then existing SD material into HD format. This
of course was a highly complex task to achieve. To
convert a ¼ million pixel SD image into a 2 million
pixel HD image, the device should have a
sophisticated programming to ‘guess’ the missing
pixels in-between, which is essentially creating
nearly 90% of the image information from the
originally available 10%. Faroudja was successful in
such ground breaking attempt. And in June 1998,
Yves Faroudja won the Charles F. Jenkins Lifetime
Achievement Award by the Academy of Television
Arts and Sciences.
DCDi®
The equipment developed to achieve the SD to HD
up-conversion for the broadcasters was of course
way beyond the budget of the domestic film
enthusiasts, but with the ever increasing power and
sophistication of microprocessors, it was clear to
Faroudja that this technology could eventually be
made available to the domestic market. DCDi®
(Directional Correlational Deinterlacing) to give it its
complete title, pioneered affordable, high quality
video processing for the first time in the domestic
market.
DCDi® eliminates the jaggedness that conventional
up-converters causes to diagonal edges in video.
®’
DCDi ’s unique algorithm identifies all the moving
edges in a scene and adjusts the angle of
interpolation at each pixel so that the interpolation
always follows the edge instead of crossing it,
eliminating stair-casing or jagged edge artifacts. This
technology was first used in the Digital Format
Converter introduced in 1997. With its combination of
decoding,
de-interlacing
and
enhancement
technologies, they won an Emmy Award from the
National Academy of Television Arts and Sciences in
2001. In addition to being used in all Faroudja Home
Theatre and High Definition Broadcast products, the
DCDi algorithm has been incorporated into a wide
range of video sources and displays by different
manufacturers, identifiable by its distinctive DCDi®
logo on their front panels.
reference information
6
1.3 – Video Processing Technology Primer
Crystalio is the only video processor on the market that
uses the latest Faroudja FL2300 DCDi® central
processor, so quite simply if you want to enjoy the
benefit of over 30 years of pioneering video
excellence – Crystalio is your video processor of choice.
Listed below are some state-of-the-art video processing
technologies that Crystalio offers to you:
Aspect Ratio Conversion
The aspect ratio of a video source describes the
proportion of the image’s width versus its height.
Traditionally, programmes made for television have
been made at a 4:3 aspect ratio (for every 3 units
high the picture is 4 units wide), whereas films have
used widescreen aspect ratios (16:9 or wider).
4:3 image
16:9 image (distorted)
For the image to look correct (i.e. to prevent the
image being distorted or stretched either vertically or
horizontally), every part of the playback ‘chain’, i.e.
the video source material, the video source and the
display, must be correctly configured.
Aspect Ratio Conversion is used to fit images on
displays with different aspect ratios while best
preserving the correct aspect ratio of the image.
NTSC and PAL contents including TV, VCR,
Camcorder and video games, typically have an
aspect ratio of 4:3.
NTSC and PAL contents can be shown on a 16:9
display using various forms of conversion, including
Pillar Boxing, Zoom and Non-Linear, referred to as
Anamorphic or Panoramic. Faroudja’s technology
varies aspect ratio and picture position to handle
traditional 4:3 aspect ratio sources and the wider
16:9 HDTV aspect ratio on a variety of display types
and video formats.
VPS-2300 User Guide
1
About Crystalio
TrueLife® Enhancement
Cross Colour Suppression
Conventional video enhancement simply boosts up
the high-frequency components of the video signal
with a ‘peaking filter’. This often leads to undesirable
artifacts (or visible ‘glitches’), which are distracting
and ruining the viewing experience.
®
Faroudja, on the other hand, uses its TrueLife
Enhancement technology to identify patterns of
transition that are the desired details in an image
such as skin texture, freckles or hair. These areas of
transition are deliberately enhanced to render the
details more visible and more lifelike. At the same
time, the technology enhances large edges to create
greater depth of perception without introducing
visible artifacts or distortion.
Cross colour is an artifact produced by imperfect
decoding of composite video. High frequency luma
(brightness) components are incorrectly decoded as
chroma (colour) signals, causing colour effects to
appear where there should be none. This problem
can be detected in many types of “busy” scenes
including tiled rooftops, herringbone patterned
clothing and leafy scenery etc. The most common
and visible cross colour artifacts are flickering,
flashing colours or rainbow patterns. The artifact can
be eliminated in still images, but is much more
complex to detect and correct in moving images.
Faroudja’s Cross Colour Suppression uses motion
detection to selectively perform the filtering in an
intelligent manner, identifying where there is no
motion in the image and using the already existing
frame memory for the chroma storage required.
Film Mode Detection Technology
In 1989, Faroudja invented and patented film mode
detection, also known as 3:2 pulldown detection.
Film-originated content (where conventional film
cameras were used as opposed to digital video
cameras) that has gone through 3:2 pulldown for
conversion to NTSC (the United States television
broadcast standard) is detected and the original film
frames are recreated by blending the fields back
together.
‘Pulldown’ is the process of translating film signals to
tally with the broadcast standard. Again, such a
process often results in artifacts commonly known as
combs. Faroudja was the first to introduce “bad edit”
detection capability to detect the original film frames
within the video stream and reconstruct an accurate
image. This produces an image free from motion
artifacts with full vertical resolution. This film mode
processing is widely accepted in the industry.
Motion Adaptive Noise Reduction
Noise in an image is typically eliminated or reduced
by filtering. Filtering can be done spatially (1-D) or
temporally (3-D). Spatial filtering results in a softer
image with the details lost. Temporal filtering, without
the problem of detail loss, would however induce
smearing or ghosting of moving objects in the image
if not accurately performed. Faroudja employs
Motion Adaptive processing to reduce noise without
causing smearing.
2 Familiarizing with Crystalio
2.1 – Crystalio Front Panel
2
1
8
9
10
5
6
3
7
HDTV Video Scaler/Processor
POWER
SETUP
OK
RGB/DVI
SDI
1 POWER button
Press once to switch on, press once again to switch
to standby.
The status is shown by the Power Indicator LED.
!!Caution: Before connecting Crystalio to the power
supply, check the voltage switch at the rear panel to
make sure the correct voltage is selected.
!!Caution: When Crystalio is switched off, please
wait for at least 10 seconds before switching it on
again.
2 POWER indicator LED
Green - Crystalio is running
- Crystalio is in standby mode
3 INPUT button
Press to cycle through the Crystalio video input
sources.
Input sources support HDTV Component, HDTV
DVI, SDI, S-Video and RGBs etc. Please refer to
Section 5.2, Input Select, for details.
4 OUTPUT button
Press to cycle through the Crystalio output modes:
<RGBHV>, <RGBs>, <DVI>, <YpbPr>, & <YcbCr>
5 Navigation buttons
6 SETUP / OK button
7 CANCEL button
8 RGB indicator LED
ON - analogue video output in RGB mode
OFF - analogue video output in Component Y-Pb-Pr mode
INPUT
CANCEL
Serial Digital Interface
8
VPS-2300
FILM
2:2
PULLDOWN
Red
4
OUTPUT
DCDi
Pixel
Magic
byFAROUDJA
9 FILM & 2:2 PULLDOWN indicator LEDs
Film
OFF
ON
ON
OFF
2:2 Pulldown
OFF
OFF
ON
ON
Mode
Video (DCDi)
Film (3:2 Pulldown)
Film (2:2 Pulldown)
Not applicable
10 LCD Display
The LCD display has 2 distinct modes.
Status Display
By default, the LCD displays the current status of Crystalio
which includes the following information:
Video input source
Video source format
Screen aspect ratio
Output resolution / format
Image aspect ratio
Image size
Output selection
Current de-interlacing mode
Setup Display
When setting up Crystalio, the LCD displays setup menu.
Typical operation includes:
To enter menu set up mode, press <SETUP>
To highlight the previous or next item, press <UP>
or <DOWN>
To increase or decrease value, press <LEFT> or
<RIGHT>
To select an item or confirm setting, press <OK>
To exit and go up one level of the menu, press
<CANCEL>
VPS-2300 User Guide
2 Familiarizing with Crystalio
2.2 – Crystalio Rear Panel
1
2
5
6
Cr/R
S-Video2
4
7
Cb/B
Video1/sync
Component/RGB1
S-Video1
230
Y/G
3
Video2/sync
Component/RGB2
HDTV Digital in
Cr/R
Y/G
HDTV Analog in
Cb/B
Hsync
Expansion
Vsync
DVI Out
SDI 1
SDI 2
SDI 3
LAN
RS232
USB
POWER
VIDEO INPUT TERMINALS
1 Power Supply Cable Entry
These allow you to connect your video sources to
Crystalio. Please refer to Section 3.3 for details.
Use the cable supplied with your Crystalio.
2 Power Supply Voltage Selector
This must be set to the same as your mains
voltage, either 110v or 220v AC. It should have
been set correctly by your supplying dealer.
!!Caution: Make sure this is correctly set BEFORE
connecting Crystalio to your power supply.
Digital
3 HDTV Digital In
4 SDI 1, SDI 2, and SDI 3
Analogue
5 Component/RGB 1
Can be used either as:
RGBs (RGB with composite sync) or RGsB (RGB
with Sync on Green)
Component Video Y-Pb-Pr
1 x Composite (CVBS) video and 1 x S-Video
6 Component/RGB 2
Can be used either as:
RGBs (RGB with composite sync) or RGsB (RGB
with Sync on Green)
Component Video Y-Pb-Pr
1 x Composite (CVBS) Video and 1 x S-Video
7 HDTV analogue in
Can be used either as:
High Definition Component Video Y-Pb-Pr
RGBHV
RGsB (RGB with Sync on Green)
2 Familiarizing with Crystalio
2.2 – Crystalio Rear Panel (cont’d)
11
10
12
Cr/R
S-Video2
8
Cb/B
Video1/sync
Component/RGB1
S-Video1
230
Y/G
9
Video2/sync
Component/RGB2
HDTV Digital in
Cr/R
Y/G
HDTV Analog in
Cb/B
Hsync
Expansion
Vsync
DVI Out
SDI 1
SDI 2
SDI 3
LAN
RS232
USB
VIDEO OUTPUT TERMINALS
Computer / Network Connectivity
Your display device(s) should be connected to these
terminals. Crystalio offers the following connection
configurations.
These are optional / advanced connections
Digital
8 DVI
The DVI (Digital Video Interface) provides the best
quality video output from Crystalio. If you are
connecting to a display device that has a DVI terminal,
this is the recommended option to use. This allows
direct transmission of the video information from
Crystalio to the display without any conversion from
digital to analogue signals.
Analogue
9 5 x BNC Connectors
Can be used either as:
RGBHV
RGB(Cs)
Component Video Y-Pb-Pr or Y-Cb-Cr
10
10 USB (Universal Serial Bus)
Allows Crystalio to be upgraded using USB thumb
disk.
11 RJ45 Ethernet connection
Allows Crystalio to be connected to a computer
network for firmware upgrades.
RS232 DB9 Male Serial connection
Allows Crystalio to be integrated into and controlled
by home theatre control systems.
VPS-2300 User Guide
2 Familiarizing with Crystalio
9
2.3 – Remote Control
A remote control is supplied with your Crystalio for
your direct access to the commonly used functions.
AR STORE PROFILE button
Use this to memorize Aspect Ratio profiles.
10 AR PROFILE buttons
To recall stored Aspect Ratio profiles. Refer to
Section 5.7 for details.
Note: Insert batteries to remote control before using.
1 Power ON & OFF buttons
11 USER STORE PROFILE button
To store user-defined video
profiles.
Press ON to switch your Crystalio
on and press OFF to switch to
standby mode.
1
!!Caution: When Crystalio is
switched off, please wait for at
least 10 seconds before switching
it on again.
3
2 Video Settings buttons
ON
4:3
BRIGHT
CONTRAST
COLOR
16:9
OFFSET
GAIN
HUE
2.35:1
SDI 1
SDI 2
SDI 3
SCREEN
VIDEO
HDTV
DVI
12 VIDEO USER PROFILE buttons
To recall stored user profiles. Refer
to Section 5.8 for details.
2
13 POSITION CUSTOM CENTRE
Use this together with the
Navigation buttons to control the
position of displayed image. Refer
to Section 5.5 for details.
4
ES
C
6
AR
USER
LED ACTIVE
13
POSITION
CUSTOM CENTER
PIXEL MAGIC 1:1
LED OFF
14
AR PROFILE
4 Input Select buttons
15 PIXEL MAGIC 1:1 button
To activate Pixel Magic System.
Refer to Section 5.9 for details.
AC
TIV
E
STORE PROFILE
10
14 LED ACTIVE / LED OFF buttons
To switch on and off the LED
indicators on the front panel.
8
LC
D
F
OF
9
To switch to the common aspect
ratio settings directly including 11
4:3, 16:9, 2.35:1, and SCREEN.
Refer to Section 5.3 for details.
SVIDEO 2
ENTER
D
LC
7
SVIDEO 1
ON
5
COMPONENT1 COMPONENT2
D
LC
Use these buttons to configure
the appearance of the video being
displayed. Parameters available
for
customization
including
BRIGHTness,
CONTRAST,
COLOR
saturation,
RGB
OFFSET, RGB GAIN, and HUE.
Refer to Section 5.4 for details.
3 Aspect Ratio buttons
OFF
1
2
3
4
5
6
ZOOM
BEST FIT
ZOOM IN
ZOOM OUT
15 16 ZOOM buttons
16
FULL WIDTH FULL HEIGHT
To select the active video source
directly including SDI 1, Video,
Component, and DVI etc. Refer to
Section 5.2 for details.
VIDEO USER PROFILE
17
1
2
2:2 EVEN
NTSC30 ON
2:2 ODD
5 Navigation buttons
6 ENTER button
ENTER button acts the same as
the SETUP / OK button on the
front panel. It is used to enter the
menu setup mode and to select
item or confirm setting.
7 ESC button
ESCape button acts the same as the CANCEL
button on the front panel. It is used to exit and go
back one level of the menu setup
8 LCD ON / LCD ACTIVE / LCD OFF buttons
To control the backlight of LCD display on the
front panel. Refer to Section 5.5 for details.
3
VIDEO
4
12
AUTO
To scale displayed image so that it
makes the image perfectly fit the
display device. These include
ZOOM, BEST FIT, ZOOM IN,
ZOOM OUT, FULL WIDTH, &
FULL HEIGHT. Refer to Section
5.5 for details.
NLS
18
17 Deinterlace buttons
Use these to select deinterlace
method including AUTO, VIDEO,
NTSC@30 ON, 2:2 EVEN, and 2:2
ODD. Refer to Section 5.5 for
details.
18 NLS button
Use this to switch on and off Non-Linear
Stretching. Refer to Section 5.5 for details.
3
Hardware Installation
3.1 – Compatible Equipment
In simple terms, Crystalio serves as a video processor
which enhances video signal from source devices and
then deliver the enhanced video signal to the display
devices.
Crystalio is compatible with:
3.2 – Mains
!!Caution: Ensure that the voltage selector is set
correctly for your mains voltage. If you have any
doubts, DO NOT connect your Crystalio and contact
your dealer for advice. Incorrect setting of the voltage
selector will result in serious damage to your unit and
may lead to fire hazard / electric shock.
!!Caution: Connect Crystalio to a power point using
the mains cable provided.
Any source device capable of outputting:
Composite Video
3.3 – Video Inputs
S-Video
RGsB (Sync on Green)
RGBs (Separate Sync)
Component (Y-Pb-Pr)
Crystalio includes a comprehensive set of input
terminals to allow you to connect a wide range of video
sources.
For the best results you should:
VGA (HD15)
Digital DVI
use the highest quality output that your video
source provides
SDI (Serial Digital Interface)
use high quality cables for all connections
When deciding on which output to use from your
device, use the following list as a guideline (with best
quality being first):
Any analogue or digital display device is
capable to accept input in the form of:
1
SDI or DVI (a direct digital connection from a
compatible set top box or DVD player).
2
RGB (RGsB/RGBS) – often available from set
top boxes, DVD players etc., This could be used
an optional connection on games consoles.
3
Component (YpbPr) – typically available on
mid-range to high-end DVD players and some
games consoles.
4
S-Video – a general purpose connection found
on many devices. Sometimes (but incorrectly)
this referred as SVHS.
5
Composite – the most common, and the lowest
performing video connection.
Analogue RGBHV
Analogue RGB with composite sync
Analogue Component (Y-Pb-Pr)
Analogue Component (Y-Cb-Cr)
Digital DVI
12
TIPS: It is recommended that you choose the
interlaced output from your source device instead
of the progressive (e.g. 480i instead of 480p).
This leaves the conversion from interlaced video
to progressive video to be performed by Crystalio,
which has sophisticated processing dedicated to
this task.
VPS-2300 User Guide
3
Hardware Installation
Hardware Installation Diagram
Video Inputs
Game Console / DVD Player
DVD Player with SDI
Output
HDTV Source
3.4 – Video Outputs
For maximum performance you should use the
digital connection where possible.
The reason for this is that the display of a digital device
(for example a plasma panel, TFT monitor or
LCD/LCOS/DLP projector) is built up of a grid of fixed
number of elements or pixels, which are all directly and
individually controlled by the internal digital electronics
of the display. Using the DVI interface of the display
allows these individual pixels to be directly controlled
by Crystalio, bypassing the internal picture processing
electronics of the display device, and thereby
producing more detailed and accurate images.
When deciding on which output to use from your
device, use the following list as a guideline (best
quality first):
1
DVI (a direct digital connection from Crystalio to
the display device).
2
RGBHV / RGB(Cs)
3
Component video
CRT Projector
Plasma TV / LCD TV /
Digital Projector
Video Outputs
3.5 – Product Registration
To enjoy the 12-month warranty for your Crystalio, you
must register online at:
http://www.crystalio.com/support.html
This would only take a couple of minutes. You will need
your serial number so please make a note of it prior to
registering your Crystalio.
Once registered, you will be entitled to view technical
information, online product help, and of course
software updates for your Crystalio.
4
Basic Software Setup
4.1– Configure Your Video Source
Even your video source has the option to output
progressive video (denoted by a number and then the
letter ‘p’, for example 480p), for maximum results, it is
recommended to disable such option and select
interlaced video mode instead (denoted by a number
and then the letter ‘i’, for example 480i).
4.2 – Select Input Terminal
Using remote control
Press the button of the type of input terminal via which
your input device has been connected.
The reason for this is that Crystalio features the stateof-the-art technology specifically designed for
converting interlaced video into progressive video, and
that will usually deliver higher performance than the
converter built in your source device.
Note: For HDTV analogue input, repeat pressing the HDTV
button to cycle through the HDTV Component, RGB, and
RGBHV option.
OR
4.3 – Switch On Crystalio
Press the POWER button on the front panel, the Power
LED should show green and the LCD display
illuminates. Note that you will need to wait for
approximately 40 seconds for Crystalio to initialize and
for video to display.
Using front panel control
SETUP
1 Press SETUP button
to start VP SETUP
OK
2 Choose Input Select, press OK button to continue
VP SET UP
> Input Select
Aspect Ratio
Video Settings
Advanced
System Config
AR Profile
……
If you do not see video as expected, refer to the
[Troubleshooting] section.
INPUT SELECT
HDTV Compnt
HDTV RGBHV
HDTV RGB
> HDTV DVI
SDI 1
SDI 2
SDI 3
Component 1
……
3 Choose input terminal via which your input device
is connected
4 Press OK button to confirm
OR
Using front panel control
Press the INPUT button to cycle through the various
input terminals and stop at the one by which your input
device is connected.
14
VPS-2300 User Guide
4
Basic Software Setup
4.4 – Select Output Terminal
4.5 – Set Output Format / Resolution
Using front panel control
Setting Output Format for Analogue devices
SETUP
1
Press SETUP button
SETUP
to start VP SETUP
1 Press SETUP button
OK
2
Choose System Config, press OK to continue
VP SET UP
Input Select
Aspect Ratio
Video Settings
Advanced
> System Config
AR Profile
Video Profile
Pixel Magic
to start VP SETUP
OK
SYSTEM CONFIG
Input Format
HD Active Wnd
> Output Select
Resolution
Output Format
H sync /V sync
Pre Y/C Delay
……
2 Choose System Config, press OK to continue
VP SET UP
Input Select
Aspect Ratio
Video Settings
Advanced
> System Config
AR Profile
Video Profile
Pixel Magic
SYSTEM CONFIG
Input Format
HD Active Wnd
Output Select
Resolution
> Output Format
H sync /V sync
Pre Y/C Delay
……
OUTPUT FORMAT
480p @59.94Hz
> 480p @60Hz
540p @60Hz
576p @60Hz
……
3
Choose Output Select, press OK to continue
3 Choose Output Format, press OK to continue
4
Choose DVI for digital device or RGBHV / YPbPr /
YCbCr / RGB(Cs) for analogue device
4 Choose output format of the display device being
connected in the OUTPUT FORMAT menu
OUTPUT SELECT
RGBHV
> DVI
YPbPr
YCbCr
RGB(Cs)
OUTPUT SELECT
> RGBHV
DVI
YPbPr
YCbCr
RGB(Cs)
5 Press OK button to confirm
Setting Resolution for Digital devices
SETUP
1 Press SETUP button
5
Press OK button to confirm
to start VP SETUP
OK
2 Choose System Config, press OK to continue
VP SET UP
Input Select
Aspect Ratio
Video Settings
Advanced
> System Config
AR Profile
Video Profile
Pixel Magic
SYSTEM CONFIG
Input Format
HD Active Wnd
Output Select
> Resolution
Output Format
H sync /V sync
Pre Y/C Delay
……
3 Choose Resolution, press OK to continue
4 Choose the resolution of your display device from
the list and press OK button to confirm
OR
TIPS: For optimum display, you should set
Crystalio to output a video signal that matches
your display perfectly in terms of resolution and
aspect ratio. See Section 5 Expert Configuration
for details on how to achieve this.
RESOLUTION
> Preset Models
800 x 600
848 x 480
856 x 480
……
PRESET MODELS
> Epson TW100
Fuj 1024x1024
Hitachi 40 Alis
InFocus 7205
……
5 Choose Preset Models, press OK to continue
6 Select the display device being connected
7 Press OK button to confirm
Congratulations! You have now completed the basic
configuration. In the following sections, there is much
more fine-tuning that you can do to fully optimize the
performance.
5
Expert Configuration
5.1 – Overview
Digital display devices create the picture from a large
number of pixels or points of light. The best picture with
these devices is achieved by:Delivering the picture signal digitally by using digital
video interface (DVI)
Sending a picture that ‘fits’ exactly the number of
pixels that the display device physically has. This is
known as 1:1 pixel mapping or driving the display at
its ‘native resolution’
Analogue display devices are not built up from
individual pixels, as such they do not have a ‘native
resolution’. However, they have a range of resolutions
where they can deliver the best performance, therefore
it is recommended to utilize in that mode.
Although optimum resolution varies from one display
device to another, this would not be causing setback to
Crystalio, since it has been designed to match the
resolution of almost any display device available in the
market.
What makes Crystalio distinguished from the ordinary
video processors among various state-of-the-art
technologies incorporated is, that the sophisticated
control allows users to have the flexibility to configure
every single aspect of video processing.
Crystalio provides expert users with a diverse range of
options and settings for customizing the system to suit
their specific needs and preferences. These include
color fine-tuning and enhancement, aspect ration
control, re-defining remote control buttons, customizing
menu display, saving display profiles, etc. These
options allow users to be able to control the display
settings precisely and to have quality video viewing
experience. With such control, users could maximize
the performance of any video sources and exploit the
capability of almost any display devices.
16
VPS-2300 User Guide
5
Expert Configuration
5.2 – Input Select
5.3 – Aspect Ratio
This option allows you to select the active video
source. Note that if you have configured Crystalio to
hide 1 or more sources, these sources will not be
shown.
Crystalio features sophisticated Aspect Control
management by using UltraAR™, allowing almost any
aspect ratio (including custom ratios) to be used with
almost any device.
Setup
Setup
SETUP
►
OK
>
Input
Select
SETUP
►
Port Arrange
Aspect
Ratio
►
OK
VP SET UP
> Input Select
Aspect Ratio
Video Settings
Advanced
System Config
……
select appropriate
mode from list
►
VP SET UP
Input Select
> Aspect Ratio
Video Settings
Advanced
System Config
……
Available Modes
Available Modes
Input Select
Input
Format
Aspect Ratio
Source Material Aspect Ratio
HDTV
Compnt
HD Analogue
Component
(YpbPr)
4:3
4:3
HDTV
RGBHV
HD Analogue
RGBHV
16:9
16:9
16:9 Letterbox
16:9 Letterbox
HDTV RGB
HD Analogue
RGB sync on
Green
2.35:1
Anamorphic 2.35:1
Same as Screen
Use this mode if the source image
aspect ratio is same as screen aspect
ratio
Customize
Allows custom control over the aspect
ratio for non standard material
HDTV DVI
HD Digital DVI
DVI
SDI 1
SDI 1
SDI
SDI 2
SDI 2
SDI
SDI 3
SDI 3
SDI
Component 1*
Component 1
Component
(YpbPr)
Component 2*
Component 2
Component
(YpbPr)
S-Video 1
S-Video 1
Svideo
S-Video 2
S-Video 2
Svideo
Video 1
Composite video
1
Composite (CVBS)
Video 2
Composite video
2
Composite (CVBS)
RGB sync on
Green 1
RGB sync on
Green (RGsB)
RGB 2*
RGB sync on
Green 2
RGB sync on
Green (RGsB)
RGBs 1*
RGB separate
sync 1
RGB Separate
Sync (RGBS)
RGBs 2 *
RGB separate
sync 2
RGB Separate
Sync (RGBS)
RGB 1*
TIPS: For Customized option, use the Navigation
Buttons on the front panel to set up customized
aspect ratio.
Decrease
aspect ratio
Increase
aspect ratio
HDTV Video Scaler/Proce
SETUP
OK
SDI
Serial Digital Interface
Confirm
selection
CANCEL
Pixel
Magic
Cancel
selection
Note: Increment / decrement of aspect ratio is 0.05, except
that it will also stop at 4:3 (1.33:1) and 16:9 (1.78:1)
5
Expert Configuration
5.4 – Video Settings
Available Modes
Crystalio allows you to configure the appearance of the
video being displayed with a range of parameters.
Video
Setting
Function
Available
range
Brightness
Adjusts display brightness
-999 to 999
Contrast
Adjusts display contrast
-18 to 14
Colour
Adjusts display colour saturation
-99 to 99
Hue
Adjusts display hue
-180 to 180
Sharpness
Adjusts display sharpness
0 to 100
Setup
SETUP
►
OK
Video
Settings
►
select appropriate
setting from list
VP SET UP
Input Select
Aspect Ratio
> Video Settings
Advanced
System Config
AR Profile
Video Profile
Pixel Magic
Note: This setting is same as
adjust TrueLife Luma Edge Eff.
Note: Use Navigation Buttons on the front panel to
set up:
increase value in
increments of 10
increase
value
HDTV Video Scaler/Proce
R Offset
Adjusts Red element of display
saturation
-999 to 999
G Offset
Adjusts Green element of display
saturation
-999 to 999
B Offset
Adjusts Blue element of display
saturation
-999 to 999
R Gain
Adjusts Red gain
-99 to 99
G Gain
Adjusts Green gain
-99 to 99
B Gain
Adjusts Blue gain
-99 to 99
Black
Enhancer
Black Enhancer improves black
level details
Natural
Black /
Enhanced
Black
Voltage
Pump
Voltage Pump drives analogue
output voltage up
On / Off
SETUP
OK
SDI
Serial Digital Interface
decrease
value
18
decrease value in
increments of 10
confirm
selection
CANCEL
Pixel
Magic
cancel
selection
Note: This setting is available
when analogue output is
selected.
VPS-2300 User Guide
5
Expert Configuration
5.5 – Advanced
Available Modes
The settings introduced in this section allows Crystalio
to be configured to suit complex environments,
enabling you to configure many of the Faroudja video
processing options to maximize the picture quality.
Advanced
Available modes
DCDi®
Faroudja developed DCDi® (Directional
Correlational De-interlacing) technology to
eliminate the jaggedness that conventional upconverters introduced to diagonal edges in
video. DCDi®’s unique algorithm identifies all
the moving edges in a scene and adjusts the
angle of interpolation at each pixel so that the
interpolation always follows the edge instead of
crossing it, eliminating stair-casing or jagged
edge artifact, to produce a smooth and natural
looking image.
Note: The DCDi®, De-interlace and Noise Reducer will be
hidden in this menu if HDTV input has been selected.
Setup
SETUP
►
Advanced
select appropriate
advanced setting
►
OK
VP SET UP
Input Select
Aspect Ratio
Video Settings
> Advanced
System Config
AR Profile
Video Profile
Pixel Magic
On
Activate DCDi® de-interlacing
Off
Deactivate DCDi® de-interlacing
Deinterlace
Note: Use Navigation Buttons on the front panel to set up:
increase
value
HDTV Video Scaler/Proce
Auto
Crystalio will automatically select the most
appropriate de-interlace method. The method
selected can either be
• DCDi®
• Film 3:2 Pulldown
• Film 2:2 Pulldown Even (PAL only)
• Film 2:2 Pulldown Odd (PAL only)
SETUP
Video
OK
SDI
Serial Digital Interface
decrease
value
confirm
selection
DCDi® de-interlacing only
CANCEL
Pixel
Magic
cancel
selection
NTSC@30 On
Crystalio will automatically select the most
appropriate de-interlace method. The method
selected can either be
• Film 3:2 Pulldown
• Film 2:2 Pulldown Even (NTSC/PAL)
• Film 2:2 Pulldown Odd (NTSC/PAL)
• DCDi®
2:2 Even
Film 2:2 Pulldown Even
2:2 Odd
Film 2:2 Pulldown Odd
Note: If DCDi® is switched off in the
Advanced menu setting, simple video
de-interlace will be used instead of
DCDi
Advanced
Available modes
Advanced
Available modes
Noise
Reducer
This is useful for improving the quality of off-air
material.
Zoom
This setting allows the displayed image to be
scaled to perfectly fit the display device.
Options:
•
•
•
•
True Life ™
Full Width
Hi
Medium
Lo
Off
Crystalio will set the width of the image to
match the dimensions of the display device
Full Height
Crystalio will set the height of the image to
match the dimensions of the display device
Conventional video enhancement is done by a
“peaking filter” that enhances the highfrequency components of the video signal.
However, this creates unwanted artifacts.
Faroudja does not use a peaking filter to
enhance an image, instead it uses its
TrueLife™ Enhancement technology to identify
transitions considered to be the details in an
image such as skin texture, freckles or hair.
These detail transitions are deliberately
enhanced making them more visible and more
lifelike. The technology also enhances large
edges to create greater depth of perception
without introducing visual artifacts or distortion.
Best Fit
This automatically selects Full Width and Full
Height options together, so that the image
displayed fills the dimensions of the display
device.
Source Width
Crystalio will set the width of the image to
match the dimensions of the video source. No
horizontal scaling is taking place in this mode
Source Height
Detail Eff
Crystalio will set the height of the image to
match the dimensions of the video source. No
vertical scaling is taking place in this mode
Sets the level of Horizontal Detail enhancement
Detail Thd
Customize
Sets the threshold point for the introduction of
Horizontal Detail enhancement
This allows fine manual control over the exact
image size
Luma Edge Eff
Note: Zoom takes place in increments of
0.02. The displayed image can not be
enlarged beyond 10 times the original
source image dimensions, nor can it be
reduced to less than half of the source
image dimensions.
Sets the level of Horizontal Edge Luma
enhancement
Luma Edge Thd
Sets the threshold point for the introduction of
Horizontal Edge Luma enhancement
Zoom In
Crystalio will enlarge the image by increments
of x0.1
Chroma Edge Eff
Sets the level of Horizontal Edge Chroma
enhancement
Zoom Out
Crystalio will shrink the image by decrements
of x0.1
Chroma Edge Thd
Sets the threshold point the introduction of
Horizontal Edge Chroma enhancement
Zoom to Line
Crystalio will enlarge/shrink the image to exact
line
V Luma Edge Eff
Sets the level of Vertical Details enhancement
V Luma Edge Thd
Sets the threshold point for the introduction of
Vertical Detail enhancement
Advanced
20
Available modes
Advanced
Available modes
VPS-2300 User Guide
Position
This setting allows the displayed image to be
moved to perfectly fit the display device.
Film Detect
Center
Crystalio will reset the image position to be
central on the display device
This defines the film mode detection window.
On some cases when the source has sub-title,
the de-interlacing method used may not be
correct. So, use this control for adjustment.
Normal Wnd
Uses whole image for detection
Customize
This allows fine manual control over the exact
image position (Use Navigation Buttons on the
front panel to set up)
Note: When initially pressing the arrow
keys, the image will move 30 pixels at a
time. If the same arrow key is held, the
movement will accelerate. Similarly if the
opposite key is pressed, the movement will
decelerate.
Small Wnd
Crystalio automatically limits the position
function to ensure that the image is not
moved completely off the visible area
Crop
Uses partial image for detection
The crop function allows areas of the displayed
image to be masked, useful if you do not want
part of the image to be visible on the display
device.
Crop Top
Crystalio will remove a section of the top area
of the image
Crop Bottom
Film Bias
Control
This can be set to a value ranging from 1 to 9,
with the smallest value suitable for most video
sources, while the greater values better suit film
sources.
NLS Config
Non-Linear Stretching is used to fill a full 16:9
screen with a 4:3 image while minimizing the
widening effect on the image especially at
center of the screen. There are two parameters,
Center Shape and Crop to Fit, to stretch the
image according to personal preference.
Crystalio will remove a section of the bottom
area of the image
Crop Left
Crystalio will remove a section of the left area
of the image
Crop Right
Crystalio will remove a section of the right area
of the image
Use Navigation Buttons on the front panel to
set up
Note: When initially pressing the arrow
keys, the image will crop 30 pixels at a time.
If the same arrow key is held, the crop rate
will accelerate. Similarly if the opposite key
is pressed, the crop rate will decelerate.
Center Shape
This controls the shape of image in center area.
Setting of 3 makes the image look good at
center, but with more distortion at left and right
sides.
Setting of 0 produces a less non-linear
stretched image across the whole screen,
resulting in obvious distortion at the center of
the image.
Advanced
Available modes
Advanced
Available modes
NLS Config
(cont’d)
The following pictures show different settings of
Center Shape from 0 to 3, with Crop to Fit being
set to default value of 2.
NLS Config
(cont’d)
Crop to Fit
This controls how the image is being cropped at
the top and bottom. Cropping the image results
in less horizontal stretching.
Setting of 0 results in no cropping. Setting of 3
results in maximum cropping at the top and
bottom.
The following pictures show different settings of
Crop to Fit from 0 to 3, with Center Shape
being set to default value of 2.
Center Shape = 0 (produces a less non-linear
stretched image)
Crop to Fit = 0
Center Shape = 1
Crop to Fit =1
Center Shape = 2
Crop to Fit = 2
Center Shape = 3 (Horizontal stretching takes
place mainly at the two sides, resulting in
minimum horizontal stretching at center)
Crop to Fit = 3 (Maximum cropping)
22
VPS-2300 User Guide
Advanced
Available modes
Advanced
Available modes
Back Light
Crystalio can black out the LCD display to avoid
LCD back light affecting video viewing.
Remap
Button
On Crystalio remote control, there are no “16:9
Letter Box” nor “Toggle D/A” buttons. User can
redefine some buttons to perform these
operations.
On
The LCD is illuminated whenever Crystalio is
running (i.e. not in standby mode)
16:9 Letter Box
N/A
Active
2:35:1 : [2.35:1] button is replaced with
[16:9 LetterBox] function
The LCD is illuminated whenever the Crystalio
settings are being accessed (such as menu is
being selected). After a short period of
inactivity, the illumination will switch off
automatically.
Toggle D / A
N/A
The LCD backlighting is disabled.
LED OFF
: [LED OFF] button is
replaced with [Toggle D/A] function
Similar to LCD back light, the LEDs on the front
panel can be blacked out.
LCD ON
: [LCD ON] button is
replaced with [Toggle D/A] function
Active
LCD ACTIVE : [LCD ACTIVE] button is
replaced with [Toggle D/A] function
The LEDs are illuminated to show the current
status
LCD OFF
: [LCD OFF] button is
replaced with [Toggle D/A] function
Off
The LEDs are disabled
Note: the Power LED cannot be disabled.
Hide Input
: default
LED ACTIVE : [LED ACTIVE] button is
replaced with [Toggle D/A] function
Off
LED
: default
Crystalio has a comprehensive set of input
connections. For ease of use it may be more
convenient to remove any unused inputs from
the menu selections. For example, if you are
not using Composite video connections, then
by hiding these inputs it reduces 8 items from
the input menu.
Setup
SETUP
►
Advanced ► Hide Input
OK
Select which input to hide from the list
Select either Hide or Show as required
Note: The current input cannot be hidden.
Firmware
Upgrade
This allows the Crystalio internal software to be
updated, either from a USB thumb disk, or via
the network connection.
For detailed instructions, please refer to
http://www.crystalio.com/support.html
5
Expert Configuration
5.6 – System Config
The settings in this section are used during the initial
installation and setup. These settings include defining
the display device parameters, connection types etc.
System
Config
Available modes
Input
Format
(cont’d)
If [HDTV Input] is selected, the following input
formats are available:
480p (NTSC)
Setup
SETUP
►
OK
System
Config
►
480 progressive scan NTSC video
select appropriate
setting from list
576p (PAL)
576 progressive scan PAL video
VP SET UP
Input Select
Aspect Ratio
Video Settings
Advanced
> System Config
AR Profile
Video Profile
Pixel Magic
720p
720 Hi-Definition (HD) progressive scan
video
1080i@50Hz
1080 Hi-Definition (HD) interlaced video with
refresh rate 50 frames per second
Available Modes
System
Config
Available modes
Input
Format
If [SDTV Input] is selected, the following input
formats are available:
1080i@60Hz
1080 Hi-Definition (HD) interlaced video with
refresh rate 60 frames per second
800x600p
SDTV
Video source of 800x600 resolution
Standard Definition video – with auto format
selection (NTSC or PAL)
1024x768p
Video source of 1024x768 resolution
480i (NTSC)
1280x1024p
480 interlaced NTSC video
Video source of 1280x1024 resolution
576i (PAL)
HDTV
576 interlaced PAL video
Hi-Definition (HD) video – with auto format
selection
If [S-Video Input] or [Video Input] is selected,
the following input format is available:
Note: If the input format is incorrectly set, no
image will be displayed
PAL60
PAL 60 video
System
Config
24
Available modes
System
Config
Available modes
VPS-2300 User Guide
HD Active
Wnd
This adjusts the position of active window of HD
input source. For different HD source input, this
value may need adjustment to get the whole
video.
X:
This adjusts the horizontal (X) position of HD
active window
Y:
This adjusts the vertical (Y) position of HD
active window
Resolution
For optimum performance, it is essential that
this setting is correct for the connected digital
display.
Hint: If your output display device is under the
[Preset Models] list, you can simply select the
model there.
Otherwise, check the native resolution of your
output device and select such from the
resolution list or use [Customize] to define the
resolution of your device.
Preset Models
Note: HD Active Wnd is only available for HiDefinition input ports. Each HD input port
records its own HD Active Wnd setting.
Output
Select
This configures which video output terminal the
video signal is sent to.
RGBHV
Analogue output in RGBHV format
DVI
Digital output
YPbPr
Analogue output in component video (YPbPr)
YCbCr
Analogue output in component video (YCbCr)
RGB(Cs)
Analogue output in RGB format with composite
sync
If digital output terminal (e.g. DVI) is selected,
the next step is to set the output resolution that
must conform with the digital output device
If, however, analogue terminal is selected, the
output format should be set to match the
analogue output device
Choose from a library of popular displays:
• Epson TW100
• Fuj 1024x1024
• Hitachi 42 ALis
• InFocus 7205
• Mrz VP-12S3
• JVC SX21
• JVC DLA-G10
• JVC DLA-G11
• JVC DLA-G15
• JVC DLA-G20
• JVC DLA-HX1
• JVC DLA-M2000
• JVC DLA-M15U
• NEC 42MP2
• Pana PT-AE500
• Pana TH-42PHW6
• Sanyo PLV-Z2
• Sharp 201
• Shp XV-Z12000U
• Sony Qualia
• Sony HS-10
• Panasonic TH-50PHD6
Or, select the native resolution of your output
display device from the list:
800 x 600
848 x 480
856 x 480
960 x 540
1024 x 768
1280 x 720
1280 x 768
1280 x 960
1280 x 1024
1360 x 768
1368 x 768
1400 x 1050
1440 x 960
1152 x 864
1024 x 1024 ALis
1024 x 576
1366 x 768
852 x 480
852 x 576
1024 x 576 (1)
1024 x 852
1024 x 1024
1360 x 1024
1360 x 1024 (1)
1360 x 1024 (2)
1365 x 1024
1365 x 1024 (1)
1400 x 788
1440 x 1152
1440 x 720
1920 x 1080
System
Config
Available modes
System
Config
Resolution
(cont’d)
Customize
Resolution
(cont’d)
If your display does not match any of the predefined settings, you can enter the parameters
here to match Crystalio exactly with its
characteristics.
Delete
Delete the current customized timing
Note: If current customized timing is in
use or used by DynaVOut, this
customized timing cannot be deleted.
H. Scan Rate
Enter the horizontal scan rate in the format
xxx.yyy KHz
Rename
Rename the customized timing
H. Active Pixel
Enter the number of horizontal active pixels
Note: User can store up to 50
customized timing in Crystalio
H. Front Porch
Enter the horizontal front porch
V. Refresh Rate
Enter the vertical refresh rate in the format
xx.yy frames per second
V. Active Pixel
Enter the number of vertical active pixels
V. Front Porch
Enter the vertical front porch
V. Sync Width
Set the vertical sync width
V. Back Porch
Enter the vertical back porch
Confirm
Confirm the above settings
The customized timing will store the user
defined timing. The timing will be stored
even user turn off Crystalio
Edit
Change the customized timing detail.
The procedure is same as Customize
Setting up Customize
H. Back Porch
Enter the horizontal back porch
Customized Timing
Apply
Apply the current selected customized
timing
Note: Before you modify these settings, it is
important that you check the capabilities of the
display device. Incorrect settings might cause
permanent damage to your display. If you are
in any doubt, contact your display
manufacturer / dealer for advice.
H. Sync Width
Set the horizontal sync width
Available modes
Output
Format
This configures the format of the analogue
video outputs.
[email protected]
480 progressive NTSC video with 59.94Hz
refresh rate
480p@60Hz
480 progressive NTSC video with 60Hz refresh
rate
540p@60Hz
540 progressive video
576p@50Hz
576 progressive PAL video
720p@60Hz
720 Hi-Definition (HD) progressive video
768p@60Hz
768p Hi-Definition (HD) progressive video
[email protected]
960 Hi-Definition (HD) progressive video
(1440x960) with 59.94Hz refresh rate
[email protected]
960 Hi-Definition (HD) progressive video
(1440x960) with 60Hz refresh rate
1024p@60Hz
1024 Hi-Definition (HD) progressive video
26
VPS-2300 User Guide
System
Config
Available modes
System
Config
Output
Format
(cont’d)
1050p@60Hz
Output
Format
(cont’d)
1050 Hi-Definition (HD) progressive video
1080i@50Hz
1080i@60Hz
1080p@60Hz
Delete
Delete the current customized timing
Note: If current customized timing is in
use or used by DynaVOut, this
customized timing cannot be deleted.
1080 Hi-Definition (HD) progressive video
1152p@50Hz
1152 Hi-Definition (HD) progressive video
(1440x1152)
Rename
Rename the customized timing
720p@60Hz(1)
720 Hi-Definition (HD) progressive video but
with different timing as before
720p@50Hz
720 Hi-Definition (HD) progressive video
720p@50Hz(1)
720 Hi-Definition (HD) progressive video
but with different timing as before
Set Refresh Rt
If your display does not match the pre-defined
refresh rate settings, you can enter the
parameters here to match Crystalio exactly to
its characters.
Choose from following options:
• @24
• @25
• @30
• @48
• @50
• @59.94
• @60
• @72
• Customize
Note: Before you modify these settings, it is
important that you check the capabilities of the
display device. Incorrect settings might cause
permanent damage to your display. If you are
in any doubt, contact your display
manufacturer / dealer for advice.
The customized timing will store the user
defined timing. The timing will be stored
even user turn off Crystalio
Edit
Change the customized timing detail.
The procedure is same as Customize
1080 Hi-Definition (HD) interlaced video with
60Hz refresh rate
1080 Hi-Definition (HD) progressive video but
with different timing as before
Customized Timing
Apply
Apply the current selected customized
timing
1080 Hi-Definition (HD) interlaced video with
50Hz refresh rate
[email protected](1)
Available modes
Note: User can store up to 50
customized timing in Crystalio
DynaVOut
When activated, Crystalio will set the output
video format dynamically based on the input
video.
When NTSC IN
Options:
• Resolution
• Format
Output Resolution or Format will change
automatically when input format is 480i (NTSC)
When PAL IN
Options:
• Resolution
• Format
Output Resolution or Format will change
automatically when input format is 576i (PAL)
System
Config
Available modes
System
Config
Available modes
H-Sync /
This sets the H-Sync (horizontal position) and
V-Sync (vertical position) values. H-Sync and
V-Sync are used to adjust the output video so
that the active region (viewable part) is mapped
currently (centered or fitting within) the output
display device.
SDI Polarity
This option sets the SDI input polarity.
V-Sync
SDI1
Set SDI1 input source polarity between positive
or negative, or choose [auto detect] for
automatic detection
Note: This function is different from the
[Position] function as [Position] moves the
video within the active region of the output
video while [H-Sync / V-Sync] moves the
whole output video.
SDI2
Set SDI2 input source polarity between positive
or negative, or choose [auto detect] for
automatic detection
Therefore, this is a “System Config” function
instead of an “Advanced” function. For any
particular output display device, it needs to be
set up once.
SDI3
Set SDI2 input source polarity between positive
or negative, or choose [auto detect] for
automatic detection
The Pixel Magic function includes a chapter to
guide you to set up H-Sync and V-Sync. Please
refer to section [Pixel Magic] function.
Pre Y/C
Delay
This sets the Pre YC delay. The Pre YC delay
refers to the input source.
Level 1 to Level 8 refer to different Pre Y/C
delay timing.
Post Y/C
Delay
Screen A R
Note: Incorrect polarity will make the output video
shaking
Output
Sync
Adjust the output sync polarity.
H-Sync
•
•
This sets the Post YC delay. The Post YC delay
refers to the output video.
Negative
Positive
Level 1 to Level 8 refer to different Post Y/C
delay timing.
V-Sync
• Negative
• Positive
Set the screen Aspect Ratio.
Note: Output Sync only available for
analogue output selected
Map Resolution
In this mode, Crystalio looks at the pixel
dimension of the configured display device and
sets the aspect ratio accordingly. E.g. if the
display has a resolution set to 1024x768, the
aspect ratio is deemed to be 4:3.
4:3
This sets screen aspect ratio to 4:3 (1.33:1)
16:9
This sets screen aspect ratio to 16:9 (1.78:1)
2.35:1
This sets screen aspect ratio to 2.35:1 (1.33:1)
Port
Arrange
This option sets the port arrangement for the
rear panel.
Upper Port
Set the upper port to one of the following:
• Component1
• RGBS1
• RGB1
Lower Port
Set the lower port to one of the following:
• Component2
• RGBS2
• RGB2
Customize
Note: The aspect ratio adjustment increment is
0.05, except that it will also stop at 4:3 (1.33:1)
and 16:9 (1.78:1).
28
Y/G
Cb/B
Video1/sync
Component/RGB1
S-Video1
230
This allows the screen aspect ratio to be set to
a non-standard / customized setting
Cr/R
S-Video2
Video2/sync
Component/RGB2
LAN
RS232
USB
VPS-2300 User Guide
System
Config
Available modes
System
Config
DVI
PassThr
This is for using HDTV DVI input. User can
select this option to enable DVI pass through
such that no scaling will be performed by
Crystalio. The input video source to Crystalio
will be directly outputted to the display device.
Factory
Setting
(Cont’d)
On
Enable DVI Pass Through
Off
Disable DVI Pass Through
Hardware
Reset
This option resets all Crystalio hardware
settings. All saved options will be cleared.
Factory
Setting
This option sets Crystalio back to factory
defaults. The default factory settings are as
follows:
1. Input Select
SDI 1
2. Aspect Ratio
Same as Screen
3. Video Settings
Brightness
=0
Contrast
=0
Color
=0
Hue
=0
Sharpness
=0
R Offset
=0
G Offset
=0
B Offset
=0
R Gain
=0
G Gain
=0
B Gain
=0
Black Enhancer = Natural Black
Voltage Pump = Off
4. Advanced
DCDi
= On
De-interlace
= Auto
Noise Reducer = Off
True Life ► all Effects = 0
True Life ► all Threshold = 0
Zoom
= Best Fit
Position
= 0,0
Crop ► Left, Right, Top, Bottom = 0
Film Detect
= Normal Wnd
NLS Config – Crop to Fit = 2
NLS Config – Center Shape = 2
Back Light
= Active
LEDs
= Active
Hide Input ► all Input Terminals = Show
Available modes
5. System Config
Input Format ► all standard definition (SD)
video input terminals = SDTV
Input Format ► all hi-definition (HD) video
input terminals = HDTV
Output Selection = DVI
Resolution
= 1024 x 768
Output Format = undefined (Output is set
to use exact resolution)
DynaVout
= not effective
H-Sync/V-Sync = 0,0
Screen A.R.
= Map Resolution
5
Expert Configuration
5.7 – AR Profile
Available Modes
Crystalio allows detailed configuration of aspect ratios,
image size and position, and this feature is further
enhanced by the ability to store up to 5 sets of aspect
ratio profiles.
AR Profile
Available modes
Store
1. Select this to memorize the current video
settings including:
•
•
•
•
Each AR Profile stores the following settings:
• Aspect Ratio
• Zoom
• Position
• Crop
2. Select a profile to memorize the settings:
•
•
•
•
•
Setup
SETUP
►
AR Profile
OK
VP SET UP
Input Select
Aspect Ratio
Video Settings
Advanced
System Config
> AR Profile
Video Profile
Pixel Magic
►
Aspect Ratio
Zoom
Position
Crop
select appropriate
setting from list
Recall
User 1
User 2
User 3
User 4
User 5
1. Select this to recall memorized aspect ratio
settings covering:
•
•
•
•
Aspect Ratio
Zoom
Position
Crop
2. Select a memorized AR Profile to recall:
•
•
•
•
•
30
User 1
User 2
User 3
User 4
User 5
VPS-2300 User Guide
5
Expert Configuration
5.8 – Video Profile
Available Modes
Crystalio allows detailed configuration of video
parameters (color, contrast, brightness, etc) to be
memorized into 5 different video profiles for
subsequent fast retrieval.
AR Profile
Available modes
Store
1. Select this to memorize the current video
parameters including:
•
•
•
•
•
•
•
•
•
•
•
•
•
Each Video Profile stores the following settings:
• Input Format
• Brightness
• Contrast
• Colour
• R, G, B Offset
• R, G, B Gain
• Hue
• Pre YC Delay
• Post YC Delay
• Sharpness
• Noise Reducer
• De-interlace Mode
• TrueLife setting
2. Select a Video Profile to memorize the video
parameters:
Setup
SETUP
►
OK
Video
Profile
VP SET UP
Input Select
Aspect Ratio
Video Settings
Advanced
System Config
AR Profile
> Video Profile
Pixel Magic
►
Input Format
Brightness
Contrast
Colour
R, G, B Offset
R, G, B Gain
Hue
Pre YC Delay
Post YC Delay
Sharpness
Noise Reducer
De-interlace Mode
TrueLife setting
•
•
•
•
•
select appropriate
setting from list
Recall
User 1
User 2
User 3
User 4
User 5
1. Select this to recall memorized video
parameters.
2. Select a memorized Video Profile to recall:
•
•
•
•
•
User 1
User 2
User 3
User 4
User 5
5
Expert Configuration
5.9 – Pixel Magic System
Crystalio provides an automated mechanism for setting
the output display configuration of Crystalio to perfectly
match those of your display device.
Step 4
Press <RIGHT> button on the front panel to go
to Page 2.
Step 5
Crystalio now scales the video so that it is
exactly same size as the source resolution.
If the timing is correct, select [Custom Timing]
to customize the resolution timing. Alternatively,
you can select [Move Pattern] and move the
pattern to make sure every part of the screen is
pixel perfect.
If you already know the settings of your display, you
can select them via setting up Resolution (Section 4.5).
However, there may be circumstances where either the
settings are not known, or are not listed in the library of
standard settings. Pixel Magic System is a userfriendly system that allows you to interactively
configure your display until you achieve a perfect
image.
When this is completed, press <RIGHT> button
to go to Page 3.
Step 6
To use Pixel Magic System, you must have a DVD
player connected to your display. Also, for best result,
you should use a DVD player with a digital video
connection. This means either a DVI or a SDI
connection. The reason for this is that only a digital
connection guarantees 100% lossless transfer of the
DVD information to Crystalio, which is necessary for
the most accurate setup result.
If you do not have access to a DVD player with digital
connection, we recommend you to use the setup
procedures described in Resolution (Section 4.5).
Step 1
Ensure that your DVD player is connected to
Crystalio
according
to
the
recommendations (via a digital terminal).
Switch ON DVD player and insert PixelMagic
DVD disc.
Step 2
Ensure the DVD player is set as the input
source of Crystalio.
Step 3
► Pixel Magic
► Play PixelMagic
DVD Chapter 1
VP SET UP
Input Select
Aspect Ratio
Video Settings
Advanced
System Config
AR Profile
Video Profile
> Pixel Magic
Play Chapter 1 of the PixelMagic DVD in your
DVD player according to the instruction shown
on the Crystalio display.
32
Crystalio now enlarges the video to fit the whole
screen.
You can now select [H-Sync / V-Sync] and
adjust the active video so that it is at the correct
position on screen.
Step 7
When this is completed, you can press
<RIGHT> button to go to Page 4.
You may choose to play any one of Chapter 3
to 6 of PixelMagic DVD to further examine
whether the output timing is pixel perfect..
Step 8
Setting Up Pixel Magic System
Follow instructions on Page 3, play PixelMagic
DVD Chapter 2.
When this is completed, press <RIGHT> button
to go back to the main menu.
Note: In any page of PixelMagic:
Press <CANCEL> button to end the PixelMagic
section
Press <ENTER> button is the same as pressing
<RIGHT> button
PixelMagic uses “2:2 pulldown” de-interlacing method
throughout the whole process, so, you will see both
“Film” and “2:2 pulldown” LEDs illuminated.
VPS-2300 User Guide
6
Troubleshooting
No LEDs displayed (including power)
Check that the unit is connected to a working mains
supply, and that it is switched on.
Power LED is On, but no other LEDs shown / LCD
not showing a display
Check options [Backlight] and [LEDs] have not been
de-activated.
VP SET UP
Input Select
Aspect Ratio
Video Settings
> Advanced
System Config
AR Profile
Video Profile
Pixel Magic
►
ADVANCED
True Life
Zoom
Position
Crop
Film Detect
> Back Light
> LEDs
Hide Input
Firmware Upgd
No picture is displayed
Ensure that Crystalio is switched on.
It may take up to 1 minute for Crystalio to complete
its initialization process before the video can be
displayed.
Ensure correct video input has been selected and
that is correctly cabled and the video source is
active.
Ensure the source video is of correct format. Refer
to Section 5.6 System Config for more information.
Picture is displayed but is unstable
Check cabling, particularly that the cable providing
video sync is connected correctly.
Picture appears stretched
Ensure that the aspect ratio of the video source
material, video source device and Crystalio are all
correctly set.
7
Specifications
Features
Three SDI (Serial Digital Interface) inputs
Digital DVI and analogue RGBHV/YCrCb outputs
Directional Correlation De-interlacing (DCDi™) for
optimal de-interlacing of original video material*
All major TV output formats supported, including
480p, 540p, 576p, 720p, 1080i, 1080p and many
more
Advanced 6-tap, 64-phase scaler / up converter to
offer top-notch scaling capability
Full manual control of de-interlacing algorithms for
advanced users
Preset digital timings of popular digital display
devices
User-customizable output resolution to match your
own display devices
Tearless
frame
50/60/72/75/100/120Hz
rate
conversion,
Ten user-customizable independent profiles for each
input
Motion Adaptive Noise Reduction to improve picture
quality for analogue inputs
Chroma filter to mask the Chroma Up-Sampling
Error (also known as CUE or chroma-bug) of MPEG
decoders
Adaptive
comb
filter
for
excellent
chrominance/luminance separation and reduced
cross colour and cross luminance artefacts
Real-time status information display on LCD panel
including source, video format, output resolution, deinterlacing, aspect ratio, zoom, and more
Non-linear stretching to display 4:3 material on 16:9
displays
Film Mode Processing for proper de-interlacing of
3:2 and 2:2 pulldown material*
HDTV up conversion, scaling and frame-doubling
Edit correction - film content is continuously
monitored for any break in sequence caused by
"bad edits" and quickly compensates for the most
effective reduction in artefacts*
TrueLife™ enhancer brings out details in the picture
and produces a more life-like image
Pixel Magic System™ to help users set Crystalio®
output resolution to various display devices in pixel
perfect mode
UltraAR™ supports virtually any Video Image
aspect ratio from 0.75:1 to 4.00:1, and Display
Device aspect ratio from 1:1 to 3:1
Brightness, Contrast and Saturation control
R, G, B offset individual control
Various Zoom controls including "Best Fit", "Full
Width", "Full Height", and customization from 0.5 to
10 times screen height
User-friendly user interface and remote control
Firmware upgradeable through built-in Ethernet and
USB ports
CrystalWall feature to enable video wall applications
using multiple Crystalio units and display devices
* For standard definition video only
Video Inputs
User-Friendly Appliance
SDI (Serial Digital Interface) input
x3
Component/RGBs/RGsB input
x2
Composite Video input
(also used as sync for RGBs)
x2
S-Video input
x2
HDTV analogue input
x1
DVI input (HDCP compatible)
x1
Infrared remote control and LCD/LED on the front
panel
General
Dimensions: 438 x 322 x 88 mm / 17.2 x 12.7 x 3.5 inch
Weight:
7 kg / 15.5 lbs
Power:
110 / 220V AC user selectable, 35 W
Regulatory approval: CE, UL, FCC
Video Outputs
Digital:
DVI (HDCP compatible)
HDTV Video Scaler/Processor
POWER
Analogue:
RGBHV or component video
RGB/DVI
SETUP
OK
SDI
Serial Digital Interface
34
VPS-2300
FILM
2:2
PULL DOWN
CAN CEL
IN PUT
Pixel
Magic
OU TPUT
DCDi
by FAROUDJA
VPS-2300 User Guide
8 Safety Information
Important information
To ensure maximum performance, please read this
manual carefully. Keep it in a safe place for future
reference.
Grounding or polarization – Precautions should be
taken so that the grounding or polarization of an
appliance is not defeated.
Install this unit in a cool, dry, clean place – away
from windows, heat sources, sources of excessive
vibration, dust, moisture and cold. Avoid sources of
humming (transformers, motors). To prevent fire or
electrical shock, do not expose the unit to rain or
water.
This unit is not disconnected from the AC power
source as long as it is connected to the wall outlet,
even if this unit itself is turned off. This state is called
the standby mode. In this mode, this unit is designed
to consume a small amount of power.
Never remove the unit cover. Contact your dealer if
an object falls inside the unit.
Do not use force on switches, controls or connection
wires. When moving the unit, first disconnect the
power plug and the wires connected to other
equipment. Never pull on the wires themselves.
The openings on the unit cover assure proper
ventilation of the unit. If these openings are
obstructed, the temperature inside the unit will rise
rapidly. Therefore, avoid placing objects against
these openings, and install the unit in a wellventilated area to prevent fire and damage.
Be sure to allow a space of at least 30 cm behind,
20 cm on the both sides and 10 cm above the top
panel of the unit to prevent fire and damage.
The voltage selector on the rear panel of this unit
must be set for your local main voltage BEFORE
plugging into the AC main supply. Voltages are
110/120/220/240 V AC, 50/60 Hz.
The voltage used must be the same as that
specified on this unit. Using this unit with a higher
voltage than specified is dangerous and may result
in fire or other accidents. PIXEL MAGIC SYSTEMS
LTD. will not be held responsible for any damage
resulting from use of this unit with a voltage other
than specified.
Digital signals generated by this unit may interfere
with other equipment such as tuners, receivers or
TVs. Move this unit farther away from such
equipment if interference is observed.
Do not attempt to clean the unit with chemical
solvents; this might damage the finish. Use a clean,
dry cloth.
Be sure to read the “TROUBLESHOOTING” section
regarding common operating errors before
concluding that the unit is faulty.
When not planning to use this unit for long periods
of time, disconnect the AC power plug from the wall
outlet.
To prevent lightning damage, disconnect the AC
power plug when there is an electrical storm.
9
Support and Warranty Information
Product Support
Product Warranty
Crystalio is designed to provide you with many years of
viewing pleasure. If for any reason you encounter a
problem with your Crystalio unit, please follow the
following:
Pixel Magic Systems Ltd. warrants Crystalio for OneYear from date of purchase to the original purchaser
that this product is free from defects in material and
workmanship. If, after inspection, you discover any
defects in material or workmanship, Pixel Magic
Systems Ltd. will have the option to repair, or replace
the defective Pixel Magic Systems’ product free of
charge. This one-year warranty does not cover
damages from normal wear and tear or from accidental
damage, misuse, improper care, alterations and
damage caused in transportation by a common carrier
or airline.
Carefully follow the steps shown in Section 7,
Troubleshooting; or
Contact your dealer for advice.
!!Caution: Under NO circumstances should you
attempt to open, repair or modify your Crystalio unit
as this could expose you to electrical shock, and / or
severely damage your Crystalio.
There are no other warranties expressed or implied,
including, but not limited to, the implied warranties of
merchantability and the fitness for a particular purpose
beyond the terms of this one-year warranty. The oneyear warranty offered by Pixel Magic Systems Ltd.
herein may not be modified by any oral representations
made by any employee, agent or representative of
Pixel Magic Systems Ltd.
Repair or replacement as provided under this warranty
is the exclusive remedy of the consumer. Pixel Magic
Systems Ltd. shall not be liable for any incidental or
consequential damages for breach of any expressed or
implied warranty on this product, except to the extent
prohibited by applicable law, any implied warranty of
merchantability or fitness for a particular purpose on
this product is limited in duration to the duration of this
warranty. If you need to have your Pixel Magic
Systems’ product repaired or replaced under the
conditions of this one-year warranty, please contact
your dealer to make suitable arrangements.
Limitation of Liability (for all customers)
BOTH YOURS AND PIXEL MAGIC SYSTEMS’
LIABILITY SHALL BE LIMITED TO THE PRICE PAID
FOR PRODUCT. IN NO EVENT SHALL EITHER YOU
OR PIXEL MAGIC SYSTEMS LTD. BE LIABLE TO THE
OTHER FOR ANY INDIRECT, SPECIAL, INCIDENTAL
OR CONSEQUENTIAL DAMAGES RESULTING FROM
PERFORMANCE OR FAILURE TO PERFORM UNDER
THIS AGREEMENT, OR USE OF ANY GOODS OR
SERVICE SOLD PURSUANT HERETO, WHETHER
DUE TO A BREACH OF CONTRACT, BREACH OF
WARRANTY, NEGLIGENCE , OR OTHERWISE.
NEITHER YOU NOR PIXEL MAGIC SYSTEMS LTD.
SHALL HAVE ANY LIABILITY TO THE OTHER FOR
INDIRECT OR PUNITIVE DAMAGES, OR FOR ANY
CLAIM BY ANY THIRD PARTY EXCEPT AS
EXPRESSLY PROVIDED HEREIN.
36
_____________________________________________________________________________________________
Website: www.crystalio.com
Email: [email protected]
DCDi® by Faroudja and TrueLife™ are registered trademarks of Genesis Microchip.
Pixel Magic System™, UltraAR™, and CrystalWall™ are trademark of Pixel Magic Systems Ltd.
All rights reserved.