1
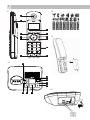
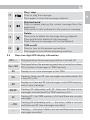
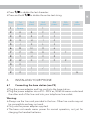
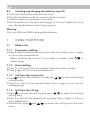
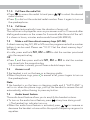
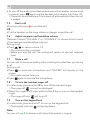
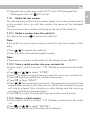
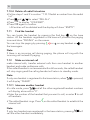
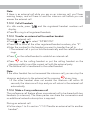
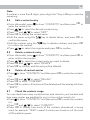
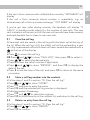
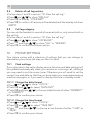
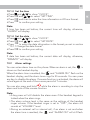
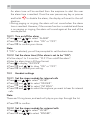
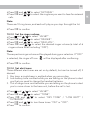
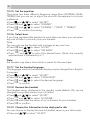
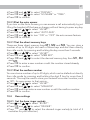
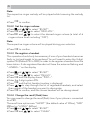
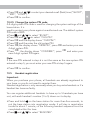
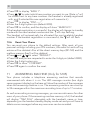
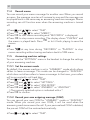
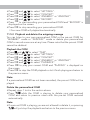
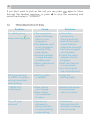
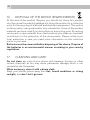
1
UK
USER GUIDE
UK
CORDLESS
TELEPHONE
Voxtel S100/105
V1
2
P1
P2
12
11
M1
10
9
8
M2
M3
1
2
3
4
OK
P3
2 ABC 3 DEF
4 GHI
5
JKL
6 MNO
7 PQRS
8
TUV
9 WXYZ
0
R
6
7
P4
5
20
13
14
15
16
P5
19 18
17
3
BECAUSE WE CARE
Thank you for purchasing this product. This product has been designed
and assembled with utmost care for you and the environment. This is
why we supply this product with a quick installation guide to reduce the
number of paper (pages) and therefor save trees to be cut for making this
paper.
A full and detailed user guide with all the features descripted can be
found on our website www.aegtelephones.eu . Please download the full
user guide in case you want to make use of all the advanced features of
your product. To save the environment we ask you not to print this full user
guide. Thank you for supporting us to protect our environment.
2
IMPORTANT SAFETY INSTRUCTIONS
When using your telephone, basic safety precautions should always be
followed to reduce the risk of fire, electric shock and injury, including the
following:
1. Read and understand all the instructions.
2. Follow all warnings and instructions marked on the product.
3. Unplug the power adapter from the wall outlet before cleaning. Do not
use liquid cleaners or aerosol cleaners. Use a damp cloth for cleaning.
4. Keep your phone away from hot, humid conditions or strong sunlight
and don’t let it get wet or use this product near water (for example,
near a bath tub , kitchen sink, swimming pool).
5. Do not overload wall outlets and extension cords as this can result in
the risk of fire or electric shock.
6. Unplug this product from the wall outlet under the following conditions:
tWhen the power supply cord or plug is damaged.
tIf the product does not operate normally by following the operating
instructions.
tIf the product has been dropped and the cabinet has been damaged.
tIf the product exhibits a distinct change in performance.
7. NEVER use your phone outdoors during a thunderstorm-unplug the
base from the telephone line and the mains socket when there are
storms in your area. Damage caused by lightning is not covered by
the guarantee.
8. Do not use the telephone to report a gas leak in the vicinity of the leak.
UK
1
4
9. Use only the supplied NiMH (Nickel Metal Hydride) batteries! The
operation periods for the handsets are only applicable with the default
battery capacities.
10. The use of other battery types or non-rechargeable batteries/primary
cells can be dangerous. These may cause interference and/or damage
to the unit or surroundings. The manufacturer will not be held liable for
damage arising from such non-compliance.
11. Do not use third party charging bays. Damage may be caused to the
batteries.
12. Please ensure the batteries are inserted in the correct polarity.
13. Dispose of batteries safely. Do not immerse them in water, burn them,
or put them where they could get punctured.
3
Intended use
This telephone is intended to be connected to a public analogue
telephone network or to an analogue extension of a compatible PBX
system.
4
UNPACKING YOUR PHONE
In the box you will find:
t1 Handset
t1 Base station
t1 Mains power adapter
t1 Telephone line cord
t2 Rechargeable batteries
t1 User guide
Keep the packing materials in a safe place in case you later need to
transport the device.
5
GETTING TO KNOW YOUR PHONE
5.1
Handset overview (see P1)
#
1
UK
5
Meaning
M1
M2
M3
M1/M2/M3 - Direct memory keys
tIn idle mode: press and hold to dial the stored number
2
Clear
tIn main menu mode: press to go back to idle screen
tIn sub-menu mode: press to go back to previous level
tIn sub-menu mode: press and hold to go back to idle
screen
tIn editing / predialling mode: press to clear a
character/digit
tIn editing / predialling mode: press and hold to delete
all the characters / digits
tDuring a call: press to mute / unmute the microphone
tIn idle mode: press to make internal call
3
Up / call log
tIn idle mode: press to access the call log
tIn menu mode: press to scroll up the menu items
tIn contacts list / redial list / call log: press to scroll up
the list
4
Onhook / Off
tDuring a call: press to end a call and go back to idle
screen
tIn menu / editing mode: press to go back to previous
menu
tIn menu / editing mode: press and hold to go back to
idle screen
tIn idle mode: press and hold to power off the handset
tIn idle mode (when the handset is powered off): press
and hold to power on the handset
6
5
Alphanumeric keypad
tPress to insert a digit / character / * / #
t1-9 keys in idle mode: Press and hold to dial out prestored fast-key memories
t* key in idle mode: press and hold to enable or disable
the keypad lock.
t# key during a call: press and hold to insert a Flash(R).
t# key in idle mode: press and hold to turn on / off the
handset ringer.
t0 key in idle / predialing / number editing mode: Press
and hold to insert a pause.
t# key in call log mode: press to review caller’s number
if applicable
6
Volume up / down
tDuring a call: press to increase or decrease the
earpiece volume.
7
Microphone
8
Off hook / handsfree
tIn idle / predialling mode: press to make a call. Press
again to turn on the speakerphone.
tIn redial list / call log / contacts list: press to make a call
to the selected entry in the list. Press again to turn on
the speakerphone.
tDuring ringing: press to answer a call. Press again to
answer with speakerphone.
9
Down / redial list
tIn idle mode: press to access the redial list.
tIn menu mode: press to scroll down the menu items.
tIn contacts list / redial list / call log: press to scroll
down the list.
10
Menu / OK
tIn idle mode: press to access the main menu.
tIn sub-menu mode: press to confirm the selection.
tDuring a call: press to access intercom/ contacts list /
redial list/ call log.
/OK
11
Amplify
tDuring a call: press to turn on or off the audio boost.
12
Earpiece
5.2
Display icons and symbols (see P2)
The LCD display gives you information on the current status of the
telephone.
Meaning
Steady on when the handset is within range of the base.
Flashes when the handset is in marginal range of the base.
Off when out of range of the base or cannot communicate
with the base.
Steady on when a call is in progress.
Flashes when there is an incoming call.
On when the speakerphone is turned on.
Steady on when an intercom call is in progress.
Flashes during intercom ringing.
Steady on when the telephone answering machine (TAM) is
turned on.
Flashes when new TAM messages are received.
On when a new TAM message is playing or a new call is
viewed in the call log.
On when the handset ringer is switched off.
Steady on when an alarm is set.
Flashes when the alarm time has been reached.
On when the keypad is locked.
UK
7
8
On when you have a new Voice Mail message. (This is a caller
display service from the network)
Indicates when there are more characters or numbers in front
of those being displayed.
Indicates when there are more characters or numbers after
those being displayed.
Full battery power level.
2/3 battery power level.
1/3 battery power level.
Flashes when low battery power level is detected, needs
charging.
Cycle when, battery is charging.
5.3
Base station overview (see P4)
#
Meaning
13
Find
Press the find button on the base station to find your
registered handset(s).
Press and hold to start registration process.
14
Volume up
Increase speaker volume during message playback.
15
Volume down
Decrease speaker volume during message playback.
16
Skip forward
Press to skip the current message and play the next
message.
17
Play / stop
Press to play the message.
Press again to stop the message playback.
18
Skip backward
Press to repeat playing the current message from the
beginning.
Press twice to skip backward to the previous message.
19
Delete
Press once to delete the message during playback.
Press and hold to delete all the messages.
Note: New voice messages will not be deleted.
20
TAM on/off
Press to turn on the answering machine.
Press again to turn off the answering machine.
5.4
Base two digit-LED display information
0F-> -0n-> XX
Displayed when the answering machine is turned off.
Displayed when the answering machine is turned on where
XX is number of messages in TAM memory.
00
Steady on: no voice messages in the TAM.
XX
Flashing: there are XX new messages recorded where XX
is from 01 to 59.
ZZ
Steady on: there are ZZ old messages in the TAM memory
and no new messages.
XX/FF
Flashing XX alternately with FF: there are XX new voice
messages recorded and the TAM memory is full.
FF
Flashing FF: the TAM memory is full and there are no new
messages.
- - /XX
Flashing XX alternately with - -: the time / date is not set
and there are XX new messages recorded.
--
Flashing - -: the time / date is not set and there are no new
messages recorded.
UK
9
10
XX
XX steady on: playing the current XX old recorded
message.
XX flashing: playing the current XX new recorded incoming
message.
A1/A2
Steady on: playing the current outgoing message (OGM)
where A1 is the answer & record OGM and A2 is the
answer only OGM.
XX/An
Flashing XX alternately with An: currently recording the
new XX incoming message.
rA
Flashing: remote access is in progress from a handset or
via the external line.
LX
Steady on: indicates the current volume level where X is
from 1 to 8.
5.5
Menu structure
tIn idle mode, press menu key to go to “CONTACTS“, the first option
in the menu list.
tRefer to the following for the menu structure.
or down key
to go to other options in the menu list.
tPress up key
tPress OK to enter a sub-menu or function.
tPress cancel key
to go back to the previous level.
5.6
Text and digit entry table
The following tables show you where each letter and punctuation
character can be found, by using repeated presses of the alphanumeric
keypad.
This will be helpful when storing a name in the contacts and renaming
your handset.
In editing mode, a cursor is displayed to indicate the current text entry
position. It is positioned at the right of the last character entered.
Writing tips:
tOnce a character is selected, the cursor will move to the next position
after a short pause.
tYou can move the cursor within the text with the / keys to amend
the text entry.
11
6
4th
press
UK
tPress
to delete the last character.
to delete the entire text string.
tPress and hold
Key
1st
press
2nd
press
3rd
press
5th
press
1
Space
-
1
2
A
B
C
2
3
D
E
F
3
4
G
H
I
4
5
J
K
L
5
6
M
N
O
6
7
P
Q
R
S
8
T
U
V
8
9
W
X
Y
Z
9
0
0
*
*
?
/
(
)
#
#
‘
,
_
.
6th
press
7
&
INSTALLING YOUR PHONE
6.1
Connecting the base station (see P5)
tPlug the power adapter and line cord into the base station.
tPlug the power adapter into a 210 - 230 V ac, 50/60 Hz mains socket and
the other end of the line cord into your telephone line socket.
Warning:
tAlways use the line cord provided in the box. Other line cords may not
be compatible and may not work.
tOnly use the power adapter supplied.
tThe base unit needs mains power for normal operation, not just for
charging the handset batteries.
12
6.2
Installing and charging the batteries (see P3)
tSlide open the battery compartment cover.
tPlace the 2 batteries with the correct polarity, as shown.
tSlide the battery compartment cover back.
tPut the handset on the base and charge for 15 hours before first time
use. The handset beeps when charging starts.
Warning:
Only use AAA size NiMH rechargeable batteries.
7
USING YOUR PHONE
7.1
Make a call
7.1.1 Preparatory dialling
tEnter the phone number and press to dial the number, press it again
to turn on the speakerphone.
to
>When entering the number, if you make a mistake, press
delete digits.
7.1.2 Direct dialling
tPress to connect to the line and then enter the phone number.
tPress again to turn on the speakerphone.
7.1.3 Call from the contacts list
tPress to access the contacts list and press / to select the desired
contacts entry.
tPress to dial out the selected entry. Press it again to turn on the
speakerphone.
7.1.4 Call from the call log
to access the call log and press
/
to select the desired
tPress
call log entry.
tPress to dial out the selected call log entry. Press it again to turn on
the speakerphone.
and
/
to access the call log from the main
tAlternatively, press
menu.
7.1.5 Call from the redial list
to access the redial list and press / to select the desired
tPress
redial number.
tPress to dial out the selected redial number. Press it again to turn on
the speakerphone.
7.1.6 Call timer
Your handset automatically times the duration of every call.
The call timer is displayed as soon as you answer a call or 15 seconds after
dialling and remains on the screen for 5 seconds after the end of the call.
It is shown in hours, minutes and seconds format (HH:MM:SS).
7.2
Make a call from direct memory keys (M1-M3)
A direct memory key, M1, M2 or M3 must be programmed with a number
before it can be used. Please see “10.3.11 Set the direct memory keys”
for details.
tIn idle, press and hold M1, M2 or M3 to dial the number pre-stored
into the respective key.
OR
tPress and then press and hold M1, M2 or M3 to dial the number
pre-stored into the respective key.
>If no number is stored, you will hear a double beeps tone.
7.3
Answer a call
If the handset is not on the base or a charging cradle:
tWhen the phone rings, press to answer a call, press it again to turn on
the speakerphone.
Note:
If the handset is on the base or charging cradle and if “AUTO ANS“ is
set to on: when the phone rings, pick up the handset to answer the call
automatically, without having to press any button.
7.4
Audio boost feature
The audio boost feature allows you to amplify the handset volume.
at any time during a call.
tTo turn on the audio boost feature, press
>The handset top indicator turns on.
/
to increase or
tWhen the audio boost feature is activated, press
decrease the handset volume within the specific frequency range set in
equalizer.
UK
13
14
tTo turn off the audio boost feature and return the handset volume back
again and the handset top indicator light turns off.
to normal, press
>The audio boost feature will be turned off automatically when the call
is ended.
7.5
End a call
to end the call.
tDuring a call press
OR
tPut the handset on the base station or charger to end the call.
7.6
Adjust earpiece and handsfree volume
There are 5 levels (“VOLUME 1” to “VOLUME 5”) to choose from for each
of the earpiece and handsfree volumes.
During a call:
tPress / to select volume 1-5.
>The current setting is shown.
>When you end the call, the setting will remain at the last selected
level.
7.7
Mute a call
You can talk to someone nearby without letting the caller hear you during
a call.
During a call:
to mute the microphone and “MUTED” will display on the
tPress
screen.
>Your caller cannot hear you.
again to unmute the microphone.
tPress
7.8
To turn the handset ringer off
tIn idle mode, press and hold # to turn off the handset ringer.
icon will be displayed.
>The ringer off
tWhen the ringer is off, press and hold the # key to turn on the handset
ringer.
will turn off.
>The ringer off icon
7.9
Turn on the keypad lock
tIn idle mode, press and hold * to turn on the keypad lock.
will be displayed.
>The keypad lock icon
Note:
You can still use
to answer a call when the handset is ringing.
tIn keypad lock mode, press and hold * to turn off the keypad lock.
will turn off.
>The keypad lock icon
7.10
Redial the last number
You can redial any of the 5 last numbers called. If you have stored a name
in the contacts list to go with the number, the name will be displayed
instead.
The most recent last number will display at the top of the redial list.
7.10.1 Redial a number from the redial list
to access the redial list.
tIn idle mode, press
Note:
If the redial list entry shows a name, press # to view the number of this
entry.
tPress / to browse the redial list.
tPress to dial to the selected redial number.
Note:
If there are no numbers in the redial list, the display shows “EMPTY ”.
7.10.2 Store a redial number into your contacts list
tFollow steps 1 and 2 in section “7.10.1 Redial a number from the redial
list”.
tPress and / to select “STORE“.
tPressOK and then enter the name you want to use in your contacts list.
tPress OK and then modify the number if necessary.
tPress OK to show “RING 1”.
tPress / to browse the ring tone list. The respective ring tone will be
played when browsing the ring tone list. (Note: the selected ring tone
will only be played if you subscribe to caller display and the incoming
number matches the stored number.)
tPress OK to confirm the selected ring tone and to save the entry.
7.10.3 Delete a redial number
tFollow steps 1 and 2 in section “7.10.1 Redial a number from the redial
list”.
tPress and / to select “DELETE”.
tPress OK to confirm and the entry will be deleted.
UK
15
16
7.10.4 Delete all redial list entries
tFollow steps 1 and 2 in section “7.10.1 Redial a number from the redial
list”.
tPress and / to select “DEL ALL”.
tPress OK to display “CONFIRM?”.
tPress OK again to confirm.
>All entries will be deleted and the display will show “EMPTY”.
7.11
Find the handset
on the base
You can locate the handset by pressing the find key
station. All the handsets registered to the base will produce the paging
tone and show “PAGING“ on the screen.
or on any handset or
on
You can stop the paging by pressing ,
the base again.
Note:
If there is an incoming call during paging, the phone will ring with the
incoming call instead of paging.
7.12
Make an internal call
make internal calls, transfer external calls from one handset to another
handset and make conference calls.
If the called handset is not answered within 60 seconds, the called handset
will stop ringing and the calling handset will return to standby mode.
Note:
If only one handset is registered to the base station, when
it will display “FAILED”.
is pressed,
7.12.1 Intercom another handset
and all the other registered handset numbers
tIn idle mode, press
will display, alone with a “9”.
tEnter the number of the handset that you want to call, or enter 9 to call
all handsets.
tThe called handset rings. Press
internal call.
on the called handset to establish the
Note:
If only two handsets are registered to the base station, pressing
call the other handset immediately.
will
Note:
If there is an external call while you are on an intercom call, you‘ll hear
warning beeps, and will have to end the intercom call before you can
answer the external call.
7.12.2 Call all handsets
and the registered handset numbers will
tIn idle mode, press
display.
tPress 9 to ring to all registered handsets.
7.12.3 Transfer an external call to another handset
During an external call:
tPress and / to select “INTERCOM”.
tPress OK to show all the other registered handset numbers, plus “9“.
tEnter the number for the handset you want to transfer the call to.
>The external call is put on hold automatically and the called handset
rings.
tPress
on the called handset to establish an internal call.
tPress
on the calling handset or put the calling handset on the
charging cradle to end the current call with the external party.
tThe external call is transferred to the called handset.
Note:
If the other handset has not answered the intercom call, you can stop the
at any time.
intercom and return to the external call by pressing
>If the other handset does not answer the intercom call within 30
seconds, the intercom will stop and you will return to the external call
automatically.
7.12.4 Make a 3-way conference call
The conference call feature allows one external call to be shared with two
handsets (in intercom). The three parties can share the conversation and
no additional network subscription is required.
During an external call:
tFollow steps 1 to 4 in section “7.12.3 Transfer an external call to another
handset”.
UK
17
18
tPress and hold the * key on the calling handset to establish the
conference call.
Either handset can exit the conference by pressing
handset still connected to the external call.
8
, leaving the other
PRIVATE PHONEBOOK
Each handset can store up to 20 private phonebook entries with names
and numbers. Each phonebook entry can have a maximum of 20 digits
for the phone number and 8 characters for the name. You can also select
different ringtones for your phonebook entries. (Note: the different
ringtones only play if you subscribe to caller display and the incoming
number matches the stored number.)
Phonebook entries are stored alphabetically by name.
8.1
Add a new contacts entry
tFrom idle model, press to show “CONTACTS“ and then press OK to
enter the contacts list.
tPress OK to show “ADD”.
tPress OK and then enter the name.
tPress OK and then enter the number.
/
to select the desired ringtone for your contacts
tPress OK and
entry.
tPress OK to store the contacts entry.
8.2
Search for a contacts entry
tFrom idle model, press to show “CONTACTS“ and then press OK to
enter the contacts list.
tEnter the first letter of the name using the alphanumeric keys (e.g. if it
begins with C, press the 2 key three times) and then / to scroll to
the entry you want.
8.3
View a contacts entry
tFrom idle model, press to show “CONTACTS” and then press OK to
enter the contacts list.
tPress / to select the desired contact entry.
tPress OK and / to select “VIEW”.
/
to review the name, number and melody of the
tPress OK and
selected phonebook entry.
Note:
If number is more than 8 digits, press digits the * key or # key to view the
remaining.
8.4
Edit a contacts entry
tFrom idle model, press to show “CONTACTS” and then press OK to
enter the contacts list.
tPress / to select the desired contact entry.
tPress OK and / to select “EDIT”.
tPress OK to display the current name.
tEdit the name using the
key to delete letters, and press OK to
confirm the name.
key to delete numbers, and press OK
tEdit the number using the
to confirm the number.
tPress / to select the ringtone and press OK to confirm.
8.5
Delete a contacts entry
tFrom idle model, press to show “CONTACTS” and then press OK to
enter confirm the number.
tPress / to select the contact entry you want to delete.
tPress OK and / to select “DELETE”.
tPress OK to confirm, and the entry will be deleted.
8.6
Delete all contact entries
tPress to show “CONTACTS” and then press OK to enter the contacts
list.
tPress OK and / to select “DEL ALL”.
tPress OK to show “CONFIRM?”.
tPress OK to confirm. All entries will be deleted and the display will show
“EMPTY”.
8.7
Check the contacts usage
You can check how many contact entries and stored in your handset and
how many spaces are available for you to store in the contacts list.
tPress to show “CONTACTS” and then press OK to enter the contacts
list.
tPress OK and / to select “CAPACITY”.
tPress OK to display how much of the contacts phonebook is being
used, for example “14/20” means14 entries are stored out of the total
of 20 available spaces.
UK
19
20
8.8
Set the fast dial numbers
Up to 8 of your contact entries can be allocated to a fast dial key (from 2
to 9), where you can dial the number from idle mode by simply pressing
and holding the appropriate digit key for more than 2 seconds. If no fast
dial number is stored, you will hear a double-beep tone when the key is
held down.
8.8.1 Add or edit the fast dial number
tPress to show “CONTACTS” and then press OK to enter the contacts
list.
tPress OK and / to select “FASTDIAL”.
tPress OK and / to show the digit key from 2 to 9 that you want to
set. Then press OK to select it.
>If “EMPTY” is displayed briefly, there is no number stored in the
selected key:
tPress / to select an entry from the contacts list.
tPress OK to save the new number in the selected fast dial key.
>If a name is displayed, there is already a number stored in the selected
key.
tPress OK to select “EDIT”.
tPress OK and then / to select an entry from the contacts list.
tPress OK to save the new number in the selected fast dial key.
8.8.2 Delete a fast dial number
tRepeat the steps 1 to 3 in section “8.8.1 Add or edit the fast dial
number” .
tPress and / to select “DELETE”.
tPress OK to confirm the delete.
9
CALLER DISPLAY (NETWORK DEPENDENT)
This feature is available if you have subscribed the caller line identification
service with your network service provider. Your phone can store up to 10
received calls with date/time information in the call log. The number will
be shown on the screen when the phone is ringing.
If the number matches with one of the entries in your contacts list, the
caller’s name stored in the contact list will be displayed alternately with
the number and the handset will ring with the ring tone associated with
that contacts entry.
If the call is from someone who withheld their number, “WITHHELD“ will
display.
If the call is from someone whose number is unavailable, e.g. an
international call or from a private exchange, “OUT AREA“ will display.
If you‘ve got new caller display records, the handsets will display “X
CALLS“ in standby mode, where X is the number of new calls. The new
calls indication will remain until all the new call records have been viewed,
and each handset has to clear its own new calls.
9.1
View the call log
All received calls are saved in the call log with the latest call at the top of
the list. When the call log is full, the oldest call will be replaced by a new
call. Any unanswered calls which have not been viewed are marked with a
at the top of the display.
tPress
to access the call log.
OR Press and / to show “CALL LOG”, then press OK to select it.
tPress / to select the desired entry.
tPress # to view the caller’s number if applicable.
and
/
to show “DETAILS”, and then OK to display the
tPress
date of the call.
tPress # to see the time of the call, and press OK to return to the name
or number.
9.2
Store a call log number into the contacts
tFollow steps 1 and 2 in section “9.1 View the call log”.
tPress and / to show “STORE”.
tPress OK and then to enter the name.
tPress OK and the selected call log number is displayed.
tEdit the number if necessary.
tPress OK and / to select the ringtone.
tPress OK to store the entry in the contacts list, and return to the call log.
9.3
Delete an entry from the call log
tFollow steps 1 and 2 in section “9.1 View the call log”.
tPress and / to show “DELETE”.
tPress OK to confirm.
UK
21
22
9.4
Delete all call log entries
tFollow steps 1 and 2 in section “9.1 View the call log”.
tPress and / to show “DEL ALL”.
tPress OK to display “CONFIRM?”.
tPress OK to confirm. All entries will be deleted and the display will show
EMPTY.
9.5
Call log category
You can set the handset to record all received calls or only missed calls in
the call log.
tFollow steps 1 and 2 in section “9.1 View the call log”.
tPress and / to show “CATEGORY”.
tPress OK and then / to show “ALL” or “MISSED”.
tPress OK to confirm the chosen option.
10
PHONE SETTINGS
Your phone comes with a selection of settings that you can change to
personalise your phone the way you like it to work.
10.1
Clock settings
If you subscribe to the caller display service, the time and date settings will
be updated automatically when you receive an incoming call, although
you may need to set the correct year. Otherwise you will need to set the
correct time and date so that the you know when you received answering
machine messages, or if you want to display the time in standby mode.
10.1.1 Change the date format
tPress and / to show “CLOCK”.
tPress OK and / to select “DATE FMT”.
tPress OK and then / to choose a date format of either “DDMMYY“
or “MMDDYY”.
tPress OK to confirm your choice.
10.1.2 Change the time format
tPress and / to show “CLOCK”.
tPress OK and / to select “TIME FMT”.
tPress OK and then / to choose a time format of either “12HR” or
“24HR”.
tPress OK to confirm your choice.
23
UK
10.1.3 Set the time
tPress and / to show “CLOCK”.
tPress OK and / to select “SET TIME”.
tPress OK and then to enter the time information in 24 hour format.
tPress OK to confirm your setting.
Note:
If time has been set before, the current time will display, otherwise,
“HH:MM” will display.
10.1.4 Set the date
tPress and / to show “CLOCK”.
tPress OK and / to select “SET DATE”.
tPress OK to enter the date information in the format you set in section
“10.1.1 Change the date format”.
tPress OK to confirm your setting.
Note:
If date has been set before, the current date will display, otherwise,
“DDMMYY” will display.
10.2
Alarm settings
You can set an alarm time on this phone. When an alarm is set, the
shown on the handset display.
is
and “ALARM ON ” flash on the
When the alarm time is reached, the
handset display, and the alarm tone rings for 45 seconds. You can press
any key to disable the alarm. If snooze function is activated, the alarm will
sound again at the end of the snooze period of 7 minutes.
while the alarm is sounding to stop the
You can also press and hold
alarm and turn off the snooze function.
Note:
>A key press will still disable the alarm even if the handset keypad is
locked when the alarm rings.
>The alarm volume level is the same as the settings of the handset
ringer volume. If the handset ringer is set to “OFF”, the alarm still
sounds at “VOLUME1” level.
>During an external call or internal call, if an alarm is set and when
the alarm time is reached, the
and “ALARM ON” will still flash.
24
An alarm tone will be emitted from the earpiece to alert the user
the alarm time is reached. Once the user presses any key or presses
and holds
to disable the alarm, the display will revert to the call
duration.
>During paging or ringing, the alarm will not sound when the alarm
time is reached. However, if the snooze function is enabled and there
is no paging or ringing, the alarm will sound again at the end of the
snooze period.
10.2.1 Turn on/off the alarm
tPress and / to select “ALARM”
tPress OK and / to show “ON” or “OFF”.
tPress OK to confirm your choice.
Note:
If “ON” is selected, you will be prompted to set the alarm time.
10.2.2 Set the alarm time (if the alarm is set to be “ON”)
tFollow steps 1 to 3 in section “10.2.1 Turn on/off the alarm”.
tEnter the alarm time in 24 hour format.
tPress to display “SNOOZE”.
tPress OK and / to show “ON” or “OFF”.
tPress OK to confirm your setting.
10.3
Handset settings
10.3.1 Set the ringer melody for internal calls
tPress and / to select “HS SET”.
tPress OK and / to select “RINGER”.
tPress OK and / to select “INT RING”.
tPress OK and / to select the ringtone you want to hear for internal
calls.
Note:
There are 10 ring tones, and each will play as you step through the list.
tPress OK to confirm.
10.3.2 Set the ringer melody for external calls
tPress and / to select “HS SET”.
tPress OK and / to select “RINGER”.
tPress OK and
tPress OK and
calls.
/
/
to select “EXT RING”.
to select the ringtone you want to hear for external
Note:
There are 10 ring tones, and each will play as you step through the list.
tPress OK to confirm
10.3.3 Set the ringer volume
tPress and / to select “HS SET”.
tPress OK and / to select “RINGER”.
tPress OK and / to select “RING VOL”.
/
to select the desired ringer volume (a total of 6
tPress OK and
ringer volume levels including “OFF”).
Note:
The respective ringer volume will be played during your selection. If “OFF”
is selected, the ringer off icon
will be displayed after confirming.
tPress OK to confirm.
10.3.4 Set alert tones
Three different alert tones are set on by default, but can be turned off, if
desired.
1. Key tone: a single beep is emitted when you press a key.
2. Low battery tone: emitted while you are talking on the phone to alert
you that you need to charge the handset batteries.
3. Out of range tone: emitted while you are talking on the phone to alert
you to move closer to the base unit, before the call is lost.
tPress and / to select “HS SET”.
tPress OK and / to select “TONE”.
/
to select “KEY TONE” / “LOW BATT” /
tPress OK and
“OUTRANGE”.
tPress OK and / to turn these tones “ON” or “OFF”.
tPress OK to confirm.
UK
25
26
10.3.5 Set the equalizer
The phone has three different frequency range filters (NORMAL, BASS,
TREBLE) that you can set, to adjust the sound in the earpiece to suit your
preference.
tPress and / to select “HS SET”.
tPress OK and / to select “EQLIZER”.
tPress OK and / to select “NORMAL” / “BASS” / “TREBLE”.
tPress OK to confirm the setting.
10.3.6 Select base
If you have registered the handset to more than one base, you can select
any one of them to use with your your handset.
Note:
You can only use the handset with one base at any one time.
tPress OK and / to select “HS SET”.
tPress OK and / to select “SEL BASE”.
/
to select the desired base. (Note: the currently
tPress OK and
selected base is indicated by a *.)
Note:
the handset may take a short while to search for the new base.
10.3.7 Set the handset language
The language used on the handset display may be changed from English,
if required.
tPress and / to select “HS SET”.
tPress OK and / to select “LANGUAGE”.
tPress OK and / to select the desired language.
tPress OK to confirm.
10.3.8 Rename the handset
The handset name, displayed in the standby mode (default HS), can be
changed to any other name of up to 6 letters.
tPress and / to select “HS SET”.
tPress OK and / to select “HS NAME”.
tPress OK and enter the name, of up to 6 letters for your handset.
tPress OK to confirm.
10.3.9 Choose the Information to be displayed in idle
You can choose to display the time or handset name in your idle screen.
tPress and / to select “HS SET”.
tPress OK and / to select “DISPLAY”.
tPress OK and / to select “HS NAME” or “TIME”.
tPress OK to confirm.
10.3.10 Set the auto answer
If you turn on the Auto Answer, you can answer a call automatically by just
lifting the handset off the base or charger, without having to press any key.
tPress and / to select “HS SET”.
tPress OK and / to select “AUTO ANS”.
tPress OK and / to turn “ON” or “OFF” the auto answer feature.
tPress OK to confirm.
10.3.11 Set the direct memory keys
There are three direct memory keys M1, M2 and M3. You can store a
number of up to 20 digits into each of these keys and dial them directly
from idle mode, by pressing and holding the key more than 2 seconds.
tPress and / to select “HS SET“.
tPress OK and / to select “MEM KEY“.
tPress OK and / to select the desired memory key from M1, M2
and M3.
tPress OK to enter a new number or edit the number stored already.
tPress OK to confirm.
10.3.12 Set the mailbox number
You can store a number of up to 20 digits, which can be dialled out directly
from idle mode by pressing and holding the digit 1 key for more than 2
seconds. This may be used to store your network voice mail number, such
as 1571, for easy access to that service.
tPress and / to select “HS SET”.
tPress OK and / to select “MAILBOX”.
tPress OK and then enter a new number or edit the mailbox number.
tPress OK to confirm.
10.4
Base settings
10.4.1 Set the base ringer melody
tPress and / to select “BS SET”.
tPress OK and / to select “RINGER”.
/
to select the desired ringer melody (a total of 5
tPress OK and
melodies for your selection).
UK
27
28
Note:
The respective ringer melody will be played while browsing the melody
list.
tPress OK to confirm.
10.4.2 Set the ringer volume
tPress and / to select “BS SET”.
tPress OK and / to select “RING VOL”.
/
to select the desired ringer volume (a total of 6
tPressOK and
ringer volume levels including “OFF”).
Note:
The respective ringer volume will be played during your selection.
tPress OK to confirm.
10.4.3 De-register a handset
This operation should only be necessary if one of your handsets becomes
faulty or lost and needs to be replaced. You will need to enter the 4-digit
system PIN (Default PIN is 0000) in order to de-register a handset from the
base station. A de-registered handset will have the antenna flashing and
“--UNREG--” on the display.
tPress and / to select “BS SET”.
tPress OK and / to select “DEL HS”.
tPress OK and the display shows “PIN?---”.
tEnter the 4-digit system PIN.
tPress OK and the first handset number is displayed.
tPress / to step through the list of registered handsets, and select
the number of the handset you want to de-register.
tPress OK to confirm, and the chosen handset will be de-registered.
10.4.4 Change the recall (flash) time
You may need to change the recall (flash) time if your phone is connected
to a PBX.
The recall time options are “SHORT” (the default value of 100ms), “MID”
(280ms) or “LOING” (600ms).
tPress and / to select “BS SET”.
tPress OK and / to select “FLASH”.
tPress OK and / to select your desired recall (flash) time (“SHORT”,
“MID”, “LONG”).
tPress OK to confirm.
10.4.5 Change the system PIN code
A 4-digit system PIN code is used for changing the system settings of the
base station. It is
used to protect your phone against unauthorised use. The default system
PIN code is 0000.
tPress and / to select “BS SET”.
tPress OK and / to select “CHG PIN”.
tPress OK and the display shows “OLD PIN?”.
tPress OK and the enter the old system PIN.
tPress OK,the display shows “NEW PIN”, press OK and enter your new
4-digit system PIN.
tPress OK, the display shows “CONFIRM?”, press OK and enter your
new 4-digit system PIN again.
Note:
If the new PIN entered in step 6 is not the same as the new system PIN
entered in step 5, you must enter your new PIN at step 5 again.
tPress OK to confirm.
10.5
Handset registration
Important:
When you purchase your phone, all handsets are already registered to
your base, so you do not need to register them.
Handset registration is only necessary when you buy extra handsets or if a
handset has become faulty.
You can register additional handsets to have up to 5 handsets per base
unit, with each handset‘s number (1 to 5) shown on its display.
on the base station for more than five seconds, to
tPress and hold
put the base station into registration mode. It will stay in registration
mode for about 1 minute, so the following handset sequence must be
completed within this time.
tPress and / to select “REGISTER”.
UK
29
30
tPress OK to display “BASE 1“.
tPress / to select which base number you want to use. (Note: a * will
be shown next to any base numbers the handset is already registered
with, and if selected the new registration will overwrite it.)
tPress OK to display “PIN?------“.
tEnter the 4-digit system pin (default 0000).
tPress OK to confirm, and the display will show “SEARCH‘G”.
If the handset registration is successful, the display will change to standby
mode with the new handset number and the will stop flashing.
The handset will automatically be allocated the next available handset
number. If the handset registration is unsuccessful, the will still flash.
10.6
Reset Your Phone
You can reset your phone to the default settings. After reset, all your
personal settings including your PIN numbers, the redial list and call log
entries will be deleted. Also all the direct memory keys (M1-M3) and the
mailbox memory (key1) will be deleted.
tPress and / to select “DEFAULT“.
tPress OK and you are requested to enter the 4-digit pin (default 0000).
tEnter the 4-digit system pin.
tPress OK to show “CONFIRM?“.
tPress OK again to confirm the reset.
11
ANSWERING MACHINE (Only for S105)
Your phone includes a telephone answering machine that records
unanswered calls when it is on. The LED message counter (two digits
seven segment display) on the base will show the number of the messages
when the answering machine is on. The answering machine can store up
to 59 messages within the maximum recording time of up to 17 minutes.
As well as recording incoming messages, you can record memos for other
users of your phone. If the answering machine memory is full, the handset
will display “TAM FULL“ alternately with the handset‘s name or time,
depending on the handset standby display mode set and you will have to
delete some messages before any new ones can be recorded.
11.1
Turn on/off the answering machine
You can turn the answering machine on or off using the base or the
handset.
When the answering machine is set to “ON”, calls will be answered after
the set answer delay and if the answer and record mode is set, the caller
can then leave you a message.
When the answering machine is set to “OFF“, calls will be answered after
10 rings and the answer only message will be played to your callers. They
will not be able to leave you a message.
Using the base:
tPress on the base station.
Using the Handset:
tPress and / to select “TAM”.
tPress OK and / to select “ON/OFF”.
tPress OK and / to select “ON” or “OFF”.
tPress OK to confirm.
displays on
>If answering machine is set to “ON”, the TAM icon
the handset screen.
will not appear on the
>If answering machine is set to “OFF”,
handset screen and the message counter on the base station will
display “- -“.
11.2
Listen to the messages in the answering machine
When new messages are recorded on the answering machine, the TAM
flashes on the handset display and the message counter on the
icon
base flashes with the number of new messages in the answering machine,
until all the new messages are played.
Old messages will be played after all new messages are played
completely. The message counter stays steady to indicate the number of
old messages stored in the answering machine.
Listen new messages through the base:
on the base station.
tPress
>The new messages are played from the loudspeaker on the base
station in the sequence they are recorded with the number of that
message flashing as it is played.
or
to increase or decrease the volume during message
tPress
playback respectively.
UK
31
32
Note:
If there are no new messages, “00” will display steadily in the message
will have no effect.
counter on the base. Pressing
Listen new messages through the handset:
tPress and / to select “TAM”.
tPress OK and / to select “PLAYBACK”.
tPress OK to start message playback through the handset loudspeaker
and the screen displays the date of the message received.
tPress # to see the time the message was received.
tPress
to play the messages through the handset earpiece
Note:
is displayed on the screen to indicate that it is a new
The star icon
will
message. When a message has been played, the star icon
disappear and will not be shown if you listen to that message again.
Note:
If there are no messages, the handset display will briefly show “00/00“,
then return to “PLAYBACK”.
or
tDuring message playback, press
message playback volume respectively.
to increase or decrease the
Note:
After a new message is played, it will be saved as an old message
automatically unless it is deleted.
and
/
to select “STOP”, “FORWARD”, “PREVIOUS”,
tPress
“DELETE” to perform the following functions during message playback.
STOP
Stop the current message playback and return to the
“PLAYBACK” menu.
FORWARD
Skip to play the next message. The date or time
information of the next message will display if there is
another message.
PREVIOUS
Repeat playing the current message from the beginning.
The date or time information of the current message will
display.
DELETE
Delete the current message and start playing the next
message.
tPress OK to confirm the function.
Note:
Alternatively, you can use the following shortcut keys to control different
operations during message playback.
tPress key 5 to stop message playback.
tPress key 4 once to repeat playing the current message from the
beginning.
tPress key 4 twice to skip back to play the previous message.
tPress key 6 to skip to play next message.
tPress key 2 to delete the current message playing, and start playing the
next message.
11.3
Delete all messages in the answering machine
Delete all messages using the base:
In idle:
on the base station until a long beep is played.
tPress and hold
tAll the old messages will be deleted.
Note:
If three short beeps are heard, there were no old messages to delete.
New messages will not be deleted. If there are no more messages in the
answering machine, “00’’ will display on the base station.
Delete all messages using the handset:
tPress and / to select “TAM”.
tPress OK and / to select “DEL ALL”.
tPress OK to show “CONFIRM?”.
tPress OK to delete all old messages.
Note:
The display briefly shows “EMPTY” and then returns to “DEL ALL”.
UK
33
34
11.4
Record memo
You can record your memo message for another user. When you record
a memo, the message counter will increase by one and the message can
be played back in the same way as answering machine messages. Memo
recording can still function even when the answering machine is turned
off.
tPress and / to select “TAM”.
tPress OK and / to select “MEMO”.
tPress OK to start memo recording and “RECORD’G” is displayed.
tPress OK to stop memo recording. The display shows “PLAYING” and
the memo is played back. Press OK or let it finish playing to save the
memo.
OR
at any time during “RECORDG” or “PLAYING” to stop
tPress
memo recording without saving and return back to TAM menu.
11.5
Answering machine settings
You can use the “SETTINGS” menu in the handset to change the settings
of your answering machine.
11.5.1 Set the answer mode
By default, the answer machine is set in “ANS&REC” mode which allows
callers to leave a message. This mode can be changed to “ANSONLY”
which does not allow callers to leave a message. In that case, your callers
will be prompted to call back later.
tPress and / to select “TAM”.
tPress OK and / to select “SETTINGS”.
tPress OK and / to select “ANS MODE”.
tPress OK and / to select “ANS&REC” or “ANSONLY”.
>The currently selected option is indicated with a *.
tPress OK to confirm.
11.5.2 Record your own outgoing message (OGM)
You can record your own OGM for “ANS&REC“ mode or “ANSONLY“
mode. When you record your own OGM, it will be used when the
answering machine answers the call. If your personalised OGM is deleted,
the pre-set OGM will be restored automatically.
tPress
and
/
to select “TAM”.
tPress OK and / to select “SETTINGS”.
tPress OK and / to select “OGM SET”.
tPress OK and / to select “ANS&REC” or “ANSONLY”.
tPress OK and / to select “RECORD”.
tPress OK to start recording your personalised OGM and “RECORD” is
displayed on the screen.
tPress OK to stop recording your personalised OGM.
>Your new OGM will playback automatically.
11.5.3 Playback and delete the outgoing message
You can listen to your own personalised OGM or the pre-set OGM for
“ANS&REC” mode or “ANSONLY” mode or delete your personalised
OGM or record a new one at any time. Please note that the pre-set OGM
cannot be deleted.
Playback the OGM
tPress and / to select “TAM”.
tPress OK and / to select “SETTINGS”.
tPress OK and / to select “OGM SET”.
tPress OK and / to select “ANS&REC” or “ANSONLY”.
tPress OK and / to select “PLAYBACK”.
tPress OK to play your current OGM and “PLAYING” is displayed on
the screen.
tPress OK to stop the OGM playback or let it finish playing and return to
the previous menu.
Note:
If a personalised OGM has not been recorded, the pre-set OGM will be
played.
Delete the personalised OGM
tRepeat steps 1 to 6 in the section above.
while the OGM is playing to delete your personalised
tPress
OGM and return to previous menu with the pre-set OGM restored
automatically.
Note:
tIf a pre-set OGM is playing, you are not allowed to delete it, so pressing
will just stop the playback and return to the previous menu.
UK
35
36
11.5.4 Set the answer delay
You can set the number of rings before the answering machine answers
and starts playing your OGM. You can set the answering machine to
answer after two to eight rings or time saver (TS).
If time saver (TS) is set, the answering machine will answer after 6 rings if
there are no new messages already recorded, or after 2 rings if there is
a new message, so if you call in for remote access and it doesn‘t answer
after 2 or 3 rings, you can hang up and save on call charges.
Note:
If your network voice messaging service is enabled, you will need to set
the ring delay on your phone to less than 6 rings, otherwise the network
service will answer and record incoming calls, and prevent the phone from
recording them.
tPress and / to select “TAM”.
tPress OK and / to select “SETTINGS”.
tPress OK and / to select “ANS DLAY”
/
to select “2 RINGS” / “4 RINGS” / “6 RINGS” /
tPress OK and
“8 RINGS” / “TS”. (The currently selected option is indicated with a *.)
tPress OK to confirm.
11.5.5 Set the maximum recording time for incoming messages
You can set the maximum length of the recording time of the incoming
messages to be either 60 seconds, 120 seconds, 180 seconds or unlimited
(up to the total recording time available)
tPress and / to select “TAM”.
tPress OK and / to select “SETTINGS”.
tPress OK and / to select “REC TIME”.
/
to select “60S” / “120S” / “180S” / “UNLIMIT”.
tPress OK and
(The currently selected option is indicated with a *“)
tPress OK to confirm.
11.5.6 Change the compression rate
Three different compression rates (“HIGH”, “MID” and “LOW”)
are provided for you to select different quality levels of recording
incoming message. The lower the compression rate, the higher the
recording quality level attained, but the shorter the total recording time
available. (“LOW”=7 minutes, “MID”=10 minutes, “HIGH”=16 minutes,
approximately.)
tPress and / to select “TAM”.
tPress OK and / to select “SETTINGS”.
tPress OK and / to select “COMPRESS”.
/
to select your desired compression rate. (The
tPress OK and
currently selected option is indicated with a *.)
tPress OK to confirm.
11.5.7 Activate remote access
Your phone lets you check your messages, or otherwise operate your
answering machine, by calling the answering machine when you are away
from home and then entering a 4-digit remote access PIN from a tonecalling phone. The 4-digit remote access PIN code is used to prevent
other people from unauthorised access of your answering machine.
Change the 4-digit remote access PIN
tPress and / to select “TAM”.
tPress OK and / to select “SETTINGS”.
tPress OK and / to select “CHG PIN”.
tPress OK to show “OLD PIN?”, press OK again and then enter the old
PIN ( default remote access PIN is 0000) .
tPress OK to show “NEW PIN?”, press OK again and then enter your
new 4-digit PIN.
tPress OK to show “CONFIRM?”. Press OK again and then enter the
new PIN again.
Note:
If the new PIN entered in step 6 is not the same as the new system PIN
entered in step 5 you must enter your new PIN at step 5 again.
tPress OK to confirm
Activate or deactivate the remote access
The remote access is activated by default, but you can deactivate it to
prevent any external access.
tPress and / to select “TAM”.
tPress OK and / to select “SETTINGS”.
tPress OK and / to select “REMOTE”.
tPress OK and / to select “ON” or “OFF” to turn the remote access
on or off, respectively. The currently selected option is indicated with a
*.)
UK
37
38
tPress OK to confirm.
Access your answering machine remotely
You can ring your phone from another tone-dialling phone to switch the
answering machine on or off and/or listen to your messages remotely.
tPlace a call from a tone-dialling phone to your phone.
tWhen the answering machine answers the call and starts playing the
OGM, press *.
Note:
at any time during the recording or playing back to return to
Press
the previous screen without saving the personalised OGM.
tEnter the 4-digit remote access, if the PIN is accepted, a long beep is
played.
Note:
The * must be entered while the OGM is still playing, the OGM will stop,
and the 4-digit PIN should follow without any delays.
Note:
If the 4-digit remote access PIN is entered incorrectly three times
consecutively, the line will be released automatically.
tPress the following keys to carry out your desired function.
Keys
Functions
While message is
not playing
While message is playing
2
Delete the current
message playback
4
Skip to repeat playing the
current message from the
beginning. Press twice
to skip backward to the
previous message.
39
5
Functions
Play the message
6
Stop the current
message playback
Skip to play the next message
7
Turn on the answering
machine
9
Turn off the answering
machine
Note:
If your answering machine is switched off, the phone will answer the call
after 10 rings.
You can press * and then enter the 4-digit remote access PIN (default
remote access PIN is 0000) to activate the remote access feature.
When your answering machine memory is full and the answer mode is in
“ANS&REC” mode,
the mode, the change to “ANSONLY” automatically, and will not allow
callers to leave messages, but will still answer incoming calls after the preset number of rings.
It will change back to “ANS&REC” mode automatically after some
messages have been deleted.
11.5.8 Call screening
When the answering machine answers a call, the base will start call
screening automatically and you will be able to hear the OGM and the
incoming caller. Adjust the base volume control, if necessary.
The handset will display “SCREEN?“, and if OK is pressed you will be
able to hear the incoming caller through the handset loudspeaker and the
display will change to “SCREEN‘G.“
At any time if you want to pick up the call, you can press on the handset
and the message recording will be stopped automatically. If the answering
machine is in the process of recording, the message already stored will
be saved.
UK
Keys
40
If you don‘t want to pick up the call, you can press OK again to listen
to stop the screening and
through the handset earpiece, or press
return the display to “SCREEN?“.
12
TROUBLESHOOTING
Problem
Cause
No dialling tone
Solutions
tThe connection
cord of the base
station is not
plugged in.
tThe adapter cord
is not plugged in
correctly in the
base station.
tAnother handset
is using the base
to make a call.
tWrong telephone
line cord.
tCheck the
connections.
Unplug and plug
back in the mains.
Check that the
telephone line cord
has been plugged
into the base.
tCheck the mains
adapter is firmly
plugged.
tWait until the line
is unoccupied.
tUse the original
line cord supplied.
When connected
to a PBX, no and/or
wrong connection
after dialling.
tDialling prefix
is needed.
tInsert the
dialling prefix.
“SEARCH‘G“
is displayed
tBase station
out of range.
tBase station
not connected
to mains.
tReduce the range.
tConnect base
station to mains.
The call does
not work
tService not
activated or
wrong operator
or wrong dialling
mode setting.
tCheck your
Subscription with
network or change
the dial mode.
when pressing
key
41
No display
Cause
tEmpty battery
Solutions
tRecharge battery
Answering Machine
Problem
Cause
Solutions
The unit does
not record new
messages.
tThe answering
machine is
turned off.
tTurn on the
answering machine.
The caller cannot
leave a message.
tThe answering
machine is
turned off.
tMessage
memory is full.
tAnswer only
mode is set.
tTurn on the
answering machine.
tErase unnecessary
messages.
tChange to
“ANS&REC” mode.
I cannot operate
the answering
Machine remotely.
tYou are entering
the wrong remote
access code.
tYou are pressing
the dial keys
too quickly.
tYou are using a
pulse telephone.
tIf you forget the
remote access
code, reset to the
default settings.
tPress each
key firmly.
tTry again using a
touch tone phone.
While recording an
outgoing message
or listening to
messages, the
unit rings and
recording stops.
tA call is being
received.
tAnswer the
incoming call and
try again to record
your outgoing
message later.
If the fault persists
tDisconnect all other instruments connected to the same telephone line
and try to make a call. If the call now works the fault is with the other
instruments.
UK
Problem
42
tDisconnect the base unit from the telephone line and plug a different
phone into the master telephone socket. If this works the line is ok.
tIf the call does not work, and you are using a two-way socket adapter,
remove it and plug a telephone directly into the socket. If the call now
works, the adapter may be faulty.
13
GUARANTEE AND SERVICE
The phone is guaranteed for 24 months from the date of purchase shown
on your sales receipt. This guarantee does not cover any faults or defects
caused by accidents, misuse, fair wear and tear, neglect, faults on the
telephone line, lightning, tampering with the equipment, or any attempt
at adjustment or repair other than through approved agents.
Please keep your sales (till) receipt this is your proof of guarantee.
13.1
While the unit is under Guarantee
tDisconnect the base unit from the telephone line and the mains
electricity supply.
tPack up all parts of your phone system, using the original package.
tReturn the unit to the shop where you bought it, making sure you take
your sales receipt.
tRemember to include the mains adapter.
13.2
After the Guarantee has expired
If the unit is no longer under Guarantee, contact us via
www.aegtelephones.eu
This product works with rechargeable batteries only. If you put non
rechargeable batteries in the handset and place it on the base, the
handset will be damaged and this in NOT covered under the warranty
conditions.
43
TECHNICAL DETAILS
Standard
Digital Enhanced Cordless (DECT)
Frequency range
1.88 to 1.9 GHz (bandwidth = 20 MHz)
Channel bandwidth
1.728 MHz
Operating range
Up to 300 m outdoors; Up to 50 m indoors
Operating time
Standby: 100 hours, Talking: 10 hours
Battery charge time:15 hours
Temperature range
Operating 0° C to 40° C,
Storage -20° C to 60° C
Electrical power
Base unit:
S004LV0600045 / S004LB0600045
input 100-240VAC 50/60Hz 150mA,
output 6VDC 450mA
Handset battery
Information
2 X 1.2V AAA size 400mAh NiMH
15
CE DECLARATION
This product is in compliance with the essential requirements and other
relevant provisions of the R&TTE directive 1999/5/EC.
The Declaration of conformity can be found on: www.aegtelephones.eu
UK
14
44
16
DISPOSAL OF THE DEVICE (ENVIRONMENT)
At the end of the product lifecycle, you should not throw this product
into the normal household garbage but bring the product to a collection
point for the recycling of electrical and electronic equipment. The symbol
on the product, user guide and/or box indicate this. Some of the product
materials can be re-used if you bring them to a recycling point. By reusing
some parts or raw materials from used products you make an important
contribution to the protection of the environment. Please contact your
local authorities in case you need more information on the collection
points in your area.
Batteries must be removed before disposing of the device. Dispose of
the batteries in an environmental manner according to your country
regulations.
17
CLEANING AND CARE
Do not clean any part of your phone with benzene, thinners or other
solvent chemicals as this may cause permanent damage which is not
covered by the Guarantee.
When necessary, clean it with a damp cloth.
Keep your phone system away from hot, humid conditions or strong
sunlight, and don‘t let it get wet.
UK
45
© 2012 Binatone Electronics International Limited
All rights reserved
Subject to avaibility. Rights of modification reserved.
AEG is a registered trademark used under license from AB Electrolux (publ)
www.aegtelephones.eu