1
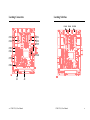
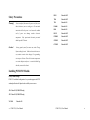
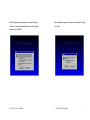
PCM-3523,PCM-3523S
User’s Manual
0
PCM-3523(S) User’s Manual
PCM-3523(S) User’s Manual
1
Copyright Notice
Packing Set
This document is copyrighted, 1997. All rights are reserved. The original
manufacturer reserves the right to make improvements to the products
Before you begin installing PCM-3523, PCM-3523S card, please make
described in this manual at any time without notice.
sure that the following materials have been shipped.
No part of this manual may be reproduced, copied, translated or
- 1 VGA To Signal Converter module
transmitted in any form or by any means without the prior written
- 1 User's Manual (this document)
permission of the original manufacturer. Information provided in this
- 1 DB15(male) to DB15(female) cable
manual is intended to be accurate and reliable. However, the original
- 1 16-pin box header(female) to 16 pin box header(female) cable
manufacturer assumes no responsibility for its use, or for any
- 1 Drivers disk for DOS, Windows 3.1 & Windows 95
infringements upon the rights of third parties, which may result from its
use.
If any of these items are missing or damaged, contact your distributor or
sales representative immediately.
Acknowledgements
AITECH is trademarks of AITECH electronics semiconductor.
PC/104 and the PC/104 logo are registered trademarks of the PC/104
Consortium
Windows, Windows 95 and Windows NT are registered trademarks of
Microsoft Corporation
MICROSOFT, MS-DOS and MS are registered trademarks of Microsoft
Corporation
All other product names or trademarks are properties of their respective
owners.
1st Edition
Printed in Taiwan September 1997
2
PCM-3523(S) User’s Manual
PCM-3523(S) User’s Manual
3
Contents
Chapter 1 General Information … … .… … … … … … … … .6
Appendix A Installing PC/104 Modules… … … … … … … .36
Appendix B Pin Assignments… … … … … … … … … … … … ...40
Introduction… ..… … … ..… … … … ..… … … .… .… … … … … ...7
PC/104 connectors ( J1,J2)… … … ..… … … … … … … … … … ....41
Product Highlights… … … … … .… … … .… … … … … … … … ..8
DB15 connector (CN1,CN3)… … .… … … … … … … … … … … ..4
Features … … … … … … … … … …….………………….…. … .8
S-Video 5 pin header (CN6)… … … … … … … … … … … … … …
Specifications … … … … … … … … .… … … … ..… … … … … … 9
C-Video 3 pin header (CN8,CN10)… … … … … … … … … … … .42
Technical Specifications
Physical and Environmental Specifications
Board layout … … … … … … … … .… … … … … … … … … … ...11
Chapter 2 Hardware Installation .… … … … … … … … .12
Jumpers, connectors and switches ..… … … … .… … …
..13… … .
Locating jumpers … … … … … … … … … … … … … … … … … 19
Locating connectors … … … … … … … … … … … … .… … … ...20
Locating switches… … … … … … … … … … … … … .… … … ...21
Safety precautions … … … … … … … … … … … … … .… … … ...22
Installing PCM-3523 Module … … … … … … … … … … ..… … 22
Chapter 3 Installation for Windows 95 and WIN 3.1
Introduction … … … .… … … … … … … … … … … … … … … … ..25
Installing the Driver… ..… … … … … … … … … … … … .… … … .25
4
PCM-3523(S) User’s Manual
PCM-3523(S) User’s Manual
5
CHAPTER
1
General
Information
This chapter gives background information on the
PCM-3523. You can find out:
Ü Introduction
Ü Product Highlight
Ü Features
Ü Specification
Ü Board Layout
Introduction
The PCM-3523(S) converts RGB video and sync from a standard VGA
source into broadcast quality NTSC and PAL video. Composite and
S-Video outputs are compliant with SMPTE-170M and CCIR-656
specification. A fully integrated 3-line adaptive flicker filter provides three
selectable operating modes.
The PCM-3523(S) is a VGA to Video converter capable of producing
broadcast-quality signals conforming to NTSC and PAL standards using a
single low-cost application circuit. Included is all of the active circuitry
required to generate a television signal with outstanding image quality in a
standalone application.
Incoming VGA source signals must be 2X the frame and 2X the line rate
of outgoing TV standard within a +-2% tolerance. Supported VGA
formats are 640x480 at 60Hz for NTSC and PAL-M, and 640x480 and
800x600 at 50Hz for PAL B/G/H/I.
The
PCM-3523S
has
an
additional
software
control
of
the
composite-video output to select between external video input or VGA
input. Which the PCM-3523 does not have this function.
6
PCM-3523(S) User’s Manual
PCM-3523(S) User’s Manual
7
Product Highlights
Ü
3-Channel 9-bit output D/A converters
Ü
PC/104 Embedded-PC Module.
Ü
Blanks to blue or black
Ü
Multiple Input Formats
Ü
Single +5V power supply
-640x480 50/60 Hz, 800x600 50Hz
Ü
Multiple Output Standards
-NTSC, NTSC-EIA, PAL-B/G/H/I
Specifications
Ü
Flicker Free Design
Technical Specifications
Ü
Composite-Video Output
Computer BUS: PC/104 (ISA) Standard
Ü
S-Video Output
Bus Width: 16-bit
Ü
Horizontal/Vertical Position Control
Ü
Composite-Video Output is allowed to switch between external video
Input/Output Connectors:
input and VGA input by software control.(PCM-3523S)
Ü
VGA input (DB15 male)
Input
Ü
VGA input (16 pin box header)
Input
Ü
External video input (RCA)
Input
Features
Ü
Flicker free VGA to TV signals converter
Ü
External video input (3-pin header )
Input
Ü
3-Channel 8 bit input conversion
Ü
VGA output (DB15 female)
Output
Ü
Multiple input formats
Ü
VGA output (16 pin box header)
Output
-640x480 50/60Hz, 800x600 50 Hz
Ü
Composite video output (RCA)
Output
Multiple output formats
Ü
Composite video output(3-pin header )
Output
-NTSC, NTSC-EIA, PAL-B/G/H/I
Ü
S-Video output (4 pin mini DIN)
Output
Ü
Composite and S-video output formats
Ü
S-Video output (5-pin header )
Output
Ü
Horizontal and vertical positioning control
Ü
4 pin power connector (+5V)
Input
Ü
Configuration set by switches
Ü
Internal color bar
Ü
8
PCM-3523(S) User’s Manual
PCM-3523(S) User’s Manual
9
Physical and Environmental Specifications
Board Layout
Length: 3.6 inches
Width: 3.8 inches
Operating Temperature: 32 to 140 °F (0 to 60 °C)
Humidity (operating): 5% to 95% Non-Condensing
Power Requirement: 5.25 to 4.75 tolerances on power supply
10 PCM-3523(S) User’s Manual
PCM-3523(S) User’s Manual
11
CHAPTER
2
Hardware Installation
This chapter tells how to set up the PCM-3523(S)
hardware, including instruction on setting jumpers and
connecting external devices. Be sure to read all the
safety precautions before you begin the installation
procedure.
Ü
Ü
Ü
Ü
Ü
Ü
Jumpers , Connectors , Switches
Locating Jumpers
Locating Connectors
Locating Switches
Safety Precaution
Installing PCM-3523 Modules
Jumpers, Connectors, Switches
Connectors on the board link it to external TV monitor devices and other
PC/104 modules. In addition, the board has a number of jumpers that
allow you to configure the display application to suit your systems. The
table below lists the function of each of the board jumpers, connectors and
switches:
Jumpers
JP3
4-pin power connector
JP4
Select control method of composite video output by hardware
or by software. Refer to table 1.
JP5
Select composite video output source. Output from external
video or VGA input. Refer to table 1
VSCOM Vertical Sync Communication Enable. When close to OFF,
vertical sync pulse width (VGAVS) will control the filter
mode. When close to ON, filter will control by the FILTER
toggle switch.
DPM
Display Power Management Signaling Enable. When close
to OFF, the operation state of the chip is controlled by the
pulse activity on VGAHS and VGAVS. When close to ON ,
the state of the chip is controlled only by input pin.
TD0,TD1 Video Output Standard Select. Preprogrammed into the
module are timing, sub-carrier
frequency
and
phase
parameters corresponding to worldwide NTSC and PAL
12 PCM-3523(S) User’s Manual
PCM-3523(S) User’s Manual
13
standard. TD0-1 select one of four sets of parameters to set up
Setting Jumpers
the encoder. Frames rate of the graphics source must be twice
the frame rate of the selected video standard. Refer to table 4.
PAL800
Resolution Select for PAL. Sets number of samples per VGA
line. Refer to table 4.
BLK
Blank Screen Generator. When close to OFF, the color
selected by BLUE is displayed on the screen. When close to
ON, incoming video from the internal FIFO is encoded and
Composite Video output select (for PCM-3523S only)
JP4
JP5
C-Video output source
Closed 1-2
Closed 1-2
from VGA converted to video
will be blanked to blue when BLANK is closed to OFF. When
Closed 1-2
Closed 2-3
bypass from external video
close to ON the screen will be blanked to black when BLANK
Closed 2-3
don’t care
controlled by software
is closed to OFF. Refer to table 2.
If controlled by software then you must use the PC I/O port address 280H
displayed. Refer to table 2.
BLUE
Table 1
Blank Screen Color Select. When close to OFF, the screen
PWRDN Power-Down Control. When close to OFF, the PCM3523(S)
to control the C-Video output. For example, if you want the C-Video to be
is fully operational and enabled. When close to ON , the
output from the external video, then you must output 0 value to port 280h.
PCM3523(S) is configured for minimum power consumption.
In assembly language you should write: out 280h,0;. If you want the
D/A converters and clocks are disabled. Previously established
C-Video to be output from the VGA converted signal then you must write:
set-up conditions are retained and remain in effect when
out 280h, 1;.
PWRDN close to OFF again.
Table 2. Video Output
SVIDEN S-Video D/A Power Enable. When close to OFF, the
CHROMA and LUMA D/A converters are enabled. When
close to ON, they are disable to save power. Refer to table 3
CVIDEN Composite Video D/A Power Enable. When close to OFF,
BLUE
BLK
Video output
X
ON
video
ON
OFF
Black
OFF
OFF
Blue
the COMPOSITE D/A converter is enabled. When close to
ON it is disabled to save power. Refer to table 3.
14 PCM-3523(S) User’s Manual
Table 3. Video Output Control
PCM-3523(S) User’s Manual
15
VGAHS&
CVIDEN VGAVS
CN4
VGA output (16 pin box header)
S-Video
CN5
S-Video output. (4-pin mini DIN)
Composite
Video
SVIDEN
X
OFF
YES
Active
X
CN6
S-Video output. (5-pin header)
OFF
X
YES
X
Active
CN7
Composite video output. (RCA jack)
ON
ON
X
Blank
Blank
CN8
Composite video output. (3-pin header)
OFF
OFF
NO
Blue
Blue
CN9
External video input. (RCA jack)
CN10
External video input. (3-pin header)
Table 4.
VGA Input Format
HxV
TD1
TD0
PAL800
Frame
Line
Input
Rate
Rate
Pixels
(Hz)
(kHz)
Switches
Label
Function
POS-D
Image Positioning Down and Up. Each pulse moves the TV
ON
X
ON
640x480
59.94
31.469
OFF
ON
ON
640x480
50
31.250
OFF
ON
OFF
800x600
50
31.250
8-line increments to the highest position (+64 line). At this
OFF
OFF
ON
640x480
60
31.469
point the direction again reverses and the next sixteen pulses
windows down eight lines. At the lowest position (-64
line( the direction reverse and the pulses move the image up in
move the image down to the lowest position.
Connectors
Label
Function
J1
PC/104 ISA-bus expansion
J2
PC/104 ISA-bus expansion
CN1
VGA input (DB15 male)
CN2
VGA input (16-pin box header)
CN3
VGA output (DB15 female)
POS-R
Image Positioning Right and Left. Each pulse moves the TV
window eight pixels to the right. At the maximum right
position (+64 pixels) the direction reverses and the next
sixteen pulses move the window left to the maximum left
position (-64 pixels). Direction again reverses and the next
16 PCM-3523(S) User’s Manual
sixteen pulses move the image right.
FILTER
Flicker Filter Select. Each pulse cycles the flicker filter mode
PCM-3523(S) User’s Manual
17
as below sequence.
Filter Mode
V
HIGH(default)
V
MEDIUM
V
No filter
V
Locating Jumpers
Color bars
JP3
JP4 JP5
Configuration
Jumpers
18 PCM-3523(S) User’s Manual
PCM-3523(S) User’s Manual
19
Locating Connectors
Locating Switches
POS-D POS-R FILTER
CN3
CN4
CN1
CN2
CN9
CN5
CN6
CN10
CN7
CN8
J1
20 PCM-3523(S) User’s Manual
J2
PCM-3523(S) User’s Manual
21
DPM
Closed to OFF
TD0
Closed to OFF
Always completely disconnect the power cord from your
TD1
Closed to ON
chassis whenever you are working on it. Do not make
PAL800
Closed to ON
connections while the power is on because the sudden
BLK
Closed to ON
rush
BLUE
Closed to OFF
PWRDN
Closed to OFF
SVIDEN
Closed to OFF
CVIDEN
Closed to OFF
Safety Precautions
Warning!
of
power
components.
can
damage
sensitive
electronic
Only experienced electronics personnel
should open the PC chassis.
Caution!
Always ground yourself to remove any static Charge
before touching the card. Modern electronic devices are
very sensitive to static electric charges. Use a grounding
wrist strap at all times. Place all electronic components
on a static-dissipate surface or in a static-shielded bag
when they are not in the chassis.
Installing PCM-3523 Module
Factory Default Settings
PCM-3523 card default configuration of a system that supports the NTSC
standard specification will depend on the available system resources.
JP4 Closed 1-2 (PCM-3523S only)
JP5 Closed 1-2 (PCM-3523S only)
VSCOM
Closed to ON
22 PCM-3523(S) User’s Manual
PCM-3523(S) User’s Manual
23
CHAPTER
3
Installation for Win 95 and Win3.1
Introduction
The PCM-3523 driver is supplied on one floppy disk.
Installing the Driver
The supplied software contains a Windows screen control utility,
Wscrctrl.exe. Use the File Manager under your Windows 3.1 or run in
Ü
Introduction
Windows 95 Start Menu to setup this utility. To install driver on your
system, please run setup.exe file. The software will guide you through the
Ü
Installing the driver
24 PCM-3523(S) User’s Manual
entire installation.
PCM-3523(S) User’s Manual
25
1. The following dialog box appears when you run the setup.exe in
Windows. To proceed with the installation , choose the “continue”
2. The next dialog box appears. Then choose the standard TV system
you needed.
Button or press “ENTER”.
26 PCM-3523(S) User’s Manual
PCM-3523(S) User’s Manual
27
3. After choosing your TV system, following dialog box appears. Then
decide the directory you want to install in your hard disk.
28 PCM-3523(S) User’s Manual
4. After choosing the directory. The setup program will create a
Screen Control Icon in your Windows system.
PCM-3523(S) User’s Manual
29
5. The setup program will copy the files to the Windows system.
6. The setup program will create the Screen Control Icon in Windows
system.
30 PCM-3523(S) User’s Manual
PCM-3523(S) User’s Manual
31
7. The installation is completed.
8. After installation is completed, the screen will show the attention
for Windows 95 Users.
32 PCM-3523(S) User’s Manual
PCM-3523(S) User’s Manual
33
9. The next step will show the SMPTE color chart on your TV screen
10. Installation is completed.
when you restart your windows program.
34 PCM-3523(S) User’s Manual
PCM-3523(S) User’s Manual
35
Installing PC/104 Modules
APPENDIX
A
Installing PC/104 Modules
This appendix gives instructions for installing PC/104
Modules
The CPU card’s PC/104 connectors give you the flexibility to attach
PC/104 expansion modules. These modules perform the functions of
traditional plug-in expansion cards, but save space and valuable slots.
Modules include:
Ü
Ü
Ü
Ü
Ü
Ü
Ü
Ü
Ü
Ü
Ü
Ü
PCM-3335
PCM-3600
PCM-3420
PCM-3200
PCM-3810
PCM-3820
PCM-3115
PCM-3610
PCM-3660
PCM-3718
PCM-3724
PCM-3910
386 CPU Module w/ Flat Panel/CRT Interface
FAX/Modem Module
Fast SCSI-2 Module
Sound Module
Solid State Disk Module
High Density Flash Disk Module
PCMCIA Module (two slots)
Isolated RS-232 and RS-422/485 Module
Ethernet Module
30 kHz A/D Module
48-Channel DIO Module
Breadboard Module
Installing these modules on the CPU card is quick and simple. The
following steps show how to mount the PC/104 modules:
1. Remove the CPU card from your system paying particular attention to
the safety instructions already mentioned.
2. Make any jumper or link changes required to the CPU card now. Once
the PC/104 module is mounted you may have difficulty in accessing
these.
3. Normal PC/104 modules have male connectors and mount directly onto
the main card. However, to ensure better bus matching, the connectors
on the CPU card and the PC/104 module are both female. For this
reason, you may need to use the “male-male” adapter included with the
CPU card in order to properly connect your PC/104 module. (Refer to
the diagram on the following page.)
4. Mount the PC/104 module onto the CPU card by pressing the module
firmly but carefully onto the mounting connectors.
5. Secure the PC/104 module onto the CPU card using the four mounting
spacers and screws.
36 PCM-3523(S) User’s Manual
PCM-3523(S) User’s Manual
37
38 PCM-3523(S) User’s Manual
PCM-3523(S) User’s Manual
39
PC/104 Connectors (J1, J2)
APPENDIX
B
Pin Assignments
This appendix contains information of a detailed or
specialized nature. It includes:
PCM-3523 PC/104 Connectors (J1, J2)
Pin
Signal
Number
Row-A
Row-B
0
--1
IOCHCHK
0V
2
SD7
RESETDRV
Row-A
0V
SBHE
LA23
Row-B
0V
MEMCS16
IOCS16
3
4
5
6
7
8
LA22
LA21
LA20
LA19
LA18
LA17
IRQ10
IRQ11
IRQ12
IRQ15
IRQ14
DACK0
SD6
SD5
SD4
SD3
SD2
SD1
+5V
IRQ9
-5V
DRQ2
-12V
ENDXFR
Signal
9
SD0
+12V
MEMR
DRQ0
10
11
12
13
14
15
16
IOCHRDY
AEN
SA19
SA18
SA17
SA16
SA15
(KEY)
SMEMW
SMEMR
IOW
IOR
DACK3
DRQ3
MEMW
SD8
SD9
SD10
SD11
SD12
SD13
DACK5
DRQ5
DACK6
DRQ6
DACK7
DRQ6
85V
Ü
PC/104 Connector (J1,J2)
Ü
16 Pin box header(CN2,CN4)
Ü
DB15 Connector(CN1,CN3)
Ü
17
18
SA14
SA13
DACK1
DRQ1
SD14
SD15
MASTER
0V
S-Video 5-pin header (CN6)
Ü
C-Video 3-pin header (CN8,CN10)
19
20
SA12
SA11
REFRESH
SYSCLK
(KEY)
---
0V
---
21
22
SA10
SA9
IRQ7
IRQ6
-----
-----
23
SA8
IRQ5
---
---
24
25
SA7
SA6
IRQ4
IRQ3
-----
-----
26
27
28
29
30
SA5
SA4
SA3
SA2
SA1
DACK2
TC
BALE
+5V
OSC
-----------
-----------
31
SA0
0V
---
---
32
0V
0V
---
---
40 PCM-3523(S) User’s Manual
PCM-3523(S) User’s Manual
41
DB15 Connector (CN1,CN3)
Pin Number
Signal
Pin Number
Singal
1
RED
2
N.C.
3
GREEN
4
GND
5
BLUE
6
N.C.
7
N.C.
8
N.C
9
GND
10
VGAHS
11
GND
12
VGAVS
13
GND
14
N.C.
15
GND
16
N.C.
S-Video 4-Pin Header (CN6)
Pin Number
Signal
1
GND
2
GND
3
LUMA
4
CROMA
5
GND
C-Video 3-Pin Header (CN8,CN10)
Pin Number
Signal
1
GND
2
C-Video Signal
3
GND
42 PCM-3523(S) User’s Manual
PCM-3523(S) User’s Manual
43