1
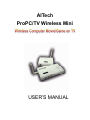
AITech
ProPC/TV Wireless Mini
USER’S MANUAL
FEDERAL COMMUNICATIONS COMMISSION
This device complies with Part 15 of the FCC Rules Operation is subject to the
following two conditions: this device may not cause harmful interference, and (2)
this device must accept any interference received, including interference that
may cause undesired operation.
This equipment has been tested and found to comply with the limits for a Class
B Digital Device, pursuant to part 15 of the FCC Rules. These limits are
designed to provide reasonable protection against harmful interference in a
residential installation. This equipment generates, uses and can radiate radio
frequency energy and, if not installed and used in accordance with the
instruction, may cause harmful interference to radio communication. However,
there is no grantee that interference will not occur in a particular installation. If
this equipment does cause harmful interference to radio or television reception,
which can be determined by tuning the equipment off and on, the user is
encouraged to try to correct the interference by one or more of the following
measures:
-Reorient or relocate the receiving antenna.
-Increase the separation between the equipment and receiver.
-Connect the equipment into an outlet on a circuit different from that to
which the receiver is connected.
-Consult the dealer or an experienced radio/TV technician for help.
Notice: Changes or modifications not expressly approved by the party
responsible for compliance could void the user’s authority to operate the
equipment.
CE DECLARATION
This device complies with CE. These limits are designed to provide reasonable
protection against harmful interface in a residential installation.
All contents are subject to change without notice.
All trademarks are the property of their respective owner.
I
Table of Contents
Chapter 1. Overview ………………………………………….....................
1
1.1 : Introduction ……………………………………………………………….
1
1.2 : Features …………………………………………………………………..
1
1.3 : Specifications ……………………………………………………………..
2
1.4 : System Requirements ……………………………………………………
2
1.5 : Package Contents ………………………………………………………..
2
Chapter 2. Outline Description ………………………………..…….......
3
Chapter 3. Installation ……………………………….……………………… 5
Chapter 4. Function Description ………………………………………... 7
4.1 : Horizontal/Vertical position ………………………………………………
7
4.2 : HSIZE …………………………………………………………………..….
7
4.3 : VSIZE ………………………………………………………………………
8
4.4 : BRIGHTNESS …………………………………………………………….
8
4.5 : CONTRAST ……………………………………………………………….
8
4.6 : SHARPNESS ……………………………………………………………..
9
4.7 : DEFAULT ………………………………………………………………….
9
4.8 : NORMAL / ZOOM ………………………………………………………...
9
4.9 : FREEZE / UN-FREEZE …………………………………………………. 10
4.10 : FLICKER ………………………………………………………….……... 10
Chapter 5. Troubleshooting ……………………………………………... 11
II
Chapter 1. Overview
1.1 Introduction
AITech’s ProPC/TV Wireless Mini accepts computer signal and convert
them into composite video format. With building in 2.4GHz wireless video
transmission technology, you can transmit computer VGA signal to TV
simply via wireless. Its purely hardware design and multi-system support
gives you the best solution for portable application! It supports VGA mode
up to 2048x1536 high resolutions!
ProPC/TV Wireless Mini is your best choice for computer Game or movie
showing on the big screen TV and no need to worry any cable connection
from computer to TV!
1.2
Features
-
1
One 2.4GHz wireless VGA to TV transmitter and one receiver
Instant Plug & Play, no software drivers required
VGA signal to TV via 2.4GHz Wireless Transmission technology, do not
need any cables from computer to TV
Support one VGA to TV transmitter to multiple receivers
Wireless range up to 300ft. at open site area
Channel number: 4 (2.400~2.483GHz)
Multi system Support for NTSC and PAL
32 Bit True color quality
OSD (on-screen-display) function, for convenient control function.
Support maximum VGA resolution up to 2048 x1536
Simultaneous display on both TV screen and PC monitor
3 x zoom function support, best for presentation
Horizontal/Vertical scaling and positioning
Sharpness/Brightness/Contrast/Flicker control
Freeze/Un-Freeze video control
Auto-Saving for control parameters
Chapter 1. Overview
1.3
Specifications
-
-
-
1.4
Transmitter
- Input: VGA signal (from computer);
Stereo audio jack (from computer);
RCA video/audio jack (Yellow/Red/White)
- Output: Computer monitor pass-thru;
2.4GHz wireless signal (Antenna)
- Power in: 5V/650mA
- Dimension (mm): 150 x 87 x 25
Receiver
- Input: 2.4 GHz wireless signal (Antenna)
- Output: RCA video/audio jack (Yellow/Red/White)
- Power in: 6V/300mA
- Dimension (mm): 110 x 92 x 25
Horizontal frequency: 31.469 KHz – 91.146 KHz
Vertical frequency: 56Hz – 100Hz
Support VGA Display mode up to 2048 x 1536 60Hz
System Requirements
-
1.5
IBM PC or compatibles with VGA output connector.
TV set or Video input device with Composite video input
Package Contents
-
ProPC/TV Wireless Mini transmitter x 1
ProPC/TV Wireless Mini receiver x 1
Antenna x 2
15-pin HD extension VGA cable x 1
RCA video/audio cable x 2
3.5mm x 3.5mm audio cable x 1
Power adapter: 5V/650mA x 1 for transmitter
6V/300mA x 1 for Receiver
User’s manual x 1
2
Chapter 2. Outline Description
Please refer to the figure as below for the outline of ProPC/TV
Wireless Mini
Transmitter
Receiver
3
Chapter 2. Outline Description
Transmitter
1.
PAL/NTSC : TV system select
2.
Monitor : Connect to PC monitor
3.
VGA in : VGA signal from PC
4.
Line in : Audio from PC
5.
DC 5V: power in
6.
A-IN : Audio in from external video device (e.g. DVD player)
7.
V-IN : video in from external video device (e.g. DVD player)
8.
AV / PC switch : Select transmitter input source (e.g. PC or
DVD player)
9.
Power switch : Power ON/OFF PCTVsender
10.
M : OSD function button (this function for VGA to TV only)
11.
CH : Channel selection
12.
CH LED : Channel indicator
13.
ANT : Antenna connection
Receiver
1.
DC 6V: power in
2.
V-out : video output to TV
3.
A-out : audio output to TV
4.
Power switch : Power ON/OFF
5.
CH : Channel selection
6.
CH LED : Channel indicator
7.
ANT : Antenna connection
4
Chapter 3. Installation
NOTE: Make sure “PCTVsender”, Computer and TV are all power off
before installation
3.1
Transmitter connection:
3.1.1 Connect Antenna to “ANT” of Transmitter
3.1.2 Steps for VGA to TV function as below
1.
Properly connect the 15-pin HD extension VGA cable between VGA
port (Computer) and “VGA IN” (PCTVsender) input port.
2.
Connect PC monitor cable to “Monitor” (PCTVsender) output port.
3.
Connect the 3.5mm x 3.5mm audio cable to “LINE IN”
(PCTVsender) from Computer SPEAKER-OUT.
4.
Switch correct system of NTSC/PAL switcher.
or
3.1.3 Steps for Video to TV function as below
1.
Connect RCA video/audio cable from external device (e.g. DVD
player) AV out to “PCTVsender” (V-IN and A-IN).
3.1.4 Connect 5V power adapter to “DC5V” (PCTVsender) power port.
3.2
Receiver connection
3.2.1 Connect Antenna to “ANT” of Receiver.
3.2.2 Properly connect RCA video/audio cable from “ProPC/TV Wireless
Mini” (V-OUT) (A-OUT) to TV’s AV input port.
3.2.3 Connect power adapter to “DC 6V” (PCTVsender) power port.
5
Chapter 3. Installation
After connection
3.3
Push the “ON/OFF” power button. (ProPC/TV Wireless Mini transmitter
and receiver) to “ON” status.
3.4
Set the channel by pressing the select button on the top of the transmitter
and the receiver to the same channel.
3.5
Push the transmitter “PC/AV” button to change the signal input between
PC or external device. (e.g. DVD player)
3.6
Turn on both computer (or DVD player) and TV.
3.7
Now the video showed on PC monitor or external device (e.g. DVD player)
will display on TV screen simultaneously.
3.8 Adjust Transmitter and Receiver antenna to make best transmission.
6
Chapter 4. Function Description
Note : The following adjustments is for VGA to TV mode settings
only.
4.1
Horizontal/Vertical position :
Press [
/ ] to adjust TV vertical position.
Press [⊳
⊳ / ] to adjust TV horizontal position.
4.2
There are 9 functions in OSD menu, which are:
HSIZE
VSIZE
BRINGHTNESS
CONTRAST
SHARPNESS
DEFAULT
NORMAL/ZOOM
FREEZE/UN-FREEZE
FLICKER
7
Chapter 4. Function Description
4.3
HSIZE :
-
Controls the horizontal scaling:
-
Press [ M ] to bring up the OSD menu.
- Press [ / ] to scroll to HSIZE function.
- Press [ ] to increase horizontal dimension.
- Press [⊳
⊳ ] to decrease horizontal dimension.
- To exit HSIZE control, press [ M ] again
4.4
VSIZE :
- Controls the vertical scaling:
- Press [ M ] to bring up the OSD menu.
- Press [ / ] to scroll to VSIZE function.
- Press [ ] to increase vertical dimension.
- Press [⊳
⊳ ] to decrease vertical dimension.
- To exit VSIZE control, press [ M ] again
4.5
BRIGHTNESS :
- Controls the brightness level of the display
- Press [ M ] to bring up the OSD menu.
- Press [ / ] to scroll to BRIGHTNESS function.
- Press [
] to increase brightness level.
- Press [⊳
⊳ ] to decrease brightness level
- To exit brightness control, press [ M ] again
8
Chapter 4. Function Description
4.6
CONTRAST :
-
Controls the contrast level of the display
- Press [ M ] to bring up the OSD menu.
- Press [ / ] to scroll to the CONTRAST function.
- Press [
] to increase the contrast level.
- Press [⊳
⊳ ] to decrease contrast level
- To exit contrast control, press [ M ] again
4.7
SHARPNESS :
- Controls the sharpness level of the display
- Press [ M ] to bring up the OSD menu.
- Press [ / ] to scroll to SHARPNESS function.
- Press [
] to increase sharpness level.
- Press [⊳
⊳ ] to decrease sharpness level
- To exit contrast control, press [ M ] again
4.8
DEFAULT :
- Reset all control parameters to manufacturer default setting.
- Press [ M ] to bring up the OSD menu.
- Press [ / ] to scroll to DEFAULT function.
- Press [⊳
⊳ / ] to reset all control parameter to default setting.
9
Chapter 4. Function Description
4.9
NORMAL / ZOOM :
- Switches between normal mode and zoom mode.
- In Zoom mode, the picture is zoomed in at the scale of 9x.
- Press [ M ] to bring up the OSD menu.
- Press [ / ] to scroll to NORMAL ZOOM function.
- Press [⊳
⊳ / ] switches between the normal mode and zoom mode.
- Once in zoom mode, Press [
/ ] to adjust vertical position.
- Press [⊳
⊳ / ] to adjust horizontal position.
4.10 FREEZE / UN-FREEZE :
- Switches between pause mode and play mode. While in pause mode,
the picture appears to be frozen.
- Press [ M ] to bring up the OSD menu.
- Press [ / ] to scroll to FREEZE UN-FREEZE function.
- Press [⊳
⊳ / ] switches between the pause mode and play mode.
4.11 FLICKER :
- Adjust this setting to achieve a balance between screen clarity and
stability.
- Press [ M ] to bring up the OSD menu.
- Press [ / ] to scroll to FLICKER function.
- Press [
] to increase flicker rate level.
- Press [⊳
⊳ ] to decrease flicker rate level.
10
Chapter 5. Troubleshooting
Q1 : Poor signal, or there is an interference
A1 : (1) Adjust the transmitter by rotating orientations until you get the best
reception
(2) Change the channel on both transmitter and receiver. (Please make
sure that they are on the same channel)
(3) If there is a microwave oven in use in the path between the transmitter
and receiver, remove the microwave oven or turn it off.
(4) Make sure the transmitter and receiver are within range of each other.
Q2 : No CH LED(channel indicator) light
A2 : (1) Make sure the power adapter of Transmitter and Receiver are plug-in
correctly.
(2) Make sure the power of Transmitter and Receiver are switched ON.
Q3 : No video output
A3 : (1) Make sure the power of Transmitter and Receiver are on
(2) Make sure Receiver cable of video out is connected correctly
(3) Make sure the 15pin HD VGA cable is connected correctly in
Transmitter and PC’s VGA output
(4) Make sure the AV/PC mode is switched correctly in Transmitter
(5) Check the CHANNEL on both transmitter and receiver are set to the
same number
(5) If you connect from notebook, please make sure the CRT output of
notebook is enabled.
11
Chapter 5. Troubleshooting
Q4 : Just mono (black/white) display on TV
A4 : Switch “NTSC/PAL” switch to match TV system.
Q5 : I found line flicker on TV screen
A5 : (1) Please adjust “FLICKER” (see 4.11)
(2) Please lower the contrast level and higher the brightness level which
will minimize the flicker.
12