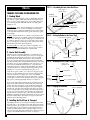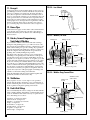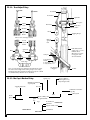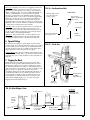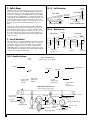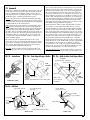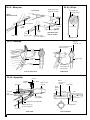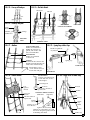
1
THE AMERICAN FISHING SCHOONER
Technical Characteristics
Scale: 1/4” = 1 ft. ( 1: 48 )
Length: 33”
Width: 5-1/2”
Height: 28”
Manufactured by
Model Shipways
Kit No. MS2109
BENJAMIN W. LATHAM
The northward spring migrations of the American mackerel (Scomber scombrus, L.) gave rise
to one of the most interesting and speculative
facets of the New England fisheries in the second half of the 19th century and the early
decades of the 20th. Many methods were developed to capture these wily and unpredictable
fish, the most successful being the purse-seine,
a large net which was set in a ring around a
mackerel school and then closed by “pursing,”
or drawing its bottom edge together with a
“purse line,” thus forming a bag from which
the trapped fish were baled with large dipnets.
The development of the purse-seine also led to
the development of the seine boat, a large doubleended boat from which the net was set. This boat
supposedly evolved from the New Bedford whale
boat in both form and construction, but was soon
modified and enlarged as seine nets became larger. Attendant to this technology was a wide variety of boat and net gear of special design. Because
the schooners themselves were specially rigged
and fitted for these operations, they assumed a
distinctive appearance.
(Continued on page 3)
Instruction Manual
The American Fishing Schooner
Benjamin W. Latham
Noank Mackerel Seiner, 1902
By Erik A. R. Ronnberg Jr., 1973
Plank-On-Bulkhead Construction and Overall Manual Update
By Ben Lankford, 1994
Model built by Bob Bruetsch
The more you read about the New England fisheries, the more fascinating their history becomes. Unfortunately, the few substantial reference works available are mostly
out of print, and one must either spend large sums at rare-book shops, or ransack libraries to get at them. The easier volumes to find are those by Church, Chapelle, and
Story – all excellent reading. Goode’s The Fisheries and Fishery Industries of the United
States is the great work on fishing methods as practiced in the 19th century. It is now
quite rare, but well worth the trouble to locate. Chapelle’s book, The American Fishing
Schooner, is certain to become the standard reference on fishing schooners, their design, and construction. The beginner would do well to consult Campbell’s The Neophyte Shipmodeller’s Jackstay and its excellent references. These and other books are
listed in the bibliography at the end of this manual.
©Copyright 2005
Model Expo, A Divisions of Model Shipways, Inc.
3850 N 29th Terrace • Hollywood, FL 33020
www.modelexpo-online.com
2
(continued from front cover)
The schooners of the mackerel fleet varied considerably in size at
the end of the 19th century. Prior to 1880, vessels suitable for this
work usually measured 60-80 tons, but with the introduction of
new hull types and incentives to increase the sizes of new
schooners, the early 1900’s saw schooners of 120 tons, and more,
being fitted out for mackerel seining. Auxiliary power was introduced; nets and boats increased in size; double-crews and gear
were carried in the largest vessels; finally, in the 1920’s, the seine
boats themselves were fitted with engines. This last innovation
was made necessary by the nets, which had become so large they
could not be set and pursed quickly enough under oars alone: if
an “average” seine net measured 203 fathoms long by 21 fathoms
deep in 1880, by 1910 it had grown to 235 by 23 fathoms, and in
the 1920’s, when engine-powered boats became common, the
seine net measured 300 by 24 fathoms.
The schooner Benjamin W. Latham was designed for Captain Henry
Langworthy of Noank, Connecticut, by Thomas F. McManus of
Boston. She was built in the shipyard of Tarr & James at Essex,
Massachusetts, and was launched on October 30, 1902. She was a
very small mackerel seiner for her day, measuring only 72 tons
gross; the same fishery employed vessels nearly twice her tonnage.
Latham’s hull is more like the “spoon-bow” type than anything
else. At the time of her building, this shape was a relatively new
development for fishermen. This design reflects the influence of
B. B. Crowninshield who introduced this hull type to the fishing
fleet two years previously with his first example schooner, Rob
Roy. Also unusual was the knuckle at the forward edge of the
keel, an experiment which few builders seemed inclined to copy
in later vessels. This was a period when owners were anxious to
see their vessels fitted with keels that were straight, not “rockered,” the latter characteristic having caused many schooners to
slip and fall down on the marine railways when hauled out.
Latham’s keel may have been over-designed for this reason.
Nearly every vessel in the Noank fishing fleet was fitted for mackerel seining in the early 1900’s, and this undoubtedly was the principle activity of Benjamin W. Latham. First registered as a sailing
vessel, she seems to have been fitted with a 48-horsepower gasoline engine sometime in her second or third season. This would
have dictated that her propeller shaft be fitted off-center, either to
port or to starboard as shown on the plans. Since a seiner “bailed
the seine” (removed the fish from the net) to starboard, it would
seem wise to have had the screw to port to avoid fouling the nets.
In keeping with most fishermen, Latham’s career goes mostly undocumented, except for meager scraps of information yielded reluctantly by officials of customs and registry documents. She is
known to have had accommodations for a crew of fifteen, and because of her size, she was a “one-boater” (towed one seine boat).
If the seine boat was a 40-footer, it would always have been
towed astern, since there was no deck room for it aboard the
schooner.
In 1906, Latham was re-registered at New York and operated out
of the Fulton Fish Market. What sort of fishing she did at this time
is not known, although it seems likely that she was converted to
dory trawling. Very likely, she would have been cut down in rig
in the 1920’s, working mainly under power thereafter. What she
looked like in 1939 under Puerto Rican ownership is not known,
nor is the nature of her work. She was lost in 1943 off San Juan,
Puerto Rico.
3
CONSTRUCTION STAGES AND TABLE OF CONTENTS
Brief History
Introduction/Credits
Before You Begin
How to Work With the Plans & Parts
What You’ll Need to Start Construction
Painting & Staining the Model
Cover, pg 3
Pg 2
Pg 5
Pg 6
Pg 7
Pg 8
Stage A: Framing the Plank-On-Bulkhead Hull
1. Bending Wood
2. Center Keel Assembly
3. Installing the Keel-Stem & Sternpost
4. Installing the Bulkheads
5. Installing the Transom
6. Covering the Mast Slots
7. Drilling the Rudder Stock Hole
8. Installing Horn Timber Cheeks
9. Installing the Planksheer
10. Installing the Hawse Timbers
Pg 10
Pg 10
Pg 10
Pg 10
Pg 11
Pg 12
Pg 12
Pg 12
Pg 13
Pg 13
Pg 13
Stage B: Planking the Plank-On-Bulkhead Hull
1. Getting Started
2. Planking Battens & Belts
3. Planking Butts
4. Spiling
5. Fastening the Planks
6. Planking the Outer Hull
7. Plank Variations within a Belt
8. Planking the Transom
9. Planking the Bulwarks
10. Planking the Deck
Pg 14
Pg 14
Pg 14
Pg 14
Pg 15
Pg 15
Pg 15
Pg 17
Pg 17
Pg 17
Pg 17
Stage C: Completing the Basic Hull Structure
1. Correcting & Sanding
2. Natural Wood/Double-Planking Option
Pg 19
Pg 19
Pg 19
Stage D: Mounting the Hull
1. Mounting Board with Two Pedestals
2. Launching Ways
Pg 19
Pg 19
Pg 19
Stage E: Adding the Hull Details
1. Timberheads (or Bulwark Stanchions)
2. Main Rail
3. Rail Moldings
4. Buffalo Chock
5. Monkey Rails
6. Main Pinrails
7. Boom Jiber Box
8. Scuppers
9. Rudder
10. Cleats & Snatch Cleats
11. Bowsprit
12. Hawse Pipes
13. Capstans
14. Skid Battens
15. Deck & Rail Fittings
Pg 20
Pg 20
Pg 20
Pg 20
Pg 20
Pg 20
Pg 21
Pg 21
Pg 21
Pg 21
Pg 21
Pg 22
Pg 22
Pg 22
Pg 22
Pg 22
4
Stage F: Mast & Spar Construction
1. General Information
2. The Importance of Scale
3. Tapering Masts & Spars
4. Curved Spars
5. Lower Mast Fittings
6. Topmast Fittings
7. Stepping the Masts
8. Gaffs & Booms
9. Jaws & Goosenecks
10. Ironwork
Pg 24
Pg 24
Pg 24
Pg 24
Pg 24
Pg 25
Pg 27
Pg 27
Pg 28
Pg 28
Pg 29
Stage G: General Rigging Information
1. Cordage
2. Treating the Lines
3. Differentiating Between the Lines
4. Using Beeswax
5. Sails: To-be or Not To-be
6. Making the Sails
7. Rigging the Model With Sails
8. Rigging the Model Without Sails
9. Flags
10. Rigging & Block Sizes for Actual Vessel
11. Rigging & Block Diameter Conversion Table
Pg 31
Pg 31
Pg 31
Pg 31
Pg 32
Pg 32
Pg 32
Pg 33
Pg 34
Pg 34
Pg 34
Pg 34
Stage H: Standing Rigging
1. Chainplates
2. Rigging the Bowsprit
3. Turnbuckles
4. Footropes & Manropes
5. Fore & Main Shrouds
6. Belaying Pin Racks
7. Ratlines
8. Lantern Boards
9. Spring Stay
10. Jumbo Stay
11. Jib Stay
12. Spreader Lifts
13. Fore & Main Topmast Shrouds
14. Main Topmast Stay
15. Pullback Stay
16. Main Boom Footropes
Pg 35
Pg 35
Pg 37
Pg 37
Pg 37
Pg 37
Pg 38
Pg 38
Pg 38
Pg 38
Pg 38
Pg 38
Pg 38
Pg 38
Pg 38
Pg 38
Pg 38
Stage I: Running Rigging
1. Blocks
2. Jumbo, Fore & Main Boom Rigging
3. Fore & Main Gaff Rigging
4. Head Sail Rigging
5. Fore & Main Topsail Rigging
6. Staysail Rigging
7. Mooring & Other Lines
Pg 40
Pg 40
Pg 40
Pg 40
Pg 42
Pg 42
Pg 42
Pg 42
Bibliography
Acknowledgments
Pg 44
Pg 46
BEFORE YOU BEGIN
This kit differs from most in that its large scale (1/4” = 1 ft.)
will permit the model maker to fabricate or “scratch build”
most parts with great accuracy, and in some cases, duplicate
full-size construction or techniques in miniature. For this reason, the “hows” and “whys” of the vessel’s building and operation will be explained in greater detail than is otherwise customary.
The novice who attempts this kit should accept this challenge
to the full limits of his or her abilities. Aspects of construction
which may possibly seem too difficult or superfluous to the beginner will be mentioned as such in that particular discussion.
While the modeling progresses, you will see where you may
want to substitute some of the kit fittings with your own creations. By all means try them, especially if you think you can
improve the model. The worst that can happen is a little lost
time. But, the experience gained will be most valuable for future projects. For further reading on modeling techniques refer
to the Bibliography at the back of this manual.
Please note that while all of the necessary materials for a beautiful model have been provided, some detailing work has been
left to the imagination of the individual modeler. For instance,
fishing nets can be made from darkened or stained cheesecloth;
knives and hatches from scrap wood and metal; fish cleaning
trays from scrapwood; and so on. Also, the kit will contain the
minimal number of rigging and block sizes needed for completing the model. You may want to buy other rigging line or
scratch build blocks to make the model as close to scale as possible. The detailing possibilities are endless and to provide for
all of them with individual parts would result in a kit far too
pricey for most modelers.
Assuming a modeler works with reasonable skills about 20
hours per week as a hobby, the Benjamin W. Latham model
should take about 5 months to complete (roughly 400 hours).
The most time-consuming tasks will be planking the hull and
completing the masts and rigging. Of course, the time will be
extended if any scratch-built items are substituted. But, don’t
let time govern your progress. The best approach for the beginner, and experienced modeler alike, is to tackle the job as a series of small projects which are conveniently laid out for you in
stages. So, don’t look too far ahead, or you may become discouraged. Assume each small project is an end unto itself and
work on it until it is correct. You will ultimately do a better job
on that particular part, and the overall completed model will
approach perfection.
Beginners, no doubt, will have some problems, especially if
this is the first modeling attempt. The important thing, however, is to learn from making mistakes. Seek help from more experienced modelers or the excellent reference material that is
available to you. And regardless of how the model is turning
out, finish it completely. Improvement takes experience; it cannot be gained with half-completed models. It would be advisable to follow the instructions in sequence until you gain the
experience to work up your own procedures. Have fun with
the project and think about how nice it will look on display
when it is completed. Good Luck!
5
HOW TO WORK WITH THE PLANS AND PARTS
Before starting model construction, examine the kit and study
the plans carefully. Familiarizing yourself with the kit will
serve two purposes. First, it will let you determine that all
parts have been supplied as listed. And second, you’ll be surprised at just how quickly handling the parts allows you to better understand the kit requirements. Try to visualize how
every part will look on the completed model. Also, determine
ahead of time what must be done first. The instructions will
help you in this regard, but a thorough knowledge of the plans
at the outset is essential.
It is suggested that small fittings and hardware be sorted into
labeled containers to avoid loss during building.
1. The Plans
The Latham model kit contains the following 1972-73 plans:
1)
2)
3)
4)
Hull & Lines – Plan Sheet 1 of 4
Rigging – Plan Sheet 2 of 4
Hull, Mast & Fitting Details – Plan Sheet 3 of 4
Seine Boat & Purse Seine (rev. 1981) – Plan Sheet 4 of 4
... and the following 1993 plans:
5) Plank-on-Bulkhead Hull Construction – Sheet 1 of 2
6) Plank-on-Bulkhead Hull Construction – Sheet 2 of 2
Many sketches throughout this manual further illustrate the
various stages of construction.
The Benjamin W. Latham kit is manufactured to a scale of 1/4”
= 1 ft. Each plan sheet is drawn to the exact scale that the
model is to be built, except for the rigging plan and some details which have been enlarged for clarity. Therefore, most dimensions can be lifted directly off the plans by using a set of
draftsman dividers or by using a “tick” strip, which is simply a
piece of paper used to “pick up” the dimensions (a roll of calculator tape works very well). Lay your paper strip down on
the plan and carefully mark each dimension to be transferred
with a sharp pencil. Then “lift” these measurements by placing
the strip down on the wood or item to be made to scale and
transferring them. You should also obtain a 1/4-inch-to-thefoot architect’s scale, since all dimensions on the plans are full
ship sizes.
An outline that lists rigging and block diameters for the Latham
is on page 34, along with a Diameter Conversion Table for converting the full ship rigging and block sizes to 1/4-inch scale.
The table provides a formula for converting diameters to 1/4”
scale. Several conversions have already been calculated for
standard diameters.
Try to maintain the scale size when modeling. As scales get
smaller, the tendency is to build on the heavy side, possibly
from concern about breaking small parts. Models look best,
however, if built to exact scale and even to thinner-than-scale,
which should be the case for a rigging line if the exact size is
unavailable.
2. Making Allowances Along the Way
Try to be exact when following the plans, but use common
sense along the way. You may need to make adjustments or
allow for small differences in how your model is shaping up:
perhaps your mast has too much rake (the angle at which it
sits). When lines go to belaying points they should not drape
over parts or conflict with other lines. If necessary, move a belaying point or a fairlead block. In other words, put yourself on
the schooner and use your judgement. That is how the early
ship riggers worked!
6
3. Understanding the Hull Lines
Beginners may not be familiar with hull lines. They are shown
on the Hull & Lines plan 1 of 4. The buttock lines (they are the
vertical lines on the body plan and shown as curved lines on
the profile view) are simply vertical longitudinal sections taken
through the hull. The waterlines, or half-breadths, are horizontal planes, and the section lines numbered 1 to 22 are vertical
transverse sections. All of these lines define the hull shape and
are used by the draftsman to fair (create regular even curves)
the hull form. With the plank-on-bulkhead construction, the
laser cut bulkheads define the hull form. These are based on
the hull lines, but are made smaller to allow for the thickness
created by adding the planks.
4. Cast-Metal Fittings
The Benjamin W. Latham kit is supplied with Britannia metal,
brass, as well as wooden fittings to eliminate problems in making such parts from scratch. The Britannia metals are a great
improvement over the white metal that was used in some older
kits. Unlike pewter, Britannia does not contain lead, so there
are no possible corrosion problems. Many of these fittings,
however, will require final finishing before they are suitable
for installing on the model.
Before painting the cast-metal fittings, clean them up by removing all the mold-joint flash. To do this, use a No. 11 hobby
blade to cut the flash, then sand with fine sandpaper. It is also
suggested that you clean the fittings thoroughly with warm
soapy water before applying primer. Make sure they are rinsed
thoroughly and allowed to dry before painting.
5. Soldering & Working with Brass
Some fittings for the Latham model, such as mast bands, must
be made from brass (see figure 1a). Therefore, a certain amount
of metal working and soldering will be required. Brass strips
are included in the kit. The brass sheet can be cut with a small
pair of tin snips or heavy scissors. Heavier brass will require
the use of a jeweler’s saw. After cutting, all edges should be
smoothed with needle files and fine wet-or-dry sandpaper.
When cutting slivers from the brass sheet, you may notice that
shears tend to bend the sheet sideways, as well as curl the
piece. To straighten the edges in both directions, grip with a
pair of small pliers.
Drilling holes in brass can be accomplished using small drills and
a pin vise, which is a slow process. A Dremel Moto-Tool mounted on a Dremel drill press is ideal. This tool is worth the cost.
Prior to drilling, use a small centerpunch to start; otherwise, these
small drills tend to wander. Lubricate with a light oil and drill
very slowly to avoid breakage. When using the Dremel, clamp
the pieces in place or hold them down with a stick of wood. The
brass will be very hot, so keep your fingers off!
Soft Soldering: The key here is to keep all brass parts clean.
Use a solvent, or lightly sand, or both. Keep your fingers off to
avoid grease spots. Soldering is easy if care is taken to properly
set up your work area first. Use jigs or other holding devices,
so the parts do not move around. Soldering can be done with a
small torch or pencil soldering iron. First, add flux to the joint,
just enough to do the job. The solder will flow where the flux is
applied. Next, heat the joint.
This sequence is important. The larger the parts, the longer it
will take to heat the brass before the solder will flow. If you get
too much solder on the joint, file it off with needle files. You’ll
want the joint to look like the real thing, not a big glob of fillets.
WHAT YOU’LL NEED TO START CONSTRUCTION
Silver Solder: If extra strength is desired, and also to
avoid the lead in softer solder, silver solder can be used.
A propane torch is a must, as the melting point of silver
solder is much higher. Clean the metal and apply the flux
(liquid silver solder flux is better than the borax type). Cut
a very small piece of solder and lay it next to the joint.
This is necessary because, unlike soft solder, silver solder
will not break away from the roll. It tends to ball up on
the end. Next, heat the joint and solder it together. When
the correct temperature is reached the solder will jump
into the joint––job completed! Be careful to remove the
heat as soon as possible, because the brass also will be
near its melting point.
Figure 1a illustrates how to make mast bands, eyebolts
and rings. Rings can be soldered after they are used on
the model, or not soldered at all, unless there is some
strain on the ring from rigging.
FIG. 1a - Making Mast Bands, Eyebolts and Rings
Pins to hold
parts in place
MAST BANDS
Form around
dowel or drill
Cut from
sheet brass
Flux/solder
all joints
After soldering,
drill, cut and file
to shape
The following tools and supplies are recommended for the
construction process. Modelers who have built before may have
their own favorites.
A. Knives & Saws
1. Hobby knife with No. 11 blades
2. Coping saw (or jeweler’s saw frame) and fine blades
3. Razor saw
B. Files – Set of needle files
C. Carving Tools – Small chisel for carving center keel rabbet
D. Sharpening Stone – Necessary to keep the tools razor sharp
E. Clamps
1. A few small C-clamps
2. Several wooden clothespins
3. Rubber bands
F. Wire Cutters & Tin Snips
For cutting fine wire & chain; for cutting brass sheet
G. Boring Tools
1. Set of miniature drills: #60 to #80
2. A pin vise
3. Larger bits: 1/16”, 3/32”, and 1/8”
H. Miscellaneous
1. Tack hammer
2. Tweezers (a few)
3. Small fine pointed scissors
4. Miniature pliers
a. small round for forming rings and eyes
b. flat nose (with serrated jaws)
5. Draftsman’s dividers
6. Proportional dividers
7. Bench vise (small) with own base for moving around
8. Soldering iron with 1/8” diameter tip and/or propane torch
a. solder
b. flux
9. Sewing thread (for seizings & lanyards; other rigging in kit)
a. black
b. beige
10. Beeswax (for treating rigging lines)
11. 1/2” or 3/4” masking tape
I. Sandpaper – Fine and medium grit garnet or aluminum oxide
sandpaper (#100 to #220 grit)
J. Finishing: – Paint brushes
1. Fine point for details
2. 1/4” to 1/2” flat square for hull
Real ship
Form around drill or rod
Solder
Cut off as required
Wood jaws in vise
EYEBOLTS
K. Supplies: – (will be covered in detail in the Painting &
Staining section and throughout instructions.)
1. Paints
2. Primer
3. Stains/varnish
4. White or Carpenter’s (yellow) wood glue
5. Five-minute epoxy
6. Super glue
L. Cotton or linen cloth: (fine weave) for sails, if added
M. Plastic: Plastic sheet or glass for windows, skylights
Saw or cut with
hobby knife
Bend in
line – solder
Wrap wire
around rod
RINGS
Note about Glues: White or Carpenter’s yellow wood glue will
suffice for most of the model. Five-minute epoxy provides extra
strength for gluing fittings. Cyanoacrylate (Super) glue such as Jet,
can be used for quick adhesion and is ideal for dabbing onto a
rigging seizing to hold it in place. The best cyanoacrylate glue for
most applications is a medium viscosity gap-filling type. The
watery-thin type is recommended to fill a narrow crack by
capillary action and for quick setting of hull planking.
7
PAINTING & STAINING THE MODEL
It may seem strange to begin an instruction manual with directions on applying the finishes to the model. Not so! Much time
and effort can be saved, and a more professional result can be
obtained, if the finishing process is carried out during construction. Painting of various small parts, masts and spars
should be accomplished before they are installed on the model.
Painting sequence must be a well thought out procedure, otherwise you may have difficulty as you proceed with assembly.
For example, it is easier to paint a deckhouse or hatch coaming
before it is glued to the deck. Put the parts aside until they are
ready to be installed. Proper timing in application of finishes
and the use of masking tape to define painted edges should
eliminate unsightly glue marks and splotchy stained surfaces.
In the end, following these general suggestions will be to your
advantage.
1. Preliminaries
Brush painting: Painting with fine, soft-bristle brushes is probably best for the beginner. And many highly skilled modelmakers prefer the brushed-on technique because a brushed
surface, with its fine imperfections, imparts a more life-like appearance to the model.
Choosing Brushes: Brushes must be very soft and of the highest quality. Artist grade sable or synthetics are the best. They
should be a littler wider for painting the surface. A too narrow
brush will cause excessive streaking of the finish.
Brushing Technique: When applying paint or stain with a
brush, lay down one thin coat in a single stroke, then coat the
adjacent areas with single strokes. Never make strokes over
fresh paint, or you will tear up the surface. Let the paint dry to
a hard finish before applying a second coat.
Rub down all external surfaces with 220-grit dry sandpaper
and wipe off all dust thoroughly. Give all unprimed surfaces
two coats of primer and already-primed surfaces one more
coat. A very light sanding is recommended after the last coat of
primer, but don’t sand down to bare wood, or the water will
raise the grain and make a terrible mess. With clean hands, a
soft brush, and a clean, soft rag or tack rag, gently dust and
wipe off the hull.
Scribing the Waterline: One method of scribing is to level the
hull (mount it so the waterline is parallel to the bench top) and
mark the waterline using a height gauge and a sharp scriber
point (see figure 1b). It is then a matter of painting the bottom
and topside colors precisely to this mark, with or without the
aid of masking tape. The scribe line acts somewhat as a barrier
to paint transgressions, but a steady hand is needed for this operation.
Choosing paint: Consider carefully the kind of paint you will
use to paint your model and the methods of application that
suit you best. Is the paint that you have chosen compatible
with the primer previously applied, or does it blister, crinkle,
or turn to “alligator hide?” Better find out! Prime a test block of
wood with the same primers used on the model. When dry,
apply a coat of the brand of paint you have chosen. If the two
don’t “fight” as described above, you may consider it safe to
proceed.
A second method is to spray or brush on the bottom color,
guessing roughly where the waterline will lie and deliberately
painting beyond this arbitrary boundary. The waterline is then
scribed on this overlapping coat of bottom paint and the topside coat is painted down to the line, covering previous excesses. Masking tape can be used as a substitute for shaky hands
when painting to the line.
2. Color Scheme
For hand brushing, use a flat-finish paint. Glossy finishes are
not desirable. A satin finish will give the most satisfactory results, but the undercoat paint should be dead flat. Use model
paints such as the Historic Marine Colors made by Model
Shipways and sold at the Model Expo website: www.modelexpo-online.com.
By the early 1900’s, the era had long passed when a fishing
schooner, to quote Chapelle, was “dolled up like the little blue
wagon.” Then, black hulls, grey decks and white superstructures were the most common color scheme. There were a few
variations, however, and always the chance for a little “gold
leaf and tinsel.”
Are you ready for a real top quality paint job? Although slightly
expensive, an airbrush is well worth the investment. Model Expo
sells a very affordable airbrush at www.modelexpo-online.com.
Airbrushes are easy to use, work well with all the paints mentioned, and do an exceptional job. The air brush throws a pattern
only about 1/2” wide, but obviously, you would still need a
large work space such as a house workshop or isolated room.
Whether you prefer to paint by brush or airbrush, try Model
Shipways paints. These paints are a very fine and versatile line
of ready-mixed water based colors. The colors were specially
developed to emulate the paints used by historic ships. They
are subdued in tones and their properties make both spraying
and brushing techniques easy to master.
Masking off surfaces: It can be very tricky to mask off the surfaces you don’t want to paint. Some brands of masking tape
are absolutely no good because they allow paint to bleed under
them, so be selective. For masking off fine stripes or lines, such
as the cove line, it is best to use drafting tape, such as the Chart
Pak brand. It is available in widths as fine as 1/32” and 1/64.”
This tape has very good adhesion and will not bleed when applied firmly. You may also use black plastic electrician’s tape.
Spray Painting: Spraying techniques work best with fast-drying lacquers. You will find many brands of paint available in
8
aerosol cans which can give quite good results. Test them on a
wood block as previously described before using them on the
model.
Hull: The bottom of a schooner very likely had a coat or two
of Tarr & Wonson’s copper paint, then a deep reddish brown.
The topsides were black (add a drop or two of red or umber to
soften intensity) with gilt scrollwork and cove moldings (these
were sometimes yellow, depending on the budget).
It may be wise to paint the cove molding prior to painting the
topsides black. Whether yellow or gold suits your fancy, brush
the paint into the molding (or where the molding should be, if
you omitted it) and allow it to dry thoroughly. Mask over the
cove with 1/32” drafting tape (1/64” is more to scale but tricky
to handle) and press it down gently, using a piece of metal rod
or some similar burnishing tool. Paint over the topsides with
black and remove the tape gently as soon afterward as possible, peeling at an acute angle to the surface.
Tops & Inboard Sides of Main & Monkey Rails: paint white;
outboard edges should be black.
Bulwarks (Inboard): paint white from rails to decking.
Structures ranging from Bitts to Trunk Cabin: usually painted
all same color: white (or any color that suits you, as captain of
your ship)
Hatch Covers: color of the deck.
Grub (or Great) Beam: often painted white for visibility at
night.
FIG. 1b – Scribing the Waterline
Pencil
or scriber
Deck: could be light grey, although some vessels’ decks were
painted Pea Green. Sometimes great circles were swept around
the quarter bitts, at the grub beam, and abreast the foremast.
The color used for the deck was then painted within the radii
(see perspectives drawings on sheet 3 or 4––these are the dark
areas shown on the deck around fiferails, windlass, and along
the waterways).
Waterways: Outside the previously mentioned circles, the waterway color was painted (this could be white to match the bulwarks, or a deep prussian blue, which was then quite popular).
In painting the waterways, the caulking line between it and the
deck plank was rigidly followed, even where planks were
nibbed, giving a sawtooth effect along some stretches. Beyond
the arcs of the circles, this did not matter.
Is the model perfectly level?
Wood Block
Ironwork: was generally black, but sometimes a benign soul
would paint the hawse pipe linings and lips a bright red. The
diaphragm pumps were similarly treated; sometimes they
were a bright red all over; other times they would be black
with only the insides of the bowls and spouts painted red.
Anchors: may be painted black or left a red-lead color, but
their stocks were tarred a glossy dark brown when the tar was
fresh. The anchor chain sat in a rusty heap in the chain box and
may be “antiqued” accordingly on the model.
Windlass Barrel: often had its ironwork blacked. The barrel
inside the riding bitts was oiled or black-varnished, making it
very dark and somewhat glossy. The windlass heads, however,
were often painted white, ironwork and all. In later years,
many windlass barrels were completely painted, usually white.
Hub, Rim & Spokes of Stoddart Steering Wheel: could be
painted grey or white, the mahogany spokes would have been
oiled and their brass caps polished bright.
Bowsprit: may be black or white inboard, and black outboard,
with the iron bands black and the pole white. All gaffs and
booms should be salmon-buff with white tips.
Masts: The lower masts were painted white from the deck to
the boom saddle or the gooseneck; the mastheads were often
white, but some vessels, including Latham, had buff mastheads
with black ironwork. The tips of the mastheads, which protruded above the caps, were often white-leaded. The topmasts at the
doublings were the color of the lower mast heads; their poles
were generally white. All blocks, regardless of location, would
have been painted the same color as the spars: white or buff.
The hoists of both lower masts and topmasts, over which the
gaffs and mast hoops traveled, were “slushed” or coated with a
mixture of tallow and grease. This allowed gaffs and hoops to
slide up and down with a minimum of friction. The color was a
greyish-umber which darkened when its greasy substance
caught dirt and grime.
Seine Boat: was usually painted white with copper anti-fouling paint below the waterline. Its inboard works should be all
grey or white.
Gunwales & Gunwale Strakes: were generally a bright yellow,
set off by a red stripe along the lower side.
Dory: any shade of buff, grey or green with light grey inboard.
Oars: oiled natural, but inevitably turned a weathered grey.
Lanterns: Port lantern board is red and the starboard is green.
9
STAGE A
FIG. 1c – Assembling the Two Center Keel Pieces
Wax paper or
plastic wrap
FRAMING THE PLANK-ON-BULKHEAD HULL
1. Bending Wood
Building
board or table
Building a P-O-B hull requires some wood bending and twisting of the wood parts which must remain in the desired position so as not to put too much stress on glue joints and fasteners. Following are three different methods of bending and
shaping wood:
Glue joint
Weight (Approx 2#)
Straight edge
to align WL-6
Steam Bending: This is done by holding the wood piece that
you want to bend over a kettle of steaming water and then
bending it. The wood must be held in the bent position until it
cools. It should remain nearly in that position, but may spring
back slightly.
Soaking: Another method is to soak the wood piece in warm
water for several hours. Try adding a little household ammonia
to the water. This speeds up the soaking process and makes the
wood fibers slippery so the wood is easily bent. After soaking
the wood, shape it to the desired position, using a form. Let it
remain there until it has dried completely.
FIG. 2 – Cutting the Rabbet in the Center Keel
Cut with wood grain
Chisel
Hot Iron Bending: You may also bend wood quickly over a
soldering iron, but don’t let it get too hot. It is also possible to
purchase model plank bending irons commercially.
2. Center Keel Assembly
The first step in constructing the hull is to assemble the four
halves of the laser-cut center keel pieces. First, use a sharp pencil and mark the bulkhead locations below the slots and the
WL-6 reference line. Mark on both sides of each center keel
piece. Be especially critical in locating the reference line. Measure from several points, taking them from the plans. This reference line is a key to proper alignment. Next, glue the two 1/8”
laser cut parts that make up keel piece No. 1 together with
white glue and place a weight on the unit until it dries. Make
sure that the pieces are accurately aligned. Repeat the process
with the two 1/8” pieces that make up keel piece No. 2.
FIG. 3 – Installing the Keel-Stem & Sternpost
Place the two parts, 1 and 2, over a sheet of wax paper or plastic wrap, on a flat building board or table. Glue the joint with
white or carpenter’s wood glue. Use a steel or aluminum
straight edge to align the WL-6 reference line. Place a weight
on each piece to hold it down while the glue dries. Let the glue
dry at least overnight, preferably 24 hours (see figure 1c).
Dowel
Next, cut the rabbet in the center keel. The bearding line is the
intersection of the center keel and the inside face of the hull
planks. After the center keel is ready, mark the bearding line
on both sides. The bearding line appears along the sternpost
and the keel-stem. Measure from the P-O-B plans. The plans
show a real ship rabbet for the planks and a model option that
is easier to do. Using a chisel, start the rabbet cut at the bearding line and cut toward the edge of the center keel. When the
planking is installed, the planks will lie flush on the cut portion
from the bearding line to the rabbet (see figure 2). This completes the center keel preparation.
3. Installing the Keel-Stem, & Sternpost
The fishing schooner has no real point of change between the
keel and stem, so we will call it a keel-stem. The laser-cut keelstem (four pieces: glue together as was the Center Keel Assembly) and sternpost can be added now. Taper the keel-stem according to hull detail plans before gluing it in place. Dowels
can be used to help align and hold the pieces. Remove any glue
squeeze-out from the rabbet before it sets (see figure 3).
10
Hobby knife
Bearding line
Recess for
rudder stock
Center keel
Clean out glue
Keel or
sternpost
No! – Get it straight
Sternpost
at top
FIG. 4 – Shaping the Bulkheads
Bevel & cut inboard
side of stanchion
Deck bevel
Bevel
marked
with pencil
Hobby
knife
The top of the sternpost requires a slight recess where the rudder stock will be located. Carve this in before installing the
sternpost (also see figure 3).
Option: You can add the keel-stem and sternpost before cutting the rabbet. It makes the rabbet a little more difficult to cut,
but allows an easier installation of the keel-stem because there
is more gluing surface.
FIG. 5 – Fore & Aft Bevel of Stanchions
Sanding
block
3/16”bulkhead
1/8”
4. Installing the Bulkheads
5/32”
The bulkheads are labeled “A” through “N”. Compare the
laser-cut bulkheads with the plans to determine which is
which and label each bulkhead. Check each bulkhead to make
sure it will slide into the center keel slots. Machine tolerances
during laser cutting may provide a too tight fit. Sand the slots,
if necessary, until the bulkheads slip on. The fit should be
snug, allowing a little tolerance for glue.
On each bulkhead, mark the location of the WL-6 reference line
in pencil. This mark should line up with the WL-6 mark on the
center keel. This alignment will assure that the hull form is accurate and that each bulkhead is in correct relationship to the
others.
FIG. 6 – Installing the Bulkheads
WL-6 must
line up
Tack temporary strip
until glue dries
Next, mark the bevels on the bulkheads. Use a tick strip to
transfer the bevel line as shown on the plans, or cut the bulkhead patterns from the plan and glue them onto the bulkheads.
You may also lay the pattern over the bulkhead and use a pin
prick to locate the bevel. Cut the bevels with a #11 hobby knife
blade (see figure 4).
Some of the bevels are very slight, especially the deck bevels
and the side bevels near amidships. These can be sanded after
the bulkheads are installed, instead of pre-cutting them.
All of the laser-cut bulkheads extend up to the underside of the
main rail to include a timberhead (bulwark stanchion). Consequently, bevels must be cut on the inside of the stanchions as
well as on the outside. The bulkheads are located at every third
stanchion. Two additional “fake” stanchions will be added between the bulkheads after the hull is planked.
In addition to the side bevels, the bulwark stanchion portion of
each bulkhead must be shaped on the fore and aft side. This
can be done with a sanding block (see figure 5). The stanchions
taper slightly and are about 1/8” wide at the rail and 5/32” at
the deck.
Glue the bulkheads in place, making sure that the WL-6 marks
on the bulkheads and the center keel line up. Use a square to
make each bulkhead perpendicular to the center keel. Then
tack a temporary strip to the top of each bulkhead to hold it in
place while the glue dries (see figure 6).
After all bulkheads are in place, tack a temporary batten on
each side of the hull just below the deck (see figure 7). This is a
critical step. Measure the spacing between bulkheads and retack the battens until the hull is aligned. Even though the center keel was assembled flat, it could warp out of line. The end
result would be a banana-shaped hull. Check the spacings between bulkheads, and port against starboard spacings. Check
the hull visually to see if it is properly aligned.
When you are satisfied that the hull is aligned, make sure the
bottom of each bulkhead feathers out and lays precisely on the
bearding line. Trim as necessary to line up. Also, check to see
that the top of each bulkhead at the centerline is flush or slightly higher than the center keel. Since all alignment is based on
the WL-6 marks, there could be some slight errors. If the center
keel is below the top of the bulkheads, that’s OK. If above, trim
the center keel until it is flush with the bulkheads.
Glue
Check 90°
with square
FIG. 7 – Aligning the Bulkheads, using Battens
Check alignment
visually in all directions
Check straightness
of center keel with
straight edge
Check spacing
Tack temporary
batten on hull
11
Next, check the fairness of the hull form and sand in the slight
bevels that were not pre-cut. To do this, use a stiff basswood
batten about 3/32” thick and lay it across the bulkhead edges
and deck in various locations (see figure 8). If not fair, sand the
bevels that stick out, or add shim material if there are dips.
This is an important check. When you start planking, the
planks should lie flat against the bulkheads. No bumps or dips
should occur on the surface. Be mindful here––the functioning
of Murphy’s rule is a possibility. And, manufacturing or assembly errors can occasionally creep in.
FIG. 8 – Checking the Fairness of the Hull Form
Sand flush with top of
bulkheads if necessary
WL-6
Line up with WL-6
on center keel
Notice that from the intersection of the sternpost to the transom, there is no bearding line. This portion of the center keel is
a horn timber on the real ship. The planking will butt against
the timber, so no rabbet cut is necessary. More on this later.
5. Installing the Transom
The stern of most ships is difficult to visualize and to construct.
The Benjamin W. Latham has a transom that slopes sharply aft. A
laser-cut transom piece is provided in the kit. This piece represents the framing timbers of a real ship. It will be covered with
1/16” planks on the outside and 1/32” planks on the inside. But
for now, it is important to install only the laser-cut piece.
There are various bevels that must be cut on the transom piece
(see the plans and figure 9). The bevels, where the planking
will join, are especially critical. The top bevel will receive the
main rail. The lower (side) bevel receives the hull planking and
is a little tricky to cut. But, if you don’t get it exactly right, it
can be corrected during the planking operation to assure that
the planks land flush on the bevel. After the bevels are cut,
steam bend the transom piece to the required curve (see plans
and figure 10).
Next, slip the transom slot over the center keel in the position
shown on the plans. Make sure the angle is correct by using
scrap wood to create a template for the angle. Glue the transom
to the center keel. Tack a temporary batten on each side from
bulkhead “N” to the transom to hold it in place (see figure 11).
Bearding line
Smooth
flow into
rabbit
Needs
shim
Trim if necessary to
line up on bearding line
Needs
trimming Good
Good
Heavy batten across several
bulkheads to check fairness
FIG. 9 – Cutting Bevels on the Transom
Top bevel– main rail will
land on this bevel
Visually check the transom for alignment, sighting fore and aft,
and from the side. Get it right; a twisted transom looks bad
and creates a problem during the planking process.
6. Covering the Mast Slots
On both sides of the mast slots in the center keel, add the
pieces shown on the P-O-B plan. Cut them from scrap wood.
Glue them securely, because you won’t be able to get to them
after the decking is installed. The mast slots should be slightly
larger than the actual mast. The masts will be wedged in their
holes when installed.
7. Drilling the Rudder Stock Hole
Drill or carve a hole into the center keel directly above the
sternpost as shown on the plans. This hole will receive the rudder stock. You could omit the hole, cut the stock flush with the
hull, and simply glue the stock to the hull, but the effect is
nicer if a hole is present.
Bottom bevel
at lower end
Bottom bevel at side
This bevel should be in line with
the flow of outer hull planking
FIG. 10 – Steam Bending the Transom Piece
Clamp
Transom
piece
12
Form
Steam, then bend on form.
Clamp until cool
8. Installing Horn Timber Cheeks
FIG. 11 – Installing the Transom
From just forward of the hull/sternpost intersection to the
transom, fit a 1/8”-square piece between each bulkhead on
both sides. These “cheek” pieces are located slightly more than
1/16” up from the bottom of the center keel. This area of the
center keel represents a horn timber on a real ship. The cheeks
are for attaching the hull planks at the horn timber. On a real
ship they are bolted to the horn timber (see figure 12).
Notice in the sketch that the bottom of the horn timber from
the sternpost aft is not completely flat, but is a shallow vee
shape. After the planking is installed, this vee can be sanded
in, or you can cut it before planking.
Make template for
correct transom angle
Bulkhead “N”
Transom
9. Installing the Planksheer
A large ship, such as a clipper, has a separate planksheer, waterway, and nibbing strake for deck planking. On the fishing
schooner, one piece serves all three functions. The outboard
edge of the planksheer is flush with the outside hull planking,
and the top of the plank is flush with the deck planking. Nibs
are cut into the inboard edge for the deck planks.
On the larger real vessel, the planksheer (or planksheer-waterway in this case), would be a solid piece with holes cut out for
the bulwark stanchions. With holes cut, the planksheer then
would be slipped over the stanchions. For the model, each
planksheer-waterway section is made up of two pieces. A
laser-cut piece has slots for the stanchions on the outer edge at
each bulkhead. After this piece is installed, a 1/16”-square
strip will be added to the outboard edge to complete the model
planksheer.
At this time, there are no nibs cut into the inboard edge of the
planksheer. Cut the nibs during the deck planking process in
order to avoid errors.
It may be necessary to file the planksheer slots so they fit snugly around the stanchions. Also, the aft end of the quarter deck
planksheer is longer than required. Cut the end to fit against
the transom. The forward end of the quarter deck planksheer
should be flush with the front edge of Bulkhead “G.” The fore
deck planksheer should butt against the Bulkhead.
Glue
Temporary batten
on each side
FIG. 12 – Installing Horn Timber Cheeks
Bulkhead “N”
Bulkhead
“M”
Center keel
Hull
plank
1/8” square
horn timber cheek
Shallow vee cut
on center keel
FIG. 13 – Installing the Planksheer
Laser cut
planksheer
Flush here
Glue the planksheer pieces in place. The upper outboard edge
of the planksheer pieces should be flush with the outside of
each bulkhead. When in place, add a 1/16”-square basswood
strip on the outside edge (see figure 13). After the hull planking is completed, the outer edge of the planksheer can be sanded flush with the hull planks.
1/16” square strip
glued to edge
10. Installing the Hawse Timbers
The hawse timbers can be a single 1/8”-thick piece at the forward end as shown on the plans (also look ahead to figure 22a).
Glue the timbers to the top of the planksheer. You can cut the
hawse pipe before you install the timbers if desired. Make sure
you leave space for the bowsprit to pass through at the bow.
BEFORE PLANKING
Most of the basic framing is now completed and you should be
ready to start planking. Take a moment to look over what you
have done so far. Recheck the fairness of the hull. Making corrections now will allow the planking process to go smoothly.
Sand flush with
hull planks
AFTER PLANKING
13
STAGE B
FIG. 14 – Planking with Stealers
PLANKING THE PLANK-ON-BULKHEAD HULL
Stealer
1. Getting Started
The planking process is tedious and you should plan on spending some time doing the job. Work on each plank as a project
unto itself. Rushing will only result in frustration and a poor
result.
PLANKS GETTING TOO WIDE
Single plank insert
Since both sides of the hull will be identical, you can cut two
planks the same shape at once. Fit one plank at a time to each
of the sides. Before starting, place the hull upside down and
secure it in a vise or cradle. It would be ideal to use something
portable that would allow you to rotate the hull easily.
2. Planking Battens & Belts
The model will be easier to plank if you first divide the hull
into a series of “belts.” The belts flow along the hull in smooth
curves. Each belt is designed so the planks lay against the hull
and sweep up at the ends like the deck sheer, lessening the
need for excessive edge bending. Within each belt, the planks
are usually spaced evenly, tapered, and fitted as required.
When selecting a belt width and the number of planks within
each belt, you need to consider how the planks will lay against
the frames and how they will taper. If the planks are too wide,
they will not lay flat on the bulkheads. Also, you will not want
them to taper so much that there is no width left for fasteners.
This would require substituting a larger plank for two to increase width. Also, in some areas, the planks may get wider
rather than taper. If they get too wide, a stealer plank must be
cut into the plank. While these alterations are acceptable and
are used on many ships, it is best to design the run of planking
to limit the number of such inserts (see figure 14).
PLANKS GETTING TOO NARROW
FIG. 15 – Staggering the Planking Butts
Real ship – must be 5’ or more
(model meets rule)
Real ship – must have 3 strakes between butts on same
frame (model meets rule with plank length selected)
FIG. 16 – Spiling
1. Use compass – run steel point along plank in place
and mark parallel line on new plank with pencil end
To save you the trouble, a planking layout has already been
developed for the Benjamin W. Latham model. The layout is
shown on the P-O-B plans. The arrangement shown is based on
notes in Howard Chapelle’s book, The American Fishing
Schooner (see number 14 of the Bibliography). Generally, the
schooners had about 21 planking strakes per side. The upper
strakes had very little taper forward and aft and no stealers
were used above the waterline. This was done to improve the
appearance of the plank runs.
The Benjamin W. Latham model has been designed with
Chapelle’s observations in mind. The upper belt was kept reasonably wide forward and aft. Stealers are introduced at the
stern in the lower belt.
Bulkhead
2. Measure width & mark. Draw curve
3. Cut out plank
Parallel
Wood – lay along bulkheads
without edge bending
Plank already
in place
3. Planking Butts
Before you start planking, you need to consider the planking
butts. Since the longest length of trees available determined the
cut-lengths of wood, available planking was generally shorter
than the overall lengths of the lifesize vessels. Shipbuilders
generally had to work with planks only 20 or 30
feet long. Some modelers think it is easier to use a
plank length the full length of the model, since fake
butts can be scribed in later or omitted. Granted, this can be
done; it’s really up to the modeler. But, there are some excellent
advantages to using shorter pieces. Since all planks must taper
from midship forward and aft, the use of a short length will
allow the marking of the taper to be quick, and the plank easier
to fasten into place. Also, a short piece can be held down with
one hand. And if you make a mistake, you will have only a
small piece to do over. So, the following is based on the assumption that you will use the shorter planking lengths.
14
FIG. 17 – Belt Battens
Batten
“G”
A
B
C
D
Mark locations on
bulkheads with pencil
Look for smooth
flow of battens
A plank length approximately 6 inches will cover four bulkhead spaces. This is a comfortable length to handle for this
model. To scale, it is a plank 24 feet long. However, to avoid
having very short pieces at the bow and stern, you may need
to use a longer plank to complete the run.
FIG. 18 – Sloping the Plank Edges
BOW AREA
Planksheer
Edge must
be sloped
and fitted
To follow real ship rules, you should stagger the butts on the
model (see figure 15). The sketch shows a stagger sequence
which is similar to that of real ships. The stagger also applies to
the deck planking. The 6-inch plank works well with the rules.
With this length you can meet the rule for three full plank
widths between butts on a single frame. Had you used a plank
length to cover only three bulkhead spacings, this would not
be possible. Because the butts occur on bulkheads, you would
wind up with only two full planks between the butts.
4. Spiling
On real ships, more so than on models, edge bending is limited. The wood may be very stiff, so each plank must be cut to
shape. Spiling is the term used for laying out the cuts (see figure 16). It’s simply a matter of transferring curves to a straight
plank, then sawing the plank to shape. For the Benjamin W.
Latham model, the wide planks landing at the sternpost should
be the only strakes you need to spile. For narrow planks, the
basswood strips are flexible enough so they can be edge bent
into place.
5. Fastening the Planks
There are some fancy plank clamps on the market, but they are
more trouble than they are worth. They must be screwed into
the edge of the bulkheads, leaving a big hole to contend with
when doing the next plank. Instead, you can hold the shorter
planks in place, or position them with straight pins. Be careful
not to split the plank when using straight pins. If necessary,
drill a small pilot hole first. Glue each plank to the bulkheads,
and edge glue them together. For the edges, use white or carpenter’s glue so that setting will not occur too fast. At the bulkheads, it is good to use thin super glue to quickly secure the
plank in place.
While glue alone will hold the planks, you may wish to use
small brass brads or wooden treenails for additional holding
power, or just for looks. Using fine brass brads, cut off and discard the heads, then hammer them into place. If treenails are
desired, you can buy them commercially. Better yet, get some
long bamboo skewer sticks, strip off small pieces, then pull
them through a draw plate until you have very small dowels.
Drill holes for the treenails, add a touch of glue and drive them
into place. Treenails are good if you want to add them for each
frame. While there are no frames, only bulkheads, use the bulwark stanchions for locating where the frames would be.
6. Planking the Outer Hull
Belt Layout: Now the fun begins! From the Hull Planking Layout drawing, use a tick strip along each bulkhead location and
mark the belt seams. Using a tick strip, transfer the location of
the belt seams onto each bulkhead and mark them with a pencil. Next, lay the battens (1/16” x 1/8” x model-length basswood strips) along the marks and temporarily tack them in
place.
The purpose of the battens is to assure an accurate flow of the
belts. Even though the Hull Planking Layout was developed to
provide an accurate flow of belts, errors in drafting and tick
strip marking may occur. The battens were designed to assist
in this regard. With them in place, any errors previously made
can be corrected. Also, you may not like the flow and desire to
change it to suit your own taste.
Severe slope–
some rounding of
plank required
STERN AT TRANSOM
With all the battens in place, visually check their flow. Look at
the model from the side and from the bow and stern. Do the
battens have nice smooth curves? Adjust them if necessary (see
figure 17). The sketch shows what they should look like from
the side. When everything seems okay, remark the belt seam
lines on the bulkheads, making sure they are clearly indicated.
You do not want to lose them. You may now remove the battens. It would be a good idea to leave the middle batten in
place temporarily to help secure the hull so it won’t warp before it is planked.
Sloping Plank Edges: As you proceed with the planking, you
may need to slope the edges of a particular plank so it butts
flush against the adjacent plank. This is especially true for a
plank adjacent to another member intersecting at an angle. For
example, the first plank below the planksheer at the bow
should butt against the planksheer at an angle. At the stern, the
angle is even more severe. The edges of these planks must be
trimmed so they fit against the planksheer (see figure 18).
To begin with, all the planks on the hull have square edges.
When butted against each other on a round hull form, a small
gap will appear between each plank. Most of the gaps eventually will be filled with glue, or you may fill them with wood
filler. On a real ship, the gaps are caulked. In fact, the edges of
the planks are often sloped to increase gapping. This measure
assures that the inside of the planks butt against each other,
while on the outside there are sufficient gaps for caulking. If
you want a perfectly smooth hull without the gapping, you
must trim the edge of each plank as you fit it. It’s a lot of work
but your decision.
Laying the Planks in Belt A: Each belt of planking should be
done separately. Consequently, you can start with any belt. For
discussion, let’s start at the top and work down. Belt A has six
planking strakes below the planksheer forward of the deck
step. Aft of the deck step, there is a seventh strake. The extra
strake fills the space caused by the deck step which raises the
planksheer on the quarter deck. The maximum plank width is
at Bulkheads G and H. The planks here should taper both forward and aft. All the planks can be cut from 1/4” x 1/16”
strips. They should be slightly over 3/16” wide amidships,
tapering to about 1/8” at the bow and 3/32” at the stern. Full
size, the maximum width is about 10 inches.
Use a tick strip and lift the plank widths from the Hull Planking Layout. If you have changed the locations of the battens,
first mark the position of the seventh aft plank below the
planksheer and in line with the forward planksheer. Then, simply divide the remaining space into six equal plank widths at
each bulkhead. A set of proportional dividers would help.
Mark these lines on the bulkheads with a pencil. You should
now have a completely marked area for Belt A.
15
FIG. 19 – First Two Strakes in Place
Start
2
3
1
“K”
“J”
6
“G”
“B”
“F”
4
5
The next step is to cut planks to fit between the marks. Belt A
will not require spiling, so straight tapered planks can be
made. Start at Bulkhead G and install the upper plank under
the quarter deck planksheer. Use two planks, one from Bulkhead G to K, and another from K to the transom. First, lay a
piece of planking material over the bulkheads. Using a pencil,
mark the lengths at each of the bulkheads. Next, use a set of dividers, or a tick strip, and lift the plank widths from the marks
on the bulkheads and transfer them to create each plank. Draw
a line through the points and cut the planks. You should now
have tapered planks. Trace these planks to obtain those needed
for the other side of the hull.
FIG. 20a – Planking Nibs at Bow
Typical nibs in lower
bow planking
Install the planks you’ve just cut on the hull, butting them up
against the planksheer. Where the planking does not fit flush
up against the underside of the planksheer, trim the plank
edges so they do fit. Glue and fasten them into place.
Continue the same process for the next strake below. This time,
the strake will go from the bow to the stern. Stagger the butts
for this strake. Install a plank from Bulkhead F to B, B to the
stem, F to J, and J to the transom. You will have four planks
making up the strake from bow to stern (see figure 19). At the
stern, some planks must be twisted into place. They should be
steam bent if the twists are severe.
Generally, no nibs
are used above the
design waterline
FIG. 20b – Planks in Belt “C” at Stern
This sharp angle diminishes
rapidly forward of the rabbet
as shown by dotted line
Horn timber cheek
Move down to the next planking strake and work as before.
Stagger the planking butts, starting at Bulkhead E. Continue
until this strake is complete, then complete the other strakes in
Belt A.
For now, let the aft ends of the planks that rest on the transom
extend just beyond the transom. When you plank the transom,
the transom and hull planks will meet in a miter. More on this
later.
Laying the Planks in Belt B: Belt B is very similar to Belt A in
that it has six planking strakes about the same width. If you
have not removed the temporary batten, do it now. Then you
may start the planking process for Belt B. Remember to stagger
the butts.
At the stern, a few planks should land on the transom bevel,
and the others should butt against the side of the horn timber
(our center keel) and up against the horn timber cheeks.
At the bow, the planks feather out at the stem rabbet rather
sharply. This is fine for the model, but there is an option. Many
real schooners have nibs in the planking forward (see figure
20a). You can do this if you desire. This also applies to Belts C
and D. See the profile detail on the plans.
Laying the Planks in Belt C: Belt C is also similar to Belt A except that the planks do not taper as abruptly at the stern. At the
intersection of the horn timber and the sternpost, there should
be an abrupt change. One plank should flow to the horn timber. The plank below it should flow into the rabbet at the stern-
16
Slope edge
of both
planks
Center keel
(horn timber)
This plank
flows to the
horn timber
Sternpost
Rabbet
This plank
flows into the
rabbet
FIG. 20c – Planks in Belt “D” at Stern
Belt “D” at sternpost
Two stealers in belt “D” only
post. These two planks must have their edges sloped so they
meet flush (see figure 20b). Belt C also has some twists, so
steam bend them in place if necessary.
Laying the Planks in Belt D: This belt will contain the garboard
strake (next to the keel) and two other strakes. It also will contain two stealers in order to reduce the width aft (see figure
20c). All the planks here will be very wide and must be spiled.
You will need to use the wide planking strips provided in the
kit. Also, you will find that in order for these planks to fit in
place, a severe twist must occur. The planks will have to be
steam bent to obtain the right shape.
The stealers could have been placed in Belt C rather than in
Belt D. However, since the tendency of the lower batten is to
naturally flow upward as it goes aft, placing the stealers in the
lower belt is more logical.
7. Plank Variations within a Belt
FIG. 20d – Planking the Transom
Bulwark
plank
Hull plank
Waist
Transom
plank
Miter joint
Cove
REAL SHIP
FIG. 20f – Fitting the Fashion Piece
Main rail
FASHION PIECE
1/32” – fit on top of
1/32” bulwark plank
1/16” plank
FIG. 20g – Installing the Great Beam
Great beam 3/32” thick
Plank the inside of the transom with 1/32” stock after the deck
planking is installed. Run the transom planks over to the inside
of the bulwark planking.
The planks between the planksheer and main rail will be in two
thicknesses. From the planksheer to the waist (see location on
plans), use 1/16”-thick material. Above the waist, use 1/32”thick material. The bulwark planks are fairly uniform and will
not require any severe tapering forward or aft. First, fit the
1/16” plank. This will need a jog in it at the deck step as shown
on the plans. Next, fit the 1/32” plank. You may let it extend
slightly above the stanchions. Then, trim it flush with their tops.
Scuppers: Later on in these instructions, there is a discussion
on how to cut or otherwise treat the scuppers which go
through the bulwark planking. If you intend to install the scuppers, now would be a good time to do it. Cut the scuppers in
the edge of the 1/16” planking before it is installed on the
model (see page 21).
The Cove: Another detail that can be done now before the
planking is installed is the cove, a thin hollow molding, located
just below the waist (see figure 20e). This was an important aesthetic feature of the fishing schooner and accentuated the low
profile and graceful sheer of the hull. The cove can be scribed
with a sharp steel point and straight edge. If you elect not to
scribe in the cove , do not fail to paint it on (generally, it was gilt).
Fashion Piece: At the transom, there is a fashion piece that
must be fitted (see figure 20f). The piece is 1/32” thick, and
should be added over top of the already installed 1/32” plank.
1/32”
bulwark plank
WAIST
8. Planking the Transom
9. Planking the Bulwarks
Scupper
MODEL
OPTIONS
If you are working within a belt, and have five planks exactly
the same width, and then find that the last plank in the belt
needs to be made slightly wider to complete the belt ... should
you worry? Certainly not. No planking job, even on real ships,
is that precise. You are dealing with hand-cut planks. The important thing is to keep the flow of planks smooth. A variation
in widths is of no great concern.
For the model, the side hull planks can be extended past the
transom and the transom planks butted into the hull planks or
vice versa. However, on the real ship, the transom plank meets
the hull plank in a miter joint. If you elect to do this, first cut
the ends of the hull plank that you left hanging over, then add
the 1/16” thick transom planks. Cut the miter on each plank,
then glue them into place (see figure 20d). You could also cut
the miter as you add each side plank.
FIG. 20e – The Cove
Quarter deck plank
Notch for
planksheer
Center keel
BHD “G”
Fore deck plank
Scrap deck plank support
Planksheer
10. Planking the Deck
The Great Beam & Plank Supports: Before laying any deck
planking, you must install the great beam (also called a Grub
beam by Essex shipwrights) at the deck step. You must also
add some supporting members under the great beam and
under the edge of the planksheer to provide support for the
ends of deck planks. Cut the great beam to the deck camber
curve. The great beam butts against Bulkhead G and projects
1/16” above it. When the quarter deck planks are installed the
planks will be flush with the top of the great beam. Notch the
ends of the great beam to fit over the fore deck planksheer (see
figure 20g). The sketch shows the construction of the great
beam and the supports (see also figure 21).
17
Hatch & Cabin Coamings: Before planking, you must decide
how you want to treat the hatch and cabin coamings. A recommended approach for doing it the way it was done on the real
ship, is to install all coamings first. You can then plank around
the coamings. On the underside of the coamings, insert some
scrap wood so the deck planking has a support for gluing (see
figure 20h).
FIG. 20h – Hatch & Cabin Coamings
Deck Planks: The deck planks should be 1/16” square. The
size may seem small for the scale of this model, but this particular fishing schooner did have very narrow planks. On earlier
schooners, the planking was much wider. The change was
made to improve the watertightness of the deck.
Scrap support for deck
plank and coaming
Hatch coaming
Deck plank
FIG. 20i – Deck Planking Nib Arrangement
Nibs
Nibs
No nibs
No nibs
Prepare the strips by painting one edge black or dark brown.
When the planks are glued together, this will simulate caulking
in the seams. You may also use a brown colored carpenter’s
wood glue on the edges of the planks. When dry, this glue is
dark enough to simulate the caulking.
Thick Pads: There are several thick pads on the deck as shown
on the plans and in the sketches (see figures 21 and 22a). These
can be made of thicker planks that are added as you lay the
deck, or you may add planks over top of the regular deck
planking. It’s your choice.
Nibs
No nibs
Trunk cabin
Planks parallel
to trunk cabin
FIG. 21 – Break at Quarter Deck
Planks parallel
to centerline
Scupper holes
Timber head
After hatch
Pump holes
Main mast hole
“PAD”
(thick planking)
Great beam
MAIN DECK
TOP VIEW
FIG. 22a – Fore Deck Showing Pads & Hawse Timbers (Cap Rails Omitted)
Hawse
timbers
Waterway
Hawse
pipes
Hawse
timbers
“Manger”
(Timberheads not shown)
Hawse
timber
Hawse
pipe
DECK
Hawse pipe
has flared “lip”
outboard
Hawse pipe –
note the
forward slant
Riding bitt pad
HAWSE TIMBER DETAIL
Fore deck pad
Fore mast hole
Companionway
Hawse
timbers
Iron
hawse
pipe
“Manger” (wood)
18
Procedure: The fishing schooners had a very unusual deck
planking layout and nibbing arrangement, so follow the plans
carefully (see figure 20i also). Cut the nibs into the edge of the
planksheer as you go.
The fore deck plank should be laid parallel to the centerline.
Start at the centerline and work outboard. Scrape off any glue
squeeze-out before going to the next plank. Planking butts can
be used, like the outer hull, or they may be omitted. On a real
ship, they do not show up as readily as the seams do. You may
also scribe butts after the planking is laid. Since there is no cutting or curves involved like the hull planking, using long deck
strips is no problem. Use brads or treenails if you like. See Hull
Plank discussion.
The quarter deck should be laid parallel to the trunk cabin
sides. You will end up with nibs at the centerline, as well as
some at the planksheer.
STAGE C
COMPLETING THE BASIC HULL STRUCTURE
1. Correcting & Sanding
After all the planks are installed, look over the entire hull. If
you find seams with starved glue joints, rub some wood glue
in the cracks, and if necessary, add some wood filler. When
seams are filled, sand the entire hull and deck planking until
they are smooth. Addition of the rails and details will be covered under Stage E.
2. Natural Wood/Double-Planking Option
Most wooden ships have single-thickness planking. The model
of the Benjamin W. Latham is designed with this in mind and is
intended to be painted the colors of the real ship. However,
many modelers are familiar with the European double-planked
kits, or may want to have a natural wood-tone finish on the
hull, which is typical of the Admiralty type models. Also, after
the planking job is completed, some modelers wish to try again
to improve the looks of the job.
If for any reason you desire to double-plank over the basswood
planking, thin wood strips in mahogany, walnut, or some other
types of exotic hardwood can be purchased from Model Expo to
complete the task. For the Latham, you will need 80 strips sized
0.5mm x 5mm x 20 inches long. This amount includes about 20
percent increase for waste and errors.
The strips are only available in up to 5mm widths. Consequently, you will need to double-up or glue two strips side by
side to arrive at the correct width for some of the wider planks.
The natural wood planks will cover the existing planking, but
you still will have a basswood planksheer, main rails, and
upper rails exposed. Instead of initially using the basswood
for these details, you could make a substitution with the wood
of your choice. You could also cap them with the doubleplanking strips, or simply stain them to look similar.
STAGE D
MOUNTING THE HULL
Before going on, it is best to mount the hull to prevent details
from becoming damaged during handling. Any alignments
that require a true waterline will be easier to do. Any modeler
may devise his own mounting or purchase mounting kits commercially. This kit contains two pedestals for use with a mounting board which you must make or purchase separately. Model
Expo’s Item No. RH4530 30” x 5-1/2” Routed Red Oak base is
ready for staining and highly recommended. It’s size will accommodate both the Latham schooner and its seine boat. A second mounting option is the launching ways.
1. Mounting Board with Two Pedestals
If you’ve decided to make your own baseboard to use with the
kit’s two brass pedestals, it must be made long enough to
mount both the schooner and seine boat (a minimum of 30” in
length). With baseboard in hand, round off the top edges or cut
a simple chamfer (taking the edges off or beveling them). If you
own a router, or can borrow one, you will be able to cut a nice
fancy edge on the baseboard. Finish the base with a dark stain
or paint.
Next, drill the pilot holes for the pedestals and support dowels
for the seine boat. Working with a 30” long board, drill the first
pedestal hole 9 inches from the end at width center. Space the
next one 12 inches from the first toward the stern. At the opposite end of the board drill a first dowel support hole 4 inches
from the end just 2 inches off the port or starboard edge of the
baseboard. Drill the next hole 5 inches from the first toward the
bow. If you have correctly drilled the pilot holes for the pedestals, the model should sit with the waterline parallel to the
baseboard (see figure 22b). If the balance is off, you can add a
brass shim under one pedestal to correct it. Visually align the
seine boat.
2. Launching Ways
Launching ways are mostly suitable for models without sails.
Make them from scratch or purchase a kit commercially.
Drilling of the keel is still required to apply the rods that anchor the model to the ways. The launching ways are easily assembled and should be mounted on a minimal board size of
24” x 6”. (Expanding the size of the board will allow you to create a mini-diorama comprised of boat yard ground activity.
This would be good for the Latham model so you could lay the
seine boat to rest beside the ways.) Follow the directions supplied with the ways to achieve the proper waterline level.
Note: It is recommended that either choice mounting piece be
finished before mounting the Hull Assembly into place.
FIG. 22b – Mounting the Hull using Baseboard & Pedestals
When applying the strips, proceed exactly as you did for the
basswood planking process. You may want to work with
longer strips since the basswood planking already defines the
plank shapes. Simply lift dimensions from the hull and cut the
natural wood strips. When completed, sand and finish the hull
with Model Shipways oil or glaze, or tung oil. Finally, add a
coat of wax and then polish it.
WL
Equal
forward
& aft
Pedestal
Screw
Shim to level
19
STAGE E
FIG. 23 – Railing at Main Deck Deck
Main rail
ADDING THE HULL DETAILS
Before beginning with the details, outline all topside items on
the deck by marking their locations with a pencil. Take all measurements from the plans using tick strips. Proper locations
should be measured from some firm “bench mark” such as a
mast hole or a station line marked on the deck. Add all equipment on or near the bulwarks first, before adding those near
the centerline.
1. Timberheads (or Bulwark Stanchions)
These members comprise an extension of the hull frame and
give the bulwarks their form and strength (see figures 23 and
26). During the building of the Plank-On-Bulkhead hull, every
third bulwark stanchion was included as part of the bulkheads.
You now must add two additional “fake” stanchions, and taper
them exactly to the shape used for the bulkheads. Glue them in
place. Scrape off any glue squeeze-out. Let them dry before
proceeding to the main rail.
FIG. 24 – Railing Joiner Work
BOW
3. Rail Moldings
The edges on the rails of many fishermen had simple moldings,
usually super-imposed “half-rounds” (see figure 25). If the
model maker wants to contrive scrapers or some other device
to form these, his efforts would be well rewarded. Detailing of
this sort adds much interest and challenge to the work. Otherwise, especially for the beginner, a neatly sanded rail edge with
neatly rounded corners will suffice.
4. Buffalo Chock
This is a very simple log rail on top of the main rail, port and
starboard, at the bow (see the plans and figure 30). It should
be square or rectangular in cross-section and taper aft slightly. Taper the rail first, planing and sanding it lightly. Next,
file the ends to their proper shapes. Soak or steam the pieces
and bend them to fit the main rail. Then fasten them down
with glue and pins.
Quarter
knee
Breast
hook
Over the monkey rail is placed the monkey log, made from
1/16” x 1/16” strip-wood. Note that part of the port monkey
log is omitted to make room for the seine roller. Follow plan
sheet 1 of 4 closely on this matter.
20
Simplfied
scarf for
models
FIG. 25 – Some Common Railing & Superstructure Moldings
CAP RAIL MOLDINGS
2/3
1/3
Inside
rabbet
A. Traditional “hawks bill”
molding (called “dirt catcher”
in the gloucester area.)
Half lap
joints
1/2
1/2
Coaming
B. Cruder style of “hawks
bill” molding. Very common
among fishermen.
F. HATCH
C. No molding.
Crudest & cheapest.
No inside
molding.
Dovetail
joint
Coaming
D.
Fife rail showing a
typical stanchion
and an occasionally
used rail molding.
5. Monkey Rails
Fit the monkey board first (see figure 26). This is made from
1/16” x 1/8” for the sides. The section over the stern should be
cut from a 1/8” block. Piece the corners. Over this is placed the
monkey rail which can be made from 1/16” x 1/8” strip-wood
planed down to 3/64” x 1/8”. This rail is made in much the
same way as the main rail. However, steam bending the side
portions may be preferable to cutting them from sheet stock.
STERN
Scarf
2. Main Rail
This rail runs the full length of the vessel, capping the bulwarks and the timberheads (see figures 23 and 24). The railing
along the sides and around the bow and stern must be cut from
the sheet stock and very carefully joined. Simple scarf joints are
recommended, together with careful gluing and pinning. Note
that the outboard side of the rail protrudes beyond the bulwark
planking; likewise, the inboard side covers the timberheads
with a slight margin of overhang.
SIDES
E.
G. TRUNK CABIN
(end view)
Pinrail at
bulwarks
Note: on bulwark rails, it was common to use the same
moldings on both inboard and outboard edges, including the
bulwark pin rails. This is not usually the case for the fife rails
at the fore and main masts.
6. Main Pinrails
These are simple swellings of the main rail on its inboard sides
abreast of the main mast which hold the belaying (see lower
right of figure 25). Note dimensions and their location on the
hull plan. No alterations to the main rail are necessary for fitting the belaying pins at the fore shrouds.
7. Boom Jiber Box
This is an extension of the taffrail (main rail at the stern) and
should be blended smoothly with it. Install the support chocks
and prime and paint the area within them (check the color
scheme in the section on Painting and Staining the Model).
Then install the boom buffer hardware (also primed and painted). With this finished to your satisfaction, glue down the jiber
box top, making sure that the block ring for the main sheet
aligns properly with the opening. Since this detail is now essentially complete, be sure that you are satisfied with your
workmanship, because these parts will be quite inaccessible
later, if repairs are needed or afterthoughts begin to haunt you.
8. Scuppers
As can be seen on the bulwarks and rigging profiles of the
plans, the bulwarks of the Benjamin W. Latham are pierced with
many scupper holes. These openings on the real ship permitted
rapid drainage of water which frequently found its way over
the lee rail in heavy weather. They measured 1” x 5” but on the
model are mere slits measuring 1/50” high x 1/10” long. One
of the greatest pitfalls encountered in the modeling process is
creating these holes grossly over scale. If you feel confident
that you can drill or punch them out and retain a true-scale effect, go ahead and try it. Otherwise, a convincing effect can be
produced by making slight indentations in the bulwarks on the
outboard side, using an old small screwdriver that has be
ground down to 1/10” in width and sharpened to a chisel
edge. Scribe lines outboard at main and quarter deck levels and
locate the scuppers so they lay on either or both sides of the
timberheads as shown on the plans. Remember, the holes were
meant to let water out, not three pound mackerels! As noted
earlier in the instructions, you may cut the scuppers before installing the bulwark planking.
9. Rudder
The rudder is of the plug-stock type and is provided laser-cut
in the kit. It should be securely bolted to the rudder/stern post,
which is a round wooden plug that pivots on the rudder’s true
axis. Fit the stump-ends of the stern post’s upper and lower
parts into blind holes drilled in the center keel. The lower end
should be tapered and fastened neatly to the rudder blade with
glue and pins. Notch the hinge-side of the rudder as shown on
the plans and add the pintles (see figure 27). Mark the corresponding locations of the gudgeon straps on the stern post and
make, or “fake”, the gudgeons to suit your preference. The
rudder can now be installed, but it is advisable to prime and
paint it, together with the stern post, before final installation.
10. Cleats & Snatch Cleats
With the outboard woodwork of the hull done, the deck structures now may be made and fitted. First, finish up the bulwarks by making the numerous cleats and snatch cleats from
strip-wood leftovers (see plan sheet 3 of 4 at top middle section
and figure 31). Then glue them to the timberheads as shown on
the plans. Follow these locations closely. Next, carefully paint
the bulwarks (white). Apply two or three coats according to directions on the paint container. Leave no nook or cranny unpainted. Paint the rails, too. Then drill them with holes for the
belaying pins and eyebolts which will be installed later.
FIG. 26 – Railing at Quarter Deck
Monkey log
Monkey rail
Monkey board
Main rail
FIG. 27 – Pintles & Gudgeons, Connecting Rudder & Sternpost
Gudgeon
(above is
top view)
A. Actual practice
Iron strap
Pin bent at
slight angle
Pin forged
to strap
Paper strap
B. “Faked pintle”
Paper or
shim strap
Eyebolt
C. “Faked” hinge
Paper straps
Gudgeon
“padded out”
Drift pin
FIG. 28 – Fitting the Bowsprit
Samson post mortised
for bowsprit heel
Bowsprit
Head of stem post should
be fitted so bowsprit beds
snugly on it
FIG. 29 – Built-up Deck Structures
Chain box
Forward companionway
(forward side)
21
11. Bowsprit
At this point, the bowsprit should be made. See the section on
spar making for various construction methods. Next, make the
samson post and fit it very snugly into the deck. After this is
done, the bowsprit heel socket should be carefully located on
the post’s forward side. Take the post out and mortise the socket into position. Then cut a tenon into the bowsprit heel. Next,
replace the post and test fit the bowsprit. Check the bowsprit
for the proper steeve (the angle that a bowsprit makes with the
horizon or the keel). If the angle is off, make a new samson
post, correcting the position of the heel socket (see figure 28).
FIG. 30 – Iron Cathead
Buffalo chock
12. Hawse Pipes
Drill out the hawse pipes for the anchor cables and fit the managers inboard (refer to figure 22a). The hawse pipe lips furnished in this kit may now be added to the outboard edges of
the hawse holes.
FIG. 33 – Windlass, Aft View
13. Hatches, Forward Companionway,
Trunk Cabin & Wheelbox
If you elected to add the various hatch and cabin coamings
during the deck planking process, you will now need to complete the hatches and build the wheelbox, companionway, and
trunk cabin for fitting on top of the coamings. If you planked
the entire deck without providing the coamings, you’ll need to
make the complete units and glue them on top of the deck
planking after carefully marking their positions.
This kit provides only strip or sheet wood to construct these
furnishings. Consequently, these items must be built up. Follow the plans for the various shapes and moldings shown on
the plans (see also figures 21, 25 & 29). As an option, you could
cut the cabin and companionway from solid basswood or pine
blocks onto which you would then add the various moldings.
Use of blocks was common in older Model Shipways kits with
solid wood hulls. Each modeler is pretty much on his own as to
how he wishes to make these deck furnishings. Let ingenuity
and a desire for detail be your guides. For beginners who feel
equal to the task, review earlier paragraphs on moldings and
add these to the hatch coamings and cabin sides.
When the individual items have been completed, prime and
paint them, and then set them aside to dry.
Pawl
Ratchet
Samson post
Riding
bitt knee
Chain whelp
(iron)
Whelp stud
Pad
Windlass head
Cleat (wood spacer)
FIG. 34 – Windlass Pump, Forward View
14. Skid Battens
Club-boom
crotch
Next, cut pieces of 1/32” x 1/32” strip-wood to specified
lengths and glue them to the decks to serve as skid battens, as
shown on the deck plan. Use the deck structures you have just
made as guides for the precise placing of the battens.
15. Deck & Rail Fittings
Whelp (wood)
Riding bitt
Windlass brake
(removable)
Samson post
Pump ratchet
Rocker
arm
Sort out and identify the various castings for the deck and rails.
After assembly, priming and painting, set them in their proper
locations. Drill and socket where necessary (see plans for locations). The fittings are as follows:
Quadrant link
Cat Head: (see figures 30 and 31)
Anchor Catted: (see figure 31)
Windlass: (see figures 32, 33 and 34)
Pump: (see figure 35)
Boom Buffer: (see figure 36)
Steering Wheel: (see figure 37)
Propeller: (see figure 38)
Exhaust Pipe: (see figure 39)
Quadrant
Bowsprit
Brake pivot
22
FIG. 32 – Assembling the Windlass & Bitt Support Mechanism
FIG. 31 – Anchor Catted
Rocker arm
(2 castings)
Clasp
(wood)
Samson post
(wood)
WINDLASS ASSEMBLY
Cleat
Windlass barrel
(1 casting)
Snatch
cleat
Rocker arm
(1 casting)
Quadrant
(2 castings)
Buffalo chock omitted
Pivot
(1 casting)
FIG. 35 – Pump Assembly
Plunger
casting
Pump
brake
casting
Pad
Make parts
from brass
wire (supplied)
Riding bitt
(wood)
Riding
bitt knee
(wood)
Solder
Quadrant
links
Quadrants
QUADRANT LINK ASSEMBLY
Pump bowl
casting
Pump
base
casting
FIG. 36 – Boom Buffer
Pin
See plans, sheet 1 for actual dimensions
(assembled soldered)
FIG. 37 – Wheel & Wheel Box Assembly
Make
brass
ring
Steering wheel
(1 casting)
Rudder
post
Wheel box sides,
ends, and top are
made of wood
Section
View
Buffer links
(2 castings)
Buffer link
(1 casting)
Pad (thick plank)
Hook main
sheet block
to ring
Shaft 1/16” brass rod
Note: The steering gear housed in the wheel
box is a rather complex device which is best
substituted by the rig shown above.
SIDE VIEW
FIG. 38 – Propeller Assembly
Open
Open
Rudder post
The wheel shaft is bent 90° at its aft
end and fitted into a hole centered on
the top of the rudderpost
FIG. 39 – Exhaust Pipe
Jiber box
Strut
Propeller
shaft strut
(1 casting)
Shaft
Propeller
casting
Propeller shaft1/16” brass rod
Exhaust pipe casting
Propeller casting
Shaft log (wood)
faired to hull bottom
Propeller and shaft
are joined midway
in strut socket
Aft end of exhaust
pipe should project
1/16”- 3/32” beyond
transom
23
STAGE F
MAST & SPAR CONSTRUCTION
1. General Information
Carefully study the details of masts and spars which appear on
all four sheets of the kit plans. Sheet 3 of 4 contains details of
the hardware which must not be overlooked. Likewise, the
leads and belaying points for the running rigging must be
given careful attention. When you feel certain that you understand what goes where (and hopefully why), you should next
take out the dowels supplied in the kit and match them to the
spars of equivalent lengths and diameters as shown in the
plans.
Note that virtually all spars on this vessel are tapered and that
proportions of the tapers differ somewhat:
1) On gaffs and booms, the point of greatest diameter lies
about 1/3 of the spar length from the jaws (or gooseneck).
2) The bowsprit’s maximum diameter is at the knightheads
where it passes through the vessel’s bow.
3) Lower masts are thickest at about deck level and taper upward to the tops, where there is a more pronounced taper from
crosstrees to caps.
4) Topmasts have very little taper at the doublings where they
overlap the lower masts. Above these, they taper in a fashion
similar to the lower masts, but are surmounted by poles, to
which the trucks and flag halyards are fastened.
2. The Importance of Scale
While the scale of masts is important, the booms and gaffs are
probably the most critical spars to consider in regard to proper
scale. Stubby, fat-ended booms and gaffs stick out like sore
thumbs, giving a model that unprofessional look. Care should
be taken to assure that they are tapered properly and to correct
scale.
3. Tapering Masts & Spars
All spars have a parabolic (curved), not straight taper. Sighting
down the spar, you would find that the sides bulge like the
sides of a barrel, but in a much less distended fashion. The kit
provides either round or slightly tapered birch dowels for
masts and spars, but final tapering to plan dimensions is still
required. A dowel is difficult to taper since it is already round.
The best approach is to slice the dowel from a round shape at
maximum diameter to a square shape at the ends, then to an
eight-sided shape, then sixteen-sided shape. Final rounding is
achieved by sanding. This approach prevents a round dowel
from becoming an oval (see figure 40).
In finishing the tapered dowels, which are generally supplied
too long, cut off the excess from each end so that the point of
maximum diameter lies as indicated in the plans. To cut off
ends, make a nick with a knife at the end mark and roll the
dowel back and forth under the blade until it cuts through. It is
advisable to sand the spars prior to cutting them, otherwise
you may round the ends off excessively, or produce some
strange taper that was never seen on any sailing vessel.
To taper a straight dowel, use a small hobby plane (see figure
35 for planing sequence). The plane blade must be very sharp
and adjusted to remove only a thin curl of wood at a time. The
taper of the lower masts from deck to hounds should be very
slight; from 5/16” at the deck to 9/32” (1/4”+) at the cheeks,
24
and may be ignored by the novice, but not by the more experienced modeler. Above the crosstrees, the mast heads should
taper more noticeably, but the “flats,” which accommodate the
cheeks and trestletrees, make planing tricky. It is probably
safer to file the mastheads down to size. Remember that on
fishermen, mastheads are round in section, not square (see figure 41). Mark carefully where the cheeks and trestletrees are to
go, and carefully file “flats” into the sides for them.
4. Curved Spars
If you have been doing your homework and have been eagerly
poring over photographs of fishermen in the books previously
recommended, it should become readily apparent that there
was hardly ever a straight spar on a Gloucester-rigged vessel.
From the day the early riggers went aboard a new vessel to
“dance in her rigging and weave their spell on her,” the masts
would be sprung forward and the bowsprit “hogged down.”
All was done in the interest of keeping the stays “tight as fiddle
strings,” so the vessel would sail well and close to the wind.
The lower masts would always be stepped and wedged with a
slight 2° to 3° rake aft. The lengths of the fore and spring stays
were carefully calculated to be a little short. Then, with the aid
of a special tackle and a large gang pulling at the hauling end,
the masts would be sprung forward, and the stays shackled to
their respective straps or eyes.
A new mast would have had a very slight forward rake which
became more pronounced with the change in seasons as adjustments were made to keep the stays tight. The topmasts, being
of lighter stuff, were sprung more easily and required more
frequent adjustment; therefore, they usually had a more pronounced forward curve than the lower masts. After two or
three years, these sticks became so badly warped, they had to
be replaced. The bowsprit was similarly treated, but here turnbuckles were used to get the necessary tension and resultant
curvature.
Other spars such as the gaffs and booms were not induced to
take unnatural shapes on purpose, but stresses caused by the
sails could warp them (see figure 42). The booms were usually
so heavy and poorly supported when idle, that they sagged
considerably, particularly when resting on the boom crotches.
The previous information is mentioned for the sake of the perfectionists and the uninformed who may now be looking disconsolately at a warped dowel, wondering whether he should
attempt to straighten it or replace it. Unless the warpage is really bad, take advantage of the situation and shape the dowel so
the bend will simulate the condition of the actual spar. This will
spare the rigging on the model from the severe strains imposed
by trying to duplicate the tense rigging of the actual vessel.
It is a source of great pride for the skilled modeler to be able to
produce perfectly straight, symmetrical spars thus representing
a vessel perfectly constructed and fitted out Bristol fashion.
But, we are dealing with a vessel that should be fitted out in
Gloucester fashion––meaning that the end results are expected
to be less than perfect! By nature, the rigs of these early fishermen flirted precariously with the laws of mechanics. Principles
of rigging predicated spars distorted by high tension. In other
words, a working fisherman with perfectly straight spars probably never existed. So, if realism is your preference, your
model should carry sprung spars. More follows on this subject.
5. Lower Mast Fittings
After shaping the fore and main masts, mark the forward and
aft sides at both ends where they will be easily readable. Next,
mark the levels of the lower sides of the trestletrees and file
“flats” for these and the cheeks on the port and starboard sides.
Now make and fit these members to the mast, securing them
firmly with glue and pins. Allow them to dry firmly.
Meanwhile, fashion the spreaders from 1/16” x 3/32” stripwood, tapered as directed on Sheet 4 of the plans. Make end
notchings and add any prescribed eyebolts, but do not glue the
spreaders to the trestletrees until the masts are ready to rig. If
installed now, they will surely break.
Bands for the halyards: These may be added now. It was common practice with Essex-built craft to drive the halyard ringbolts through the masts and the bands, then secure them with
fore locks (see figure 43). One simple method to simulate this is
to glue a strip of rag paper around the mast, drill a hole
through it and the mast, and drive in a ringbolt, bending it over
at the far side. When painted, the paper band can look very
convincingly like metal. Metal bands can be made as shown in
figure 1a.
Throat halyard cranes: These should be fitted next. But, DO
NOT GLUE the throat halyard cranes in place until after the
spreaders are installed at rigging time. If you wish, make the
heart irons and linkages for the throat halyard blocks, paint
them, hook them to the cranes, and set these assemblies aside
until they are needed (see figure 44).
FIG. 40 – Tapering Masts & Spars
Plane
Plane in this direction
(Always with the grain)
Make more
strokes at this end
(tapered end)
Plane in this direction
Spar
TAPERING A DOWEL
When the taper has been “4-sided”, as shown above, it may then
be “8-sided”, “16-sided”, then rounded with a file, and sanded
smooth. (Dotted lines indicate wood to be removed)
4-sided
8-sided
16-sided
Rounded
FIG. 42 – Mast & Spar Curvature
FIG. 41 – Lower Mast Head
Dashed lines indicate
rake of masts and steeve
of bowsprit prior to
setting up the stays.
Halyard tension
7/32”
Topping lift
Sagging in
boom crotch
Taper is
quite
pronounced
This shows with some exageration (but not much!) the degrees
and directions of warpage of spars induced by rigging, sagging,
and tension from running rigging and sails.
Taper is blended to
smooth contours
above spreaders
FIG. 43 – Mast Head Bands & Eyes
Level of
trestle trees
A
A’
“Flatted”
for cheeks port
& starboard
Fore-locks
Taper is
slight
9/32”
Section A-A’
5/16”
Diameter at deck
Actual Practice:
ring bolt goes through
band; sets up on forward side of mast head
Ring bolt
Mast band
Ring
For Models:
wire eyebolt goes through
paper or shim band, is bent
over on forward side
Bent over
Eyebolt
Ring
25
FIG. 44 – Throat Halyard Fittings
FORE
MAIN
Iron band
Iron crane
Crane
Spreader
Iron “gate”
Heart
iron
Iron heart
Trestle tree
Cheeks, P & S
Shackles
Upper
halyard
blocks
Block
Topping lift eye
(These views looking forward)
Ring or
spectacle
iron
Lower
halyard
blocks
Oak chafe battens
(strips 3/4” x 1-1/2”)
nailed to mast.
Sheet iron was later
used; open seam
on forward side
Spectacle
iron
Ring
Gaff jaw
Gaff
Topsail sheet
blocks:
P & S (fore)
S. only (main)
Iron strap
Wooden truck
(“clapper”)
Note: vessels 90-120 tons carried two double blocks at the
fore cranes and a triple block at the gaff jaws (fore only),
but this rig may have been more than necessary for a small
vessel like Latham, thus the above substitute
FIG. 45 – Mast Caps & Masthead Fittings
Spring stay
Figure-8 link for
main topmast stay
lanyard (port side)
Shackle for pullback
stay lanyard
Topping lift crane
Parrel
Iron bail
Band below foremast
cap only
Jibstay bail
Bail
Crane
pivot eyes
Split
key
Figure-8 link, P & S
for spreader lifts
Cap
Round head
FOREMAST
thru-bolt
Figure-8 link (outer)
Bail (inner)
MAIN MAST
END VIEW
26
Mast caps: Originally of iron, these are supplied as metal castings in the kit. But if you prefer to make your own, it is suggested that you make them of brass strips or short lengths of
tubing, soldered together. You can also drill and file them out
of brass or aluminum flat stock. The caps must be drilled
through to accommodate bolts and links which support the
spreader lifts and also serve as pivots for the bails (supporting
half hoops) used for the stays (see figure 45). In addition, an
eyebolt must be fitted to the aft side of the main cap for the
topping lift crane. A lower crane pivot must also be made and
fitted. All of this construction must be well made. It is desirable
to solder all eyes in the bails for extra strength.
Fore mast: The foresail boom requires that a gooseneck be fitted to the fore mast. This will allow the fore boom to clear
dories, the seine boat and any other main deck clutter (see figure 46). It can be made of paper strips, pins and eyebolts in a
manner similar to the peak halyard bands.
Main mast: This gets fitted with a wooden saddle. It is furnished as a casting in the kit, but may be substituted with a
wooden piece of the modeler’s own fabrication, if desired.
FIG. 46 – Fore Boom Goose Neck
FORE MAST
Shackle and hook for
fore sail tack (hook
points to port)
Ears on mast
bands for tightening
bolts, P & S
(TOP VIEW)
Swivel pin
Swivel pin with split
key on port side
Shackle
outside all
Split key
6. Topmast Fittings
The hardware for topmasts is quite simple: one band at the
foremast head; two at the main. Brittania castings are provided
for these bands, but not all of the eyes on each band are needed. Snip off all those that are not called for in the plans. These
may be glued down after the topmasts are in place.
FIG. 47 – Trestle Trees
Topmast Heels: These must be “fidded” and wedged into the
trestletrees very carefully. This is a good time to make a trial fit
and install the “gates” for the trestletrees at the same time (see
figure 47).
7. Stepping the Masts
Finish up the masts by adding any forgotten eyebolts and
hardware. Fit the spreaders and throat halyard cranes. Then
add the chafe collars to the lower masts (refer back to figure
44). Stain and paint these according to earlier directions. Next,
slide on the mast hoops and mast coats, both of which are supplied as castings (see figure 48). The masts may now be
stepped into the mast holes and wedged tight with slivers of
wood which should be cut off at deck level. Add a touch of
contact cement around the wedges and slide the mast coats
down until they rest snugly on the deck. You may now proceed with the standing rigging or go on to the other spars.
Rigging instructions begin in Stage G.
Cheek
Eyebolt, P & S,
for jumbo
halyard blocks
Topmast
heel “gate”
FIG. 48 – Mast Wedges & Coats
For Model:
use castings
supplied or turn
out of hardwood
Wedges driven
Wedge
Lead strips
Wedges
driven
around
mast
Mast hole
Canvas mast
coat (stitched
on aft end)
Wedges driven
below deck level
27
8. Gaffs & Booms
FIG. 49 – Gaff & Boom Jaws
Methods of tapering and shaping these spars are the same as
for the masts. But, you must adapt their lengths and the position of their fittings to suit the rigging and clear any fixed obstructions. For example, if you made an error, however slight,
in spacing the fore and main masts so that the gaff and boom
of the foresail strikes the main mast if swung from port to starboard, you must shorten the gaffs and booms to allow adequate clearance. Likewise, check to see if the jumbo boom will
clear the fore mast when it is hauled full-back on its gooseneck.
Fittings on booms should coincide with mating deck fittings.
Is the main sheet band on the boom centered over the boom
jiber? Check the other booms, too! Anyone can make small
errors of this nature; it happened on full-size vessels, too. But,
if you do not make allowances for these little mistakes now,
your errors will be compounded in later work, making them
far more obvious.
Sharp
edges
TOP VIEW
TOP VIEW
Carve, file
and sand
Wood grain
Round edges
FINAL SHAPED JAWS
ROUGH CUT JAWS
FIG. 50 – Main Boom Jaws
SIDE VIEW
Clapper
TOP VIEW
9. Jaws & Goosenecks
These are the most conspicuous fittings on the masts. So, they
should be strongly and neatly made. Jaws may be rough-cut
and glued to the spars prior to finishing touches (see figure
49). They are perhaps easiest to do on the assembled units.
Small, hinged shoes, or clappers must be set in the jaws of the
gaffs and main boom. The main boom clapper differs from the
other two (see the plans and figure 50).
FIG. 51– Bands for the Booms
Pivot
pin
Boom
jaw
Main tack
eyebolts (2)
Parrel
strap
Clapper
Tack
eyebolts
Parrel
(iron bail)
ACTUAL PRACTICE
(scale drawings are on plans)
Clew
of sail
Hinge
Iron-plate link
Iron bail
Wire link
Set up
bolt
Outhaul band
(jumbo, fore
& main)
Link
Sheet band
(jumbo, fore
& main)
Crotch
tackle band
(main only)
Boom tackle
band
(fore & main)
SIMPLIFIED FOR MODELS
(these are suggestions only)
Two eyebolts
side by side
Wire bail
Paper or
shim band
Out haul band
Sheet band
28
Wire eyebolt
Wire link
Lill pin, end bent over
Shim or
paper band
Wire eyebolt
Eyebolt, P & S
“pinched”
Wire link
Wire strap at sides
Crotch tackle band Boom tackle band
10. Ironwork
Booms: The fore boom gooseneck has been illustrated in figure 46 and the jumbo boom gooseneck appears in figure 52. If
you wish to fake the ironwork with paper and wire, simplified
assembly methods are shown in figure 51.
ures 55 and 57). First, fit the wooden jackstays onto both sides
of the bowsprit along its upper outboard edges (see figure 56).
Drill them out for the jib stops (for locations see Rigging Plan
Sheet 2 and upper left corner of sheet 3. Near the end of the
bowsprit is a withe (four eyes) to which the outer bobstay, the
jibstay and the bowsprit guys are shackled (see figure 58). Just
inside of this withe is fitted a brace band (no eyes) which supports the former by helping to distribute some of the compression loads. The brace band may be faked with paper, but the
withe might be better made with metal. Or, you can use a brittania metal casting provided for the purpose.
Gaffs: The ironwork for the gaffs is not as demanding. Throat
halyard blocks and hardware have been shown in figure 44.
This should be a thoroughly enjoyable project for the modeler
who finds fine metalwork an interesting challenge, which it
should be. The fore peak halyard blocks are fixed to bands on
the gaff (see figure 53a). The main peak halyard blocks run on
wire bridles which are seated in shallow grooves in the gaff
(see figure 53b). These block bridles are discussed in the section on standing rigging.
On the underside of the bowsprit, abaft the bands of the lifesize Latham was a long plate for the inner bobstay. Passing
through that plate was a heavy metal staple which formed the
bobstay eye. The ends of this staple were headed over clinch
rings on the upper side of the bowsprit (see figure 58). On the
model, the metal plate can be simulated with heavy paper, but
the eye must be very secure. Form a small staple from a common pin. Next, drill a hole in the bowsprit for it. Then drive
the pin up through the hole and bend the ends over neatly.
The ends of the gaffs are fitted with blocks for the topsail
sheets. The fore has two cheek blocks (important note: the fore
topsail sheets are double!). The main has a single block shackled to a band. The main gaff also must have a band with an
eye-strap for the flag halyard (see figure 54).
Outboard of the bands projects the pole of the bowsprit, from
which the balloon stay is shackled. This pole has a longitudinal
band running its whole length, above and below, and is recessed into the wood. A strip of rag paper will represent that
fitting nicely. An eyebolt can be driven through the pole and
headed over underneath to accommodate the jibstay.
Ironwork is somewhat more difficult to make for the gaffs and
booms than for the masts and bowsprit. The bands are smaller, more complicated, and drilling a thin dowel for the eyebolts and sheave holes is a tricky job at times (see figure 51 for
the different types of bands required for these spars).
Bowsprit: There is much ironwork to be fitted for this spar
which includes the bobstay irons and gammon irons (See fig-
FIG. 52 – Jumbo Boom
Seine boat & net booms: The ironwork for these is quite simple and covered in detail on the seining gear Plan Sheet 4 of 4.
FIG. 53a – Peak Halyard Straps & Bridles
FIG. 53b – Bridle for Main Peak Halyard Blocks
ACTUAL
(popular at turn of century)
ACTUAL
Iron roller or saddle
FOR
MODEL
Knot
Splice
Goose neck
Iron strap
FORWARD VIEW
(all fore gaffs and many or most main gaffs)
FOR
MODEL
Make a fine
groove in gaff
for bridle
FIG. 54 – Gaff Ends
Wood cheek block,
port side
Topsail sheet block
Cheek blocks,
port & starboard
Double
topsail sheets
or
Iron band
Flag
halyard
block
Peak outhaul
Peak outhaul
1. For larger vessels
2. Probally better for Latham
MAIN GAFF
FORE GAFF
29
FIG. 55 – Bobstay Irons
FIG. 56 – Jib Stops
Make wire staple;
form eyes at ends
X-SECTION
Wood jackstay
Figure-8 knot
BASIC
INSTALLATION
Pin
Bobstay link
Wire
link
Wire
staple
Glue on
paper “strap”
Iron straps
Bowsprit
Paper “strap”
MODIFIED FOR
MODEL WORK
Drill hole & cut
groove in stem post
Whipped ends
FIG. 57 – Gammoning
Lill pin,
end bent over
Wire eyebolts driven
thru bowsprit
Bolt
Gammon
strap
Paper strap
Iron
rivets
Ends recessed
in stem knee &
bent inward
ACTUAL PRACTICE
FIG. 58 – Bowsprit Ends
SIMPLIFIED
Jib stay
Backing
band
Iron withe
Man rope
Balloon stay
eyebolt
Inner
bobstay eye
(staple)
Iron withe
Inner
bobstay
plate
Bowsprit
Bowsprit
guy
turn buckle
Pole
Iron strap
(let in flush)
Outer bobstay turnbuckle
Inner bobstay eye
(in recessed plate)
Iron strap
Withe
Backing band
Foot rope
SIDE VIEW
30
BOTTOM VIEW
STAGE G
GENERAL RIGGING & SAILMAKING INFORMATION
Rigging plans are often confusing because of the numerous
lines involved, and the fact that overlapping and concealing of
some of the detail occurs. Every effort, however, has been made
to make the Benjamin W. Latham rigging procedure as clear as
possible. Modelers should have little trouble, if the plans are reviewed thoroughly and the instructions are followed.
There is a very fine stranded steel cable on the market advertised as control lines for model airplanes. It can be had in several sizes at hobby shops. It is suggested that any standing rigging which is all-served should be made up of linen thread,
using the wire only for stays, etc. which have some of the wire
exposed.
Steel wire is tough stuff to work into loops, eyes, etc., so it is
best worked prior to being fitted to the model. Don’t let the
wire be too shiny, but work a little black or dark umber into
the lay to simulate tar.
2. Treating the Lines
1. Cordage
Standing rigging is black and running rigging is white. The
nylon rigging line supplied in this kit will be adequate for most
modelers. To rig as accurately as possible, however, search out
and buy different line sizes to match the scale of the plans.
Seasoned veterans will probably want to make substitutions,
using linen, which comes in a wider variety of sizes and will
last longer. Rigging diameters, block lengths and a conversion
table are given on page 34.
Generally speaking, when selecting the size of thread for a
given line, it is better to err on the small side. Many beautifully
crafted hulls have lost their look of realism because of a heavy,
clumsy-looking rigging job. Look at photographs of these fishermen and note how delicate the rigging appears, then strive to
attain the same visual effect.
The use of wire for standing rigging: By Benjamin W. Latham’s
time, using wire for the standing rigging on fishermen was an
accepted practice. From the visual standpoint, the diameters of
shrouds, stays, etc. were considerably reduced, and not much
larger, if ever, than the heaviest running rigging. Some of these
lines, such as the stays, stood bare to the elements. But, a lot of
them were completely covered with serving (see next paragraph) and well tarred, thus prolonging their life considerably.
In addition, the eyes, ends and splices in all pieces of wire rigging were served. Shrouds, bobstays, bowsprit guys and
footropes were served over their entire lengths. The main
boom topping lift was served wherever chafe gear is shown in
the rigging plan, then covered with baggy-wrinkle (scruffylooking padding used on shrouds to prevent chafing).
Using real wire for standing rigging can be a tricky business.
However, there is no doubt that it looks better. The results can
be heartbreaking if the wrong techniques are applied to the
wrong materials. First of all, avoid the tinned copper wires.
These stretch, kink and never set up as tightly as you would
have them do. Such wire is always subject to minute temperature changes, and what looks taut at 65° will look terrible at 70°.
Worming, Parcelling & Serving: Lines on ships were wormed,
parcelled and served (a method of protecting parts of a rope)
where they are likely to be chafed, such as the shrouds, especially at the mast heads and ends of lines fitted with thimbles.
For models, worming (laying thin pieces of line (the worms)
between the strands), and parcelling (winding strips of canvas
saturated with tar over the part wormed) is unnecessary. Only
serving (tightly binding the wormed and parcelled area in the
other direction with spun yarn) of the lines is required on the
model.
Serving the lines is best left to the experienced modelmaker.
Beginners should not attempt it unless they are exceptionally
good at detail and are able to scale down accurately.
Cordage for serving should be as fine as can be obtained. Silk,
nylon, polyester and dacron are all good for the job. Avoid
using cotton or linen for this work because they are too coarse
and lumpy.
How to serve: Stretch the line between two points and use a
miniature serving mallet the same way the early riggers would
have done it (see figure 59). You also could secure a line between two fishing line swivels (see figure 60). Rotate the line
with one hand while feeding the serving line with the other
hand. Just make sure you do not stop without grabbing hold of
the serving end. Otherwise, the entire thing could unravel.
3. Differentiating Between the Lines
Standing rigging: Stockholm tar was the usual preservative
for standing rigging on the lifesize fishermen. It was dark
brown and almost black in color. If you mix burnt umber and
black in equal parts, you will have about the right shade for
the model.
In tinting standing rigging, it is suggested that you try thin
down Model Shipways paints. Avoid a “jet black” color; even
blackened tar had a slight brownish tinge to it. A little glow
will not hurt either, for it accentuates the lay of the rope, or
FIG. 59 – Serving
Exploded View
Serving Mallet
Tension pulley
Vise
Serving
mallet
Turn of serving
Thread
Table
Lay of rope (or thread)
BENCH LAYOUT
Weight
END VIEW
31
serving, and imparts depth, giving it life. Some of the early
riggers added turps and black paint to the tar to harden it and
give it a glossy black richness which had a very handsome appearance. You can achieve this quality even with Model Shipways paints which are dead flat without additives. Just mix in
a little Crystal Cote prior to painting. When dry, rub down the
rigging by drawing it through your fingers. This will eliminate
any fuzziness due to loose thread fibers. Or, you could use
beeswax to eliminate fuzz.
models is Egyptian cotton spinnaker cloth, sometimes called
ballooner cloth. Model Shipways carries 100% unbleached fine
weave cotton muslin, which is a good substitute.
Running rigging: This consisted mainly of manila rope for
the fishermen of this period. It was a very supple-fibered
cordage that ran smoothly through the blocks and was easy to
handle. New manila rope was a golden straw color which
tended to bleach on exposure to sun and salt water. Manila
running rigging was seldom, if ever, tarred. It would rot out
quickly if oiled.
6. Making the Sails
The cordage supplied in the kit is too light in color so you will
need to dye it. Depending on your tastes, the rigging can be
tinted to resemble new stuff or old, and can vary from a rich
tan to a silvery weathered gray. Linen thread from the spool
will simulate bleached rigging well, but its color can be deepened to simulate new rope.
To dye the cordage, you may use any one of the commercial
dyes for fabrics available from stores dealing with yard goods.
Avoid dyeing the thread in tea or coffee; the tannic acids in
these brews will rot out the most durable of natural fibers.
Paint will stiffen thread and oil stains will rot it. Stains made
by Model Shipways Paints will work. But, they must be
thinned, or the line will be tinted too dark.
Staining the lines with shoe polish: Perhaps the best tinting for
thread is liquid wax shoe polish. There are several different
brands offering brown polish in varying shades and tones
which can be mixed with neutral polish to obtain a lighter
shade. In using these polishes, you are not only tinting the
thread, but you are also coating it with a preservative which
will extend its life. When dry, draw the thread through your
fingers. Doing so will lay down any surface fuzz and add a
mild sheen which adds life to the line’s appearance.
Staining can be done before or after you’ve rigged the lines,
and depends strongly on whether you choose to use
beeswax or not.
4. Using Beeswax
Beeswax protects the lines against moisture and helps to eliminate fuzz. If you plan to use it, lines that need “tarring” must
be stained and dried first before running over a block of
beeswax. Only then should they be rigged to the model.
The cloth must be pre-shrunk first. Soak it in distilled water,
and then let it dry, followed by very careful ironing. If the cloth
you use is pure white, it may be tanned very slightly by adding
brown dye to the distilled water. Tint the cloth a shade or two
lighter than manila rope, please.
Laying out the patterns: For layout work, tack the cloth down
to a clean drawing board or smooth sheet of plywood. With a
soft pencil, lightly mark the sail outline and the cloth seams
(see figure 61a). Next, cut out the sails, leaving a uniform 1/4”
margin around the marked outline (3/16” will be better, if you
have very steady hands). Leave 1/2” margins on the foot and
leach sides of the fore and main sails.
Folding and Stitching: With the aid of patience, clean hands,
tweezers and a little white glue, fold the margins over so the
edges touch the pencil outlines of the sails. Glue will hold this
crease and permit a second folding along the pencil outline (see
figure 61b). Having made the tablings, which is what sailmakers call hems, sew them down on a sewing machine (or by
hand, if you have a lot of patience and iron fingers!). the stitches should be very fine, no more than 1/32” in spacing. When
using a sewing machine, you must go very slowly to avoid
running off the hem.
Next, run a line of machine stitches along the pencil lines
scribed for the individual cloth panels. A double line is shown
on the sail plan, indicating the selvedges, or overlaps of adjacent cloths. It is not recommended to attempt a double line of
fine stitches on sails this small. If you notice that the cloth is
puckering around the stitches, reduce the machine’s thread
tension, or the sails will be a wrinkled mess when you are
done, and no amount of ironing will flatten them out again.
Stretching the Sails: This step will assure that the sail shape is
correct, since it may have been altered during sewing. Using
the original pattern, draw the outline of the sail’s shape on a
piece of paper. Place the piece of paper down on a solid ,but
penetrable backing, such as a wooden board or cork. Now
wash the entire sail again and lay it over the outline you’ve just
drawn. Stretching the wet sail to the outline’s shape, stick pins
through its outer edges and into the backing to hold it in place.
When the sail is dry, it will have the proper shape. Iron it flat.
This subject is indeed a controversial one for modelers, for
there are as many who will argue against putting sails on the
model as there are advocates of the practice. In any case, model
sailmaking is an art which is difficult to master. A modelmaker’s first attempts seldom bring satisfaction. Trial and error,
constant practice, triumph and heartbreak––all are attendant
with this facet of ship modeling.
Sewing the boltropes to the tablings: After sewing down the
cloth seams and stretching the sails, you may proceed to stitch
the boltropes to the tablings. In the Gloucester sail lofts, the
tablings were always sewn on the starboard side of a fore-andaft sail; the boltropes to port. A lot of time can be saved if you
sew with the sewing machine needle empty, taking the outside
edge of the tabling through a “dry run.” This will leave neatly
spaced (1/8 to 3/16”) punctures through which you can easily
push a needle (see figure 62). When sewing on the boltrope,
drive the needle through the roping. This will hold it in place
better than stitching around it. Make loops in the boltropes at
the sail corners for outhauls, tacks, throat and head cringles,
reef cringles, etc.
Working in 1/4” scale, one must first admit that no cloth may be
had that will provide the proportional equivalents needed for
absolute realism. This is true also of sewing and roping techniques; the effect is visual and fine tolerances are out of the question. With this in mind, you should decide whether you wish to
risk the investment of time and energy on sails when the outcome is uncertain. If you do, materials are your next problem.
Choosing the right sailcloth material: The best sailcloth for
Punching holes for reef points & other elements: The sides of
the sails which are laced to the gaffs and booms, or seized to
mast hoops or staysail hanks, must be punctured at regular intervals to accommodate these elements. Check the sail plan.
Also, you will want to install the reef points. Puncture the sails
along the reef bands where they intersect the selvedges. Next,
tie an overhand knot in a short length of fine white cordage.
Pass the thread through the puncture-hole until the knot fetch-
5. Sails: To-be or Not To-be
32
FIG. 60 – Serving
FIG. 61a – Sail Tablings
Fish hook or other swivel
Option: secure line in a lathe,
rotate lathe head by hand
Vise
Tie, touch with
white glue when
serve is complete
Thread
Serve
Worm
Margin 1/4”
or 3/16”
Cloth seams
marked in pencil
Twist
Parcel
FIG. 62 – Roping
FIG. 63 – Reef Points
Sewing
machine
needle
(no thread)
Overhand
knot
FIG. 61b – Sail Folding Sequence
3/16”-1/4”
Margin
1
Tabling folded on
starboard side
1
2nd overhand knot
Tabling peirced
at 1/8” intervals
with unthreaded
needle
Puncture
in sail
Pencil mark
2
First fold
2
Sewing
machine
needle
Bolt rope sewn on
port side of sail,
opposite the tabling
3
es up. Then, tie another overhand knot snug to the sail so the
reef point won’t slip out (see figure 63). All reef points should
be cut over size and trimmed back after installation.
2
1
Second fold
FIG. 64 – Topsail Clew Line
Single blocks at head,
tack and clew cringles
7. Rigging the Model With Sails
The sails should be laced to the gaffs and booms and seized to
the hoops and hanks after the halyards have been rove off, but
before they are belayed. Use fine thread for hoop and hank
seizings and slightly heavier cordage for the lacings.
Thimble fair leads
sewn to the bolt ropes
Last to rig are the topsail clew lines used to facilitate furling
(see figure 64).
Furled Sails: It is impossible to furl a sail made from the same
material and of the same size used for the fully set sail. The
cloth is usually too bulky looking. There are two solutions to
this problem: you may use a lighter material such as Silkspan,
which is a model airplane covering tissue; or you may use the
same cloth, cut to a proportion one-third the size of the original.
You must still add some seams and hems, though, since even
with the sail furled, the detailing will show.
Belayed
to fife rail
8. Rigging the Model Without Sails
Even without sails, some of the rigging lines such as sheets,
halyards and downhauls should remain on Latham, along with
their lead blocks. Some of the lines will need to be hooked together, such as the jib halliards and downhauls. The running
ends of these lines should be belayed at their proper locations.
Mounting the sail rigging lines on Latham will add tremendous-
33
ly to the look of the model, especially at the forward stays
where the contrasting black stay and light running lines, along
with their blocks, create interesting visual detail. On the plans,
you will see that the belaying arrangement also indicates the inclusion of cleats or belaying pins for rigging lines such as the jib
sheets and topsail tacks. And though without sails these cleats
and pins are unused, they still should be fitted on the model.
9. Flags
Naturally, if you set the sails, you will want to have the vessel’s
flags flying. If one were to follow modern flag etiquette, the
Stars & Stripes should be flown from the main gaff. In the early
1900’s, there were 45 stars in alternating rows of 7 and 8 stars
with an 8-star row on top. Occasionally, a new vessel on her
maiden trip would fly Old Glory from the main truck (wooden
cap at the top of a pole or topmast for attaching flag or signal
halyards) with a huge christening pennant bearing her name
from the fore truck. Some topmast trucks, particularly the
spherical style, had no halyard sheaves, so a small thimble and
grommet were rigged around the poles to take the halyards.
Benjamin W. Latham’s colors are not known and colors and designs did vary a great deal. Pennants can be made from paper
or fabric. Color them with paint, artist’s or fabric markers. Letters can be handpainted, stenciled or applied using dry transfer
letters (see figure 65 for some style suggestions).
FIG. 65 – Name Pennants
Length varies with length of name
Solid color border
Solid color pennant
“Barber shop” border (usually one color)
DIAMETER CONVERSION TABLE
R
G
G
I
N
Diameters
for Lifesize Vessel
Diameters
in Tenths of an Inch
3/8"
1/2"
5/8"
3/4"
7/8"
1"
.375"
.5"
.625"
.75"
.875"
1"
B
34
I
L
O
C
K
G
Diameters
Converted to 1/4" Scale
.0209" x Inches in 10ths:
.008" (.20mm)
.010" (.25mm)
.013" (.33mm)
.016" (.40mm)
.018" (.45mm)
.021" (.53mm)
S
Lengths
for Lifesize Vessel
Lengths
in Tenths of an Inch
Lengths
Converted to 1/4" Scale
4"
5"
6"
8"
10"
4”
5”
6”
8”
10”
.084" (2.13mm or 1/16")
.104" (2.64mm or 3/32")
.125" (3.18mm or 1/8")
.167" (4.24mm or 5/32")
.209" (5.31mm or 3/16")
Rigging & Block Sizes for Actual Size Vessel
(To convert sizes to 1/4” scale see Diameter Conversion Table)
S
T
A
N
D
I
Item
Bobstays (2)
Bowsprit guys
Footropes
Lower shrouds
Lower shroud lanyards
Jumbo stay
Jib stay
Spring stay
Topmast shrouds
Tomast shroud lanyards
Balloon stay
Pullback
Main topmast stay
Main boom footropes
R
Item
U
N
N
I
N
G
R
I
G
G
I
N
G
Material
Diameter
steel wire
7/8”
steel wire
3/4”
iron wire
5/8”
iron wire
3/4”
hemp or manila
7/8”
steel wire
3/4”
steel wire
3/4”
steel wire
1”
steel wire
5/8”
hemp or manila
3/4”
steel wire
1/2”
steel wire
5/8”
steel wire
1/2”
iron wire
5/8”
Notes
all served
served ends
all served
all served
tarred
served ends
served ends
served ends
served ends
tarred
served ends
served ends
served ends
all served
N
N
G
R
I
G
Rope
Diameter
Jumbo halyard
3/4”
Jumbo halyard whip
1/2”
Jumbo topping lift pendant
1/2” steel wire
Jumbo topping lift fall
5/8”
Jumbo boom outhaul
1/2”
Jumbo sheet
5/8”
Jumbo downhaul
1/2”
Jib halyard
3/4”
Jim halyard whip
1/2”
Jib sheets
3/4”
Jib downhaul
1/2”
Balloon halyard
5/8”
Balloon downhaul
3/8”
Balloon sheets
5/8”
Fore throat halyard
7/8”
Fore throat halyard whip
5/8”
Fore peak halyard
1”
Fore peak halyard whip
3/4”
Fore sheet
1”
Fore topping lift pendant
1/2” steel wire
Fore topping lift fall
5/8”
Fore boom tackle
5/8”
5/8”
Fore topsail halyard
3/4”
Fore topsail sheets
Fore topsail tacks
5/8”
Fore topsail clewline
1/2”
7/8”
Main throat halyard
Main throat halyard whip
5/8”
1”
Main peak halyard
Main peak halyard whip
3/4”
Main boom crotch tackle
1/2”
1-1/2”
Main boom topping lift pendant
Main boom crotch tackle runner
1”
Main boom crotch tackle fall
5/8”
3/4”
Main boom tackle
Main topsail halyard
5/8”
Main topsail sheet
5/8”
5/8”
Main topsail tacks
1/2”
Main topsail clewline
Staysail peak halyard
5/8”
Staysail throat halyard
3/4”
5/8”
Staysail tack
Staysail sheet
3/4”
1/2”
Flag halyard
Dory tackle pendant
7/8”
Dory tackle fall
5/8”
1”
Cat stopper
G
I
G
Block
Size
8”
5”
—6”
5”
6”
5”
8”
5”
4” bullseyes
5”
6”
4”
—10”
6”
10”
8”
10”
—6”
6”
6”
Cheek blocks
—5”
10”
6”
10”
8”
5”
—10”
6”
8”
6”
6”
—5”
6”
8”
——4”
—6”
—-
STAGE H
FIG. 66 – Locating the Chainplates
STANDING RIGGING
As mentioned in the discussion under General Rigging Information, all lines for the standing rigging should be blackened
in color.
1. Chainplates
These fittings are one of the foundations for the standing rigging and should be considered carefully for this reason. The
chainplates for this vessel are tricky–probably the toughest job
on the whole model. They can be fitted well only once; any
mistakes will show badly and be almost impossible to correct
without leaving tell-tale marks. Consider yourself forewarned!
Locating the Chainplates: First, find the precise locations of
the chainplates at the rails. The forward port and starboard
chainplates for the fore shrouds lay athwart the center of the
fore mast at the deck. This applies to the forward main shroud
chainplates, too (see figure 66 and the rigging plans). Mark
these positions with a pencil, then measure and mark the positions of the chainplates which lay abaft their respective leaders.
See the rigging and deck plans for spacing intervals and transfer these spacings carefully using a pair of dividers.
There are three lower shrouds on both sides of each mast. The
chainplates of each group should be evenly spaced. Equally
spaced between the second and third chainplates of each
triplet lays a fourth and smaller chainplate for the topmast
shrouds. Be sure that all of these positions are marked clearly
and exactly.
Achieving the Proper Angle: Each chainplate should be
mounted at an angle relative to the rake of the mast. First, step
the masts so they stand nearly vertical (see the rigging plan,
and for the moment, disregard the previous sermon on sprung
masts). Take a length of cordage and loop and tie it at a point
on the mast where the shrouds will eventually be placed. Then
extend the line of cordage down to the rail where a chainplate
should be fitted (see figure 67). Pull the cord to the waterline,
holding it taut, and strike a line from the reference mark at the
rail to the lowest limit of the chainplate. Such a line should be
created for each chainplate in order to determine its proper individual angle.
Making the Chainplates: Included in the kit are sixteen prefabricated chainplates that will allow for a simplified installation
(see Figure 68). This method requires a minimum of tools and
is recommended for the beginner. Normally, the chainplate is
recessed into the hull planking with its upper end “buried” in
the cap rail, as will be described in the next paragraph. But, if
you adopt the simplified installation, you will be able to forego
these maneuvers.
For those interested in building precisely detailed Essex chainplates, one method is shown in figure 69. If the kit chainplates
displease you, the eyes may be cut off and smaller holes drilled
along the length of each piece. The widths of these pieces are
actually just right for the four topmast shroud chainplates. The
twelve lower shroud chainplates require that you buy three
#985 brass strips measuring .017” x 1/16” x 6.” You will find
them in the Model Expo catalog.
First fore
chainplates
First main
chainplates
FIG. 67 – Achieving the Proper Angle
Topmast
Trestle trees
Loop & knot
Scriber
Cordage
Scratch mark
Pin
Lower limit
of chainplate
FIG. 68 – Simplified Chainplates
FOR LOWER SHROUDS
Deadeye
Strop ring
Chainplate
Lill pin
35
FIG. 69 – Chainplates of Essex-Built Schooners
Main rail
Monkey
rail
Main rail
Monkey
board
Strap
Recess in
monkey
board
Monkey
rail pierced
Strap
Main rail
pierced
Bolt
Bolt
Cove
Waist
Waist
Chain
plate
Waist
Cove
Cove
Side of
strap
Chain plate
flush with hull
plank below
the waist
Forge weld
Planksheer
BASIC
ASSEMBLY
Planksheer
INSTALLED AT
MONKEY RAIL
INSTALLED AT
MAIN RAIL
FIG. 70 – Turnbuckles (simplified)
Side of
chainplate
(upper end)
Bend eyes 90°
PARTS
SIDE VIEW AT
MONKEY RAIL
FIG. 72a – Shroud Sequence
Make eyes
at both ends
of wire
Mast
Cut-splice real
ship or option–
seize on model
Marry
the two
Make a
matching link
Seize
Cut after soldering
3
Solder
Center single
shroud P & S
Solder
Run a length of wire through the two links–solder the joints
File smooth
Solder
Solder
Form eyes at turnbuckle ends–file soldered joints smooth
Bowsprit guy
Bowsprit
Man rope
Foot rope
Jib stop
36
Starboard pair
2
Port pair
FIG. 72b – Seating the Shrouds
FIG. 71 – Bowsprit Rigging Cross-Section
Stirrup
1
Clove hitch
SEQUENCE
1. Forward starboard pair
2. Forward port pair
3. Single spliced shroud
If done properly, the chainplates should be recessed into the
hull so they are flush with the hull planking. Their heads
should poke up through the rails (see figure 69). This will entail
some fancy drilling and cutting, not to mention giving your
layout work very careful attention. Nails for fastening the
plates in true-scale fashion are no longer available. So, using a
No. 75 bit, drill the chainplates to accept lill pins. Hold the pins
in place on the hull and drive them in with a driver tool. If you
prefer smaller heads on the pins, they may be filed smaller and
flatter, using a pin vise to hold them during the process.
figure 72a). This joining will form a single continuous line that
you can extend downward at both port and starboard in between each of the two pairs of both masts. Follow the serving
procedure in the next paragraph.
2. Rigging the Bowsprit
Follow the same serving practice on the shroud “singles” as
described in the previous paragraph, but in this case, the heavy
service extends below the levels of the gaff jaws if the fore and
main sails are to be set. The extra service was done on the lifesize vessel to prevent the gaffs from chafing the shrouds.
Inner & Outer Bobstays: Make and set up the inner and outer
bobstays (see plan sheets 2 & 4). These should be served over
their whole length. The lower ends should be eyespliced and
shackled into the bobstay irons. The upper ends should be eyespliced, shackled to turnbuckles and set up taut. The lower
ends of the bobstays on the lifesize vessel were often given an
extra heavy serving. In addition, the outer received a covering
of rawhide or heavy leather called a stradden, which was laced
on the topside of the stay. This was done to prevent chafing
from the ground tackle while lying at anchor. Many operators
of mackerel schooners engaged in summer work dispensed
with the heavy bobstay coverings.
Bowsprit Guys: Next to be fitted are the bowsprit guys. They
should be spliced and served in similar fashion to the bobstays,
minus the stradden. Instead, give them an extra heavy service,
from their inboard ends out to a point abreast of the gammoning.
3. Turnbuckles
Serving the Shroud Lines: The shroud “pairs” should be
served over their entire lengths. They require additional heavy
servings around the eyes at the chainplates, which on the lifesize vessel were covered with canvas and well tarred. The extra
serving will look well on the model, but canvas is tricky to simulate and is probably best omitted.
Shroud Line Deadeyes: The lower ends of the shroud lines
were, in actual practice, spliced around the deadeyes. Each
shroud end should be first served where the deadeye should
be fitted. An eyesplice then should be made and covered with
serving in the same fashion as was done on the main lengths of
the shroud lines. The deadeye splice may be substituted with a
very neat job of seizing and tapering of the shroud end along
its doubling, followed by serving (see figure 73).
FIG. 73 – Shroud Deadeyes
Wire shroud is shown;
cordage can be substituted
on model
If the modelmaker wants to adjust the forward stay rigging, he
can purchase four #700 working turnbuckles which will do the
job well, at slight sacrifice in scale appearance. Otherwise,
dummy turnbuckles can be fabricated with wire and solder
(see figure 70).
4. Footropes & Manropes
These are finer secondary elements of the bowsprit rigging.
They also should be served overall, but rigged very slack as
shown on the rigging plan. The bowsprit guys and footropes
should be linked together by tarred manila “stirrups” which
should be done similar to ratlines (see figure 71).
2
1
Shroud served in
way of deadeye
5. Fore & Main Shrouds
Pairing & Seating of Shroud Lines: Shroud lines must be put
on before the stays and before the topmasts can be fitted. Each
mast will have a 3-line shroud unit on both its sides, port and
starboard. Each of the lines will extend from the mast heads to
the chainplates (see plans). You may work on one or both masts
at the same time. Begin with the first pair of shroud lines at starboard and then the second pair at port (see figures 72a). Each
pair is comprised of a single length of cordage that should be
doubled over and seized together to form a loop that will fit
loosely around each mast head (see figure 72b). When you have
finished these four pairs, they must be served. Follow the serving procedure for the shroud “pairs” in the discussion on serving that follows before going on the the last of the shroud lines.
After serving the shroud pairs, you may begin the “single”
shroud line that should be positioned in between the lines of
each finished pair. To create this “single” center shroud line
you will need two lengths of cordage for joining at each mast
head. One end of each of these two lengths should be wrapped
around the mast head to meet the other. Draw just enough excess length, so that you can cut-splice them together (see also
3
Shroud spliced
Service
completed
ACTUAL PRACTICE
Shroud end
tapered by cutting
out strands
Seizing covers
doubling
1
2
SIMPLIFIED FOR MODELS
37
Setting Up the Deadeyes: Generally, the upper deadeyes
should be set up to the shrouds so they line up parallel with
the main rail (see figure 74). To set up each shroud line, first tie
a stop knot in the lanyard of each deadeye. A Matthew Walker
knot is most proper, but in this scale, a figure-eight knot makes
a neat substitute. Next, reeve off the lanyards (see figure 75).
You will need to finish them off in a lark’s head knot at the
shroud lines and seize the lanyard end to its last leg, BUT before making the lark’s head, make the sheer poles and seize
them to the shrouds (see figure 76).
6. Belaying Pin Racks
Following installation of the sheer poles and the setting up of
the deadeyes, the pin racks should be cut out, stained, and
their belaying pins installed. Seize the racks between the lanyards (see also figure 76).
7. Ratlines
These may be rigged as soon as all four shroud line units are
set up. Or, if you prefer, you may do them after the fore and
main lower standing rigging is finished. There are various
ways to do this job. They can be sewn in place, glued on, or
hitched to the shrouds as in actual practice. Hitching is the
most tedious method, but it always looks the best when done
carefully and honestly (see figure 77). Whatever method you
prefer, use the finest thread available. Assuming that the real
ratlines had a diameter of 3/8,” a .008” diameter thread should
do the job on the model at 1/4” scale. It is possible to find silk
and some synthetics to this degree of fineness.
Draw A Ratline Diagram: Proper spacing and levelness of ratlines are vital to achieving a pleasing appearance. To aid you
in your work, draw fine rulings for spacing the ratlines on an
index card. Place the card with the finished diagram between
the shroud lines and mast, parallel to the waterline. Your taking the time to create this guide will make the work easier to
see and do. If your ratlines resemble a spider’s handiwork
rather than that of clumsy fingers when you are finished, then
you’ve achieved the right effect!
8. Lantern Boards
These should be fabricated from wood with wooden lantern
brackets built out to seat the kerosene lanterns (see figure 78).
The boards should be inserted into iron holders that are seized
to the shroud lines. If at the time you rig them, you find that
the topmast shroud lines rub against the lantern brackets, you
may rig a strut below each board to eliminate chafing.
9. Spring Stay
This stay is eyespliced and served at both ends with bare wire
in between (see figure 79). Doing the former requires removal
of the masthead bails so they can be passed through the eyes.
Simple seizings covered with serving are perhaps a better alternative.
10. Jumbo Stay
First make the bridle that goes around the fore masthead and
over the spreader (see figure 80). This bridle should have its
ends eyespliced and should be served over its whole length. It
can be made of wire, but thread will be more manageable. The
head of the jumbo stay should be eyespliced, served and
shackled to the bridle ends. It can be made of wire which
should be bare over most of its length, except for the addition
of rigging tar. The lower end should be served, doubled over,
and seized with wire to form an eye which gets bolted into the
gammon strap. In the case of the actual vessel, fitting the
38
jumbo stay and its bridle was not so simple a matter. As you
may recall from earlier reading, the masts were raked aft
slightly and sprung forward, making the procedure difficult.
For the Curious: On the actual vessel, riggers and available
hands went forward to assist the boss rigger during this dangerous job. After a gin tackle was hitched to the stay, the lower
end was made fast to the bowsprit. The windlass gang
pumped the hauling end and the hauling gang pulled down
and bolted the stayeye to the gammon strap. If it slipped or
broke, the poor soul who handled the gin-tackle would be
thrown from the masthead as from a slingshot––and how these
fishermen loved to have their stays tight!
11. Jib Stay
This stay should be spliced and served at its upper end and
shackled to an iron bail at the fore mast cap (see also figure 80).
The lower end should be served, doubled over and seized,
then shackled to the iron withe at the end of the bowsprit.
There should be a lot of tension on the jib stay, but not quite as
much as on the jumbo stay. Do not slacken the latter when setting up the former.
12. Spreader Lifts
These short wire lengths support the spreaders at points where
they must bear the strains of the dory tackles and the tramplings of the masthead men and lookouts. On each side, the
wire should be served at about its center, doubled over to form
an eye, and then seized and shackled to a figure-eight link at
the cap (see details on plan sheet 3). The lower ends should be
eyespliced around thimbles, served, and then set up to eyebolts in the spreaders with lanyards.
13. Fore & Main Topmast Shrouds
These are single wire leads on each side of the topmasts (see
plan sheet 2). They should be cut-spliced to each other, served
and then seated over the topmasts. The lower ends should be
served and spliced around deadeyes, as in the lower shrouds,
and set up with lanyards in like fashion. The topmast shroud
lanyards should pass outboard of the sheer poles and should
not be involved in any way with these or the pin racks. The
shroud wire should be bare, except for the ends and the short
span that passes through the spreader tips.
14. Main Topmast Stay
Eye-splice and serve the upper end and seat it snugly around
the main topmast head, over the topmast shrouds. Terminate
the lower end in a small eye that is spliced and served. Reeve a
lanyard between the eye and a figure-eight link on the port
side of the fore mast cap. Set up the line, springing the main
topmast forward (see rigging plan sheet 2).
15. Pullback Stay
The ends and fittings are identical to the main topmast stay,
but this is somewhat shorter, as can be measured from the rigging plan. It should be set up with a lanyard to a shackle in the
aft eye of the spring stay. Apply only enough tension to keep
the stay from kinking; the forward rake of the fore topmast
must not be affected.
16. Main Boom Footropes
Located both port and starboard, each footrope should be eyespliced at both ends and served over its whole length. The aft
ends should be shackled to ringbolts at the end of the boom on
both sides. Shackle the forward ends into the set-up bolts in
the main sheet band (see rigging plan sheet 2).
FIG. 76 – Pin Rack Details
FIG. 74 – Line-up of Deadeyes
Sheer pole
Pin rack
W.L.
FIG. 75 – Deadeye Lanyards
BROADSIDE
DETAIL OF LASHING
Lark’s
head knot
Matthew
Walker knot
END VIEW
Seizings
INBOARD
VIEW
FIG. 77 – Ratlines
TOP VIEW
GENERAL VIEW
FIG. 79 – Spring Stay at Mast Caps
ACTUAL PRACTICE
Ratlines clove-hitched at
middle shroud ends; eye
spliced, and seized to end
shrouds with marline
Shackle for pullback
stay lanyard
FOR MODELS
Ratlines clove-hitched
to all shrouds
Bail
Spring stay
OPTION
Double back the tail-ends after
hitching and tuck them into the
ratline. Glue and trim neatly
Faked ratlines can be
“sewn” thru the shrouds.
Touch ends with glue
FIG. 78 – Lantern Boards
Iron bail
FORE MAST
MAIN MAST
BOARD IRON
FIG. 80 – Heads of Jib & Jumbo Stays
Seized to forward shrouds,
board slides into slot & is
nailed in place
Fastening hole
Fore
topmast
shroud
X-section
Iron seized to shrouds at
top & bottom
TOPMAST SHROUD STRUT
Fore lower
(side view)
(top view)
shrouds
Lantern board iron
(2 per board)
Seizing
at lower
Iron bail
Shackle
Jib stay
Jumbo
stay
bridle
Seizings at topmast shroud
Topmast shroud seizing
Iron
strut
Dimensions of this fitting vary with
the need to keep the top mast shroud
from hitting the lantern
Shackle
Jumbo stay
39
STAGE I
RUNNING RIGGING
The running rigging lines are all beige in color. If you are going
to apply beeswax to the lines, it is best to do it before rigging
them. Especially in the case of the standing ends of running
lines and those attached to blocks. Again, it is important to
think about procedures well in advance of installing any parts.
Where to Begin: If you plan to rig your model with sails, they
should be made now and bent to the rigging and spars as pertinent running rigging is rove off. A discussion of sailmaking is
in Stage G, item five. If you haven’t read that section yet, do so
now.
Before you start the running rigging, all blocks must be hooked
or shackled to their appropriate bands on the spars or designated hull fittings. Bridles and pendants also must be rigged
where indicated.
FIG. 81 – Stropping the Blocks
Cut & invert
the twist
Make loop
larger than
block
Ream holes
Solder
Soft wire
File out
grooves
Twist
Pinch
Hook
1. Blocks
Boxwood blocks are supplied in the kit and should be allocated
according to the plans. You may want to make some smaller
blocks to get even closer to scale as possible. Clean the blocks a
bit by reaming out the sheave holes and filing out the grooves
for the sheaves and strops (or straps). Then strop them (see figure 81). Note from the plans and sketches that most fisherman
blocks of this period were internally stropped. To follow such
practice on the model would mean resorting to actual blockmaking techniques in miniature. Only advanced modelmakers
should attempt to do this. Your safest bet is to fit external
strops as snugly in the strop grooves as possible, then carefully
file the sides of the blocks so they blend with the strops. Paint
all blocks just as they were on the working fishermen. Use
either white or buff to match the booms and gaffs.
Becket
block
Drill hole in
base of block
Form loop around
block & make an
eye at the head
FIG. 82 – Main Boom Topping Lift
Baggy wrinkle
2. Jumbo, Fore & Main Boom Rigging
Study the rigging plan carefully and observe the leads and belaying points of boom tackles, topping lifts, sheets and crotch
tackles (see also figures 82 and 83). Start with the topping lifts
and get them set up so the booms “peak” at about the angles
shown on the plans. Fit the fore and jumbo booms to their
goosenecks, the main boom to its saddle, and rig the main
boom parrel strap.
Fore & Main Boom Tackles: Rig these next and belay them as
directed (see plans and refer to figure 51). The Sheets can now
be made fast to the block beckets and rove off and belayed (see
the plans and figures 84 and 85). Unless the model is to be
rigged with sails, the booms should be sheeted home snug.
Figure 84 shows the proper rigging of the crotch tackles as they
would be if the sails were furled or omitted. The figure also
demonstrates how the tackle would be properly stowed away
if the vessel was under sail (unless the vessel was jogging
under reduced sail).
Topping lift
Single block
Topping lift
pendant
Double block
Topping lift fall
Sheaves in main boom
3. Fore & Main Gaff Rigging
Throat Halyard Blocks: By now, these blocks should have
been hooked into the crane irons (refer to figure 44). Bolt the
fore peak halyard blocks to their bands on the gaffs. Run the
gaff blocks of the main peak halyard on wire bridles whose
ends have been spliced around the gaff and served. Keep the
rest of the wire bare. All masthead blocks for the peak halyards
should be hooked to their respective ringbolts.
40
Ring bolt
Iron band
with ring
bolt
Foot rope
To pin in boom
jaw, starboard
FIG. 83 – Fore & Jumbo Boom Tackles
FIG. 84 – Main Sheet & Crotch Tackle
Mast
Pendant
Hauling
end
Ring hitch
Hook
Belayed
To boom
FIG. 85 – Fore & Jumbo Sheets
FORE SHEET
(and later jumbo sheet)
FIG. 86a – Throat & Peak Halyards
JUMBO SHEET
(pre-1910)
Boom
Boom
(Gaffs and masts omitted for clarity)
Simplified
block with
twisted wire
strop
Hauling end
belayed to
lower sheet
block
Peak halyard
Topmast
shroud
Iron sheet
block with
side cleat
Peak
halyard whip
Wire ring
Bullseye
fair lead
Wire ends
Cleat in bitts
Throat
halyard
Halyard whip
Peak & Throat Halyards: These halyards can be hauled from
both of their ends. The hauling ends are used to lift the gaffs up.
The whip ends are used to make final adjustments in the set of
the gaffs (see figures 86a and 86b). These ends alternate. This
means that the throat halyard whip will be opposite the peak
halyard whip, and the throat and peak hauling ends will be
opposite each other. Note the gill-guys (wooden poles) that are
rigged to the upper whip blocks and run to the topmast
shrouds (see figure 86c). They prevent the whip falls from
twisting and fouling. Note the small halyard fairleaders
mounted to the iron spreader struts; the hauling ends of throat
and peak halyards are passed through these in their travels to
the fife rails (see the masthead details on sheet 4).
Throat
halyard
whip
Fore bitts
(Looking forward)
FORE MAST
41
It should be anticipated that some topsail gear will lead to the
gaffs. Precise leads are described in a later paragraph. There is
also a flag halyard to rig from the peak of the main gaff (refer
to figure 54). Don’t forget to rig the parrels (wire) and trucks
(glass beads) to the gaff jaws (refer to figure 44).
4. Head Sail Rigging
Even if you don’t rig sails, perhaps you ought to rig all of the
halyards, sheets and downhauls for the jumbo, jib and balloon
to show evidence of their existence, if nothing more. In actuality, when sails were taken off the vessel, all downhauls, the jib
and balloon sheets, and the balloon tack line would have been
unrigged, too. But, to do this on the model would leave it looking rather bare. It is your choice, so rig it accordingly.
Jumbo & Jib Halyards: These should be rigged with hauling
and whip ends, but they are simpler than those of the gaff halyards (see figure 87). As can be seen, gill-guys are not needed
for the whips. If you’re not going to show sails, hook the halyard blocks to the tack hooks at the stay-eyes, or hook them to
the downhauls, if the latter are rigged.
Balloon Halyard: This halyard is much simpler and requires
little additional explanation (see rigging plan sheet 2). It may
be hooked to the tack line when in lowered position without
sails.
Jib Sheet: Run this line through bullseyes spliced into the ends
of a served wire sheet pendant. On the real vessel, the standing
end of the sheet was spliced to a bullseye mounted atop the
buffalo chock, but it can be seized on the model. Next, it
should be rove through the sheet pendant, and aft to another
bullseye fairlead mounted inside the buffalo chock, then on to a
cleat in the bulwarks (see hull and rigging plans).
Balloon Sheet: This line consists of single leads, port and starboard, which should be hooked to the clew of the sail and led
aft to adjustable fairlead thimbles which should be rigged to
the main topmast shrouds. From the leaders, they should be
taken to belaying pins in the main rail (see figure 88). With the
sails omitted, the jib and balloon sheets may still be rigged by
hooking their clew-ends into the hooks of the lower halyard
blocks. In addition, the jumbo sheet leader should be lowered
to main rail level.
5. Fore & Main Topsail Rigging
Topsail Halyards: These are very simple lines (see the rigging
plans). The topsail sheets should be led out to blocks at the
gaff-ends, and down through lead blocks at the gaff jaws, then
on to their belaying points (refer to figures 54 and 44, respectively). The rigging of the fore topsail sheet is rather more complicated than this and requires a double lead. On the real ship,
it was a necessity to allow getting the topsail over the spring
stay and main topmast stay when tacking the line. Under sail,
the lee sheet was taken up. The weather sheet was slack and
led up over the main topmast stay and down to the weather
cheek block at the head of the gaff.
Main Topsail Tack: This is a single lead which should be
hooked into the tack of the main topsail and led down to a pin
in the fife rail on the port side. The fore topsail tack again
should have two leads. Make the weather tack taut and the lee
slack. The weather tack is for hauling the foot of the topsail
over the gaff. It should be taken down to the fife rail and belayed. The lee tack should be led up from the foot of the sail,
then over the spring and main topmast stays from the lee side.
Next, take it down the weather side of the stays and the fore
peak halyard, then over the gaff, and down the lee side of the
fore sail to the fife rail (see figure 89).
42
FIG. 86b – Main Mast
(Gaffs and masts
omitted for clarity)
Peak halyard
Topmast
shroud
Peak
halyard
Throat
halyard
Throat halyard
whip
Halyard whip
Main bitts
(Looking forward)
If you plan to exclude sails, the topsail sheets and tacks may be
omitted. For the sake of visual interest, however, the sheets
may be rigged. Hook their clew-ends to the topsail halyard
blocks, and then hook the halyard blocks to the mast caps.
6. Staysail Rigging
Because the staysail on Benjamin W. Latham had both peak and
throat halyards, it had to be lowered to deck when tacking, and
then reset on the opposite legs of the same double halyards.
This, of course, differed from the staysail halyards of the later
“racing” fishermen which had only to dip their staysails under
their springstays to reset them on the opposite tack.
The peak halyard was actually an endless rig, so there were no
bitter ends to come loose. The lee part of the halyard was
hooked to the head of the sail and hoisted aloft by hauling on
the weather part which was then belayed to the main rail (see
figure 90).
The throat halyard was a single lead with hooks at each end;
the lee hook went into the throat cringle of the staysail which
was sent aloft by hauling on the weather part of the halyard. In
tacking, the sail was lowered to the deck and the halyard ends
switched duties.
When idle, both ends of the peak halyard were hooked to the
sheer poles, the slack taken to a belaying pin; and both ends of
the throat halyard were taken to their respective belaying
points.
The staysail tack was a simple lead from sail to fife rail and requires no further elaboration. The staysail sheets were single
leads, port and starboard, as shown on the plans. Their hauling
ends first went through snatch cleats in the bulwarks, then aft
to the bulwark cleats.
7. Mooring & Other Lines
For that “salty” look, add a few coils of line to the deck. Coil
them loosely and secure with white glue (see figure 91). Coil
the ends of tied-off line around their pins (see figure 92). Add
other details. The only limit is your imagination and patience!
Congratulations––your model is complete! Don’t hesitate to
call Model Expo when you are ready to begin your next modeling endeavor.
FIG. 86c – Gill-Guy
FIG. 88 – Balloon Sheet Leader
FIG. 87 – Jumbo & Jib Halyards
Wooden rod
Ring,
thimble or
jib hank
(rigger’s
preference)
Blocks at
mast head
Main topmast shroud
To head
of sail
Rope
(can be served)
Thimble (seized)
Adjustable
leader pendant
Single becket
block
Halyard
Whip
FIG. 86d – Belaying Halyard at Bitt
Thimble
or lizard
No gill-guys
needed for
the whips
1. Halyard
hauled thru
from abaft
3. Halyard
belayed to pin
& coiled
2. Halyard
hitched three
times to bitt
Rail
Rail
Bitt
Snatch
cleat
JUMBO
Halyard-port
whip-starboard
FIG. 89 – Lead of Fore Topsail Tack (heavy lines)
Balloon
sheet
To pin rack
Belayed to rail
JIB
Halyard-starboard
whip-port
FIG. 90 – Staysail Halyards (idle)
Spring stay
Sister hook
Fore topsail
Single block
Band at
main topmast
Swivels (2)
at becket
LOOKING AFT
Length greatly
foreshortened
To pin rack
Weather tack
FIG. 92 – Rope Coils
Hitch loop
over pin &
draw taut
Lee tack
Fore sail
FIG. 91 – Coiling the Ropes
“FAKE” COILS
Brass rod
1/16” dia.
Thread to
hold in place
Coil
Yes
Rail
No!
Too neat
1/4” thick
plexiglas
(or equivalent)
3/16”
dia.
Coil line over form. Seize
with lacquer or wood sealer
Remove coil
from form
Drape coil
over pin
43
BIBLIOGRAPHY
History of New England Fishing Vessels:
1. Barnes, A.M. (compiler)
American and Canadian Fishing Schooners,
The American Neptune, Pictorial Supplement VIII
Peabody Museum, 1966. An excellent compilation of photographs of fishing vessels; unhappily, Latham is not among
them. Fine gravure work; excellent detail.
2. Chapelle, Howard I.
The American Fishing Schooner, 1825-1935
A comprehensive history of the evolution of the American fishing schooner from about 1825 to its demise as a sailing vessel
in the 1930’s. This is a monumental study; the gleanings of a
lifetime; a book of typical Chapellian expanse with 137 ship
plans and supporting sketches. A half of its 690 pages are devoted to his notes and sketches of fishing vessel detail, devices,
machinery, rigging, decoration, structure, etc.
3. Chapelle
American Sailing Craft
Kennedy Brothers, 1936. Three fine chapters on the Gloucester
fishing schooner, with plans.
4. Chapelle
American Small Sailing Craft
W.W. Norton, 1951. Plans and history of fishing dories;
fine photo of Higgins & Gifford seine boats.
5. Chapelle
The History of American Sailing Ships
W.W. Norton & Co., Inc., N.Y., 1935. Bonanza reprint.
Contains some interesting comments of a general nature on
fishing schooners.
11. Pierce, Wesley George
Goin’ Fishin’
Marine Research Society, 1934. A mixture of “history” and
personal recollections of the New England fishing industry,
particularly of the port of Gloucester, Massachusetts. The
“history” (at least that of pre-1870) is not to be relied on, but
the accounts of the author’s personal experiences are accurate,
within reason and quite interesting.
12. Story, Dana A. and John M. Clayton
The Building of a Wooden Ship
Barre, 1971. A very detailed study, in text and photographs,
of the building of fishing vessels in Essex, Massachusetts.
Most photos are of later craft, but the building techniques are
basically those of Latham’s time.
13. Story
Frame Up!
Barre, 1964. A lively account of the shipyards of Essex, Massachusetts and the builders of the Gloucester fishing schooners.
14. Thomas, Gordon W.
Fast and Able
Historic Ships Associates, 1968 (Formerly Builders of Gloucester’s Prosperity, Cape Ann Savings Bank, 1952). Interesting and
informative compilation of histories of notable Gloucester fishing schooners and their skippers.
Modeling Techniques & Skills:
6. Chapelle
The National Watercraft Collection
Smithsonian Institution Bulletin, 1960. Not just a catalog, this
book contains valuable text and data on all types of American
fishing craft, including mackerel seiners and seine boats. 2nd
edition.
1. Ansted, A.
A Dictionary of Sea Terms
Brown, Son and Ferguson, 1967. Useful collection of general
definitions. Please remember that New England fishermen had
many terms of their own, which in Latham’s case, take precedence over these.
7. Church, Albert Cook
American Fishermen
W.W. Norton, 1940, reissued in 1960. One of the most useful
collections of photographs of fishing schooners. Section 4,
which deals with mackerel seining, is absolutely essential as
a reference on seining techniques of the early 1900’s.
2. Ashley, Clifford W.
The Ashley Book of Knots
Doubleday & Co. 1944. This great compendium on knots and
ropework contains detailed descriptions of nearly all applications of this art to the rigging of fishing vessels. An essential
bench-side reference for all serious modelers.
8. The Edson Corporation
(formerly the Edson Manufacturing Co.), catalog, ca. 1895. A
general catalog of Edson-made ship fittings with useful illustrations and specifications on ships’ hardware widely used on
fishing schooners at the time, particularly those built at Essex,
Massachusetts.
3. Campbell, G. F.
The Neophyte Shipmodeller’s Jackstay
Model Shipways, 1962. Describes modelwork of a general nature, drawing examples from many types of sailing ships. Contains some good hints on crafts techniques. For the beginner.
9. Goode, G. Brown, and associates
The Fisheries and Fisheries Industries of the United States
Smithsonian Institution, 1887. Section V., Vol. 1, and Plates.
Contains an exhaustive account of the New England mackerel
seine fishery of the 1880’s, with much data on gear and techniques which cannot be found anywhere else in print. While
this work is a bit too early to apply directly to Latham, the essential description and overall features of the practice are the
same. Out of print and now very scarce.
44
10. O’Hearn, Joseph C. (compiler)
New England Fishing Schooners
Kalmbach Publishing Co., 1947. A varied and interesting
collection of photographs.
4. Davis, Charles G.
The Ship Model Builders Assistant
Marine Research Society, Salem, 1926. Sweetman reprint, 1960.
Has many useful articles on modeling techniques; unfortunately, some of the text dealing with historical aspects of vessels
and their construction is inaccurate. Beware of anachronisms.
5. Grimwood, Victor R.
American Ship Models
W.W. Norton, 1942. Bonanza reprint. Contains much useful information on modeling techniques and a very good chapter on
tools and materials.
Museums with important collections relative to
the New England Fishing Industry:
1. Cape Ann Historical Association
27 Pleasant Street, Gloucester, Massachusetts 01930. Models,
paintings, photographs, news clippings, artifact material on exhibit. Comprehensive library on Gloucester maritime history.
2. The Mariners Museum
Newport News, Virginia 23606. Models, paintings, photographs and artifact material on exhibit. Excellent library.
3. The Marine Historical Association
Mystic Seaport, Mystic, Connecticut 06355. Fishing schooner
L.A. Dunton; also fishing dories and related exhibits. Excellent
library and archival centers
4. Peabody & Essex Museum
161 Essex Street, Salem, Massachusetts 01970. Fine contemporary models of fishing schooners, paintings, artifact material
on exhibit; also a splendid collection of builders’ half-models
and sail plans, mostly in storage and available for study by
appointment. Extensive photo files; superb library.
5. Smithsonian Institution
The Museum of American History on Constitution Avenue,
Washington, D.C. 20560. Superb collection of rigged models of
American fishing craft. Photo files, plans files, artifact material
in storage with varying accessibility.
6. South Street Seaport Museum
16 Fulton Street, New York, New York 10038. Fishing schooner
and fishing gear.
7. Whaling Museum
18 Johnny Cake Hill, New Bedford, Massachusetts 02740.
An important collection of photographs of fishing taken by
Albert Cook Church is available for study by arrangement
with the museum staff.
45
ACKNOWLEDGMENTS
In preparing this manual, it was important to collaborate
with individuals whose firsthand knowledge of New
England fishing vessels could provide valuable insight
necessary to the completion of this project. Each of the
people contacted has taken great pains to preserve the
subject matter in their area of expertise. Without their
efforts, much of the history of New England fishing vessels, particularly those built between 1900 and 1940, would
most probably be lost. To these tireless persons who gave
so generously of their time and extensive knowledge, I
express my gratitude and indebtedness:
1. Edward S. Bosley
Scarsdale, N.Y., for his exhaustive notes and drawings of
fittings and rigging of Essex-built fishermen.
2. Howard I. Chapelle
Smithsonian Institution, Washington, D.C., for providing
an accurate lines plan of the Benjamin W. Latham, and for
many helpful comments on her arrangement and construction.
3. Maxson L. Langworthy
Noank, Conn., for allowing me to study a contemporary
oil painting of Latham––both vessel and painting having
been commissioned and owned by his father, Capt. Henry
Langworthy.
4. Erik A. R. Ronnberg, Sr.
Rockport, Mass., for many details of rigging practice on fishing schooners, and for much fatherly guidance on matters
concerning sailing vessels, and modelmaking in general.
5. Charles F. Sayle
Nantucket, Mass., for answering myriad questions about
fishing schooners and fishing techniques, particularly of
mackerel seiners and seine boats, most of this knowledge
having come from his own experience in the industry.
6. Dana A. Story
Essex, Mass., for solving many problems concerning the
construction of fishing schooners, and for explaining many
aspects of Essex shipbuilding practice.
7. Gordon W. Thomas
Ipswich, Mass., for checking and confirming whatever
meager historical data has survived on Latham.
I am also grateful to the Peabody Museum of Salem, Massachusetts for giving me access to its photograph files on
fishing vessels; to the Whaling Museum of New Bedford,
for the opportunity to examine the photographs of seining
vessels and seining methods in its collections; to the Edson
Corporation, also of New Bedford, for generously providing data on their pumps, boom jibers, and other ships’
hardware of Latham’s period.
46
MODELER'S LOG
Date
Time
Notes
47
MODELER'S LOG
Date
Time
Notes
MODEL SHIPWAYS
3850 N 29th Terrace • Hollywood, FL 33020
www.modelexpo-online.com