1
4) Programming
3) Standby ( Anti-Frost ) Mode
With a pilot wire:
The appliance can be controlled remotely if its pilot wire is connected to an appliance fitted with
a programmer, ,to a central programming unit or to an energy control system.
This is the mode to maintain a temperature of approximately 7°C in the room in case of prolonged
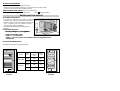
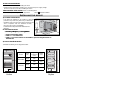
Chart indicating the orders the device can receive over its pilot wire
(to be measured between the pilot wire and the neutral).
Orders received
No signal
Negative
half-wave
Full wave
230V
Positive
half-wave
Ref/neutral
oscilloscope
Mode achieved
COMFORT
ECO
STANDBY
STOP
Heating
temperature
COMFORT
setting
3°C to 4°C
below
COMFORT
setting
Standby
temperature,
about 7°C
Instant device
stop.
With a separate programmer:
The appliance can also be programmed independently by inserting a programmer in the housing at the rear
of the control box.This programmer will create the ECO and COMFORT modes just as you have set them
on the programmer.
USING THE
DEVICE
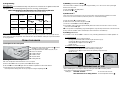
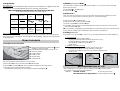
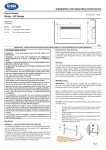
1) Description of the control panel
n Temperature setting knob with Anti-Frost
o
p
q
r
s
t
position
and ability to restrict the range.
Time adjustment knob TURBO 1/4h, 1/2h, 1h, 2h.
Power On indicator
TURBO indicator
TURBO control
ON/OFF switch
Heating indicator
absence from the house.
a) Leave switch s in the ON position.
.
b) Set the knob n to
4) Turbo mode This is the mode to set the device into Forced Operation, ensuring prompt temperature increase
in the room over the time defined (maximum power for conventional models)
a) Leave the switch s in the ON position.
b) Select the time for the Turbo using the knob o.
c) Press the command r, the indicator q lights.
d) The TURBO mode can be interrupted manually before the end of the time set. In order to do this,
press the command r again.
NB: On a piloted or independently programmed appliance, only the Stop and Anti-frost instructions have
priority when the TURBO mode is activated (the other instructions are ineffective).
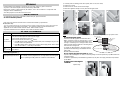
5) Locking instructions
It is possible to lock the knob
n or restrict its use, preventing
unintentional or limited operation of
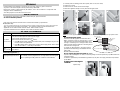
1- Locking the knob:
a) Set the knob to the position required.
b) Using a small-size flat-blade screwdriver, pull the knob’s cap (1).
c) Detach pin P from its stand using a cutting tool.
d) Set pin P in the alignment of arrow B (2).
e) Refit the cap.
2- Limitation of the knob’s use range:
a) Using a small-size flat-blade screwdriver, pull the knob’s cap (1).
b) Remove the two P pins from their stand using a cutting tool.
c) Position the two P pins at each end of the operating range desired (3).
d) Refit the cap.
1
2
3
P
P
B
2) Setting the COMFORT temperature
This is the temperature desired when the room is occupied.
a) Set the switch s to the ON position, and the p indicator lights.
b) Set knob n, the indicator t lights when the ambient temperature is below that desired.
c) Wait a few hours for the temperature to stabilise.
If the temperature setting does not suit you, adjust it using the adjusting knob n.
RECOMMENDATIONS
OF USE
- When ventilating the room, stop the device by setting the switch s to the OFF position.
- If you leave for several hours, lower the temperature.
Leaving for:
Less than 24 hours
:do not touch the controls.
More than 24 hours or during summer :set the temperature knob to
.