1
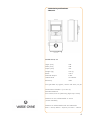
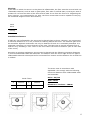
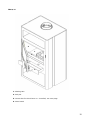
Varde Thurø 11
Installations–
And user guide
1. edition 01.06.2012 FOR-1141 GB
1
2
Congratulations on purchasing your new stove.
Varde Ovne A/S is a Danish company specializing in functional, environmentally friendly and
designed quality stoves.
Index
Welcome and Index
Side 3
Technical specifications Thurø 11
Side 4
Regulations and approval
Side 5
Flooring and distance
Side 6
Chimney
Side 7
Air supply
Side 8
Spare parts
Side 9
Thurø 11
Side 10
Vermiculit
Side 11
How to choose the wood
Side 12
How to light and stoke a fire
Side 13
Maintenance
Side 14
Troubleshooting
Side 15
Test certificate
Side 16
Warranty
Side 17
3
Technical Specifications
Thurø 11
Model Thurø 11
Hight (mm)
939
Wide (mm)
548
Depth (mm)
415
Weight (kg)
101 kg
Effect
4-8 w
Nominal Output
6 Kw
Heated area
50-120m2
Efficiency
78%
Flue gas data: 4,9 g/sek., 265°C ved 20°C, 12 pa.
Combustion chamber: (H x W x D):
240x400x260mm
Flue outlet Ø 15 cm (Mounting hight top: 93cm)
Distance to non-inflammable: 5-10cm
(recom mended)
Distance to inflammable wall and materials:
Rear = 20cm, Sides = 32,5cm, In front = 100cm
4
Important!
Before lighting up your Varde Stove for the
first time, we recommend that you read these
instructions carefully and contact your local
stove vendor or building authoorities to inquire
about existing regulations regarding the
intallation of stoves. Please follow these
regulations closely.
Inspection of installation
It is very important that the installation be
inspected by a qualified chimney sweeper
before the stove is in used for the first time.
Regulations
All local regulations as well as National and
European, should be adhered to when
installing your stove.
This Varde Stove
Has passed the
Danish /European Standard DS/EN 13240
and the German (DINplus) test , and have
thereby proved to be a environmentally friendly
product.
Proffesional installation
All Varde Ovne stoves are closed fireplaces.
The stove is designed for intermittent
combustion and can be connected to a
chimney used by other fireplaces, as long as
the appropriate rules and regulations are
adhered to.
We recommend that you consult with the
dealer where you purchased the stove or an
other competent installer, as there may be
specific things to consider during the
installation. You should also reseive the
applicable rules for installing the stove and
follow them.
Please Note!
You are by law required to register your stove at the local chimney-sweeper.
Until installation keep the stove dry and not to cold. The stove cannot stand moisture.
That an existing chimney, not necessarily is effective enough for a new modern stove.
Vermiculite is a very porous material, therefore handle with care. When refilling the stove, put
the wood carefully, use the glove.
EC declaration of confirmaty.
MANUFACTURER
Name:
Adress
Varde Ovne A/S
Kongevej 246, DK-6510 Gram, Danmark
Product
Product type
Type code
Standard
Application
Fuel
Special conditions
Varde Thurø 11
Thurø
Heating stove, suitable for intermittent combustion
Costruction products (89/106/EC/) standard used EN 13240
Residential Heating
Wood
Non
CE-Markning
Issued
Nominal Output
Fuel type
Fluegas temperature
Efficiency
Co-release
2012
6 kW
Wood
270 °C
78 %
0,2 %
Jan Meldgaard
CEO
Varde Ovne
5
Flooring:
If the floor on which the stove is to be placed is inflammable, the floor must be covered with non
-flammable material, such as steel or glass plate, floor tiles or artifical slate, covering an area of
at least 15 cm from the sides of the stove and at least 30 cm from the front of it. Regarding the
front, however, we recommend 50 cm. Also, the Floor construction must be capable of carrying
the combined weight of stove and chimney.
Steel
Stove
101 kg
Installation distance:
If walls are non-inflammable, the stove can be placed closer to them. However, we recommend
a minimum distance of 5-10 cm, to allow for cleaning behind the stove. The cleanout gate must
be accessible. Optimal combustion can only be obtained if fresh air is constantly admitted. It is
important, therefore, to ensure that this is the case. The best way to provide a steady flow of
fresh air is by installing 1-2 air vent’s in the room where the stove is situated. (One in each side
of the room).
According to existing regulations, stoves must be placed with the following minimum distances
in mm to inflammable walls and materials. The distance from the outer edge of the flue pipe to
inflammable material is descriped as for horizontal Flue 300mm and the distance for vertical flue
is 225mm
The stove must in accordance with
applicable rules comply with the following
minimum distances from inflammable walls
and materials:
Sides : 32,5cm
Varde Thurø
A
200mm
C
325mm
B
225mm
D
1000mm
Rear : 20cm
Distance to furniture : 100cm
6
The chimney:
Always use a chimney with a diameter of at least 15 cm. This corresponds to a clear of 175 cm2.
Make sure the chimney is of a sufficient height, that it draws well and that smoke does not
bother your neighbours.
We recommend that you fit your chimney with a damper, allowing for draft control. This may
prove particularly important on windy days.
Note: the damper must never shut off draught completely – always allow at least 20 cm² free
passage through the chimney.
With nominal usage the stove has tested a flue gas flow of 4,9 g/second and with a flue gas
temperature of 265 °C in a room of 20 °C.
Varde stoves are always fitted with a smoke plate which redirects smoke to make its way to the
chimney as effectively as possible. This ensures that the heat from the smoke is emitted inside
your home rather than outside it. The smoke plate is moveable and placed on top of the Vermiculite fire brick side plate. You should make sure that it is pushed all the way back against the
back wall of the combustion chamber.
Draught conditions
Consult your local stove dealer about how best to adjust the draught in your chimney.
Hight of chimney
If in doubt, contact your local stove dealer. He will be able to inform you of the correct hight.
Connection of Flue pipe:
Information about the new cast iron adapter, Part no.: 134
Your stove is equipped with the new cast iron adapter from Varde Ovne.
The adapter is suitable for smoke pipes with inner diameter on 150 mm.
If you need it, it’s now possible for you to make a condensate drain-hole in the adapter.
♦
Carefully punch a chisel or the like through the adapter in the outer groove, at the arrow
mark. This way you can establish a condensate drain hole in the adapter.
Arrow mark for the hole.
Carefully punch a hole with a
chisel or the like.
Now the condensate – hole is
ready.
7
Combustion/Secondary air
Pre-heated air for the combustion process, the amount of which can be altered according to the
desired room temperature, and the effectiveness of the chimney. A high level of chimney
draught requires a lesser intake of combustion air.
Primary air
Also known as ´sub-air´, the air which is drawn into the combustion chamber through the air
valve on the ash pan.
Air valve
Air valve for primary air.
Combustion/secondary air
Valve for combustion/secondary air.
Continual fresh air
A continual supply of fresh air is required in the room in wich the stove is situated. This can be
achieved by installing 1-2 vents, whilst also ensurring that these can not be blocked. The
quantity of air used for burning, is approx. 15,5 m³ / h.
Overheating
Occurs if too much wood is placed in the stove or if the combustion receives too much air.
The Shake grate
The shaking grate is sittuated at the
bottom of the combustions chamber. The
ashes will be shaken into the ashpan by
pulling and pushing of the lever.
Shake grate
Pull and push the lever.
8
Spare parts
If Spare parts at any time should be needed, please check the list below.
Vermiculit fire bricks, Item no.: 2100505
Glass, Item no.: 1130503
Sealings i set, Item no.: 1101
Handel, Item no.: 11306124
Door, Item no.: 1130526
Shake grate pole, Vare nr.: 800000069
Shake grate, Item no.: 66
Ashtray, Item no.: 1130555
Glass springs, Item no.: 10013
Wood Catch, Item no.: 81
9
Thurø 11
3
1
4
2
1. Shake grate
2. Ash pan
3. Vermiculite fire brick Item no.: 2100505, see next page
4. Wood catch
10
Vermiculite
The plates in the combustion chamber are Vermiculite plates and will aventually be worn,
- as will the smoke plate. Should you accidentally breah the plate, for instance by hitting it hard
with a piece of wood, this does not effect the quality of the combustion. You need not replace
the plate until the gap is 5 mm wide.
Vermiculite
A special non-flammable material. The vermiculite fire plates both isolate and protect the stove
from attrition. Vermiculite plates and deflector not covered by the warranty. Vermiculite is a
very porous material, therefore handle with care. When refilling the stove, put the wood
carefully, use the glove.
1
2
4
3
Vermiculit fire brick, Item no.:
2100505
1.
2.
3.
4.
Smoke guide
Side plade, left
Side plade, right
Rear
How too replace the Vermiculite
1.
2.
3.
4.
Deflector, lift easily, bottom bag end are tilted forward, take down.
The left side plate can be easily liftes up and rotated out.
Right side plate can be easily lifted up and rotated out.
The back cover is liftes up and out of the stove.
Mounting of new Vermiculite plates follow point 4 towards point 1.
11
What kind of wood to use?
Generally, beech wood is considered the best
type of wood for burning. It burns evenly
without producing much smoke and ashes are
clean and take up little space. Ash, birch and
maple wood are fine alternatives.
The new stove
The first time you light up the stove the
enamel will temper, and give off some smoke
and a slight smell. We recommend that you
leave doors and windows open, as airing the
room will make the smell disappear. This
tempering softens the enamel making it
susceptible to damage. Therefore exercise
caution and avoid touching the enamel.
Likewise we recommend opening the door to
the stove at regular intervals for the first
hours to prevent the insulations rope from
sticking to the enamel.
How big the firewood?
Split firewood with a diameter larger than 10
cm. Use firewood with a length on 20-25 cm.
The use of larger quantities of fuel than
recommended in the tabel belove will overtax
the stove and resulte in increased temperatures
in the chimney as well as a lowered efficiency.
This may cause damage to both chimney and
stove, and the annulment of the warranty. Also,
never use toxic materials such as chipboard,
painted or impregnated wood.
Lightnings sticks
Length: 20 –25 cm
Wide 3x3 cm
Normal amounth: 10-15 sticks (approx. 1 kg)
What to burn.
This Varde Stove is tested and approved for
the burning of wood. Only dry wood with a
moisture content of maximum 21 percent and
the size to fit into the combustion chamber
should be used. The burning of moist wood
will result in an increased amount of tarry
soot, pollution and uneconomic fuel
consumption. Newly chopped wood contains
about 60-70 percent moisture, which makes it
completely unsuitable as fuel. Allow newly
chooped firewood to dry in a open shed for a
couple of years before using it in the stove.
Do not use! - Consider the environment
Also, never use toxic materials such as
chipboard, painted or impregnated wood.
The use of larger quantities of fuel than
recommended in the tabel belove will overtax
the stove and resulte in increased
temperatures in the chimney as well as a
lowered efficiency. This may cause damage to
both chimney and stove, and the annulment
of the warranty.
Topdown Lightning of the fire
Firewood
Length: 25-30 cm
Diameter: max. 10 cm
Normal amounth: 3-4 firwood (approx. 2 kg)
The following optimal register and fuel quanitty settings are recommended(in case of similar chimney
draught):
Fuel
Quantity
[kg]
Primary Air
[%]
2,0
10
Combustion
Air
[%]
Nominal
Output
[kW]
Chimney
Draught
[PA]
Efficiency
[≥ i %]
Refill interval at
nominal output
[minuts]
80
6
12
78
ca. 73
12
How to light and stoke a fire:
The first time you light up the stove the enamel will temper, and give off some smoke and a
slight smell. We recommend that you leave doors and windows open, as airing the room will
make the smell disappear. This tempering softens the enamel making it susceptible to damage.
Therefore exeercise caution and avoid touching the enamel. Likewise we recommend opening
the door to the stove at regular intervals for the first hours to prevent the insulations rope from
sticking to the enamel.
Never use highly inflammable fluids such as sprit and petrol for lighting up!
We recommend a ”Top-Down” lightning, where you light the wood in the upper area of the
combustions chamber and not in the ground. This method is the most environmental metod to
light a fire. The metod will keep the glass clean. In the combustion chamber you make a cross
(╬) of 4 small pieces of wood with a small distance between each one of them. On top you of
them you make another cross (╬) of 8-12 smaller sticks (0,5-1 kg.), on top of this firewood and
in between use 2-3 kildning blocks. A thin layer of ashes at the bottom of the stove makes lighting up a fire easier.
Before lighting up the stove, open the Shake grate by pulling the lever all the way out.
Then open the valve on the ash-pan for access of primary air and open the valve under the ash
-pan for combustion air (alternatively, shortly leave the door a little bit open if there is no wind
and no draught in the chimney), thus allowing the fire to catch on. Always remember to close
the door again, otherwise the stove can be overheadted, and this is not covered by the
warranty. When the fire burns steady, then remember to close the valve on the ash-pan again,
until its approx. 10 % open.
In most instances, however, you will have to achieve the best combustion air settings yourself, as the height and draught of your chimney, as well as the quality of the firewood are decisive factors in determining how your particular stove is best set.
When refilling the stove with wood, we recommend opening the stove door only once embers
are left in the combustion chamber. Opening the door whilst the flames are still burning and
producing smoke and gas, might cause smoke slip into the room instead of up the chimney.
13
Maintenance:
As any piece of equipment in daily use, your stove needs maintenance.
The stoves should only be cleaned when cold. Use a dry cloth for cleaning the exterior of the
stove.
Clean the interior regulary by removing ashes, soot and tar from the combustion chamber. The
Deflector should be removed for cleaning as the reverse side will be covered in dirt and soot.
Finally check that the smoke pathway thhrough the smoke pipe and chimney is completely clear.
You should also inspect the gaskets in the door and the ash-pan for signs of wear. Replace them
if permeable. Also, remember to oil the hinges of the door as required.
Empty the Ash-pan regulary. It can be emptied into your dustbin, as long as you make sure it
contains no hot embers. When in doubt as how to clean your stove, contact the dealer from
whom you bought your stove, or your chimney sweeper.
It is especially important to check the stove and its chimney for blokages after a long period of
non-use.
The enamelled surface of the stove may wear down at certain places if the stove is
overheated. Worn surfaces, however, can be repaired with a special Senotherm® spray paint,
available at your local vendor.
The plates in the combustion chamber are Vermiculite plates and will aventually be worn,
- as will the smoke plate. Should you accidentally breah the plate, for instance by hitting it hard
with a piece of wood, this does not effect the quality of the combustion. You do not need to
replace the plate until the gap is 5 mm wide.
Only use original parts from Varde Ovne A/S
Do not make any unauthorised changes.
All external parts of the stove become hot during use, too. Therefore exercise
necessary caution when the stove is in use.
IMPORTANT!!
Chimney Fires
Should your chimney catch fire, cut off the air supply to the stove’s combustion chamber and
contact the emergency service. (The majority of fires die out after the oxygen supply is cut off.)
Following this, the least you should do is to contact your chimney sweeper, who will check your
stove and chimney for damage.
14
Troubleshooting.
Smoke enters the room:
•
•
•
Not enough draugh in the chimney.
•
Make sure the hight of the chimney is correct.
Inspect the smoke pipe or the chimney for blockage.
Clean the inside of the stove removing soot from the upper vermiculite / smoke
(Deflector) plate.
The glass or the chimney soot up:
•
•
•
•
The wood is too moist.
Not enough secondary air is applied to the combustion process.
You may have shut off the supply of ignition air too aerly when lightning up the stove.
There always have to be clear flames in the combustion chamber.
The heat is emitted from the stove:
•
•
The wood is too moist (all energy goes into drying it) or of a poor quality.
•
The amount of combustion(secondary air) air is not enough.
Inspect the position of the smoke plate and make sure there is free passage for the
smoke.
Combustion is too intense:
•
•
•
Gaskets in the door or the ash-pan are no longer tight and need replacement.
The chimney draugh is too strong—apply a valve in the chimney.
Inspect that the ignition air is closed.
The Shake grate is stuck:
•
•
Inspect the grate for jammed wood, nails or the like.
.
Make sure the lever is placed correctly
Recycling
Packing
The packing is 100% recycleable.
Ceramic Glass
Ceramic glass tobe deposited at the local recycling center and sorted together with pottery and
porcelain.
Vermiculite
Vermiculite plates from the stove must be returned to the local recycling center.
15
16
Warranty
All Varde stoves go through a close quality inspection, and we take
pride in always delivering products of a consistent quality. This being
said, manufacturing faults may still occur, and on these we offer a 5
year warranty.
The warranty does not include:
· wearing parts, such as the Vermiculite plates in the combustions
chamber, the smoke plate, glass, gaskets, cast iron bottom and
Shake grate.
· Damages whichs occur as a consequence of misuse, such as
overheating, incorrect installation, missing or wrong maintenance etc.
(see instructions earlier)
·Damages caused by external influence of a physical character.
·Cost of transportation in connection with warranty repairs.
·Assembling/reassembling in connection with warranty repairs.
·Compensation for following damages, including damage on other
objects.
Warranty conditions:
These instructions for use are also your proff of warranty. The
warranty will not take effect until vendor’s stamp, information about
model, registration numer and date of purchase (invoice if possible)
have been applid below. In case of claims, please bring this proof of
warranty to your local vendor.
Model:
Vendor’s stamp and signature
Reg.no.:
Date of
purchase:
17
Kongevej 246, 6510 Gram, Danmark, Tel. +45 7482 0003. vardeovne.dk
18