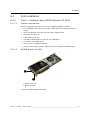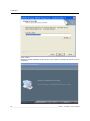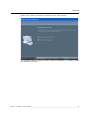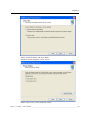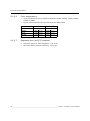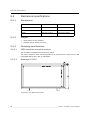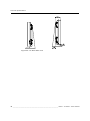
1
LC-5621
56" - quad full HD LCD display
User manual
K5960013-00
Intentionally left blank
2 ________________________________________________________ Barco - LC-5621 - User manual
About the manual
1
About the manual
1.1
Contents of the user manual
This manual consists of the following chapters:
Chapter 1: About the manual
Chapter 2: Important notice
Chapter 3: Safety precautions
Chapter 4: Package and storage
Chapter 5: About the product
Chapter 6: Installation
This chapter describes how the monitor should be installed and connected into
the system. It incorporates the pin layout of all the connectors.
Chapter 7: Operation
This chapter describes the function and the general operation of all function keys
and indicators. How to power up the unit, how to adjust brightness and other
adjustments.
Chapter 8: Troubleshooting
This chapter lists some troubleshooting tips for common problems.
Chapter 9: Technical specifications
This chapter tabulates the technical specifications and the dimensions of the
display module.
Chapter 10: List of abbreviations
1.2
Change record
Revision
Date
Description
00
Mar-08
Initial Release
Barco - LC-5621 - User manual ________________________________________________________ 3
About the manual
1.3
Notation convention
Following notations are applicable to this manual and should be respected
through the manual.
WARNING:
Warnings – presented in this manual, provide information, which if not adhered to, may result
in personal injury or death.
CAUTION:
Cautions – presented in this manual, provide information, which if not adhered to, may result
in damage to the equipment.
NOTE:
Notes – presented in this manual, provide information, which emphasize points, significant to
understand and operate the unit.
IMPORTANT:
Important – presented in this manual, provide information, which is important to highlight.
4 ________________________________________________________ Barco - LC-5621 - User manual
Important notice
2
Important notice
2.1
Commercial In Confidence
The information contained herein is Barco confidential information. No part of
the information contained herein may be disclosed outside of the organization of
the recipient, its sub-contractors, and customers in any form or by any means
and/or stored in a database or retrieval system without the prior written consent
of Barco.
2.2
Notice
The technical specifications mentioned in this manual shall under no
circumstances be used as proof or item of evidence.
Only the technical specifications defined in the Barco technical
specifications document (which is not part of this manual) can be used
as a base for contract negotiations.
Note that the DVI-D connectors are not always used according to the standard
DVI-D regulations, carefully follow the instructions of this user manual in order
to make the proper connections.
2.3
Federal Communication Commission (FCC) notice
This equipment has been tested and found to comply with the limits of an FCC
class (refer to the technical specifications of the specific unit for more details
about the corresponding class). These limits are designed to provide reasonable
protection against harmful interference when the equipment is operated in a
commercial environment. This equipment generates, uses and can radiate radio
frequency energy and, if not installed and used in accordance with the
instruction manual, may cause harmful interference to radio communications.
Operation of this equipment in a residential area is likely to cause harmful
interference in which case the user will be required to correct the interference at
his own expense.
2.4
Disposal information
WARNING:
The fluorescent tubes inside the backlight of the LCD contain a small amount of mercury that is
considered hazardous to a person's health. Please follow local regulation or laws for disposal.
The LCD panel is composed of multiple layers of glass and protective glass with a small amount
of liquid in between. Rough handling or dropping can cause the LCD panel to break. If any part
of the skin or body comes in direct contact with the liquid, immediately wash the affected areas
with plenty of water for at least 15 minutes. If any symptoms are present after washing, get
medical care.
Barco - LC-5621 - User manual ________________________________________________________ 5
Important notice
2.5
Copyright
No parts of this book may be reproduced in any form, by print, photo printing,
microfilm or any other means without written permission from Barco NV.
This manual could include inaccuracies or typographical errors. Manual change
supplements are revised as often as necessary to keep manuals as current and
accurate as possible.
Copyright © Barco NV
6 ________________________________________________________ Barco - LC-5621 - User manual
Safety precautions
3
Safety precautions
3.1
Safety warning
WARNING:
Electric shock or fire hazard can be caused if critical components are replaced by nonconforming components. These components are marked in this guide by a
with conform types only!
3.2
sign. Replace
Product safety notice
WARNING:
Many electrical and mechanical parts in display units have special safety-related
characteristics. These characteristics are often not evident from visual inspection nor can the
protection afforded by them necessarily be obtained by using replacement components rated
for higher voltage, wattage, etc. Replacement parts that have these special safety
characteristics are identified in this data and its supplements and bulletins. Electrical
components having such features are identified by
or * on the schematics and on the
parts lists in this data and its supplements and bulletins. The use of a substitute replacement
that does not have the same safety characteristics as the recommended replacement part
shown in the parts lists in this data and its supplements and bulletins, may create shock or fire.
Barco - LC-5621 - User manual ________________________________________________________ 7
Package & storage
4
Package & storage
4.1
General
A safe transport of the units can only be guaranteed if the original undamaged
package is used for shipping. Handle with care when transporting.
Keep your original packaging. It is designed for this unit and is the ideal
protection during transportation.
4.2
Procedure in case of damaging
All shipments should be opened and inspected for concealed damage or pilferage
as soon as possible after the arrival at destination. The shipping cartons should
be retained for the surveyor’s inspection and full and accurate reserves must be
made by a letter or a fax message.
Depending upon the used means of transport, the written protest is subject to
different time-rules:
•
by sea: the protest has to be issued against the captain and/or ship within 3
days of the delivery of the goods.
•
by road: the protest has to be issued against the last road-carrier within 7
days after delivery of the goods.
•
by air: the protest has to be issued against the air-carrier within 14 days
after delivery of the goods.
In all cases, a claim or potential claim should be reported as soon as possible
whether or not full documentation is immediately available.
After completion of all required steps, the claim should normally be finalized
within one month. For more information about the claims handling procedure,
contact Barco NV.
4.3
Storage
Specific storage conditions can be found in the technical specifications. It is best
to store the unit in its original packaging, on a shelf in a ventilated and humidity
controlled room.
NOTE:
At least every 2 years, all boards containing electrolytic capacitors need to be powered during
24 hours minimum.
8 ________________________________________________________ Barco - LC-5621 - User manual
About the product
5
About the product
5.1
Product description
5.1.1
LC-5621
Barco’s LC-5621 display has been specifically designed for us in dedicated
professional applications. The display features quad full High Definition
(3840x2160) and delivers crisp, clear and color-accurate perfect images on a
large display size with 56” diagonal.
With the 56” Quad-HD display, operators benefit from a large display surface
without having to compromise on image quality or accuracy.
The LCD technology used in the Barco LC series offers many benefits not found
in other flat panel technologies:
5.1.2
•
High brightness
•
High contrast, even in high ambient light environments
•
Lower power consumption
•
Long lifetime
Main features
Ultra-high resolution
Barco’s LC-5621 is able to show large amounts of data in ultimate detail.
Faster response time
Thanks to its extremely fast response time (6.5 ms gray to gray), the LC-5621
reproduces fast-moving action scenes with vivid accuracy.
Wide viewing angle
The wide viewing angle (176°) and large surface are very beneficial in
collaborative environments where detailed information is viewed by multiple
participants.
Adjustable color temperature
The color temperature can be set to 5600K, 6500K, 7500K, 8500K, or 9300K to
adjust the color balance to different user requirements. User adjustment of the
color balance is also possible with R, G and B sliders.
VESA mounting structure for easy installation
Integrated mounting interfaces according to the VESA standards allow easy wall
or ceiling installation with VESA-approved standard (VESA MIS F, 800, 400, 8).
Table stands and mounting devices are optional.
Control & diagnostics
With extensive control and diagnostic functions through RS232, the LC-5621 can
be easily controlled, both on or off site or in real-time with a simple touch of a
button.
Barco - LC-5621 - User manual ________________________________________________________ 9
About the product
5.2
Recommended use
5.2.1
General precautions for all units
For optimum performance, please note the following when setting up and using
the unit(s).
•
Allow adequate ventilation in case the configuration is built in a rack or a
console, so that the heat can properly dissipate.
•
Make sure all units are disconnected from mains before connecting the signals.
•
The power cable or connector (in case of a split design = *connection cable)
is the primary means of detaching the system from the power supply. One
of the cable ends should be easily accessible.
•
Clean the screen surface of the display with a sponge or soft cleaning cloth.
Do NOT use abrasive cleaning agents, glass cleaner or tissue paper. Use
non-aggressive glass cleaning products instead. Do NOT use alcohol/solvents at higher concentration > 5%.
•
Avoid displaying fixed patterns on the display for long periods of time to
avoid image persistence (after-image effects).
NOTE:
Always power-down the unit before disconnecting the power cable.
IMPORTANT:
Immediately unplug if:
•
Power supply cord or plug is damaged.
•
If the units have been dropped or the cabinets are damaged.
•
If the units don’t operate normally by following operating instructions.
*Connection cable= cable between the panel or display module and control
module
5.2.2
Image retention
The specified usage of the monitor with fixed patterns per 24 hours is maximum
2 shifts of 8 hours, with minimum 1 hour of relaxation between the shifts. The
24 months product warranty does not apply to the case of image retention
phenomena (after-image, shadows, dark lines and other image artifacts), that
may result from a usage outside of this specification.
10 _______________________________________________________ Barco - LC-5621 - User manual
Installation
6
Installation
6.1
Mounting procedure
6.1.1
LC-5621 mounted on stands
The unit is standard mounted on two stands on the rear of the unit. The stands
use the VESA mounting holes foreseen in the unit.
The stands can be mounted on two ways as shown in the drawing below.
USB HUB
P
C IN
ON
DVI-D (Master)
RS232
DVI-D (Slave)
OFF
1
1
USB HUB
MAIN
POWER
AC IN
ON
DVI-D (Master)
RS232
DVI-D (Slave)
OFF
1
1
1
Stand (2x)
Figure 1: Location of the stands of the LC-5621
Barco - LC-5621 - User manual _______________________________________________________ 11
Installation
6.1.2
LC-5621 with VESA compliant mounting solution
The LC-5621 can be mounted on an arm compliant to the VESA MIS F, 800, 400,
8 standards.
The LC-5621 can also be mounted on a wall or ceiling according to the VESA MIS
F, 800, 400, 8 standards.
1
1
1
1
1
1
USB HUB
MAIN
POWER
AC IN
ON
DVI-D (Master)
RS232
DVI-D (Slave)
OFF
1
1
1
VESA mounting holes (8x)
Figure 2: Location of the VESA mounting holes
12 _______________________________________________________ Barco - LC-5621 - User manual
Installation
6.2
Connecting the signals
6.2.1
Connector location
5
1
2
1
DVI-D connector (Master)
2
RS-232 connector
3
DVI-D connector (Slave)
4
USB Hub
5
Power switch
6
Power connector (AC IN)
3
6
4
Figure 3: Connector location LC-5621
Barco - LC-5621 - User manual _______________________________________________________ 13
Installation
6.2.2
Detailed connector information
6.2.2.1
Power connector
IEC connector layout
POWER 100 - 240 VAC
Figure 4: Power connector
Power ranging
Automatic selection between the following voltage ranges:
•
90Vac – 140Vac (100V and 115V nominal)
•
180Vac – 264Vac (230V nominal)
•
Frequency: 45 – 65Hz
Mains Fuse inside the unit (T 6.3 A H), for fuse replacement procedures, refer to
the maintenance manual of the unit.
NOTE:
When connecting mains, check if the power source corresponds with the mains voltage marked
on the identification label on the display!
14 _______________________________________________________ Barco - LC-5621 - User manual
Installation
6.2.2.2
DVI connector
DVI-D connector layout
DVI-D receptable connector (24 pins), right angle with pegs
1
2
9
10 11 12 13 14 15 16
3
4
5
6
7
8
17 18 19 20 21 22 23 24
DVI input pinning
Pin
signal
1
TMDS Data 2-
2
TMDS Data 2+
3
TMDS Data 2/4 Shield
4
TMDS Data 4-
5
TMDS Data 4+
6
DDC Clock
7
DDC Data
8
NC
9
TMDS Data 1-
10
TMDS Data 1+
11
TMDS Data 1/3 Shield
12
TMDS Data 3-
13
TMDS Data 3+
14
+5V Power
15
Ground for +5V
16
Hot Plug Detect
17
TMDS Data 0-
18
TMDS Data 0+
19
TMDS Data 0/5 Shield
20
TMDS Data 5-
21
TMDS Data 5+
22
TMDS Clock Shield
23
TMDS Clock+
24
TMDS Clock-
Barco - LC-5621 - User manual _______________________________________________________ 15
Installation
6.2.2.3
Control connector
9 pins subD male connector layout
1
5
6
9
Control pinning
Pin
signal
1
Nc
2
Signal receive
3
Signal transmit
4
Nc
5
GND
6
Nc
7
Nc
8
Nc
9
Nc
16 _______________________________________________________ Barco - LC-5621 - User manual
Installation
6.3
First installation
6.3.1
Case 1: Customer buys NVIDIA Quadro FX 4600
6.3.1.1
System requirements
Minimum system requirements for using a NVIDIA Quadro FX 4600:
6.3.1.2
•
PC compatible with Intel Pentium® or AMD Opteron® class processor or
higher
•
Open PCI Express x16 lane slot with open adjacent slot
•
Microsoft Windows XP
•
1 GB system memory
•
100 MB of available disk space for full installation
•
CD-ROM or DVD-ROM drive
•
VGA or DVI-I compatible display
•
750 W power supply (higher capacity may be required for NVIDIA SLI)
NVIDIA Quadro FX 4600
2
1
1
Master DVI slot
2
Slave DVI slot
Figure 5: NVIDIA Quadro FX 4600
Barco - LC-5621 - User manual _______________________________________________________ 17
Installation
6.3.1.3
Downloading the correct drivers
NOTE:
Before you install the LC-5621, use an additional LCD monitor to install the drivers to the
workstation.
First the correct driver should be installed on your system.
Go to http://www.nvidia.com
Go to download drivers and select the following items
Now the following screen should appear:
18 _______________________________________________________ Barco - LC-5621 - User manual
Installation
Check the checkbox and push the “Download Now” button.
Now the driver should be downloaded on your system.
6.3.1.4
Installing the drivers
Install the driver of the NVIDIA Quadro FX 4600 by double clicking the icon on
your desktop. Following image appears on the screen:
Accept the license agreement and click “Next”.
Barco - LC-5621 - User manual _______________________________________________________ 19
Installation
Click “Next”.
Following screen appears on the screen, click “Next” to install the drivers to your
computer.
20 _______________________________________________________ Barco - LC-5621 - User manual
Installation
Select “Yes, I want to restart my computer now”. Click “Finish”.
It is possible that the computer doesn’t restart automatically. If needed, restart
the computer manually.
Barco - LC-5621 - User manual _______________________________________________________ 21
Installation
6.3.1.5
Connecting the LC-5621 to the workstation
NOTE:
Switch the additional LCD screen with the LC-5621.
Put DVI-D Master of the unit to the master DVI connector on the graphics card
closest to the motherboard. Put DVI-D Slave of the unit to the slave DVI
connector on the graphics card furthest from the motherboard.
When the computer is restarted, the following screen appears on the right side
of the unit. The left side of the unit is black.
Click “Next” to continue.
Following screen appears on the screen.
22 _______________________________________________________ Barco - LC-5621 - User manual
Installation
Select “Custom setup” and click “Next”.
Following screen appears on the screen.
Select “Color LCD (1 of 2) and click “Next”.
Barco - LC-5621 - User manual _______________________________________________________ 23
Installation
Following screen appears on the screen.
Select the screen resolution and Color quality as shown on the image above.
Click “Next”.
Following screen appears on the screen.
24 _______________________________________________________ Barco - LC-5621 - User manual
Installation
Click “Next”.
Following screen appears on the screen.
Choose “Span” and click “Next”.
Barco - LC-5621 - User manual _______________________________________________________ 25
Installation
Following screen appears on the screen.
Click “Finish”.
Now the left side of the unit and the right side of the unit show the total picture.
26 _______________________________________________________ Barco - LC-5621 - User manual
Installation
6.3.2
Case 2: Workstation delivered by Barco
When the workstation (PWS-101) is provided by Barco, the NVIDIA Quadro FX
4600 will be installed on this work station. The correct drivers of this graphics
card will be installed.
The unit can be attached directly to the workstation. Connect the unit with the
master DVI-D connector to the master DVI connector of the graphics card. This
is the DVI connector closest to the motherboard (as shown on the picture
below).
Connect the slave DVI-D connector of the unit to the slave DVI connector of the
graphics card. This is the DVI connector furthest of the motherboard (as shown
on the picture below).
2
1
1
Master DVI slot
2
Slave DVI slot
Figure 6: Location of the master & slave DVI-connector
Barco - LC-5621 - User manual _______________________________________________________ 27
Operation
7
Operation
7.1
Function of primary controls and indicators
7.1.1
Primary controls
7.1.1.1
Location of the primary controls
1
SOURCE
2
MODE
3
ENTER
4
/+
5
/-
6
MENU
7
1
Standby
2
Source
3
Mode
4
Enter
5
Up
6
Down
7
Menu
Figure 7: Primary controls of the LC-5621
7.1.1.2
Standby button
Pressing this button puts the display in standby mode.
Standby mode means that the power to the LCD panel and backlight is disabled
and that all power consumption is reduced to a strict minimum. The display
turns black.
To bring the unit out of this mode, press the button again. Power is restored
immediately.
28 _______________________________________________________ Barco - LC-5621 - User manual
Operation
7.1.1.3
Source button
SOURCE
Pressing this button adjusts the gamma settings of the display.
7.1.1.4
Mode button
MODE
Pressing this button shows information on the display.
7.1.1.5
Enter button
ENTER
Pressing this button enables the user to select/activate the menu item when the
OSD menu is activated.
7.1.1.6
Up/Down buttons
/+
/-
Pressing this buttons will navigate the “cursor” through the OSD menu when
active or increase/decrease the selected value in the OSD.
7.1.1.7
Menu button
MENU
Pressing this button will activate the OSD menu. Pressing this button when the
OSD menu is already activated will close the OSD menu.
Barco - LC-5621 - User manual _______________________________________________________ 29
Operation
7.1.2
IR control
7.1.2.1
Location of the primary controls on the IR control
2
1
3
F3
F2
F4
F1
F5
ADJ
EXIT
ENTER
6
PAUSE
5
7
TEXT
?
9
4
PHASE
0
7
8
5
6
3
4
1
2
SHARPN
1
F1 (Source)
2
F2 (Mode)
3
ADJ (Menu)
4
EXIT (Menu)
5
ENTER (Enter)
6
Stand-by
7
Up/Down
TINT
COLOR
BRIGHTN
COLOR
TREBLE
BALANCE
BASS
VOL
Figure 8: Location of the primary controls on the IR control
7.1.2.2
F1 button (IR control)
F1
Pressing this button adjusts the gamma settings of the display.
7.1.2.3
F2 button (IR control)
F2
Pressing this button shows information on the display.
7.1.2.4
ADJ button (IR control)
ADJ
Pressing this button will activate the OSD menu.
7.1.2.5
Exit button (IR control)
EXIT
Pressing this button when the OSD menu is activated will close the OSD menu.
30 _______________________________________________________ Barco - LC-5621 - User manual
Operation
7.1.2.6
Enter button (IR control)
ENTER
Pressing this button enables the user to select/activate the menu item when the
OSD menu is activated.
7.1.2.7
Standby button (IR control)
Pressing this button puts the display in standby mode.
Standby mode means that the power to the LCD panel and backlight is disabled
and that all power consumption is reduced to a strict minimum. The display
turns black.
To bring the unit out of this mode, press the button again. Power is restored
immediately.
7.1.2.8
Up/down buttons (IR control)
Pressing this buttons will navigate the “cursor” through the OSD menu when
active or increase/decrease the selected value in the OSD.
7.1.3
Indicators
7.1.3.1
Location of the indicators
1
1
IR receiver
2
Power LED
2
Figure 9: Location of the indicators
Barco - LC-5621 - User manual _______________________________________________________ 31
Operation
7.1.3.2
Power LED
Led indicator
Mode
Orange
Standby
Green
In operation
32 _______________________________________________________ Barco - LC-5621 - User manual
Operation
7.2
Adjusting display settings
7.2.1
Overview of the on screen display
Figure 10: Overview of the on screen display
Barco - LC-5621 - User manual _______________________________________________________ 33
Operation
7.2.2
Using the on screen display
7.2.2.1
Overview of the key functions
Before depicting the OSD menus we will give an overview of the key functions.
Entering one of these menus via control panel?
•
Press
•
Press
•
Press
MENU
/+
, the OSD main menu appears on the screen.
or
ENTER
/-
until the desired submenu is selected.
to enter the desired submenu.
Quitting a menu?
•
To quit a menu push
•
Remark:
MENU
MENU
.
from the main menu closes the OSD.
Changing a value?
•
Press
•
If the line displays a value that can be modified:
3
/+
Press
or
/-
ENTER
to select the desired line.
and change the value with
/+
or
/-
keys.
Executing a command?
•
Go to the desired execute line.
•
Press
ENTER
to execute the command.
Read-only text
•
When a line is not selectable, this line is “read-only”.
Entering one of these menus via IR control?
The procedure for entering the menus via IR control is equal to the procedure for
entering the menus via control panel.
The buttons used for the IR control are shown below, the left side shows the
buttons of the control panel on the display, the right side shows the buttons of
the IR control.
34 _______________________________________________________ Barco - LC-5621 - User manual
Operation
ENTER
ENTER
MENU
ADJ
/+
/-
MENU
EXIT
7.2.2.2
Main menu
Figure 11: Main menu
The main menu enables the user to scroll through the different menu items of
the display.
7.2.2.3
Brightness menu
Figure 12: Brightness menu
To enter the brightness menu, push
Push
/+
or
/-
ENTER
. The brightness bar becomes visible.
to increase/decrease the brightness value.
Barco - LC-5621 - User manual _______________________________________________________ 35
Operation
Brightness can be adjusted from 0 (minimum light output) to 100 (maximum
light output). The default value for brightness is 30.
7.2.2.4
Contrast menu
Figure 13: Contrast menu
To enter the contrast menu, push
Push
/+
or
/-
ENTER
. The contrast bar becomes visible.
to increase/decrease the contrast value.
Contrast can be adjusted from 0 to 100. The default value for contrast is 50.
7.2.2.5
Gamma menu
Figure 14: Gamma menu
In the gamma menu, the different gamma settings can be adjusted. One can
choose between following gamma settings:
•
Gamma off
•
Gamma 2.2
•
Gamma 2.4
•
Gamma 2.6
•
Gamma DICOM
•
Gamma USER
Gamma DICOM sets the gamma for Medical applications.
Gamma USER activates the LUT that is uploaded via RS-232.
36 _______________________________________________________ Barco - LC-5621 - User manual
Operation
7.2.2.6
Color temp menu
Figure 15: Color temp menu
In the color temp menu, the different color temperatures can be set. One can
choose between following color temperatures:
7.2.2.7
•
5600K
•
6500K
•
7500K
•
8500K
•
9300K
User color menu
Figure 16: User color menu
To enter the user color menu, push
ENTER
. The color bar becomes visible. One
can adjust the gain of the red, green and blue components. Push
increase/decrease the color value.
/+
or
/-
to
Color can be adjusted from 0 to 255.
Barco - LC-5621 - User manual _______________________________________________________ 37
Operation
7.2.2.8
Sys info
Figure 17: System info
This menu shows system information such as horizontal frequency (HF), vertical
frequency (VF), resolution (Res), model number (Mdl), firmware version (MVer),
FPGA version (FVer) and runtime hours (Hrs).
7.2.2.9
Fan status menu
Figure 18: Fan status menu
The fan status menu shows the fan speed (RPM) of the different fans and the
temperature reading of the thermal sensor in the display.
38 _______________________________________________________ Barco - LC-5621 - User manual
Operation
7.2.2.10
Language menu
Figure 19: Language menu
The language of the OSD menus can be set in this menu. The different
languages that one can choose are:
7.2.2.11
•
English
•
German
•
Spanish
•
Italian
•
Japanese
Misc menu
Figure 20: Misc menu
One can reset all settings of the display to the factory settings by entering this
menu.
The display RS-232 address can be adjusted via “Display Addr”.
Barco - LC-5621 - User manual _______________________________________________________ 39
Troubleshooting
8
Troubleshooting
8.1
Troubleshooting procedure
No picture on screen.
•
The signal cable should be completely connected to the graphics card/computer.
•
The graphics card should be completely seated in its slot.
•
Check the power switch should be in the ON position.
•
Front power switch and computer power switch should be in the ON position.
•
Check to make sure that a supported mode has been selected on the graphics card or system being used (Please consult graphics card or system manual to change graphics mode.).
•
Check the monitor and your graphics card with respect to compatibility and
recommended settings.
•
Check the signal cable connector for bent or pushed-in pins.
•
Ensure the DVI input mode is set to digital when the MAC digital output is
connected to the DVI-I connector.
Image persistence.
•
Image persistence is when a residual or “ghost” image of a previous image
remains visible on the screen. To alleviate image persistence, turn off the
monitor for as long as the previous image was displayed. See chapter “Recommended use”.
Image is unstable, unfocused or swimming in apparent.
•
Signal cable should be completely attached to the computer.
No signal
•
Signal cable should be completely attached to the computer.
•
Make certain the computer is not in a power-saving mode (touch the keyboard or mouse).
•
If no video is present on the screen, turn the power button off and on again.
LED on monitor is not lit (no green or orange color can be seen)
•
Power switch should be in the ON position and power cord should be connected.
•
Check the power cable should be connected surely.
40 _______________________________________________________ Barco - LC-5621 - User manual
Technical specifications
9
Technical specifications
9.1
Electro-optical specifications
9.1.1
Panel
•
a-Si TFT Active Matrix LCD (AM-LCD) – 8 bit/color
•
Super MVA technology, normally black
9.1.2
Image specifications
9.1.2.1
Screen dimensions
•
Aspect ratio 16:9
•
Screen dimensions:
3
3
9.1.2.2
Screen specifications
•
16.8 million colors - 256 gray scales
•
Typical viewing angle:
3
9.1.2.3
White surface luminance at maximum brightness
3
9.1.2.5
Horizontal: 176°, Vertical: 176° @ CR>=30
Light output
•
9.1.2.4
1244.16 x 699.84 mm (48.98” x 27.55”)
1427.48 mm (56.2”) diagonal
max. 400 cd/m² (116.75 fL)
Contrast ratio
•
Contrast ratio in dark environment: 1200:1
•
Typical specular reflection: <0.5%
•
Typical diffuse reflection: TBD%
Resolution
•
3840 x 2160 pixels.
•
1 pixel is composed of 3 sub pixels R, G and B (RGB Vertical Stripe configuration)
•
pixel dimensions: 0.108 mm x 0.342 mm
Barco - LC-5621 - User manual _______________________________________________________ 41
Technical specifications
9.1.2.6
Color temperature
•
color temperatures can be switched between 5600K, 6500K, 7500K, 8500K,
9300K or USER
•
Typical CIE coordinates are mentioned in the table below
x
y
0,651 + 0.03
0,332 + 0.03
GREEN
0,269 + 0.03
0,593 + 0.03
BLUE
0,144 + 0.03
0,060 + 0.03
WHITE
0,285 + 0.03
0,293 + 0.03
RED
CIE-1931 x,y coordinates are measured
9.1.2.7
Response time (at 25°C ambient)
•
Rise time (black to white transition): typ. 8 ms
•
Fall time (white to black transition): typ. 8 ms
42 _______________________________________________________ Barco - LC-5621 - User manual
Technical specifications
9.1.3
Signal inputs
9.1.3.1
DVI connector
DVI-D connector layout
DVI-D receptable connector (24 pins), right angle with pegs
1
2
9
10 11 12 13 14 15 16
3
4
5
6
7
8
17 18 19 20 21 22 23 24
DVI input pinning
Pin
signal
1
TMDS Data 2-
2
TMDS Data 2+
3
TMDS Data 2/4 Shield
4
TMDS Data 4-
5
TMDS Data 4+
6
DDC Clock
7
DDC Data
8
NC
9
TMDS Data 1-
10
TMDS Data 1+
11
TMDS Data 1/3 Shield
12
TMDS Data 3-
13
TMDS Data 3+
14
+5V Power
15
Ground for +5V
16
Hot Plug Detect
17
TMDS Data 0-
18
TMDS Data 0+
19
TMDS Data 0/5 Shield
20
TMDS Data 5-
21
TMDS Data 5+
22
TMDS Clock Shield
23
TMDS Clock+
24
TMDS Clock-
Barco - LC-5621 - User manual _______________________________________________________ 43
Technical specifications
9.1.3.2
Control connector
9 pins subD male connector layout
1
5
6
9
Control pinning
Pin
signal
1
Nc
2
Signal receive
3
Signal transmit
4
Nc
5
GND
6
Nc
7
Nc
8
Nc
9
Nc
9.1.4
Power supply specification
9.1.4.1
115 Vac / 220 Vac (50 ~ 60 Hz) supply
9.1.4.2
•
Nominal voltage: 115 Vac or 220 Vac
•
Operates between 85 Vac – 264 Vac
•
Frequency range: 50 ~60 Hz
Power consumption
•
9.1.4.3
Pmax = 500 W
Safety
•
Unit meets:
3
3
9.1.4.4
IEC 60950-1
IEC 60601-1
Power connector
•
115/220 Vac
3
IEC power chassis connector for 115 Vac and 220 Vac
44 _______________________________________________________ Barco - LC-5621 - User manual
Technical specifications
9.1.5
Human Machine Interface (HMI)
9.1.5.1
On-Screen Display (OSD)
9.1.5.2
•
The On-Screen Display (OSD) feature is the ability to display text on top of
the input.
•
The OSD can be used to adjust parameters like brightness, contrast,
gamma,…
•
The OSD menu can be accessed via the IR control.
•
This information is also accessible form the host processor through the RS232 interface according to the BARCO remote protocol.
Controls
The controls of the monitor are located on the right side of the unit (seen from
front). There are 7 buttons:
9.1.5.3
Main function
Menu
Power (¨)
Standby / switch into operation
Source
Gamma items selection
Mode
Show information
Enter
Activate selection
c/+
Scroll up for menu items
d/-
Scroll down for menu items
Menu
Opens OSD, exits OSD, exit OSD control
Indicators
Led indicator
Mode
Orange
Standby
Green
In operation
Barco - LC-5621 - User manual _______________________________________________________ 45
Technical specifications
9.2
Mechanical specifications
9.2.1
Dimensions
9.2.2
With stand
Without stand
Height
866 mm (34.09”)
800.8 mm (31.53”)
Width
1345.1 mm (52.96”)
1345.1 mm (52.96”)
Depth
300 mm (11.81”)
135.2 mm (5.32”)
Weight
•
With stand: 58 kg (128 lbs)
•
Without stand: 53 kg (117 lbs)
9.2.3
Mounting specifications
9.2.3.1
VESA compliant mounting solution
The LC-5621 is standard mounted on a stand.
The unit is foreseen with mounting holes to be mounted on a vesa arm or wall
with VESA MIS F, 800, 400, 8 standards.
9.2.3.2
Drawings LC-5621
Figure 21: LC-5621 Front view
46 _______________________________________________________ Barco - LC-5621 - User manual
Technical specifications
USB HUB
MAIN
POWE R
AC IN
ON
DVI-D (Master)
RS232
DVI-D (Slave)
OFF
Figure 22: LC-5621 Rear view
Figure 23: LC-5621 Bottom view
Barco - LC-5621 - User manual _______________________________________________________ 47
Technical specifications
Figure 24: LC-5621 Side view
48 _______________________________________________________ Barco - LC-5621 - User manual
Technical specifications
9.3
Environmental specifications
9.3.1
Temperature
9.3.1.1
Operating (continuous)
9.3.1.2
9.3.2
9.3.3
•
High temp.: + 35°C (+95°F)
•
Low temp.: + 5° C (+41°F)
Storage
•
High temp.: +55°C (+131°F)
•
Low temp.: -20°C (-4°F)
Altitude/Low pressure
•
Operating nom. 3000 m
•
Storage nom. 3000 m
Relative Humidity (RH)
•
Operating & storage: nom 75% @ 35°C (95°F) non-condensing
9.3.4
EMI/EMC
9.3.4.1
Immunity EN 61000-4-x
•
Unit meets following immunity specifications :
3
3
3
3
3
3
3
9.3.4.2
EN 61000-4-2 (Level 3): Electrostatic Discharge immunity
EN 61000-4-3 (Level 3): Radiated, RF immunity, electromagnetic immunity
EN 61000-4-4 (Level 3): EFT-Burst immunity
EN 61000-4-5 (Level 3): Surge immunity
EN 61000-4-6 (Level 2): RF conducted disturbances
EN 61000-4-8: Power frequency magnetic immunity
EN 61000-4-11: Mains voltage interruptions and variations
Emission
•
Unit meets FCC-A
•
Unit meets EN 55022 Limit A
9.4
Other specifications
9.4.1
MTBF
•
9.4.2
50000 hours
MTTR
•
TBD
Barco - LC-5621 - User manual _______________________________________________________ 49
List of abbreviations for all units
10
List of abbreviations for all units
This list of abbreviations is drawn up for all Barco units. Some of these
abbreviations are not applicable for the product described in this manual.
µ
µC
Microcontroller
A
A
Ampère
AC
Alternating Current
ActEv
Action and Events
ADC
Analog Digital Converter
ADP
Auxiliary Display Panel
AGC
Automatic Gain Control
AIB
Analog Input Board
ALC
Ambient Light Controller
AMLCD
Active Matrix Liquid Crystal Display
APA
Automatic Phase Adjust
APPLIC
Application
AR coating
Anti-Reflective coating
B
BIB
Backlight Inverter Board, Backlight Input Board
BIT
Built In Test
BIL
Barco Intermodule Link
BLOS
Backlight OpticaL Stabilisation
BNC
Bayonet Neil-Concelman or British Naval Connector
C
CAN
Controller Area Network
CCFL
Cold Cathode Fluorescent Lamp
CLK
CLocK
CM
Console mounted
COMM
Communication
Conn.
Connector
CPLD
Complex Programmable Logic Device
CPU
Central Processing Unit
CS
Composite Sync
CVBS
Composite Video Burst Sync
D
Db
Decibels
DC
Direct Current
DCM
Display Control Module
DDC
Direct Digital Controls
50 _______________________________________________________ Barco - LC-5621 - User manual
List of abbreviations for all units
DDR SDRAM
Double Data Rate Synchronous Dynamic Random Access
Memory
DDS
Direct Digital Synthesizer
DEF-STAN
Defense Standard
DEI
DEInterlacer
DIB
Digital Input Board
Diff
Differential
DM
Display Module
DVI
Digital Video Interface
E
EDID
Extended Display Identification Data
EEPROM
(E²PROM)
Electrically Erasable and Programmable Read Only Memory
EMC
Electro Magnetic Conductive
EMI
Electro Magnetic Immunity
ESD
Electrostatic Discharge
ETI
Elapsed Time Indication
F
FCC
Federal Communication Commission
FIFO
First In First Out
FLIR
Forward Looking InfraRed
FPGA
Field Programmable Gate Arrays
FRONT
Assembly of more than 1 I/O connector
G
GND
Ground
GNDA
Ground Analog
GNDD
Ground Digital
H
HB
High Bright
HMI
Human Machine Interface
HS
Horizontal Sync
I
I2C
Inter-IC (bus)
I/O
Input/Output
ICD
Interface Control Document
IIB
Image Input Board
IMB
Interface Mother Board
IOB
Input/Output Board
IOM
Input/Output MIL Connector Board
IOPC
Input /Output Power Control
IPB
Image Processing Board
IR
InfraRed
ITO
Indium Tin Oxide
Barco - LC-5621 - User manual _______________________________________________________ 51
List of abbreviations for all units
J
JTAG
Joint Test Action Group
K
KEYB
Keyboard
L
LCD
Liquid Crystal Display
LFC
Light Flicker Compensation
LRU
Line Replaceable Unit
LUT
Look-Up Table
LVDS
Low Voltage Differential Signalling
LVTTL
Low Voltage Transistor-Transistor Logic
M
MH
Mounting Holes
MIL
Military
MHz
Mega Hertz
MMAN
Maintenance Manual
MRFD
Modular Rugged Flat Display
ms
Millisecond
MTBF
Mean Time Between Failures
MTTR
Mean Time To Repair
N
N/A
Not Applicable
NTSC
National Television Standard Committee
NV or NVIS
Night Vision
NVG
Night Vision Goggle
O
OSD
On Screen Display
OVERTEMP
Overtemperature
P
PAL
Phase Alternating Line
PCB
Printed Circuit Board
PDB
Panel Driver Board
PIB
Panel Interface Board
PIP
Parallel Interface Port
PLL
Phase Locked Loop
PM
Panel Module
PSB
Power Supply Board
PVM
Panel Video Module
PWM
Pulse Width Modulation
PWR
Power
Q
R
RAM
Random Access Memory
52 _______________________________________________________ Barco - LC-5621 - User manual
List of abbreviations for all units
RADAR
Radio Detection and Ranging
RDM
Rugged Display Module
RFU
Reserved for future use
RGB
Red Green Blue
RISC
Reduced Instruction Set Computer
RM
Rack Mounted
ROM
Read-Only Memory
RPM
Rotation Per Minute
RX
Receiver
S
SBB
Symbol Generator Bypass Board
SDRAM
Synchronous Dynamic Random Access Memory
SECAM
Sequential Couleur avec Memoire
SEL
Selection
SER
Serial Port
SG
Symbol Generator
SGB
Symbol Generator Board
SIB
Signal Interface Board
SMPTE
Society of Motion Picture and Television Engineers
SOG
Sync On Green
SONAR
Sound Navigation and Ranging
SRAM
Static Random Access Memory
SRU
Shop Replaceable Unit
STD
Standard
SVGA
Super Video Graphic Array
SW
Software
SXGA
Super extended Graphics Array
S/N
Serial Number
T
TBB
ThinLITE Backlight Board
TBD
To Be Defined
TBT
To Be Tested
TMAN
Technical Manual
TCK
Test ClocK
TDI
Test Data Input
TDO
Test Data Output
Temp
Temperature
TFT
Thin-Film Transistor
TIB
ThinLITE Interface Board
TID
Touch Input Device
TL
Thinlite
TMS
Test Mode Select
TNC
Threaded Neill Concelman
Barco - LC-5621 - User manual _______________________________________________________ 53
List of abbreviations for all units
TRST
Test Reset
TRT
TRT connectors
TTL
Transistor-Transistor Logic
TX
Transmitter
U
UART
Universal Asynchronous Receiver-Transmitter
UMAN
User Manual
UXGA
Ultra eXtended Graphic Array
V
V
Volt
VCM
Video Control Module
VESA
Video Electronics Standards Association
VGA
Video Graphic Array
VHDL
Is the VHSIC Hardware Description Language
VHSIC
Very High Speed Integrated Circuit
VID
Video
VL
Vectorlink
VL RX
VectorLink Receiver
VM
Vesa Mounted
VPB
Video Processing Board
Vpp
Voltage peak power point
VS
Vertical Sync
W
WDI
Watch Dog Input
WUXGA
Widescreen Ultra eXtended Graphics Array
X
XGA
EXtended Graphic Array
Y
Y
Luminance
54 _______________________________________________________ Barco - LC-5621 - User manual
Table of contents
11
Table of contents
1 About the manual.............................................................................. 3
1.1 Contents of the user manual............................................................... 3
1.2 Change record .................................................................................. 3
1.3 Notation convention .......................................................................... 4
2 Important notice ............................................................................... 5
2.1
2.2
2.3
2.4
2.5
Commercial In Confidence..................................................................
Notice .............................................................................................
Federal Communication Commission (FCC) notice..................................
Disposal information..........................................................................
Copyright.........................................................................................
5
5
5
5
6
3 Safety precautions ............................................................................ 7
3.1 Safety warning ................................................................................. 7
3.2 Product safety notice ......................................................................... 7
4 Package & storage............................................................................. 8
4.1 General ........................................................................................... 8
4.2 Procedure in case of damaging............................................................ 8
4.3 Storage ........................................................................................... 8
5 About the product ............................................................................. 9
5.1 Product description............................................................................ 9
5.1.1 LC-5621............................................................................................ 9
5.1.2 Main features..................................................................................... 9
5.2 Recommended use .......................................................................... 10
5.2.1 General precautions for all units ......................................................... 10
5.2.2 Image retention ............................................................................... 10
6 Installation..................................................................................... 11
6.1 Mounting procedure......................................................................... 11
6.1.1 LC-5621 mounted on stands .............................................................. 11
6.1.2 LC-5621 with VESA compliant mounting solution .................................. 12
6.2 Connecting the signals ..................................................................... 13
6.2.1 Connector location............................................................................ 13
6.2.2 Detailed connector information........................................................... 14
6.2.2.1 Power connector ................................................................... 14
6.2.2.2 DVI connector ...................................................................... 15
6.2.2.3 Control connector ................................................................. 16
6.3 First installation .............................................................................. 17
6.3.1 Case 1: Customer buys NVIDIA Quadro FX 4600 .................................. 17
6.3.1.1 System requirements ............................................................ 17
6.3.1.2 NVIDIA Quadro FX 4600 ........................................................ 17
6.3.1.3 Downloading the correct drivers.............................................. 18
6.3.1.4 Installing the drivers ............................................................. 19
6.3.1.5 Connecting the LC-5621 to the workstation .............................. 22
6.3.2 Case 2: Workstation delivered by Barco............................................... 27
7 Operation....................................................................................... 28
7.1 Function of primary controls and indicators......................................... 28
7.1.1 Primary controls............................................................................... 28
7.1.1.1 Location of the primary controls.............................................. 28
7.1.1.2 Standby button .................................................................... 28
7.1.1.3 Source button ...................................................................... 29
Barco - LC-5621 - User manual _______________________________________________________ 55
Table of contents
7.1.1.4 Mode button......................................................................... 29
7.1.1.5 Enter button ........................................................................ 29
7.1.1.6 Up/Down buttons.................................................................. 29
7.1.1.7 Menu button ........................................................................ 29
7.1.2 IR control ........................................................................................ 30
7.1.2.1 Location of the primary controls on the IR control ..................... 30
7.1.2.2 F1 button (IR control)............................................................ 30
7.1.2.3 F2 button (IR control)............................................................ 30
7.1.2.4 ADJ button (IR control).......................................................... 30
7.1.2.5 Exit button (IR control).......................................................... 30
7.1.2.6 Enter button (IR control) ....................................................... 31
7.1.2.7 Standby button (IR control) ................................................... 31
7.1.2.8 Up/down buttons (IR control) ................................................. 31
7.1.3 Indicators........................................................................................ 31
7.1.3.1 Location of the indicators ....................................................... 31
7.1.3.2 Power LED ........................................................................... 32
7.2 Adjusting display settings................................................................. 33
7.2.1 Overview of the on screen display ...................................................... 33
7.2.2 Using the on screen display ............................................................... 34
7.2.2.1 Overview of the key functions................................................. 34
7.2.2.2 Main menu........................................................................... 35
7.2.2.3 Brightness menu................................................................... 35
7.2.2.4 Contrast menu ..................................................................... 36
7.2.2.5 Gamma menu ...................................................................... 36
7.2.2.6 Color temp menu .................................................................. 37
7.2.2.7 User color menu ................................................................... 37
7.2.2.8 Sys info ............................................................................... 38
7.2.2.9 Fan status menu................................................................... 38
7.2.2.10 Language menu .................................................................. 39
7.2.2.11 Misc menu ......................................................................... 39
8 Troubleshooting .............................................................................. 40
8.1 Troubleshooting procedure ............................................................... 40
9 Technical specifications .................................................................... 41
9.1 Electro-optical specifications ............................................................. 41
9.1.1 Panel .............................................................................................. 41
9.1.2 Image specifications ......................................................................... 41
9.1.2.1 Screen dimensions ................................................................ 41
9.1.2.2 Screen specifications ............................................................. 41
9.1.2.3 Light output ......................................................................... 41
9.1.2.4 Contrast ratio ....................................................................... 41
9.1.2.5 Resolution ........................................................................... 41
9.1.2.6 Color temperature ................................................................ 42
9.1.2.7 Response time (at 25°C ambient) ........................................... 42
9.1.3 Signal inputs ................................................................................... 43
9.1.3.1 DVI connector ...................................................................... 43
9.1.3.2 Control connector ................................................................. 44
9.1.4 Power supply specification ................................................................. 44
9.1.4.1 115 Vac / 220 Vac (50 ~ 60 Hz) supply ................................... 44
9.1.4.2 Power consumption ............................................................... 44
9.1.4.3 Safety ................................................................................. 44
9.1.4.4 Power connector ................................................................... 44
9.1.5 Human Machine Interface (HMI).................................................................................... 45
9.1.5.1 On-Screen Display (OSD)....................................................... 45
56 _______________________________________________________ Barco - LC-5621 - User manual
Table of contents
9.1.5.2 Controls .............................................................................. 45
9.1.5.3 Indicators ............................................................................ 45
9.2 Mechanical specifications.................................................................. 46
9.2.1 Dimensions ..................................................................................... 46
9.2.2 Weight............................................................................................ 46
9.2.3 Mounting specifications ..................................................................... 46
9.2.3.1 VESA compliant mounting solution .......................................... 46
9.2.3.2 Drawings LC-5621 ................................................................ 46
9.3 Environmental specifications............................................................. 49
9.3.1 Temperature.................................................................................... 49
9.3.1.1 Operating (continuous) .......................................................... 49
9.3.1.2 Storage ............................................................................... 49
9.3.2 Altitude/Low pressure ....................................................................... 49
9.3.3 Relative Humidity (RH)...................................................................... 49
9.3.4 EMI/EMC ......................................................................................... 49
9.3.4.1 Immunity EN 61000-4-x ........................................................ 49
9.3.4.2 Emission.............................................................................. 49
9.4 Other specifications ......................................................................... 49
9.4.1 MTBF .............................................................................................. 49
9.4.2 MTTR .............................................................................................. 49
10 List of abbreviations for all units ...................................................... 50
11 Table of contents............................................................................55
12 List of figures.................................................................................58
Barco - LC-5621 - User manual _______________________________________________________ 57
List of figures
12
Figure
Figure
Figure
Figure
Figure
Figure
Figure
Figure
Figure
Figure
Figure
Figure
Figure
Figure
Figure
Figure
Figure
Figure
Figure
Figure
Figure
Figure
Figure
Figure
List of figures
1: Location of the stands of the LC-5621 .......................................................... 11
2: Location of the VESA mounting holes ............................................................ 12
3: Connector location LC-5621 ........................................................................ 13
4: Power connector ........................................................................................ 14
5: NVIDIA Quadro FX 4600 ............................................................................. 17
6: Location of the master & slave DVI-connector ................................................ 27
7: Primary controls of the LC-5621 .................................................................. 28
8: Location of the primary controls on the IR control .......................................... 30
9: Location of the indicators ............................................................................ 31
10: Overview of the on screen display .............................................................. 33
11: Main menu ............................................................................................. 35
12: Brightness menu ...................................................................................... 35
13: Contrast menu ........................................................................................ 36
14: Gamma menu ......................................................................................... 36
15: Color temp menu ..................................................................................... 37
16: User color menu ...................................................................................... 37
17: System info ............................................................................................. 38
18: Fan status menu ..................................................................................... 38
19: Language menu ....................................................................................... 39
20: Misc menu .............................................................................................. 39
21: LC-5621 Front view .................................................................................. 46
22: LC-5621 Rear view ................................................................................... 47
23: LC-5621 Bottom view ............................................................................... 47
24: LC-5621 Side view ................................................................................... 48
58 _______________________________________________________ Barco - LC-5621 - User manual
List of figures
End of document
Barco - LC-5621 - User manual _______________________________________________________ 59