1
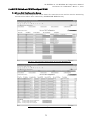
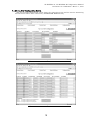
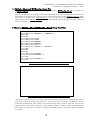
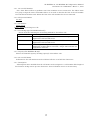
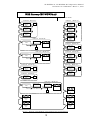
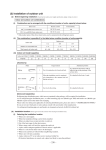
SC-WGWNA-A, SC-WGWNA-B Configuration Manual
Document No. ISTZ10006 March 1, 2010
NEW SUPERLINK WEB GATEWAY
CONFIGURATION MANUAL
MODEL:
SC-WGWNA-A
SC-WGWNA-B
March 1, 2010
MITSUBISHI HEAVY INDUSTRIES, LTD.
AIR-CONDITIONING AND REFRIGERATION
SYSTEMS HEADQUARTERS
1
SC-WGWNA-A, SC-WGWNA-B Configuration Manual
Document No. ISTZ10006 March 1, 2010
Contents
1 ENVIRONMENT
1.1 Personal Computer (PC)
2 Ethernet CABLE CONNECTION
3 INITIAL SETTING OF PC
3.1 PC Network Setting
4 INITIAL SETTING OF WEB GATEWAY
4.1 Initial Setting of WEB Gateway Ethernet
4.2 How to change the IP Address of the WEB Gateway
4.3 SUPERLINK Setting
5 PASSWORD FAILURE
5.1 Troubleshooting
6 ABOUT PACinfo.csv (WGWconfig.csv) FILE (64 unites x 2 networks Factory settings)
6.1 Air-con Cell Configuration Screen
6.2 PACinfo.csv and WGWconfig.csv File
6.3 Opening PACinfo.csv (WGWconfig.csv) Using Text Editor
6.4 Opening PACinfo.csv(WGWconfig.csv) Using EXCEL
7 ABOUT PACinfo_128.csv (WGWconfig_128.csv) FILE (128 unites x 1 network)
7.0 How to switch to one SUPERLINK System
7.1 Air-con Cell Configuration Screen
7.2 PACinfo_128.csv and WGWconfig_128.csv File
7.3 Opening PACinfo_128.csv (WGWconfig_128.csv) Using Text Editor
7.4 Opening PACinfo_128.csv(WGWconfig_128.csv) Using EXCEL
2
SC-WGWNA-A, SC-WGWNA-B Configuration Manual
Document No. ISTZ10006 March 1, 2010
1 ENVIRONMENT
1.1. Personal Computer (PC)
Please check that the PC meets the following specifications.
CPU
500MHz or higher(2GHz or higher is recommended)
Memory
512MB or higher(1GB or higher is recommended)
OS
Windows2000 or Windows XP(Home/Professional)
Windows Vista SP1 or above on some conditions.
(See 「Communication/Buzzer Configuration」screen.)
Screen size
1024×768 or higher(1280×1024 is recommended)
Browser
Internet Explorer 6 or 7.
(Language version of WEB Gateway and OS browser must be the same.)
2 Ethernet CABLE CONNECTION
Use 10BASE-T or 100BASE-TX Ethernet cable(also called LAN cable).
Connection can be made by WEB Gateway and PC direct connection or by using HUB. In the case
of a WEB Gateway and PC direct connection, use an Ethernet cross cable (also called cross LAN
cable).
3 INITIAL SETTING OF PC
3.1 PC Network Setting
3.1.1 Setting of LAN Connection
The PC for this system monitoring control must be able to use Internet Protocol (TCP/IP).
Please check the instruction manual of each PC to confirm this.
3.1.2 Setting of IP Address of PC
Before setting up the WEB Gateway, first set up the IP address of the PC as follows so that the
WEB gateway and PC can be directly connected.
IP Address
Subnet mask
Default Gateway
Priority DNS server
Alternate DNS server
192.168.0.1 ∼ 192.168.0.254
(Since WEB Gateway uses 192.168.0.110, do not use this
as an IP address.)
255.255.255.0
No setting
No setting
No setting
3.1.3 Browser (Internet Explorer)
Set the Internet Explorer (IE) by selecting「Tools」−「Internet Options…」and select the settings
as follows.
z
z
z
「General」
Homepage
http://192.168.0.110/en/
(It is convenient to set the URL to open when starting IE to 「WEB Control & Monitor
System」.)
「Security」
Internet
Default level「Medium」or lower
Local Intranet
Default level「Medium-low」or lower
「Privacy」
Privacy setting
「Medium」
(
「WEB Control & Monitor System」cannot be used unless the browser is set to “Allow”
Cookie. It is recommended to use the default IE settings for each item of 「Security」
and 「Privacy」.
3
SC-WGWNA-A, SC-WGWNA-B Configuration Manual
Document No. ISTZ10006 March 1, 2010
z
z
「Connections」
Connect with the used network. When the PC is connected to a WEB Gateway in a Local
Area Network (LAN), disable the use of a proxy server.
「Advanced」
It is recommended to use the default IE settings for each item of「Advanced」 .
4 INITIAL SETTING OF WEB GATEWAY
4.1 Initial Setting of WEB Gateway Ethernet
4.1.1 Initial setting of the IP Address
As for the WEB Gateway, the IP address and the subnet mask, the factory settings are as
follows.
IP Address
Subnet mask
192.168.0.110
255.255.255.0
4.2 How to change the IP Address of the WEB Gateway
Log in to the WEB Gateway using “Administrator User” then from 「Configuration Menu」,
open the「Communication/Buzzer Configuration」screen. On this screen, the IP Address and
Subnet mask are specified, and only when required, the Default Gateway is specified.
Information entered into each field should be in "XXX.XXX.XXX.XXX" format.
Attention:
・IP address 0.*.*.*, 127.*.*.*, 224.*.*.* to 255.*.*.*
can't be used due to reservations.
・Don't input "0" at the front of each octet.
Ex:
Correct:192.168.1.110
Incorrect:192.168.001.110
・Don't input more than a four-digit number for each octet.
Ex:
Correct:192.8.100.110
Incorrect:192.8.0100.110
・Subnet mask must contain only binary bit"1" from left side.
Ex:
Correct:255.255.255.0
Incorrect:192.255.255.0
4.3 SUPERLINK Setting
It is necessary to change from Prev. SL using the SL switch (SUPERLINK SELECTION) on
the right side of the unit. (Switching is possible only when the power is OFF.)
For SL2N and SL3N, change is required for the setup deprived of the right of instruction of
Remocon control Lock/Unlock.
5 PASSWORD FAILURE
5.1 Troubleshooting
5.1.1 Trouble regarding the IP Address
Push the reset SW (located inside of the hole with a diameter of about 2mm) in the center on
the right side of the unit using a clip or wire. Pushing for 10 seconds or more and then
releasing it will result in a reboot and the IP address will return to the initial value. Please
check that the red LED blinks for about 30 seconds at this time.
4
SC-WGWNA-A, SC-WGWNA-B Configuration Manual
Document No. ISTZ10006 March 1, 2010
6 ABOUT PACinfo.csv (WGWconfig.csv) FILE
6.1 Air-con Cell Configuration Screen
The Air-con Cell Configuration screen shows the connection status and the unit for monitoring
and control for indoor units connected by SUPERLINK WEB Gateway.
Fig. 6.1.1 Air-con Cell Configuration Screen (SC-WGWNA-A)
Fig. 6.1.2 Air-con Cell Configuration Screen (SC-WGWNA-B)
5
SC-WGWNA-A, SC-WGWNA-B Configuration Manual
Document No. ISTZ10006 March 1, 2010
6.1.1 SL System Number
The two (2) SL system numbers (SL Sys No.) for the WEB Gateway are written as S1 and S2.
6.1.2 SL Address
The SL Address of an indoor unit is written as U00∼U63.
SL system number and SL Address are shown in ascending order. For Prev. SL, use U00∼U47.
6.1.3 Accounting Type (SC-WGWNA-B only)
Choose from the following the accounting method for the indoor unit.
Type
Accounting Method
MULTI1
Accounting according to the amount of refrigerant flow.
Applicable to KX and LX Series
MULTI2
Accounting according to the thermo ON/OFF.
Applicable to KX and LX Series
RUN/STOP
Accounting according to the unit operating time.
Applicable to Multi-indoor unit PAC,Single PAC and PAC for
equipments (with I/F).
6.1.4 Capacity (SC-WGWNA-B only)
Choose the nominal capacity (Cooling capacity) of the indoor unit.
6.1.5 Air-con Cell Number
The WEB Gateway performs monitoring and control by the cell number.
The cell numbers C00∼C95 are assigned to the indoor units specified by the SL system
number and SL Address. Attach a cell number to the indoor unit connected to the SUPERLINK.
It is not necessary to attach a cell number to indoor units that are not connected.
Cell number C00∼C95 can be freely assigned to the indoor units. Assign cell numbers to the
desired display order in the monitoring screen.
Moreover, a cell number can set up the indoor unit remote control group. When two or more
indoor units are specified as a remote control group, attach the same cell number to these indoor
units to define the group. There is no restriction on the number of the indoor units that form a
group. In case of groups, only the indoor unit having the smallest SL system number or SL
address (SL system number being the priority) will be assigned the “Air-con Cell Name” and
“Description” explained in the following clause.
6.1.6 Air-con Cell Name
Assign an understandable name to a particular cell number. The length of the character string
can be up to 16 characters.
6.1.7 Description
A description more detailed than the cell name can be assigned to a cell number. The length of
the character string can be up to 64 characters. Leave it blank in case recording a detailed
description is not necessary.
6
SC-WGWNA-A, SC-WGWNA-B Configuration Manual
Document No. ISTZ10006 March 1, 2010
6.2 PACinfo.csv and WGWconfig.csv File
「 PACinfo.csv 」 is exclusive to SC-WGWNA-A while 「 WGWconfig.csv 」 is exclusive to
SC-WGWNA-B.
The setting information in the Air-con Cell Configuration screen can be downloaded from the file
download screen and the file can be saved to the PC. This file is called PACinfo.csv. Aside from
being a backup file, PACinfo.csv can also be edited using Notepad or EXCEL applications. Edited
PACinfo.csv can be uploaded from the file upload screen and can be set as the cell setting.
6.3 Opening PACinfo.csv (WGWconfig.csv) Using Text Editor
Air-con Cell No.,SL System No.,SL Address,Air-con Cell Name,Description
C00,S1,U00,Room 01,FDUM45KXE6 x 1 FDUM56KXE6 x 2
C00,S1,U01,,
C00,S1,U02,,
C01,S1,U03,Room 02,FDT100V
C02,S1,U04,Room 03,FDT125V
C03,S1,U05,Room 04,FDUM56KXE6
C04,S1,U06,Room 05,FDUM56KXE6
C05,S1,U07,Room 06,FDT71V x 2
C10,S2,U05,Room 07,FDT36KXE6 x 2 FDT45KXE6 x 2
C10,S2,U06,,
C10,S2,U07,,
C10,S2,U08,,
C11,S2,U10,Room 08,FDT112KXE6
C12,S2,U11,Room 09,FDTW28KXE6 x 2
C12,S2,U12,,
C13,S2,U13,Room 10,FDTS45KXE6 x 2
C13,S2,U14,,
Fig. 6.3.1
PACinfo.csv file opened using text editor
Air-con Cell No.,SL System No.,SL Address,Accounting Type,Capacity,Air-con
Cell Name,Description
C00,S1,U00,MULTI1,5.6,Room 01,This room is Cell 00.
C01,S1,U01,MULTI1,5.6,Room 02,This room is Cell 01.
C02,S1,U02,MULTI1,5.6,Room 03,This room is Cell 02.
C03,S1,U03,MULTI1,5.6,Room 04,This room is Cell 03.
C04,S1,U04,MULTI2,5.6,Room 05,This room is Cell 04.
C05,S1,U05,MULTI2,8.0,Room 06,This room is Cell 05.
C06,S1,U06,MULTI2,8.0,Room 07,This room is Cell 06.
C07,S1,U07,MULTI2,8.0,Room 08,This room is Cell 07.
C08,S1,U08,RUN/STOP,11.2,Room 09,This room is Cell 08.
C09,S1,U09,RUN/STOP,11.2,Room 10,This room is Cell 09.
C10,S1,U10,RUN/STOP,11.2,Room 11,This room is Cell 10.
C11,S1,U11,RUN/STOP,11.2,Room 12,This room is Cell 11.
C12,S1,U12,RUN/STOP,7.1,Room 13,This room is Cell 12.
C13,S1,U13,RUN/STOP,7.1,Room 14,This room is Cell 13.
C14,S1,U14,RUN/STOP,7.1,Room 15,This room is Cell 14.
Fig. 6.3.2
WGWconfig.csv file opened using text editor
The CSV file is stored where a comma separates each item. The first line expresses the title of
each item to show the order of the items (i.e. Air-con Cell No., SL Sys No., SL Address, Air-con
Cell Name, Description). The second and succeeding lines show the data from the Air-con Cell
Configuration screen. Since each item is separated by commas, a comma cannot be inputted into
the contents of each item. If a comma is inputted, the WEB Gateway will not be able to recognize
it correctly.
7
SC-WGWNA-A, SC-WGWNA-B Configuration Manual
Document No. ISTZ10006 March 1, 2010
6.3.1 Air-con Cell Number
C00∼C95. There will be no problem even if the numbers are not consecutive. For indoor units
in a group, assign the same cell number. There is no need to describe the line of the cell number
of an unconnected indoor unit. Delete the line of the cell number that is not connected.
6.3.2 SL System Number
S1∼S2
6.3.3 SL Address
U00∼U63
U00∼U47 when using Prev. SL
6.3.4 Accounting Type (SC-WGWNA-B only)
Choose from the following the accounting method for the indoor unit.
Type
Accounting Method
MULTI1
Accounting according to the amount of refrigerant flow.
Applicable to KX and LX Series
MULTI2
Accounting according to the thermo ON/OFF.
Applicable to KX and LX Series
RUN/STOP
Accounting according to the unit operating time.
Applicable to Multi-indoor unit PAC,Single PAC and PAC for
equipments (with I/F).
6.3.5 Capacity (SC-WGWNA-B only)
Choose the nominal capacity (Cooling capacity) of the indoor unit.
6.3.6 Air-con Cell Name
Cell name for the cell number must be within 8 full size or 16 half-size characters.
6.3.7 Description
A description more detailed than the cell name can be assigned to a cell number. The length of
the character string can be up to 64 characters. Leave it blank in case it is not necessary.
8
SC-WGWNA-A, SC-WGWNA-B Configuration Manual
Document No. ISTZ10006 March 1, 2010
6.4 Opening PACinfo.csv(WGWconfig.csv) Using EXCEL
Fig. 6.4.1 PACinfo.csv file opened using EXCEL
Fig. 6.4.2
WGWconfig.csv file opened using EXCEL
The above files can be edited. 「PACinfo.csv(WGWconfig.csv)」 is not an EXCEL file. 「Do you
want to save changes?」 dialog appears when saving the edited file. This is asked because the
PACinfo.csv (WGWconfig.csv) file has a CSV file format, not the extension (.xls) of an EXCEL
file. Select 「 Save by the existing file format 」 or 「 Save 」 . Save the final PACinfo.csv
(WGWconfig.csv) to the PC that you are using and to the PC performing the initial setting.
9
SC-WGWNA-A, SC-WGWNA-B Configuration Manual
Document No. ISTZ10006 March 1, 2010
WEB Gateway (SC-WGWNA-A)
S1 system
S2 system
Cell C10 “Room 07”
Cell C00 “Room 01”
Indoor Unit
Address
U00
Indoor Unit
Address
U05
R
Indoor Unit
Address
U01
Indoor Unit
Address
U06
Indoor Unit
Address
U02
Indoor Unit
Address
U07
Indoor Unit
Address
U08
Cell C01 “Room 02”
SC-ADN Address
Indoor unit
U03
Cell C11 “Room 08”
Outdoor unit
Indoor Unit
Address
U10
R
Indoor Unit
Address
U11
Indoor unit
U04
Outdoor unit
Cell C13 “Room 10”
Cell C03 “Room 04”
Indoor Unit
Address
U13
R
Indoor Unit
Address
U14
Cell C04 “Room 05”
Indoor Unit
Address
U06
R
Cell C05 “Room 06”
SC-ADN Address
Indoor unit
Indoor unit
U07
Outdoor unit
R
Outdoor Unit
Address
05
Outdoor Unit
Address
00
Outdoor Unit
Address
03
Fig. A.1
R
Indoor Unit
Address
U12
R
Indoor Unit
Address
U05
R
Cell C12 “Room 09”
Cell C02 “Room 03”
SC-ADN Address
R
Outdoor Unit
Address
07
Example of SC-WGWNA-A Cell Configuration and SL Address
10
R
SC-WGWNA-A, SC-WGWNA-B Configuration Manual
Document No. ISTZ10006 March 1, 2010
Table A.1
SL
Outdoor Unit
Type
Outdoor
Unit
Address
Example of SC-WGWNA-A Cell Configuration and SL Address
Indoor Unit
Type
Room
Name
FDUM45KXE6
FDC155KXEN6
00
FDUM56KXE6
Room 01
FDUM56KXE6
S1
Indoor
Unit
Address
○
U00
↑
U01
↑
U02
Air-con
Cell No.
Air-con
Cell Name
C00
Room 01
FDC100VN
-
FDT100V
Room 02
○
U03 *
C01
Room 02
FDC125VN
-
FDT125V
Room 03
○
U04 *
C02
Room 03
FDC112KXEN6
03
FDUM56KXE6
Room 04
○
U05
C03
Room 04
FDUM56KXE6
Room 05
○
U06
C04
Room 05
U07 *
C05
Room 06
C10
Room 07
C11
Room 08
C12
Room 09
C13
Room 10
FDC140VN
FDC155KXES6
S2
Remocon
Group
FDC112KXES6
-
05
06
FDT71V
07
○
FDT71V
↑
FDT36KXE6
○
U05
↑
U06
FDT45KXE6
↑
U07
FDT45KXE6
↑
U08
○
U10
○
U11
↑
U12
○
U13
↑
U14
FDT36KXE6
FDT112KXE6
FDTW28KXE6
FDC140KXES6
Room 06
Room 07
Room 08
Room 09
FDTW28KXE6
FDTS45KXE6
Room 10
FDTS45KXE6
Note: Although Table A.1 is an example of an imaginary building, it corresponds with Fig. 6.3.1,
Fig. 6.4.1, and Fig. A.1.
Note: ↑ indicates that indoor unit is part of a remote control group. It is necessary to assign a
SL Address U00,U01,・・・ to each indoor unit even if it is a part of a group.
Note: * indicates the SL Address of the SUPERLINK adapter SC-ADN (SC-AD, SC-AD-L). For
single PAC, it is necessary to connect with a remote control line to the SUPERLINK of
SC-WGWNA-A through adapter SC-ADN. The second unit for Room 05 is the wireless twin
unit for single PAC.
Note: A cell number is the monitoring and control unit of SC-WGWNA-A. The same monitoring
and control applies to indoor units in a group (i.e., having the same cell number).
Note: Although the model name of the indoor and outdoor unit is unnecessary, it is recommended
to fill them in as a reference for distinguishing units from each other.
11
SC-WGWNA-A, SC-WGWNA-B Configuration Manual
Document No. ISTZ10006 March 1, 2010
SC-WGWNA-A
SC-WGWNA-A
Fig. B.1.1
SC-WGWNA-A Wiring Diagram
SC-WGWNA-B
SC-WGWNA-B
Fig. B.1.2
SC-WGWNA-B Wiring Diagram
PAC
(yellow) LED:Blinks intermittently
HOST
(yellow) LED:Blinks after about
0.5sec
New SUPERLINK:
2 minutes
ERROR (red)
OP
LED:OFF
Prev. SUPERLINK:
(green) LED:Blinks constantly
12
ON
OFF
1sec
ON
OFF
SC-WGWNA-A, SC-WGWNA-B Configuration Manual
Document No. ISTZ10006 March 1, 2010
7
ABOUT PACinfo_128.csv (WGWconfig_128.csv) FILE
7.0 How to switch to one SUPERLINK System
In case that an outdoor unit of combination systems is used, more than 65 indoor units might
be connected to one SUPERLINK system.
In this case, the WEB Gateway is used in one SUPERLINK system.
Access to the following URL from the browser of the PC.
URL : http://192.168.0.110/128/
If the IP Address of the WEB Gateway was changed, enter the IP Address instead.
Push “Switch Mode” button, then a screen shown below is displayed and the WEB Gateway will
reboot automatically.
About 3 minutes later, access following URL and set the initial configuration.
URL : http://192.168.0.110/en/
If the IP Address of the WEB Gateway was changed, enter the IP Address instead.
13
SC-WGWNA-A, SC-WGWNA-B Configuration Manual
Document No. ISTZ10006 March 1, 2010
7.1 Air-con Cell Configuration Screen
The Air-con Cell Configuration screen shows the connection status and the unit for monitoring
and control for indoor units connected by SUPERLINK WEB Gateway.
Fig. 7.1.1 Air-con Cell Configuration Screen (SC-WGWNA-A)
Fig. 7.1.2 Air-con Cell Configuration Screen (SC-WGWNA-B)
14
SC-WGWNA-A, SC-WGWNA-B Configuration Manual
Document No. ISTZ10006 March 1, 2010
7.1.1 SL System Number
The two (2) SL system numbers (SL Sys No.) for the WEB Gateway are written as S1 and S2.
When using in one SUPERLINK system, only S1 is to be connected.
7.1.2 SL Address
The SL Address of an indoor unit is written as U000∼U127.
SL system number and SL Address are shown in ascending order. For Prev. SL, use U000∼
U047.
7.1.3 Accounting Type (SC-WGWNA-B only)
Choose from the following the accounting method for the indoor unit.
Type
Accounting Method
MULTI1
Accounting according to the amount of refrigerant flow.
Applicable to KX and LX Series
MULTI2
Accounting according to the thermo ON/OFF.
Applicable to KX and LX Series
RUN/STOP
Accounting according to the unit operating time.
Applicable to Multi-indoor unit PAC,Single PAC and PAC for
equipments (with I/F).
7.1.4 Capacity (SC-WGWNA-B only)
Choose the nominal capacity (Cooling capacity) of the indoor unit.
7.1.5 Air-con Cell Number
The WEB Gateway performs monitoring and control by the cell number.
The cell numbers C00∼C95 are assigned to the indoor units specified by the SL system
number and SL Address. Attach a cell number to the indoor unit connected to the SUPERLINK.
It is not necessary to attach a cell number to indoor units that are not connected.
Cell number C00∼C95 can be freely assigned to the indoor units. Assign cell numbers to the
desired display order in the monitoring screen.
Moreover, a cell number can set up the indoor unit remote control group. When two or more
indoor units are specified as a remote control group, attach the same cell number to these indoor
units to define the group. There is no restriction on the number of the indoor units that form a
group. In case of groups, only the indoor unit having the smallest SL system number or SL
address (SL system number being the priority) will be assigned the “Air-con Cell Name” and
“Description” explained in the following clause.
7.1.6 Air-con Cell Name
Assign an understandable name to a particular cell number. The length of the character string
can be up to 16 characters.
7.1.7 Description
A description more detailed than the cell name can be assigned to a cell number. The length of
the character string can be up to 64 characters. Leave it blank in case recording a detailed
description is not necessary.
15
SC-WGWNA-A, SC-WGWNA-B Configuration Manual
Document No. ISTZ10006 March 1, 2010
7.2 PACinfo_128.csv and WGWconfig_128.csv File
「PACinfo_128.csv」 is exclusive to SC-WGWNA-A while「WGWconfig_128.csv」is exclusive to
SC-WGWNA-B.
The setting information in the Air-con Cell Configuration screen can be downloaded from the file
download screen and the file can be saved to the PC. This file is called PACinfo_128.csv. Aside
from being a backup file, PACinfo_128.csv can also be edited using Notepad or EXCEL
applications. Edited PACinfo_128.csv can be uploaded from the file upload screen and can be set
as the cell setting.
7.3 Opening PACinfo_128.csv (WGWconfig_128.csv) Using Text Editor
Air-con Cell No.,SL System No.,SL Address,Air-con Cell Name,Description
C00,S1,U000,Room 01,FDUM45KXE6 x 1 FDUM56KXE6 x 2
C00,S1,U001,,
C00,S1,U002,,
C01,S1,U003,Room 02,FDT100V
C02,S1,U004,Room 03,FDT125V
C03,S1,U005,Room 04,FDUM56KXE6
C04,S1,U006,Room 05,FDUM56KXE6
C05,S1,U007,Room 06,FDT71V x 2
C10,S1,U008,Room 07,FDT36KXE6 x 2 FDT45KXE6 x 2
C10,S1,U009,,
C10,S1,U010,,
C10,S1,U011,,
C11,S1,U012,Room 08,FDT112KXE6
C12,S1,U013,Room 09,FDTW28KXE6 x 2
C12,S1,U014,,
C13,S1,U015,Room 10,FDTS45KXE6 x 2
C13,S1,U016,,
Fig. 7.3.1
Fig. 7.3.2
PACinfo_128.csv file opened using text editor
WGWconfig_128.csv file opened using text editor
The CSV file is stored where a comma separates each item. The first line expresses the title of
each item to show the order of the items (i.e. Air-con Cell No., SL Sys No., SL Address, Air-con
Cell Name, Description). The second and succeeding lines show the data from the Air-con Cell
Configuration screen. Since each item is separated by commas, a comma cannot be inputted into
the contents of each item. If a comma is inputted, the WEB Gateway will not be able to recognize
it correctly.
16
SC-WGWNA-A, SC-WGWNA-B Configuration Manual
Document No. ISTZ10006 March 1, 2010
7.3.1 Air-con Cell Number
C00∼C95. There will be no problem even if the numbers are not consecutive. For indoor units
in a group, assign the same cell number. There is no need to describe the line of the cell number
of an unconnected indoor unit. Delete the line of the cell number that is not connected.
7.3.2 SL System Number
S1 only
7.3.3 SL Address
U000∼U127
U000∼U047 when using Prev. SL.
7.3.4 Accounting Type (SC-WGWNA-B only)
Choose from the following the accounting method for the indoor unit.
Type
Accounting Method
MULTI1
Accounting according to the amount of refrigerant flow.
Applicable to KX and LX Series
MULTI2
Accounting according to the thermo ON/OFF.
Applicable to KX and LX Series
RUN/STOP
Accounting according to the unit operating time.
Applicable to Multi-indoor unit PAC,Single PAC and PAC for
equipments (with I/F).
7.3.5 Capacity (SC-WGWNA-B only)
Choose the nominal capacity (Cooling capacity) of the indoor unit.
7.3.6 Air-con Cell Name
Cell name for the cell number must be within 8 full size or 16 half-size characters.
7.3.7 Description
A description more detailed than the cell name can be assigned to a cell number. The length of
the character string can be up to 64 characters. Leave it blank in case it is not necessary.
17
SC-WGWNA-A, SC-WGWNA-B Configuration Manual
Document No. ISTZ10006 March 1, 2010
7.4 Opening PACinfo_128.csv(WGWconfig_128.csv) Using EXCEL
Fig. 7.4.1 PACinfo_128.csv file opened using EXCEL
Fig. 7.4.2
WGWconfig_128.csv file opened using EXCEL
The above files can be edited. 「PACinfo_128.csv(WGWconfig_128.csv)」 is not an EXCEL file.
「Do you want to save changes?」 dialog appears when saving the edited file. This is asked
because the PACinfo_128.csv (WGWconfig_128.csv) file has a CSV file format, not the extension
(.xls) of an EXCEL file. Select「Save by the existing file format」 or 「Save」. Save the final
PACinfo_128.csv (WGWconfig_128.csv) to the PC that you are using and to the PC performing
the initial setting.
18
SC-WGWNA-A, SC-WGWNA-B Configuration Manual
Document No. ISTZ10006 March 1, 2010
WEB Gateway (SC-WGWNA-A)
S1 system
S2 system ( Not Used )
Cell C10 “Room 07”
Cell C00 “Room 01”
Indoor Unit
Address
U000
Indoor Unit
Address
U008
R
Indoor Unit
Address
U001
Indoor Unit
Address
U009
Indoor Unit
Address
U002
Indoor Unit
Address
U010
Indoor Unit
Address
U011
Cell C01 “Room 02”
SC-ADN Address
Indoor unit
U003
Cell C11 “Room 08”
Outdoor unit
Indoor Unit
Address
U012
R
Indoor Unit
Address
U013
Indoor unit
U004
Outdoor unit
Cell C13 “Room 10”
Cell C03 “Room 04”
Indoor Unit
Address
U015
R
Indoor Unit
Address
U016
Cell C04 “Room 05”
Indoor Unit
Address
U006
R
Cell C05 “Room 06”
SC-ADN Address
Indoor unit
Indoor unit
U007
Outdoor unit
R
Outdoor Unit
Address
05
Outdoor Unit
Address
00
Outdoor Unit
Address
06
Outdoor Unit
Address
03
Outdoor Unit
Address
07
Fig. A.2
R
Indoor Unit
Address
U014
R
Indoor Unit
Address
U005
R
Cell C12 “Room 09”
Cell C02 “Room 03”
SC-ADN Address
R
Example of SC-WGWNA-A Cell Configuration and SL Address
19
R
SC-WGWNA-A, SC-WGWNA-B Configuration Manual
Document No. ISTZ10006 March 1, 2010
Table A.2
SL
Outdoor Unit
Type
Outdoor
Unit
Address
Example of SC-WGWNA-A Cell Configuration and SL Address
Indoor Unit
Type
Room
Name
FDUM45KXE6
FDC155KXEN6
00
FDUM56KXE6
Room 01
FDUM56KXE6
Remocon
Group
Indoor
Unit
Address
○
U000
↑
U001
↑
U002
Air-con
Cell No.
Air-con
Cell Name
C00
Room 01
FDC100VN
-
FDT100V
Room 02
○
U003 *
C01
Room 02
FDC125VN
-
FDT125V
Room 03
○
U004 *
C02
Room 03
FDC112KXEN6
03
FDUM56KXE6
Room 04
○
U005
C03
Room 04
FDUM56KXE6
Room 05
○
U006
C04
Room 05
U007 *
C05
Room 06
C10
Room 07
C11
Room 08
C12
Room 09
C13
Room 10
FDC140VN
-
S1
FDC155KXES6
FDC112KXES6
05
06
FDT71V
07
○
FDT71V
↑
FDT36KXE6
○
U008
↑
U009
FDT45KXE6
↑
U010
FDT45KXE6
↑
U011
○
U012
○
U013
↑
U014
○
U015
↑
U016
FDT36KXE6
FDT112KXE6
FDTW28KXE6
FDC140KXES6
Room 06
Room 07
Room 08
Room 09
FDTW28KXE6
FDTS45KXE6
Room 10
FDTS45KXE6
Note: Although Table A.2 is an example of an imaginary building, it corresponds with Fig. 7.3.1,
Fig. 7.4.1, and Fig. A.2.
Note: ↑ indicates that indoor unit is part of a remote control group. It is necessary to assign a
SL Address U000,U001,・・・ to each indoor unit even if it is a part of a group.
Note: * indicates the SL Address of the SUPERLINK adapter SC-ADN (SC-AD, SC-AD-L). For
single PAC, it is necessary to connect with a remote control line to the SUPERLINK of
SC-WGWNA-A through adapter SC-ADN. The second unit for Room 05 is the wireless twin
unit for single PAC.
Note: A cell number is the monitoring and control unit of SC-WGWNA-A. The same monitoring
and control applies to indoor units in a group (i.e., having the same cell number).
Note: Although the model name of the indoor and outdoor unit is unnecessary, it is recommended
to fill them in as a reference for distinguishing units from each other.
20
SC-WGWNA-A, SC-WGWNA-B Configuration Manual
Document No. ISTZ10006 March 1, 2010
SC-WGWNA-A
SC-WGWNA-A
×
Fig. B.2.1
(Not Used)
SC-WGWNA-A Wiring Diagram
SC-WGWNA-B
SC-WGWNA-B
×
Fig. B.2.2
SC-WGWNA-B Wiring Diagram
PAC
(yellow) LED:Blinks intermittently
HOST
(yellow) LED:Blinks after about
0.5sec
New SUPERLINK:
2 minutes
ERROR (red)
OP
(Not Used)
LED:OFF
Prev. SUPERLINK:
(green) LED:Blinks constantly
21
ON
OFF
1sec
ON
OFF