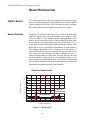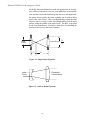
1
Integrator’s Guide
Diamond™ GEM, G & K Lasers
5100 Patrick Henry Drive
Santa Clara, CA 95054
Diamond™ GEM, G, &K Laser Integrator’s Guide
This document is copyrighted with all rights reserved. Under the copyright
laws, this document may not be copied in whole or in part or reproduced in
any other media without the express written permission of Coherent, Inc.
Permitted copies must carry the same proprietary and copyright notices as
were affixed to the original. This exception does not allow copies to be
made for others, whether or not sold, but all the material purchased may
be sold, given or loaned to another person. Under the law, copying
includes translation into another language.
Coherent, the Coherent Logo, Diamond, and GEM are trademarks of
Coherent, Inc. Teflon is a registered trade mark.
Every effort has been made to ensure that the data given in this document
is accurate. The information, figures, tables, specifications and schematics
contained herein are subject to change without notice. Coherent makes no
warranty or representation, either expressed or implied with respect to this
document. In no event will Coherent be liable for any direct, indirect,
special, incidental or consequential damages resulting from any defects in
its documentation.
Technical Support
In the US:
Should you experience any difficulties with your laser or need any
technical information, please visit our web site www.coherentinc.com.
Additional support can be obtained by contacting our Technical Support
Hotline at 800-367-7890. Telephone coverage is available Monday
through Friday (except US holidays).
If you call outside our office hours, your call will be taken by our answering
system and will be returned when the office reopens.
If there are technical difficulties with your laser that cannot be resolved by
support mechanisms outlined above, please E-mail or telephone Coherent
Technical Support with a description of the problem and the corrective
steps attempted. When communicating with our Technical Support Group,
via the web or telephone, the model and Laser Head serial number of your
laser system will be required by the Support Engineer responding to your
request.
Outside the US:
If you are located outside the US visit our web site for technical assistance
or contact, by phone, our local Service Representative. Representative
phone numbers and addresses can be found on the Coherent web site,
www.coherentinc.com.
Coherent provides telephone and web technical assistance as a service to
its customers and assumes no liability thereby for any injury or damage
that may occur contemporaneous with such services. These support
services do not affect, under any circumstances, the terms of any warranty
agreement between Coherent and the buyer. Operation of any Coherent
laser with any of its interlocks defeated is always at the operator's own risk.
ii
TABLE OF CONTENTS
Preface ............................................................................................................................ vi
U.S. Export Control Laws Compliance .......................................................................... vi
Symbols Used in this Document..................................................................................... vi
Introduction ......................................................................................................................1
Safety .....................................................................................................................................2
General Laser Safety Requirements .................................................................................2
System Integrators ............................................................................................................2
Your Compliance Responsibilities ...................................................................................3
Material Processing Lasers ...............................................................................................3
Workplace Safety..............................................................................................................4
Basic Performance Requirements .....................................................................................5
Basic Compliance Guidelines ...........................................................................................6
Classification ...........................................................................................................7
Performance .............................................................................................................7
Labeling ..........................................................................................................................10
Other Guidance ...............................................................................................................12
Diamond GEM-Series Laser Products ...........................................................13
Diamond G & K-Series Products and Packages ......................................14
OEM Package .................................................................................................................14
Basic Package (K-Series Lasers Only) ...........................................................................14
Performance Package (K-Series Lasers Only)................................................................15
Facilities Requirements ............................................................................................16
Electrical Power ..............................................................................................................16
DC Power Supply Requirements ...........................................................................16
System Cooling...............................................................................................................17
Water Flow Interlock .............................................................................................18
Shutter .............................................................................................................................19
Installation .......................................................................................................................20
Fixed Beam .....................................................................................................................20
Moving Beam .................................................................................................................21
Moving Laser ..................................................................................................................22
The RF Cable .........................................................................................................23
Beam Delivery ................................................................................................................24
Alignment .......................................................................................................................24
Sealing ............................................................................................................................24
iii
Diamond™ GEM, G, &K Laser Integrator’s Guide
Purge Gas ...............................................................................................................25
Mirages ..................................................................................................................26
Seals for Moving Beams........................................................................................26
Pumping .................................................................................................................26
Polarization .....................................................................................................................27
Back Reflection...............................................................................................................27
Beam Propagation .......................................................................................................30
Optics Basics...................................................................................................................30
Beam Diameter ......................................................................................................30
M2 (M Squared) Factor .........................................................................................31
Beam Propagation..................................................................................................31
Focusing a Beam....................................................................................................32
Rayleigh Range and Depth of Focus .....................................................................32
Beam Expansion ....................................................................................................33
Interfacing Diamond GEM-Series Lasers to Systems ..........................35
Interlocks ........................................................................................................................35
Interfacing Diamond G & K-Series Lasers to Systems........................38
OEM Interface ................................................................................................................38
DC Power Supply ..................................................................................................38
RF Power Supply ...................................................................................................39
Water Flow Switch ................................................................................................40
Shutter ....................................................................................................................40
DDI Interface ..................................................................................................................40
Remote Control Interface................................................................................................41
Interlocks ........................................................................................................................41
Beam Propagation Characteristics of
Diamond GEM-Series and K-Series Lasers .......................................42
GEM, G, and K-Series Beam Propagation .....................................................................42
Accessory Manufactures and Services ...........................................................44
Index ....................................................................................................................................47
iv
LIST OF ILLUSTRATIONS
1.
2.
3.
4.
5.
6.
7.
8.
9.
10.
11.
12.
13.
14.
15.
Warning Logotype (Example) .....................................................................................11
Labels for Removable Housings (Example) ................................................................11
Aperture Warning Label ..............................................................................................11
Certification and Identification Label for a Laser System...........................................12
Recommended Cooling System Functional Block Diagram for GEM-Series Lasers .18
Fixed Laser with Fixed Beam Delivery System ..........................................................21
Beam Delivery Components Attached Directly to Laser ............................................22
Laser Mount with Adjustments for Moving Axis........................................................22
Laser and Additional Optics on Adjustable Mounting Plate .......................................23
Cross Section of Air Ejector for Protecting Bending Mirror.......................................27
Installation Dimensions for Coherent CQE Module 0175-989-00 ..............................28
Installation Dimensions for Coherent Isolator/CQE Assembly 0175-990-00 .............29
Beam Profile ................................................................................................................30
Simple Beam Expander ...............................................................................................34
Galilean Beam Expander .............................................................................................34
LIST OF TABLES
1.
2.
3.
4.
5.
6.
7.
8.
Diamond GEM,G& K-Series Features ..........................................................................6
GEM-Series Lasers Models .........................................................................................13
Diamond Lasers Models ..............................................................................................14
Electrical Power for the Diamond GEM-Series Lasers ...............................................16
Signal Interface Description and Connector Pinout for GEM-25/50/60/100/200 .......36
Signal Interface Description and Connector Pinout for GEM-30................................37
Beam Diameter vs. Distance From Laser Measured in Millimeters............................42
Beam Diameter vs. Distance From Laser Measured in Inches....................................43
v
Diamond™ GEM, G, &K Laser Integrator’s Guide
Preface
This manual contains integration information for the Diamond
GEM, G, and K-Series CO2 laser systems.
U.S. Export
Control Laws
Compliance
It is the policy of Coherent to comply strictly with U.S. export
control laws.
Export and re-export of lasers manufactured by Coherent are subject
to U.S. Export Administration Regulations, which are administered
by the Commerce Department. In addition, shipments of certain
components are regulated by the State Department under the International Traffic in Arms Regulations.
The applicable restrictions vary depending on the specific product
involved and its destination. In some cases, U.S. law requires that
U.S. Government approval be obtained prior to resale, export or
re-export of certain articles. When there is uncertainty about the
obligations imposed by U.S. law, clarification should be obtained
from Coherent or an appropriate U.S. Government agency.
Symbols Used in
this Document
This symbol is intended to alert the operator to the presence of
dangerous voltage within the product's enclosure that may be of
sufficient magnitude to constitute a risk of electric shock and to
indicate possible risk of equipment damage.
This symbol is intended to alert the operator to the danger of
exposure to hazardous visible and invisible laser radiation.
This symbol is intended to emphasize the presence of important
operating and maintenance instructions.
vi
Introduction
INTRODUCTION
The Coherent Diamond™ lasers are a group of compact,
high-performance, sealed carbon dioxide (CO2) lasers. They have
many packaging advantages over older styles of lasers that greatly
facilitate their integration into OEM equipment. They may be
installed in any orientation and are able to function while being
accelerated. These capabilities, combined with their small physical
size, allow Diamond lasers to be installed on robot arms or gantries.
There are, however, several areas where the integrator must be
careful to consider the details of the laser installation so that the
system performs reliably. This document highlights these areas,
gives examples of good practice and provides tools for the system
builder to design a robust product that delivers all of the performance that the Diamond can provide.
1
Diamond™ GEM, G, & K, Integrator’s Guide
SAFETY
General Laser
Safety
Requirements
The information presented in this section is provided to give the
System integrator some recommendations on safety requirements
when incorporating a laser into an end product. It is by no means
complete. The System integrator is responsible for insuring that their
system will meet all of the necessary safety regulations and requirements.
The manufacture of laser products is Federally regulated, in the U.S.
and the exportation of laser products into Europe also requires
conformance to new EC Directives, laws and standards.
All Laser Products are subject to regulation under the Radiation
Control for Health and Safety Act of 1968 (Public Law 90-602,
hereinafter “the Act”). The Regulations for the Administration and
Enforcement of the Act, Title 21 Code of Federal Regulation
(21 CFR), require adherence to the Federal Laser Performance Standard contained in 21 CFR §1040, as well as compliance to other
reporting, record keeping and administrative requirements
contained in 21 CFR Sub-chapter J.
System
Integrators
A “laser manufacturer” is anyone who supplies (or modifies) a laser
product. The definition of a laser product, as presented in 21 CFR
includes “. . . any manufactured product or assemblage of components which constitutes, incorporates or is intended to incorporate a
laser or laser system. . .”
This means no matter what relative percentage of your product is
laser related, if the product is intended to incorporate a laser, it
becomes a laser product. A “manufacturer,” according to 21 CFR, is
“any person engaged in the business of manufacturing, assembling
or importing” of (the subject laser) electronic product.
Manufacturers have certain compliance responsibilities “before
entering commerce”. Commerce is defined, for the purpose of the
regulation, as any Interstate commerce and includes exchange “for
value” or as a prize or award. “Entering commerce” may include
shipping to a beta test site, a trade show, or even (in some circumstances) transferring the product to another part of the company.
2
Safety
Your
Compliance
Responsibilities
A “purchaser” is the end user, or one who receives the product for
purposes other than resale. If you have purchased the laser to integrate into a system, it is important to note that a given manufacturer
and a given purchaser may be part of the same company. This can
occur when the product is subject to interstate commerce, or when it
can be shown that one entity has the “manufacturer’s” role and the
other the “purchaser’s” role; also inter-division transfer pricing may
be considered “for value”). It’s especially important to note these
requirements when dealing with a foreign subsidiary, parent or division bringing laser products into the U.S.
The text of the Federal Law is available from the Government
printing office as well as directly through the Office of the Center for
Devices and Radiological Health. There are also guideline documents and “A Guide To Preparing Product Reports For Lasers And
Products Containing Lasers” (dated September 1995). You may
request this material from:
U.S. Department of Health and Human Services
Public Health Service, Food and Drug Administration
Center for Devices and Radiological Health
Division of Small Manufacturers’ Assistance
Rockville, Maryland 20857
www.fda.gov/cdrh
(800) 638-2041
Material
Processing
Lasers
Coherent Diamond lasers are predominantly used in material
processing applications (operations in which there is sufficient laser
energy to cause a phase change in the incident material). An important resource standard for integrating laser processing machines is
American National Standards Institute (ANSI) B11.21.
The ANSI B11.21 Standard encompasses the appropriate design,
construction, care and use of laser processing machines, and
includes references to other requirements, such as electrical
construction, noise, vibration and mechanical hazards, and so on.
The B11.21 also contains the appropriate references to ANSI Z
136.1, which is the User standard for laser radiation safety (used as
a basis for OSHA compliance).
You can obtain the ANSI B11.21 information from:
Association for Manufacturing Technology
7901 Westpark Drive
McLean VA 22102
www.mfgtech.org
3
Diamond™ GEM, G, & K, Integrator’s Guide
You can obtain ANSI Z 136.1 from:
Laser Institute of America
12424 Research Parkway Suite 125
Orlando FL 32826
www.laserinstitute.org
You may obtain a listing of ANSI standards directly from:
American National Standards Institute
11 West 42nd Street
New York, NY 10036
www.ansi.org
There are also several consulting companies who can assist you, for
a fee, in preparing for CDRH, ANSI and OSHA and EC laser safety
compliance.
Workplace
Safety
As an “incorporator” of lasers you not only are a manufacturer of
laser products, but a tester and servicer as well. For these reasons
you need to become familiar with guidelines for using and working
on those products safely (manufacturers are also required by CDRH
to provide their customers with safe use information, among other
things). Perhaps the most important and widely accepted such standard in the U.S. is the American National Standard Institute (ANSI)
Z 136.1-2000 Standard for Safe Use of Lasers.
This standard is in fact the basis for the current OSHA Guideline on
Laser Safety in the Workplace (OSHA Instruction Publication
8-1.7), and the ANSI model state standard is used as the outline of
many existing and proposed state regulations. ANSI Z 136.1 is
available through a number of sources, including the Laser Institute
of America or the American National Standards Institute (see
addresses above).
Additionally, for machine manufacturers, or system integrators, of
laser processing machines, the ANSI B11.21 Standard for the
Construction, Care and Use of Machine Tools using Lasers for
Material Processing will be essential. It should be available for
distribution, through ANSI or AMT (see addresses above) in the late
1997 time frame. The ANSI B11.21 standard addresses a wide range
of manufacturers’ responsibilities, including hazardous by-product
issues related to laser processing of materials.
4
Safety
Basic
Performance
Requirements
All laser products must be designed and built to the lowest hazard
class (Class IV most hazardous, Class I not hazardous) possible for
the product to still perform its function. In the U.S. this means there
are instances when a Class IV product would be allowed (although
human exposure to radiation is not permitted). In Europe, for laser
processing machines, only Class I machines are permitted.
In Material Processing applications, obviously, the laser must be
powerful enough to effect the process, so the method to achieve
Class I is to completely enclose the beam or otherwise prevent
human access to laser radiation.
Coherent Diamond lasers, like other CO2 infrared lasers, can really
only be classified as Class I or Class IV (Class II to IIIb are virtually
limited to visible lasers). Shipped from the factory, they are either
Certified Class IV or uncertified OEM component products (with an
inherent Class IV hazard level).
All laser products, regardless of Class, require protective housings
which prevent human access to laser and collateral radiation to all
but the radiation emitted to perform the product function. This
means if you have purchased the OEM package you will have to
fabricate and provide a protective housing for the laser, regardless of
the application or class of the final use.
When incorporating Diamond products into systems, you, the integrator, must provide the required features (or extend those as
provided by Coherent).
If you are completely enclosing the entire product and its process to
achieve a Class I product Classification, you must still make certain
warnings and features, which are appropriate for Class IV, available
on the product for application during service or other times (other
than normal operation) when the unit may be functioning with a
Class IV hazard present.
In addition to protective housings, Class IV laser products require
performance features under both 21 CFR 1040 and IEC 825-1:
•
Key Control – controlling main power, must be removable, no
operation with key removed
•
Remote Interlock Connector – in series with safety interlock
circuit, available to the end-user
•
Safety Interlock – at any portion of housing which could
provide access to radiation, intended for operation or maintenance
•
Emission Indicator – audible/visible, indicates prior to laser
emission
•
Beam Attenuator – to block all access to radiation
5
Diamond™ GEM, G, & K, Integrator’s Guide
•
Aperture Label – indicating where the radiation is emitted
•
Warning Logotype – Label stating the nature and class of
hazard
In the following table, an ‘X’ indicates whether the Diamond GEM,
G, & K-series model contains the required feature. An ‘O’ indicates
the feature is not provided and the integrator must design and
provide one. In any case, even features which are provided by
Coherent must be extended or replicated for end users of the final
product.
Table 1. Diamond GEM,G& K-Series Features
K-SERIES
OEM
BASIC
PERFORMANCE
SERIES
GEMSERIES
Protective Housing
O
X
X
O
O
Beam Attenuator
O
X
X
O
O
Remote Interlock Connector
O
X
X
O
O
Key Control
O
X
X
O
O
Safety Interlocks
O
X
X
O
O
Warning Labels
O
X
X
O
O
CLASS IV REQUIRED FEATURES
Basic
Compliance
Guidelines
G-
In designing a laser product, manufacturers must first determine
what level of accessible radiation is required to perform the necessary function of the product. Laser radiation which is not necessary
must be eliminated or contained within a protective housing (in the
EC all radiation must be inaccessible).
Manufacturers must then determine the Class of their product
according to the highest level of radiation accessible during operation. The Class of the product determines the requirements for
controls, indicators, labels, warnings and literature statements. The
wording of any warning is determined by the injury causing potential of the accessible laser radiation.
6
Safety
Classification
Laser products are classified according to the highest level of laser
radiation to which human access is possible during operation only.
In this way very high-powered lasers can be enclosed within very
low hazard rated laser products, if the radiation access is prohibited
during the time of actual operation.
Laser Classes are determined by the power and energy level of the
accessible radiation. Each class has a limit determined by a formula
whose arguments are the energy, wavelength and duration of the
accessible radiation.
Class IV is unlimited in power and is the most potentially hazardous
(skin, eye damage), to humans. Class I is the lowest hazard rating
and products in this Class are considered nonhazardous (for infrared
the power limit to Class I is virtually zero for the purpose of this
guideline. i.e. no radiation is accessible during operation).
For G & K-series CO2 (infrared) lasers, there are really only two
alternatives (Class I or IV), since Class II, IIIa and IIIb are used only
for visible lasers (red to blue). Most CO2 (infrared) laser systems, as
delivered from laser manufacturers, without beam delivery and
workstations attached, are Class IV lasers (very hazardous) and
carry the highest warnings and controls (like a loaded rifle). If workstations and beam guards are added to such a product, such that no
radiation is emitted (or leaks) during operation, then we can Classify
the product as Class I and apply fewer or less restrictive warnings
and controls for the protection of operators and casual observers.
There are occasions when a supplier or system integrator would,
himself, supply a Class IV product (if, for example he was a subcontractor to another supplier who would finish the installation). Such a
subcontractor is permitted to sell the Class IV product, but must still
certify it as such. Also, if other than a Class I product is being sold
or entered into commerce, the access to necessary radiation must be
documented and justified (manufacturers are required to reduce the
accessible radiation to lowest Class that allows the product to function. For infrared that means provide a Class I product unless you
can justify a Class IV situation).
As more end user customers become more educated in laser safety,
though, almost all laser products are being required (by purchase
order) to be Class I configuration at the completion of installation
(especially true in automotive industry and EC countries) to facilitate worker safety.
Performance
A Protective Housing is required for all laser products. The protective housing must prevent human access to radiation in excess of
Class I (as above) at all places and times the radiation is not neces7
Diamond™ GEM, G, & K, Integrator’s Guide
sary in order for the product to accomplish its function. The laser
system must be produced to the lowest possible class. This means if
the beam and its reflections can be completely enclosed (practically
and feasibly) then they must be enclosed (to the Class I, or light-tight
level).
There are two criteria for ascertaining the integrity of the protective
housing: first, no part of the human body may be inserted into the
beam or its reflections; and second, no reflection from a single flat
reflecting surface (hypothetical) may exit any hole or opening in the
housing.
Generally, for manufacturers of work enclosures with material
handling equipment, etc., the most difficult portion of the
protective housing is that which must be opened to allow part
entrance/exit, or for operators to clear jams, etc. Normally, a
designer would simply cut a hole for this purpose, or if
concerned about some aspect of safety, install a door over the
hole. For matters of radiation safety, however, the door mechanism can become complex from at least two respects:
1.) A door designed to be closed during the laser operation, but
open to allow parts or humans to enter or exit, must then be
interlocked, [by some approved means] to disable laser operation when the door is open; and
2.) once you choose the mechanical door and interlock scheme
you must then conduct statistically significant life or endurance
testing for the reliability of the mechanism; predict its life and
maintenance or replacement cycle; and report such information
to both the CDRH and your customers. For these reasons (and
reliability as well), it is generally preferable to provide protection with as few moving parts as possible. Since light travels only
in straight lines, it may be feasible to construct machinery which
by configuration and use of light baffles, meets the criteria for
protective housings.
Safety Interlocks may be required on any laser product. They must
prevent human access to radiation that exceeds the limits of Class I
whenever a protective housing is opened during operation or maintenance (and the said human access is not necessary to the product
function).
If access to the interior radiation is sometimes needed (to verify
alignment, for example) then the interlock may be defeatable (and
the product labeled accordingly). Safety interlocks need not prevent
8
Safety
access to radiation accessible during service only. Service only
panels of the protective housing need not be interlocked, but should
be removable only with the use of a tool.
Operation means functions by which the product accomplishes its
intended purpose; may include loading/unloading parts, documents,
setting/manipulating external controls. Maintenance means functions performed by the user to assure performance (preventative
maintenance). Service means, usually, repair. It may be performed
by trained service personnel or by sophisticated users following
instructions specifically indicated as service instructions. The manufacturer stipulates which functions are service and which are maintenance.
Snap action spring switches are subject to short circuit and are
not approved as fail-safe safety switches. Switches in series with
solenoid-actuated doors could, under certain circumstances, be
used, if the door remained latched-up on failure. Shorting bars
and plugs are generally acceptable, under certain terms of
correct usage.
A Remote Interlock Connector is required on all Class III and IV
laser products. The purpose is to allow a user to connect a remote
barrier interlock (or daisy chain) or emergency stop switch or similar
device. It must be in the interlock circuit such that when the terminals are open, human access to laser radiation is prevented. Electrical potential must not be greater than 130 V rms. A shorted mating
connector may be provided by the manufacturer to allow the product
to be operated when the remote interlock is not being used.
Key control is required for Class IIIb and IV laser products in order
that the user may prevent unauthorized operation (The key must not
be removable with switch in “ON” position).
An Emission Indicator(s) is required on Class II, IIIa IIIb and IV
laser systems. The indicator may be audible or visible. On Class IIIb
and IV laser systems the indicator must precede emission of radiation by a sufficient amount of time for users and observers to recognize that the product has been energized (so they can avoid accidental exposure). Usually 2-7 seconds before lasing is adequate.
Emission indicators must be duplicated on control panels and laser
heads if they are capable of being separated by 2 meters or more.
A Beam Attenuator is required on all lasers above Class I. The beam
attenuator is a mechanical or electrical device such as a shutter that
blocks laser emission. The beam attenuator blocks bodily access to
radiation above the limits of Class I, without the need to turn the
9
Diamond™ GEM, G, & K, Integrator’s Guide
laser off. The beam attenuator must be available for use at all times
during operation. Power switches and key controls do not satisfy the
requirement for beam attenuator(s). The beam attenuator must be
separate from control or main power.
Operating Controls must be located so as to make exposure to radiation unnecessary while the user is manipulating them.
View optics, Viewports or Display Screens may not provide human
access to radiation greater than the limits of Class I during operation
or maintenance.
Windows, microscopes on welders, drillers, surgical devices, view
ports and other such things are considered in this category. The
compliance of viewports and viewing optics can be complex,
requiring attenuation and other eye-safety measures. Consult the
standard for details and measurement requirements. You may also
need advice from welding safety or other technical expertise.
Manual Reset is required on all Class IV lasers manufactured after
August 20, 1986. It must prevent automatic restart after an interruption due to remote interlock activation or from an interruption of
more than 5 seconds due to unexpected loss of main electrical
power.
Labeling
Warning logotypes are required on all laser above Class I. For
infrared the warning must include the warnings for invisible, as well
as visible radiation. For a Class IV product, the labels which are
attached to the embedded laser are usually not sufficient for the
higher level product. The OEM must post new ones of their own, in
prominent, visible locations. An example of a Class IV logotype is
shown in Figure 1.
Removable or replaceable protective housing sections that are not
interlocked or are interlocked with defeatable interlock switches are
required to be labeled with a warning. Examples are shown in
Figure 2.
Aperture warning labels are required wherever radiation in excess of
Class I is emitted through an opening in the protective housing
during operation. Wording is specific; x-radiation, collateral and
invisible must be indicated if present; see the example in Figure 3.
Certification labels and Identification labels are frequently
combined on a single piece of material for simplicity. Certification
labels declare the product compliance (wording specified) and date
of manufacture; and I.D. labels name the manufacturer and plant
location. The month and year must be spelled out with no abbrevia-
10
Safety
Figure 1. Warning Logotype (Example)
Figure 2. Labels for Removable Housings (Example)
Figure 3. Aperture Warning Label
tions (e.g. December 1989). Codes may be used only if on file with
CDRH via model report. Figure 4 is an example of a certification
and identification label.
11
Diamond™ GEM, G, & K, Integrator’s Guide
Figure 4. Certification and Identification Label for a Laser System
Other Guidance
Product compliance also includes requirements for providing certain
information to users (customers’ manuals, brochures and data
sheets); record keeping and notification; product recall administration; variances and exemptions; and model reporting and notification requirements.
As these issues relate more to the sales and administration of the
product, they are not included in this design aid. For further information, please contact a laser safety certification service.
As stated in the beginning of this section, the information presented
here is provided to give the System integrator some recommendations on safety requirements when incorporating a laser into an end
product. It is by no means complete. The System integrator is
responsible for insuring that their system will meet all of the necessary safety regulations and requirements.
12
GEM-Series Laser Products
DIAMOND GEM-SERIES LASER PRODUCTS
There are nine models of Diamond GEM-series lasers. The models
are:
Table 2. GEM-Series Lasers Models
MODEL
POWER RATING
AIR/LIQUID
AC/DC
GEM-25A
25 watts
Air
DC
GEM-25L
25 watts
Liquid
DC
GEM-30A
30 watts
Air
DC
GEM-30L
30 watts
Liquid
DC
GEM-50A
50 watts
Air
DC
GEM-50L
50 watts
Liquid
AC
GEM-60L
60 watts
Liquid
AC
GEM-100A
100 watts
Air
DC
GEM-100L
100 watts
Liquid
AC
13
Diamond™ GEM, G, & K, Integrator’s Guide
DIAMOND G & K-SERIES PRODUCTS AND PACKAGES
There are nine models of Diamond G & K-series Diamond lasers.
The models are:
Table 3. Diamond Lasers Models
MODEL
POWER RATING
Diamond G-100
100 watts
Diamond G-150
150 watts
Diamond K-125i
125 watts
Diamond K-150
150 watts
Diamond K-225i
225 watts
Diamond K-250
250 watts
Diamond K-500
500 watts
Diamond K2K
145 watts
K-series lasers are available in three packages: OEM, Basic and
Performance. The G-series lasers are only available in OEM packages.
OEM Package
The OEM package comprises a laser and an RF power supply. For
K-series lasers, where the laser head and power supply are separate,
connecting cables are also supplied. Neither the laser nor the power
supply are enclosed. The power supply requires 48 VDC (Coherent
can supply an air-cooled DC power supply as an option). The laser
is not provided with a shutter or alignment laser.
When integrating a system with the OEM package, the builder must
provide an enclosure and shutter for the laser.
Basic Package
(K-Series Lasers
Only)
For the Basic package, the Diamond laser head is enclosed in a
housing with a manual shutter (an electric shutter with an alignment
laser is available as an option) and a Diamond Digital Interface
14
Diamond Products and Packages
(DDI) is provided to facilitate communication with the power
supply. Additional options for this package include an air-cooled DC
power supply and a remote control.
The Basic package provides everything needed for a fully functional
system. In most cases, the power supplies may be installed in the
system’s electrical cabinet. Where this is not appropriate, the Performance Package may be used.
Performance
Package
(K-Series Lasers
Only)
The Performance Package comprises a fully optioned Basic package
(a laser with an electric shutter, an RF power supply with Diamond
Digital Interface, a DC power supply with a heat exchanger and a
remote control) with all of the electrical components installed in a
sealed cabinet. It is therefore the package of choice when it is not
desired to install the laser’s power supply in the system’s electrical
cabinet.
15
Diamond™ GEM, G, & K, Integrator’s Guide
FACILITIES REQUIREMENTS
The exact facilities requirements for each Diamond laser is detailed
in the table titled “Utility Requirements” in the Operator’s Manual
for that laser. Since the laser gas is sealed inside the cavity, the lasers
require only prime electrical power and cooling (air or liquid) for
their operation.
Electrical Power
Some versions of the Diamond GEM-series lasers operator on
220 VAC power (They have integral DC supplies) and some require
customer supplied DC power.
Table 4. Electrical Power for the Diamond GEM-Series Lasers
MODEL
AC/DC
VOLTAGE
CURRENT
GEM-25A
DC
28 VDC
18 A
GEM-25L
DC
28 VDC
18 A
GEM-30A
DC
48 VDC
12 A
GEM-30L
DC
48 VDC
12 A
GEM-50A
DC
48 VDC
25 A
GEM-50L
AC
220 VAC
7A
GEM-60L
AC
220 VAC
7A
GEM-100A
DC
48 VDC
49 A
GEM-100L
AC
220 VAC
13 A
DC Power Supply
Requirements
The following are the requirements for the customer supplied DC
power supplies for the GEM-series.
Regulation:
<± 2%
Regulation Sensing:
Remote at load
(4 wire connection)
Ripple and Noise:
<1% p-p (20 MHz BW limit)
Overload and Short Circuit Protect
Automatic Recovery
16
Facilities Requirements
The Diamond G & K-series RF power supplies operate on 48 VDC.
Coherent offers DC power supplies (included in the K-series Performance Package) that convert incoming AC power to the voltage
used by the laser. With the exception of an optional single phase
power supply for the G-series lasers, Coherent DC power supplies
operate on 3 phase current. These 3 phase power supplies may be
damaged by the loss of a phase in the supply current. A phase imbalance detector should be installed to shut down input power upon loss
of a phase in locations where the electrical supply is subject to such
problems.
System Cooling
Diamond lasers are relatively insensitive to variations in cooling
water temperature. For most applications, any temperature in the
range of 10ºC (15ºC for GEM-series) to 35°C (30°C max for the
K-500) with regulation to ±4°C is adequate. Water lines should be
large enough for the flow to be maintained at or above the specification requirement at all times. For runs under 50 feet (15 meters),
3/8 inch (9.5 mm) ID hose is satisfactory. If longer hoses than this
are needed, the diameter should be increased to 1/2 inch (13 mm).
Nylon reinforced PVC is a suitable material for flexible water hoses.
While the G & K-series laser will run quite satisfactorily on tap
water as long as its hardness is less than the equivalent of
250 mg/liter of CaCO3, most installations will use some form of
recirculating chiller to minimize water use. Recirculated water
should be filtered to remove particulate matter from the coolant, and
algaecide should be added to prevent biological fouling. For filtration, a Balston 53/18 filter with an LP-200-18-10 cartridge,
providing 75 micron filtration, is sufficient for any Diamond laser.
The GEM-series requires +25% Dow Frost coolant in order to avoid
damage to the aluminum cooling passages of the laser head.
Chloramine-T algaecide in the amount of 1 gram for every gallon of
chiller water volume will control algae growth. To eliminate problems from corrosion, the water loop should not contain aluminum or
carbon steel, and dissimilar metals should not be in contact with one
another. Stainless steel, copper alloys and plastic are the best materials for maintaining coolant quality.
Cooling water should be maintained above the dew point to avoid
condensation on laser optics and electronics. Damage from condensation is not covered under the laser warranty. It is advisable, then,
in humid environments, to maintain the coolant temperature at or
above ambient and to circulate coolant at all times to avoid condensation when the laser is not operating.
17
Diamond™ GEM, G, & K, Integrator’s Guide
AC power
AC power cable*
AC Power
Relay
Electronic
Controller
Refrigerated
Recirculator
Flow
Interlock
Switch
Coolant
Filter
Coolant
RF Power
Supply*
RF coaxial cable*
Coolant
Laser Head*
Those items marked with * are supplied by Coherent/DEOS®
Figure 5. Recommended Cooling System Functional Block Diagram for GEM-Series Lasers
Water Flow
Interlock
The cooling water flow to Diamond lasers must be monitored at all
times. Diamond K-series laser heads are already equipped with
water flow switches, while the system integrator must supply one for
the GEM and G-series laser. Suitable switches may be obtained from
Proteus Industries. There are many common situations where there
is not enough water flow to the laser: a valve may not be open, the
pump may not be operating, a filter may be clogged, a hose may be
kinked. On the Basic and Performance packages for the K-series, the
switch is monitored by the control electronics so that the laser shuts
down and indicates a water fault when the switch detects insufficient
flow. With the OEM packages, the system integrator must incorporate the water flow switch in the interlock circuitry so that the laser
cannot operate when the water flow is low. The water flow monitor
used on K-series OEM lasers incorporates a relay, and therefore
cannot handle inductive loads such as relays, solenoids or transformers. Use a low-voltage solid state input to sense closure of this
switch. It is important to incorporate the water flow interlock: operating an OEM laser with insufficient water flow voids the warranty.
The RF amplifier also requires water cooling. The water lines on
GEM-series lasers should be hooked up in series. Since the separate
amplifier on K-series lasers does not have its own flow switch, the
water lines on OEM and Basic K-series lasers should be hooked up
in series with those running to the laser head as indicated in the
section titled “Installation” in the Operator’s Manuals. On G-series
lasers, the integral RF power supply is internally connected to the
18
Facilities Requirements
water flow ports. The Diamond Performance Package, which has a
water-to-air heat exchanger for the DC power supply, is set up so
both the water source and return are connected to the power module.
Supply and return lines for the laser head are connected to the
module as indicated in Figure titled “Cooling System Diagram” in
the Performance Package Operator’s Manual.
Shutter
On the GEM-series the shutter is customer supplied. To meet US
regulations, all high-power (Class IV) laser systems must have shutters capable of absorbing the full output of the laser. The K-series
Basic and Performance laser heads are already equipped with such
shutters, while OEM heads are not. Shutters added to Diamond
lasers should have apertures large enough to transmit the beam (their
clear aperture should be at least 1.5 times the beam diameter) and
should signal their status in both the closed and open positions.
19
Diamond™ GEM, G, & K, Integrator’s Guide
INSTALLATION
Diamond lasers may be installed in any orientation, and may be
either stationary or mobile. The least favorable orientation is vertical
with the beam exiting upwards, because it is easy for contaminants
to settle on the laser’s output optic. If this orientation is selected, it
is necessary to be very careful to avoid damaging the optic during
installation and maintenance, and to supply purge gas at all times
afterwards. On the GEM-series, we recommend this orientation be
avoided.
Fixed Beam
For a fixed laser with a fixed beam delivery system (Figure 6), it is
only necessary that all the optical elements be securely attached to
their support structure.
The GEM liquid cooled laser head models come with mounting feet
which attach to the liquid chill plate. The GEM air cooled laser
heads come equipped with tapped holes which accommodate
optional mounting brackets. These brackets provide rigid mounting
while allowing thermal expansion. For more information please
refer to the appropriate section in the operator’s manual. Because
these lasers can be distorted if inappropriately mounted, instructions
in the operator’s manual regarding mounting of the laser should be
strictly followed.
The Diamond base plate isolates the laser resonator from mounting
stresses, so a simple flat mounting surface is adequate. K-series
lasers have alignment slots for 0.25 inch (6.35 mm) pins as noted on
the laser head mounting drawing (figure titled “Laser Head Dimensions and Mounting Hardware Locations” in the Operator’s
Manual). If a pair of these pins are incorporated on the mounting
plate, it is possible to remove and reinstall the laser without loss of
alignment. Similarly, G-series lasers have an integral optical rail
which allows lasers to be switched while maintaining alignment.
It is possible, with a Basic or Performance K-series laser head, or
with a G-series laser, to attach beam delivery components directly to
the output bezel of the laser (Figure 7). This is a very simple solution
to beam delivery problems, but it is not suitable for heavy loads. The
front panel of the K-series enclosure is a relatively thin aluminum
plate and will deflect if force is put on it. The front panel of the
G-series lasers is attached to a resonator optic, so excessive loads on
20
Installation
it can affect output mode quality. Attaching more than 10 lb. (5 kg)
of equipment to the front bezel without providing additional bracing
is discouraged.
The laser and beam delivery should be connected to the same structure. If they are on separate frames, floor movement can cause
system misalignment.
Provision must be made for beam delivery alignment. Either the
laser or the first beam delivery optic must be adjustable to allow the
beam to be centered on the optic. Slotted mounting holes with
washer stacks for vertical adjustment will work, but more sophisticated systems such as jack screws are easier to use.
Figure 6. Fixed Laser with Fixed Beam Delivery System
Moving Beam
If the laser is to send its beam to a moving optic (Figure 8), complete
adjustability of the laser support is necessary to maintain alignment
through the optic’s range of travel. Vertical and horizontal jack
screws at both the front and rear mounting hole locations will greatly
facilitate this alignment. If, as is often the case, polarizing and
expanding optics are interposed between the laser and the moving
optic, the best design is to incorporate everything on a sub-plate and
provide adjustments to it (Figure 9).
21
Diamond™ GEM, G, & K, Integrator’s Guide
Figure 7. Beam Delivery Components Attached Directly to Laser
Collimated Laser Beam
(See Beam Propagation Section)
Figure 8. Laser Mount with Adjustments for Moving Axis
Moving Laser
When the laser itself is set on a moving axis, the beam delivery is
generally fixed with respect to the laser. Beam delivery concerns,
therefore, are the same as for a fixed beam. For GEM and K-series
lasers, which have their RF power supplies separate from the laser
heads, and so an additional consideration is added, handling the RF
cable.
22
Installation
Collimated Laser Beam
(See Beam Propagation Section)
Figure 9. Laser and Additional Optics on Adjustable Mounting Plate
The RF Cable
RF cables have a finite life in terms of the number of bends they can
withstand. As the bend radius is reduced, the life becomes shorter.
Coherent provides cables with an extended flex life for use on
systems with moving lasers. Even with these cables, it is good practice to do the following:
•
Use the shortest RF cable possible.
•
Select the longest-lived cable type available.
•
Run the cable in its own track (put the water hoses in another
track) and allow it to take the largest possible bend radius.
•
Do not tie wrap or otherwise constrain the cable.
•
Make sure that nothing can abrade the cable as the axes
traverse their full range of motion.
•
Avoid stress to the cable (torsion, shear, or tension).
•
Allow for cable replacement as a maintenance operation.
For those applications where they are suitable, the GEM & G-series
lasers, with their integral RF power supplies, are better choices for
systems where the laser is on a moving axis.
23
Diamond™ GEM, G, & K, Integrator’s Guide
BEAM DELIVERY
Many difficulties in laser processing systems arise from deficiencies
in the beam delivery system. The beam delivery system has the vital
job of transmitting the initially high-quality beam emitted by the
laser to the workpiece without having the beam degraded by
misalignment or aberrations. In addition, the beam delivery system
must protect itself and the laser from light reflected from the
processing region. In almost all environments, the beam delivery
system must be enclosed and purged to protect the optics from
contamination by dirt.
Alignment
When designing a laser system, provision must be made for alignment of all the optical components. When a component moves, the
beam alignment must be maintained throughout the excursion of
that component. This, in general, requires that one of the elements
on the moving beam path must be adjustable in both translation and
angle. Most beam bending modules have adjustments for angular
alignment, but need to be mounted on slotted carriers or slides to
allow for translation. The visible alignment laser (optional on the
Basic package and standard on the Performance package of K-series
lasers) makes alignment of a complex beam delivery system much
quicker and easier than aligning with the CO2 beam. The visible
alignment laser should only be used for approximate alignment. It is
not the same wavelength as the CO2 beam so some errors in beam
positions could occur.
A detailed alignment procedure, as well as all necessary targets,
should be supplied with every laser system.
Sealing
It is critically important to keep all of the optics in a high-power CO2
laser system clean. Dirt on an optic does far more than reduce the
beam quality; it damages, usually permanently, the optical surface
itself. Particulate materials are heated quite strongly by the beam and
conduct this heat to the surface on which they sit. The coating under
the particle is destroyed by this heat. Cleaning the optic may remove
the particle, but the damage remains.
Industrial lasers often work in relatively dirty surroundings. In many
cases, the laser process itself contributes to local airborne contamination. The only way to preserve the laser and beam delivery optics
24
Beam Delivery
in industrial environments is to have the beam path from the laser to
the final focusing lens completely sealed, and purged with clean gas.
Purge Gas
Diamond K-series lasers have a purge gas inlet. The recommended
gas is dry nitrogen, which is most conveniently obtained from a
Dewar (nitrogen from cylinders, in addition to being more expensive
than cryogenic nitrogen, is more subject to contamination with oil or
water). It is also possible to use air as long as it meets the following
criteria:
•
Filtration 1 micron
•
Dew point 10°C below incoming water temperature
•
99.995% oil free
To achieve this quality of air from most standard industrial
compressed air supplies requires the use of a coalescing filter and an
air drier. One suitable arrangement consists of a Balston A912A-DX
coalescing filter followed by a Balston 7601 drier. A Balston 41-071
indicator on the coalescing filter will signal when the element must
be replaced. The use of unfiltered compressed air (which typically
contains water and oil) will almost certainly cause premature failure
of the laser optics.
On industrial systems, the gas supply should be interlocked to
prevent operation unless the purge gas is flowing. A flow switch
rather than a pressure switch should be used as a sensor, since line
blockage after a pressure switch will not generate a fault indication.
Use Teflon, polyethylene or polypropylene tube to deliver the purge
gas. Do not use PVC or similar materials which can outgas.
In order to keep the flow of purge gas to a reasonable level, the beam
delivery system must be sealed. Starting at the laser, a carrier for a
shaft seal or O-ring may be attached to the 1.75-20 threads on the
front bezel of Basic and Performance K-series laser heads. Since this
bezel is isolated from the laser resonator, it may be subjected to
considerable load without affecting the output. On the OEM
K-series models, however, the exit tube is attached to the beam
shaping optics. When attaching a seal to this 1 inch (25.4 mm) tube,
it is important that no loads be transmitted to the tube. A flexible
bellows such as a Gortiflex CT-1 (from A and A Manufacturing) is
the best solution to this problem.
For G-series systems, a combination purge gas inlet and beam tube
seal should be attached to the laser’s output plate.
25
Diamond™ GEM, G, & K, Integrator’s Guide
Where the beam path is fixed, aluminum tubing makes a good beam
guard. It is available in many diameters and has a smooth outer
surface that seals well. In most systems, beam guard tubes are black
anodized although this has no effect on their performance.
Mirages
Nitrogen has a extremely small but finite absorption of 10.6 µm
light. At high average laser powers, the gas in the beam delivery
system will consequently be heated by the laser beam. If there is no
gas flow, the warmer gas will rise. In a long horizontal path, this
creates a gradient index lens that causes mode degradation. In severe
cases, an initially circular mode can be deformed into a semicircle.
The remedies for this are to increase the tube diameter (which
decreases the gradient for any given amount of heating) or turn up
the purge gas flow.
Seals for Moving
Beams
It is more difficult to seal moving elements than static ones. Where
the travel is less than half the distance between a pair of moving
elements, two telescoping rigid tubes with an oil seal work well.
Telescoping tubes do not work so well when there are more than two
of them because they tend to bind. Bellows can have a large expansion ratio, but they are usually made of organic materials which can
be decomposed by reflected laser light. Spiral lead screw covers
(available from Centryco) resist light reflections, but they do not seal
well and can deform into the laser beam. Putting a bellows (for a gas
seal) over a spiral cover (for laser light resistance) is a reasonably
robust solution. For long runs, the bellows must be guided on rods
to keep it on the beam line.
Many other types of beam delivery optic protection for moving
beams have been tried. Some success has been achieved with open
beam paths by having the individual optics protected by ejectors
(Figure 10). This arrangement does not seem to protect
upward-facing optics, and works best if it is always on, even when
the system is shut down.
Pumping
A properly sealed moving axis acts as a pump. When the axis
extends, the volume of the beam delivery system increases by the
product of the distance traveled and the cross-sectional area of the
beam guard. At a sufficiently high travel rate, this can exceed the
purge gas flow and cause a negative pressure inside the beam path.
In most cases, this can be solved by calculating the maximum
volume increase rate with all moving axes extending and supplying
more purge gas than that value. It is helpful for such systems to have
26
Beam Delivery
Figure 10. Cross Section of Air Ejector for Protecting Bending Mirror
one-way valves in the beam delivery system to allow excess purge
gas to leave when the axes contract. For very high-speed systems, it
may be necessary to have the purge gas flow switch from a normal
rate to a higher rate when the axes extend.
Polarization
Diamond lasers have a highly polarized output. The direction of
polarization is horizontal for all Diamond lasers but the K-400 and
K-500, where it is vertical. In some applications, notably ceramic
scribing and metal cutting, superior results are achieved with
circular polarization. A quarter wave plate is required to convert the
linear polarization to circular. For high-power CO2 lasers, reflective
optics are generally used as wave plates. Such optics must be set to
reflect the beam at 45º to the direction of polarization of the
incoming beam. The Coherent CQE module, Part Number
5701-0059, (Figure 11) allows this to be done easily.
To preserve circular polarization, all beam bending mirrors after the
CQE must be “zero phase shift” optics. Despite their name, these
optics typically have up to 6° of phase shift each, so it is best to put
the CQE near the process end of the beam line to avoid loss of
circular polarization.
Back Reflection
High power laser systems are very sensitive to light reflected back
from the work or from support tooling. If, for example, cloth is cut
on an aluminum backing plate, a large fraction of the laser power
will be returned through the beam delivery optics. This light is fairly
well-collimated by the focusing lens and can enter the laser cavity
with possibly catastrophic effects. Even if laser damage does not
27
Diamond™ GEM, G, & K, Integrator’s Guide
Figure 11. Installation Dimensions for Coherent CQE Module 0175-989-00
occur, back reflections alter the laser output and degrade the beam
quality. In other cases, the returned light may be focused on beam
delivery optics so that they are destroyed.
It is essential for GEM-series laser systems used in high beam return
(back reflection) modes, to have an optical isolator in the beam
delivery system. An isolator is a mirror with a coating that reflects
S-polarized light (light polarized normal to the plane of reflection)
and absorbs P-polarized light (light polarized parallel to the plane of
reflection).
It is essential for G & K-series systems used to cut metal, or working
over metal supports, to have an optical isolator in the beam delivery
system. An isolator is a mirror with a coating that reflects S-polarized light (light polarized normal to the plane of reflection) and
absorbs P-polarized light (light polarized parallel to the plane of
reflection). This mirror is set in the beam line before an CQE module
so that the incoming beam is S-polarized. The CQE, as noted above,
converts the light to circular polarization. Any reflected light returns
to the CQE with circular polarization. The geometry is such that
when the light exits the module, it is linearly polarized at right angles
to the laser’s initial plane of polarization. This is intercepted by the
isolator as P-polarized light and is absorbed before it can do any
damage. Isolators may have to absorb substantial power, requiring
them to be water-cooled. The isolator/CQE assembly, part number
0175-990-00, (Figure 12) should be located as near the focusing lens
as possible to protect all the beam delivery optics. The CQE and
28
Beam Delivery
isolators referred to are for operation at 10.6 µm. For operation at
9.4 µm use CQE part number 0175-989-01 and isolator part number
0175-990-01.
Damage to the laser due to back reflection is not covered by
warranty, so the system designer should protect against it.
Figure 12. Installation Dimensions for Coherent Isolator/CQE Assembly 0175-990-00
29
Diamond™ GEM, G, & K, Integrator’s Guide
BEAM PROPAGATION
Optics Basics
It is not the intent here to have an exhaustive discussion of optics
theory and beam propagation. That information is readily available
in optics and laser text books. The following basic optics information will be helpful when designing a beam delivery system.
Beam Diameter
The typical Coherent CO2 laser beam is very close to an ideal Gaussian beam profile where the peak intensity of the beam is at the
center. In Figure 13, the intensity profile cutting through a laser
beam is shown for the ideal case. For these beams, the beam diameter is defined as the width of the beam where the intensity is 13.5%
of the peak intensity. Based on the mathematical description of the
beam profile, this is a good first approximation of beam diameter.
The practical information here is selecting the clear aperture of
optics that the laser beam must go through. In order to allow at least
99% of the laser beam though an aperture it should be at least 1.5
times the beam diameter at that point. In actual practice, the clear
aperture should be selected to be several millimeters larger so it is
easy to align the beam through the optic. The laser beam information
provided in the data sheets is based on measurements using specific
instruments designed to measure beam diameters.
Gaussian Beam Profile
1
0.9
Relative Intensity
0.8
0.7
0.6
0.5
13.5% of
peak intensity
0.4
0.3
Beam Diameter
0.2
0.1
0
-2
-1.5
-1
-0.5
0
0.5
Transverse Beam Axis
Figure 13. Beam Profile
30
1
1.5
2
Beam Propagation
M2 (M Squared)
Factor
The actual laser beams differ somewhat from the ideal Gaussian
profile shown in Figure 13. To handle the handle the deviation from
the ideal case, the factor M2 or K has been developed and is often
quoted in laser specifications. For the ideal beam the M2 factor is 1
and the factor increases as the beam deviates more from ideal
behavior. For a beam with an M2 factor of 1.2, the beam is actually
√ 1.2 = 1.1 larger than an ideal Gaussian beam. It basically relates to
the factor by which the beam diameter is different from ideal. As
will be shown in the later examples, it has practical use to determine
the beam size at various locations in a beam delivery system. Note
that the M2 = 1/K and is also in common use.
Beam Propagation
As a laser beam propagates away from it narrowest point or beam
waist, it will increase in size in a very predictable fashion. To calculate the beam size at a specific location, one must know the size of
the beam waist and its location. Thus the beam diameter, D at a
distance Z away from the beam waist with a beam diameter of D0
follows the equation:
D =
2
2 2
Do + Θ Z
The factor Θ is the beam divergence. The beam divergence depends
on some basic properties of the beam including the wavelength, λ
and the beam waist size D0. The relationship for the beam divergence at full angle, then is:
2
4λM
Θ = -------------πD o
Often the beam divergence is a value included in the specifications
of a laser. If a calculation is being made of the divergence, the units
of the wavelength and the beam waist diameter must be the same. As
an example a laser operating at a wavelength of 10.6 µ, a 7 mm
beam waist diameter, and an M2 of 1.2 the calculated divergence is
as follows:
Θ = 4 x 0.0106 mm x 1.2 / (3.14 x 7) = 0.0023 rad = 2.3 mrad
Now calculating the beam diameter for the same laser as above at
2 meters from the beam waist;
D = √(49 mm2 + 0.00232 x 2000mm2)
D= √(49 mm2 + 5.29 x 10-6 x 4 x 10 6 mm2) = 8.4 mm
31
Diamond™ GEM, G, & K, Integrator’s Guide
Focusing a Beam
Most laser processing applications call for focusing the laser beam
to a small spot so that the high power density can accomplish the
desired work. This is true for applications involving cutting, drilling,
scribing, welding, and others on a wide range of material. The
typical question is what is the spot size that will be achieved for this
application. In order to achieve the smallest spot size, the beam must
be focused with a lens that transmits the laser wavelength. In order
to achieve the desired spot size, one must size the clear aperture for
the diameter of the beam at that point using the guidelines covered
in the section on beam diameters. The approximate spot size of the
focused laser beam using a lens with focal length f is:
2
D f = 4fλM
---------------πD e
Where De is the beam diameter at the focusing lens and Df is the
focused beam diameter. Calculating for the same beam in the beam
propagation example with a 5 inch (127 mm) focal length lens for a
beam a 2 meters from the beam waist
Df = (4 x 127 mm x 0.0106 mm x 1.2)/ (3.14 x 8.4 mm)
Df = 0.245 mm = 245 µ
One important note that to reduce the focused spot size the designer
reduce the focal length of the lens or increase the spot size on the
focusing lens. The danger either approach is that the aberrations and
non-ideal behavior in the optics can lead to larger spot sizes that
calculated here. As a general guide, the equation above will give
valid answer if the lens focal length divided by the beam diameter
on the lens (f/De) is greater than 10. The beam waist will be located
near the focal length of the lens. The location of the focused beam
waist also depends on the distance from the beam waist to the
focusing lens.
Rayleigh Range
and Depth of
Focus
When processing material it is important to have knowledge of the
work range where the process will function properly. The major
issue is the acceptable range in the distance between a focusing lens
and the work surface. A convenient model for this is to calculate the
Rayleigh range for the focused beam as an initial evaluation of the
32
Beam Propagation
optical design. The Rayleigh range is the difference in distance
between the beam waist location and the point at which the beam is
1.4 times larger.
2
πD o
Z r = -------------2
4λM
The beam waist diameter can be for a focused beam in this issue but
it could also be any other beam waist and the equation is still applicable. For the same focused beam in the previous example, the
Rayleigh range or depth of focus is:
Zr = (3.14 x(0.245 mm)2) /(4 x 0.0106 mm x 1.2)
Zr = (0.188 mm2) /(0.051 mm) = 3.7 mm
It should be noted that reducing the spot size will reduce the depth
of focus more rapidly than the spot size is reduced. Thus when
reducing spot size the process can become much more intolerant to
variability in the distance between the focusing lens and the work
piece. The Rayleigh range provides a guide to the range of acceptable working distances but the actual value will depend on the
process, the equipment, and dynamics between the two factors.
Beam Expansion
As noted above, an increase in the beam diameter on a focusing lens
can produce smaller focused spot size. The other issue that beam
expansion addresses is variation in the focused spot size on gantry
based system. In these later systems, the beam size on the focusing
lens will vary as the distance between the laser and the focusing lens
is moved which in turn causes the focused spot size to change as well
as the distance to the beam waist. Beam expansion will reduce the
change in the focused spot size and changes in focal point. The
simplest beam expanders use two lenses with different focal lengths
(see figure 14). The ratio of the focal lengths gives the magnification
of the beam. Galilean beam expanders use a negative lens followed
by a positive lens for expansion.
Using the simple beam expander as an example, the combination of
a 2.5 inch and 5 inch lenses will magnify the beam by a factor of
two. The proper separation of the two lenses is the sum of their focal
lengths. Small adjustment of the separation is required to correct for
the effect of the distance from the first lens to the beam waist. As a
general guide line for design keep the ratio of the focal length
33
Diamond™ GEM, G, & K, Integrator’s Guide
divided by the beam diameter for each lens greater than 10 to minimize effects of aberration. Also the same guidelines on acceptable
clear apertures and beam diameters given above are still applicable
On gantry based systems, the beam expander can be used to adjust
focus at the work surface. This is accomplished by setting the final
objective lens to exactly it’s back focal length (BFL) from the work
surface (along the middle of the optical axis). The BFL is specified
by the lens manufacturer. Focusing is then done by adjusting the
spacing of the lenses in the beam expander.
Input
Beam
Input Beam x
F1
F2
F1
F2
Figure 14. Simple Beam Expander
Expanded
Output Beam
Input
Beam
Figure 15. Galilean Beam Expander
34
Interfacing GEM-Series Lasers to Systems
INTERFACING DIAMOND GEM-SERIES
LASERS TO SYSTEMS
The GEM-series laser control is via the 15-pin D-type connector on
the RF power supply. The exception is the GEM-30 where control is
via the RJ-45 interface connector. The information that follows is a
summary and more detailed information on interfacing the laser is
contained in the respective operator’s manual.
Interlocks
External interlocks must often be connected to the GEM-series laser.
These include safety interlocks such as door signals, process interlocks such as assist gas flow sensors and mechanical interlocks such
as axis limit signals. In most cases, key switches and similar
safety-related devices should be connected to the laser enable signal.
35
Diamond™ GEM, G, & K, Integrator’s Guide
Table 5. Signal Interface Description and Connector Pinout for GEM-25/50/60/100/200
PIN NO.
1
FUNCTION
DESCRIPTION
RS-423 MODULATION
Input signal (unbalanced)
The RS-423 specification requires a driver capable of delivering a
signal between 4 V and 6 V into a test load of 450 Ω.
2(+)
and
3(–)
MODULATION
Differential input signal
(RS-422)
The RS-422 balanced specification requires a driver that is capable of
developing a differential signal between 2 V and 10 V into a load of
100 Ω.
4
ANALOG FORWARD
Voltage output signal
Analog representation of the RF power supply’s forward RF output
voltage. 0 V to 5 V, 5 V = full scale. Signal will drive ≥10 kΩ load. A
voltage level lower than 2.5 V indicates a bad RF power supply. See
representative signal curves for the particular GEM-series RF power
supply.
5
ANALOG REFLECTED
Voltage output signal
Analog representation of the RF power supply’s reflected RF output
voltage. 0 V to 5 V, 5 V = full scale. Signal will drive ≥10 kΩ load. A
voltage level greater than 1.0 V may indicate either a bad laser head,
a bad RF cable, or both.
6
VSWR Fault
Open collector output
Will sink 25 mA of current when an VSWR fault occurs. This indicates an excessive mismatch between the laser head and the RF power
supply.
7
–
Not currently used.
8
VDC
Voltage output signal
+15 VDC ± 0.5 VDC, 0.25 amp max output available from RF power
supply to user equipment.
9
GND
Ground
Customer ground. Return line for all signals. Is also chassis ground.
10
Power Supply Enable
TTL input signal
Enables internal DC power supply. TTL high will enable this pin.
11
MODULATION SELECT
Input signal
Selects between unbalanced TTL modulation or Differential modulation signal. No connection selects unbalanced input (Pins 1 and 9).
Ground this pin to selected balance inputs (Pins 2 and 3).
12
OVER TEMPERATURE
Open collector output
Will sink 25 mA of current when an OVER TEMPERATURE fault
occurs. This indicates that the RF power supply has gone over temperature.
13
DUTY CYCLE FAULT
Open collector output
Will sink 25 mA of current when a DUTY CYCLE FAULT error
occurs. This indicates a duty cycle exceeding 50% when the RF power
supply is set to the Enhanced Pulse Mode. Fault automatically reset
when fault condition is removed.
14
–
Not currently used.
15
MODE CONTROL
Input signal
Selects between CW Mode or Enhanced Pulse Mode.
0 V to 7 V = CW Mode
7.2 V to 10 V = Enhanced Pulse Mode
36
Interfacing Diamond Lasers to Systems
Table 6. Signal Interface Description and Connector Pinout for GEM-30
PIN NO.
1
SIGNAL DESCRIPTION
RF Enable
TTL logic input; 1=RF ON, 0=RF OFF; 1 kΩ impedance
This input turns on the laser. See also Pin 7, Control Enable, below.
2
SWR OK
TTL logic output; 1=SWR OK, 0=SWR Fault; IOH = -0.4 mA, IOL= 8 mA
Output is asserted when DC supply current (IDD) is below max. value.
3
LASER OK
TTL logic output; 1=LASER OK, 0=LASER Fault; IOH = -0.4 mA, IOL= 8 mA
Output is asserted when no faults (SWR, Temp. or Volt.) are detected.
4
Temperature OK
TTL logic output; 1=Temp OK, 0=Temp Fault; IOH = -0.4 mA, IOL= 8 mA
Output is asserted when temperature is below maximum value.
5
Voltage OK
TTL logic output; 1=Voltage OK, 0=Voltage Fault; IOH = -0.4 mA, IOL= 8 mA
Output is asserted when DC supply voltage (VDD) is below max. value.
6
Internal Coherent use. Must be grounded by OEM.
7
Control Enable
TTL logic input; 1=Laser Control Enabled, 0=Laser Control Disabled
This input must be asserted before RF enable can be used to turn on laser.
8
Customer Logic Ground for all interface signals
Notes:
1) Connector used is RJ-45 type.
2) These specifications are subject to change.
37
Diamond™ GEM, G, & K, Integrator’s Guide
INTERFACING DIAMOND G & K-SERIES
LASERS TO SYSTEMS
Diamond lasers have three types of interfaces. For OEM lasers,
connection is made directly to the RF amplifier. Basic and Performance lasers have the Diamond Digital Interface and, optionally,
may be connected through the remote control. The information that
follows is a summary and more detailed information on interfacing
the laser is contained in the respective operator’s manual.
OEM Interface
To operate an OEM laser, the system control must be connected to
the DC power supply, the RF power supply, the water flow switch
and the (external) laser shutter.
DC Power Supply
The Coherent DC power supply manufactured by HC Power, may be
turned on by connecting Pin 6 to Pin 14 in its DB25 connector. Table
titled “DC Power Supply DB25 Connector Pinout” in the OEM
manual lists the other signals available from this connector; they are
generally not of use other than for maintenance purposes.
The laser’s water flow switch may be put in series with the power
supply enable signal so that everything shuts down if the water flow
is low. While this is simple to do, it does not provide any fault information, leading to mysterious laser shutdowns. Also, if the low flow
is intermittent, the power supply will keep turning on and off until
the problem is corrected. It is better practice to latch the low water
flow signal and associate it with a fault output so that the problem
can be identified and corrected.
The DC supply shuts down if it detects overcurrent or overvoltage.
This can be reset only by cycling the AC power to the unit. It is
helpful, then, to have the DC supply on its own circuit breaker to
allow this. The status of the DC power supply can be sensed by
looking for +5 V on Pin 14 relative to Pin 13. There will be no
voltage if the supply has shut down.
The Coherent DC Power supply manufactured by Power One may
be turned on by connecting the REMOTE ENABLE (pin 8) and
+5 V LOGIC (pin 5) in the 25 pin cable assembly will cause the DC
power supplies to turn on. These leads can be tied into the main
interlock circuit of the end users system. One suggestion is to
connect this output in series with the water flow switch contacts as
38
Interfacing Diamond Lasers to Systems
part of an interlock system. It can provide up 50 mA of current at
5 VDC and is on as soon as the AC power is applied. Note that if an
over-current or over-voltage situation occurs, the DC supplied must
have the AC input power turned off and then back on to reset the DC
supply and also reset the +5 V logic voltage
RF Power Supply
Control of the laser is performed through the DB25 connector on the
RF power supply. Two inputs are required to operate the laser, and
four outputs are available for monitoring its function. There are, in
addition, two analog outputs that are useful for maintenance
purposes only.
The RF amplifier is enabled by connecting Pin 3 to Pin 16. This is
the preferred signal to use for the water flow interlock and should
also be connected to safety interlocks.
Laser modulation is enabled by driving Pin 7 to a TTL high level
with respect to Pin 20. A differential line driver such as an
AM26LS31 is suitable for this. The laser is on whenever the line is
high and off when it is low. Laser “On” times, referred to as pulse
widths, can be any length less than 1000 µs, although the actual laser
discharge may not respond to very short pulse widths. Incoming
pulse widths longer than 1000 µs will be automatically limited by
the RF amplifier. In addition, the duty cycle of pulsing must not
exceed a maximum (depending on the laser model). The RF amplifier will automatically limit duty cycles. If either the commanded
pulse width or duty cycle exceed the limits, the amplifier will issue
a warning signal.
The RF amplifier provides output signals to monitor its performance
and warn of potential problems. These outputs are to be interfaced
to a differential line receiver such as an AM26LS33, and are:
Digital Reflected Power (Pin 8+, Pin 21–)
This signal goes high when the laser is operating correctly. In the
case of a problem, it will change state with the laser modulation. It
should therefore be monitored by the system control, with a warning
message issued if it drops out when the laser is running. The control
should wait 100 milliseconds after modulation starts to monitor the
reflected power to allow transients to dissipate.
Digital Forward Power (Pin 9+, Pin 22–)
This signal is synchronized with the modulation when the laser is
operating correctly. If it stays high during laser operation, there is a
problem with the RF amplifier. The system control should issue a
39
Diamond™ GEM, G, & K, Integrator’s Guide
warning message if this signal stays high more than 1 millisecond.
The control should wait 100 milliseconds after modulation starts to
monitor the forward power to allow transients to dissipate.
Duty Cycle Limit (Pin 10+, Pin 23–)
The duty cycle is the ratio of the pulse width to the pulse interval.
Each model of the Diamond laser has a specified maximum duty
cycle. The Duty Cycle Limit signal goes high if the incoming duty
cycle exceeds the laser’s limit, or if the incoming pulse duration
exceeds 1000 µs. Note that the power supply limits its output to
allowable conditions; a Duty Cycle Limit signal indicates that there
is a difference between the commanded output and the actual output.
VSWR Limit (Pin 11+, Pin 24–)
The VSWR (voltage standing wave ratio) limit signal is issued when
the ratio of the reflected RF to the forward RF exceeds a preset limit.
This signal is momentary; its duration is on the order of the pulse
width. The control should wait 100 milliseconds after modulation
starts to monitor the VSWR limit to allow transients to dissipate.
The normal practice with all of these warning signals is to indicate
the warning on the system control until a reset is commanded to
clear them.
Water Flow Switch
Low water flow is a system fault. A low water signal from the flow
switch should be interpreted as such and prevent laser operation
until the fault is cleared.
Shutter
If an electrically-controlled shutter is used, it should be interlocked
to the system control so that it closes whenever a safety interlock is
opened. Shutter position should also be monitored, indicating a fault
condition if the commanded position is not achieved after a short
time. If a manual shutter is used, opening any safety interlock must
disable the RF amplifier.
DDI Interface
The Diamond Digital Interface, used on Basic and Performance
lasers, simplifies system connection and status monitoring. With the
DDI, the system control need only communicate with one device
rather than four. All connections except for external interlocks are
made through a single DB37 plug (J1 on Basic systems, Controller
40
Interfacing Diamond Lasers to Systems
on the Performance power supply). Interlock signals are accessed
through the DB9 plug marked User on Basic lasers and Interlock on
Performance lasers.
The DDI provides many more inputs and outputs than the OEM
interface. In addition to the enable and modulation signals, inputs
are provided for shutter control, the aiming laser, turning the DC
power supply on, clearing faults and selecting output signals. The
inputs are optically isolated and are to be driven by devices such as
an MC74HCT240A.
The DDI’s outputs, with the exception of shutter position and an
alert signal, are multiplexed through four lines. When an alert signal
is received, the system control must interrogate the DDI by cycling
the A and B inputs while monitoring Out 0 through Out 3 to determine the exact fault (See table titled “Diamond Digital Interface
Multiplexer” in the Diamond Operator’s Manual).
The User or Interlock connector is meant to be used for safety interlocks. The system interlock string, including key switches, connects
pins 8 and 9. Any break in this string shuts the laser down, so it is
not a good idea to put work chamber door switches on it. These
should be interlocked to the laser shutter (or to RF enable for
systems with manual shutters) instead.
When the DC power supply is on, Pins 1 and 2 are switched together
by a relay in the DDI. This can be used as a signal for “Laser On”
warning lights. Note that the relay contacts can only take 0.2 A at
25 V, so it is not appropriate to directly connect lights to this line.
Remote Control
Interface
The main reason for controlling a Diamond laser through the
Remote Control is that the pulse period and duration may be set on
the remote’s thumbwheel switches. This allows system controllers
without pulse outputs to be used. The remote also displays faults and
warnings, allows for their reset, and minimizes interface requirements. It is, in general, an inefficient way to set up a permanent interface but is useful for temporary setups.
Inputs to the remote may be made through BNC connectors or
through the Interlock + Control connector J11. Tables titled “Remote
Control Unit Controls and Indicators” in the Operator’s Manual
indicate how the remote may be set up for external control.
Interlocks
External interlocks must often be connected to the Diamond laser.
These include safety interlocks such as door signals, process interlocks such as assist gas flow sensors and mechanical interlocks such
41
Diamond™ GEM, G, & K, Integrator’s Guide
as axis limit signals. In most cases, key switches and similar
safety-related devices may be put across pins 8 and 9 of the User
connector on the DDI. It is better to connect operator access doors to
the shutter signal, since opening the User interlock shuts the laser
down. Systems using OEM lasers must incorporate comparable
interlock functionality.
42
Beam Propagation Characteristics
BEAM PROPAGATION CHARACTERISTICS OF
DIAMOND GEM-SERIES AND K-SERIES LASERS
GEM, G, and
K-Series Beam
Propagation
The following charts describe the beam propagation characteristics
for the GEM-series, G-series, and K-series laser. In the following
tables, the distance is referenced from the front end plate of the laser
head. The tables show only beam diameters up to 1.0 inch (25 mm)
clear aperture optics. Beam diameters that are larger are unsuitable
for most applications. It is recommended that beam expansion be
used for beams propagating over extended distances..
Table 7. Beam Diameter (MM) vs. Distance From Laser (MM)
DISTANCE FROM
LASER (MM)
GEM 30/50
GEM 60/100
G50/100
K150
K250
K500
0
1.8
3.8
1.9
7.0
6.8
11.0
250
2.7
3.9
2.9
7.0
6.83
11.0
500
4.5
4.3
4.7
7.1
6.9
11.0
750
6.4
4.8
6.7
7.2
7.0
11.1
1000
8.4
5.4
8.7
7.4
7.2
11.1
1500
12.5
7.0
12.9
7.8
7.7
11.3
2000
16.6
8.7
17.2
8.4
8.3
11.5
2500
-
10.5
-
9.1
9.0
11.8
3000
-
12.3
-
9.9
9.9
12.2
3500
-
14.2
-
10.7
10.8
12.5
4000
-
16.1
-
11.6
11.7
13.0
4500
-
-
-
12.6
12.7
13.4
5000
-
-
-
13.5
13.7
14.0
43
Diamond™ GEM, G, & K, Integrator’s Guide
Table 8. Beam Diameter (Inches) vs. Distance From Laser (Feet)
DISTANCE FROM
LASER (FEET)
GEM 30/50
GEM 60/100
G50/100
K150
K250
K500
0
0.07
0.15
0.07
0.28
0.27
0.43
0.5
0.09
0.15
0.09
0.28
0.27
0.43
1.0
0.12
0.16
0.13
0.28
0.27
0.43
2.0
0.21
0.18
0.22
0.28
0.27
0.44
3.0
0.31
0.21
0.32
0.29
0.28
0.44
4.0
0.40
0.24
0.42
0.30
0.29
0.44
5.0
0.50
0.28
0.52
0.31
0.30
0.45
6.0
0.60
0.32
0.62
0.32
0.32
0.45
8.0
-
0.40
-
0.35
0.35
0.46
10.0
-
0.49
-
0.39
0.39
0.48
12.0
-
0.58
-
0.43
0.44
0.50
15.0
-
-
-
0.50
0.51
0.53
20.0
-
-
-
0.62
0.63
0.60
44
Accessory Manufactures and Services
ACCESSORY MANUFACTURES AND SERVICES
Air filtration
Balston, Inc.
260 Neck Road, Box 8223
Haverhill, MA 01835-0723
(800) 343-4048
fax (508) 374-7070
Beam delivery components
Laser Mechanisms, Inc.
24730 Crestview Court
Farmington Hills, MI 48335
(810) 474-9480
fax (810) 474-9277
Beam seals, way covers
A and A Manufacturing Co. Inc.
2300 S. Calhoun Road
New Berlin, WI 53131
(414) 786-1500
fax (414) 786-3280
Centryco
300 West Broad Street
Burlington, NJ 08016
(800) 257-9537
fax (609) 386-6739
Coolants and Coolant additives
The Dow Chemical Company
U.S.A.
(800)447-4369
Union Carbide Corporation
U.S.A.
(800)568-4000
Tokyo Fine Chemical Co., Ltd.
Japan
+81 3 3506 7666
45
Diamond™ GEM, G, & K, Integrator’s Guide
Virginia KMP Corp.
U.S.A.
(800)285-8567
Safety consultants
LAI International
1132 Hilford Court
San Jose, CA 95132
(408) 923-7656
fax (408) 923-6675
Water flow switches
Proteus Industries
340 Pioneer Way
Mountain View, CA 94041
46
Index
INDEX
A
F
Air filtration 45
Algaecide 17
Alignment 24
ANSI standards 4
ANSI B11.21 3,
ANSI Z 136.1 3,
Aperture warning label
Facilities requirements
Features 6
Filtration 25
Fixed beam 20
Focusing a beam 32
4
4
6,
I
10
Identification labels 10, 12
Interface
DDI 40
OEM 38
Remote control 41
Interlocks 35, 41
External 35, 40, 41
Remote 5, 9
Safety 5
Water flow 18
B
Back reflection 27
Basic package 14
Beam
Attenuator 5, 9
Delivery 24
Components 45
Diameter 30
Expansion 33
Focusing 32
Propagation 31
Beam seals 45
K
Key control
5,
9
L
C
Labels 10
Aperture warning 6, 10
Certification 10, 12
Identification 10, 12
Removable housings 11
Warning 10
Cable RF 23
Certification labels 10, 12
Classification 7
Compliance 3
Guidelines 6
Cooling
Liquid 17
Recommended layout 18
Water 17
CQE module 27
M
M2 Factor 31
Manual reset 10
Manufactures 45
Material processing 3
Mirages 26
Moving
Beam seals 26
Beam system 21
Laser 22
D
DC power supply 38
Requirements 16
DDI interface 40
Depth of focus 32
Dew point 25
Digital forward power 39
Digital reflected power 39
Display screens 10
Duty cycle limit 40
O
OEM interface 38
OEM package 14
Operating controls 10
Optical isolator 28
Optics basics 30
E
Electrical power 16
Emission indicator 5, 9
Export control laws compliance, U.S.
External interlock 35, 40, 41
16
P
vi
Performance 7
Performance package
Polarization 27
47
15
Diamond™ GEM, G, & K Laser Integrator’s Guide
Power rating 13,
Power supply
DC 38
RF 39
Protective housing
Pumping 26
Purge gas 25
Consultants 46
Interlocks 5, 8
Requirements 2
Workplace 4
Sealing 24
Seals
Moving beams 26
Shutter 19, 40
System integrators 2
14
7
R
Rayleigh range 32
Remote control
Interface 41
Remote interlock connector
Requirements
DC power supply 16
Facility 16
Performance 5
Safety 2
Responsibilities 3
Compliance 3
RF cable 23
RF power supply 39
V
5,
View optics 10
Viewports 10
VSWR limit 40
9
W
Warning logotype 6,
Water cooling 17
Water flow
Interlock 18
Switch 40, 46
Workplace safety 4
Z
S
Safety
Classification
Zero phase shift
7
48
27
10
Diamond™ GEM, G, & K Laser Integrator’s Guide
© Coherent, Inc. 11/2002, Printed in the U.S.A.
Part Number: 1013164, Rev AA