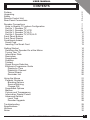
1
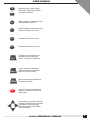
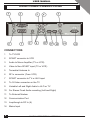
USER MANUAL
CONTENTS
Preface
Unpacking
Safety
Remote Control Unit
Rear Panel Connections
2
2
3
4
6
Decoder Connections
Hints to Quakity TV system Configuration
Set-Up 1: Decoder,TV
Set-Up 2: Decoder,TV,VCR
Set-Up 3: Decoder,TV,Hi-Fi
Set-Up 4: Decoder,TV,VCR,Hi-Fi
Front Panel Buttons
Front Panel Display
Conditional Access
Smart Card
Inserting The Smart Card
7
7
8
9
10
11
12
12
13
13
13
Getting Started
Switching the Decoder On at the Mains
Tuning Your TV
Information Plate
Reminders
Soundtracks
Subtitles
Teletext
Signal Source Selection
Electronic Programme Guide
Display by Time
Display by Channel
Theme Search
Reminder List
14
14
14
15
16
17
17
18
18
19
19
20
20
20
Using the Menus
Parental Guidance
Blocking Options
Service Blocking
Change PIN
Soundtrack Options
Mailbox
Colours and Transparency
Information Display Period
Advanced Options
Local Time
Decoder Upgrade
21
22
22
23
24
25
25
26
27
27
28
28
Troubleshooting
Specifications
Hotlines
Notes
29
30
31
32
DIGITAL TERRESTRIAL TERMINAL
1
USER MANUAL
PREFACE
The Digital Terrestrial Terminal introduces you to exciting new technology. This manual
provides information on how to use the decoder and enjoy the benefits of all its features.
The Decoder is menu-driven and is easy to use, even for users unfamiliar with, or
intimidated by modern technology. When you are comfortable with the basic operation
of the DTT, you can move onto the more advanced and complex features.
The manual provides:
Important safety precautions, please study them.
Step-by-step instructions on how to use the Decoder and its
advanced features.
Step-by-step instructions on how to connect to basic sound and TV
systems. Please note that it is beyond the scope of this manual to
include all possible configurations.
A troubleshooting guide to assist you if you have difficulty operating
the DTT correctly, or in the event of technical difficulties.
The operation of the Decoder can be upgraded via the Digital Terrestrial Network, thus
the menus in the manual may differ slightly from those displayed on your television.
This manual, the menus and the features downloaded in this document and the
information contained herein are the subject of copyright and intellectual property rights
under international conventions. All rights are reserved. No part of this document may
be reproduced, stored in a retrieval system or transmitted in any form by any means,
electronic, mechanical or optical, in whole or in part, without the prior written permission
of UEC Technologies (Pty) Ltd., the Manufacturer.
UNPACKING
The following items are included with the Digital Terrestrial Terminal (DTT):
1 x Remote Control Unit (RCU)
2 x AA Size Batteries
1 x RF Flylead
1 x Mains Cable
1 x User Manual (Operating Instructions)
2
DIGITAL TERRESTRIAL TERMINAL
USER MANUAL
SAFETY
This DTT meets/exceeds International Safety Standards. Please read the following
recommended safety precautions carefully.
MAINS SUPPLY
: 88 - 288 V AC 50/60 Hz ONLY.
LIQUIDS
: K eep liquids away from the Terminal.
CLEANING
: Disconnect the Terminal from the Mains. Use a dry cloth to clean
the exterior.
VENTILATION
: Do not block ventilation holes. Ensure that free airflow is maintained
around the Terminal. Never stand the terminal on soft furnishings or
on carpet. Do not use or store the Terminal where it is exposed to
direct sunlight, or near a heater. Never stack other electronic equipment
on top of the Terminal.
ATTACHMENTS
: Do not use any attachment that is not recommended by the
manufacturer, as it may cause a hazard/damage the equipment.
SERVICING
: Do not attempt to service this product yourself. Any attempt to do
so will invalidate the warranty. Refer all servicing to a qualified
service agent.
LIGHTNING
: If the Terminal is installed in an area subject to intense lightning
activity, protection devices for the Terminal mains connector and
modem telephone lines are essential. The individual manufacturers
instructions for safeguarding other equipment, such as TV sets,
Hi-Fi system, etc must also be followed during lightning storms.
EARTHING
: The earthing system must comply with local regulations.
DIGITAL TERRESTRIAL TERMINAL
3
USER MANUAL
REMOTE CONTROL UNIT (RCU)
Standby button
ALT
Allows you to switch between the current channel and
the last viewed channel
Allows you to access the UHF channel and to switch
between signal sources
Displays the clock
?
Allows access to soundtrack options
Mutes the Volume
i
TV
Allows accessto the
Information Plate and to the
Extended Information
Allows access to the
various Radio/Music
Bouquets available and
switches from a TV
service to a Radio
service
Allows access to Subtitles and
Teletext
TV
4
DIGITAL TERRESTRIAL TERMINAL
Allows access to the various
TV Bouquets available and
switches from a Radio service
to a TV srevice
USER MANUAL
0
to
9
Numeric Keys used to enter
PIN codes, Channel Numbers
and other numbers
P+
When pressed, advances to the
next channel in the list
P-
When pressed, advances to the
previous channel in the list
V+
Increases the volume level
V+
Decreases the volume level
EXIT
Is used as an escape key to
escape from the selected
option. Exits from the Menu
MENU
Allows access to the Menu.
If pressed while in the Menu,
Exits to normal viewing
TV
GUIDE
Allows access to the Electronic
Programme Guide
OK
Used to confirm all selections
made in the Menus and to set
Reminders
Cursor Keys, used for scrolling
through the Menu and list boxes.
and when scrolling through
channels with the Information
Plate displayed
DIGITAL TERRESTRIAL TERMINAL
5
USER MANUAL
REAR PANEL CONNECTIONS
CONNECTORS
1
To TV/VCR
2
SCART connector to VCR
3
Audio to Mono Amplifier (TV or VCR)
4
Video to Non-SCART input (TV or VCR)
5
Terrestrial Antenna In
6
RF In connector (From VCR)
7
SCART connector to TV or AUX input
8
To S-Video connector on the TV
9
Variable Left and Right Audio to Hi-Fi or TV
10
For Stereo Fixed Audio recording (Left and Right)
11
To External Modem
12
Communication Port
13
Loopthough to RF In (6)
14
Mains Input
6
DIGITAL TERRESTRIAL TERMINAL
USER MANUAL
DECODER CONNECTIONS
There are several ways of connecting the DTT to your existing entertainment system.
The following more common examples enable you to view the available Terrestrial
services, record and playback on your VCR and listen to CD quality stereo sound on
your Hi-Fi.
Consult your local installer for assistance in setting up an audio/video configuration
best suited to your requirements.
HINTS FOR QUALITY TV SYSTEM CONFIGURATIONS
1
Where possible, connect cables via audio/video outputs/inputs (SCART or
RCA) rather than RF connectors.
2
Use an appropriate, correctly installed Terrestrial system.
3
Ensure that the system is properly earthed and protected against lightning.
4
Use high quality stereo TV and Hi-Fi equipment.
5
Use high quality screened cables.
DIGITAL TERRESTRIAL TERMINAL
7
USER MANUAL
SETUP1: DTT, TV
NOTE: In the event that only one DTT but more than one TV set is used
domestically, the same channel will be viewed on all sets.
1
Connect the cable from the antenna to the Aerial In socket on the DTT. Using the
RF flylead supplied, connect the Loopthrough Out socket on the Decoder to the RF
In socket on the Decoder. This connection allows you to have access to the normal
analogue Terrestrial channels. (Refer to [1] on illustration below)
2
Using a SCART-to-SCART cable (not supplied), connect the TV SCART on the
Terminal to the SCART connector on your TV. (SCART connections only).(Refer
to [2] on illustration below)
3
If your TV set does not have a SCART connector, then use a RF flylead to
connect the RF Out socket of the Terminal to the RF In socket of your TV.(Refer
to [3] on illustration below)
4
If your TV set has a S-Video connector, connect to the S-Video connector on the
Terminal. Also connect Mono Audio on the Terminal to Audio In on the TV. (Refer
to [4] on illustration below)
5
If your TV set does not have a SCART connector, you could use a SCART-to-RCA
cable and connect the SCART connector to the TV SCART connector on the decoder
and the RCA connectors to the RCA connectors on the TV. (Refer to [5] on
illustration below.)
TV
S-Video
SCART to SCART RF In
AV Connections
[4]
[2]
V
[1]
A
[3]
[5]
8
[1]
DIGITAL TERRESTRIAL TERMINAL
USER MANUAL
SETUP2: DTT, TV, VCR
NOTE: It is recommended that you remove the Mains supply to the Terminal
before connecting or disconnecting to or from the Digital Terrestrial
Network.
1
Connect the Antenna connector to the Aerial In socket of the Terminal. Connect
the Loopthrough Out socket of the Terminal to the RF In socket of the Terminal,
using the RF flylead supplied. (Refer to [1] on illustration below)
2
Refer to Setup1. Make those connections first and then proceed to step 3.
3
Using a RF flylead, connect the RF Out socket of the Terminal to the RF In socket
on the VCR. (Refer to [3] on illustration below)
4
Using the RF flylead supplied with the VCR, connect the RF Out socket of the
VCR to RF In socket on the TV. (Refer to [4] on illustration below)
5
Using another SCART cable, connect the VCR SCART on the decoder to the
SCART connector on the VCR. (Refer to [5] on illustration below)
6
Switch Power to On.
7
Set the TV and VCR Scart Source and the TV and VCR Scart Video Output using
the TV installation option.
TV
VCR
RF In
Scart to Scart
[4]
RF Out
RF In Scart to Scart
[1]
Connections in box used
if no Scart connectors
[3]
[5]
[1]
DIGITAL TERRESTRIAL TERMINAL
9
USER MANUAL
SETUP3: DTT, TV, Hi-Fi
NOTE: Do not connect or disconnect the Terminal to or from the Terrestrial
Network while connected to the Mains supply.
1
Connect the Antenna to the Aerial In socket on the Terminal. Connect a RF
flylead (supplied) from the Loopthrough Out socket on the Terminal to the RF
In socket on the Terminal. (Refer to [1] on illustration below)
2
Refer to Set-Up1. Make those connections first and then proceed to step 3.
3
Connect a flylead between the variable stereo sound outputs on the Terminal
and the audio inputs on the Hi-Fi. (Refer to [3] on illustration below)
TV
Hi-Fi
SCART to SCART
RF In
[1]
L
[3]
10
Audio
Input
R
[3]
[1]
DIGITAL TERRESTRIAL TERMINAL
USER MANUAL
SETUP4: DTT, TV, VCR, Hi-Fi
NOTE: It is recommended that you remove the Mains supply to the Terminal
before connecting or disconnecting to or from the Digital Terrestrial
Network.
1
Connect the Antenna connector to the Aerial In socket of the Terminal. Connect
the Loopthrough Out socket of the Terminal to the RF In socket of the Terminal,
using the RF flylead supplied. (Refer to [1] on illustration below)
2
Using a RF flylead, connect the RF Out socket of the Terminal to the RF In
socket on the VCR. (Refer to [2] on illustration below)
3
Using the RF flylead supplied with the VCR, connect the RF Out socket of the VCR
to RF In socket on the TV. (Refer to [3] on illustration below)
4
If using a SCART-to-SCART cable (not supplied), connect the TV SCART connector
on the Terminal to the SCART connector on the TV. (Refer to [4] on illustration
below)
5
Using another SCART cable, connect the VCR SCART on the decoder to the
SCART connector on the VCR. (Refer to [5] on illustration below)
6
Connect the VARIABLE Left and Right Hi-Fi Audio Out connectors on the Terminal
to the Left and Right Audio connectors on the Hi-Fi. (Refer to [6] on illustration
below)
7
Switch Power to On.
8
Set the TV and VCR Scart Source and the TV and VCR Scart Video Output
using the TV installation option.
Hi-Fi
TV
VCR
RF In
Scart to Scart
L
[3]
RF Out
RF In Scart to Scart
Audio
Input
Connections in box used
if no Scart connectors
[1]
[5]
[4]
R
[6]
[6]
[2]
[1]
DIGITAL TERRESTRIAL TERMINAL
11
USER MANUAL
FRONT PANEL BUTTONS
KEY
DESCRIPTION
Switches the Terminal between Standby and On.
Switches between TV and Audio services.
TV
Increases the Volume/Channel.
Decreases the Volume/Channel.
P/V
Selects the Volume or Channel.
When pressed together, resets the Terminal. Use only
when the Terminal stops responding to the RCU.
and
TV
FRONT PANEL DISPLAY
DTT in standby.
24hr clock displayed.
Four flashing bars and red light.
Service not found/poor signal.
Service No.53 selected.
Yellow light. Mail message
Green light-Audio service
selected.
Red light. Error indication.
Rotating bar-searching for
service information.
Menu selected.
12
DIGITAL TERRESTRIAL TERMINAL
USER MANUAL
CONDITIONAL ACCESS
Although some Terrestrial TV and Audio services are free to air, most TV and Audio
services are available on a subscription basis and can only be enjoyed via a Conditional
Access component. These are removable Smart Cards and a built-in Conditional
Access process already fitted into the system.
SMART CARD
You should have purchased a Smart Card from the dealer when you purchased your
decoder. The Smart Card looks similar to a credit card and is inserted into the slot
behind the right-hand front flap of the decoder. (See illustration below.)
A valid Smart Card entitles you to view and listen to all the services you choose to
subscribe to.
INSERTING THE SMART CARD
1
Open the right-hand flap on the front panel of the decoder(see illustration).
Swing the flap downwards to expose the card slot.
2
Hold the smart Card horizontally with the electronic chip (generally
small square, gold in colour) facing downwards.
3
Insert the Smart Card into the slot until the card is completely in.
DIGITAL TERRESTRIAL TERMINAL
13
USER MANUAL
GETTING STARTED
NOTE: Unless absolutely necessary, do not change installation, connections or
decoder set-up, or retune a working system. If changes are made, record
all the original settings.
SWITCHING THE DECODER ON AT THE MAINS
When you switch the decoder on at the mains, it goes through a power-up sequence,
then attempts to connect to a signal at the factory-set frequency.
TUNING YOUR TV
If your TV is not tuned to the decoder viewing channel, you will not be able to view the
Digital Terrestrial services.
1
2
3
8
9
10
Connect the Terrestrial Signal to the decoder. Refer to Optional Decoder
Connections.
Switch on the TV and select an unsed channel to setup your decoder. This
channel will now be used for the viewing of the Terrestrial services.
Press and hold the green button on the RCU for approximately 5 seconds, until
“UHF” is displayed on the front panel display.
4
Tune your TV set until you obtain the
test pattern shown on the left. A
channel number will be displayed
on the decoder front panel display,
e.g 46.
5
Once you have obtained this test
pattern on your TV set, press OK on
the remote control.
6
Check that there is no interference on
the other channels your TV was tuned
to. If there you notice any interference,
you need to change the UHF channel
that is being used by the decoder.
7
Repeat step 3. Now use the LEFT or
RIGHT arrow key to change the UHF channel. Increase or decrease the
UHF channel by 2.
Once you have changed the UHF channel, the TV screen will no longer
display the test pattern and the channel number on the front panel display
will be different. Repeat step 4.
Once this test pattern is visible on the TV set again, press OK on the RCU.
You should now be able to view all the Terrestrial services subscribed to.
If interference is still present, it is recommended that good quality screened
cables (preferably double screened) be used for interconnecting all other equipment
to the decoder.
14
DIGITAL TERRESTRIAL TERMINAL
USER MANUAL
INFORMATION PLATE
At any time whilst watching or listening to Radio/Music services, you can obtain
information about the current programme and select available programmes via the
Information Plate.
1
Press i on the RCU. The following window is displayed.
2
Use the arrow keys UP or DOWN to scroll through titles on other services,
whilst simultaneously watching the current service. The current programmes
are listed when NOW is selected and the programmes to follow are listed
when NEXT is highlighted.
Pressing “i” while the Information Plate is displayed, provides a synopsis of
the programme being viewed. The Local time is also displayed on the TV
when the Information Plate is displayed. Refer to illustration below.
3
To alternate between NOW and NEXT programmes on the Information Plate,
use the LEFT and RIGHT arrow keys on the RCU.
4
When NEXT is selected, an Information Plate is displayed that displays the
NEXT programme. Pressing OK sets a reminder and a clock symbol is
displayed on the Information Plate. Pressing OK again removes this reminder.
Next programmes cannot be viewed before their start times. To exit the
Information Plate, press EXIT on the RCU.
DIGITAL TERRESTRIAL TERMINAL
15
USER MANUAL
REMINDERS
Please refer to the explanation on page 15 “Information Plate” on how to set reminders.
This decoder provides you with two options when setting reminders.
16
1
With the Information Plate displayed and NEXT activated, press the OK
button on the RCU and a reminder will be set. This Reminder will display
a message on the TV screen when your programme is about to start. Press
OK on the RCU when this message appears and the decoder will change
to that channel. See illustration below.
2
The second type of reminder is set in the same way as above but in this
case, with the Information Plate displayed and NEXT active, press OK on
the RCU twice. A reminder is set. This reminder will cause the decoder to
tune to thatprogramme automatically when the programme starts. See
illustration below.
DIGITAL TERRESTRIAL TERMINAL
USER MANUAL
SELECTING SOUNDTRACKS
Available Soundtracks, included with programmes, can be heard and selected at any
time while watching a programme.
NOTE: Preferred Soundtrack options can be selected from the Menu.
Refer to Soundtrack Options on page 25
1
Press
follows:
2
Press ? on the RCU repeatedly and the various options are displayed in
the selection box.
Once you have the correct option in the selection box (see illustration
above) press OK on the RCU.
The new soundtrack will be heard.
3
4
?
on the RCU. The current soundtrack language is displayed as
SUBTITLES
If subtitles are available, they are normally displayed on the screen as part of the
programme.
1
If subtitles are not available the following information box will appear on the
screen when you press
on the RCU.
2
If subtitles are currently present and you want to stop the subtitles, press
on the RCU and an informatiom box (illustration above) will be displayed.
Press
on the RCU repeatedly until the message “Stop Subtitles” appears,
then press OK on the RCU.
DIGITAL TERRESTRIAL TERMINAL
17
USER MANUAL
TELETEXT
Some services may have a Teletext service. This can be selected as follows:
1
NOTE:
2
3
4
5
With the service selected, press
box is displayed:
on the RCU. The following message
The symbol changes to three bars to indicate teletext selected.
If Teletext is not available, a “No Teletext” message is displayed.
To make teletext transparent press
again.
To page up or down, press P+ or P- on the RCU. To change to a distant
page, key in the page number using the numeric digits on the RCU and then
press OK.
To clear teletext from the screen, press EXIT on the RCU.
SIGNAL SOURCE SELECTION
Switching between signal source devices is automatic by using the UHF button (green
button) on the RCU. To select between the available signal sources, a single pressrelease of the UHF button in normal viewing mode (i.e not in the Menu or EPG) switches
to the next source. This is an override selection in that it will switch to VCR even if the
VCR is not playing.
The signal source is indicated on the decoder front panel. The available options are:
Decoder (DTT): This allows you to use your Terrestrial services.
18
VCR:
This allows you to view a programme from the VCR. Press
play on the VCR to view.
TV:
If your decoder and TV are connected through SCART, it will
allow analogue terrestrial channels to be viewed on the TV.
DIGITAL TERRESTRIAL TERMINAL
USER MANUAL
ELECTRONIC PROGRAMME GUIDE
In order to access the Electronic Programme Guide, press
An on-screen menu is displayed as follows:
TV
GUIDE
on the RCU.
NOTE: When the EPG is displayed, Video and Audio is not present.
1
“Display by Time” allows you to search all the channels subscribed to according
to Time for an entire week. Reminders may also be set here.
2
“Display by Channel” allows you to search a specific channel for an entire week.
Reminders may also be set here.
3
“Theme Search” allows you to search for particular events/programmes
in various categories.
4.
“Reminder List” allows you to view all the reminders that were set either in the
Display by Time option or the Display by Channel option.
DISPLAY BY TIME
DIGITAL TERRESTRIAL TERMINAL
19
USER MANUAL
DISPLAY BY CHANNEL
THEME SEARCH
REMINDER LIST
20
DIGITAL TERRESTRIAL TERMINAL
USER MANUAL
USING THE MENUS
To use the Menu system:
1
Ensure that the decoder is not in standby mode.
2
Press the MENU button on the RCU. The following Main Menu will be displayed,
which provides access to all other sub-menus as shown below.
When you change values or settings in each of the menus or sub-menus, move
the highlight to “Accept Changes” option and press OK or the changes you made
will not be saved. All the Menus are navigated as follows:
1
Use the
or
vertical list box.
buttons to scroll the highlight bar up or down in a (sub)menu or
2
Select a highlighted menu option and go one level lower within the menu hierarchy
by pressing OK on the RCU. This applies to the Main Menu screen and all sub
menu screens.
3
Use EXIT to return to the previous menu (go one level higher within the menu
hierarchy).
4
Use or buttons to move the highlight to the option you require. Press OK.
To change any setting or values, first press OK. The area were the values can be
changed becomes WHITE. Use or to change the values. Once the values
have been changed press OK again. Now move the highlight bar to the “Accept
Changes” option and press OK.
5
Use the MENU button to EXIT from all menus and return to TV or Audio programmes.
6
Use numbered buttons on the RCU to enter numeric values.
DIGITAL TERRESTRIAL TERMINAL
21
USER MANUAL
PARENTAL GUIDANCE
The decoder has a parental guidance facility to control viewing of restricted programmes.
Access to this facility is controlled via the Parental PIN code.
TIP:
NOTE:
The PIN is set at the factory to 1234. If you intend to use the Parental
Guidance facility, please change the PIN as soon as possible.
Remember to keep a note of your new PIN in a secure place.
To use or change your Parental PIN code, your Smart Card must be in
the decoder.
BLOCKING OPTIONS
1
Press Menu on the RCU. The Main Menu list is displayed with Parental Guidance
highlighted. Press OK on the RCU.
2
A Security Check screen is displayed. Enter the Parental Guidance PIN code
using the digit buttonson the RCU.
3
The Parental Guidance sub-menu is displayed (see illustration above) with Blocking
Options highlighted. Press OK on the RCU.
4
The Blocking Options sub menu is displayed, which is organised as follows:
NOTE: If the incorrect PIN is entered, the previous menu (Security Check) is
again displayed.
22
DIGITAL TERRESTRIAL TERMINAL
USER MANUAL
NOTE: The default setting is “No BLock” and Parental Level “R18”.
5
Press OK to change the Blocking Options. The options available are “No Block”,
“Total Block” and Parental Guidance”. Use the
or
buttons to scroll through
the different options. Press OK on the RCU to make your selection.
6
If you chose “Parental Guidance” in the Blocking Options then you need to select
a Parental Level. In the Blocking Options sub menu, scroll down to the Parental
Level option and press OK on the RCU. Use
or
to change the Parental Level
to the required level. The options available here are “R18”, “18”, “16”, “PG13”and
“Family”. Once you select the level you require, press OK on the RCU.
7
After you have made the necessary changes, move the highlight to”Accept these
settings” option and press OK on the RCU. This saves all the changes you have
just made.
8
You will now be back at the Parental Guidance sub menu. To get back to the Main
Menu, press EXIT or to return to normal viewing press Menu on the RCU.
SERVICE BLOCKING
This option is different from Blocking Options in that this feature is used to block out
an entire channel irrespective of the age restriction, where as Blocking Options only
blocks a programm on a channels For example, if you do not want your kids to watch
the Cartoon channel, then you would use the Service Blocking option. This channel
will not be shown until the Parental Guidance PIN code is entered.
To access Service Blocking, do the following.
1
In the Parental guidance menu, scroll down to Service Blocking option and press
OK on the RCU. The Service Blocking Bouquet Selection screen is displayed as
illustrated below.
2
Select the Bouquet in which the service you want to block is located by moving
the highlight up or down. Press OK on the RCU. The Service Blocking screen is
displayed with all the channels available on the selected bouquet. Refer to illustration
on the next page.
3
Use the Up or Down buttons on the RCU to scroll to the channel you want to
block.The channels available are listed in the LEFT-HAND box. Refer to illustration
on next page.
DIGITAL TERRESTRIAL TERMINAL
23
USER MANUAL
4
Once you have located the channel you wish to block, press the
button on
the RCU. This will now move the channel into the RIGHT-HAND block which is
titled “Blocked”. Press OK on the RCU.
5
A message block appears on the screen asking you to PLEASE WAIT. Once
processing is complete, the Service Blocking Bouquet Selection menu will be
displayed. Press EXIT on the RCU to revert to the Main Menu or press MENU to
return to normal viewing. The channel is now blocked.
CHANGE PIN
This option should be used to change the Parental PIN code from the factory set code
to a code of your preference. When selected from the Parental Guidance sub-menu,
the following is displayed on the screen.
1
At the “Old PIN” code prompt enter the current PIN code.
2
The highlight automatically moves to the “New PIN” code prompt. Enter your New
PIN code. Your new PIN must be a 4-digit number.
3
The highlight automatically moves to the “Re-enter new PIN” code prompt. Re
enter the same New PIN code. Once entered the decoder automatically returns
to the Parental Guidance sub menu. Press EXIT or Menu on the RCU.
24
DIGITAL TERRESTRIAL TERMINAL
USER MANUAL
SOUNDTRACK OPTIONS
This option is selected from the Main Menu. It allows you to choose from a list of
supported soundtracks. Once selected, the decoder will use this as the default language.
To access Soundtrack options do the following:
1
Press Menu on the RCU, select Soundtrack options from the Main menu and press
OK.
2
The Soundtrack options screen is displayed (see below) with Default Language
highlighted.
3
Press OK. This allows you to change the language. Use the
or
buttons
on the RCU to change the language. Once you have chosen the preferred
language, press OK on the RCU.
4
Scroll down to “Accept these settings” and press OK. You will now be back at the
Main Menu. Press EXIT or MENU. Normal viewing will resume.
MAILBOX
The service provider can send global messages over-the-air. When a message has
been received, the yellow front panel indicator will be illuminated and an envelope
symbol will appear on the TV screen.
To read the message do the following:
1
Press Menu on the RCU. The Main Menu is displayed.
2
Use the Down arrow on the RCU and scroll to Mail Messages. Press OK.
3
The Mail Message screen is displayed. Press OK to return to the Main Menu.
Press EXIT or Menu to return to normal viewing.
The front panel yellow indicator will be off and the mail symbol will no longer be
displayed.
DIGITAL TERRESTRIAL TERMINAL
25
USER MANUAL
COLOURS AND TRANSPARENCY
This feature allows you to customise the colours of the on-screen displays. There are
a few options to choose from. The colour schemes can be either transparent or opaque.
When Transparent, the video can be seen in the background when the Menu, Information
Plate or Subtitle box is displayed.
When Opaque is chosen, the video is not visible in the background. In both cases
audio is present. To access this option, do the following:
1
Press Menu on the RCU, The Main Menu will be displayed. Scroll down to Colours
and Transparency. Press OK. The Colours and Transparency menu is displayed.
2
To choose a colour scheme, press OK with Colour settings highlighted. This will
allow you to choose another colour scheme.
3
Use the or button on the RCU to choose a new colour scheme. Once you
have made your choice, press OK. Scroll down to Accept these settings and press
OK. You will now be back at the Colours and Transparency menu.
4
Scroll down to Transparency settings and press OK. The Transparency settings
menu is shown.
5
In this menu you have the option of setting the Background and subtitles to either
transparent or opaque.
26
DIGITAL TERRESTRIAL TERMINAL
USER MANUAL
INFORMATION DISPLAY PERIOD
If the period of time the Information Bar, Bouquet List, Teletext/subtitles Box or Volume
Bar is displayed on the screen is too long or too short, the duration of each of the above
can be adjusted to suit you preference using this option in the menu.
This menu is accessed from the Main Menu. The Information Display Period menu is
illustrated below. To change any of the options in this menu, select and press OK on
the RCU.
Make the necessary changes and then select Acccept these changes and press OK
to save all changes made. Refer to the on-screen help for assistance when using this
feature.
ADVANCED OPTIONS
This is where the setup of the decoder is done. With the exception of two of the submenus in this section it is recommended that you do not make changes to the settings
in these sub-menus. The PIN code for Advanced Options is 9949.
If there is a need to change any of the other settings in the other sub-menus, please
call the service provider or an approved installer.
The two sub-menus that you may use of, is the “Local Time” menu and the “Decoder
Upgrade” menu. An illustration of the Advanced Options menu is shown below.
DIGITAL TERRESTRIAL TERMINAL
27
USER MANUAL
LOCAL TIME
In this menu you can set the time that is displayed by the decoder. If the time displayed
does not correspond with the current time, change the time by following these instructions:
1
Press Menu on the RCU. Scroll down to Advanced Options and press OK.
2
The Advanced Options menu is displayed. Scroll down to the Local Time option
and press OK. Local Time is highlighted.
3
Press OK and you will be able to change the time displayed using the
or
arrow keys on the RCU. The time can be increased or decreased in intervals of
30 minutes.
4
When finished, press OK on the RCU. Scroll down to Accept these settings and
press OK. The Local time will be updated.
5
Press EXIT or Menu on the RCU.
DECODER UPGRADE
This Option is only available when there is an upgrade available over-the-air. Consult
your service provider.
28
DIGITAL TERRESTRIAL TERMINAL
USER MANUAL
TROUBLESHOOTING
SYMPTOM
SOLUTION
DIGITAL TERRESTRIAL TERMINAL FAULTS
Does not display any message Check the main power cable and check that it is plugged
on the front panel or DTT has into a power socket.
Check that you have switched the mains power switch On.
no power.
Check if DTT is in standby mode.
No Picture
Ensure that DTT is switched On (see above).
Check that RF, SCART or RCA are connected correctly to
the TV or VCR.
Check that the correct channel on the TV has been selected
and the correct Video output is selected on the DTT.
Check that the UHF channel has been set properly in the
case of RF connections being used.
Poor Picture Quality
See No Picture ( above).
Check the signal level, if it is low you may need to re-align
the antennae.
No Sound
See No Picture (above).
Check that the volume level of the TV and DTT are correct
Check that the DTT and TV are not in Mute mode.
Remote Control does not Work. Point the RCU directly at the DTT Front Panel Display.
Check the Batteries of the RCU and replace if required.
ON-SCREEN ERROR MESSAGES
No Signal/Searching for Signal Check the Antennae - replace if necessary.
Check the cable from the antennae.
Check the position of the antennae - realign if necessary.
If you encounter any other error conditions/messages please contact your
Service Provider for assistance with the problem.
DIGITAL TERRESTRIAL TERMINAL
29
USER MANUAL
SPECIFICATIONS
MEMORY
RAM
FLASH
Non-Volatile Memory
Host Processor
MIPS
8 MByte + 2 MByte
4 MByte
16 KByte
NEC EMMA(MIPS core)
100
FRONT END
DVB standard
OFDM Mode
Frequency Band VHF/UHF
Channel Bandwidth
Frequency Step
Input Signal Range
Symbol Rate
Complaint with DVB-T/ETSI spec.
2k/8k, SFN capability
47 to 862 MHz
8 MHz
167 kHz
-88 dBm to -14 dBm (depending on mode)
4.98 to 31.67 Msps (depending on mode)
REMODULATOR
Remodulator RF Input VHF/UHF
Remodulator (Digital) RF Output
47 MHz to 862 MHz
UHF channels 21 to 69
AUDIO
DVB Standard
Sample Frequencies
MPEG2 Layer1 and 2 (Musicam)
32, 44.1, 48 kHz
VIDEO
DVB Standard
Video Format
Video RAM
Host Supplied Audio/Video
Format Conversion
MPEG2 MP @ ML
PAL
16 Mbits
I and P frame support
Pan & Scan, Letterbox
GENERAL
Front Panel Buttons
Mains Voltage
Dimensions
Weight
RCU
Temperature
Relative Humidity
Altitude
30
5 buttons
210 - 250 V AC 50 Hz
357x70x240 mm (WxHxD)
~2.5 Kg (unpacked)
32 button, infra-red, battery
operated.
5 degrees C to 45 degrees C
5% to 80%<38 degrees C wet
bulb temperature
0 to 2000 m
DIGITAL TERRESTRIAL TERMINAL
USER MANUAL
HOTLINES
Manufacturer’s website:
www.uec.co.za
Service Centre Contact Details:
Name:
AL-BAHA Est. For Applications of Technology
Postal Address:
P.O. Box 941721
Amman (11194)
JORDAN
Location:
Sameer Mahmoud Al-Zu’bi Street
Bldg. No. 1
First Floor
Apt. No. 1
Tla’a Al-Ali Al-Sharqi
Amman-JORDAN
Telephone:
+ 962 (6) 5512452
+ 962 (6) 5512457
+ 962 (6) 5523056
+ 962 (6) 5523058
Fax:
+ 962 (6) 5512459
DIGITAL TERRESTRIAL TERMINAL
31
USER MANUAL
NOTES
32
DIGITAL TERRESTRIAL TERMINAL