1
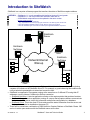
SiteWatch™ V1.1x
User and Technical
Guide
Contents
Copyrights and Trademarks ................................................................................................................. ii
Introduction to SiteWatch ............................................................................................................................1
Using SiteWatch............................................................................................................................................2
SiteWatch Initial Setup .................................................................................................................................5
Installing the 3 different SiteWatch Applications ..........................................................................................8
Reports (Report Manager)..........................................................................................................................10
SiteWatch Server Utility Software .............................................................................................................12
Repair
............................................................................................................................................12
Backup / Restore
...........................................................................................................................12
Upgrade Key ..................................................................................................................................13
Purge
.............................................................................................................................................13
Licensing Key Upgrade for SiteWatch Server..........................................................................................14
Trouble Shooting and Technical Notes ....................................................................................................15
Index ............................................................................................................................................................19
21-0402E v1.1.3 (2008.08)
© 2008 CSG Security Inc. / Sécurité CSG Inc.
i
Disclaimer
This document contains proprietary information of
CSG Security Inc. / Sécurité CSG Inc., and may not be
reproduced in any form or disclosed to any third party
without written approval of a duly authorized
representative of CSG Security Inc./Sécurité CSG Inc.
All products are warranted against defects in
workmanship or materials (details available upon
request). Installers are responsible for knowing and
complying with any local regulatory fire and building
codes. In the interests of improving quality and
design, the right to amend specifications without given
prior notice is reserved.
Do Not Alter Components:
Altering units, or removing
components without written consent by the manufacturer may
void warranties and/or cause the specific device to no longer meet
local regulatory requirements.
Copyrights and Trademarks
™
Netvision and SiteWatch are trademarks of
CSG Security Inc. / Sécurité CSG Inc.
™ Pentium is a trademark of Intel Corporation
™ ® Windows 2000, and Windows XP are trademarks or
registered trademarks of the Microsoft Corporation.
© Copyright 2008
CSG Security Inc. / Sécurité CSG Inc.
All rights reserved.
ii
SiteWatch™ User and Technical Guide
21-0402E v1.1.3
Introduction to SiteWatch
SiteWatch is a computer software program that monitors the status of NetVision capture stations.
NOTICES: · SiteWatch v1.1 is only compatible with NetVision Version 2.2 and greater.
· SiteWatch v1.1 can only be used with Windows 2000 and XP.
· All SiteWatch components must be updated to the same version.
General upgrade procedure:
1. Shut down the SiteWatch component
(e.g., right-click the icon in the sys tray (right of task bar on PC desk top) and choose “Exit”.
2. Run the SiteWatch installation CD and choose “Remove” during the procedure.
3. Run the Installation again and choose to install only the applicable SiteWatch component.
SiteWatch
Server
SiteWatch
SiteWatch
NetVision
SiteWatch
Client
Cameras
Network/Internet
/Dial-up
SiteWatch
NetVision
Cameras
SiteWatch
Client
• NetVision Stations are assigned to groups. Stations with trouble conditions such as malfunctioning
cameras will indicate on the SiteWatch client PC. For example, a guard observing the condition can
notify a technical representative to attend and correct the fault.
• SiteWatch is comprised of 3 programs running at the same time on 3 different PCs using their IP
addresses over the Internet, a Network or Dial-up connection.
• SiteWatch NetVision: A service application running on the capture station that provides its status.
• SiteWatch Server: A service application running on a server that all capture stations communicate
their status to. This server stores this information and all sites configuration in a database.
• SiteWatch Client: This is the client PC that retrieves all the status information from the server and
displays it. It can also be installed on the server PC.
• There can be a maximum combination of 2000 NetVision Capture Stations or SiteWatch Clients. 200
can be in active open sessions with the SiteWatch server at one time.
21-0402E v1.1.3
SiteWatch™ User and Technical Guide
1
Using SiteWatch
When the SiteWatch program is launched, a Login box is displayed. The case sensitive name and
password of the operator is entered and the name of the Server is entered / selected.
•
•
•
•
•
•
The default Name to enter is: “Administrator” and the Password is “pass”.
A small button next to the Server box when pressed will display a selection box for IP or Dial-up.
Pressing the “Delete Server” button will clear a server name. A new one can be entered.
The Login button is pressed.
There is a server connection progress line at the bottom of the login box.
Providing the operator is authorized, the SiteWatch opens.
• The information bar at the very top of the screen provides information about the name of the connected
server and the operator that is logged on.
• The menu provides selections for:
− “File” – for the current operator to Logout or Exit the program completely.
− “View” – to change the present displayed selection.
− “Help” – displays “Contents” which displays these Help Topics or “About” – that will display the
software version number.
• The main tool bar has special selections for:
− Log Out – for the current operator to
Logout.
− Exceptions Only / Show all Nodes –
Toggles back and forth between showing all status items vs. exceptions only.
− Show / Hide Events – Toggles back and forth between displaying and hiding the events list.
− Refresh – to manually renew the activity log.
− Report Manager – displays the reports generating selections box. Discussed in the ‘Reports” section of
this Help Guide.
− Help – displays Help topics.
− Save – the Refresh button will change to Save when configurations have been entered or changed.
Pressing the button when it says Save will save the new information and the button will change back to
Refresh.
2
SiteWatch™ User and Technical Guide
21-0402E v1.1.3
• This tool bar can be undocked, docked or closed.
• The two buttons on the left below this tool bar are for selecting the trees to view the list of system
“Operators” and capture “Stations” that are being monitored.
• Example: “Cameras” will display the
list of cameras connected to the
capture station and their particulars
(NOTE: if a Camera’s “video state
is unknown” a red X error indicating
trouble with the camera, will turn
grey). “Storage” will open an
information sheet for the station’s
Drive in use. Displaying available
capacity space, the drive’s total size
and the amount of the drive that has
been used up for captures.
• Settings made in the work area to the right of the tree box affect the items in the trees. The splitter
between the 2 areas can be used to enlarge or reduce the size of both areas. There is a splitter at the
bottom of both these areas also used for resizing.
V1.12
Red/White X in Sample Image:
This indicates the image is invalid
(such as if not being recorded).
Warning Next To Drive Letter:
This indicates a partition being
reported as less than 20GB (which
may indicate drive failure).
• Below these two areas is another bar with various selection buttons on it.
“UnSorted” – You can sort the event list by clicking on some of the column headings. Clicking
"Unsorted" resets the list to show newest events at the top.
“Display:” – These coloured buttons set the types of events to appear in the list:
− “White X in a red circle” – Error events displayed.
− “Explanation mark in a yellow triangle” – Warnings
− “Lower case letter “i” in a call out balloon – Information displayed
− “White X in a gray circle – events from “undefined” conditions. Selections not properly configured.
− The square button on the very right that looks like “a PC hard drive that has stopped working”
represents HDD S.M.A.R.T. NetVision Station hard drive errors. It is depressed by default.
− “Refresh Events” – This button is pressed when an item in the main tree is highlighted and all the events
for that specific item in the Events area are displayed. Maximum 500 events per item.
21-0402E v1.1.3
SiteWatch™ User and Technical Guide
3
− “Acknowledge Event” – An event or events can be highlighted and acknowledged by pressing this
button. This will clear the event.
− “Acknowledge All Events” – This will clear the event window. Only new events will be displayed.
• Status and Date/Time event particulars at the top of the activities display area are actually sorting
buttons:
− Pressing each button will sort the particular information in an ascending or descending order and an up
or down arrow will display on the right of the selected button to indicate the direction of the order.
Category Buttons:
− Status – current state of the fault.
− Date/Time – when the occurrence happened.
− Station – NetVision PC with fault.
− Event – type of fault, camera etc.
− Camera – the camera number reporting
− Details – what kind of fault.
•
A special event is the red circle clock. It represents that a response from a station has “timed out”.
− NOTE: A “timed out” event appears when a capture station has failed to communicate 15 minutes
after it is scheduled to.
Responding to Alerts
•
Activities appearing as they happen in the event area and similarly showing up in the Station’s
tree are treated as alerts for operators to respond to. They would notify the designated
personnel as necessary; to check the fault and restore it.
•
The Status Bar at the very bottom of the main screen displays the systems current activities.
4
SiteWatch™ User and Technical Guide
21-0402E v1.1.3
SiteWatch Initial Setup
•
•
•
•
•
•
•
Operator’s Button: Displays
existing operators in tree.
The default Logon operator
name and password of
“Administrator” and “pass” when
the SiteWatch client is started
for the first time can view or edit
anything. By selecting the
operators name in the operator
tree, the name and password
can be changed in the operator
settings area box on the right
side of the tree box.
To add a new operator, right click in the tree box. A box will
appear to select “Add operator”.
A blank operator settings area in the box on the right will appear to
enter the new operator.
Operations inside SiteWatch depend on the permissions assigned
to the operator that is logged on to SiteWatch at the time.
An operator must be assigned to at least one of the existing
NetVision groups or their status will be displayed with a yellow
warning icon beside their name.
An operator can view all other operators that have permissions equal or less than they do.
Operator Settings:
− Name: operator’s name.
− Password/Change Password: enter operator’s password (twice).
−
−
−
−
−
−
−
Permissions and Related Indicators:
Yellow triangle: No station groups assigned.
Red "A": Create/edit stations allowed.
Note: Operators can only edit SiteWatch NetVisions they can view.
Light green key symbol: Create/edit operators allowed.
Note: Operators with “Edit operator” permission can add/delete operators they can view. They can not
delete themselves. They can not add/delete NetVision Groups or Stations but can edit existing ones.
Light blue key symbol: Only "Edit Configuration" tasks allowed.
White key symbol: "View Only" permission. No "Edit" permissions allowed.
Options:
− Lock Out Time: set the amount of time it takes before SiteWatch times out and returns to the Login box.
NetVision Station Groups Assignment
− Check the box for the group the operator is assigned to.
• Stations Button: Displays in tree, existing NetVision Station Groups, NetVision Stations and possible
faults from their connected cameras or Database Storage being too full. When a connected camera etc.
does not have a fault, it does not appear in the tree.
21-0402E v1.1.3
SiteWatch™ User and Technical Guide
5
• To add a NetVision Station Group: Deselect “Exception View”.
Rest the mouse pointer near the bottom of the tree box and right
click the mouse. A box will open to select adding a new group.
• After making the selection the right configuration area will
display a box for the group’s Name and below it, another
“Comments” box to enter any special instructions. After making
these entries, press the Save button.
• To add a NetVision
Station: Deselect
“Exception View”. Right
click higher in the box.
This can highlight an item
in the tree. A box will
appear to either delete
the highlighted item or
add a NetVision Station.
• After making the selection
to add a station, the right
configuration area will display 2
tabs to select for entering the
station’s settings:
Identity
− Name: the NetVision station’s full
name.
− Alias: either the NetVision station’s
full name, an abbreviation of it or, an
alternative name. There can be no
spaces in the alias, alphanumeric
characters only and a maximum of
16 characters.
− Location: physical Address, City, Province /
State, Country, Postal/Zip Code, Contact
Name and Phone Number.
Configuration
Schedule:
− A check box to Enable Scheduled Update.
− A drop down box to select when the Station
should report to the Server and SiteWatch.
Every 5 minute to 12 hours.
Check Recording:
− Cameras are constantly recording. If a camera
stops recording for whatever reason,
depending on the delay set in this box (1 – 72
hours) an event will appear for “recording
failure” from the problem camera in the events
list. When the fault is cleared and the camera
is recording again, a “recording” event will
appear for the camera to indicate the camera
is restored. “0” = Disabled / None.
6
Storage:
−
“Quota” entry box – enter the
percentage of station event storage
space to be considered ‘capacity full’.
Quota Indication: This is as last reported from
each DVR. When this threshold is reached, it will be
indicated on-screen (in the ‘tree’). This information
is NOT recorded as an event.
NOTE: This selection is enabled by opening the
“Recording Setup” on the NetVision machine, using
the NetVision software. I.e. Control Panel / DSR
Configuration / Recording Setup / Setup. No
changes are necessary, simply open the “drive” list
once and close it for the feature to operate on
SiteWatch.
Capture system:
− PAL or NTSC format selection.
A drop down box to generate an alarm if there is
“less than the number of frames per second”
selected. “None” can also be selected to disable
the function.
SiteWatch™ User and Technical Guide
21-0402E v1.1.3
• Viewing a Station’s Features: Pressing the plus (+) symbol next to stations in the tree will display the
station’s features:
• Cameras. Selecting Cameras will open another tree box between the existing one and the
configuration box on the right. Cameras can be selected individually. Pressing the plus (+) symbol
next to a camera will display its Last Capture Rate and Video Signal in this tree. A “Recording
Failure” may also appear for the camera if there was no recording detected in the time specified in
the “Check Recording” box in the NetVision Station/Configuration screen. ATM / POS Connectivity
will also display if it has been enabled. A white x in a red circle before e.g. a camera or ATM indicates
it is not communicating
properly.
When a camera is
selected, the right
configuration box will
display 3 selection tabs.
Each tab pressed will
display a camera’s settings
for viewing only. These
settings are adjustable at
the Netvision Station itself.
Camera
Configuration
− (Title): e.g. Camera 01,
Sequencing: e.g. “On”, Card
Number: e.g. 0 [0..3],
Channel: e.g. 0 [0..3].
− On Site, Enable ATM/POS: A check box to
enable Automatic Banking / Point Of Sale:
Interac®.
ATM connectivity NOTE: If the ATM is
operational, a transaction occurred in the last 24
hours. If it is not operational, there were no
transactions in the last 24 hours.
− Last Snapshot – displays the camera’s most
recent view with date and time.
-
VIDEO ONLINE EVENTS
- Netvision System has to be in View Mode
(log on) and Active property set to “true”.
−
−
−
−
−
−
−
−
−
Settings
Last User Logon: e.g. SUPERVISOR,
Record Resolutuion: e.g. High,
Recording Mode: e.g. Circular,
Dwell Time: e.g. 2 [1..120sec],
Display Time Format: e.g. 12-hour format,
Continue Display at Logoff: e.g. Off,
Status Retain: e.g. Off,
Continue Recording at Logoff: e.g. Off,
Continue PTZ Control at Logoff: e.g. Off.
21-0402E v1.1.3
Recorder
− Frame Rate: (For Instant, Alarm, Scheduled) -[frame/sec]
− Pre Alarm: e.g. Off, Pre Alarm Record Length:
e.g. 5 [0.60 sec].
− External Alarm Input: Status, Length
(duration) -- [1..600 sec], Normally Open
(Y/N).
− Audio Channel: e.g. No selection (no audio).
•
Storage.
Selecting a Station’s “Storage”
feature will display the SiteWatch NetVision
Drive in use, Storage Available (MB), Disk
Size (MB) and the Percentage Used.
SiteWatch™ User and Technical Guide
7
Installing the 3 different SiteWatch Applications
Security USB key NOTES:
- When the Netvision station establishes the first communication with the server, the server sends a registration
number to the station. This registration number is stored in the station USB key. After that, this station can only
send data to the server that has the same registration number, othewrise, an invalid key registration message will
be displayed.
SiteWatch Installation CD
The SiteWatch Installation CD will display 3 choices for loading any of the 3 applications on the PC the disk is running
on. As the programs are selected, follow their Install Wizards to complete their installation.
• SiteWatch NetVision
(NOTE: A USB Station licensing key is supplied to attach to this PC.)
After opening the SiteWatch NetVision
application, enter the Netvision Alias,
SiteWatch Server name plus Dial-up
connection name, if there is no LAN
connectivity.
SiteWatch Server name is the machine’s
name where status information will be sent.
After entering these settings, click on the
“Start”, right arrow button (pressing the
“square” button stops communications). The
status information will only be sent to the
SiteWatch Server after a NetVision machine
has been properly configured in the SiteWatch. All error messages will be stored in the SiteWatchNetVision.log,
located on the root directory of the drive where the service is installed.
Capture Station Menu
- If the SiteWatch NetVision configuration box is closed using the upper right corner “x”, it will reduce to an icon
on the desk top task bar.
- If this icon is right clicked, a menu will appear. It will list selections for “Open SiteWatch Netvision”, “Start” or
“Stop” the capture station SiteWatch and “Exit”.
Changing a SiteWatch Netvision Station OS HDD
•
If a SiteWatch NetVision station’ Operating System, Hard Disk Drive has to be changed, this station will no
longer communicate with the SiteWatch server. The station will go into a permanent “timed out” condition.
• This occurs as a USB Security Key function to prevent station substitution.
• To bring the NetVision station back on line, it will have to be completely deleted and re-entered in the SiteWatch
operator program (Client). This will re-instate communications between the station and the server.
• Before the station is removed from the Client, a backup could be done to save the old station’s database.
• Use the SiteWatch Backup/Restore Utility (mentioned in “Utility Software” following) to backup the old
database.
• Delete the station from the SiteWatch Client and then re-enter it.
• If it is necessary to run a report from the old database, do a backup of the newly entered station’s database.
• Use the Restore utility to overwrite the new database with the old one in the Client.
• Run e.g. reports form the old database.
• When finished, save the old database by doing the backup procedure again.
• Restore the new database to overwrite the old one and continue regular operations.
• The old database cannot be left in the Client or, the NetVision station will permanently fail to communicate
with the SiteWatch server again.
8
SiteWatch™ User and Technical Guide
21-0402E v1.1.3
Dial-Up Configuration
MSDE Requirements
− The NetVision Capture Station calls the
SiteWatch server only. Through its internal
modem and telephone connection.
•
The Account where the SiteWatch Server is
installed must have Administrative Permission and
Manual Logon.
− Configuring the dial-up feature is done through
the conventional Window’s utility e.g. Windows
2000: Start/Settings/Control Panel/Network and
Dial-up Connections/Make New Connection.
•
This computer must have file and print sharing.
•
This computer must have a Network adapter.
− “Dial-up to private network” is selected for the
NetVision Capture Station and “Accept incoming
connections” is set at the SiteWatch server PC.
− The Server PC’s phone number is entered at the
NetVision Capture Station’s dial-up and “For All
Users” is selected. Continue until finished.
− At the SiteWatch Server PC’s dial-up Wizard, an
installed modem on the PC is selected. The next
screen may be left as “Allow Virtual Private
connection” selected. Next screen: a new user is
added. E.g. User name: SiteWatch, Full name:
SiteWatch Server, Password: SiteWatch, Confirm
password: SiteWatch. Continue until finished.
− NOTE: the NetVision Capture Station “Dial-up to
private network” and the SiteWatch Server’s “Accept
incomming connections” user name and password
must be the same.
− Remember to enter the dial-up connection name in
the SiteWatch NetVision configuration box.
− After all the Dial-up details are done, the SiteWatch
NetVision will begin calling the SiteWatch server.
The first time it connects to the server, the
SiteWatch NetVision will learn what its schedule is to
call in with its condition and not call again until it is
scheduled to.
NOTE: The NetVision client PC will synchronize its
time with the SiteWatch Server PC each time it
communicates (if the time drift is within 1 minute).
The SiteWatch server PC can adjust to an atomic
clock periodically over the Internet by installing
special software on the server PC for it. A free
download of Atomic Clock sync software can be
found at <http://worldtimeserver.com>
If the NetVision client PC’s time diffrence is greater
then 1 minute during a synchronization, an event
will display in the event’s list for the particular
NetVision client PC saying: “time changed
(tamper)” as, this could mean the PC’s time was
tampered with. The Sitewatch Server will adjust the
client PC’s time and generate this message: “time
changed by 1 hr. (server enforced)”.
• SiteWatch Server
NOTE: The requirement to operate the SiteWatch
Server is 512 Mb of RAM.
21-0402E v1.1.3
− When installing the server application, the
program will prompt for the USB Server
licensing key to be plugged into the Server
PC.
− Selecting “Next” will begin the installation of
the MSDE (database).
The Server is installed as a Window’s Service
‘MSDE” and is installed as the Database engine. All
event information will be stored in the file
SiteWatchServer.log, located in the root directory of
the drive where the service is installed.
NOTE: If necessary, it is recommended to install a
SiteWatch Client on the Server PC to acknowledge
that the Server application is running.
The following events are sent to the server as soon
as they occur. They are checked every minute in
the SiteWatch Netvision.
- Configuration changes (Camera Settings,
Recorder Settings, Option Settings). These
items are accessible through Menu Utility in the
Netvision Application.
- NetVision starts/shutdown.
- Changes in Video status (video loss, online,
offline).
SiteWatch Server Name
- This is the name of the computer that the
SiteWatch server software is located on.
- A computer’s name is commonly found on the
computer by right clicking on a “My Computer”
icon or reference, selecting “Properties” and
selecting e.g. “Computer Name”, “Network
Identification”, etc.
• SiteWatch Client (no USB key)
To operate the Client, the operator must have
their authority previously defined by an
administrator. The operator might be able to see
all groups of NetVision PCs or specific ones
according to their authorities. To start configuring
the system, a NetVision Group and then a
NetVision PC with its IP address and schedule
are defined. The schedule will inform the
SiteWatch NetVision service how often it should
send data to the server. After making these
settings, the NetVision capture station is properly
registered on the server and ready to send status
information to the server and be viewed on the
Client.
SiteWatch™ User and Technical Guide
9
Reports (Report Manager)
• NOTE: Reports will not function unless a Printer Driver is installed on the PC that is running the SiteWatch.
• Selecting “Report Manager” from the
main tool bar will display a selection for
“Reports”. This selection will open the
Report Manager. This feature supplies
the ability to display event particulars on
the PC screen or send them to a printer.
Very Large Reports: These are truncated at
5000 (latest) events to allow the report to run
efficiently. If this occurs, an indication will
appear at the top of the report.
Report Manager Selections
Report Type
Select Type:
− Site Report, Group Report, Exception
Report Only - by Site, Exception Report
Only - by Group, Time Horizon Report by Group.
Select Output:
− Screen, Printer, Email (Selecting email will open the PC email system and the report can be transmitted to an
email address.)
Stations
Select Station Group:, Select Stations:.
Interval
− From: Date, Time – To: Date, Time
(Drop down button for date opens a current calender page. The current date, based on the PC settings, is
circled. Arrow buttons on either side of the month’s name will increment or decrement the months of the year.
Selecting a day on the calendar page will set the date in the box. Exit the calender page by clicking the mouse
pointer outside of the calender page.)
“Run Report” to the selected output (screen or
printer) or “Close Report Manager” buttons
Time Horizon Report - by Group
• This report is for viewing the first time a station
began running and when its oldest recording was.
• When the “Time Horizon Report - by Group” is
selected, the main Report Manager screen will
display a selection box labeled “Time Horizon”. The
number of days is entered here as a threshold for
when a station has had their last recording.
•
10
Clicking on “Run Report” on the main Report
Manager screen opens a graph type screen. Days
are numbered from top to bottom on the left side of
the graph. A default of 180 days applies. Stations
are situated on the graph in relation to the number
of days since their last recording. When the amount
of recordings has reached its limit, the last
recording is replaced with a new one.
SiteWatch™ User and Technical Guide
21-0402E v1.1.3
•
Each Station’s Name, the date it was
First Run and its Oldest Recording are
listed inside red and blue circles on the
graph. These items can be selected
under “Display” at the top of the
screen. A red circle represents a
station that has common recordings
with the last one occurring inside the
number of days selected in the Time
Horizon box on the Report Manager’s
main screen. A blue circle represents
a station whose last recordings have
gone beyond the number of days
selected.
•
4 way arrows at the top left provide
controls for zooming up/down/left/right
on the station circles.
•
Next to these arrows are 2 more for
maximum zoom, horizontal or vertical, in or out on the station circles.
•
There are four more arrows to the right of these for panning up/down/left/right on the circles.
•
To the right of the Display selections is a “Print” button to print the graph or an “X” to close the graph.
21-0402E v1.1.3
SiteWatch™ User and Technical Guide
11
SiteWatch Server Utility Software
Repair
•
Press the left top tab to open the
SiteWatch Server database
repair option.
This utility can be used:
− If configuration corruption
appears evident, e.g. newly
added information is not retained
properly.
− If disk space appears to be
getting abnormally low, Repair
can act as a defragmenter.
Backup / Restore
•
Press the middle tab to backup
or restore the SiteWatch Server
database.
WARNING: It is very important to do
regular Backups. As soon as a
SiteWatch system has been
installed and all of its operators,
capture stations have been
configured, a backup should be
immediately done. A schedule for
doing a backup e.g. once a week
should be organized and always
adhered to.
•
NOTE: The SiteWatch server
service must be shut down to do back-up and restore or, errors will occur.
Stopping the SiteWatch server service
•
•
•
•
•
•
•
•
•
12
Go to Settings/Control Panel/Administrative Tools/Services.
Select the SiteWatch Server in the list and highlight it.
Right click the mouse and press Stop.
Minimize the Services screen.
Perform the backup through the SiteWatch back-up utility screen.
After the back-up is completed, maximize the Services screen.
Re-select the SiteWatch Server in the list and highlight it.
Right click the mouse and press Start. The SiteWatch server should be running again.
Close these screens and return to normal operation.
SiteWatch™ User and Technical Guide
21-0402E v1.1.3
Upgrade Key
This is covered in the next section.
Related Topic: Licensing Key Upgrade for SiteWatch Server
Purge
Over a long period of time, the database can become very large--causing the system to run slowly.
The purge feature allows you to delete all event data that was logged by the Sitewatch software before a
selected date--thereby returning the database to a manageable size.
ATTENTION: Purged data cannot be recovered. It is always recommended to perform a "Backup" before using the Purge
feature. Restoring a backup allows reports to be run on the older data. (See previous/above.)
Steps:
1) Use the arrows to locate a desired month.
2) Click to select the desired day.
3) Click [Purge Events].
4) Respond as desired when asked to confirm your selection.
Note: The column of numbers on the left edge of the calendar are "week numbers" (1 - 52).
21-0402E v1.1.3
SiteWatch™ User and Technical Guide
13
Licensing Key Upgrade for SiteWatch Server
• The number of originally purchased NetVision stations can be increased by upgrading the licensing key
that was originally supplied with the SiteWatch system.
• Before the number of stations can be increased, the SiteWatch dealer must be contacted and a Sales
Order produced for the number of
additional stations required.
• Open the SiteWatch Utility program
and select the “Upgrade Key” tab.
• With the USB licensing key plugged
into the PC, press the “Read Key”
button.
• A new screen will appear
displaying the Key’s code, Serial
number and how many client,
NetVision Stations that are
presently allowed.
• Enter the Sales Order number in
the box supplied.
• Enter the return fax number.
• This information is then printed out.
Press the “Preview” button to
review the form or close the
preview and make corrections as
necessary.
• Press the “Print” button to print out
the form.
• Fax the form to the fax number
supplied on the form.
• A fax should be received back with
the Sales order number, the Customer’s return fax number, the new Upgrade Key number and the
number of additional stations specified.
• Return to the Utility’s secondary upgrade key screen that the form was printed from.
• Enter the new Upgrade Key number in the “Upgrade Key” box at the bottom of the Utiltiy screen.
Press the “Upgrade” button.
• If an error message appears, verify the new key number was entered correctly.
• If the procedure succeeded, a successful message will appear.
• The “Client’s Allowed:” number on the secondary upgrade key screen should be increased to the
number specified.
14
SiteWatch™ User and Technical Guide
21-0402E v1.1.3
Trouble Shooting and Technical Notes
System Running Slowly
If you haven't purged the database in a year or longer, it can become very large--causing the system to run more
slowly. Before purging, you can also backup the database, to allow reports to be run on previous data if needed.
Related Topic: SiteWatch Server Utility Software
Log Files
For “Exceptions” only.
SiteWatch NetVision Log Files located in SiteWatch NetVision machine’s local disk (e.g. c:), filename: SiteWatch
NetVision.log.
SiteWatch Server Log Files located in SiteWatch Server machine’s local disk (e.g. c:), filename: SiteWatch Server.log.
SiteWatch NetVision and SiteWatch Server
Log File Report:
“NetVision station could not be registered! USB Error: Invalid key registration number!”
Explanation:
NetVision capture station has a key with a Registration number different than the one in the Server.
Check if the keys have been replaced or overwritten.
Log File Report:
“NetVision station could not be registered! USB Error: Number of licenses exceeded!”
Explanation:
No more stations are allowed to send data to the SiteWatch server due to the number of licenses.
Check the number of licenses that are allowed in the server.
Log File Report:
“NetVision station could not be registered! Machine not registered! Alias:”
Explanation:
There's no entry in the database (through the Client) for this station. Enter a record for this station in
order to enable it.
SiteWatch NetVision
Log File Report:
“SiteWatch Server does not respond!”
Explanation:
This message means that all information sent to the server did not get an acknowledgement. Check if
the server name in the form is correct and if the service for the SiteWatch server is running.
Log File Report:
“Error when setting up Machine ID!”
Explanation:
An error has occurred when the “internal” machine ID (unique ID) is assigned for the capture station.
Notify the manufacturer.
Log File Report:
“Problems with dial up connection!”
Explanation:
This problem is out of SiteWatch Netvision scope.
Check how the dialup connection is configured in Control Panel | Network and Dialup connections
and try to establish a connection using the dialup icon under Network and Dialup connections.
21-0402E v1.1.3
SiteWatch™ User and Technical Guide
15
Log File Report:
“This is a critical error! SiteWatch could not be registered with Netvision! Restart Netvision
application!”
Explanation:
This problem occurs when there are more than 16 clients registered with Netvision. SiteWatch
Netvision is registered with the Netvision Application by sending Windows messages in order to
receive video status notification. This problem may be fixed by restarting the Netvision Application.
SiteWatch Server
Log File Report:
“Error when checking Nvs schedule.”
Explanation:
An error has occurred when verifying whether the NetVision station was sending data in schedule.
This is not a critical error, especially if the database is busy with another connection, since it's
performed every minute and does not interfere with another operation.
Log File Report:
“Error when purging database:”
Explanation:
This occurs when SiteWatch Server is deleting events older than 180 days.
Log File Report:
“Not a valid USB key!”
Explanation:
The USB server key has possibly been replaced
SiteWatch Notes
“To Get Snapshots”: (the NetVision program itself must be running)
- “GetImage.dll” and “IJL15.dll” have to be under the same directory where SiteWatch is installed.
- Netvision has to be running and the camera online.
- Netvision Application has to be in View Mode and Active property set to True
- Webcam property has to be properly set in DSR Configuration (Control panel) item Remote Service Manager.
- Verify if http://localhost:httpPort works for one of the cameras. Run the example below:
- http://localhost/dsr-cgi/GetDSRImage.cgi?Camera=1&Width=280&Height=200&username=ur&password=wd&3
- Check the DSR Configuration (Control panel) item Change Http Port. Should be 80 or 8080.
Frame Rate: (the NetVision program itself must be running)
- AVI files for the camera must be present.
- The camera has to be Online.
- The Active Property is set to True - Menu Utility | Camera Settings in Netvision application.
- Verify if in the DSR Configuration (Control Panel Icon) the Recording Setup item is properly configured.
- Frame rates are recorded as follows:
. There are 2 different status types: Below and Above frame rate.
. If the first frame rate is Below "Min Frame Rate" specified in the Client (Tabsheet Configuration) the next one has to
be Above "Min Frame Rate" in order to be stored in the database.
. If the first frame rate is Above "Min Frame Rate" specified in the Client (Tabsheet Configuration) the next one has
to be Below "Min Frame Rate" in order to be stored in the database. This sequence repeats in the same way.
Dial-Up: (the NetVision program itself must be running)
- Try to establish a connection using the icon at Start Menu | Settings | Network and Dialup connections. This
should start the Netvision Dial-up.
- Check if the IP specified in Site Watch Netvision is external.
- When a dialup connection name is specified in the form, SiteWatchNetvision calls the dialup connection (Control
Panel | Network and Dial-up Connections) and waits for a succesfull connection to start sending data to the
SiteWatch Server. SiteWatch Netvision does not do any operation when a call is undergoing. If it fails, a message
will be saved to the LOG file and it will continue to keep trying every 5 minutes until a connection is successfully
established.
- After all attempts to connect have been done, it will try to connect again by following the schedule settings for the
capture station.
16
SiteWatch™ User and Technical Guide
21-0402E v1.1.3
Names for Station and Server PCs:
- It is required that a NetVision station and SiteWatch server must have names to ping them in both directions on a
LAN.
- Both PCs must acknowledge each other by name (any alphanumeric entry and not case sensitive).
- To make "ping by Name" work, check the IP assignments, and the Wins/DNS servers configuration. If no such
servers exist, edit the following file to resolve the IP - Name pairing:
…Windows\System32\Drivers\etc\hosts Open the “hosts” file with notepad.
- Proceed to the end of the file and enter the other computer IP/Name in a row by itself: (enter IP e.g) 10.100.123.56
(press the “Tab” key) (enter the host name e.g.) swserver.
- Do this for both PCs. Restart both and try pinging the PCs by name, which should be successful.
Timeout Event: (Hard Drive not Properly Configured)
- This will appear after 15 minutes delay in the current NetVision schedule.
- If the Timeout Event clock icon displays but communications appear okay, check to see if the Timeout Event
needs to be reset in the harddrive roots.
- Check the server harddrive root at e.g. C:\sitewatchserver.log or the NetVision at C:\sitewatchnetvision.log
- If the error message lines: “(Date) (Time) – Error when sending data to server ! Error when saving rec status info:
Error when getting drive info.” appear after these harddrive prompts, not all the events will be sent to the server.
- This means that the NetVision station has not been properly configured.
- Do the following to correct this fault:
- On the NetVision station, enter Control Panel and select “DSR Configuration”.
- Select recording set-up and deselect/select hard drives in use.
- Press Apply and Exit.
NetVision / SiteWatch Application Status Reports:
- NetVision not running: SiteWatch is sending data to the server but the NetVision application is not running.
- NetVision running: SiteWatch is sending data to the server and the NetVision application is running.
- NetVision SiteWatch Service not responding: the SiteWatch application is out of schedule but the status of the
NetVision application is unknown.
USB Key:
- When the NetVision Station establishes the first communication with the server, the server sends a registration
number to it.
- This registration number is stored in the station USB key.
- Following this the station can only send data to the server that has the same registration number.
- Or, an Invalid Key registration error will occur.
Instant Events:
- The following events are sent to the server as soon as they occur. They are checked every minute in the
SiteWatch NetVision:
- Configuration changes (Camera Settings, Recorder Settings, Option Settings). These items are accessible
through Menu Utility in the NetVision application.
- NetVision starts/shutdown.
- Changes in Video status (video loss, online, offline).
21-0402E v1.1.3
SiteWatch™ User and Technical Guide
17
18
SiteWatch™ User and Technical Guide
21-0402E v1.1.3
Index
Alias ..................................................................................... 6
Application Status Reports ................................................. 16
ATM/POS ............................................................................. 6
Backup the database.......................................................... 12
Camera ................................................................................ 6
Camera video state is unknown ........................................... 3
Capture System ................................................................... 6
Changing a station OS HDD ................................................ 8
Clients Allowed................................................................... 14
Configuration........................................................................ 6
Configuration, Camera ......................................................... 6
Database............................................................................ 12
Maintenance................................................................... 12
Database Back-up.............................................................. 12
Database Repair ................................................................ 12
Delete Server ....................................................................... 2
Dial-up.......................................................................... 15, 16
Dial-up Configuration............................................................ 8
Dial-up Connection............................................................... 2
Events .................................................................................. 6
Faxing, Upgrade Key.......................................................... 14
Features, Station .................................................................. 6
Frame Rate .................................................................. 15, 16
GUI SiteWatch, install .......................................................... 8
Hard Drive Errors ................................................................. 3
Hard Drive not Configured.................................................. 17
HDD S.M.A.R.T. ................................................................... 3
Identity.................................................................................. 6
Include Windows Events .................................................... 10
Instant Reports ................................................................... 16
Licensing Key..................................................................... 14
Licensing Key, Server ........................................................ 14
Log File Report................................................................... 15
Log Files............................................................................. 15
Log-in ................................................................................... 2
Main Tool Bar ....................................................................... 2
MSDE Requirements............................................................ 9
Name, Password .................................................................. 2
Names for PCs required..................................................... 16
Names, Station, Server ...................................................... 17
NetVision Station.................................................................. 6
NetVision Station Hard Drive Errors ..................................... 3
Notes.................................................................................. 16
Password, Name .................................................................. 2
Purge database.................................................................. 12
Recorder, Camera................................................................ 6
Recording Failure ................................................................. 6
Repair database ................................................................. 12
Report Manager ................................................................. 10
Reports............................................................................... 10
Reports running slowly (see purge).................................... 12
Responding to Alerts ............................................................ 2
Restore the database ......................................................... 12
Sales Order, Upgrade Key ................................................. 14
Server Config, MSDE ........................................................... 9
Server Software, install ........................................................ 8
Settings, Camera ................................................................. 6
Shut down server ............................................................... 12
SiteWatch NetVision, install ................................................. 8
SiteWatch Operator Interface............................................... 8
SiteWatch Server Name....................................................... 9
SnapShots.................................................................... 15, 16
Station Features ................................................................... 6
21-0402E v1.1.3
Stop server ......................................................................... 12
Storage ................................................................................. 6
Storage, Camera .................................................................. 6
System running slowly (see purge)..................................... 12
Time Horizon Report - by Group......................................... 10
Timeout Event .................................................................... 16
Tool Bar, Main ...................................................................... 2
Tools..................................................................................... 6
Upgrade key ....................................................................... 14
USB Key, SiteWatch NetVision ............................................ 8
USB Key, SiteWatch Server ................................................. 8
Using SiteWatch ................................................................... 2
Utility Software.................................................................... 12
Utility Upgrade Key............................................................. 14
SiteWatch™ User and Technical Guide
19