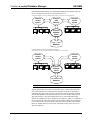
1
CRESTRON e-control™ Database Manager (SW-DBM) version 1.4 © 1999 Crestron Electronics, Inc. Crestron e-control Database Manager SW-DBM Contents How to Use This Manual 3 A Note on Printing This Document ................................................................................................... 3 Quick Start ........................................................................................................................................ 3 Section Summary .............................................................................................................................. 3 Quick Start Guide: Address Book (demo1) 5 Introduction 6 What is Crestron e-control™ Database Manager?............................................................................. 6 System Terminology and Topology .................................................................................................. 6 Leading Specifications ...................................................................................................................... 8 Requirements..................................................................................................................................... 8 Installation......................................................................................................................................... 9 Licensing ........................................................................................................................................... 9 Basic Server Setup 11 Communications Setup.................................................................................................................... 12 Test Communications...................................................................................................................... 15 Additional Server Side Setup .......................................................................................................... 16 Server Configuration In Depth 16 Specifying a Configuration File ...................................................................................................... 16 Password Access ............................................................................................................................. 17 COM Settings Definition................................................................................................................. 18 Signal Block Definition................................................................................................................... 20 Server Windows and Menus............................................................................................................ 27 The Database File 32 Database Fundamentals ................................................................................................................... 32 The Queries Table ........................................................................................................................... 35 Successive Queries .......................................................................................................................... 38 Operating on Database Tables ......................................................................................................... 40 Demos 41 Demo 1 Database Browsing and Maintenance ................................................................................ 42 Demo 2 Successive Query............................................................................................................... 43 Demo 3: AutoPick ........................................................................................................................... 45 Appendix A: Theory of Operation 48 Server Protocol................................................................................................................................ 48 Signal Block Definition / Activation ............................................................................................... 48 Signal Block Enable / Disable ......................................................................................................... 48 Signal Block Error Reporting .......................................................................................................... 48 Appendix B: Intersystem Communications and Signal Space Considerations 50 System Connections ........................................................................................................................ 50 Appendix C: Signal Reference 54 Definition of Terms ......................................................................................................................... 54 String Proxies .................................................................................................................................. 54 Bit Patterns ...................................................................................................................................... 54 Error Reporting ............................................................................................................................... 55 Signal Summary .............................................................................................................................. 55 Signal Reference.............................................................................................................................. 58 ii • Table of Contents Installation & Reference Guide — DOC. 5823 Crestron e-control Database Manager SW-DBM Crestron e-control Database Manager How to Use This Manual A Note on Printing This Document Adobe and Acrobat are trademarks of Adobe Systems Incorporated. This Portable Document File (PDF) can be printed with Adobe Acrobat Reader. Printing from a Windows 95 platform, version 4.0 or later, is strongly recommended because the figures print poorly with earlier versions. The latest version is freely available from Adobe at http://www.adobe.com/acrobat/. Quick Start To see an “out-of-the-box” demonstration of Crestron e-control™ e-Mail Instant messaging as quickly as possible, turn to the Quick Start Guide(s) beginning on the next page. You will need: • A Crestron CNMSX-PRO control system • A touchscreen (LC-3000, CT-3000, CT-3500, or VT-3500); and • A null-modem cable Follow the instructions in the guides precisely in the order given and you should be up and running in a matter of minutes. NOTE: The demos included with this package are all compiled to two versions, a COM version for use with an RS-232 serial connection, and a TCP version for use with an Ethernet connection (the latter case requiring the CNX Gateway). The Quick Start Guides refer only to the COM versions of these programs because setting up a serial connection is far simpler. We strongly recommend getting at least one demo to work first using a serial connection. Once that works, try the TCP versions. Instructions for setting up TCP/IP communications are provided below (see “Communications Setup, Control System Side, TCP/IP,” page 14). You do not need to license the software to try the demos provided you are still within the 15-day free trial period. Section Summary For more information, start with “Introduction” on page 6. 3 • How to Use This Manual Installation & Reference Guide — DOC. 5823 Crestron e-control Database Manager SW-DBM Detailed setup and configuration instructions and follow “Introduction”. Then comes information about the database file format. After that, the examples (demos) are described and illustrated in detail. Appendices include Theory of Operation, along with a complete Signal Reference. 4 • How to Use This Manual Installation & Reference Guide — DOC. 5823 Crestron e-control Database Manager SW-DBM Quick Start Guide: Address Book (demo1) 1 Install this package on your PC Presumably, since you are reading this PDF file, you have already done this. 2 Connect a CNMSX-PRO (with touchscreen) Connect a programming cable (a standard modem cable) from any COM port on your PC to the COMPUTER port on the front or back of the CNMSX-PRO control system. Connect a touchscreen to the control system set up for CRESNET ID 03. 3 The demo files can be found in the demos folder (also accessible through the Start Menu shortcut e-control Database Manager Demos) 4 Make sure pins 4, 5, and 6 are not connected. Upload all control system software Open the Crestron Viewport and establish communications with your control system. If you have not already done so, use the FileTransfer | Send Touchpanel… command to upload demoDBM.hex to the touchscreen at ID 03. Use the FileTransfer | Send Program… command to upload the compiled SIMPL windows file demo1COM.bin to the CNMSX-PRO. You may now close the Viewport. Connect the null modem cable Connect a null-modem cable from COM1 on the PC to COM A on the CNMSX-PRO. 5 The installer sets the server to use config file demoDBM.ini. Run the “server” Select shortcut e-control Database Manager Server from the Crestron folder in the Windows Start Menu. If the title bar of the window does not read “e-control Database Manager Demos,” use the File | Configuration file… command to navigate to the demos folder and select the file demoDBM.ini. 6 Start the “server protocol” Give the command Server | Start Server w/Signal Analyzer. (The Signal Analyzer is good for demos because it shows you the various signals going back and forth.) 7 Start the demo On the touchscreen, navigate through the setup instructions to the demo screen. This final page-flip to the demo screen starts the demo. 8 Open a database record! Make a selection on the touchscreen to open a record. A sample address book containing Crestron offices around the world appears. When you select an office, its address information is displayed. You can browse the database, add and delete records, and modify information in a record. If you select an option that requires entering information, a keyboard appears on the touchpanel so you can type the necessary information. 5 • Quick Start Guide: Address Book (demo1) Installation & Reference Guide — DOC. 5823 Crestron e-control Database Manager SW-DBM Introduction What is Crestron e-control™ Database Manager? Crestron e-control Database Manager (SW-DBM) empowers any Crestron control system with database capability. Simply by asserting specific signals, your control systems can send arbitrary text, whole text files, canned messages, alerts, status updates, etc., to any e-mail address. Messages can be sent to a control system for display and to assert specific signals. The term “server” does not imply a need for specialized hardware. Any PC meeting the minimum requirements on page 7 will suffice to run swserver.exe. The actual database access is not carried out by the control systems themselves, but by the freely distributed Crestron e-control Software Server. SW-DBM is a licensable component of this “server” application (swserver.exe) which is hosted on a standard PC running Windows® 95 or Windows NT® and provides the following core technologies: • Signal-level communications with the control system • Access to database tables • Access to external services (such as e-mail servers) through the PC’s network connection. The server is connected to the control system via either a serial cable through an RS-232 port or an Ethernet network through a LAN port. To effect the latter type of connection, the control system relies on an intermediary, the Crestron CNX Gateway, to translate communications protocols. To aid in making all this clear, the following illustrated discussion of system terminology and topology should prove useful at this point. System Terminology and Topology This manual simultaneously discusses several different inter-connected computer systems. To reduce confusion, throughout the manual, these systems are referred to using the terms in the following table. (Also refer to the diagrams on the next page.) Term Explanation The system or the control system One of a number of Crestron control system(s), which may include any combination of the following models: CNMS, CNRACK, CNMSX-PRO, CNMSX-AV, and CNRACKX. The server or the software server The Crestron Software Server, swserver.exe, which runs on a PC under Microsoft® Windows® 95 or Windows NT®. The gateway or the CNX Gateway A communications conduit that sits between the server and the control system(s). The control system(s) are connected to the server via direct RS-232 serial connection or via TCP/IP to the gateway and thence via TCP/IP to the server. NOTE: “Connected via TCP/IP” means any node (computer) visible on the Local Area Network (LAN). If the LAN is connected to the Internet, this could include any node visible anywhere on the Internet. Since a node can also see itself, this implies that multiple services can run on the same machine. For example, the gateway and the server can be “self-hosted” in this way. 6 • Introduction Installation & Reference Guide — DOC. 5823 Crestron e-control Database Manager SW-DBM In the illustration that follows, the communication pathways are represented by the arrows. The physical network is not represented, however. System block diagram, showing communication pathways (all connections using TCP/IP): Crestron control system VT-3500 VT-3500 Crestron CNX Gateway VT-3500 Crestron Software Server Crestron control system VT-3500 VT-3500 VT-3500 Database System block diagram, showing communication pathways (curved arrows are RS-232 serial connections; straight arrows are TCP/IP): Crestron control system VT-3500 VT-3500 Crestron control system VT-3500 Crestron Software Server VT-3500 VT-3500 VT-3500 Database NOTE: The CNX Gateway is not necessary when using RS-232 serial communications. TCP/IP connections between the server and the control systems require that each side of the connection be provided with the IP address of the other. This kind of connection also requires the use of the CNX Gateway which is separately licensed software that facilitates communication between the server and the control system. The CNX Gateway is typically installed on the server (when sufficient TCP/IP sockets are available) or it can be installed on any computer visible (i.e., pingable) on the TCP/IP network. There only needs to be one Gateway running on one computer to service the needs of all the computers and CNX control systems on the network. However, multiple Gateways are perfectly permissible as long as they are run on different computers. 7 • Introduction Installation & Reference Guide — DOC. 5823 Crestron e-control Database Manager SW-DBM Leading Specifications Specifications Table SPECIFICATIONS DETAILS SWSERVER.EXE (included with this package) Version 1.4 CNMS/RACK Operating System Version 3.18.12 or later CNMSX/RACKX Operating System Version 5.09.25 or later CNMSX/RACKX Monitor Version 5.09.25 or later CNMSX/RACKX TCP/IP Stack Version 5.09.10 or later CNX Gateway Version 2.08.04 or later SIMPL™ Windows® Version 1.4 or later; or Version 1.3 with Symbol Library Update 067 or later VisionTools™ Pro (VT Pro-e) Version 2.0.8.2 or later Requirements The server should meet these minimum system requirements. Windows 95/98/NT Operating System hardware requirements 32 MB RAM 100 MB hard drive space 133 MHz or faster Pentium processor A faster processor is recommended for serving multiple connections simultaneously 800 x 600 or higher screen resolution COM ports Required to make serial (RS-232) connections to control systems (one port per control system). (See Cable requirements below.) Network Interface Card Required to make TCP/IP connections to control systems. TCP/IP sockets (These are software constructs provided by your operating system. The maximum number of sockets is operating system dependent.) Server requires one socket per server–control system connection Required for EtherNet control system connections only. The maximum number of sockets is operating system dependent. CNX Gateway (see below) requires one socket + one additional socket per server–control system connection Cables Precise CNSP-532 specs are available in the Crestron Cable Database. 8 • Introduction Null modem cable, Crestron model CNSP-532 or equivalent Required for serial control system connections only. Warning: Do not use a generic null modem cable. Installation & Reference Guide — DOC. 5823 Crestron e-control Database Manager SW-DBM Auxiliary software CNX Gateway Required for TCP/IP (EtherNet) connections between the server and the control systems. Not required for serial connections. SMTP Express Recommended to reduce server overhead and improve server responsiveness while e-mail is being sent. Installation As of this writing, the Crestron Downloads page can be found at: http://ftp.crestron.com/library/ To install the Software Server, first download the installer package from the Crestron FTP site. To do this, first go to the Crestron website and select the Downloads page. New users must register. Proceed to the ECONTROL Library. Simply click on SW-DBM.EXE to start the download. Once the install package arrives on your PC, double-click the icon to initiate the install. Directions for the install are provided. The package is typically installed in C:\Crestron\econtrol. During the install, the package reminds the user that a CNX Gateway is required. (This is actually only true for TCP/IP connections. Direct RS-232 connections do not require the CNX Gateway.) Licensing A 15-day free trial follows initial installation. If you are still within the 15-day period, you have the option to postpone licensing and skip to the next section. Both the Software Server and the CNX Gateway are a licensed products, which means that although both software packages may be freely downloaded from the Crestron FTP site, use of the software requires purchase of licenses from Crestron. Each server running the Software Server must be individually licensed. In addition, to use Ethernet, you must acquire a CNX Gateway license with sufficient connections to accommodate all servers and control systems on your network. Server components are separately licensed. A license for the e-mail component must be obtained from Crestron even if other components are already in use. Each package, once installed, generates a “Site Code” specific to the server on which it is running. Upon being provided with these Site Codes, Crestron can issue the appropriate “Site Keys,” which, once entered into each package’s licensing window, enables the full functionality of the software. 9 • Introduction Installation & Reference Guide — DOC. 5823 Crestron e-control Database Manager SW-DBM Obtaining a License e-control Software Server – Upgrade/Transfer License window showing “unlimited” database license — shown activated (checked) You must use the Copy button to copy the SITE CODE to the clipboard. (Copying with Ctrl+C does not work from this field.) Open the server application. Select Server | License to open the e-control Software Server – Upgrade/Transfer License window, shown above. The license can be obtained over the phone or via e-mail. Call Crestron Customer Support with the “Site Code” shown in the Site Code field. However, it is easier and far more reliable to copy the “Site Code” into an e-mail message addressed to [email protected]. Once received, Crestron Customer Support issues a “Site Key” which must either by typed or pasted into the Site Key field of the window. Once entered, click on the Update License button. If the key is valid, the licensed components appear in the list above. Before closing the License Window, be sure to activate the components you plan to use. In the above example, the user has checked the box next to SW-DBM. It is permissible to exit the program while waiting for a “Site Key” to be issued. The application can be restarted and the “Site Key” entered at a later time. The “Site Key” issued is only valid on the same computer. It does not work on a different computer. The License Window of the CNX Gateway is almost identical to the above. See the documentation that comes with the Gateway package for specific instructions. Transferring an Existing License to Another Computer As mentioned, a license is only valid on the computer for which it was obtained. However, a license can be transferred from one computer to another without the need to contact Crestron first. There are several reasons to transfer a license. The application developer may set up the system off-site, then transfer the license to the actual computer on-site when ready. Alternatively, if the hardware or operating system on the computer where the server is licensed is upgraded, the license may cease to be valid, but could be transferred to another computer before the upgrade and then back to the original machine after the upgrade. On both the source computer (where the license is currently valid) and the destination computer (where the license is to be transferred), open the server application. Select Server | License to open the e-control Software Server – 10 • Introduction Installation & Reference Guide — DOC. 5823 Crestron e-control Database Manager SW-DBM Upgrade/Transfer License window (shown above). Make sure this window is active on both computers. Step 1. On the destination computer, create a preparation file on a diskette in the A: drive by inserting a blank, formatted diskette and selecting Prepare Diskette. This creates a file on the diskette which indicates who is receiving the license. A second, backup copy of the file is also created. Alternatively, these files can be created on another portable media (e.g. Zip disc) or a network drive by simply browsing for a new file location in the save file window. If you plan to transfer via a network drive, first make sure that both computers have the appropriate read/write access to the drive and folder being used. Step 2. After the above step has completed, remove the diskette from the drive and insert it into the source computer’s floppy drive. Do not flip the write-protect tab; the diskette must remain write-enabled. Click on the Transfer License button. The source computer reads the preparation file to see which computer wants the license. It encodes the license for the destination and writes it back to the same file on the floppy diskette (or network drive). The source computer has now passed the license to the file. Only the designated computer can use the license, so the server is no longer licensed on the source computer. NOTE: At this point in the transfer procedure the server license resides on a file on the diskette or network drive, and not on the computer. If this file should become lost or damaged, the license is lost as well. Because of this, please use the utmost care while performing this transfer. Step 3. Bring the diskette back to the destination computer. Click on the Transfer License button. The computer reads the license information off the diskette and transfers the license to itself. The server is now licensed on this machine. Basic Server Setup This product requires a proper physical connection between both “sides” of the system — the server and the control system. Furthermore, the software on both sides must be properly configured. As previously discussed, the connection can be either serial via RS-232 cable or Ethernet via Local Area Network (LAN). Choose your mode of communication and refer to the following sections to make the proper physical connections and to configure the software. The following sections include specific notes in italics for setting up the server and the control system to run the included demo programs. Although the focus is therefore on the demos, the same basic procedures would be followed to ready the system for any other programming as well. The files for all three demos are in a folder called demos which can be located through the following Start Menu shortcut: Start Menu | Programs | Crestron | e-control Database Manager | Database Manager Demos Inside this folder there are three individual demo folders and support files: demo1 demo2 demo3 demoDBM.vtp demoDBM.hex demoDBM.ini DBMdemo.mdb 11 • Basic Server Setup VisionTools touchscreen project file compiled VisionTools file Server’s Configuration Settings file which accommodates all three demos Sample database file for use with all three demos Installation & Reference Guide — DOC. 5823 Crestron e-control Database Manager SW-DBM The installer registers demoDBM.ini as the currently selected Configuration Settings file. (If the server’s title bar does not read “e-control Database Manager Demos,” use the File | Configuration file… command to reset it.) This file configures the server for all three demos. Each demo folder contains the following files: Demo?COM.smw Demo?TCP.smw demo?COM.bin demo?TCP.bin RS-232 is featured in the Quick Setup Guide because it is easy to set up. Because we anticipate strong interest in TCP/IP, we have pre-built both versions for your convenience. SIMPL Windows project file (RS-232 version) SIMPL Windows project file (TCP/IP version) compiled SIMPL program code (RS-232 version) compiled SIMPL program code (TCP/IP version) In the above, ? stands for the demo number. The two versions of the SIMPL program for each demo, (COM and TCP) are almost identical, both being configured for a CNMSX-PRO, using the front panel device and a touchpanel with CRESNET ID = 03. Both versions have ports defined for both serial (RS-232) communications via the CNMSX-PRO’s built-in COM A port (slot 4, port A), and EtherNet (TCP/IP) communications via the LAN port on a CNXENET card installed in the CNMSX-PRO’s DPA slot. In the COM versions, the TCP/IP port is commented off while in the TCP versions, the RS-232 port is commented off. This is the only difference between the two versions. The following sections separately describe the setup procedures for connecting multiple control systems via either RS-232 or TCP/IP connections. Actually, a mixture of connections is permitted. For example, two control system might be connected via RS-232 (using the COM1 and COM2 ports) while two more might be simultaneously connected via the TCP/IP network connection. In the following, the indented, italicized paragraphs contain advice on setting up the server and a control system specifically to run the supplied demo files. You will find that most of the steps have already been accomplished because they are specified by the supplied demo configurations. Communications Setup Server Side 1. Run server application by selecting Database Manager from the Crestron folder of your Start menu. 2. Select config file. Specify a Configuration Settings file (.ini file) by selecting File | Configuration File…. Refer to “Specifying a Configuration File,” page 16. The server is installed with a demomail.ini pre-selected as the default configuration file. (This is intended to simplify the Quick Start Guide.) Set communications mode. Select Server | Configure and enter a password to open the Configuration Options window. (Refer to “NOTE: If the server cannot open a specified configuration file, it uses default values for all options. If any changes are made, a new config file is created using the specified pathname when the OK or the Apply buttons are actuated 3. Password Access,” page 16). Select the COM Settings tab. The settings for each connection to a control system must match those on the other end (the control system side) of the actual connections. Click on each connection in turn, click the Modify… button, and choose either RS-232 (and select the port and speed) or TCP/IP (and set the IP address and IP ID). Click OK to make the changes for each connection. The demos are pre-configured to use RS-232. 12 • Basic Server Setup Installation & Reference Guide — DOC. 5823 Crestron e-control Database Manager SW-DBM Control System Side, RS-232 Serial communication requires wiring the server directly to the control system. NOTE: Serial communications requires neither the CNX Gateway software nor the use of an Ethernet network. 1. Connect PC for programming purposes. For each control system to be connected to the server, temporarily connect the PC containing the control system and touchscreen project files to the control system via a serial cable between any available COM port of the server and the COMPUTER port of the CNX control system. (This could be — but need not be — the same physical machine that runs the Software Server.) Refer to the CNMSX manual (latest revision of Doc. 8118) for instructions. This connection can be removed once the control system is programmed. 2. Install control system program. Upload the compiled SIMPL Windows program file (.bin file) to each control system. As supplied, the demo programs are configured for a CNMSX-PRO control system. For other models, using SIMPL Windows, convert the program as described below and recompile. 3. Install touchpanel pages. Upload the compiled VT Pro-e project file (.hex file) to each control system. As supplied, the demo touchpanel file, which contains pages for all the demos, is configured for a CT-3000 touchpanel; and the accompanying .hex file is compiled for same. This file however also works fine with an LC-3000, CT-3500, and a VT-3500. If you have one of these models, go ahead and upload the .HEX file as is. If you are working with another panel, convert the file to your target panel and recompile. 4. Connect to server. Connect null-modem cables (Crestron model CNSP-532) from each control system to the server. Each connection requires its on COM port on the server side. The port to use on the control system depends on the specific model: CNMSX-PRO. Use one of the built-in COM ports. The demo files are all configured for a CNMSX-PRO using COM A (slot 4, port A). CNMSX-AV. Use one of the built-in COM ports. Use SIMPL Windows to convert the demo files. In the Configuration Manager, drag & drop a CNMSX-AV system onto the CNMSX-PRO. The converted system does not have a front panel, so compile “notices” appear — which can be ignored. CNRACKX. Install a CNXCOM-2. Use SIMPL Windows to convert the demo files. In the Configuration Manager, drag & drop a CNRACKX system onto the CNMSX-PRO. The converted system has a CNXCOM-2 card in slot 4; use Port A. The converted system does not have a front panel, so compile “notices” appear — which can be ignored. CNMS. Install a CNCOMH-2 card. Use of the built-in COM ports for the present purpose is not recommended. Use SIMPL Windows to convert the demo files. In the Configuration Manager, drag & drop a CNMS system onto the CNMSX-PRO. The converted system has a CNCOMH-2 card in slot 5; use Port A. The converted system does not have a front panel, so compile “notices” appear — which can be ignored. CNRACK. Install a CNCOMH-2. Use SIMPL Windows to convert the demo files. In the Configuration Manager, drag & drop a CNRACK system onto the CNMSX-PRO. The converted system has a CNCOMH-2 card in slot 4; use Port A. The converted system does not have a front panel, so compile “notices” appear — which can be ignored. 13 • Basic Server Setup Installation & Reference Guide — DOC. 5823 Crestron e-control Database Manager SW-DBM Control System Side, TCP/IP For more information on control system TCP/IP setup, consult the e-control Overview document, overview.pdf, installed with the CNX Gateway software; or the SIMPL Windows release notes, installed with SIMPL Windows. TCP/IP communications requires a control system with a LAN/Internet port. Therefore, a CNX generation control system is required (CNMSX-AV, CNMSX-PRO, CNRACKX, or CNRACKX-DP). The CNX control system and the server are both connected to the same network. This connection, once properly configured, can then be used both for system communications (uploading, Test Manager support, Viewport functions) and run-time server/client (server/control system) communications as well. (The latter function however requires the addition of the CNX Gateway software.) 1. Install Ethernet card. Install the CNXENET card into the Direct Processor Access (DPA) slot of each CNMSX. Refer to the CNXENET manual (latest revision of Doc. 8129) for instructions. 2. Connect server. Connect the CNX control system(s) to the server using one of the following two methods: (1) Connect the control system into the same LAN as the server. Use a commercially available Ethernet hub to expand the number of connections available by plugging in the LAN, the server, and the control system into the same hub. (2) Alternatively, make a two-device private network by connecting an Ethernet “crossover” cable between the Ethernet port of the server’s Network Interface Card and the LAN port of the CNX control system’s CNXENET card. Do not attempt this with a regular Ethernet cable. 3. Connect PC for programming purposes. For each control system to be connected to the server, temporarily connect the PC containing the control system and touchscreen project files to the control system via a serial cable between any available COM port of the server and the COMPUTER port of the CNX control system. (This need not be the same machine that will run the Software Server.) Refer to the CNMSX manual (latest revision of Doc. 8118) for instructions. This connection can be removed once the control system is programmed. Open the Viewport and issue the Setup | Communications Settings… command to reconfigure communications for RS-232. 4. Check firmware versions. Before proceeding, however, verify that the CNX control system has been loaded with the proper versions of firmware. Still in the Viewport, select File Transfer | Update Control System to bring up a window box containing the current versions of monitor, operating system, and TCP/IP stack. Verify the versions per the 5. Leading Specifications (page 7). In early versions of the CNMSX, it may be necessary to upgrade to an intermediate version of the monitor first and then to the required version of the monitor. (The Viewport issues a notice if this is necessary.) 14 • Basic Server Setup To upgrade any of these files, retrieve a copy of the latest upgrade package from the Crestron website (OPSYS Library). These files have an extension of .upz which contains all three system components in one compacted file. Once downloaded, browse for the appropriate file in the Update Control System window. Click Send to upload the files to the control system. (When upgrading the system in this manner, always send all three components to avoid incompatibilities.) 6. Define control system IP address. Still in the Viewport, select Functions | Set Control System IP Information. The Set Control System IP Address window opens. Assign an IP address for the CNX control system. The address should be obtained from the MIS department. The IP address has four fields separated by periods (e.g. 192.168.2.3) and must be unique. Click OK. 7. Enter gateway address. Still in the Viewport, select Functions | Setup IP Table to open the IP Table window. Click on the Retrieve Current IP Table Installation & Reference Guide — DOC. 5823 Crestron e-control Database Manager SW-DBM from Control System button to display the current listing. Verify that the IP address for the PC running the CNX Gateway (often but not necessarily the server itself) appears with an IP ID of 03. If it does not appear, use the Add… button to add an entry for IP ID 03. Then click the Send IP Table to Control System button. 8. Switch to TCP/IP. Now that TCP/IP is properly configured, the Ethernet connection can be used for all subsequent system communications (from SIMPL Windows, Test Manager, Vision Tools Pro-e, and all Viewport functions). See the section below titled Test Communications. Open the Viewport and issue the Setup | Communications Settings… command to reconfigure communications for TCP/IP. The serial cable can now be removed. 9. Install control system program. Upload the compiled SIMPL Windows program file (.bin file) to each control system. As supplied, the demo programs are configured for a single CNMSX-PRO control system. For other models, use SIMPL Windows to convert the program as follows and recompile: CNMSX-AV. In the Configuration Manager, drag & drop a CNMSX-AV system onto the CNMSX-PRO. The converted system does not have a front panel, so compile “notices” appear — which can be ignored. CNRACKX. Install a CNXCOM-2 card in slot 4 and use Port A. In the Configuration Manager, drag & drop a CNRACKX system onto the CNMSX-PRO. The converted system has a CNXCOM-2 card in slot 4; use Port A. The converted system does not have a front panel, so compile “notices” appear — which can be ignored. 10. Install touchpanel pages. Upload the compiled VT Pro project file (.hex file) to each control system. As supplied, the demo touchpanel file, demomail.vtp (which contains pages for all five demos), is configured for a LC-3000 touchpanel; and the accompanying .hex file is compiled for same. This file however also works fine with an CT-3000, CT-3500, and a VT-3500. If you have one of these models, go ahead and upload the .hex file as is. If you are working with another panel, convert the file to your target panel and recompile. Test Communications At this point, test your connections. RS-232 Control Systems Use the Viewport to verify communications between the server and the CNX control system. Select Diagnostics | Establish Communications. If properly connected, the PC responds with the COM port and baud rate. TCP/IP Control Systems First test the IP address of the CNX control system by “pinging” it. From a networked PC bring up an MS-DOS prompt (Windows 95/98) or “Command Prompt” (Windows NT) and type “ping <IP ADDRESS>”, as shown below. The control system responds with several lines “Reply from address < IP ADDRESS >…”. If no response is received from the “ping” to the IP address of the CNX control system, repeat the procedure in “Control System Side, TCP/IP,” page 14. C:\WINDOWS>ping 132.149.2.2 Pinging 132.149.2.2 with 32 bytes of data: 15 • Basic Server Setup Installation & Reference Guide — DOC. 5823 Crestron e-control Database Manager Reply Reply Reply Reply from from from from 132.149.2.2: 132.149.2.2: 132.149.2.2: 132.149.2.2: SW-DBM bytes=32 bytes=32 bytes=32 bytes=32 time=8ms time=5ms time=5ms time=5ms TTL=60 TTL=60 TTL=60 TTL=60 Once a reliable connection is established, test that the CNX control system is listening and responding properly. Reconfigure Viewport communications to use TCP/IP by selecting Setup | Communications Settings. Once the Port Settings window opens, select TCP/IP as the Connection Type. For IP Address, Click on Fixed and enter the CNX control system IP address in the active field. Test the new connection by issuing the Diagnostics | Check Operating System Version command. Additional Server Side Setup In addition to properly setting up and testing communications with each connected system, the following steps are also required to make the server operational: 1. Select database file. Supply the full pathname to the database under the COM Settings tab. This file is the sole source of all database tables accessed by all signal blocks. See “The Database File,” page 32, for additional information. The demos are pre-configured to point to the file DBMdemo.mdb in the demos folder. 2. Indicate control system connection. Point each active signal block to a COM Settings definition. (If you have not yet defined the connection through which this signal block will communicate, you can leave this blank for the now. However, the signal block cannot be activated until it references a COM Settings definition.) See “COM Settings,” page 23, for a description of how to point a signal block to a COM Settings definition. All the signal blocks in the demo configuration already point to a COM Settings definition. Server Configuration In Depth This section is a reference to all the options available in the Configuration Options window. Changes to options in this window are saved to the current Configuration Settings file when the OK or the Apply buttons are actuated. Therefore, it is important to make sure you are operating on the appropriate Configuration Settings file before opening the window. Specifying a Configuration File The installer registers the file demoDBM.ini as the current Configuration Settings file. This file pre-configures the server for all three demos, and particularly for use with the Quick Start Guide — which instructs you to load demo1. You can use the File | Configuration file… command to select a Configuration Settings file of your choice. The file pathname so specified is stored in the Windows registry on your machine. In addition to specifying the configuration filename, this command also instantly reconfigures the server based on the named file. This is a very useful feature for the developer working on multiple projects. NOTE: If the server cannot open a specified configuration file, it uses default values for all options. If any changes are made, a new config file is created using the specified pathname when the OK or the Apply buttons are actuated 16 • Server Configuration In Depth Installation & Reference Guide — DOC. 5823 Crestron e-control Database Manager SW-DBM Password Access Access to the server’s Configuration Options window is password-protected. This is to prevent end-user meddling with the configuration options, which can very possibly disable the server’s proper operation. Select Server | Configure. The server prompts the user for a password. Enter crestron2 which displays all tabs. Entering anything else displays the General tab only. The configuration password dialog — controls access to the Configuration Options window The Configuration options window, General tab, showing all tabs (correct password entered). Level 1 and 2 passwords may be changed from the General tab. Click on the Change Password button to open the Change Password window. Enter the old password and the new password twice. Click OK to complete the change. Resetting the Configuration Password In the event the password is misplaced, be aware that it is not stored in readable form. Rather, values derived from the password is stored in the configuration files. The password can effectively be reset by locating the configuration file and then either deleting or editing it. Use the File | Configuration file... command to note the pathname of the currently selected configuration file. Exit the server. 17 • Server Configuration In Depth Installation & Reference Guide — DOC. 5823 Crestron e-control Database Manager SW-DBM Deleting the file means that all configuration variables revert to their default values the next time the server is run. The problem with this approach, of course, is that you lose any settings already made. To reset the password only (without affecting the rest of the configuration), edit the .ini file using the Notepad application (Start | Programs | Accessories | Notepad). Locate and delete the following key in the [GENERAL] section (the value may differ): privilegeLevel_2=180350152 Exit the Notepad application, saving the file. The password is now reset to its default — which is “crestron2.” Run the server again. Issue the Server | Options... command. Enter the default password. You can now change the password to whatever you want by clicking the Change Password button. COM Settings Definition A data structure called a “system” must be created for each connection you intend to make to your control systems. All active signal blocks (Signal Blocks tab) must reference such a structure. See “COM Settings,” page 23, for instructions on defining such a reference for your signal blocks. The COM Settings tab The COM Settings tab of the Configuration Options window contains a list of data structures called “COM settings definitions” which represent connections to control systems. From this tab, you can activate and deactivate such definitions, and define additional ones. NOTE: Connections may be defined before or after signal blocks are defined. However, signal blocks cannot be activated until they reference a defined connection. Refer to the figure below. To remove a COM settings definition, select it and click the Remove button. To duplicate an existing definition, select it and click the Duplicate button. The new definition differs from the original in that it is given a unique name which is derived from the name of the original, incremented by one. (If the original did not end in a number, the name of the duplicate is the name of the original with a “1” suffixed to it.) Click the Add… button to define an new connection; or select one of the definitions already listed and click Modify… to modify it. The COM Settings window opens: 18 • Server Configuration In Depth Installation & Reference Guide — DOC. 5823 Crestron e-control Database Manager SW-DBM The Configuration Options window, COM Settings tab, showing the only connection defined in the demo configuration (selected). COM Settings definitions (connections) can be active or inactive. A check in the box next to the definition name indicates that the connection is activated. If not activated, it is ignored when the server protocol is started. The COM Settings window The COM Settings window for the connection defined in the configuration for demo 1, showing RS-232 communications selected … 19 • Server Configuration In Depth Installation & Reference Guide — DOC. 5823 Crestron e-control Database Manager SW-DBM … and if TCP/IP communications were selected, it would look like this (fictitious IP address shown): Definition name Each COM Settings definition requires a unique name. A field for this data can be found at the top left of the COM Settings window. We recommend choosing a name that reflects either the location of the control system (such as SUITE3) or its function (such as PHONEBOOK). This name is used in the server’s user interface to identify the system data structure. It is also sent along with error messages to the actual control system to identify the source of an error resulting from processing one of the system-level signals defined herein. Control system generation Here you specify the type of control system. The server uses this information to take into account minor differences in the way the older generation of Crestron control systems functioned in terms of timing and data capacity. Communications mode In this frame you choose RS-232 or TCP/IP connections. The details are described in the Server Side configuration sections for RS-232 (page 13) and TCP/IP (page 14). System-level signal definitions In this window you can also define optional system-level signals by checking the appropriate boxes. Doing so defines a special signal block which communicates with its own Intersystem Communications symbol in your SIMPL Windows program. In this case, you should also fill in the Signals field, as follows: Signals This is the offset of the Intersystem Communications symbol in your SIMPL Windows program. The connection’s signal block must not overlap any other signal block (channel 1 of) these COM settings or else the server protocol will not be able to be started. Refer to the “Signal Reference” section, which begins on page 58, for more information on each of the signals listed in the window. Signal Block Definition Data structures called a “signal blocks” are created on the server, each communicating with its own Intersystem Communications symbol on a control system. Each active signal block must reference a “COM Settings” data structure which defines a connection to a control system. See “COM Settings Definition,” above. 20 • Server Configuration In Depth Installation & Reference Guide — DOC. 5823 Crestron e-control Database Manager A “signal block” is a software construct defined in the server which communicates with Intersystem Communications (XSIG) symbols in the SIMPL program running in your control system. SW-DBM The Signal Blocks tab (see below) displays a list of defined signal blocks. Two types of signal blocks are available with an SW-DBM license: Custom Scroller Standard Scroller for interactive display and maintenance of an arbitrary database table. a subset of the above; for interactive display of up to two fields from a database table; typically used in support of a separately licensed server component (such as SW-EMAIL) (especially when not also licensed for SW-DBM); conforms to SIMPL symbol Receive e-Mail. Without an SW-DBM license, Standard Scroller signal blocks cannot be directly enabled via a signal from a control system. In that case, they are only useful when attached to another type of signal block designed to control scrollers. Examples of such controlling signal blocks include, among others, the e-Mailer and e-Mailbox signal blocks provided with an SW-EMAIL license. Such signal blocks can use scrollers in support of their primary function. For example, an e-Mailer (e-mail sender) can use scrollers to display an address book and prepared messages; an e-Mailbox (e-mail receiver) can use them to display an IN box and a message. When attached to a controlling signal block, a scroller is enabled automatically when the controller is enabled. With an SW-DBM license, a Standard Scroller can be enabled directly, and so can be used on its own whenever the full functionality of a Custom Scroller is not called for. Standard Scroller signal blocks are simpler, involving far fewer signals and options. Their signal configuration is static and designed to interface with the included Standard Scroller SIMPL Windows macro. (If you use a Custom Scroller, you cannot use the macro.) Specific differences between the two types of scroller signal blocks are summarized in below: Standard scroller options no license required Custom scroller options SW-DBM license required Enable signal non-functional except in simulation (from Signal Analyzer window). Enabled signal sent by server as usual (but not available through DBMScroller macro). Fully functional Enable and Enabled signals Maximum of 8 rows x 2 columns Any number of rows/columns in displayed list e-Mail data echoed through e-Mailer signal block only Echo selection of fields from “picked” records through Data signals Same Specify list fields, data fields, and SQL queries Same Sort by list fields or ID field N/A Modify any field(s) through Write signals N/A Add new records N/A Delete “picked” record N/A Local error reporting signals N/A Successive query signals N/A Auto-pick feature The Signal Blocks tab The signal blocks tab contains a list of the currently defined signal blocks. Refer to the figure below. To remove a signal block definition, select it and click the Remove button. 21 • Server Configuration In Depth Installation & Reference Guide — DOC. 5823 Crestron e-control Database Manager SW-DBM To duplicate an existing definition, select it and click the Duplicate button. The new definition differs from the original in that it is given a unique name which is derived from the name of the original, incremented by one. (If the original did not end in a number, the name of the duplicate is the name of the original with a “1” suffixed to it.) New signal blocks can be added by selecting a signal block type from the New signal block type list box and clicking the Add… button. Existing signal blocks can be modified by highlighting the signal block in the Defined signal blocks list and clicking the Modify… button. The Configuration Options window, Signal Blocks tab, showing all the signal blocks defined in the demo configuration. As shown, all three signal blocks are active (checked); and the custom scroller signal block for demo1, ADDRBOOK, is selected. Signal Blocks, once defined, can be active or inactive. A check in the box next to the signal block name indicates that the signal block is activated. If a signal block definition is not checked, it is ignored when the server protocol is started, neither accepting nor responding to incoming signals in its range. Inactive signal blocks are not considered for signal space conflicts with other signal blocks when the server protocol is started. NOTE: Signal Blocks may be defined before or after the COM Settings to which they need to refer are defined. If the signal block is defined first, you will not be able to specify the COM Settings yet. This is permitted. However, such signal blocks cannot be activated until they reference defined COM Settings. The server can have any number of signal blocks defined and active simultaneously. Selecting a signal block from the list in the Signal Blocks tab and clicking the Modify… button — or defining a new signal block with the Add… button — opens a signal block definition window. Such a window shows a particular signal block definition. The definition includes: • Interface definition. The options across the top of the Signal Block Definition window are common to all types of signal blocks and include the signal block’s name, system connection, and signal offset. (The term interface refers to the 22 • Server Configuration In Depth Installation & Reference Guide — DOC. 5823 Crestron e-control Database Manager SW-DBM server-signal block interface; i.e., information that all signal blocks must have to be handled by the server as signal blocks.) • Optional signal definitions. Words shown in the Signal Block Definition window in bold case are names of optional signals implemented by the signal block. These are included in the signal block definition (they are "defined") either by checking the adjacent checkbox, or (in the case of a set of enumerated signals) by supplying a non-zero number in the adjacent text field. Undefined signals do not appear in the signal list and must not appear in the matching Intersystem Communications symbol on the control system side. Be aware that there may also be a number of non-optional signals which are not shown in the window. • Behavior options. These have specific effects on signal block behavior when the server protocol is running. The highest numbered signal in the signal block’s input or output signal lists is shown in the box in the upper-right corner. This is based on the signal offset entered in the adjacent box and the current signal block definition. This value is updated synchronously as the user interacts with the window. This box turns red when the highest analog or serial signal number on either the input or the output lists exceed 1023; or should the highest digital signal number exceed 4095. Interface Definition All signal blocks require the following basic information. Fields for these data are shown across the top of all Signal Block Definition windows. Name A unique signal block name is required here. This name is used in the server’s user interface to identify the signal block. It is also sent along with error messages to the control system to identify the source of the error. We recommend choosing a name that reflects either the location of the control system (such as BOOTH3) or its function (such as PHONEBOOK). COM Settings The COM Settings list box contains the names of all the COM Settings definitions from the COM Settings tab. Point the signal block to a particular COM Settings definition by selecting it from the list. Each signal block must be associated with a control system. Control systems are defined separately under the COM Settings tab. You may define the signal blocks first if you like, then define the systems, and come back and make the associations later. Note, however, that signal blocks cannot be activated without first associating a system, through its COM Settings connection, with the signal block. Channel For systems with multiple Virtual COM Port channels defined, select a channel here. Signal Offset When a signal block shares a signal space (a channel) with another signal block, they both cannot begin numbering their signals at 0. In such a case, supply values space the signal blocks’ signals properly — such that they do not overlap with each other. If any signal blocks’ signal spaces overlap, attempting to start the server protocol results in an error. Auto-enable If this box is checked, the signal block is automatically enabled when the server protocol is started. 23 • Server Configuration In Depth Installation & Reference Guide — DOC. 5823 Crestron e-control Database Manager SW-DBM Standard Scroller Signal Block Definition NOTE: The reader is urged to refer to the Signal Reference for more information about the signals discussed in these sections. A “standard” scroller is a very simplified form of the full-featured “custom” scroller (described in the following section). The Standard Scroller features the following: • A static signal block definition. That is, unlike the Custom Scroller, the selection of signals that comprise the signal block of a Standard Scroller cannot be changed. Certain options that control the behavior of the signal block can however be changed (as described below). • Conforms to the DBMScroller SIMPL macro. Due to the static definition, the supplied macro can be used in your SIMPL programming. • Useful for browsing a database table and selecting a record therein. Cannot display the records, however. • Scroller display is limited to 8 (rows) x 2 (columns), maximum. • Does not require an SW-DBM license. If licensed for any other component that can make use of interactive database table displays (such as SW-EMAIL, for example), access is automatically conferred for creation and use of Standard Scroller signal blocks. (If also licensed for SW-DBM, custom scrollers may be used by such components.) The Standard Scroller Signal Block Definition window looks similar to the Custom Scroller Signal Block Definition window. The difference is that in the former, optional signal definitions are disabled. The Standard Scroller Signal Block Definition window, showing the definition of a hypothetical 4-row x 1-column “standard” scroller. 24 • Server Configuration In Depth Installation & Reference Guide — DOC. 5823 Crestron e-control Database Manager SW-DBM Default Query This textbox contains the number of the query from the Queries table ID field that this signal block performs when it is enabled. List Rows and List Columns In Use Sets the number of rows and columns in use by the scroller. These values must be within the range of the number of rows and columns defined (see below, under “Custom Scroller Options”). Sort Each scroller table must have an ID field. This number makes each row distinct from every other row. To have the rows display in the order of this field, select the by ID field option. If you want the rows to display sorted by the list fields you specified in the Queries table, select the by list fields option. To display the values from highest to lowest, check the Descending checkbox. Scrollbar If you defined the Scrollbar signal (above), these options select between a line mode scrollbar and a bar mode scrollbar. Demos 1 and 3 use a line mode scrollbar; Demo 2 has a bar mode scrollbar. You can also invert the direction of the scrollbar by checking the Invert direction box. Blank Scroller Upon This group of specify when the server will “blank” the scroller. As you can see from the figure, a Standard Scroller can be blanked when the server protocol is started and/or halted; and/or when the signal block is enabled and/or disabled. (The between levels of successive query option is disabled because it is only relevant to the successive query signals which are only available in a Custom Scroller.) Other Signals Non-optional signals implemented by the both standard and custom scrollers are not listed in the Scroller Signal Block Definition windows. These include Enable and Enabled; Done; and First, Prev, Next, and Last. Discard “type-ahead” This option is recommended (and is checked by default in a new definition). Custom Scroller Options Selecting ADDRBOOK and clicking the Modify… button opens the Custom Scroller Signal Block Definition window. 25 • Server Configuration In Depth Installation & Reference Guide — DOC. 5823 Crestron e-control Database Manager SW-DBM The Custom Scroller Signal Block Definition window, showing the defintiion of the ADDRBOOK scroller from demo1. This window allows the user to customize a scroller signal block to fit his needs. For example, to set up a touchscreen scroller with 16 rows and 4 columns using list fields and displaying 24 data fields, as described in Query 17, just enter the numbers here. Check the signals QueryDescription and Scrollbar to include them in the signal block definition. Successive Query Check this box to use the successive query technique used in Demo 2. You must also indicate how many levels of GoLevel and GoLevelEcho signals are to be used in the successive query. See “Successive Queries,” page 38, for complete information. List Rows and List Columns Defined Sets the number of rows (r) and columns (c) defined for the scroller signal block. These are reflected in the number of Listr,c and Pickr signals. That is, there are r x c List signals and r Pick signals. Local Feedback Check this option to define the three error signals (ErrString, ErrNumber, and ErrTrigger) in the signal block. These signals are routinely used by the server to report errors to the control system. See the “Signal Reference” beginning on page 58 for more information. If these signals are not defined here, errors are reported instead to the signal block that “owns” the scroller, if any. If that signal block also does not define its error signals, errors are reported to the control system through the system signal block. If that system signal block also does not have its error signals defined, the errors are not reported to the control system at all, although they are still added to the server’s error log. 26 • Server Configuration In Depth Installation & Reference Guide — DOC. 5823 Crestron e-control Database Manager SW-DBM Special Modes Check the Auto-Pick box to send a Pick1 signal automatically on each scroll action. Data Fields The Data Fields Defined textbox defines the number of Datad signals. The Data Fields Filter textbox defines the initial value of the data filter bit pattern. See page 54 for a discussion of “Bit Patterns.’ The control system can change the data filter bit pattern at run-time using the DataFilter signal. See the entry for the DataFilter signal in the Signal Reference for more information. Edit Signals Checking the Edit Signals box defines the Writed signals. See the entry for the Writed signal in the Signal Reference for more information. Buffer Checking the Buffer box enables the UpdateRec signal that copies changed scroller records to the database. In the current version of the server, this signal is not implemented; the Write signals currently update the database. Server Windows and Menus This section contains descriptions of the server’s two main windows, the Server Monitor window and the Signal Analyzer window. The Server Monitor Window While the server protocol is running, the Server | Start w/Signal Analyzer command from the Server Monitor window opens the Signal Analyzer window. (If the server is already running, toggling Server | Signal Analyzer does the same thing.) The Server Monitor window. The server protocol has been started with a single system connected via RS-232. Note the name of the currently loaded configuration in the title bar. 27 • Server Configuration In Depth Installation & Reference Guide — DOC. 5823 Crestron e-control Database Manager SW-DBM The Message Log Frame When the server protocol is running, the Message Log frame shows status and error messages; for example, it lists each time the protocol is started and halted. The System Connection Status Frame This frame contains a colorful legend above a series of small numbered rectangles, representing each of the defined systems. The color of a control system’s rectangle indicates its connection status, according to the legend. When the server protocol is not running, all systems show a status of “Not Connected” (gray). In figure above, the server protocol has been started. There is only one system defined and its status is “[connected via] TCP/IP” (green) meaning that a successful TCP/IP connection has been made to that system. The other possible states are “Waiting [for connection or disconnection]” (yellow), “[connected via] RS-232” (blue), and “Fault” (red). If a system cannot connect, it turns red and stays that way until the next connection attempt. The protocol runs if at least one system connects successfully. The File Menu The following command is only available when the server protocol is halted: • Configuration file…. This command can be used to instantly reconfigure the server by indicating an alternate configuration settings file. Any configuration changes made henceforth are saved to this new file. The name of this file is stored in the Windows registry and becomes the default configuration. Use this command to select the appropriate configuration file for each demo before running it. The following command is always available: • Exit terminates the server application. If the server protocol is running, a warning message appears. The Server Menu Before the server protocol is started, the following commands are available: • Server | License… opens the e-control Software Server – Upgrade/Transfer License window for licensing and activating the various server components. • Server | Configure… opens the Configuration Options window (described beginning on page 16). To start the server protocol, use one of the following commands: • Server | Start connects to the control systems and starts the server protocol. If no successful connections are made, the protocol remains halted. • Server | Start w/Signal Analyzer connects to the control systems, starts the server protocol, and opens the Signal Analyzer window (see below). • Server | Start without connecting opens the Signal Analyzer window and starts the server protocol but without connecting to the control systems. This is useful for testing server behavior simulating incoming signals and watching the signals generated in response (which are not actually sent). The above commands all become disabled (dimmed) when the server protocol starts, whereupon the following signals, normally disabled, become enabled: • Server | Stop halts the server protocol. • Server | Signal Analyzer opens or closes the Signal Analyzer window. When this item is checked, the window is opened. When it is unchecked, the window is closed. The remaining commands are always available: 28 • Server Configuration In Depth Installation & Reference Guide — DOC. 5823 Crestron e-control Database Manager • SW-DBM Server | Log | Timestamps. Selecting this option puts a checkmark next to it and henceforth all log items will contain a timestamp of the form hh:mm:ss (24-hour clock) at the beginning of each line. Selecting the command again removes the checkmark and timestamps will no longer be included in the log. NOTES: 1. This option affects the server log and the signal log in the Signal Analyzer window as well. 2. • This option is “sticky” — meaning that its most recently set state is saved in the Windows Registry and is automatically applied to the option the next time the window is opened. Server | Log | Clear clears the message log. The Database Menu This menu contains a single command, Database | Queries Table, which opens the Queries Table window. This window provides display and edit access to this essential table in the database file named in Configuration Options window. See “Editing the Table” on page 38 for more information. The Signal Analyzer Window While the server protocol is running, checking the Signal Analyzer command from the Server menu opens this window. The Signal Analyzer window, showing the all the active signal blocks defined in the demo configuration. The ADDRBOOK signal block (from demo1) is selected. Therefore the ADDRBOOK signals are displayed in the lists to the left and right. The Timestamps option is on; the Debug Info option off. 29 • Server Configuration In Depth Installation & Reference Guide — DOC. 5823 Crestron e-control Database Manager SW-DBM Signal Simulator The top part of the window is for simulating receipt of incoming signals and transmission of outgoing signals. Signal Blocks & Connections This list contains all active signal blocks as well as all active connections that have signals defined (and hence can behave as signal blocks too). To simulate an incoming or outgoing signal, you must first select an item from this list. Signal lists There are two lists which are displayed for all signal blocks (including system signal blocks for systems with signals defined), an incoming list on the left labeled CS to PC signals which contains all of the signals that go from the control system (CS) to the server (PC); and an outgoing list on the right labeled PC to CS signals which contains all the signals that go from the server to the control system. The letters A for “analog”, S for “serial” (or “string”), or D for “decimal” preceding each signal in the lists indicate the type of signal expected (incoming) or to be sent (outgoing). NOTE: A special feature of the server converts an analog signal to a string when that signal is received with a signal number that expects a serial signal. To simulate a signal, after selecting your signal block, select an item from one of the signal lists. You are now ready to send the signal. To do so, give the Simulate | Incoming or Simulate | Outgoing command (see below). The value frames Values for simulated signals are entered here. (See Incoming and Outgoing commands, below.) Signal Log The bottom part of the window logs all signals going back and forth from all signal blocks to and from all control systems. Each signal logged consists of the following: • An optional timestamp (see below); followed by • an incoming signifier ( <- ) or an outgoing signifier ( -> ); followed by • one of the letters A (“analog”), S (“serial” or “string”), or D (“decimal”); followed by • the name of the signal block the signal is a part of (based on its signal number and the connection through which it has come or will go); followed by • the name of the signal; followed by • the signal number (relative to the start of the signal block) ; and, finally, • the value of the signal. There are two special signal values, “[Blank]” which indicates a null string and “Pulse” which indicates a true/false sequence for outgoing digital signals. (Pulse is never shown for incoming signals.) NOTES: 1. 30 • Server Configuration In Depth The capacity of the log is limited to the 32,767 youngest (most recent) signals. Installation & Reference Guide — DOC. 5823 Crestron e-control Database Manager SW-DBM 2. The present release does not dump the log to a disk file. 3. Signals are only logged when the Signal Analyzer window is opened. However, in general, do not keep the window opened unnecessarily as the logging routines can cause a noticeable degradation of server responsiveness when the server is running on a slower PC. The File Menu The only currently implemented commands in this menu print the input and output signal lists for the currently selected signal block (File | Print Signal List | Selected), or for all active signal blocks (File | Print Signal List | All). This printout can be used to create matching Intersystem Communication symbols in SIMPL Windows. To this end, the lists contain signal labels identical to the labels used in that symbol. The Simulate Menu This menu contains the following commands for simulating signals. Simulated signals are added to the Signal Log on the bottom portion of the window, just like real signals. • Simulate | Incoming simulates receipt of the signal currently selected in the incoming (“CS-to-PC”) signal list. Before issuing the command, set the value to be “received” with the signal by entering data into one of the three value frames. The frame to use is based on the signal selected. This function is also available by clicking the rx button under the incoming signal list. • Simulate | Outgoing simulates receipt of the signal currently selected in the outgoing (“PC-to-CS”) signal list. Before issuing the command, set the value to be transmitted with the signal by entering data into one of the three value frames. The frame to use is based on the signal selected. Note that simulating an outgoing signal when the system associated with the signal block is not connected has no practical effect. This function is also available by clicking the tx button under the incoming signal list. The Log Menu This menu contains the following commands that affect the Signal Log display: 31 • Server Configuration In Depth • Log | PINGs and PONGs. Uncheck this item to suppress logging of the Ping and Pong signals available in the system signal blocks. The intent would be to keep the log uncluttered when a control system has been programmed to ping to server on a periodic basis. • Log | Clear clears the signal log. • Log | Timestamps. Selecting this option puts a checkmark next to it and henceforth all log items will contain a timestamp of the form hh:mm:ss (24-hour clock) at the beginning of each line. Selecting the command again removes the checkmark and timestamps will no longer be included in the log. • Log | Debug Info. Selecting this option puts a checkmark next to it and henceforth all logged signals as well as the rx and tx buttons will contain additional signal information. The log items normally contain an element of the form [n] where n is the signal number relative to the start of the signal block. When Debug Info is checked, this element takes on the form [com(ch):m=n] where com is the COM Settings name; (ch) is the Virtual COM Port channel number (included only when > 1); m is the absolute signal number (n + the signal block’s offset) (included only when different from n — i.e., only when the offset is nonzero); and n is the relative signal number (as above); The rx and tx buttons each normally contain a number, n, the relative signal number of the currently selected signal from the respective signal list. When Installation & Reference Guide — DOC. 5823 Crestron e-control Database Manager SW-DBM Debug Info is checked, the buttons each contain additional information of the form m=n where m is the absolute signal number (included only when different from n). Selecting the command again removes the checkmark and the additional information is excluded. This option is also “sticky” like the Timestamps command. • Log | Find… brings up the following modal window which helps locate a specific signal. Signal log search window. Searches can be performed with and without case sensitivity by checking the Match Case option. When the window opens this option is unchecked — meaning that the search algorithm disregards the upper- and lower-case status of the characters in the search key. Also when the window opens, the search direction is set to Forward to end meaning that the search will begin with the signal on the highlighted line and will continue to the end of the log. The other options are Forward from top which searches the entire log; Backward to top which searches beginning with the signal on the highlighted line and continuing back to the beginning of the log; and Forward to end then wrap around from top which also searches the entire log starting with the signal on the highlighted line. The Database File Database Fundamentals For the reader unfamiliar with database concepts, this section will serve as a primer. Tables A relational database is composed of tables of information. Each table consists of rows and columns. Each row represents one database record; the columns in the row describe all of the attributes for that record. For example, the sample Addresses table has a row for each company. The columns of this table are address id (an index number that is unique for each record), company, address, city, state, postal code, country, email address, work phone, fax number. Following is a portion of the table: A portion of address book table used by demo1, as viewed from Microsoft Access. The table was created using Microsoft Access. You can create any arbitrary database using Access; once the table is created, you do not need Access to run the system. 32 • The Database File Installation & Reference Guide — DOC. 5823 Crestron e-control Database Manager SW-DBM The control system accesses a database table using a scroller signal block. More than one touchscreen can browse a table at the same time; one user’s view does not affect any other user’s view of the table rows displayed in the scroller. However, if the application allows editing of the database from the touchscreen (as shown in demo1), one user can conceivably change a row while another user is viewing the old version of the row. If the second user also attempts to edit the row, a message indicating that the row has been changed is displayed and the user has a choice of overwriting the previous changes, discarding the new changes, or copying the new changes to the clipboard. Once you have one or more database tables, each database scroller needs to select at least one table and identify the columns to display on the touchscreen. The set of instructions for selecting tables and columns is called a query. Queries In Microsoft Access, the language for constructing queries is called SQL (Structured Query Language). An SQL query contains all of the information needed to select rows for display: the name of the table or tables to read, the names of the columns to retrieve, and , if you do not want to retrieve every row of a table, it specifies a logical test for determining which rows to retrieve. For example, consider the Addresses table shown above, which contains names, addresses, and phone numbers for Crestron offices. Assume that you want to display the names and address columns for all offices in the USA. In SQL, the query would be: SELECT Company, Address, City, State, PostalCode FROM Addresses WHERE (Country="USA"); This query retrieves the following answer set: The SELECT clause of the query lists the columns to be retrieved. While this query identifies the table name for each column prefixed to the column name, in this case only one table is being accessed, so the column names alone would have been sufficient. If two tables were being accessed (demonstrated in demo2), you would need to identify the table name with the column name. If you do this, you can assign a shorter alias name to each table. This technique is also demonstrated in Demo2. The FROM clause of the query identifies the table or tables to be accessed. The WHERE clause of the query indicated any conditions you want each row to pass in order to be retrieved. Joins: Accessing Multiple Tables One table may not hold all of the data you need for your application. Consider the query used by Demo2. The “recordset” (logical table) which results from this query contains fields (columns) from two actual tables: 33 • The Database File Installation & Reference Guide — DOC. 5823 Crestron e-control Database Manager SW-DBM • The Albums table contains a row for each album available to the application. The columns of the Albums table include the artist, and the genre, the name of the album, and a unique Album ID. • The Tracks table contains a row for each track of each album from the Albums table. The columns of the Tracks table include the track number, track name, and playing time of the track, and the Album ID of the album in the Albums table where the track is found. The objective is to make all the album information available when querying for a track. Because each album can have a different number of tracks, you would not try to put all the track information in the album record. An alternative is to create separate records in the Albums table for each track. However, doing so requires duplicating all the album information in the records for each and every track on the album. The solution is to keep the tables as they are, and separate, but let the database engine appear to “join” them when you access the track table. We do this by indicating the tables to join, and the “pivot field,” the field they have in common that ties the information from the superior table to each and every record in the subordinate table. In this case, the pivot field is the Album ID. This join creates a recordset with a record for each track that contains additional columns for selected fields from the Albums table. In the following figure, the album title appears in each track record. A portion of the results of a join query viewed from Microsoft Access Following is a Queries table record that might produce the above query: Hypothetical Queries table record, viewable from either the server or from Microsoft Access. NOTE: The list fields, also included in the generated query, are not shown in the results above. The value in the table column shown above specifies that matching rows for the Albums and Tracks table are those rows that have the same values in the CDJID column (A.CDJID = T.CDJID). This is an INNER JOIN, meaning that only rows with a match in both tables are retrieved and displayed. If an album in the Albums table has no matching track rows in the Tracks table, that album is not included in the records retrieved and sent to the touchscreen. Similarly, if tracks exist with no matching rows in the Albums table, they are also ignored. The SQL statement constructed from this row of the Queries table is: SELECT T.Track, T.Title, A.Artist AS ARTIST, A.Title AS ALBUM, T.Track AS CUT, T.Title AS TUNE, 34 • The Database File Installation & Reference Guide — DOC. 5823 Crestron e-control Database Manager SW-DBM T.Minutes AS ["], T.Seconds AS ['] FROM Albums A INNER JOIN Tracks T ON A.CDJID = T.CDJID Note the following syntax features of SQL, all illustrated in the above example: • Dot syntax. When the same field name is used in more than one table, you must use the syntax table.field to eliminate ambiguity. In the above example, this syntax was used throughout, although in fact the fields Artist and Track did not actually appear in both tables. • Table name aliases. The FROM clause assigns the alias A to the Albums table and T to the Tracks table. Once these aliases are established, you can use them instead of the full table names in the listFields and dataFields columns. • Captions. Use the word AS after a field name in the SELECT clause to introduce a caption. In the above, ARTIST, ALBUM, CUT, etc. are captions. Unlike a table name alias, you cannot refer to the field using its caption. Captions, when defined, are displayed in place of the field name in reports generated with Microsoft Access. The server also uses captions during successive queries. The captions are inserted as data into the description string and transmitted to the control system via the QueryDescription signal. If the caption is not defined here, the field name is used instead. • Square brackets are used around any table names, field names, and captions that contain spaces or punctuation. Outer joins are also supported. A LEFT JOIN includes all rows from the first table in the output, even if it has no matching rows in the second table. A RIGHT JOIN includes all rows from the second table even if it has no matching rows in the first table. With an outer join, matching rows are still matched and the selected columns from the two tables are strung together in one record. Any row that is included that does not have a matching row in the other table is assigned default values for the additional columns – zero for numeric columns and blank for character columns. The Queries Table You do not need to know SQL or Microsoft Access to construct a query for use by the scroller signal blocks in the Crestron Software Server. In the server application, you construct queries using a special database table named Queries. This requires that each database you create contain at least two tables, the table with the data for your application and a Queries table. For example, the Address Book database contains two tables, Addresses and Queries: The database window from Microsoft Access, showing the two tables in the AddrBook database.. 35 • The Database File Installation & Reference Guide — DOC. 5823 Crestron e-control Database Manager SW-DBM Fields The following sections describe each column (field) in the Queries table. The Queries table, viewed from the server using its Database | Queries Table command. The Queries table tell scroller signal blocks how to access the other tables. ID The ID column is a unique index number assigned to the query. A matching number is supplied by the scroller signal block to locate a particular record in the table. Description The description column contains a name for the query. If the scroller signal block’s QueryDescription signal is defined, the value of this field is sent to the control system when the query is performed (either on signal block enable, or on receipt of a QueryNumber signal). During a successive query, the dollar sign character ($) embedded in the description string has special meaning. (See "Displaying a Successive Query,” page 39, for more information.) Table The table column names the table or tables to be used in the query; in this example, it is the Addresses table. This column is used to construct the FROM clause of the SQL request. Any valid FROM clause syntax is acceptable. Condition The condition column is for a logical condition; it is used to construct the WHERE clause of the SQL query. You may not want to select every record from the table. The condition determines which rows from the table are selected for display on the touchscreen. NOTE: This condition, if given, is ANDed with any conditions, if any, that the server is already imposing on the query. For example, if you want to select only addresses for Crestron offices in the USA, you can enter the following logical condition in the condition column: Country = "USA" 36 • The Database File Installation & Reference Guide — DOC. 5823 Crestron e-control Database Manager SW-DBM A logical condition is an expression. An expression is a combination of column names, operators, and values. There are several types of operators that you can use to define the expression you need. Arithmetic operators form new numeric values by operating on numbers or columns that contain numbers. Examples are addition (+), subtraction (-), multiplication (*), and division (/). They operate on numbers and on columns that contain numbers. Relational operators compare columns and values. The result of a relational expression is true (include record in query) or false (exclude record from query). Examples are equal (=), greater than (>), less than (<), greater than or equal to (>=), and less than or equal to (<=). Logical operators manipulate relational expressions to return a value of (include record in query) or false (exclude record from query). Examples are AND, OR, and NOT. AND connects two relational expressions; both must be true for the combined expression to be true. OR connects two relational expressions; at least one must be true for the combined expression to be true. NOT operates on one relational expression; it reverses the value from true to false or false to true. String operators manipulate text strings and columns that contain text values. An example is concatenation (&) which creates one text string by concatenating two individual strings. ListFields The listFields column identifies the columns that comprise the scroller contents. It is used to construct the SELECT clause of the SQL request. There number of fields listed must be equal to (or greater than) the number of columns the scroller is currently using. Successive queries require additional sets of list fields to be given, one set per line. The first field in each set is added to the implicit conditions (to the WHERE clause) of the next query level. DataFields The dataFields column identifies the columns from the picked record to be sent to the touchscreen. The order of fields is as listed in the datafields field of the Queries table. Example: Three fields are listed in datafields. When a record is picked from the list, the three fields are echoed back to the system using the Data1, Data2, and Data3 signals. However, note that only fields defined by the data filter bit pattern are sent. (See DataFilter in the Signal Reference for more information.) SQL If you know the SQL programming language, you can enter a SELECT command in this column to be used as the query for selecting records from the table. The query is taken from this column instead of being constructed from the previously described columns. NOTE: Even if you supply your own SELECT command, you must still provide the list of fields to be displayed in the list in the listFields column and the list of fields to be displayed in the opened record in dataFields. 37 • The Database File Installation & Reference Guide — DOC. 5823 Crestron e-control Database Manager SW-DBM Editing the Table It is not necessary to have Microsoft Access to edit the Queries table; it can be edited directly from within the server application. Open the server and select Database | Queries Table. The Queries Table window opens to display the contents of the Queries table of the database file named in the COM Settings tab of the Configuration Options window. The “data grid” control in this window features the following interactivity for editing the table: • For viewing purposes (only), tables can be sorted by clicking on the head of each column (field). • Resize the window by clicking and dragging on the lower right corner. Note that column widths adjust proportionately. • A column’s width may be adjusted manually by clicking on the far right of its header and dragging left (to reduce its width) or right (to augment its width). • Row height can also be adjusted (for all rows at once) by similarly clicking between rows in the row’s left margin and dragging up or down. (This is useful to know when a cell’s contents wraps onto additional lines.) • Records can be deleted by selecting the entire row (by clicking in the row margin), and depressing the DEL key. • The information in each cell can be replaced by simply highlighting the cell and typing over its contents; or you may click once to highlight the cell and again to precisely place the cursor for editing purposes. • Records so changed (as evidenced by the little pencil icon in the row margin) can be changed back by selecting a cell or an entire row (by clicking in the row margin) and depressing the ESC key. • Additional records can be entered by scrolling down to the row containing an asterisk (*) in the left-most column and typing the information. • Use ENTER to advance to the next cell in a row. The arrow keys also navigate between cells in a rows, and between rows as well. • Use the “Requery to show remote edits” button to display changes made elsewhere since you opened the window. For example, if the database file has been placed on a file server and has recently been edited from another computer, you can display those edits by clicking this button. NOTE: Changes are not actually made until you leave the row (or close the window). When leaving a row in which you have made a change, you will be asked whether or not to keep (“commit”) the changes. To accept the changes, click YES; to reject the changes, click NO and then use the ESC key as described above. Successive Queries A successive query is a way of using the touchscreen scroller to “zoom in” to a desired record by narrowing down choices through a series of scroller picks. The following simple example helps explain this: A typical successive query used as a phonebook in a videoconferencing suite might consist of the following three query levels: (1) Countries, (2) Cities, and (3) Reps. The user is first presented with a list of countries. Picking a country from the list results in a new list, this time of cities in that country. Picking a city results in a third list, this time of reps. Finally, picking a rep displays the rep’s personnel data record. (Typically, there is a data field that contains a phone number, to be used by the control system to “speed dial” the call to make the connection. This field may or may not be displayed.) 38 • The Database File Installation & Reference Guide — DOC. 5823 Crestron e-control Database Manager SW-DBM In general, successive queries work like this: Recall that picking an item from a touchscreen scroller sends a Pick signal to the server which normally sends a series of Data signals in response, containing field values from the associated record in the database table. (See “Picking a Record” on page 40 for more information on scroller picks.) However, in a successive query with v levels, the first v-1 levels, called successive levels, behave differently. Picking a record from a successive level causes the server to respond by advancing to the next query level. Only the final pick, on the vth query, displays the picked record as usual. Each successive level of query always results in a “narrower” recordset, a subset of the previous query. However, it is important to note that while the number of records represented in succeeding levels is always less than (or equal to) the number of records represented in the preceding levels, the number of records actually displayed in a succeeding level may be more. This is because these queries are always DISTINCT type queries — wherein duplicates are eliminated. Another example makes this clear: Suppose the database table contains entries for 100 reps distributed among only five different countries. Since this is a DISTINCT query, only the five distinct values appear in the level 1 (“country”) query. Had this been a regular (nonDISTINCT) query, all 100 records would have appeared. The fields used to display each level are listed on separate lines in the list fields column of the Queries table. Each line may contain a single field (as would be the case in the example above), or a list of fields (separated by commas) for a multicolumn list display. Queries table showing the query used for demo2. Demo 2, Successive Query, uses the successive query signals to let the user “drill down” from a general list of music genres to a specific artist, album, and track. At the start of the application, the scroller displays the list of genres available (for example, Rock and Reggae). Once the user has selected a genre, the scroller displays a list of artists who have albums of that genre. Next the user can select an album, and the tracks for the album are displayed. When the user selects a track, the track is played. Displaying a Successive Query A single scroller signal block is used to display all the levels in a successive query. (The single-scroller approach was chosen to keep the number of signals within reason. A separate scroller for each level of a five- or six-level query could end up using hundreds of signals.) The server displays movement between levels by refreshing the scroller with a new list of items to choose from, and by sending a GoLevelEchov signal (if defined). This scroller may be represented in either of two ways on the touchscreen: 1. 2. As a single structure on a single touchscreen page The structure may be reproduced on a series of pages, one page for each level. The following standard scroller signals get special treatment during a successive query: 39 • The Database File Installation & Reference Guide — DOC. 5823 Crestron e-control Database Manager SW-DBM The QueryDescription signal is sent upon arrival at each level, with the caption of the first list field in the scroller display optionally inserted into the description in place of a special flag character (a dollar sign). If the description string is "($ Selection Screen)" then on level 1, the server sends the string "(Genre Selection Screen)" in the QueryDescription signal. On level 2, it resends the signal with "(Artist Selection Screen)", and so on. The Datad signals are used to echo the selections made at each level. Be sure to define sufficient Datad signals to accommodate each level of the query + the number required to display all the fields listed in dataFields as well. Navigating Between Levels Narrowing the Query As explained above, the user moves to succeeding levels in a successive query by picking items from the scroller lists. If defined, the server sends a GoLevelEchov signal to the control system whenever a transition is made to a new level or when the final record is displayed. In the multipage display paradigm, the GoLevelEchov signals are useful for automatically flipping the pages. Widening the Query Returning to a preceding level is easily accomplished using either the UpLevel signal, or the GoLevel signals. The former redisplays the preceding level’s list; the latter jumps directly to any preceding level. (Attempts to jump ahead are ignored.) Special Considerations Since a single scroller structure is utilized for each level in a successive query, the multi-page display paradigm suffers from a lack of buffering. That is, on each succeeding page, the old data is still visible upon arrival. This is serious eyesore when the column widths differ from query to query. For this reason, the option “Blank scroller between levels of successive query” in the Scroller Signal Block Definition window is provided. Checking this option when using the multi-page display paradigm blanks the contents of the scroller before flipping the page (as used in Demo2). We do not recommend this option for the single-page display paradigm because of the extra time and network traffic involved. In the single-page paradigm, the scroller simply appears to refresh when an item is picked (which seems to be acceptable to most users). Operating on Database Tables Several signals are designed to maintain database tables. Picking a Record There is one Pickv signal associated with each row in the scroller. When the user touches a row in the scroller, the control system program sends the corresponding Pickv signal to the server. The server knows what scroll page the user is seeing and opens the indicated record. How the server responds to the Pickv signal is determined first by whether the scroller is “owned” by any other signal block. If so, the signal block’s code responds to the touch in its own way. 40 • The Database File Installation & Reference Guide — DOC. 5823 Crestron e-control Database Manager SW-DBM If the scroller is an orphan (not owned), the scroller’s current pick action setting determines what action to take. The default action (value = 0) is to “open” the record and transmit its contents using the Datad signals. The order in which the fields are sent is as listed in the dataFields field of the Queries table. Certain listed fields may be omitted based on the current value of the data filter bit pattern. NOTE: There is only one pick action defined for orphan scrollers in the present release. The CloseRec signal “deselects” the picked record, blanking the dataFields, and making the record unavailable for deletion with the DeleteRec signal or for editing with the Writed signals (see next section for more on these two signals). Adding a Record The NewRec signal creates a new record (a blank row) in the current database table. You can then update the fields in this new row as described in the section “Updating a Record” (below). Updating a Record Fields may be changed repeatedly using the Writed signals which update records immediately upon receipt by the server. The numbering of the Writed signals parallels that of the Datad signals. Upon a successful write, the server always echoes back the written data in a Datad signal which updates the data field on the touchscreen to match the data just written out to the database file. Also, if the field so changed is also a list field (a field that appears in the scroller itself), a Listr,c signal may be sent as well. Finally, the Done signal is pulsed after a successful write. Deleting a Record Once a record is picked, you can use a DeleteRec signal to delete it from the recordset and the corresponding database table. The DeleteAllRecs signal deletes all of the records in the table, leaving an empty table. (Be very careful with this signal!) Demos Three demonstrations on the use of the Database Manager are included with the package. Each demo is described along with an accompanying “bird’s eye view” diagram of its SIMPL program. . All demos use the following three files: • A VT Pro-e source file (demoDBM.vtp file), containing pages for all three demos, ready to be compiled LC-3000 touchpanel. • A compiled touchscreen file (demoDBM.hex file); dervied from the above; ready to upload to an LC-3000, CT-3000, CT-3500, or VT-3500. • A Configuration file (demoDBM.ini) configures the server for all three demos. In addition, each individual demo has a folder containing the following files: • A SIMPL Windows source file (demo?.smw file), ready to be compiled for a CNMSX-PRO control system (“PRO” = front panel with LCD display) with a CNXENET (Ethernet) card in the DPA slot. 41 • Demos Installation & Reference Guide — DOC. 5823 Crestron e-control Database Manager SW-DBM • A compiled control system program file which uses serial RS-232 communications (demo?COM.bin file); derived from the above by commenting off the Virtual COM port; ready to upload to such a control system. • A compiled control system program file which uses EtherNet communications (demo?TCP.bin file); derived from the above by commenting off the serial COM port; ready to upload to such a control system. The supplied SIMPL and VT Pro-e files may require conversion prior to compiling and uploading if your target touchpanel is not one of those mentioned above. Conversion is a simple matter using VT Pro-e. Before attempting to run the demos, use the File | Configuration File… command to make sure the server is using the configuration file named above. Demo 1 Database Browsing and Maintenance This demo illustrates browsing a table with the ability to add, delete, and update records. To enable database maintenance operations, you must check the Edit symbols checkbox in the Scroller Signal Block Definition window. The scroller in the demo has six rows, and lists Crestron offices around the world. When the user picks row n, a Pickn signal is sent to the server, which sends the corresponding datafields to the touchscreen. Selecting a data field displays a virtual keyboard that lets you enter new information for that field. Clicking OK on the keyboard when finished typing closes the keyboard, enters the text the user typed in the datafield on the touchscreen and sends a WriteField signal to the server that updates the database record. (In a future release, the table will not be updated until the server receives an UpdateRec signal.) Selecting the Add a new record button sends a NewRec signal to the server, which creates a new empty database record. Add information by selecting each data field and using the keyboard to update the blank datafields. Selecting a record and pressing Delete this record sends a DeleteRec signal to the server and deletes the row from the database table. Demo 1 Block Diagram [ Figure unavailable ] Demo 1 SIMPL Windows Program Two items need to be added to the control system in the Configuration Manager in SIMPL Windows. From the Control Systems folder in the Device Library select CNMSX-AV; and also add a two-way serial driver to a COM port on the CNXCOM6 board from the Serial Drivers (General) folder (or add a Virtual Communication Port from the Ethernet Control Modules folder and a driver as above). In the Programming Manager, the other blocks are added to the system from the Logic Symbols folder in the Symbol Library. Interlock and Set/Reset Latch are selected from the Memory folder. Intersystem Communications w/offset is selected from the System Control folder. Demo 1 VT Pro-e Program The first page of demo 1 gives you the choice of starting the demo or returning to the main menu. 42 • Demos Installation & Reference Guide — DOC. 5823 Crestron e-control Database Manager SW-DBM NOTE: Before proceeding to the actual demo page, start the server protocol by issuing the Server | Start command. The second page of demo 1 displays the names of six offices from the Addresses table. The arrow buttons are used to scroll forward or backward or go to the first or last six records in the list of offices in the Addresses table. Selecting an office populates the data fields of the scroller. Selecting a datafield opens page 3, which is the keyboard. Pressing any character on the keyboard adds those characters to the text at the top of the page. Pressing bksp backspaces over the characters on the text button. Pressing OK or Cancel returns to page 2. OK replaces the text in the selected datafield with the characters from the keyboard; Cancel leaves the datafield unchanged. Demo 2 Successive Query This demo illustrates the successive query technique described in “Successive Queries” (page 38). It uses the Albums and Tracks databases joined together in the example in the section on database joins (“Joins: Accessing Multiple Tables,” page 33). To enable the GoLevel and GoLevelEcho signals that implement successive queries, check the successive query checkbox in the Signal Block Definition window, and indicate the number of levels needed for the query. At the start of this demo, the scroller displays a list of music categories from the Albums table using a GoLevelEcho1 signal indicating that this is the top level of the successive query. The user “drills down” from these broad categories to finer levels of detail, finally selecting a particular track on a particular album. When the user selects a category in the scroller, the corresponding Pickn signal is sent to the server. The server responds with a GoLevelEcho2 signal that displays the selected category and redefines the scroller to display a list of artists or groups that have albums of the selected category. The next pick drills down to albums of the selected artist or group, using GoLevelEcho3. Picking an album displays a list of tracks using GoLevelEcho4. The track information comes from the Tracks table; it has been joined to the Albums table using the CDJID column that exists in both tables and is used to match the tracks with their albums. Selecting a track displays information about that track and gives the user the option to reselect the track, album, artist, or category. If the use reselects one of these levels, the server sends the appropriate GoLevelEcho signal corresponding to the level of the selection. 43 • Demos Installation & Reference Guide — DOC. 5823 Crestron e-control Database Manager SW-DBM Demo 2 Block Diagram Com Port Intersystem Communication Com1_OUT [tx$] [rx$] Com1_IN rx$ Enable First Prev Next Last (refresh) (requery) (blank) GoLevel1 GoLevel2 GoLevel3 GoLevel4 dig_in1 dig_in2 dig_in3 dig_in4 dig_in5 dig_in6 dig_in7 dig_in8 dig_in9 dig_in10 dig_in11 dig_in12 Touchpanel A First-fb Prev-fb Next-fb Last-fb GoLevel1-fb GoLevel2-fb GoLevel3-fb GoLevel4-fb B C fb1 fb2 fb3 fb4 fb6 fb7 fb8 fb9 Pick1-fb Pick2-fb Pick3-fb Pick4-fb Pick5-fb Pick6-fb Pick7-fb Pick8-fb fb11 fb12 fb13 fb14 fb15 fb16 fb17 fb18 * press1 press2 press3 press4 First Prev Next Last press5 LeavePage press6 press7 press8 press9 GoLevel1 GoLevel2 GoLevel3 GoLevel4 * press10 GoToDemoScreen press11 press12 press13 press14 press15 press16 press17 press18 Pick1 Pick2 Pick3 Pick4 Pick5 Pick6 Pick7 Pick8 * (UpLevel) dig_in13 Pick1 Pick2 Pick3 Pick4 Pick5 Pick6 Pick7 Pick8 dig_in14 dig_in15 dig_in16 dig_in17 dig_in18 dig_in19 dig_in20 dig_in21 tx$ aout1 aout2 aout3 aout4 Com1_OUT QueryDescription ErrNumber ErrString Scrollbar aout5 List1-1$ aout12 List1-8$ aout13 List2-1$ aout20 List2-8$ aout21 List3-1$ aout28 List3-8$ aout29 List4-1$ aout36 List4-8$ aout37 aout38 aout39 Data1 Data2 Data3 E F G H WaitMsg fb19 aout40 Data4 GoLevel1-echo fb21 aout48 Data12 GoLevel5-echo fb25 dig_out1 GoLevel1-echo List1-1$ text1 dig_out5 GoLevel5-echo List1-8$ text8 QueryDescription text9 dig_out6 dig_out7 dig_out8 ErrTrigger Done Enabled * D E F Data1 text10 List2-1$ text11 List2-8$ text18 H I D * Interlock Data2 G I text20 List3-1$ text21 List3-8$ text28 Data3 text30 List4-1$ text31 List4-8$ text38 ErrString text39 Data4 text40 Data12 text48 Scrollbar an_fb1 Done [clear] First Prev Next Last i1 i2 i3 i4 o1 o2 o3 o4 First-fb Prev-fb Next-fb Last-fb Pick1 Pick2 Pick3 Pick4 Pick5 Pick6 Pick7 Pick8 i5 i6 i7 i8 i9 i10 i11 i12 o5 o6 o7 o8 o9 o10 o11 o12 Pick1-fb Pick2-fb Pick3-fb Pick4-fb Pick5-fb Pick6-fb Pick7-fb Pick8-fb GoLevel1 GoLevel2 GoLevel3 GoLevel4 i13 i14 i15 i16 o13 o14 o15 o16 GoLevel1-fb GoLevel2-fb GoLevel3-fb GoLevel4-fb A C B Demo 2 SIMPL Windows Program Two items need to be added to the control system in the Configuration Manager in SIMPL Windows. From the Control Systems folder in the Device Library select CNMSX-AV; and also add a two-way serial driver to a COM port on the CNXCOM6 board from the Serial Drivers (General) folder (or add a Virtual Communication Port from the Ethernet Control Modules folder and a driver as above). In the Programming Manager, the other blocks are added to the system from the Logic Symbols folder in the Symbol Library. Interlock and Set/Reset Latch are selected from the Memory folder. Intersystem Communications w/offset is selected from the System Control folder. 44 • Demos Installation & Reference Guide — DOC. 5823 Crestron e-control Database Manager SW-DBM Demo 2 VT Pro-e Program The first page of demo 2 gives you the choice of starting the demo or returning to the main menu. NOTE: Before proceeding to the actual demo page, start the server protocol by issuing the Server | Start command. The second page of demo 2 displays the names of eight genres from the Albums table. The arrow buttons are used to scroll forward or backward or go to the first or last eight records in the list of genres in the Albums table. Selecting a genre does not invoke a page flip, it triggers the next GoLevel in the successive query, which displays the third page. This page displays the names of the artists. Selecting an artist invokes the next GoLevel in the query, which displays the fourth page. On this page, selecting an album invokes the next level, which displays the fifth and last page. On this page, selecting a track displays the track information. This page also has areas for reselecting each type of entity from each level of the query. Touching one of these areas invokes the appropriate GoLevel signal, which displays the appropriate page. Note that there are no page flips in this demo because the query level always sends a specific group of listFields to the touchscreen, and this determines the page displayed. Demo 3: AutoPick This demo illustrates the use of the AutoPick option that automatically sends a Pick 1 signal to the server. You invoke AutoPick by checking the Auto-Pick checkbox in the Scroller Signal Block Definition window. The scroller in this demo has only one row at the top of the screen that lists the album name. The user can scroll through the albums using the Forward and Back buttons, which send Next and Previous signals to the server. Due to the AutoPick setting, these signals also cause the server to effect an automatic pick of the first (and in this case, only) row in the scroller (as if a Pick1 signal had also been sent to the server). Touching the image of the album cover on the touchscreen flips to another page to suggest that doing so might play the album if there were a real jukebox connected to the system. 45 • Demos Installation & Reference Guide — DOC. 5823 Crestron e-control Database Manager SW-DBM Demo 3 Block Diagram Com Port [tx$] Com1_OUT Intersystem Communications [rx$] Com1_IN rx$ Touchpanel A First-fb Prev-fb Next-fb Last-fb press1 press2 press3 press4 press5 fb1 fb2 fb3 fb4 First Prev Next Last WaitMsg fb9 B C List1$ Data1 Data2 Data3 Data4 Data5 Data6 Data7 Data8 Data9 ErrString Scrollbar dig_in1 First Prev Next Last dig_in2 dig_in3 dig_in4 dig_in5 Interlock text1 text2 text3 text4 text5 text6 text7 text8 text9 text10 Done [clear] First Prev Next Last i1 i2 i3 i4 GoToDemoScreen LeavePage set reset First-fb Prev-fb Next-fb Last-fb A C List1$ Data1 Data2 Data3 Data4 Data5 Data6 Data7 Data8 Data9 B dig_out1 ErrTrigger dig_out2 Done dig_out3 Enabled out Enable AND NOT i1 o1 o2 o3 o4 aout5 aout6 aout7 aout8 aout9 aout10 aout11 aout12 aout13 aout14 VirCom1_OUT QueryDescription ErrNumber ErrString Scrollbar Set/Reset Latch text11 an_fb1 press10 Enabled Enable tx$ aout1 aout2 aout3 aout4 o1 Enable i1 i2 o1 WaitMsg NOTE: This block diagram shows the use of a virtual COM port for TCP/IP communications with the server. For serial communications using RS-232, the virtual COM port is simply replaced with a real (serial) COM port. Demo 3 SIMPL Windows Program Two items need to be added to the control system in the Configuration Manager in SIMPL Windows. From the Control Systems folder in the Device Library select CNMSX-AV; and also add a two-way serial driver to a COM port on the CNXCOM6 board from the Serial Drivers (General) folder (or add a Virtual Communication Port from the Ethernet Control Modules folder and a driver as above). In the Programming Manager, the other blocks are added to the system from the Logic Symbols folder in the Symbol Library. Interlock and Set/Reset Latch are selected from the Memory folder. Intersystem Communications w/offset is selected from the System Control folder. Demo 3 VT Pro-e Program The first page of demo 3 gives you the choice of starting the demo or returning to the main menu. NOTE: Before proceeding to the actual demo page, start the server protocol by issuing the Server | Start command. The second page of demo 3 displays the first album in the Albums table. The arrow buttons are used to scroll forward or backward in the list of albums in the Albums table. When the desired album appears on the top line of the screen, touch the field that contains the image of the album cover to send the Pick1 signal to the server and play the album. This also flips the page to page 3. 46 • Demos Installation & Reference Guide — DOC. 5823 Crestron e-control Database Manager SW-DBM On page 3, the album cover is again displayed with the message Now playing …. Touch the album image to return to page 2. 47 • Demos Installation & Reference Guide — DOC. 5823 Crestron e-control Database Manager SW-DBM Appendix A: Theory of Operation This section describes the operation of the e-mailer signal block as it processes signals from the control system. Signal names are shown as conjoined words with initial caps set in bold type, such as SendNow. Refer to the “Signal Reference” beginning on page 58 for in-depth information on these signals. Server Protocol Run the Crestron Software Server application, swserver.exe, to license (Server | License…) and configure (Server | Configure…) server operation. Although the server application is now running, the server protocol must be manually started (Server | Start) t o establish the communications link. Once started, licensing and configuration options are off limits. To change a configuration option, the server protocol must be halted (Server | Stop). Signal Block Definition / Activation Definition / activation of signal blocks is performed in the Signal Blocks tab of the Configuration Options window — which can only be accessed while the server protocol is halted. Signal Blocks (in general) are “defined” (created) in the “Configure options” window, Signal Blocks tab. Once defined, they are saved in the Configuration Settings file. Signal Blocks are not “active” (listening for signals) unless activated in the list under the Signal Blocks tab by checking the box next to the signal block name. The number of active signal blocks of each type cannot exceed the respective limits of your license. Should this happen, a warning appears on the Signal Blocks tab and the server protocol does not start. There is no theoretical limit to the total number of signal blocks which may be defined in a given configuration. (A practical limit has yet to be determined.) Signal Block Enable / Disable Whereas most digital signals are pulsed, the Enable signal is unusual in that it is state-sensitive. Once the signal block has been defined and activated, and the server protocol is running, the signal block still has very limited functionality until it is enabled with an assertion of the Enable signal by the control system. Most other signals require the signal block to be enabled first; otherwise they produce an “Object not loaded” error. Once enabled, system resources are loaded and the signal block to respond to signals from the control system to send or receive e-mail. De-asserting the Enable signal causes the signal block to unload those system resources, making it dormant once again. The following signals are exceptions to this rule. They can be processed without first enabling the signal block: • Enable (assert) of course • All the e-mailbox’s Set____ signals • The e-mailer’s Shortcut signals. When received by a disabled e-mailer, the e-mailer is “auto-enabled” — but only for the duration of the signal. Signal Block Error Reporting All signal blocks have a Local error signals option to define a set of signals for the purpose of reporting of errors “locally.” Otherwise, errors are reported “globally” to the control system through the optional signal block that can be associated with a 48 • Appendices Installation & Reference Guide — DOC. 5823 Crestron e-control Database Manager SW-DBM COM Settings definition which contains a similar set of error reporting signals.. These signals include ErrNumber, ErrString, and ErrTrigger. See the “Signal Reference,” beginning on page 58, for details. 49 • Appendices Installation & Reference Guide — DOC. 5823 Crestron e-control Database Manager SW-DBM Appendix B: Intersystem Communications and Signal Space Considerations The Send e-Mail SIMPL Windows symbol is available from the Crestron FTP site. Under SIMPLWIN, look for “Library update” (version equal to or greater than that specified in “Leading Specifications” on page 7). The DBMScroller SIMPL macro is installed with SIMPL Windows 1.4. It is also installed into the Modules folder. For use with 1.3, move the file to your currently set user macros folder. The Intersystem Communications symbol is commonly known by its speedkey name, XSIG. The following discussion applies in general to all Crestron Software Server components. Keep in mind while reading this section that use of the Intersystem Communications SIMPL symbol is the most general approach for setting up communications with the signal blocks defined in the server. To simplify the control system side programming, be aware of the following alternatives to the Intersystem Communications symbol: • For e-mailer signal blocks, we recommend the more specific Send e-Mail symbol. Checking Using “Send e-Mail” SIMPL symbol in the signal block definition constrains the definition to ensure compatibility with this symbol. • Likewise, Standard Scroller signal blocks can use the DBMScroller SIMPL Windows macro. Each active signal block exchanges data with a particular running in a control system connected to the server. Typically, several signal blocks communicate with the same control system, using several Intersystem Communications symbols. This section discusses how to properly connect signal blocks to their target Intersystem Communications symbols. System Connections Signal Blocks are connected to XSIGs through a physical connection (a hardware communications port). The control system accesses the port through a driver. There are different drivers for each kind of port: System Protocol Hardware Port Serial Driver CNRACK or CNMS RS-232 CNCOMH-2 plug in control card A or B CNCOMH-2 Two-way serial driver TCP/IP N o t a v a i l a b l e RS-232 Built-in serial port A through F CNXCOM Two-way serial driver TCP/IP CNXENET direct processor access (DPA) card NET Virtual Communication Port RS-232 Built-in COM ports or 3rd-party serial cards COM1 through COM8 Network Interface (NIC) card NET CNRACKX or CNMSX PC TCP/IP Manufacturerspecific In all cases, the control system receives data as a serial data stream from the driver and transmits data by sending a serial data stream to the driver. This is precisely the kind of data the XSIG symbols use. 50 • Appendices Installation & Reference Guide — DOC. 5823 Crestron e-control Database Manager SW-DBM Encoding and Decoding the Serial Data Stream Analog, serial, and digital signals to be sent from the control to the server are fed into the input (left) side of an Intersystem Communications symbol which encodes the signals into a serial data stream, available as an output labeled tx$ (for transmitter). This data stream is connected to the input side of the serial driver symbol, also labeled tx$, and is sent out the COM port to the server. Convenience feature: You can connect an analog signal to a serial signal input of a signal block’s symbol. Upon receipt, the server automatically converts the analog value to a decimal (base 10) numeric string. The server receives the data on a certain connection, via a certain channel number (if TCP/IP). It searches through its active signal blocks for one with a signal range that can accommodate the incoming signal. It also knows the signal type (analog, serial, or digital) and sends the signal to the appropriate method implemented by the signal block. A useful exception to this general paradigm is that when the server receives an analog signal when it expected a serial signal (i.e., the signal number matched that of a serial signal, the server as a courtesy, automatically converts the analog value to a decimal (base 10) numeric string. Data from the server received at the COM port is available on the output (right) side of the serial driver symbol, labeled rx$ (for receiver). This data must then be decoded by the control system into system signals it can use. To do this, the rx$ stream is connected to the input side of an Intersystem Communications symbol, also labeled rx$. The outputs of this symbol are analog, serial, and digital signals. The Intersystem Communications Symbol Signal Space The term “signal space” refers to the number of signals available to the Intersystem Communications symbol connected to a given i/o stream. Specifically, there are a total of 4096 signals available. However, while the first 1024 signals may be of any type (Analog, serial, or digital), the remaining 3072 signals can only be used for digital signals. An additional constraint imposed by the SIMPL Windows compiler is that each symbol (and therefore each signal block on the server side) must list all its digital signals after all its analog/serial signals (which may be intermixed). Since each signal block’s signals are numbered consecutively within this space, and since the non-digital signals of all signal blocks must be positioned below 1024, only that portion of the space is normally of practical use. NOTE: The various signal block definition windows all provide a dynamic display of the highest signal number currently defined. This value changes as the user selects options and enters values for the size of enumerated signal sets. This value is also affected when the user changes the value of the symbol’s offset. If any of these actions would place the highest digital signal above 4095 or the highest non-digital signal above 1023, the text box containing the highest signal number turns red to alert the user. The user must bring the signals within range before attempting to activate the signal block or an error is added to the server log. Also note that when attempting to start the server protocol, an error is reported if any Intersystem Communication symbols sharing the same connection have signal ranges that overlap. Large configurations are often not able to fit all their signal blocks within this space. TCP/IP connections use a Virtual COM port which offers 128 discrete channels. For such connections, each channel supports a separate i/o stream, and hence a separate signal space. The solution is to apportion your signal blocks among a number of channels. For RS-232 connections, there is only the one channel with which to work. In such cases, a second physical connection is needed. The following sections discuss different connection models in detail. One Connection, Many Signal Blocks Signal Blocks configured in the server for a particular control system can “talk” to their respective Intersystem Communications symbols through a single connection 51 • Appendices Installation & Reference Guide — DOC. 5823 Crestron e-control Database Manager SW-DBM to the control system. All the symbols’ rx$ and tx$ streams are tied to the same serial driver symbol. The set of signals intended for a particular Intersystem Communications symbol are distinguished from the other sets by their offset and/or their channel number. Normally, the signals in an Intersystem Communication symbol’s input list and its output list are internally enumerated starting at the top of each list with zero (0). The next signal down the input list and the next down the output list are numbered 1; the next pair, 2; and so forth. These “signal numbers” are transmitted along with the data and are used at the receiving end to determine what to do with the data. NOTE: The signal numbers under discussion here are for communications purposes only and are not utilized in any way outside the Intersystem Communications symbol context. The numbering scheme displayed on the Intersystem Communication symbols in SIMPL Windows has nothing to do with the actual signal numbering. Additional Intersystem Communications symbols using the same connection must specify a value to offset their signal numbers by a constant amount. The top signals in such an Intersystem Communications symbol do not begin with zero, but rather with the supplied offset. This offset must be specified on both sides of the connection, as follows. On the server side, the offset is entered into the textbox in the upper right corner of the signal block definition window. Note in the figure below that the textbox in question is not labeled Offset as one might expect, but Signals. The adjacent box labeled to shows the signal number of the last signal in the input or output lists (whichever is higher). This information helps to determine the offset of the next signal block. The Signal Block Interface frame from a typical signal block definition window, showing the signal block’s COM Settings, Vcom channel assignment, and signal offset. NOTE: In the above example, Vcom channel is dimmed because “SYS” specifies a serial connection. (Only TCP/IP connections have channels.) On the control system side, in SIMPL Windows the offset is entered into the offset textbox at the bottom of the Intersystem Communications symbol. A portion of an Intersystem Communications symbol. showing the Offset and Option textboxes. 52 • Appendices Installation & Reference Guide — DOC. 5823 Crestron e-control Database Manager SW-DBM NOTES: 1. Always suffix a d (for decimal) to values typed into the Offset textbox. 2. Always enter 1d into the Option textbox for all Intersystem Communications symbols. Multiple channels Multiple channels apply to connections made through Virtual COM Ports only (i.e., TCP/IP connections only). Each Virtual COM Port can have up to 128 channels, where each channel can be thought of as a separate COM port. If a separate channel is used for each Intersystem Communications symbol, then all Intersystem Communications symbols can use an offset of zero (i.e., no offset). The advantage is simplicity; each channel has its own signal space. In this case, the programmer never needs to worry about offsets on either side. NOTE: Only systems connected to a Virtual COM Port (via TCP/IP) have multiple channels. The channel list is disabled (dimmed) in the signal block definition window for systems connected via RS-232. RS-232 connections are single-channel connections. Do not use multiple channels if there is any possibility of needing to revert to an RS-232 connection. Multiple Connections Usually all Intersystem Communications symbols from a single control system “talk” to the server through one physical connection, although it is possible to install multiple connections, such as any combination of RS-232 connections (each with its own cable) and/or or a TCP/IP connections (all referencing the same IP address, but each with its own IP ID). NOTE: Multiple connections between a single control system and a single server delivers better response because of the additional buffers involved. However, keep in mind that multiple TCP/IP connections do need to be individually licensed. The COM Settings Signal Block An Intersystem Communications symbol to service the COM Settings signal block need only be present if at least one signal is defined in the System Definition window. However, it need not be at signal offset 0 but could be positioned anywhere within the signal space subject to the constrains discussed above. If present, the COM Settings signal block’s Intersystem Communications symbol is always connected to channel #1 in a Virtual COM port. 53 • Appendices Installation & Reference Guide — DOC. 5823 Crestron e-control Database Manager SW-DBM Appendix C: Signal Reference Definition of Terms Data fields The indirect text fields which receive the data that is echoed when a record is opened (“picked”). Connection A connection to a system which can be either serial (RS-232) or EtherNet (TCP/IP). List fields The indirect text fields in scrollers. There can be more than one field (column) per row in the scroller. Scroller (1) Scrolling lists as displayed on touchscreens, made up of (a) a column of buttons containing indirect text fields, along with (b) transport buttons, and (c) an optional analog gauge object serving as a scrollbar. Also (2) the signal block which services such a construct. Server The Crestron Software Server. That is, swserver.exe running on a Windows PC. Signal Block Active component within the Server, which listens for and responds to signals from connected control systems. For example, each scroller requires its own signal block. If not specified explicitly as some other type of signal block, refers to a standard scroller signal block. System A Crestron control processor along with appropriate programming. String Proxies The various Echo signals keep a server-side “proxy” of the data last sent to the system. Before sending, the new value is compared with the proxy and is only actually sent if it differs. The proxy is then updated to match the new value. In this way, identical string data are not continually resent. Bit Patterns For those unfamiliar with bit patterns, here is a primer. Base 2 Basics A quantity is represented in computer memory as a binary (base 2) number (i.e., a string of 1s and 0s). As you know, in base 10, the least significant (low-order) “digits” are on the right, and the most significant (high-order) are on the left. This is also true of base 2: The lowest order “bit,” (binary digit), on the far right, and are numbered starting from 0. Thus, when sixteen bits are available, they are numbered 0 to 15 from right to left — because each bit on its own represents the quantities 20 through 215. Bit patterns as used here do not represent quantities. Rather, the values of the individual bits (0 or 1) turn features off and on (respectively). Thus, when the documentation refers to Bit 5 as controlling feature X, this means that feature X is “enabled” when Bit 5 is set to 1. 54 • Appendices Installation & Reference Guide — DOC. 5823 Crestron e-control Database Manager SW-DBM Base 16 used for notational purposes Straight base 2 notation (a long string of 0s and 1s) is considered to be too unwieldy to be useful to the human eye as it is too easily prone to misrepresentation and misinterpretation. Hexadecimal (base 16) notation is used to conveniently specify the bit patterns for the signals that use them (i.e., the Config and SignalAn signals). Hexadecimal groups all sixteen bits into four sets of four bits each, assigning the base 10 digits 0 to 9 plus the first six letters of the alphabet A to F to the sixteen possible combinations of the four bits. For example, the sixteen-bit (base 2) pattern 0000000111010101 can be broken into the four four-bit sets 0000 0001 1101 0101 which get assigned to them the four hexadecimal “hex digits” 0 1 D 5 Note that D stands for the quantity we normally express in base 10 as thirteen (13). Therefore, the above bit pattern is referred to conveniently as $01D5, or since leading zeros are optional in any base, $1D5. The missing (high-order) bits are assumed to be 0000. Although $1D5 represents a quantity — which happens to be four hundred sixty-nine (469) in base 10 — again, we are only interested in bit patterns here, not the quantities they may represent. Error Reporting At this time error handling is a little haphazard, with some errors being tallied back to the control system, while others are logged in the Server Monitor window. Tallied Errors A descriptive string is sent with all errors (via ErrString). However, while some are accompanied with error numbers (via ErrNumber + ErrTrigger), some are not. Log Items The log is intended for after-the-fact analysis of important events. The log is an inmemory FIFO list (first in, first out). When the log approaches capacity, log items are removed, one by one, starting with the oldest items first, until there is enough room for the new item. All logged items are preceded with either a per-cent sign (%) or a dollar sign ($). Items preceded with % are informational. Items preceded with $ are errors, reflecting unanticipated situations. Signal Summary The “Signal Reference,” below, is an alphabetical list of all signals from both COM Settings and Scroller signal blocks. Certain signal names are used in both types of signal blocks. However, only one entry for each signal type appears in the reference. Among these are the Done signal and the three error signals (ErrNumber, ErrString, and ErrTrigger). This identical naming reflects the fact that these signals function similarly regardless of where they appear. 55 • Appendices Installation & Reference Guide — DOC. 5823 Crestron e-control Database Manager SW-DBM When these signals are defined in the scroller signal block, the server uses them. When not defined, however, the server sends the signal via the “owning” signal block. If the signal is not defined there either, or the scroller has no owner, the signal is sent to the COM Settings signal block. If the signal is also undefined in the COM Settings signal block, the signal is lost (not sent). COM Settings Signal Block Summary The system block contains two Ping and two Pong signals. One pair consists of a send (Ping) and receive (Pong) from the Server’s point of view; and the other, a send (Ping) and receive (Pong) from the Systems’ point of view. This accommodates pinging from either (a) Systems to the Server or (b) vice versa. Signal Block Signal Name Direction Type COM Settings BlankAll server-to-system D COM Settings Done server-to-system D All ErrNumber server-to-system A All ErrString server-to-system S All ErrTrigger server-to-system D COM Settings PingSvr system-to-server D COM Settings PingSys server-to-system D COM Settings PongSvr server-to-system D COM Settings PongSys system-to-server D COM Settings RefreshAll server-to-system D Scroller Signal Block Summary Some signals shown below cannot be defined in an e-mailer scroller (a restricted version of a standard scroller). Signal Block Direction Type Custom Scroller Blank system-to-server D Custom Scroller ClearRec system-to-server D Custom Scroller CloseRec system-to-server D Custom Scroller Cols system-to-server A Custom Scroller Datad server-to-system S Custom Scroller DeleteAllRecs system-to-server D Custom Scroller DeleteRec system-to-server D All Scrollers Done server-to-system D All Scrollers Enable system-to-server D All Scrollers Enabled server-to-system D Custom Scroller ErrNumber server-to-system A Custom Scroller ErrString server-to-system S Custom Scroller ErrTrigger server-to-system D First system-to-server D Custom Scroller GoLevelv system-to-server D Custom Scroller GoLevelEchov+1 server-to-system S All Scrollers Last system-to-server D All Scrollers Listr or Listr,c server-to-system S All Scrollers 56 • Appendices Signal Name Installation & Reference Guide — DOC. 5823 Crestron e-control Database Manager Signal Block SW-DBM Direction Type NewRec system-to-server D All Scrollers Next system-to-server D All Scrollers Pickr system-to-server D All Scrollers Prev system-to-server D All Scrollers Custom Scroller Signal Name QueryDescription server-to-system S Custom Scroller Refresh system-to-server D Custom Scroller Requery system-to-server D All Scrollers ScrollBar system-to-server A Custom Scroller UpLevel system-to-server D Scroller Signals Grouped by Secondary Functionality The following lists aid the reader in understanding how scroller signals interact. Initiating a Query The following scroller signals all initiate a query: Signal Block Direction Type Enable system-to-server D Custom Scroller GoLevelv system-to-server D Custom Scroller Requery system-to-server D All Scrollers Signal Name Opening a record The following scroller signals open a record for display and marks it for editing: Signal Block Direction Type All Scrollers First Signal Name system-to-server D All Scrollers Last system-to-server D All Scrollers Next system-to-server D All Scrollers Pickr system-to-server D All Scrollers Prev system-to-server D Note that the navigation signals (First, Prev, Next, Last) open the first record on each page when and only when the Auto-Pick checkbox in the Scroller Signal Block Definition window is checked. Otherwise, Pick is the only signal which opens records. Closing an Opened Record The following scroller signals close an opened record: Signal Block Direction Type CloseRec system-to-server D First system-to-server D GoLevelv system-to-server D All Scrollers Last system-to-server D All Scrollers Next system-to-server D All Scrollers Prev system-to-server D Refresh system-to-server D Custom Scroller All Scrollers Custom Scroller Custom Scroller 57 • Appendices Signal Name Installation & Reference Guide — DOC. 5823 Crestron e-control Database Manager Signal Block SW-DBM Signal Name Direction Type Custom Scroller Requery system-to-server D Custom Scroller UpLevel system-to-server D Note that Pick, of course, immediately opens a new record. List Signals The following scroller signals affect scroller contents: Signal Block Custom Scroller Signal Name Direction Type Blank (and BlankAll) system-to-server D All Scrollers Enable system-to-server D All Scrollers First system-to-server D Custom Scroller GoLevelv system-to-server D All Scrollers Last system-to-server D All Scrollers Next system-to-server D All Scrollers Prev system-to-server D Custom Scroller Refresh (and RefreshAll) system-to-server D Custom Scroller Requery system-to-server D Custom Scroller UpLevel system-to-server D Signal Reference The alphabetical reference proper begins on the next page. 58 • Appendices Installation & Reference Guide — DOC. 5823 Crestron e-control Database Manager SW-DBM Blank Description Direction Causes the server to respond by clearing the scroller list. System to Server Type Digital Value Pulse Expected Reply Comments scroller signal Possible List signals (all with null strings); followed by pulse of Done signal The server sends a null string to each column in each row using List signals. List fields which are already null are not updated. (See “String Proxies,” page 54.) Automatically effected when scroller signal block is disabled. This signal cannot be defined in an emailer scroller. See Also 59 • Appendices List, Refresh, Requery signals Installation & Reference Guide — DOC. 5823 Crestron e-control Database Manager SW-DBM BlankAll Description Direction Causes the server to respond by clearing all scroller lists. System to Server Type Digital Value Pulse Expected Reply Comments system signal Possible List signals (all with null strings); followed by pulse of Done signal The server responds as if a Blank signal had been received from each scroller defined for the system from which the signal was received. That is, the server sends a null string to each column in each row of each list using List signals. Note however that all scrollers are blanked regardless of whether or not they are enabled at the time the BlankAll signal arrives. Not implemented in the present release. See Also 60 • Appendices Blank, List Installation & Reference Guide — DOC. 5823 Crestron e-control Database Manager SW-DBM ClearRec Description Direction Causes the server to nullify every field in the opened record. System to Server Type Digital Value Pulse Expected Reply Comments scroller signal Possible Data signals (all with null strings); followed by pulse of Done signal This signal is only effective when a record is opened. This would normally be the most recent record “picked.” If no record has yet been picked since the query was initiated (or the scroller has been scrolled, or the CloseRec signal has been pulsed), pulsing ClearRec produces the following error: You must choose a record first. If successful, the data fields are all blanked. As usual, fields already blanked are not signaled (see “String Proxies,” page 54). This signal cannot be defined in an emailer scroller. Not implemented in the present release. See Also 61 • Appendices Data, CloseRec Installation & Reference Guide — DOC. 5823 Crestron e-control Database Manager SW-DBM CloseRec Description Direction Causes the server to “deselect” the chosen record. System to Server Type Digital Value Pulse Expected Reply Comments scroller signal Done signal pulse The opened record is closed, meaning that all data fields are blanked, and signals that operate on opened records (including this one) is henceforth ineffectual. This signal is only effective when a record is opened. This would normally be the most recent record “picked.” If no record has yet been picked (or the scroller has been scrolled, or this signal has already been pulsed), pulsing CloseRec (again) produces the following error: You must choose a record first. This signal cannot be defined in an emailer scroller. Not implemented in the present release. See Also 62 • Appendices Installation & Reference Guide — DOC. 5823 Crestron e-control Database Manager SW-DBM Cols Description Direction Type Value Expected Reply Comments scroller signal Sets number of columns displayed in the scroller. System to Server Analog 1 through the number of columns defined Possible List signals (all with null strings); pulse of the Done signal If the new number of columns is less than the old number, the extra columns are blanked. Not implemented in the present release. See Also 63 • Appendices Installation & Reference Guide — DOC. 5823 Crestron e-control Database Manager SW-DBM Datan Description Direction Type Value scroller signal Sends “picked” record to control system Server to System Serial Contents of fields of the opened record Expected Reply Comments The order of fields is as listed in the datafields field of the Queries table. Example 1: Three fields are listed in datafields. When a record is picked from the list, the three fields are echoed back to the system using the Data1, Data2, and Data3 signals. However, note that only fields defined by the data filter bit pattern are sent. (See DataFilter for more information.) When using successive queries (Successive query checked in the Scroller Signal Block Definition window ), all the list fields listed in the listfields field of the Queries table are echoed using the first (so many) Data signals. Only the last list in the successive query is actually considered to be a “pick” (record opener). When the record is finally picked, the fields listed in the datafields field of the Queries table are transmitted using the remaining Data signals. Example 2: If there are three lists consisting of 1, 3, and 2 list fields, then these fields are echoed using the {Data1}, {Data2, Data3, Data4}, and {Data5, Data6} signals. Upon picking an item from the third list, a record is opened and the fields listed in datafields (say in this case there are three such fields listed) are echoed using the {Data7, Data8, Data9} signals. All Data signals in a successive query are subject to filtering. (Again, see DataFilter for more information.) See Also 64 • Appendices DataFilter signal Installation & Reference Guide — DOC. 5823 Crestron e-control Database Manager DataFilter SW-DBM scroller signal Description Direction Type Value System to Server Analog A bit pattern Expected Reply Comments The bits in the pattern refer to the fields listed in the datafields field of the Queries table. There is a one-to-one correspondence between the bits in the pattern and the fields in the opened record. Bit 0 corresponds to the first field listed, bit 1 to the second, etc. When a bit is set, the field is transmitted. The bit pattern has an initial value specified as part of the scroller definition; it can also be set at run-time using the DataFilter (analog) signal. The initial value is shown in the Scroller Signal Block Definition window in hexadecimal. Note that the default for this initial value is $FFFF (all bits set = all fields sent). The bit pattern contains only 16 bits. Therefore only the first 16 data fields are filterable. Any additional listed fields are always sent. Data are transmitted using the Data signal with a number equal to the position of the field in the list in the datafields field of the Queries table. Example 1: Assume there are four fields listed in datafields. If the first and third fields are filtered out (value set with DataFilter = $FFFA), the second and fourth fields are transmitted via signals Data2 and Data4. All Data signals in a successive query are subject to filtering, including those signals used to echo the list fields. Example 2: Consider Example 2 in the entry for the Data signal. To filter out extra list field columns from being echoed, as well as any echoes from the last list at all, and to echo only the second field listed in datafields, set the filter to $83. With this setting only the following signals are sent: The contents of the first picked record’s list field echoed via Data1; the contents of the first (of three) columns (only) of the second picked record’s list fields via Data2; nothing of the third picked record’s list fields, but upon the third touch, the second (of three) data fields via Data8. Note that regardless of the number of fields listed and the current value of the data filter bit pattern, only the first n signals can ever be transmitted, where n is the number of Data signals defined. If Renumber fields is checked in the Scroller Signal Block Definition window, the fields remaining after the filter is applied are renumbered consecutively. Example 3: Consider again Example 1, above. If the (proposed) “compress” option is checked, the data would instead be transmitted via the first two Data signals, namely Data1 and Data2. Example 4: Consider again Example 2, above. Instead of responding with Data1, Data2, and Data8, the server would respond with Data1, Data2, and Data3. Note however that the Renumber fields checkbox remains unimplemented in the present release. See Also Data signal See “Bit Patterns,” page 54 65 • Appendices Installation & Reference Guide — DOC. 5823 Crestron e-control Database Manager SW-DBM DeleteAllRecs Description Direction Removes all qualifying records from the referenced tables. System-to-Server Type Digital Value Pulse Expected Reply Comments scroller signal Done signal Obviously a dangerous signal. “Qualifying records” means records that qualified for inclusion in the query that created the recordset. “Referenced table(s)” means the table(s) referenced by the recordset associated with the scroller signal block. All such records are deleted. (More than one table could be referenced if the table field of the Queries table contains a join. See See “Joins: Accessing Multiple Tables” on page 33 for more information on the joins). This signal cannot be defined in a license-free scroller. See Also 66 • Appendices Installation & Reference Guide — DOC. 5823 Crestron e-control Database Manager SW-DBM DeleteRec Description Direction Deletes the currently opened record. System-to-Server Type Digital Value Pulse Expected Reply Comments scroller signal Done signal The current record is deleted from the recordset (and hence from the table or tables upon which the recordset is based). The data fields are all blanked. The record is removed from the scroller. This signal is only effective when a record is opened. This would normally be the most recent record “picked.” If no record has yet been picked (or the scroller has been scrolled, or the CloseRec signal has been pulsed), pulsing DeleteRec produces the following error: You must choose a record first. This signal cannot be defined in an emailer scroller. See Also 67 • Appendices Installation & Reference Guide — DOC. 5823 Crestron e-control Database Manager SW-DBM Done Description Direction Indicates requested operation complete Server to System Type Digital Value Pulse Expected Reply None Comments system signal; scroller signal Sent to System in response to most System-to-Server signals, indicating that the requested operation has been completed. Typically, there is a 0.2-sec. delay between the leading and trailing edge of the pulse. See Also 68 • Appendices Installation & Reference Guide — DOC. 5823 Crestron e-control Database Manager SW-DBM Enable Description Direction Type Value scroller signal This signal enables/disables the signal block. System to Server Digital Assert to enable the signal block De-assert to disable the signal block Expected Reply Comments None The signal block must be enabled prior to use. If not, all signals which operate on scrollers (which does not include scroller config signals) produces the following error: Query not opened. When the signal block is enabled, a query is initiated to establish a recordset. (See NewQuery signal.) If the query cannot be found, the following error is produced: Scroller NAME cannot find query number n. The signal block remains disabled. To try again, it is first necessary to de-assert the Enable signal, in order to re-assert it. To try again with a different query number, before re-asserting, set the query number using the NewQuery signal. Upon successful enable, the following takes place: § The scroller is blanked (but only if the Blank scroller upon signal block enable checkbox in the Scroller Signal Block Definition window has been checked) § NewQuery signal simulated § First signal simulated § Enabled signal asserted De-assertion of (i.e., resetting) the Enable signal disables the signal block, as follows: § Query is closed § The scroller is blanked (but only if the Blank scroller upon signal block disable checkbox in the Scroller Signal Block Definition window has been checked) § Enabled signal de-asserted (reset) It is recommended that if the NewQuery signal was used, that its value be reset to zero (0). See Also 69 • Appendices NewQuery, First, Enabled signals Installation & Reference Guide — DOC. 5823 Crestron e-control Database Manager SW-DBM Enabled Description Direction Type Value scroller signal “Handshake” response to the Enable signal. Server to System Digital Asserted in response to assert of Enable signal. De-asserted in response to de-assertion of Enable signal. Expected Reply Comments None Although this signal is often ignored, in a proper implementation, when enabling the signal block (usually upon arrival to a certain touchscreen page), the System should: (1) Wait for assertion of Enabled before issuing any other scroller signals. (2) Indicate an error condition if assertion of Enabled does not occur after a certain amount of time (typically 30 seconds). When disabling the signal block (usually upon arrival to a certain touchscreen page), the System should: (3) Wait for de-assertion of Enabled before leaving touchscreen page. (4) Indicate an error condition if de-assertion of Enabled does not occur after a certain amount of time (typically 30 seconds). The demos implement (1) and (3) but not (2) and (4). See Also 70 • Appendices Enable signal Installation & Reference Guide — DOC. 5823 Crestron e-control Database Manager SW-DBM ErrNumber Description Direction Type Value Expected Reply Comments system signal; scroller signal When the server encounters an error processing a request from the System, it uses this signal to send an error number. Server to System Analog New error number None This signal works in conjunction with the ErrString and ErrTrigger signals which always follow immediately. For an e-mail scroller, this and the other Err signals are always defined. For a standard scroller, they are optionally defined in the Standard Scroller Definition window (Local Errors checkbox). When not defined, the server attempts to use the SYSTEM error signals, unless they too are not defined. This signal can be safely ignored. This signal cannot be defined in an emailer scroller. See Also 71 • Appendices ErrTrigger, ErrString signals Installation & Reference Guide — DOC. 5823 Crestron e-control Database Manager SW-DBM ErrString Description Direction Type Value Expected Reply Comments system signal; scroller signal Description of error Server to System Serial Error message for display None Although this signal can be safely ignored, it is easily hooked to indirect text fields on a touchscreen and/or on the CNMSX-PRO front panel, etc. This signal is used by the server in two ways: (1) Used in conjunction with the ErrNumber and ErrTrigger signals, the latter following immediately. (2) Used alone for informational messages. Sometimes these messages represent error conditions and sometimes they are purely informational. For an e-mail scroller, this and the other Err signals are always defined. For a standard scroller, they are optionally defined in the Standard Scroller Definition window (Local Errors checkbox). When not defined, the server attempts to use the SYSTEM error signals, unless they too are not defined. This signal cannot be defined in an emailer scroller. See Also 72 • Appendices ErrNumber, ErrTrigger signals Installation & Reference Guide — DOC. 5823 Crestron e-control Database Manager SW-DBM ErrTrigger Description Direction Trigger for ErrNumber and ErrString Server to System Type Digital Value Pulse Expected Reply None Comments system signal; scroller signal This signal is sent after the ErrNumber and ErrString to indicate that an error condition has occurred. For an e-mail scroller, this and the other Err signals are always defined. For a standard scroller, they are optionally defined in the Standard Scroller Definition window (Local Errors checkbox). When not defined, the server attempts to use the SYSTEM error signals, unless they too are not defined. This signal can be safely ignored. This signal cannot be defined in an emailer scroller. See Also 73 • Appendices ErrNumber, ErrString signals Installation & Reference Guide — DOC. 5823 Crestron e-control Database Manager SW-DBM First Description Direction System to Server Digital Value Pulse Comments See Also 74 • Appendices Displays the scroller’s first page. Type Expected Reply scroller signal List signals ScrollBar signal pulse of Done signal Automatically effected when scroller signal block is enabled. Enable, Prev, Next, Last signals Installation & Reference Guide — DOC. 5823 Crestron e-control Database Manager SW-DBM GoLevelv Description Direction Return to an earlier level of a successive query. System to Server Type Digital Value Pulse Expected Reply Comments scroller signal Scroller blanking (as per configuration options); GoLevelEcho signal pulse; Scroller refresh with new data; Done signal pulse The number of GoLevel signals, v, is the number of successive query levels defined in the Configuration Options window. The purpose of the GoLevel signals is to return to a preceding level. These signals cannot be used for forward navigation. Example: From level 2, GoLevel1 and GoLevel2 are valid but GoLevel3 or higher would be ignored. See Also 75 • Appendices UpLevel, GoLevelEcho, Done signals Installation & Reference Guide — DOC. 5823 Crestron e-control Database Manager SW-DBM GoLevelEchov+1 Description Direction Level navigation occurred. Server to System Type Digital Value Pulse Expected Reply None Comments scroller signal Successive query scrollers only. This signal is sent when navigating to a narrower query or back to wider query. The server responds with this signal upon receipt of the following signals: q Enable: enabling the scroller q Pick: a valid scroller pick q GoLevel: explicit backward navigation q UpLevel: explicit backward navigation Note that the number of GoLevelEcho signals, v+1, is always one more than the number of GoLevel signals, v, the number of successive query levels defined in the Configuration Options window. The reason for this is that the extra GoLevelEcho signal is sent when the user finally picks a real record to display from the last query level. See Also 76 • Appendices Enable, Pick, signals Installation & Reference Guide — DOC. 5823 Crestron e-control Database Manager SW-DBM Last Description Direction Displays the scroller’s last page. System to Server Type Digital Value Pulse Expected Reply Comments scroller signal List signals ScrollBar signal pulse of Done signal There may be empty rows at the bottom of the last page. Picking one of these produces the error: Pickn error: No such record. See Also 77 • Appendices First, Prev, Next signals Installation & Reference Guide — DOC. 5823 Crestron e-control Database Manager SW-DBM Listr - or - Listr,c Description Direction Type Value Expected Reply Comments See Also 78 • Appendices scroller signal Contents of scroller Server to System Serial Each List signal transmits the contents of one indirect text field representing a cell (each column within each row) in the scroller. None. Not all List signals are always sent; see “String Proxies,” page 54. The following signals each have the potential to alter the scroller contents. Enable, NewQuery, First, Prev, Last, Next, Blank, BlankAll, Refresh, RefreshAll, Requery, RequeryAll, DeleteRec, DeleteAllRecs Installation & Reference Guide — DOC. 5823 Crestron e-control Database Manager SW-DBM NewRec Description Direction Creates and “opens” a new record in the referenced table(s) System-to-server Type Digital Value Pulse Expected Reply Comments scroller signal Done signal, possible blank strings to various Datan signals “Qualifying records” means records that qualified for inclusion in the query that created the recordset. “Referenced table(s)” means the table(s) referenced by the recordset associated with the scroller signal block. New records are created in all such tables. (More than one table could be referenced if the table field of the Queries table contains a join. See “Joins: Accessing Multiple Tables” on page 33 for more information on the joins). The new record is represented at the end of the scroller signal block’s recordset, and hence at the end of the last page of the scroller display. It only appears in its proper (sorted) position when the scroller is disabled/re-enabled, or the Requery signal is pulsed. Note that no data actually appears in the scroller list until the field(s) which are displayed in the list (as listed in the listFields field of the Queries table) are written. Note that the new record is automatically “picked” meaning that it is “opened” for editing. That is, the various Writen signals modify respective fields in this (new) record. This signal cannot be defined in an license-free scroller. See Also 79 • Appendices Installation & Reference Guide — DOC. 5823 Crestron e-control Database Manager Next Description Direction Value Pulse See Also 80 • Appendices System to Server Digital Comments scroller signal Displays next scroller page. Type Expected Reply SW-DBM List signals ScrollBar signal pulse of Done signal No effect if currently on last page. First, Prev, Last signals Installation & Reference Guide — DOC. 5823 Crestron e-control Database Manager SW-DBM Pickr Description Direction User has chosen a certain record currently visible in scroller System to Server Type Digital Value Pulse Expected Reply Comments scroller signal Data signals (default pick action) There is one Pick signal per row in the scroller. When the user touches a row in the scroller, the corresponding Pick signal is sent to the server. The server knows what scroll page the user is seeing and opens the indicated record. How the server responds to the Pick signal is determined first by whether the scroller is owned by any other signal blocks. If so, the signal block’s code responds to the touch in its own way. Second, if the scroller is generic (not owned), the scroller’s current pick action setting determines what action to take. See the PickAction signal. See Also 81 • Appendices PickAction and Data signals Installation & Reference Guide — DOC. 5823 Crestron e-control Database Manager SW-DBM PingSvr, PingSys, PongSvr, PongSys Description Direction Request for acknowledgement PingSvr: System to Server PingSys: Server to System Type Digital Value Pulse Expected Reply Comments system signals PongSvr: Server to System to Server PongSys: System PongSvror PongSys When the Server receives a PingSvr signal, it immediately responds with a PongSvr signal pulse. This is useful during System installation to test communications with the Server. A very rudimentary SIMPL program is required. This is actually more useful for testing RS-232 connections which are not formally opened the way TCP/IP connections are. Assuming a reliable connection has been established, a secondary reason to ping the Server (using either communications mode) is to test the communications protocol and Server operation in general. For the Server to PingSys the Systems and get a PongSys in response also requires one of the PingPong programs to be loaded into the control systems. If you wish to keep this capability in your finished SIMPL program, include explicit programming. One general use of the signals might be to have the Systems check for the connection every few minutes or so by sending a Ping. If a Pong is not returned within a certain window of time, the control system should repeat the Ping transmission a couple of times. If still no reply, the control system should then report an error in some way (to the front panel or to a touchscreen). See Also 82 • Appendices Installation & Reference Guide — DOC. 5823 Crestron e-control Database Manager Prev Description Direction Value Pulse See Also 83 • Appendices System to Server Digital Comments scroller signal Displays previous scroller page. Type Expected Reply SW-DBM List signals ScrollBar signal pulse of Done signal No effect if currently on first page. Prev, Next, Last signals Installation & Reference Guide — DOC. 5823 Crestron e-control Database Manager SW-DBM QueryDescription Description Direction Type Value Expected Reply Comments scroller signal Text describing query Server to System Serial String from description field of query record. None. Sent when query is made, either when the signal block is enabled (by the Enable signal); or after enable, upon initiation of a new query (by the NewQuery signal). Typically displayed on touchscreen above scroller. In a successive query, the name of the first field in each query is sent upon arriving at each level. This value has a proxy and hence is only sent when it changes. See Also 84 • Appendices Enable, ClearScroller, Requery, NewQuery signals Installation & Reference Guide — DOC. 5823 Crestron e-control Database Manager SW-DBM Refresh Description Direction Resends all scroller string proxies which causes server to respond. System to Server Type Digital Value Pulse Expected Reply Comments scroller signal List, Data, and QueryDescription serial signals Normally used to re-establish the contents of all scroller-related indirect text fields. See “String Proxies,” page 54. This signal cannot be defined in an emailer scroller. See Also 85 • Appendices List, Data, and QueryDescription signals Installation & Reference Guide — DOC. 5823 Crestron e-control Database Manager SW-DBM Requery Description Direction Causes server to respond by going back to the database to rebuild the current scroller page, resends all scroller strings. System to Server Type Digital Value Pulse Expected Reply Comments scroller signal Possible Data signals (all with null values); followed by all in-use List signals Despite its name, this signal does not actually re-run the query; it just moves through the already-established recordset again to rebuild the current scroller page, sending serial data back to the control system via the List signals. Note that all these list signals are always transmitted because the proxies are also being rebuilt. If a record is opened when this signal is issued, it is closed. This action sends out blanking Data signals. This signal cannot be defined in an emailer scroller. See Also 86 • Appendices List and Data signals Installation & Reference Guide — DOC. 5823 Crestron e-control Database Manager SW-DBM Requery All system signal Description Direction Type Value Expected Reply Comments Not implemented in the present release. See Also 87 • Appendices Enable signal Installation & Reference Guide — DOC. 5823 Crestron e-control Database Manager SW-DBM Rows Description Direction Type Value Expected Reply Comments scroller signal Sets number of rows displayed in the scroller. System to Server Analog 1 through the number of rows defined Possible List signals (all with null strings); pulse of the Done signal If the new number of rows is less than the old number, the extra rows are blanked. Not implemented in the present release. See Also 88 • Appendices Installation & Reference Guide — DOC. 5823 Crestron e-control Database Manager SW-DBM ScrollBar Description Direction Type Value scroller signal Maintains “scroll bar” (actually an analog gauge) displayed on touchscreen adjacent to scroller. System to Server Analog Bar mode: (65535 / pps) to 65535 (where pps is number of pages in the table) Line mode: 0 to 65535 Expected Reply Comments None. This signal should be hooked directly to an analog gauge. Operates in one of two modes, Bar Mode and Line Mode, settable from the Scroller Signal Block Definition window. Both modes show progress through the recordset, but in slightly different ways. Bar Mode (or “thermometer” mode) shows progress based on the last row in the current page. The formula the server uses to calculate the value is p / pps x 65535 where p is the current page and pps is the total number of pages. Example 1: There are 20 records in the recordset. The current scroller height is set to 8 rows. Therefore, there are three pages. On the first page, 1/3 of the gauge is filled [value = 1/3 x 65535 = 21845]; on the second page, 2/3 of the gauge is filled [value = 2/3 x 65535 = 43690]; and on the third page, the entire gauge is filled [value = 3/3 x 65535 = 65535]. Line Mode shows progressed based on the first row on the first page through the last row on the last page. The formula the server uses to calculate the value is (p1) / (pps-1) x 65535. Example 2: Again, there are three pages. On the first page, the gauge is empty [value = (1-1)/(3-1) x 65535 = 0]; on the second page, 1/2 of the gauge is filled [value = (2-1)/(3-1) x 65535 = 32767]; and on the third page, the entire gauge is filled [value = (3-1)/(3-1) x 65535 = 65535]. If you find this confusing, note that it is simply a manifestation of the classic “fence post problem.” The easiest way to think about this is to consider a certain length of fencing to represent the length of the recordset. Bar Mode shows sections of the fence, one section per page. (In Example 1, there are three pages represented by three sections of fence.) By contrast, Line Mode shows fence posts. (In Example 2, there are also three pages but this time they are represented by three fence posts.) Line Mode is not yet implemented in the present version. See Also 89 • Appendices Signals from the control system that affect the scroll page also affect the value of the ScrollBar signal. These include: First, Prev, Next, Last, DeleteRec, DeleteAllRecs, and NewRec. Installation & Reference Guide — DOC. 5823 Crestron e-control Database Manager SW-DBM UpdateRec Description Direction Update record in database file with field edits. System to Server Type Digital Value Pulse Expected Reply Comments scroller signal Done signal Any changes made to any field(s) in the opened record (including, possibly, a new record) made with the WriteField signals are output when the UpdateRec signal is pulsed. Not implemented in the present version. See Also 90 • Appendices WriteField signal Installation & Reference Guide — DOC. 5823 Crestron e-control Database Manager SW-DBM UpLevel Description Direction System to Server Digital Value Pulse Comments See Also 91 • Appendices Return to the preceding level of a successive query. Type Expected Reply scroller signal Scroller blanking (as per configuration options); GoLevelEcho signal pulse; Scroller refresh with new data; Done signal pulse Ignored if received when on the top level (level 1). However, valid when received after data display (final scroller pick). GoLevel, GoLevelEcho, Done signals Installation & Reference Guide — DOC. 5823 Crestron e-control Database Manager SW-DBM WriteFieldd Description Direction Type Value Expected Reply Comments scroller signal String data to replace contents of data fields in opened record. System to Server Serial A string to use to modify the field in question None. Fields may be changed repeatedly using the WriteField signal Upon a successful write, the server always echoes back the write data in a Data signal which updates the data field on the touchscreen to match the data just written out to the database file. Also, if the field change is a field which appears in the scroller itself, a List signal may be sent as well. Finally, the Done signal is pulsed after a successful write. The numbering of the WriteField signals parallels that of the Data signals — which numbering can be further affected by the setting of DataFilter (both of which see Data and DataFilter ) See Also 92 • Appendices UpdateRec signal; Data and DataFilter signals Installation & Reference Guide — DOC. 5823 Crestron e-control Database Manager 93 • Appendices SW-DBM Installation & Reference Guide — DOC. 5823 Crestron e-control Database Manager 94 • Appendices SW-DBM Installation & Reference Guide — DOC. 5823