1
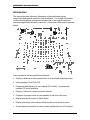
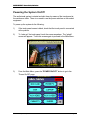
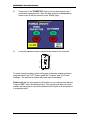
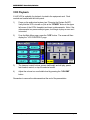
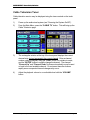
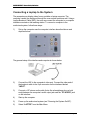
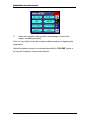
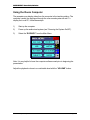
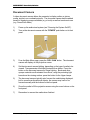
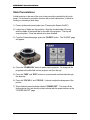
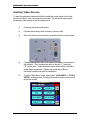
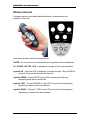
BROWN UNIVERSITY
Barus & Holley
Auditorium
Audiovisual System
Reference Manual
Submitted by:
HB Communications Inc.
60 Dodge Ave.
North Haven, Connecticut 06473-0689
(203) 234-9246
(800) 922-2776
TABLE OF CONTENTS
Introduction
2
Introduction to Touch Panels
3
Touch Panel: a Road Map
4
Powering the System On/Off
5
VCR Playback
7
Cable Television Tuner
8
Connecting a Laptop to the System
9
Using the Room Computer
11
Document Camera
12
Slide Presentations
13
Auxiliary Video Sources
14
Wireless Remote
15
Matrix Switcher (Emergency Use)
16
Assistance
17
BROWN UNIVERSITY: Barus & Holley: Auditorium
Introduction
This manual provides reference information on the audiovisual system
components and general operation of the Auditorium. For in-depth information
on the individual pieces of equipment, please refer to the original equipment
manuals supplied with the each component. A plan view of the room is depicted
below.
The room has the following audiovisual features:
•
Display of slides and video presentations on a motorized projection screen.
•
Video playback via a VHS VCR.
•
Connection and display of a user’s laptop (PC or Mac). A permanentlyinstalled PC is also available.
•
Display of media on a video document camera.
•
Playback of program audio on two speakers in the front of the room.
•
Display and remote control of 35mm slides.
•
Display of auxiliary video sources which may be connected at any time.
•
A touch panel connected to a control system handles all room A/V functions.
Audiovisual System Operator’s Manual
Page 2
BROWN UNIVERSITY: Barus & Holley: Auditorium
Introduction to Touch Panels
The primary means of controlling the computers, display, and other equipment is
a Crestron CT-1600 touch panel that plugs into the podium. This touch panel
has a tilting screen that locks into place when in use (and folds down when not in
use). It is shown below:
Sample touch panel rendering
To activate a touch panel, simply touch the darkened screen. The splash screen
will appear. Touch the screen anywhere to proceed to the Main Menu. The
touch panel interface is designed for ease-of-use, using graphic buttons and
icons to represent each function.
Audiovisual System Operator’s Manual
Page 3
BROWN UNIVERSITY: Barus & Holley: Auditorium
Touch Panel: a Road Map
To become more familiar with the touch panel’s features, all of the available
screens are shown on the next two pages as a reference.
Audiovisual System Operator’s Manual
Page 4
BROWN UNIVERSITY: Barus & Holley: Auditorium
Powering the System On/Off
The audiovisual system is started and shut down by means of the touch panel at
the conference table. There is no need to use the power switches on the racked
equipment.
To power up the system do the following:
1)
If the touch panel screen is blank, check that the touch panel is connected
at the podium.
2)
To “wake up” the touch panel, touch the screen anywhere. The “splash”
screen will appear. Touch the screen again to proceed to the Main Menu.
Splash Screen
3)
From the Main Menu, press the “POWER ON/OFF” button to go to the
“Power On/Off” page.
Audiovisual System Operator’s Manual
Page 5
BROWN UNIVERSITY: Barus & Holley: Auditorium
4)
Press each of the “POWER ON” buttons for the video projector and
audiovisual equipment rack. Note: the slide projector is independently
turned on an off with the controls on the “Slides” page.
5)
Lower the projection screen using the button panel on the front wall.
To power down the system, return to this page in the same manner as before
and press each of the “OFF” buttons under the “Projector” and “A/V Power”
headings. The audiovisual system will power down immediately.
Please note that the video projector will continue to run a few minutes after the
“Projector OFF” button has been pressed. This cooling cycle lasts only a few
minutes, but the projector cannot be restarted until the cycle ends (the projector
is completely quiet).
Audiovisual System Operator’s Manual
Page 6
BROWN UNIVERSITY: Barus & Holley: Auditorium
VCR Playback
A VHS VCR is available for playback, located in the equipment rack. Deck
controls are handled with the touch panel.
1)
Power up the audiovisual system (see “Powering the System On/Off”).
Verify that the VCR is turned on (look at the “POWER” button in the upper
left corner of the VCR’s faceplate) and insert a videocassette. Note: if the
videocassette is a prerecorded program, it will begin to play as soon as it
is inserted.
2)
From the Main Menu page, press the “VCR” button. The screen will then
display the “VCR CONTROLS” page.
3)
The transport control buttons operate traditionally and will play, pause,
fast-forward, rewind, or stop the selected media.
4)
Adjust the volume to a comfortable level by pressing the “VOLUME”
button.
Remember to remove the videocassette at the end of the presentation.
Audiovisual System Operator’s Manual
Page 7
BROWN UNIVERSITY: Barus & Holley: Auditorium
Cable Television Tuner
Cable television service may be displayed using the tuner controls on the touch
panel.
1)
Power up the audiovisual system (see “Powering the System On/Off”).
2)
From the Main Menu, press the “CABLE TV” button. This will bring up the
Cable Television page.
3)
The rectangular window at the top of the tuner panel displays the current
channel entry, but not necessarily the current channel. Enter a channel
number using the keypad, using the “Clear” button if a mistake is made,
and the “ENTER” button to actually change the channel. The channel
“Channel Up” and “Channel Down” buttons automatically move forward
or back to the next available channel. Do not press these two buttons
rapidly as an unexpected channel changes may occur.
4)
Adjust the playback volume to a comfortable level with the “VOLUME”
button.
Audiovisual System Operator’s Manual
Page 8
BROWN UNIVERSITY: Barus & Holley: Auditorium
Connecting a Laptop to the System
The presenter may display video from a portable or laptop computer. The
computer’s audio can be played through the room sound system as well. Using a
Laptop Breakout Cable (LBC), the user can connect the computer to a computer
interface mounted on the teaching station. To connect a computer to the
audiovisual system, follow these steps:
1)
Set up the computer near the computer interface described above and
depicted below.
The general setup of the interface and computer is shown below:
2)
Connect the LBC to the computer’s video port. Connect the other end of
the breakout cable to the 9-pin connector on the interface labeled
"INPUT".
3)
Connect a 1/8" stereo audio cable (looks like a headphone plug on both
ends) between the computer’s audio output jack and the "PC AUDIO" jack
on the interface.
4)
Start up the computer.
5)
Power up the audiovisual system (see “Powering the System On/Off”).
6)
Select “LAPTOP” from the Main Menu.
Audiovisual System Operator’s Manual
Page 9
BROWN UNIVERSITY: Barus & Holley: Auditorium
7)
Adjust the computer’s video resolution as necessary to improve the
image’s readability and clarity.
Note: It is very helpful to have the computer software cued prior to beginning the
presentation.
Adjust the playback volume to a comfortable level with the “VOLUME” button, or
by using the computer’s volume control function.
Audiovisual System Operator’s Manual
Page 10
BROWN UNIVERSITY: Barus & Holley: Auditorium
Using the Room Computer
The presenter may display video from the computer in the teaching station. The
computer’s audio can be played through the room sound system as well. To
display the Local PC, follow these steps:
1)
Start up the computer.
2)
Power up the audiovisual system (see “Powering the System On/Off”).
3)
Select the “ROOM PC” from the Main Menu.
Note: It is very helpful to have the computer software cued prior to beginning the
presentation.
Adjust the playback volume to a comfortable level with the “VOLUME” button.
Audiovisual System Operator’s Manual
Page 11
BROWN UNIVERSITY: Barus & Holley: Auditorium
Document Camera
A video document camera allows the presenter to display written or picture
media, similar to an overhead projector. The document camera has the added
benefit of displaying opaque materials (e.g. a book) as well as translucent ones
(e.g. PowerPoint slides).
1)
Power up the audiovisual system (see “Powering the System On/Off”).
2)
Turn on the document camera with the “POWER” push button on its front
panel.
3)
From the Main Menu page, press the “DOC CAM” button. The document
camera will display on the projection screen
4)
Set the document camera lighting, depending on the type of media to be
viewed. Transparencies should be illuminated from below: Press the
button on the document camera for Stage Lighting. Books and other
opaque materials are illuminated from above, using the protruding light
bars above the viewing surface: press the button for the Upper Lamps.
5)
The document camera typically auto focuses the media being displayed,
but for some three-dimensional objects, the camera may have to be
focused manually with the buttons on the front panel.
6)
Zoom the media to fill the projection screen using the zoom buttons on the
front panel.
7)
Remember to remove the media when finished.
Audiovisual System Operator’s Manual
Page 12
BROWN UNIVERSITY: Barus & Holley: Auditorium
Slide Presentations
A slide projector in the rear of the room is also remotely controlled by the touch
panel. It is enclosed in a wooden structure with a clear cabinet door, to allow for
loading or unloading of slide trays.
1) Power up the audiovisual system (see “Powering the System On/Off”).
2) Load a tray of slides into the projector. Align the notched edge of the tray
with the middle of the handle bar on the side of the projector. The tray will
snap into place. Close the cabinet door when finished.
3) From the Presentation page, press the “SLIDES” button. The “SLIDES” page
will appear.
4) Press the “POWER ON” button to power up the projector. No image will be
projected until a slide falls into the projector slot from the tray.
5) Press the “FWD” and “REV” buttons to move forward and backward through
the slide tray.
6) Press the “FOCUS +” and “FOCUS –“ buttons to adjust the sharpness of the
picture.
7) When finished, press the button labeled “POWER OFF”. This turns off the
slide projector only and should not be confused with the power buttons on the
“POWER ON/OFF” page.
Audiovisual System Operator’s Manual
Page 13
BROWN UNIVERSITY: Barus & Holley: Auditorium
Auxiliary Video Sources
To allow the presenter maximum flexibility in what he or she brings to the class,
an extra “auxiliary” video input has been provided. The presenter may connect
the auxiliary video source in the following manner.
1)
Power up the audiovisual system.
2)
Connect the auxiliary video source to a power outlet.
3)
Set up the video source near the computer interface on the podium.
4)
Connect the source’s video or S-video to the labeled connectors on
the interface. Then, connect the audio to the left (“L”) and right
(“R”) audio jacks. Video and audio patch cables will be needed to
make these connections. Please see a member of Brown
University’s audiovisual staff for assistance.
5)
From the “Main Menu” page, select either “AUX VIDEO” or “AUX SVIDEO”, as appropriate, to display the auxiliary video source on the
projection screen.
Audiovisual System Operator’s Manual
Page 14
BROWN UNIVERSITY: Barus & Holley: Auditorium
Wireless Remote
A wireless remote control allows additional control of presentations from
anywhere in the room.
The buttons and their functions are listed below:
LASER – the remote acts as a laser pointer as long as this button is depressed.
PC, SLIDES, LAPTOP, VCR – instantaneous display of the source described.
Joystick UP – When the VCR is displayed, it will play the tape. When SLIDES is
selected, this button will advance the slide tray.
Joystick DOWN – Presses STOP on the VCR or reverses the slide tray,
depending which source is selected.
Joystick LEFT – Presses REWIND on the VCR or focuses the slide projector,
depending in which source was selected.
Joystick RIGHT – Presses F. FWD on the VCR or focuses the slide projector,
depending on which source was selected.
Audiovisual System Operator’s Manual
Page 15
BROWN UNIVERSITY: Barus & Holley: Auditorium
Matrix Switcher (Emergency Use)
If the touch panel fails or is unavailable, the audiovisual system may still
be operated manually. All of the source media decks can be operated by their
front panel controls. To switch the various sources to the display, the user must
be familiar with the Extron Crosspoint 84HVA System Switcher located in the
equipment rack. The Matrix Switcher controls the A/V from the computer input
plates, the CD player, and the audio cassette recorder.
The front panel of the switcher is illustrated below:
The front of the switcher has ten buttons, each representing a media source.
The input and output devices are connected to the switcher as shown below:
Input Device
Local PC
Document Camera
VHS VCR
Laptop Interface
Auxiliary Video
Auxiliary S-Video
not used
not used
1
2
3
4
5
6
7
8
Output Device
Computer output, all audio
S-Video output, no audio
Video output, no audio
not used
In general, an input device may be displayed on an output device in the following
manner.
1)
Press and release the RGBHV and/or Audio button(s) to select audio
and/or video.
2)
Press and release the desired input button.
3)
Press and release the desired output button(s).
4)
Press and release the Enter button.
For more information, please consult the manufacturer’s owner’s manual.
Audiovisual System Operator’s Manual
Page 16
BROWN UNIVERSITY: Barus & Holley: Auditorium
Assistance
Audiovisual System Operator’s Manual
Page 17