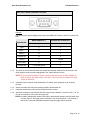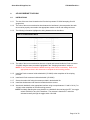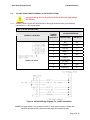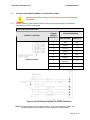
1
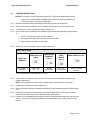
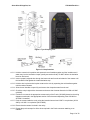
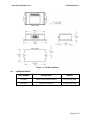
INSTALLATION AND OPERATION
MANUAL
Document Number: 570-0049 Revision -
2-WIRE REMOTE SWITCH INTERFACE 455-0032
AND ELT INTERFACE 455-0041 INSTALLATION
Artex Aircraft Supplies, Inc.
14405 Keil Road NE
Aurora, Oregon 97002 USA
Phone 503-678-7929, Fax 503-678-7930
E-mail [email protected]
www.artex.net
Artex Aircraft Supplies, Inc. doing business as Cobham Avionics
Artex Aircraft Supplies, Inc.
570-0049 Revision -
NOTICES
1.
This document discloses subject matter in which Artex Aircraft Supplies, Inc. has proprietary
rights. Neither receipt nor possession thereof confers or transfers any right to reproduce or
disclose the document, any part thereof, any information therein, or any physical article or device,
or practice any method or process except by written permission from or written agreement with
Artex Aircraft Supplies, Inc.
2.
The interfaces 453-0032 or 453-0041 are only available in a pack list configuration 455-0032 and
455-0041 respectively.
3.
The interface system does not function with any of the Artex remote switches, and can only
operate with the single toggle switch 140-3349 provided in the pack list 455-0049.
4.
Due to the large array of configurations possible, Artex Aircraft Supplies, Inc. does not provide a
harness as part of the installation of the ELT or the interface system.
5.
The toggle switch 140-3349 is not available with a protective guard.
6.
The interfaces 453-0032 and 453-0041 function with all Artex Emergency Locator Transmitters,
other than the ELT-200 series.
7.
The mating connector and contacts connecting to the ELT are found in the install kit included in
the pack list at the time the beacon is purchased. Accordingly, the hardware included in the 4550032 and 455-0041 is only used to connect each interface together.
8.
The toggle switch 140-3349 is not grounded to the ELT, so the system works for metallic and
composite aircrafts when the beacon and the toggle are installed far apart.
9.
Follow standard aircraft wiring practices.
10.
This manual is subject to regular updates and changes.
Page 2 of 30
Artex Aircraft Supplies, Inc.
570-0049 Revision -
LIST OF EFFECTED PAGES
PAGE #
DATE
TITLE
02-02-09
1
02-02-09
2
02-02-09
3
02-02-09
4
02-02-09
5
02-02-09
6
02-02-09
7
02-02-09
8
02-02-09
9
02-02-09
10
02-02-09
11
02-02-09
12
02-02-09
13
02-02-09
14
02-02-09
15
02-02-09
16
02-02-09
17
02-02-09
18
02-02-09
19
02-02-09
20
02-02-09
21
02-02-09
22
02-02-09
23
02-02-09
24
02-02-09
25
02-02-09
26
02-02-09
27
02-02-09
28
02-02-09
29
02-02-09
30
02-02-09
REASON FOR CHANGE
Page 3 of 30
Artex Aircraft Supplies, Inc.
570-0049 Revision -
REVISION HISTORY
REVISION
ENGINEERING CHANGE ORDER
DATE
-
RELEASE
02-02-09
Page 4 of 30
Artex Aircraft Supplies, Inc.
570-0049 Revision -
TABLE OF CONTENTS
1.
INTRODUCTION.............................................................................................................................. 7
2.
PARTS LIST .................................................................................................................................... 7
3.
INSTALLATION AND WIRING OVERVIEW................................................................................... 9
3.1
INSTALLATION OVERVIEW ................................................................................................................... 9
3.2
SYSTEM OVERVIEW .......................................................................................................................... 10
4.
CABLE HARNESS ........................................................................................................................ 10
4.1
INSULATION ADJUSTMENT PROCEDURE ............................................................................................ 11
4.2
CRIMPING INSTRUCTIONS
5.
................................................................................................................. 12
453-0041 WIRING TO ELT............................................................................................................ 14
5.1
6.
INSTRUCTIONS ................................................................................................................................. 14
453-0032 WIRING TO 453-0041 ................................................................................................... 16
6.1
7.
INSTRUCTIONS ................................................................................................................................. 16
453-0032 WIRING TO 140-3349 TOGGLE SWITCH ................................................................... 17
7.1
DIODES INSTALLATION ..................................................................................................................... 17
7.2
140-3349 TOGGLE SWITCH WIRING (14 VDC INSTALLATION)............................................................... 18
7.3
140-3349 TOGGLE SWITCH WIRING (14 VDC INSTALLATION)............................................................... 19
7.4
453-0032 WIRING ........................................................................................................................... 20
8.
INTERFACE INSTALLATION ....................................................................................................... 21
8.1
9.
INSTRUCTIONS ................................................................................................................................. 21
PANEL CUTOUT/TOGGLE SWITCH INSTALLATION................................................................ 22
9.1
10.
INSTRUCTIONS ................................................................................................................................. 22
SPECIFICATIONS ......................................................................................................................... 24
10.1 INTERFACE MATERIAL ...................................................................................................................... 24
10.2
INTERFACE DIMENSIONS ................................................................................................................... 24
10.3
INTERFACE WEIGHT .......................................................................................................................... 25
10.4
TOGGLE SWITCH DIMENSIONS ........................................................................................................... 26
10.5
TOGGLE SWITCH WEIGHT .................................................................................................................. 26
10.6
MISCELLANEOUS COMPONENTS SPECIFICATIONS ............................................................................... 27
10.7
ENVIRONMENTAL CATEGORIES .......................................................................................................... 29
11.
INDEX ............................................................................................................................................ 30
Page 5 of 30
Artex Aircraft Supplies, Inc.
570-0049 Revision -
LIST OF FIGURES
Figure 1: Installation Overview...................................................................................................................... 9
Figure 2: Tyco Crimping Tool...................................................................................................................... 13
Figure 3: Crimp Overview ........................................................................................................................... 13
Figure 4: 453-0032 Wiring Diagram For 14 VDC Installation ..................................................................... 18
Figure 5: 453-0032 Wiring Diagram For 28 VDC Installation ..................................................................... 19
Figure 6 : Label 591-0037 & 591-0092 ....................................................................................................... 22
Figure 7 : Panel cutout dimensions............................................................................................................. 22
Figure 8: Toggle Switch Locking Ring ........................................................................................................ 23
Figure 9: Hardware installation ................................................................................................................... 23
Figure 10: 453-0032 Interface..................................................................................................................... 24
Figure 11: 453-0041 Interface..................................................................................................................... 25
Figure 12: 140-3349 Toggle Switch ............................................................................................................ 26
Page 6 of 30
Artex Aircraft Supplies, Inc.
1.
570-0049 Revision -
INTRODUCTION
This manual contains detailed information about the installation and operation of the interfaces
453-0032 and 453-0041 with any Artex Emergency Locator Transmitters. The interfaces do not
function with the ELT-200 series.
The intent of the interface system is to provide a cost effective means to our customers to retrofit
existing ELT installations using 2-wire connection between the ELT and a toggle switch.
This manual is not intended to be an installation for the ELT system. Use this manual in
conjunction with any Artex ELT manuals.
2.
PARTS LIST
The following parts should be included with the 455-0032, 455-0041, and 455-0049 Pack Lists.
Please contact Artex Aircraft Supplies, Inc. if shortages are found.
QUANTITY
PART NUMBER
DESCRIPTION
455-0032
Pack List, 2-Wire RSWT Interface 453-0032
1 ea.
150-0022
Connector, Plug D-Sub 9-Pin Crimp
1 ea.
151-0006
Backshell, D-Sub 9-Pin Plastic
11 ea.
151-0042
Pin, D-Sub 22-26 AWG Crimp
2 ea.
201-0810
Screw, PHP 8-32 x 5/8 SS
2 ea.
241-0832
Nut, Hex 8-32 x ¼ SS
2 ea.
246-0001
Washer, Flat #8 OD3/8 SS
2 ea.
247-0800
Washer, Lock Internal Tooth #8
1 ea.
453-0032
2-Wire Remote Switch Interface
QUANTITY
PART NUMBER
DESCRIPTION
455-0041
Pack List, 2-Wire ELT Interface 453-0041
1 ea.
150-0022
Connector, Plug D-Sub 9-Pin Crimp
1 ea.
151-0006
Backshell, D-Sub 9-Pin Plastic
11 ea.
151-0042
Pin, D-Sub 22-26 AWG Crimp
2 ea.
201-0810
Screw, PHP 8-32 x 5/8 SS
2 ea.
241-0832
Nut, Hex 8-32 x ¼ SS
2 ea.
246-0001
Washer, Flat #8 OD3/8 SS
2 ea.
247-0800
Washer, Lock Internal Tooth #8
1 ea.
453-0041
2-Wire ELT Interface
Page 7 of 30
Artex Aircraft Supplies, Inc.
QUANTITY
570-0049 Revision -
PART NUMBER
DESCRIPTION
455-0049
Pack List, 2-Wire ELT/RSWT Interface
2 ea.
120-4007
Diode, 1N4007
1 ea.
140-3349
Switch, DPDT W/LED Tip 2-Pos.
1 ea.
455-0032
Pack List, 2-Wire RSWT Interface 453-0032
1 ea.
455-0041
Pack List, 2-Wire ELT Interface 453-0041
1 ea.
570-0049
Manual, 2-Wire RSWT Interface 455-0032 & ELT
Interface 455-0041
1 ea.
591-0037
Label, Toggle Switch Horizontal
1 ea.
591-0092
Label, Toggle Switch
NOTES: For a new installation, the hardware required to connect the wires to the ELT end is
included in the pack list during the purchase of the beacon.
For an existing installation using an Artex ELT, you can purchase the Installation Kit
based on the ELT series of the beacon that you have if you do not have the necessary hardware
on hand already.
Table 1: Installation Kits
ELT SERIES
INSTALLATION KIT PART NUMBER
110-4, 100HM, 110-6
455-7004
C406-1, C406-1HM
C406-2, C406-2HM
G406-1, G406-2
G406-4, G406-4HM
B406-4,
455-7421
C406-N, C406-N HM
455-7422
ME406, ME406HM, ME406P
455-7423
Page 8 of 30
Artex Aircraft Supplies, Inc.
570-0049 Revision -
3.
INSTALLATION AND WIRING OVERVIEW
3.1
INSTALLATION OVERVIEW
The installation below is shown without an ELT.
To ELT
(Refer to applicable
ELT manual for wiring)
453-0041
(Refer to section 5 and 6 for wiring)
453-0032
(Refer to section 6
and 7 for wiring)
Two-communication wires
across the aircraft
(Refer to section 6 for wiring)
Aircraft power wires 14 or 28 VDC
(Refer to section 7 for wiring)
Toggle switch 140-3349
(Refer to section 7 for wiring)
Figure 1: Installation Overview
Page 9 of 30
Artex Aircraft Supplies, Inc.
3.2
570-0049 Revision -
SYSTEM OVERVIEW
Due to the range of ELT installation available, this manual does not illustrate each single wiring
diagram pertaining to a specific ELT because the wiring is in fact very generic to all Artex
beacons. All Artex ELTs follow the same wiring criteria, and have 5 basic electrical lines
connecting the toggle switch to the beacon:
1. Light: This pin turns ON the toggle switch LED. The ELT output is a square wave
pulse with 280 millisecond period. The ON period of the pulse is 140 milliseconds
and the OFF period is 140 milliseconds.
2. Reset 1: This pin enables the ELT to determine the ON or ARM position of the toggle
switch.
3. Reset 2: This pin enables the ELT to determine the ON or ARM position of the toggle
switch.
4. External ON: This pin turns ON the ELT when it is grounded.
5. Ground: This pin is tied to Aircraft DC ground and references all control input and
output signals.
The interface system alleviates the need to install the 5 electrical wires across the aircraft when
the ELT and the toggle switch are installed apart. As such, the system uses 2 interfaces to
convert the typical 5-wire communication line down to 2 wires.
The ELT interface 453-0041 has a built-in horn that is powered by the ELT.
Upon initialization of either the ELT or the toggle switch 140-3349, the event communication
latency between these two products is less than 2 seconds. As such, a change in the lamp state
(LED) also takes place within 2 seconds.
Once the system is operational, the standard LED flash rate is ~140 msec.
The quiescent state power consumption (with the toggle switch in the “ARM” position) of the
interfaces is less than 100µA.
The color of the two communication wires between the interfaces is inconsequential, but each
wire must:
1.
Have the proper gauge (22-26).
2.
Be properly connected to the appropriate contact on the D-sub mating connector of
each interface as shown in the appropriate wiring diagram.
The voltage range of the 453-0032 interface is 6.5 to 30 VDC, but aircraft power is typically 14
and 28 VDC.
The interface 453-0041 contains a latching relay so a slight clinking noise should be expected
during operation.
4.
CABLE HARNESS
Due to the large array of configurations possible, Artex Aircraft Supplies, Inc. does not provide a
harness as part of the installation of the ELT. Accordingly, it is the responsibility of the installer:
1. To manufacture the required harness(es) and ensure that the wires are adequate for
the installation.
2. To check the integrity of the 2-communication wires installed across the aircraft.
3. To thoroughly check the integrity of any wires used in the installation to lessen wiring
problems and increase operational readiness.
4. To follow standard aircraft wiring practices.
Page 10 of 30
Artex Aircraft Supplies, Inc.
570-0049 Revision -
The D-sub crimp contact 151-0042 accepts 22 to 26 AWG wires and is used with Tyco crimping
tool 91525-1 or equivalent.
Artex recommends using a shielded cable to prevent signals related to power frequency, audio
frequency and electrical transients generated from on-board equipments from interfering with the
ELT operation.
The mating connector and contacts connecting to the ELT are found in the install kit included in
the pack list at the time the beacon is purchased. Accordingly, the hardware included in the 4550032 and 455-0041 is only used to connect each interface together.
The interfaces 453-0032 and 453-0041 adequately communicate and allow operation of the
toggle switch 140-3349 with the ELT when using 26 AWG wires with a length of 240 ft (73
meters). Other combinations of length and gauge size must be tested on a case by case basis to
ensure proper communication between the ELT and the toggle switch.
4.1
INSULATION ADJUSTMENT PROCEDURE
On many tools, the insulation barrel crimp height is regulated by the Insulation Adjustment Knob
(Figure 2). The insulation crimp should hold the insulation firmly without cutting into it. To
determine the proper insulation crimp setting, test crimp a loose piece contact using the setting
which corresponds to the insulation diameter:
-
(1) for small
-
(2) and (3) for medium
-
(4) for large
D-Sub Crimp:
Do NOT cut or nick the wire strands during
wire stripping.
Contact crimp 151-0042 accepts wire AWG 22 through 26.
DESCRIPTION
MANUFACTURER
GAUGE
TOOL PART NUMBER
Hand Tool Crimper
Tyco
22-26
92525-1 or equivalent
NOTE: Use Tyco Extraction/Removal Tool 91067-2 or equivalent.
For further information, refer to Tyco 91285-1 Insertion/Extraction Tool document IS9404
located on Tyco web site.
Page 11 of 30
Artex Aircraft Supplies, Inc.
4.2
570-0049 Revision -
CRIMPING INSTRUCTIONS
NOTES: This section is used in conjunction with the ELT and remote switch wiring sections
Refer to Tyco CERTI-CRIMP II Straight Action Hand Tools document 408-8547 for
further information if required (Tyco web site).
4.2.1
Read the instructions before proceeding to familiarize yourself with the process.
4.2.2
Ensure that the wire intended for use is compatible with the wire size of the contact crimp.
4.2.3
Contact crimp 151-0042 accepts wire AWG 22 through 26.
4.2.4
Cut the wires to size according to the installation requirements and depending on the proximity
of:
1. The ELT with reference to the 453-0041 interface
2. The toggle switch with reference to the 453-0032 interface
3. Each interface with respect to each other
4.2.5
Strip 0.100” ±0.010 of insulation from the ends of each wire.
Table 2: Strip Length
CRIMP TOOL
NUMBER
TYCO 91525-1 or
equivalent
WIRE SIZE mm2
(AWG)
INSULATION
DIAMETER
mm (in)
STRIP
LENGTH
mm (in)
0.38 – 0.12
(22 – 26)
1.27 max.
(0.050 max)
2.54 ±0.25
(0.100 ±0.010)
CRIMP HEIGHT mm (in)
0.88 – 0.76 ±0.05
(0.0345 – 0.0300
±0.0020)
Unit of measurement: mm (Millimeter), in (inch)
4.2.6
Crimp contact 151-0042 to the end of each wire connecting to an interface according to the
following instructions.
NOTE: Once engaged, the ratchet will not release until the dies have been fully closed.
4.2.7
Hold the tool so that the front side is facing you.
4.2.8
Ensure that the tool ratchet is released by squeezing the tool handles and allowing them to open
fully.
4.2.9
Holding the contact by its mating portion and looking straight into the crimp section, insert the
contact from the back of the tool into the appropriate crimp chamber.
4.2.10 Position the contact between the crimpers so that the locator/insulation stop enters the slot in the
contact. The wire barrel should butt against the locator/insulation stop. Refer to Figure 2 and
Figure 3.
Page 12 of 30
Artex Aircraft Supplies, Inc.
570-0049 Revision -
Figure 2: Tyco Crimping Tool
Figure 3: Crimp Overview
4.2.11 Hold the contact in this position and squeeze the tool handles together until the insulation anvil
starts entry into the insulation crimper (usually two ratchet clicks). Do NOT deform the insulation
barrel or wire barrel.
4.2.12 Insert a properly stripped wire through the locator slot and into the wire barrel of the contact until
the insulation butts against the locator/insulation stop.
4.2.13 Hold the wire in place and crimp the contact to the wire by squeezing the tool handles together
until the ratchet releases.
4.2.14 Allow the tool handles to open fully and remove the crimped contact from the tool.
4.2.15 Check the crimp height with a micrometer and ensure that it meets dimension 0.0300 to 0.0345
(±0.0020).
4.2.16 Position the contact in the appropriate contact cavity of the D-sub (150-0022) based on the wiring
diagrams mentioned in the appropriate section of this document depending if the 453-0032 or
453-0041 is installed.
4.2.17 Push the contact inside the cavity using the insertion/removal tool 91067-2 or equivalent (20-24
AWG), or 91285-1 or equivalent (24-28 AWG).
4.2.18 Ensure that the contact is locked in the cavity.
4.2.19 Repeat the previous steps for all the wires required in the D-sub connector attaching to an
interface.
Page 13 of 30
Artex Aircraft Supplies, Inc.
570-0049 Revision -
4.2.20 Install the D-sub connector inside a backshell (151-0006).
4.2.21 Secure the strain relief using the screws provided in the backshell kit.
4.2.22 Install the thumbscrews and close the backshell with the screws.
5.
453-0041 WIRING TO ELT
5.1
INSTRUCTIONS
5.1.1
The mating connector and contacts connecting to the ELT are found in the install kit included in
the pack list at the time the beacon is purchased. Accordingly, the hardware included in the 4550032 and 455-0041 is only used to connect each interface together.
5.1.2
The built-in horn inside the interface is powered by the ELT and does not require the 453-0032
interface.
5.1.3
The wiring of an Artex ELT to the interface 453-0041 interface is simply performed by:
1. Referring to the wiring diagram inside the manual of the ELT under installation.
Electronic copies of the manuals are available from Artex’s Web Site www.artex.net
2. Identifying the pin out for the following electrical lines:
•
Light
•
Reset 1
•
Reset 2
•
External ON
•
Ground
•
Horn power
•
Horn ground
3. Matching the electrical lines from the ELT to the 453-0041 interface connector based
on the information presented below.
Table 3: ELT Wiring
PIN LOCATION
453-0041
INTERFACE
PIN #
GENERIC ELT
SIGNAL
DESCRIPTION
1
N/A
2
N/A
3
Reset 1
4
Reset 2
5
Horn +
6
Light
7
Horn Ground
(Aircraft Ground)
8
External ON
9
Aircraft Ground
Page 14 of 30
Artex Aircraft Supplies, Inc.
570-0049 Revision -
Table 4: ELT Interface 453-0041 Front View
Example:
The following information highlights the wiring of the ME406 ELT series to the ELT interface 4530041:
ME406 SERIES ELT
453-0041 ELT INTERFACE
PIN OUT
PIN OUT
Light
2
6
Reset 1
6
3
Reset 2
13
4
External ON
14
8
Ground
7
7 and 9
Horn power
8
5
Horn ground
7 or aircraft ground
7
DESCRIPTION
5.1.4
The wires for the interface 453-0041 are crimped and inserted inside the D-sub connector 1500022 using the same procedure highlighted in the “Cable Harness” section.
NOTE: Do not close the backshell if the two communication wires have not been installed yet.
Refer to section “453-0032 wiring to 453-0041” in this document to complete the wiring
across the interfaces.
5.1.5
Install the D-sub connector inside a backshell (151-0006) at the completion of the crimping
process.
5.1.6
Secure the strain relief using the screws provided in the backshell kit.
5.1.7
Install the thumbscrews and close the backshell with the screws.
5.1.8
Attach the backshell to the interface 453-0041 using a torque between 1.5 and 2.0 in-lb (.7 to .22
Nm) at the completion of the entire wiring process.
NOTE: Accidently attaching the interface 453-0032 to the backshell instead of the 453-0041 does
not harm the ELT, the toggle switch 140-3349, or any of the interfaces. The outcome is
that the ELT cannot be activated remotely through the toggle switch 140-3349.
Page 15 of 30
Artex Aircraft Supplies, Inc.
570-0049 Revision -
6.
453-0032 WIRING TO 453-0041
6.1
INSTRUCTIONS
6.1.1
The size of the two wires is based on the D-sub crimp contact 151-0042 accepting 22 to 26
gauge wires.
6.1.2
The color of the two communication wires between the interfaces is inconsequential, but each
wire must be properly connected to the appropriate contact on the D-sub mating connector.
6.1.3
The following information highlights the wiring between the two interfaces:
Table 5: Communication Wires
6.1.4
The ends of the two communication wires are crimped and inserted inside the D-sub connector
150-0022 using the same procedure highlighted in the “Crimping Instructions” section 4.
NOTE: Do not close the backshell if additional wiring to the D-subs is necessary. Refer to the
appropriate sections in this document to complete the entire wiring process.
6.1.5
Install the D-sub connector inside a backshell (151-0006) at the completion of the crimping
process.
6.1.6
Install each D-sub connector inside a backshell (151-0006).
6.1.7
Secure the strain relief using the screws provided in the backshell kit.
6.1.8
Install the thumbscrews and close the backshell with the screws.
6.1.9
Attach each backshell to the appropriate interface using a torque between 1.5 and 2.0 in-lb (.7 to
.22 Nm) at the completion of the entire wiring process.
NOTE: Accidently attaching the wrong interface to a backshell does not harm the ELT, the toggle
switch 140-3349, or any of the interfaces. The outcome is that the ELT cannot be
activated remotely through the toggle switch 140-3349.
Page 16 of 30
Artex Aircraft Supplies, Inc.
7.
570-0049 Revision -
453-0032 WIRING TO 140-3349 TOGGLE SWITCH
The interface has two connections available on the D-sub connector to connect either aircraft
power 14 VDC or 28 VDC. The connections have internal current limiting resistors to protect the
built-in LED on the toggle switch, so it is critical to establish the proper connection between the
interface, the toggle switch, and the aircraft power.
The power supply inside the interface is designed to operate on 6.5 to 30 V input. Due to this
wide input range, a switching power supply is used to create 5 V for power distribution throughout
the system. This switching supply allows the system to draw on average approximately 125 µA
from a 14 V battery and 65 µA from a 28 V battery.
7.1
DIODES INSTALLATION
Ensure that the leads of the diodes do not touch the body of the toggle
switch, or any other contacts other than the ones mentioned below.
7.1.1
Solder the diodes 120-4007 to the toggle switch according to the following information:
Table 6: Diodes Location On The Toggle Switch
Page 17 of 30
Artex Aircraft Supplies, Inc.
7.2
570-0049 Revision -
140-3349 TOGGLE SWITCH WIRING (14 VDC INSTALLATION)
Improperly wiring the aircraft power to the D-sub will irreversibly damage
the interface.
7.2.1
Solder the wires from the 453-0032 interface to the toggle switch according to the following
information for 14 VDC aircraft power:
Table 7: 14 VDC Aircraft Power
CONTACT LOCATION
Diodes not shown
453-0032 INTERFACE
TOGGLE
SWITCH
CONTACT #
DESCRIPTION
CONTACT #
1
N/A
N/A
2
Ground
9
3
Ext. On
7
4
Reset 1
6
5
N/A
N/A
6
Reset 2
3
7
Aircraft Power
(14 VDC)
4
8
N/A
N/A
9
Light 14 (-)
8
Figure 4: 453-0032 Wiring Diagram For 14 VDC Installation
NOTE: The toggle switch is not grounded to the ELT, so the system works for metallic and
composite aircrafts when the beacon and the toggle are installed far apart.
Page 18 of 30
Artex Aircraft Supplies, Inc.
7.3
570-0049 Revision -
140-3349 TOGGLE SWITCH WIRING (14 VDC INSTALLATION)
Improperly wiring the aircraft power to the D-sub will irreversibly damage
the interface.
7.3.1
Solder the wires from the 453-0032 interface to the toggle switch according to the following
information for 28 VDC aircraft power:
Table 8: 28 VDC Aircraft Power
CONTACT LOCATION
Diodes not shown
453-0032 INTERFACE
TOGGLE
SWITCH
CONTACT #
DESCRIPTION
CONTACT #
1
N/A
N/A
2
Ground
9
3
Ext. On
7
4
Reset 1
6
5
N/A
N/A
6
Reset 2
3
7
Aircraft Power
(28 VDC)
4
8
N/A
N/A
9
Light 28 (-)
5
Figure 5: 453-0032 Wiring Diagram For 28 VDC Installation
NOTE: The toggle switch is not grounded to the ELT, so the system works for metallic and
composite aircrafts when the beacon and the toggle are installed far apart.
Page 19 of 30
Artex Aircraft Supplies, Inc.
7.4
570-0049 Revision -
453-0032 WIRING
Table 9: Remote Switch Interface 453-0032 Front View
VIEW
7.4.1
PIN #
SIGNAL DESCRIPTION
1
N/A
2
N/A
3
Reset 2
4
Aircraft Power (14 or 28 VDC)
5
Light (28 VDC Installation)
6
Reset 1
7
External ON
8
Light (14 VDC Installation)
9
Aircraft Ground
The wires for the interface 453-0032 are crimped and inserted inside the D-sub connector 1500022 using the same procedure highlighted in the “Cable Harness” section.
NOTE: Do not close the backshell if the two communication wires have not been installed yet.
Refer to section “453-0032 wiring to 453-0041” in this document to complete the entire
wiring process.
7.4.2
Install the D-sub connector inside a backshell (151-0006) at the completion of the crimping
process.
7.4.3
Secure the strain relief using the screws provided in the backshell kit.
7.4.4
Install the thumbscrews and close the backshell with the screws.
7.4.5
Attach the backshell to the 453-0032 interface using a torque between 1.5 and 2.0 in-lb (.7 to .22
Nm) at the completion of the entire wiring process.
NOTE: Accidently attaching the interface 453-0041 to the backshell instead of the 453-0032 does
not harm the ELT, the toggle switch 140-3349, or any of the interfaces. The outcome is
that the ELT cannot be activated remotely through the toggle switch 140-3349.
Page 20 of 30
Artex Aircraft Supplies, Inc.
570-0049 Revision -
8.
INTERFACE INSTALLATION
8.1
INSTRUCTIONS
8.1.1
Secure the interfaces 453-0032 and 453-0041 to a structural member using the hardware found
in the 455-0032 and 455-0041 respectively.
8.1.2
2 ea.
201-0810
Screw, PHP 8-32 x 5/8 SS
2 ea.
241-0832
Nut, Hex 8-32 x ¼ SS
2 ea.
246-0001
Washer, Flat #8 OD3/8 SS
2 ea.
247-0800
Washer, Lock Internal Tooth #8
Torque the screws to 8 in-lb (.90 Nm) ±1 in-lb (.11 Nm).
Page 21 of 30
Artex Aircraft Supplies, Inc.
570-0049 Revision -
9.
PANEL CUTOUT/TOGGLE SWITCH INSTALLATION
9.1
INSTRUCTIONS
NOTE: The toggle switch 140-3349 is not available with a protective guard.
9.1.1
Select a mounting location where the toggle switch can be seen from the pilot’s seated location,
easily be reached by the pilot, out of direct sunlight, and can accommodate the switch and the
label.
9.1.2
Choose the appropriate label based on the orientation on the control panel. Label 591-0037 and
label 591-0092 are provided in the 455-0049 pack list.
591-0037 Label
591-0092 Label
Figure 6 : Label 591-0037 & 591-0092
9.1.3
Create a cutout in the panel for the toggle switch according to the minimum dimensions specified
below.
NOTES: The maximum panel thickness is .102” (2.6mm).
The .087” (2.21mm) diameter hole is intended to prevent the toggle switch from rotating
once the locking ring is installed.
9.1.4
Adjust the hole-pattern appropriately on the panel depending on the orientation of the remote
switch.
NOTE: Ø is the symbol for diameter
591-0037 Label Cutout Orientation
591-0092 Label Cutout Orientation
Tolerance: +.020, -.000
Figure 7 : Panel cutout dimensions
9.1.5
Clean the application surface area thoroughly prior to applying the label.
9.1.6
Remove the paper backing from the label and line up the label over the cutout.
Page 22 of 30
Artex Aircraft Supplies, Inc.
570-0049 Revision -
9.1.7
Press firmly and evenly over the label to produce maximum adhesion.
9.1.8
Slide the locking ring on the toggle switch.
Locking Ring
Bat
Tongue
Figure 8: Toggle Switch Locking Ring
9.1.9
Slide the bat of the toggle switch through the cutout and insert the tongue of the locking ring
inside the smaller hole.
9.1.10 Install the lockwasher and the mounting nut over the thread of the toggle switch.
9.1.11 Secure the nut using a torque screwdriver set to 6 lb-in (.67 Nm).
591-0037 Label Assembly
591-0092 Label Assembly
Figure 9: Hardware installation
9.1.12 Fasten the harness to the aircraft and ensure that it has enough slack to prevent tensile load on
the contacts of the toggle switch.
9.1.13 Plug the D-sub connector leading from the harness on the toggle switch to the 453-0032
interface.
9.1.14 Refer to the Transmitter Test section of the appropriate ELT manual to check the operation of the
complete connection to the ELT.
Page 23 of 30
Artex Aircraft Supplies, Inc.
10.
SPECIFICATIONS
10.1
INTERFACE MATERIAL
570-0049 Revision -
10.1.1 Both interfaces 453-0032 and 453-0041 are made with flame retardant ABS plastic, UL94V-0.
10.1.2 The surface of each interface is polished finish.
10.2
INTERFACE DIMENSIONS
The following dimensions are displayed in [millimeters] and inches
NOTE: Ø is the symbol for diameter
Figure 10: 453-0032 Interface
Page 24 of 30
Artex Aircraft Supplies, Inc.
570-0049 Revision -
Figure 11: 453-0041 Interface
10.3
INTERFACE WEIGHT
PART NUMBER
DESCRIPTION
WEIGHT
453-0032
2-Wire Remote Switch Interface
2.07 oz (59 gr.) Max.
453-0041
2-Wire ELT Interface
2.78 oz (79 gr.) Max.
Page 25 of 30
Artex Aircraft Supplies, Inc.
10.4
570-0049 Revision -
TOGGLE SWITCH DIMENSIONS
Figure 12: 140-3349 Toggle Switch
10.5
TOGGLE SWITCH WEIGHT
PART NUMBER
DESCRIPTION
WEIGHT
140-3349
Switch, DPDT W/LED Tip 2-Pos.
.35 oz (10 gr.) Max.
Page 26 of 30
Artex Aircraft Supplies, Inc.
10.6
570-0049 Revision -
MISCELLANEOUS COMPONENTS SPECIFICATIONS
Table 10: Components Specifications
COMPONENT
Built-in Interface
D-Sub
SPECIFICATIONS
Shell Size
9
Mounting Option
4-40 jackscrew
Durability
1000 Cycle minimum
Dielectric Withstanding Voltage
1000 VAC minimum for 1 minute
Gender
Receptacle (female)
Shell Size
9
Wire Termination Type
Crimp snap
Dielectric Withstanding Voltage
1000 VAC minimum for 1 minute
Gender
Plug (male)
Contact Termination
Crimp
AWG
22-26
Insertion/Extraction Tool
Tyco 91067-2 or equivalent (20-24 AWG)
Tyco 91285-1 or equivalent (24-28 AWG)
Crimp Hand Tool
Tyco 91525-1 or equivalent
Gender
Pin (male)
Size
20
Insulation Diameter in[mm]
0.040 – 0.050 [1.01 – 1.27)
Color
Black
Shell Size
9
Thumbscrew
4-40
Thumbscrew torque
1.5 to 2.0 in-lb (.7 to .22 Nm)
Pole & Throw
DPDT
Number of Position
2
LED Color
Red
Contact Material Rating
3A @ 30 VDC
LED Forward Peak Current:
25 mA
LED Continuous Forward
Current
20 mA
LED Forward Voltage
2.1 Volts
Electrical Life
25000 operations minimum
D-Sub 150-0022
Pin Crimp
151-0042
Backshell
151-0006
Toggle Switch
140-3349
Page 27 of 30
Artex Aircraft Supplies, Inc.
570-0049 Revision -
Table 10: Components Specifications
COMPONENT
SPECIFICATIONS
Mechanical Life
50000 operation minimum
Locking Mechanism
No
Nut Mounting Torque
6 lb-in (.67 Nm)
Angle of Throw
20º
Page 28 of 30
Artex Aircraft Supplies, Inc.
10.7
570-0049 Revision -
ENVIRONMENTAL CATEGORIES
DO-160D Env. Cat. C4XAAB[204]XXXXXXXZAZA[UUU]M[XXXX]XXA
DO-160D Environmental categories break down:
Table 11: Environmental Categories
Page 29 of 30
11.
INDEX
1
140-3349 wiring (14 vdc installation), 18
140-3349 wiring (28 vdc installation), 19
4
455-0032, 7
455-0041, 7
455-0049, 8
5
591-0037 label, 22
591-0092 label, 22
C
Cable harness wiring, 10
Components specifications, 27
Crimping tool, 11
Current draw, 17
Interfaces, 21
Toggle switch, 22
Insulation adjustment, 11
L
Label
Cutout, 22
List of Figures, 6
N
Notices, 2
P
Panel Cutout Dimensions, 22, 23
Parts List, 7
S
Shielded cable, 11
Specifications, 24
Components, 27
D
Dimensions
Interfaces, 24
Toggle switch, 26
E
ELT installation kits, 8
Environmental Categories, 29
I
W
Weight
Interfaces, 25
Toggle switch, 26
Wiring, 10
453-0032 to 140-3349, 17
453-0032 to 453-0041, 16
453-0041, 14
Toggle switch, 17
Wiring overview, 10
Installation
Page 30 of 30