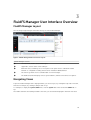
1
Dell FluidFS V3 NAS Solutions For PowerVault NX3500, NX3600, And NX3610 Administrator's Guide Notes, Cautions, and Warnings NOTE: A NOTE indicates important information that helps you make better use of your computer. CAUTION: A CAUTION indicates either potential damage to hardware or loss of data and tells you how to avoid the problem. WARNING: A WARNING indicates a potential for property damage, personal injury, or death. Copyright © 2014 Dell Inc. All rights reserved. This product is protected by U.S. and international copyright and intellectual property laws. Dell™ and the Dell logo are trademarks of Dell Inc. in the United States and/or other jurisdictions. All other marks and names mentioned herein may be trademarks of their respective companies. 2014 - 01 Rev. A02 Contents 1 Introduction.............................................................................................................. 11 How PowerVault FluidFS NAS Works ................................................................................................. 11 FluidFS Terminology............................................................................................................................ 11 Key Features Of PowerVault FluidFS Systems.................................................................................... 12 Overview Of PowerVault FluidFS Systems..........................................................................................13 Internal Cache............................................................................................................................... 14 Internal Backup Power Supply...................................................................................................... 14 Internal Storage............................................................................................................................. 14 PowerVault FluidFS Architecture........................................................................................................ 14 Client/LAN Network.......................................................................................................................15 MD System..................................................................................................................................... 16 SAN Network..................................................................................................................................16 Internal Network............................................................................................................................ 16 Data Caching And Redundancy..........................................................................................................16 File Metadata Protection..................................................................................................................... 16 High Availability And Load Balancing..................................................................................................17 Failure Scenarios............................................................................................................................ 17 Ports Used by the FluidFS System.......................................................................................................18 Required Ports............................................................................................................................... 18 Feature-Specific Ports................................................................................................................... 18 Other Information You May Need...................................................................................................... 19 2 Upgrading to FluidFS Version 3........................................................................... 21 Supported Upgrade Paths................................................................................................................... 21 FluidFS V2 and FluidFS V3 Feature and Configuration Comparison................................................. 21 Performing Pre-Upgrade Tasks.......................................................................................................... 24 Upgrading from FluidFS Version 2.0 to 3.0 ....................................................................................... 25 3 FluidFS Manager User Interface Overview.......................................................29 FluidFS Manager Layout......................................................................................................................29 Navigating Views................................................................................................................................. 29 Working With Panes, Menus, And Dialogs......................................................................................... 30 Showing And Hiding Panes...........................................................................................................30 Opening A Pane Menu.................................................................................................................. 30 Opening A Table Element Menu.................................................................................................. 30 Changing Settings Within A Dialog............................................................................................... 31 Accessing NAS Volume SubTopics.....................................................................................................32 Working With The Event Log.............................................................................................................. 32 Viewing The Event Log..................................................................................................................32 Viewing Event Details.................................................................................................................... 33 Sorting The Event Log................................................................................................................... 33 Searching the Event Log............................................................................................................... 33 4 FluidFS 3.0 System Management........................................................................35 Connecting to the FluidFS Cluster .................................................................................................... 35 Connecting to the FluidFS Cluster Using the FluidFS Manager Web Client............................... 35 Connecting to the FluidFS Cluster CLI Using a VGA Console.....................................................35 Connecting to the FluidFS Cluster CLI through SSH Using a Password.....................................36 Connecting to the FluidFS Cluster CLI through SSH without Using a Password....................... 36 Managing Secured Management....................................................................................................... 36 Adding a Secured Management Subnet ...................................................................................... 37 Changing the Netmask for the Secured Management Subnet .................................................. 38 Changing the VLAN ID for the Secured Management Subnet ................................................... 38 Changing the VIP for the Secured Management Subnet............................................................ 38 Changing the NAS Controller IP Addresses for the Secured Management Subnet................... 39 Deleting the Secured Management Subnet ................................................................................ 39 Enabling Secured Management ...................................................................................................39 Disabling Secured Management ..................................................................................................40 Managing the FluidFS Cluster Name .................................................................................................40 Viewing the FluidFS Cluster Name............................................................................................... 40 Renaming the FluidFS Cluster...................................................................................................... 40 Managing Licensing ............................................................................................................................41 Viewing License Information ........................................................................................................41 Accepting the End-User License Agreement .............................................................................. 41 Managing the System Time ................................................................................................................41 Viewing the Time Zone................................................................................................................. 41 Setting the Time Zone...................................................................................................................42 Viewing the Time ..........................................................................................................................42 Setting the Time Manually............................................................................................................ 42 Viewing the NTP Servers .............................................................................................................. 42 Add or Remove NTP Servers ........................................................................................................43 Enabling NTP ................................................................................................................................ 43 Disabling NTP................................................................................................................................ 43 Managing the FTP Server ................................................................................................................... 44 Accessing the FTP Server .............................................................................................................44 Enabling or Disabling the FTP Server........................................................................................... 44 Managing SNMP .................................................................................................................................44 Obtaining SNMP MIBs and Traps .................................................................................................45 Changing the SNMP Read-Only Community ............................................................................. 45 Changing the SNMP Trap System Location or Contact ............................................................. 45 Adding or Removing SNMP Trap Recipients ............................................................................... 45 Enabling or Disabling SNMP Traps .............................................................................................. 46 Managing the Health Scan Throttling Mode .....................................................................................46 Viewing the Health Scan Throttling Mode .................................................................................. 46 Changing the Health Scan Throttling Mode ............................................................................... 47 Managing the Operation Mode.......................................................................................................... 47 Viewing the Operation Mode .......................................................................................................47 Changing the Operation Mode ....................................................................................................47 Managing Client Connections ...........................................................................................................48 Displaying the Distribution of Clients between NAS Controllers ...............................................48 Viewing Clients Assigned to a NAS Controller ............................................................................48 Assigning a Client to a NAS Controller ........................................................................................48 Unassigning a Client from a NAS Controller ...............................................................................48 Manually Migrating Clients to another NAS Controller .............................................................. 49 Failing Back Clients to Their Assigned NAS Controller ...............................................................49 Rebalancing Client Connections across NAS Controllers ..........................................................49 Shutting Down and Restarting NAS Controllers ............................................................................... 50 Shutting Down the FluidFS Cluster ..............................................................................................50 Starting Up the FluidFS Cluster .................................................................................................... 50 Rebooting a NAS Controller ........................................................................................................ 50 Managing NAS Appliance and NAS Controller .................................................................................. 51 Enabling or Disabling NAS Appliance and Controller Blinking.................................................... 51 5 FluidFS 3.0 Networking ........................................................................................ 53 Managing the Default Gateway ......................................................................................................... 53 Viewing the Default Gateway .......................................................................................................53 Changing the Default Gateway.....................................................................................................53 Managing DNS Servers and Suffixes................................................................................................... 53 Viewing DNS Servers and Suffixes................................................................................................ 54 Adding DNS Servers and Suffixes..................................................................................................54 Removing DNS Servers and Suffixes............................................................................................ 54 Managing Static Routes...................................................................................................................... 55 Viewing the Static Routes............................................................................................................. 55 Adding a Static Route.................................................................................................................... 55 Changing the Target Subnet for a Static Route........................................................................... 56 Changing the Gateway for a Static Route....................................................................................56 Deleting a Static Route..................................................................................................................56 Managing the Internal Network.......................................................................................................... 57 Viewing the Internal Network IP Address..................................................................................... 57 Changing the Internal Network IP Address.................................................................................. 57 Managing the Client Networks........................................................................................................... 57 Viewing the Client Networks........................................................................................................ 58 Creating a Client Network............................................................................................................ 58 Changing the Netmask for a Client Network...............................................................................58 Changing the VLAN Tag for a Client Network............................................................................. 59 Changing the Client VIPs for a Client Network............................................................................59 Changing the NAS Controller IP Addresses for a Client Network...............................................59 Deleting a Client Network............................................................................................................ 60 Viewing the Client Network MTU.................................................................................................60 Changing the Client Network MTU..............................................................................................60 Viewing the Client Network Bonding Mode................................................................................ 60 Changing the Client Network Bonding Mode..............................................................................61 Managing SAN Fabrics.........................................................................................................................61 Managing SAN Fabrics/Subnets....................................................................................................62 Viewing the SAN Network Configuration.....................................................................................62 Adding an iSCSI Fabric.................................................................................................................. 62 Modifying an iSCSI Fabric’s Configuration................................................................................... 62 Deleting an iSCSI Fabric................................................................................................................ 63 Modifying iSCSI Portals................................................................................................................. 63 Viewing Storage Identifiers........................................................................................................... 64 6 FluidFS 3.0 Account Management And Authentication .............................. 65 Account Management and Authentication........................................................................................65 Default Administrative Accounts........................................................................................................ 65 Administrative Account.................................................................................................................66 Support Account........................................................................................................................... 66 Enabling or Disabling the Support Account.................................................................................66 Changing the Support Account Password................................................................................... 67 Using the Escalation Account....................................................................................................... 67 CLI Account...................................................................................................................................68 Default Local User and Local Group Accounts................................................................................. 68 Managing Administrator Accounts.....................................................................................................68 Viewing Administrators................................................................................................................. 69 Adding an Administrator............................................................................................................... 69 Assigning NAS Volumes to a Volume Administrator....................................................................70 Changing an Administrator’s Permission Level............................................................................70 Changing an Administrator’s Email Address................................................................................ 70 Changing a Local Administrator Password................................................................................... 71 Deleting an Administrator..............................................................................................................71 Managing Local Users..........................................................................................................................71 Adding a Local User....................................................................................................................... 71 Changing a Local User’s Group.................................................................................................... 72 Enabling or Disabling a Local User............................................................................................... 72 Changing a Local User Password................................................................................................. 73 Deleting a Local User.................................................................................................................... 73 Managing Password Age and Expiration............................................................................................ 73 Changing the Maximum Password Age........................................................................................73 Enabling or Disabling Password Expiration.................................................................................. 74 Managing Local Groups...................................................................................................................... 74 Viewing Local Groups................................................................................................................... 74 Adding a Local Group....................................................................................................................74 Changing the Users Assigned to a Local Group...........................................................................75 Deleting a Local Group................................................................................................................. 76 Managing Active Directory..................................................................................................................76 Enabling Active Directory Authentication.....................................................................................77 Modifying Active Directory Authentication Settings.................................................................... 78 Disabling Active Directory Authentication................................................................................... 78 Managing LDAP................................................................................................................................... 78 Enabling LDAP Authentication...................................................................................................... 78 Changing the LDAP Base DN........................................................................................................ 79 Adding or Removing LDAP Servers.............................................................................................. 80 Enabling or Disabling LDAP on Active Directory Extended Schema.......................................... 80 Enabling or Disabling Authentication for the LDAP Connection................................................ 80 Enabling or Disabling TLS Encryption for the LDAP Connection................................................ 81 Disabling LDAP Authentication..................................................................................................... 81 Managing NIS.......................................................................................................................................81 Enabling NIS Authentication......................................................................................................... 82 Changing the NIS Domain Name................................................................................................. 82 Changing the Order of Preference for NIS Servers..................................................................... 82 Disabling NIS Authentication........................................................................................................ 83 Managing User Mappings between Windows and UNIX/Linux Users.............................................. 83 User Mapping Policies...................................................................................................................83 User Mapping Policy and NAS Volume Security Style................................................................. 83 Managing the User Mapping Policy..............................................................................................84 Managing User Mapping Rules..................................................................................................... 84 7 FluidFS 3.0 NAS Volumes, Shares, and Exports............................................... 87 Managing the NAS Pool...................................................................................................................... 87 Discovering New or Expanded LUNs............................................................................................87 Viewing Internal Storage Reservations......................................................................................... 87 Viewing the Size of the NAS Pool................................................................................................. 87 Expanding the Size of the NAS Pool.............................................................................................88 Enabling or Disabling the NAS Pool Used Space Alert ............................................................... 88 Enabling or Disabling the NAS Pool Unused Space Alert ........................................................... 88 Managing NAS Volumes .................................................................................................................... 89 File Security Styles.........................................................................................................................89 Thin and Thick Provisioning for NAS Volumes............................................................................ 90 Choosing a Strategy for NAS Volume Creation...........................................................................90 Example NAS Volume Creation Scenarios................................................................................... 91 NAS Volumes Storage Space Terminology ................................................................................. 92 Configuring NAS Volumes ........................................................................................................... 92 Cloning a NAS Volume..................................................................................................................96 NAS Volume Clone Defaults.........................................................................................................96 NAS Volume Clone Restrictions................................................................................................... 97 Managing NAS Volume Clones.....................................................................................................97 Managing CIFS Shares........................................................................................................................ 98 Configuring CIFS Shares............................................................................................................... 98 Viewing and Disconnecting CIFS Connections......................................................................... 100 Using CIFS Home Shares ............................................................................................................101 Changing the Owner of a CIFS Share ........................................................................................102 Managing ACLs or SLPs on a CIFS Share....................................................................................103 Accessing a CIFS Share Using Windows.................................................................................... 104 Accessing a CIFS Share Using UNIX/Linux................................................................................. 105 Managing NFS Exports...................................................................................................................... 105 Configuring NFS Exports.............................................................................................................105 Setting Permissions for an NFS Export....................................................................................... 109 Accessing an NFS Export ........................................................................................................... 109 Managing Quota Rules .....................................................................................................................110 Viewing Quota Rules for a NAS Volume.....................................................................................110 Setting the Default Quota per User ........................................................................................... 110 Setting the Default Quota per Group.......................................................................................... 111 Adding a Quota Rule for a Specific User .................................................................................... 111 Adding a Quota Rule for Each User in a Specific Group............................................................112 Adding a Quota Rule for an Entire Group ..................................................................................112 Changing the Soft Quota or Hard Quota for a User or Group.................................................. 113 Enabling or Disabling the Soft Quota or Hard Quota for a User or Group .............................. 113 Deleting a User or Group Quota Rule.........................................................................................114 Managing Data Reduction.................................................................................................................114 Enabling Data Reduction at the System Level............................................................................ 115 Enabling Data Reduction on a NAS Volume .............................................................................. 115 Changing the Data Reduction Type for a NAS Volume............................................................. 116 Changing the Candidates for Data Reduction for a NAS Volume............................................. 116 Disabling Data Reduction on a NAS Volume.............................................................................. 117 8 FluidFS 3.0 Data Protection................................................................................119 Managing the Anti-Virus Service.......................................................................................................119 Excluding Files and Directory Paths from Scans........................................................................120 Supported Anti-Virus Applications............................................................................................. 120 Configuring Anti-Virus Scanning................................................................................................ 120 Viewing Anti-Virus Events .......................................................................................................... 123 Managing Snapshots......................................................................................................................... 123 Creating On-Demand Snapshots............................................................................................... 124 Managing Scheduled Snapshots ................................................................................................124 Modifying and Deleting Snapshots............................................................................................. 126 Restoring Data from a Snapshot................................................................................................. 127 Managing NDMP............................................................................................................................... 129 Supported DMAs......................................................................................................................... 130 Configuring NDMP ..................................................................................................................... 130 Specifying NAS Volumes Using the DMA................................................................................... 132 Viewing NDMP Jobs and Events.................................................................................................132 Managing Replication........................................................................................................................133 How Replication Works...............................................................................................................134 Target NAS Volumes................................................................................................................... 136 Managing Replication Partnerships............................................................................................ 136 Replicating NAS Volumes............................................................................................................138 Recovering an Individual NAS Volume....................................................................................... 141 Restoring the NAS Volume Configuration................................................................................. 142 Restoring Local Users .................................................................................................................144 Restoring Local Groups...............................................................................................................145 Using Replication for Disaster Recovery.................................................................................... 146 9 FluidFS 3.0 Monitoring........................................................................................ 153 Viewing the Status of Hardware Components.................................................................................153 Viewing the Status of the Interfaces .......................................................................................... 153 Viewing the Status of the Disks...................................................................................................153 Viewing the Status of the Power Supplies..................................................................................154 Viewing the Status of a Backup Power Supply...........................................................................154 Viewing the Status of the Fans....................................................................................................154 Viewing the Status of FluidFS Cluster Services................................................................................ 154 Viewing the Status of Background Processes..................................................................................156 Viewing FluidFS Cluster NAS Pool Trends........................................................................................156 Viewing Storage Usage..................................................................................................................... 156 Viewing FluidFS NAS Pool Storage Usage.................................................................................. 156 Viewing Volume Storage Usage..................................................................................................156 Viewing FluidFS Traffic Statistics.......................................................................................................156 Viewing NAS Controller Load Balancing Statistics...........................................................................157 10 FluidFS 3.0 Maintenance...................................................................................159 Adding and Deleting NAS Appliances in a FluidFS Cluster ............................................................. 159 Adding NAS Appliances to the FluidFS Cluster...........................................................................159 Deleting a NAS Appliance from the FluidFS Cluster...................................................................161 Detaching, Attaching, and Replacing a NAS Controller...................................................................161 Detaching a NAS Controller........................................................................................................ 161 Attaching a NAS Controller ........................................................................................................ 162 Replacing a NAS Controller........................................................................................................ 162 Managing Service Packs....................................................................................................................163 Viewing the Upgrade History ..................................................................................................... 163 Managing Firmware Updates............................................................................................................164 Reinstalling FluidFS from the Internal Storage Device.................................................................... 164 11 Troubleshooting..................................................................................................167 Viewing the Event Log.......................................................................................................................167 Running Diagnostics......................................................................................................................... 167 Running FluidFS Diagnostics on a FluidFS Cluster .................................................................... 167 Launching the iBMC Virtual KVM......................................................................................................168 Troubleshooting Common Issues....................................................................................................169 Troubleshooting Active Directory Issues................................................................................... 169 Troubleshooting Backup Issues..................................................................................................170 Troubleshooting CIFS Issues....................................................................................................... 171 Troubleshooting NFS Issues........................................................................................................175 Troubleshooting NAS File Access And Permissions Issues........................................................179 Troubleshooting Networking Issues........................................................................................... 181 Troubleshooting Replication Issues........................................................................................... 182 Troubleshooting System Issues.................................................................................................. 185 12 Getting Help.........................................................................................................189 Contacting Dell................................................................................................................................. 189 Locating Your System Service Tag................................................................................................... 189 Documentation Feedback................................................................................................................ 189 Introduction 1 The Dell Fluid File System (FluidFS) network attached storage (NAS) solution is a highly-available file storage solution. The solution aggregates multiple NAS controllers into one system and presents them to UNIX, Linux, and Microsoft Windows clients as one virtual file server. How PowerVault FluidFS NAS Works PowerVault FluidFS NAS leverages the PowerVault FluidFS appliances and the Dell PowerVault MD storage to provide scale‐out file storage to Microsoft Windows, UNIX, and Linux clients. The FluidFS system supports SMB (CIFS) and NFS clients installed on dedicated servers or on virtual systems deploying VMware virtualization. The MD storage systems manage the “NAS pool” of storage capacity. The FluidFS system administrator can create NAS volumes in the NAS pool, and CIFS shares and/or NFS exports to serve NAS clients working on different platforms. To the clients, the FluidFS system appears as a single file server, hosting multiple CIFS shares and NFS exports, with a single IP address and namespace. Clients connect to the FluidFS system using their respective operating systems’ NAS protocols: • UNIX and Linux users access files through the NFS protocol • Windows users access files through the SMB(CIFS) protocol The FluidFS system serves data to all clients concurrently, with no performance degradation. FluidFS Terminology The following table defines terminology related to FluidFS scale‐out NAS. 11 Term Description Fluid File System (FluidFS) A special purpose, Dell proprietary operating system providing enterprise class, high‐performance, scalable NAS services using Dell PowerVault, EqualLogic or Dell Compellent SAN storage systems. FluidFS Controller (NAS controller) Dell hardware device capable of running the FluidFS firmware. FluidFS Appliance (NAS appliance) Enclosure containing two NAS controllers. The controllers in an appliance are called peers, are hot‐swappable and operate in active‐active mode. Backup Power Supply (BPS) A backup power supply that keeps a FluidFS controller running in the event of power failure and allows it to dump its cache to a nonvolatile storage device. FluidFS system (cluster) Multiple NAS controllers appropriately connected and configured to form a single functional unit. PowerVault FluidFS Manager WebUI Management user interface used for managing PowerVault FluidFS systems. NAS reserve (pool) The SAN storage system LUNs (and their aggregate size) allocated and provisioned to a FluidFS system. NAS volume File system (single-rooted directory/folder and file hierarchy), defined using FluidFS management functions over a portion of the NAS reserve. Client Network (Client LAN) The network through which clients access CIFS shares or NFS exports and also through which the PowerVault FluidFS Manager is accessed. Client VIP Virtual IP address(es) that clients use to access CIFS shares and NFS exports hosted by the FluidFS system. CIFS share A directory in a NAS volume that is shared on the Client Network using the SMB (CIFS) protocol. NFS export A directory in a NAS volume that is shared on the Client Network using the Network File System (NFS) protocol. Network Data Management Protocol (NDMP) Protocol used for NDMP backup and restore. Replication partnership A relation between two FluidFS systems enabling them to replicate NAS volumes between themselves. Snapshot A time-specific view of a NAS volume data. Key Features Of PowerVault FluidFS Systems The following table summarizes key features of PowerVault FluidFS scale‐out NAS. Feature Description Shared back‐end infrastructure The MD system SAN and NX36X0 scale‐out NAS leverage the same virtualized disk pool. Unified block and file Unified block (SAN) and file(NAS) storage. High performance NAS Support for a single namespace spanning up to two NAS appliances (four NAS controllers). Capacity scaling Ability to scale a single namespace up to 1024 TB capacity. 12 Feature Description Connectivity options 1GbE and 10GbE, copper and optical options for connectivity to the client network. Highly available and active‐active design Redundant, hot‐swappable NAS controllers in each NAS appliance. Both NAS controllers in a NAS appliance process I/O. BPS allows maintaining data integrity in the event of a power failure by keeping a NAS controller online long enough to write the cache to the internal storage device. Automatic load balancing Automatic balancing of client connections across network ports and NAS controllers, as well as back‐end I/O across MD array LUNs. Multi‐protocol support Support for CIFS/SMB (on Windows) and NFS (on UNIX and Linux) protocols with ability to share user data across both protocols. Client authentication Control access to files using local and remote client authentication, including LDAP, Active Directory, and NIS. Quota rules Support for controlling client space usage. File security style Choice of file security mode for a NAS volume (UNIX or NTFS). Cache mirroring The write cache is mirrored between NAS controllers, which ensures a high performance response to client requests and maintains data integrity in the event of a NAS controller failure. Journaling mode In the event of a NAS controller failure, the cache in the remaining NAS controller is written to storage and the NAS controller continues to write directly to storage, which protects against data loss. NAS volume thin clones Clone NAS volumes without the need to physically copy the data set. Deduplication Policy‐driven post‐process deduplication technology that eliminates redundant data at rest. Compression LZPS (Level Zero Processing System) compression algorithm that intelligently shrinks data at rest. Metadata protection Metadata is constantly check-summed and stored in multiple locations for data consistency and protection. Replication NAS-volume level, snapshot‐based, asynchronous replication to enable disaster recovery. Snapshots Redirect‐on‐write, user‐accessible snapshots NDMP backups Snapshot‐based, asynchronous backup (remote NDMP) over Ethernet to certified third‐party backup solutions. Anti‐virus scanning CIFS anti‐virus scanning by deploying certified third‐party ICAP‐ enabled anti‐virus solutions. Monitoring Built‐in performance monitoring and capacity planning. Overview Of PowerVault FluidFS Systems PowerVault FluidFS system consists of one or two PowerVault NX36x0 appliances connected and configured to utilize a PowerVault MD storage array and provide NAS services. PowerVault FluidFS systems can start with one NX36x0 appliance, and expand with another (identical) appliance as required. 13 NOTE: To identify the physical hardware displayed in PowerVault FluidFS Manager, match the Service Tag shown in FluidFS Manager with the Service Tag printed on a sticker on the front right side of the NAS appliance. All NAS appliances in a FluidFS system must use the same controllers — mixing of 1 GbE and 10 GbE appliances or controllers is not supported. The following appliances are supported: • NX3500 (legacy) — 1 Gb Ethernet client connectivity with 1GB iSCSI back‐end connectivity to the MD system(s) • NX3600 — 1 Gb Ethernet client connectivity with 1GB iSCSI back‐end connectivity to the MD system(s) • NX3610 — 10 Gb Ethernet client connectivity with 10GB Ethernet iSCSI back‐end connectivity to the MD system(s) NAS appliance numbers start at 1 and NAS controller numbers start at 0. So, NAS Appliance 1 contains NAS Controllers 0 and 1 and FluidFS Appliance 2 contains NAS Controllers 2 and 3. Internal Cache Each NAS controller has an internal cache that provides fast reads and reliable writes. Internal Backup Power Supply Each NAS controller is equipped with an internal Backup Power Supply (BPS) that protects data during a power failure. The BPS units provide continuous power to the NAS controllers for a minimum of 5 minutes and have sufficient battery power to allow the NAS controllers to write all data from the cache to non‐volatile internal storage before they shut down. The NAS controllers regularly monitor the BPS battery status for the minimum level of power required for normal operation. To ensure that the BPS battery status is accurate, the NAS controllers routinely undergo battery calibration cycles. During a battery calibration cycle, the BPS goes through charge and discharge cycles; therefore, battery error events during this process are expected. A battery calibration cycle takes up to seven days to complete. If a NAS controller starts a battery calibration cycle, and the peer NAS controller BPS has failed, the NAS controllers enter journaling mode, which might impact performance. Therefore, Dell recommends repairing a failed BPS as soon as possible. Internal Storage Each NAS controller has an internal storage device that is used only for the FluidFS images and as a cache storage offload location in the event of a power failure. The internal hard drive does not provide the NAS storage capacity. PowerVault FluidFS Architecture PowerVault FluidFS scale‐out NAS consists of: • Hardware: – FluidFS appliance(s) – MD system 14 • NAS appliance network interface connections: – Client/LAN network – SAN network – Internal network The following figure shows an overview of the PowerVault FluidFS architecture: Figure 1. PowerVault FluidFS Architecture Overview Client/LAN Network The client/LAN network is used for client access to the CIFS shares and NFS exports. It is also used by the storage administrator to manage the FluidFS system. The FluidFS system is assigned one or more virtual IP addresses (client VIPs) that allow clients to access the FluidFS system as a single entity. The client VIP also enables load balancing between NAS controllers, and ensures failover in the event of a NAS controller failure. If client access to the FluidFS system is not through a router (in other words, the network has a “flat” topology), define one client VIP. Otherwise, define a client VIP for each client interface port per NAS controller. If you deploy FluidFS in an LACP environment, please contact Dell Support to get more information about the optimal number of VIPs for your system. 15 MD System The PowerVault MD array provides the storage capacity for NAS; the NX36x0 cannot be used as a stand‐ alone NAS appliance. The MD array eliminates the need for separate storage capacity for block and file storage. SAN Network The NX36x0 shares a back‐end infrastructure with the MD array. The SAN network connects the NX36x0 to the MD system and carries the block level traffic. The NX36x0 communicates with the MD system using the iSCSI protocol. Internal Network The internal network is used for communication between NAS controllers. Each of the NAS controllers in the FluidFS system must have access to all other NAS controllers in the FluidFS system to achieve the following goals: • Provide connectivity for FluidFS system creation • Act as a heartbeat mechanism to maintain high availability • Enable internal data transfer between NAS controller • Enable cache mirroring between NAS controllers • Enable balanced client distribution between NAS controllers Data Caching And Redundancy New or modified file blocks are first written to a local cache, and then immediately mirrored to the peer NAS controller (mirroring mode). Data caching provides high performance, while cache mirroring between peer NAS controllers ensures data redundancy. Cache data is ultimately (and asynchronously) transferred to permanent storage using optimized data‐placement schemes. When cache mirroring is not possible, such as during a single NAS controller failure or when the BPS battery status is low, NAS controllers write directly to storage (journaling mode). File Metadata Protection File metadata includes information such as name, owner, permissions, date created, date modified, and a soft link to the file’s storage location. The FluidFS system has several built‐in measures to store and protect file metadata: • Metadata is managed through a separate caching scheme and replicated on two separate volumes. • Metadata is check-summed to protect file and directory structure. • All metadata updates are journaled to storage to avoid potential corruption or data loss in the event of a power failure. • There is a background process that continuously checks and fixes incorrect checksums. 16 High Availability And Load Balancing To optimize availability and performance, client connections are load balanced across the available NAS controllers. Both NAS controllers in a NAS appliance operate simultaneously. If one NAS controller fails, clients are automatically failed over to the remaining controllers. When failover occurs, some CIFS clients reconnect automatically, while in other cases, a CIFS application might fail, and the user must restart it. NFS clients experience a temporary pause during failover, but client network traffic resumes automatically. Failure Scenarios The FluidFS system can tolerate a NAS controller failure without impact to data availability and without data loss. If one NAS controller becomes unavailable (for example, because the NAS controller failed, is turned off, or is disconnected from the network), the NAS appliance status is degraded. Although the FluidFS system is still operational and data is available to clients, the administrator cannot perform most configuration modifications and performance might decrease because data is no longer cached. The impact to data availability and data integrity following a multiple NAS controller failure depends on the circumstances of the failure scenario. Dell recommends detaching a failed NAS controller as soon as possible, so that it can be safely taken offline for service. Data access remains intact as long as one of the NAS controllers in each NAS appliance in a FluidFS system is functional. The following table summarizes the impact to data availability and data integrity of various failure scenarios. Scenario System Status Data Integrity Single NAS controller failure Available, degraded Unaffected Comments • Peer NAS controller enters journaling mode • Failed NAS controller can be replaced while keeping the file system online Sequential dual‐NAS controller failure in single NAS appliance system Unavailable Unaffected Sequential failure assumes that there is enough time between NAS controller failures to write all data from the cache to disk (MD system or non‐volatile internal storage) Simultaneous dual‐ NAS controller failure in single NAS appliance system Unavailable Lose data in cache Data that has not been written to disk is lost Sequential dual‐NAS controller failure in multiple NAS appliance system, same NAS appliance Unavailable Unaffected Sequential failure assumes that there is enough time between NAS controller failures to write all data from the cache to disk (MD system or non‐volatile internal storage) Simultaneous dual‐NAS controller failure in multiple NAS appliance Unavailable Lose data in cache Data that has not been written to disk is lost 17 Scenario System Status Data Integrity Comments system, same NAS appliance Dual‐NAS controller Available, degraded failure in multiple NAS appliance system, separate NAS appliances Unaffected • Peer NAS controller enters journaling mode • Failed NAS controller can be replaced while keeping the file system online Ports Used by the FluidFS System The FluidFS system uses the ports listed in the following table. You might need to adjust your firewall settings to allow the traffic on these ports. Some ports might not be used, depending on which features are enabled. Required Ports The following table summarizes ports that are required for all FluidFS systems. Port Protocol Service Name 22 TCP SSH 53 TCP DNS 80 TCP Internal system use 111 TCP and UDP portmap 427 TCP and UDP SLP 443 TCP Internal system use 445 TCP and UDP CIFS/SMB 2049–2049+(domain number ‐ 1) TCP and UDP NFS 4000–4000+(domain number ‐ 1) TCP and UDP statd 4050–4050+(domain number ‐ 1) TCP and UDP NLM (lock manager) 5001–5001+(domain number ‐ 1) TCP and UDP mount 5051–5051+(domain number ‐ 1) TCP and UDP quota 44421 TCP FTP 44430–44439 TCP FTP (Passive) Feature-Specific Ports The following table summarizes ports that are required, depending on enabled features. 18 Port Protocol Service Name 88 TCP and UDP Kerberos 123 UDP NTP 135 TCP AD ‐ RPC 138 UDP NetBIOS 139 TCP NetBIOS 161 UDP SNMP Agent 162 TCP SNMP trap 389 TCP and UDP LDAP 464 TCP and UDP Kerberos v5 543 TCP Kerberos login 544 TCP Kerberos remote shell 636 TCP LDAP over TLS/SSL 711 UDP NIS 714 TCP NIS 749 TCP and UDP Kerberos administration 1344 TCP Anti-virus ‐ ICAP 3268 TCP LDAP global catalog 3269 TCP LDAP global catalog over TLS/SSL 8004 TCP ScanEngine server WebUI (AV host) 9445 TCP Replication trust setup 10000 TCP NDMP 10550‐10551, 10560‐10568 TCP Replication Other Information You May Need WARNING: See the safety and regulatory information that shipped with your system. Warranty information may be included within this document or as a separate document. • The Getting Started Guide provides an overview of setting up your system and technical specifications. • The Owner's Manual provides information about solution features and describes how to troubleshoot the system and install or replace system components. • The rack documentation included with your rack solution describes how to install your system into a rack, if required. • The System Placemat provides information on how to set up the hardware and install the software on your NAS solution. • Any media that ships with your system that provides documentation and tools for configuring and managing your system, including those pertaining to the operating system, system management software, system updates, and system components that you purchased with your system. • For the full name of an abbreviation or acronym used in this document, see the Glossary at dell.com/ support/manuals. 19 NOTE: Always check for updates on dell.com/support/manuals and read the updates first because they often supersede information in other documents. 20 Upgrading to FluidFS Version 3 2 Supported Upgrade Paths To upgrade to FluidFS version 3.0, the FluidFS cluster must be at FluidFS version 2.0.7630 or later. If the FluidFS cluster is at a pre‐2.0.7630 version, upgrade to version 2.0.7680 prior to upgrading to version 3.0. The following table summarizes the supported upgrade paths. Version 2.0 Release Upgrades to Version 3.0.x Supported? 2.0.7680 Yes 2.0.7630 Yes 2.0.7170 No 2.0.6940 No 2.0.6730 No 2.0.6110 No FluidFS V2 and FluidFS V3 Feature and Configuration Comparison This section summarizes functionality differences between FluidFS version 2.0 and 3.0. Review the functionality comparison before upgrading FluidFS to version 3.0. • Note: The Version 3.0 column in the table below indicates changes that must be made in some cases, in order to accommodate version 3.0 configuration options. Feature Version 2.0 Management interface Version 3.0 The NAS ManagerUser Interface has been updated. Management connections The FluidFS cluster is managed using a dedicated Management VIP. Version 3.0 does not use a Management VIP— the FluidFS cluster can be managed using any client VIP. During the upgrade, the Management VIP from version 2.0 is converted to a client VIP. Default management account The default administrator account is named admin. The default administrator account is named Administrator. During the upgrade, the admin account from version 2.0 is deleted and the CIFS Administrator account becomes the version 3.0 Administrator account. During the upgrade, you will be prompted to reset the CIFS Administrator password if you have not reset it within the last 24 hours. Make sure to 21 Feature Version 2.0 Version 3.0 remember this password because it is required to manage the FluidFS cluster in version 3.0. User‐defined management accounts Only local administrator accounts can be created. You can create local administrator accounts or create administrator accounts for remote users (members of Active Directory, LDAP or NIS repositories). During the upgrade, any user‐defined administrator accounts from version 2.0 are deleted. Workaround: Use one of the following options: Convert the administrator accounts to local users before upgrading and convert them back to administrator accounts after upgrading. Re‐create administrator accounts after the upgrade. Command Line Interface (CLI) access and commands Administrator accounts log into the CLI directly. Version 3.0 introduces a cli account that must be used in conjunction with an administrator account to log into the CLI. In addition, the command set is significantly different in version 3.0. Dell Technical Support Services remote troubleshooting account The remote troubleshooting account is named fse (field service engineer). The remote troubleshooting account is named support. During the upgrade, the fse account from version 2.0 is deleted. After the upgrade, the support account is disabled by default. FluidFS cluster name and NetBIOS name The FluidFS cluster name and NetBIOS name do not have to match. The NetBIOS name can begin with a digit. The FluidFS cluster name is used as the NetBIOS name. Before upgrading, the FluidFS cluster name and NetBIOS name must be changed to match. Also, the FluidFS cluster name cannot be longer than 15 characters and cannot begin with a digit. Data reduction overhead Version 2.0 does not include a data reduction feature. Version 3.0 introduces a data reduction feature. If data reduction is enabled, the system deducts an additional 100GB per NAS appliance from the NAS pool for data reduction processing. This is in addition to the amount of space that the system deducts from the NAS pool for internal use. Anti‐virus scanning You can specify which file types to scan. You cannot specify which files types to scan— all files smaller than the specified file size threshold are scanned. You can specify whether to allow or deny access to files larger than the file size threshold. As in version 2.0, you can specify file types and directories to exclude from anti‐virus scanning. Supported NFS protocol versions Version 2.0 supports NFS protocol version 3. Version 3.0 supports NFS protocol version 3 and 4. Supported SMB protocol versions Version 2.0 supports SMB protocol version 1.0. Version 3.0 supports SMB protocol version 1.0, 2.0, and 2.1. 22 Feature Version 2.0 Version 3.0 CIFS home shares Clients can access CIFS home shares in two ways: \\<client_VIP_or_name> \<path_prefix>\<username> \\<client_VIP_or_name> \homes Both access methods point to the same folder. Version 3.0 does not include the “homes” access method. After the upgrade, the “homes” share will not be present, and clients will need to use the “username” access method instead. If you have a policy that mounts the \ \<client_VIP_or_name>\homes share when client systems start, you must change the policy to mount the \\<client_VIP_or_name> \<path_prefix>\<username> share. Local user names A period can be used as the last character of a local user name. A period cannot be used as the last character of a local user name. Before upgrading, delete local user names that have a period as the last character and re‐ create the accounts with a different name. Local users and local groups UID/GID range A unique UID (user ID) or GID (group ID) can be configured for local users and local groups. The UID/GID range for local users and local groups is 1001 to 100,000. There is no way to configure or determine the UID/GID of local users and local groups. This information is internal to the FluidFS cluster. During the upgrade, any existing local users and local groups from version 2.0 with a UID/GID that is outside the version 3.0 UID/GID range will remain unchanged. Local users and local groups created after the upgrade will use the version 3.0 UID/GID range. Guest account mapping policy By default, unmapped users are mapped to the guest account, which allows a guest account to access a file if the CIFS share allows guest access. Unmapped users cannot access any CIFS share, regardless of whether the CIFS share allows guest access. Guest access is enabled automatically after the upgrade only if there are guest users already defined for any CIFS shares in version 2.0. NDMP client port The NDMP client port must be in the range 1–65536. The NDMP client port must be in the range 10000–10100. Before upgrading, the NDMP client port must be changed to be in the range 10000–10100. You must also make the reciprocal change on the DMA servers. Replication ports TCP ports 10560–10568 and 26 are used for replication. TCP ports 10550–10551 and 10560–10568 are used for replication. Snapshot schedules Snapshot schedules can be disabled. Snapshot schedules cannot be disabled. During the upgrade, disabled snapshot schedules from version 2.0 are deleted. Internal subnet The internal (interconnect) subnet can be changed from a Class C subnet during or after deployment. The internal subnet must be a Class C subnet. Before upgrading, the internal subnet must be changed to a Class C subnet, otherwise the service pack installation will fail with the following message: “Please allocate a new C-class subnet for FluidFS Internal Network, run the following 23 Feature Version 2.0 Version 3.0 command, and then repeat the upgrade: system networking subnets add NEWINTER Primary 255.255.255.0 -PrivateIPs x.y.z.1,x.y.z.2 (where x.y.z.* is the new subnet)”. Note: If you receive this message while attempting to upgrade, obtain a Class C subnet that is not used in your network, run the command to set the internal subnet (for example: system networking subnets add NEWINTER Primary 255.255.255.0 –PrivateIPs 172.41.64.1, 172.41.64.2), and retry the service pack installation. Port for management and remote KVM Only subnet‐level isolation of The following features are available: management traffic is Physical isolation of management traffic supported. Remote KVM that allows you to view and manage the NAS controller console remotely over a network These features are implemented using the Ethernet port located on the lower right side of the back panel of a NAS controller. 1GbE to 10GbE client connectivity upgrade Version 2.0 does not support upgrading an appliance from 1GbE client connectivity to 10GbE client connectivity. Version 3.0 introduces support for upgrading an appliance from 1GbE client connectivity to 10GbE client connectivity. Upgrades must be performed by a Dell installer or certified business partner. Performing Pre-Upgrade Tasks Complete the following tasks before upgrading. • The FluidFS cluster must be at FluidFS version 2.0.7630 or later before upgrading to FluidFS version 3.0. • When upgrading to V3 “admin” user will not be available anymore, and local “Administrator” must be used instead. Make sure to know its password, Administrator password must be changed up to 24 Hours before the upgrade. To change Administrator password Login to CLI ( Using SSH ) and run the following command :system authentication local-accounts users change-password Administrator CAUTION: The password you set will be required to manage the FluidFS cluster after upgrading to version 3.0. Make sure that you remember this password or record it in a secure location. • Change the FluidFS cluster name to match the NetBIOS name, if needed. Also, ensure that the FluidFS cluster name is no longer than 15 characters and does not begin with a digit. • Change the internal subnet to a Class C subnet, if needed. • Convert user‐defined administrator accounts to local users, if needed. • Change policies that mount the \\<client_VIP_or_name>\homes share to mount the \ \<client_VIP_or_name>\<path_prefix>\<username> share, if needed. 24 • Delete local user names that have a period as the last character and re‐create the accounts with a different name, if needed. • Change the NDMP client port to be in the range 10000–10100, if needed. You must also make the reciprocal change on the DMA servers. • Stop all NDMP backup sessions, if needed. If an NDMP backup session is in progress during the upgrade, the temporary NDMP snapshot is left in place. • Open additional ports on your firewall to allow replication between replication partners, if needed. • Remove parentheses characters from the Comment field for CIFS shares and NFS exports. • Ensure the NAS volumes do not have the following names (these names are reserved for internal FluidFS cluster functions): – . – .. – .snapshots – acl_stream – cifs – int_mnt – unified – Any name starting with locker_ • Ensure that at least one of the defined DNS servers is accessible using ping and dig (DNS lookup utility). • Ensure that the Active Directory domain controller is accessible using ping and that the FluidFS cluster system time is in sync with the Active Directory time. • Ensure that the NAS controllers are running, attached, and accessible using ping, SSH, and rsync. • Although the minimum requirement to upgrade is that at least one NAS controller in each NAS appliance must be running, Dell recommends ensuring that all NAS controllers are running before upgrading. • Ensure that the FluidFS cluster system status shows running. Upgrading from FluidFS Version 2.0 to 3.0 Use the following procedure to upgrade a Dell PowerVault NX3500/NX3600/NX3610 FluidFS cluster from FluidFS version 2.0 to 3.0. 25 NOTE: • Perform pre‐upgrade tasks. • Installing a service pack causes the NAS controllers to reboot during the installation process. This might cause interruptions in CIFS and NFS client connections. Therefore, Dell recommends scheduling a maintenance window to perform service pack installations. • Contact Dell Technical Support Services to obtain the latest FluidFS version 3.0 service pack. Do not modify the service pack filename. 1. Login to the FluidFS v2 Manager application using a browser and go to Cluster Management → Cluster Management → Maintenance → Service Packs. 2. Browse to the ISO location and click Upload. The system starts uploading the service pack file. 26 3. When the file is uploaded, click Install. The upgrade process starts and may take an hour or more. The upgrade’s progress is displayed as follows: 4. During the upgrade, you will be notified that a node has been rebooted. After receiving this message, wait 15 minutes more so that the reboot of both nodes and the Final Sync are completed. 5. Login again with the Administrator user (the Admin user is no longer available). The new FluidFS version 3 Manager UI is displayed. 6. Make sure the system is fully operational and all components are in Optimal status, before you start working with it. 27 28 3 FluidFS Manager User Interface Overview FluidFS Manager Layout The following image and legend describe the layout of the FluidFS Manager. Figure 2. FluidFS Manager Web User Interface Layout FluidFS Manager Sections ❶ Left-hand tabs, used to select a view topic. ❷ Upper tabs, used to select a view subtopic. ❸ Main view area, containing one or more panes. Each pane refers to a different FluidFS element or configuration setting, which can be viewed/modified/deleted. ❹ The event log, which shows a sortable table of event messages. ❺ The dashboard, which displays various system statistics, statuses and services at a glance. Navigating Views A specific FluidFS Manager view is displayed when you select a topic, by clicking the topic tab on the left, and select a subtopic, by clicking a subtopic tab on top. For example, to display the System\SNMP view, click the System tab on the left and the SNMP tab on top. The FluidFS elements and settings related to the view you selected are displayed in the main view area. 29 Figure 3. Navigating Views in FluidFS Manager Working With Panes, Menus, And Dialogs Showing And Hiding Panes Panes within the main view area display FluidFS elements and settings. A pane’s contents may be hidden by clicking the button, and displayed by clicking the button. Opening A Pane Menu To modify a setting or add an element to a pane, click the button and select the desired menu option. Opening A Table Element Menu Some panes display a table of elements, each of which may be edited independently. To modify or delete an element in a table, click the desired menu option. 30 button in the row of the element you want to change, then select the Changing Settings Within A Dialog When you select a menu option, a dialog box is displayed, which allows you to modify or delete the element or setting you chose. When you edit a setting and click OK, the dialog closes and the change takes effect. 31 Accessing NAS Volume SubTopics NAS Volumes have additional configuration subtopics that are not displayed by default. To display NAS Volume subtopics and their views: 1. Enter the NAS Volumes / All NAS Volumes view. 2. In the All NAS Volumes pane, click display. 3. Click View Details. in the row of the volume whose subtopic views you want to The top tabs are replaced by the volume subtopic tabs, and you can access their views by clicking them. Working With The Event Log FluidFS generates events to log normal operations and problems. Events allow you to monitor the FluidFS cluster, and detect and solve problems. Events are logged to the Event Log. Viewing The Event Log You can view events contained in the Event Log, displayed in the bottom pane of the FluidFS Manager. 32 Figure 4. Event Log Viewing Event Details View detailed information for an event contained in the Event Log. In the Events pane on the bottom of the FluidFS Manager interface, click whose details you want to view. A dialog box displays the event details. in the row of the event Sorting The Event Log You can sort events contained in the Event Log by column heading. In the Events pane on the bottom of the FluidFS Manager interface, click the column headings of the table to sort the events by the values in that column (for example Date, Event). Searching the Event Log Search events contained in the Event Log for a specified string. 1. In the Search field at the top-right of the Events pane, type a search string 2. Press Enter or click the 3. The Events table displays all events containing the search string (the search is case-insensitive). icon. 33 34 FluidFS 3.0 System Management 4 Connecting to the FluidFS Cluster As a storage administrator, you can use either the FluidFS Manager web client or command line interface (CLI) to connect to and manage the FluidFS cluster. The FluidFS cluster is accessed through the client network. NOTE: To avoid potential management conflicts, Dell recommends that you do not attempt to log on to both FluidFS Manager and the CLI at the same time. Connecting to the FluidFS Cluster Using the FluidFS Manager Web Client Through a browser, log on to the FluidFS Manager web client to manage the FluidFS cluster. 1. In a browser, enter the FluidFS Manager URL. The URL for the FluidFS Manager any of the FluidFS VIPs or the DNS name. For example, http:// 172.41.2.200/login. The FluidFS login window is displayed. 2. In the Username field, type the administrator user name. By default, the administrator username is Administrator. 3. In the Password field, type the administrator password. By default, the administrator username is Stor@ge! 4. Click Ok. The FluidFS Manager All NAS Volumes screen is displayed. Connecting to the FluidFS Cluster CLI Using a VGA Console Log on to the CLI using a VGA console to manage the FluidFS cluster. Connect a monitor to one of the NAS controller’s VGA port and connect a keyboard to its USB ports. 1. In the command line, type cli at the login as prompt. A welcome message is displayed. 2. Type the FluidFS cluster administrator user name at the login as prompt. The default user name is Administrator. 3. Type the FluidFS cluster administrator password at the password prompt. The default password is Stor@ge! You are logged on to the CLI and a Welcome window is displayed, listing the installed FluidFS version and the available commands in the main menu. 35 Connecting to the FluidFS Cluster CLI through SSH Using a Password Log on to the CLI through SSH to manage the FluidFS cluster. 1. Use either of the following options: – For Windows — Using an SSH client, connect to a client VIP. From the command line, type cli at the login as prompt: – For UNIX/Linux — type the following command from a prompt: ssh cli@<client_VIP_or_name> 2. Type the FluidFS cluster administrator user name at the login as prompt. The default user name is Administrator. 3. Type the FluidFS cluster administrator password at the password prompt. The default password is Stor@ge! You are logged on to the CLI and a Welcome window is displayed, listing the installed FluidFS version and the available commands in the main menu. Connecting to the FluidFS Cluster CLI through SSH without Using a Password You can use SSH keys to bypass the SSH login prompt to manage the FluidFS cluster. 1. Log on to a UNIX/Linux workstation for which you want to bypass the SSH login prompt. 2. From the command line, type the following command: ssh-keygen -t rsa 3. Press <Enter> at the Enter file in which to save the key (/home/<user_name>/.ssh/id_rsa) prompt. 4. Press Enter at the Enter passphrase (empty for no passphrase) prompt and again at the Enter same passphrase again prompt. An SSH key is generated at /home/<user_name>/.ssh/id_rsa.pub. 5. Copy the SSH key. 6. Log on to the FluidFS system using the CLI with the administrator username and password. 7. Type the following command: system administrators edit Administrator -SSHKey “<SSH_key>” in the CLI using a password. 8. Now you can use the following command to log on to the FluidFS cluster from the workstation without needing a password: ssh <FluidFS_administrator_user_name>@<client_VIP_or_name> 9. You can also use the following format to run commands from the workstation without needing a password: ssh <FluidFS_administrator_user_name>@<client_VIP_or_name> <CLI_command> Managing Secured Management By default, all FluidFS cluster management ports are open on all subnets, along with the other ports needed for client access (CIFS/NFS), replication, and NDMP. Secured management, when enabled, exclusively limits all management traffic to one specific subnet. The subnet on which secured management is enabled also has the necessary ports open for client access, replication, and NDMP 36 traffic. Other subnets will not have any of the management ports listening on them, making them available only for client access, replication, and NDMP traffic. This prevents users on client (data) access subnets from accessing any FluidFS cluster management functions. In FluidFS, the ports listed in the following table do not participate in CIFS/NFS communication, but are exposed on the client network by default. Enabling secured management allows you to expose the management ports on a management subnet only. Service Ports Web Services 80 Secure Web Services 443 FTP 44421 FTP (Passive) 44430–44439 SSH 22 FluidFS Manager communication 35451 Secured management can be enabled only after the system is deployed. To make a subnet secure: • It must exist prior to enabling the secured management feature • It can reside on the client network (subnet‐level isolation of management traffic) or the LOM (Lights Out Management) Ethernet port (physical isolation of management traffic). The LOM Ethernet port is on the lower right side of the back panel of a NAS controller. • Log in from this subnet. Secured management configuration, together with other networking features, is accessed through the Security Access pane in the System\Internal view. Adding a Secured Management Subnet The subnet on which you enable secured management must exist prior to enabling the secured management feature. To add a secured management subnet: 1. Click the System tab on the left. 2. Click the Internal tab on top. 3. In the Security Access pane, click 4. Click New Subnet for FluidFS Management. . The New Subnet for FluidFS Management dialog box is displayed. 5. Click 6. In the IP Address field, type a management IP address and click OK. to the right of the VIP1 field. 7. For each NAS controller: a) Click to the right of the NAS controller field. b) In the IP Address field, type an IP address for the NAS controller and click OK. 8. To automatically fill the IP addresses for the NAS Controllers and VIP, click Auto Fill. 37 9. (Optional) Configure the remaining FluidFS management subnet attributes as needed. – To change the netmask of the network, type a netmask in the Netmask field. – To specify a VLAN ID, type a VLAN ID in the VLAN Id field. When a VLAN spans multiple switches, the VLAN ID is used to specify to which ports and interfaces to send broadcast packets. 10. To separate the new subnet from all client subnets, select This subnet should be physically separated from all client subnets. 11. Click OK. Changing the Netmask for the Secured Management Subnet Change the netmask for the secured management subnet. 1. Click the System tab on the left. 2. Click the Internal tab on top. 3. In the Security Access pane, click 4. Click Modify Subnet for FluidFS Management. . The Modify Subnet for FluidFS Management dialog box is displayed. 5. In the Netmask field, type a netmask for the secured management subnet. 6. Click OK. Changing the VLAN ID for the Secured Management Subnet Change the VLAN ID for the secured management subnet. When a VLAN spans multiple switches, the VLAN ID is used to specify to which ports and interfaces to send broadcast packets. 1. Click the System tab on the left. 2. Click the Internal tab on top. 3. In the Security Access pane, click 4. Click Modify Subnet for FluidFS Management. 5. In the VLAN Id field, type a VLAN Id for the secured management VLAN Id. 6. Click OK. . The Modify Subnet for FluidFS Management dialog box is displayed. Changing the VIP for the Secured Management Subnet Change the secured management subnet VIP through which the administrator manages the FluidFS cluster. 1. Click the System tab on the left. 2. Click the Internal tab on top. 3. In the Security Access pane, click 4. Click Modify Subnet for FluidFS Management. . The Modify Subnet for FluidFS Management dialog box is displayed. 5. Click 6. In the IP Address field, type the new VIP address and click OK. 38 to the right of the VIP1 field. 7. Click OK. Changing the NAS Controller IP Addresses for the Secured Management Subnet Change the NAS controller IP addresses for the secured management subnet. 1. Click the System tab on the left. 2. Click the Internal tab on top. 3. In the Security Access pane, click 4. Click Modify Subnet for FluidFS Management. . The Modify Subnet for FluidFS Management dialog box is displayed. 5. Click to the right of the NAS controller you want to change. 6. In the IP Address type an IP address for the NAS controller and click OK. 7. Click OK. Deleting the Secured Management Subnet Delete the secured management subnet if you no longer want to exclusively limit management traffic to one specific subnet. 1. Click the System tab on the left. 2. Click the Internal tab on top. 3. In the Security Access pane, click 4. Click Delete Subnet for FluidFS Management . . The Delete Subnet for FluidFS Management dialog box is displayed. 5. Click OK. Enabling Secured Management Enable secured management to exclusively limit management traffic to one specific subnet. NOTE: After enabling secured management, if you are connected to FluidFS Manager through the secured management subnet, your management session is temporarily interrupted while the change takes effect. During this time the following message is displayed in FluidFS Manager: Communication with the cluster was interrupted in process of issuing a command that performs modification to the cluster. After the change takes effect, your management session will resume automatically. Management sessions on all other subnets are disconnected. NOTE: The subnet on which you enable secured management must exist prior to enabling the secured management feature. 1. Click the System tab on the left. 2. Click the Internal tab on top. 3. In the Security Access pane, click . 39 4. Click Restrict Access of FluidFS Management. The Restrict Access of FluidFS Management dialog box appears. 5. Check the box whose text starts with All FluidFS management communication…. 6. Click OK. Disabling Secured Management Disable secured management to allow management traffic from any subnet. 1. Click the System tab on the left. 2. Click the Internal tab on top. 3. In the Security Access pane, click 4. Click Restrict Access of FluidFS Management. . The Restrict Access of FluidFS Management dialog box appears. 5. Uncheck the box whose text starts with All FluidFS management communication…. 6. Click OK. Managing the FluidFS Cluster Name The FluidFS cluster name is a unique name used to identify the FluidFS cluster in FluidFS Manager and the name that clients use to access the FluidFS cluster. This name is also the FluidFS cluster NetBIOS name. If clients access the FluidFS cluster by name (instead of IP address), you must add an entry in the DNS server that associates the FluidFS cluster name to the FluidFS cluster client VIPs. If you are using multiple client VIPs, add all client VIPs to the DNS server and associate them with the same FluidFS cluster name (known as round‐robin DNS). This enables client load balancing between client VIPs. Viewing the FluidFS Cluster Name View the current FluidFS cluster name that is displayed in FluidFS Manager and the name that clients use to access the FluidFS cluster. 1. Click the System tab on the left. 2. Click the Internal tab on top. 3. The FluidFS cluster name is displayed in the Internal Settings pane, in the Cluster name field. Renaming the FluidFS Cluster Changing the FluidFS cluster name changes the name that is displayed in FluidFS Manager and the name that clients use to access the FluidFS cluster. You must also make the reciprocal change on the DNS server. 1. Click the System tab on the left. 2. Click the Internal tab on top. 3. In the Internal Settings pane, click 4. Click Modify Cluster Name. . The Modify Cluster Name dialog box appears. 5. In the Cluster Name field, type a new name for the FluidFS cluster. 6. Click OK. 40 Managing Licensing The license determines which NAS features are available in the FluidFS cluster. Viewing License Information All FluidFS cluster features are automatically included in the license for PowerVault scale‐out NAS. FluidFS Manager displays FluidFS cluster license information, but the license cannot be modified. 1. Click the System tab on the left. 2. Click the Version & License tab on top. The license information is displayed in the License pane. Accepting the End-User License Agreement You must accept the end‐user license agreement (EULA) before using the system. Accepting the EULA is usually completed during deployment. 1. Click the System tab on the left. 2. Click the Version & License tab on top. 3. In the License Agreement pane, click 4. Click Accept License Agreement. . The License Agreement dialog box appears. 5. Click the box next to I accept the license agreement terms and click OK Managing the System Time Setting the system time enables: • Windows clients to mount the file system • Scheduled activities, such as snapshot and replication tasks, to occur at the appropriate time • The correct time to be recorded in the Event Log. There are two options for setting the system time: • Manually set the time: Manually set the time for the FluidFS cluster. • Automatically synchronize the time with an NTP server: Network Time Protocol (NTP) synchronizes clocks over a network. If the FluidFS cluster is part of a Windows network, the Active Directory server can serve as the NTP server. If the FluidFS cluster is not part of a Windows network, configure it to synchronize with a local NTP server (if such a server exists), or with an NTP server on the Internet. Viewing the Time Zone View the current time zone for the FluidFS cluster. 1. Click the Performance & Connectivity tab on the left. 2. Click the Client Network & Time tab on the top. 3. The time zone is displayed in the Time pane. 41 Setting the Time Zone Set the time zone for the FluidFS cluster. 1. Click the Performance & Connectivity tab on the left. 2. Click the Client Network & Time tab on the top. 3. In the Time pane, click 4. Click Modify Time Configuration. . The Modify Time Configuration dialog box appears. 5. Click the […] button to the right of the Time Zone field. The Time Zone Search window opens. 6. Type the name of the city or region that represents the time zone and click the button. NOTE: If the time zone is not found, try entering another search string. 7. When your time zone is found, click OK. 8. Click OK. Viewing the Time The system date and time are displayed in the upper right corner of the FluidFS Management web client application. Setting the Time Manually Manually set the time for the FluidFS cluster if you are not using NTP. NOTE: NTP must be disabled. 1. Click the Performance & Connectivity tab on the left. 2. Click the Client Network & Time tab on the top. 3. In the Time pane, click 4. Click Modify Current Time . . The Modify Current Time dialog box appears. 5. Click the […] button to the right of the Date and time field. The Choose Date and Time window opens. 6. Click the [-] and [+] buttons to adjust the year, month, day, hour, minute and second values, then click OK 7. Click OK. Viewing the NTP Servers View the current NTP servers for the FluidFS cluster. 1. Click the Performance & Connectivity tab on the left. 2. Click the Client Network & Time tab on the top. 3. The NTP servers are displayed in the Time pane. 42 Add or Remove NTP Servers Add one or more NTP servers with which to synchronize the FluidFS cluster time. Adding multiple NTP servers ensures continued time synchronization in the event of an NTP server failure. If the FluidFS cluster cannot establish contact with the first server, it attempts to connect to the remaining servers in order. Remove an NTP server if it is no longer available. 1. Click the Performance & Connectivity tab on the left. 2. Click the Client Network & Time tab on the top. 3. In the Time pane, click 4. Click Modify Time Configuration. . The Modify Time Configuration dialog box appears. 5. Add or remove NTP servers. – To add an NTP server, type the host name or IP address of an NTP server in the NTP Servers text field and click Add. 6. – To remove NTP server, select an NTP server from the NTP Servers list and click Click OK. Enabling NTP Enable NTP to synchronize the FluidFS cluster time with an NTP server. NOTE: Add one or more NTP servers with which to synchronize the FluidFS cluster time. 1. Click the Performance & Connectivity tab on the left. 2. Click the Client Network & Time tab on the top. 3. In the Time pane, click 4. Click Modify Time Configuration. . The Modify Time Configuration dialog box appears. 5. Select the Use NTP server(s) to keep the cluster time synchronized check box. 6. Click OK. Disabling NTP Disable NTP if you prefer to manually set the FluidFS cluster time. 1. Click the Performance & Connectivity tab on the left. 2. Click the Client Network & Time tab on the top. 3. In the Time pane, click 4. Click Modify Time Configuration. . The Modify Time Configuration dialog box appears. 5. Uncheck the Use NTP server(s) to keep the cluster time synchronized check box. 6. Click OK. 43 Managing the FTP Server The FluidFS cluster includes an FTP server that provides a storage location for the following types of system files: • Diagnostic results files • License file • SNMP MIBs and traps • Service pack files Accessing the FTP Server The FTP server can be accessed at: ftp://<FluidFS_administrator_user_name>@<client_VIP_or_name>:44421/ For example: ftp://[email protected]:44421/ Upon access, you are prompted for the FluidFS cluster administrator password. Enabling or Disabling the FTP Server By default, the FTP server is enabled to allow FluidFS Manager to transfer the FluidFS cluster diagnostics. The FTP server must be enabled to upload service packs and license files, to access and transfer FluidFS cluster diagnostic results, and to access SNMP MIBs and traps. To enable or disable the FTP server: 1. Click the System tab on the left. 2. Click the Internal tab on the top. 3. In the Security Access pane, click 4. Click Modify FTP Accessibility Policy. . The Modify FTP Accessibility Policy dialog box appears. 5. Enable or disable the FTP server. – To enable the FTP server, select the Allow FTP Access`check box. 6. – To disable the FTP server, clear the Allow FTP Access check box. Click OK. Managing SNMP Simple Network Management Protocol (SNMP) is one way to monitor the health of the system and generate alert messages (SNMP traps) for system problems. To use SNMP, the FluidFS cluster‐specific Management Information Bases (MIBs) and traps must be compiled into a customer‐provided SNMP management station. The MIBs are databases of information specific to the FluidFS cluster. 44 Obtaining SNMP MIBs and Traps The SNMP MIBs and traps for the FluidFS cluster are available for download from the FluidFS cluster FTP server. NOTE: The FTP server must be enabled. Download the SNMP MIBs and traps from: ftp://<FluidFS_administrator_user_name>@<client_VIP_or_name>:44421/mibs/ Changing the SNMP Read-Only Community Change the read‐only community for devices reading SNMP variables from the FluidFS cluster. By default, the read‐only community is FluidFS. 1. Click the System tab on the left. 2. Click the SNMP tab on the top. 3. In the SNMP MIB Access pane, click 4. Click Modify Settings. . The Modify MIB SNMP Access Settings dialog box appears. 5. Type the new community name in the Read community field. 6. Click OK. Changing the SNMP Trap System Location or Contact Change the system location or contact person for FluidFS cluster‐generated SNMP traps. By default, the SNMP trap system location and contact person are unknown. 1. Click the System tab on the left. 2. Click the SNMP tab on the top. 3. In the SNMP Trap pane, click 4. Click Modify Settings. . The Modify MIB SNMP Trap Settings dialog box appears. 5. To change the SNMP trap system location, type a new location in the System location field. 6. To change the SNMP trap system contact, type a new contact in the System contact field. 7. Click OK. Adding or Removing SNMP Trap Recipients Add or remove hosts that receive the FluidFS cluster‐generated SNMP traps. 1. Click the System tab on the left. 2. Click the SNMP tab on the top. 3. In the SNMP Trap Access pane, click 4. Click Modify Settings. . The Modify MIB SNMP Trap Settings dialog box appears. 45 5. Add or remove SNMP trap recipients. – To add an SNMP trap recipient, type a host name or IP address in the Trap Recipients text field and click Add. 6. – To remove an SNMP trap recipient, select an SNMP trap recipient and click the Click OK. button. Enabling or Disabling SNMP Traps Enable or disable SNMP traps by category (NAS Volumes, Hardware, Access Control, Performance & Connectivity, or System). For enabled SNMP traps, specify the severity of events for which to send SNMP traps. 1. Click the System tab on the left. 2. Click the SNMP tab on the top. 3. In the SNMP Trap Filter pane, click 4. Click Modify. . The Modify SNMP Trap Filter Settings dialog box appears. 5. Enable or disable SNMP traps. – To enable SNMP traps, check the events for which to send SNMP traps (NAS Volumes, Hardware, Access Control, Performance & Connectivity, or System) and select the severity (Major or All) of events to be sent. 6. – To disable SNMP traps, uncheck the events that you don’t want to be sent. Click OK. Managing the Health Scan Throttling Mode Health scan throttling has three modes: • Normal(Default mode): Health scan is running and scanning the file system to identify potential errors. • Maintenance: Health scan is running in high priority and scanning the file system to identify potential errors. • Off: Health scan is off and does not run. NOTE: Dell recommends keeping the health scan throttling mode set to Normal unless directed otherwise by Dell Technical Support Services. Viewing the Health Scan Throttling Mode View the current health scan throttling mode. 1. Click the System tab on the left. 2. Click the Internal tab on the top. The health scan throttling mode is displayed in the Background Processes pane. 46 Changing the Health Scan Throttling Mode Change the health scan throttling mode. Dell recommends keeping the health scan throttling mode set to Normal unless specifically directed otherwise by Dell Technical Support Services. 1. Click the System tab on the left. 2. Click the Internal tab on the top. 3. In the Background Processes pane, click 4. Click Modify Health Scan Settings. . The Modify Health Scan Settings dialog box appears. 5. Select the mode you want (Normal mode, Maintenance mode, or Off). 6. Click OK. Managing the Operation Mode The FluidFS cluster has three operation modes: • Normal: System serves clients using CIFS and NFS protocols and operates in mirroring mode. • Write‐Through Mode: System serves clients using CIFS and NFS protocols, but is forced to operate in journaling mode. This might have an impact on write performance. This mode of operation is recommended when, for example, you have repeated electric power failures. • No Service: System does not serve clients using CIFS or NFS protocols and allows limited management capabilities. This mode must be enabled before replacing a NAS appliance. Viewing the Operation Mode View the current operation mode. 1. 2. Click the System tab on the left. Click the Internal tab on the top. The operation mode is displayed in the Internal Settings pane, in the Operation Mode field. Changing the Operation Mode Changing the operation mode might affect the accessibility and performance of CIFS shares and NFS exports. 1. Click the System tab on the left. 2. Click the Internal tab on the top. 3. In the Internal Settings pane, click 4. Click Modify Operation Mode. . The Modify Operation Mode dialog box appears. 5. Select a new operation mode (Normal, Write‐Through on, or No service). 6. You must select the check box next to I acknowledge that changing system operation mode may have impact on the system accessibility and/or performance. 7. Click OK. 47 Managing Client Connections Displaying the Distribution of Clients between NAS Controllers Display the current distribution of clients between NAS controllers. 1. 2. Click the Performance & Connectivity tab on the left. Click the Load Balancing tab on the top. In the Current Activity pane, the client/router IPs and the NAS Controllers they are connected to are displayed. Viewing Clients Assigned to a NAS Controller View clients that are currently assigned to a particular NAS controller. 1. 2. Click the Performance & Connectivity tab on the left. Click the Load Balancing tab on the top. In the Current Activity pane you can see all clients and the controllers and corresponding interfaces to which they are connected (in the NAS Controller column). Assigning a Client to a NAS Controller You can permanently assign one or more clients to a particular NAS controller. However, for effective load balancing, Dell does not recommend manually assigning clients to NAS controllers. Assigning a client to a NAS controller disconnects the client’s connection. Clients automatically reconnect to the assigned NAS controller. 1. Click the Performance & Connectivity tab on the left. 2. Click the Load Balancing tab on the top. 3. In the Current Activity pane, click controller. 4. Click Pin Client to NAS Controller. in the row of the client that you want to assign to the NAS The Pin Client to NAS Controller dialog box appears. 5. Select the Pin this client to NAS controller check box. 6. Select the NAS controller to which to assign the client. 7. Select the client interface on the NAS controller to which to assign the client. 8. Click OK. Unassigning a Client from a NAS Controller You can permanently unassign one or more clients from a particular NAS controller so the client is subject to the regular FluidFS cluster load balancing. 1. Click the Performance & Connectivity tab on the left. 2. Click the Load Balancing tab on the top. 3. In the Current Activity pane, click controller.. 48 in the row of the client that you want to unassign from a NAS 4. Click Pin Client to NAS Controller. The Pin Client to NAS Controller dialog box appears. 5. Ensure that the Pin Client to NAS Controller check box is unchecked. 6. Click OK. Manually Migrating Clients to another NAS Controller You can manually migrate clients between NAS controllers if, for example, there is an imbalance in network load on the NAS controllers. Migrating a client to another NAS controller disconnects the client’s connection. Clients will then automatically reconnect to the NAS controller to which they were migrated. 1. Click the Performance & Connectivity tab on the left. 2. Click the Load Balancing tab on the top. 3. In the Current Activity pane, click 4. Click Move to another controller. in the row of the client you want to migrate. The Move Client to NAS Controller dialog box appears. 5. From the Move this client to drop‐down menu, select the NAS controller to which to migrate the client. 6. Click OK. Failing Back Clients to Their Assigned NAS Controller You must fail back client connections to their original NAS controller when a NAS controller that was down becomes available. Failing back client connections disconnects only the client connections that failed over due to the original NAS controller failure. Those clients automatically reconnect to the assigned NAS controller. 1. Click the Performance & Connectivity tab on the left. 2. Click the Load Balancing tab on the top. 3. In the Current Activity pane, click 4. Click Balance Clients. . The Balance Clients Across NAS Controllers dialog box appears. 5. Click Failback clients. 6. Click OK. Rebalancing Client Connections across NAS Controllers Rebalancing client connections evenly distributes connections across all the available NAS controllers. Rebalance client connections in the following scenarios: • • After FluidFS cluster hardware changes (for example, adding a NAS appliance) When a NAS controller that was down, becomes available Rebalancing client connections disconnects all client connections. Clients automatically reconnect to the FluidFS cluster. 1. Click the Performance & Connectivity tab on the left. 2. Click the Load Balancing tab on the top. 3. In the Current Activity pane, click . 49 4. Click Balance Clients. The Balance Clients Across NAS Controllers dialog box appears. 5. Click Rebalance clients. 6. Click OK. Shutting Down and Restarting NAS Controllers In some cases, you must temporarily shut down a FluidFS cluster or reboot a NAS controller. Shutting Down the FluidFS Cluster In some cases, you might need to temporarily shut down all NAS controllers in a FluidFS cluster. For example, you might need to do this if you are moving the NAS hardware to a different location. When a FluidFS cluster is shut down, NAS volume data is no longer available to clients and clients are disconnected. NOTE: Dell recommends scheduling a maintenance window and informing clients that the resources hosted by the FluidFS cluster is unavailable. 1. Change the FluidFS cluster operation mode to No Service. For more information on changing the FluidFS cluster operation mode, see Changing the Operation Mode 2. To shut down the NAS controllers, press and release the recessed power button at the back of each NAS controller. NOTE: Do not press and hold the power button down for several seconds. Pressing and holding the power button down for several seconds does not shut down the NAS controllers. Starting Up the FluidFS Cluster Start up a FluidFS cluster to resume operation after shutting down all NAS controllers in a FluidFS cluster. NOTE: Before turning on the system, ensure that all cables are connected, and all components are connected to a power source. 1. If previously shutdown, turn the MD system(s) back on before starting the FluidFS cluster. 2. Press and release the recessed power button at the back of each NAS controller to turn on the NAS controllers. 3. Change the FluidFS cluster operation mode to Normal. For more information on changing the FluidFS cluster operation mode, see Changing the Operation Mode Rebooting a NAS Controller Only one NAS controller can be rebooted in a NAS appliance at a time. Rebooting a NAS controller disconnects client connections while clients are being transferred to other NAS controllers. Clients automatically reconnect to the FluidFS cluster. 1. Click the Hardware tab on the left. 2. Click the NAS Appliances tab on the top. 3. In the Overview pane, click 50 in the row of the NAS appliance you want to reboot. 4. Click Reboot. The Reboot NAS Controller dialog box appears. 5. Click OK. Managing NAS Appliance and NAS Controller You can configure the system identification button on the NAS appliances or controllers to blink, in order to easily locate that particular NAS appliance or controller within a rack. The system identification button for a NAS appliance is located on the front panel and is labeled. The system identification button for a NAS controller is located on the back panel. Enabling or Disabling NAS Appliance and Controller Blinking When NAS appliance blinking is enabled, the system identification button blinks so you can easily locate the NAS appliance within a rack. 1. Click the Hardware tab on the left. 2. Click the NAS Appliances tab on the top. 3. In the Overview pane, click 4. Click Blink. in the row of the NAS appliance you want to enable or disable. The Blink NAS Appliance dialog box appears. 5. To enable or disable NAS appliance blinking, choose one of the following options: – Turn off blinking for the NAS appliance and its NAS controllers – Turn on blinking for the NAS appliance and both its NAS controllers – Turn on blinking for the NAS appliance and its NAS controller in slot 1 6. – Turn on blinking for the NAS appliance and its NAS controller in slot 2 Click OK. 51 52 FluidFS 3.0 Networking 5 Managing the Default Gateway The default gateway enables client access across subnets. Only one default gateway can be defined. If client access does not go through a router (i.e. this is a flat network), a default gateway does not need to be defined. Viewing the Default Gateway View the current default gateway. 1. Click the Performance & Connectivity tab on the left. 2. Click the Client Network & Time tab on the top. The default gateway is displayed in the Routing pane. Changing the Default Gateway Change the default gateway if the default gateway changes for the network. 1. Click the Performance & Connectivity tab on the left. 2. Click the Client Network & Time tab on the top. 3. In the Routing pane, click 4. Click Modify Default Gateway. . The Modify Default Gateway dialog box appears. 5. In the Default Gateway field, type a new default gateway IP address. 6. Click The OK dialog box appears. Managing DNS Servers and Suffixes Domain Name Service (DNS) is a networking service that enables users to locate computers by providing name‐to‐IP address and IP address‐to‐name resolution services. You can configure one or more external DNS servers (external to the FluidFS cluster but within the site) to be used for name resolution. A DNS suffix specifies a DNS domain name without the host part of the name (for example, west.example.com rather than computer1.west.example.com). If clients access the FluidFS cluster by name, you must add an entry in the DNS server that associates the FluidFS cluster name to the FluidFS cluster client VIPs. If you are using multiple client VIPs, add all client VIPs to the DNS server and associate them with the same FluidFS cluster name (known as round‐robin DNS). This enables client load balancing between client VIPs. In addition, you must configure DNS if you are using Active Directory, and the DNS servers must be the same DNS servers that your Active Directory domain controllers use. 53 Viewing DNS Servers and Suffixes View the current DNS servers providing name resolution services for the FluidFS cluster and the associated DNS suffixes. 1. 2. Click the Performance & Connectivity tab on the left. Click the Client Network & Time tab on the top. The DNS servers and suffixes are displayed in the DNS pane. Adding DNS Servers and Suffixes Add one or more DNS servers to provide name resolution services for the FluidFS cluster and add associated DNS suffixes. Adding multiple DNS servers and suffixes ensures continuous name resolution services in the event of a DNS server failure. If the FluidFS cluster cannot establish contact with the preferred server, it will attempt to connect to the remaining servers in order. 1. Click the Performance & Connectivity tab on the left. 2. Click the Client Network & Time tab on the top. 3. In the DNS pane, click 4. Click Modify. . The Modify DNS Settings dialog box appears. 5. To add a DNS server, type the IP address of a DNS server in the DNS Servers text field and click Add. 6. DNS servers are listed in descending order of preference. – To increase the precedence for a DNS server, select a DNS server and click . 7. – To decrease the precedence for a DNS server, select a DNS server and click . To add a DNS suffix, type the DNS suffix in the DNS Suffixes text field and click Add. 8. DNS suffixes are listed in descending order of preference. 9. – To increase the precedence for a DNS suffix, select a DNS suffix and click . – To decrease the precedence for a DNS suffix, select a DNS suffix and click Click OK. . Removing DNS Servers and Suffixes Remove a DNS server or DNS suffix if it is no longer available or used. 1. Click the Performance & Connectivity tab on the left. 2. Click the Client Network & Time tab on the top. 3. In the DNS pane, click 4. Click Modify. . The Modify DNS Settings dialog box appears. 5. To remove a DNS server, select a DNS server in the DNS Servers list and click 6. To remove a DNS suffix, select a DNS suffix in the DNS Suffixes list and click 54 . . 7. Click OK. Managing Static Routes To minimize hops between routers, static routes are recommended in routed networks when there are multiple direct paths from the FluidFS cluster to various routers. Static routes allow you to configure the exact paths in which the system communicates with various clients on a routed network. Consider the network shown in the following figure. There can be only one default gateway for the system. Assume that router X is designated as the default gateway. Packets that are sent to clients in subnet Y would be routed to router X, which would then be sent back (through the switch) to router Y. These packets travel through router X needlessly, reducing the throughput to all subnets in the network. The solution is to define, in addition to a default gateway, a specific gateway for certain subnets by configuring static routes. To do this, you must describe each subnet in your network and identify the most suitable gateway to access that subnet. Static routes do not have to be designated for the entire network—a default gateway is most suitable when performance is not an issue. You can select when and where to use static routes to best meet performance needs. Viewing the Static Routes View the current static route. 1. Click the Performance & Connectivity tab on the left. 2. Click the Client Network & Time tab on the top. The static routes are displayed in the Routing pane. Adding a Static Route When adding a static route, specify the subnet properties and the gateway through which to access this subnet. 1. Click the Performance & Connectivity tab on the left. 2. Click the Client Network & Time tab on the top. 3. In the Routing pane, click . 55 4. Click Add Static Route. The New Static Route dialog box appears. 5. In the Target network subnet ID field, type a network IP address. For example, 10.10.5.0 6. In the Target subnet netmask field, type a netmask. For example, 255.255.255.0 7. In the Gateway field, type the gateway IP address through which to access the subnet. For example, 10.10.5.1 8. Click OK. Changing the Target Subnet for a Static Route Change the subnet properties of a static route. 1. Click the Performance & Connectivity tab on the left. 2. Click the Client Network & Time tab on the top. 3. In the Routing pane, for the static route that you want modify click 4. Click Modify static route. . The Modify Static Route dialog box is displayed. 5. In the Target network subnet ID field, type a network IP address. For example, 10.10.5.0 6. In the Target subnet netmask field, type a netmask. For example, 255.255.255.0 7. In the Gateway field, type the gateway IP address through which to access the subnet. 8. Click OK. Changing the Gateway for a Static Route Change the gateway through which to access the subnet for a static route. 1. Click the Performance & Connectivity tab on the left. 2. Click the Client Network & Time tab on the top. 3. In the Routing pane, for the static route that you want modify click 4. Click Modify static route. . The Modify Static Route dialog box appears. 5. In the Gateway field, type the gateway IP address through which to access the subnet. For example, 10.10.5.1 6. Click OK. Deleting a Static Route Delete a static route to send traffic for a subnet through the default gateway instead of a specific gateway. 1. Click the Performance & Connectivity tab on the left. 2. Click the Client Network & Time tab on the top. 56 3. In the Routing pane, select the static route that you want modify and click 4. Click Delete static route. . The Delete Static Route dialog box appears. 5. Click OK. Managing the Internal Network The internal network defines the private subnet dedicated to the FluidFS cluster for internal communication. This range is not routed or accessible by other machines on the network. Viewing the Internal Network IP Address View the current internal network IP address. While it is not displayed in FluidFS Manager, the netmask is a Class C netmask (255.255.255.0). 1. Click the System tab on the left. 2. Click the Internal tab on the top. The internal network IP address is displayed in the Internal Settings pane. Changing the Internal Network IP Address You can change the internal network IP address. However, the netmask cannot be changed from a Class C netmask (255.255.255.0). The internal subnet must not conflict with other subnets on the network. If sharing internal switches with other FluidFS clusters, make sure that the internal subnet does not conflict with the internal subnet used for the other FluidFS clusters. 1. Click the System tab on the left. 2. Click the Internal tab on the top. 3. In the Internal Settings pane, click 4. Click Modify Internal Network. . The Modify Internal Network dialog box appears. 5. In the Internal network IP address field, type a network IP address. For example, 10.255.69.0 6. In the Internal network mask field, type a network mask IP address. For example, 255.255.255.0 7. Click OK. Managing the Client Networks The client networks define the client VIP(s) through which clients access CIFS shares and NFS exports. If client access to the FluidFS cluster is not through a router (in other words, this is a flat network), Dell recommends defining one client VIP. If clients access the FluidFS cluster through a router, define a client VIP for each client interface port per NAS controller. 57 Viewing the Client Networks View the current client networks. 1. 2. Click the Performance & Connectivity tab on the left. Click the Client Network & Time tab on the top. The client networks are displayed in the Subnets pane. Creating a Client Network Create a client network on which clients access CIFS shares and NFS exports. NOTE: A client network must have at least one client VIP. 1. Click the Performance & Connectivity tab on the left. 2. Click the Client Network & Time tab on the top. 3. In the Subnets pane, click 4. Click New Client Subnet. . The New Client Subnet dialog box appears. 5. Add an IP address for each NAS controller. a) To edit one of the NAS Controller IP values (NAS Controller 0 or NAS Controller 1), select the relevant row in the IP address list and click to edit. The Edit NAS Controller dialog box appears. b) In the IP Address field, type an IP address for the NAS controller and click OK. c) Repeat steps (a) and (b) for each NAS controller. 6. Add client VIPs through which the clients access CIFS shares and NFS exports. a) To edit one of the VIP values (VIP1, VIP2, VIP3, or VIP4), select the relevant row in the IP address list and click to edit. The Edit VIP dialog box appears. b) In the IP Address field, type an IP address and click OK. c) Repeat steps (a) and (b) for each VIP you want to edit. 7. To automatically fill the IP addresses for the NAS Controllers and VIP, click Auto Fill. 8. In the Netmask field, type a netmask for the client network. 9. (Optional) Configure the VLAN ID value if needed. Type a VLAN ID in the VLAN ID field. NOTE: When a VLAN spans multiple switches, the VLAN tag is used to specify to which ports and interfaces to send broadcast packets. 10. Click OK. Changing the Netmask for a Client Network Change the netmask for a client network. 1. Click the Performance & Connectivity tab on the left. 2. Click the Client Network & Time tab on the top. 3. In the Subnets pane, in the row of the subnet you want to change, click 58 . 4. Click Modify. The Modify Client Subnet dialog box appears. 5. In the Netmask field, type a netmask for the client network. 6. Click OK. Changing the VLAN Tag for a Client Network Change the netmask for a client network. 1. Click the Performance & Connectivity tab on the left. 2. Click the Client Network & Time tab on the top. 3. In the Subnets pane, in the row of the subnet you want to change, click 4. Click Modify. . The Modify Client Subnet dialog box appears. 5. In the VLAN Id field, type a VLAN Id for the client network. 6. Click OK. Changing the Client VIPs for a Client Network Change the client VIPs through which clients access CIFS shares and NFS exports. NOTE: A client network must have at least one client VIP. 1. Click the Performance & Connectivity tab on the left. 2. Click the Client Network & Time tab on the top. 3. In the Subnets pane, in the row of the subnet you want to change, click 4. Click Modify. . The Modify Client Subnet dialog box appears. 5. To edit a client VIP through which the clients access CIFS shares and NFS exports: a) To edit one of the VIP values (VIP1, VIP2, VIP3, or VIP4), select the relevant row in the IP address list and click to edit. The Edit VIP dialog box appears. b) In the IP Address field, type an IP address and click OK. c) Repeat steps (a) and (b) for each VIP you want to edit. 6. To remove a client VIP, change the IP address value to an empty string. 7. Click OK. Changing the NAS Controller IP Addresses for a Client Network Change the NAS controller IP addresses for a client network. 1. Click the Performance & Connectivity tab on the left. 2. Click the Client Network & Time tab on the top. 3. In the Subnets pane, in the row of the subnet you want to change, click 4. Click Modify. . The Modify Client Subnet dialog box appears. 59 5. To edit one of the NAS Controller IP values (NAS Controller 0 or NAS Controller 1): a) Select the relevant row in the IP address list and click to edit. The Edit NAS Controller dialog box appears. b) In the IP Address field, type an IP address for the NAS controller and click OK. c) Repeat steps (a) and (b) for each NAS controller. 6. Click OK. Deleting a Client Network Delete a client network if clients no longer need to access CIFS shares and NFS exports on that network. You cannot delete the Primary subnet. 1. Click the Performance & Connectivity tab on the left. 2. Click the Client Network & Time tab on the top. 3. In the Subnets pane, in the row of the subnet you want to delete, click 4. Click Delete. . The Delete Client Subnets dialog box appears. 5. Click OK. Viewing the Client Network MTU View the current Maximum Transmission Unit (MTU) of the client network. 1. Click the Performance & Connectivity tab on the left. 2. Click the Client Network & Time tab on the top. The MTU is displayed in the Client interface field. Changing the Client Network MTU Change the Maximum Transmission Unit (MTU) of the client network to match your environment. 1. Click the Performance & Connectivity tab on the left. 2. Click the Client Network & Time tab on the top. 3. In the Client interface pane, click 4. Click Modify Settings. . The Modify Client Interface Settings dialog box appears. 5. In the MTU field, type a new MTU. If your network hardware supports jumbo frames, enter 9000, otherwise enter 1500. 6. Click OK. Viewing the Client Network Bonding Mode View the current bonding mode (Adaptive Load Balancing or Link Aggregation Control Protocol) of the client network interface. 1. Click the Performance & Connectivity tab on the left. 2. Click the Client Network & Time tab on the top. The bonding mode is displayed in the Client interface pane, under the MTU field. 60 Changing the Client Network Bonding Mode Change the bonding mode (Adaptive Load Balancing or Link Aggregation Control Protocol) of the client network interface to match your environment. • If using ALB, use one client VIP per client port in the FluidFS cluster. • If using LACP, use one client VIP per NAS controller in the FluidFS cluster. 1. Click the Performance & Connectivity tab on the left. 2. Click the Client Network & Time tab on the top. 3. In the Client Interface pane, click 4. Click Modify Settings. . The Modify Client Interface Settings dialog box appears. 5. Click the radio button next to the desired option: – Without link aggregation 6. – With link aggregation (IEEE 802.1ax), also known as dynamic 802.3ad or LACP Click OK. Managing SAN Fabrics SAN subnets or "fabrics" are the network connections between NAS controllers and PowerVault MD controllers. In PowerVault systems, the SAN network consists of multiple subnets called SAN, SANb, SANc, etc. The number of SAN fabrics depends on the number of SAN ports available on the PowerVault NAS controllers, and MD controller ports assigned to FluidFS/NAS. The general recommendation is to assign 2 ports on each MD controller to NAS traffic, so the number of SAN subnets are also 2. The following table summarizes the type and number of physical ports on each type of FluidFS controller: PowerVault FluidFS Controller SAN ports Type SAN ports NX3500 1GbE eth30, eth31 NX3600 1GbE eth30, eth31, eth32, eth33 NX3610 10GbE eth30, eth31 As a rule: • Each NAS Controller should have a SAN NIC and an IP address assigned to each subnet: eth30 on SAN, eth31 on SANb, and so on. • Each MD controller should have a port and an iSCSI Portal address assigned to each subnet. The following table summarizes the typical configuration of a system with 2 NAS controllers and 2 MD controllers: Subnet/Fabric NAS Controller0 NAS Controller1 MD Array SAN eth30:<IP> eth30: <IP> port0, <Portal IP> SANb eth31:<IP> eth31:<IP> port1, <Portal IP> The netmask and MTU on all subnets must be identical on all FluidFS and MD controller ports. 61 Managing SAN Fabrics/Subnets In the FluidFS Manager, the SAN Fabrics view allows you to manage the various subnets and addresses on the PowerVault FluidFS system to ensure they match the configuration of the MD array(s). Viewing the SAN Network Configuration To view the SAN network configuration: 1. Click the Hardware tab on the left. 2. Click the SAN Fabrics tab on the top. The currently configured SAN Fabrics are displayed in the Overview pane. In addition, each SAN fabric (named SAN, SANb, SANc…) has its own pane, named Fabric SAN, Fabric SANb, and so on. In that pane, you can see that status of each fabric and its connections to FluidFS and MS controllers. Adding an iSCSI Fabric To add an iSCSI fabric: 1. Click the Hardware tab on the left. 2. Click the SAN Fabrics tab on the top. 3. In the Overview pane, click 4. Click New iSCSI Fabric. . 5. In the Network interface dropdown, select the network interface to be used by the SAN fabric. The New iSCSI Fabric dialog box appears. 6. In the Netmask field, type the netmask IP address. 7. In the VLAN Id field, type the VLAN ID for the iSCSI subnet. 8. In the NAS Controller table, for each NAS controller: a) b) c) d) 9. Click in the row of the NAS controller. The Edit NAS Controller dialog box appears Enter an IP address to be used by the SAN fabric. Click OK. Repeat steps (a) to (c) for each controller. Click OK. The new SAN fabric appears in the Overview pane. Modifying an iSCSI Fabric’s Configuration To modify the configuration of an iSCSI fabric: 1. Click the Hardware tab on the left. 2. Click the SAN Fabrics tab on the top. 3. In the Overview pane, for the SAN fabric (named Fabric SAN, Fabric SANb, and so on) that you want to modify, click 4. . Click Modify. The Modify iSCSI Fabric dialog box appears. 62 5. In the Network interface dropdown, select the network interface to be used by the SAN fabric. 6. In the Netmask field, type the netmask IP address. 7. In the VLAN Id field, type the VLAN ID for the iSCSI subnet. 8. In the NAS Controller table, for each NAS controller: a) b) c) d) 9. Click in the row of the NAS controller. The Edit NAS Controller dialog box appears Enter an IP address to be used by the SAN fabric. Click OK. Repeat steps (a) to (c) for each controller. Click OK. Deleting an iSCSI Fabric To delete an iSCSI fabric: 1. Click the Hardware tab on the left. 2. Click the SAN Fabrics tab on the top. 3. In the Overview pane, for the SAN fabric (named Fabric SAN, Fabric SANb, and so on) that you want 4. Click Delete. 5. Click OK. to delete, click . The Delete iSCSI Fabric dialog box appears. Modifying iSCSI Portals To modify the iSCSI portals configuration: 1. Click the Hardware tab on the left. 2. Click the SAN Fabrics tab on the top. 3. In the iSCSI Portals Overview pane click 4. . Click Modify iSCSI Portals. The Modify iSCSI Portals dialog box appears. 5. If the target requires CHAP authentication, select the Target requires CHAP authentication checkbox, and enter the user name and password details of an authorized user. 6. To add an iSCSI IP address: a) Click the Add button under the IP address table. The New IP Address for iSCSI Storage dialog box appears. b) Enter the new IP address. c) Enter a description for the new IP address. d) Click OK. 7. To delete an iSCSI IP address: a) Select the iSCSI IP address in the table. b) Click 8. . Click OK. 63 Viewing Storage Identifiers To view the NAS controller storage identifiers: 1. Click the Hardware tab on the left. 2. Click the SAN Fabrics tab on the top. The NAS controller storage identifiers are displayed in the Storage Identifier of Type: iSCSI pane. NOTE: All predefined storage identifiers are displayed, regardless of the number of controllers found in the system. 64 FluidFS 3.0 Account Management And Authentication 6 Account Management and Authentication There are two types of access to the FluidFS cluster: • Administrator‐level access for FluidFS cluster management • Client‐level access to CIFS shares and NFS exports Administrator accounts control administrator‐level access. Users and groups control client‐level access to CIFS shares and NFS exports. The FluidFS cluster supports administrator‐level and client‐level authentication for both local and remote users and groups: • Local users and groups: The FluidFS cluster manages and authenticates users and groups. Local management is useful when you have only a limited number of users and groups. In addition, authentication does not depend on external servers. • Remote users and groups: Manage and authenticate users and groups using the following external database types. Remote management is useful when you have many users and groups, but depends on the availability of the external database. – Active Directory: Configure the FluidFS cluster to access an Active Directory database to authenticate Windows users. NOTE: Active Directory can also be used as an LDAP database for UNIX/Linux users. – NIS or LDAP: Configure the FluidFS cluster to access a NIS or LDAP database to authenticate UNIX/Linux users. NOTE: Local and remote users can be managed simultaneously. NOTE: If you configure Active Directory and either NIS or LDAP, you can set up mappings between the Windows users in Active Directory and the UNIX/Linux users in LDAP or NIS to allow one set of credentials to be used for both types of data access. Default Administrative Accounts The FluidFS cluster has the following built‐in administrative accounts, each of which serves a particular purpose. 65 Login Name Purpose SSH Access Enabled by Default SSH Access Allowed VGA Console Access Enabled by Default VGA Console Access Allowed Default Password Administrator FluidFS cluster management (not a UNIX/ Linux user) Yes Yes Yes Yes Stor@ge! support No Yes No Yes None (must be set by Administrator) enableescalat Enable ionaccess escalation account No No Yes Yes N@sst0r3 (cannot be changed) escalation FluidFS cluster troubleshooting when unable to log in with support account No Yes No Yes N@sst0r3 (cannot be changed) cli Gateway to command line interface access Yes (can bypass password using SSH key) Yes (can N/A bypass password using SSH key) N/A N/A FluidFS cluster troubleshooting (regular UNIX/ Linux user) Administrative Account The Administrator account is used for FluidFS cluster management using the FluidFS Manager Client and CLI. This account cannot be removed or renamed. This account has write permission on all CIFS shares by default. Support Account If Dell Technical Support Services needs to perform remote troubleshooting, you can make your system accessible to them using the support account. CAUTION: Dell strongly recommends that you do not attempt to use the support account. Operations performed as the support user are for advanced remote troubleshooting to resolve critical system issues only. Misuse of this account can damage the FluidFS cluster and/or its data. NOTE: If Dell personnel must access the support account for remote troubleshooting, Dell recommends that you change the password to a new, strong password after the troubleshooting session is concluded. Enabling or Disabling the Support Account Enable the support account if Dell Technical Support Services needs to perform remote troubleshooting. When troubleshooting is complete, disable the support account. 1. Click the System tab on the left. 2. Click the Internal tab on the top. 66 3. In the Security Access pane, click 4. Click Modify Remote Support Policy. . 5. Enable or disable the support account. The Modify Remote Support Policy dialog box appears. – To enable the support account, select the Allow Remote Support check box. 6. – To disable the support account, clear the Allow Remote Support check box. Click OK. Changing the Support Account Password Dell recommends that you change the support account password to a new, strong password after each troubleshooting session is concluded. 1. Click the System tab on the left. 2. Click the Internal tab on the top. 3. In the Security Access pane, click 4. Click Change Support User Password. . The Change Support User Passworddialog box appears. 5. In the New Password field, type a password. The password must be at least seven characters long and contain three of the following elements: a lowercase character, an uppercase character, a digit, or a special character (such as +, ?, or ∗). 6. In the Repeat Password field, re‐type the password. 7. Click OK. Using the Escalation Account If Dell Technical Support Services needs to perform remote troubleshooting, but an administrator is unable to access the FluidFS Manager Client or CLI to enable the support account, you can use the escalation account instead. The escalation account is enabled using the enableescalationaccess account, which requires VGA console access. CAUTION: Dell strongly recommends that you do not attempt to use the escalation account. Operations performed as the escalation user are for advanced remote troubleshooting to resolve critical system issues only. Misuse of this account can damage the FluidFS cluster and/or its data. NOTE: Connect a monitor to the NAS controller’s VGA port and connect a keyboard to one of the NAS controller’s USB ports. 1. From the command line, at the login as prompt, enter enableescalationaccess. 2. at the Password prompt, enter N@sst0r3 3. Respond to the prompt to specify the number of minutes to keep the escalation account enabled. 4. Type Yes to the prompt confirming that you want to enable the escalation account. You are returned to a login prompt and the escalation account is enabled. 5. Type escalation at the login as prompt. 6. Type N@sst0r3 at the Password prompt. 67 CLI Account The CLI account is used with an administrator account to access the command-line interface of the FluidFS cluster. Default Local User and Local Group Accounts The FluidFS cluster has the following built‐in local user and local group accounts, each of which serves a particular purpose. Account Type Account Name Purpose Local User Administrator Account used for FluidFS cluster management Local User nobody Account used as the owner of everything for guest accounts Local Group Administrators • • Accommodates the Administrator account, and all other users (local and remote) designated as administrators BUILTIN domain group fully compatible with the Windows Administrators group Local Group nobody_group Accommodates the nobody account Local Group Local Users Accommodates local user accounts Local Group Users BUILTIN domain group fully compatible with the Windows Users group Local Group Backup Operators BUILTIN domain group fully compatible with the Windows Backup Operators group Managing Administrator Accounts You can both create local administrators and give remote users (AD/LDAP/NIS) administrator permissions. System alerts are sent to the email address specified for the administrator. When creating an administrator, you specify an administrator permission level. The permission level defines the set of actions that are allowed by the administrator. Permission levels are predefined in the system as follows: • NAS Volume Administrator: The following table summarizes which settings a volume administrator can change for the NAS volume(s) to which they are assigned. They can also view, but not change, settings for other NAS volumes and the rest of the FluidFS cluster configuration. • NAS Cluster Administrator: The administrator can manage any aspect of the FluidFS cluster. NAS Volume Setting Volume Administrator Allowed to Change Setting? NAS volume folder to which the NAS volume is assigned Yes Access time granularity Yes Permissions interoperability Yes Report zero disk usage Yes 68 NAS Volume Setting Volume Administrator Allowed to Change Setting? Data reduction Yes NAS volume space settings and alert thresholds Yes CIFS shares and NFS exports Yes Snapshots and snapshot schedules Yes Restore NAS volume from snapshot Yes Restore NAS volume configuration Yes Quotas Yes NAS volume clones No Replication No Viewing Administrators View the current list of administrator accounts. 1. Click the System tab on the left. 2. Click the Mail & Admins tab on the top. The administrators are displayed in the Administrator Users pane. Adding an Administrator Add an administrator account to manage the FluidFS cluster using the FluidFS Manager Client and CLI. You can only define other administrators with permission levels that are hierarchically lower than your own. NOTE: Before you can create a local administrator, create a local user that becomes an administrator. 1. Click the System tab on the left. 2. Click the Mail & Admins tab on the top. 3. In the Administrator Users pane, click 4. Click New Administrator User. . The New NAS Administrator dialog box appears. 5. Select a local or remote user to become an administrator. a) Click the […] button to the right of the NAS administrator username field. b) c) d) e) The User Browser dialog box appears. From the Domain name drop‐down menu, select the domain to which the user is assigned. In the Starts with field, type either the full name of the user or the beginning of the user name. Click Display. Select a user from the search results and click OK. 6. In the Email address field, type the user’s email address. 7. Select the permission level of the administrator: – NAS Cluster Administrator: The administrator can manage any aspect of the FluidFS cluster. – NAS Volume Administrator: The administrator can only view the FluidFS cluster configuration and manage the NAS volume(s) to which they are assigned. 69 8. Click OK. Assigning NAS Volumes to a Volume Administrator By default, new volume administrators can manage all NAS volumes. After a volume administrator is created, you can change the NAS volumes that can be managed by the volume administrator. 1. Click the System tab on the left. 2. Click the Mail & Admins tab on the top. 3. In the Administrator Users pane, click 4. Click Modify. in the row of the administrator you want to modify. The Modify Administrator User dialog box appears. 5. In the Email address, enter the e-mail address for the selected administrator user. 6. Under Choose the NAS administration level, select NAS volume administrator. 7. Click the button. The NAS Volume Browser dialog box appears. a) Select the NAS Volumes to assign to the volume administrator. b) Click OK. The NAS Volume Browser dialog closes. c) Click Add. The volume is added to the administrator’s volume list. d) Repeat steps (a) to (c) for each volume you want to add. 8. Click OK. Changing an Administrator’s Permission Level Change the permission level of an administrator account. 1. Click the System tab on the left. 2. Click the Mail & Admins tab on the top. 3. In the Administrator Users pane, click 4. Click Modify. in the row of the administrator you want to modify. The Modify Administrator User dialog box appears. 5. Select the permission level of the administrator: – NAS Cluster Administrator: The administrator can manage any aspect of the FluidFS cluster. 6. – NAS Volume Administrator: The administrator can only view the FluidFS cluster configuration and manage the NAS volume(s) to which they are assigned. Click OK. Changing an Administrator’s Email Address Change the permission level of an administrator account. 1. Click the System tab on the left. 2. Click the Mail & Admins tab on the top. 3. In the Administrator Users pane, click 4. Click Modify. in the row of the administrator you want to modify. The Modify Administrator User dialog box appears. 70 5. In the Email Address field, type the new email address for the administrator. 6. Click OK. Changing a Local Administrator Password You can change the password only for a local administrator account. The password for remote administrators is maintained in the external database. 1. Click the Access Control tab on the left. 2. Click the User Repositories tab on the top. 3. In the Local Users pane, click 4. Click Change Password. in the row of the user whose password you want to change. The Change Password for Local User dialog box appears. 5. In the New password field, type a password for the administrator. The password must be at least seven characters long and contain three of the following elements: a lowercase character, an uppercase character, a digit, or a special character (such as +, ?, or ∗). 6. In the Repeat new password field, re‐type the password for the administrator. 7. Click OK. Deleting an Administrator Delete an administrator account when it is no longer used for FluidFS cluster management. The built‐in Administrator account cannot be deleted. 1. Click the System tab on the left. 2. Click the Mail & Admins tab on the top. 3. In the Administrator Users pane, click 4. Click Delete. in the row of the administrator you want to modify. The Delete dialog box appears. 5. Click OK. Managing Local Users You can create local users that can access CIFS shares and NFS exports, or that will become a FluidFS cluster administrator. You might want to create local users in the following cases: • You do not have remote users (AD/LDAP/NIS) • Both CIFS/NFS will be used, but you have a remote user repository (AD/LDAP/NIS) relevant for only one protocol and a small number of users using the other protocol When prompted to authenticate to access a CIFS share, local users must use the following format for the user name: <client_VIP_or_name>\<local_user_name> Adding a Local User Add a local user account. 71 NOTE: The group to which the local user is assigned must exist. 1. Click the Access Control tab on the left. 2. Click the User Repositories tab on the top. 3. In the Local Users pane, click 4. Click New Local User. . The New Local User dialog box appears. 5. In the User name field, type a name for the local user. The user name may contain only the following characters: letters, numbers, underscores, hyphens, spaces, and periods. Also, a period cannot be used as the last character. 6. Click the […] button to the right of the Primary Local Group field. The Groups Browser dialog box appears. 7. Select the group to which the local user is assigned and click OK. 8. In the Password field, type a password for the local user. The password must be at least seven characters long and contain three of the following elements: a lowercase character, an uppercase character, a digit, or a special character (such as +, ?, or ∗). 9. In the Repeat Password field, re‐type the password for the local user. 10. (Optional) Add secondary groups for this user. a) Click the […] button under the Secondary Groups list. The Groups Browser dialog box appears. b) Select a secondary group you want to add and click OK. c) Click Add. d) Repeat steps (a) to (c) for each secondary group you want to add. 11. Click OK. Changing a Local User’s Group Change the primary local group to which a local user is assigned. 1. Click the Access Control tab on the left. 2. Click the User Repositories tab on the top. 3. In the Local Users pane, click 4. Click Modify. in the row of the user you want to change. The Modify Local User dialog box appears. 5. Click the […] button to the right of the Groups field. The Groups Browser dialog box appears. 6. Select the group to which the local user is assigned and click OK. 7. Click OK. Enabling or Disabling a Local User Disabling a local user prevents the local user from accessing CIFS shares and NFS exports. 1. In the Local Users pane, click 2. Click Modify. in the row of the user you want to change. The Modify Local User dialog box appears. 72 3. Enable or disable the local user. – To enable the local user, clear the Disable access from this local user check box. 4. – To disable the local user, select the Disable access from this local user check box. Click OK. Changing a Local User Password Change the password for a local user account. 1. Click the Access Control tab on the left. 2. Click the User Repositories tab on the top. 3. In the Local Users pane, click 4. Click Change Password. in the row of the user you want to change. The Change Password for Local User dialog box appears. 5. In the New Password field, type a new password for the local user. The password must be at least seven characters long and contain three of the following elements: a lowercase character, an uppercase character, a digit, or a special character (such as +, ?, or ∗). 6. In the Repeat new password field, re‐type the password for the local user. 7. Click OK. Deleting a Local User Delete a local user account when the user no longer needs to access CIFS shares and NFS exports, or manage the FluidFS cluster (in the case of an administrator based on a local user). NOTE: If the local user has an associated administrator account, you must delete the administrator account before deleting the local user account. 1. Click the Access Control tab on the left. 2. Click the User Repositories tab on the top. 3. In the Local Users pane, click 4. Click Delete. in the row of the user you want to change. The Delete Local User dialog box appears. 5. Click OK. Managing Password Age and Expiration Changing the Maximum Password Age You can change the number of days after which local users and local administrators will be forced to change their password. The password expiration settings for remote users are maintained in the external database and are not affected by this setting. 1. Click the System tab on the left. 2. Click the Internal tab on the top. 3. In the Security Access pane, click 4. Click Modify Password Expiration Policy. . The Modify Password Expiration Policy dialog box appears. 73 5. Click Edit Password Expiration. The Edit Password Expiration dialog box appears. 6. In the within [ ] days field, type the number of days after which the password will expire. 7. Click OK. Enabling or Disabling Password Expiration When password expiration is enabled, local users and local administrators are forced to change their password after the specified number of days. The password expiration settings for remote users are maintained in the external database and are not affected by this setting. 1. Click the System tab on the left. 2. Click the Internal tab on the top. 3. In the Security Access pane, click 4. Click Modify Password Expiration Policy. . The Modify Password Expiration Policy dialog box appears. 5. Enable or disable local user and administrator password expiration. – To enable local user and administrator password expiration, select the Password for local users and administrator users will expire check box. 6. 7. – To disable local user and administrator password expiration, clear the Password for local users and administrator users will expire check box. If password expiration is enabled, in the within [ ] days field, type the number of days after which the password expires. Click OK. Managing Local Groups Create local groups to apply quota rules to multiple users. You can assign local users, remote users, and remote users groups to one or more local groups. The primary group to which a user belongs determines the quota for the user. Viewing Local Groups View the current local groups. 1. Click the Access Control tab on the left. 2. Click the User Repositories tab on the top. The local groups are displayed in the Local Groups pane. Adding a Local Group Add a local group containing local users, remote users, or remote users groups. 1. Click the Access Control tab on the left. 2. Click the User Repositories tab on the top. 3. In the Local Groups pane, click 4. Click New Local Group. . The New Local Group dialog box appears. 74 5. In the Local group name field, type a name for the group. 6. To add local users to the group: a) Click the […] button under the Local users in this group list. The User Browser dialog box appears. b) In the Search field, type either the full name of the user or the beginning of the user name and click the button. c) Select the user you want to add and click OK. d) Click Add under the Local users in this group list. e) Repeat steps (a) to (d) for every user you want to add. 7. To add domain users to the group: a) Click the […] button under the Domain users in this group list. The User Browser dialog box appears. b) From the Domain drop‐down menu, select the domain to which the user is assigned. c) In the Search field, type either the full name of the user or the beginning of the user name and click the button. d) Select the user you want to add and click OK. e) Click Add under the Domain users in this group list. f) Repeat steps (a) to (e) for every user you want to add. 8. To add domain groups to the group: a) Click the […] button under the Domain groups in this group list. The Group Browser dialog box appears. b) From the Domain drop‐down menu, select the group’s domain. c) In the Search field, type either the full name of the group or the beginning of the group name and click the button. d) Select the group you want to add and click OK. e) Click Add under the Domain users in this group list. f) Repeat steps (a) to (e) for every group you want to add. 9. Click OK. Changing the Users Assigned to a Local Group Modify which local users, remote users, or remote users groups are assigned to a local group. 1. Click the Access Control tab on the left. 2. Click the User Repositories tab on the top. 3. In the Local Groups pane, click 4. Click Modify. in the row of the group you want to delete. The Modify Local Group dialog box appears. 75 5. To add local users to the group: a) Click the […] button under the Local users in this group list. The User Browser dialog box appears. b) In the Search field, type either the full name of the user or the beginning of the user name and click the button. c) Select the user you want to add and click OK. d) Click Add under the Local users in this group list. e) Repeat steps (a) to (d) for every user you want to add. 6. To add domain users to the group: a) Click the […] button under the Domain users in this group list. The User Browser dialog box appears. b) From the Domain drop‐down menu, select the domain to which the user is assigned. c) In the Search field, type either the full name of the user or the beginning of the user name and click the button. d) Select the user you want to add and click OK. e) Click Add under the Domain users in this group list. f) Repeat steps (a) to (e) for every user you want to add. 7. To add domain groups to the group: a) Click the […] button under the Domain groups in this group list. The Group Browser dialog box appears. b) From the Domain drop‐down menu, select the group’s domain. c) In the Search field, type either the full name of the group or the beginning of the group name and click the button. d) Select the group you want to add and click OK. e) Click Add under the Domain users in this group list. f) Repeat steps (a) to (e) for every group you want to add. 8. Click OK. Deleting a Local Group Delete a local group if it is no longer used. NOTE: Before a local group can be deleted, you must remove its members. 1. Click the Access Control tab on the left. 2. Click the User Repositories tab on the top. 3. In the Local Groups pane, click 4. Click Delete. in the row of the group you want to delete. The Delete Local Group dialog box appears. 5. Click OK. Managing Active Directory In environments that use Active Directory (AD), you can configure the FluidFS cluster to join the Active Directory domain and authenticate Windows clients using Active Directory for access to CIFS shares. The FluidFS cluster supports mixed mode and native mode Active Directory configurations. 76 Enabling Active Directory Authentication Join the FluidFS cluster to an Active Directory domain to allow it to communicate with the directory service. By default, the FluidFS cluster uses the domain controller returned by Active Directory. Alternatively, you can designate a domain controller if you want to ensure that the FluidFS cluster uses a specific domain controller. Adding multiple domain controllers ensures continued authentication of users in the event of a domain controller failure. If the FluidFS cluster cannot establish contact with the preferred server, it will attempt to connect to the remaining servers in order. • An Active Directory service must be deployed in your environment. • The FluidFS cluster must have network connectivity to the directory service. • You must be familiar with the Active Directory configuration. • The FluidFS cluster requires credentials from an Active Directory account for the join operation. The join operation is the only action for which these credentials are required, and they are not stored or cached by the FluidFS cluster. Use one of the following options for the account used to join the FluidFS cluster to the domain: – Use a Domain Admin account. This is the preferred method. – Use an account that has the "join a computer to the domain" privilege, as well as having full control over all computer objects in the domain. – If both of the above options are unavailable, the minimum requirements for an account are: * An Organizational Unit (OU) admin that has the "join a computer to the domain" privilege, as well as having full control over objects within that OU, including computer objects. * Before joining the FluidFS cluster to the domain, a computer object must be created by the OU admin for the FluidFS cluster; in the OU privileges to administer are provided. The FluidFS cluster computer object name, and the NetBIOS name used when joining it, must match. When creating the FluidFS cluster computer object, in the User or Group field under permissions to join it to the domain, select the OU admin account. Then, the FluidFS cluster can be joined using the OU admin credentials. • FluidFS clusters need read access for the tokenGroups attribute for all users. The default configuration of Active Directory for all domain computers is to allow read access to the tokenGroups attribute. If the permission is not given, Active Directory domain users that are in nested groups or OUs encounter Access Denied errors, and users that are not in nested OUs or groups are permitted access. • The Active Directory server and the FluidFS cluster must use a common time server. • You must configure the FluidFS cluster to use DNS. The DNS servers you specify must be the same as those your Active Directory domain controllers use. 1. Click the Access Control tab on the left. 2. Click the User Repositories tab on the top. 3. In the Active Directory for CIFS and NFS users Authentication pane, click 4. Click Join. . The Join Active Directory dialog box appears. 5. In the Active Directory domain name field, type a domain to which to join the FluidFS cluster. 6. (Optional) To add preferred controllers for the join operation and users authentication: a) Select the Consider these controllers as preferred check box. b) Type a domain controller host name or IP address in the controllers text field and click Add. c) Repeat step (b) for each controller you want to add. 77 7. Click OK. Modifying Active Directory Authentication Settings You cannot directly modify the settings for Active Directory authentication. You must remove the FluidFS cluster from the Active Directory domain and then re‐join it to the Active Directory domain. 1. Click the Access Control tab on the left. 2. Click the User Repositories tab on the top. 3. In the Active Directory for CIFS and NFS users Authentication pane, click 4. Click Modify. . The Modify Active Directory dialog box appears. 5. Click OK. 6. Follow the instructions in Enabling Active Directory Authentication. Disabling Active Directory Authentication Remove the FluidFS cluster from an Active Directory domain if you no longer need the FluidFS cluster to communicate with the directory service. 1. Click the Access Control tab on the left. 2. Click the User Repositories tab on the top. 3. In the Active Directory for CIFS and NFS users pane, click 4. Click Leave. . The Leave Active Directory dialog box appears. 5. Click OK. 6. Follow the instructions in Enabling Active Directory Authentication to re-join the Active Directory. Managing LDAP In environments that use Lightweight Directory Access Protocol (LDAP), you can configure the FluidFS cluster to authenticate UNIX/Linux clients using LDAP for access to NFS exports. The LDAP database can be provided by either an LDAP server or Active Directory. The FluidFS clusters support the following LDAP configurations: • Anonymous LDAP: The connection from the FluidFS cluster to the LDAP server(s) is not authenticated. The data is sent in plain text. • Authenticated LDAP: The connection from the FluidFS cluster to the LDAP server(s) is authenticated using a user name and password. The data is sent in plain text. • LDAP over TLS/SSL: The connection from the FluidFS cluster to the LDAP server(s) is authenticated and encrypted. To validate the certificate used by the LDAP service, you must export the SSL certificate from the LDAP service and upload it to the FluidFS cluster. Enabling LDAP Authentication Configure the FluidFS cluster to communicate with the LDAP directory service. 78 Adding multiple LDAP servers ensures continued authentication of users in the event of an LDAP server failure. If the FluidFS cluster cannot establish contact with the preferred server, it will attempt to connect to the remaining servers in order. 1. Click the Access Control tab on the left. 2. Click the User Repositories tab on the top. 3. In the NIS or LDAP repository for NFS users pane, click 4. Click Modify Settings. . The Modify NIS/LDAP Settings dialog box appears. 5. Select LDAP. The LDAP settings fields are displayed. 6. In the Base DN field, type an LDAP base distinguished name to represent where in the directory to begin searching for users. It is usually in the format: dc=domain, dc=com. 7. In the LDAP Servers text field, type the host name or IP address of an LDAP server and click Add. Repeat this step for any additional LDAP servers. 8. (Optional) Configure the remaining LDAP attributes as needed. – To indicate that Active Directory provides the LDAP database, select the Use LDAP on Active Directory Extended Schema check box. – To authenticate the connection from the FluidFS cluster to the LDAP server, select theUse Non‐ nonymous LDAP bind check box. Then, type the LDAP bind distinguished name used to authenticate the connection in the Bind DN field and type the LDAP bind password in the Bind Password field. – To encrypt the connection from the FluidFS cluster to the LDAP server using TLS, select the Use TLS over LDAP check box. 9. – To validate the certificate used by the LDAP service, select the Install LDAP Certificate check box. Then, click Upload Certificate and select the LDAP SSL certificate to upload to the FluidFS cluster. Click OK. Changing the LDAP Base DN The LDAP base distinguished name represents where in the directory to begin searching for users. 1. Click the Access Control tab on the left. 2. Click the User Repositories tab on the top. 3. In the NIS or LDAP repository for NFS users pane, click 4. Click Modify Settings. . The Modify NIS/LDAP Settings dialog box appears. 5. Select LDAP. The LDAP settings fields are displayed. 6. In the Based DN field, type an LDAP base distinguished name. It is usually in the format: dc=domain, dc=com 7. Click OK. 79 Adding or Removing LDAP Servers There must be at least one LDAP server. 1. Click the Access Control tab on the left. 2. Click the User Repositories tab on the top. 3. In the NIS or LDAP repository for NFS users pane, click 4. Click Modify Settings. . The Modify NIS/LDAP Settings dialog box appears. 5. Select LDAP. The LDAP settings fields are displayed. 6. Add or remove LDAP servers. – To add an LDAP server, type the host name or IP address of an LDAP server in the LDAP Servers text field and click Add. 7. – To remove an LDAP server, select an LDAP server and click Click OK. . Enabling or Disabling LDAP on Active Directory Extended Schema Enable the extended schema option if Active Directory provides the LDAP database. 1. Click the Access Control tab on the left. 2. Click the User Repositories tab on the top. 3. In the NIS or LDAP repository for NFS users pane, click 4. Click Modify Settings. . The Modify NIS/LDAP Settings dialog box appears. 5. Enable or disable LDAP on Active Directory extended schema. – To indicate that Active Directory provides the LDAP database, select the Use LDAP on Active Directory Extended Schema check box. 6. – To indicate that an LDAP server provides the LDAP database, clear the Use LDAP on Active Directory Extended Schema check box. Click OK. Enabling or Disabling Authentication for the LDAP Connection Enable authentication for the connection from the FluidFS cluster to the LDAP server if the LDAP server requires authentication. 1. Click the Access Control tab on the left. 2. Click the User Repositories tab on the top. 3. In the NIS or LDAP repository for NFS users pane, click 4. Click Modify Settings. The Modify NIS/LDAP Settings dialog box appears. 5. Select LDAP. The LDAP settings fields are displayed. 80 . 6. Enable or disable authentication for the LDAP connection. – To enable authentication for the LDAP connection, select the Use Non‐Anonymous LDAP bind check box. Then, type the LDAP bind distinguished name used to authenticate the connection in the Bind DN field and type the LDAP bind password in the Bind Password field. 7. – To disable authentication for the LDAP connection, clear the Use Non‐Anonymous LDAP bind check box. Click OK. Enabling or Disabling TLS Encryption for the LDAP Connection Enable TLS encryption for the connection from the FluidFS cluster to the LDAP server to avoid sending data in plain text. To validate the certificate used by the LDAP service, you must export the LDAP SSL certificate and upload it to the FluidFS cluster. 1. Click the Access Control tab on the left. 2. Click the User Repositories tab on the top. 3. In the NIS or LDAP repository for NFS users pane, click 4. Click Modify Settings. . The Modify NIS/LDAP Settings dialog box appears. 5. Select LDAP. The LDAP settings fields are displayed. 6. Enable or disable TLS encryption for the LDAP connection. – To enable TLS encryption for the LDAP connection, select the Use LDAP over TLS check box. 7. – To disable TLS encryption for the LDAP connection, clear the Use LDAP over TLS check box. If TLS encryption is enabled, enable or disable LDAP certificate validation. – To enable LDAP certificate validation, select the Install LDAP Certificate check box. Then, click Upload Certificate and select the LDAP SSL certificate to upload to the FluidFS cluster. 8. – To disable LDAP certificate validation, clear the Install LDAP Certificate check box. Click OK. Disabling LDAP Authentication Disable LDAP authentication if you no longer need the FluidFS cluster to communicate with the directory service. 1. Click the Access Control tab on the left. 2. Click the User Repositories tab on the top. 3. In the NIS or LDAP repository for NFS users pane, click 4. Click Modify Settings. . The Modify NIS/LDAP Settings dialog box appears. 5. Select None. 6. Click OK. Managing NIS In environments that use Network Information Service (NIS), you can configure the FluidFS cluster to authenticate clients using NIS for access to NFS exports. 81 Enabling NIS Authentication Configure the FluidFS cluster to communicate with the NIS directory service. Adding multiple NIS servers ensures continued authentication of users in the event of a NIS server failure. If the FluidFS cluster cannot establish contact with the preferred server, it will attempt to connect to the remaining servers in order. 1. Click the Access Control tab on the left. 2. Click the User Repositories tab on the top. 3. In the NIS or LDAP repository for NFS users pane, click 4. Click Modify Settings. . The Modify NIS/LDAP Settings dialog box appears. 5. Select NIS. The NIS settings fields are displayed. 6. 7. In the Domain Name field, type a NIS domain name. In the NIS Servers text field, type the host name or IP address of a NIS server and click Add. Repeat this step for any additional NIS servers. 8. 9. NIS servers are listed in descending order of preference. – To increase the precedence for a NIS server, select a NIS server and click . – To decrease the precedence for a NIS server, select a NIS server and click Click OK. . Changing the NIS Domain Name The NIS domain name specifies which domain to query in the NIS directory service. 1. Click the Access Control tab on the left. 2. Click the User Repositories tab on the top. 3. In the NIS or LDAP repository for NFS users pane, click 4. Click Modify Settings. . The Modify NIS/LDAP Settings dialog box appears. 5. In the NIS Domain Name field, type a NIS domain name. 6. Click OK. Changing the Order of Preference for NIS Servers Change the order of preference for a NIS server. If the FluidFS cluster cannot establish contact with the preferred server, it will attempt to connect to the remaining servers in order. 1. Click the Access Control tab on the left. 2. Click the User Repositories tab on the top. 3. In the NIS or LDAP repository for NFS users pane, click 4. Click Modify Settings. The Modify NIS/LDAP Settings dialog box appears. 82 . 5. 6. NIS servers are listed in descending order of preference. – To increase the precedence for a NIS server, select a NIS server and click . – To decrease the precedence for a NIS server, select a NIS server and click Click OK. . Disabling NIS Authentication Disable NIS authentication if you no longer need the FluidFS cluster to communicate with the directory service. 1. Click the Access Control tab on the left. 2. Click the User Repositories tab on the top. 3. In the NIS or LDAP repository for NFS users pane, click 4. Click Modify Settings. . The Modify NIS/LDAP Settings dialog box appears. 5. Select None. 6. Click OK. Managing User Mappings between Windows and UNIX/ Linux Users You can define mappings between Windows users in Active Directory and UNIX/Linux users in LDAP or NIS. This ensures that a Windows user inherits the UNIX/Linux user permissions, and a UNIX/Linux user inherits the Windows user permissions, depending on the direction of the mapping and the NAS volume security style. User Mapping Policies The user mapping policies include: • Automatic mapping: Automatically map all Windows users in Active Directory to the identical UNIX/ Linux users in LDAP or NIS, and map all UNIX/Linux users to the identical Windows users. Automatic mapping is disabled by default. • Mapping rules: Define mappings between specific Windows users in Active Directory and the corresponding UNIX/Linux users in LDAP or NIS. These specific mapping rules take precedence over automatic mapping. You can select the direction of the mapping — the mapping can go in one direction or both: – Mapping is allowed in one direction: * Windows users to a UNIX/Linux user * UNIX/Linux user to a Windows user – Mapping is allowed in both directions between Windows and UNIX/Linux users. • User Mapping Policy and NAS Volume Security Style User mapping permissions depend on the file security style for the NAS volume: 83 • • • NTFS security style: Permissions are controlled by Windows and NTFS. The UNIX/ Linux user adheres to the permissions of the corresponding Windows user, regardless of the UNIX/Linux permission settings. UNIX security style: Permissions are based on the UNIX/Linux permissions. The Windows user adheres to the permissions of the corresponding UNIX/Linux user. Mixed security style: Both UNIX/Linux and Windows permissions are used. Each user can override the other userʹ permission settings; therefore, be careful when using the Mixed security style. Managing the User Mapping Policy Configure the FluidFS cluster mapping policy to automatically map all users or to only allow mappings between specific users. Mapping Windows and UNIX/Linux Users Automatically Automatically map all Windows users in Active Directory to the identical UNIX/Linux users in LDAP or NIS, and map all UNIX/Linux users to the identical Windows users. Mapping rules override automatic mapping. 1. Click the Access Control tab on the left. 2. Click the User Mapping tab on the top. 3. In the Mapping Policy pane, click 4. Click Modify Policy. . The Modify User Mapping Policy dialog box appears. 5. Select Automatically map CIFS and NFS users with the same name. 6. Click OK. Mapping Windows and UNIX/Linux Users by Mapping Rules Only Only allow mappings between specific Windows users in Active Directory and the identical UNIX/Linux users in LDAP or NIS. 1. Click the Access Control tab on the left. 2. Click the User Mapping tab on the top. 3. In the Mapping Policy pane, click 4. Click Modify Policy. . The Modify User Mapping Policy dialog box appears. 5. Select Map based on the mapping rules only. 6. Click OK. Managing User Mapping Rules Manage mapping rules between specific users. Mapping rules override automatic mapping. Creating a User Mapping Rule Create a mapping rule between a specific Windows user in Active Directory and the identical UNIX/Linux user in LDAP or NIS. Mapping rules override automatic mapping. 1. Click the Access Control tab on the left. 2. Click the User Mapping tab on the top. 3. In the Mapping Rules pane, click 4. Click New. . The New User Mapping Rule dialog box appears. 84 5. Click the […] button to the right of the CIFS User (Active Directory) field. The User Browser dialog box appears. a) From the Domain drop‐down menu, select the domain to which the user is assigned. b) In the Starts with field, type either the full name of the user or the beginning of the user name and click the button. c) Select the user you want to add and click OK. 6. Click the […] button to the right of the NFS User (NIS/LDAP) field. The User Browser dialog box appears. a) From the Domain drop‐down menu, select the domain to which the user is assigned. b) In the Starts with field, type either the full name of the user or the beginning of the user name and click the button. c) Select the user you want to add and click OK. 7. Select the direction of the user mapping: – The two users have identical file access permissions (using any protocol) – The NFS user can access any file accessible by the CIFS user 8. – The CIFS user can access any file accessible by the NFS user Click OK. Deleting a User Mapping Rule Delete a mapping rule between a specific Windows user in Active Directory and the identical UNIX/Linux user in LDAP or NIS. 1. Click the Access Control tab on the left. 2. Click the User Mapping tab on the top. 3. In the Mapping Rules pane, for the mapping rule that you want to delete, click 4. Click Delete. . The Delete User Mapping Rule dialog box appears. 5. Click OK. 85 86 FluidFS 3.0 NAS Volumes, Shares, and Exports 7 Managing the NAS Pool The amount of raw space allocated to the FluidFS cluster (NAS pool) is determined by the MD Array LUNs assigned to the NAS controllers. The maximum size of the PowerVault FluidFS NAS pool is 1 PB. The usable size of the NAS pool depends on how much space the system deducts from the NAS pool for internal use. On average, the system deducts approximately 400 GB per NAS appliance for internal use. The exact amount of internal space varies by configuration, but it is roughly calculated as follows per FluidFS cluster: (256GB ∗ number of NAS appliances) + (4GB ∗ number of MD LUNs/volumes) + 20GB + 0.5% of the total NAS pool + (100GB * number of NAS appliances, if data reduction is enabled) Discovering New or Expanded LUNs You can automatically discover newly created or expanded LUNs on the connected MD Storage arrays. 1. Click the Hardware tab on the left. 2. Click the Storage tab on the top. 3. In the Storage pane, click and select Discover New or Expanded LUNs. The Discover New or Expanded LUNs dialog prompts you that the LUN discovery occurs in the background, and you must refresh the browser page to see the view the new LUNs. 4. Select the I noted that Discover LUNs is performed in background ... check box and click OK. Viewing Internal Storage Reservations View information about the space that the system deducts from the NAS pool for internal use. 1. Click the System tab on the left. 2. Click the Internal tab on the top. The internal storage reservations are displayed in the Internal Storage Reservations pane. Viewing the Size of the NAS Pool View the current configured size of the NAS pool. 1. Click the Hardware tab on the left. 2. Click the Storage tab on the top. The NAS pool size is displayed in the Overview pane, in the Space allocated to the NAS pool field. 87 Expanding the Size of the NAS Pool You can increase the size of the NAS pool as your NAS storage space requirements increase, without affecting the services to the clients. However, you cannot decrease the size of the NAS pool. The maximum size of the NAS pool is 1 PB. NOTE: The MD Array(s) must have enough capacity to allocate more storage space to the FluidFS cluster. 1. Click the Hardware tab on the left. 2. Click the Storage tab on the top. 3. In the Overview pane, click 4. Click Expand NAS Pool. . The Expand NAS Pool dialog box appears. The Additional allocation to the NAS pool value is displayed. 5. Click OK. The progress of the expand NAS pool process is displayed in the Expand NAS Pool dialog box. If you close the dialog box, the process will continue to run in the background. Enabling or Disabling the NAS Pool Used Space Alert You can enable an alert that is triggered when a specified percentage of the NAS pool space has been used. 1. Click the NAS Volumes ab on the left. 2. Click the NAS Pool tab on the top. 3. In the NAS Pool pane, click 4. Click Modify Space Threshold. . The Modify NAS Pool Space Threshold dialog box appears. 5. Enable or disable the NAS pool used space alert. – To enable the NAS pool used space alert, select the Alert when used space is over check box. 6. – To disable the NAS pool used space alert, clear the Alert when used space is over check box. If the NAS pool used space alert is enabled, in the Alert when used space is over size field, type a number (from 0 to 100) to specify the percentage of used NAS pool space that triggers an alert. 7. Click OK. Enabling or Disabling the NAS Pool Unused Space Alert You can enable an alert that is triggered when the remaining unused NAS pool space is below a specified size. 1. Click the NAS Volumes tab on the left. 2. Click the NAS Pool tab on the top. 3. In the NAS Pool pane, click 4. Click Modify Space Threshold. . The Modify NAS Pool Space Threshold dialog box appears. 88 5. Enable or disable the NAS pool unused space alert. – To enable the NAS pool unused space alert, select the Alert when unused space is over check box. 6. – To disable the NAS pool unused space alert, clear the Alert when unused space is over check box. If the NAS pool unused space alert is enabled, in the Alert when unused space is below size field, type a size in megabytes (MB), gigabytes (GB), or terabytes (TB) to specify the unused NAS pool space that triggers an alert. 7. Click OK. Managing NAS Volumes A NAS volume is a portion of the NAS pool in which you create CIFS shares and NFS exports to make storage space available to clients. NAS volumes have specific management policies controlling their space allocation, data protection, security style, and so on. You can either create one large NAS volume consuming the entire NAS Pool or divide the NAS pool into multiple NAS volumes. In either case you can create, resize, or delete these NAS volumes. NAS volume availability depends on the availability of the MD Array(s). If the MD Array is offline, NAS volume data is not available for the FluidFS cluster. Correct the MD Array problem to resume NAS volume availability. Several NAS features are configured on a per NAS volume basis: • Quota rules • Security styles • Data reduction • Snapshots • NDMP backup • Replication File Security Styles The Windows and UNIX/Linux operating systems use different mechanisms for resource access control. Therefore, you assign each NAS volume a file security style (NTFS, UNIX, or Mixed) that controls the type of access controls (permission and ownership) for the files and directories that clients create in the NAS volume. A NAS volume supports the following security styles: • UNIX: Controls file access using UNIX permissions. A client can change permissions only by using the chmod and chown commands on the NFS mount point. • NTFS: Controls file access by Windows permissions. A client can change the permission and ownership using the Windows File Properties → Security tab. • Mixed: Supports both NTFS and UNIX security styles. If you choose this option, the security of a file or directory is the last one set. Permissions and access rights from one method to another are automatically translated. For example, if a Windows administrator sets up file access permissions on a file through a CIFS Share, a Linux user can access the file through NFS and change all the file permissions. This option is not recommended in production environments, except where there is a need for scratch space and when you are not concerned about file access security and simply need some NAS volume space to store files temporarily. Both NTFS and UNIX security styles allow multi‐protocol file access. The security style simply determines the method of storing/managing the file access permissions information within the NAS volume. 89 If you need to access the same set of files from both Windows and UNIX/Linux, the best way to implement multi‐protocol access is by setting up individual user mapping rules or by enabling automatic user mapping. Ownership and access permissions are automatically translated based on user mapping settings and file access credentials. Modifying the file security style of a NAS volume affects only files and directories created after the modification. Thin and Thick Provisioning for NAS Volumes Although PowerVault NAS pool is thickly provisioned to the FluidFS system, NAS volumes can be thin‐ provisioned. With thin‐provisioning (the default), storage space is consumed on the MD Arrays(s) only when data is physically written to the NAS volume, not when the NAS volume is initially created. Thin‐ provisioning allows NAS volumes to account for future increases in usage. However, because it is possible for the storage space allocated by the NAS volumes to exceed the storage space allocated to the NAS pool, ensure that you monitor available capacity on the MD array(s) to ensure that the FluidFS system always has sufficient free space available. You can also specify a portion of the NAS volume (Reserved Space) that is dedicated to the NAS volume (no other volumes can take the space). The total Reserved Space of all NAS volumes cannot exceed the available capacity of the NAS pool. If a file is deleted from a thin‐provisioned NAS volume, the free space as seen in FluidFS Manager increases. The freed up capacity is also visible and available to clients in the CIFS shares or NFS exports. However, the MD array does not report any capacity freed up in the NAS pool. Thick provisioning allows you to allocate storage space on the MD array(s) statically to a NAS volume (no other volumes can take the space). Thick provisioning is appropriate if your environment requires guaranteed space for a NAS volume. Choosing a Strategy for NAS Volume Creation Choosing to define multiple NAS volumes enables you to apply different management policies, such as data reduction, data protection, security style, and quotas, based on your storage needs. Consider the following factors to help choose the right strategy based on your environment’s requirements: • General requirements NAS volumes can be easily created, resized (increased or decreased) based on the system capacity, or deleted. – NAS volumes can be easily created, resized (increased or decreased) based on the system capacity, or deleted. – A single NAS volume can contain NFS exports, CIFS shares, or a combination of NFS exports and CIFS shares. – The minimum size of a NAS volume is 20 MB (or if the NAS volume has already been used, the minimum size is the stored data). • Business requirements: A company or application requirement for separation or for using a single NAS volume must be considered. NAS volumes can be used to allocate storage for departments on demand, using the threshold mechanism to notify administrators when they approach the end of their allocated free space. • Data reduction: Each NAS volume can have a dedicated data reduction policy to best suit the type of data it stores. • Snapshots: Each NAS volume can have a dedicated snapshot scheduling policy to best protect the type of data it stores. • Security style: In multiple protocol environments, it might be beneficial to separate the data and define NAS volumes with UNIX security style for UNIX/Linux‐ased clients, and NTFS for Windows‐ased clients. This enables the administrator to match the security style with business requirements and 90 various data access patterns. The security style can also be set to Mixed which supports both POSIX security and Windows ACLs on the same NAS volume. • Quotas: Different quota policies can be applied to different NAS volumes, allowing the administrator to focus on managing quotas when it is appropriate. Example NAS Volume Creation Scenarios The following scenarios provide examples of how NAS volumes can be created to meet the needs of an example organization with the following conditions: 1. The average read/write mix is 80/20 and the average hourly change rate for existing data is less than 1%. 2. The departments and NAS volume requirements are as described in the following table: Department Securit Snapsho Replicatio y Style ts n NDMP Backup Number Read/ of Write Mix CIFS/NF S Clients Hourly Change % of Existing Data Post Production NFS Hourly No Weekly 20 20/80 1% Administration and Finance CIFS No No Weekly 10 50/50 None Broadcast Mixed No No Weekly 10 90/10 None Press CIFS Daily No No 5 10/90 5% Marketing CIFS Daily Yes No 5 50/50 None Scenario 1 Create NAS volumes based on departments. The administrator logically breaks up storage and management into functional groups. In this scenario, the departmental requirements are quite different and support the design to logically create NAS volumes along department lines. • Advantages: – It is logically easy to manage the NAS volumes. – The NAS volumes are created to match the exact needs of the department. • Disadvantage: The NAS volumes become difficult to manage if the number of departments in the organization increases. Scenario 2 We recommend grouping departments that have similar security requirements into NAS volumes. The administrator creates three NAS volumes: one for NFS, one for CIFS, and another for mixed. • Advantage: The NAS volumes work separately between Windows and Linux. • Disadvantage: Unwanted services may be provided to certain departments. For example, if the CIFS volume is backed up weekly for the administration and finance departments, the press and marketing departments also get backups even though they do not require it. Scenario 3 NAS volumes can be created based on the feature (snapshots, replication, NDMP backup, and so on). • Advantage: The NAS volumes are created to match the exact needs for each feature. 91 • Disadvantage: User mapping is required. A user needs to choose one security style, either NTFS or UNIX, and based on the security style chosen the correct mapping for other users is set. NAS Volumes Storage Space Terminology FluidFS Manager displays storage space details for individual NAS volumes and for all NAS volumes collectively. The following table defines terminology used in FluidFS Manager related to NAS volume storage space. Term Description Size Maximum size of a NAS volume defined by the storage administrator. Used Space Storage space occupied by writes to the NAS volume (user data and snapshots). Reserved Space A portion of a thin‐provisioned NAS volume that is dedicated to the NAS volume (no other volumes can take the space). The amount of reserved space is specified by the storage administrator. Reserved space is used before unreserved space. Unreserved Space A portion of a thin‐provisioned NAS volume that is not reserved (other volumes can take the space). The amount of unreserved space for a NAS volume is: (NAS volume size) – (NAS volume reserved space). Available Space Storage space that is physically currently available for the NAS volume. The amount of available space for a NAS volume is: (unused NAS volume reserved space) + (NAS volume unreserved space, provided that there is free space in the NAS pool). Overcommitted Space A portion of a thin‐provisioned NAS volume that is not available and not in use by the NAS volume. The amount of overcommitted space for a NAS volume is: (sum of all the NAS volume space) - (NAS Pool: Used Space) - (NAS Pool: Unused (unreserved Space). With thin‐provisioning, storage space is consumed only when data is physically written to the NAS volume, not when the NAS volume is initially allocated. This means more storage space can be allocated to the NAS volumes than has been allocated in the NAS pool itself. Snapshot Space Storage space occupied by snapshots of a NAS volume. Data Reduction Saving Storage space reclaimed as a result of data reduction processing. Configuring NAS Volumes Manage NAS volumes and NAS volume alerts. Adding a NAS Volume Add a NAS volume to allocate storage that can be shared on the network. When a NAS volume is added, default values are applied for some settings. To change the defaults, you must modify the NAS volume. 1. Click the NAS Volumes tab on the left. 2. Click the All NAS Volumes tab on the top. The NAS volumes are displayed in the All NAS Volumes pane. 92 Adding a NAS Volume Add a NAS volume to allocate storage that can be shared on the network. When a NAS volume is added, default values are applied for some settings. To change the defaults, you must modify the NAS volume. 1. Click the NAS Volumes tab on the left. 2. Click the All NAS Volumes tab on the top. 3. In the All NAS Volumes pane, click 4. Click New NAS Volume. . The New NAS Volume dialog box appears. 5. In the NAS volume name field, type a name for the NAS volume. 6. In the Size field, type a size for the NAS volume in megabytes (MB), gigabytes (GB), or terabytes (TB). NOTE: A NAS volume must have a minimum size of 20MB. 7. Click OK. Renaming a NAS Volume Rename a NAS volume. 1. Click the NAS Volumes tab on the left. 2. Click the All NAS Volumes tab on the top. 3. In the All NAS Volumes pane, for the NAS volume that you want to rename, click 4. Click Rename. . The Rename NAS Volume dialog box appears. 5. In the New name field, type a new name for the NAS volume. 6. Click OK. Changing Access Time Granularity for a NAS Volume Change the access time granularity settings of a NAS volume to change the interval at which file‐access time stamps are updated. 1. Click the NAS Volumes tab on the left. 2. Click the All NAS Volumes tab on the top. 3. In the All NAS Volumes pane, click 4. Click View Details. in the row of the volume you want to modify. The Space view is displayed for the selected volume. 5. In the NAS Volume Advanced Settings pane, click 6. Click Modify File Access Time Granularity. . The Modify File Access Time Granularity for NAS Volume dialog is displayed. 7. Select one of the available options: – Never – Once (every 5 minutes/an hour/a day) 8. – Always Click OK. 93 Changing Permissions Interoperability for a NAS Volume Change the permissions interoperability settings of a NAS volume to change the file access security style for the NAS volume. 1. Click the NAS Volumes tab on the left. 2. Click the All NAS Volumes tab on the top. 3. In the All NAS Volumes pane, click 4. Click Modify Interoperability Policy. in the row of the volume you want to modify. The Modify CIFS & NFS Interoperability Policy dialog box appears. 5. Select the file access security style for the NAS volume (Unix, NTFS , or Mixed). 6. Click OK. Enabling or Disabling Zero Disk Usage Reporting for a NAS Volume When zero disk usage reporting is enabled for a NAS volume, the DU (Disk Usage) command reports 0 when the actual allocated size of a file is unknown (as compatible with VMWare thin provisioning). 1. Click the NAS Volumes tab on the left. 2. Click the All NAS Volumes tab on the top. 3. In the All NAS Volumes pane, click 4. Click View Details. in the row of the volume you want to modify. The volume’s Space view is displayed. 5. In the NAS Volume Advanced Settings pane, click 6. Click Modify DU Compatibility. . The Modify DU Compatibility for NAS Volume dialog box appears. 7. Select one of the following reporting options: – The size of the file as the allocated size 8. – Zero (0) as the allocated size (VMWare thin provisioning compatible) Click OK. Changing the Space Settings of a NAS Volume Change the space settings of a NAS volume, including provisioning, size, and reserved space. 1. Click the NAS Volumes tab on the left. 2. Click the All NAS Volumes tab on the top. 3. In the All NAS Volumes pane, click 4. Click Modify NAS Volume Space. in the row of the volume you want to modify. The Modify NAS Volume Space dialog box appears. 5. In the Size section, type a new size for the NAS volume and select the size unit (megabytes [MB], gigabytes [GB], or terabytes [TB]). 6. In the Space Provisioning section, select the space provisioning type (Thick or Thin). NOTE: The new size must be larger than the space used by the NAS volume. 94 7. For Thin NAS Volumes: in the Reserved Space field, type the size of the storage that is statically allocated to the NAS volume and select the units as megabytes (MB), gigabytes (GB), or terabytes (TB). NOTE: The reserved space must be smaller than the configured size of the NAS volume. 8. Click OK. Enabling or Disabling a NAS Volume Used Space Alert You can enable an alert that is triggered when a specified percentage of the NAS volume space has been used. 1. Click the NAS Volumes tab on the left. 2. Click the All NAS Volumes tab on the top. 3. In the All NAS Volumes pane, click 4. Click Modify NAS Volume Space. in the row of the volume you want to modify. The Modify NAS Volume Space dialog box appears. 5. 6. 7. Enable or disable a NAS volume used space alert: – To enable a NAS volume used space alert, select the Alert when used space is over check box. – To disable a NAS volume used space alert, clear the Alert when used space is over check box. If a NAS volume used space alert is enabled, in the Over X % of NAS Volume Size field, type a number (from 0 to 100) to specify the percentage of used NAS volume space that triggers an alert. Click OK. Enabling or Disabling a NAS Volume Unused Space Alert You can enable an alert that is triggered when the remaining unused NAS volume space is below a specified size. If a client application requires a certain amount of storage space, you might want to enable an unused space alert to ensure that the application always has the required storage space. 1. Click the NAS Volumes tab on the left. 2. Click the All NAS Volumes tab on the top. 3. In the All NAS Volumes pane, click 4. Click Modify NAS Volume Space. in the row of the volume you want to modify. The Modify NAS Volume Space dialog box appears. 5. 6. 7. Enable or disable a NAS volume used space alert: – To enable a NAS volume used space alert, select the Alert when used space is below check box. – To disable a NAS volume used space alert, clear the Alert when used space is below check box. If a NAS volume used space alert is enabled, in the Below X % of NAS Volume Size field, type a number (from 0 to 100) to specify the percentage of used NAS volume space that triggers an alert. Click OK. Enabling or Disabling a NAS Volume Snapshot Space Consumption Threshold Alert You can enable an alert that is triggered when a specified percentage of the NAS volume space has been used for snapshots. 1. Click the NAS Volumes tab on the left. 2. Click the All NAS Volumes tab on the top. 3. In the All NAS Volumes pane, click 4. Click Modify NAS Volume Space. in the row of the volume you want to modify. The Modify NAS Volume Space dialog box appears. 95 5. Enable or disable a NAS volume snapshot space consumption threshold alert. – To enable a NAS volume snapshot space consumption threshold alert, select the Alert when snapshot space is over check box. 6. – To disable a NAS volume snapshot space consumption threshold alert, clear the Alert when snapshot space is over check box. If a NAS volume snapshot space consumption threshold alert is enabled, in the Over X % of NAS Volume Size field, type a number (from 0 to 100) to specify the percentage of used NAS volume space that triggers an alert. 7. Click OK. Deleting a NAS Volume After deleting a NAS volume, the storage space used by the deleted NAS volume is reclaimed by the NAS pool. Deleting a NAS volume deletes all the files and directories as well as its properties, that is, CIFS shares and NFS exports, snapshots definitions, and so on. Once deleted, the NAS volume cannot be restored unless it is redefined and restored from an external backup. • Before a NAS volume can be deleted, you must remove its CIFS shares, NFS exports, replications, quota rules, NAS volume clones, and any other reference to the NAS volume. • Ensure that the NAS volume is not mounted and warn affected clients that the data will be deleted. 1. Click the NAS Volumes tab on the left. 2. Click the All NAS Volumes tab on the top. 3. In the All NAS Volumes pane, click 4. Click Delete. in the row of the volume you want to modify. The Delete NAS Volume dialog box appears. 5. Click OK. Cloning a NAS Volume Cloning a NAS volume creates a writable copy of the NAS volume. This is useful to test against non‐ production data sets in a test environment without impacting the production file system environment. Most operations that can be performed on NAS volumes can also be performed on clone NAS volumes, such as resizing, deleting, and configuring CIFS shares, NFS exports, snapshots, replication, NDMP, and so on. The cloned NAS volume is created from a snapshot (base snapshot) from the original NAS volume (base volume). No space is consumed by the clone NAS volume until data stored on it is modified. NAS Volume Clone Defaults The clone NAS volume will have the following default values: • Has the same size as its base volume, is thin‐rovisioned, and its reserve space is 0 (and therefore it consumes no space) • Quota usage is copied from the base snapshot of the base volume • Quota rules have the default definitions (like a new NAS volume) • Has the same permissions on folders including the root directory as the base volume • Has the same security style and access time granularity definitions as the base volume • There are no CIFS shares, NFS exports, or snapshot schedules defined 96 NAS Volume Clone Restrictions The following restrictions apply to cloned NAS volumes: • You cannot create a clone NAS volume of a clone NAS volume (nested clones) unless a clone NAS volume is replicated to another FluidFS cluster and then cloned. • You cannot delete a base volume until all of its clone NAS volumes have been deleted. • A snapshot cannot be deleted as long as there are clone NAS volumes based on it. • Restoring to an older snapshot fails if it would result in a base snapshot being deleted. • You can replicate a clone NAS volume only after the base volume is replicated. If the base snapshot in the base volume is removed, and a clone NAS volume exists on the replication target FluidFS cluster, replication between NAS volumes will stop. To resume replication, the cloned NAS volume on the target FluidFS cluster must be deleted. • You cannot create a clone NAS volume from a replication source NAS volume or NDMP snapshot. However, you can create a clone NAS volume of a replication target NAS volume. • Prior to creating a clone NAS volume, data reduction and the snapshot space consumption threshold alert must be disabled on the base volume (previously deduplicated data is allowed). • Data reduction cannot be enabled on a clone NAS volume. • Once a NAS volume is cloned, data reduction cannot be re‐enabled until all clone NAS volumes have been deleted. • A clone NAS volume contains user and group recovery information, but not the NAS volume configuration. • Clone NAS volumes count towards the total number of NAS volumes in the FluidFS cluster. Managing NAS Volume Clones View, create, and delete NAS volume clones. Viewing NAS Volume Clones View the current NAS volume clones. 1. Click the NAS Volumes tab on the left. 2. Click the All NAS Volumes tab on the top. 3. In the All NAS Volumes pane, click to view. 4. Click View Details. 5. Click the Snapshots tab on the top. in the row of the volume whose NAS volume clones you want The cloned volumes are displayed in the Cloned NAS Volumes pane. Creating a NAS Volume Clone Cloning a NAS volume creates a writable copy of the NAS volume. • There must be an existing snapshot from which the clone NAS volume will be created. • Data reduction must be disabled on the base volume. 97 • The snapshot space consumption threshold alert must be disabled on the base volume. 1. Click the NAS Volumes tab on the left. 2. Click the All NAS Volumes tab on the top. 3. In the All NAS Volumes pane, click to view. 4. Click View Details. 5. Click the Snapshots tab on the top. 6. In the Snapshots pane, click 7. Click Clone NAS Volume. in the row of the volume whose NAS volume clones you want in the row of the snapshot on which you want to base the clone. The Clone NAS Volume dialog box appears. 8. In the Cloned NAS volume name field, type a name for the NAS volume clone. 9. Click OK. Deleting a NAS Volume Clone Delete a NAS volume clone if it is no longer used. 1. Click the NAS Volumes tab on the left. 2. Click the All NAS Volumes tab on the top. 3. In the All NAS Volumes pane, click to view. 4. Click View Details. 5. Click the Snapshots tab on the top. 6. In the Snapshotspane, click 7. Click Delete. in the row of the volume whose NAS volume clones you want in the row of the snapshot on which you want to base the clone. The Deletedialog box appears. 8. Click OK. A message appears, warning you that all data on the clone will be lost. 9. Click the Ignore the above warning checkbox. 10. Click OK. Managing CIFS Shares Common Internet File System (CIFS) shares provide an effective way of sharing files across a Windows network with authorized clients. The FluidFS cluster supports the SMB protocol versions 1.0, 2.0, and 2.1. When you first create a CIFS share, access is limited as follows: • The Administrator account has full access. • If you are using Active Directory, the AD domain administrator has full access. To assign other users full access to a CIFS share, you must log in to the CIFS share, using one of the above mentioned administrator accounts, and set access permissions and ownership of the CIFS share. Configuring CIFS Shares View, add, modify, and delete CIFS shares. 98 Viewing All CIFS Shares on the FluidFS Cluster View all current CIFS shares for the FluidFS cluster. 1. Click the NAS Volumes tab on the left. 2. Click the All CIFS Shares tab on the top. The CIFS shares are displayed in the All CIFS Shares pane. Viewing CIFS Shares on a NAS Volume View the current CIFS shares for a NAS volume. 1. Click the NAS Volumes tab on the left. 2. Click the All NAS Volumes tab on the top. 3. In the All NAS Volumes pane, click 4. Click View Details. 5. Click the CIFS Shares tab on the top. in the row of the volume whose CIFS shares you want to view. The details of the volume’s CIFS shares are displayed. Adding a CIFS Share Create a CIFS share to share a directory in a NAS volume using the CIFS protocol. When a CIFS share is added, default values are applied for some settings. To change the defaults, you must modify the CIFS share. 1. Click the NAS Volumes tab on the left. 2. Click the All NAS Volumes tab on the top. 3. In the All NAS Volumes pane, click 4. Click View Details. 5. Click the CIFS Shares tab on the top. 6. In the CIFS Shares pane, click 7. Click New CIFS Shares. in the row of the volume whose CIFS shares you want to view. . The New CIFS Shares dialog box appears. 8. In the CIFS Share name field, type a name for the new CIFS share. 9. Click the […] button to the right of the Folder field. The Browse Folders dialog box appears. 10. In the folder tree, click [+] to expand subfolders. 11. Select a folder from the tree or type a folder in the edit box under the folder tree. (To share the root of the NAS volume, type /). 12. Click OK. 13. If the folder you entered doesn’t exist and you want to create it, check the Create the folder if it does not exist checkbox. 14. Click OK. Enabling or Disabling Accessed-Based Share Enumeration for a CIFS Share Create a CIFS share to share a directory in a NAS volume using the CIFS protocol. When a CIFS share is added, default values are applied for some settings. To change the defaults, you must modify the CIFS share. When SLP access‐based share enumeration is enabled, if a given user or group does not have share level permissions for a particular CIFS share, the CIFS share, and its folders and files, will not be visible to that 99 user or group. When SLP access‐based share enumeration is disabled, the CIFS share, and its folders and files, will be visible to users and groups regardless of whether they have permissions for the CIFS share. To enable or disable accessed-based share enumeration for a CIFS share: 1. Click the NAS Volumes tab on the left. 2. Click the All NAS Volumes tab on the top. 3. In the All NAS Volumes pane, click 4. Click View Details. in the row of the volume whose CIFS shares you want to view. 5. Click the CIFS Shares tab on the top. 6. In the CIFS Shares pane, click 7. Click Modify. . The Modify CIFS Shares dialog box appears. 8. To enable or disable access‐based share enumeration, select or clear the Access Based Enumeration check box. 9. Click OK. Deleting a CIFS Share If you delete a CIFS share, the data in the shared directory is no longer shared but it is not removed. 1. Click the NAS Volumes tab on the left. 2. Click the All NAS Volumes tab on the top. 3. In the All NAS Volumes pane, click 4. Click View Details. 5. Click the CIFS Shares tab on the top. 6. In the CIFS Shares pane, click 7. Click Delete. in the row of the volume whose CIFS shares you want to view. . The Delete CIFS Shares dialog box appears. 8. Click OK. Viewing and Disconnecting CIFS Connections You can view active CIFS client connections and disconnect individual CIFS connections. Displaying Active CIFS Connections Display the current CIFS connections. 1. Click the Performance & Connectivity tab on the left. 2. Click the CIFS and NDMP Sessions tab on the top. The active CIFS connections are displayed in the CIFS Session pane. Disconnecting a CIFS Connection Disconnect a particular CIFS connection. 1. Click the Performance & Connectivity tab on the left. 2. Click the CIFS & NDMP Sessions tab on the top. 3. In the CIFS Sessions pane, click 100 in the row of the session you want to disconnect. 4. Click Disconnect. The Disconnect Connection dialog box appears. 5. Click OK. Using CIFS Home Shares The FluidFS cluster enables you to create a share per client that is limited to that client. For example, when a client "jsmith" connects to the FluidFS cluster, jsmith will be presented with any available general shares, as well as a share labeled "jsmith" that is visible only to jsmith. When creating a CIFS share with a user‐based directory structure (home share), the share will not be accessible initially. This is because all directories for each user must be created by the storage administrator. This can be accomplished with a script (user‐created script), batch file, or PowerShell cmdlet that is written by the storage administrator. Alternatively, the storage administrator can manually create these folders. This is to provide stricter access controls to the storage administrator. The storage administrator can decide whether some or all of the users will be given a home share. Configuring CIFS Home Shares Enable CIFS home shares to create a share per client that is limited to that client. 1. Create a CIFS share that is the root of all the users’ folders. For example, create a CIFS share named users, at directory /users. 2. Give ownership of the CIFS share to the account that will create the folders (either using a user created script or manually) for each user’s home share. a) Using Windows Explorer, connect to the CIFS share. b) In the security setting of the CIFS share, click on Advanced, and change the owner to Domain Admins, a specific Domain Administrator, or a FluidFS cluster administrator account. c) Disconnect from the CIFS share and reconnect to it as the account that has ownership of it, as previously set in step (b). 3. Create a CIFS share containing a user‐based directory tree. a) Click the NAS Volumes tab on the left. b) Click the All CIFS Shares tab on the top. c) In the Home Shares pane, click . d) Click Modify Home Shares Policy. The Modify Home Shares Policy dialog box appears. e) Click Enable home shares. The home shares details are displayed. f) Click the […] button to the right of the NAS volume field. The NAS Volume Browser opens. g) Select the NAS volume on which the CIFS home shares are located and click OK. h) Click the […] button to the right of the Initial path field. i) j) The Folder Browser opens. Browse to the path created in step (1), for example /users, and click OK. Select the template for the users’ home folders: * Initial path, domain name, and user name * Initial path and user name k) Click OK. 4. Using Windows Explorer, for each user to whom you want to assign a home share, create a folder that conforms to the Folder Template you selected in step (h). 101 Changing the Owner of a CIFS Share When a CIFS share is created, the owner of the CIFS share must be changed before setting any access control lists (ACLs) or share level permissions (SLP), or attempting to access the CIFS share. The following methods can be used to initially change the owner of a CIFS share: • Use an Active Directory domain account that has its primary group set as the Domain Admins group. • Use the FluidFS cluster Administrator account (used if not joined to Active Directory or Domain Admin credentials are not available). Changing the Owner of a CIFS Share Using an Active Directory Domain Account To change the owner of a CIFS share , the Active Directory domain account must have its primary group set as the Domain Admins group. These steps might vary slightly depending on which version of Windows you are using. 1. Open Windows Explorer and in the address bar type: \\<client_VIP_or_name>. A list of all CIFS shares is displayed. 2. Right‐click the required CIFS share (folder) and select Properties. The Properties dialog box appears. 3. Click the Security tab and then click Advanced. 4. Click the Owner tab and then click Edit. 5. Click Other users or groups. The Advanced Security Settings dialog box appears. The Advanced Security Settings dialog box appears. The Select User or Group dialog box appears. 6. Choose the domain admin user account that is used to set ACLs for this CIFS share or choose the Domain Adminsgroup. 7. Click OK. 8. Select Replace owner on subcontainers and objects and click OK. 9. Click the Permissions tab and follow Microsoft best practices to assign ACL permissions for users and groups to the CIFS share. 10. Click OK. Changing the Owner of a CIFS Share Using the FluidFS Cluster Administrator Account If the FluidFS cluster is not joined to Active Directory, use the Administrator account to change the owner of a CIFS share. These steps might vary slightly depending on which version of Windows you are using. 1. Start the Map network drive wizard. 2. In Folder type: \\<client_VIP_or_name>\<CIFS_share_name>. 3. Select Connect using different credentials. 4. Click Finish. 5. When prompted, type the Administrator credentials and click OK. 6. Right‐click the mapped CIFS share (folder) and select Properties. The Properties dialog box appears. 7. Click the Security tab and then click Advanced. The Advanced Security Settings dialog box appears. 8. Click the Owner tab and then click Edit. The Advanced Security Settings dialog box appears. 102 9. Click Other users or groups. The Select User or Group dialog box appears. 10. Choose the domain admin user account that is used to set ACLs for this CIFS share or choose the Domain Adminsgroup. Alternatively, the FluidFS cluster Administrator account can be used. 11. Click OK. 12. Select Replace owner on subcontainers and objects and click OK. 13. After the owner is set, unmap the network drive. 14. Remap the network drive as the account that has ownership of it, as set in step (10). 15. Click the Permissions tab of the Advanced Security Settings dialog box and follow Microsoft best practices to assign ACL permissions for users and groups to the CIFS share. 16. Click OK. Managing ACLs or SLPs on a CIFS Share The FluidFS cluster supports two levels of access control to CIFS shares, files, and folders: • Access Control Lists (ACLs): Governs access to specific files and folders. The administrator can control a wide range of operations that users and groups can perform. • Share Level Permissions (SLPs): Governs access to entire shares. The administrator controls only read, change, or full access to an entire share. SLPs are limited as they only address full control, modify, and read rights for any given user or group at the CIFS share level. ACLs offer a finer level of control, and can control many more operations than only read/change/full access. It is recommended to leave the default setting for SLP (everyone has full control) and use ACLs to control access to the CIFS share, unless there is a specific requirement for SLPs that cannot be accomplished using ACLs. Dell recommends that a Windows administrator follows the best practices defined by Microsoft for ACLs and SLPs. NOTE: Do not create both ACL‐type permissions and SLPs for the same CIFS share. NOTE: Do not attempt to create a CIFS share using MMC. Use MMC only to set SLPs. Setting ACLs on a CIFS Share To set ACLs, use Windows Explorer procedures. When defining an ACL for a local user account, you must use the format: <client_VIP_or_name>\<local_user_name>. Setting SLPs on a CIFS Share If the FluidFS cluster is not joined to Active Directory, use the Administrator account to change the owner of a CIFS share. These steps might vary slightly depending on which version of Windows you are using. To set SLPs, you must use the Microsoft Management Console (MMC) with the Shared Folder snap‐in to set permissions. Administrators can use a predefined MMC file (.msc) from the Windows Server 2000/2003/2008 start menu and add a Shared Folder snap‐in to connect to the FluidFS cluster. The MMC does not let you choose which user to connect with a remote computer. By default, it forms the connection through the user logged on to the machine. To connect through a different user: • If the FluidFS cluster that you are trying to manage is joined to an Active Directory, log in to the management station with <domain>\Administrator. • Before using MMC, connect to the FluidFS cluster by using the client VIP address in the address bar of Windows Explorer. Log in with the administrator account and then connect to MMC. 103 NOTE: You might need to reset the local administrator password first. If there are no predefined MMC files: 1. Select Start → Run. 2. Type mmc and click OK. The [Console 1 ‐Console Root] window is displayed. 3. Select File → Add/Remove Snap‐n. 4. Select Shared Folders and click Add. 5. In the Shared Folders window, choose Another computer and type the FluidFS cluster name (as configured in the DNS). Alternatively, you can use the client VIP. 6. Click Finish. The new shares tree is displayed in the Console Root window. 7. Right‐lick on the required CIFS share, and choose Properties. 8. In the Share Properties window, click the Share Permission tab to set SLPs. Accessing a CIFS Share Using Windows Microsoft Windows offers several methods to connect to CIFS shares. To access a CIFS share, the client must be a valid user (local or remote) and provide a valid password. Accessing a CIFS Share Using the net use Command Execute the net use command from a command prompt: net use <drive_letter>: \\<client_VIP_or_name>\<CIFS_share_name> Accessing a CIFS Share Using the UNC path Use the UNC path. 1. From the Start menu, select Run. The Run window is displayed. 2. Type the path to the CIFS share to which you want to connect: \\<client_VIP_or_name>\<CIFS_share_name> 3. Click OK. Accessing a CIFS Share by Mapping the Share as a Network Drive Map the share as a network drive. 1. Open Windows Explorer and choose Tools → Map Network Drive. The Map Network Drive dialog box appears. 2. From the Drive drop‐own list, select any available drive. 3. Type the path to the CIFS share to which you want to connect in the Folder field or browse to the CIFS share: \\<client_VIP_or_name>\<CIFS_share_name> 4. 104 Click Finish. Accessing a CIFS Share Using the Windows Network Connect to the share using the Windows Network. This option does not map the share. 1. From the Start menu, select Computer. The Computer window is displayed. 2. Click Network. 3. Locate the NAS appliance and double‐click it. 4. From the CIFS shares list, select the CIFS share to which you want to connect. Accessing a CIFS Share Using UNIX/Linux Mount the CIFS share from a UNIX/Linux operating system using one of the following commands: # mount -t smbfs -o user_name=<username>,password=<password> // <client_VIP_or_name>/<CIFS_share_name> /<local_folder> # smbmount //<client_VIP_or_name>/<CIFS_share_name> /<local_folder> -o user_name=<username> Managing NFS Exports Network File System (NFS) exports provide an effective way of sharing files across a UNIX/ Linux network with authorized clients. After creating NFS exports, NFS clients then need to mount each NFS export. The FluidFS cluster fully supports NFS protocol version v3 and partially supports NFS protocol version v4. • Supported NFSv4 features: – File and byte‐range locking – Kerberos v5 security using an AD server – AUTH_SYS legacy weak authentication – UID translation using an LDAP server (UNIX or AD) or an NIS server – UTF‐8 file and directory names Configuring NFS Exports View, add, modify, and delete NFS exports and control whether NFS v4 is enabled. Viewing All NFS Exports on a FluidFS Cluster View all current NFS exports for a FluidFS cluster. 1. Click the NAS Volumes tab on the left. 2. Click the All NFS Exports tab on the top. The NFS exports are displayed in the All NFS Exports pane. Viewing NFS Exports on a NAS Volume View the current NFS exports for a NAS volume. 1. Click the NAS Volumes tab on the left. 2. Click the All NAS Volumes tab on the top. 3. In the All NAS Volumes pane, click to view. in the row of the volume whose NFS exports shares you want 105 4. Click View Details. 5. Click the NFS Exports tab on the top. Adding an NFS Export Create an NFS export to share a directory in a NAS volume using the NFS protocol. When an NFS export is added, default values are applied for some settings. To change the defaults, you must modify the NFS export. 1. Click the NAS Volumes tab on the left. 2. Click the All NAS Volumes tab on the top. 3. In the All NAS Volumes pane, click exports. 4. Click View Details. 5. Click the NFS Exports tab on the top. 6. In the NFS Exports pane, click 7. Click New NFS Export. in the row of the volume to which you want to add NFS . The New NFS Export dialog box appears. 8. Click the […] button to the right of the Directory field. The Browse Folders dialog box appears. 9. In the folder tree, click [+] to expand subfolders. 10. Select a folder from the tree or type a folder in the edit box under the folder tree. (To share the root of the NAS volume, type /). The folder path must be fewer than 255 characters long and may not contain the following characters: >, ʺ, \, |, ?, and *. 11. Click OK. 12. If the folder you entered doesn’t exist and you want to create it, check the Create the folder if it does not exist checkbox. 13. (Optional) Click the Allow root access from checkbox and enter the IP address of the single system that you want to have root access (by default, the root user is "squashed" so that it has no special permissions). 14. Click OK. Changing the Client Authentication Methods for an NFS Export Change the authentication method(s) that clients use to access an NFS export. 1. Click the NAS Volumes tab on the left. 2. Click the All NAS Volumes tab on the top. 3. In the All NAS Volumes pane, click to modify. 4. Click View Details. 5. Click the NFS Exports tab on the top. 6. In the NFS Exports pane, click 7. Click Modify. in the row of the volume whose NFS exports shares you want in the row of the export you want to modify. The Modify NFS Export dialog box appears. 8. In the Authentication Methods area, select the check boxes for one or more authentication methods (UNIX Style, Kerberos v5, Kerberos v5 Integrity, and Kerberos v5 Privacy) that clients are allowed to use to access an NFS export. 9. Click OK. 106 Changing the Client Access Permissions for an NFS Export Change the permissions for clients accessing an NFS export. 1. Click the NAS Volumes tab on the left. 2. Click the All NAS Volumes tab on the top. 3. In the All NAS Volumes pane, click to modify. 4. Click View Details. 5. Click the NFS Exports tab on the top. 6. In the NFS Exports pane, click 7. Click Modify. in the row of the volume whose NFS exports shares you want in the row of the export you want to modify. The Modify NFS Export dialog box appears. 8. To add access permissions for clients accessing the NFS export: a) Click the Add button. The Access Permissions for NFS Export dialog box appears. b) In the Client Machine Trust area, select an option to specify which client machines (All Clients, Single Client, Client Machines in a Network, or Client Machines in a Netgroup) are allowed to access the NFS export. c) In the Allow Access For area, select whether clients have Read/write or Read only access to the NFS export. d) From the Trust Following Users area, select which client accounts (Everyone except root , Everyone, or Nobody) are allowed to access the NFS export. e) Click OK. 9. To change access permissions for clients accessing the NFS export, click the client name (in blue) in the Trusted Client Machines column, to open the Access Permissions for NFS Export dialog and configure as described in step (8). 10. To remove access permissions for clients accessing the NFS export, select an entry in the Access Details list and click . 11. Click OK. Enabling or Disabling Secure Ports for an NFS Export Requiring secure ports limits client access to an NFS export to ports lower than 1024. 1. Click the NAS Volumes tab on the left. 2. Click the All NAS Volumes tab on the top. 3. In the All NAS Volumes pane, click to modify. 4. Click View Details. 5. Click the NFS Exports tab on the top. 6. In the NFS Exports pane, click 7. Click Modify. in the row of the volume whose NFS exports shares you want in the row of the export you want to modify. The Modify NFS Export dialog box appears. 8. Enable or disable secure ports. – To enable secure ports, select the Require Secure Port checkbox. – To disable secure ports, clear the Require Secure Port checkbox. 107 9. Click OK. Enabling or Disabling Reported Size Limiting for an NFS Export To enable access for client machines that cannot handle large file systems, limit the reported size of the NFS export. 1. Click the NAS Volumes tab on the left. 2. Click the All NAS Volumes tab on the top. 3. In the All NAS Volumes pane, click to modify. 4. Click View Details. 5. Click the NFS Exports tab on the top. 6. In the NFS Exports pane, click 7. Click Modify. in the row of the volume whose NFS exports shares you want in the row of the export you want to modify. The Modify NFS Export dialog box appears. 8. Enable or disable reported size limiting. – To enable reported size limiting, select the Limit Reported Size To check box. 9. – To disable reported size limiting, clear the Limit Reported Size Tocheck box. If reported size limiting is enabled, in the Limit Reported Size field, type the maximum reported size for the NFS export, and select the size unit as kilobytes (KB), megabytes (MB), gigabytes (GB), or terabytes (TB). 10. Click OK. Enabling or Disabling 32-bit File ID Compatibility for an NFS Export To preserve compatibility with 32‐bit applications, the FluidFS cluster can force 64‐bit clients to use 32‐bit inode numbers for an NFS export. 1. Click the NAS Volumes tab on the left. 2. Click the All NAS Volumes tab on the top. 3. In the All NAS Volumes pane, click to modify. 4. Click View Details. 5. Click the NFS Exports tab on the top. 6. In the NFS Exports pane, click 7. Click Modify. in the row of the volume whose NFS exports shares you want in the row of the export you want to modify. The Modify NFS Export dialog box appears. 8. Enable or disable 32‐bit file ID compatibility. – To enable 32‐it file ID compatibility, select the Report 32 bit inode to clients check box. 9. – To disable 32‐it file ID compatibility, clear the Report 32 bit inode to clients check box. Click OK. Deleting an NFS Export If you delete an NFS export, the data in the shared directory is no longer shared but it is not removed. 1. Click the NAS Volumes tab on the left. 2. Click the All NFS Exports tab on the top. 108 3. In the All NFS Exports pane, click 4. Click Delete. in the row of the NFS export you want to delete. The Delete dialog box appears. 5. Click OK. Enabling or Disabling NFS v4 NFS v4 is enabled or disabled on a system wide basis. By default, NFS v4 is disabled, which forces clients to use NFS v3 and earlier. You might want to do this if you have clients that are incompatible with NFS v4. 1. Click the System tab on the left. 2. Click the Internal tab on the top. 3. In the Internal Settings pane, click 4. Click Modify NFS Settings. . The Modify NFSv4 Settings dialog box appears. 5. Enable or disable NFS v4: – To enable NFS v4, select the Enable NFSv4 check box. 6. – To disable NFS v4, clear the Enable NFSv4 check box. Click OK. Setting Permissions for an NFS Export To assign user access to an NFS export, you must log in to the NFS export using a trusted client machine account and set access permissions and ownership of the NFS export using the chmod and chown commands on the NFS mount point. Accessing an NFS Export Clients use the mount command to connect to NFS exports using UNIX/Linux. NOTE: The parameters are recommended parameters. See the mount command manual page in the respective operating system for more information and other options. Accessing an NFS Export with UNIX/Linux To mount an NFS export folder from a shell on a client system, use the su command to log in as root and run the following command: # mount <options> <client_VIP_or_name>:/<volume_name>/<exported_folder> <local_folder> Accessing an NFS Export with UNIX/Linux Using NFS v4 To mount an NFS export folder and force the use of NFS v4 from a shell on a client system, use the su command to log in as root and run the following command: # mount –t nfs4 <client_VIP_or_name>:/<volume_name>/<exported_folder> <local_folder> Accessing an NFS Export with UNIX/Linux Using NFS v3 If NFS v4 is enabled on the FluidFS cluster, you can force a specific client to use NFS v3 if needed. To mount an NFS export folder and force the use of NFS v3, from a shell on a client system, use the su command to log in as root and run the following command: 109 # mount -o nfsvers=3,rsize=32768,wsize=32768 <client_VIP_or_name>:/ <volume_name>/<exported_folder> <local_folder> Accessing an NFS Export with UNIX/Linux without Default Use of TCP Older versions of UNIX/Linux do not use TCP by default. To mount an NFS export folder from a shell on a client system, use the su command to log in as root and run the following command: # mount -o hard,tcp,nfsvers=3,timeo=3,retrans=10,rsize=32768,wsize=32768 <client_VIP_or_name>:/<volume_name>/<exported_folder> <local_folder> Accessing an NFS Export with a Mac To mount an NFS export folder, run the following command: # mount_nfs -T -3 -r 32768 -w 32768 -P <client_VIP_or_name>:/<volume_name>/ <exported_folder> <local_folder> Managing Quota Rules Quota rules allow you to control the amount of NAS volume space a user or group can utilize. Quotas are configured on a per-NAS-volume basis. When a user reaches a specified portion of the quota size (soft quota limit) an alert is sent to the storage administrator. When a user reaches the maximum quota size (hard quota limit), they are unable to write data to the CIFS shares and NFS exports on the NAS volume. Viewing Quota Rules for a NAS Volume View the current quota rules for a NAS volume. 1. Click the NAS Volumes tab on the left. 2. Click the All NAS Volumes tab on the top. 3. In the All NAS Volumes pane, click 4. Click View Details. 5. Click the Quota tab on the top. in the row of the volume whose quotas you want to view. The quota rules are displayed. Setting the Default Quota per User Configure the quota applied to users for which no other quota is defined. 1. Click the NAS Volumes tab on the left. 2. Click the All NAS Volumes tab on the top. 3. In the All NAS Volumes pane, click 4. Click View Details. 5. Click the Quota tab on the top. 6. In the Users Quota pane, click 7. Click Modify Default Rule. 8. To enable a soft quota limit, select the Soft Quota check box and type a soft quota limit in megabytes (MB), gigabytes (GB), or terabytes (TB) at which an alert will be issued. in the row of the volume whose quotas you want to define. . The Modify Default Rule for User Quota dialog box appears 110 9. To enable a hard quota limit, select the Hard Quota check box and type a hard quota limit in megabytes (MB), gigabytes (GB), or terabytes (TB) at which no more writing to the NAS volume will be permitted. 10. Click OK. Setting the Default Quota per Group Configure the quota applied to groups for which no other quota is defined. 1. Click the NAS Volumes tab on the left. 2. Click the All NAS Volumes tab on the top. 3. In the All NAS Volumes pane, click 4. Click View Details. 5. Click the Quota tab on the top. 6. In the Group Quotas pane, click 7. Click Modify Default Rule. in the row of the volume whose quotas you want to define. . The Modify Default Rule for Group Quota dialog box appears 8. To enable a soft quota limit, select the Soft Quota check box and type a soft quota limit in megabytes (MB), gigabytes (GB), or terabytes (TB) at which an alert will be issued. 9. To enable a hard quota limit, select the Hard Quota check box and type a hard quota limit in megabytes (MB), gigabytes (GB), or terabytes (TB) at which no more writing to the NAS volume will be permitted. 10. Click OK. Adding a Quota Rule for a Specific User Configure the quota that is applied to a user. 1. Click the NAS Volumes tab on the left. 2. Click the All NAS Volumes tab on the top. 3. In the All NAS Volumes pane, click 4. Click View Details. 5. Click the Quota tab on the top. 6. In the Users Quotas pane, click 7. Click New Rule. in the row of the volume whose quotas you want to modify. . The New Rule for User Quota dialog box appears 8. Click the […] button to the right of the Rule for user field. The User Browser dialog box appears. 9. From the Domain name drop‐down menu, select the domain to which the user is assigned. 10. In the Starts with field, type either the full name of the user or the beginning of the user name. 11. Click Display. 12. Select a user from the search results. 13. Click OK. 14. To enable a soft quota limit, select the Soft Quota check box and type a soft quota limit in megabytes (MB), gigabytes (GB), or terabytes (TB) at which an alert is issued. 111 15. To enable a hard quota limit, select the Hard Quota check box and type a hard quota limit in megabytes (MB), gigabytes (GB), or terabytes (TB) at which no more writing to the NAS volume is permitted. 16. Click OK. Adding a Quota Rule for Each User in a Specific Group Configure the quota applied to each user that belongs to a group. 1. Click the NAS Volumes tab on the left. 2. Click the All NAS Volumes tab on the top. 3. In the All NAS Volumes pane, click 4. Click View Details. 5. Click the Quota tab on the top. 6. In the Groups Quotas pane, click 7. Click New Rule. in the row of the volume whose quotas you want to modify. . The New Rule for Group Quota dialog box appears 8. Click the […] button to the right of the Rule for group field. The Group Browser dialog box appears. 9. From the Domain drop‐down menu, select the group’s domain. 10. In the Starts with field, type either the full name of the group or the beginning of the group name. 11. Click Display. 12. Select a group from the search results. 13. Click OK. 14. Select Any user in group. 15. To enable a soft quota limit, select the Soft Quota check box and type a soft quota limit in megabytes (MB), gigabytes (GB), or terabytes (TB) at which an alert is issued. 16. To enable a hard quota limit, select the Hard Quota check box and type a hard quota limit in megabytes (MB), gigabytes (GB), or terabytes (TB) at which no more writing to the NAS volume is permitted. 17. Click OK. Adding a Quota Rule for an Entire Group Configure the quota applied to all users in a group collectively. 1. Click the NAS Volumes tab on the left. 2. Click the All NAS Volumes tab on the top. 3. In the All NAS Volumes pane, click 4. Click View Details. 5. Click the Quota tab on the top. 6. In the Groups Quotas pane, click 7. Click New Rule. in the row of the volume whose quotas you want to modify. . The New Rule for Group Quota dialog box appears 8. Click the […] button to the right of the Rule for group field. The Group Browser dialog box appears. 112 9. From the Domain drop‐down menu, select the group’s domain. 10. In the Starts with field, type either the full name of the group or the beginning of the group name. 11. Click Display. 12. Select a group from the search results. 13. Click OK. 14. Select The group itself. 15. To enable a soft quota limit, select the Soft Quota check box and type a soft quota limit in megabytes (MB), gigabytes (GB), or terabytes (TB) at which an alert is issued. 16. To enable a hard quota limit, select the Hard Quota check box and type a hard quota limit in megabytes (MB), gigabytes (GB), or terabytes (TB) at which no more writing to the NAS volume is permitted. 17. Click OK. Changing the Soft Quota or Hard Quota for a User or Group To configure a quota applied to a user, users in a group, or a group: 1. Click the NAS Volumes tab on the left. 2. Click the All NAS Volumes tab on the top. 3. In the All NAS Volumes pane, click 4. Click View Details. in the row of the volume whose quotas you want to modify. 5. Click the Quotas tab on the top. 6. In the Users Quota or Groups Quotas pane, click 7. Click Modify. 8. To change the soft quota limit, type a new soft quota limit in kilobytes (KB), megabytes (MB), gigabytes (GB), or terabytes (TB) at which an alert will be issued. 9. To change the hard quota limit, type a new hard quota limit in kilobytes (KB), megabytes (MB), gigabytes (GB), or terabytes (TB) at which no more writing to the NAS volume will be permitted. in the row of the rule you want to modify. The Modify Rule dialog box appears 10. Click OK. Enabling or Disabling the Soft Quota or Hard Quota for a User or Group To configure a quota applied to a user, users in a group, or a group: 1. Click the NAS Volumes tab on the left. 2. Click the All NAS Volumes tab on the top. 3. In the All NAS Volumes pane, click 4. Click View Details. 5. Click the Quotas tab on the top. 6. In the Users Quota or Groups Quotas pane, click 7. Click Modify. in the row of the volume whose quotas you want to modify. in the row of the rule you want to modify. The Modify Rule dialog box appears 113 8. Enable or disable the soft quota limit. – To enable the soft quota limit, select the Soft Quota check box. 9. – To disable the soft quota limit, clear the Soft Quota check box. Enable or disable the hard quota limit. – To enable the hard quota limit, select the Hard Quota check box. – To disable the hard quota limit, clear the Hard Quota check box. 10. Click OK. Deleting a User or Group Quota Rule Delete a user or group quota rule if you no longer need to control the amount of NAS volume space a user or group can utilize. 1. Click the NAS Volumes tab on the left. 2. Click the All NAS Volumes tab on the top. 3. In the All NAS Volumes pane, click 4. Click View Details. 5. Click the Quotas tab on the top. 6. In the Users Quota or Groups Quotas pane, click 7. Click Delete. in the row of the volume whose quotas you want to modify. in the row of the rule you want to modify. The Delete Quota Rule dialog box appears 8. Click OK. Managing Data Reduction Data reduction is enabled on a per NAS volume basis. The FluidFS cluster supports two types of data reduction: • Data deduplication: Uses algorithms to eliminate redundant data, leaving only one copy of the data to be stored. The FluidFS cluster uses variable-size block level deduplication as opposed to file level deduplication. • Data compression: Uses proprietary algorithms to reduce the size of stored data. Data reduction also provides space savings for snapshots taken after files have been reduced. By default, data reduction is applied only to files that have not been accessed or modified for 30 days, in order to minimize the impact of data reduction on performance. The minimum file size to be considered for data reduction processing is 64 KB. Data reduction is applied per NAS controller, that is, the same chunks of data that are owned by the different NAS controllers are not considered duplicates. Because quotas are based on logical rather than physical space consumption, data reduction does not affect quota calculations. In the event that you disable data reduction, data remains in its reduced state during subsequent read operations by default. You have the option to enable rehydrate‐on‐read when disabling data reduction, which causes “rehydration” (reversal of data reduction) of data on subsequent read operations. You cannot rehydrate an entire NAS volume with a single command, although you could accomplish this by reading the entire NAS volume. 114 There are several factors to consider when enabling data reduction: • Data reduction processing has a 5‐20% impact on the performance of read operations on reduced data. There is no impact on write operations on reduced data. • Increased internal traffic during data reduction processing. • Data is rehydrated for anti‐virus scanning. • Data is rehydrated before being replicated to a target NAS volume. • You cannot enable data reduction on a cloned NAS volume. • Data reduction stops automatically when a NAS volume has less than 5 GB unused space. Therefore, a NAS volume resize operation can inadvertently stop data reduction. Enabling Data Reduction at the System Level Before you can enable data reduction for a NAS volume, you must enable data reduction at the system level. 1. Click the System tab on the left. 2. Click the Internal tab on the top. 3. In the Background Processes pane, click 4. Click Modify Data Reduction Settings. . The Modify Data Reduction Settings dialog box appears. 5. Check the "Schedule the Data Reduction…" checkbox. 6. Select the hour at which to run data reduction. 7. Select the period (in hours) for which to run data reduction. 8. Click OK. Enabling Data Reduction on a NAS Volume Data reduction is enabled on a per NAS volume basis. NOTE: Data reduction must be enabled at the system level before it will run on individual NAS volumes. 1. Click the NAS Volumes tab on the left. 2. Click the All NAS Volumes tab on the top. 3. In the All NAS Volumes pane, click want to modify. 4. Click View Details. in the row of the volume whose data reduction settings you The volume’s Space view is displayed. 5. In the Data Reduction pane, click 6. Click Modify Data Reduction Policy. . The Modify Data Reduction Policy dialog box appears. 7. Click Enable data reduction on this NAS volume. Data reduction settings are displayed. 8. To enable compression as well as deduplication, select In addition to de-duplication use compression during the file optimization. 115 9. To change the number of days after which data reduction is applied to files that have not been accessed, type the number of days in the Optimize files that were not accessed in the last field. NOTE: The number of days must be at least 30. 10. To change the number of days after which data reduction is applied to files that have not been modified, type the number of days in the Optimize files that were not modified in the last field. NOTE: The number of days must be at least 30. 11. Click OK. Changing the Data Reduction Type for a NAS Volume Change the data reduction type (Deduplication or Deduplication and Compression) for a NAS volume. 1. Click the NAS Volumes tab on the left. 2. Click the All NAS Volumes tab on the top. 3. In the All NAS Volumes pane, click want to modify. 4. Click View Details. in the row of the volume whose data reduction settings you The volume’s Space view is displayed. 5. In the Data Reduction pane, click 6. Click Modify Data Reduction Policy. . The Modify Data Reduction Policy dialog box appears. 7. To enable or disable compression as well as deduplication, select or clear In addition to deduplication use compression during the file optimization. 8. Click OK. Changing the Candidates for Data Reduction for a NAS Volume Change the number of days after which data reduction is applied to files that have not been accessed or modified for a NAS volume. 1. Click the NAS Volumes tab on the left. 2. Click the All NAS Volumes tab on the top. 3. In the All NAS Volumes pane, click want to modify. 4. Click View Details. in the row of the volume whose data reduction settings you The volume’s Space view is displayed. 5. In the Data Reduction pane, click 6. Click Modify Data Reduction Policy. . The Modify Data Reduction Policy dialog box appears. 7. To change the number of days after which data reduction is applied to files that have not been accessed, type the number of days in the Optimize files that were not accessed in the last field. 8. To change the number of days after which data reduction is applied to files that have not been modified, type the number of days in the Optimize files that were not modified in the last field. 9. Click OK. 116 Disabling Data Reduction on a NAS Volume By default, after disabling data reduction on a NAS volume, data remains in its reduced state during subsequent read operations. You have the option to enable rehydrate‐on‐read when disabling data reduction, which causes a rehydration (reversal of data reduction) of data on subsequent read operations. 1. Click the NAS Volumes tab on the left. 2. Click the All NAS Volumes tab on the top. 3. In the All NAS Volumes pane, click want to modify. 4. Click View Details. in the row of the volume whose data reduction settings you The volume’s Space view is displayed. 5. In the Data Reduction pane, click 6. Click Modify Data Reduction Policy. . The Modify Data Reduction Policy dialog box appears. 7. Click Disable data reduction on this NAS volume. 8. To rehydrate data on subsequent read operations, select the Files, which were processed by data reduction, will be saved rehydrated during read checkbox. 9. Click OK. 117 118 FluidFS 3.0 Data Protection 8 Managing the Anti-Virus Service The FluidFS cluster anti‐virus service provides real‐time anti‐virus scanning of files stored in CIFS shares. The anti‐virus service applies only to CIFS shares; NFS is not supported. The scan operation is transparent to the client, subject to the availability of an anti‐virus server. A file is scanned only when a client tries to open the file (not when an infected file is written, a file is opened to read/modify attributes, old files are opened for re‐write, and so on). The anti‐virus service consists of two components: • One or more network‐accessible computers running a supported third‐party, ICAP‐ enabled anti‐virus application to provide the anti‐virus scanning service to the FluidFS cluster. • A FluidFS cluster anti‐virus scanning policy that specifies file extensions and directories to exclude from scans, an anti‐virus scanning file size threshold, and whether to allow or deny files larger than the file size threshold. When a CIFS share client requests a file from the FluidFS cluster, the FluidFS cluster passes the file to an anti‐virus server for scanning and then takes one of the following actions: • If the file is virus‐free, the FluidFS cluster permits client access. The FluidFS cluster does not scan that file again, providing it remains unmodified since the last check. • If the file is infected, the FluidFS cluster denies client access. There is no indication to the client that the file is infected. The client experience is: – A file deletion returns a system‐specific ʺfile not foundʺ state for a missing file, depending on the client’s computer. – An access denial might be interpreted as a file permissions problem. Only storage administrators can recover an uninfected version of the file, or access and process the infected file. To gain access to an infected file, you must connect to the CIFS share through another CIFS share on which the anti‐virus service is disabled. Otherwise, the FluidFS cluster recognizes the file as infected, and denies access. You may also access the file through an NFS export, because NFS does not support anti‐virus. File transfers between the FluidFS cluster and the anti‐virus server are not encrypted. Therefore, Dell recommends protecting/restricting the communication. 119 Excluding Files and Directory Paths from Scans You can determine which files and directory paths are scanned, using extension or location properties as follows: • File Extensions Excluded From Virus Scan: Specifies file extensions (file types) to exclude from scanning, such as docx. • Directories Excluded From Virus Scan: Specifies directory paths to exclude from scanning, such as /tmp/logs (alternatively, folders and sub‐folders). The wildcards * (asterisk) and ? (question mark) are permitted when specifying directory paths, such as / user/*/tmp or /user/t?p. Supported Anti-Virus Applications For the latest list of supported anti‐virus applications, see the Dell Fluid File System Version 3 Support Matrix. At the time of this writing, the FluidFS cluster supports the following anti‐ virus applications: • McAfee VirusScan Enterprise 8.8 • McAfee VirusScan Enterprise for Storage 1.0.2 • Sophos Endpoint Security and Control 10.0 • Symantec Protection Engine for Cloud 7.0 • Symantec ScanEngine 5.2 • TrendMicro InterScan Web Security Suite 3.1 Configuring Anti-Virus Scanning To perform anti‐virus scanning, you must add an anti‐virus server and then enable anti‐virus scanning on a per CIFS share basis. Adding an Anti-virus Server Add one or more anti‐virus servers. Dell recommends adding multiple anti‐virus servers to achieve high‐ availability of virus scanning, and reduce the latencies for file access. NAS anti‐virus allocates scanning operations to the anti‐virus servers to maximize the available scanning bandwidth. The fewer the available anti‐virus servers, the more time required to scan files. NOTE: • The anti‐virus server must be network accessible. Dell recommends that the server is located on the same subnet as the FluidFS cluster. • The anti‐virus server must run a supported ICAP‐enabled anti‐virus application. • The anti‐virus server must be present and working. If no server is available, file access is denied to clients. 1. Click the System tab on the left. 2. Click the Data Protection tab on the top. 3. In the Antivirus Scanners pane, click 4. Click New Antivirus Server. . The New Antivirus Server dialog box appears. 120 5. In the Antivirus Server field, type the host name or IP address of the anti‐virus server. 6. In the Port field, type the port that the FluidFS cluster uses to connect to the anti‐virus server. 7. Click OK. Deleting an Anti-virus Server Delete an anti‐virus server when it is no longer available. NOTE: If you have only one anti‐virus server, you cannot delete that server until you first disable anti‐virus scanning on all CIFS shares. 1. Click the System tab on the left. 2. Click the Data Protection tab on the top. 3. In the Antivirus Scanners pane, click 4. Click Delete. in the row of the server you want to delete. . The Delete dialog box appears. 5. Click OK. Enabling Anti-virus Scanning for a CIFS Share Anti‐virus scanning is enabled on a per CIFS share basis. NOTE: You must configure anti‐virus servers before enabling anti‐virus scanning for a CIFS share. 1. Click the NAS Volumes tab on the left. 2. Click the All CIFS Shares tab on the top. 3. In the Antivirus Scanners pane, click scanning. 4. In the File System tab navigation pane, select CIFS Shares. 5. Click Modify Virus Scan Settings. in the row of the CIFS share for which you want to enable The Modify Virus Scan Settings dialog box appears. 6. Select the Enable virus scan check box. 7. (Optional) Configure the remaining anti‐virus scanning attributes as needed. – To exempt file extensions from anti‐virus scanning, select the Do not scan files with the following extensions check box and specify the extensions in the Do not scan files with the following extensions list. – To exempt directories from anti‐virus scanning, select the Do not scan files with the following folders check box and specify the directories in the Do not scan files with the following folders list. – To deny access to files larger than the specified anti‐virus scanning file size threshold, select the Deny access to large unscanned files check box. 8. – To change the maximum size of files that are included in anti‐virus scanning, type a size in the Maximum file size for anti-virus scanning field in kilobytes (KB), megabytes (MB), gigabytes (GB), or terabytes (TB). Click OK. 121 Allowing or Denying Access to Large Unscanned Files Specify whether to allow or deny access to files that are larger than the specified anti‐virus scanning file size threshold for a CIFS share. 1. Click the NAS Volumes tab on the left. 2. Click the All CIFS Shares tab on the top. 3. In the Antivirus Scanners pane, click scanning. 4. In the File System tab navigation pane, select CIFS Shares. 5. Click Modify Virus Scan Settings . 6. Select the Enable virus scan check box. 7. To allow or deny access to large unscanned files, clear or select the Deny access to large unscanned files check box. 8. Click OK. in the row of the CIFS share for which you want to enable The Modify Virus Scan Settings dialog box appears. Changing the Anti-virus Scanning File Size Threshold for a CIFS Share Change the maximum size of files that are included in anti‐virus scanning for a CIFS share. 1. Click the NAS Volumes tab on the left. 2. Click the All CIFS Shares tab on the top. 3. In the Antivirus Scanners pane, click scanning. 4. In the File System tab navigation pane, select CIFS Shares. 5. Click Modify Virus Scan Settings . in the row of the CIFS share for which you want to enable The Modify Virus Scan Settings dialog box appears. 6. In the Maximum file size for anti-virus scanning field, type a file size in kilobytes (KB), megabytes (MB), gigabytes (GB), or terabytes (TB). 7. Click OK. Including or Excluding File Extensions and Directories in Anti-virus Scanning for a CIFS Share Specify whether to perform anti‐virus scanning for all file extensions and directories for a CIFS share, or exempt some file extensions and directories from anti‐virus scanning. 1. Click the NAS Volumes tab on the left. 2. Click the All CIFS Shares tab on the top. 3. In the Antivirus Scanners pane, click scanning. 4. In the File System tab navigation pane, select CIFS Shares. 5. Click Modify Virus Scan Settings . in the row of the CIFS share for which you want to enable The Modify Virus Scan Settings dialog box appears. 6. To exempt file extensions from anti‐virus scanning, select the Do not scan files with the following extensionscheck box and specify the extensions in the Do not scan files with the following extensions list. 7. To exempt directories from anti‐virus scanning, select the Do not scan files with the following folderscheck box and specify the directories in theDo not scan files with the following folders list. 122 8. To remove an extension or folder from the exemption list, select the extension or folder and click 9. Click OK. . Disabling Anti-virus Scanning for a CIFS Share Anti‐virus scanning is disabled on a per CIFS share basis. 1. Click the NAS Volumes tab on the left. 2. Click the All CIFS Shares tab on the top. 3. In the Antivirus Scanners pane, click 4. In the File System tab navigation pane, select CIFS Shares. 5. Click Modify Virus Scan Settings . in the row of the CIFS share for which you want to modify. The Modify Virus Scan Settings dialog box appears. 6. Clear the Enable virus scan check box. 7. Click OK. Viewing Anti-Virus Events Events related to anti‐virus scanning can be viewed in the Events pane at the bottom of the FluidFS Manager display. Managing Snapshots Snapshots are read‐only, point‐in‐time copies of NAS volume data. Storage administrators can restore a NAS volume from a snapshot if needed. In addition, clients can easily retrieve files in a snapshot, without storage administrator intervention. Snapshots use a redirect‐on‐write method to track NAS volume changes. That is, snapshots are based upon a change set. When the first snapshot of a NAS volume is created, all snapshots created after the baseline snapshot contain changes in relation to the previous snapshot. There are various policies that can be set for creating a snapshot, including when a snapshot is to be taken and how long to keep snapshots. For example, mission‐critical files with high churn rates might need to be backed up every 30 minutes, whereas archival shares might only need to be backed up daily. Because snapshots retain old version of files on the NAS volume, be sure to monitor available capacity on the NAS volume and schedule and retain snapshots in a manner that ensures that the NAS volume always has sufficient free space for both user data and snapshots. Dell also recommends enabling a snapshot space consumption alert to be triggered when snapshots are consuming significant NAS volume space. The FluidFS cluster automatically deletes one or more of the oldest snapshots for a NAS volume in the following cases: • If you delete a NAS volume, the FluidFS cluster deletes all of the snapshots for the NAS volume. • If you restore a NAS volume from a snapshot, the FluidFS cluster deletes all the snapshots created after the snapshot from which you restored the NAS volume. 123 Creating On-Demand Snapshots Create a NAS volume snapshot to take an immediate point‐in‐time copy of the data. 1. Click the NAS Volumes tab on the left. 2. Click the All NAS Volumes tab on the top. 3. In the All NAS Volumes pane, click snapshot. 4. Click View Details. 5. Click the Snapshots tab on the top. 6. In the Snapshotspane, click 7. in the row of the volume for which you want to create a . Click New Snapshots. The New Snapshotdialog box appears. 8. In the Snapshot Name field, type a name for the snapshot. 9. Click OK. Managing Scheduled Snapshots You can create a schedule to generate snapshots regularly. To minimize the impact of snapshot processing on system performance, we recommend scheduling snapshots during off‐peak times. Snapshots created by a snapshot schedule will be named using the format <snapshot_schedule_name>_YYYY_MM_DD HH_MM. Creating a Snapshot Schedule for a NAS Volume Create a NAS volume snapshot schedule to take a scheduled point‐in‐time copy of the data. 1. Click the NAS Volumes tab on the left. 2. Click the All NAS Volumes tab on the top. 3. In the All NAS Volumes pane, click snapshot schedule. 4. Click View Details. 5. Click the Snapshots tab on the top. in the row of the volume for which you want to create a 6. In the Snapshots Scheduling pane, click 7. Click New Snapshots Scheduling. . The New Snapshots Scheduling dialog box appears. 8. In the Snapshots Scheduling Name field, type a name for the snapshot Schedule. 9. Specify when to create snapshots. – To schedule snapshot creation every X minutes, select Take snapshot every and type the desired frequency in minutes. – To schedule snapshot creation for a specific day and time, select Take snapshot on and select the day, hour and minute the snapshot should be created. 124 10. (Optional) Configure the remaining snapshot schedule attributes as needed. – To retain all snapshots that are created by the snapshot schedule indefinitely, clear the Retain each snapshot for check box. – To define an expiration period for the snapshots that are created by the snapshot schedule in the future, select the Retain each snapshot for check box and specify the retention period for snapshots in minutes, hours, days, or weeks. 11. Click OK. Changing the Snapshot Schedule Frequency Change how often to create snapshots for a snapshot schedule. 1. Click the NAS Volumes tab on the left. 2. Click the All NAS Volumes tab on the top. 3. In the All NAS Volumes pane, click to modify. 4. Click View Details. 5. Click the Snapshots tab on the top. in the row of the volume whose snapshot schedule you want 6. In the Snapshots Scheduling pane, click 7. Click Modify. in the row of the schedule you want to modify. The Modify Snapshots Scheduling dialog box appears. 8. In the Snapshot scheduling name field, type a name for the snapshot Schedule. 9. Specify when to create snapshots. – To schedule snapshot creation every X minutes, select Take snapshot every and type the desired frequency in minutes. – To schedule snapshot creation for a specific day and time, select Take snapshot on and select the day, hour and minute the snapshot should be created. 10. Click OK. Changing the Retention Policy for a Snapshot Schedule Specify whether to retain all snapshots that are created by a snapshot schedule, or configure the snapshots to expire after a certain period of time. 1. Click the NAS Volumes tab on the left. 2. Click the All NAS Volumes tab on the top. 3. In the All NAS Volumes pane, click to modify. 4. Click View Details. 5. Click the Snapshots tab on the top. in the row of the volume whose snapshot schedule you want 6. In the Snapshots Scheduling pane, click 7. Click Modify. in the row of the schedule you want to modify. The Modify Snapshots Scheduling dialog box appears. 8. To retain all snapshots that are created by the snapshot schedule indefinitely, clear the Retain each snapshot for check box. 9. To define an expiration period for the snapshots that are created by the snapshot schedule in the future, select the Retain each snapshot for check box and specify the retention period for snapshots in minutes, hours, days, or weeks. 10. Click OK. 125 Deleting a Snapshot Schedule Specify whether to retain all snapshots that are created by a snapshot schedule, or configure the snapshots to expire after a certain period of time. 1. Click the NAS Volumes tab on the left. 2. Click the All NAS Volumes tab on the top. 3. In the All NAS Volumes pane, click to modify. 4. Click View Details. 5. Click the Snapshots tab on the top. 6. In the Snapshots Scheduling pane, click 7. Click Delete . in the row of the volume whose snapshot schedule you want in the row of the schedule you want to modify. The Delete dialog box appears. 8. Click OK. Modifying and Deleting Snapshots Manage snapshots that were created on demand or by a schedule. Renaming a Snapshot Rename a snapshot. 1. Click the NAS Volumes tab on the left. 2. Click the All NAS Volumes tab on the top. 3. In the All NAS Volumes pane, click to modify. 4. Click View Details. 5. Click the Snapshots tab on the top. 6. In the Snapshots pane, click 7. Click Modify . in the row of the volume whose snapshot schedule you want in the row of the snapshot you want to rename. The Modify Snapshot dialog box appears. 8. In the New name field, type a new name for the snapshot. 9. Click OK. Changing the Retention Policy for a Snapshot Specify whether to retain the snapshot indefinitely or expire the snapshot after a period of time. 1. Click the NAS Volumes tab on the left. 2. Click the All NAS Volumes tab on the top. 3. In the All NAS Volumes pane, click to modify. 4. Click View Details. 5. Click the Snapshots tab on the top. 6. In the Snapshots pane, click 126 in the row of the volume whose snapshot schedule you want in the row of the snapshot you want to rename. 7. Click Modify . The Modify Snapshot dialog box appears. 8. To retain all snapshots that are created by the snapshot schedule indefinitely, clear the Retain each snapshot for check box. 9. To define an expiration period for the snapshots that are created by the snapshot schedule in the future, select the Retain each snapshot for check box and specify the retention period for snapshots in minutes, hours, days, or weeks. 10. Click OK. Deleting a Snapshot Delete a snapshot if you no longer need the point‐in‐time copy of the data. 1. Click the NAS Volumes tab on the left. 2. Click the All NAS Volumes tab on the top. 3. In the All NAS Volumes pane, click to modify. 4. Click View Details. 5. Click the Snapshots tab on the top. 6. In the Snapshots pane, click 7. Click Delete . in the row of the volume whose snapshot schedule you want in the row of the snapshot you want to rename. The Delete dialog box appears. 8. Click OK. Restoring Data from a Snapshot You can restore data in two ways: • Restore individual files: Once a snapshot is created, the FluidFS cluster creates a client‐ accessible snapshots directory containing a copy of the files included in the snapshot. Clients can easily restore individual files from a snapshot using copy and paste, without storage administrator intervention. This method is useful for the day‐to‐day restore actions of individual files. • Restore a NAS Volume from a snapshot: The storage administrator can restore an entire NAS volume where copy and paste of huge amounts of data would take significant time. This method is useful in the case of an application error or virus attack. Snapshots retain the same security style as the active file system. Therefore, even when using snapshots, clients can access only their own files based on existing permissions. The data available when accessing a specific snapshot is at the level of the specific share and its subdirectories, ensuring that users cannot access other parts of the file system. Viewing Available Snapshots View the snapshots available for restoring data. 1. Click the NAS Volumes tab on the left. 2. Click the All NAS Volumes tab on the top. 3. In the All NAS Volumes pane, click to modify. 4. Click View Details. in the row of the volume whose snapshot schedule you want 127 5. Click the Snapshots tab on the top. The snapshots are displayed in the Snapshots pane. Restoring a NAS Volume from a Snapshot View the snapshots available for restoring data. The storage administrator can restore an entire NAS volume from a snapshot. The restored NAS volume will contain all the NAS volume data that existed at the time the snapshot was created. Each file in the restored NAS volume will have the properties, such as permission and time, which existed when you (or a schedule) created the snapshot. CAUTION: The restore operation cannot be undone. Any data created or changed between the time of the snapshot and the time the restore operation is completed, is permanently erased. You should restore a NAS volume from a snapshot only if you first understand all the repercussions of the restore operation, as described below. After you restore a NAS volume from a snapshot: • The FluidFS cluster deletes any snapshots created after the snapshot from which you restored the NAS volume. Snapshots created before the snapshot from which you restored the NAS volume are not affected. • Current CIFS clients of the NAS volume are automatically disconnected. • Current NFS clients of the NAS volume receive stale NFS file handle error messages. You must unmount and then re‐mount the NFS exports. 1. Click the NAS Volumes tab on the left. 2. Click the All NAS Volumes tab on the top. 3. In the All NAS Volumes pane, click 4. Click View Details. 5. Click the Snapshots tab on the top. 6. In the Snapshots pane, click 7. Click Rollback NAS Volume. in the row of the volume you want to restore. in the row of the snapshot you want to restore. The Rollback NAS Volume dialog box appears. 8. Click OK. The NAS volume is rolled back to the selected snapshot, and all snapshots created after the selected snapshot disappear from the Snapshots pane. Restoring Files Using UNIX/Linux or Windows This restore option allows clients to restore a file from a snapshot using copy and paste. 1. Access the NFS export or CIFS share. 2. Access the .snapshots directory. 3. Find the snapshot according to its time of creation. 4. Copy the file from its snapshot location to its original location. 128 Restoring Files Using Windows Only Snapshots integrate into the Shadow Copies and previous versions features of Windows. This restore option allows clients to restore a file using previous versions. 1. Right‐click the file, select Properties, and then click the Previous Versions tab. A list containing available previous versions of the file is displayed. 2. Click the version to restore, and then click Restore. Managing NDMP Snapshots integrate into the Shadow Copies and previous versions features of Windows. This restore option allows clients to restore a file using previous versions. The FluidFS cluster supports Network Data Management Protocol (NDMP), which is an open standard protocol that facilitates backup operations for network attached storage, including FluidFS cluster NAS volumes. The FluidFS cluster supports NDMP versions 2, 3, and 4. NDMP should be used for longer‐term data protection, such as weekly backups with long retention periods. The FluidFS cluster supports only a three‐way backup, wherein a supported, third‐party Data Management Application (DMA) server mediates the data transfer between the FluidFS cluster and the storage device. The FluidFS cluster supports full backup, incremental backup, differential backup (dump levels 0‐9), and Direct Access Recovery (DAR). A FluidFS cluster includes an NDMP server that performs NAS volume backups to an external DMA server. The FluidFS cluster does not use a dedicated address for backup operations; any configured client network address can be used. Data is sent over Ethernet. After you configure and start NDMP in a FluidFS cluster, the NDMP server monitors the client network for backup requests from the DMA servers. The DMA server then accesses (mounts) the NAS volumes that it intends to back up and initiates the backup operations. Multiple NDMP backups can run at the same time. To minimize the impact of NDMP backup processing on system performance, schedule NDMP during off‐ peak times. 129 The following steps are involved in backing up NAS volume data using NDMP: 1. The DMA server creates a connection to the FluidFS cluster IP address. NOTE: NDMP does not provide High Availability (HA). If a backup session is interrupted due to connection loss, the session is terminated. 2. The NDMP server on the FluidFS cluster creates a temporary snapshot of each NAS volume that the DMA server designated for backup. Alternatively, when performing a backup of replication target NAS volumes, the FluidFS cluster does not create a dedicated NDMP snapshot. Instead, it uses the base replica snapshot from the last successful replication. Temporary NDMP snapshots are named using the following format: ndmp_backup_<session_ID>_<controller_number> NOTE: Manually deleting the temporary snapshot will immediately terminate the current backup session. The error on the DMA application will be data unavailable or internal. NOTE: If a backup session is terminated with an error, the temporary snapshot might remain, and can be safely deleted manually. 3. The NDMP server copies the NAS volume data to the DMA server. 4. After receiving the data, the DMA server moves the data to a storage device, such as a local disk or tape device. 5. Once the backup completes, the NDMP server deletes the temporary snapshots. Supported DMAs For the latest list of supported DMAs, see the Dell Fluid File System Version 3 Support Matrix. At the time of this writing, the FluidFS cluster supports the following DMAs: • CommVault Simpana 9.0 • Quest NetVault Backup 8.6x and 9.0x • Symantec BackupExec 2010R3 and 2012 • Symantec NetBackup 7.0 • Symantec Protection Engine • IBM Tivoli Storage Manager 6.3 Configuring NDMP Before you can take an NDMP backup, you must add a DMA server and configure the NDMP user name, password, and client port. Adding a DMA Server Configure one or more DMA servers from which the NDMP server can service NAS volume backup requests. There is no limit on the number of DMA servers taking backups at any point in time. • The DMA server must run a supported NDMP backup application. • The DMA server must be network accessible. 1. Click the System tab on the left. 2. Click the Data Protection tab on the top. 3. In the NDMP pane, click 130 . 4. Click Modify Settings. 5. In the DMA Servers text field, type the IP address of a DMA server and click Add. The Modify NDMP Settings dialog box appears. Repeat this step for any additional DNA servers. 6. Click OK. Removing a DMA Server Remove a DMA server if it is no longer needed for NDMP backups. 1. Click the System tab on the left. 2. Click the Data Protection tab on the top. 3. In the NDMP pane, click 4. Click Modify Settings. . The Modify NDMP Settings dialog box appears. 5. In the DMA Servers list, click the DMA server you want to remove and click 6. Click OK. . Changing the NDMP Password A user name and password are required when configuring an NDMP server in the DMA. The default password is randomized and must be changed prior to using NDMP. 1. Click the System tab on the left. 2. Click the Data Protection tab on the top. 3. In the NDMP pane, click 4. Click Change Password. . The Change Password dialog box appears. 5. In the New Password field, type an NDMP password. The password must be at least seven characters long and contain three of the following elements: a lowercase character, an uppercase character, a digit, or a special character (such as +, ?, or ∗). 6. In the Repeat Password field, re‐type the NDMP password. 7. Click OK. Changing the NDMP Username A user name and password are required when configuring an NDMP server in the DMA. By default, the user name is backup_user. You can change this user name if needed. 1. Click the System tab on the left. 2. Click the Data Protection tab on the top. 3. In the NDMP pane, click 4. Click Modify Settings . . 5. In the Backup user name field, type a new NDMP user name. 6. Click OK. The Modify NDMP Settings dialog box appears. 131 Changing the NDMP Client Port By default, the NDMP server monitors port 10000 for incoming connections. You can change the client port to match the port used by the DMA. 1. Click the System tab on the left. 2. Click the Data Protection tab on the top. 3. In the NDMP pane, click 4. Click Modify Settings . 5. In the NDMP Port field, type a new client port. 6. Click OK. . The Modify NDMP Settings dialog box appears. Specifying NAS Volumes Using the DMA In order to perform backup and restore operations, the DMA server must be configured to be able to access the FluidFS cluster. On each DMA server, you must configure the following: • Client VIP (or a DNS name) that the DMA server accesses. If you ever change the client VIP, you must also make the reciprocal change on the DMA servers. NOTE: NDMP has no load balancing built in. A single DMA backing up 10 NAS volumes from a single client VIP forces all 10 sessions to be on the same NAS controller. Therefore, Dell recommends using DNS round‐robin to provide load balancing, by specifying the DNS name of the FluidFS cluster in the DMA. • NDMP user name and password (default user name is backup_user). • Port that the NDMP server monitors for incoming connections (default port is 10000). In addition, some DMA servers require the following: • Host name of the FluidFS cluster, which uses the following format: <controller_number>.<FluidFS_cluster_name> • OS type: Dell Fluid File System • Product: Compellent FS8600 • Vendor: Dell Inc. Most backup applications automatically list the available NAS volumes to back up. Otherwise, you can manually type in the NAS volume path. The FluidFS cluster exposes backup NAS volumes at the following path: /<NAS_volume_name> To improve data transfer speed, limit the number of concurrent backup jobs to one per NAS controller. Viewing NDMP Jobs and Events All NDMP jobs and events can be viewed using FluidFS Manager. 132 Viewing Active NDMP Jobs View all NDMP backup and restore operations being processed by the FluidFS cluster. 1. Click the Performance & Connectivity tab on the left. 2. Click the CIFS & NDMP Sessions tab on the top. The NDMP jobs are displayed in the NDMP Sessions pane. Viewing NDMP Events Events related to NDMP backups can be viewed in the Events pane at the bottom of the FluidFS Manager display. Managing Replication Replication allows you to copy NAS volume data from the local (source) FluidFS cluster to a different NAS volume on the local FluidFS cluster or to a remote (target) FluidFS cluster. The following figure shows an overview of local replication between NAS volumes on a single FluidFS cluster. 133 Replication can be used in various scenarios to achieve different levels of data protection. Replication Scenarios Description Fast backup and restore Maintain full copies of data for protection against data loss, corruption, or user mistakes Disaster recovery Mirror data to remote locations for failover during a disaster Remote data access Applications can access mirrored data in read‐only or read‐write mode if volumes are promoted or cloned Online data migration Minimize downtime associated with data migration Configuring replication is a three step process: • Add a replication partnership between two FluidFS clusters. • Add replication for a NAS volume. • Run replication on demand or schedule replication. How Replication Works Replication leverages snapshots. The first time you replicate a NAS volume, the FluidFS cluster copies the entire contents of the NAS volume. For subsequent replication operations, the FluidFS cluster copies only the data that changed since the previous replication operation started. This allows for faster replication, efficient use of system resources, and saves on storage space while keeping data consistent. Replication is asynchronous, meaning that data is replicated to the target NAS volume based on a predefined schedule, which can be different for each volume. The amount of time replication takes depends on the amount of data on the NAS volume and the amount of data that has changed since the previous replication operation. Replication receives priority over serving data to clients. When replicating a NAS volume to another FluidFS cluster, the target FluidFS cluster must be set up as a replication partner. Each FluidFS cluster may have multiple replication partners, enabling you to replicate 134 different NAS volumes to different partners, depending on operational requirements. However, each individual NAS volume can be replicated to only one target NAS volume on one replication partner. The following figure summarizes which replications scenarios are supported and unsupported. 135 Once a partner relationship is established, replication is bi‐directional. One system could hold target NAS volumes for the other system as well as source NAS volumes to replicate to that other system. A replication policy can be set up to run according to a set schedule or on demand. Replication management flows through a secure SSH tunnel from system to system over the client network. To access or recover data, you can promote a target NAS volume to a recovery NAS volume and grant clients access to the recovery NAS volume data. The recovery NAS volume will appear as a local NAS volume. Target NAS Volumes A target NAS volume is a read‐only copy of the source NAS volume that resides on the target FluidFS cluster. The target NAS volume holds identical system configuration information (quota rules, snapshot policy, security style, and so on) as the source NAS volume. You can promote target NAS volumes to recovery NAS volumes temporarily or permanently and grant clients access to recovery NAS volume data. The following considerations apply to target NAS volumes: • Unlike source NAS volumes, you cannot create snapshots of target NAS volumes. • There must be sufficient free space on the target FluidFS cluster to store the target NAS volumes. • The system retains only the current replica of the source NAS volumes. To roll back to a previous point in time, you must use snapshots. • You can either replicate the source NAS volume to an existing NAS volume or to a new target NAS volume. If you replicate to an existing NAS volume, the NAS volume must not contain any data you want to retain. Any data residing on the NAS volume will be overwritten and cannot be recovered. • Target NAS volumes count towards the total number of NAS volumes in the FluidFS cluster. Managing Replication Partnerships When replicating a NAS volume to another FluidFS cluster, the other FluidFS cluster must be set up as a replication partner. This is a bi‐directional replication trust—source NAS volumes and target NAS volumes can be located on either system. Adding a Replication Partnership Add a replication partner before configuring replication. 136 NOTE: • Both the source and target FluidFS clusters have the same NAS appliance count. For example, if the source FluidFS cluster has two NAS appliances, the target FluidFS cluster must have two NAS appliances. Do not attempt to replicate a four‐NAS appliance FluidFS cluster to a two‐NAS appliance FluidFS cluster. Attempting to establish a replication partnership between FluidFS clusters with different NAS appliance counts fail. • The FluidFS version installed on the target FluidFS cluster must be the same as or more current than the FluidFS version installed on the source FluidFS cluster. • The source and target FluidFS clusters must be able to communicate with each other so that replication operations can occur. • Verify that the FluidFS replication ports are open on your firewall to allow replication between the source and target FluidFS clusters. • The target FluidFS cluster has enough space to replicate the data from the source FluidFS cluster. 1. Click the System tab on the left. 2. Click the Data Protection tab on the top. 3. In the Cluster Partnerships pane, click 4. Click New. . The New Cluster Partnership dialog box appears. 5. In the IP address of partner cluster field, enter the IP address of the remote cluster. Changing the Local or Remote Networks for a Replication Partnership Change the local or remote replication network or IP address for a replication partnership. 1. Click the System tab on the left. 2. Click the Data Protection tab on the top. 3. In the Cluster Partnerships pane, click 4. Click Modify. on the row of the partnership you want to modify. . The Modify Cluster Partnership dialog box appears. 5. Configure the local and remote replication networks, ensuring that the FluidFS clusters can communicate with each other over the specified networks (that is, routing is in place). – To change the client network used for replication on the local FluidFS cluster, select a client network from the Local Replication Information Client Network drop‐down menu. – To change the IP address used for replication on the local FluidFS cluster, select an IP address from the Local Replication Information Replication IP Address drop‐down menu. – To change the client network used for replication on the remote FluidFS cluster, select a client network from the Remote Replication Information Client Network. 6. – To change the IP address used for replication on the remote FluidFS cluster, select an IP address from the Remote Replication Information Replication IP Address drop‐down menu. Click OK. Delete a Replication Partnership When you delete a replication partnership, the replication relationship between the source and target FluidFS clusters is discontinued. When deleting a replication partnership, ensure that both systems are up and running. If both systems are up, the replication partnership is deleted on both systems. If one of the 137 systems is down or unreachable, the partnership is deleted only on the system that is running. Once the other system comes back up, the partnership must be deleted on that system too. 1. Click the System tab on the left. 2. Click the Data Protection tab on the top. 3. In the Cluster Partnerships pane, click 4. Click Delete. the row of the partnership you want to delete. The Delete dialog box appears. 5. Click OK. Replicating NAS Volumes You can perform manual and scheduled replication operations, and pause, resume, delete, and monitor replication. Adding Replication for a NAS Volume Adding a replication creates a replication relationship between a source NAS volume and a target NAS volume. After adding a replication, you can set up a replication policy to run according to a set schedule or on demand. NOTE: Create a target NAS volume on the target FluidFS cluster that is the same size or larger than the source NAS volume. 1. Click the NAS Volumes tab on the left. 2. Click the All NAS Volumes tab on the top. 3. In the All NAS Volumes pane, click 4. Click View Details. 5. Click the Replication tab on the top. 6. In the Replication Partnership pane, click 7. Click Connect. in the row of the volume you want to replicate. . The Connect to Partner of Replication dialog box appears. 8. In the Destination cluster drop down, select a FluidFS cluster. 9. Click the […] button to the right of the Destination NAS volume field. The NAS volume browser opens. 10. Select the destination volume and click OK. 11. In the Connect to Partner of Replication dialog, click OK. A warning stating that ALL changes on the destination NAS volume will be lost is displayed. 12. Click the Ignore the above warning check box, then click OK. The replication partnership is displayed in the Replication Partnership pane. Deleting Replication for a NAS Volume Deleting replication for a NAS volume is similar to disabling replication for a NAS volume in that it does not disrupt replication operations for other NAS volumes or the replication partnership between the source and target FluidFS clusters. After deleting replication, the target NAS volume becomes a standalone, writable NAS volume. You can delete replication from either the source or target FluidFS cluster. 138 NOTE: • The target NAS volume must be promoted to a standalone NAS volume. • You must remove replication schedules for the replication. 1. Click the NAS Volumes tab on the left. 2. Click the All NAS Volumestab on the top. 3. In the All NAS Volumes pane, click delete. 4. Click View Details. 5. Click the Replication tab on the top. 6. In the Replication Partnership pane, click 7. Click Disconnect. in the row of the volume whose replication you want to . The Disconnect from Partner of Replication dialog box appears. 8. Click OK. The replication partnership is removed from the Replication Partnership pane. Running Replication on Demand After a replication is created, you can replicate a NAS volume on demand. You can run replication only from the source FluidFS cluster. 1. Click the NAS Volumes tab on the left. 2. Click the All NAS Volumestab on the top. 3. In the All NAS Volumes pane, click 4. Click View Details. 5. Click the Replication tab on the top. 6. In the Replication Status pane, click 7. Click Replicate Now . in the row of the volume you want to replicate. . The Replicate Now dialog box appears. 8. Click OK. Scheduling Replication After a replication is created, you can replicate a NAS volume on demand. You can run replication only from the source FluidFS cluster. 1. Click the NAS Volumes tab on the left. 2. Click the All NAS Volumestab on the top. 3. In the All NAS Volumes pane, click schedule. 4. Click View Details. 5. Click the Replication tab on the top. 6. In the Replication Scheduling pane, click 7. Click New Replication Scheduling . in the row of the volume whose replication you want to . The New Replication Scheduling dialog box appears. 8. In the Replication scheduling name field, type a name for the replication schedule. 139 9. Specify when to run replication: – To run replication based on a period of time, select Take replication every [ ] minutes and type in the number of minutes. – To run replication based on day and time, select Take replication on and select the day, hour and minute at which to run replication. 10. Click OK. Changing a Replication Schedule Change the frequency that replication runs for a replication schedule. 1. Click the NAS Volumes tab on the left. 2. Click the All NAS Volumestab on the top. 3. In the All NAS Volumes pane, click schedule. 4. Click View Details. 5. Click the Replication tab on the top. 6. In the Replication Scheduling pane, click 7. Click Modify. in the row of the volume whose replication you want to in the row of the schedule you want to change. . The Modify Replication Scheduling dialog box appears. 8. Specify when to run replication: – To run replication based on a period of time, select Take replication every [ ] minutes and type in the number of minutes. 9. – To run replication based on day and time, select Take replication on and select the day, hour and minute at which to run replication. Click OK. Deleting a Replication Schedule Change the frequency that replication runs for a replication schedule. 1. Click the NAS Volumes tab on the left. 2. Click the All NAS Volumestab on the top. 3. In the All NAS Volumes pane, click want to delete. 4. Click View Details. 5. Click the Replication tab on the top. 6. In the Replication Scheduling pane, click 7. Click Delete. 8. Click OK. in the row of the volume whose replication schedule you in the row of the schedule you want to delete. The Delete Replication Scheduling dialog box appears. Pausing Replication When you pause a replication, any replication operations for the NAS volume that are in progress are suspended. While replication is paused, scheduled replications do not take place. Replication may be paused for individual NAS volumes, but you cannot pause all in‐progress replication operations taking 140 place in a FluidFS cluster, or between a specified pair of replication partners. You can pause replication only from the source FluidFS cluster. 1. Click the NAS Volumes tab on the left. 2. Click the All NAS Volumestab on the top. 3. In the All NAS Volumes pane, click want to delete. 4. Click View Details. 5. Click the Replication tab on the top. 6. In the Replication Scheduling pane, click 7. Click Disable. in the row of the volume whose replication schedule you . The Disable Replication dialog box appears. 8. Click OK. Resuming Replication When you resume replication, any replication operations that were in progress at the time the operation was disabled will resume. In addition, any replication schedules will resume at their next scheduled time. Replication may be resumed for individual NAS volumes, but you cannot resume all in‐progress replication operations taking place in a FluidFS cluster, or between a specified pair of replication partners. You can resume replication only from the source FluidFS cluster. 1. Click the NAS Volumes tab on the left. 2. Click the All NAS Volumestab on the top. 3. In the All NAS Volumes pane, click want to resume. 4. Click View Details. 5. Click the Replication tab on the top. 6. In the Replication Scheduling pane, click 7. Click Enable. 8. Click OK. in the row of the volume whose replication schedule you . The Enable Replication dialog box appears. Monitoring Replication Progress Monitor the progress of all replication operations being processed for the FluidFS cluster. 1. Click the NAS Volumes tab on the left. 2. Click the All Replicationstab on the top. All source and destination volumes are displayed in tables, and their replication status is displayed in the Status column. Recovering an Individual NAS Volume When a NAS volume is defined as a replication target, users may not write to it, as it only replicates changes made to the replication source volume. If the source volume is down because of a malfunction, you may want to "promote" the target and "demote" the source; i.e. switch their roles so that the former target is now the "master" or source. This is so that clients can write to the promoted volume. 141 Promoting a Target NAS Volume When you resume replication, any replication operations that were in progress at the time the operation was disabled will resume. In addition, any replication schedules will resume at their next scheduled time. Replication may be resumed for individual NAS volumes, but you cannot resume all in‐progress replication operations taking place in a FluidFS cluster, or between a specified pair of replication partners. You can resume replication only from the source FluidFS cluster. When you promote a target NAS volume, you have the option to demote it at a later time, thereby making the promotion temporary. Alternatively, you can permanently promote it. Promoting a target NAS volume to a recovery NAS volume makes the target NAS volume writable, and clients can manually fail over to it. This operation can be performed regardless of whether the source NAS volume is available. The recovery NAS volume’s data will be complete up to the point in time of the most recent successful replication. When you promote a target NAS volume, any replication operations for the NAS volume that are in progress are suspended. You can promote a target NAS volume from either the source or target FluidFS cluster. 1. Click the NAS Volumes tab on the left. 2. Click the All NAS Volumestab on the top. 3. In the All NAS Volumes pane, click 4. Click View Details. 5. Click the Replication tab on the top. 6. In the Replication Status pane, click 7. Click Promote Destination. in the row of the volume you want to promote. . The Promote Destination dialog box appears. 8. Click OK. Demoting a Target NAS Volume Demote the target NAS volume to resume the original replication operations. When you demote a target NAS volume, all data written to the recovery NAS volume while it was temporarily promoted will be lost. You can demote a target NAS volume only from the source FluidFS cluster. 1. Click the NAS Volumes tab on the left. 2. Click the All NAS Volumestab on the top. 3. In the All NAS Volumes pane, click 4. Click View Details. 5. Click the Replication tab on the top. 6. In the Replication Status pane, click 7. Click Demote Destination. in the row of the volume you want to promote. . The Demote Destination dialog box appears. 8. Click OK. Restoring the NAS Volume Configuration Restoring the NAS volume configuration is an effective way to restore the following NAS volume settings without having to manually reconfigure them: • CIFS shares 142 • NFS exports • Snapshot schedules • Quota rules This is useful in the following circumstances: • After recovering a system • After recovering a NAS volume • When failing over to a replication target NAS volume NAS Volume Configuration Backups Whenever a change in the NAS volumeʹs configuration is made, it is automatically saved in a format that allows you to restore it later. The configuration is stored and encrypted in the .clusterConfig folder, which is located in the NAS volumeʹs root folder. This folder can be backed up, either individually, or with the NAS volumeʹs user data, and later restored. The configuration of a NAS volume can be restored on another NAS volume on the same system or on another system. A NAS volume configuration backup can be made available to be restored using the following methods: • The storage administrator can manually copy the .clusterConfig folder to the NAS volume from its backup or from another NAS volume. When using a backup from another system, the restore operation works only if the saved configuration was taken from a system using the same FluidFS version. • The storage administrator can copy the .clusterConfig folder to the NAS volume from its backup or from another NAS volume using an NDMP restore. When using a backup from another system, the restore operation works only if the saved configuration was taken from a system using the same FluidFS version. • The .clusterConfig folder is automatically copied to target NAS volumes during replication. Restoring the NAS Volume Configuration When you restore a NAS volume configuration, it overwrites and replaces the existing configuration. Clients that are connected to the FluidFS cluster are disconnected. Clients will then automatically reconnect to the FluidFS cluster. 1. Ensure the .clusterConfig folder has been copied to the root folder of the NAS .clusterConfigvolume on which the NAS volume configuration will be restored. One way to access the root folder of a NAS volume is to open Windows Explorer and in the address bar type: \\<client_VIP_or_name>\C$\<NAS_volume>\. 2. Click the NAS Volumes tab on the left. 3. Click the All NAS Volumes tab on the top. 4. In the All NAS Volumes pane, click restore. 5. Click Restore Settings. in the row of the volume whose configuration you want to The Restore NAS Volume Settings dialog box appears. 143 6. Select the settings to restore from backup: – To restore CIFS shares, select the CIFS Shares check box. – To restore NFS exports, select the NFS Exports check box. – To restore snapshot schedules, select the Snapshot Scheduling check box. – To restore quota rules, select the Quota Rules check box. Click OK. 7. Restoring Local Users Restoring the local user configuration provides an effective way to restore all local users without having to manually reconfigure them. This is useful in the following circumstances: • After recovering a system • When failing over to a replication target NAS volume Local Users Configuration Backups Whenever a change in the local user configuration is made, it is automatically saved in a format that allows you to restore it later. The configuration is stored and encrypted in the .clusterConfig folder, which is located in the NAS volumeʹs root folder. This folder can be backed up, either individually, or with the NAS volumeʹs user data, and later restored. A local users configuration backup can be made available to be restored using the following methods: • The storage administrator can manually copy the .clusterConfig folder to a NAS volume in the system from its backup or from another system. When using a backup from another system, the restore operation works only if the saved configuration was taken from a system using the same FluidFS version. • The storage administrator can copy the .clusterConfig folder to a NAS volume in the system from its backup or from another system using an NDMP restore. When using a backup from another system, the restore operation works only if the saved configuration was taken from a system using the same FluidFS version. • The .clusterConfig folder is automatically copied to target NAS volumes during replication. Restoring Local Users Local users can be restored by restoring the configuration stored on the most current NAS volume in the FluidFS cluster and restoring it on the same system or on another system. When you restore the local user configuration, it overwrites and replaces the existing configuration. Clients that are currently connected to the FluidFS cluster are disconnected. Clients will then automatically reconnect. 1. Ensure the .clusterConfig folder has been copied to the root folder of a NAS volume on the system on which to restore local users. One way to access the root folder of a NAS volume is to open Windows Explorer and in the address bar type: \\<client_VIP_or_name>\C$\<NAS_volume>\. 2. Click the Access Control tab on the left. 3. Click the User Repositories tab on the top. 4. In the Local Users pane, click 5. Click Restore Local Users. . The Restore Local Users dialog box appears. 144 6. In the Restore local users from backup taken from cluster drop‐down menu, select the cluster whose backup will be used to restore local users. 7. Click OK. Restoring Local Groups Restoring the local group configuration provides an effective way to restore all local groups without having to manually reconfigure them. This is useful in the following circumstances: • After recovering a system • When failing over to a replication target NAS volume Local Groups Configuration Backups Whenever a change in the local group configuration is made, it is automatically saved in a format that allows you to restore it later. The configuration is stored and encrypted in the .clusterConfig folder, which is located in the NAS volumeʹs root folder. This folder can be backed up, either individually, or with the NAS volumeʹs user data, and later restored. A local groups configuration backup can be made available to be restored using the following methods: • The storage administrator can manually copy the .clusterConfig folder to a NAS volume in the system from its backup or from another system. When using a backup from another system, the restore operation works only if the saved configuration was taken from a system using the same FluidFS version. • The storage administrator can copy the .clusterConfig folder to a NAS volume in the system from its backup or from another system using an NDMP restore. When using a backup from another system, the restore operation works only if the saved configuration was taken from a system using the same FluidFS version. • The .clusterConfig folder is automatically copied to target NAS volumes during replication. Restoring Local Groups Local groups can be restored by restoring the configuration stored on the most current NAS volume in the FluidFS cluster and restoring it on the same system or on another system. When you restore the local groups configuration, it overwrites and replaces the existing configuration. Clients that are currently connected to the FluidFS cluster are disconnected. Clients will then automatically reconnect. 1. Ensure the .clusterConfig folder has been copied to the root folder of a NAS volume on the system on which to restore local users. One way to access the root folder of a NAS volume is to open Windows Explorer and in the address bar type: \\<client_VIP_or_name>\C$\<NAS_volume>\. 2. Click the Access Control tab on the left. 3. Click the User Repositories tab on the top. 4. In the Local Groups pane, click 5. Click Restore Local Groups. . The Restore Local Groups dialog box appears. 6. In the Restore local groups from backup taken from cluster drop‐down menu, select the cluster whose backup will be used to restore local groups. 7. Click OK. 145 Using Replication for Disaster Recovery You can create a disaster recovery configuration in which you replicate data from a primary FluidFS cluster to a target FluidFS cluster. You can fail over to the target cluster if the primary FluidFS cluster stops responding because of an unexpected failure (hardware, disk, and so on). The target FluidFS cluster can either be used solely for backup for the primary site, or it can have its own NAS volumes sharing data at the target site. In a bi‐directional configuration, both FluidFS clusters can act as a failover target for each other. After you have fixed the problem that caused the original FluidFS cluster to fail, you can manually fail back to the original configuration in which clients access data on the source NAS volume, which in turn replicates to the target NAS volume. Depending on time and bandwidth considerations, failing back to the source NAS volume might take a considerable amount of time to complete. The following considerations apply when using replication for disaster recovery: • If the original source NAS volume is no longer available, you can configure the recovery NAS volume to replicate to another NAS volume in the original source FluidFS cluster. However, if the original source NAS volume is available, Dell recommends failing back to it. Failing back to the original source NAS volume usually takes less time than failing back to a new NAS volume. If the FluidFS clusters have a common snapshot, they only need to synchronize the data that changed after that snapshot was created. If no common snapshot is available, or if replicating to a new NAS volume, all data must be synchronized. • A single FluidFS cluster cannot contain two sets of CIFS home shares. Consider the example in which Cluster A and Cluster B both have CIFS home shares, for different sites or user bases. Cluster A and Cluster B both serve as replication destinations for each other’s NAS volume that contains the CIFS home shares. If the administrator tries to fail over Cluster A’s NAS volume that contains CIFS home shares to Cluster B, Cluster B rejects this operation because it already has CIFS home shares defined on it. Managing the DNS Configuration for Single NAS Volume Failover For single NAS volume failover, it is important that the environment is set up to properly migrate clients of the NAS volumes you are failing over, without disrupting the clients of other NAS volumes you are not failing over. When a NAS Volume is failed over from one FluidFS cluster to another, the IP addresses that are used to access it change from Cluster A’s IP addresses to Cluster B’s IP addresses. Dell recommends facilitating this change using DNS. It is recommended to set up a DNS entry to correlate to each NAS volume, and change the DNS entry for single NAS volumes when they are failed over. For example, suppose Marketing and Sales have their own NAS volumes, with a CIFS share on the NAS volume named marketing_share and sales_share respectively. A DNS entry named FluidFSmarketing, is created for Marketing and another DNS entry for Sales named FluidFSsales is created. Both NAS volumes point to the same set of client VIPs on source Cluster A. Marketing can access the Marketing NAS volume or CIFS share using \\FluidFSmarketing\marketing, and Sales can access the Sales NAS volume or CIFS share using \ \FluidFSsales\sales. Initially, both DNS entries FluidFSmarketing and FluidFSsales point to the same set of client VIPs. At this point, both the marketing and sales CIFS shares can be accessed from either one of the DNS names, FluidFSmarketing or FluidFSsales. When you want to fail over a single NAS volume (for example Marketing) change the DNS entries for FluidFSmarketing to resolve to the client VIPs on Cluster B. 146 Dell recommends that you maintain a table to track which DNS entries are used to access each NAS volume. This helps when performing failover and setting up group policies. Setting Up and Performing Disaster Recovery This section contains a high‐level overview of setting up and performing disaster recovery. In these instructions, Cluster A is the source FluidFS cluster containing the data that must be backed up and Cluster B is the target FluidFS cluster, which backs up the data from source cluster A. Prerequisites • Cluster B is installed, but has no NAS volumes configured. • Cluster A and Cluster B have the same NAS appliance count. For example, if Cluster A has two NAS appliances, Cluster B must have two NAS appliances. • Cluster A and Cluster B are at the same FluidFS version. • Cluster B has different network settings (client, SAN, internal, and so on) than source Cluster A, however, Cluster A and Cluster B must be able to communicate with each other so that replication operations can occur. • Cluster B has enough space to replicate all data from Cluster A. Phase 1 — Build Replication Partnership Between Source Cluster A And Backup Cluster B 1. Log on to cluster A. 2. Set up replication partnership between source cluster A and backup cluster B. For more information on setting up replication partners, see Adding a Replication Partnership. 3. Create a replication policy for all the source volumes in cluster A to target volumes in cluster B. NOTE: Replication policy is a one to one match on a volume basis, for example: Source volume A1 (cluster A) to target volume B1 (cluster B) Source volume A2 (cluster A) to target volume B2 (cluster B) ………………………… Source volume An (cluster A) to target volume Bn (cluster B) NOTE: FluidFS v2 supports auto generate target volume during addition of the replication policy. For FluidFS 1.0, you must create the target volumes in cluster B and make sure that the volume size is big enough to accommodate the corresponding source volume data in cluster A. 4. Start the replication scheduler to ensure that at least one successful replication has occurred for all the source volumes in cluster A. If the replication fails, fix the problems encountered and restart the replication process. This ensures that all source volumes in cluster A have at least one successful replication copy in cluster B. Set up a regular replication schedule, so the target volumes in cluster B always have most up to date replication copy for cluster A. CAUTION: Replication restore is not a complete BMR restore, settings such as network configuration (client, SAN, and IC) cannot be backed up and restored using the replication method. Note all cluster A settings (for use when restoring cluster A) including network configuration, cluster wide settings such as volume name, alert settings, and so on for future use. If the system restore operation fails to restore these settings, you can manually restore the cluster A settings back to their original values. 147 Phase 2 — Cluster A Fails And Client Requests Fail Over To Backup Cluster B If source cluster A stops responding because of an unexpected failure (hardware, disk, and so on), you must: 1. Log on to backup cluster B. 2. Delete the existing replication policy for all replication target volumes. – When deleting the replication policy from the destination cluster B — FluidFS replication manager tries to contact source cluster A, which fails. The volume on destination cluster B must have its configuration restored using Cluster Management → Restore NAS Volume Configuration. 3. – When deleting the replication policy from the source cluster A — You are given an option to apply the source volumes configuration to the destination volume. If you do not remember to select this, or it fails, the configuration of the source volume from cluster A can be restored onto the destination volume on cluster B using Cluster Management → Restore NAS Volume Configuration. Confirm replication policy deletion on backup cluster B, and that the source volume configuration from cluster A is applied. Currently the following volume configurations can be restored: – NFS exports – CIFS shares – Quota rules – Snapshot schedule – NAS volume alerting, security style and related parameters – NAS volume name – NAS volume size This transforms target volumes (B1, B2, .. Bn) to standalone volumes. Repeat this procedure to bring all target volumes in cluster B to standalone volumes with volume configuration applied from cluster A. 4. From the NAS Manager web interface, restore the NAS system configuration from cluster A. This restores cluster B configuration to cluster A settings. Currently the following cluster system configuration can be restored: – Protocols configuration – Users and Groups – User mappings – Monitoring configuration – Time configuration – Antivirus hosts 148 5. Ensure that cluster B is used to temporarily serve client requests during the fail over time. Administrators must perform the following steps to set up DNS and authentication: a) Point the DNS names from customer DNS server to cluster B instead of cluster A. Ensure that the DNS server on cluster B is the same as the DNS server or in the same DNS farm as the DNS server of cluster A. Existing client connections may break and may need to be reestablished. You must unmount and remount the NFS Exports on the client. NOTE: Complete steps b, c, and d only for single volume failovers. b) On DNS, manually update the DNS entry for the NAS volume that was failed over. This step is to repoint end users that are accessing this volume from cluster A to cluster B, while the end users keep accessing it using the same DNS name. NOTE: Client systems may need to refresh DNS cache. c) To force CIFS and NFS clients to cluster B, we also must delete the CIFS shares and NFS exports on cluster A. This forces the CIFS and NFS clients to reconnect, at such time they are connected to cluster B. After restoring the source volume’s configuration on cluster B, all of the shares and exports will be present on the destination volume (on cluster B), so no share/export configuration information is lost. d) The failed over volume now can be accessed using the exact same DNS name and share name as it was when hosted on cluster A, except now it is hosted on cluster B. NOTE: NFS mounts must be un-mounted and mounted again. Active CIFS transfers fail during this process, but if CIFS shares are mapped as local drives, they automatically reconnect once the replication is deleted, DNS is updated, and NFS/CIFS shares are deleted on cluster A. e) Join AD server or LDAP/NIS. Ensure that the AD and LDAP are in the same AD/LDAP farm or same server. Phase 3 — Restore Cluster A Fail Back From Cluster B To Cluster A 1. Fix the reason that caused cluster A to fail (replace hardware, replace disk, and so on), and if required reinstall FluidFS. 2. Rebuild the cluster (use the settings for cluster A that you saved earlier), format the NAS reserve, and set up the network (client, SAN, and IC) as before. 3. Log on to cluster B and set up the replication partnership between cluster B and cluster A. For more information on setting up replication partners, see Adding a Replication Partnership. 4. Create replication policy for all the source volumes in cluster B to target volumes in cluster A. NOTE: Replication policy is a one to one match on volume base, for example: Source volume B1 (cluster B) to target volume A1 (cluster A) Source volume B2 (cluster B) to target volume A2 (cluster A) ………………………… Source volume Bn (cluster B) to target volume An (cluster A) NOTE: FluidFS v2 supports auto generate target volume during addition of the replication policy. For FluidFS 1.0, you must create the target volumes in cluster B and make sure that the volume size is big enough to accommodate the corresponding source volume data in cluster A. 149 5. In the NAS Manager web interface, select Data Protection → Replication → NAS Replication and click Replicate Now for all the volumes in cluster B (B1, B2, .., Bn). If the replication fails, fix the problems encountered and restart the replication process. Ensure that all the volumes are successfully replicated to cluster A. 6. Delete the replication policy for all the volumes (B1, B2, .. Bn) and apply source volume configuration from cluster B to cluster A. Repeat this procedure to delete all the replication policies and bring all target volumes in cluster A to standalone volumes. – When deleting the replication policy from the destination cluster B — FluidFS replication manager tries to contact source cluster A, which fails. The volume on destination cluster B must have its configuration restored using Cluster Management → Restore NAS Volume Configuration. 7. – When deleting the replication policy from the source cluster A — You will be given an option to apply the source volumes configuration to the destination volume. If you do not remember to select this, or it fails, the configuration of the source volume from cluster A can be restored onto the destination volume on cluster B using Cluster Management → Restore NAS Volume Configuration. Log on to cluster A. 8. From the NAS Manager web interface, restore the NAS system configuration from cluster B. This changes cluster A global configuration settings, like, protocol setting, time setting, authentication parameters, and so on to cluster B settings. NOTE: If system configuration restore fails, manually set them back to the original settings (use the settings for cluster A that you saved earlier). Cluster A is restored to its original settings. 150 9. Start using cluster A to serve client requests. Administrators must perform the following steps to set up DNS and authentication: a) Point the DNS names from customer DNS server to cluster A instead of cluster B. Ensure that the DNS server on cluster A is the same as the DNS server or in the same DNS farm as the DNS server of cluster B. Existing client connections may break and need to re-establish during this process. NOTE: Complete steps b, c, and d only for single volume failovers. b) On DNS, manually update the DNS entry for the NAS volume that was failed over. This step repoints end users that are accessing this volume from cluster B to cluster A, while the end users keep accessing it using the same DNS name. NOTE: Client systems may need to refresh DNS cache. c) To force CIFS and NFS clients to cluster A, we also must delete the CIFS shares and NFS exports on cluster B. This forces the CIFS and NFS clients to reconnect, at such time they are connected to cluster A. After restoring the source volume’s configuration on cluster A, all of the shares and exports will be present on the destination volume (on cluster A), so no share/export configuration information is lost. d) The failed over volume now can be accessed using the exact same DNS name and share name as it was when hosted on cluster B, except now it is hosted on cluster A. NOTE: NFS mounts must be un-mounted and mounted again. Active CIFS transfers fail during this process, but if CIFS shares are mapped as local drives, they automatically reconnect once the replication is deleted, DNS is updated, and NFS/CIFS shares are deleted on cluster B. e) Join AD server or LDAP/NIS. Ensure that the AD and LDAP are in the same AD/LDAP farm or same server. 10. Build up replication structure between source cluster A and backup cluster B, to set up replication policy between cluster A and cluster B, use cluster B volumes as replication target volumes, to prepare for next disaster recover. 151 152 FluidFS 3.0 Monitoring 9 Viewing the Status of Hardware Components FluidFS Manager displays the status of the following NAS appliance and NAS controller hardware components: • Networks • Disks • Power supplies • Backup power supply • Fans In the Hardware\NAS Appliances view, each NAS appliance has its own pane, in which its controllers and their components are displayed in a tree view. You can expand each node by clicking its [+] button, and collapse it by clicking its [-] button. Viewing the Status of the Interfaces View the status of the interfaces in a NAS controller. 1. Click the Hardware tab on the left. 2. Click the NAS Appliances tab on the top. 3. In the pane of the NAS appliance you want to view, expand the NAS Controllers node. 4. Expand the node of the controller you want to view. 5. Under the controller node, expand the Client Network, SAN Network and Internal Network nodes to view their NIC components and their statuses. Viewing the Status of the Disks View the status of the interfaces in a NAS controller. 1. Click the Hardware tab on the left. 2. Click the NAS Appliances tab on the top. 3. In the pane of the NAS appliance you want to view, expand the NAS Controllers node. 4. Expand the node of the controller you want to view. 5. Under the controller node, expand the Local Disks node to view each disk and its status. 153 Viewing the Status of the Power Supplies View the status of the power supplies in a NAS appliance. 1. Click the Hardware tab on the left. 2. Click the NAS Appliances tab on the top. 3. In the pane of the NAS appliance you want to view, expand the NAS Controllers node. 4. Expand the node of the controller you want to view. 5. Under the controller node, expand the PSUsnode to view each power supply and its status. Viewing the Status of a Backup Power Supply View the status of the power supplies in a NAS appliance. 1. Click the Hardware tab on the left. 2. Click the NAS Appliances tab on the top. 3. In the pane of the NAS appliance you want to view, expand the NAS Controllers node. 4. Expand the node of the controller you want to view. 5. Under the controller node, examine the BPS node to view the backup power supply and its status. Viewing the Status of the Fans View the status of the power supplies in a NAS appliance. 1. Click the Hardware tab on the left. 2. Click the NAS Appliances tab on the top. 3. In the pane of the NAS appliance you want to view, expand the NAS Controllers node. 4. Expand the node of the controller you want to view. 5. Under the controller node, expand the Fans node to view each fan and its status. Viewing the Status of FluidFS Cluster Services To view the status of services configured on a FluidFS cluster (such as Active Directory, LDAP, DNS, and NTP), click the Dashboard tab in the pane on the right of the FluidFS Manager display. 154 155 Viewing the Status of Background Processes Some operations take some time to perform and do not complete immediately, such as detaching a NAS controller. In these cases, you can monitor the progress of operations in FluidFS Manager. 1. Click the System tab on the left. 2. Click the Internal tab on the top. In the Background Processes pane, the status of each background process is displayed. Viewing FluidFS Cluster NAS Pool Trends FluidFS Manager displays statistics about the NAS pool for a FluidFS cluster, including total capacity, unused reserved space, unused unreserved space, and used space. 1. Click the NAS Volumes tab on the left. 2. Click the NAS Pool tab on the top. The NAS pool trends are displayed in the NAS Pool Trends pane. Viewing Storage Usage Viewing FluidFS NAS Pool Storage Usage To view the total size and current usage of the NAS pool: 1. Click the NAS Volumes tab on the left. 2. Click the NAS Pool tab on the top. The NAS pool size and used space values are displayed in the NAS Pool pane. Viewing Volume Storage Usage To view the historical storage usage of a NAS Volume: 1. Click the NAS Volumes tab on the left. 2. Click the All NAS Volumes tab on the top. 3. In the All NAS Volumes pane, click to view. 4. Click View Details. 5. The Space view is display. in the row of the volume whose NAS volume clones you want The storage usage history is displayed in the NAS Volume Space Trends pane. Viewing FluidFS Traffic Statistics FluidFS Manager displays line charts that show traffic statistics over time for a FluidFS system. 1. Click the Performance & Connectivity tab on the left. 2. Click thePerformance tab on the top. 156 3. Graphs for the following performance values are displayed: – Overall Read Throughput – click the Client, Replication , and NDMP buttons to display or hide the relevant performance graphs. – Overall Write Throughput – click the Client, Replication , and NDMP buttons to display or hide the relevant performance graphs. – Client Read Throughput – click the Network, CIFS , and NFS buttons to display or hide the relevant performance graphs – Client Write Throughput – click the Network, CIFS , and NFS buttons to display or hide the relevant performance graphs. – CIFS & NFS Operations – click the Read, Write , and Other buttons to display or hide the relevant performance graphs. Viewing NAS Controller Load Balancing Statistics FluidFS Manager displays statistics about load balancing for a NAS controller, including processor utilization and the number of connections to the NAS controller. 1. Click the Performance & Connectivity tab on the left. 2. Click the Load Balancing tab on the top. The load statistics are displayed for each controller in a separate pane. 157 158 FluidFS 3.0 Maintenance 10 Adding and Deleting NAS Appliances in a FluidFS Cluster Use FluidFS Manager to add or delete a NAS appliance in a FluidFS cluster. Adding NAS Appliances to the FluidFS Cluster You can add a NAS appliance (two NAS controllers) to the FluidFS cluster to increase processing power. Adding a NAS appliance allows additional client connections and evenly redistributes client connections and FluidFS cluster operations among more NAS controllers contributing their resources. For high availability reasons, you must add NAS appliances as NAS controller pairs. You cannot add a single NAS controller. Only one NAS appliance can be added at a time up to a maximum of two NAS appliances (four NAS controllers). Adding a NAS appliance is a seamless operation that does not interrupt current FluidFS cluster operations. After the NAS appliance is successfully added, new client connections are automatically distributed to all NAS controllers, ensuring that there is efficient load balancing between all NAS controllers. NOTE: • The additional NAS appliance is mounted in a rack and cabled, and the NAS controllers are in standby mode and powered on. A NAS controller is on and in standby mode if the power LED is flashing green at around two flashes per second. • NAS appliance service tags are recorded. • New client VIP IP addresses are available to be added to the new NAS appliance. If client access to the FluidFS cluster is not through a router (in other words, a flat network), Dell recommends defining one client VIP for effective load balancing. • New NAS controller IP addresses are available to be added to the new NAS appliance. Verify that there are two additional IP addresses available per NAS appliance. NOTE: Due to the complexity and precise timing required, Dell recommends that you schedule a maintenance window to add the NAS appliance(s). 1. (Directly cabled internal network only) If the FluidFS cluster contains a single NAS appliance, with a direct connection on the internal network, re‐cable the internal network as follows. a) b) c) d) e) Cable the new NAS appliance(s) to the internal switch. Remove just one of the internal cables from the original NAS appliance. Connect a cable from each NAS controller port vacated in Step b to the internal switch. Remove the second internal cable from the original NAS appliance. Connect a cable from each NAS controller port vacated in Step d to the internal switch. 2. Click the Hardware tab on the left. 3. Click the NAS Appliances tab on the top. 4. In the Overview pane, click . 159 5. Click New NAS Appliance. The New NAS Appliance dialog box appears. 6. Select the NAS appliance to add to the FluidFS cluster. a) In the top pane, select the NAS appliance. b) Click Add Appliance. The selected NAS appliance is moved to the bottom pane. c) Click Finish. * For Fibre Channel NAS appliances, the Configure Client Network page displays. * 7. For iSCSI NAS appliances, the Configure IP Addresses for NAS Controller iSCSI HBAs page displays. (iSCSI only) Complete the Configure IP Addresses for NAS Controller iSCSI HBAs page to configure the IP addresses for SAN / eth30. a) Select a NAS controller and click Edit Settings. The Edit Controller IP Address dialog box appears. b) In the IP Address field, type an IP address for the NAS controller. c) Click OK. Repeat the preceding steps for each NAS controller. d) To specify a VLAN tag, type a VLAN tag in the VLAN Tag field. When a VLAN spans multiple switches, the VLAN tag is used to specify to which ports and interfaces to send broadcast packets. e) Click Next. 8. (iSCSI only) Complete the Configure IP Addresses for NAS Controller iSCSI HBAs page to configure the IP addresses for SANb / eth31. a) Select a NAS controller and click Edit Settings. The Edit Controller IP Address dialog box appears. b) In the IP Address field, type an IP address for the NAS controller. c) Click OK. Repeat the preceding steps for each NAS controller. d) To specify a VLAN tag, type a VLAN tag in the VLAN Tag field. When a VLAN spans multiple switches, the VLAN tag is used to specify to which ports and interfaces to send broadcast packets. e) Click Next. The Configure Client Network page displays. 9. If needed, add additional client VIPs through which the clients will access CIFS shares and NFS exports. a) In the Virtual IPv4 Addresses area, click Add. The Add Client IP Address dialog box appears. b) In the IPv4 Address field, type a client VIP IP address. c) Click OK. 10. Add an IP address for each new NAS controller. Repeat the following steps for each NAS controller. a) (iSCSI only) Complete the Configure IP Addresses for NAS Controller iSCSI HBAs page to configure the IP addresses for SANb / eth31. b) In the IP Address field, type an IP address for the NAS controller. c) Click OK. 11. (Optional) Configure the remaining client network attributes as needed. – To change the netmask of the client network, type a new netmask in the Netmask field. – To specify a VLAN tag, type a VLAN tag in the VLAN Tag field. 160 12. Click Next. After you are finished configuring each client network, the Connectivity Report page displays. 13. Use the Connectivity Report page to verify connectivity between the FluidFS cluster and the MD array. The NAS controller ports must show the status Up before you can complete the wizard. If you click Finish and the NAS controller ports do not have the status Up, an error will be displayed. – For iSCSI NAS appliances, when the Connectivity Report initially appears, iSCSI log ons might still be occurring in the background, causing some or all of the FluidFS cluster iSCSI initiators to show the status Not Found/Disconnected. If this happens, wait 30 seconds, then click Refresh to update the Connectivity Report. When the iSCSI log ons are complete and the Connectivity Report has been refreshed, the status for each FluidFS cluster iSCSI initiator shows Up. – For Fibre Channel NAS appliances, when the Connectivity Report initially appears, the FluidFS cluster HBAs show the status Not Found/Disconnected. You must record the WWNs and manually update fabric zoning on the Fibre Channel switch. Then, click Refreshto update the Connectivity Report. When the zoning is configured correctly and the Connectivity Report has been refreshed, the status for each FluidFS cluster HBA shows Up. 14. Click Finish. Deleting a NAS Appliance from the FluidFS Cluster If an attempt to add a NAS appliance to a FluidFS cluster fails, the entry for the NAS appliance must be deleted from the FluidFS cluster before you can reattempt to add the NAS appliance or add a different NAS appliance. 1. Click the Hardware tab on the left. 2. Click the NAS Appliances tab on the top. 3. In the Overview pane, click 4. Click Delete (Un-Joined). in the row of the NAS appliance you want to delete. The Delete (Un-Joined) NAS Appliance dialog box appears. 5. Click OK. Detaching, Attaching, and Replacing a NAS Controller Use these procedures to replace a failed NAS controller. Detaching a NAS Controller Detach a NAS controller only if the NAS controller needs to be replaced with a new NAS controller. After you detach a NAS controller, it resets to its factory defaults and powers off, if possible. Otherwise, you must reinstall the FluidFS software to reset the NAS controller to its factory defaults. Only one NAS controller at a time can be detached in a NAS appliance. Detaching a NAS controller disconnects client connections while clients are being transferred to other NAS controllers. Clients will then automatically reconnect to the FluidFS cluster. While a NAS controller is detached from the FluidFS cluster, CIFS shares and NFS exports remain available (although performance might decrease because data is no longer cached); however, most FluidFS cluster configuration changes are not allowed. CAUTION: Only detach a NAS controller under the direction of Dell Technical Support Services. 1. Click the Hardware tab on the left. 2. Click the NAS Appliances tab on the top. 161 3. In the Overview pane, click detach. 4. Click Detach. in the row of the NAS appliance whose controller you want to The Detach NAS Controller dialog box appears. 5. In the NAS controller dropdown, select the controller you want to detach. 6. Click OK. The progress of the detach process is displayed in the Detach dialog box. If you close the dialog box, the process will continue to run in the background. The NAS controller is detached when the NAS controller State changes to Detached. Attaching a NAS Controller Attach a new NAS controller when replacing an existing NAS controller. Once attached, the new NAS controller inherits the FluidFS cluster configuration settings of the existing NAS controller. NOTE: Verify that the NAS controller being attached is in standby mode and powered on. A NAS controller is on and in standby mode if the power LED is flashing green at around two flashes per second. 1. Click the Hardware tab on the left. 2. Click the NAS Appliances tab on the top. 3. In the Overview pane, click controller. 4. Click Attach. in the row of the NAS appliance to which you want to attach a The Attach NAS Controller dialog box appears. 5. In the NAS controller dropdown, select the controller you want to attach. 6. Click OK. The progress of the attach process is displayed in the Attachdialog box. If you close the dialog box, the process will continue to run in the background. The NAS controller is attached when the NAS controller Statechanges to Formatted. 7. (Fibre Channel only) After the attach operation completes, record the new WWNs and manually update fabric zoning on the Fibre Channel switch. Replacing a NAS Controller In the event of a failure where a NAS controller cannot be brought back online (for example, a malfunctioning NAS controller), you must remove the existing NAS controller from the FluidFS cluster and replace it with a different NAS controller. While a NAS controller is detached from the FluidFS cluster, CIFS shares and NFS exports remain available (although performance might decrease because data is no longer cached); however, most FluidFS cluster configuration changes are not allowed. Therefore, it is important to replace a failed NAS controller as soon as possible. NOTE: Only replace a NAS controller under the direction of Dell Technical Support Services. NOTE: Before replacing the NAS controller ensure that the existing NAS controller is verified as failed by Dell Technical Support Services. 1. Detach the existing NAS controller. 2. Ensure that all cables are labeled. 162 3. Disconnect all cables from the back of the existing NAS controller. 4. Remove the existing NAS controller from the NAS appliance chassis. a) Press the controller release button to disengage the controller handle. b) Push the controller handle down until the controller disengages from the appliance. c) Use the controller handle to pull the controller out of the appliance. 5. Insert the new NAS controller in the NAS appliance chassis. a) b) c) d) Ensure that the controller cover is closed. Align the controller with the appropriate slot in the appliance. Push the controller into the appliance until the controller seats into place. Push the handle toward the front of the appliance until it locks. 6. Reconnect all cables to the same ports on the new NAS controller. The NAS controller automatically powers on if at least one power supply is connected to a power source. 7. Attach the new NAS controller. Managing Service Packs The FluidFS cluster uses a service pack methodology to update the FluidFS software. Viewing the Upgrade History View a list of service pack updates that have been installed on the FluidFS cluster. 1. Click the System tab on the left. 2. Click the Version & License tab on the top. The system’s version history is displayed in the Software Upgrade pane. Installing a Service Pack to Update the FluidFS Software NOTE: • Installing a service pack causes the NAS controllers to reboot during the installation process. This might cause interruptions in CIFS client connections. In addition, active NDMP jobs are terminated. Therefore, Dell recommends scheduling a maintenance window to perform service pack installations. • Contact Dell Technical Support Services to obtain service packs. Do not modify the service pack filename. • Ensure that all NAS controllers are powered on and their State is Formatted (the State is displayed in the Hardware\NAS Appliances view). You cannot update the FluidFS software if a NAS controller is down or detached. • The FluidFS cluster FTP server must be enabled. WARNING: The service pack installation process is irreversible. The FluidFS cluster cannot be reverted back to a previous version once updated. You can upload and install the service pack upgrade file to your FLuidFS system using the CLI or the web UI. To upload and install the service pack upgrade file using the CLI: Use an FTP client to upload the service pack file to the FluidFS cluster FTP server at: ftp://<FluidFS_administrator_user_name>@<client_VIP_or_name>:44421/ servicepack/ The file must be transferred using binary mode. For example, the following command sequence can be used on a Windows command prompt: 163 ftp open <client_VIP_or_name> 44421 <FluidFS_administrator_user_name> <FluidFS_administrator_password> cd servicepack bin put <path_to_service_pack>/DellFluidFS-3.0.<xxxx>-SP.sh quit To upload and install the service pack upgrade file using the web UI: 1. Click the System tab on the left. 2. Click the Version & License tab on the top. 3. In the Software Upgrade pane, click and click Upload Software Package. The Upload Software Version file dialog is displayed. 4. Click the […] button to the right of the Software version file field. A file browser dialog box appears. 5. Browse to the software version file, select it and click Open. 6. Click OK. Managing Firmware Updates Firmware is automatically updated on NAS controllers during service pack updates and after a failed NAS controller is replaced. After a firmware update is complete, the NAS controller reboots. It is important that you do not remove a NAS controller when a firmware update is in progress. Doing so corrupts the firmware. A firmware update is in progress if both the rear power‐on LED and cache active/off‐load LED repeatedly blink amber 5 times and then blink green 5 times. If you connect a monitor to a NAS controller’s VGA port during a firmware update, the following message is displayed: Executing firmware updates for TopHat system. Reinstalling FluidFS from the Internal Storage Device Each NAS controller contains an internal storage device from which you can reinstall the FluidFS factory image. If you experience general system instability or a failure to boot, you might have to reinstall the image on one or more NAS controllers. NOTE: Only reinstall the FluidFS software under the direction of Dell Technical Support Services. WARNING: Reinstalling the FluidFS software on all NAS controllers will revert your system to factory defaults. All data on the FluidFS cluster will be unrecoverable after performing the procedure. 164 NOTE: 1. • If the NAS controller is still an active member in the FluidFS cluster, you must first detach it. • Connect a monitor to the NAS controller’s VGA port and connect a keyboard to one of the NAS controller’s USB ports. Press and release the recessed power button at the back of the NAS controller to shut down the NAS controller. NOTE: Power off only the NAS controller on which you are reinstalling the FluidFS software. Do not power off the remaining NAS controllers. Powering off a NAS controller disconnects client connections while clients are being transferred to other NAS controllers. Clients will then automatically reconnect to the FluidFS cluster. 2. Press and release the recessed power button at the back of the NAS controller to turn on the NAS controller. 3. When you see the F11 = BIOS Boot Manager prompt, press F11. 4. Select the boot device USB Flash Disk. 5. Select Reinstall Dell FluidFS <FluidFS_release_to_install>. NOTE: Reinstall the NAS controller to FluidFS version 2.0 only if you are redeploying the NAS controller in a FluidFS version 2.0 cluster. 6. Confirm the action by typing resetmysystem (version 3.0) or resetmysystem -v2 (version 2.0) and pressing Enter. 7. Once the reinstallation completes, the NAS controller will reboot into standby mode. 8. After reinstalling FluidFS, attach the NAS controller to a FluidFS cluster. 165 166 11 Troubleshooting Viewing the Event Log You can view messages about system events and errors in the Event Log. Running Diagnostics Running diagnostics helps you detect problems with the FluidFS cluster. The diagnostic options available for the FluidFS cluster are: • FluidFS diagnostics: Used to diagnose software issues. • Embedded system diagnostics: Used to diagnose hardware issues. Running FluidFS Diagnostics on a FluidFS Cluster FluidFS diagnostics can be run while the FluidFS cluster is still online and serving data. The following FluidFS diagnostic options are available: • Client Connectivity Diagnostic • File Accessibility Diagnostic • File System Diagnostic • General System Diagnostic • Network Diagnostic • Performance Diagnostic • Protocols Log Diagnostic On completion of the diagnostics, the compressed archive of the diagnostic result files are available from the FluidFS cluster FTP server at: ftp://<FluidFS_administrator_user_name>@<client_VIP_or_name>:44421/diagnostics/archive/ <diagnostic_name> NOTE: The FluidFS cluster FTP server must be enabled. 1. Click the System tab on the left. 2. Click the Internal tab on the top. 3. In the Diagnostics Tools pane, click Performance, Client Connectivity). 4. Click Run. in the row of the tool you want to run (e.g. Network, The Run Diagnostic dialog box appears. 167 5. Enter any requested diagnostic parameters and click OK. After the diagnostics have been run, FluidFS Manager will perform a Phone Home of the diagnostics if the FluidFS cluster FTP server is enabled. Launching the iBMC Virtual KVM The iBMC (Integrated Baseboard Management Controller) virtual KVM (keyboard, video, and mouse) allows you to view and manage the NAS controller console remotely over a network. If Dell Technical Support Services needs to perform remote troubleshooting, you can make your system accessible to them using the iBMC virtual KVM. • To use the iBMC virtual KVM, you must use a computer with Internet Explorer. • Before connecting to the iBMC virtual KVM, determine the iBMC IP address and password. – To determine the iBMC IP address of the NAS controller: * If the NAS controller is in standby mode (a NAS controller is on and in standby mode if the power LED is flashing green at around two flashes per second), the iBMC IP address is 192.168.254.253. * If the FluidFS cluster is configured, the iBMC IP address is based on the NAS controller number: <internal_class_C_address>.<controller_number_plus_one_times_two> For example, if the internal address range is 10.255.69.0/24, the iBMC IP address of NAS controller 0 is 10.255.69.2, the iBMC IP address of NAS controller 6 is 10.255.69.14, and so on. • To determine the iBMC password: – If the NAS controller is in standby mode (a NAS controller is on and in standby mode if the power LED is flashing green at around two flashes per second), the iBMC password is Stor@ge!. – If the FluidFS cluster is configured, the iBMC password is synchronized with the support account password. 1. Connect a network cable to the LOM (Lights Out Management) Ethernet port on a NAS controller. The LOM Ethernet port is located on the lower right side of the back panel of a NAS controller. 2. Connect a Windows client to the iBMC. a) Connect a Windows client to the same network used for the LOM Ethernet port. b) Set the IP address of the Windows client to match the iBMC subnet. c) Open an Internet Explorer web browser. In the address bar of the web browser, type the iBMC IP address of the NAS controller. The iBMC login page appears. d) In the Username field, type ADMIN. e) In the Password field, type the iBMC password. f) Click OK. The iBMC Properties page appears. 3. Launch the iBMC virtual KVM. a) In the navigation pane, expand vKVM & vMedia and click Launch. b) In the right pane, click Launch Java KVM Client. The Video Viewer appears and displays the FluidFS cluster console. 168 Troubleshooting Common Issues Troubleshooting Active Directory Issues Group Quota For An Active Directory User Does Not Work Description Group quota is defined for an Active Directory group; however, when a group member consumes space, the actual usage of the group does not grow and the group limitation is not enforced. Cause The NAS cluster solution quota enforcement is performed based on the UID and GID of the file (UNIX) or the SID and the GSID of the primary group of the user (NTFS), if defined. For Active Directory users, the Primary Group setting is not mandatory, and if not defined, the used space is not accounted to any group. For group quota to be effective with Active Directory users, their primary group must be assigned. Workaround To setup the primary group for an Active Directory user: 1. 2. 3. 4. Open the Active Directory management. Right-click on the desired user. Select the Member Of tab. The group you need must be listed. Click the group and then click the Set Primary Group button. Now quotas takes effect for the user's group. Active Directory Authentication Description A valid Active Directory user fails to authenticate. Cause Probable causes may be: • • • • Workaround 1. 2. 3. 4. The user is trying to authenticate using an incorrect password. The user is locked or disabled in Active Directory. Active Directory domain controllers are offline or unreachable. System clock and Active Directory clock are out of sync. Check the NAS cluster solution system event log in the NAS Manager for errors. Verify that the user is not disabled or locked in Active Directory. Verify that domain controllers are online and reachable using the network. Kerberos requires client/server clocks to be in sync. Verify the system time is in sync with the domain controller time and if required, configure the NTP setting of the system. Troubleshooting Active Directory Configuration Description Unable to add Active Directory users and groups to CIFS shares. Cause Probable causes may be: • • • Unable to ping the domain using FQDN. DNS may not be configured. NTP may not be configured. 169 Workaround When configuring the system to connect to an Active Directory domain: 1. 2. 3. 4. 5. 6. 7. Ensure that you use FQDN and not the NETBIOS name of the domain or IP address of the domain controller. Ensure that the user has permissions to add systems to the domain. Use the correct password. See DNS Configuration tab and enter the correct information. Configure the NTP information and ensure that the system time matches the domain time. If multiple NAS systems are used, ensure that you set different NETBIOS names. The system defaults to CIFS Storage as the name. Ensure that you select Authenticate users' identity via Active Directory and local users database. Troubleshooting Backup Issues Troubleshooting Snapshots Description Taking and deleting snapshots fail. Cause Probable causes may be: • • • • • Workaround • • • • • • There are many client I/O requests waiting to be serviced, including a request to remove a large directory. There are many snapshot creation/deletion requests being currently processed. Another snapshot request for the volume is currently being executed. The total number of snapshots reached the system limit. Incorrect IP address was specified in the backup job. For a manual request failure, retry taking or deleting the snapshot after a minute or two. If the request originated from the snapshot scheduler, wait another cycle or two. If the failure persists, try taking or deleting the snapshot manually on the same volume. Check the dashboard if the system is under heavy workload. If the system is under a heavy workload, wait until the workload decreases and reissue the snapshot request. Check the snapshot schedule. A very dense snapshot schedule has a negative impact on the overall performance of the system. The accumulated snapshot rate must not exceed 20 snapshots per hour per system. Check the total number of snapshots in the system. If the number is in thousands, delete a few snapshots and retry. Ensure the Client virtual IP address is specified in the backup job. Troubleshooting An NDMP Internal Error Description Backup or restore fails with an internal error. Cause NDMP internal errors are indicators of a file system not being accessible or a NAS volume not being available. Workaround If the backup application cannot connect to a NAS appliance: 1. 170 Log in to the NAS Manager or open a remote terminal to the appliance. 2. 3. 4. 5. 6. 7. 8. 9. On the NAS Manager, go to Data Protection → NDMP → NDMP Configuration page. In NAS CLI, go to Data Protection NDMP Configuration menu. Verify that NDMP is enabled. If NDMP is enabled, go to step 5. On the NAS Manager, the Enabled check box must be checked. In the NAS CLI, type view and ensure that State is set to Enabled. If NDMP is not enabled, enable it. Verify that backup application IP address is configured in NDMP. On the NAS Manager, the DMA server list must include the IP address of the backup application. In the NAS CLI, type view and ensure that the DMA Servers list includes the IP address of the DMA application trying to access the NAS appliance. If the backup appliance can connect to a NAS appliance but cannot log in, use backup_user as the user name for the NDMP client, while setting up the NDMP backup/restore in your backup application. The default password for NDMP client is Stor@ge! To change the password: 1. 2. 3. Log in to the NAS Manager or open remote terminal to the appliance. In the NAS Manager, go to Data Protection → NDMP → NDMP Configuration page. In NAS CLI, go to Data Protection → NDMP → Configuration menu. In the NAS Manager, click Change Password. In the NAS CLI, run the command: data-protection ndmp configuration set-Password <new_password> If the backup application can log into the NAS appliance, but if no volumes are available for backup, verify that the NAS appliance has NAS volumes created on it. Troubleshooting CIFS Issues Misconfigured AV Host Settings Result In Access Denied To CIFS files Description The Dell NAS cluster solution supports antivirus scans on a per CIFS share basis. When a file on a share is opened by a client application, the NAS cluster solution sends the file to an antivirus host to be scanned. If no antivirus host is available, access to the file and to the whole share, is inhibited. Cause Since the antivirus hosts are not available on the NAS cluster solution, files cannot be opened on an antivirus enabled CIFS share. Workaround Ensure that the problem appears only on antivirus enabled shares, while clients accessing other shares do not experience such problems. Check the status of the antivirus hosts and the network path between the NAS cluster solution and the antivirus hosts. CIFS Access Denied Description CIFS access to a file or folder is denied. Cause A client without sufficient permissions performs an operation on a file/folder. Workaround Check the permissions on the file/folder and set the required permissions. 171 CIFS ACL Corruption Description Cause CIFS ACL corruption. • • • • Workaround ACLs were accidently changed by a user or script. ACL is corrupted after an antivirus application accidently quarantined corresponding files. ACL got corrupted after data recovery by backup application due to compatibility issues. ACL got corrupted after migrating data from different location by using third party application. For example, RoboCopy. Check the current ACL setting in the Windows client. Redefine the ACLs for the files by using a Windows client the same way you initially defined it. Verify that you set the ACLs as the owner of the files, directories, and shares. In case you cannot redefine your ACLs since you currently do not have permissions, perform the following steps: 1. 2. 3. Restore the files from snapshots or backup. In the case you have migrated the data from a different location using RoboCopy application, there is a good chance you can restore ACLs by copying only ACLs metadata, instead of re-copying the whole data. In case all file system ACLs are corrupted, you can restore all data from the NAS replication partner. CIFS Client Clock Skew Description CIFS client clock skew. Cause The client clock must be within 5 minutes range from the Kerberos server (that is Active Directory) clock. Workaround Configure the client to clock-synch with the Active Directory (as an NTP server) to avoid clock skews errors. CIFS Client Disconnection On File Read Description CIFS client disconnection on file read. Cause Extreme CIFS workload during controller failover. Workaround Client needs to reconnect and open the file again. CIFS Client General Disconnection Description CIFS client disconnection. Cause In case the system identified a general issue with the CIFS service, it automatically recovers but the failure causes all users to be disconnected and the above event to be triggered. Workaround If this issue repeats frequently, contact Dell. CIFS Client Login Failure Description CIFS client login failure. Cause User supplied incorrect password upon connection. 172 Workaround Interactive users can retry with correct password. Applications and servers may need special attention as the user/password, which is usually set in a script or configuration file, has probably expired. CIFS Connection Failure Description CIFS client share access denied. Cause The user is unknown in the Active Directory server, and the NAS system mapped this user to a guest user. If the share does not allow guest access, the user receives an access denied alert. Workaround Ensure that the user is listed in the Active Directory server the NAS is using. Alternatively, you can remove the guest limitation for the share. If the user can now access the share as guest, the newly created files are owned by the nobody/guest user. CIFS Delete On Close Denial Description Files are deleted while they are in use. Cause If a file is deleted when it is open, it is marked for deletion, and is deleted after it is closed. Until then, the file appears in its original location but the system denies any attempt to open it. Workaround Notify the user who tried to open the file that the file is deleted. CIFS File Access Denied Description CIFS file access denied. Cause Client has insufficient privileges to perform the requested operation on the file. Workaround This is an informative event. The user may request to modify the file ACL to allow access. CIFS File Sharing Conflict Description CIFS file sharing conflict. Cause When a file is opened using the CIFS protocol, the opening application communicates the sharing mode that must be used while this file is open. This sharing mode describes what other users activities are allowed on this file, while it is open. This definition is sent by the application and the user cannot control/configure it. After there is a violation of the sharing definition, the user receives an access denied error and this event is issued. Workaround This is an informative event; The administrator may contact the locking user and request to close the application referencing this file. The application which opened the file may not have shut down gracefully. It is recommended to reboot the client if possible. CIFS Guest Account Invalid Description CIFS service cannot start. Cause A valid CIFS guest account is required for CIFS functionality. Workaround Configure the system guest account with a valid account. 173 CIFS Locking Inconsistency Description CIFS service is interrupted due to CIFS interlocking issues. Cause CIFS client interlocking scenarios. Workaround System recovers itself automatically, issuing the above event when recovered. CIFS Maximum Connections Reached Description Maximum number of CIFS connections per NAS controller is reached. Cause Each NX3600 appliance is limited to 200 concurrent CIFS connections and each NX3610 and FS8600 is limited to 1500 connections. • • • Workaround The system is in an optimal state and the number of CIFS clients accessing one of the controllers reaches the maximum. In such a scenario, consider adding another NAS appliance. The system is in optimal state but the clients are significantly unbalanced between NAS controllers. In this case, rebalance the clients using the NAS Manager. The system is in degraded state (one or more NAS controllers are down) and the CIFS clients are left over on the remaining controller. In this case, wait until the system returns to optimal or decrease the number of CIFS clients in the system. If all NAS controllers are in optimal mode, the connections are divided between both of them. CIFS Share Does Not Exist Description Cause Workaround Client attempts to connect to an inexistent share. • • Spelling mistake on client side. Accessing the incorrect server. List the available NAS shares and verify that all shares are displayed and nothing has changed unintentionally. Verify that you can access the problematic share using a Windows client: 1. 2. Click Run. Enter the client access VIP and share name: \\<Client_VIP>\<CIFS_share_name> CIFS Path Share Not Found Description Cause Client accessed a share which refers to an inexistent directory in the NAS container. • • Workaround List all available shares on the NAS and identify the problematic share. It must have an indication that it is not accessible. 1. 174 The NAS system is restored from a backup or remote replication. During restore time, the directory structure is not complete and a few directories may not exist. Communicate the status and wait for the restore process to complete. A client with authorization, deletes or alters a directory that is mounted by another client. If multiple users are accessing the same dataset, it is recommended that you apply a strict permission scheme to avoid such conflicts. Restore the problematic path from a backup. 2. 3. Manually create the missing directories. Set permissions to control access as required. Remove the share and communicate to the client. CIFS Write To Read Only Volume Description Client tries to modify a file on read-only volume. Cause A NAS volume is set to read-only when it is the target of a replication. The most frequent reason for this event is either: • • • Workaround The user meant to access the target system for read purposes, but also tries to modify a file by mistake. The user accesses the incorrect system due to similarity in name/IP. The user is accessing a NAS container, which was made a replication target without his knowledge. In order to write to this volume, replication must be detached first. Refer the user to the correct location. Troubleshooting NFS Issues Cannot Mount NFS Export Description When attempting to mount an NFS export, the mount command fails due to various reasons such as: • • • • • Cause • • • • • • • Workaround Permission denied. Appliance not responding due to port mapper failure - RPC timed out or input/ output error. Appliance not responding due to program not registered. Access denied. Not a directory. The client connects using NFS/UDP and there is a firewall in the way. The client is not in the export list, the appliance could not recognize the client system through NIS, or the appliance does not accept the identity you provided. The NAS cluster solution is down or has internal file system problems. The mount command got through to the port mapper, but the rpc.mountd NFS mount daemon was not registered. Client system’s IP address, IP range, domain name or netgroup is not in the export list for the volume it is trying to mount from the NAS appliance. Either the remote path or the local path is not a directory. The client does not have root authority or is not a member of the system group. NFS mounts and unmounts are only allowed for root users and members of the system group. If the issue is due to NFS/UDP and firewall, check if the client mounts using UDP (this is usually the default) and there is a firewall in the path. If a firewall exists, add an appropriate exception to the firewall. If the issue is due to permissions: • • Verify the path you provided is correct. Check that you are trying to mount as root. 175 • Check that the system's IP address, IP range, domain name or netgroup is in the exports list. If the appliance not responding due to a port mapper failure: • • • Check the NAS cluster appliance status. Check the network connection by trying to NFS mount from some other system. Verify if other users experience the same problem. If the appliance is not responding due to the program not registered, check if the port mapper on your client is up. If the issue is due to access denied: • Get a list of the appliance exported file systems using the command: showmount -e <FluidFS hostname> • • Check the system name or netgroup name is not in the user list for the file system. Check the file systems related to the NFS through the NAS cluster solution user interface. If the issue is due to the directory, check the spelling in your command and try to run the mount command on both directories. NFS Export Does Not Exist Description Attempted to mount an export that does not exist. Cause This failure is commonly caused by spelling mistakes on the client system or when accessing the wrong server. Workaround 1. 2. 3. 4. 5. 6. 7. Check the available exports on the NAS; verify that all the required exports exist. On the problematic client, verify that the relevant export is available to this client: % showmount -e <Server name/IP> Export list for <Server name/IP>: /abc 10.10.10.0 /xyz 10.10.10.0 If the export is available, review the export name spelling in the relevant mount command on the client. It is recommended to copy paste the export name from the showmount output to the mount command. NFS File Access Denied Description This event is issued when an NFS user does not have enough permissions for the file on a NAS container. Cause File ownership is UID/UNIX and the user is not privileged to access the file, or, file ownership is SID/ACL and after translation to UID/UNIX the permissions do not allow access to the file. Workaround For native access (when CIFS user accesses SID/ACL file or NFS user accesses UID/ UNIX file) understanding the missing permission is standard. If the access is non-native, translation rules come to effect and it is recommended that you contact Dell Technical Support. 176 NFS Insecure Access To Secure Export Description User tries to access a secure export from an insecure port. Cause Secure export requirement means that the accessing clients must use a well-known port (below 1024), which usually means that they must be a root (uid=0) on the client. Workaround • • • Identify the relevant export and verify that it is set as secure (requires secure client port). If the export must remain secure, see the NFS client documentation in order to issue the mount request from a well-known port (below 1024). If a secure export is not required (e.g., the network is not public), ensure that the export is insecure and retry accessing it. NFS Mount Fails Due To Export Options Description This event is issued when NFS mount fails due to export options. Cause The export list filters client access by IP, network or netgroup, and screens the accessing client. Workaround 1. 2. 3. 4. Verify the relevant export details. Write down all existing options so that you are able to revert to them. Remove IP/client restrictions on the export and retry the mount. If the mount succeeds, verify that the IP or domain is explicitly specified, or that it is part of the defined network or netgroups. Pay attention to pitfall scenarios, where the network netmask is not intuitive, for example, 192.175.255.254 is part of 192.168.0.0/12, but not of 192.168.0.0/16. After the mount succeeds, adjust the original options accordingly. NFS Mount Fails Due To Netgroup Failure Description This event is issued when client fails to mount an NFS export because the required netgroup information cannot be attained. Cause This error is usually the outcome of a communication error between the NAS system and the NIS/LDAP server. It can be a result of network issue, directory server overload, or a software malfunction. Workaround Repeat the following process for each configured NIS server, each time leaving just a single NIS used, starting with the problematic NIS server: 1. 2. 3. 4. 5. Inspect the NIS/LDAP server logs and see if the reason for the error is reported in the logs. Complete a network test by pinging the NAS from a client located in the same subnet as the NIS/LDAP server. Ping the NIS/LDAP server from a client located in the same subnet as the NAS. If a packet loss is evident on one of the above, resolve the network issues in the environment. Using a Linux client located in the same subnet as the NAS and configured to use the same directory server, query the netgroup details from the NIS/LDAP server using the relevant commands. Ensure that the reply is received in a timely manner (up to 3 seconds). You can temporarily workaround the problem by removing the netgroup restriction on the export and/or by defining an alternative directory server. 177 Identify the relevant export and the options defined for it, while focusing on the netgroup definition. Document the used netgroup in order to restore it after the issue is solved and remove the netgroup limitation. NFS Mount Path Does Not Exist Description Client tries to mount a mount path that does not exists on a NAS container. Cause This error usually occurs in one of the following scenarios: • • • Workaround 1. 2. 3. 4. When accessing a system which is being restored from backup or remote replication. The full directory structure is available only when the restore is complete. When a client with an authorization to access a higher directory in the same path deletes or alters a directory which is being mounted by another client. When multiple users are accessing the same data set, it is recommended to apply a strict permission scheme to avoid this scenario. If the NAS system is being restored, communicate the current status to the client and instruct the client to wait for the restore process to complete. In the other case, there are three options: – Restore the problematic path from a backup. – Manually create the missing directories to enable the mount. Clients receive errors when trying to access existing data in a deleted path. – Remove the export and communicate this to the client. List all available exports on the NAS and identify the problematic export. It must have an indication that it is not accessible. Delete the export or create the directory where the export points to. NFS Owner Restricted Operation Description NFS client is not permitted to perform the requested action to the specific file. Cause NFS user attempted a chmod or chgrp operation while not being the owner of the file. Workaround This is a minor, user-level issue. Frequent events of this type may indicate a malicious attempt to access restricted data. NFS Write To Read-Only Export Description NFS client tries to perform modifications on a read-only export. Cause An NFS export can be defined as a read-only export. A client accessing a read-only export cannot perform write operations or modify included files. Workaround This event, by itself, does not require any administrative intervention. NFS Write To Read-Only Volume Description An NFS user tries to modify a file on a read-only volume. Cause A NAS volume becomes read-only when it is set as the target in a replication relation. Modifying a read-only volume is inhibited, until the replication relation is removed and the volume returns to a simple, normal state. Workaround Inform the user(s) of the state of the NAS volume. 178 NFS Write To Snapshot Description An NFS user tries to modify a file located in a snapshot. Cause NAS volume snapshots cannot be modified by design. Workaround Snapshot data cannot be modified. A snapshot is an exact representation of the NAS volume data at the time of its creation. NFS Access Denied To A File Or Directory Description User cannot access the NFS file or directory even though the user belongs to the group owning the NFS object and the group members are permitted to perform the operation. Cause NFS servers (versions 2 and 3) use the Remote Procedure Call (RPC) protocol for authentication of NFS clients. Most RPC clients have a limitation of up to 16 groups passed to the NFS server. If a user belongs to more than 16 UNIX groups, as supported by some UNIX flavors, some of the groups are not passed and are not checked by the NFS server and thus the user's access may be denied. Workaround A possible way to verify this problem is to use newgrp to temporarily change the primary group of the user and thus ensure it is passed to the server. The simple workaround, although not always feasible, is to remove the user from unnecessary groups, leaving only 16 groups or less. Troubleshooting NAS File Access And Permissions Issues Cannot Change The Ownership Of A File Or A Folder Description Every file on the NAS system is owned by either a UNIX or NTFS user. Inability to change ownership is treated differently, depending on whether the access is native or non-native. Cause The user is not authorized to perform the ownership change. Workaround An authorized user must perform this action. Cannot Modify NAS Files Description Cause A user or an application cannot modify a file. • • • Workaround • • The client cannot modify a file due to lack of permissions on the file. The NAS volume has reached full capacity and the file system denies any write requests, including overwrites. The NAS volume is a target in a replication relationship and is read only. If the problem appears only on some files, this is a permission issue. Verify that the user account has modify permissions on the file or use a different user account. If the problem is related to a specific NAS volume: 179 a. b. Verify there is enough free space on the NAS volume or expand it. Verify that the accessed NAS volume is not a target of a replication. Mixed File Ownership Denied Description Both file owner and group owner must be from the same identity type (either UNIX or NTFS). An attempt to set different identity types was detected. Cause It is impossible to change only the file owner ID to UID if the original file ownership is SID/GSID. Workaround To change the file ownership to UNIX style ownership, set UID and GID at the same time. Problematic SMB Access From A Linux Client Description A Linux/UNIX client is trying to mount a NAS cluster solution share using SMB (using /etc/fstab or directly using smbmount). A Linux/UNIX client is trying to access the file system using the smbclient command, such as: smbclient //<nas>/<share> -U user %password -c ls Workaround It is recommended that you use the NFS protocol interfaces to access the NAS cluster solution FluidFS systems from Linux/UNIX clients. To workaround this issue: 1. 2. Ensure that your admin creates NFS exports to same locations that you use to access using CIFS and connect to them using mount command from Linux/UNIX clients. Use NFS-based interfaces to access the NAS cluster solution. For example, from the NAGIOS Linux management system, use the / check_disk command instead of the / check_disk_smb command. Strange UID And GID Numbers On Dell NAS System Files Description New files created from Ubuntu 7.x clients get the UID and GID of 4294967294 (nfsnone). Cause By default, Ubuntu 7.x nfs clients do not specify rpc credentials on their nfs calls. As a result, files created from these clients, by any user, are owned by 4294967294 (nfsnone) UID and GID. Workaround To force UNIX credentials on NFS calls, add the sec=sys option to the NAS cluster solution mounts in the Ubuntu fstab file. 180 Troubleshooting Networking Issues Name Server Unresponsive Description All NIS, LDAP, or DNS servers are unreachable or not responding. Workaround For each server: 1. 2. 3. Ping the server from a client on NAS cluster solution subnet and verify it responds. Issue a request to the server from a client on the NAS cluster solution subnet and verify it responds. Check server logs to understand the cause the server fails to respond to requests. Specific Subnet Clients Cannot Access The NAS Cluster Solution Description Users (new or old), accessing from specific network(s) or cannot access the NAS cluster solution. Cause This issue is due to a conflict between the users' subnet addresses and the NAS system internal network's address. The NAS system routes the response packets to the incorrect network. Workaround 1. 2. Check the internal network addresses of the NAS system and verify if there is a conflict with the problematic client network addresses. If a conflict exists, manually change the conflicting NAS internal network address using either the NAS Manager or CLI. Troubleshooting DNS Configurations Description Unable to connect to the NAS cluster solution using the system name and/or unable to resolve host names. Cause Probable causes may be: • • Workaround 1. 2. 3. Unable to ping system using Fully Qualified Domain Name (FQDN). Unable to connect to the NAS Manager using system name. Verify that the client IP information is set correctly. Verify that the NAS cluster solution controller is configured to the correct DNS server. Contact DNS server administrator to verify the DNS record creation. Determining The IQN Of The NAS Cluster Solution Controllers Using CLI Description Determining the IQN of the NAS cluster solution controllers using CLI. Workaround Using an ssh client and the NAS Management VIP, log in to the NAS cluster solution CLI as an admin. From the command line, type the following command: system maintenance luns iscsi-configuration view 181 Troubleshooting RX And TX Pause Warning Messages Description The following warning messages may be displayed when the NAS Manager reports connectivity in a Not Optimal state: Rx_pause for eth(x) on node 1 is off. Tx_pause for eth(x) on node 1 is off. Cause Flow control is not enabled on the switch(es) connected to a NAS cluster solution controller. Workaround See the switch vendor's documentation to enable flow control on the switch(es). Troubleshooting Replication Issues Replication Configuration Error Description Replication between the source and destination NAS volumes fails because the source and destination systems’ topologies are incompatible. Cause The source and destination systems are incompatible for replication purposes. Workaround Upgrade the NAS cluster solution which is down. Verify that both the source and destination have the same number of NAS controllers. NOTE: You cannot replicate between a four-node NAS cluster and two-node NAS cluster. Replication Destination Cluster Is Busy Description Replication between the source NAS volume and the destination NAS volume fails because the destination cluster is not available to serve the required replication. Cause Replication task fails because the destination cluster is not available to serve the required replication. Workaround Administrators must verify the replication status on destination system. Replication Destination FS Is Busy Description Replication between the source NAS volume and the destination NAS volume fails. Cause Replication task fails because the destination cluster is temporarily unavailable to serve the required replication. Workaround The replication continues automatically when the file system releases part of the resources. Administrators must verify that the replication continues automatically after a period of time (an hour). Replication Destination Is Down Description Replication between the NAS source volume and the NAS destination volume fails. Cause Replication task fails since the file system of the destination NAS volume is down. Workaround Administrators must check if the file system is down in the destination system using the monitoring section of the NAS Manager. If the NAS cluster solution file system is not responding, administrators must start the system on the destination cluster. The replication continues automatically after the file system starts. 182 Replication Destination Is Not Optimal Description Replication between the NAS source volume and the NAS destination volume fails because the destination NAS volume is not optimal. Cause Replication fails because file system of the destination NAS volume is not optimal. Workaround The administrators must check the system status of destination system using the monitoring section of the NAS Manager to understand why the file system is not optimal. The replication continues automatically after the file system recovers. Replication Destination Volume Is Busy Reclaiming Space Description Replication between the NAS source volume and the NAS destination volume fails because the destination NAS volume is busy freeing up space. Cause Replication task fails because the destination NAS volume is busy freeing up space. Workaround The replication continues automatically when the space is available. The administrators must verify that the replication automatically continues after a period of time (an hour). Replication Destination Volume Is Detached Description Replication between the NAS source volume and the NAS destination volume fails because the NAS destination volume is detached from the NAS source volume. Cause Replication task fails because the destination NAS volume was previously detached from the source NAS volume. Workaround The administrators must perform the detach action on the NAS source volume. If required, reattach both NAS volumes in a replication relation. Replication Disconnection Description Replication between the NAS source volume and the NAS destination volume fails because the connection between source and destination systems is lost. Cause Network infrastructure disconnection between the source and the destination. Workaround The administrator must check if the replication is automatically restored. If the replication is not automatically restored, check the network communication between the source cluster and the destination cluster. Network communication can be checked by using a third party system in the same subnet that can ping both the source and destination clusters. Replication Incompatible Versions Description Replication between the NAS source volume and the NAS destination volume fails because the system version of the source NAS cluster is higher than the system version of the destination cluster. Cause Replication task fails since the system version of the source NAS cluster is higher than the system version of the destination cluster. Workaround Administrators must upgrade the system version of the destination cluster to match the system version of the source cluster. 183 Replication Internal Error Description Replication between the source and the destination NAS volumes fails due to an internal error. Workaround Contact Dell to resolve this issue. Replication Jumbo Frames Blocked Description Replication between the NAS source volume and NAS destination volume fails because the jumbo frames are blocked over the network. Cause Replication task fails because jumbo frames are blocked over the network. Workaround The administrator must verify that the network configuration between the source cluster and the destination cluster has enabled transferring jumbo frames across the switches or routers. Replication Destination Does Not Have Enough Space Description Replication between NAS source volume and NAS destination volume fails because there is not enough space in the destination NAS volume. Cause Replication task fails because there is not enough space in the destination NAS volume. Workaround Increase the space of the destination NAS volume. Replication Source Is Busy Description Replication between the NAS source volume and the NAS destination volume fails because the file system of the source NAS volume is busy replicating other NAS volumes. Cause Replication task fails because the file system of the source NAS volume is busy replicating other NAS volumes. Workaround The replication continues automatically when the file system releases part of the resources. The administrators must verify that the replication automatically continues after a period of time (an hour). Replication Source Is Down Description Replication between the NAS source volume and the NAS destination volume fails because the file system of source NAS volume is down. Cause The file system of the source NAS volume is down. Workaround Administrators must check if the NAS cluster solution is down in the source system, by checking the monitoring section of the NAS Manager. If the NAS cluster solution is down, the administrators must start the file system on the source cluster. The replication continues automatically when the file system starts. Replication Source Is Not Optimal Description Replication between the source and the destination NAS volumes fails because the file system of the source NAS volume is not optimal. Cause Replication fails since the file system of the source is not optimal. 184 Workaround The administrator must check the file system status of source system, using the monitoring section in the NAS Manager, to understand why the file system is not optimal. Replication Source Volume Is Busy Reclaiming Space Description Replication between the NAS source volume and the NAS destination volume fails because the source NAS volume is busy reclaiming space. Cause Replication task failed since the source NAS volume is busy reclaiming space. Workaround The replication continues automatically when space is available. Administrators must verify that the replication automatically continues after a period of time (an hour). Troubleshooting System Issues Troubleshooting System Shutdown Description During a system shutdown using the NAS Manager, the system does not stop and the controllers do not shutdown after 20 minutes. Cause The system shutdown procedure is comprised of two separate processes: • • Stopping the file system Powering down the NAS cluster solution controllers The file system may take a long time to clean the cache to the storage either due to lot of data, or due to an intermittent connection to the storage. During the powering down stage, the issue can be due to the OS kernel hanging on the controller or failing to sync its state to the local drive. Workaround If the file system has stopped and if one of the controllers are still up, you can physically power down the controller using the power button. If file system has not stopped, you must let it continue working. The file system reaches a 10 minute timeout, flushes its cache to the local controllers, and continues the shutdown process. NAS Container Security Violation Description NAS container security violation. Cause Selecting security style for a NAS container dictates the dominant protocol to be used to set permissions on files in this volume. NFS for UNIX security style volumes and CIFS for NTFS security style volumes. Consequently, this makes some operations invalid: • • • • • Setting UNIX permissions for a file in an NTFS Security style container. Setting UID/GID ownership for a file in an NTFS Security style container. Setting ACL for a file in a UNIX Security style container. Changing read-only flag for a file in a UNIX Security style container. Setting SID/GSID ownership for a file on UNIX Security style container. The NAS container security style must reflect the main protocol used to access its files. Workaround If a user frequently needs to perform a cross-protocol security related activity, split the data into separate NAS containers based on the main access protocol. 185 Multiple Errors Received During File System Format Description You receive multiple errors during a file system format. Cause Probable causes may be: • • • • • Workaround Incorrect SAN IPs are used in the Dell NAS Initial Deployment Utility (IDU). Incorrect IQNs used while defining hosts in the MDSM. Uneven number of LUNs are mapped to the host group. LUN size is below the minimum required size. Less than minimum number of required LUNs. If incorrect SAN IPs are used while running the NAS IDU: 1. 2. Verify that the MD discovery IP used while running the NAS IDU is on the same subnet as one of the two SAN IPs configured on your controllers. To verify MD discovery IP, log in to your NAS Manger IP using CLI and run the following command:system maintenance luns configuration iscsiview This command shows the MD discovery IP. If the IP is not in the same subnet as the IPs configured for your SAN, change the MD discovery IP to one of the subnets defined on your controller's SAN A and B. If incorrect IQNs are used while defining hosts in MDSM, verify that the IQNs displayed in MDSM match the controller IQNs. To change the discovery IP in the CLI, run the following command: system maintenance luns configuration iscsi-set iSCSIDiscoveryIPs <IP Address> none none After the command is complete, refresh the host port identifiers. You can now run the configuration wizard from the NAS Manager again. 1. 2. Compare if the IQNs displayed in MDSM are the same as displayed under the Mappings tab in the hosts section in the NAS Manager. If there is a mismatch, correct the IQNs used for the hosts in MDSM and try formatting the system. The LUNs must be discovered and formatted. If the issue is due to uneven number of LUNs: 1. 2. 3. If an error is encountered, verify that even number of LUNs are mapped to the host group. An odd number of LUNs is not supported. LUNs have to grow in pairs starting from 2 to 16. If uneven LUNs are used, correct the count by adding or removing a LUN. Try to format the system. If the LUN size is below minimum requirements: 1. 2. 3. Verify that the LUNs are larger than the minimum required size of 125 GB. If the LUNs are less than 125 GB, change LUN size to meet or exceed the minimum required size. Try to format the system. If the LUN count is below the minimum requirements: 1. 2. 186 Verify that more than one LUN is mapped to the host group. The minimum number of LUNs required is 2. If the number of LUNs is less than 2, add LUNs to meet the required minimum LUN count of 2. 3. Try to format the system. Associating LUN Names To Virtual Disks Description Determining which LUNs in the NAS Manager are virtual disks in the Modular Disk Storage Manager (MDSM). Workaround Open the NAS Manager web interface and go to Cluster Management → Maintenance → Add Luns. This page displays all LUNs that the NAS cluster solution has access to (assigned to the NAS cluster solution host group). Each LUN can be identified using its world-wide name. In the NAS Manager web interface, the LUN's world-wide name is preceded by a prefix. Open MDSM and go to the Logical tab and click Virtual Disk. The virtual disk worldwide identifier is displayed in the Properties pane. This workaround enables you determine which virtual disks are assigned to the NAS file system. NAS IDU Failed To Discover Any Controllers Description NAS IDU failed to discover any controllers. Cause IPV6 may not be enabled on your workstation. Workaround Enable IPV6 support on your management workstation. Attach Operation Fails Description The operation to attach the controller to NAS cluster fails. Workaround • • • Connect a keyboard and monitor to the controller that failed the attach operation, and view the error message to determine why the attach operation failed. Verify the following: – While the controller was detached, the IP assigned to it on the client network was not allocated to another host. While the controller is detached, it loses its identity, including IP addresses. When it is attached, its identity is applied back to the controller, including the IP addresses. – Verify the default gateway is in the Primary subnet by using the NAS Manager. In Cluster Management → Network Configuration, view the default gateway. In Cluster Management → Subnets, to view the Primary subnet on the client network. If the default gateway is not in the Primary subnet, change the default gateway. For attach to succeed, the default gateway must be pingable. After an attach operation fails, the controller must manually be reset to standby mode. This is done by connecting a keyboard and monitor to the controller that failed attach, and pressing the system identification button key the on-screen instructions. , as directed by Controller Taking Long Time To Boot Up After Service Pack Upgrade Description The controller takes a long time to boot up after upgrading the service pack of the controller firmware. Workaround • • Connect a keyboard and monitor to the controller that is taking a long time to boot up. If the system is booting, and is at the boot phase, let the upgrades finish. This can take up to 60 minutes to complete. 187 • 188 Do not reboot the controller manually if it is in the boot phase Executing System Upgrades. Getting Help 12 Contacting Dell NOTE: Dell provides several online and telephone-based support and service options. If you do not have an active Internet connection, you can find contact information on your purchase invoice, packing slip, bill, or Dell product catalog. Availability varies by country and product, and some services may not be available in your area. To contact Dell for sales, technical support, or customer-service issues: 1. Go to dell.com/contactdell. 2. Select your country or region from the interactive world map. When you select a region, the countries for the selected regions are displayed. 3. Select the appropriate language under the country of your choice. 4. Select your business segment. The main support page for the selected business segment is displayed. 5. Select the appropriate option depending on your requirement. Locating Your System Service Tag Your system is identified by a unique Express Service Code and Service Tag number. The Express Service Code and Service Tag are found on the front of the system by pulling out the information tag. This information is used by Dell to route support calls to the appropriate personnel. Documentation Feedback If you have feedback for this document, write to [email protected]. Alternatively, you can click on the Feedback link in any of the Dell documentation pages, fill up the form, and click Submit to send your feedback. 189