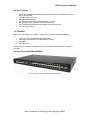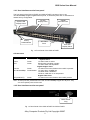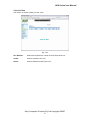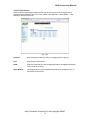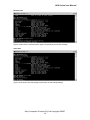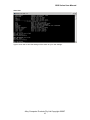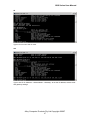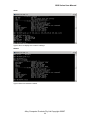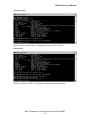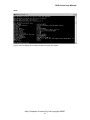
1
GSS Series User Manual User Manual GSS Series 48 Port Gigabit Web Managed Switch (GSS-48T4SFP) Version 1.0 Sep. 2007 Alloy Computer Products Pty Ltd Copyright ©2007 1 GSS Series User Manual Table of Contents CAUTION ..............................................................................................................................................3 ELECTRONIC EMISSION NOTICES ..................................................ERROR! BOOKMARK NOT DEFINED. ABOUT THIS USER MANUAL .................................................................................................................5 OVERVIEW OF THE USER MANUAL .......................................................................................................5 1. INTRODUCTION ..............................................................................................................................6 1.1 OVERVIEW ......................................................................................................................................6 1.2 KEY FEATURES ...............................................................................................................................7 1.3 CHECKLIST .....................................................................................................................................7 1.4 OVERVIEW OF THE GSS-48T4SFP..................................................................................................7 1.4.1 User interfaces on the front panel..........................................................................................8 1.4.2 User interfaces on the rear panel...........................................................................................8 1.5. OVERVIEW OF THE OPTIONAL SFP MODULES ...............................................................................9 2. INSTALLATION .............................................................................................................................10 2.1. STARTING THE GSS-48T4SFP.....................................................................................................10 2.1.1. Hardware and Cable Installation .......................................................................................10 2.1.2. Cabling Requirements.........................................................................................................12 2.1.2.1. Cabling Requirements for UTP Ports.......................................................................................... 12 2.1.2.2. Cabling Requirements for 1000SX/LX/ZX SFP Modules .......................................................... 12 3. OPERATION OF THE WEB BASED MANAGEMENT ............................................................14 3.1 WEB MANAGEMENT HOME OVERVIEW ........................................................................................15 3.2 SYSTEM ........................................................................................................................................17 3.2.1 System Information ..............................................................................................................17 3.2.2 IP..........................................................................................................................................18 3.2.3 Time .....................................................................................................................................19 3.2.4 Account ................................................................................................................................21 3.3 PORT .............................................................................................................................................22 3.3.1 Status....................................................................................................................................22 3.3.2 Configuration.......................................................................................................................23 3.3.3 Simple Counter.....................................................................................................................24 3.3.4 Detail Counter .....................................................................................................................25 3.4 STORM ..........................................................................................................................................27 3.5 MIRROR ........................................................................................................................................28 3.6 FILTER ..........................................................................................................................................29 3.6.1 Bad Length ...........................................................................................................................29 3.6.2 Bad Length ...........................................................................................................................30 3.6.3 Unknown Ether-Type ...........................................................................................................31 3.6.4 Unknown IP Protocol...........................................................................................................32 3.6.5 IPv4 Options ........................................................................................................................33 3.6.6 Unknown Source ..................................................................................................................34 3.7 QOS..............................................................................................................................................35 3.7.1 Priority.................................................................................................................................35 3.7.1.1 IP Layer Priority State Setting...................................................................................................... 35 3.7.1.2 Differentiated Service Code Point (DSCP) .................................................................................. 37 3.7.1.3 Port Priority Setting...................................................................................................................... 38 3.7.1.4 Shaper Queue ............................................................................................................................... 39 3.7.1.5 ACL Priority Override ................................................................................................................. 40 3.7.2 Policer..................................................................................................................................41 3.7.3 Shaper ..................................................................................................................................42 3.7.4 Flow .....................................................................................................................................43 3.7.4.1 IP Flow ID Ignore Setting ............................................................................................................ 43 3.7.4.2 IP Flow ID Configuration............................................................................................................. 44 3.7.4.3 MAC Flow ID Configuration ....................................................................................................... 45 Alloy Computer Products Pty Ltd Copyright ©2007 2 GSS Series User Manual 3.7.5 Police-Flow..........................................................................................................................46 3.7.6 Mark.....................................................................................................................................47 3.7.7 Mark-enable.........................................................................................................................48 3.8 ACL .............................................................................................................................................49 3.8.1 ACL Mode ............................................................................................................................49 3.8.2 ACL/VLAN Mapping ............................................................................................................50 3.8.3 ACL Rule..............................................................................................................................51 3.9 ACL QOS LOAD ...........................................................................................................................53 3.10 USER DEFINED ............................................................................................................................54 3.11 SNMP ........................................................................................................................................55 3.12 LINK AGGREGATION ...................................................................................................................56 3.13 ALARM .......................................................................................................................................57 3.13.1 Events.................................................................................................................................57 3.13.2 Email/SMS..........................................................................................................................58 3.14 CONFIGURATION .........................................................................................................................59 3.14.1 Save / Restore.....................................................................................................................59 3.14.2 Config File .........................................................................................................................60 3.15 DIAGNOSTICS..............................................................................................................................61 3.15.1 Diag ...................................................................................................................................61 3.15.2 Loopback............................................................................................................................62 3.15.3 Ping Test ............................................................................................................................63 3.16 LOOP DETECTION .......................................................................................................................64 3.17 TFTP SERVER .............................................................................................................................65 3.18 LOG ............................................................................................................................................66 3.19 FIRMWARE UPGRADE .................................................................................................................67 3.20 MAX. PACKET LENGTH ...............................................................................................................68 3.21 MAC TABLE ...............................................................................................................................69 3.21.1 Information ........................................................................................................................69 3.21.2 Aging Time .........................................................................................................................70 3.21.3 Static Forward ...................................................................................................................71 3.21.4 Static Filter ........................................................................................................................72 3.22 VLAN ........................................................................................................................................73 3.22.1 VLAN Mode........................................................................................................................73 3.22.2 VLAN Group ......................................................................................................................74 3.22.3 Port Protocol .....................................................................................................................76 3.22.4 Port VID.............................................................................................................................77 3.23 REBOOT ......................................................................................................................................78 3.24 LOGOUT ......................................................................................................................................78 4. OPERATION OF CLI MANAGEMENT ......................................................................................79 4.1 CLI MANAGEMENT ......................................................................................................................79 4.1.1 Login ....................................................................................................................................79 4.2 COMMANDS OF THE CLI ...............................................................................................................80 4.2.1 Global Commands of the CLI ..............................................................................................81 4.2.2 Local Commands of the CLI ................................................................................................86 APPENDIX A .......................................................................................................................................92 TECHNICAL SPECIFICATIONS ..............................................................................................................92 Alloy Computer Products Pty Ltd Copyright ©2007 3 GSS Series User Manual Caution Electronic Circuit devices are sensitive to static electricity. Dry weather conditions or walking across a carpeted floor may cause you to acquire a static electric charge. To protect your switch, always: • Touch the metal chassis of your computer to ground the static electrical charge before you handle the switch. • Pick up the switch by holding it on the left and right edges only. Electronic Emission Notices Federal Communications Commission (FCC) Statement This equipment has been tested and found to comply with the limits for a Class A computing device pursuant to Subpart J of Part 15 of FCC Rules, which are designed to provide reasonable protection against such interference when operated in a commercial environment. European Community (CE) Electromagnetic Compatibility Directive This equipment has been tested and found to comply with the protection requirements of European Emission Standard EN55022/EN60555-2 and the Generic European Immunity Standard EN50082-1. EMC: EN55022(1988)/CISPR-22(1985) EN60555-2(1995) EN60555-3 IEC1000-4-2(1995) IEC1000-4-3(1995) IEC1000-4-4(1995) class A class A 4K V CD, 8KV, AD 3V/m 1KV – (power line), 0.5KV – (signal line) Australian C-Tick Compliance. This equipment is compliant with the required Australian C-Tick standards Alloy Computer Products Pty Ltd Copyright ©2007 4 GSS Series User Manual About this User Manual This User Manual will guide you on procedures to install, configure and monitor the Alloy 48 port Gigabit Web Managed Switch utilising the built-in web and console management interfaces. Overview of the User Manual • • • Chapter 1 “Introduction” describes the features of the GSS-48T4SFP Gigabit Web Managed switch Chapter 2 “Installation” Chapter 3 “Operation of the Web-based Management” Alloy Computer Products Pty Ltd Copyright ©2007 5 GSS Series User Manual 1. Introduction 1.1 Overview The Alloy 48 Port Gigabit Switch meets all IEEE 802.3/u/x/z standards. It features 48x 10/100/1000Mbps copper RJ-45 ports and 4x Paired Gigabit Ethernet SFP Ports. The SFP ports can be used to install a range of optional mini-GBIC Gigabit Ethernet Port Modules (which provide the ability to connect multimode and/or single mode fibre optic cable links – see below); the SFP ports are each paired with one of the 10/100/1000Mbps copper RJ-45 ports. The GSS-48T4SFP can be managed through any of its Ethernet RJ-45 ports, using a web-based browser such as Internet Explorer or Firefox. The GSS-48T4SFP can also be managed via a serial console port or telnet for command line based management. The SFP ports support the following optional mini-GBIC modules for fibre optic cable connections (either single mode or multimode terminated in LC type connectors): • • • • • • • • • • • 1000Mbps multimode 1000Base-SX, 850nm, max. range 500m 1000Mbps single mode 1000Base-LX, 1310nm, max. range 10Km 1000Mbps single mode 1000Base-LHX, 1310nm, max. range 40Km 1000Mbps single mode 1000Base-LHX, 1550nm, max. range 40Km 1000Mbps single mode 1000Base-ZX, 1550nm, max. range 70Km 1000Mbps single mode 1000Base-EZX, 1550nm, max. range 120Km 1000Mbps WDM single mode/single core 1310nm, max. range 20Km 1000Mbps WDM single mode/single core 1550nm, max. range 20Km 1000Mbps WDM single mode/single core 1310nm, max. range 40Km 1000Mbps WDM single mode/single core 1550nm, max. range 40Km 1000Mbps CWDM single mode/single core 1470 - 1610nm, max. range 70Km Notes: * The two WDM (Wave Division Multiplexer) mini-GBIC modules are designed to facilitate a link over a single core of single mode fibre cable. The two units must be used in a paired manner, one at either end of the link. * Mini-GBIC modules that are designed to the relevant standards should be compatible with any make of switch with SFP ports. If you have concerns regarding compatibility, please contact the supplier of your mini-GBIC product. The 10/100/1000Mbps copper ports meet all IEEE 802.3/u/x/z Gigabit and Fast Ethernet specifications. The 1000Mbps SFP Fibre ports via optional mini-GBIC modules are compliant with all IEEE 802.3z and 1000Base-SX/LX/LHX/ZX/EZX standards. 1000Mbps single fibre WDM transceivers are designed with an optic Wavelength Division Multiplexing (WDM) technology that transports bi-directional full duplex signals over a single fibre core. Alloy Computer Products Pty Ltd Copyright ©2007 6 GSS Series User Manual 1.2 Key Features • • • • • • • 48 10/100/1000Mbps Gigabit Ethernet Ports all compliant with IEEE802.3, 802.3u, 802.3z and 802.3ab 4 Paired TP/SFP fibre ports Web Based Management Port Based VLAN and Tag-based (IEEE802.1q) VLAN 802.1p Class of Service with 8 level priority queuing Port Trunking with flexible load distribution and failover function Port mirroring function 1.3 Checklist Before you start installing your switch, verify that the package contains the following: • • • • A GSS-48T4SFP Gigabit Web Managed Switch Mounting Accessories (for 19” Rack Shelf mounting) CD-ROM AC Power Cord Please notify your supplier immediately if any of the aforementioned items are missing or damaged. 1.4 Overview of the GSS-48T4SFP Fig. 1.1 Front view of the GSS-48T4SFP switch Alloy Computer Products Pty Ltd Copyright ©2007 7 GSS Series User Manual 1.4.1 User interfaces on the front panel The front panel of the GSS-16T4SFP and GSS-24T4SFP consists of 16x or 24x 10/100/1000Mbps Copper Gigabit Ethernet ports, 4x SFP fibre ports and 1x reset button to restore factory configuration. TP LED Display Panel System LED Display Panel Factory Default Button Gigabit Ethernet Ports SFP Fibre Ports SFP LED Display Panel Fig. 1.2 Front Panel of the GSS-16T4SFP LED Indicators LED COLOUR Power CPU System LED’s Lit when Power is active Blinks when operating normally Lit when switch has a problem Gigabit Copper Ports Green Lit when link is active, flashes when traffic is present Green/Amber Lit green when 1000Mb link Lit amber when 100Mb link Off when 10Mb link or no link present Gigabit Fibre Ports Green Lit when link is active, flashes when traffic present Green Green Link/Act 10/100/1000Mbps SFP(LINK/ACT) FUNCTION Note: All SFP ports are paired with one of the 10/100/1000Mbps copper RJ-45 ports. Only one of the paired ports can be used. 1.4.2 User interfaces on the rear panel Mains Power Plug Fig. 1.3 Rear Panel of the GSS-16T4SFP & GSS-24T4SFP Alloy Computer Products Pty Ltd Copyright ©2007 8 GSS Series User Manual 1.5. Overview of the Optional SFP Modules With the GSS-48T4SFP switch, the SFP ports are paired with RJ-45 copper ports 45, 46, 47 and 48. Only one of any given paired port can be used. In this manner, these paired ports can be seen as ‘Dual Media’ ports that support 10/100/1000Mbps or 1000Mbps fibre via the SFP interfaces. Optional 1000Mbps mini-GBIC fibre transceiver modules can be used for high-speed uplink connections to fibre backbones or servers, when installed in the SFP ports. A range of optional Alloy mini-GBIC modules are available: Alloy Part No. Description MGBIC-MLC 1000Mbps multimode 1000Base-SX, 850nm, max. range 500m MGBIC-SLC10 1000Mbps single mode 1000Base-LX, 1310nm, max. range 10Km MGBIC-SLC4013 1000Mbps single mode 1000Base-LHX, 1310nm, max. range 40Km MGBIC-SLC4015 1000Mbps single mode 1000Base-LHX, 1550nm, max. range 40Km MGBIC-SLC70 1000Mbps single mode 1000Base-ZX, 1550nm, max. range 70Km MGBIC-SLC120 1000Mbps single mode 1000Base-EZX, 1550nm, max. range 120Km MGBIC-WDMS3.20 1000Mbps WDM single mode/single core 1310nm, max. range 20Km MGBIC-WDMS5.20 1000Mbps WDM single mode/single core 1550nm, max. range 20Km MGBIC-WDMS3.40 1000Mbps WDM single mode/single core 1310nm, max. range 40Km MGBIC-WDMS5.40 1000Mbps WDM single mode/single core 1550nm, max. range 40Km MGBIC-CWDM-70 1000Mbps CWDM single mode/single core 1470 -1610nm, max. range 70Km Notes: * The two WDM (Wave Division Multiplexer) mini-GBIC modules are designed to facilitate a link over a single core of single mode fibre cable. The two units must be used in a paired manner, one at either end of the link. * Mini-GBIC modules that are designed to the relevant standards should be compatible with any make of switch with SFP ports. If you have concerns regarding compatibility, please contact the supplier of your mini-GBIC product. * The information given in the table above is current at time of publication; availability of individual Alloy mini-GBIC modules may vary over time. Fig. 1.4: Front View of 1000Base-SX/LX LC, SFP Fibre Transceiver Fig. 1.5: Front View of 1000Base-LX WDM LC SFP Fibre Transceiver Alloy Computer Products Pty Ltd Copyright ©2007 9 GSS Series User Manual 2. Installation 2.1. Starting the GSS-48T4SFP This section provides a quick start guide for: • Hardware and Cable Installation • Management Station Installation • Software booting and configuration 2.1.1. Hardware and Cable Installation Please Note: ⇒ Wear a grounding strap to avoid damaging the switch with electrostatic discharge ⇒ Be sure that the power switch is in the ‘OFF’ position before you insert the power cord • Installing Optional SFP Mini-GBIC Modules SFP port Fig. 2.1: Installation of optional SFP mini-GBIC Mini-GBIC module • Connecting the SFP Mini-GBIC Module to the Chassis: The optional SFP Mini-GBIC modules are hot-swappable, so you can plug or unplug them while the power is applied to the switch. 1. Verify that the mini-GBIC module is compatible with the SFP port on the switch (for example, some switch manufacturer’s design their mini-GBIC modules to be operable only in their branded devices). 2. Verify that the type of mini-GBIC you have selected for use will be compatible with the type of fibre optic cable that is to be used. 3. Verify that the type of mini-GBIC you have selected for use will be compatible with the fibre optic transceiver at the other end of the link (e.g. – compatible wavelength and standard) 4. Slide the module along the slot and ensure that the module is properly seated against the SFP slot socket/connector. 5. Install the media cable for network connection 6. Repeat the above steps, as needed, for each module to be installed into the switch Alloy Computer Products Pty Ltd Copyright ©2007 10 GSS Series User Manual • Copper Ports - Cable Installation Please Note: ⇒ The RJ-45 ports on the GSS-48T4SFP support MDI/MDI-X auto-crossover functionality. This enables use of either straight-through or crossover UTP cable types; the RJ-45 ports will automatically be configured to suit the characteristics of the device at the remote end of the link. ⇒ The RJ-45 ports on the GSS-48T4SFP support Nway auto-negotiation; the ports will automatically be configured to be compatible with the speed and duplex settings of the device at the remote end of the link. ⇒ The minimum grade of cable for use with the switch is Cat. 5e grade UTP or STP. Higher grades of UTP/STP cable may also be used to connect to the copper RJ-45 ports. 1. Depress the clip on the RJ-45 connector and push into the RJ-45 port. Release connector and ensure that the cable connector is securely locked into the RJ-45 port. 2. Repeat the above steps, as needed, for each RJ-45 port to be connected. • Power On Please Note: ⇒ Alloy GSS-48T4SFP uses a 100-240 VAC, 50-60 Hz power supply. The power supply will automatically convert your local AC power source to DC power for use by the switch. 1. Ensure that the power switch is turned off before connecting mains power 2. Connect the power cord supplied with the switch to your nearest mains outlet 3. Connect the other end of the power cord into the IEC power port on the switch 4. Lock the power cable into place using the power cable clamp mounted on the IEC power port 5. Turn the switch on 6. When initial power is applied, all the LED indicators will light up for a brief period while the system performs its startup tests. Once the initial tests (‘POST test’) have completed all except the power LED should return to an off state. • Firmware Loading After power on, the boot-loader will load the switch firmware into the main operational memory. This process will take about 30 seconds. Once completed, the switch will flash all the LED’s once and then switch to a ready state. Alloy Computer Products Pty Ltd Copyright ©2007 11 GSS Series User Manual 2.1.2. Cabling Requirements To help ensure a successful installation and keep network performance at optimum levels, take care to use Cat.5E grade or higher cabling. Ensure that stranded core UTP cable, if used, runs for no more than 10 metres, and that solid core runs for a maximum of 100metres. Poor cabling is the most common cause for network dropouts or poor performance. 2.1.2.1. Cabling Requirements for UTP Ports • For Ethernet copper network connections, the UTP cable used must be Cat. 3 grade as a minimum, with a maximum length of 100 metres • For Fast Ethernet copper network connections, the UTP cable used must be Cat. 5 grade as a minimum, with a maximum length of 100 metres • For Gigabit Ethernet copper network connection, UTP cable used must be Cat.5 grade or higher, with a maximum length of 100 metres. Cat.5e grade UTP cable is recommended. 2.1.2.2. Cabling Requirements for 1000SX/LX/ZX SFP Modules There are two categories of fibre optic cable - multimode (MM) and single mode (SM). The later is categorised into several classes by the distance it supports. These are SX, LX, LHX, ZX and EZX. The majority of mini-GBIC modules available use a LC type connector. The connector types used currently on Alloy mini-GBIC modules are LC and WDM SC, for the following module types: • Gigabit Fibre with multimode LC mini-GBIC modules • Gigabit Fibre with single mode LC mini-GBIC modules • Gigabit Fibre with single mode/single core WDM SC 1310nm mini-GBIC modules • Gigabit Fibre with single mode/single core WDM SC 1550nm mini-GBIC modules The following table; lists the types of fibre optic cable that are supported by SFP mini-GBIC modules installed in the GSS-48T4SFP. Other cable types not listed here may be supported; please contact the supplier of your switch for details. Multimode Fibre Cable and Modal Bandwidth Multimode 62.5/125μm IEEE 802.3z Gigabit Ethernet 1000SX 850nm Modal Bandwidth Range Multimode 50/125μm Modal Bandwidth Range 160MHz-Km 220m 400MHz-Km 500m 200MHz-Km 275m 500MHz-Km 550m Single mode Fibre 9/125μm 1000BaseLX/LHX/XD/ZX Single mode transceiver 1310nm 10Km, 40Km Single mode transceiver 1550nm 40Km, 70Km, 120Km 1000Base-LX Single Fibre (WDM SC) Single mode *20Km, 40Km Single mode *20Km, 40Km TX(Transmit) 1310nm RX(Receive) 1550nm TX(Transmit) 1550nm RX(Receive) 1310nm Alloy Computer Products Pty Ltd Copyright ©2007 12 GSS Series User Manual Cont. Please Note: ⇒ Further information can be found in section 1.5 on page 7 ⇒ All figures denoting the range a given cable type can achieve must be treated as maximum values. A number of variables can limit the actual range that can be achieved – grade of cable used, quality of cable, and presence of joins in cable runs, for example Alloy Computer Products Pty Ltd Copyright ©2007 13 GSS Series User Manual 3. Operation of the Web Based Management The following chapter allows the administrator to monitor and manage the GSS-48T4SFP through the web management interface. Management functionality such as Port Based and 802.1q VLAN, Port Aggregation (Trunking), QoS, Port configuration and much more can all be configured quickly and easily via any Ethernet port of the GSS-48T4SFP. To access the web management open a web browser such as Internet Explorer or Mozilla Firefox and enter the default IP address into the address bar. The default network settings for the GSS-48T4SFP are shown below: IP Address: 192.168.1.1 Subnet Mask: 255.255.255.0 Gateway: 192.168.1.254 Username: admin Password: admin Once you have entered the IP address of the GSS Series switch into a web browser you will be prompted with a login screen where you will need to enter a valid username and password to gain access to the switch. The default username and password are shown above. Fig. 3.1 Alloy Computer Products Pty Ltd Copyright ©2007 14 GSS Series User Manual 3.1 Web Management Home Overview Once you have entered a valid username and password and logged into the switch the System Configuration page will be displayed, this is the default page, it will be displayed every time that you log into the switch. On the left hand side of the screen you will see a menu structure used to Configure, Monitor and manage your switch. System • System Information – Displays system information including Model Name, Firmware Version, Hardware Version, MAC Address etc. Also used to configure IP and SNMP settings. • IP – Used to configure the switches IP address settings. • Time – Used to configure time settings for the switch. • Account – Used to configure account access to the switch. Port • Status – Displays the link status of each port. • Configuration – Used to configure port speed and flow control settings. • Simple Counter – Displays basic port statistics. • Detailed Counter - Displays detailed port statistics. Storm – Used to configure broadcast storm settings. Mirror – Used to configure port mirroring. Filter • Bad Length – Used to enable filtering features. • Unknown Encapsulation – Used to enable filtering features. • Unknown Ether-Type – Used to enable filtering features. • Unknown IP Protocol – Used to enable filtering features. • IPv4 Options – Used to enable filtering features. • Unknown Source – Used to enable filtering features. QoS • Priority – Used to configure priority levels for each QoS class. • Policer – Used to configure policy QoS settings for each port. • Shaper – Used to configure shaper QoS settings for each port. • Flow – Used to configure flow QoS settings for each port. • Police Flow – Used to configure police flow QoS settings for each port. • Mark – Used to configure mark QoS settings for each port. • Mark Enable – Used to configure mark enable QoS settings for each port. ACL • ACL Mode – Used to configure Access Control List mode. • ACL/VLAN Mapping – Used to map ACL to a particular VLAN. • ACL Rule – Used to configure ACL rules. Alloy Computer Products Pty Ltd Copyright ©2007 15 GSS Series User Manual ACL QoS Load – Used to load the ACL QoS settings. User Defined – Used to configure user defined ACL controls. SNMP – Used to configure SNMP settings. Link Aggregation – Used to configure link aggregation settings. Alarm • Events – Used to enable particular alarm events. • Email/SMS – Used to configure Email and SMS settings. Configuration • Save / Restore – Used to save and restore the configuration of the switch. • Config File – Used to download and upload the configuration settings of your switch. Diagnostics • Diag – Performs diagnostic tests of the switch. • Loopback – Performs a loopback test on all ports. • Ping Test – Used to test network connectivity. Loop Detection – Used to enable Loop Detection. TFTP Server – Used to enter the IP Address of a TFTP Server. Log – View system log. Firmware Upgrade – Used to upgrade the firmware in the switch. Max Packet Length – Used to set the maximum allowed packet length. MAC Table • Information – Displays known MAC Addresses. • Aging Time – Used to set the MAC aging time of the switch. • Static Forward – Used to add static MAC address entries. • Static Filter – Used to configure MAC address filtering. VLAN • VLAN Mode – Used to select the desired VLAN mode. • VLAN Group – Used to configure VLAN groups. • Port Protocol – Used to configure PVID for different protocol types. • Port VID – Used to configure the PVID for each port. Reboot – Used to save and reboot the switch. Logout – Used to logout of the web management. Alloy Computer Products Pty Ltd Copyright ©2007 16 GSS Series User Manual 3.2 System 3.2.1 System Information The System Information configuration page is used to display basic switch information including the Model Name, MAC Address, Firmware Version, Hardware Version, and IP information. Fig. 3.2 Model Name: Displays the model name of the switch. (Read Only) System Desc: Displays a brief description of the switch. (Read Only) Location: Enter a descriptive location in the space provided. Contact: Enter a contact name in the space provided. System Up Time: Displays how long the switch has been running. Current Time: Displays the current time. BIOS Version: Displays the BIOS version of the switch. F/W Version: Displays the current firmware loaded into the switch. (Read Only) H/W Version: Displays the current hardware version. (Read Only) Serial Number: Displays the serial number of the switch. (Read Only) Host IP Add: Displays the current IP address of the switch. (Read Only) MAC Address: Displays the MAC Address of the switch. (Read Only) Device Port: Displays what ports are on this switch. RAM Size: Displays the amount of RAM in the switch. Flash Size: Displays the amount of flash RAM in the switch. Apply Button: The Apply button must be pressed after making any changes to any of the values on this screen. Alloy Computer Products Pty Ltd Copyright ©2007 17 GSS Series User Manual 3.2.2 IP The IP configuration page is used to configure the IP Address, Subnet Mask, Gateway and DNS server settings. Fig. 3.3 IP Address: Enter the IP Address of the switch into the space the provided. Subnet Mask: Select the appropriate Subnet Mask from the drop down box. Default Gateway: Enter the Default Gateway for the switch into the space provided. DNS Server: Enter the DNS server into the space provided. Apply Button: The Apply button must be pressed after making any changes to any of the values on this screen. Alloy Computer Products Pty Ltd Copyright ©2007 18 GSS Series User Manual 3.2.3 Time The GSS-48T4SFP provides two methods to keep the switch’s time settings correct, they are via manual input and via a Time Server on the internet. If you are manually entering your time settings enter the “Year”, “Month”, “Day, “Hour”, “Minute” and “Seconds” into the space provided. If you enter a number that is invalid, for instance you enter 61 in the seconds field it will be rounded down to the nearest valid number, in this case 59. If you are using NTP (Network Time Protocol) there are four built in Internet Time Servers that you can use, or there is a space provided where you can enter a particular Time Server address. When using NTP you will also need to specify what time zone you are presently located in. The Time Zone is Greenwich-centered which uses the expression form of GMT +/xx hours. Fig. 3.4 Current Time: Shows the current system time. Manual: You can set the switches time settings manually. Enter the Year, Month, Day, Hour, Minute and Seconds into the spaces provided. The valid figures for the parameters Year, Month, Day, Hour, Minute and Seconds are >= 2000, 1 – 12, 1 – 31, 0 – 23, 0 – 59, respectively. NTP: NTP is used to sync the network time with a time server on the internet based on the Greenwich Mean Time (GMT). Once the user has selected one of the built in time servers or entered a manual time server and selected the correct time zone click the <apply> button to update. The switch will now sync with the selected time server. However this synchronisation does not occur periodically if the time does become out of sync for some unknown reason the administrator will manually have to click the apply button again to re-sync with the time server. The Time Zone is an offset time of the GMT. The switch supports a configurable time zone from -12 to +13 hours in increments of 1 hour. Daylight Savings: Daylight Savings can be configured from -5 ~ +5 hours in increments of 1 hour. If your location has adopted daylight savings please enter the appropriate value in the daylight savings drop down box. If your area does have daylight savings you will need to enter a starting and ending date of the daylight savings period. Once the date passes the starting Alloy Computer Products Pty Ltd Copyright ©2007 19 GSS Series User Manual date of the daylight savings settings the switch’s time will be adjusted by the amount of hours entered in the drop down box. Apply Button: The Apply button must be pressed after making any changes to any of the values on this screen. Alloy Computer Products Pty Ltd Copyright ©2007 20 GSS Series User Manual 3.2.4 Account The account configuration is used to create or modify guest and administrator accounts. The GSS-48T4SFP allows the administrator to create up to 5 guest accounts. Accounts can only be created by the administrator. When a Guest user logs into the switch they will not be able to modify any parameters, they will only have read only rights to the switch. A Guest user can log into the switch and change there own password, but will not be able to modify any other accounts. The Guest account is purely created for monitoring purposes only. Administrators have the ability to delete accounts and also change the username and passwords of each account. The Administrator account can not be deleted. Fig. 3.5 Create New: Click the Create New button to create a new guest account. Edit: Click the Edit button to edit an existing account, please ensure that you click on an account before clicking the Edit button. Delete: Select the account that you want to delete and click the Delete button. Authorisation: Specifies what rights the user has. Only Administrator and Guest accounts can be created. Username: Please enter a username for the administrator or guest account, a maximum of 15 alphanumeric characters only. Password: Please enter a password for the administrator or guest account, a maximum of 15 alphanumeric characters only. Confirm Password: Please confirm the password. Alloy Computer Products Pty Ltd Copyright ©2007 21 GSS Series User Manual 3.3 Port 3.3.1 Status The Port Status section allows the administrator to view the current status of each port. The port status screen tells us the type of media being used, whether the link is active or not, whether the port is active or not, if it is using auto negotiation, what speed the port is running at and whether flow control is enabled. Fig 3.6 Port: Is the physical port of the switch. Port Name: Displays the name of the port if it’s been configured in the port configuration section. Media: Displays TP for a copper port and Fibre for a fibre port. Link: Displays the link status of the port, either up or down. State: Displays the state of the port, either enabled or disabled. Auto Nego. Displays whether Auto-Negotiation is enabled or disabled. Speed/Duplex: Displays the speed and duplex settings of the port. Flow Control: Displays whether flow control has been enabled or disabled for both transmit and receive. Alloy Computer Products Pty Ltd Copyright ©2007 22 GSS Series User Manual 3.3.2 Configuration The Port Configuration section allows the administrator to Enable or Disable a port, turn auto negotiation on or off for a particular port and also force the speed and duplex settings of each port. The administrator can also Enable or Disable the flow control settings for each port. Fig 3.7 Port: Click on the port number you wish to configure. Port Name: Enter a descriptive name for the port. State: Shows whether the port is enabled or disabled, if Enabled traffic can be transmitted and received from that port, if Disabled no traffic can be passed through this port. If a cable is plugged into a port and the port is set to disabled the link light will become active but no data will pass through that port. Mode: Is used to set the speed and duplex settings for a particular port. If Auto is displayed the port is running in auto-negotiation mode. If you are connecting to a device that is having trouble linking when running in Auto mode you may need to manually force the speed and duplex settings of the port. The port can be forced to 10Mbps Half Duplex (10M/Half), 10Mbps Full Duplex (10M/Full), 100Mbps Half Duplex (100M/Half) and 100Mbps Full Duplex (100M/Full). Flow Control: Used to configure flow control settings for the port. Flow control can be enabled, disabled or Asymmetric Flow control can be used. Apply Button: The Apply button must be pressed after making any changes to any of the values on this screen. Alloy Computer Products Pty Ltd Copyright ©2007 23 GSS Series User Manual 3.3.3 Simple Counter The Simple Counter section allows the administrator to view information regarding the amount of data that is being passed through a particular port whether the packets are good or bad. Fig. 3-8 shows you a screen shot of the simple counter screen. As you can see from the image all ports on the switch are displayed at one time. If the amount of data being displayed on the screen is more that 12 digits long, the counter will be reset back to zero and continue on. Fig. 3.8 Port No: The physical port of the switch. RX Byte: Displays the total amount of bytes received by the port. TX Byte: Displays the total amount of bytes transmitted by the port. RX Packet: Displays the total amount of packets received by the port. TX Packet: Displays the total amount of packets transmitted by the port. RX Error Packet: Displays the amount of error packets received by the switch. TX Collision: Displays the total amount of transmitted collisions that have occurred. Refresh Interval: The user can define the amount of time the switch will take to update the ports statistics. This is measured in seconds and ranges from 3 – 10. Reset All: The reset button is located at the top right hand side of the screen and is used to reset the counters back to zero. Alloy Computer Products Pty Ltd Copyright ©2007 24 GSS Series User Manual 3.3.4 Detail Counter The Detail Counter section allows the administrator to view information regarding the amount of data that is being passed through a particular port whether the packets are good or bad. Fig. 3-9 shows you a screen shot of the detail counter screen. Unlike the simple counter screen the detail counter screen will only display the statistics of one port at a time. If you wish to view a particular ports statistics select the port from the drop down box provided. If the amount of data being displayed on the screen is more that 12 digits long, the counter will be reset back to zero and continue on. Fig. 3.9 RX Unicast: Displays the total number of unicast packets received. RX Multicast: Displays the total number of multicast packets received. RX Broadcast: Displays the total number of broadcast packets received. RX Pause: Displays the total number of pause packets received. RX Other Control: Displays the total number of other control packets received. RX 64 Bytes: Displays the total number of 64 byte frames received. RX 65 ~ 127 Bytes: Displays the total number of 65 ~ 127 byte frames received. RX 128 ~ 255 Bytes: Displays the total number of 128 ~ 255 byte frames received. RX 256 ~ 511 Bytes: Displays the total number of 256 ~ 511 byte frames received. RX 512 ~ 1023 Bytes: Displays the total number of 512 ~ 1023 byte frames received. RX 1024 ~ 1518 Bytes: Displays the total number of 1024 ~ 1518 byte frames received. RX 1519 ~ 1522 Bytes: Displays the total number of 1519 ~ 1522 byte frames received. RX Jumbo Packets: Displays the total number of Jumbo packets received. Alloy Computer Products Pty Ltd Copyright ©2007 25 GSS Series User Manual RX Runt Packets: Displays the total number of runt packets received. RX Oversize Packets: Displays the total number of oversize packets received. RX CRC: Displays the total number of CRC error packets received. RX Code: Displays the total number of Code packets received. RX Fragment: Displays the total number of fragmented packets received. TX Unicast: Displays the total number of unicast packets transmitted. TX Multicast: Displays the total number of multicast packets transmitted. TX Broadcast: Displays the total number of broadcast packets transmitted. TX Pause: Displays the total number of pause packets transmitted. TX 64 Bytes: Displays the total number of 64 byte frames transmitted. TX 65 ~ 127 Bytes: Displays the total number of 65 ~ 127 byte frames transmitted. TX 128 ~ 255 Bytes: Displays the total number of 128 ~ 255 byte frames transmitted. TX 256 ~ 511 Bytes: Displays the total number of 256 ~ 511 byte frames transmitted. TX 512 ~ 1023 Bytes: Displays the total number of 512 ~ 1023 byte frames transmitted. TX 1024 ~ 1518 Bytes: Displays the total number of 1024 ~ 1518 byte frames transmitted. TX 1519 ~ 1522 Bytes: Displays the total number of 1519 ~ 1522 byte frames transmitted. TX Jumbo Packets: Displays the total number of Jumbo packets transmitted. TX Single Collision: Displays the total number of single collision packets transmitted. TX Multiple Collision: Displays the total number of multiple collision packets transmitted. TX Excessive Col: Displays the total number of excessive collision packets transmitted. TX Late Collision: Displays the total number of late collision packets transmitted. TX Deferred: Displays the total number of deferred collision packets transmitted. Select: Used to select what ports statistics are being displayed. Refresh Interval: The user can define the amount of time the switch will take to update the ports statistics this is measured in seconds and ranges from 3 – 10. Reset: The reset button is located at the top right hand side of the screen and is used to reset the counters back to zero. Alloy Computer Products Pty Ltd Copyright ©2007 26 GSS Series User Manual 3.4 Storm The GSS-48T4SFP allows suppression of broadcast and multicast packets. Broadcast and multicast packets can cause the switch and your network to run poorly. By suppressing broadcast and or multicast packets from entering the switch, it allows the switch to process normal packets as required. Fig. 3.10 Storm: Used to enable and configure what storm control is used. The administrator can select from Broadcast or Broadcast and Multicast. Rate: Specify the storm rate from 119 – 125000000. Burst Limit: Specify the burst limit. State: Tick the check box next to the port(s) that you want storm control enabled. All Ports Unchecked: Used to deselect all ports. All Ports Checked: Used to select all ports. Apply Button: The Apply button must be pressed after making any changes to any of the values on this screen. Alloy Computer Products Pty Ltd Copyright ©2007 27 GSS Series User Manual 3.5 Mirror The Mirror function of the GSS-48T4SFP is used to capture data from a particular port on the switch. Any port on the switch can be selected as the monitoring port; this port will be used to capture data from another port on the switch using third party data capturing software. Data can be captured from more than one port on the switch simultaneously therefore you can have one monitoring port and several other ports being monitored by the one port. Fig. 3.11 Monitoring Port: Select the port you would like to use as the capturing port. This port will be plugged directly to a PC running Packet Capturing software. Monitored Port: This is the port or ports that the Monitoring Port will be capturing packets from. Any data that is sent or received by these ports will be duplicated to the Mirror port. Apply Button: The Apply button must be pressed after making any changes to any of the values on this screen. Alloy Computer Products Pty Ltd Copyright ©2007 28 GSS Series User Manual 3.6 Filter The GSS-48T4SFP allows the administrator to filter unwanted packets from entering the switch. If packets are of the wrong size, wrong encapsulation type, unknown ether-type, unknown IP Protocol, wrong IPv4 options or the packets contain an unknown source address these can all be discarded by the switch. 3.6.1 Bad Length Fig. 3.12 Ports: Tick the check box next to the corresponding port to enable Bad Length Filtering on that port. If a packet is received which is under or over size the packet will be discarded. Apply Button: The Apply button must be pressed after making any changes to any of the values on this screen. Alloy Computer Products Pty Ltd Copyright ©2007 29 GSS Series User Manual 3.6.2 Bad Length Fig. 3.13 Ports: Tick the check box next to the corresponding port to enable Unknown Encapsulation Filtering on that port. If a packet is received which has an unknown encapsulation type the packet will be discarded. Apply Button: The Apply button must be pressed after making any changes to any of the values on this screen. Alloy Computer Products Pty Ltd Copyright ©2007 30 GSS Series User Manual 3.6.3 Unknown Ether-Type Fig. 3.14 Ports: Tick the check box next to the corresponding port to enable Unknown Ether-Type Filtering on that port. If a packet is received which has an unknown ether-type the packet will be discarded. Apply Button: The Apply button must be pressed after making any changes to any of the values on this screen. Alloy Computer Products Pty Ltd Copyright ©2007 31 GSS Series User Manual 3.6.4 Unknown IP Protocol Fig. 3.15 Ports: Tick the check box next to the corresponding port to enable Unknown IP Protocol Filtering on that port. If a packet is received which has an unknown IP Protocol the packet will be discarded. Apply Button: The Apply button must be pressed after making any changes to any of the values on this screen. Alloy Computer Products Pty Ltd Copyright ©2007 32 GSS Series User Manual 3.6.5 IPv4 Options Fig. 3.16 Ports: Tick the check box next to the corresponding port to enable Unknown IPv4 Options Filtering on that port. If a packet is received which has an unknown IPv4 Option the packet will be discarded. Apply Button: The Apply button must be pressed after making any changes to any of the values on this screen. Alloy Computer Products Pty Ltd Copyright ©2007 33 GSS Series User Manual 3.6.6 Unknown Source Fig. 3.17 Ports: Tick the check box next to the corresponding port to enable Unknown Source Filtering on that port. If a packet is received which has an unknown source address the packet will be discarded. Apply Button: The Apply button must be pressed after making any changes to any of the values on this screen. Alloy Computer Products Pty Ltd Copyright ©2007 34 GSS Series User Manual 3.7 QoS The GSS-48T4SFP offers three different QoS methods; they are DSCP (Differentiated Service Code Point), Port based and 802.1p. 3.7.1 Priority Fig. 3.18 3.7.1.1 IP Layer Priority State Setting The IP Layer Priority State setting is used to disable DSCP. If you apply multiple QoS rules to a single port DSCP will always override port based and 802.1p. Therefore if you want to use port based or 802.1p QoS you will need to enable the IP-Ignored function. Fig. 3.19 Port: Physical port of the switch. IP-Ignored: Used to enable or disable the IP-Ignored function. When enabled DSCP Alloy Computer Products Pty Ltd Copyright ©2007 35 GSS Series User Manual will be disabled for the selected port. Apply Button: The Apply button must be pressed after making any changes to any of the values on this screen. Alloy Computer Products Pty Ltd Copyright ©2007 36 GSS Series User Manual 3.7.1.2 Differentiated Service Code Point (DSCP) The DSCP configuration page is used to set a priority level on each of the DSCP values. Fig. 3.20 DSCP: The DSCP value. Priority: Used to set a priority level of the DSCP value. Apply Button: The Apply button must be pressed after making any changes to any of the values on this screen. Alloy Computer Products Pty Ltd Copyright ©2007 37 GSS Series User Manual 3.7.1.3 Port Priority Setting The Port Priority configuration page is used to set a priority level on each port. Fig. 3.21 Port: Physical port of the switch. Priority: Used to set a priority level of the port. Priority levels range form 0 -7. Apply Button: The Apply button must be pressed after making any changes to any of the values on this screen. Alloy Computer Products Pty Ltd Copyright ©2007 38 GSS Series User Manual 3.7.1.4 Shaper Queue This page is used to assign a priority level to each of the 4 queues, 8 priority levels are available. Fig. 3.22 Priority: Priority level to assign to Queue. Queue: Select the desired Queue to be bound to the particular priority level. Queue values range from 0 to 3. Apply Button: The Apply button must be pressed after making any changes to any of the values on this screen. Alloy Computer Products Pty Ltd Copyright ©2007 39 GSS Series User Manual 3.7.1.5 ACL Priority Override The ACL Priority override function allows any ACL (Access Control List) rule to override the QoS settings applied to that port. Fig. 3.23 Port: Physical port of the switch. ACL Override: Used to enable or disable the ACL Override function. Apply Button: The Apply button must be pressed after making any changes to any of the values on this screen. Alloy Computer Products Pty Ltd Copyright ©2007 40 GSS Series User Manual 3.7.2 Policer The Policer function is used to determine what happens to ingress packets that match the configured Flow ID. The Flow ID is based on particular Queue levels 0 - 3. Fig. 3.24 Port: Is the physical port number of the switch. Policer: Is the Queue value. Rate (%): This is the percentage rate of the port. If the port is receiving data at the configured percentage rate of the set limit, then the appropriate action will be applied. Burst Limit (bytes): Enter the required burst rate. The burst rate limits how many packets are allowed in the ports memory buffer. Action: The action function determines what happens to the packets that match the policy rules, four options are available; PASS – will pass packets through the switch. DISCARD – will discard packets that match this rule. DISCARD–CONGESTED – will discard packets if the buffer is congested. DEMOTE – will demote packets to a configured value based on the mark settings. Apply Button: The Apply button must be pressed after making any changes to any of the values on this screen. Alloy Computer Products Pty Ltd Copyright ©2007 41 GSS Series User Manual 3.7.3 Shaper The Shaper function allows egress packets to be limited depending on the amount of packets being transmitted from the switch. Fig. 3.25 State: Used to enable or disable the shaper function. Burst Limit: Is the pre-configured value that determines whether packets will be dropped or forwarded. Value ranges from 1 – 61440 bytes. Port: Is the physical port number of the switch. Queue: Is the Queue value. Rate (%): This is the percentage rate of the port. If the port is transmitting data at the configured percentage rate of the set limit, then packets will not enter the egress queue. Apply Button: The Apply button must be pressed after making any changes to any of the values on this screen. Alloy Computer Products Pty Ltd Copyright ©2007 42 GSS Series User Manual 3.7.4 Flow 3.7.4.1 IP Flow ID Ignore Setting This is used to override the IP Flow function and use the MAC flow function instead. When enabled only the MAC flow rules will take effect. Fig. 3.26 Port: Is the physical port number of the switch. IP-Ignored: Used to enable or disable the IP Ignored function. Apply Button: The Apply button must be pressed after making any changes to any of the values on this screen. Alloy Computer Products Pty Ltd Copyright ©2007 43 GSS Series User Manual 3.7.4.2 IP Flow ID Configuration Packets will be applied a particular Queue level determined by the IP address inside the Ethernet packet. The packets will then be given a high or low priority based on the queue they have been assigned to. Fig. 3.27 IP: Enter a valid IP Address in to the space provided. Prefix: Enter a prefix value between 1 and 32. This prefix value is the value of the IP address in bits. If you want a range of IP addresses to be applied to this rule then you can enter an IP Address and then apply a prefix of 24. Therefore if the IP Address is 192.168.0.x and you have a prefix of 24 then any IP Address of 192.168.0.1 – 192.168.0.254 will be affected. Source Flow ID: Enter the source flow ID. This ID will be applied to the source address found inside the packet. Range is 0 – 3. Destination Flow ID: Enter the destination flow ID. This ID will be applied to the destination address found inside the packet. Range is 0 – 3. Add: Used to create a new IP rule. Edit: Used to edit an existing IP rule. Delete: Used to delete an existing rule. Alloy Computer Products Pty Ltd Copyright ©2007 44 GSS Series User Manual 3.7.4.3 MAC Flow ID Configuration Packets will be applied a particular Queue level determined by the MAC address inside the Ethernet packet. The packets will then be given a high or low priority based on the queue they have been assigned to. Fig. 3.28 MAC: Enter a valid MAC Address in to the space provided. Port No: Enter the port number of the switch. Source Flow ID: Enter the source flow ID. This ID will be applied to the source address found inside the packet. Range is 0 – 3. Destination Flow ID: Enter the destination flow ID. This ID will be applied to the destination address found inside the packet. Range is 0 – 3. Alias: Enter the MAC address alias. Add: Used to create a new IP rule. Edit: Used to edit an existing IP rule. Delete: Used to delete an existing rule. Alloy Computer Products Pty Ltd Copyright ©2007 45 GSS Series User Manual 3.7.5 Police-Flow The Police-Flow configuration page is used to apply different priority levels to the 4 queues used by the IP and MAC ID Flow. Fig. 3.29 Source Flow ID: Select the Source Flow ID from the drop down box. Destination Flow ID: Select the Destination Flow ID from the drop down box. Priority: Priority level for each Flow ID. Policer: Select the appropriate Queue level for each priority setting. Apply Button: The Apply button must be pressed after making any changes to any of the values on this screen. Alloy Computer Products Pty Ltd Copyright ©2007 46 GSS Series User Manual 3.7.6 Mark The Mark section is used to determine what priority level will be applied once a packet has been demoted. This priority level can be changed on both the COS and DSCP fields. Fig. 3.30 Priority: The QoS priority level. Not Demoted: Is the COS priority level based on packets that haven’t been demoted. Demoted: Is the COS priority level based on packets that have been demoted. Not Demoted: Is the DSCP priority level based on packets that haven’t been demoted. Demoted: Is the DSCP priority level based on packets that have been demoted. Apply Button: The Apply button must be pressed after making any changes to any of the values on this screen. Alloy Computer Products Pty Ltd Copyright ©2007 47 GSS Series User Manual 3.7.7 Mark-enable The Mark-enable section is used to enable or disable the mark function for CoS and DSCP on each port. Fig. 3.31 Port: Physical port of the switch. CoS: Used to enable or disable the mark function for CoS. DSCP: Used to enable or disable the mark function for DSCP. Apply Button: The Apply button must be pressed after making any changes to any of the values on this screen. Alloy Computer Products Pty Ltd Copyright ©2007 48 GSS Series User Manual 3.8 ACL 3.8.1 ACL Mode ACL (Access Control List) is designed to protect the switch from unnecessary IP traffic or Layer-4 packets and allows the users to filter denial of service (DoS) floods against the switch, thereby preventing the flood from degrading the performance of the switch. Two modes of ACL are supported VLAN and Port based and a total of 64 ACL rules can be created. Fig. 3.32 Mode: Select the appropriate ACL mode that you would like to use, port mode or vlan mode. Apply Button: The Apply button must be pressed after making any changes to any of the values on this screen. Alloy Computer Products Pty Ltd Copyright ©2007 49 GSS Series User Manual 3.8.2 ACL/VLAN Mapping This section is used to MAP a VLAN ID to a particular ACL rule. Fig. 3.33 Index: Automatically generated number. VLAN ID: Displays the VLAN ID. ACL Number: Select the required ACL number from the drop down box. Apply Button: The Apply button must be pressed after making any changes to any of the values on this screen. Alloy Computer Products Pty Ltd Copyright ©2007 50 GSS Series User Manual 3.8.3 ACL Rule This section is used to create your ACL rules. Fig. 3.34 ACL Number: Select the required ACL number from the drop down box. Create: Used to create an ACL rule. Delete: Used to delete an existing ACL rule. Alloy Computer Products Pty Ltd Copyright ©2007 51 GSS Series User Manual Fig. 3.35 ACL: Automatically generated value, determined by the ACL number. Rule: Automatically generated number. EtherType: Select the Ethernet Type from the drop down box provided. Selected values can be IPv4, Arp, RARP, User Defined 1, User Defined 2, User Defined 3, None and Any. Source IP: Enter the Source IP Address for which the rule will be applied to. Destination IP: Enter the Destination IP Address for which the rule will be applied to. Protocol: Select the protocol type from the drop down box provided. Selected values can be ICMP, IGMP, TCP, UDP, User Defined 1, User Defined 2, User Defined 3, None and Any. Source Port: Enter the source port of the service you wish to use. Only used when set to UDP or TCP protocol. Destination Port: Enter the destination port of the service you wish to use. Only used when set to UDP or TCP protocol. Permit: Select whether you want to permit or deny this type of traffic. Priority: Set a priority level for your ACL rule. Apply Button: The Apply button must be pressed after making any changes to any of the values on this screen. Alloy Computer Products Pty Ltd Copyright ©2007 52 GSS Series User Manual 3.9 ACL QoS Load The ACL QoS Load function is used to apply any of your ACL and QoS settings immediately. Fig. 3.36 Load: Used to activate any of your QoS and ACL configuration settings. Alloy Computer Products Pty Ltd Copyright ©2007 53 GSS Series User Manual 3.10 User Defined The User Defined section is where you create your user defined functions when creating your ACL rules. User Defined functions can be created for the Ethernet type and also the protocol type. Fig. 3.37 EtherType State: Used to enable the user defined functions. Value: Enter the Ethertype Value in the space provided. IP Protocol State: Used to enable the user defined functions. Value: Enter the IP Protocol Value in the space provided. Eg. Port 25 for SMTP. Apply Button: The Apply button must be pressed after making any changes to any of the values on this screen. Alloy Computer Products Pty Ltd Copyright ©2007 54 GSS Series User Manual 3.11 SNMP Any Network Management System (NMS) running the Simple Network Management Protocol (SNMP) can manage any Managed device equipped with an SNMP agent, provided that the Management Information Base (MIB) is installed correctly on the managed devices. SNMP is a protocol that is used to govern the transfer of information between SNMP managers and agents and traverses the Object Identity (OID) of the Management Information Base (MIB), described in the form of SMI syntax. The SNMP agent is running on the switch to respond to requests issued by an SNMP manager. The GSS-48T4SFP allows the administrator to turn the SNMP agent on or off. If SNMP is set to “Enable”, the SNMP agent will be started. All supported MIB OIDs, including RMON MIB, can be accessed via an SNMP manager. If SNMP is set to “Disable”, the SNMP agent will be de-activated, the related Community Name, Trap Host IP Address, Trap and all MIB counters will be ignored. Fig. 3.38 SNMP: Used to enable or disable the SNMP function. Security: Security can be enabled on all SNMP requests. If using SNMPv1 or v2 an IP address and community name can be used. If using SNMPv3 an authentication protocol can be used with either MD5 or SHA authentication. Three security methods are available NoAuthNoPriv, AuthNoPriv and AuthPriv. Version: Select SNMP v1, v2 or v3. Authentication Protocol: If using SNMPv3 please select the type of authentication protocol used. IP-Port: Is used when using SNMP v1 and 2. Enter the IP address of the SNMP server. Enter the port number used to communicate with the server. Community: Enter the required community name. Privacy Password: Enter the required Privacy Password. This is only used when using a security type of AuthPriv. Apply Button: The Apply button must be pressed after making any changes to any of the values on this screen. Alloy Computer Products Pty Ltd Copyright ©2007 55 GSS Series User Manual 3.12 Link Aggregation Link Aggregation is used to Aggregate Ports into a logical trunk. Link Aggregation can bundle more than one port with the same speed, full duplex and the same MAC address to be a single logical port, thus the logical port aggregates the bandwidth of these ports. This allows the switch to aggregate multiple ports together to form a high bandwidth backbone link. Fig. 3.39 Port: Physical port of the switch. Group: Select the trunking group in which you want the corresponding port to belong to. Apply Button: The Apply button must be pressed after making any changes to any of the values on this screen. Alloy Computer Products Pty Ltd Copyright ©2007 56 GSS Series User Manual 3.13 Alarm The GSS-48T4SFP supports a number of trap messages that can be sent to an administrator if certain events occur on the switch. The switch offers 5 different trap events that can be sent to the administrator in 3 different ways; email, mobile phone SMS or trap. 3.13.1 Events Fig. 3.40 Email: Tick the corresponding events under the Email check box for these events to be emailed if they occur. SMS: Tick the corresponding events under the SMS check box for these events to be sent via SMS if they occur. Trap: Tick the corresponding events under the Trap check box for these events to be sent as an SNMP Trap if they occur. Cold Start: Will send an email, SMS or Trap if the event occurs. Warm Start: Will send an email, SMS or Trap if the event occurs. Link Down: Will send an email, SMS or Trap if the event occurs. Link Up: Will send an email, SMS or Trap if the event occurs. Authentication Failure: Will send an email, SMS or Trap if the event occurs. Apply Button: The Apply button must be pressed after making any changes to any of the values on this screen. Alloy Computer Products Pty Ltd Copyright ©2007 57 GSS Series User Manual 3.13.2 Email/SMS Fig. 3.41 Mail Server: Enter the address of a mail server that can send your email events. Username: Enter a username to allow the email server to send the email events. Password: Enter a password to allow the email server to send the email events. Email Address 1: Enter a valid email address in the space provided. Email Address 2: Enter a valid email address in the space provided. Email Address 3: Enter a valid email address in the space provided. Email Address 4: Enter a valid email address in the space provided. Email Address 5: Enter a valid email address in the space provided. Email Address 6: Enter a valid email address in the space provided. SMS Server: Enter the address of a SMS server that can send your SMS events. Username: Enter a username to allow the SMS server to send the events. Password: Enter a password to allow the SMS server to send the events. Mobile Phone 1: Enter a valid mobile phone number in the space provided. Mobile Phone 2: Enter a valid mobile phone number in the space provided. Mobile Phone 3: Enter a valid mobile phone number in the space provided. Mobile Phone 4: Enter a valid mobile phone number in the space provided. Mobile Phone 5: Enter a valid mobile phone number in the space provided. Mobile Phone 6: Enter a valid mobile phone number in the space provided. Apply Button: The Apply button must be pressed after making any changes to any of the values on this screen. Alloy Computer Products Pty Ltd Copyright ©2007 58 GSS Series User Manual 3.14 Configuration 3.14.1 Save / Restore The GSS-48T4SFP supports multiple configuration files to be used by the administrator including the default configuration, start configuration and user configuration. In this section the administrator can save the switch’s configuration, restore the switch to factory default and also save the current configuration as the startup configuration when the switch is re-booted. Fig. 3.42 Save Start: Saves the current switch configuration as the start up configuration of the switch. Save User: Saves the current switch configuration as the user configuration. Restore Default: Restore the default configuration of the switch including the default IP address. Restore Default: Restore the default configuration of the switch without changing the IP address. Restore User: Restore the saved user configuration. Alloy Computer Products Pty Ltd Copyright ©2007 59 GSS Series User Manual 3.14.2 Config File Used by the administrator to Export and Import the start and user configuration files. Fig. 3.43 TFTP Server IP: Displays the currently configured TFTP Server for the switch. Export File Path: Enter the file path of where you would like to export the configuration file. Export Start: After configuring the export path click on the export start button to export the startup configuration file. Export User: After configuring the export path click on the export user-conf button to export the User-Conf configuration file. Import File Path: Enter the file path of where you would like to import the configuration file from. Import Start: After configuring the import path click on the import start button to import the startup configuration file. Import User: After configuring the import path click on the import user-conf button to import the User-Conf configuration file. Alloy Computer Products Pty Ltd Copyright ©2007 60 GSS Series User Manual 3.15 Diagnostics Three Diagnostic tools are supported in the GSM Series Switches including Diagnostics, Loopback test and Ping test. 3.15.1 Diag Fig. 3.44 UART Test: Performs a UART test on the switch. DRAM Test: Test the RAM of the switch. Flash Test: Tests the Flash RAM in the switch. Run: Performs the Diagnostic tests on the switch. Alloy Computer Products Pty Ltd Copyright ©2007 61 GSS Series User Manual 3.15.2 Loopback Fig. 3.45 Run Again: Performs a loopback test on all ports of the switch. Alloy Computer Products Pty Ltd Copyright ©2007 62 GSS Series User Manual 3.15.3 Ping Test Fig. 3.45 IP Address: Enter the IP Address of the device you are trying to communicate with. Default Gateway: Displays the default gateway of the switch. Ping Result: Displays the result of the ping test. Ping: Performs the ping test. Alloy Computer Products Pty Ltd Copyright ©2007 63 GSS Series User Manual 3.16 Loop Detection The loop detection function allows the switch to detect if a loop has been formed on your network. Fig. 3.46 Loop Detection: Tick the check box next to the corresponding port to enable loop detection. Action Enable: Used to enable the Loop detection function for the ports that have been selected. Apply Button: The Apply button must be pressed after making any changes to any of the values on this screen. Locked Port: If a port on the switch locks, you have the ability to unlock the port. Select the port that has locked and press the Resume button. Resume: Used to unlock ports. Alloy Computer Products Pty Ltd Copyright ©2007 64 GSS Series User Manual 3.17 TFTP Server The TFTP Server is used to upgrade the firmware in the switch. It is also used when backing up and uploading your configuration. Fig. 3.47 Server: Enter the IP Address of the TFTP Server. Apply Button: The Apply button must be pressed after making any changes to any of the values on this screen. Alloy Computer Products Pty Ltd Copyright ©2007 65 GSS Series User Manual 3.18 Log Fig. 3.47 No: Displays the order number of all entries in the log. Time: Displays the Time that the trap occurred. Events: Displays the name of the trap event that has occurred. Auto Upload Enable: Switch the Auto Upload status from enabled to disabled. Upload Log: Upload the contents of the log via a TFTP Server. Clear Log: Clear all data contained in the log. Alloy Computer Products Pty Ltd Copyright ©2007 66 GSS Series User Manual 3.19 Firmware Upgrade Fig. 3.48 TFTP Server: Displays the currently configured TFTP Server address. Path and Filename: Enter the path and filename of the firmware file. Upgrade: Press to upgrade the firmware in the switch. Alloy Computer Products Pty Ltd Copyright ©2007 67 GSS Series User Manual 3.20 Max. Packet Length Fig. 3.49 Maximum Packet Length (bytes): Select the maximum packet length allowed by the switch. Values are 1522 and 16383. Apply Button: The Apply button must be pressed after making any changes to any of the values on this screen. Alloy Computer Products Pty Ltd Copyright ©2007 68 GSS Series User Manual 3.21 MAC Table The MAC Table configuration can be used by the administrator to statically add MAC entries to the switches MAC table, display MAC address information from connecting devices, allow you to flush the switches MAC table and also allow you to configure the MAC age out time of the switch. 3.21.1 Information Fig. 3.50 Port: Select the port you would like to query. Select/Unselect All: Used to select or unselect all ports. MAC Address: Enter the MAC address you are trying to search for. Search: Press the search button to search for the MAC Address on each of the selected ports. <>: Navigational arrows to search through pages. Alloy Computer Products Pty Ltd Copyright ©2007 69 GSS Series User Manual 3.21.2 Aging Time Allows the administrator to set the MAC age time out value and allows you to flush the Mac table of the switch. Fig. 3.51 Aging Time: Enter the MAC aging time in seconds. When the switch learns a MAC address this is the amount of time it will stay in the switches MAC table. Apply Button: The Apply button must be pressed after making any changes to any of the values on this screen. Alloy Computer Products Pty Ltd Copyright ©2007 70 GSS Series User Manual 3.21.3 Static Forward The Static Forward function is used to associate a MAC address to a particular port of the switch. When a MAC address is assigned to a specific port all of the switches traffic sent to that MAC address will be forwarded to this port. To add a Static Forward entry to the table enter the MAC address, port number, VID and Alias. If you wish to delete an existing entry highlight the required MAC address and click the delete button. Fig. 3.52 MAC: Enter the MAC address in the space provided. Port: Enter the port number of the switch where the MAC address will belong. Source Flow ID: Select the Source Flow ID from the drop down box provided. Destination Flow ID: Select the Destination Flow ID from the drop down box provided. Alias: Enter an Alias name for the MAC address in the space provided. Add: Once you have entered the details above click on the Add button to add your static MAC entry. Edit: Once you have added a static entry it will appear in the table. Select an entry from the table and click the edit button to modify the existing entry. Delete: Select an existing MAC entry and click the delete button to remove the entry from the static MAC table. Alloy Computer Products Pty Ltd Copyright ©2007 71 GSS Series User Manual 3.21.4 Static Filter The Static Filter function allows the administrator to block MAC addresses from being forwarded by the switch. If a MAC address belongs to the Static Filtering table the switch will discard all traffic from that MAC address. The administrator can easily add MAC addresses to the Static Filter table by entering the MAC Address, VID and Alias fields. If you wish to delete an entry from the table highlight the MAC address and click Delete. Fig. 3.53 MAC: Enter the MAC address in the space provided. Alias: Enter an Alias name for the MAC address in the space provided. Add: Once you have entered the details above click on the Add button to add your static MAC entry. Delete: Select an existing MAC entry and click the delete button to remove the entry from the static MAC table. Alloy Computer Products Pty Ltd Copyright ©2007 72 GSS Series User Manual 3.22 VLAN The GSS-48T4SFP supports both 802.1q Tagged based VLAN’s and Port-based VLAN’s. VLAN’s are used to logically separate your network into smaller more defined networks. VLAN’s help to reduce broadcast traffic across your network as all broadcast traffic will be limited to the VLAN group in which it belongs. A typical example of where a VLAN could be used is in a school environment where the teacher and student networks must be kept separate. The switch supports up to 256 active Tagged VLAN entries and a VLAN ID ranging from 1 – 4096 and up to 72 Port based VLAN’s can be created. 3.22.1 VLAN Mode Fig. 3.54 VLAN Mode: Select the type of VLAN method you would like to use : Disabled: When set to disable, VLAN’s will not be used on the switch. Tag Based: Tag-based VLAN’s identify members by its VID. A VID can be applied to a packet from a host machine that supports 802.1q or from the switch itself when a packet is sent from the switch. Ingress and Egress rules can also be applied to each port to identify how a packet is handled. The switch will accept both tagged and un-tagged packets depending on the ingress rules that have been defined. Rules can be created to allow only incoming packets to be tagged; however when this rule is applied any untagged packets will be dropped. Each tag-based VLAN you build must have a VLAN name and VLAN ID. Valid VLAN ID’s range from 1 – 4096. The maximum number of tagbased VLAN groups that can be created is 254. Port Based: Port-based VLAN’s are as it states defined by each port. Ports are configured into logical groups allowing data to be sent to and from any port that belongs to a particular group. If a port belongs to VLAN group 1 and another port belongs to VLAN group 2 these ports will not be able to communicate with each other. Ports that belong to the same group can communicate. Ports can also belong to multiple groups for example, allowing an internet connection to be shared among two VLAN groups. The switch has support for up to 72 port-based VLAN groups. Alloy Computer Products Pty Ltd Copyright ©2007 73 GSS Series User Manual Apply Button: The Apply button must be pressed after making any changes to any of the values on this screen. 3.22.2 VLAN Group Shows information of the existing tag-based VLAN groups, the administrator can also Add, Delete and Edit VLAN’s using the function buttons provided. Fig. 3.55 VID: Displays the VID on the configured VLAN group. VLAN Name: Displays the name of the VLAN. Member Port: Displays the member ports of the VLAN. Create: Press create to add a new VLAN. Delete: Highlight an existing VLAN entry and press delete to remove the VLAN group. Edit: Highlight and existing VLAN entry and press edit to modify the VLAN group. Alloy Computer Products Pty Ltd Copyright ©2007 74 GSS Series User Manual Create VLAN Group Fig. 3.56 VLAN ID: Enter the VLAN ID that you would like to use. If using Port Based VLAN’s this will be an automatically generated number. VLAN Name: Enter a descriptive name for your VLAN. Member Port: Tick the check box next to the corresponding ports that you would like to exist in this VLAN. All Port Unchecked: Automatically un-ticks all ports. All Port Checked: Automatically ticks all ports. Apply Button: The Apply button must be pressed after making any changes to any of the values on this screen. Alloy Computer Products Pty Ltd Copyright ©2007 75 GSS Series User Manual 3.22.3 Port Protocol Protocol based VLAN tagging allows packets that do not have a tag to be tagged with a configured PVID based on IPv4, IPv6, ARP, RARP, User Defined 0, User Defined 1, User Defined 2 and other protocols. Fig. 3.57 Protocol: Select the protocol that you want your tagging rules to apply to. Port: Physical port of the switch. PVID: Enter the PVID that you want untagged packets to be tagged with based on the protocol of choice. Apply Button: The Apply button must be pressed after making any changes to any of the values on this screen. Alloy Computer Products Pty Ltd Copyright ©2007 76 GSS Series User Manual 3.22.4 Port VID The Port VID page is used to configure what PVID will be applied to untagged packets entering the switch. Four different modes are supported in the way the tagged packets and untagged packets are handled; they are Access, Private, Hybrid and Trunk. If using Access mode the port will only receive untagged packets, if a tagged packet is found it will be discarded. Ports running Access mode can only send untagged packets they can’t send tagged packets. Ports running Private mode are the same as Access mode except private mode ports can only communicate with Hybrid and Trunk ports they can’t communicate with other Private or Access Ports. Trunk ports are used if you want to Tag all packets that are sent out of the switch and Trunk ports will only accept Tagged packets. Hybrid ports are much the same as Trunk ports except if the VID of the VLAN group matches the configured PVID then packets that are sent out of the switch will not be tagged. Fig. 3.58 Port: Physical port of the switch. PVID: Enter the PVID that you want untagged packets to be tagged with based on the protocol of choice. Mode: Select the required VLAN mode for the port. Apply Button: The Apply button must be pressed after making any changes to any of the values on this screen. Alloy Computer Products Pty Ltd Copyright ©2007 77 GSS Series User Manual 3.23 Reboot The GSS-48T4SFP allows the Administrator to reboot the switch from the web management you can also reboot the switch using the reset button on the front panel of the switch. Fig. 3.59 Save and Reboot: Press this button to save all configuration changes and reboot. Reboot: Press this button to Reboot the switch without saving changes. 3.24 Logout Used to Logout of the web management. Fig. 3.60 Alloy Computer Products Pty Ltd Copyright ©2007 78 GSS Series User Manual 4. Operation of CLI Management 4.1 CLI Management The CLI based management of the GSS-48T4SFP is a cut down version of the web management if a particular feature is not found in the CLI management it will need to be configured via the web management. When configuring the GSS-48T4SFP via the RS-232 console please connect the switch with the provided serial cable to a DCE device such as a PC. Once you have connection run a terminal emulation program such as Hyper Terminal. When connecting to the switch please use the serial settings of the switch to create the connection, the default settings are below: Baud Rate: 57600 Data Bits: 8 Parity: None Stop Bits: 1 Flow Control: None The same interface can also be accessed using Telnet. The default IP Address, Subnet Mask and Gateway addresses are shown below: IP Address: 192.168.1.1 Subnet Mask: 255.255.255.0 Gateway: 192.168.1.254 Open a command prompt and telnet to the default IP address shown above. 4.1.1 Login The command line interface (CLI) is a text based interface, users can access the CLI through either a direct serial connection to the device or a Telnet session. The default username and password for the device is shown below: Username: admin Password: admin After you have logged in successfully the prompt will be shown as “#” meaning that you are the first to login to the switch with administrator rights. If a “$” prompt is shown it means that you have logged in as a guest and you are only allowed to view the system, no changes can be made to the switch. Fig. 4.1 Alloy Computer Products Pty Ltd Copyright ©2007 79 GSS Series User Manual 4.2 Commands of the CLI To display the list of commands that are supported on the GSS-48T4SFP CLI type “?” and press enter. All commands on the switch are divided into 2 groups Global commands and Local commands. The Global commands include “exit”, “end”, “help”, “history”, “logout”, “restore default”, “restore user”, “save user” and “save start”. For more details, please refer to Section 4-2-1. All Local commands will be run through in Section 4-2-2. Fig. 4.2 Alloy Computer Products Pty Ltd Copyright ©2007 80 GSS Series User Manual 4.2.1 Global Commands of the CLI End Type in end and press enter to return to the root menu. Exit Type in exit and press enter to return to the previous menu. Alloy Computer Products Pty Ltd Copyright ©2007 81 GSS Series User Manual Help Type in help to display a list of commands. History Type in history to display a list of previously used commands. Alloy Computer Products Pty Ltd Copyright ©2007 82 GSS Series User Manual Logout Type in Logout to exit the CLI management. Restore Default Type in restore default to reset the switch back to its factory default settings, you will also be prompted to reset the IP address back to default. Alloy Computer Products Pty Ltd Copyright ©2007 83 GSS Series User Manual Restore User Type in restore user to reset the switch back to its previously saved user settings. Save Start Type in save start to save the settings of the switch as the startup settings. Alloy Computer Products Pty Ltd Copyright ©2007 84 GSS Series User Manual Save User Type in save user to save the settings of the switch as your user settings. Alloy Computer Products Pty Ltd Copyright ©2007 85 GSS Series User Manual 4.2.2 Local Commands of the CLI Autologout Type in autologout <seconds> to change the autologout time of the switch. Hostname Type in hostname <name> to change the hostname of the switch. Alloy Computer Products Pty Ltd Copyright ©2007 86 GSS Series User Manual IP Type in IP to move to the IP menu. Set Type in Set IP <IP Address> <Subnet Mask> <Gateway> to set the IP address, subnet mask and gateway settings. Alloy Computer Products Pty Ltd Copyright ©2007 87 GSS Series User Manual Show Type in Show to display the current IP settings. Reboot Type in Reboot to reboot the switch. Alloy Computer Products Pty Ltd Copyright ©2007 88 GSS Series User Manual System Type system to enter system mode. Set Contact Type in set contact <name> to change the contact name for the switch. Alloy Computer Products Pty Ltd Copyright ©2007 89 GSS Series User Manual Set device-name Type in set device-name <name> to change the device-name of the switch. Set Location Type in set location <location> to change the location description of the switch. Alloy Computer Products Pty Ltd Copyright ©2007 90 GSS Series User Manual Show Type in show to display the currently configured system information. Alloy Computer Products Pty Ltd Copyright ©2007 91 GSS Series User Manual Appendix A Technical Specifications Hardware Specifications Standard Compliance: IEEE802.3/802.3ab / 802.3z / 802.3u / 802.3x Network Interface: Configuration Mode Connector NWay TP (RJ-45) 10/100/1000Mbps Gigabit TP 1000Base-SX Gigabit Fibre 1000 FDX *SFP 1000Base-LX Gigabit Fibre 1000 FDX *SFP 1000Base-LX Single Fibre WDM (BiDi) 1000 FDX *SFP Port 1 – 48 44-48 (Option) 44-48 (Option) 44-48 (Option) *Ports 44-48 are TP/SFP fibre dual media ports with auto detection function *Optional SFP module supports LC or BiDi LC transceiver Transmission Mode: 10/100Mbps support full or half duplex 1000Mbps support full duplex only Transmission Speed: 10/100/1000Mbps for TP 1000Mbps for Fibre Full Forwarding/Filtering Packet Rate: PPS (packets per second) Forwarding Rate 1,488,000PPS 148,800PPS 14,880PPS Speed 1000Mbps 100Mbps 10Mbps MAC Address and Self-learning: 8K MAC address 256 VLAN table entries (Tag Based) 72 VLAN table entries (Port Based) Flow Control: IEEE802.3x compliant for full duplex Backpressure flow control for half duplex Cable and Maximum Length: TP 1000Base-SX 1000Base-LX 1000Base-LX WDM (BiDi) Cat. 5e UTP cable, up to 100m Up to 220/275/500/550m, which depends on Multi-Mode Fibre type Single-Mode Fibre, up to 120Km Single-Mode Single Fibre, up to 60Km Alloy Computer Products Pty Ltd Copyright ©2007 92 GSS Series User Manual Diagnostic LED: System LED : Per Port LED: 10/100/1000M TP Port 1 to 44 1000M SFP Fibre Port 44-48 Power Requirement : Power, CPU : LINK/ACT, 10/100/1000Mbps : SFP(LINK/ACT) AC Line Voltage : 100∼240 V Frequency : 50∼60 Hz Consumption : 85W Ambient Temperature : 0° to 40°C Humidity : 5% to 90% Dimensions : 44(H) × 442(W) × 248.6(D) mm Comply with FCC Part 15 Class A, CE Mark Approval & C-Tick Alloy Computer Products Pty Ltd Copyright ©2007 93