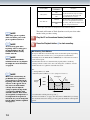
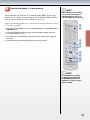
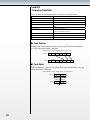
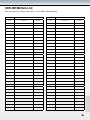
1
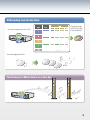
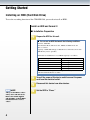
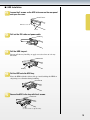
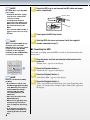
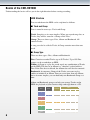
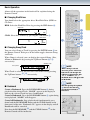
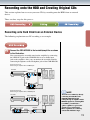
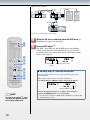
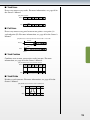
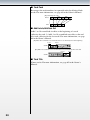
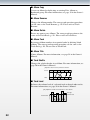
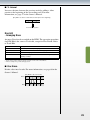
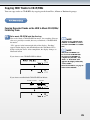
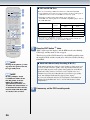
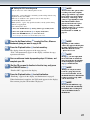
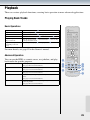
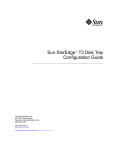
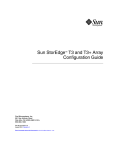
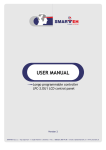
Getting Started
HDD/CD Recorder
CDR-HD1500
...................... 4
Quick Master
HDD Recording
.................... 11
Editing
.................... 16
CD Recording
.................... 25
Playback
Refer to “CDR-HD1500
Owner’s Manual” for
additional information.
.................... 29
The CDR- HD 1500 lets you record
various music data onto the hard disk,
helps you build up your own music
library and allows you to create your own
CDs. All that is necessary for hard disk
recording and CD creation is achieved
using accustomed conventional operations:
pressing buttons and turning knobs, free
from complicated operations on a PC.
Appendix
.................... 30
Capability of Your CDR-HD1500
The CDR-HD1500 enriches your life with music.
Hard Disk Recording from Various External Music Devices
Analog
Digital
LPs
Tapes
FM Broadcasts
DAT
MD
Satellite Broadcasts
CD player/
DVD player
Digital recording may not be possible due to copy protection,
SCMS, or Serial Copy Management System.
Hard Disk Recording from the Built-in CD-R drive
* HDD: Hard Disk Drive
In order to create CDs, you need to record audio sources to the HDD.
CD Recording from the Hard Disk
You can create your own CDs.
Creating Original CDs of Your
Favorite Music
You can duplicate CDs.
Functioning as a Music Server or a Juke-box
Getting Started
Installing an HDD (Hard Disk Drive)
To use the recording function of the CDR-HD1500, you need to install an HDD.
Install an HDD and Format it
■ Installation Preparation
1
Prepare the HDD for this unit.
■ You can use an HDD that meets the following conditions.
Interface: IDE/ATA
Data Transfer Mode: PIO mode 0-4, Multiword DMA mode 0-2
Size: 3.5 inches
Capacity: 20 GB-400 GB (Up to 400 GB is recommended; more than
400 GB may not be operable.)
Estimated recordable time for each HDD capacity is as follows.
Capacity
Available Time
80 GB
approx. 120 hrs.
160 GB
200 GB
320 GB
400 GB
approx. 240 hrs.
approx. 300 hrs.
approx. 480 hrs.
approx. 600 hrs.
For information on compatible HDDs, please contact your nearest
authorized Yamaha branch or dealer.
NOTE
Always set the HDD to “Slave”
when you use with this device.
Refer to the manual supplied
with the HDD, or ask the HDD
manufacturer how to set it to
“Slave.”
2
Turn off the power of this device and disconnect the power
cord from the electrical outlet.
3
Disconnect this device from other devices.
4
Set the HDD to “Slave.”
■ HDD Installation
1
Loosen the 2 screws on the HDD slot cover on the rear panel
and open the cover.
HDD slot cover
Screws
2
Pull out the IDE cable and power cable.
3
Pull the HDD tray out.
Do not pull the tray forcibly, or apply excessive force to it in any
direction.
HDD tray
4
Put the HDD onto the HDD tray.
5
Secure the HDD in the tray with the 4 screws.
Place the HDD with the sticker side up. Avoid striking the HDD or
subjecting it to vibration during handling.
Screws
(2 other screws on opposite side.)
NOTE
Be careful when connecting IDE/
power cables:
• Confirm the directions of plugs
and connectors, and insert the
connectors securely.
• Accidental static electrical
charge may cause damage to the
HDD. Don’t touch the terminal
pins and circuit board on the
HDD.
• Don’t insert the HDD forcibly, or
apply excessive force to it in any
direction.
NOTE
When you install an HDD already
formatted on the same CDRHD1500, there is no need to format
it again. If you install an HDD
formatted on other equipment
(including another CDR-HD1500),
you need to format it again.
6
Press the HDD tray in and connect the IDE cable and power
cable, respectively.
IDE cable
Power
cable
7
Firmly push the HDD tray inside.
8
Shut the HDD slot cover and secure it with the supplied
screws (removed in step 1).
■ Formatting the HDD
To enable recording onto the HDD, it needs to be formatted by this
device first.
1
Plug the power cord into an electrical outlet and turn the
power on.
“Format Start?” appears in the display.
1
NOTE
Please be careful when handling
the HDD:
• Be careful not to vibrate or hit
the HDD. Inappropriate handling
of the HDD may cause data loss
and/or malfunction. Yamaha
cannot be held responsible
for accidental data loss and
malfunction.
• Data cannot be retrieved if the
HDD malfunctions.
• HDD is not an appropriate long
term data storage tool. Please
use it for temporary data storage
only.
• To avoid losing any important
data, Yamaha recommends you
to back up the data onto CD-R
discs.
2
Press the Playback button 1.
3
Press the Playback button 1.
4
Press the Playback button 1.
“Format Really” appears in the display.
“Push PLAY KEY” appears in the display.
“Wait” starts blinking and formatting starts soon. Formatting takes
approx. 15 seconds and is complete when “Format OK” appears in
the display.
Basic Procedure
From HDD installation to CD recording.
HDD Installation (p. 4)
To record songs you need to install an HDD into the CDR-HD1500.
1 Connection (p. 11)
Connect an external device to the CDR-HD1500. (This step is not necessary when recording using the built-in CD-R drive.)
2 Settings for Recording (p. 13)
3 Recording (p. 14)
Some basic settings are necessary for an
appropriate recording.
4 Editing (p. 16)
Record songs played on the external
device.
Album Edit
Editing items help you organize
your recorded songs.
Title
Rename
001
002
Track Edit
5 CD Recording (p. 25)
Copy the songs on the HDD to a CD.
6 Finalizing (p. 27)
Finalize the CD to be playable on other CD players.
Basics of the CDR-HD1500
Understanding the basics will set you in the right direction before starting recording.
HDD Structure
Data recorded onto the HDD can be explained as follows.
■ Track and Group
Data is stored in two ways: Track and Group.
Track: Song data as its name implies. When you record song data, or
Tracks, they will be stored in a Group called “Disc.”
Group: There are three types: Disc, Album and Bookmark. All
contain Tracks.
A song can also be called a Track; A Group contains more than one
track.
■ Group Type
There are three types: Disc, Album and Bookmark.
Disc: Contains recorded Tracks (up to 99 Tracks). Up to 999 Disc
groups can be recorded on an HDD.
Album: A Group or a play list, made up of any combination of Tracks
on the HDD. The data in an Album is a “shortcut” to data held in a
Disc. If the Disc data is deleted, the Album data will also be removed.
Bookmark: A temporary Group of the Tracks you want to play
and/or to include in an Album. You can create more than one Album,
but as its name implies, you can hold only one Bookmark Group at a
time.
Album and Bookmark groups can help you arrange Tracks on the
HDD for playback of your favorite songs and copy them to a CD.
Disc
Track
1
1
2
3
2
1
2
3
3
1
2
3
4
1
2
3
999
Bookmark
Album
1
2
3
999
Basic Operation
Almost all the operations in this book will be explained using the
Remote Control.
■ Changing Disk Drives
1
You should select the appropriate drive: Hard Disk Drive (HDD) or
CD Drive.
HDD: Select the Hard Disc Drive by pressing the HDD button 7.
HDD mark
2
3
4
5
CD-R: Select the CD Drive by pressing the CDR button 8.
CD-R mark
6
7
8
■ Changing Group/Track
You can select Group or Track by pressing the ENTER button 4 on
the Remote Control. Each press of the button toggles between Group
and Track.
When Group is selected, you can display the targeted Group, (Disc,
Album or Bookmark) by pressing the Up/Down buttons 3 / 6
successively.
GROUP mark
Group name
NOTE
When Track is selected, you can select a desired Track by pressing
the Up/Down buttons 3 / 6 successively.
TRACK mark
Track name
When a Group is selected,
successive presses of the Down
button show each Group in the
following sequential order: Disc
1, 2, 3…> Album 1, 2, 3…>
Bookmark. Disc 1 will appear after
the Bookmark.
NOTE
■ Bookmark
Create a Bookmark: Press the BOOKMARK button 2 during
playback of the desired Track. “MARK” appears in the display to
indicate the selected Track has been ‘bookmarked.’
Cancel a Bookmark: Press the BOOKMARK button 2 again during
track playback. “MARK” will disappear.
Cancel all Bookmarks: Stop playback and simultaneously press
down both the BOOKMARK button and the CLEAR button on the
front panel of the unit. “Bookmark Clr” appears in the display and all
Bookmarks will be canceled.
Note that the BOOKMARK 2 and the CLEAR buttons 5 on the
Remote Control will be ineffective.
Note that pressing the Up button
3 decreases the value and
pressing the Down button 6
increases it.
■ Changing Displayed Information
Various information such as Track length and remaining time can be shown in the display.
Press the TEXT/TIME button 1 while the desired Track/Group is selected. Each press of the TEXT/
TIME button 1 changes the information.
Displays during HDD playback
Displays during CD playback
Group number, track number and elapsed
time of the recorded track
Track number and elapsed time of the track
being played
Group number, track number and remaining
time of the track being played
Track number and remaining time of the
track being played
Group number and group total time
Group number and remaining time of the
group
Group title or track title
(Group title)
(Track title)
Displays during HDD recording
Disc number, track number and elapsed time
of the track being recorded
Disc number and total recorded time on the
disc
Disc total time
Disc remaining time
CD TEXT (when available)
Disc title
Track title
Displays during CD-R/CD-RW disc recording
Track number and elapsed time of the track
being recorded
Total recorded time on a disc
Total recordable time on a disc
10
Recording onto the HDD and Creating Original CDs
This section explains how to create your own CDs by recording onto the HDD from an external
device.
There are three steps for this process:
Recording onto Hard Disk from an External Device
The following explanation uses LP recording as an example.
1
Connect the CDR-HD1500 to the turntable/amplifier as shown
in the illustration.
You can monitor the recorded sound on the amplifier by connecting
the LINE OUT jack on the CDR-HD1500 to an available input
jack on the amplifier. Also, you can monitor the recorded sound by
connecting headphones to the Headphone jack of the CDR-HD1500.
Analog Connections
When using an amplifier with a PHONO jack:
Amplifier
Turntable
TAPE
IN
(PLAY)
PHONO
PHONO
REC
PLAY
L
L
L
R
R
R
IN
OUT
R
L
IN
TAPE
TAPE
IN
OUT
(PLAY)
(REC)
LINE
IN
(REC)
LINE
OUT
(PLAY)
VIDEO
OUT
SVIDEO
L
L
VIDEO
L
R
L
R
4
R
REC
PLAY
3
OPTICAL
IN
ANALOG
R
4
COAXIAL
LINE IN? LINE OUT
REC COAXIAL
PLAY
OPTICAL
3
RS?232C
LINE IN OUT
LINE OUT
DIGITAL
ANALOG
CDR-HD1500
Analog Connections
When using an amplifier without PHONO jack:
NOTE
Turntable
Phono Equalizer
IN
PHONO
L
L
R
R
IN
LINE
IN
VIDEO
OUT
SVIDEO
L
L
LINE
OUT
PLAY
REC
IN
OUT
OUT
L
R
Amplifier
R
PLAY
REC
VIDEO
L
4
R
L
R
R
REC
PLAY
LINE IN LINE OUT
ANALOG
3
R
4
COAXIAL
OPTICAL
IN
REC
COAXIAL
PLAY
OPTICAL
OUT
LINE IN LINE
OUT
3
RS232C
L
L
R
R
DIGITAL
ANALOG
IN
CDR-HD1500
AUX
IN
OUT
L
You cannot record LPs by directly
connecting the turntable to the
CDR-HD1500 without first
routing through an amplifier with a
PHONO input. If no such amplifier
is available, you will need a
“phono equalizer” to process the
signal to be recorded instead.
Phono equalizers are commonly
sold at audio hardware shops.
11
Digital Connections Example
OPTICAL
OUT
COAXIAL
DAT OUT
COAXIAL
IN
OPTICAL
IN
Amplifier
R
COAXIAL
OPTICAL
IN
COAXIAL
OPTICAL
COAXIAL
OUT
OPTICAL
COAXIAL
IN
L
OPTICAL
OUT
OPTICAL
OUT
COAXIAL
OUT
COAXIAL
IN
OPTICAL
IN
VIDEO
OUT
SVIDEO
VIDEO
L
L
R
R
4
REC
PLAY
LINE IN — LINE OUT
ANALOG
3
COAXIAL
OPTI
CAL
OPTICAL
COAXIAL
IN
IN
COAXIAL
COAXIAL
OPTICAL
OPTICAL
OUT
DIGITAL
OUT
RS–232C
DIGITAL
CDR-HD1500
You can use a “coaxial” cable or “optical” cable.
1
2
3
4
5
6
7
8
9
2
(When the CD drive is selected) press the HDD button 6.
3
Press the REC button 1.
The HDD mark appears in the display.
The “REC” mark lights up and the HDD mark starts blinking.
A Disc group and track 1 will automatically be generated for
recording and they are shown in the display. Recording standby
mode is now engaged.
Destination Disc
number
Destination Track number
■ Recording Songs on a Previously Recorded Disc
You can designate the Disc and record songs after the previously
recorded Tracks.
Follow the procedure below to select the desired Disc.
1. Confirm that the “GROUP” mark is shown in the display.
Check if “GROUP” is shown.
2. Press the Up/Down buttons 3 to display the desired Disc.
NOTE
Pressing the Stop button 8 on this
step aborts the operation and exits
the recording standby mode.
12
3. Press the ENTER button 5 to select the Disc.
Once the Disc is selected, a blank track available for recording will
automatically be chosen.
4
Press the INPUT button 2 (several times) to select ANALOG.
Select ANALOG here since this example uses LP (analog) recording.
INPUT
OPTICAL
NOTE
You can select the input source
by pressing the INPUT button 2
only when recording standby mode
is engaged. You cannot select it
unless engaged.
COAXIAL
ANALOG
(If the input source routes through OPTICAL IN, select OPTICAL,
and if it routes through COAXIAL IN, select COAXIAL.)
5
Press the MENU button 4 to display the Level adjustment
window and adjust the recording level by rotating the
ANALOG REC LEVEL knob on the front panel.
To adjust the recording level, you need to play back the sound
source. Adjust the recording level within the appropriate range
(avoiding the red area of the peak level meter at volume peaks).
(The default value of the digital recording level is set to 0dB [the
original level of the input source]. To adjust, see page 34 in the
Owner’s Manual.)
6
If necessary, select and set the HDD recording mode.
You can select a suitable recording mode that provides a track
marker between songs. Track Synchro is selected as the default.
Track Synchro is appropriate for normal recording.
There are five modes.
For more information, see page 35 in the Owner’s Manual.
Recording Mode
Start/Stop Recording
Track Marker
Manual
Manual
Manual
Manual
Track Synchro
Auto
Auto
Multi Synchro
*1
Auto
Description
To place track markers manually.
Start/stop of song playback is also
manual.
Track markers will automatically
be placed between songs according
to song playback. Start/stop song
playback manually.
Track markers will automatically be
placed between songs according to
song playback. Designated songs will
automatically be recorded.
13
Recording Mode
Start/Stop Recording
Description
Track Marker
Auto
All Synchro
Auto
Manual
Auto Period*
2
Auto
Track markers will automatically
be placed between songs according
to song playback. All songs will
automatically be recorded.
Track markers will automatically be
placed at a designated time interval.
Recording will automatically be done
for the designated duration.
* You can specify the number of songs you want to record with Multi Synchro.
*2You can place track markers at a designated time interval with Auto Period.
1
The mode will return to Track Synchro even if you select other
modes in the previous setting.
NOTE
When using a phono equalizer,
make sure that the power of the
phono equalizer is turned on.
NOTE
To avoid a long pause at the
beginning of the recording, press
the Playback button after the
turntable needle has securely
landed on the LP.
NOTE
You can show the Track/Disc
information such as song length in
the display. For more information,
see page 10.
NOTE
Music such as classical may be
problematic since a pianissimo
section may be recognized as the
beginning of the next song. Other
sections, for the opposite reason,
may not receive track markers
correctly. You can adjust the
settings of Synchro Setup should
you experience difficulty with
automatic detection. If two tracks
are recognized as a single track, or
if a single track is recognized as
more than one, you can change this
later by editing, which is explained
from page 16.
14
7
Play the LP on the external device (turntable).
8
Press the Playback button 9 to start recording.
■ Detecting Track Markers
It may be difficult to automatically detect track marker points depending
on the sound source. In this case, you can place the track markers
manually. Press the TRACK NO. WRITE button on the Remote Control
at the desired point.
Track marker detection is determined by signal (and its sensitivity
setting) from the sound source. You can change the conditions of track
marker detection to optimize automatic detection.
Ex.
• Analog TH Level: -40dB
• Int.Time (Interval Time): 2.5 sec. (range: 0.5–5.0 sec.)
Track Marker
1
-20dB
Available
Range
-40dB
1st
song
2nd
song
Silent
Portion
-60dB
longer than 2.5 sec
A track marker will be placed at point 1.
For more information, see page 36 in the Owner’s Manual. If you change
the automatic detection setting, you may get track markers at unexpected
points.
9
Press the Stop button 8 to quit recording.
Songs from the LP will now be recorded on the HDD. As the song
data increases you may need to keep track of the Disc/Album/Track
data. A sample of the data list is shown on page 35.
NOTE
In the following section, Editing,
you can correct any failures in
automatic detection, and create
your own albums of favorite songs.
Suppose the following problems have occurred. The next chapter will show you how
to correct those problems.
1
2
1. Track 2 becomes blank because of an unintentional press of the TRACK NO.
WRITE button.
2. A 10 second silent portion is inserted at the beginning of Track 3 because
recording started too early.
3. Two tracks are accommodated in Track 4 because of inaccurate automatic
detection.
3
4
5
4. A classical song is divided into three tracks: track 5, 6 and 7.
6
7
8
9
NOTE
An external timer is required
to allow timer recording with
the CDR-HD1500. For more
information, see page 32 in the
Owner’s manual.
15
Editing Recorded Tracks
You can solve any issues at the recording stage by editing and correcting recorded tracks. You can also
create your own Albums using editing functions, and create original CDs from Album/Disc groups.
Editing functions can be divided into the following three groups:
• Track Edit: Edits and corrects recorded tracks.
• Album Edit: Edits and creates an Album group to produce an original CD.
• Disc Edit: Edits a Disc group to produce an original CD.
Editing consists of the following two steps:
1. Editing and correcting recorded tracks > Track Edit
2. Editing to produce an original CD > Album Edit/Disc Edit
NOTE
The Undo function cancels the
last edit operation, and reverts
to the original status. For more
information, see page 70 in the
Owner’s Manual.
1. Editing and correcting recorded tracks
You can correct any issues at the recording stage using the Track Edit
function (p. 18).
The following is a possible scenario that requires editing:
1 Track 2 becomes blank because of an unintentional press of the TRACK NO.
WRITE button.
2 A 10-second silent portion is inserted at the beginning of track 3 because
recording was initiated too early.
3 Two tracks are accommodated in track 4 because of a failure in automatic
detection.
4 A classical piece of music is divided into three tracks: track 5, 6 and 7.
2
blank
10 secs.
1
3
A song
Two
4 tracks
5
6
7
8
silent portion
The issues above can be solved by the following editing operations.
1Erase track 2 > Track Erase function
The blank track (2) is erased. At this point, track numbering will be unaltered.
2Decrease the silent portion at the beginning of track 3 from 10 to 2 seconds >
Part Erase function
3Divide track 4 into two tracks > Track Divide function
Track 4 becomes tracks 4 and 5.
The succeeding tracks, numbered 5 through 7, will change to tracks 6, 7 and 8 (to
accommodate what is now track 5).
4Combine tracks 6, 7 and 8 to a single track > Track Combine function
After the edit in step 4, the track numbers will need to be rearranged.
5Rearrange the track numbers in sequential order > Track Pack function
16
Before
1
2
blank
10 secs.
3
A song
4
Two
tracks
5
6
7
8
silent portion
Edit1
1
Blank
number
3
4
5
6
7
8
1
Blank
number
3
4
5
6
7
8
1
Blank
number
3
4
5
6
7
8
9
1
Blank
number
3
4
5
1
2
3
4
Edit2
Edit3
Edit4
6
9
Edit5
After
5
6
For more information on the Track Edit function, see page 58 in the
Owner’s Manual.
2. Editing to create an original CD
You need to create a group(s) and/or Album(s), the tracks from which
can be used to record to a CD. You can, of course, create CDs from
a recorded disc(s). You can create an original CD by selecting your
favorite tracks from your various discs and setting up Albums.
Use Album New (Album Edit) for creating an Album.
For more information on the Album Edit and Disc Edit functions, see
pages 52 and 66 in the Owner’s Manual.
17
Track Edit
- Arranging Track Data
You can correct any inappropriate sections, and name tracks.
Track Rename
Track Adjust
Track Erase
Part Erase
Track Combine
Rearranges a track’s number within a group.
Advances/delays a track’s start point.
Erases any unnecessary track(s).
Erases any unnecessary parts of a track.
Restores an unintentionally divided track to a single
track.
Divides a track into two.
Refreshes the sequential number order of remaining
tracks after deleting a track(s).
Adds a fade-in effect at the beginning of a track.
Adds a fade-out effect at the end of a track.
Names tracks.
Track Divide
Track Pack*
Add Fade In
Add Fade Out
Track Title
* indicates editing is not possible during playback.
■ Track Rename
Changes the track number in the same group. For more information,
see page 58 in the Owner’s Manual.
[Ex.] Change the track number from track 2 to track 5.
Before
1
2
3
4
5
6
After
1
blank
number
3
4
5
6
7
■ Track Adjust
Advances/delays a track’s start point. For more information, see page
59 in the Owner’s Manual.
[Ex.] Advance track 2’s start point two seconds earlier.
Before
Negative
setting
Positive
setting
After
2 secs.
18
■ Track Erase
Erases any unnecessary tracks. For more information, see page 60 in
the Owner’s Manual.
[Ex.] Erase track 2.
Before
blank
number
After
■ Part Erase
Erases any unnecessary parts between two points: start point (A)
and end point (B). For more information, see page 60 in the Owner’s
Manual.
[Ex.] Decrease a silent portion from 10 seconds to 2 seconds.
10 secs.
Before
2 secs.
After
2 secs.
■ Track Combine
Combines two or more consecutive tracks into one. For more
information, see page 62 in the Owner’s Manual.
[Ex.] Combine tracks 2, 3 and 4 into track 2.
Before
After
■ Track Divide
Divides a track into two. For more information, see page 62 in the
Owner’s Manual.
[Ex.] Divide track 2 into two, track 2 and track 3.
Before
1
After
1
2
2
3
3
4
4
5
19
■ Track Pack
Rearranges the track numbers in sequential order by deleting blank
tracks. For more information, see page 63 in the Owner’s Manual.
[Ex.] Rearrange the order.
blank
number
Before
blank
number
After
■ Add Fade In/Add Fade Out
Adds 1 to 10 second fade-in effect at the beginning of a track
(effective for track 1). Adds 1 to 10 second fade-out effect at the end
of a track (effective for the last track). For more information, see page
64 in the Owner’s Manual.
[Ex.] Add a 10 second fade-in for a track that has a 2 second silent portion at its beginning.
2 secs.
8 secs.
Volume
[Ex.] Add an 8 second fade-out to a track that has a 2 second silent portion at its end.
8 secs.
2 secs.
Volume
■ Track Title
Names tracks. For more information, see page 65 in the Owner’s
Manual.
20
Album Edit
- Creating Albums
You can create new Albums, or play lists of your own by taking
favorite songs from your Disc archives in preparation to create a CD
in the next step.
An Album can accommodate up to 99 tracks (songs). Before
recording to a CD, you may need to adjust the Album length so as not
to exceed that of the CD to be created.
Album New*
Edit Stored*
NOTE
Album Edit allows editing of an
Album not a Disc. To edit a Disc
please choose Disc Edit.
Creates a new Album.
Adds track(s) to an existing Album. Deletes track(s)
from an existing Album.
Creates an Album by duplicating an existing Disc,
Album or Bookmark group.
Changes the Album numbers.
Deletes an Album.
Rearranges the Album numbers in sequential order by
deleting blank numbers.
Names Albums.
Changes the track order in an Album.
Balances the volume level of a selected track with
other tracks.
Adds a silent portion at the beginning of a track.
Album Copy*
Album Rename*
Album Delete
Album Pack*
Album Title
Track Shuffle
Track Level
Tr. Interval
* indicates editing is not possible during playback.
■ Album New
Creates a new Album. For more information, see page 52 in the
Owner’s Manual.
■ Edit Stored
Adds track(s) to an existing Album or deletes unnecessary track(s)
from it. For more information, see page 53 in the Owner’s Manual.
[Ex.] Add a Track to the Album containing six Tracks.
Before
After
[Ex.] Delete Track 2.
Before
After
21
■ Album Copy
Creates an Album by duplicating an existing Disc, Album or
Bookmark group. For more information, see page 54 in the Owner’s
Manual.
■ Album Rename
Changes the Album number. The concept and operation procedures
are the same as for Track Rename (p. 18). Please refer to Track
Rename.
■ Album Delete
Erases any unnecessary Albums. The concept and operation are the
same as for Track Erase (p. 19). Please refer to Track Erase.
■ Album Pack
Rearranges Album numbers in sequential order by deleting blank
Albums. The concept and operation procedure are the same as for
Track Pack (p. 20). Please refer to Track Pack.
■ Album Title
Names Albums. For more information, see page 54 in the Owner’s
Manual.
■ Track Shuffle
Changes the playback order in an Album. For more information, see
page 56 in the Owner’s Manual.
[Ex.] Move Track 2 to the point before Track 5.
Before
1
2
3
4
5
6
After
1
2
3
4
5
6
■ Track Level
Balances the volume level of a selected track to that of other tracks.
For more information, see page 56 in the Owner’s Manual.
[Ex.] Adjust the volume level of Track 2 to other Tracks.
Average
volume level
Volume level
22
■ Tr. Interval
Increases the time between the previous track by adding a silent
portion at the beginning of the succeeding track. For more
information, see page 57 in the Owner’s Manual.
[Ex.] Add 2 seconds to a track without a silent portion at its beginning.
2-second silent portion
Disc Edit
- Arranging Discs
Arranges Discs/tracks recorded on the HDD. The operation procedure
for Disk Edit is the same as Track edit, except for Disc Divide. Refer
to Track Edit.
Disc Rename
Disc Erase
Disc Combine
Disc Divide*1
Disc Pack*2
Disc Title
Changes the Disc number.
Erases any unnecessary Disc groups.
Combines two or more consecutive Disc groups into one.
Divides a Disc group into two.
Refreshes the sequential number order of remaining Disks after
deleting a Disk(s).
Names Discs.
* divides a Disc group by tracks. To divide a track by seconds, refer to Track Divide.
*2indicates editing is not possible during playback.
1
■ Disc Divide
Divide a disc into 2 tracks. For more information, see page 68 in the
Owner’s Manual.
[Ex.] Divide a disc into 2 tracks.
Before
1
After
1
2
2
3
3
4
4
5
23
■ Creating Albums Using the Bookmark Function
1. Bookmark a desired track during playback on the HDD. This creates a
temporary Bookmark group.
2. Create a new Album by copying the Bookmark group (Album Copy
function).
■ If song data is too long and is recorded on two successive Discs
179 mins. 59 secs. (Maximum length of a Disc)
Disc A
Disc B
Recorded parts on 2 successive discs
1. Divide the Disc using the Disc Divide function.
Disc Divide
Disc A
Disc B
2. Use the Disc Combine function to combine two Discs, the latter portion
of the divided Disc containing the beginning section of a song, and Disc B
containing the latter.
Disc Combine
Disc A
Disc B
Track Marker
3. Use the Track Combine function to combine track 1 with the beginning
part of the song, and track 2 with the latter part of the song.
Track Combine
Disc A
24
Disc B
Copying HDD Tracks to CD-R/RWs
You can copy tracks to CD-R/RWs by copying tracks from Disc, Album or Bookmark groups.
Copying Recorded Tracks on the HDD to Music CD-R/RWs/
Finalizing Them
1
Set a music CD-R/RW onto the disc tray.
You need a blank “CD-R/CD-RW for music” for recording. You can
also use a partially-recorded (but not yet finalized) “CD-R/CD-RW
for music.”
“CD” appears in the bottom right side of the display. “Reading”
appears on the display, and which indicates that the Music CD is
being read by the device. After completion, the display changes as
illustrated below.
If you insert a new CD-R/CD-RW for Music:
NOTE
You may need to adjust the track
numbers of an Album so as not to
exceed the CD-R/RW’s recordable
time.
NOTE
Only music CD-R/RWs can
be used on the CDR-HD1500.
If you insert a CD-R/RW for
computer use (data CD), “Not
Audio” or “Data Track” will
appear in the display, followed by
“Unrecordable.”
For more information, see page 78
in the Owner’s Manual.
If you insert an unfinalized CD-R/CD-RW for Music:
Number of Tracks
Total time
25
■ CD-R and CD-RW Discs
1
2
3
There are several major differences between a CD-R and CD-RW.
• Copy (Writing): You cannot record (overwrite) on the recorded part of
a CD-R. You can record on a CD-RW over and over again.
• Playback: A CD-R can be played back on any CD player.
A CD-RW can only be played on a CD-RW-compatible player, such as
the CDR-HD1500.
Playback
4
Overwrite
5
Unfinalized*1 CD-R
Unfinalized CD-RW
Finalized CD-R
Finalized CD-RW
6
No
Yes
No
Yes*2
CD-RW incompatible
player
No
No
Yes
No
CD-RW compatible
player
No
No
Yes
Yes
*1For information on “Finalization,” see page 28.
*2You need to erase the TOC (table of contents) on a CD-RW to make it rewritable. For
information on TOC erasure, see page 48 in the Owner’s Manual.
7
8
2
NOTE
Audio Master Quality Recording is a high quality recording mode used
to create an audio CD in the quality of the original. By minimizing the
jitter that subtly degrades audio quality during playback, Audio Master
Quality Recording achieves sound close to the original source. Set
A.M.Q.R. by pressing the A.M.Q.R. button 2 in CD-R copy standby
mode. The A.M.Q.R mark indicator appears in the display.
If you use the A.M.Q.R. function, the original data on the HDD will
disappear from the HDD and “move” onto the CD-R. This is called
“Digital Move.”
NOTE
26
“REC” lights up in the display, and the HDD mark starts blinking.
CD-R copy standby mode is now engaged.
The first press of the COPY button 1 selects HDD recording from
the internal CD-R, and the second press will select CD-R recording
from HDD.
■ About Audio Master Quality Recording (A.M.Q.R.)
Pressing the Stop button 7 in this
step aborts the operation and exits
the copy standby mode.
By using A.M.Q.R., Actual
recordable time will be shorter
than that printed on the CDR/RWs. Recordable time is
approximately 63 minutes on a
74-minute CD, and 68 minutes on
an 80-minute CD. This is because
meta-information like TOC (table
of contents) is also recorded.
Press the COPY button 1 twice.
3
If necessary, set the CD-R recording mode.
■ Setting the CD-R recording mode
You can select one of the following three modes:
All Synchro: copies all tracks to CD-R by synchronizing with the song
playback on the source HDD.
Full Auto: in addition to the operation done in Auto Synchro,
automatically finalizes the CD.
Multi Synchro*: copies only specified tracks to CD by synchronizing
with the song playback.
Select All Synchro, here.
1. Press the MODE button 4 during CD-R copy standby mode.
2. Press the Up/Down buttons 5 to display All Synchro.
3. Press the ENTER button 6 to select the mode.
NOTE
You can select other options when
recording a CD, such as digital/
analog copy methods, copy volume
level, and its copy speed. Getting
the message “Can’t Copy” when
you try to copy digitally recorded
data indicates that the data is
protected and cannot be copied
digitally according to SCMS
standards. In this case, you need to
change the copy method.
For information on SCMS, see
page 32.
* You can designate the number of tracks with Multi Synchro mode.
4
Press the Up/Down buttons 5 to select the Disc, Album or
Bookmark group you want to copy to CD.
5
Press the Playback button 8 to start recording.
The display shows the progress of the copy process.
“Wait” will momentarily appear in the display, and then the copy
operation will finish.
6
You can add more tracks by repeating steps 2-5 above, and
complete your CD.
7
(Set the CD you want to finalize in the disc tray, and) press
the FINALIZE button 3.
“Finalize OK?” appears in the display.
8
Press the Playback button 8 to start finalization.
“Finalizing” appears in the display and finalization is engaged.
When finalization is complete, the TOC mark appears in the display.
You can now play the CD on other CD players.
NOTE
Depending on CD condition,
“Wait” may appear, indicating that
the OPC* adjust function is active.
This takes about 10 seconds.
* Optimum Power Control
NOTE
In step 5, you cannot play back
the recorded CD on another CD
player. To make the disc playable
on other CD players, proceed to
step 6 to finalize the CD.
NOTE
Track(s) can only be recorded
to CD as a group. If you want
to record several tracks, use the
Bookmark function to bunch tracks
together to form a group, which
you can then record.
NOTE
If you select the Full Auto copy
mode, the CD will automatically
be finalized after recording. You
cannot add further tracks to a
finalized CD.
27
■ About Finalization
Making the CD you have created playable on other CD players requires it to be
‘finalized.’ A TOC (table of contents) is written on the CD during this finalization
process.
You cannot add further tracks to a finalized CD regardless of any recordable
space remaining on the CD-R.
TOC, Finalized data
28
Playback
There are various playback functions, covering basic operation to more advanced applications.
Playing Back Tracks
Basic Operations
Playback
Press the Playback button 5.
Stop
Press the Stop button 2.
Pause
Press the Playback button 5 during playback.
Fast Forward/Fast Rewind
Hold down the Fast Forward 1 / Fast Rewind button 3.
Skip back to previous track/
Skip to next track
Press the previous track 4 / next track button 6 twice to skip
to the previous/next track.
Skip back to the previous
group/ Skip to the next
group
Press the previous group 7 / next group button 8.
For more details, see page 19 in the Owner’s manual.
Advanced Operation
You can use the HDD as a music server, or a jukebox, and play
back tracks for specific purposes.
Play Style
Repeat
Random
Intros Scan
Time Search
Sets the playback range.
(See page 20 for more information.)
Plays back the same track repeatedly.
(See page 21 for more information.)
Plays back tracks on the HDD/CD randomly.
(See page 22 for more information.)
Plays back only the beginning of tracks (to find a desired
track).
(See page 23 for more information.)
Plays back a track from a designated point (to find a desired
part/track quickly).
(See page 20 for more information.)
2
1
4
5
3
6
8
7
29
Appendix
DISPLAY MESSAGES
Can’t Copy
Digital copying is not possible.
Can’t Edit
The item you have selected is not editable.
Can’t Tr.Lev.
Copying an Album using A.M.Q.R (Audio Master Quality
Recording) is not possible if track levels have been adjusted.
Can’t use HDD
The CDR-HD1500 is not operable since the HDD’s format
is inappropriate.
Change Discs!
Change the CD to duplicate.
Check Disc
The CD is unusable. Check the CD carefully.
Data Track
The data storage CD (for PC) is not playable.
Disc Full
The CD has reached its full (memory) capacity. No further
recording is possible.
Disc No.Full
The HDD has reached its maximum Disc number - 999. No
further recording is possible.
Drive Check
The HDD has encountered a problem. Check if it is set to
”Slave.”
Erasing
Erasing CD-RW data. Please wait.
Finalize OK?
The CDR-HD1500 asks you to confirm finalization.
Finalizing
Finalization is in progress. Please wait.
Format Really
The CDR-HD1500 asks you to confirm HDD formatting.
30
HDD Full
The HDD has reached its full (memory) capacity. No further
recording is possible.
Imaging
Forming disc image. Please wait.
Initialize ?
The CDR-HD1500 asks you to confirm return to factory
preset status.
Invalid Mode
You have selected an unavailable recording mode. Recording
is not possible.
New Disc
The inserted CD contains no data.
No Data
The HDD contains no song data.
No Disc
No CD is set on the disc tray.
No Enough Spc
The CD to be copied to has reached its full (memory)
capacity. No further recording is possible.
No Input
No digital signal is being input.
No Previous
No previous track is available.
No Source
No song data is available on the source media.
Not Audio
A data storage CD (for PC) is not playable.
No Undo data
The Undo function is ineffective.
OPC Adjust
Optimizing the laser power before recording. Please wait.
Pack Before !
Editing is not possible. Rearrange the track numbers using
Track Pack before editing.
Reading
Now reading CD. Please wait.
Recording
Copying data to CD. Please wait.
Standby
Preparing CD copy. Please wait.
Timer Standby
Setting for timer recording has been completed. Or,
initiating timer recording.
Track No.Full
The Disc group has reached its maximum track number - 99.
No further recording is possible.
Unavailable
Cannot copy to CD using A.M.Q.R (Audio Master Quality
Recording).
Unrecordable
You are trying to record/copy to an HDD/CD which is not
recordable.
Wait
The CDR-HD1500 is processing. Please wait for a while.
For more information, see page 78 in the Owner’s
Manual.
31
Glossary
■ AAC
■ OPC
An audio compression system conforming to the MPEG
(Moving Picture Experts Group) movie standard, offering
good quality at a higher compression ratio than MP3
compression.
Abbreviation for ‘Optimum Power Control.’ The laser power
necessary used to write data varies depending on the CD-R/RW
selected. OPC allows the CDR-HD1500 to automatically adjust
laser power according to the CD-R/RW you use.
■ CD TEXT
■ PCM
Text information recorded onto a CD, such as title, artist
name, lyrics, etc. You need to use a CD player/CD-ROM
drive corresponding to CD TEXT format.
Abbreviation for ‘Pulse Code Modulation,’ which is an analogdigital converter system to change analog audio data to digital.
The PCM system is employed for music CDs (CD-DA).
■ Coaxial/Optical Digital Jacks
■ RS-232C
The digital input/output jacks. Any data input/output through
these jacks is free from degradation since the data sent
remains in the digital domain.
Coaxial/Optical connectors and cables differ physically, but
their function is the same.
A serial transmission connector standard to allow a PC to
connect to peripheral devices such as a printer, monitor,
scanner, etc. A null modem (cross wire RS-232C) cable is
required to connect your CDR-HD1500 to the PC.
■ Digital Move
■ S Video/Composite Video Signals
Moves digital data on the HDD to a CD. The digital data
is deleted from the source HDD, or “moved.” This makes
it possible to copy between two generations, from CD to
HDD, and HDD to CD-R/RW, which is otherwise prohibited
by SCMS.
S Video signals are transmitted with brightness (Y) signals
and chrominance signals separated. Composite video
signals, on the other hand, are transmitted with both signals
combined. Because its brightness and chrominance signals
are carried separately, S Video produces clearer images than
Composite video.
■ Emphasis
■ SCMS
A recording mode used to improve audio quality, which
boosts high frequencies during recording, and then reduces
them proportionately on playback, resulting in decreased
hiss.
Abbreviation for ‘Serial Copy Management System,’ which
prevents unlimited digital copies of commercial CDs,
allowing for ‘first generation’ copies only.
■ Format
Allows recording media like CD to be used on a specific
device, by conforming to the data writing system of the
device.
Before using an HDD, you will need to format it with your
CDR-HD1500.
■ Master and Slave
The main start-up disk for PC is called “Master,” while subdisks to be controlled are called “Slaves.”
The HDD connected to the CDR-HD1500 MUST be set to
“Slave.”
■ OSD (On Screen Display)
Shows the groups and/or tracks stored on the CDR-HD1500
on an externally-connected monitor for easier viewing.
For more information, see page 27 in the Owner’s Manual.
32
■ Sampling Frequency
To convert analog audio signals to digital, analog data
requires to be “digitized” periodically. This “digitization” is
called “sampling” and its frequency - the number of digital
‘bits’ per second - is called the “sampling frequency,” which
is measured in ‘Hertz’ (or simply ‘Hz’).
■ TOC
Acronym for ‘Table Of Contents,’ which contains a list of
the recorded tracks, session information, and CD-TEXT.
By loading the table of contents, a CD player can display a
CD’s playback time, etc., and access target tracks faster.
■ Track Marker
A separator, which separates two consecutive songs. A
player such as the CDR-HD1500 recognizes the song start
point by finding the track marker, which is also used for
Track Search and Intro Scan functions. You can create a
track marker on this unit either automatically or manually.
Function Tree
While the CDR-HD1500 is not in operation
■ Pressing the MENU button:
Album Edit*
— Album New
— Edit Stored
— Album Copy
— Album Rename
— Album Delete
— Album Pack
— Album Title
— Track Shuffle
— Track Level
— Tr. Interval (Track Interval)
Track Edit*
— Track Rename
— Track Adjust
— Track Erase
— Part Erase
— Track Combine
— Track Divide
— Track Pack
— Add Fade In
— Add Fade Out
— Track Title
Disc Edit*
— Disc Rename
— Disc Erase
— Disc Combine
— Disc Divide
— Disc Pack
— Disc Title
Undo
HDD Utility
— HDD Info.
— HDD Format
Sys. Utility (System Utility)
— Firm. Version (Firmware Version)
— Initialize
— Dimmer Setup
— Video Output
— Auto Play
— Firm Update
Synchro Setup
— OPT TH Level (Optical Threshold Level)
— COAX TH Level (Coaxial Threshold Level)
— ANLG TH Level (Analog Threshold Level)
— Int. Time (Interval Time)
— End Duration
DAC Mode (Digital-Analog Converter Mode)
* Menu items with an asterisk (*) are not displayed when CD-R drive is
selected.
■ Pressing the MODE button:
Time Search
Play Style*
Repeat
— Repeat Single
— Repeat Full
Random
Intros Scan
* Menu items with an asterisk (*) are not displayed when CD-R drive is
selected.
* Menu items with an asterisk (*) are not displayed when CD-R drive is
selected.
33
While HDD recording standby mode is engaged:
■ Pressing the MENU button:
Level
■ Pressing the MODE button:
Track Synchro
Multi Synchro
All Synchro
Auto Period
Manual
While CD copy standby mode is engaged:
■ Pressing the MENU button:
Copy Method
— Auto Dig/Anlg
— Analog Copy
— Digital Move
— Digital Copy
Copy Level
Copy Speed
Imaging Speed*
■ Pressing the MODE button:
All Synchro
Full Auto*
Multi Synchro
* Menu items with an asterisk (*) are not displayed during HDD
recording from CD.
After inserting an unfinalized CD-RW
■ Pressing the ERASE button:
Erase Last?
Erase All?
After inserting a finalized CD-RW
■ Pressing the ERASE button:
Erase TOC?
Erase All?
34
[CDR-HD1500 Data List]
You can photocopy and use this table as a Track/Disc/Album history.
No.
Disc/Album
Tr.No.
Track Name
No.
Remarks
Disc/Album
Tr.No.
Track Name
Remarks
35
© 2007
YAMAHA ELECTRONICS CORPORATION, USA 6660 ORANGETHORPE AVE., BUENA PARK, CALIF. 90620, U.S.A.
YAMAHA CANADA MUSIC LTD. 135 MILNER AVE., SCARBOROUGH, ONTARIO M1S 3R1, CANADA
YAMAHA ELECTRONIK EUROPA G.m.b.H. SIEMENSSTR. 22-34, 25462 RELLINGEN BEI HAMBURG, GERMANY
YAMAHA ELECTRONIQUE FRANCE S.A. RUE AMBROISE CROIZAT BP70 CROISSY-BEAUBOURG 77312 MARNE-LA-VALLEE CEDEX02, FRANCE
YAMAHA ELECTRONICS (UK) LTD. YAMAHA HOUSE, 200 RICKMANSWORTH ROAD WATFORD, HERTS WD18 7GQ, ENGLAND
YAMAHA SCANDINAVIA A.B. J A WETTERGRENS GATA 1, BOX 30053, 400 43 VÄSTRA FRÖLUNDA, SWEDEN
YAMAHA MUSIC AUSTRALIA PTY, LTD. 17-33 MARKET ST., SOUTH MELBOURNE, 3205 VIC., AUSTRALIA
All rights reserved.