1
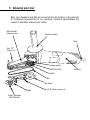
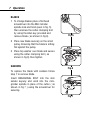
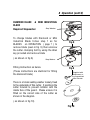
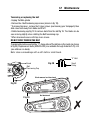
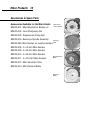
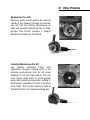
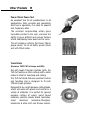
MIN.PK.BOOK001
TM
MINI-GRINDER
OWNER’S INSTRUCTION MANUAL
Thank you for purchasing an Arbortech Product.
Your Arbortech Mini Grinder has been designed & manufactured
to provide you with the highest satisfaction in performance,
durability and safe operation.
Double
Insulated
READ THIS MANUAL
TO SAVE TIME AND MONEY
REV-110112
Please read this manual carefully to ensure correct operation and care of
the machine. If you are using the Mini Grinder correctly, it will provide
you with years of reliable service and save you time and money.
Page
No.
2.
5.
6.
7.
11.
13.
13.
16.
TABLE OF CONTENTS
Rules for safe operation of electrical equipment
Knowing your tool
Unpacking and Assembly
Operation
Maintenance
Accessories & Spare Parts
Other Products
Technical Information
Please read these instructions before
you use your Mini-Grinder.
Rules for safe operation of electrical equipment 2
The Arbortech Mini Grinder is designed and built to meet and exceed
Australian and International Safety Standards.
Use only Arbortech approved or other qualified service centres for the
servicing and/or repair of this tool. For further assistance contact Arbortech.
The Arbortech Mini Grinder is double insulated to provide the highest
possible operator protection from electric shock. Please observe all
necessary safety precautions to avoid electric shock. Do not operate this tool
until you have read and understood all safety instructions and rules of
operation. Failure to comply with these instructions can result in serious
accidents including fire, electric shock or serious personal injury.
IMPORTANT
INCORRECT USE OF THE MINI GRINDER MAY LEAD TO PREMATURE
WEAR AND/OR DAMAGE. PLEASE READ THESE USER INSTRUCTIONS
CAREFULLY BEFORE USE TO ENSURE CORRECT OPERATION.
WARNING - READ ALL SAFETY WARNINGS AND ALL INSTRUCTIONS
Failure to follow all instructions listed below, may result in electric shock,
fire and/or personal injury.
SAVE ALL WARNINGS AND INSTRUCTIONS FOR FUTURE REFERENCE.
The term “power tool” in the warnings refers to your mains-operated
(corded) power tool or battery-operated (cordless) power tool.
1)
WORK AREA SAFETY
• Keep work area well ventilated, clean and well lit. Cluttered or dark areas invite
accidents.
• Do not operate power tools in explosive atmospheres, such as in the presence
of flammable liquids, gases or dust. Power tools create sparks which may ignite
the dust or fumes.
• Keep children and bystanders away while operating a power tool. Distractions
can cause you to loose control.
2)
ELECTRICAL SAFETY
• Power tool plugs must match the outlet. Never modify the plug in any way. Do
not use any adapter plugs with earthed (grounded) power tools. Unmodified
plugs and matching outlets will reduce risk of electric shock.
• Avoid body contact with earthed or grounded surfaces, such as pipes, radiators,
ranges and refrigerators. There is an increased risk of electric shock if your body
is earthed or grounded.
• Do not expose power tools to rain or wet conditions. Water entering a power
tool will increase the risk of electric shock.
• Do not abuse the cord. Never use the cord for carrying, pulling, or unplugging
the power tool. Keep cord away from heat, oil, sharp edges or moving parts.
Damaged or entangled cords increase the risk of electric shock.
• When operating a power tool outdoors, use an extension cord suitable for
outdoor use. Use of a cord suitable for outdoor use reduces the risk of electric
shock.
• If operating a power tool in a damp location is unavoidable, use a residual
current device (RCD) protected supply. Use of an RCD reduces the risk of
electric shock. Note: The term “Residual Current Device (RCD)” may be replaced
by the term “ground fault circuit interrupter (GFCI)” or “earth leakage circuit
breaker (ELCB)”
3)
PERSONAL SAFETY
• Stay alert, watch what you are doing and use common sense when operating a
power tool. Do not use a power tool while you are tired or under the influence
of drugs, alcohol or medication. A moment of inattention while operating power
tools may result in serious personal injury.
• Use personal protective equipment. Always wear eye protection. Protective
equipment such as dust mask, non-skid safety shoes, hard hat or hearing
protection used for appropriate conditions will reduce personal injuries.
• Prevent unintentional starting. Ensure the switch is in the off-position before
connecting to a power source and/or battery pack, picking up or carrying the
tool. Carrying power tools with your finger on the switch or energizing power
tools that have the switch on invites accidents.
• Remove any adjusting key or wrench before turning the power tool on. A wrench
or a key left attached to a rotating part of the power tool may result in personal
injury.
• Do not overreach. Keep proper footing and balance at all times. This enables
better control of the power tool in unexpected situations
• Dress properly. Do not wear loose clothing or jewellery. Keep your hair, clothing
and gloves away from moving parts. Loose clothes, jewellery or long hair can
be caught in moving parts.
• If devices are provided for the connection of dust extraction and collection
facilities, ensure these are connected and properly used. Use of dust collection
can reduce dust-related hazards.
4)
POWER TOOL USE AND CARE
• Do not force the power tool. Use the correct tool for your application. The
correct power tool will do the job better and safer at the rate for which it was
designed.
• Do not use the tool if the switch does not turn it on and off. Any power tool that
cannot be controlled with the switch is dangerous and must be repaired.
• Disconnect the plug from the power source and/or the battery pack from the
power tool before making any adjustments, changing accessories, or storing
power tools. Such preventative safety measures reduce the risk of starting the
power tool accidentally.
• Store idle power tools out of the reach of children and do not allow persons
unfamiliar with the power tool or these instructions to operate the power tool.
Power tools are dangerous in the hands of untrained users.
• Maintain power tools. Check for misalignment or binding of moving parts,
breakage of parts and any other condition that may affect the power tools
operation. If damaged, have the power tool repaired before use. Many accidents
are caused by poorly maintained power tools.
• Keep cutting tools sharp and clean. Properly maintained cutting tools with sharp
edges are less likely to bind and are easier to control.
• Use the power tool, accessories and tool bits etc. in accordance with these
instructions, taking into account the working conditions and the work to be
performed. Use of the power tool for operations different from those intended
could result in a hazardous situation.
5)
SERVICE
• Have your power tool serviced by a qualified repair person using only identical
replacement parts. This will ensure that the safety of the power tool is
maintained.
5 Knowing your tool
Note: text, diagrams and data are correct at time of printing. In the interests
of continuous improvement of our products, technical specifications are
subject to alteration without prior notice.
Mini-Grinder
Extension arm
Auxiliary handle
Cord
4g x 1/2”
screws x4
Large pulley
M10x1.5 Nut
Spindle
Belt
Top Cover
Blade
Cutter Clamping
Bolt/Washer
6g x 3/8” Cover screws x3
Housing
Knowing your tool (cont’d) 6
Spindle Lock
Mini-Grinder
Spindle Lock
On/off
switch
Belt Tensioning
Cap
Fig.4
Mounting plate
Unpacking and assembly
1. Remove the Mini Grinder from its box. Inspect
to ensure that no damage has occurred during
shipping. If damaged, report to the retailer
immediately.
2. Remove the auxiliary handle from the box and
attach to the tool. (as shown in fig.1)
Fig.1
3.Ensure that the Mini Grinder extension arm is
always fitted securely to the mounting plate. If
loose, tighten the 3 screws that hold the MiniGrinder to the mounting plate on the tool body.
as seen in fig.2.
4. The Mini Grinder is packaged with a Mini
Woodcarver Blade fitted, ready for use. Ensure
that the cutter clamping bolt is tightened fully.
(as shown in fig.3)
5. Before plugging in, ensure that the on/off
switch is in the OFF position.
Fig.3
Fig.2
7 Operation
BLADES
1 To change blades place a flat head
screwdriver into the Mini Grinder
spindle lock and hold (seen in fig .5)
then unscrew the cutter clamping bolt
by using the Allen key provided and
remove blade ( as shown in fig 6)
Fig.5
2 Place new blade securely on the small
pulley. Ensuring that the blade is sitting
flat against the pulley.
3 Place top washer over blade and secure
using the cutter clamping bolt ( as
shown in fig 6) then tighten
SANDERS
Fig.6
To replace the blade with sanders follow
step 1 to remove blade.
Insert HEXAGONAL BOLT into the mini
sander keyway and wind into the minigrinder spindle in place of the cutter ( as
shown in fig 7 ) using the screwdriver for
securing.
Fig.7
8 Operation (cont’d)
DIAMOND BLADE
BLADE
& MINI INDUSTRIAL
Required Stepwasher
Step Washer
To change blades with Diamond or Mini
Industrial Blade follow step 1 as for
BLADES on OPERATION ( page 7 ) to
remove blade (seen in fig .5) then unscrew
the cutter clamping bolt by using the Allen
key provided and remove blade
( as shown in fig 6)
Fig.8
Step Washer
Fitting Instruction as below
(These instructions are identical for fitting
the diamond blade)
Fig.9
Supplied with
Attachment or
Pre-Assembled
Mini-Grinder
There is a brass seating washer loosely fixed
to the underside of this cutter. It positions the
cutter forward to prevent collision with the
inside face of the guard. Please ensure it is
fitted on the correct side of the cutter as
shown in the diagram.
( as shown in fig 10)
Fig.10
Operation (cont’d) 9
Warning: Always wear correct safety clothing, including ear, eye
and lung protection.
• The Mini Grinder should always be used with
two hands, placing the left hand on the auxiliary
handle and the right on the tool body.
(as shown in fig.11)
CUTTING GRIP
Fig.11
• Ensure the machine is
running BEFORE contacting
the material, to be worked on.
• To sand, polish or scrub, hold
the Mini-Grinder horizontally.
(as shown in fig.12).
Fig.12
• Use the Mini Woodcarver Blade to cut or remove wood and
plastics. The Mini Sanding Pads are for cleaning and sanding wood,
plastics, metal, paint and much more. Use the diamond blade for
cutting and recessing any masonry based material.
10 Operation (cont’d)
To trench cut, hold the Mini-Grinder vertically and simultaneously lower into
the wood and pull towards you. (as shown in fig.13)
SHOWING ANGLE & DIRECTION OF CUT
25-30 is a
comfortable
working angle.
0
25-300
Angle
Fig.13
• Use the bottom edge of the blade
(as shown in fig.13)
And not as in fig.14.
Fig.14
Maintenance 11
• Blade sharpening - Mini Woodcarver Blade:
1. Unplug the Mini Grinder.
2. Use a (5/32´´) or 4 mm round metal file
(MIN.FG.002). When sharpening hold the file at
90 to the blade, keeping the file level.
(as shown in fig.15)
0
o
90 Sharpening Angle
• Checking adaptor plate
Ensure that the Mini-Grinder adaptor plate is
always mounted securely. If loose, tighten the
three adaptor plate screws as shown in fig.16.
Fig.15
Note: The arm must be removed to be able to
plate screws to the
tighten the adapter
casting of the grinder
Fig.16
Cleaning the grills and switch
Regulary check to see if any dust or foreign matter
has entered the grills positioned on the front and
back of the motor or under the switch (as shown
in fig.17).
If so use a soft brush to remove any accumulated
dust. To clean grills and switch
SAFETY
ALWAYS USE EYE PRETECTION
ALWAYS UNPLUG FROM THE WALL WHEN CLEANING
Fig.17
12 Maintenance
Tensioning or replacing the belt
Unplug the Mini-grinder
Remove the 4 belt tensioning cap screws (shown in fig. 18).
• To remove top cover , remove the 3 cover screws (see knowing your tool page 5) then
slide cover back away from blade and lift off.
• Rotate tensioning cap Fig 18 to remove slack from the belt fig 19. The blade can be
seen moving slightly when rotating the Belt tensioning cap.
• When tensioned secure with top cover screws.
•
•
DO NOT OVER TENSION THE BELT
If replacing the belt ensure that the “V” shape sides of the belt are on the inside (as shown
in fig.20). Replacement belts (MIN.FG.003) are available through Arbortech Pty Ltd
(see address on back).
Note: clean surroundings with a soft cloth or small brush.
“V” Belt
Guard
Fig.20
Belt
Tensioning Cap
Slack removed and tensioned
Fig.18
Fig.19
Not tensioned
Small
Pulley
Other Products 13
Accessories & Spare Parts
Accessories Available for the Mini-Grinder
MIN.FG.001 Mini-Woodcarver Blades x 2
Mini Wood
Carver Blade
MIN.FG.002 4mm Sharpening File
MIN.FG.003 Replacement Pulley Belt
MIN.FG.004 Bearing & Spindle Assembly
Sanding
MIN.FG.006 Mini-Sanders 4x assorted sanders Disk
MIN.FG.008 4 x 40 Grit Mini-Sanders
MIN.FG.009 4 x 60 Grit Mini-Sanders
MIN.FG.010 4 x 80 Grit Mini-Sanders
MIN.FG.011 4 x 120 Grit Mini-Sanders
Mini-Industrial
Blade
MIN.FG.012 Mini Industrial Cutter
MIN.FG.016 Mini Diamond Blade
Diamond
Blade
14 Other Products
Woodcarver Pro-4 Kit
Wherever waste wood needs to be removed
rapidly or cut, shaped, trimmed or trenched,
you will find the 100mm Woodcarver an
ideal and versatile attachment for an angle
grinder. This Pro-Kit contains a 100mm
Woodcarver blade and Pro-Guard.
Industrial Woodcarver Pro-Kit
The 100mm Industrial Cutter with
replaceable Tungsten Carbide teeth is the
ultimate professional tool for all wood
shaping in soft and hard woods. You can
now remove large areas of wood quickly,
easily with control and precision, cutting in
all directions regardless of grain to produce
a fine finish. This Pro-Kit contains a 100mm
Industrial Cutter, Pro-Guard and fixing key.
Other Products 15
Power Chisel Power Tool
An excellent tool for all woodworkers in all
applications. Safe, versatile and completely
dust free in operation, it is ideal for experts
and beginners alike.
The constant reciprocating action gives
incredible control to the user, and also the
ability to carve difficult and uneven timbers
which traditionally have been hard to carve.
This kit contains a 20mm flat chisel, 20mm
gouge chisel, 15 ml oil bottle, power chisel
unit with fitted motor.
Trade Blade
(Known as TUFF CUT in Europe and USA)
Set with tough Tungsten Carbide teeth, the
Tuff-Cut features a 4mm cutting width, which
makes it ideal for trenching and cutting.
The Tuff-Cut blade features excellent control
and handling and is designed to fit onto
125mm angle grinders.
Designed to be a multi purpose cutting blade,
which will work with power and control in a
variety of materials. It is perfect for general
purpose cutting of wood, wood based
materials, plastics, plaster board, laminates,
sheet
materials
melamine,fibreglass,
aluminium & other soft, non ferrous metals.
16 Technical Information
Max. Blade diameter:
50 mm
Max. RPM:
18,000 rpm @ extension spindle
Power:
5.8A ~ 700 Watt
Rating:
230-240V, AC, 50-60Hz
Disc Bore Size:
9.5mm
Max. cutting depth:
10 mm
Weight:
1.83 Kg
Overall Length:
350mm
120V, AC, 60Hz
CE-Declaration of Conformity:
We declare under our sole responsibility that this product is in conformity with the CE
Standards.
*Manufacturer reserves the right to change specifications without notice.
*Note: Specifications may differ from country to country.
NOTE: Motor may differ from that shown on box depending
on specifications required for your country.
NOTES
NOTES
TM
ARBORTECH PTY LTD • 67 WESTCHESTER ROAD • MALAGA • 6090
PERTH • WESTERN AUSTRALIA
TEL: 08 9249 1944 • FAX: 08 9249 2936
U.S.A. -Tollfree: 866-517-7869 U.S.A Office: 978-466-7945
U.S.A Fax: 866-515-8104 EUROPE: T: +49 2724-288301
F: +49 2724-205515
Website: www.arbortech.com.au
US Website: www.arbortechusa.com
Facebook: www.facebook.com/arbortechtools
Email: [email protected]