1
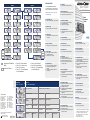
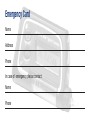
Quick Reference Guide
This Quick Reference Guide is intended for
instructed users only. Please refer to your
Accu-Chek Spirit Combo User Guide for detailed
information on your Accu-Chek
Spirit Combo insulin pump.
Start and stop insulin delivery
Change the cartridge
The Quick bolus
Pump is in RUN
1. Press d until STOP YOUR PUMP screen
appears.
2. Press f to confirm.
3. Pump is in STOP.
Insert the battery
Pump is in STOP
1. Press d until START YOUR PUMP screen
appears.
2. Press f to confirm.
3. Pump is in RUN.
1. P ump is in STOP.
2. Press d until CARTRIDGE CHANGE
appears.
3. Press f to confirm.
4. DISCONNECT SET – REMOVE CARTRIDGE
appears.
5. Remove the empty cartridge.
6. Press f for 3 seconds until the piston rod
starts to return.
7. After the piston rod has returned the
cartridge volume flashes.
8. To adjust cartridge volume if necessary,
hold the cartridge with attached adapter
turned upwards.
9. Hold it parallel and close to the cartridge
compartment.
10. Thread part top of adapter must be exactly
at the same level as the top of the pump
housing.
1. P ump is in RUN.
2. Press s for 3 seconds until you hear a
four-tone beep and feel a vibration. The
quick bolus function is activated.
3. Press a repeatedly, until the desired
bolus amount is reached. This is based on
the bolus increment that you set in your
THERAPY SETTINGS.
4. 5 seconds after you pressed a for the
last time, the total bolus amount is
confirmed with beep and vibration for every
set bolus increment.
5. 5 seconds after the confirmation the pump
starts to deliver the bolus.
1. P ump is in STOP.
2. Remove the battery cover
with the battery key
counterclockwise.
3. Insert the battery with the
negative (–) end down in
the battery compartment. The positive end
fits in the notch of the battery cover.
4. Turn with your battery key carefully
clockwise until it locks.
5. The text for the SELF-TEST appear in the
display.
6. After SELF-TEST press a or s to select
battery type. Press f to confirm.
7. The pump is in STOP.
Change the infusion set
1. P ump is in STOP.
2. Remove the infusion set from your infusion
site.
3. Unscrew the infusion set from the adapter
without touching the tip of the cartridge.
4. Screw the new infusion set carefully into
the adapter until it is firmly attached.
5. Prime the new infusion set.
Set the time
1. P ress d until the TIME AND DATE SETTINGS
screen appears.
2. Select by pressing f.
3. Scroll with a or s to set the hour.
4. Continue with pressing d to change from
hour to minute, year, month, day and time
format. Change the given data with a or
s. When finished with all changes, press
f.
5. Pump returns to STOP or RUN mode as
before.
Prime the infusion set
1. P ump is in STOP.
2. Press d repeatedly until text INFUSION
SET PRIMING appears.
3. Press f to select. Disconnect infusion set
from body.
4. Press f for 3 seconds, priming process
starts.
5. The infusion set must be free of air bubbles
and the insulin must drip from the end of
the needle.
6. Priming process can be stopped by
pressing f.
7. Pump returns to STOP.
! If there is space between bottom of
plunger and end plate of the piston rod
repeat steps 9. to 14.
Program the basal rate
1. P ress d repeatedly until BASAL RATE
PROGRAMMING 1 appears (or, if desired,
basal rates 2, 3, 4 or 5).
2. Press f to select.
3. Press d, the 1st hour (beginning at
midnight) is shown.
4. Press a or s to set the desired basal rate
for the shown hour.
5. Press d to move to the next hour. Continue
using a, s and d to set all 24 hourly
basal rates.
6. Confirm by pressing f. The new daily total
is shown. Please check total.
7. Press f to save the settings, new basal
rate becomes active immediately.
j To copy the basal rate: press a and s
simultaneously, the basal rate of the
selected hour is copied to the next hour.
During programming
1. Press s to reset the bolus amount to
0.0 units.
2. If no new bolus is programmed, the pump
will return to RUN after 5 seconds.
Prepare the cartridge
1. P lace the adapter on the cartridge and
press firmly.
2. Remove the protective
cover of the cartridge.
3. If necessary remove the
protective cover of the
infusion set.
4. Screw the infusion sets
luer-lock clockwise into
the adapter. Do NOT
overtighten.
1. P ress d repeatedly until MY DATA screen
appears.
2. Press f to select.
3. Press d repeatedly to select:
a) BOLUS DATA
b) ERROR DATA
c) DAILY TOTALS
d) TBR DATA
e) PUMP TIMER**
4. Press a or s to review the entries.
5. Press f to close.
During or after confirmation
1. Press a or s for 3 seconds.
2. Warning W8: BOLUS CANCELLED occurs.
3. Press f twice to confirm.
During bolus delivery
1. Press a or s for 3 seconds.
2. Warning W8: BOLUS CANCELLED occurs.
3. Press f twice to confirm.
Temporary basal rate (TBR)
15. Press f to confirm the cartridge volume.
16. Pump starts a self-test.
1. P ump is in RUN, press d to move to
STOP YOUR PUMP
2. Press f to select.
3. Warning W6: TBR CANCELLED occurs.
4. Press f twice to confirm.
5. Press d to move to START YOUR PUMP
6. Press f to select.
Review data memory
(MY DATA)
To cancel a Quick bolus
11. Press a or s repeatedly to move the
piston rod forward until end plate of the
piston rod is at the same level as the
bottom of cartridge plunger.
12. Insert the cartridge in the cartridge
compartment.
13. Turn the adapter clockwise into the lock
position.
14. The bottom end of the plunger and the end
plate of the piston rod must fit exactly.
To cancel a temporary basal rate
(TBR)
1. P ump is in RUN.
2. Press d until the TEMPORARY BASAL
RATE (TBR) screen appears.
3. Select by pressing f, the % for the TBR
appears.
4. Press / scroll with a or s to increase or
decrease the basal rate.
5. Press d to move to the duration.
6. Press / scroll a or s to set the duration.
7. Press f to save and close.
8. The programmed temporary basal rate is
activated immediately.
9. At the end of the TBR, Warning W7: TBR
OVER occurs.
10. Press f twice to confirm.
Adjust the sound volume
1. P ress d repeatedly until the PUMP
SETTINGS appears (in RUN or STOP).
2. Press f to select.
3. Press d repeatedly to move to the
SOUND VOLUME function.
4. Press a or s to adjust the volume.
5. Press f to save and exit.
Switch Bluetooth ® ON / OFF
1. P ress d repeatedly until the BLUETOOTH
SETTINGS screen appears.
2. Press f to select.
3. Press a or s to select ON / OFF
4. Press f to save and exit.
! You must make sure that Bluetooth ®
function is switched off on both
devices before boarding an aircraft.*
Select User Menu
Keylock
1. P ress d repeatedly until PUMP
SETTINGS screen appears.
2. Press f to select.
3. The current Keylock status (ON or OFF) is
displayed.
4. Press a or s to turn Keylock ON
or OFF.
5. Press f to save and exit.
6. When the Keylock is on and no key is
pressed (in RUN or in STOP), all four keys
are locked automatically.
1.
2.
3.
4.
P ress d until MENU SETTINGS appears.
Select menu by pressing f.
The current menu is displayed.
Press a or s to select the desired
menu (STANDARD, CUSTOM or
ADVANCED).
5. Save by pressing f.
If the previously selected basal rate profile
is not accessible from the new user menu,
there will be dashes in the display.
Unlock the keys
1. Press d + s simultaneously until the
screen changes.
2. You may now operate the keys.
3. If no key is pressed within 10 seconds
(in RUN or STOP), the four keys are locked
again automatically.
Change signal settings
1. P ress d repeatedly until PUMP SETTINGS
appears.
2. Press f to select.
3. Press d repeatedly until signal
sETTINGS screen appears.
4. Press a or s to set the desired alarm
signal.
5. Close and save by pressing f.
*The Bluetooth ® word mark and logos are registered
trademarks owned by Bluetooth SIG, Inc. and any
use of such marks by Roche is under license.
Other trademarks and trade names are those of
their respective owners.
**B ackup and loan pumps only.
RUN
WARNING / ERROR
STOP
For every WARNING and ERROR it is
recommended that you consult your User
Guide for additional detailed information!
Always press twice f to snooze and
confirm the signal.
f
f
W1 CARTRIDGE LOW
1. Replace the cartridge as soon as possible.
W7 TBR OVER
1. Put the pump into RUN (if necessary).
W8 BOLUS CANCELLED
1. Ensure that this cancellation was intended.
2. Program a new bolus (if necessary).
Insulin Pump
Quick
Reference
Guide
W9 LOANTIME WARNING**
1. Put the pump into RUN (if necessary).
2. Check MY DATA screen.
3. Contact your pump support.
W2 BATTERY LOW
1. Replace the battery within a few hours.
W10 BLUETOOTH FAULT
1. Redo pairing procedure for insulin pump
and Meter.
W3 REVIEW TIME
1. Check the date and the time and correct,
if necessary.
W4 CALL FOR UPDATE
1. Contact your pump support for update.
BRP 4
BRP 4
BRP 3
BRP 3
BRP 2
BRP 2
Not available in STANDARD
MENU
= Basal Rate Profile 2 – 4
05331803001/C
BRP
Local representatives:
AT
AU
BE
CA
CH
CZ
DE
DK
ES
FI
FR
GR
+43 1 27787-596
1800 633 457
0800 93 626
1-800-280-7801
0800 11 00 11
+420 724 133 301
0180 2 000 412
+45 36 39 99 54
900 400 000
+358 800 92066
+33 4 76 76 30 00
800 11 71000
HU
IN
IT
NL
NO
NZ
PL
SE
UK
US
ZA
+36 80 630 106
+91 (22) 6697 4900
800 089 300
0800 022 05 85
+47 815 00 510
0800 80 22 99
+48 22 481 55 55
+46 (0)20-41 00 42
0800 731 22 91
1-800-280-7801
+27 11 504 4600
ACCU-CHEK and ACCU-CHEK SPIRIT COMBO are
trademarks of Roche.
Roche Diabetes Care AG
3401 Burgdorf, Switzerland
jj
jj
jj
jj
Press d to move forwards
Press f to confirm or save
Press a to select up
Press d + a simultaneously
to move backwards
Mainmenu
Press f to enter
jj Press s to select down
jj Press a for the Backlight
jj Press d + s simultaneously
to unlock the Keylock
W5 PUMP TIMER**
1. Put the pump into RUN (if necessary).
2. Check MY DATA screen.
3. Contact your pump support.
W6 TBR CANCELLED
1. Put the pump into RUN (if necessary).
2. Ensure that this cancellation was
intended.
3. Program a new temporary basal rate
(if necessary).
S ELECT USER MENU
A DVANCED / CUSTOM / STANDARD
B
LUETOOTH ON / OFF
P AIRED DEVICE
A DD DEVICE
B
OLUS
INCREMENT
P RIME AMOUNT
B
ASAL RATE LOCK
A UTOMATIC OFF
KEY LOCK
S OUND VOLUME
S IGNAL SETTINGS
O
RIENTATION
L ANGUAGE
E RROR DATA
E2 BATTERY EMPTY
1. Change the battery immediately.
E3 AUTOMATIC OFF
1. Put the pump into RUN (if necessary).
E4 OCCLUSION
1. Check blood glucose level.
2. Disconnect the infusion set from body.
3. Exchange cartridge and infusion set.
4. Prime, connect the set to body and put
the pump in RUN.
E8 POWER INTERRUPT
1. Check for correct time and date.
E9 END OF OPERATION**
1. Check MY DATA screen.
2. Contact your pump support.
E10 CARTRIDGE ERROR
1. Disconnect the infusion set from body and
remove the cartridge.
2. Activate the CARTRIDGE CHANGE function.
3. Reinsert the cartridge and attach a new
infusion set.
4. Prime, connect the set to body and put
the pump in RUN.
E5 END OF OPERATION**
1.Arrange immediate replacement of your
insulin pump.
2.Contact your healthcare professional
team if necessary.
E11 SET NOT PRIMED
1. Disconnect the infusion set from body.
2. Prime, connect the set to body and put the
pump in RUN.
E6 MECHANICAL ERROR
S
ubmenu
Press d to move forward …
B
OLUS DATA
E1 CARTRIDGE EMPTY
1. Change the cartridge immediately.
D
AILY TOTALS
1.Disconnect the infusion set from body
and remove the cartridge.
2. Exchange the battery.
3.If possible activate the CARTRIDGE
CHANGE function.
4.Reinsert the cartridge and attach a new
infusion set.
5.Prime, connect the set to body and put
the pump in RUN.
6. If 3. not possible contact pump support.
E7 ELECTRONIC ERROR
1. Disconnect the infusion set from body.
2. Exchange the battery.
3.Prime, connect the set to body and put
the pump in RUN.
DISPLAY CONTRAST
T BR DATA
P UMP TIMER**
E12 DATA INTERRUPTED
1. Restart the data transfer.
E13 LANGUAGE ERROR
1. Check Language.
2. Contact your pump support.
REMINDER
1. Put the pump into RUN (if necessary).
End of warranty
1. Contact your pump support.
*The Bluetooth ® word mark and logos are registered
trademarks owned by Bluetooth SIG, Inc. and any
use of such marks by Roche is under license.
Other trademarks and trade names are those of
their respective owners.
**B ackup and loan pumps only.
I am a diabetic patient being treated with an insulin pump, that delivers
insulin via a tube into my skin. If I show abnormal behavior or I am unconscious, please pull the tube with the needle out of my skin or cut the tube
off directly at the needle. If I am able to swallow, give me sugar in some
form immediately. Notify a doctor, hospital or ambulance.
Emergency Card
Name
Address
Phone
In case of emergency please contact:
Name
Phone
This is to certify that
Mrs/Mr
Date of birth
has DIABETES MELLITUS.
She/He has to rely on regular supply of insulin with the Accu-Chek Spirit Combo
insulin pump Serial No.
which he/she carries with him/her.
05331803001/C
Medical Certificate
Place and date
Name of doctor
Phone
Signature
Stamp
Fax