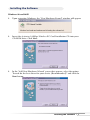
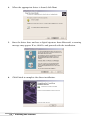
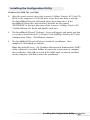
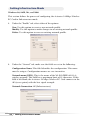
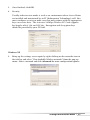
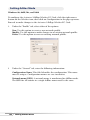
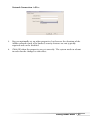
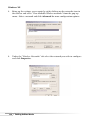
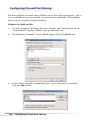
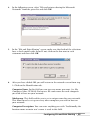
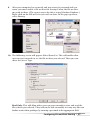
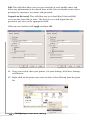
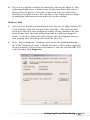
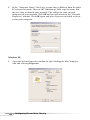
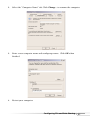
1
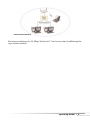
54 Mbps Wireless
PC Card
User Guide
0530-0309-000
Page
Table of Contents
l.
ll.
lIl.
IV.
V.
Introduction
Technical Support
Operating Modes
Installing the PC Card
Installing the Software
Windows 98 and 98SE
Windows Me
Windows 2000
Windows XP
VI. Installing the Configuration Utility
Windows 98, 98SE, Me, and 2000
VII. Setting Infrastructure Mode
Windows 98, 98SE, Me, and 2000
Windows XP
VIII. Setting AdHoc Mode
Windows 98, 98SE, Me, and 2000
Windows XP
IX. Configuring File and Print Sharing
Windows 98, 98SE, and Me
Windows 2000
Windows XP
X. Troubleshooting
XI. Frequently Asked Questions
XII. Regulatory and Warranty
2
3
4
6
7
7
9
11
13
15
15
16
16
17
20
20
22
24
24
29
30
32
33
34
Proprietary Notice and Disclaimer
Unless otherwise noted, this document and the information herein disclosed are proprietary to Actiontec Electronics, Inc the manufacturer. Any person or
entity to whom this document is furnished or who otherwise has possession thereof, by acceptance agrees that it will not be copied or reproduced in whole
or in part, nor used in any manner except to meet the purposes for which it was delivered.
The information in this document is subject to change without notice and should not be construed as a commitment by Actiontec the manufacturer.
Although Actiontec the manufacturer will make every effort to inform users of substantive errors, Actiontec the manufacturer disclaims all liability for any
loss or damage resulting from the use of this document or any hardware or software described herein, including without limitation contingent, special or
incidental liability.
Note: PC is a trademark of IBM Corporation. Windows 98 and 98 SE is a trademark of Microsoft Inc. All other brand or product names and logos used
in this manual are trademarks or registered trademarks of their respective holders.
0530-0309-000
Table of Contents
1
Introduction
Thank you for purchasing the Actiontec 54 Mbps Wireless PC card. This
Wireless PC Card is easy to setup and easy to use. If you’re tired of all those
messy wires needed to connect a laptop to your home network, take your
networking to the next level with the Actiontec 54 Mbps Wireless PC Card. You’ll
be able to have full access to your network and share files, printers and even
your High-Speed Internet access wirelessly from anywhere within your home.
This card uses Wi-Fi5 (a.k.a. IEEE 802.11a) technology.
Package Contents
Make sure the following items came in this package:
• Actiontec 54 Mbps Wireless PC Card
• Installation CD-ROM
• User’s Manual
• Quick Start Installation Guide
• Warranty Card
Minimum System Requirements
• Compatible notebook, PC or handheld device with an available 32-bit
Cardbus Type II slot
• 16 MB of RAM
• Windows 98, Windows 98SE, Windows ME, Windows 2000 or Windows XP
2
Introduction
Contacting Technical Support
Actiontec Electronics prides itself on making high-quality, durable, highperformance products. If you need assistance, the Actiontec Technical Support
Department is available seven days a week from 6 a.m. to 11 p.m. (Mountain
Time) to provide professional support.
Actiontec Electronics, Inc.
760 N. Mary Avenue
Sunnyvale, CA 94085
Phone: 1-719-884-8300
E-mail: [email protected]
Contacting Technical Support
3
Operating Modes
The Actiontec 54 Mbps Wireless PC Card can be set to operate in one of two
modes: AdHoc mode or Infrastructure mode.
AdHoc Mode
When configured for AdHoc mode, the Actiontec 54 Mbps Wireless PC Card is
able to operate in an environment where a wireless network consists of a
number of stations using additional 54 Mbps Wireless Cards without access
points. They can share files this way, but are not able to access Wired LAN
(Local Area Network) resources.
AdHoc Network
Infrastructure Mode
When configured for Infrastructure mode, the Actiontec 54 Mbps Wireless PC
Card network is able to operate on a network composed of base stations and
access points that connect the wireless network to a wired LAN (Local Area
Network), allowing wireless computers access to LAN resources, such as file and
print servers or existing Internet connectivity.
4
Operating Modes
Infrastructure Network
You may reconfigure the 54 Mbps Wireless PC Card at any time by following the
steps in this manual.
Operating Modes
5
Installing the 54 Mbps Wireless PC Card
1.
Your computer can be on or off, it will not affect the installation process. Locate an
available Type II or Type III PCMCIA slot on your laptop. If you are not sure where
the slot is, please consult your laptop’s user manual.
2.
Insert the Actiontec 54 Mbps Wireless PC Card into the appropriate PCMCIA slot.
Your hardware is now installed.
WARNING!!
While this device is in operation, a separation distance of at least 20 centimeters
must be maintained between the radiating antenna and the body of all persons
exposed to the transmitter in order to meet the FCC RF exposure guidelines.
This device complies with Part 15 of FCC Rule., as well as ICES 003 B / NMB
003 B. Operation is subject to the following two conditions: (1) this device may
not cause harmful interference, and (2) this device must accept any interference
received, including interference that may cause undesirable operation.
Modifications not expressly authorized by Actiontec Electronics may invalidate
the user's right to operate this equipment.
6
Installing the 54 Mbps Wireless PC Card
Installing the Software
Windows 98 and 98SE
1.
Upon restarting Windows, the “New Hardware Found” window will appear.
2.
Insert the Actiontec 54 Mbps Wireless PC Card Installation CD into your
CD-ROM drive. Click Next.
3.
In the “Add New Hardware Wizard’ screen that appears, select the option
“Search for the best driver for your device (Recommended)” and click the
Next button.
Installing the Software
7
4.
A screen will display location options to look for the driver. Make sure the
box next to “CD-ROM drive ” is checked and click Next.
5.
Click Next to continue.
8
Installing the Software
6.
Click Finish to continue to complete the driver installation. Note: In
Windows ME, the device manager will show a warning in regards to the
driver and Windows Logo testing. This is normal.
7.
Click Yes to restart the system.
Note: Once the system is restarted, the 54 Mbps Wireless PC Card will
display two flashing greet lights.
Windows Me
1.
Upon restarting Windows, the “New Hardware Found” screen appears.
Installing the Software
9
2.
Insert the PC Card Installation CD into your CD-ROM drive
3.
In the “Add New Hardware Wizard” screen that appears, select the option
“Automatic search for a better driver (Recommended)” and click Next.
4.
Click Finish to continue to complete the driver installation. Note: In
Windows ME, the device manager will show a warning in regards to the
driver and Windows Logo testing. This is normal.
4.
Click Yes to restart the system.
Note: Once the system is restarted, the PC Card will display two flashing
green lights.
10
Installing the Software
Windows 2000
1.
After you have installed the PC Card, your computer will display the
“Found New Hardware Wizard” window. Click Next.
2.
Choose “Search for a suitable driver for my device (recommended) and
click Next.
3.
Insert the Actiontec 54 Mbps Wireless PC Card Installation CD into your
CD-ROM drive. Choose the “CD-ROM Drive” option and click Next.
Installing the Software
11
4.
When the appropriate driver is found, click Next.
5.
Since the driver does not have a digital signature from Microsoft, a warning
message may appear. If so, click Yes and proceed with the installation.
6.
Click Finish to complete the driver installation.
12
Installing the Software
Windows XP
1.
After installing the PC Card, the “Found New Hardware Wizard” will
appear. Insert the Actiontec 54 Mbps Wireless PC Card Installation CD into
your CD-ROM drive. Choose the “Install the software automatically
(recommended)” option and click Next.
2.
A window displaying that the hardware has not passed Windows logo
testing may appear. Click Continue Anyway to install the driver.
3.
The wizard install the drivers automatically. Click Finish to complete the
installation.
Installing the Software
13
6.
Right-click on the Networks icon in the task bar and select “View Available
Wireless networks” from the pop-up menu.
6.
Select the network you wish to connect to and click Connect.
6.
A status window will appear over the network icon in the task bar showing
the network name and signal strength.
14
Installing the Software
Installing the Configuration Utility
Windows 98, 98SE, Me, and 2000
1.
After the system restarts, insert the Actiontec 54 Mbps Wireless PC Card CDROM in the computer’s CD-ROM drive if you have not done so already.
The InstallShield Wizard will launch when drive door closes. If the
InstallShield Wizard has not launched, look for the file named
“SETUP.EXE” in the root directory of the Actiontec 54 Mbps Wireless PC
Card Installation CD-ROM and double-click on it.
2.
The InstallShield Wizard “Welcome” screen will appear and notify you that
it is ready to install the 802.11a Wireless LAN (54Mbps Wireless PC Card)
Configuration Utility. Click Next to continue.
3.
The InstallShield Wizard will proceed with the installation. Once
completed, click Finish to continue.
Note: For 98/98 SE users - the Windows Management Information (WMI)
utility will now be installed. Follow the onscreen instructions to complete
the installation. Click OK to restart.If the WMI tools are already installed
on the computer, click No to abort the installation.
Installing the Configuration Utility
15
Setting Infrastructure Mode
Windows 98, 98SE, Me, and 2000
This section defines the process of configuring the Actiontec 54 Mbps Wireless
PC Card in Infrastructure mode.
1.
Under the “Profile” tab, select either of the options:
New: Use this option to create a new network profile.
Modify: Use this option to make changes to an existing network profile.
Delete: Use this option to erase an existing network profile.
2.
Under the “General” tab, make sure the fields are set to the following:
Configuration Name: This field identifies the configuration. This name
must be unique. Configuration names are case insensitive.
Network name (SSID): This is the name of the Wi-Fi5 (IEEE 802.11a)
wireless network. This field has a maximum limit of 32 characters. If this
field is left blank, the Actiontec 54 Mbps Wireless PC Card connects to the
AP (access point) with the best signal strength.
Network Connection: AP (Infrastructure)
16
Setting Infrastructure Mode
3.
Once finished, click OK.
4.
Security
Usually, infrastructure mode is used as an environment where Access Points
are installed and maintained by an IT (Information Technology) staff. You
must configure security to make sure that only stations with the appropriate
keys can receive data. The Actiontec 54 Mbps Wireless PC Card supports
key lengths of 64, 128, and 152 bits. Encryption and decryption keys
should be provided by your IT Staff.
Windows XP
1.
Bring up the settings screen again by right-clicking on the networks icon in
the task bar and select “View Available Wireless networks” from the pop-up
menu. Select a network and click Advanced for more configuration options.
Setting Infrastructure Mode
17
2.
Under the “Wireless Networks” tab select the network you wish to connect
to. Click Configure from the “Available networks:” list. (If the network
that you wish to connect to is not listed, click Add from the “Preferred
networks:” list.)
3.
Enter the SSID for the network you wish to connect. You can also set the
WEP encryption and encryption key information for the network. If the
access point is configured with encryption, check the “Data encryption
(WEP enabled)” box and uncheck the “The key is provided for me
automatically” box.
In the “Network key” field, type in the encryption keys that match the
54Mbpx Wireless Access Point that you want to connect to. Once you enter
these numbers, the “Key format” and “Key length” fields will automatically
change. Do not change these two fields.
Click OK.
18
Setting Infrastructure Mode
4.
The “Wireless Network Connection Properties” screen will appear. Click
OK.
5.
You can also specify the types of networks to connect to by clicking
Advanced in the “Wireless Network Connection Properties” window. Select
and option and click Close.
Any available network: will give priority to infrastructure mode networks
but will also connect to an ad-hoc network if available.
Access point: connects to infrastructure mode networks only
Computer-to-computer: connects to ad-hoc networks only
Setting Infrastructure Mode
19
Setting AdHoc Mode
Windows 98, 98SE, Me, and 2000
To configure the Actiontec 54Mbps Wireless PC Card, click the right mouse
button on the Wireless icon, then click on Configuration in the pop-up menu.
Proceed to make changes to the Actiontec 54Mbps Wireless PC Card.
1.
Under the “Profile” tab, select either of the options:
New: Use this option to create a new network profile.
Modify: Use this option to make changes to an existing network profile.
Delete: Use this option to erase an existing network profile.
2
Under the “General” tab, enter the following information:
Configuration Name: This field identifies the configuration. This name
must be unique. Configuration names are case insensitive.
Network name (SSID): A network name is mandatory for AdHoc mode.
The SSID for all stations in a single AdHoc name must be the same.
20
Setting AdHoc Mode
Network Connection: AdHoc.
3.
You can optionally set up other properties, but because the duration of the
AdHoc network tends to be limited, security features are not typically
required and can be disabled.
4.
Click OK when the properties are set correctly. The system needs to reboot
in order for the changes to take effect.
Setting AdHoc Mode
21
Windows XP
1.
Bring up the settings screen again by right-clicking on the networks icon in
the task bar and select “View Available Wireless networks” from the pop-up
menu. Select a network and click Advanced for more configuration options.
2.
Under the “Wireless Networks” tab select the network you wish to configure
and click Properties.
22
Setting AdHoc Mode
3.
Select the “This is a computer-to-computer (ad-hoc) network, wireless
access points are not used” option and click OK.
4.
You can also specify the types of networks to connect to by clicking
Advanced in the “Wireless Network Connection Properties” window. Select
and option and click Close.
Any available network: will give priority to infrastructure mode networks
but will also connect to an ad-hoc network if available.
Access point: connects to infrastructure mode networks only
Computer-to-computer: connects to ad-hoc networks only
Setting AdHoc Mode
23
Configuring File and Print Sharing
You can establish a network that will allow you to share files and printers. This is
an easy method to set up a network in your home or small office. Please follow
these steps to setup file and print sharing:
Windows 98, 98SE and Me
1.
On your computer’s desktop click Start, Settings and Control Panel. In the
“Control Panel” window, double-click the Network icon.
2.
The following “Network” screen should appear. Click the Add button.
3.
In the “Select Network Component Type” screen, click Service and then
click the Add button.
24
Configuring File and Print Sharing
4.
In the following screen, select “File and printer sharing for Microsoft
Networks” from the given list and click OK.
5.
In the “File and Print Sharing” screen, make sure that both of the selections
have a check mark beside them. If not, click on the box next to each
statement and then click OK.
6.
After you have clicked OK, you will return to the network screen from step
2. Click on the Identification tab.
Computer Name: In this field you can type any name you want. (i.e. My
Computer, John, CPU654) Do not use the same name for each computer
you wish to have on your network.
Workgroup: This field enables you to set a unique name for your network.
This name must be set up on every other computer you wish to have on
your network.
Computer Description: You can enter anything you wish. Traditionally, the
location name or main user’s name is used in this field.
Configuring File and Print Sharing
25
7.
Click on the Configuration tab. This will take you back to the screen from
step 2. In the “Primary Network Logon:” box, located just above the “File
and Print Sharing” button, make sure that Client for Microsoft Networks is
selected. If not, click the down arrow and select it from the given list. Click
OK.
8.
A screen will appear asking you to restart your computer. Click Yes to
restart the computer. If you do not see this screen please restart your
computer manually. After your computer restarts you will be asked to
supply a User Name and Password. Enter whatever you would like but be
sure to write down these values, as they will enable you to access your
network.
26
Configuring File and Print Sharing
9.
After your computer has restarted and you entered a password and user
name, you must enable a file or drive for sharing. Locate the file or drive
you wish to share. (The easiest way to do this is using Windows Explorer.)
Right-click on the File or Drive you wish to share. In the pop-up menu,
select Sharing.
10. The following screen will appear. Select Shared As. This will enable other
users on your network to see the file or drive you selected. Then you can
chose the Access Type.
Read Only: This will allow other users on your network to view and read the
file or drive you selected. They will not be able to modify it in any way. You can
further restrict their privileges by entering a password in the appropriate field.
Configuring File and Print Sharing
27
Full: This will allow other users on your network to read, modify, move and
delete any information in the shared drive or file. You can further restrict their
privileges by entering a user name and password.
Depends on Password: This will allow you to set both Read Only and Full
access on the shared file or drive. The level of access will depend on the
passwords you enter in the appropriate field.
When you are finished click Apply and then OK.
11. Next, you need to share your printer. On your desktop, click Start, Settings,
and Printers.
12. Right-click on the printer you want to share. Select Sharing from the given
list.
28
Configuring File and Print Sharing
13. The next step will be to enable the sharing by selecting the Share As. This
will automatically insert a default name for the share name. You can set a
password for the printer at this time if you want to restrict who on the
network can use this resource. You can also set the default printer settings
by modifying information on the other tabs of this window.
Windows 2000
1.
After you have installed and configured your Actiontec 54 Mbps Wireless PC
Card, Windows 2000 will automatically enable file… The only item that
needs to be altered is your workgroup settings. All the computers on your
network must have the same workgroup name but different computer
names. To check or change this right-click on the My Computer icon on
your desktop, then select Properties from the given list.
2.
In the “System Properties” windows, click on the Network Identification
tab. If the “Workgroup” name is already the same as all the other computers
on your network, you do not need to change it, and you can click OK. If it
is not the same, click Properties.
Configuring File and Print Sharing
29
3.
In the “Computer Name:” field, type a name that is different from the other
PCs on your network. Then, in the “Workgroup” field, type the name that
you are using to identify your network. This will be the same on each
computer on your network. Click OK and you will return to the “Network
Properties” window. Click OK again and even if you are not asked to do so,
restart your computer.
Windows XP
1.
30
Open the System Properties window by right clicking the My Computer
icon and selecting Properties.
Configuring File and Print Sharing
2.
Select the “Computer Name” tab. Click Change... to rename the computer.
3.
Enter a new computer name and workgroup name. Click OK when
finished.
4.
Restart your computer.
Configuring File and Print Sharing
31
Troubleshooting
This section provides solutions to common problems that may arise during the installation
and operation of the Actiontec 54 Mbps Wireless PC Card. If you are having problems,
refer to the section below to find an answer. Please contact Actiontec’s technical support for
further assistance.
1.
My computer does not recognize the Actiontec 54 Mbps (802.11a) Wireless PC Card.
Make sure the 54 Mbps Wireless PC Card is properly inserted into a 32 bit CardBus
slot. If windows does not detect the hardware upon insertion of the card, the system
could have a previous Actiontec NDIS driver installed. Remove the old driver and try
again.
2.
The Actiontec 802.11a Wireless PC Card does not work properly after the driver is
installed.
Reinsert the 54 Mbps Wireless PC Card into the slot. A beep should be heard if the
adapter is properly inserted. Go to the Device Manager and make sure the Actiontec
802.11a Wireless LAN Adapter exists under the network adapters device node. If you
see the yellow exclamation then there are conflicting resources. In this case, make sure
the computer system has a free IRQ and make sure you have installed the proper
driver. Uninstall the driver, restart the system, and repeat the driver installation steps if
necessary.
3.
Stations cannot associate in Ad-Hoc mode.
Make sure the same service set identifier is specified for all stations that need to join
the same AdHoc network. Set up one station to establish a BSS and wait briefly before
setting up other stations. This prevents several stations from trying to establish a BSS
at the same time, which can result in multiple singular BSSs being established, rather
than a single BSS with multiple stations associated to it.
4.
The station cannot access the Internet in the Infrastructure configuration.
Make sure the station is associated and joined with the AP (Access Point). If Wired
Equivalent Privacy (WEP) security is enabled on the AP, the station must have the
proper WEP keys specified. Also make sure TCP/IP properties are correctly
configured.
32
Troubleshooting
Frequently Asked Questions
1.
How fast can I access my network?
The Actiontec 54 Mbps Wireless PC Card supports all IEEE 802.11a data rates of 6, 9,
12, 24, 36, 48, and 54 Mbps and Turbo Mode at 72 Mbps.
2.
What is the range for network access,and how reliable is the connection?
The range for network access is approximately 100 meters (300 feet) indoors and 300
meters (1,000 feet) outdoors.
3.
Can I operate an 802.11b network in the same area or vicinity?
Networks based on the IEEE 802.11b standard can coexist with networks based on
the Actiontec 54 Mbps Wireless PC Card because each network operates in its own
frequency band. IEEE 802..11b operates at 2.4 GHz while IEEE 802.11a operates at 5.0
GHz
4.
Can I perform realtime multimedia functions QOS?
Yes, the Actiontec 54 Mbps Wireless PC Card supports Quality of Service for realtime
multimedia applications. This allows multiple video, audio, voice, data, and telephony
applications to coexist on the same radio channel. The Actiontec 54 Mbps Wireless PC
Card is compatible with CableLabs CQoS, Microsoft GQoS and IEEE 802.1 p/q
Quality of Service.
5.
Can I share my network resources,such as printers,drivers and my shared Internet
connection?
The Actiontec 54 Mbps Wireless PC Card is a fully functional networking device, it
allows ICS (Internet connection sharing), printer sharing, and drive sharing. Please
refer to section V of this manual, “Configuring and File and Print Sharing,” for further
help.
6.
Will my network be affected by my cordless phone or microwave oven?
No. The Actiontec 54 Mbps Wireless PC Card operates at a radio frequency of
5.0GHz, most microwaves operate around the 2.4 GHz range, and most handsets at
900MHz to 2.4 GHz. Therefore, enough of a spectral separation exists for the
operation of IEEE 802.11a networks without interference.
Frequently Asked Questions
33
Regulatory and Warranty
Note: This equipment has been tested and found to comply with the limits for
a Class B digital device, pursuant to Part 15 of the FCC Rules. These limits are
designed to provide reasonable protection against harmful interference in a
residential installation. This equipment generates, uses and can radiate
radio frequency energy and, if not installed and used in accordance with the
instructions, may cause harmful interference to radio communications.
However, there is no guarantee that interference will not occur in a particular
installation. If this equipment does cause harmful interference to radio or
television reception, which can be determined by turning the equipment off and
on, the user is encouraged to try to connect the interference by one or more
of the following measures:
-Reorient the receiving antenna
-Increase the separation between the equipment and receiver
-Move the computer away from the receiver
-Connect the equipment into an outlet on a circuit different from that
to which the receiver is connected.
Radio Frequency Interference Requirements: This device is restricted to indoor
use due to its operation in the 5.15 to 5.25 GHz frequency range. FCC requires
this product to be used indoors for the frequency range 5.15 to 5.25 GHz to
reduce the potential for harmful interference to co-channel Mobile Satellite
systems.
High power radar are allocated as primary users of the 5.25 to 5.35 GHz and 5.65
to 5.85 GHz bands. These radar stations can cause interference with and /or
damage this device.
Actiontec Electronics, Inc. Limited Warranty
Hardware: Actiontec Electronics Inc. warrants to the end user (“Customer”) that
this hardware product will be free from defects in workmanship and materials,
under normal use and service, for twelve (12) months from the date of purchase
from Actiontec Electronics or its authorized reseller.
Actiontec Electronics’ sole obligation under this express warranty shall be, at
Actiontec’s option and expense, to repair the defective product or part, deliver to
Customer an equivalent product or part to replace the defective item, or if neither
of the two foregoing options is reasonably available, Actiontec Electronics may, in
its sole discretion, refund to Customer the purchase price paid for the defective
product. All products that are replaced will become the property of Actiontec
Electronics Inc. Replacement products may be new or reconditioned. Actiontec
Electronics warrants any replaced or repaired product or part for ninety (90) days
34
Regulatory and Warranty
from shipment, or the remainder of the initial warranty period, whichever is
longer.
Software: Actiontec Electronics warrants to Customer that each software
program licensed from it will perform in substantial conformance to its
program specifications, for a period of ninety (90) days from the date of
purchase from Actiontec Electronics or its authorized reseller. Actiontec
Electronics warrants the media containing software against failure during the
warranty period. The only updates that will be provided are at the sole
discretion of Actiontec Electronics and will only be available for download at the
Actiontec web site, www.actiontec.com. Actiontec Electronics’ sole obligation
under this express warranty shall be, at Actiontec Electronics’ option and
expense, to refund the purchase price paid by Customer for any defective
software product, or to replace any defective media with software which
substantially conforms to applicable Actiontec Electronics published
specifications. Customer assumes responsibility for the selection of the
appropriate applications program and associated reference materials. Actiontec
Electronics makes no warranty or representation that its software products will
meet Customer’s requirements or work in combination with any hardware or
applications software products provided by third parties, that the operation of
the software products will be uninterrupted or error free, or that all defects in
the software products will be corrected. For any third-party products listed in
the Actiontec Electronics software product documentation or specifications as
being compatible, Actiontec Electronics will make reasonable efforts to provide
compatibility, except where the non-compatibility is caused by a “bug” or defect
in the third party’s product or from use of the software product not in
accordance with Actiontec Electronics published specifications or User Guide.
THIS ACTIONTEC ELECTRONICS PRODUCT MAY INCLUDE OR BE
BUNDLED WITH THIRD-PARTY SOFTWARE, THE USE OF WHICH IS
GOVERNED BY A SEPARATE END-USER LICENSE AGREEMENT. THIS
ACTIONTEC ELECTRONICS WARRANTY DOES NOT APPLY TO SUCH
THIRD-PARTY SOFTWARE. FOR THE APPLICABLE WARRANTY, PLEASE
REFER TO THE END-USER LICENSE AGREEMENT GOVERNING THE USE
OF SUCH SOFTWARE.
Obtaining Warranty Service: Customer may contact Actiontec Electronics
Technical Support Center within the applicable warranty period to obtain
warranty service authorization. Dated proof of purchase from Actiontec
Electronics or its authorized reseller may be required. Products returned to
Actiontec Electronics must be pre-authorized by Actiontec Electronics with a
Return Merchandise Authorization (RMA) number marked on the outside of
the package, and sent prepaid and packaged appropriately for safe shipment, and
it is recommended that they be insured or sent by a method that provides for
Regulatory and Warranty
35
tracking of the package. The repaired or replaced item will be shipped to
Customer, at Actiontec Electronics’ expense, not later than thirty (30) days after
Actiontec Electronics receives the defective product.
Return the product to:
In the United States:
Actiontec Electronics, Inc
760 North Mary Avenue
Sunnyvale, CA 94085
Actiontec Electronics shall not be responsible for any software, firmware,
information or memory data or Customer contained in, stored on, or integrated
with any products returned to Actiontec Electronics for repair, whether under
warranty or not.
WARRANTIES EXCLUSIVE: IF AN ACTIONTEC ELECTRONICS’ PRODUCT
DOES NOT OPERATE AS WARRANTED ABOVE, CUSTOMER’S SOLE
REMEDY FOR BREACH OF THAT WARRANTY SHALL BE REPAIR,
REPLACEMENT, OR REFUND OF THE PURCHASE PRICE PAID, AT
ACTIONTEC ELECTRONICS’ OPTION. TO THE FULL EXTENT ALLOWED
BY LAW, THE FOREGOING WARRANTIES AND REMEDIES ARE EXCLUSIVE
AND IN LIEU OF ALL OTHER WARRANTIES, TERMS OR CONDITIONS,
EXPRESS OR IMPLIED, EITHER IN FACT OR BY OPERATION OF LAW,
STATUTORY OR OTHERWISE, INCLUDING WARRANTIES, TERMS OR
CONDITIONS OF MERCHANTABILITY, FITNESS FOR A PARTICULAR
PURPOSE, SATISFACTORY QUALITY, CORRESPONDENCE WITH
DESCRIPTION, AND NON-INFRINGEMENT, ALL OF WHICH ARE
EXPRESSLY DISCLAIMED . ACTIONTEC ELECTRONICS NEITHER
ASSUMES NOR AUTHORIZES ANY OTHER PERSON TO ASSUME FOR IT
ANY OTHER LIABILITY IN CONNECTION WITH THE SALE,
INSTALLATION, MAINTENANCE OR USE OF ITS PRODUCTS.
ACTIONTEC ELECTRONICS SHALL NOT BE LIABLE UNDER THIS
WARRANTY IF ITS TESTING AND EXAMINATION DISCLOSE THAT THE
ALLEGED DEFECT OR MALFUNCTION IN THE PRODUCT DOES NOT
EXIST OR WAS CAUSED BY CUSTOMER’S OR ANY THIRD PERSON’S
MISUSE, NEGLECT, IMPROPER INSTALLATION OR TESTING,
UNAUTHORIZED ATTEMPT TO OPEN, REPAIR OR MODIFY THE
PRODUCT, OR ANY OTHER CAUSE BEYOND THE RANGE OF THE
INTENDED USE, OR BY ACCIDENT, FIRE, LIGHTNING, OTHER HAZARDS
OR ACTS OF GOD.
LIMITATION OF LIABILITY: TO THE FULL EXTENT ALLOWED BY LAW,
ACTIONTEC ELECTRONICS ALSO EXCLUDES FOR ITSELF AND ITS
SUPPLIERS ANY LIABILITY, WHETHER BASED IN CONTRACT OR TORT
(INCLUDING NEGLIGENCE), FOR INCIDENTAL, CONSEQUENTIAL,
36
Regulatory and Warranty
INDIRECT, SPECIAL, OR PUNITIVE DAMAGES OF ANY KIND, OR FOR
LOSS OF REVENUE OR PROFITS, LOSS OF BUSINESS, LOSS OF
INFORMATION OR DATA, OR OTHER FINANCIAL LOSS ARISING OUT OF
OR IN CONNECTION WITH THE SALE, INSTALLATION, MAINTENANCE,
USE, PERFORMANCE, FAILURE, OR INTERRUPTION OF ITS PRODUCT,
EVEN IF ACTIONTEC ELECTRONICS OR ITS AUTHORIZED RESELLER HAS
BEEN ADVISED OF THE POSSIBILITY OF SUCH DAMAGES, AND LIMITS
ITS LIABILITY TO REPAIR, REPLACEMENT,OR REFUND OF THE
PURCHASE PRICE PAID, AT ACTIONTEC ELECTRONICS’ OPTION. THIS
DISCLAIMER OF LIABILITY FOR DAMAGES WILL NOT BE AFFECTED IF
ANY REMEDY PROVIDED HEREIN SHALL FAIL OF ITS ESSENTIAL
PURPOSE.
Disclaimer: Some countries, states or provinces do not allow the exclusion or
limitation of implied warranties or the limitation of incidental or consequential
damages for certain products supplied to consumers, or the limitation of
liability for personal injury, so the above limitations and exclusions may be
limited in their application to you. When the implied warranties are not
allowed to be excluded in their entirety, they will be limited to the duration of
the applicable written warranty. This warranty gives you specific legal rights
which may vary depending on local law.
Dispute Resolution: The customer may contact the Director of Technical
Support in the event the Customer is not satisfied with Actiontec Electronics
response to the complaint. In the event that the Customer is still not satisfied
with the response of the Director of Technical Support, the Customer is
instructed to contact the Director of Marketing. In the event that the Customer
is still not satisfied with the response of the Director of Marketing, the
Customer is instructed to contact the Chief Financial Officer and/or President.
Governing Law: This Limited Warranty shall be governed by the laws of the
State of California, U.S.A. excluding its conflicts of laws principles and excluding
the United Nations Convention on Contracts for the International Sale of
Goods.
Regulatory and Warranty
37