1
Cyclades-TS
Installation Manual
Cyclades Corporation
Cyclades-TS Installation Manual
Version 2.4 – October 2001
Copyright (C) Cyclades Corporation, 2001
We believe the information in this manual is accurate and reliable. However, we assume no responsibility,
financial or otherwise, for any consequences of the use of this product or Installation Manual.
This manual is published by Cyclades Corporation, which reserves the right to make improvements or changes
in the products described in this manual as well as to revise this publication at any time and without notice to any
person of such revision or change. The operating systems covered in this manual are v1.1.2 and v1.3.0
All brand and product names mentioned in this publication are trademarks or registered trademarks of their
respective holders.
FCC Warning Statement:
The Cyclades-TS has been tested and found to comply with the limits for Class A digital devices, pursuant to
Part 15 of the FCC rules. These limits are designed to provide reasonable protection against harmful interference
when the equipment is operated in a commercial environment. This equipment generates, uses and can radiate
radio frequency energy and, if not installed and used in accordance with the Installation Manual, may cause
harmful interference to radio communications. Operation of this equipment in a residential area is likely to cause
harmful interference in which case the user is required to correct the problem at his or her own expense.
Canadian DOC Notice:
The Cyclades-TS does not exceed the Class A limits for radio noise emissions from digital apparatus set out in
the Radio Interference Regulations of the Canadian Department of Communications.
Le Cyclades-TS n’émete pas de bruits radioélectriques dépassant les limites applicables aux appareils
numériques de la classe A prescrites dans le règlement sur le brouillage radioélectrique edicté par le Ministère
des Communications du Canada.
Table of Contents
CHAPTER 1 HOW TO USE THIS MANUAL....................................................................................................... 5
CHAPTER 2 WHAT IS IN THE BOX ................................................................................................................... 6
CHAPTER 3 SUMMARY OF THE CONFIGURATION PROCESS.................................................................. 11
CHAPTER 4 CONFIGURATION ....................................................................................................................... 13
STEP ONE ....................................................................................................................................................... 13
STEP TWO ...................................................................................................................................................... 14
STEP THREE - CONSOLE SERVER ............................................................................................................ 16
STEP THREE - TERMINAL SERVER ........................................................................................................... 23
STEP THREE - REMOTE ACCESS SERVER .............................................................................................. 28
STEP FOUR - FOR ALL PROFILES ............................................................................................................. 34
Clustering ......................................................................................................................................................... 35
CHAPTER 5 UPGRADES AND TROUBLESHOOTING .................................................................................. 40
Upgrades ......................................................................................................................................................... 40
Troubleshooting ............................................................................................................................................... 40
Hardware Test .................................................................................................................................................. 42
Single User Mode ............................................................................................................................................ 44
APPENDIX A INFORMATION FOR USERS NOT FAMILIAR WITH LINUX .................................................. 46
Users and Passwords...................................................................................................................................... 46
Linux File Structure .......................................................................................................................................... 46
Basic File Manipulation Commands ................................................................................................................ 47
The vi Editor ..................................................................................................................................................... 48
The Routing Table............................................................................................................................................ 49
ssh - The Secure Shell Session ...................................................................................................................... 50
The Process Table .......................................................................................................................................... 52
NTP Client Functionality ................................................................................................................................... 52
The Crond Utility .............................................................................................................................................. 52
The DHCP (Dynamic Host Configuration Protocol) Client .............................................................................. 53
Packet Filtering using ipchains ........................................................................................................................ 54
An example of the use of ipchains for a console access server ............................................................. 57
ts_menu Script to Simplify telnet and ssh Connections ................................................................................. 57
APPENDIX B HARDWARE SPECIFICATIONS .............................................................................................. 59
APPENDIX C SAMPLE PSLAVE.CONF FILES........................................................................................... .... 68
The Complete pslave.conf File Provided with the Cyclades-TS .................................................................... 68
The pslave.cas File Provided With the Cyclades-TS for the Console Access Server Example ................. 80
The pslave.ts File provided with the Cyclades-TS for the Terminal Server Example ................................... 83
The pslave.ras File Provided With the Cyclades-TS for the Remote Access Server Example .................. 85
APPENDIX D CUSTOMIZATION ...................................................................................................................... 88
APPENDIX E THE WEB CONFIGURATION MANAGER ................................................................................ 89
Troubleshooting the Web Configuration Manager .................................................................................... 95
Cyclades-TS
Installation Manual
CHAPTER 1 HOW TO USE THIS MANUAL
This manual assumes that the reader understands networking basics and is familiar with the terms and concepts
used in Local and Wide Area Networking. The Cyclades-TS is a Linux-based terminal server, which gives it
great flexibility. It runs an embedded version of the Linux operating system and Unix and Linux users will find the
configuration process very familiar. On the other hand, users not familiar with Unix will have a steeper learning
curve, but it is not necessary to be a Unix expert.
Configuration of the equipment is done by editing a few plain-text files (commented sample files for the principal
profiles are provided in appendix C), and then updating the versions of the files in the Cyclades-TS. The files
can be edited in the Cyclades-TS using the vi editor provided, or in another computer with the environment and
text editor of your choice. Unix user or not, we strongly recommend that you follow the steps in this installation
manual before jumping in.
This manual should be read in the order written, with exceptions given in the text.
Chapter 2 - What is in the Box - explains how the Cyclades-TS should be connected and what each cable is
used for.
Chapter 3 - Summary of the Configuration Process - provides a brief roadmap of the Cyclades-TS configuration
Chapter 4 - Configuration - describes the basic configuration process to get the Cyclades-TS up and running
for the most common uses.
Chapter 5 - Troubleshooting - provides solutions and test procedures for typical problems.
Appendix A - Linux Information - Information for those who are new to Linux/Unix.
Appendix B - Hardware Specifications - Pinout diagrams for cables.
Appendix C - Pslave.conf Sample Files - Example files for 3 profiles and the master file.
Appendix D - Customization - Instructions for those who wish to create their own applications.
Appendix E - The Web Configuration Manager - explains how to configure the TS with a browser.
Chapter 1 - How To Use This Manual
5
Cyclades-TS
Installation Manual
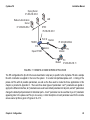
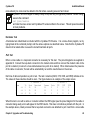
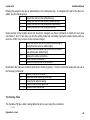
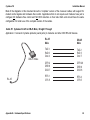
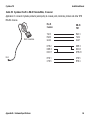
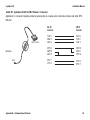
CHAPTER 2 WHAT IS IN THE BOX
The Cyclades-TS is a line of console access and terminal servers. There are several models with differing
numbers of serial ports. The following figures show the main units and accessories included in each package
and how cables should be connected. The loop-back connector is provided for convenience in case
hardware tests are necessary. The RJ-45M - DB-9 F Crossover cable and the RJ-45M - RJ-45 Sun Netra
Crossover cable (not shown in the figures) are also included with each model.
Cyclades-TS3000
Back View
On/Off
Switch
25
26
27
28
29
30
31
32
33
34
35
36
37
38
39
40
41
1
2
3
4
5
6
7
8
9
10
11
12
13
14
15
16
17
42
18
43
44
45
46
47
48
19
20
21
22
23
24
Console
Ethernet
10/100Base-T
Wall Outlet
Cross Cable
(Same as
Console Cable)
Power Cable
Connect to
a DTE Device
Console Cable
Modem
Cable
Connect to a
COM Serial Port
Connect to a modem or
to a null-modem adaptor
//////////
Installation Manual
Loop-Back
Connector
Mounting Kit
FIGURE 2.1 CYCLADES-TS3000 AND CABLES
Chapter 2 - What is in the Box
6
Cyclades-TS
Installation Manual
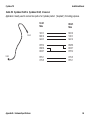
Cyclades-TS2000
Back View
17
18
19
20
21
22
23
24
25
26
27
28
29
30
31
32
90-240VAC
Ethernet
10/100Base-T
1
2
3
4
5
6
7
8
9
10
11
12
13
14
15
Console
16
On/Off
Switch
Cross Cable
(Same as
Console Cable)
Connect to
a DTE Device
Wall Outlet
Power Cable
Console Cable
Modem
Cable
Connect to a
COM Serial Port
Connect to a modem or
to a null-modem adaptor
//////////
Installation Manual
Loop-Back
Connector
Mounting Kit
FIGURE 2.2 CYCLADES-TS2000 AND CABLES
Chapter 2 - What is in the Box
7
Cyclades-TS
Installation Manual
Cyclades-TS1000
Back View
1
2
3
4
5
6
7
8
9
10
11
12
13
14
15
16
Ethernet
10/100Base-T
90-240VAC
CYCLADES
TS1000
Console
On/Off
Switch
Cross Cable
(Same as
Console Cable)
Connect to
a DTE Device
Wall Outlet
Power Cable
Console Cable
Modem
Cable
Connect to a
COM Serial Port
Connect to a modem or
to a null-modem adaptor
//////////
Installation Manual
Loop-Back
Connector
Mounting Kit
FIGURE 2.3 CYCLADES-TS1000 AND CABLES
Chapter 2 - What is in the Box
8
Cyclades-TS
Installation Manual
Cyclades-TS800
Back View
On/Off
Ethernet
DC IN
Console
1
0
On/Off
Switch
Power Cable
Modem
Cable
To Wall Outlet
Cross Cable
(Same as Console Cable)
Connect to a DTE Device
Console Cable
Connect to a modem or
to a null-modem adaptor
//////////
Installation Manual
Loop-Back
Connector
FIGURE 2.4 CYCLADES-TS800 AND CABLES
Chapter 2 - What is in the Box
9
Cyclades-TS
Installation Manual
Cyclades-TS400
Back View
On/Off
Console
1
0
On/Off
Switch
Ethernet
DC IN
Power Cable
Modem
Cable
To Wall Outlet
Cross Cable
(Same as Console Cable)
Connect to a DTE Device
Console Cable
Connect to a modem or
to a null-modem adaptor
//////////
Installation Manual
Loop-Back
Connector
FIGURE 2.5 CYCLADES-TS400 AND CABLES
Chapter 2 - What is in the Box
10
Cyclades-TS
Installation Manual
CHAPTER 3 SUMMARY OF THE CONFIGURATION PROCESS
The Cyclades-TS can be used as a:
• console server,
• terminal server,
• remote access server.
A detailed description of each of these profiles is provided in the next chapter. The Cyclades-TS’s operating
system is embedded Linux. Even if you are a Unix user and find the tools and files familiar, do not configure this
product as you would configure a regular Linux server.
You do not need to be a Unix user to configure the Cyclades-TS. Additional information about the files and tools
needed for configuration is provided in appendix A.
The basic configuration steps are:
A. Connecting the Cyclades-TS to the network and other devices. Consult Chapter 2, What is in the Box, for
questions on which cable should be used for which device.
B. Connect a PC or terminal to the Cyclades-TS via the console port and login.
C. Modify the Linux files
/etc/hostname
/etc/hosts
/etc/resolv.conf
/etc/network/st_routes
to let the Cyclades-TS know about its local environment
D. Configure the boot parameters using the script bootconf
Chapter 3 - Summary of the Configuration Process
11
Cyclades-TS
Installation Manual
E. Edit the pslave.conf file. This is the main configuration file that concentrates most product parameters and
defines the functionality of the Cyclades-TS. The modifications made to this file will depend on the profile.
F. Activate the changes.
G.Test the configuration to make sure the ports have been set up properly.
H. Save the changes and restart the server application.
Full details on each step listed above and how to perform them are provided in the next chapter. Make sure to
always complete ALL the steps for your application before testing or switching to another profile.
Chapter 3 - Summary of the Configuration Process
12
Cyclades-TS
Installation Manual
CHAPTER 4 CONFIGURATION
This chapter guides you step by step through the configuration of the Cyclades-TS for the three principal
applications:
1. Console Server,
2. Terminal Server, and
3. Remote Access Server.
Many steps are common to both, so please read the entire chapter before beginning.
STEP ONE
Connect a PC or terminal to the Cyclades-TS using the console cable. If using a PC, HyperTerminal can be
used in the Windows operating system or Kermit in the Unix operating system. The terminal parameters should
be set as follows:
• Serial Speed: 9600 bps
• Data Length: 8 bits
• Parity: None
• Stop Bits: 1 stop bit
• Flow Control: Hardware flow control or none
• Ansi emulation (Note: if your terminal does not have ansi emulation, select vt100; then, on the TS, log in as
root and switch to vt100 by typing “TERM=vt100;export TERM”)
When the Cyclades-TS boots properly, a login banner will appear.
Log in as root (there is no password). A password should be created as soon as possible. The Cyclades-TS
runs Linux, a Unix-like operating system, and those familiar with the Unix operating system will feel quite at
home. A description of the Linux file system and basic commands is given in the Linux appendix at the end of
this manual.
Chapter 4 Configuration
13
Cyclades-TS
Installation Manual
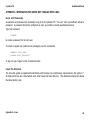
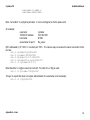
STEP TWO
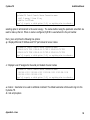
In this step, four Linux files must be modified to identify the TS1000 and its neighbors. Then, the boot parameters
are configured. The operating system provides the vi editor, which is described in the Linux appendix for the
uninitiated. The first file is /etc/hostname. The only entry should be the hostname of the Cyclades-TS. An
example is shown in Figure 4.1.
TS1000
FIGURE 4.1 CONTENTS OF THE /ETC/HOSTNAME FILE
The second file is /etc/hosts. It should contain the IP address for the Ethernet interface and the same
hostname entered in the /etc/hostname file. It may also contain IP addresses and host names for other hosts
in the network.
200.200.200.1
TS1000
200.200.200.2
RadiusServer
127.0.0.1
localhost
FIGURE 4.2 CONTENTS OF THE /ETC/HOSTS FILE
The third file that must be modified is /etc/resolv.conf. It must contain the domain name and nameserver information
for the network.
domain
nameserver
mycompany.com
200.200.200.2
FIGURE 4.3 CONTENTS OF THE /ETC/RESOLV.CONF FILE
The fourth file defines static routes and is called /etc/network/st_routes. In the console server example in
Figure 4.5, the PR1000 is the gateway router and thus its IP address is configured in this file to be the default
gateway. Other static routes are also configured in this file.
Chapter 4 Configuration
14
Cyclades-TS
Installation Manual
route add default gw
200.200.200.5
FIGURE 4.4 CONTENTS OF THE /ETC/NETWORK/ST_ROUTES FILE
Now, use the bootconf utility to configure the boot parameters. The console speed parameter should be changed
if the terminal used as a console requires a different speed. The option to skip the flash test speeds up the boot
process. The last option determines the operational mode of the Ethernet connection.
Type bootconf on the command line. The script will first ask if you want to return all parameters to their default
values. If you respond No, it will ask you to enter parameter values one by one:
MAC address assigned to Ethernet [00:60:2e:00:0e:23]
IP address assigned to Ethernet interface [209.81.55.79]
Watchdog timer ((A)ctive or (I)nactive) [A]
TSLinux boot from ((F)lash or (N)etwork) [N]
Boot type ((B)ootp,(T)ftp or Bot(H)) [T]
Boot File Name [zvmppcts.eas]
Server’s IP address [209.81.55.126]
Console speed [9600]
(P)erform or (S)kip Flash test [S]
(S)kip, (Q)uick or (F)ull RAM test [S]
Fast Ethernet ((A)uto Neg, (1)00 BtH, 100 Bt(F), 10 B(t)F, 10 Bt(H)) [A]
after modifying these parameters, the script will ask:
Do you confirm these changes in flash ( (Y)es, (N)o (Q)uit ) [N] :
Y = changes are saved to flash
N = the parameters are presented again
Q = the script quits without saving any changes made
STEP THREE
This is where the configuration for the three profiles - Console Server, Terminal Server and Remote Access
Server diverge. Follow step three for the appropriate profile.
Chapter 4 Configuration
15
Cyclades-TS
Installation Manual
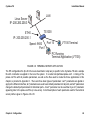
STEP THREE - CONSOLE SERVER
A console server application is shown in Figure 4.5.
Radius Authentication Server,
Syslog Server, Name Server
IP Address: 200.200.200.2
Internet Workstation
TS1000 Ethernet Interface
IP Address: 200.200.200.1
Socket
Port 7008
192.168.1.108
TS1000
Socket
Port 7002
192.168.1.102
Socket
Port 7001
192.168.1.101
Cyclades-PR1000
Ethernet Interface:
200.200.200.5
Workstation
200.200.200.4
Serial Connections
Speed: 9.6 K
FIGURE 4.5 CONSOLE SERVER APPLICATION
This application allows a user to access a server connected to the Cyclades-TS through its serial console port
from a workstation on the LAN or WAN. A server console is opened on the workstation. The authentication is
usually performed by a Radius server and either telnet or ssh (a secure shell session) can be used. See the Linux
appendix for more infomation about ssh.
Chapter 4 Configuration
16
Cyclades-TS
Installation Manual
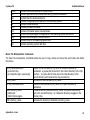
The fifth file is specific to the Cyclades-TS and a sample file with comments is supplied in the Linux file system. It
is called /etc/portslave/pslave.conf. A listing of the pslave.conf file with all possible parameters, as well as the
files used to create the three applications in this chapter, is provided in Appendix C. There are three basic types
of parameters: conf.* parameters are global or apply to the Ethernet interface; all.* parameters are used to set
default parameters for all ports, and s#.* parameters change the default port parameters for individual ports. An
all.* parameter can be overriden by a s#.* parameter appearing later in the pslave.conf file (or vice-versa). A brief
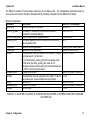
description of each parameter used for the console server profile is given in Figures 4.6-4.7.
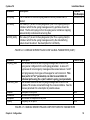
Parameter
Description
conf.eth_ip
The IP address of the Ethernet interface. This parameter, along with the
next two, is used by the cy_ras program to OVERWRITE the file
/etc/network/ifcfg_eth0 as soon as the command "signal_ras HUP" is
executed. The file /etc/network/ifcfg_eth0 should not be edited by the user
unless the cy_ras application is not going to be used.
The mask for the Ethernet network.
The Maximum Transmission Unit size, which determines whether or not
packets should be broken up.
Remote Network File System where data buffering will be written instead of
the default directory '/var/run'. The directory tree to which the file will be
written must be NFS-mounted. If data buffering is turned on for port 1, for
example, the data will be stored in the file ttyS1.data in the directory and
server indicated by this variable. The remote host must have NFS installed
and the administrator must create, export and allow reading/writing to this
directory. The size of this file is not limited by the value of the parameter
s1.data_buffering, though the value cannot be zero since a zero value turns
off data buffering.
The lock directory , which is /var/lock for the Cyclades-TS. It should not be
changed unless the user decides to customize the operating system.
conf.eth_mask
conf.eth_mtu
conf.nfs_data_
buffering
conf.lockdir
Value for
This Example
200.200.200.1
255.255.255.0
1500
commented
/var/lock
FIGURE 4.6 CONSOLE SERVER PSLAVE.CONF GLOBAL PARAMETERS
Chapter 4 Configuration
17
Cyclades-TS
Installation Manual
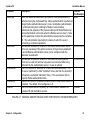
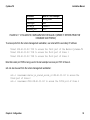
Parameter
Description
conf.syslog
The IP address of a remote syslog daemon can be provided here, if
desired.
This value (0-7) is sent to the syslog server (the TS is a syslog client) to
indicate in which file the syslog messages sent by portslave should be
stored. The file /etc/syslog.conf on the syslog server contains a mapping
between facility numbers and server log files.
This value (0-7) is sent to the syslog server (the TS is a syslog client) to
indicate in which file the syslog messages sent by the data buffering
feature should be stored. See description for conf.facility.
conf.facility
conf.DB_facility
Value for
This Example
200.200.200.2
7
0
FIGURE 4.6 CONSOLE SERVER PSLAVE.CONF GLOBAL PARAMETERS (CONT.)
Parameter
all.syslog_level
all.console_level
all.speed
all.datasize
all.stopbits
all.parity
Description
This variable determines which syslog messages will be sent to the
syslog server configured in the conf.syslog parameter. A value of 0
suppresses all but emergency messages while values between 1 and 7
send progressively more types of messages for each increment. This
value (as for all "all." parameters) can later be overridden for
individual ports using the s<port number>.syslog_level parameter.
This variable determines which syslog messages will be sent to the
Cyclades-TS console connected through the console interface. See the
previous parameter for a description of possible values
The speed for all ports.
The data size for all ports.
The number of stop bits for all ports
The parity for all ports.
Value in Exp.
4
4
9600
8
1
none
FIGURE 4.7 CONSOLE SERVER PSLAVE.CONF PORT-SPECIFIC PARAMETERS
Chapter 4 Configuration
18
Cyclades-TS
Installation Manual
Parameter
Description
all.authtype
There are several authentication type options: local (authentication is
performed using the /etc/passwd file), radius (authentication is performed
using a Radius authentication server), none, local/radius (authentication
is performed locally first, switching to Radius if unsuccessful),
radius/local (the opposite of the previous option) and RadiusDownLocal
(local authentication is tried only when the Radius server is down). Note
that this parameter controls the authentication required by the CycladesTS. The authentication required by the device to which the user is
connecting is controlled separately.
This address indicates the location of the Radius authentication server
and is only necessary if this option is chosen in the previous parameter.
A second Radius authentication server can be configured with the
parameter all.authhost2.
This address indicates the location of the Radius accounting server,
which can be used to track how long users are connected after being
authorized by the authentication server. Its use is optional.
This is the timeout (in seconds) for a radius authentication query. The
first server (authhost1) is tried "radretries" times, and then the second (if
configured) is contacted "radretries" times. If the second also fails to
respond, Radius authentication fails.
Defines the number of times each Radius server is tried before another is
contacted. The default, if not configured, is 5.
This is the shared secret necessary for communication between the
Cyclades-TS and the Radius servers.
all.authhost1
all.accthost1
all.radtimeout
all.radretries
all.secret
Value for
This Example
radius
200.200.200.2
200.200.200.2
3
5
cyclades
FIGURE 4.7 CONSOLE SERVER PSLAVE.CONF PORT-SPECIFIC PARAMETERS(CONT.)
Chapter 4 Configuration
19
Cyclades-TS
Installation Manual
Parameter
Description
all.ipno
This is the default IP address of the Cyclades-TS's serial ports. The
"+" indicates that the first port should be addressed as 192.168.1.101
and the following ports should have consecutive values. Any host can
access a port using its IP address as long as a path to the address
exists in the host's routing table.
This text determines the format of
\r\n\ TSLINUX - Portslave Internet Services\n\
the login banner that is issued when \r\n\ Welcome to terminal server %h port S%p \n\
a connection is made to the
\r\n\ Customer Support: 510-770-9727
Cyclades-TS. \n represents a new www.cyclades.com/\n\
line and \r represents a carriage
\r\n
return.
This text defines the format of the login prompt. Expansion characters,
%h login:
listed in Appendix C, can be used here.
This sets the flow control to hardware, software, or none.
hard
When not set to zero, this parameter sets the wait for a TCP connection 0
keep-alive timer. If no traffic passes through the Cyclades-TS for this
period of time, the Cyclades-TS will send a modem status message to
the remote device to see if the connection is still up.
This defines an alternative labeling system for the Cyclades-TS ports.
7001+
The '+' after the numerical value causes the interfaces to be numbered
consecutively. In this example, interface 1 is assigned the port value
7001, interface 2 is assigned the port value 7002, etc.
For the console server profile, the possible protocols are socket_server socket_server
(when telnet is used) and socket_ssh (when ssh version one or two is
used).
all.issue
all.prompt
all.flow
all.poll_interval
all.socket_port
all.protocol
Value for This
Example
192.168.1.101+
FIGURE 4.7 CONSOLE SERVER PSLAVE.CONF PORT-SPECIFIC PARAMETERS (CONT.)
Chapter 4 Configuration
20
Cyclades-TS
Parameter
Installation Manual
Description
all.data_buffering
A non-zero value activates data buffering. A file (/var/run/ttyS#.data) is
created on the Cyclades-TS and all data received from the port is
captured. The file contains a maximum size equal to this parameter,
which is overwritten each time the maximum is reached. This file can be
viewed using the normal Unix tools (cat, vi, more, etc.).
all.syslog_buffering When non-zero, the contents of the data buffer are sent to the syslog
server every time a quantity of data equal to this parameter is collected.
The syslog level for data buffering is hard coded to level 5, so the
parameter syslog_level should be greater than or equal to 5, and
data_buffering non-zero for syslog generation.
all.dont_show_DB When zero, shows a menu with data buffering options when a non-empty
menu
data buffering file is found.
all.users
Restricts access to ports by user name (only the users listed can access
the port or all but the users listed can access the port (with !).)
A single comma and spaces/tabs may be used between names. A
comma may not appear between the ! and the first user name. The
users may be local or Radius.
all.sniff_mode
This parameter determines what the second connected user (see
parameter admin_users below) can see of the session of the first
connected user: in shows data written to the port, out shows data
received from the port, and i/o shows both streams. The second session
is called a sniff session and this feature is activated whenever the
protocol parameter is set to socket_ssh or socket_server.
Value for
This Example
0
0
1
! joe, mark
out
FIGURE 4.7 CONSOLE SERVER PSLAVE.CONF PORT-SPECIFIC PARAMETERS (CONT.)
Chapter 4 Configuration
21
Cyclades-TS
Installation Manual
Parameter
Description
all.admin_users
This parameter determines which users can open a sniff session, which
is where a second connected user can see everything that a first
connected user is doing on a given port. The second user can also
cancel the first user's session (and take over). Only two users can
connect to the same port simultaneously. This parameter is obligatory
when authtype is not none, to determine who can open a sniff session or
cancel a previous session.
The device name for the port is set to the value given in this parameter.
If a device name is not provided for a port, it will not function.
Authtype must not be none for the sniff session feature to function with
authentication. If none is chosen, any user can open a sniff session
and/or cancel sessions of other users.
See the s1.tty entry in this table.
See the s1.tty entry in this table.
s1.tty
s1.authtype
s2.tty
s8.tty
Value for
This Example
peter, john
ttyS1
local
ttyS2
ttyS8
FIGURE 4.7 CONSOLE SERVER PSLAVE.CONF PORT-SPECIFIC PARAMETERS (CONT.)
Execute the command signal_ras hup to activate the changes. At this point, the configuration should be
tested. A step-by-step check list follows.
1. Since Radius authentication was chosen, create a new user on the Radius authentication server called test
and provide him with the password test.
2. From the console, ping 200.200.200.2 to make sure the Radius authentication server is reachable.
3. Make sure that the physical connection between the Cyclades-TS and the servers is correct. A cross cable
(not the modem cable provided with the product) should be used. Please see the hardware specifications
appendix for pin-out diagrams.
4. The Cyclades-TS has been set for communication at 9600 bps, 8N1. The server must also be configured to
communicate on the serial console port with the same parameters. Also make sure that the computer is
configured to route console data to the serial console port.
Chapter 4 Configuration
22
Cyclades-TS
Installation Manual
5. From a server on the LAN (not from the console), try to telnet to the server connected to the first port of the
Cyclades-TS using the following command:
telnet 200.200.200.1 7001
For both telnet and ssh sessions, the servers can be reached by either:
1. Ethernet IP of the Cyclades-TS and assigned socket port
or
2. Individual IP assigned to each port.
If everything is configured correctly, a telnet session should open on the server connected to port 1. If not, check
the configuration, follow the steps above again, and check the troubleshooting appendix. Now continue on to
step four later in this chapter.
STEP THREE - TERMINAL SERVER
The terminal server profile allows a terminal user to access a server on the LAN. The terminal can be either a
dumb terminal or a terminal emulation program on a PC. No authentication is used in this example and rlogin is
chosen as the protocol.
Chapter 4 Configuration
23
Cyclades-TS
Installation Manual
LAN
Linux Server
IP: 200.200.200.3
ETH0
IP: 200.200.200.1
TS1000
VT100 Terminal
Port 16
Speed: 9600
Port 1
PC Running
Terminal Application (VT100)
FIGURE 4.8 TERMINAL SERVER APPLICATION
The fifth configuration file (the first four were described in step two) is specific to the Cyclades-TS and a sample
file with comments is supplied in the Linux file system. It is called /etc/portslave/pslave.conf. A listing of the
pslave.conf file with all possible parameters, as well as the files used to create the three applications in this
chapter, is provided in Appendix C. There are three basic types of parameters: conf.* parameters are global or
apply to the Ethernet interface; all.* parameters are used to set default parameters for all ports, and s#.* parameters
change the default port parameters for individual ports. An all.* parameter can be overriden by a s#.* parameter
appearing later in the pslave.conf file (or vice-versa). A brief description of each parameter used for the terminal
server profile is given in Figures 4.9-4.10.
Chapter 4 Configuration
24
Cyclades-TS
Installation Manual
Parameter
Description
conf.eth_ip
The IP address of the Ethernet interface. This parameter, along with the
next two, is used by the cy_ras program to OVERWRITE the file
/etc/network/ifcfg_eth0 as soon as the command "signal_ras HUP" is
executed. The file /etc/network/ifcfg_eth0 should not be edited by the user
unless the cy_ras application is not going to be used.
The mask for the Ethernet network.
The Maximum Transmission Unit size, which determines whether or not
packets should be broken up.
The lock directory , which is /var/lock for the Cyclades-TS. It should not be
changed unless the user decides to customize the operating system.
Location of the rlogin binary that accepts the -i flag.
conf.eth_mask
conf.eth_mtu
conf.lockdir
conf.rlogin
conf.telnet
conf.ssh
conf.locallogins
Location of the telnet utility.
Location of the ssh utility.
This parameter is only necessary when authentication is being performed
for a port. When set to one, it is possible to log in to the Cyclades-TS
directly by placing a "!" before your login name, then using your normal
password. This is useful if the Radius authentication server is down.
Value for
This Example
200.200.200.1
255.255.255.0
1500
/var/lock
/usr/local/bin/
rlogin-radius
/bin/telnet
/bin/ssh
0
FIGURE 4.9 TERMINAL SERVER PSLAVE.CONF GLOBAL PARAMETERS
Chapter 4 Configuration
25
Cyclades-TS
Installation Manual
Parameter
Description
all.speed
The speed for all ports. This value (as for all "all." parameters) can
later be overridden for individual ports using the s<port
number>.speed parameter.
The data size for all ports.
The number of stop bits for all ports
The parity for all ports.
There are several authentication type options: local (authentication is
performed using the /etc/passwd file), radius (authentication is performed
using a Radius authentication server), none, local/radius (authentication
is performed locally first, switching to Radius if unsuccessful),
radius/local (the opposite of the previous option) and RadiusDownLocal
(local authentication is tried only when the Radius server is down). Note
that this parameter controls the authentication required by the CycladesTS. The authentication required by the device to which the user is
connecting is controlled separately.
For the terminal server profile, the possible protocols are login (which
requests username and password) and rlogin (which receives the
username from the TS and requests a password), telnet, ssh and ssh2.
The IP address of the host to which the terminals will connect.
all.datasize
all.stopbits
all.parity
all.authtype
all.protocol
all.host
Value for
This Example
9600
8
1
none
local
telnet
200.200.200.3
FIGURE 4.10 TERMINAL SERVER PSLAVE.CONF PORT-SPECIFIC PARAMETERS
Chapter 4 Configuration
26
Cyclades-TS
Parameter
all.issue
all.prompt
all.term
all.flow
all.socket_port
all.users
s1.tty
s16.tty
Installation Manual
Description
Value for
This Example
This text determines the format of
\r\n\ TSLINUX - Portslave Internet Services\n\
the login banner that is issued when \r\n\ Welcome to terminal server %h port S%p \n\
\r\n\ Customer Support: 510-770-9727
a connection is made to the
Cyclades-TS. \n represents a new www.cyclades.com/\n\
\r\n
line and \r represents a carriage
return.
This text defines the format of the login prompt. Expansion characters,
%h login:
listed in Appendix C, can be used here.
This parameter defines the terminal type assumed when performing
vt100
rlogin or telnet to other hosts.
This sets the flow control to hardware, software, or none.
hard
This parameter defines the port(s) to be used by the protocols telnet,
23
socket_client and socket_server. It is mandatory for the socket_server
protocol; for the other two protocols a default value of 23 is used when
no value is configured.
Restricts access to a port by user name (only the users listed can access ! joe, mark
the port or all but the users listed can access the port (with !).)
A single comma and spaces/tabs may be used between names. A
comma may not appear between the ! and the first user name. The
users may be local or Radius.
The device name for the port is set to the value given in this parameter. ttyS1
If a device name is not provided for a port, it will not function.
See the s1.tty entry in this table.
ttyS16
FIGURE 4.10 TERMINAL SERVER PSLAVE.CONF PORT-SPECIFIC PARAMETERS (CONTINUED)
Chapter 4 Configuration
27
Cyclades-TS
Installation Manual
Execute the command signal_ras hup to activate the changes. At this point, the configuration should be
tested. A step-by-step check list follows.
1. Since authentication was set to none, the Cyclades-TS will not authenticate the user. However, the Linux
Server receiving the connection will. Create a new user on the server called test and provide him with the
password test.
2. From the console, ping 200.200.200.3 to make sure the server is reachable.
3. Make sure that the physical connection between the Cyclades-TS and the terminals is correct. A cross cable
(not the modem cable provided with the product) should be used. Please see the hardware specifications
appendix for pin-out diagrams.
4. The Cyclades-TS has been set for communication at 9600 bps, 8N1. The terminals must also be configured
with the same parameters.
5. From a terminal connected to the Cyclades-TS, try to log in to the server using the username and password
configured in item one.
Now continue on to step four later in this chapter.
STEP THREE - REMOTE ACCESS SERVER
The remote access server profile allows a modem user to access the LAN. Radius authentication is used in this
example and ppp is chosen as the protocol.
Chapter 4 Configuration
28
Cyclades-TS
Installation Manual
Syslog Server
IP: 200.200.200.3
LAN
Radius Authentication
Server
IP: 200.200.200.2
ETH0
IP:200.200.200.1
TS2000
Port 1
Speed: 57600
Port 32 Modem
Modem
IP: 200.200.200.42
Modem
Modem
PC
PC
IP: 200.200.200.11
FIGURE 4.11 REMOTE ACCESS SERVER APPLICATION
The fifth configuration file (the first four were described in step two) is specific to the Cyclades-TS and a sample
file with comments is supplied in the Linux file system. It is called /etc/portslave/pslave.conf. A listing of the
pslave.conf file with all possible parameters, as well as the files used to create the three applications in this
chapter, is provided in Appendix C. There are three basic types of parameters: conf.* parameters are global or
apply to the Ethernet interface; all.* parameters are used to set default parameters for all ports, and s#.* parameters
change the default port parameters for individual ports. An all.* parameter can be overriden by a s#.* parameter
appearing later in the pslave.conf file (or vice-versa). A brief description of each parameter used for the remote
access server profile is given in Figures 4.12-4.13.
Chapter 4 Configuration
29
Cyclades-TS
Installation Manual
Parameter
Description
conf.eth_ip
The IP address of the Ethernet interface. This parameter, along with the
next two, is used by the cy_ras program to OVERWRITE the file
/etc/network/ifcfg_eth0 as soon as the command "signal_ras HUP" is
executed. The file /etc/network/ifcfg_eth0 should not be edited by the user
unless the cy_ras application is not going to be used.
The mask for the Ethernet network.
The Maximum Transmission Unit size, which determines whether or not
packets should be broken up.
The lock directory , which is /var/lock for the Cyclades-TS. It should not be
changed unless the user decides to customize the operating system.
Location of the ppp daemon with Radius.
conf.eth_mask
conf.eth_mtu
conf.lockdir
conf.pppd
conf.syslog
conf.facility
The IP address of a remote syslog daemon can be provided here, if
desired.
This value (0-7) is sent to the syslog server (the TS is a syslog client) to
indicate in which file the syslog messages should be stored. The file
/etc/syslog.conf on the syslog server contains a mapping between facility
numbers and server log files.
Value for
This Example
200.200.200.1
255.255.255.0
1500
/var/lock
/usr/local/sbin/
pppd-radius
200.200.200.3
7
FIGURE 4.12 REMOTE ACCESS SERVER PSLAVE.CONF GLOBAL PARAMETERS
Chapter 4 Configuration
30
Cyclades-TS
Installation Manual
Parameter
Description
all.speed
The speed for all ports. This value (as for all "all." parameters) can later
be overridden for individual ports using the s<port number>.speed
parameter.
The data size for all ports.
The number of stop bits for all ports
The parity for all ports.
This variable determines which syslog messages will be sent to the syslog
server configured in the conf.syslog parameter. A value of 0 suppresses all
but emergency messages while values between 1 and 7 send progressively
more types of messages for each increment.
This variable determines which syslog messages will be sent to the CycladesTS console connected through the console interface. See the previous
parameter for a description of possible values
There are several authentication type options: local (authentication is
performed using the /etc/passwd file), radius (authentication is performed
using a Radius authentication server), none, local/radius (authentication is
performed locally first, switching to Radius if unsuccessful), radius/local (the
opposite of the previous option) and RadiusDownLocal (local authentication is
tried only when the Radius server is down). Note that this parameter controls
the authentication required by the Cyclades-TS. The authentication required
by the device to which the user is connecting is controlled separately.
all.datasize
all.stopbits
all.parity
all.syslog_level
all.console_level
all.authtype
Value for
This
Example
57600
8
1
none
4
4
radius
FIGURE 4.13 REMOTE ACCESS SERVER PSLAVE.CONF PORT-SPECIFIC PARAMETERS
Chapter 4 Configuration
31
Cyclades-TS
Installation Manual
Parameter
Description
all.authhost1
This address indicates the location of the Radius authentication server
and is only necessary if this option is chosen in the previous parameter. A
second Radius authentication server can be configured with the
parameter all.authhost2.
This address indicates the location of the Radius accounting server, which
can be used to track how long users are connected after being authorized
by the authentication server. Its use is optional.
This is the timeout (in seconds) for a radius authentication query. The first
server (authhost1) is tried "radretries" times, and then the second (if
configured) is contacted "radretries" times. If the second also fails to
respond, Radius authentication fails.
Defines the number of times each Radius server is tried before another is
contacted. The default, if not configured, is 5.
This is the shared secret necessary for communication between the
Cyclades-TS and the Radius servers.
For the remote access server profile, the available protocols are PPP,
SLIP and CSLIP.
The IP address to be assigned to the dial-in users.
The netmask corresponding to the IP number provided in the previous
parameter.
The maximum transmission unit (MTU) that can be transmitted in a PPP
packet.
The maximum reception unit (MRU) that can be received in a PPP packet.
all.accthost1
all.radtimeout
all.radretries
all.secret
all.protocol
all.ipno
all.netmask
all.mtu
all.mru
Value for This
Example
200.200.200.2
200.200.200.2
5
5
cocomero
ppp
200.200.200.11+
255.255.255.255
1500
1500
FIGURE 4.13 REMOTE ACCESS SERVER PSLAVE.CONF PORT-SPECIFIC PARAMETERS (CONTINUED)
Chapter 4 Configuration
32
Cyclades-TS
Installation Manual
Parameter
all.initchat
Description
Modem initialization string.
all.flow
This sets the flow control to hardware,
software, or none.
PPP options to auto-detect a ppp
session.
all.autoppp
all.pppopt
s1.tty
s32.tty
Value for This Example
TIMEOUT 10 "" \d\l\dATZ \
OK\r\n-ATZ-OK\r\n "" \
"" ATMO OK\R\N "" \
TIMEOUT 3600 RING "" \
STATUS Incoming %p:I.HANDSHAKE "" ATA \
TIMEOUT 60 CONNECT@ "" \
STATUS Connected %p:I.HANDSHAKE
hard
%i:%j novj \
proxyarp modem asyncmap 000A0000 \
noipx noccp login auth require-pap refuse-chap \
mtu %t mru %t \
plugin /usr/lib/libpsr.so
PPP options when user has already
%i:%j novj \
been authenticated.
proxyarp modem asyncmap 000A0000 \
noipx noccp mtu %t mru %t netmask %m \
idle %I maxconnect %T \
plugin /usr/lib/libpsr.so
The device name for the port is set to the ttyS1
value given in this parameter. If a device
name is not provided for a port, it will not
function.
See the s1.tty entry in this table.
ttyS32
FIGURE 4.13 REMOTE ACCESS SERVER PSLAVE.CONF PORT-SPECIFIC PARAMETERS (CONTINUED)
Chapter 4 Configuration
33
Cyclades-TS
Installation Manual
Execute the command signal_ras hup to activate the changes. At this point, the configuration should be
tested. A step-by-step check list follows.
1. Since Radius authentication was chosen, create a new user on the Radius authentication server called test
and provide him with the password test.
2. From the console, ping 200.200.200.2 to make sure the Radius authentication server is reachable.
3. Make sure that the physical connection between the Cyclades-TS and the modems is correct. The modem
cable provided with the product should be used. Please see the hardware specifications appendix for pinout diagrams.
4. The Cyclades-TS has been set for communication at 57600 bps, 8N1. The modems should be programmed
to operate at the same speed on the DTE interface. Also make sure that the computer is configured to route
console data to the serial console port.
5. Try to dial in to the Cyclades-TS from a remote computer using the username and password configured in
item one. The computer dialing in must be configured to receive its IP address from the remote access
server (the Cyclades-TS in this case) and to use PAP authentication.
Now continue on to step four.
STEP FOUR - FOR ALL PROFILES
The next step is to update the system with the modified data in the files above. Make sure the file named /etc/
config_files contains the names of all files that should be saved to flash.
Next, the command saveconf, which reads the /etc/config_files file, should then be run. saveconf copies all the
files listed in the file /etc/config_files from the ramdisk to /proc/flash/script. The previous contents of the file /
proc/flash/script will be lost.
Chapter 4 Configuration
34
Cyclades-TS
Installation Manual
Restart the cy_ras process using its process ID. This can be done by executing the command:
signal_ras hup
This executes the ps command, searches for the cy_ras process id, then sends the signal HUP to the process,
all in one step. Now the configuration is complete.
saveconf is equivalent to tar -czf /proc/flash/script -T /etc/config_files in
standard Linux (this command is emulated by busybox on the TS and does not support the z flag).
restoreconf does the opposite of saveconf, copying the contents of the /proc/flash/script
file to the corresponding files in the ramdisk. The files on the ramdisk are overwritten.
restoreconf is run automatically each time the Cyclades-TS is booted.
Clustering
Clustering has been added to the Cyclades-TS with firmware version 1.3.0. It allows the stringing of Terminal
Servers so that one master Cyclades-TS can be used to access all Cyclades-TSs on a LAN. The master CycladesTS can manage up to 512 serial ports, so
• 1 Master TS1000 + 31 slave TS1000s or
• 1 Master TS2000 + 15 slave TS2000s or
• 1 Master TS3000 + 9 slave TS3000s + 1 slave TS2000
can be clustered.
An example with one master TS2000 and two slave TS2000s is shown in Figure 4.14.
Chapter 4 Configuration
35
Cyclades-TS
7303
Installation Manual
7302
7035
7301
7034
7033
7003
7002 7001
Port Numbers
LAN
Cyclades-TS
Slave 2
Ethernet IP
Address: 20.20.20.3
Cyclades-TS
Slave 1
Ethernet IP
Address: 20.20.20.2
Cyclades-TS
Master
Ethernet IP
Address: 20.20.20.1
Secondary Address:
209.81.55.110
Management
Workstation
IP Address:
20.20.20.10
Cyclades-PR1000
Router
Ethernet IP
Address: 209.81.55.111
Remote
Management
Workstation
FIGURE 4.14 EXAMPLE USING THE CLUSTERING FEATURE.
Chapter 4 Configuration
36
Cyclades-TS
Installation Manual
The Master Cyclades-TS must contain references to the Slave ports. The configuration described earlier for
Console Access Servers should be followed with the following exceptions for the Master and Slaves:
Master Configuration:
Parameter
Description
conf.eth_ip
Ethernet Interface IP address.
conf.eth_ip_alias
Secondary IP address for the Ethernet Interface
(needed for clustering feature).
conf.eth_mask_alias Mask for secondary IP address above.
all.socket_port
This value applies to both the local ports and ports on
slave Cyclades-TSs.
all.protocol
Depends on the application.
all.authtype
Depends on the application.
s33.tty
This parameter must be created in the master TS file for
every slave port. Its format is
IP_of_Slave[:slave_socket_port] for non-master ports.
In this case, the slave_socket_port value is not
necessary because s33.socket_port is automatically set
to 7033 by all.socket_port above.
s33.serverfarm
An alias for this port.
s33.ipno
This parameter must be created in the master TS file for
every slave port, unless configured using all.ipno.
s34.tty
See s33.tty.
s34.serverfarm
An alias for this port.
s34.ipno
See s33.ipno.
Value for This Example
20.20.20.1
209.81.55.110
255.255.255.0
7001+
Socket_ssh or socket_server
Radius or local or none
20.20.20.2:7033
Server_on_slave1_serial_s1
0.0.0.0
20.20.20.2:7034
Server_on_slave1_serial_s2
0.0.0.0
FIGURE 4.15 MASTER CYCLADES-TS CONFIGURATION (WHERE IT DIFFERS FROM THE STANDARD
CAS PROFILE)
Chapter 4 Configuration
37
Cyclades-TS
Installation Manual
Parameter
s35.tty
s35.serverfarm
s35.ipno
etc. for s36-s64
S65.tty
S65.serverfarm
S65.ipno
S66.tty
S66.serverfarm
S66.ipno
S67.tty
S67.serverfarm
S67.ipno
etc. for s68-s96
Description
See s33.tty.
An alias for this port.
See s33.ipno.
Value for This Example
20.20.20.2:7035
Server_on_slave1_serial_s3
0.0.0.0
The format of this parameter is
IP_of_Slave[:slave_socket_port] for non-master ports.
The value 7301 was chosen arbitrarily for this example.
An alias for this port.
See s33.ipno.
See s65.tty.
An alias for this port.
See s33.ipno.
See s65.tty.
An alias for this port.
See s33.ipno.
20.20.20.3:7301
Server_on_slave2_serial_s1
0.0.0.0
20.20.20.3:7302
Server_on_slave2_serial_s2
0.0.0.0
20.20.20.3:7303
Server_on_slave2_serial_s3
0.0.0.0
FIGURE 4.15 MASTER CYCLADES-TS CONFIGURATION (CONT.)
The Slave Cyclades-TSs do not need to know they are being accessed through the Master Cyclades-TS. Their
port numbers, however, must agree with those assigned by the Master.
Parameter
all.protocol
all.authtype
conf.eth_ip
all.socket_port
Value for This Example
socket_server
none
20.20.20.2
7033+
FIGURE 4.16 CYCLADES-TS CONFIGURATION FOR SLAVE 1 (WHERE IT DIFFERS FROM THE
STANDARD CAS PROFILE)
Chapter 4 Configuration
38
Cyclades-TS
Installation Manual
Parameter
all.protocol
all.authtype
conf.eth_ip
all.socket_port
Value for This Example
Socket_server
None
20.20.20.3
7301+
FIGURE 4.17 CYCLADES-TS CONFIGURATION FOR SLAVE 2 (WHERE IT DIFFERS FROM THE
STANDARD CAS PROFILE)
To access ports from the remote management workstation, use telnet with the secondary IP address:
Telnet 209.81.55.110 7001 to access the first port of the Master Cyclades-TS
Telnet 209.81.55.110 7033 to access the first port of Slave 1
Telnet 209.81.55.110 7065 to access the first port of Slave 2
Note that socket port 7065 is being used in the last example to access port 7301 in Slave 2.
ssh can also be used from the remote management workstation:
ssh -l <username>:Server_on_slave2_serial_s3 209.81.55.110 to access the
third port of Slave 2
ssh -l <username>:7069 209.81.55.110 to access the fifth port of Slave 2
Chapter 4 Configuration
39
Cyclades-TS
Installation Manual
CHAPTER 5 UPGRADES AND TROUBLESHOOTING
Upgrades
All 6 files added by Cyclades to the standard Linux files are in the /proc/flash directory. They are:
boot_ori - original boot code
boot_alt - alternate boot code
syslog - event logs (not used by Linux)
config - configuration parameters, only the boot parameters are used by the boot code
zImage - Linux kernel image
script - file where all Cyclades-TS configuration information is stored
To upgrade the Linux kernel provided in the Cyclades-TS, ftp the new zImage file on top of the zImage file in
the /proc/flash directory. Then, reboot, and the new Linux kernel will take over. This can be confirmed by
typing
cat /proc/version
to see the Linux kernel version.
Troubleshooting
If the Cyclades-TS booted properly, the interfaces can be verified using ifconfig and ping. If ping does not
work, check the routing table using the command route. Of course, all this should be tried after checking that
the cables are connected correctly.
As mentioned in Chapter 4, the file /etc/config_files contains a list of files acted upon by saveconf and
restoreconf. If a file is missing, it will not be loaded onto the ramdisk on boot. The following table lists files
that should be included in the /etc/config_files file and which programs use each.
Chapter 5 Upgrades and Troubleshooting
40
Cyclades-TS
File
/etc/securetty
/etc/issue
/etc/getty_ttyS0
/etc/hostname
/etc/hosts
/etc/host.conf
/etc/nsswitch.conf
/etc/resolv.conf
/etc/config_files
/etc/passwd
/etc/group
/etc/ssh/ssh_host_key.pub
/etc/ssh/sshd_config
/etc/ssh/ssh_config
/etc/ssh/ssh_host_key
/etc/ssh/ssh_host_key.pub
/etc/ssh/ssh_host_dsa_key
/etc/ssh/ssh_host_dsa_key.pub
/etc/snmp/snmpd.conf
/etc/portslave/pslave.conf
/etc/network/ifcfg_eth0
/etc/network/ifcfg*
/etc/network/ifcfg_lo
/var/run/radsession.id
/home
/etc/network/st_routes
Installation Manual
Program
telnet, login, su
getty
login (via console)
tcp
tcp
tcp
dns
dns
saveconf
login, passwd, adduser...
login, passwd, adduser...
sshd
sshd
ssh client
sshd (ssh1)
sshd (ssh1)
sshd (ssh2)
sshd (ssh2)
snmpd
cy_ras, portslave, TS configuration information
ifconfig eth0, cy_ras, rc.sysconf
ifconfig, cy_ras, rc.sysinit
ifconfig lo, cy_ras, rc.sysinit
radinit, radius authentication process
adduser, passwd
ifconfig, cy_ras, rc.sysconf
If any of the files listed in /etc/config_files is modified, the Cyclades-TS administrator must execute the
command saveconf before rebooting the Cyclades-TS or the changes will be lost. If a file is created (or a file
Chapter 5 Upgrades and Troubleshooting
41
Cyclades-TS
Installation Manual
name altered), its name must be added to this file before executing saveconf and reboot.
Cyclades Technical Support is always ready to help with any configuration problems. Before calling,
execute the command
cat /proc/version
and note the Linux version and Cyclades-TS version written to the screen. This will speed resolution
of most problems.
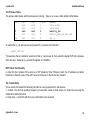
Hardware Test
A hardware test called tstest is included with the Cyclades-TS firmware. It is a menu-driven program, run by
typing tstest at the command prompt, and the various options are described below. Note that the Cyclades-TS
should not be tested while in use as the test will inactivate all ports.
Port Test
Either a cross cable or a loop-back connector is necessary for this test. The pinout diagrams are supplied in
appendix B. Connect the loop-back connector to the modem cable and then connect the modem cable to the
port to be tested (or connect a cross cable between two ports to be tested). When tstest senses the presence
of the cable or connector, the test will be automatically run and the result shown on the screen.
Each line of data correponds to a port in test. The last 4 columns (DATA, CTS, DCD, and DSR) indicate errors.
The values in these columns should be zero. The figure below is an example of the output screen.
From
2
4
5
<->
<->
<->
To
2
5
4
<- Packets ->
Sent
Received
35
35
35
35
35
35
Passes
35
35
35
Data
0
0
0
<- Errors ->
CTS
DCD
DSR
0
0
0
0
0
0
0
0
0
When this test is run with a cable or connector without the DSR signal (see the pinout diagram for the cable or
connector being used), errors will appear in the DSR column. This does not indicate a problem with the port. In
the example above, tstest perceived that a loop-back connector was attached to port 2 and that a cross cable
Chapter 5 Upgrades and Troubleshooting
42
Cyclades-TS
Installation Manual
was used to connect ports 4 and 5.
Port Conversation
This test sends and receives data on the selected port. One way to run this test is to place a loop-back
connector on the port to be tested and begin. Enter the number of the port and a baud rate (9600 is a typical
value). Type some letters, and if the letters appear on the screen, the port is working. If the letters do not appear
on the screen (which also occurs if the loop-back connector is removed), the port is not functioning correctly.
A second method that can be used to test the port is to connect it to a modem with a straight cable. Begin the
test and type “at”. The modem should respond with “OK”, which will appear on the screen. Other commands
can be sent to the modem or to any other serial device.
Test Signals Manually
This test confirms that signals are being sent and received on the selected port. Neither the loop-back connector
nor the cross cable are necessary. Enter the number of the port to be tested and begin the test.
State
ON
OFF
DTR
X
↓
DCD
DSR
X
X
RTS
X
↓
CTS
X
First, type Ctrl-D to see the X in the DTR column move position, then type Ctrl-R to see the X in the RTS column
change position. If each of the Xs moves in response to its command, the signals are being sent.
Another method to test the signals is to use a loop-back connector. Enter the number of the port with the loopback connector and start the test. In this case, when Ctrl-D is typed, the Xs in the first three columns will move
as shown below.
Chapter 5 Upgrades and Troubleshooting
43
Cyclades-TS
Installation Manual
State
ON
DTR
X
↓
DCD
X
↓
OFF
DSR
X
↓
RTS
X
CTS
X
This is because the test is receiving the DTR signal sent through the DCD and DSR channels. When Ctrl-R is
typed, the Xs in the RTS and CTS columns should move together. If the Xs change position as described, the
signals are being sent and received correctly.
Single User Mode
The Cyclades-TS has a single user mode used when:
• The name or password of the user with root privileges is lost or forgotten,
• After an upgrade or downgrade which leaves the Cyclades-TS unstable,
• After a configuration change which leaves the Cyclades-TS inoperative or unstable.
Type the word “ single” (with a blank space before the word) during boot using a console connection. This
cannot be done using a telnet or other remote connection.
The initial output of the boot process is shown below.
Entry Point = 0x00002120
loaded at: 00002120 0000D370
relocated to: 00300020 0030B270
board data at: 003052C8 0030537C
relocated to: 002FF120 002FF1D4
zimage at: 00008100 0006827E
relocated to: 00DB7000 00E1717E
initrd at: 0006827E 0024F814
relocated to: 00E18000 00FFF596
avail ram: 0030B270 00E18000
Linux/PPC load: root=/dev/ram
Chapter 5 Upgrades and Troubleshooting
44
Cyclades-TS
Installation Manual
After printing “Linux/PPC load: root=/dev/ram”, the Cyclades-TS waits approximately 10 seconds for user input.
This is where the user should type “single”. When the boot process is complete, the Linux prompt will appear
on the console:
[root@(none) /]#
If the password or username was forgotten, execute the following commands:
passwd
saveconf
reboot
For configuration problems, the user has two options:
1. Edit the file(s) causing the problem with vi, then execute the commands
saveconf
reboot
2. Reset the configuration by executing the commands:
echo 0 > /proc/flash/script
reboot
If the problem is due to an upgrade/downgrade, a second downgrade/upgrade will be necessary to reverse the
process. First, the network must be initialized in order to reach a ftp server. Execute the following script,
replacing the parameters with values appropriate for your system. If your ftp server is on the same network as
the TS, the gw and mask parameters are optional.
config_eth0 ip 200.200.200.1 mask 255.255.255.0 gw 200.200.200.5
At this point, the DNS configuration (in the file /etc/resolv.conf) should be checked. Then, download the kernel
image using the ftp command.
Chapter 5 Upgrades and Troubleshooting
45
Cyclades-TS
Installation Manual
APPENDIX A INFORMATION FOR USERS NOT FAMILIAR WITH LINUX
Users and Passwords
A username and password are necessary to log in to the Cyclades-TS. The user “root” is predefined, without a
password. A password should be configured as soon as possible to avoid unauthorized access.
Type the command:
passwd
to create a password for the root user.
To create a regular user (without root priveleges), use the commands:
adduser user_name
passwd user_password
To log out, type “logout” at the command prompt.
Linux File Structure
The Linux file system is organized hierarchically, with the base (or root) directory represented by the symbol “/”.
All folders and files are nested within each other below this base directory. The directories located just below
the base directory are:
Appendix A - Linux
46
Installation Manual
Cyclades-TS
/home
/bin
/dev
/etc
/lib
/proc
/mnt
/opt
/tmp
/usr
/var
Contains the work directories of system users.
Contains applications and utilities used during system initialization.
Contains files for devices and ports.
Contains configuration files specific to the operating system.
Contains shared libraries.
Contains process information
Contains information about mounted disks.
Location where packages not supplied with the operating system are stored.
Location where temporary files are stored.
Contains most of the operating system files.
Contains operating system data files.
Basic File Manipulation Commands
The basic file manipulation commands allow the user to copy, delete and move files and create and delete
directories.
cp file_name destination
a) cp text.txt /tmp
b) cp /chap/robo.php ./excess.php
rm file_name
mv file_name destination
mkdir directory_name
a) mkdir spot
b) mkdir /tmp/snuggles
rmdir directory_name
Appendix A - Linux
Copies the file indicated by file_name to the path indicated by
destination. a) copies the file text.txt in the current directory to the tmp
directory. b) copies the file robo.php in the chap directory to the
current directory and renames the copy excess.php.
Removes the file indicated by file_name.
Moves the file indicated by file_name to the path indicated by
destination.
Creates a directory named directory_name. a) creates the directory
spot in the current directory. b) creates the directory snuggles in the
directory tmp.
Removes the directory indicated by directory_name.
47
Installation Manual
Cyclades-TS
Other commands allow the user to change directories and see the contents of a directory.
pwd
Supplies the name of the current directory. While logged in, the user is always
"in" a directory. The default initial directory is the user's home directory,
/home/<username>
ls [options] directory_name Lists the files and directories within directory_name. Some useful options are -l
for more detailed output and -a which shows hidden system files.
cd directory_name
Changes the directory to the one specified
cat file_name
Prints the contents of file_name to the screen.
Shortcuts:
. (a dot)
.. (two dots)
represents the current directory
represents one directory above the current directory (i.e. one directory closer to the base
directory).
The vi Editor
To edit a file using the vi editor, type
vi file_name
vi is a three-state line editor: it has a command mode, a line mode and an editing mode. If in doubt as to which
mode you are in, press the <ESC> key which will bring you to the command mode.
Mode
What is done there
How to Get There
command mode
navigation within the open file
Press the <ESC> key.
editing mode
text editing
See list of editing commands below.
line mode
file saving, opening, etc. exiting From the command mode, type ":" (the
from vi
colon).
Appendix A - Linux
48
Cyclades-TS
Installation Manual
Entering the program, the user is automatically in the command mode. To navigate to the part of the file to be
edited, use the following keys:
h
moves the cursor to the left (left arrow)
j
moves the cursor to the next line (down arrow)
k
moves the cursor to the previous line (up arrow)
l
moves the cursor to the right (right arrow)
Having arrived at the location where text should be changed, use these commands to modify the text (note
commands “i” and “o” will move you into the editing mode and everything typed will be taken literally until you
press the <ESC> key to return to the command mode)
i
insert text before the cursor position (everything to
the right of the cursor is shifted right)
o
create a new line below the current line and insert
text (all lines are shifted down)
dd
remove the entire current line
u
undo the last modification
x
delete the letter at the cursor position
Now that the file has been modified, enter the line mode (by typing “:” from the command mode) and use one of
the following commands:
w
save the file (w is for write)
wq
save and close the file (q is for quit)
q!
close the file without saving
w file save the file with the name file
e file opens the file named file
The Routing Table
The Cyclades-TS has a static routing table that can be seen using the commands
route
Appendix A - Linux
49
Installation Manual
Cyclades-TS
or
netstat -rn
The file /etc/network/st_routes shown in Figure 4.5 is the Cyclades-TS’s method for configuring static routes.
Routes should be added to the file (which is a script run when the Cyclades-TS is initialized) or at the prompt (for
temporary routes) using the following syntax:
route [add|del] [-net|-host] target netmask nt_msk [gw gt_way] interf
[add|del]
[-net|-host]
target
netmask
nt_msk
gw gt_way
interf
one of these tags must be present -- routes can be either added or deleted.
-net is for routes to a network and -host is for routes to a single host.
target is the IP address of the destination host or network
the tag netmask and a mask are necessary only when subnetting is used. Otherwise, a
mask appropriate to the target is assumed. nt_msk must be specified in dot notation.
specifies a gateway, when applicable. gt_way is the IP address or hostname of the
gateway.
the interface to use for this route. Must be specified if a gateway is not. When a gateway
is specified, the operating system determines which interface is to be used.
ssh - The Secure Shell Session
ssh is a command interface and protocol often used by network administrators to connect securely to a remote
computer. ssh replaces its non-secure counterpart rsh and rlogin. There are two versions of the protocol, ssh
and ssh2. The Cyclades-TS offers both.
The command to start an ssh client session from a Unix workstation is
ssh -t <user>@<hostname>
where
<user> = <username>:ttySnn or
<username>:socket_port or
Appendix A - Linux
50
Installation Manual
Cyclades-TS
<username>:ip_addr or
<username>:serverfarm
Note: “serverfarm” is a physical port alias. It can be configured in the file pslave.conf.
An example:
username:
TS1000 IP address:
host name:
servername for port 1:
cyclades
192.168.160.1
ts1000
file_server
ttyS1 addressed by IP 10.0.0.1 or socket port 7001. The various ways to access the server connected to the
port are:
ssh -t cyclades:ttyS1@ts1000
ssh -t cyclades:7001@ts1000
ssh -t cyclades:10.0.0.1@ts1000
ssh -t cyclades:file_server@ts1000
ssh -t -l cyclades:10.0.0.1
Note that either -l or @ are used, but not both. For ssh2, the -2 flag is used:
ssh -t -2 cyclades:7001@ts1000
To log in to a port that does not require authentication, the username is not necessary:
ssh -t -2 :ttyS1@ts1000
Appendix A - Linux
51
Installation Manual
Cyclades-TS
The Process Table
The process table shows which processes are running. Type ps -a to see a table similar to that below.
PID
1
31
32
36
154
Uid
root
root
root
root
root
Gid
root
root
root
root
root
State
S
S
S
S
R
Command
/sbin/inetd
/sbin/sshd
/sbin/cy_ras
/sbin/cy_wdt_led wdt led
/ps -a
To restart the cy_ras process use its process ID or execute the command:
signal_ras hup
This executes the ps command, searches for the cy_ras process id, then sends the signal HUP to the process,
all in one step. Never kill cy_ras with the signals -9 or SIGKILL.
NTP Client Functionality
In order for the Cyclades-TS to work as a NTP (Network Timer Protocol) client, the IP address and either
hostname or domain name of the NTP server must be set in the file /bin/ex_ntpclient
The Crond Utility
To use crond, first create the following two files for every process that it will execute:
1. crontab - the file that specifies frequency of execution, name of shell script, etc. should be set using the
traditional crontab file format.
2. script shell - a script file with the Linux commands to be executed.
Appendix A - Linux
52
Cyclades-TS
Installation Manual
Next, create a line in the file /etc/crontab_files for each process to be run.
Each line must contain the three items:
• status (active or inactive) - if this item is not active, the script will not be executed.
• user - the process will be run with the priviledges of this user, who must be a valid local user.
• source - pathname of the crontab file.
When the /etc/crontab_files file contains the following line:
active root /etc/tst_cron.src
and the /etc/tst_cron.src file contains the following line:
0-59 * * * * /etc/test_cron.sh
crond will execute the script listed in tst_cron.sh with root privileges each minute.
Example files are in the /etc directory.
The next step is to update the system with the modified data in the files above. Make sure the file named /etc/
config_files contains the names of all files that should be saved to flash. Next, the command saveconf, which
reads the /etc/config_files file, should then be run. saveconf copies all the files listed in the file /etc/config_files
from the ramdisk to /proc/flash/script. See step 4 in chapter 4 for more details.
The DHCP (Dynamic Host Configuration Protocol) Client
(Note: This feature is only available for firmware versions 1.2.x and above)
DHCP is a protocol that allows network administrators to assign IP addresses automatically to network devices.
Without DHCP (or a similar protocol like BOOTP), each device would have to configured manually. DHCP
automatically sends a new IP address to a connected device when it is moved to another location on the
network. DHCP uses the concept of a fixed time period during which the assigned IP address is valid for the
device it was assigned for. This “lease” time can vary for each device. A short lease time can be used when
there are more devices than available IP numbers. For more information, see RFC 2131.
Appendix A - Linux
53
Cyclades-TS
Installation Manual
To activate the DHCP client on the Ethernet Interface, set the global parameter conf.dhcp_client to 1. All other
parameters related to the Ethernet Interface (conf.eth_ip, etc.) should be commented. If the IP addresses of
the Cyclades-TS or the default gateway are changed, the Cyclades-TS will adjust its routing table accordingly.
To inactivate the DHCP client, set the parameter conf.dhcp_client to 0. Do not forget to uncomment the Ethernet
parameters mentioned in the previous paragraph.
Two files are related to DHCP:
/bin/Handle_dhcp - the script which is run by the DHCP client each time an IP address negotiation takes place.
/etc/network/dhcpcd_cmd - command which activates the DHCP client (used by the cy_ras program). Its
factory set contents are:
/sbin/dhcpcd -c /sbin/handle_dhcp
The dhcpcd command has other options which can be used on the command line. They are:
-D This option forces dhcpcd to set the domain name of the host to the domain name parameter sent by the
DHCP server. The default option is to NOT set the domain name of the host to the domain name parameter
sent by the DHCP server.
-H This option forces dhcpcd to set the host name of the host to the hostname parameter sent by the DHCP
server. The default option is to NOT set the host name of the host to the hostname parameter sent by the DHCP
server.
-R This option prevents dhcpcd from replacing the existing /etc/resolv.conf file.
The user should not modify the -c /sbin/handle_dhcp option.
Packet Filtering using ipchains
(Note: This feature is only available for firmware versions 1.2.x and above)
Appendix A - Linux
54
Cyclades-TS
Installation Manual
The Cyclades-TS uses the Linux utility ipchains to filter IP packets entering, leaving and passing through its
interfaces. An ipchains tutorial is beyond the scope of this manual. For more information on ipchains, see the
ipchains man page (not included with the Cyclades-TS) or the howto: http://netfilter.filewatcher.org/ipchains/
HOWTO.html.
The syntax of the ipchains command is:
ipchains -command chain [-s source] [-d destination] [-p protocol] [-j
target] [-i interface]
where command is one of the following:
A - Add a condition or rule to the end of the chain. Note that the order in which a condition appears in a chain
can modify its application and the first rule added to a chain is processed first, etc.
D - Delete a condition from the chain. The condition must match exactly with the command’s arguments to be
deleted.
R- Replace a condition in the chain.
I - Insert a condition in a specified location in the chain.
L - List all conditions in the chain.
F - Flush (remove) all conditions in the chain.
N - Create a new chain.
X - Deletes a user-created chain
P - Policy applied for default handling
chain is one of the following:
input - filters incoming packets
output - filters outgoing packets
forward - filters packets which are not created by the Cyclades-TS and are not destined to the Cyclades-TS
user_created_chain - a previously defined (or in the process of being defined) chain created using the N
command described above.
The output chain controls which packets are sent. A packet can be accepted by the input chain, but then rejected
by the output chain. Likewise, the forward chain controls which packets will be routed. The input chain controls
Appendix A - Linux
55
Cyclades-TS
Installation Manual
incoming packet filtering. The packet is either destined for the router or for another computer. In the latter case,
the packet is processed by the forward chain. Packets that pass through the forward chain will then be processed
by the output chain.
source and destination have the following format:
[!]address[/mask] [!][port[:port]]
! : reverses the definition, resulting in the opposite.
address : host or network IP
port : defines a specific port
port:port : defines a range of ports
If a source or destination is not specified then 0.0.0.0/0 is used.
protocol is one of the following:
tcp, udp, icmp, all or a protocol number (see the file /etc/protocols for a list).
target is one of the following:
ACCEPT
DENY
the name of another chain
interface is:
eth0 (the Ethernet interface is the only option on the Cyclades-TS) Lists do not need to be associated to an
interface, so this option may be omitted.
To save changes made using the ipchains command, execute fwset. This command will save the filter
configuration in the file /etc/network/firewall and then save the file in flash memory.
To delete the changes made (before fwset is executed) execute fwset restore to return to the lists previously
saved in /etc/network/firewall. Only the lists previously saved using fwset will then be defined. This command is
executed at boot to invoke the last configuration saved.
Appendix A - Linux
56
Cyclades-TS
Installation Manual
Another option is to edit the file /etc/network/firewall (or another file) directly, following the syntax defined in the
file itself. If the file is edited in this way, the command fwset cannot be used to save and restore the configuration.
Use
ipchains-save > file_name to save the lists in file_name
updatefiles file_name to save file_name to flash memory
ipchains-restore < file_name to restore the lists to the configuration in file_name
An example of the use of ipchains for a console access server
Referring to Fig 4.5
If the administrator wishes to restrict access to the consoles connected to the Cyclades-TS to a user on the
workstation with IP address 200.200.200.4, a filter can be set up as shown below.
ipchains -P input ACCEPT
ipchains -P output ACCEPT
ipchains -P forward ACCEPT
ipchains -A input -p tcp -s ! 200.200.200.4 -d 0.0.0.0/0 23 -j DENY
ipchains -A input -p tcp -s ! 200.200.200.4 -d 200.200.200.1 7001:7032 -j DENY
ipchains -A input -p tcp -s ! 200.200.200.4 -d 0.0.0.0/0 22 -j DENY
ts_menu Script to Simplify telnet and ssh Connections
(Note: This feature is only available for firmware versions 1.2.x and above)
The ts_menu script can be used to avoid typing long telnet or ssh commands. It presents a short menu with the
names of the servers connected to the serial ports of the Cyclades-TS. The server is selected by its
corresponding number. ts_menu must be executed from a local session: via console, telnet, ssh, dumb terminal connected to a serial port, etc.
Only ports configured for console access (protocols socket_server or socket_ssh) will be presented.
An example is:
Appendix A - Linux
57
Installation Manual
Cyclades-TS
> ts_menu
Cyclades-TS: Serial Console Server Connection menu
1 ttyS1 2 snoopy 3 linus 4 lucy
5 charlie 6 vt100-ssh
Type 'q' to quit, a valid option [1-6], or anything else to refresh :
selecting option 2 will telnet/ssh to the server snoopy. The names defined using the parameter serverfarm are
used to make up the list. When no name is configured, ttyS<N> is used where N is the port number.
the ts_menu script has the following line options:
-p : Displays Ethernet IP Address and TCP port instead of server names
Cyclades-TS: Serial
1 209.81.55.79 7001
4 209.81.55.79 7004
Type 'q' to quit, a
Console Server Connection menu
2 209.81.55.79 7002 3 209.81.55.79 7003
5 209.81.55.79 7005 6 209.81.55.79 7006
valid option [1-6], or anything else to refresh :
-i : Displays Local IP assigned to the serial port instead of server names
Cyclades-TS: Serial Console Server Connection menu
1 192.168.1.101 2 192.168.1.102 3 192.168.1.103 4 192.168.1.104
5 192.168.1.105 6 192.168.1.106
Type 'q' to quit, a valid option [1-6], or anything else to refresh :
-u <name> : Username to be used in ssh/telnet command. The default username is that used to log in to the
Cyclades-TS.
-h : lists script options
Appendix A - Linux
58
Cyclades-TS
Installation Manual
APPENDIX B HARDWARE SPECIFICATIONS
This chapter has all the information you need to quickly and successfully purchase or build RS-232 cabling. It
focuses on information related to the Cyclades-TS, but most of the information applies to any RS-232 cabling
The RS-232 Standard
RS-232C, EIA RS-232, or simply RS-232 refer to a standard defined by the Electronic Industries Association in
1969 for serial communication. More than 30 years later, we have found more applications for this standard than
its creators could have imagined. Almost all electronic devices nowadays have serial communication ports.
RS-232 was defined to connect Data Terminal Equipment, (DTE, usually a computer or terminal) to Data
Communication Equipment (DCE, usually a modem):
DTE —> RS-232 —> DCE —> communication line –> DCE —> RS-232 –> DTE
RS-232 is now mostly being used to connect DTE devices directly (without modems or communication lines in
between). While that was not the original intention, it is possible with some wiring tricks. The relevant signals (or
wires) in a RS-232 cable, from the standpoint of the computer (DTE) , are:
Receive Data (RxD) and Transmit Data (TxD) – The actual data signals
Signal Ground (Gnd) - Electrical reference for both ends
Data Terminal Ready (DTR) - Indicates that the computer (DTE) is active
Data Set Ready (DSR) - Indicates that the modem (DCE) is active.
Data Carrier Ready (DCD) - Indicates that the connection over the communication line is active
CTS (Clear to Send, an input) – Flow control for data flowing from DTE to DCE
RTS (Request to Send, an output) – Flow control for data flowing from DCE to DTE
Not all signals are necessary for every application, so the RS-232 cable may not need all 7 wires.
The RS-232 interface defines communication parameters such as parity, number of bits per character, number
of stop-bits and the baud rate. Both sides must be configured with the same parameters. That is the first thing to
Appendix B - Hardware Specifications
59
Cyclades-TS
Installation Manual
verify if you think you have the correct cable and things still do not work. The most common configuration is 8N1
(8 bits of data per character, no parity bit included with the data, 1 stop-bit to indicate the end of a character).
The baud rate in a RS-232 line translates directly into the data speed in bits per second (bps). Usual transmission
speeds range between 9600 bps and 1920bps (used in most automation and console applications) to 115,200
bps (used by the fastest modems).
Cable Length
The original RS-232 specifications were defined to work at a maximum speed of 19,200 bps over distances up
to 15 meters (or about 50 feet). That was 30 years ago. Today, RS-232 interfaces can drive signals faster and
through longer cables.
As a general rule, consider:
• If the speed is lower than 38.4 kbps, you are safe with any cable up to 30 meters (100 feet)
• If the speed is 38.4 bps or higher, cables should be shorter than 10 meters (30ft)
• If your application is outside the above limits (high speed, long distances), you will need better quality (lowimpedance, low-capacitance) cables.
Successful RS-232 data transmission depends on many variables that are specific to each environment. The
general rules above are empirical and have a lot of safety margins built-in.
Connectors
The connector traditionally used with RS-232 is the 25-pin D-shaped connector (DB-25). Most analog modems
and most older computers and serial equipment use this connector. The RS-232 interface on DB-25 connector
always uses the same standard pin assignment.
The 9-pin D-shaped connector (DB-9) saves some space and is also used for RS-232. Most new PC COM
ports and serial equipment (specially when compact size is important) uses this connector. RS-232 interfaces
on DB-9 connectors always use the same standard pin assignment.
The telephone-type modular RJ-45 plug and jack are very compact, inexpensive and compatible with the phone
and Ethernet wiring systems present in most buildings and data centers. Most networking equipment and new
Appendix B - Hardware Specifications
60
Cyclades-TS
Installation Manual
servers use RJ-45 connectors for serial communication. Unfortunately there is no standard RS-232 pin assignment
for RJ-45 connectors. Every equipment vendor has its pin assignment.
Most connectors have two versions. The ones with pins are said to be “male” and the ones with holes are said to
be “female”.
RS-232
Name/Function
DB-25 pins DB-9 pins
RJ-45 pins
Signal
(Input/Output)
(Standard)
(Standard) (Cyclades)
Chassis
Safety Ground
1
Shell
Shell
TxD
Transmit Data (O)
2
3
3
RxD
Receive Data (I)
3
2
6
DTR
Data Terminal Ready (O)
20
4
2
DSR
Data Set Ready (I)
6
6
8
DCD
Data Carrier Detect (I)
8
1
7
RTS
Request To Send (O)
4
7
1
CTS
Clear To Send (I)
5
8
5
Straight-Through vs. Crossover Cables
The RS-232 interface was originally intended to connect a DTE (computer, printer and other serial devices) to a
DCE (modem) using a straight-through cable (all signals on one side connecting to the corresponding signals
on the other side one-to-one). By using some “cabling tricks”, we can use RS-232 to connect two DTEs as is
the case in most modern applications.
A crossover (a.k.a. null-modem) cable is used to connect two DTEs directly, without modems or communication
lines in between. They data signals between the two sides are transmitted and received and there are many
variations on how the other control signals are wired. A “complete” crossover cable would connect TxD with
RxD, DTR with DCD/DSR, and RTS with CTS on both sides. A “simplified” crossover cable would cross TxD
and RxD and locally short-circuit DTR with DCD/DSR and RTS with CTS.
Which Cable Should be Used
First, look up the proper cable for your application in the table below. Next, purchase standard off-the-shelf
Appendix B - Hardware Specifications
61
Cyclades-TS
Installation Manual
cables from a computer store or cable vendor. For custom cables, refer to the cable diagrams to build your own
cables or order them from Cyclades or a cable vendor.
To Connect To
Use Cable
DCE DB-25 Female (standard)
Cable 1 – RJ-45 to DB-25 M straight-through (Custom)
- Analog Modems
This custom cable can be ordered from Cyclades or other cable
- ISDN Terminal Adapters
vendors. A sample is included with the product ("straightthrough").
DTE DB-25 Male or Female (standard) Cable 2 – RJ-45 to DB-25 F/M crossover (Custom)
- Serial Terminals
This custom cable can be ordered from Cyclades or other cable
- Old PC COM ports
vendors. A sample is included with the products ("Console").
- Most serial printers
- Some Console Ports
- Most automation devices
DTE DB-9 Male or Female (standard)
Cable 3 – RJ-45 to DB-9 F/M crossover (custom)
- Newer PC COM ports
This custom cable can be ordered from Cyclades or other cable
- Most Mice and pointing devices
vendors. A sample is included with the products (console).
- Some automation devices
DTE RJ-45 Cyclades (custom)
Cable 4 – RJ-45 to RJ-45 crossover (custom)
- All Cyclades Console Ports
This custom cable can be ordered from Cyclades or cable
vendors using the provided wiring diagram.
DTE RJ-45 Netra (custom)
Cable 5- RJ-45 to RJ-45 crossover (custom)
- Sun Netra Console Ports
This custom cable can be ordered from Cyclades or cable
- Cisco Console Ports
vendors using the provided wiring diagram.
Cable Diagrams
Before using the following cable diagrams refer to the tables above to select the correct cable for your application.
Sometimes, crossover cables are wired slightly differently depending on the application. A “complete” crossover
cable would connect the TxD with RxD, DTR with DCD/DSR, and RTS with CTS across both sides. A “simplified”
crossover cable would cross TxD and RxD and locally short-circuit DTR with DCD/DSR and RTS with CTS.
Appendix B - Hardware Specifications
62
Cyclades-TS
Installation Manual
Most of the diagrams in this document show the “complete” version of the crossover cables, with support for
modem control signals and hardware flow control. Applications that do not require such features have just to
configure NO hardware flow control and NO DCD detection on their side. Both ends should have the same
configuration for better use of the complete version of the cables.
Cable #1: Cyclades RJ-45 to DB-25 Male, Straight Through
Application: It connects Cyclades products (serial ports) to modems and other DCE RS-232 devices.
DB-25 Male
RJ-45
Appendix B - Hardware Specifications
RJ-45
Male
DB-25
Male
TxD 3
RxD 6
Gnd 4
TxD 2
RxD 3
Gnd 7
DTR 2
DSR 8
DCD 7
DTR 20
DSR 6
DCD 8
RTS 1
CTS 5
RTS 4
CTS 5
63
Cyclades-TS
Installation Manual
Cable #2: Cyclades RJ-45 to DB-25 Female/Male, Crossover
Application: It connects Cyclades products (serial ports) to console ports, terminals, printers and other DTE
RS-232 devices.
CCoCoo
nnnsssool
olele
e
DB-25 Female/Male
RJ-45
Appendix B - Hardware Specifications
RJ-45
Custom
DB-25
F/M
TxD 3
RxD 6
Gnd 4
RxD 3
TxD 2
Gnd 7
DTR 2
DSR 8
DCD 7
DSR 6
DCD 8
DTR 20
RTS 1
CTS 5
CTS 5
RTS 4
64
Cyclades-TS
Installation Manual
Cable #3: Cyclades RJ-45 to DB-9 Female, Crossover
Application: It connects Cyclades products (serial ports) to console ports, terminals, printers and other DTE
RS-232
CCrCrr
ooossss
s
DB-9 Female
devices.
RJ-45
Appendix B - Hardware Specifications
RJ-45
Custom
DB-9
Female
TxD 3
RxD 6
Gnd 4
RxD 2
TxD 3
Gnd 5
DTR 2
DSR 8
DCD 7
DSR 6
DCD 1
DTR 4
RTS 1
CTS 5
CTS 8
RTS 7
65
Cyclades-TS
Installation Manual
Cable #4: Cyclades RJ-45 to Cyclades RJ-45, Crossover
Application: Usually used to connect two ports of a Cyclades product (“loopback”) for testing purposes.
RJ-45
RJ-45
Appendix B - Hardware Specifications
RJ-45
Male
DB-25
Male
TxD 3
RxD 6
Gnd 4
RxD 6
TxD 3
Gnd 4
DTR 2
DSR 8
DCD 7
DSR 8
DCD 7
DTR 2
RTS 1
CTS 5
CTS 5
RTS 1
66
Cyclades-TS
Installation Manual
Cable #5: Cyclades RJ-45 to Netra RJ-45, Crossover
Usually used in console management applications to connect Cyclades products to a Sun Netra server or to a
Cisco product.
SUN
N
ET
RA
RJ-45
Netra
TxD 3
RxD 6
Gnd 4
RxD 6
TxD 3
Gnd 4
DTR 2
DCD 7
DSR 7
DTR 2
RTS 1
CTS 5
CTS 8
RTS 1
/C
IS
CO
RJ-45
ES
CYCLA
D
RJ-45
Custom
RJ-45
Appendix B - Hardware Specifications
67
Cyclades-TS
Installation Manual
APPENDIX C SAMPLE PSLAVE.CONF FILES
The pslave.conf file with all possible parameters and their descriptions is presented first The pslave.conf files
for the three examples configured in chapter 4 follow.
The Complete pslave.conf File Provided with the Cyclades-TS
#
# pslave.conf
Sample server configuration file.
#
# The Terminal Server uses a virtual terminal concept. Virtual terminals are
# named s1, s2, etc. Every virtual terminal should have a related
# physical device tty (without the "/dev/"). The tty parameter
# must be configured and must be unique for each virtual terminal.
#
# There two types of parameters:
#
# 1) Global parameters
#
These parameters have the prefix "conf." Example of global parameters
#
are ethernet ip address, etc.
#
# 2) Terminal Parameters.
#
These parameters have prefixes "all.", "s1.", "s2.", etc.
#
#
The "all." entries are used as a template for all virtual terminals.
#
Setting all.speed to 9600 will set all virtual terminal (s1, s2,
#
s3, etc.) speeds to 9600.
#
#
Note that you can change the "all." settings one by one.
#
If the parameter "s4.speed 19200" appears later in the file, all
terminals
#
except s4 will have speed 9600 bps and "s4" will have speed 19200 bps.
#
#
# Expansion Variables
#
# A list of format strings used by some parameters is provided here
# for reference.
#
Appendix C - Sample pslave.conf files-The complete pslave.conf file
68
Cyclades-TS
Installation Manual
#
#
#
#
#
#
#
#
#
#
#
#
#
#
#
#
#
#
#
%l:
%L:
%p:
%P:
%b:
%i:
%j:
%1:
%2:
%3:
%4:
%c:
%m:
%t:
%r:
%I:
%T:
%h:
%%:
#
#
#
#
#
#
#
#
#
Generic SAMPLE:
all async ports at 9600 bps, 8N1
Eth IP address 192.169.160.10/24 (MTU=1500)
protocol socket_server
host IP 192.168.160.8/24
syslogd IP 192.168.160.1
Radius Server IP 192.168.160.3 (authentication and accounting)
authentication radius
#
#
#
#
#
#
#
#
#
#
#
#
login name
stripped login name
NAS port number
protocol
port speed
local IP
remote IP
first byte (MSB) of remote IP
second byte of remote IP
third byte of remote IP
fourth (LSB) byte of remote IP
connect-info
netmask
MTU
MRU
idle timeout
session timeout
hostname
%
Ethernet configuration.
These parameters should only be configured in the file
/etc/network/ifcfg_eth0 _IF_ the customer will not be using the
cy_ras/portslave aplications. If the cy_ras/portslave aplications are _NOT_
used put all ifconfig commands for the ethernet directly in the
/etc/network/ifcfg_eth0.
The cy_ras application OVERWRITES the ifcfg_eth0 file with the
values configured here.
Appendix C - Sample pslave.conf files-The complete pslave.conf file
69
Cyclades-TS
Installation Manual
# The Cyclades-TS can request all of its ethernet parameters to a DHCP server.
# The administrator can activate the dhcp client with more options changing
# the file /etc/network/dhcpcd_cmd.
#
#conf.dhcp_client
1
conf.eth_ip
192.168.160.10
conf.eth_mask
255.255.255.0
conf.eth_mtu1500
#
# Secondary IP address of ethernet
#
#conf.eth_ip_alias
192.168.161.10
#conf.eth_mask_alias 255.255.255.0
#
# Remote Network File System where data buffering will be written instead
# of the default directory '/var/run'. The directory tree to which the
# file will be written must be NFS-mounted.
#
# If data buffering is turned on for port 1, for example, the data will be
# stored in /tmp/ts_data_buffer/ttyS1.data on the machine with IP address
# 192.168.160.11. The remote host must have NFS installed and the
administrator
# must create, export and allow reading/writing to this directory.
# The size of this file is not limited by the value of the parameter
# s1.data_buffering, though the value cannot be zero since a zero value turns
# off data buffering.
#
#conf.nfs_data_buffering 192.168.160.11:/tmp/ts_data_buffer
#
# Lock directory - The lock directory is /var/lock for the Cyclades-TS.
#
It should not be changed unless the user decides to customize the
#
operating system.
#
conf.lockdir/var/lock
#
# Location of the rlogin binary that accepts the "-i" flag.
#
Appendix C - Sample pslave.conf files-The complete pslave.conf file
70
Cyclades-TS
Installation Manual
conf.rlogin /usr/local/bin/rlogin-radius
#
# Location of our patched pppd with Radius linked in.
#
conf.pppd
/usr/local/sbin/pppd-radius
#
# Location of the telnet utility. This can be the system telnet. (Optional)
#
conf.telnet /bin/telnet
#
# Location of ssh utility. This can be the system SSH. (Optional)
#
conf.ssh
/bin/ssh
#
# This parameter is only necessary when authentication is being
# performed for a port. When set to one, it is possible to log
# in to the Terminal Server directly
# by placing a "!" before your login name, then using your normal
# password. This is useful if the Radius authentication server is down.
#
conf.locallogins 1
#
# Syslog server: syslog is the IP address of a remote syslog daemon.
facility
#
is a value from 0 to 7 which is sent to the syslog server to
#
indicate in which file the syslog messages should be stored.
#
The file /etc/syslog.conf on the syslog server contains a mapping
#
between facility numbers and server log files.
#
conf.syslog
192.168.160.1
#
# Syslog facility for portslave
#
conf.facility
7
#
# Syslog facility for Data Buffering
#
conf.DB_facility 7
#
Appendix C - Sample pslave.conf files-The complete pslave.conf file
71
Cyclades-TS
Installation Manual
# Speed. All ports are set to 9600 baud rate, 8 bits, No parity, 1 stop bit.
# These values can be changed port by port later in the file.
#
all.speed
9600
all.datasize
8
all.stopbits
1
all.parity
none
#
# Syslog server message level. An integer between 0 and 7. Zero: does not send
# syslog messages to the syslog server.
#
all.syslog_level 4
#
# Syslog Console message level. An integer between 0 and 7. Zero: does not
send
# syslog messages to the console.
#
all.console_level
4
#
# Authentication type - either "local", "radius", "none", "remote"
# "local/radius", "radius/local", or "RadiusDownLocal".
#
# If the authentication type is configured as "local/radius" the portslave
# first tries to authenticate locally. If it fails, portslave will try to
# authenticate using the radius server.
#
# If the authentication type is configured as "RadiusDownLocal" the portslave
# first tries to authenticate using the radius server. If the Radius server
# sends back a rejection, authentication will fail. Local authentication
# will be tried only if the Radius server is down (timeout).
#
all.authtype
radius
#
# Authentication host and accounting host. Two of each can be configured
# per port. The first is tried 'radretries' times before the
# second is tried. If 'radretries' is not configured, 5 is used by default.
# The parameter 'radtimeout' sets the timeout per query in seconds.
#
all.authhost1
192.168.160.3
Appendix C - Sample pslave.conf files-The complete pslave.conf file
72
Cyclades-TS
Installation Manual
all.accthost1
192.168.160.3
all.radtimeout 3
all.radretries 5
#all.authhost2 192.168.160.4
#all.accthost2 192.168.160.4
#
# The shared secret used by RADIUS.
#
all.secret cyclades
#
# Default protocol.
#
# Valid values are "login", "rlogin", "telnet",
# "ssh", "ssh2", "slip", "cslip", "ppp", "ppp_only", "socket_client",
# "socket_server" and "socket_ssh".
#
# ppp_only ==> PPP over leased lines (only authentication PAP/CHAP)
#
# ppp
==> PPP with terminal post dialing (Auto detect PPP)
#
all.protocolsocket_server
#
# Default ip address of linux host to which the terminals will connect.
# Used by the protocols rlogin, ssh, socket_client, etc.
#
all.host
192.168.160.8
#
# IP Address assigned to the serial port.
# The '+' after the value causes the interfaces to have
# consecutive ip addresses. Ex. 192.168.1.101, 192.168.1.107, etc.
#
# The IP number of a port is used when the RADIUS
# server does not send an IP number, or if it tells us to use a dynamic IP no.
#
all.ipno
192.168.1.101+
all.netmask 255.255.255.255
#
# Maximum reception/transmission unit size for the port
Appendix C - Sample pslave.conf files-The complete pslave.conf file
73
Installation Manual
Cyclades-TS
#
all.mtu
all.mru
1500
1500
#
# Standard message issued on connect.
#
all.issue
\r\n\
TSLINUX - Portslave Internet Services\n\
\r\n\
Welcome to terminal server %h port S%p \n\
\r\n\
Customer Support: 510-770-9727
http://www.cyclades.com/\n\
\r\n
#
# Login prompt.
#
all.prompt %h login:
#
# Terminal type, for rlogin/telnet sessions.
#
all.term
vt100
#
# If you want the Terminal Server to update the
# login records (written to the /var/run/utmp and/or /var/log/wtmp
# files), set sysutmp/syswtmp to 1. This is useful for tracking
# who has accessed the Terminal Server and what they did.
#
all.sysutmp 1
all.syswtmp 0
all.utmpfrom
"%p:%P.%3.%4"
#
# Use initchat to initialize the modem.
#
# d == delay (1 sec), p == pause (0.1 sec), l == toggle DTR
# r == <CR>, l == <LF>
#
#all.initchat
TIMEOUT 10 \
Appendix C - Sample pslave.conf files-The complete pslave.conf file
74
Cyclades-TS
#
#
#
#
#
#
#
#
#
#
#
#
Installation Manual
"" \d\l\dATZ \
OK\r\n-ATZ-OK\r\n "" \
TIMEOUT 10 \
"" ATM0 \
OK\r\n "" \
TIMEOUT 3600 \
RING "" \
STATUS Incoming %p:I.HANDSHAKE \
"" ATA \
TIMEOUT 60 \
CONNECT@ "" \
STATUS Connected %p:I.HANDSHAKE
#
# Serial port flow control:
#
hard - hardware, rts/cts
#
soft - software, CTRL-S / CTRL-Q
#
none.
#
all.flow
hard
#
# DCD signal (sets the tty parameter CLOCAL). Valid values are 0 or 1.
#
In a socket session, if all.dcd=0, a connection request (telnet or
#
ssh) will be accepted regardless of the DCD signal and the connection
#
will not be closed if the DCD signal is set to DOWN.
#
In a socket connection, if all.dcd=1 a connection request will be
#
accepted only if the DCD signal is UP and the connection (telnet or
#
ssh) will be closed if the DCD signal is set to DOWN.
#
all.dcd
1
#
# PPP options - used if a PPP session is autodetected.
# Note that mru and mtu are both set to the MTU setting.
#
#all.autoppp%i:%j novj \
#
proxyarp modem asyncmap 000A0000 \
#
noipx noccp login auth require-pap refuse-chap \
#
mtu %t mru %t \
#
ms-dns 192.168.160.5 ms-dns 0.0.0.0 \
#
plugin /usr/lib/libpsr.so
Appendix C - Sample pslave.conf files-The complete pslave.conf file
75
Cyclades-TS
Installation Manual
#
# PPP options - User already authenticated and service type is PPP.
#
#all.pppopt %i:%j novj \
#
proxyarp modem asyncmap 000A0000 \
#
noipx noccp mtu %t mru %t netmask %m \
#
idle %I maxconnect %T \
#
ms-dns 192.168.160.5 ms-dns 0.0.0.0 \
#
plugin /usr/lib/libpsr.so
#
#
# When not set to zero, this parameter sets the wait for a TCP connection
# keep-alive timer. If no traffic passes through the Terminal Server for
# this period of time, the Terminal Server will send a modem status message
# to the remote device to see if the connection is still up.
#
all.poll_interval
0
#
# This defines an alternative labeling system for the Terminal Server ports.
# This parameter is used by the protocols telnet, socket_client and
# socket_server. It is mandadory if the protocol is socket_server, otherwise
# 23 will be used.
#
# The '+' after the numerical value causes the interfaces to be numbered
# consecutively. Ex. 7001, 7002, 7003, etc.
#
all.socket_port
7001+
#
# Data buffering configuration
#
# A non-zero value activates data buffering. A file (/var/run/ttyS#.data)
# is created on the Cyclades-TS and all data received from the port is
# captured. The file contains a maximum of 1024k, which is overwritten each
# time the maximum is reached. This file can be viewed using the normal Unix
# tools (cat, vi, more, etc.).
#
all.data_buffering 0
Appendix C - Sample pslave.conf files-The complete pslave.conf file
76
Cyclades-TS
Installation Manual
#
# When non-zero, the contents of the data buffer are sent to the syslog
# server every time a quantity of data equal to this parameter is collected.
# [40 to 255 recomended]
#
# all.syslog_level should be greater than or equal to 5, and data_buffering
# non-zero for syslog generation.
#
all.syslog_buffering 0
#
# Show Data buffering menu options if parameter is set to zero
# MENU:
# "A non-empty Data Buffering File was found. Choose wich action
# should be taken ( (I)gnore, (D)isplay, (E)rase or (S)how and erase ) :"
#
#all.dont_show_DBmenu 1
#
# Send Break to the TTY when this string is received (ssh only).
#
all.break_sequence ~break
#
# Authentication of Radius users registered without passwords
#
# When enabled (value 1) and a user registered in
# the Radius database with a blank password tries to log in, the user
# is authenticated. This is a very weak level of security since
# a user would only need to know that a particular username exists.
# This does not affect Radius users registered with passwords.
#
all.radnullpass 0
#
# Automatic User Definition (more useful when used to a specific port)
#
# This parameter is only used if the port is configured as a Terminal Server
# (login, telnet, rlogin, ssh and ssh2) and authentication type 'none'.
#
#all.userauto edson
Appendix C - Sample pslave.conf files-The complete pslave.conf file
77
Cyclades-TS
Installation Manual
#
# Port access restriction (more useful when used to a specific port).
#
A single comma and spaces/tabs may be used between names.
#
A comma may not appear between the ! and the first user name.
#
The users may be local or Radius.
#
# In this example, the users joe and mark CANNOT access any serial port
#
#all.users ! joe, mark
#
# In this example, ONLY the users joe and mark CAN access any serial port
#
#all.users
joe, mark
#
# Serverfarm is an alias name for a server connected to the Cyclades-TS
# through one of its ports (only useful if assigned to a specific port).
# This alias will only be used if the port is configured as "socket_ssh".
#
# The value entered here should be the same used in the ssh command. Ex.
#
# ssh -t <username>:<server_connected_to_serial1>@<tsname> or
# ssh -t -l <username>:<server_connected_to_serial1> <tsname>
#
#s1.serverfarm server_connected_to_serial1
#
# Snif session mode (in, out, i/o). With this parameter the user can select
# which data will be sent to the monitor. The default is "out".
#
all.sniff_mode out
#
# Users that are allowed to sniff sessionsI (administrator). This field has
# the same format "all.users", but the '!' should be used used with
PRECAUTION.
#
# In this example, ONLY the users joe, mark, and peter CAN access any
# serial port (to create first session) but ONLY the user peter can
# sniff or cancel another session.
#
#all.users
joe, mark
Appendix C - Sample pslave.conf files-The complete pslave.conf file
78
Cyclades-TS
Installation Manual
#all.admin_users peter
#
# Port-specific parameters
#
s1.tty
ttyS1
s2.tty
ttyS2
s3.tty
ttyS3
s4.tty
ttyS4
s5.tty
ttyS5
s6.tty
ttyS6
s7.tty
ttyS7
s8.tty
ttyS8
s9.tty
ttyS9
s10.tty
ttyS10
s11.tty
ttyS11
s12.tty
ttyS12
s13.tty
ttyS13
s14.tty
ttyS14
s15.tty
ttyS15
s16.tty
ttyS16
# for TS2000 uncomment s17 through s32
#s17.tty
ttyS17
#s18.tty
ttyS18
#s19.tty
ttyS19
#s20.tty
ttyS20
#s21.tty
ttyS21
#s22.tty
ttyS22
#s23.tty
ttyS23
#s24.tty
ttyS24
#s25.tty
ttyS25
#s26.tty
ttyS26
#s27.tty
ttyS27
#s28.tty
ttyS28
#s29.tty
ttyS29
#s30.tty
ttyS30
#s31.tty
ttyS31
#s32.tty
ttyS32
Appendix C - Sample pslave.conf files-The complete pslave.conf file
79
Installation Manual
Cyclades-TS
The pslave.cas File Provided With the Cyclades-TS for the Console Access Server Example
#
# pslave.conf
Sample server configuration file.
#
# Console Access Server Profile
#
conf.eth_ip
200.200.200.1
conf.eth_mask
255.255.255.0
conf.eth_mtu1500
#conf.nfs_data_buffering 192.168.160.11:/tmp/ts_data_buffer
conf.lockdir/var/lock
conf.syslog
200.200.200.2
conf.facility
7
all.syslog_level 4
all.console_level
4
all.speed
9600
all.datasize
8
all.stopbits
1
all.parity
none
all.authtype
radius
all.authhost1
200.200.200.2
all.accthost1
200.200.200.2
all.radtimeout 3
all.radretries 5
all.secret
cyclades
all.ipno
192.168.1.101+
all.term
vt100
all.issue
\r\n\
TSLINUX - Portslave Internet Services\n\
\r\n\
Welcome to terminal server %h port S%p \n\
\r\n\
Customer Support: 510-770-9727
http://www.cyclades.com/\n\
\r\n
all.prompt
all.term
all.flow
%h login:
vt100
hard
Appendix C - Sample pslave.conf files - The pslave.cas file
80
Cyclades-TS
Installation Manual
all.poll_interval
0
all.socket_port
7001+
all.protocol socket_server
all.data_buffering 0
all.syslog_buffering 0
#all.dont_show_DBmenu 1
#
# Users joe and mark will only have access granted to the serial port ttyS2
#
all.users ! joe, mark
#
# Sniff sessions will only display data sent by servers connected
# to the serial port.
#
all.sniff_mode out
#
# Only users peter and john can open a sniff session
#
all.admin_users peter, john
#
# Port-specific parameters
#
#----------------# PORT 1
#----------------s1.tty
ttyS1
s1.authtype
local
s1.serverfarm server_connected_serial1
#----------------# PORT 2
#----------------s2.tty
ttyS2
s2.users
joe, mark
s2.protocol
socket_ssh
Appendix C - Sample pslave.conf files - The pslave.cas file
81
Installation Manual
Cyclades-TS
#----------------# PORT 8
#----------------s8.tty
s8.protocol
s8.authtype
s8.serverfarm
ttyS8
socket_ssh
none
server_connected_serial8
Appendix C - Sample pslave.conf files - The pslave.cas file
82
Cyclades-TS
Installation Manual
The pslave.ts File provided with the Cyclades-TS for the Terminal Server Example
#
# pslave.conf
Sample server configuration file.
#
# Terminal Server Profile
conf.eth_ip
200.200.200.1
conf.eth_mask
255.255.255.0
conf.eth_mtu1500
conf.lockdir/var/lock
conf.rlogin /usr/local/bin/rlogin-radius
conf.telnet /bin/telnet
conf.ssh
/bin/ssh
conf.locallogins 0
all.speed
9600
all.datasize
8
all.stopbits
1
all.parity
none
all.authtype
none
all.protocoltelnet
all.host
200.200.200.3
all.issue
\r\n\
TSLINUX - Portslave Internet Services\n\
\r\n\
Welcome to terminal server %h port S%p \n\
\r\n\
Customer Support: 510-770-9727
http://www.cyclades.com/\n\
\r\n
all.prompt %h login:
all.term
vt100
all.flow
hard
all.socket_port 23
#
# Users joe and mark will only have access to serial port ttyS5
#
all.users ! joe, mark
Appendix C - Sample pslave.conf files - The pslave.ts file
83
Installation Manual
Cyclades-TS
#
# Port-specific parameters
#
s1.tty
ttyS1
s2.tty
s2.authtype
s2.protocol
s2.speed
s2.datasize
s2.stopbits
s2.parity
ttyS2
local
rlogin
19200
7
2
even
s3.tty
s3.protocol
s3.authtype
ttyS3
ssh2
remote
s4.tty
s4.protocol
s4.authtype
ttyS4
ssh
remote
s5.tty
s5.users
ttyS5
joe, mark
Appendix C - Sample pslave.conf files - The pslave.ts file
84
Cyclades-TS
Installation Manual
The pslave.ras File Provided With the Cyclades-TS for the Remote Access Server Example
#
# pslave.conf
Sample server configuration file.
#
# Remote Access Server Profile
#
conf.eth_ip 200.200.200.1
conf.eth_mask
255.255.255.0
conf.eth_mtu1500
conf.lockdir/var/lock
conf.pppd
/usr/local/sbin/pppd-radius
conf.syslog
200.200.200.3
conf.facility
7
all.speed
57600
all.datasize
8
all.stopbits
1
all.parity
none
all.syslog_level 4
all.console_level
4
all.authtype
radius
all.authhost1
200.200.200.2
all.accthost1
200.200.200.2
all.radtimeout 5
all.radretries 5
all.secret cocomero
all.protocolppp
all.ipno
200.200.200.11+
all.netmask 255.255.255.255
all.mtu
1500
all.mru
1500
all.issue
\r\n\
TSLINUX - Portslave Internet Services\n\
\r\n\
Welcome to terminal server %h port S%p \n\
\r\n\
Customer Support: 510-770-9727
http://www.cyclades.com/\n\
\r\n
Appendix C - Sample pslave.conf files - The pslave.ras file
85
Cyclades-TS
Installation Manual
all.initchat
TIMEOUT 10 \
"" \d\l\dATZ \
OK\r\n-ATZ-OK\r\n "" \
"" ATMO \
OK\R\N "" \
TIMEOUT 3600 \
RING "" \
STATUS Incoming %p:I.HANDSHAKE \
"" ATA \
TIMEOUT 60 \
CONNECT@ "" \
STATUS Connected %p:I.HANDSHAKE
all.flow
hard
all.dcd
1
all.autoppp %i:%j novj \
proxyarp modem asyncmap 000A0000 \
noipx noccp login auth require-pap refuse-chap \
mtu %t mru %t \
plugin /usr/lib/libpsr.so
all.pppopt %i:%j novj \
proxyarp modem asyncmap 000A0000 \
noipx noccp mtu %t mru %t netmask %m \
idle %I maxconnect %T \
plugin /usr/lib/libpsr.so
#
# Port-specific parameters
#
#----------------------------------------------# PORT 1 PPP dial in with terminal post dialing
#----------------------------------------------s1.tty
ttyS1
#----------------------------------------------# PORT 2 PPP dial in with terminal post dialing
#----------------------------------------------s2.tty
ttyS2
s2.authtype local/radius
Appendix C - Sample pslave.conf files - The pslave.ras file
86
Cyclades-TS
Installation Manual
#------------------------------------------# PORT 3 PPP Leased line
#------------------------------------------s3.tty
ttyS3
s3.protocol ppp_only
s3.pppopt
%i:%j novj \
proxyarp modem asyncmap 000A0000 \
noipx noccp login auth require-pap refuse-chap \
mtu %t mru %t \
plugin /usr/lib/libpsr.so
s3.initchat ""
s3.issue
""
Appendix C - Sample pslave.conf files - The pslave.ras file
87
Cyclades-TS
Installation Manual
APPENDIX D CUSTOMIZATION
Everything related to the Cyclades-TS can be traced back to two files: /etc/rc.sysinit and /etc/
inittab. All Cyclades-TS application programs are started during boot by the init process. The related lines
in the /etc/inittab file are listed below:
# System initialization.
::sysinit:/etc/rc.sysinit
# Single user shell
#console::respawn:/bin/sh < /dev/console > /dev/console 2> /dev/console
ttyS0::respawn:/sbin/getty -p ttyS0 ansi
::respawn:/sbin/cy_wdt_led wdt led
# Cyclades RAS
::once:/sbin/cron
::once:/sbin/snmpd
::once:/sbin/cy_buffering
::once:/sbin/cy_ras
::once:/sbin/sshd -f /etc/ssh/sshd_config
::once:/sbin/ex_ntpclient
::wait:/sbin/fwset restore
To customize the Cyclades-TS, change these lines or add others. If the /etc/inittab file is changed, edit the /
etc/config_files file and add a line containing only “/etc/inittab”. Save the file and exit the editor. Save the new
configuration by executing saveconf. Then, the Cyclades-TS should be turned off and then turned on again.
This is necessary because the init program provided by Busybox, a tool that emulates rm, cp, etc., but uses
much less space, does not support the option ‘q’.
Cyclades provides a development kit which allows changes to be made to the Cyclades-TS’s software. However,
Cyclades does not provide free technical support for systems modified in this way. Any changes are the
responsability of the user.
Appendix D - Customization
88
Cyclades-TS
Installation Manual
APPENDIX E THE WEB CONFIGURATION MANAGER
An HTML server to facilitate administration and configuration of the Cyclades-TS was implemented in software
v.1.3.0. To use this feature:
1. connect the Cyclades-TS to a terminal using the console cable,
2. log in to the Cyclades-TS from the terminal with root privileges,
3. change the IP address/mask/gateway using the command
config_eth0 ip 200.200.200.1 netmask 255.255.255.0 gw 200.200.200.5
replacing the IP numbers in the line above with IP numbers appropriate to your system.
4. Open a browser (Netscape, Internet Explorer, etc.) and type the IP address of the TS’s Ethernet interface
(200.200.200.1 above). A page similar to that shown in Fig. E.1 will appear.
Type root in the username field and tslinux in the password field to use the Web Configuration Manager.
Change the root password as soon as possible: the user database for the Web Configuration Manager is
different than the system user database, so the root password can be different.
Appendix E The Web Configuration Manager
89
Cyclades-TS
Installation Manual
FIGURE E.1 MAIN PAGE OF THE WEB CONFIGURATION MANAGER
Appendix E The Web Configuration Manager
90
Cyclades-TS
Installation Manual
To change the password:
1. Click on the link Web User Management->Users
2. Select the user root, then click on the Change Password button.
3. Type the new password twice and submit the request.
4. The next page will require a new login, type root and the new password
5. Click on the link Web User Management->Load/Save Configuration and click on the Save Configuration
button.
6. Then, click on the link Administration->Load/Save Configuration and click on the Save Configuration to
flash button.
To logout, click on the Administration->Log out link.
The General page of the Web Configuration Manager is shown in Fig. E.2
Appendix E The Web Configuration Manager
91
Cyclades-TS
Installation Manual
FIGURE E.2 GENERAL PAGE OF THE WEB CONFIGURATION MANAGER
Appendix E The Web Configuration Manager
92
Cyclades-TS
Installation Manual
A Menu of links is provided along the left side of the page. A summary of what each link leads to is shown in
the following figures.
Link Name
General
Serial Ports
Host Table
Static Routes
IP Chains
Boot Configurations
Edit Text File
System Users
System Groups
Description of Page Contents
Description, Ethernet, DNS, Syslog, Name Service Access, Data Buffering.
Configuration for the Portslave package.
Table of hosts in /etc/hosts.
Static routes defined in /etc/network/st_routes.
Static Firewall Chains in /etc/network/ipchains.
Configuration of parameters used in the boot process.
Tool to read and edit a configuration file.
Management of system users defined in /etc/passwd.
Management of system groups defined in /etc/groups.
FIGURE E.3 THE CONFIGURATION SECTION
Link Name
Users
Groups
Access Limits
Load/Save
Configuration
Description of Page Contents
List of users allowed to access the web server.
List of possible access groups.
List of access limits for specific URL's.
Load/Save web user configuration in /etc/websum.conf.
FIGURE E.4 THE WEB USER MANAGEMENT SECTION
Appendix E The Web Configuration Manager
93
Cyclades-TS
Link Name
Logout
Reboot
Send Message
Port Conversation
Download/Upload Image
Load/Save Configuration
Set Date/Time
Active Sessions
Process Status
Restart Processes
Installation Manual
Description of Page Contents
Exits the Web Manager.
Resets the equipment.
Sends messages to users logged in to a serial port.
Does a port conversation through a serial port.
Uses an FTP server to load and save a kernel image.
Uses flash memory or an FTP server to load or save the TS's configuration.
Set the TS's date and time.
Shows the active sessions and allows the administrator to kill them.
Shows the running processes and allows the administrator to kill them.
Allows the administrator to start or stop some processes.
FIGURE E.5 THE ADMINISTRATION SECTION
Link Name
Description of Page Contents
Interface Statistics Shows statistics for all active interfaces.
Serial Ports
Shows the status of all serial ports
Routing Table
Shows the routing table and allows the administrator to add or delete routes.
ARP Table
Shows the ARP cache.
IP Chains
Shows IP Chain Entries.
IP Rules
Shows Firewall, NAT and IP Accounting rules.
IP Statistics
Shows IP protocol statistics.
ICMP Statistics
Shows ICMP protocol statistics.
TCP Statistics
Shows TCP protocol statistics.
UDP Statistics
Shows UDP protocol statistics.
RAMDisk Usage
Shows the TS File System.
System Information Shows information about the kernel, Time, CPU and Memory.
FIGURE E.6 THE INFORMATION SECTION
Appendix E The Web Configuration Manager
94
Cyclades-TS
Installation Manual
Troubleshooting the Web Configuration Manager
1. What to do when the initial web page does not appear.
Try pinging, telnetting or tracerouting to the Cyclades-TS to make sure it is reachable. If not, the problem is
probably in the network or network configuration. Are the interfaces up? Are the IP addresses correct? Are
filters configured which block the packets?
If the Cyclades-TS is reachable, see if the /bin/webs process is running by executing the command ps. If it is
not, type /bin/webs & to start it. If the /bin/webs process is not being initialized during boot, change the file /
etc/inittab.
2. How to restore the default configuration of the Web Configuration Manager
This would be required only when the root password was lost or the configuration file /etc/websum.conf was
damaged.
From a console or telnet session, edit the file /etc/config_files. Find the reference to /etc/websum.conf and
delete it. Save the modified /etc/config_files file. Execute the command saveconf. Reboot the system.
Enter into the Web Configuration Manager with the default username and password (root/tslinux). Edit the file /
etc/config_files and insert the reference to /etc/websum.conf.
Appendix E The Web Configuration Manager
95
Cyclades Corporation
41829 Albrae Street
Fremont, CA 94538 - USA
Phone: (510) 770-9727
Fax: (510) 770-0355
www.cyclades.com
Cyclades Philippines
Unit 804, LTA Bldg. 118 Perea St.
Legaspi Village
Makati City Phillipines 1200
Phone: (632) 813-0353
Fax: (632) 655-2610
www.ph.cyclades.com
Cyclades South America
Av. Santa Catarina, 155
04635-000 São Paulo, SP, Brazil
Phone: 55-11-5033-3333
Fax: 55-11-5033-3388
www.cyclades.com.br
Cyclades UK
Unit 6 Moorwell Road Business Park
Scunthorpe, North Lincolnhire DN17 2RU - UK
Phone: +44 1724 277179
Fax: +44 1724 279981
www.uk.cyclades.com
Cyclades Germany
Rennweg 33
85435 Erding - Germany
Phone: +49 (0)81 22 90 99-90
Fax: +49 (0)81 22 90 999-33
www.cyclades.de