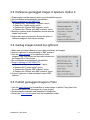
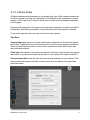
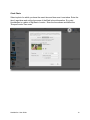
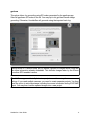
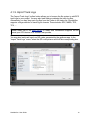
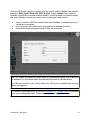
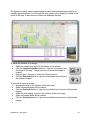
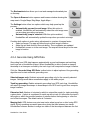
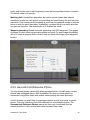
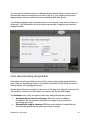
1
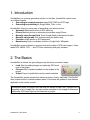
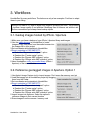
HoudahGeo
User Guide
(May 2015)
http://www.houdah.com/houdahGeo
Table of Contents
1. Introduction
2. The Basics
3. Workflows
3.1. Geotag images hosted by iPhoto / Aperture
3.2. Reference geotagged images in Aperture. Option 1
3.3. Reference geotagged images in Aperture. Option 2
3.4. Geotag images hosted by Lightroom
3.5. Publish geotagged images to Flickr
4. Step by Step
4.1. Step 1: Load
4.1.1. Add Images
4.1.2. Camera Setup
4.1.3. Import Track Logs
4.1.4. Import from GPS
4.2. Step 2: Process
4.2.1. Automatic Geocoding
4.2.2. The Inspector Pane
4.2.3. The Map
4.2.4. Geocode Using GPS Data
4.2.5. Geocode from Reference Photos
4.2.6. Geocode Using Google Earth
4.2.7. Reverse Geocode
4.2.8. Altitude Lookup
HoudahGeo: User Guide!
2
4.3. Step 3: Output
4.3.1. EXIF / XMP Export
4.3.2. Notify media libraries (iPhoto / Aperture)
4.3.3. Google Earth Export
4.3.4. KML Export
4.3.5. CSV Export
4.3.6. GPX Export
4.3.7. Flickr Upload
4.3.8. Locr Upload
5. Frequently Asked Questions
5.1. Does HoudahGeo support RAW files?
5.2. I don't own a GPS. Can I still use HoudahGeo?
5.3. Does HoudahGeo work with DNG files?
5.4. Why doesn’t HoudahGeo support Canon CRW/CIFF files?
5.5. Can you recommend a particular GPS device?
5.6. How do I ensure the camera's clock is accurate?
5.7. Why couldn't some of my images be processed?
5.8. Licensing
HoudahGeo: User Guide!
3
1. Introduction
HoudahGeo is a one-stop geocoding solution for the Mac. HoudahGeo caters to two
very different needs:
Geocoding for archival purposes using EXIF, XMP and IPTC tags
■
Geocoding for publishing to Google Earth, Flickr, or locr
■
HoudahGeo offers you many ways of geocoding your favorite photos:
Automatic: Matches photos to a GPS track log
■
iPhone: Matches photos to reference photos taken using iPhone
■
Manually using Google Earth: Point Google Earth to the desired location
■
Manually using a map: Pick locations using the built-in map
■
Precision: Attach photos to GPS waypoints
■
Manual entry: Enter coordinates found on Google Earth, Wikipedia, ...
■
HoudahGeo connects directly to many brands and models of GPS track loggers. It also
reads GPX, NMEA, TES, … and TCX files created by third party software.
2. The Basics
HoudahGeo structures the geocoding process into three successive steps:
Load: Start by adding images and optionally GPS track
■
logs to the project
Process: Add or update metadata for the images in the
■
project
Output: Export or publish the newly created metadata
■
The HoudahGeo project window thus has three states. One for each step. Use the first
three toolbar buttons to switch between states. The toolbar will update to show buttons
applicable to the current context.
HoudahGeo works on project files that may be saved for later use. A project file is
essentially a list of image files. A project stores metadata for the images it references.
Additionally, GPS track logs can be loaded into a project.
HoudahGeo: User Guide!
4
3. Workflows
HoudahGeo fits many workflows. The below are only a few examples. Feel free to adapt
these to your liking.
Writing EXIF/XMP/IPTC tags to image files requires modifying the files. This process
is lossless. Image quality is not affected. Modifying files is however not without risk.
We thus recommend you always have backup copies.
3.1. Geotag images hosted by iPhoto / Aperture
1.Make sure you have a backup of your iPhoto / Aperture library and images
2.Use the media browser in HoudahGeo to locate
images to tag. Drag them from the media browser into
the images list in your project
3.Set coordinates and metadata in HoudahGeo
4.Export metadata to EXIF/XMP/IPTC
a.Select the “Tag masters / originals” option
b.Deselect the “Create copies” option
c. Deselect the “Bypass XMP sidecars” option
d.Deselect the “Always write XMP sidecars” option
5.Have HoudahGeo notify your media library (iPhoto /
Aperture) of the new metadata
3.2. Reference geotagged images in Aperture. Option 1
1.Use Apple’s Image Capture tool to import images. Don’t erase the memory card yet
2.Load the images into a HoudahGeo project by dragging
them from the Finder
3.Set coordinates and metadata in HoudahGeo
4.Export metadata to EXIF/XMP/IPTC
a.Deselect the “Tag masters / originals” option
b.Deselect the “Create copies” option
c. Deselect the “Bypass XMP sidecars” option
d.Deselect the “Always write XMP sidecars” option
5.Import images into Aperture. Select the option to
reference images in their current location
6.Erase images from the camera / memory card
HoudahGeo: User Guide!
5
3.3. Reference geotagged images in Aperture. Option 2
1.Drag images from the memory card to your HoudahGeo project
2.Set coordinates and metadata in HoudahGeo
3.Export metadata to EXIF/XMP/IPTC
a.Deselect the “Tag masters / originals” option
b.Select the “Create copies” option
c. Deselect the “Bypass XMP sidecars” option
d.Deselect the “Always write XMP sidecars” option
4.Specify a location where HoudahGeo should save the
copies it will create
5.Import the copies into Aperture. Select the option to
reference images in their current location
3.4. Geotag images hosted by Lightroom
1.Make sure you have a backup of your Lightroom library and images
2.Instruct Lightroom to write metadata to XMP sidecars
3.Use the media browser in HoudahGeo to locate
images to tag. Drag them from the media browser into
the images list of your project
4.Set coordinates and metadata in HoudahGeo
5.Export metadata to EXIF/XMP/IPTC
a.Select the “Tag masters / originals” option
b.Deselect the “Create copies” option
c. Deselect the “Bypass XMP sidecars” option
d.Deselect the “Always write XMP sidecars” option
6.Instruct Lightroom to load metadata from the XMP
sidecars
3.5. Publish geotagged images to Flickr
1.Use the media browser in HoudahGeo to locate images to publish. Drag them from
the media browser into the images list of your project
2.Double-check coordinates and metadata in HoudahGeo
3.Select the Flickr Upload option from the HoudahGeo toolbar
HoudahGeo: User Guide!
6
4. Step by Step
4.1. Step 1: Load
During this step you configure your HoudahGeo project. Load images into the project.
Specify the camera clock setup. Optionally load GPS track logs.
HoudahGeo features a media browser to access images from your iPhoto, Aperture
and Lightroom libraries. Drag images from the media browser to the image list in your
project.
Dragging images from the media browser gives HoudahGeo additional information
needed later on for tagging masters / originals and for notifying media libraries of
updated metadata.
HoudahGeo: User Guide!
7
4.1.1. Add Images
The “Add Images” toolbar button allows you to browse the file system to add images to
your project. You may also load folders containing the images. Alternatively you may
drag images from the media browser or the Finder to the images list.
HoudahGeo supports JPEG as well as a large selection of RAW formats. Please
make use of the demo period to make sure HoudahGeo supports the image format
produced by your camera.
HoudahGeo only references files. It does not copy them. Keeping the images safe is
left up to you. You should refrain from moving image files as long as you are working
on their metadata in HoudahGeo.
HoudahGeo: User Guide!
8
4.1.2. Camera Setup
All digital cameras write timestamps to the images they take. Most cameras however do
not store the time zone they are configured for. HoudahGeo uses timestamps to match
images to GPS track logs. It needs to know how to interpret the timestamps embedded
in the images.
Camera clock setup thus is the single most important information you need to provide to
HoudahGeo. Automatic geocoding is only possible when this information is accurate.
To set up the camera clock, you may choose from three options.
Time Zone
Camera time zone: the time zone the camera was configured to at the time the photos
were taken. Typically this is your home time zone or the time zone you have travelled to.
There are three time zone lists to choose from: named time zones, GMT offsets and
time zone abbreviations.
Clock error: the number of seconds your camera's clock was fast at the time the photos
were taken. If you have accurately set the time on your camera, this value should be 0.
Current camera time: enter the time time as currently displayed on your camera. This
assumes that the camera clock has not been reset since the photos to be geocoded
have been taken.
HoudahGeo: User Guide!
9
Clock Photo
Select a photo for which you know the exact time and time zone it was taken. Enter the
time it was taken and set the time zone of the filled in time information. E.g. point
HoudahGeo to a photo of Big Ben in London. Enter the time shown and select the
“Europe/London” time zone.
HoudahGeo: User Guide!
10
gps4cam
This option allows for geocoding using QR codes generated by the gps4cam app.
Select all gps4cam QR codes in the list. You may opt to let gps4cam handle image
geocoding. Otherwise, HoudahGeo will geocode using the imported track log.
Settings made in “Camera Setup” are, by default, ignored for images which come with
time zone information already embedded. This includes images taken by the iPhone
or another GPS-enabled camera.
HoudahGeo supposes that all photos in a project were taken using the same camera
settings. If you used multiple cameras, you need to create separate projects. You then
have the option to write timestamps including time zone information during EXIF/XMP
export. You may then load the updated images into a new project.
HoudahGeo: User Guide!
11
4.1.3. Import Track Logs
The “Import Track Logs” toolbar button allows you to browse the file system to add GPS
track logs to your project. You may also load folders containing the track log files.
Alternatively you may drag track log files from the Finder to the tracks list. HoudahGeo
supports a large selection of track log file formats. These include: GPX, NMEA, TES,
TCX, …
Please make use of the demo period to make sure HoudahGeo supports the file
format your GPS device or its software can provide.
You may also load track logs from QR codes generated by the gps4cam app. In the
“Import Track Logs” menu, select the QR code pictures and tick the corresponding box.
HoudahGeo: User Guide!
12
4.1.4. Import from GPS
HoudahGeo may connect to a large selection of GPS devices. For this, it relies on
various helpers (e.g. GPSBabel) which ship with HoudahGeo and can be configured
using presets. Existing preset support:
Many Garmin devices
■
Several GiSTEK PhotoTrackr models (experimental)
■
Several GlobalSat devices
■
Several Holux devices
■
i-gotU loggers
■
The GPSRecorder iPhone app
■
iTrackU devices
■
Many Magellan devices
■
Many devices using a Mediatek MTK chipset
■
Devices supporting the Navilink protocol
■
Devices based on the Skytraq Venus 5 and Venus 6 chipsets
■
MTK-based devices (iBlue, Qstarz, ...)
■
RoyalTek RGM-3800
■
Wintec WBT-200, WBT-201, WBT-100, WBT-1000
■
Please refer to the “Configure Presets…” window for more information about the
predefined presets. In addition to HoudahGeo supporting the device’s data protocol, you
will most often also need a USB driver. The presets’ descriptions will often provide
instructions on where to locate drivers. You may also want to refer to Apple’s System
Profiler / Information utility to learn the type of USB chip used by your GPS track logger.
Please make use of the demo period to make sure HoudahGeo works as expected
with your device. We are unfortunately unable to verify compatibility with all devices
that we try to support.
You don’t need to - and usually cannot - use this feature with GPS devices that
support the USB Mass Storage Device mode. These devices mount on your Desktop
much like USB drives. You will find track log files located within folders on the device.
The track log files can be dragged directly from the Finder to the track list of your
HoudahGeo project.
HoudahGeo: User Guide!
13
To import GPS track logs from a device, you first need to select a Preset. Next select a
Port type: USB, Serial / Bluetooth, WiFi / AirPort. A device Name is also required.
However, HoudahGeo provides sensible defaults. You will probably not need to modify
this value. Situations where you need to select an alternate value include:
■
■
■
Use of a serial-to-USB from a brand other than KeySpan or simultaneous use of
several such converters
Use of custom serial device name during pairing of a Bluetooth device
Devices which are assigned a name as they are connected
The “OK” button is enabled only when there is a reasonable chance for the device to
be available. E.g. the device name should match the name of a known device.
For USB devices with a "usb:" device name, the “OK” button is enabled only once the
device is plugged in.
It is always a good idea to use a tool like HoudahGPS or LoadMyTracks to download
track logs as independent files. These may be kept on archive for future use.
HoudahGeo: User Guide!
14
Set Up Bluetooth Devices
First, make sure Bluetooth is enabled both on your computer and on the GPS device.
Using System Preferences, you will need to pair the device with your computer before
first use. In the pairing process, you will get the opportunity to specify a serial device
name. It is recommended you use the suggested default value.
You may now address the device in HoudahGeo by the above specified name.
Set Up Wintec WBT-201 USB Connection
In order to use the USB connection of your Wintec device, you need to install an
appropriate driver. You may get that driver from Silicon Labs. The Wintec device will be
known to HoudahGeo by the name of "SLAB_USBtoUART".
Set Up a MTK-based Device for USB Connection
The MTK name refers to the GPS chipset used in these devices. Different brands of
MTK-based devices use different USB chipsets. Set-up depends on the USB chipset
used. Some devices need no driver: The Qstarz BT-Q1300 shows up as
usbmodemXXX where XXX varies.
Other devices need Mac drivers to operate. You will need to find the appropriate drivers
for your device. Actually, some of these devices use the exact same chipset as the
Wintec WBT-201. For these you need to follow the instructions detailed above.
Some devices may need Bluetooth to be switched on for the USB connection to
operate.
Use of a Serial-to-USB Converter
Serial-to-USB converters require the installation of a driver provided by the converter's
manufacturer. The driver decides of the name by which HoudahGeo will see the device.
E.g. for the KeySpan converters the name to use is "KeySerial1".
Serial devices connected using a serial-to-usb converter may show up either as USB or
serial device. Please check both options.
HoudahGeo: User Guide!
15
4.2. Step 2: Process
During this step you provide or let HoudahGeo compute GPS coordinates and other
metadata for the images in the project.
4.2.1. Automatic Geocoding
The most convenient way of geocoding images is by matching them to a GPS track log
file. For this you would have loaded such a track log during the first step. If the track
log matches the images, HoudahGeo will already have geocoded your images. You may
now verify the coordinates using the map and inspector panes.
What you are looking for in a GPS device is the “track logging” feature: Every couple
of seconds, the device records its position to a file. Pure track loggers are available for
less than $100. Refer to the Frequently Asked Questions for device
recommendations.
You don’t need a GPS device. Read on for other ways of geocoding your photos:
using a map, using Google Earth, from reference photos, …
HoudahGeo: User Guide!
16
4.2.2. The Inspector Pane
During step 2, the inspector pane is shown to the right-hand side of the project window.
The values in the inspector pane pertain to the currently selected images.
The first segment of the inspector shows information about the image: its name,
preview and master path. Click the preview or master path to reveal the referenced file
in the Finder.
Photo libraries like iPhoto, Aperture or Lightroom store or reference a master version of
each image. This goes untouched as you apply adjustments to your images. Only the
preview version of the image reflects these adjustments. As you drag an image from the
HoudahGeo media browser to your project, HoudahGeo stores both the preview and
master paths. The preview image file is useful for export operations, like Flickr upload,
were you want to see the images in their final form. When writing metadata to files
during EXIF / XMP export, you will most likely want HoudahGeo to write to the master
files. Tagging preview files indeed serves little purpose. These only a have a short
lifespan: they get replaced each time you apply adjustments in iPhoto, Aperture or
Lightroom.
The second segment of the Inspector focusses on the images’ coordinates. Here you
may view and edit latitude, longitude, altitude, heading and speed.
If your GPS device includes a compass, the heading value is populated during
automatic geocoding. You may add a view offset if you know that the photo was taken
in a different direction from where the GPS compass was pointing. E.g. you took photos
out the side window of an airplane. During export, HoudahGeo combines the heading
and offset values into the viewing direction value.
Your GPS device may also offer the option to record waypoints. You may thus mark
locations where you took photos. Using the pop-up menu you may assign photos to a
waypoint. When doing so the waypoint’s coordinates are copied to the images.
The next section holds city, province and country names of the location where the
photos were taken. You may enter those manually or rely on the reverse geocoding
feature to fill those in.
HoudahGeo: User Guide!
17
A second tab of the inspector is dedicated to information which may be exported to
IPTC tags: title, comment and keywords.
HoudahGeo: User Guide!
18
4.2.3. The Map
The most prominent part of the step 2 interface is the built-in map. A toolbar at the top of
the map pane has controls to zoom the map and to switch between street map and
satellite mode. There is also a control to switch between the inspect and the geocode
modes.
HoudahGeo gives you a choice of map services.
In inspect mode, the map shows pins for all the currently selected images. It also shows
track logs. This modes serves to verify that images are correctly geocoded. You may
freely navigate the map without risk of accidental editing of image coordinates.
HoudahGeo: User Guide!
19
The geocode mode is used to adjust image positions after automatic geocoding or to
manually geocode photos. In this mode, the map shows only a single pin located at the
center of the map. It also shows a toolbar with additional controls.
To adjust the location of an image:
Select the image from the list at the bottom of the window
■
Click the Jump to Selection button to “copy the coordinates from
■
the image to the map”. The pin will move to where the image is
located
Drag the pin or the map to select the desired location
■
Click the Geocode button to “copy the coordinates from the pin to
■
the selected images”
To geocode a series of images:
Navigate the map to the location of the first image
■
Select all images taken at that location
■
Click the Geocode button to “copy the coordinates from the pin to the selected
■
images”
Adjust the map slightly to point to the location of the next image
■
Select all images taken at that location
■
Click the Geocode button to “copy the coordinates from the pin to the selected
■
images”
…
■
HoudahGeo: User Guide!
20
The Bookmarks button allows you to set and manage bookmarked pins
on the map.
The Open in Browser button opens a web browser window showing the
map area in Google Maps, Bing Maps, Apple Maps ...
The Settings button offers two options which may help speed up the
process:
Automatically proceed to next image. When this option is
■
enabled, HoudahGeo will automatically select the next image once
you are done geocoding one image
Automatically jump to selection. With this option enabled,
■
HoudahGeo will automatically update the map when you select an image
Combine both options to make minor adjustments to a series of images faster:
Select an image. The map will show the pin at that image’s location
■
Adjust the pin and click the Geocode button. The coordinates are updated
■
HoudahGeo moves on to the next image. The map will show the pin at the new
■
image’s location
…
■
4.2.4. Geocode Using GPS Data
Geocoding from GPS data happens automatically as you load images and matching
track logs into a HoudahGeo project. When HoudahGeo is able to match an image’s
timestamp to a time span covered by the track logs it will compute the image’s location.
Click the Geocode Using GPS Data toolbar button to adjust options of the geocoding
algorithm and to start automatic geocoding over.
Selected images only: Kickstart automatic geocoding only for the currently selected
images. Settings made below nonetheless apply to the whole project.
Track log geocoding: Enable automatic geocoding from GPS track logs. HoudahGeo
will match up image timestamps to timestamps in the GPS track log and thus compute
image locations.
Extension limit: Number of minutes by which to extend the search for tracks matching
a given photo. A photo is considered to match up with a track if it falls within the track's
time span or within the specified number of minutes before the beginning or after the
end of that time span. The default value is 5 minutes.
Merging limit: GPS devices may start new tracks when turned on or after losing GPS
signal. Strictly speaking we cannot geocode a photo that falls between two tracks.
HoudahGeo however decides to merge two tracks if the time elapsed between the first
HoudahGeo: User Guide!
21
track's end and the other track's beginning is less than the specified number of minutes.
The default value is 30 minutes.
Matching limit: HoudahGeo determines the location where a photo was taken by
matching it up with two track points: one preceding and one following the time the photo
was taken. If the closest point's timestamp is more than the specified number of minutes
before or after the photo was taken, HoudahGeo considers there is no match and does
not geocode the photo. The default value of 0 disables this check.
Waypoint geocoding: Enable automatic geocoding from GPS waypoints. This applies
to images for which track log geocoding yielded no result. For each image HoudahGeo
will try to locate a waypoint that is close in time and match the image to that waypoint’s
location.
4.2.5. Geocode from Reference Photos
You may already have a camera that takes geotagged photos. Actually many camera
phones take geotagged photos. With HoudahGeo you may use these photos as
references to tag photos taken with another camera during the same time frame.
At each location you would take one geotagged picture as well as a series of regular
photos. Then you load photos from both cameras into a HoudahGeo project. The
Geocode from Reference Photos feature can then copy coordinates from the
reference photos to other photos taken within the same time frame.
HoudahGeo: User Guide!
22
You may specify reference photos to always precede, always follow or just be taken in
the same time frame as the photos you want to tag. E.g. your workflow may include
always taking a reference photo before proceeding to take other photos.
Coordinates propagate from a reference photo to the nearest image and from there on
to the next. Until HoudahGeo hits a time gap large enough to suppose that you have
changed location.
4.2.6. Geocode Using Google Earth
Geocoding using Google Earth works much the same as geocoding using the built-in
map. Once you activate this feature, HoudahGeo will launch Google Earth and show a
floating window with geotagging controls.
Google Earth will show crosshairs at the center of the map view. Adjust the view so that
the crosshairs match the location where you want to tag the selected images.
The Settings button offers two options which may help speed up the process:
Automatically proceed to next image. When this option is enabled,
■
HoudahGeo will automatically select the next image once you are done
geocoding one image
Automatically jump to selection. With this option enabled, HoudahGeo will
■
automatically update the map when you select an image
HoudahGeo: User Guide!
23
The Geocode button copies the crosshairs’ coordinates to the currently selected
images.
The Fly to Image Location button moves the crosshairs to the coordinates of the
currently selected images.
The arrow buttons allow you to navigate images in the project without returning to the
HoudahGeo project window.
When you quit Google Earth, you will be offered the option to save the crosshairs to
the “My Places” folder in Google Earth. You should decline that offer.
4.2.7. Reverse Geocode
Once you are done geocoding your images, you may proceed to reverse geocoding.
This is the process of deriving location names from GPS coordinates.
HoudahGeo supports several possible services for reverse geocoding. These all
produce slightly different results. Quality of the results may vary by region. When
reverse geocoding large amount of images at the same time, this process may take a
while.
HoudahGeo: User Guide!
24
Alternatively, you can choose to use GeoNames (local) for reverse geocoding. This is
faster and does not require an Internet connection to reverse geocode. You only need to
download the GeoNames database once. This will need about 400 MB of disk space.
4.2.8. Altitude Lookup
This option allows for deriving altitude values from GPS coordinates.
HoudahGeo: User Guide!
25
4.3. Step 3: Output
During this step HoudahGeo exports or publishes the metadata collected and generated
in the previous steps.
Some settings are shared by most export options:
Selected images only: Only images previously selected in the project window will be
processed.
Geocoded images only: Only images with latitude and longitude values will be
processed.
4.3.1. EXIF / XMP Export
EXIF, XMP and IPTC tags allow for geocoding information to be stored invisibly within
the image files. HoudahGeo supports JPEG photos as well as a wide variety of RAW
formats.
Writing EXIF/XMP/IPTC tags to image files requires modifying the files. This process
is lossless. Image quality is not affected. Modifying files is however not without risk.
We thus recommend you always have backup copies.
HoudahGeo supports JPEG as well as a large selection of RAW formats. Please
make use of the demo period to make sure HoudahGeo supports the image format
produced by your camera.
Tag masters / originals: When adding images from the HoudahGeo media browser,
HoudahGeo will store the paths to both the master and preview image as managed by
your photo library. With this option enabled, HoudahGeo will tag the files referenced by
the master path. You will usually want to have this option checked.
HoudahGeo determines the master path for image fifiles as they are added to the
project from the built-in media browser. You can double-check the master path for a
given image using the Inspector sidebar of the Process step.
Create copies: With this option, HoudahGeo will create copies of your image files
before tagging those copies. It will ask you where to save the copies.
HoudahGeo: User Guide!
26
Bypass XMP sidecars: When XMP sidecars are present, HoudahGeo gives these
priority over the actual image files: it will read from and write to the sidecars. With this
option you may override this behavior and force HoudahGeo to write to the actual image
files.
Always write XMP sidecar: With this option checked, HoudahGeo will create sidecars
for images that have no sidecars yet.
Notify media libraries: This option is active only if
- the images selected are stored in an iPhoto or Aperture library,
- “Tag masters / originals” is enabled and
- “create copies” is disabled.
If this option is enabled, HoudahGeo will automatically bring up the “Notify media
libraries” dialog box upon completion of EXIF / XMP export.
Write: Check the properties that you would like HoudahGeo to write to the image files.
HoudahGeo offers the option to write timestamps back to image files. This updates
timestamps with the camera time zone and clock error. Please be absolutely sure that
the information is correct before committing it to file.
HoudahGeo: User Guide!
27
4.3.2. Notify media libraries (iPhoto / Aperture)
HoudahGeo may notify your media library (iPhoto or Aperture) that images they manage
have updated metadata available. Usually, you would perform this operation after
tagging master / original files.
4.3.3. Google Earth Export
HoudahGeo offers the option to create a Google Earth KMZ file. This allows for viewing
your photos within Google Earth. This is a terrific way for sharing photos and showing
them in context. E.g. a real estate agent may publish photos of available properties
pinned to the appropriate locations.
A KMZ file is self-contained: it holds images, thumbnails, location and track information.
In order to pass on your photos to someone else you just need to hand out this single
file.
A very nice feature of Google Earth is the ability to view photos exported from
HoudahGeo as a slideshow. The slideshow is created by flying from location to location.
At each location the slideshow may pause and briefly display the matching photo.
HoudahGeo: User Guide!
28
Template: HoudahGeo offers two predefined templates: Default - Actual Altitude and
Default - Clamped to Ground. They differ in the way altitudes are handled. With the
Clamped to Ground option Google Earth will assume photos were taken at ground level.
The use of the Actual Altitude mode makes sense only if your images have been
geocoded with altitude information. There is a risk of images not showing in Google
Earth if they are tagged with an altitude below ground level.
Root caption: This is the title by which your project will be known in Google Earth. Your
project will be listed with this name under "My Places" within Google Earth
Image size: When a marker is clicked, Google Earth will display a preview of the
corresponding photo. You may choose between 3 sizes for these preview images. If file
size is an issue, you should prefer the smaller size.
Use thumbnail images: By default the KMZ will be configured for Google Earth to
display markers at the positions where photos are located. You may choose to display
thumbnail images rather than standard markers.
Include track log: HoudahGeo can include relevant parts of a loaded GPS track log.
This shows how you got from one photo location to another. The display of the track log
within Google Earth is optional. When enabled it shows as a red line.
Open in Google Earth: The created file will open in Google Earth after the export has
completed.
A timeline will allow for browsing and filtering images by date & time.
HoudahGeo: User Guide!
29
4.3.4. KML Export
Advanced users may opt to generate KML files from a HoudahGeo project. KML is an
open standard. It is supported natively by Google Earth and Google Maps. Unlike KMZ,
it is not self-contained. The KML file references image files residing next to it. This
makes managing KML files pretty tricky.
We can distinguish two types of KML files:
The first is used locally on a computer. This one is easiest to create and to share.
■
One only needs to take care to move the images along with the KML file and
keep their relative position the same.
The second type of KML is needed for files stored on a web server. As the viewer
■
application must know where on the server to find the matching image files, the
base URL for image files needs to be stored within the KML file. Thus
HoudahGeo needs to know that URL at the time the KML is created. The KML
can then be tested only once both the KML and the appropriate image files have
been uploaded to said server.
KML export offers the same options as Google Earth KMZ export. Please see above for
documentation of these options.
Base URL: HoudahGeo will generate a folder structure containing the actual KML file
as well as the thumbnails and images it references. Base URL specifies where the
KML file will ultimately be stored.
If no "Output base URL" is specified, the KML file will work only locally. If you
■
want to pass it on to someone else, you need to copy the folder structure as is.
If base URL is specified, the KML expects the output folder to be placed at the
■
specified location on a web server. Until you do so, the KML file cannot access or
show photos. Once the photos are publicly available, you may pass along or
make available for download the KML file. You may also use Google Maps to
view the KML file.
HoudahGeo: User Guide!
30
4.3.5. CSV Export
This creates a Comma-Separated-Values file listing all images in the project. Such a file
may be processed by various tools and applications. This includes spreadsheet
applications.
HoudahGeo: User Guide!
31
4.3.6. GPX Export
This creates a GPX file which has one waypoint for each image in the project.
Waypoint names: You have the option to have HoudahGeo use the image’s title, file
name or path for the name of the associated waypoint.
Include track log: HoudahGeo can include relevant parts of a loaded GPS track log.
4.3.7. Flickr Upload
This option uploads photos from your HoudahGeo project to Flickr.com
Image size: HoudahGeo converts your images to the JPEG format before uploading.
You may specify a maximum dimension to scale the image down to.
You can freely choose a size during export. Flickr however limits the resolution you
may access online if you have a free account.
HoudahGeo: User Guide!
32
Include machine tags: Flickr supports two ways of attaching location information to a
photo. The first is based on EXIF tags which HoudahGeo automatically attaches to the
images it uploads. The second makes use of machine tags. These are special tags
which the Flickr server knows to interpret. E.g. geo:lat=34.073157 geo:lon=-118.452398
Some Flickr clients rely on the presence of these tags. It is best to let HoudahGeo
attach those.
In order to fully benefit from uploading geocoded images to Flickr, you need to enable
the "Import EXIF location data" option in your Flickr privacy settings.
Privacy: This setting determines who may see the photos you are about to publish.
Possible values are: Public, Friends & Family, Friends, Family, Private.
Set: You may choose to add your photos to one of your Flickr sets. Either pick one from
the list or enter a name to have HoudahGeo create a new set.
Clear credentials: HoudahGeo needs to be authorized for use with your Flickr account.
Once you have done this, HoudahGeo stores Flickr credentials. Should you want to use
HoudahGeo with another Flickr account, you need to first clear the existing credentials.
HoudahGeo: User Guide!
33
4.3.8 Locr Upload
This option uploads photos from your HoudahGeo project to locr.com
Image size: HoudahGeo converts your images to the JPEG format before uploading.
You may specify a maximum dimension to scale the image down to.
Privacy: This setting determines who may see the photos you are about to publish.
Possible values are: Public, Friends, Family and Private.
Album: You may choose to add your photos to one of your Locr albums. Either pick one
from the list or enter a name to have HoudahGeo create a new album.
Clear credentials: HoudahGeo needs to know your Locr user name and password to
access your account. Should you want to use HoudahGeo with another Locr account,
you need to first clear the existing credentials.
HoudahGeo: User Guide!
34
5. Frequently Asked Questions
For more questions and answers, also check out the Houdah online forums:
http://forums.houdah.com
5.1. Does HoudahGeo support RAW files?
Yes. HoudahGeo can read all the same file formats as Apple's iPhoto and Aperture.
HoudahGeo can write EXIF, XMP & IPTC tags to JPEG as well as many RAW image file
formats.
Please use the trial version of HoudahGeo to test with actual files from your camera.
5.2. I don't own a GPS. Can I still use HoudahGeo?
Yes! HoudahGeo offers various ways to geocode images: using a map, using Google
Earth, from reference photos, ….
5.3. Does HoudahGeo work with DNG files?
Yes. You may however experience problems with incorrect timestamps. At least some
versions of Adobe's DNG converter suppose that both the computer and the camera
share the same time zone. The computer time zone information is embedded in the
DNG at the time of the conversion. HoudahGeo has an option to ignore this potentially
incorrect time zone information.
5.4. Why doesn’t HoudahGeo support Canon CRW/CIFF files?
Canon CRW/CIFF files do not support GPS related IPTC or XMP tags. Thus these files
cannot directly be written to. You may however create XMP sidecar files. The newer
CR2 file format however is fully supported.
HoudahGeo: User Guide!
35
5.5. Can you recommend a particular GPS device?
GPS devices come in a wide variety conceived for many different uses. It is a good idea
to assess your needs and buy the receiver that matches those.
For the use with HoudahGeo, you need a device that has a track logging feature. This is
available in most handheld receivers. Car navigation devices however usually do not
have this ability.
You should also make sure that the device has the ability to export GPX or NMEA track
log files. This may be done using software provided with the device or with third party
software like GPSBabel or LoadMyTracks.
• Our latest favorite is the Wintec WBT-202. It features a removable battery as well as a
removable microSD memory card. You may thus head off for long trips without bringing
your computer along. Just pack additional memory cards. Where no power is available
you may also bring additional batteries. The Wintec WBT-202 mounts as a removable
disk. On this drive you will find track log files in the TES format. These may be used with
HoudahGeo.
• The older Wintec WBT-201 is smaller and cheaper, but lacks removable memory.
HoudahGeo supports connection to the Wintec WBT-201 using both USB and
Bluetooth.
Device settings may be configured using the vendor's Windows application or using the
open source GTK-Rays-2 tool.
• We can also recommend the Qstarz BT-Q1300. The Qstarz BT-Q1300 is based upon
the MediaTek MTK with 66 channels tracking for fast acquisition and reacquisition.
• The GlobalSat DG100, the i-Blue 747 and many other devices are also based on the
MTK chipset. MTK-based devices exist with a variety of USB chipsets. Some of these
chipsets require drivers for them to be visible to GPSBabel, HoudahGPS or
HoudahGeo.
• HoudahGeo users also report success with the driverless Amod AGL3080. This device
mounts on your desktop much like a USB pen drive. You just need to point HoudahGeo
to the track log files on the drive.
HoudahGeo: User Guide!
36
5.6. How do I ensure the camera's clock is accurate?
1. Decide on a time zone you will use over the course of the project. Typically this is
either your home time zone or a time zone you travel to.
2a. Set your GPS device to display time in the chosen time zone.
2b. If your GPS device has no display, use a radio-controlled clock.
3. Start setting the time on your digital camera.
4a. If your camera allows for setting seconds to zero, do so when the clock on the GPS
device jumps to the next minute.
4b. Otherwise set the time on the camera to the next full minute. Save the newly set
time at the very moment the actual time on the GPS device catches up.
5.7. Why couldn't some of my images be processed?
Do your photos have EXIF timestamps?
A photo must have a valid EXIF timestamp in order to geocode it from a GPX track log.
Remedy: Geocode the photo using the build-in map or using Google Earth.
Was the camera clock set correctly?
HoudahGeo relies on the camera clock working consistently over the course of a
project. If your camera clock was consistently off by a certain number of seconds, you
may input this clock error when importing the first image into the project.
Remedy: If the clock error has changed over the course of the project you will need to
manually edit the timestamps.
Was the time zone configured correctly?
HoudahGeo inquires about the camera time zone when importing the first image into
the project. You need to provide accurate information. Typically this is either your home
time zone or the time zone you travelled to.
Remedy: Select Camera Setup from the Load menu and apply the correct settings.
Do the photo times fall within the time frame of the track log?
In order to geocode a photo, its timestamp must fall between the time of two
consecutive track points in a given track log segment. Photos taken outside the time
span covered by the track log can thus not be geocoded. If you expect the photo to fall
HoudahGeo: User Guide!
37
within the correct time frame, you may want to double check the camera time zone and
clock error settings.
Remedy: Geocode the photo using the build-in map or using Google Earth.
Why can't Lightroom see the geotags?
Lightroom requires special setting to share metadata with HoudahGeo. You need to set
Lightroom to write metadata to XMP sidecars. HoudahGeo will read and update the
sidecars. After that you need to instruct Lightroom to reload metadata from the files.
5.8. Licensing
Demo period
HoudahGeo is available as a trial version. During the demo period you will be able to
test the full feature set with the exception of export functions. These are limited to 5
images.
Buying HoudahGeo
Is a very good idea! Licenses may be purchased from our web store.
Entering an activation code
Usually upon purchase you will be emailed an activation code. You may enter the
activation code from the demo nag window. HoudahGeo will then connect to our servers
and retrieve your license file. The file will be automatically installed. You will also receive
a copy of the license file in email. Please keep that file in a safe place. You will need it to
install HoudahGeo on your other or future Macs.
Loading a license
HoudahGeo licenses come as files. When you purchase HoudahGeo you will be mailed
your personal license file. There are many ways to load the file into your copy of
HoudahGeo. The most convenient being to open the attachment right from your e-mail
application. The license file may also be opened from the nag panel or from the
standard "Open" command.
Reminder: licenses are personal
License files are personal and contain your e-mail address. Be sure not to mix up your
license file with other people's.
HoudahGeo: User Guide!
38