1
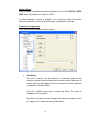
DVRRemote
User’s Manual
V1.3
00P279100ASEA3
Content
1.
2.
3.
3.1
3.2
4.
4.1
4.2
4.3
5.
5.1
5.2
5.3
5.4
Overview ...............................................................................................................4
System Requirements ...........................................................................................4
Getting Started with Setup Procedures..................................................................5
Changing Internet Settings .............................................................................5
Installing Remote Software.............................................................................6
3.2.1
Log in / Log off ........................................................................................8
3.2.2
Software Upgrades..................................................................................9
Basic Operation ...................................................................................................10
To View Live Video .......................................................................................10
4.1.1
Selecting Display Mode......................................................................... 11
4.1.2
Assigning Camera to Windows ............................................................. 11
4.1.3
Operating Cameras with Dome Control.................................................12
Instant Recording .........................................................................................13
4.2.1
Recording Video Instantly .....................................................................13
4.2.2
To Playback Instant Recording Video....................................................14
To Playback Video ........................................................................................14
4.3.1
To Playback Local *.drv Files ................................................................14
4.3.2
To Playback Instant Recording Video....................................................15
4.3.3
Playback Controls .................................................................................15
Configuring the Remote Unit ...............................................................................16
System Setup ...............................................................................................18
5.1.1
Version ..................................................................................................18
5.1.2
Language ..............................................................................................19
5.1.3
Date / Time............................................................................................20
5.1.4
Unit Name .............................................................................................22
5.1.5
Network Setup.......................................................................................23
5.1.6
RS485 Setup.........................................................................................24
5.1.7
Key Beep...............................................................................................25
Camera Setup ..............................................................................................26
Record Setup ...............................................................................................28
5.3.1
Schedule Setup.....................................................................................28
5.3.2
Preset Configuration..............................................................................30
5.3.3
ezRecord...............................................................................................32
5.3.4
Circular Recording ................................................................................33
Event Setup..................................................................................................33
5.4.1
Internal Buzzer ......................................................................................34
5.4.2
Event Icon .............................................................................................35
5.4.3
Alert Notification Setup .........................................................................36
2
5.4.4
Event Full Screen ..................................................................................37
5.4.5
Event Duration ......................................................................................38
5.4.6
Per Channel Configuration ....................................................................38
6.
Trouble Shooting Guide.......................................................................................41
6.1
No Image Displayed after Connecting ..........................................................41
6.2
The System Asks for renewing .ocx .............................................................42
Appendix: Setting up a DVR behind a Router....................................................................44
3
1. Overview
DVRRemote is a remote browser-based software application designed to
operate with DRT16 / DRT8 DVR. By using the software, users are allowed to
view live and recorded video.
The DRT16 / DRT8 DVR automatically downloads the DVRRemote plug-ins
to the connected PC when you connect to DRT16 / DRT8 DVR series unit by
entering the IP address of the unit in the address field on the browser.
The tasks that can be performed with DVRRemote are listed below:
• Remote live viewing.
• Remote control of dome cameras.
• Up to three users can connect to one DRT16 / DRT8 DVR using
DVRRemote at the same time.
2.
System Requirements
Items
Minimum Requirements
Personal Computer
Pentium-3 600 MHz processor (Pentium Celeron
or Pentium-4 1.5GHz processor preferred).
RAM 256 MB minimum Hard Drive 20 MB available
for software installation
Operating System
Window XP, 2003
Windows 2000
Microsoft Internet Explorer version 6.0 above, we
abbreviate it as “IE” through the following pages.
Web Browser
NOTE: The use of DVRRemote requires
ActiveX component; IE is recommended.
Monitor
The minimum monitor screen resolution
requirement is 1024 x 768 with 16-bit color.
Video Card
XVGA with 16 MB video RAM
Network Card
10Base-T (10 Mbps) or 100Base-TX (100 Mbps)
operation; must match the network configuration
4
3.
Getting Started with Setup Procedures
Refer to the following descriptions to install the DVRRemote remote software.
3.1
Changing Internet Settings
The browser that you want to operate with DVRRemote should be set to
accept ActiveX plug-ins. Please follow the steps to set the Internet security
settings appropriately.
• Before you operate the remote software, please check the IP address of
your DRT16 / DRT8 DVR series unit. To check the IP address, press
MENU key on the remote DVR unit and enter password to access OSD
Main menu; select <System Setup>, <Network Setup>, then <LAN Setup>
to check the IP.
• Start IE; and select <Tools> from the main menu of the browser, then
<Internet Options>, and then click the <Security> tab.
• Select <Trusted sites> and click <Sites> to specify its security setting.
5
• Disable Require server verification (https://******) for all sites in this zone.
Type the IP address of the unit in field and click <Add> to add this web site
to the zone.
•
Click <OK> to confirm the setting and close Trusted sites dialog.
Now, you can continue with the rest of the DVRRemote setup.
3.2
Installing Remote Software
Start IE to initiate the installation of DVRRemote on your personal computer.
You can save the IP address of the remote unit as a Favorites item in your
web browser to have easy access next time.
• Start IE and enter the IP address of your DRT16 / DRT8 DVR series unit in
the address field where is at the top of the browser. Shown as below
figure.
6
• The ActiveX controls and plug-ins dialog will show twice for confirmation,
click <YES> to accept ActiveX plug-ins. The DVRRemote plug-ins will be
downloaded and installed on your PC automatically when the connection
is successfully made.
NOTE: Do not enter any leading 0 characters in the address, for
example, “192.068.080.006” should be entered as “192.68.80.6”.
NOTE: If the default trigger port 80 is changed into another one,
take port 81 for example, you should enter the IP address as
“192.68.80.6:81”.
NOTE: You must have Windows Administrator privilege to update
successfully.
• A version check starts to verify whether DVRRemote has installed already,
and also check if the version is the same as that stored on that particular
DRT16 / DRT8 DVR series unit. This process may take up to 30 seconds.
When the software is completely downloaded, the Login Screen is then
displayed.
7
3.2.1
Log in / Log off
DVRRemote allows up to four “Users” to access a DRT16 / DRT8 DVR series
unit at the same time.
The following steps demonstrate procedures to view video from remote unit:
•
Start DVRRemote by entering the IP Address of the remote DRT16 /
DRT8 DVR series unit in the Address field of the browser.
•
Enter Username and password. The default Username and password is
listed as below table. You can save password in the list if needed.
•
Username
Password
user
4321
Click <OK> to log in to the remote DRT16 / DRT8 DVR series unit. The
process may take a few seconds.
• If the connection is made successfully, the main window displays live
video of the attached cameras.
If the IE browser is closed, the user will be logged out of the system
automatically
8
3.2.2
Software Upgrades
When a new version of DVRRemote software is available on your DRT16 /
DRT8 DVR series unit, it will be automatically installed when you access the
unit. Follow the steps to upgrade the software.
• The message “Browser will be closed” is now displayed. Click <Yes> to
accept to version upgrade.
• Start your IE again and enter the IP address of the remote DRT16 / DRT8
DVR series unit in the Address field of the browser.
• When the software is completely downloaded, the Login Screen will be
displayed. Please refer to Section 3.2.1 Log in/ Log off.
9
4.
Basic Operation
After the connection between your PC and the remote DVR unit is
successfully made, the DVRRemote main window displays as below figure.
The cameras connected to the remote unit will be listed on the left and an
array of camera output windows displayed on the right of the main window.
To view the main window in full-screen view, press <F11> on your keyboard.
The features on DVRRemote main window will be described in the following
sections.
4.1
To View Live Video
You can view live video from the cameras attached to the remote DVR by
clicking <Live> key on the main window toolbar.
You can select desired display mode after the view on the DRT16 / DRT8
DVR series unit is displayed on the main window. To select wanted display
mode, refer to the following sections.
10
4.1.1
Selecting Display Mode
You can indicate the number of windows displayed on the
main window. Click one of the display keys which is
positioned on the left-bottom corner of the main window. You
can select from 4, 9 and 16 camera displays.
To view certain window in full screen, you may either
double-click on the wanted window, or click on the
corresponding CAMERA key.
4.1.2
Assigning Camera to Windows
To assign a camera to a specific window in a multi-window
display mode, follow the steps:
• Select the desired display mode first by pressing the
corresponding MODE button.
• Click on the corresponding CAMERA key and drag the
cursor onto the wanted display cameo. The assignment
you make will not be saved when you exit DVRRemote.
NOTE: The CAMERA button displays with a dome icon when the
corresponding camera is equipped with dome control.
11
4.1.3
Operating Cameras with Dome Control
DVRRemote allows you to control and configure a dome
camera remotely.
Click on any CAMERA key to view the camera in full screen
display. Then click on a CAMERA key which is displayed
with a dome icon. The Dome Control Panel (shown as right)
will be displayed in the left side of the main window. The
items on the dome control panel are described as follows.
Set Preset Points
This item
is used to set up preset positions. DVRRemote allows setting
up to 255 preset positions with DynaColor, American Dynamics, and Pelco
(Pelco P & Pelco D) domes.
Use Direction keys to move dome camera to an appropriate position, and
then click the key and choose wanted number from the pull-down list. The
preset position is named as the selected number.
Go Preset Point
This item
is used to call the camera preset point which was set up with
the set preset function. Click and choose a number to call the preset for
viewing.
A.F. (Auto Focus)
Click to focus the camera automatically for a clear view.
ID (Dome ID Setup)
Click for changing the dome ID and protocol. User privileges in not allowed to
change the dome ID and protocol; Admin privileges is needed to access this
function.
12
Focus
Use to adjust the camera lens to focus on objects for a clear view. Click the
adjusting keys to modify the focus setting.
Iris
This item is used to open and close the iris to let more or less light into the
camera. Click the adjusting keys to modify the iris setting.
Zoom
You are allowed to zoom-in or zoom-out using the adjusting keys. Zoom-in to
view less area and zoom-out to view more area.
Direction Keys
These keys are used to pan and/or tilt the dome camera. Click the arrow key
in the direction you want to view.
4.2
Instant Recording
The Instant Recording function allows you to record video
quickly on your PC.
NOTE: The instant recording video will be saved
as *.drv file. And the size of each *.drv file will be
700MB. If the recording is larger than 700MB, then
it will be divided into 2 (or more) files.
4.2.1
Recording Video Instantly
Follow the steps to start recording instantly:
• Click on the <Instant Recording> key.
• Select the destination you want to save the video.
• Click on the button again to stop recording.
NOTE: The instant recording video will be saved as *.drv file.
NOTE: The Audio function is set to OFF as the default setting.
13
4.2.2
To Playback Instant Recording Video
Follow the steps to playback a video recording instantly:
• Click <Play> on main window toolbar and click <Local Playback> tab.
• Click <Open> to choose a file recorded.
• Click <OK> to start playing the recorded video.
4.3
To Playback Video
To access the Playback screens, click <Play> key on the main window toolbar.
The <Local Playback> tab enables you to play back a recorded video file with
DVRRemote that was downloaded and stored on the hard disk drive of your
PC.
The remote DVR continues recording while you are playing back recorded
video on your PC.
4.3.1
To Playback Local *.drv Files
The <Local Playback> tab allows you to play back *.drv video files that stored
on your PC's hard disk drive. The Local Playback screen is shown as below.
Follow below steps to play back a downloaded *.drv file with DVRRemote.
• Click <Open> and the file selection screen is displayed.
• Select the *.drv video file to play back and click <OK>.
• Click <OK> to start the operation, or click <Cancel> to abort the playback.
14
• View the video playback using the Playback controls. The Playback
controls information refer to Section 4.3.3 Playback Controls.
• After playback, click <Live> to return to live video.
4.3.2
To Playback Instant Recording Video
Follow the steps to playback a video recording instantly:
• Click <Play> on main window toolbar, the <Local Playback> tab displays.
• Click <Open> to choose a *.drv file.
• Click <OK> to start playing the recorded *.drv file.
4.3.3
Playback Controls
When playing back local or remote video, DVRRemote is in Playback Mode.
The playback controls toolbar is on the main window, as shown in the
following figure.
The Playback controls and indicators are described below.
Fast Rewind
Click to play the recorded video in reverse direction. Click repeatedly to select
the rewind speed: 1×, 2×, 4×, 8×, 16×, or 32×.
Play / Pause
Click once to play the recorded video, click again to pause the playback.
Fast Playback
Click to play the recorded video forward. Click repeatedly to select the
playback speed: 1×, 2×, 4×, 8×, 16×, or 32×.
Stop
Stop playing the recorded video.
15
5.
Configuring the Remote Unit
Click <MENU> key on the toolbar to configure a DRT16 / DRT8 DVR series
unit remotely. The Configuration menu displays as below.
Configuration Menu
The Configuration menu contains a list of items that are used to configure
DRT16 / DRT8 DVR series units remotely. The following subsections describe
the configuration items and keys used in the OSD menu.
NOTE: The settings in Configuration menu only apply to the unit.
The Administrator can perform unit configuration freely. If you log in
DVRRemote using User account, the most settings will be read only and
cannot be configured.
NOTE: If an Administrator account is currently accessing the unit OSD
setup menu, you are not allowed to save the configuration as an
Admin on DVRRemote. The DRT16 / DRT8 DVR unit administrator
account has priority.
16
The items in Configuration menu are described in the table below.
Item
System Setup
Camera Setup
Record Setup
Description
Configures the system related items on the remote unit, such
as password, date/time and network settings, etc.
Configures camera titles and other camera-related items on
the remote unit.
Configures record-related items on the remote unit, such as
event and audio recording parameters.
Event Setup
Configures the way in which the remote unit handles events.
Database Setup
Show the database information. It’s for read only.
Keys in Configuration Screens
The configuration screen contains several keys that enable you to save and
close the settings. These keys are shown as below.
The functions of these keys are described below.
• <OK>
You can save just the settings in the section of the Configuration
screen in which you are working, click <OK> to save the settings and
close the Configuration screen.
• <Cancel>
Click to close the screen without saving any changes.
• <Apply>
Click <Apply> to save all of the settings in the Configuration screen
and apply them to the remote unit.
17
5.1
System Setup
The System setup screen allows user to set language,
date/time, and RS-485 settings on the remote unit.
Click <MENU> key on the main window toolbar, and
expand the System setup menu by clicking the plus
icon. The expanded System Setup menu displays as
the figure on the right.
Items in the System Setup menu are described as
following sections.
5.1.1
Version
Show the Model Name, Hardware version and Software version of the
connected unit, shown as the figure below.
18
5.1.2
Language
The Language menu allows users to select the system language for OSD
menu and screen messages of the remote unit. Language selection takes
effect immediately when the selection is done.
NOTE: The selection is used to change the system language of the
remote DVR unit, but not for changing the language of the
DVRRemote software.
19
5.1.3
Date / Time
Click <Date/Time> to display the Date/Time menu, shown as follows. The
menu allows user to configure the date/time related settings.
NOTE: The following three items “Date/Time Display”, “Date/Time
Display Mode” and “Date/Time Order settings” are applied to the
remote DVR unit only.
Date/Time Display
User can set the date and time information to display in one or two rows. The
default is <1 Row>.
Date Display Mode
Users are allowed to set the date-displayed mode for the remote unit. The
date is comprised of Year (Y), Month (M), and Day (D). To change the
date-displayed mode, click on the black arrow of this item and select the
wanted option from the pull-down menu. The default display mode is <Y/M/D>
in both NTSC and PAL formats.
20
Time Display Mode
To set the time format of the remote DVR unit in 12 hour or 24 hour. The
default setting is <24 HR>.
Date/Time Order
To set the order of Date/Time display to <Date First> or <Time First>.
Daylight Saving Time
The following items are used for those people who live in certain regions to
observe Daylight Saving Time. Select <ON> to enable the following DST
settings, or <OFF> to disable the function.
• DST Start/ DST End
The items are used to set the daylight saving duration. Enter the
wanted DST start time and end time into both fields using the
keyboard directly, or use the pull-down menu to select the desired
date and time.
• DST Bias
The item is used to set the amount of time to move forward from the
standard time for Daylight Saving Time. The Available options are
<30>, <60>, <90> and <120> minutes.
When you have completed the settings, remember to take one of the
following actions.
• Click <OK> to save the modified settings.
• Click <Apply > to save all modified settings set in the configuration menu.
• Click <Cancel> to abort and leave all settings unchanged.
21
5.1.4
Unit Name
The item is used to change the unit name of the connected remote DVR unit.
To change the unit name, type the new name in the field directly using the
keyboard.
22
5.1.5
Network Setup
This item allows the user to setup the DDNS automatically or manually.
Dynamic Domain Name System (DDNS) allows a DNS name to be constantly
synchronized with a dynamic IP address. In other words, it allows those using
a dynamic IP address to be associated to a static domain name so others can
connect to it by name.
Once the setting is completed, the DDNS address will be:
http://yourhostname.ddns.iview-ddns.com
For example, if the chosen Host name is “*******”, then the address will be:
http://*******.ddns.iview-ddns.com
- Enable DDNS
The item is used to enable or disable the Dynamic Domain Name Service.
Select <YES> to enable the service, or <NO> to disable.
- Host Name
The item allows user to setup a domain name.
- DDNS Port
The item allows user to setup the port for DDNS.
- Submit/Update
When the user has completed the settings, choose <Yes> to submit the
changes
23
- ezDDNS
ezDDNS enables the users to register the host name automatically.
NOTE: The DVR must be connected to the *Real IP address, or be
assigned a specific port using **Port Forwarding technique.
*A "Real IP" is one that is assigned to you by your ISP.
**A "Virtual IP" is one assigned either manually or through DHCP.
When the user is assigned a Virtual IP, the user must use Port
Forwarding technique to assign a specific port to the DVR.
5.1.6
RS485 Setup
Used to set up the parameters of the remote unit’s RS-485 communications
port. Click <RS485 Setup> to display the RS485 Setup menu.
•
Unit ID
Used to change the RS-485 ID address of the unit. The ID starts
from <1> to <255>. The default is <224>.
NOTE: NO two units on the same bus should have the same
RS485 ID.
24
5.1.7
•
Baud Rate
Allow user to specify the baud rate for RS485 port. The available
options are <2400>, <4800>, <9600>, <19200> and <38400>. The
default is <9600> baud.
•
Bits
Users are able to specify the bits that are associated with the
protocol. The available options are <6>, <7> and <8> bits. The
default is <8> bits.
•
Stop
Users are able to specify the stop bit associated with this protocol.
Options are <1> and <2> stop bits. The default is <1> stop bit.
•
Parity
Used to specify the parity associated with this protocol. Options are
<ODD>, <EVEN>, and <NONE>. The default is <NONE>.
Key Beep
The item is used to enable or disable the unit’s key tone. Select <YES> to
enable the key tone, or <NO> to disable.
25
5.2
Camera Setup
Camera Setup menu allows users to configure camera-related items of the
DVR unit remotely. Click <MENU> key on the main window toolbar, and then
click <Camera Setup> to expand the menu. Click on the desired channel to
set its corresponding parameters.
Items listed in the menu are described as follows.
Dome Protocol
Used to select the communications protocol associated with the connected
dome camera(s). The available protocol includes <DynaColor>, <AD422>,
<Pelco D>, <Pelco P>, <Fastrax 2>, <JVC>, and <None> (default).
Dome ID
Used to assign an ID number to the selected dome camera. Note that ID
number you set here must match with the ID set on the dome.
26
Camera Title
Allow users to set a title of camera connected to the unit (up to 11 characters).
The title will be displayed both on the remote DVR unit's main monitor and the
DVRRemote main window.
Enter a camera title to the entry field using a keyboard directly. By default, the
titles of cameras are numbered from 1 through 16 respectively.
Covert
Users are able to choose certain camera to be covert while the unit is
continuing recording video. Choose a desired channel first and set the item
<Covert> to <YES>. <YES> means to covert the selected camera, and <NO>
means not to covert the selected camera. The default setting is <NO>.
Termination
Used to enable / disable the 75Ω termination resistor inside the unit to adjust
the image quality of each camera channel. <YES>= termination resistor
enabled (default); <NO> = termination resistor disabled.
NOTE: If there is no any connection is made on camera loop-out
connectors, the termination resistor should be enabled for appropriate
signal termination.
Brightness
Used to adjust the image’s brightness of the selected camera displayed on
the monitor.
Contrast
Used to adjust the image’s contrast displayed on the monitor of the selected
camera.
Saturation
Used to adjust the image’s saturation displayed on the monitor of the selected
camera.
Hue
Used to adjust the image’s hue displayed on the monitor of the selected
camera.
27
5.3
Record Setup
Record Setup menu allows users to set
record-related items, such as recording schedule,
pre-set configuration, pre-alarm recording time, or
circular / linear recording, etc.
Click <MENU> key on the main window toolbar, and
click the plus icon to expand Record Setup menu.
5.3.1
Schedule Setup
Schedule Setup menu is used to set the daytime, nighttime, and weekend
recording schedule. The Night and Day schedules are used to define daytime
and nighttime; the Weekend schedule is tailored for weekends and holidays.
•
Day/ Night Time Start
Day Time Start/ Night Time Start determine the beginning of daytime
and nighttime, respectively. The option is indicated in 1-minute
increments. The time display format is based on the setting on Time
Display Mode.
28
•
Day/ Night Time End
Day Time Start/ Night Time End determine the end time of daytime
and nighttime, respectively. The option is indicated in 1-minute
increments. The time display format is based on the setting on Time
Display Mode.
•
Weekend Schedule
The Weekend Schedule determines whether a weekend schedule is
in effect. Choose <YES> to take effect the related weekend settings.
•
Weekend Start/End
Weekend Start Time indicates the specific day and time that a
weekend begins, for example, FRI 18:00. The Weekend End Time
indicates the specific time and day that a weekend ends, for example,
MON 06:00. Time is indicated in 1-minute increments.
Note that the value you have set indicates when the regular Day and
Night scheduling ends, and Weekend recording begins.
29
5.3.2
Preset Configuration
<Preset Config> is used to select the preset recording quality and frame rate.
Different default recording quality levels are offered for users to choose from:
<Best Quality>, <Standard>, <Extended Record>, <Event Only>, <ezRecord>,
<512Kbps DSL>, <256Kbps DSL>, and <128Kbps DSL>
According to various Record modes, the preset configuration options for
normal and event status are described in terms of relative recording rate
(PPS) and recording size for each channel in the below tables.
30
The preset conditions override any other quality and rate settings. The default
Preset Configuration setting is <Standard>.
Record Mode: Full-D1 mode (NTSC: 720×480@30PPS) (PAL: 720×576@25PPS)
Preset
Normal
Event
Normal PPS
Event PPS
Event Active
Configuration
Quality
Quality
Both
15 NTSC
3.75 NTSC
20 KB
20 KB
Best Quality
(Alarm+Motion)
(12.5 PAL)
(3.125 PAL)
15 NTSC
3.75 NTSC
20 KB
Both
14 KB
Standard
(12.5 PAL)
(3.125 PAL)
Extended
3.75 NTSC
15 NTSC
8 KB
20 KB
Both
(3.125 PAL)
(12.5 PAL)
Record
30 NTSC
0 NTSC
20 KB
Both
Event Only
(25 PAL)
(0 PAL)
ezRecord
Auto
Auto
Auto
Auto
Auto
NOTE: If selecting this Record mode, only the image from channel 1~4 will be
recorded.
Record Mode: Half-D1 mode (NTSC: 720×240@60PPS) (PAL: 720×288@50PPS)
Preset
Normal
Event
Normal PPS
Event PPS
Event Active
Configuration
Quality
Quality
3.75 NTSC
30 NTSC
Both
Best Quality
17 KB
17 KB
(3.125 PAL)
(25 PAL)
(Alarm+Motion)
Standard
3.75 NTSC
(3.125 PAL)
11 KB
30 NTSC
(25 PAL)
17 KB
Both
Extended
Record
3.75 NTSC
(3.125 PAL)
5 KB
30 NTSC
(25 PAL)
17 KB
Both
0 NTSC
(0 PAL)
-
30 NTSC
(25 PAL)
17 KB
Both
Auto
Auto
Auto
Auto
Auto
Event Only
ezRecord
Record Mode: CIF mode (NTSC: 360×240@120PPS) (PAL: 360×288@100PPS)
Preset
Normal
Event
Event Active
Normal PPS
Event PPS
Configuration
Quality
Quality
7.5 NTSC
30 NTSC
Both
Best Quality
14 KB
14 KB
(6.25 PAL)
(25 PAL)
(Alarm+Motion)
Standard
7.5 NTSC
(6.25 PAL)
8 KB
30 NTSC
(25 PAL)
14 KB
Both
Extended
Record
7.5 NTSC
(6.25 PAL)
2 KB
30 NTSC
(25 PAL)
14 KB
Both
0 NTSC
(0 PAL)
-
30 NTSC
(25 PAL)
14 KB
Both
Auto
Auto
Auto
Auto
Auto
Event Only
ezRecord
31
5.3.3
ezRecord
This item aims to avoid the complicated record settings, and to make the
setup much easier.
To setup the ezRecord Setup, follow these steps:
•
<How Many Days To Record>: The average normal PPS & Quality will be
adjusted automatically. The maximum of days depends of the size of your
HDD, in other words, the larger the HDD installed, the more days the unit can
record.
•
<Daytime Record>: This item is for you to select whether you want the DVR
to record during daytime.
•
Repeat the same procedures for the Night and Weekend, respectively. Note
that <Weekend Record> will be not accessible if you select <NO> for the item
<Weekend Schedule> in <Schedule Setup>.
•
<Average Normal PPS>: Select the PPS, and the <How Many Days To
Record> will be computed automatically.
•
<Average Normal Quality>: Select the Quality, and the <How Many Days To
Record> will be computed automatically.
NOTE: The current number of connected cameras will affect the
recording quality automatically calculated through the <ezRecord
Setup>. Therefore, once you disconnect cameras or connect more
cameras to the unit, you should reset the <ezRecord Setup>.
32
5.3.4
Circular Recording
Users are able to record video either in circular mode or in linear mode. If you
choose to record in circular mode, then the unit begins to overwrite the oldest
previously recorded video; and stores new video over the HDD spaces. If you
choose to record in linear mode in stead, the unit stops recording when the
HDD is full.
Select <ON> to record video in circular mode, or <OFF> in linear mode.
5.4
Event Setup
Event Setup menu allows users to determine DRT16
/ DRT8 DVR series unit’s behavior in response to an
alarm event.
Click <MENU> key on the main window toolbar, and
click the plus icon to expand the Event Setup menu.
33
5.4.1
Internal Buzzer
This item allows user to enable / disable the unit’s internal buzzer. If set to
<ON>, the buzzer is activated in response to an alarm. If set to <OFF>, the
buzzer is not activated. The default setting is <ON>.
34
5.4.2
Event Icon
Users are able to enable (ON) / disable (OFF) the display of Event Icon on the
monitor when an alarm event occurs. The default setting is <ON>.
35
5.4.3
Alert Notification Setup
This function allows the user to send alert notifications through the CMS
program. For detailed setup instruction, please refer to the CMS user’s
manual.
•
Alert Configuration Set 1, 2, and 3
Alert Configuration Set provides 3 combinations of Alert Notification, IP,
and Port.
•
Alert Notification
4 options are included in this item; OFF, Event, Alive, and Both.
<OFF>: The Alert Notification is OFF.
<Event>: When the alarm is triggered, the DVR will send an alert
message to the CMS.
<Alive>: The DVR will send an alert message to the CMS every 2
minutes which also indicates that the connections between the DVR
and CMS is in effect.
<Both>: This enables the DVR to send both Event and Alive alert
package to the CMS.
•
Alert IP
The Alert IP must match the IP address of the CMS.
•
Alert Port
The Alert Port must match the port of the CMS.
36
5.4.4
Event Full Screen
This function sets the DVR to display Full Screen in Main, Call, or Both monitors
when an event takes place.
37
5.4.5
Event Duration
Determine the duration of the buzzer and Alarm Out relay function after an
alarm is triggered. The available event duration range is from 1 second to 100
seconds. The default is 5 seconds.
5.4.6
Per Channel Configuration
This item is used to set how alarm conditions are
handled.
Select a desired channel and configure its settings,
such as Video Loss Detect, Motion Detect and Alarm
In / Out functions.
Video Loss Detect
Used to enable / disable Video Loss as an alarm event. Select <ON> to
enable Video Loss alarm events, <OFF> to disable.
38
Motion Detect
Used to enable or disable the motion detection function of the DRT16 / DRT8
DVR series. By default, the value is <OFF>.
If motion detection function is enabled, it is required to define the motion
detection parameters such as detection area and sensitivity settings.
Detection Configuration
Click and the menu displays as below figure.
•
Sensitivity
The item is used to set the sensitivity of detection grids for the
camera. A greater value indicates more sensitive motion detection. A
motion alarm will be triggered, once the amount of motion detected
exceeds the Threshold value.
Click UP / DOWN arrow keys to adjust the value. The value is
indicated in 4% increment.
Note that every time you have changed the value, remember to click
on “Apply” key to make the change take effect.
39
•
Area Threshold
<Area Threshold> indicates the motion alarm triggered level; if the
percentage of triggered grids to total detection area is greater than
the set value, the motion alarm will be triggered.
For example, if 10 grids are selected and the <Area Threshold>
value is 70%, the motion alarm will be triggered when seven grids
are motion detected.
Click UP / DOWN arrow keys to adjust the value. The value is
indicated in 4% increment.
Note that every time you have changed the value, remember to click
on “Apply” key to make the change take effect.
After the change(s) have been made (remember to click on “Apply”),
click
to start detecting; click
to select all grids; and click
to stop detecting; click
to clear all selected
grids.
Alarm In
This item allows user to enable / disable alarm input detection. According to
your application, select <N/O> (Normal Open) or <N/C> (Normal Close) to
enable the alarm input detection or select <OFF> to disable the detection.
The default setting is <OFF>.
If you set this item to <N/C> but did not install any device to the unit, the alarm
will be triggered and the Event Icon displayed continually until this item is
changed to <N/O>, <OFF> or install a device to the unit.
Alarm Out
This item allows user to assign an alarm on certain channel to activate the
relays. These signals can be used to drive a light or siren to caution an alarm
event.
Select from the options: <A Only> indicates “Alarm Out A”, <B Only> indicates
“Alarm Out B”, <Both> indicates “Both Alarm Out” and <None> indicates “No
Alarm Out”. The default setting is <None>.
40
6.
Trouble Shooting Guide
6.1
No Image Displayed after Connecting
If you have done all the internet settings mentioned in the Section 3.1
Changing Internet Settings, and still no image displayed after the connection
between the remote DVR and your PC is made, then please follow these
steps to change your security settings:
• Start IE, and then select <Tools> form the main menu of the browser, then
<Internet Options>, and then click the <Security> tab. The Security
Settings screen is displayed as below.
41
• Click <Custom Level>, and below figure displays.
• Under <All ActiveX controls and plug-ins>, set all items to <Enable> or
<Prompt>.
• Click <OK> to accept the settings and close the <Security> screen.
Click <OK> to close Internet Options dialog.
6.2
The System Asks for renewing .ocx
What if the server ask for .ocx renewal all the time when you trying to connect
to the remote software? If the following screen displays repeatedly, please
follow the steps to delete the temporary internet files.
42
• Select <Tools> from the main menu of the web browser, then <Internet
Options>, and then click the <General> tab.
• Click the <Delete Files> key in the Temporary Internet Files field; the
screen displays as below.
• Enable the <Delete all offline content> and click <OK>.
• Now, enter the IP address of your DRT16 / DRT8 DVR series unit to make
the connection again.
43
Appendix: Setting up a DVR behind a Router
This appendix describes how to set up a router if the DVR connects to the internet via a
router.
To properly operate a web server, e.g. a DVR, the user has to set up both the IP and port of
the DVR, which are essential for data and command transmission. The port setting is
adjustable in OSD setup menu of DVR and only one port is needed to do remote operation.
Typically and by the default, the DVR operates on port 80, which is well known as the http
port. Please make sure that port 80 is not blocked by your ISP or you will have to find
another available port and change the setting of the DVR.
In case a router, or sometimes a DSL modem is in place, the real IP is now assigned to the
router instead of the DVR. The DVR is located behind the wall (router) and operates on
virtual IP. In most cases, virtual IP starts with 192.168.x.x. The router has two IPs- one is
real IP (WAN IP), the other is virtual IP (LAN IP). The virtual IP would be 192.168.x.1. When
the remote user wants to operate the DVR, he will have to send command to the real IP, i.e.
the router, the router has to map (forward the command to the DVR. Thus it is required to
set up the router for port mapping (forwarding) before you can see image remotely from
your DVR.
See your router manufacturer's websites for more instructions on port mapping.
44
Following is an example of how the router should be set.
PC
Router
(D-Link DI-724P+)
DVR 1
IP: 192.168.0.100
WAN IP: 218.160.54.13
DVR 2
IP: 192.168.0.167
IP: 192.168.0.200
Trigger port: 80
Trigger port: 81
LAN IP: 192.168.0.1
• To change the setting of the router, you need a PC with web browser.
• Connect to D-Link DI-724P+ from PC via IE. The setup screen will show after entering
the correct user name and password.
• Click the <Advanced> tab and follow the steps to set up web port forward to DVR 1.
A. Select the <Enabled> to set up the service.
B. Enter the name of the setting in the Name field: DVR 1.
C. Enter Private IP: 167
D. Choose <TCP> as the Protocol Type.
E. Enter Private Port: 80.
F. Enter Public Port: 80.
G. Click <Always> for the Schedule setting.
H. Click <Apply>.
45
• Click <Continue> to go on when the following screen displays.
• Follow the steps to set up web port forward to DVR 2.
A. Click <Enabled> to set up the service.
B. Enter the name of the setting in the Name field: DVR 2.
C. Enter Private IP: 200
D. Choose <TCP> as the Protocol Type.
E. Enter Private Port: 81.
F. Enter Public Port: 81.
G. Click <Always> for the Schedule setting.
H. Click <Apply>.
• Now you can see DVR 1 via http://218.160.54.13:80 and DVR 2 via
http://218.160.54.13:81.
• If there are more than one DVR behind the router, repeat the steps for port mapping
setting.
46