1
Installation Guide
November 2013
AMS Suite: Intelligent Device Manager
Version 12.5 Installation Guide
AMS Suite: Intelligent Device Manager
Installation Guide
NOVEMBER 2013
Disclaimer
The contents of this publication are presented for informational purposes only, and
while every effort has been made to ensure their accuracy, they are not to be
construed as warranties or guarantees, express or implied, regarding the products or
services described herein or their use or applicability. We reserve the right to modify
or improve the designs or specifications of such products at any time without notice.
Copyright and Trademark Information
© Emerson Process Management. 2013. All rights reserved.
The Emerson logo is a trademark and service mark of Emerson Electric Co.
AMS, PlantWeb™, SNAP-ON™, Asset Portal™, DeltaV™, RS3™, PROVOX™, Ovation™,
FIELDVUE™, and ValveLink™ are marks of one of the Emerson group of companies.
HART® and WirelessHART® are registered trademarks of the HART Communications
Foundation of Austin, Texas, USA.
FOUNDATION™ is a mark of the Fieldbus Foundation of Austin, Texas, USA.
All other marks are property of their respective owners.
Document History
Part Number
10P5824A001
10P5824A501
10P5824B101
10P5824C001
2
Date
Description
Dec 2008
Update, software version 10.0
Apr 2009
Update, software version 10.1
Nov 2009
Update, software version 10.5
Apr 2010
Update, software version 11.0
Aug 2010
Update, software version 11.1
Jan 2011
Update, software version 11.1.1
Sep 2011
Update, software version 11.5
Nov 2012
Update, software version 12.0
Nov 2013
Update, software version 12.5
Installation Guide
AMS Suite: Intelligent Device Manager
NOVEMBER 2013
License Agreement
Definitions: The term "You" includes, but is not limited to, users of the Fisher-Rosemount Systems, Inc. (FRSI)
product embodied in the computer program herein, the user’s employer, the employer’s wholly owned
subsidiaries, parent company, agents, employees, contractors, and subcontractors. The term "License
Agreement" refers to one of FRSI’s License Agreements, including but not limited to, all Software License
Agreements, accompanying FRSI products, all Beta Test Agreements, and all Master License Agreements.
Any and all use of this product is subject to the terms and conditions of the applicable License Agreement. The
terms and conditions of the applicable License Agreement by and between You and FRSI shall remain effective
to govern the use of this product.
The existence of a License Agreement by and between You and FRSI must be confirmed prior to using this
product. If the site at which this Program is used is a Licensed Facility under a Master License Agreement with
FRSI, the applicable License Certificate that was sent to You applies. If the site at which this Program is used is
NOT a Licensed Facility under a Master License Agreement with FRSI and the use of the program is NOT
governed by a Beta Test Agreement, the use of this Program shall be governed by the Software License
Agreement that is printed in the sales literature, on the package in which the program was delivered, and in
this manual.
License Certificate for AMS Suite: Intelligent Device Manager
If the site at which this Program is used is a Licensed Facility under a Master License Agreement between You
and Fisher-Rosemount Systems, Inc., this Licensed Copy is provided for Licensee’s use pursuant to its Master
License Agreement with FRSI ("Agreement") as modified herein. If this is an original Licensed Copy, it may be
used only on the equipment with which it has been provided except as otherwise provided in the Agreement.
If this is a Licensed Copy of a Revision or Upgrade, it may only be used in lieu of and under the same terms as
the Licensed Copy previously provided to Licensee.
Notwithstanding provisions of the Agreement, the term of the Limited Warranty for this Licensed Copy is 90
days from the date of shipment from FRSI. Licensee’s other rights and obligations with respect to its use of this
Licensed Copy are set forth in the Agreement. Questions concerning Licensee’s rights and obligations should
be directed to Project Operations, Emerson Process Management, 1100 W Louis Henna Blvd, Round Rock,
Texas 78681.
Software License Agreement for AMS Suite: Intelligent Device Manager
BY OPENING THIS PACKAGE YOU AGREE TO ACCEPT THESE TERMS AND CONDITIONS. IF YOU DO NOT AGREE
WITH THESE TERMS, YOU SHOULD PROMPTLY RETURN THE PACKAGE UNOPENED AND YOUR MONEY WILL BE
REFUNDED. FRSI provides this computer program and related materials for your use. You assume
responsibility for the acquisition of a machine and associated equipment compatible with the program, and
for installation, use, and results obtained from the program.
LICENSE: FRSI grants to you a non-transferable, non-exclusive license to: (a) use all fully paid up licensed
programs provided to you to run a single machine; (b) copy the program for backup or modification purposes
in support of the program on the single machine. You must reproduce and include the copyright notice on any
copy or modification. YOU MAY NOT REVERSE ENGINEER, USE, COPY, OR MODIFY ANY PROGRAM OR
RELATED MATERIALS OR ANY COPY, MODIFICATION, IN WHOLE OR IN PART, EXCEPT AS EXPRESSLY
PROVIDED FOR IN THIS LICENSE. IF YOU TRANSFER POSSESSION OF ANY COPY OR MODIFICATION OF THE
PROGRAM OR RELATED MATERIALS TO ANOTHER PARTY, YOUR LICENSE IS AUTOMATICALLY TERMINATED.
No license, express or implied, is granted under any intellectual property directly or indirectly owned by FRSI
which does not specifically read on the program as provided hereunder, nor shall any license, except the
license specifically granted herein, be implied in law, implied in equity, or exist under the doctrine of patent
exhaustion.
TITLE: Title to and ownership of the program and related materials shall at all times remain with FRSI or its
licensors. Your right to use the same is at all times subject to the terms and condition of this Agreement. FRSI
may, from time to time, revise or update the program and/or related materials and, in so doing, incurs no
obligation to furnish such revisions or updates to you.
3
AMS Suite: Intelligent Device Manager
Installation Guide
NOVEMBER 2013
TERM: This license is effective upon opening this package. You may terminate it at any time by destroying the
program and the related materials together with all copies and modifications in any form. It will also terminate
upon conditions set forth elsewhere in this Agreement or if you fail to comply with any term or condition of
this Agreement. You agree upon such termination to destroy the program and the related materials together
with all copies and modification in any form.
LIMITED WARRANTY: FRSI warrants the media on which the program is furnished to be free from defects in
materials and workmanship under normal use for a period of ninety (90) days from the date of delivery to you
as evidenced by a copy of your invoice. However, FRSI does not warrant that the functions contained in the
program will meet your requirements or that the operation of the program will be uninterrupted or error free.
THE PROGRAM AND RELATED MATERIALS ARE PROVIDED "AS IS" WITHOUT WARRANTY OF ANY KIND, EITHER
EXPRESS OR IMPLIED, INCLUDING, BUT NOT LIMITED TO THE IMPLIED WARRANTIES OF MERCHANTABILITY
AND FITNESS FOR A PARTICULAR PURPOSE. THE ENTIRE RISK AS TO THE QUALITY AND PERFORMANCE OF THE
PROGRAM IS WITH YOU; SHOULD THE PROGRAM PROVE DEFECTIVE, YOU ASSUME THE ENTIRE COST OF ALL
NECESSARY SERVICING, REPAIR, OR CORRECTION.
LIMITATIONS OF REMEDIES: FRSI’s entire liability and your exclusive remedy shall be: (1) the replacement of
any media not meeting FRSI’s "Limited Warranty" and which is returned with a copy of your invoice to FisherRosemount Systems, Inc., 1100 W Louis Henna Blvd, Round Rock, Texas 78681, USA, or (2) if FRSI is unable to
deliver replacement media which is free of defects in materials or workmanship, you may terminate this
Agreement by returning the program and your money will be refunded. IN NO EVENT WILL FRSI BE LIABLE TO
YOU FOR ANY DAMAGES ARISING OUT OF ANY CAUSES WHATSOEVER (WHETHER SUCH CAUSES BE BASED IN
CONTRACT, NEGLIGENCE, STRICT LIABILITY, OTHER TORT, PATENT INFRINGEMENT, OR OTHERWISE),
INCLUDING ANY LOST PROFITS, LOST SAVINGS, OR OTHER INCIDENTAL OR CONSEQUENTIAL DAMAGES
ARISING OUT OF THE USE OR INABILITY TO USE SUCH PROGRAM EVEN IF FRSI HAS BEEN ADVISED OF THE
POSSIBILITY OF SUCH DAMAGES, OR OF ANY CLAIM BY ANY OTHER PARTY.
GOVERNING LAW: This Agreement, and all matters concerning its construction, interpretation, performance,
or validity, shall be governed by the laws of the State of Texas.
EXPORT RESTRICTIONS: Licensee shall comply fully with all laws, regulations, decrees, and orders of the United
States of America that restrict or prohibit the exportation (or reexportation) of technical data and/or the direct
product of it to other countries, including, without limitation, the U.S. Export Administration Regulations.
U.S. GOVERNMENT RIGHTS: The programs and related materials are provided with "RESTRICTED RIGHTS." Use,
duplication, or disclosure by the U.S. Government is subject to restrictions set forth in the Federal Acquisition
Regulations and its Supplements.
THE PROGRAM IS NOT FOR USE IN ANY NUCLEAR AND RELATED APPLICATIONS. You accept the program with
the foregoing understanding and agree to indemnify and hold harmless FRSI from any claims, losses, suits,
judgements and damages, including incidental and consequential damages, arising from such use, whether
the cause of action be based in tort, contract or otherwise, including allegations that FRSI’s liability is based on
negligence or strict liability.
To the extent that a third party owns and has licensed to FRSI any portion of the program, such third party
owner shall be a beneficiary of this Agreement, and shall have the right to enforce its rights under this
Agreement independently of FRSI.
GENERAL: You may not sublicense, assign, or transfer the license or the program and related materials without
the prior written consent of FRSI. Any attempt otherwise to sublicense, assign, or transfer any of the rights,
duties, or obligations hereunder without such consent is void.
Should you have any question concerning this Agreement, please contact your FRSI representative or sales
office.
YOU ACKNOWLEDGE THAT YOU HAVE READ THIS AGREEMENT, UNDERSTAND IT, AND AGREE TO BE BOUND
BY ITS TERMS AND CONDITIONS. YOU FURTHER AGREE THAT IT IS THE COMPLETE AND EXCLUSIVE
STATEMENT OF THE AGREEMENT BETWEEN US WHICH SUPERSEDES ANY PROPOSAL OR PRIOR AGREEMENT,
EXCEPT THE MASTER LICENSE AGREEMENT, ORAL OR WRITTEN, AND ANY OTHER COMMUNICATIONS
BETWEEN US RELATING TO THE SUBJECT MATTER OF THIS AGREEMENT. YOU AGREE THAT FRSI MAY AUDIT
YOUR FACILITY TO CONFIRM COMPLIANCE OF THE FOREGOING PROVISIONS.
4
Installation Guide
AMS Suite: Intelligent Device Manager
NOVEMBER 2013
Contents
Chapter 1
Introduction............................................................................................... 9
To install a standalone AMS Device Manager system .......................................................9
To install a Distributed AMS Device Manager system.......................................................9
To install AMS Device Manager on a DeltaV system.........................................................9
To install AMS Device Manager on an Ovation system ...................................................10
To install AMS Device Manager Web Services ................................................................10
About this guide ...........................................................................................................10
Before you begin ..........................................................................................................11
For Windows 8 users.....................................................................................................11
Upgrading an AMS Device Manager system ..................................................................11
Upgrading AMS Device Manager.......................................................................12
Upgrading from AMS Wireless Configurator .....................................................15
Upgrading from AMS Device Configurator ........................................................16
Uninstalling AMS Device Manager ................................................................................18
Chapter 2
System requirements ............................................................................... 19
Hardware requirements................................................................................................19
PC processing speed, memory, and disk space .................................................19
Serial interfaces ................................................................................................20
USB interfaces ..................................................................................................20
Network requirements .................................................................................................20
Software requirements.................................................................................................21
Operating systems ...........................................................................................21
Support for Remote Desktop Services...............................................................22
Other software requirements ...........................................................................24
Windows security requirements ...................................................................................27
AMS Device Manager installation......................................................................27
AMS Device Manager use..................................................................................27
AmsServiceUser................................................................................................28
Requirements for system interface networks ...............................................................29
Wireless............................................................................................................29
DeltaV ..............................................................................................................30
Ovation ............................................................................................................34
PROVOX ...........................................................................................................36
FF HSE ..............................................................................................................37
RS3...................................................................................................................38
STAHL ..............................................................................................................38
HART Multiplexer Network ...............................................................................39
5
AMS Suite: Intelligent Device Manager
Installation Guide
NOVEMBER 2013
8000 BIM..........................................................................................................39
HART Over PROFIBUS .......................................................................................40
Kongsberg ........................................................................................................40
Siemens............................................................................................................41
ABB ..................................................................................................................42
Det-Tronics .......................................................................................................43
PROFIBUS .........................................................................................................43
Chapter 3
Installing AMS Device Manager................................................................. 45
Requirements and constraints ......................................................................................46
Upgrading from a previous version of AMS Device Manager..........................................47
CONSOLIDATING DATABASES ..................................................................................48
Consolidating Service Notes .............................................................................49
Determining computer names..........................................................................50
Installing Server Plus Station software ..........................................................................51
Installing Client SC Station software .............................................................................54
Adding a user to the AMSDeviceManager group ...........................................................56
Licensing a Distributed System .....................................................................................57
Configuring a Distributed System .................................................................................58
Installing SNAP-ON applications ...................................................................................58
Modifying a Distributed System....................................................................................59
Changing station types.....................................................................................59
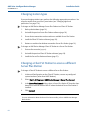
Changing a Client SC Station to access a different Server Plus Station................60
Adding Client SC Stations .................................................................................61
Replacing an AMS Device Manager Station PC...................................................61
Renaming an AMS Device Manager PC ..............................................................63
Adding a new communication interface ...........................................................64
Adding more tags than currently licensed.........................................................65
Installing AMS Device Manager on domain controllers ......................................65
Domain controller security requirements .........................................................66
Mobile workstation ......................................................................................................66
Licensing AMS Device Manager 12.5 on DeltaV stations................................................67
Installing AMS Device Manager 12.5 on DeltaV stations................................................68
DeltaV actions ..................................................................................................68
DeltaV Upgrade Wizard ....................................................................................69
Uninstalling DeltaV software ............................................................................69
Licensing AMS Device Manager 12.5 on Ovation stations..............................................70
Installing AMS Device Manager 12.5 on Ovation stations ..............................................70
Uninstalling Ovation software ..........................................................................71
6
Installation Guide
AMS Suite: Intelligent Device Manager
NOVEMBER 2013
Chapter 4
Configuring communication interfaces..................................................... 73
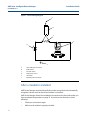
HART modems ................................................................................................... 73
Configuring AMS Device Manager for a HART modem ......................................74
Connecting a HART modem .............................................................................74
After a modem is installed ................................................................................76
Field Communicators ...................................................................................................77
Configuring AMS Device Manager for a Field Communicator ............................78
Connecting a Field Communicator ...................................................................78
Documenting calibrators..............................................................................................79
Configuring AMS Device Manager for a documenting calibrator .......................79
Connecting a documenting calibrator ..............................................................80
Connecting devices to a documenting calibrator ..............................................80
HART Multiplexer Network Interface.............................................................................80
Preparing a HART Multiplexer Network Interface .............................................81
Configuring AMS Device Manager for a HART Multiplexer Network ..................81
System interfaces .........................................................................................................83
Wireless............................................................................................................84
DeltaV ..............................................................................................................86
Ovation ............................................................................................................89
FF HSE ..............................................................................................................92
PROVOX ...........................................................................................................93
RS3...................................................................................................................95
STAHL HART .....................................................................................................98
8000 BIM........................................................................................................100
HART Over PROFIBUS......................................................................................101
Kongsberg Maritime .......................................................................................103
Siemens .........................................................................................................104
ABB ................................................................................................................104
Det-Tronics .....................................................................................................106
PROFIBUS .......................................................................................................107
Determining the system interface structure and device data ..........................108
AMS Device Manager Web Services ............................................................................109
AMS Device Manager Web Services and AMS Asset Portal 3.2 .........................110
AMS Suite: Asset Performance Management ..................................................110
Chapter 5
Starting to Use AMS Device Manager ...................................................... 111
After installation.........................................................................................................111
Changing Windows Firewall settings...............................................................111
Usernames and passwords..............................................................................111
Logging in to User Manager ............................................................................112
Assigning an “admin” password......................................................................112
Adding a username.........................................................................................113
Changing passwords.......................................................................................114
7
AMS Suite: Intelligent Device Manager
Installation Guide
NOVEMBER 2013
Changing rights and permissions....................................................................114
Using AMS Device Manager ........................................................................................115
Adding devices to an AMS Device Manager installation ...................................117
DTM Launcher ................................................................................................117
AMS Suite Calibration Connector....................................................................117
Device Description Update Manager...............................................................118
Device Configuration Reports installation .......................................................119
Attaching a Roving Station to a Server Plus Station .........................................120
Chapter 6
Troubleshooting installation................................................................... 121
Error messages ...........................................................................................................121
8
Installation Guide
AMS Suite: Intelligent Device Manager
NOVEMBER 2013
1
Introduction
To install a standalone AMS Device Manager
system
•
Read “Before you begin” on page 11.
•
Confirm that your system meets AMS Device Manager requirements starting on
page 19.
•
For a new installation of a standalone AMS Device Manager system, follow the
Server Plus installation steps in section 3, “Installing AMS Device Manager”
beginning on page 45.
•
For upgrading from AMS Device Manager 10.0 or later, review Table 1 on
page 13 and follow the appropriate steps.
To install a Distributed AMS Device Manager
system
•
Read “Before you begin” on page 11.
•
Confirm that your system meets AMS Device Manager requirements starting on
page 19.
•
For a new installation of a distributed AMS Device Manager system, follow the
Server Plus and Client SC installation steps in section 3, “Installing AMS Device
Manager” beginning on page 45.
•
For upgrading from AMS Device Manager 10.0 or later, review Table 1 on
page 13 and follow the appropriate steps.
To install AMS Device Manager on a DeltaV
system
•
Read “Before you begin” on page 11.
•
Confirm that your system meets minimum requirements for a co-deployment
(refer to the documentation provided with your DeltaV system).
•
For a new installation of AMS Device Manager on a DeltaV system, follow the
installation steps starting on page 68.
9
AMS Suite: Intelligent Device Manager
Installation Guide
NOVEMBER 2013
To install AMS Device Manager on an Ovation
system
•
Read “Before you begin” on page 11.
•
Confirm that your system meets minimum requirements for a co-deployment
(refer to the documentation provided with your Ovation system).
•
For a new installation of AMS Device Manager on an Ovation system, follow the
installation steps starting on page 70.
To install AMS Device Manager Web Services
•
Read “Before you begin” on page 11.
•
Confirm that your system meets AMS Device Manager requirements starting on
page 19.
•
Follow the installation steps on page 109.
About this guide
This AMS Suite: Intelligent Device Manager Installation Guide contains the following
information:
10
•
Section 1, “Introduction” – Provides an overview of AMS Device Manager
installation and directs you to the appropriate procedures for installing AMS
Device Manager for your setup and circumstances.
•
Section 2, “System requirements” – Lists the system requirements for AMS
Device Manager, including hardware, software, and security requirements. This
section also defines additional requirements for system interface networks.
•
Section 3, “Installing AMS Device Manager” – Describes the procedures for
installing AMS Device Manager software. Installing AMS Device Manager on a
DeltaV or Ovation network is also detailed.
•
Section 4, “Configuring communication interfaces” – Describes how to
configure the AMS Device Manager network and install network
communication devices (HART modems, HART multiplexers, Field
Communicators, documenting calibrators, and system interface networks).
•
Section 5, “Starting to Use AMS Device Manager” – Describes how to start
using AMS Device Manager and how to access additional information.
•
Section 6, “Troubleshooting installation” – Provides troubleshooting steps you
can take if you have problems installing AMS Device Manager.
Installation Guide
AMS Suite: Intelligent Device Manager
NOVEMBER 2013
For more information, refer to AMS Device Manager Books Online or contact your
local Emerson Process Management Sales/Service Office.
Before you begin
To install and use AMS Device Manager software effectively, you should be familiar
with the basic functions and operation of:
•
Microsoft® Windows®
•
Your local area network (LAN) configuration and security
•
Your communication devices and field devices
•
Network components installed in your system
•
AMS Device Manager security requirements (see “Starting to Use AMS Device
Manager” on page 111)
•
Database backup/restore procedures (see “Backing up a database” on page 16
and “Restoring a database” on page 16)
For Windows 8 users
For AMS Device Manager users operating on Windows 8 PCs, you must substitute the
Windows 8 process for the procedures shown in the AMS Suite: Intelligent Device
Manager Installation Guide and Release Notes.
For example, when an installation guide step reads:
1.
Stop AMS Device Manager Servers (Start > All Programs > AMS Device Manager
> Terminate Servers).
You must substitute with a Windows 8 operation such as:
1.
Stop AMS Device Manager Servers (on the Start screen, enter TER and click the
Terminate Servers tile).
Windows 8 touchscreen functionality is also supported in AMS Device Manager 12.5.
Refer to your Windows 8 documentation for additional information.
Upgrading an AMS Device Manager system
When you upgrade to a new version of AMS Device Manager, the installation process
overwrites all existing files located in the AMS folder (except the database files and
license files). Before you upgrade, you should back up your database as a precaution
against loss of data (see page 16). The backup files are not changed during
installation. In the unlikely event that database files are damaged or altered in some
way, you can use the backup files to restore the database.
11
AMS Suite: Intelligent Device Manager
Installation Guide
NOVEMBER 2013
Prior to upgrading your AMS Device Manager application, you should uninstall any
SNAP-ON applications on the AMS Device Manager station. You should also stop any
programs or processes that access AMS Device Manager Servers (see Table 1 on
page 13). You do not need to remove most of the system interfaces, such as RS3,
PROVOX, Ovation, and others.
The DeltaV System Interface requires that you re-apply the interface after upgrading
AMS Device Manager. To do this, in the Network Configuration utility, display the
properties of the DeltaV System Interface, click OK, and then click Close.
After you have completed the upgrade, start the application and right-click each of
the network icons. Select Rebuild Hierarchy followed by Scan > New Devices.
If you are using the Alert Monitor feature, click the Alert Monitor button
on the
AMS Device Manager toolbar to open the Alert List. Click the Station Monitoring
button in the toolbar and ensure that all the stations you need to monitor are
selected.
Install the latest version of the SNAP-ON applications that were removed prior to
upgrading; see “Installing SNAP-ON applications” on page 58.
NOTICE
AMS Device Manager does not support automatic upgrading from version 9.x or
earlier. Contact customer support for instructions for your situation.
Upgrading AMS Device Manager
Table 1 on page 13 provides steps for most AMS Device Manager users upgrading
from AMS Device Manager 10.0, 10.1, 10.5, 11.0, 11.1, 11.1.1, 11.5, or 12.0.
12
Installation Guide
AMS Suite: Intelligent Device Manager
NOVEMBER 2013
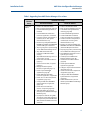
Table 1: Upgrading from AMS Device Manager 10.x or later
Desired 12.5 Setup
Current
Setup
Server Plus
Station
Server Plus Station
Client SC Station
• Check in all calibration routes
• Back up existing database (page 16)
• Uninstall SNAP-ON applications, if
• Check in all calibration routes
• Back up existing database (page 16)
• Consolidate existing databases, if
installed2
Uninstall AMS Suite Calibration
Connector application, if installed
Uninstall T+H TACC components, if
installed (refer to TACC guides
downloaded from T+H)
Remove any configured HART Over
PROFIBUS and HART Over PROFIBUS
/ Router DTM System Interfaces
Stop any programs or processes that
necessary (page 48)
Uninstall SNAP-ON applications2
Uninstall AMS Suite Calibration
Connector application, if installed
Uninstall T+H TACC components, if
installed (refer to TACC guides
downloaded from T+H)
Remove any configured HART Over
PROFIBUS and HART Over PROFIBUS
/ Router DTM System Interfaces
Stop any programs or processes that
•
•
•
•
•
•
•
•
•
•
access AMS Device Manager Server1
Stop AMS Asset Portal Data
Collection or AMS Suite APM, if
running
Stop AMS Device Manager Server in
system tray if running
Install Server Plus Station software
(page 51)
Get new license codes, if required
(page 57)
Reapply the DeltaV System
Interface, if applicable (page 11)
Install required SNAP-ON
applications (page 58)2
• Install AMS Suite Calibration
Connector application, if applicable
• Install new T+H TACC components,
•
•
•
•
if applicable (page 101)3
Configure HART Over PROFIBUS
System Interfaces, if applicable
(page 101)
Install latest version of Web
Services, if required (page 109)
Add all Windows Users (local or
domain) to the AMSDeviceManager
Windows group
If you plan to continue using AMS
Asset Portal, restart Data Collection,
but if you have purchased AMS Suite
APM, contact PlantWeb Services for
assistance.
•
•
•
•
•
•
•
•
•
access AMS Device Manager Server1
Stop AMS Device Manager Server in
system tray if running
Uninstall previous AMS Device
Manager software (page 18)
Install Client SC Station software
(page 54)
Install required SNAP-ON
applications (page 58)2
• Configure required communication
interfaces (page 73)
• Install new T+H TACC components,
if applicable (page 101)3
• Configure HART Over PROFIBUS
System Interfaces, if applicable
(page 101)
• Add all Windows Users (local or
domain) to the AMSDeviceManager
Windows group
13
AMS Suite: Intelligent Device Manager
Installation Guide
NOVEMBER 2013
Table 1: Upgrading from AMS Device Manager 10.x or later (Continued)
Desired 12.5 Setup
Current
Setup
Client SC
Station
Server Plus Station
Client SC Station
• Check in all calibration routes
• Back up existing database (page 16)
• Uninstall SNAP-ON applications, if
• Uninstall SNAP-ON applications2
• Uninstall T+H TACC components, if
installed2
• Uninstall T+H TACC components, if
installed (refer to TACC guides
downloaded from T+H)
• Remove any configured HART Over
PROFIBUS and HART Over PROFIBUS
/ Router DTM System Interfaces
• Stop any programs or processes that
•
•
•
•
•
•
access AMS Device Manager Server1
Stop AMS Device Manager Server in
system tray if running
Uninstall previous AMS Device
Manager software (page 18)
Install Server Plus Station software
(page 51)
Get new license codes (page 57)
Configure required communication
interfaces (page 73)
Install required SNAP-ON
applications (page 58)2
• Install AMS Suite Calibration
Connector application, if applicable
• Install new T+H TACC components,
•
•
•
•
14
if applicable (page 101)3
Configure HART Over PROFIBUS
System Interfaces, if applicable
(page 101)
Install latest version of Web
Services, if required (page 109)
Add all Windows Users (local or
domain) to the AMSDeviceManager
Windows group
If you plan to use AMS Asset Portal,
start Data Collection, but if you have
purchased AMS Suite APM, contact
PlantWeb Services for assistance.
installed (refer to TACC guides
downloaded from T+H)
• Remove any configured HART Over
PROFIBUS and HART Over PROFIBUS
/ Router DTM System Interfaces
• Stop any programs or processes that
access AMS Device Manager Server1
• Stop AMS Device Manager Server in
system tray if running
• Install Client SC Station software
(page 54)
• Reapply the DeltaV System
Interface, if applicable (page 11)
• Install required SNAP-ON
applications (page 58)2
• Install new T+H TACC components,
if applicable (page 101)3
• Configure HART Over PROFIBUS
System Interfaces, if applicable
(page 101)
• Add all Windows Users (local or
domain) to the AMSDeviceManager
Windows group
Installation Guide
AMS Suite: Intelligent Device Manager
NOVEMBER 2013
Table 1 Notes:
1
Processes that must be stopped in Windows Task Manager before upgrading include:
•
•
•
•
•
•
•
•
•
•
•
•
2
AMSPlantServer
AMSFileServer
AMSConnectionServer
AMSOPC
AMSGenericExports
AMSFFServer
AmsFFAtDeviceBroker
AMSLicenseServer
AmsDeviceAlertServer
AmsHseServer
AMSDevTypeRemote
AMSPBServer
SNAP-ON applications must be uninstalled before installing the latest version.
3
If you intend to use the HART Over PROFIBUS System Interface, after upgrading AMS Device
Manager you must reinstall the T+H TACC components whether or not you install new
components.
Upgrading from AMS Wireless Configurator
To install an AMS Device Manager Server Plus or Client SC Station on a PC that has
AMS Wireless Configurator installed:
1.
Open the Windows Control Panel and use Add or Remove Programs (XP) or
Programs and Features (Windows 7/Windows 8) to remove AMS Wireless
Configurator.
2.
Obtain new license codes for AMS Device Manager (see “Licensing a Distributed
System” on page 57).
3.
Install AMS Device Manager (see “Installing Server Plus Station software” on
page 51 or “Installing Client SC Station software” on page 54).
4.
If you installed a Server Plus Station in step 3, restore your backed up database
(see “Restoring a database” on page 16).
If you installed a Client SC Station in step 3, you may need to consolidate your backedup AMS Wireless Configurator database with an existing database (if so, refer to
“Consolidating databases” on page 48).
15
AMS Suite: Intelligent Device Manager
Installation Guide
NOVEMBER 2013
Upgrading from AMS Device Configurator
AMS Device Configurator is an unlicensed, limited-feature version of AMS Device
Manager provided to DeltaV users. To upgrade to a fully licensed version of AMS
Device Manager:
1.
Obtain new license codes for AMS Device Manager (see “Licensing a Distributed
System” on page 57).
2.
Stop AMS Device Manager Servers (Start > All Programs > AMS Device Manager
> Terminate Servers).
3.
Select Start > All Programs > AMS Device Manager > Licensing > Licensing
Wizard.
4.
Follow the instructions in the Licensing Wizard.
5.
Start AMS Device Manager to see the changes.
Backing up a database
To back up a database:
1.
Back up your database (select Start > All Programs > AMS Device Manager >
Database Utilities > Database Backup). Save your backup file in a location on
your local drive not in the AMS folder.
2.
Run Database Verify/Repair to check the database for duplicate, missing, and
corrupt records (select Start > All Programs > AMS Device Manager > Database
Utilities > Database Verify Repair).
Note
For a very large database, the Verify/Repair operation can take a considerable length of
time.
3.
Repeat step 1.
Note
If performing a database backup on a Windows 7/Windows 2008 Server or Windows 8/
Windows 2012 Server PC with User Account Control enabled, log in with a username
included in the AmsDeviceManager Windows group to avoid multiple error messages.
Restoring a database
To restore a database:
16
Installation Guide
AMS Suite: Intelligent Device Manager
NOVEMBER 2013
1.
Close AMS Device Manager and any related applications (for example, Alert
Monitor, Server Plus Connect), if open.
2.
Stop all database connections.
3.
Stop AMS Device Manager Servers (Start > All Programs > AMS Device Manager
> Terminate Servers).
4.
If the database backup file is located on a network drive, copy it to a local drive.
5.
Select Start > All Programs > AMS Device Manager > Database Utilities >
Database Restore.
6.
Select the database backup file you want to restore and click Open.
Note
If you are restoring a database that was created on a different PC and you want to retain the
Device Monitor List and Alert Monitor alerts, before you restore the database on the new
station, ensure that the names of the PC and system interfaces configured on the new
station are the same as the original station.
If performing a database restore on a Windows 7/Windows 2008 Server or Windows 8/
Windows 2012 Server PC with User Account Control enabled, log in with a username
included in the AmsDeviceManager Windows group to avoid multiple error messages.
17
AMS Suite: Intelligent Device Manager
Installation Guide
NOVEMBER 2013
Uninstalling AMS Device Manager
You must uninstall AMS Device Manager software if you are upgrading from any
versions earlier than 10.0. If you are upgrading from any of these versions, contact
customer support for instructions for your situation. You do not need to uninstall
AMS Device Manager software if you are upgrading from version 10.0 or later (see
“Upgrading AMS Device Manager” on page 12). The installation program modifies
the earlier version and migrates the existing database to the new version. Table 1 on
page 13 provides the steps to upgrade to AMS Device Manager 12.5.
Note
If you have SNAP-ON applications or an AMS Suite Calibration Connector application
installed, uninstall them before uninstalling AMS Device Manager. If your applications use
an external database, you must back up that database before you uninstall the application
(if you want to keep the data).
To uninstall AMS Device Manager:
1.
Back up your existing database. Save your backup file in a location outside the
AMS folder.
2.
Save your license.dat file in a location outside the AMS folder.
3.
Stop the AMS Device Manager Server by right-clicking the icon in the system
tray and selecting Stop AMS Device Manager Server.
4.
Open the Windows Control Panel and use Add or Remove Programs (XP) or
Programs and Features (Windows 7/Windows 8) to remove AMS Device
Manager.
See “Consolidating databases” on page 48 for information about consolidating
multiple AMS Device Manager databases.
18
Installation Guide
AMS Suite: Intelligent Device Manager
NOVEMBER 2013
2
System requirements
Each PC in your system must meet minimum software and hardware requirements to
ensure successful installation and operation of AMS Device Manager. System
interface networks and SNAP-ON applications may have additional requirements.
Hardware requirements
PC processing speed, memory, and disk space
The recommended free hard disk space specified below is the amount needed for AMS
Device Manager installation, not the amount needed for daily operation (there are no
recommended minimum amounts for daily operation). If you receive a message
during installation that you do not have enough hard disk space, free up as much
space as possible and then retry the installation.
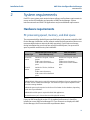
Minimum Requirements w/AMS
Device Manager only
Recommended Requirements w/
AMS Suite APM or
AMS Asset Portal
Server Plus
Station
Intel® Core™2 Quad, 2 GHz or
greater
3 GB or more of memory
2 GB or more of free hard disk
space
Intel® Core™2 Quad, 3 GHz or
greater
3 GB or more of memory
4 GB or more of free hard disk
space
Client SC
Station
Intel® Core™2 Duo, 2.4GHz or
greater
2 GB or more of memory
2 GB or more of free hard disk
space
N/A
Station Type
Notes:
Additional hard disk space is required for migrating the database if you are upgrading from
an earlier version of AMS Device Manager. The amount of space required depends on the
size of the existing database.
Additional space may be required on the Server Plus Station for the database, depending
on the size of your database.
Additional hard disk space is required for SNAP-ON applications.
Set virtual memory to 2—3 times the size of the physical memory.
If you use AMS Asset Portal version 3.2, for optimal performance, it should be
installed on a non-AMS Device Manager PC. If you choose to co-deploy with AMS
Device Manager, the PC must meet the requirements above.
19
AMS Suite: Intelligent Device Manager
Installation Guide
NOVEMBER 2013
AMS Suite: Asset Performance Management is a product offering that replaces AMS
Asset Portal. The AMS Suite APM Client Framework can be installed on an AMS Device
Manager 12.5 station that meets the requirements above. Other components of AMS
Suite APM must be installed on additional non-AMS Device Manager PCs. For more
information about AMS Suite APM, contact your Emerson Process Management
Sales/Service Office.
Serial interfaces
•
An RS-232 serial interface is required for a serial HART multiplexer network or
documenting calibrator.
•
A serial HART modem requires a serial port with a dedicated interrupt.
USB interfaces
•
A USB port and USB HART modem drivers are required to use a USB HART
modem. See the Release Notes for a list of supported modems.
•
A USB port is required to connect a 375 or 475 Field Communicator using a USB
Infrared Data Association (IrDA) adapter. In some cases, IrDA drivers may be
necessary. See the Release Notes for a list of supported adapters.
•
A USB port is required to connect a 475 Field Communicator or Bluetooth
modem using a USB Bluetooth adapter. Only Microsoft Bluetooth components
are supported (see the Release Notes for more information).
Network requirements
20
•
AMS Device Manager is designed to operate on an Ethernet network running
TCP/IP.
•
Mobile AMS Device Manager stations are allowed to connect wirelessly using
wireless plant network technology. Some communications slowdown can be
expected with wireless networking.
•
AMS Device Manager supports deployment within a single domain or
workgroup or across multiple domains or workgroups. For more information,
refer to KBA NA-0800-0113. The Microsoft Windows Management
Instrumentation and Workstation services must be running on the PC during
installation.
•
AMS Device Manager does not support deployment between a network
workgroup and a network domain.
Installation Guide
AMS Suite: Intelligent Device Manager
NOVEMBER 2013
For information about working with network firewalls, refer to “Changing Windows
Firewall settings” on page 111.
Software requirements
Operating systems
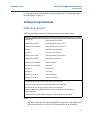
AMS Device Manager supports the following Windows operating systems.
Operating System
Version
Windows XP
Professional Service Pack 31
Windows Server 2003
Standard Edition Service Pack 21
Windows Server 2003 R2
Standard Edition Service Pack 21
Windows 7
Professional Service Pack 12
Windows 7
Enterprise Service Pack 12
Windows Server 2008
Standard Edition Service Pack 22
Windows Server 2008
Enterprise Service Pack 22
Windows Server 2008 R2
Standard Edition3
Windows Server 2008 R2
Enterprise3
Windows 8
Professional2
Windows 8
Enterprise2
Windows Server 2012
Standard Edition3
Windows Server 2012
Datacenter Edition3
Only 32-bit versions of the operating systems are supported.
1
32-bit and 64-bit versions of the operating systems are supported.
2
Only 64-bit versions of the operating systems are supported.
3
Desktops, laptops, and tablets with touch screens are supported on Windows 8
Professional only.
See the Release Notes for additional operating systems support information.
Notes
•
AMS Device Manager and associated SNAP-ONs may not be 64-bit applications
but will be able to run on a 64-bit OS. Full functionality will be supported.
21
AMS Suite: Intelligent Device Manager
Installation Guide
NOVEMBER 2013
•
Intermixing of operating system families is not supported. You can use
combinations of Windows XP and Server 2003 PCs; Windows 7 and Server 2008
PCs; Windows 8 and Server 2012 PCs. No other combinations are supported.
•
A Server operating system (Windows Server 2003/2008/2012) and server-class
PC (for example, Dell PowerEdge) are recommended if the database is expected
to be greater than 10 GB due to the SQL Server version required (see page 25);
or if AMS Device Manager is installed on a DeltaV ProfessionalPLUS Station,
Application Station, or Maintenance Station and Batch Historian or VCAT will be
used. Contact your hardware vendor for recommendations on server-class PCs
and server operating systems.
•
The correct operating system service pack (SP) must be installed on your PC
before installing AMS Device Manager. If your PC does not have the correct SP
installed, or you are unsure, contact your network administrator.
•
See “Changing Windows Firewall settings” on page 111 for additional operating
system configuration considerations.
•
All Windows users who log in to AMS Device Manager must be in the
AMSDeviceManager Windows group (page 56).
•
AMS Device Manager is supported on a Hyper-V virtual PC only when codeployed with DeltaV on the same operating systems supported in nonvirtualized environments.
Support for Remote Desktop Services
Remote Desktop Services (also known as Terminal Services) is a component of
Microsoft Windows (both server and client versions) that allows you to access
applications and data on a remote computer over a network, even from a client
computer that is running an earlier version of Windows. AMS Device Manager can be
used in Remote Desktop Services environment if the following conditions are met:
•
Remote Desktop Services must be set up prior to AMS Device Manager
installation.
•
Use of Remote Desktop Services is limited to 5 concurrent sessions when AMS
Device Manager is installed on Windows server-class computers.
Note
Do not attempt to install AMS Device Manager using Remote Desktop Services; this is not a
supported installation method and may produce undesirable results.
•
22
AMS Device Manager is not supported on a Windows Server PC where Remote
Desktop Services is set to Relaxed Security.
Installation Guide
AMS Suite: Intelligent Device Manager
NOVEMBER 2013
•
If multiple users are running AMS Device Manager in a Remote Desktop session,
and one of the users runs Terminate Servers, the AMS Device Manager
application and AMS Device Manager Servers shut down for all users.
Note
In a Remote Desktop Services environment, only 1 AMS ValveLink SNAP-ON application
session is permitted at any given time. The AMS Wireless SNAP-ON application is not
supported in a Remote Desktop Services environment.
Contact Microsoft for Remote Desktop Services licensing information. Questions
about AMS Device Manager licensing requirements should be directed to your
Emerson Process Management Sales/Service Office.
23
AMS Suite: Intelligent Device Manager
Installation Guide
NOVEMBER 2013
Other software requirements
Web browser
AMS Device Manager requires Microsoft Internet Explorer (IE) Version 6.0, SP 1 or
later. If you do not have a supported version of Internet Explorer, contact your IT
department for assistance.
AMS Device Manager Web Services
Microsoft Internet Information Services (IIS) and AMS Device Manager 12.5 Server
Plus software must be installed on your system before you can install AMS Device
Manager Web Services. AMS Device Manager Web Services is not supported on Client
SC stations. If you do not have IIS installed, contact your IT department for assistance.
Note
Some control systems do not allow IIS to be installed on the same PC. Check your control
system documentation to determine IIS compatibility.
Note
If you want to install AMS Device Manager Web Services on a DeltaV station, it must be a
DeltaV Application or ProfessionalPLUS station.
.NET Framework
AMS Device Manager 12.5 requires and installs Microsoft .NET Framework 4.0 and
3.5 Service Pack 1. Microsoft .NET Framework 3.5 SP1 is a cumulative update that
includes the following versions:
24
•
2.0
•
2.0 SP2
•
3.0
•
3.0 SP2
•
3.5
Installation Guide
AMS Suite: Intelligent Device Manager
NOVEMBER 2013
Database–Microsoft SQL Server 2008
AMS Device Manager 12.5 uses a named instance, Emerson2008, of SQL Server 2008
R2, Service Pack 2 for its database. The default password for this named instance is
42Emerson42Eme. The size of your database determines which edition of SQL Server
2008 you must use:
•
If your database is less than 10 GB, you can use SQL Server 2008 R2 Express,
Service Pack 2. The AMS Device Manager setup installs this version.
•
If your database is greater than 10 GB or will be at some future time, you must
install a full version of SQL Server 2008 R2, Service Pack 2 before you install AMS
Device Manager.
•
If the AMS Device Manager system will support more than 3000 AMS Tags or
use the Device Configuration Reporting utility, a full version of SQL Server is
recommended regardless of database size.
A full version of SQL Server must be purchased separately (if you do not already have
it). The full version of SQL Server recommends server operating systems.
Note
The AMS Device Manager database must be located on the AMS Device Manager Server
Plus Station. Any other location is not supported.
NOTICE
Do not use the Windows compress feature on the PC drive where AMS Device
Manager is installed. AMS Device Manager will be unable to open your database
information. Reinstallation of AMS Device Manager will be required.
The AMS Device Manager installation program installs or updates SQL Server on your
PC as follows:
•
If no SQL Server is installed, the AMS Device Manager installation program will
install SQL Server 2008 R2, Service Pack 2 and create an Emerson2008 named
instance with a password of 42Emerson42Eme.
•
If an instance of SQL 2008 R2 Express, Service Pack 2 is installed, but not the
Emerson2008 named instance, the AMS Device Manager installation program
will create the Emerson2008 named instance with a password of
42Emerson42Eme.
•
If the SQL Server 2008 R2, Service Pack 2 Emerson2008 named instance is
already installed, the AMS Device Manager installation program will continue
with the next part of the installation program. Access to the SQL Server system
administrator (‘sa’) account is required. If you do not have access, contact your
network administrator for more information.
25
AMS Suite: Intelligent Device Manager
Installation Guide
NOVEMBER 2013
•
If you have previously installed a full version of SQL Server 2008 R2, Service Pack
2, you should create an SQL named instance of Emerson2008 prior to installing
AMS Device Manager (refer to your SQL Server documentation). Otherwise, the
AMS Device Manager installation will install SQL 2008 R2 Express, Service Pack
2.
A Microsoft SQL Server 'sa' account password is required for AMS Device Manager
operation. Therefore, the AMS Device Manager setup creates a password
(42Emerson42Eme) for the Emerson2008 named instance. For security reasons, it is
recommended that you change the SQL password.
To change an SQL Server ‘sa’ account password on your AMS Device Manager station:
1.
Insert the AMS Device Manager program DVD in the DVD drive of the target PC.
2.
Select Start > Run from the Windows taskbar.
3.
In the text box, type CMD and click OK to open the command prompt.
4.
At the command prompt, type:
D:\SNAP-ONS AND TOOLS\TECH_SUPPORT_UTILITIES\
CHANGE_SA_PASSWORD\SQLPASWD_SQLSERVER <oldpassword>
<newpassword>
Where:
D is the DVD drive letter
<oldpassword> is the default (42Emerson42Eme) or other current SQL password
<newpassword> is the password you want to use
5.
Press ENTER. You should see the message "The SA password in SQL has been
changed from oldpassword to newpassword."
6.
Close the command prompt.
Note
Your local Windows security policies may prevent you from changing the ‘sa’ password
again until a predetermined length of time has elapsed.
Software supported for Drawings and Notes
26
•
Microsoft Word 2003, 2007, and 2010
•
Microsoft Excel 2003, 2007, and 2010
•
WordPad
Installation Guide
AMS Suite: Intelligent Device Manager
NOVEMBER 2013
Windows security requirements
AMS Device Manager installation
Installation of AMS Device Manager has these security requirements:
•
Local or domain administrator rights for the PC(s) on which AMS Device
Manager is to be installed.
•
If you are installing AMS Device Manager on a PC that has the correct version of
SQL Server and the Emerson2008 named instance (see “Database–Microsoft
SQL Server 2008” on page 25), you need to know the SQL Server ‘sa’ account
password, if a password other than the default (42Emerson42Eme) has been
set.
•
During the AMS Device Manager installation, the Use simple file sharing
(Windows XP) option is automatically disabled. To avoid any AMS Device
Manager operational issues, leave this option disabled.
Other network security requirements may also apply to the installation. Contact your
network administrator for more information.
AMS Device Manager use
The AMS Device Manager installation creates the AMSDeviceManager Windows user
group on the PC. Members of this group have all the permissions necessary to
operate AMS Device Manager. The Windows user must be a member of this group on
all AMS Device Manager stations. Windows users must be members of the
AMSDeviceManager group before their properties can be changed in User Manager.
To add a new user, see the “Usernames and passwords” procedures beginning on
page 111.
27
AMS Suite: Intelligent Device Manager
Installation Guide
NOVEMBER 2013
AmsServiceUser
A Windows user account called AmsServiceUser is automatically created on each
AMS Device Manager station and added to the Users Windows user group unless the
station is installed on a Windows domain controller.
Note
If you are installing an AMS Device Manager distributed system on domain controller PCs or
a mix of domain controllers and non-domain controller PCs, do all the domain controller
installations first (see “Installing AMS Device Manager on domain controllers” on page 67.)
The AmsServiceUser account is made a member of the AMSDeviceManager Windows
group on all AMS Device Manager stations as well as a member of the Users Windows
user group on non-domain controller stations. This user account runs the AMS Device
Manager Servers. If your AMS Device Manager system is located on a network that
requires periodic changing of passwords, the AmsServiceUser account password can
be changed using the AMSPasswordUtility.exe utility from the AMS\Bin folder on
each AMS Device Manager station. Do not use the Windows User Manager to change
this password as AMS Device Manager will no longer launch.
Note
If the AMS Suite Calibration Connector application (page 117) is installed when you change
the password for the AmsServiceUser, you must also change the password for
AmsCalibrationConnectorWS properties. This requires a change in the Windows Services
console of your workstation. If you are unsure how to do this, contact your IT department.
28
Installation Guide
AMS Suite: Intelligent Device Manager
NOVEMBER 2013
Requirements for system interface networks
Requirements for system interface networks are in addition to the hardware and
software requirements for AMS Device Manager.
Wireless
The Wireless System Interface requires:
•
An Ethernet adapter to connect to the gateway.
•
One or more (up to 16) wireless gateways that allow communication between
the AMS Device Manager station and a collection of wireless devices.
•
WirelessHART devices. Refer to the AMS Device Manager Supported Device List
for a list of supported WirelessHART devices. The Supported Device List can be
accessed after AMS Device Manager installation is complete (select Start > All
Programs > AMS Device Manager > Help > Supported Device List).
•
A valid SSL certificate (if using the optional Security Setup utility) allowing the
AMS Device Manager station to securely communicate with the gateway.
Contact your local Emerson Process Management Sales/Service Office for more
information about the Security Setup utility and certificate.
29
AMS Suite: Intelligent Device Manager
Installation Guide
NOVEMBER 2013
DeltaV
DeltaV System Interface station software requirements:
•
AMS Device Manager 12.5 can be installed on the following DeltaV 9.3.1,
10.3.1, 11.3, 11.3.1, 12.3 stations:
DeltaV Workstations
AMS Device Manager Software
ProfessionalPLUS Station
Server Plus or Client SC
ProfessionalPLUS as Remote Client Server
Server Plus or Client SC
Local Application Station
Server Plus or Client SC
Remote Application Station
Server Plus or Client SC
Local "Operate" Station
Server Plus or Client SC
•
•
•
•
Professional
Operator
Base
Maintenance
Operator Station as Remote Client Server
Client SC only
Remote "Operate" Station
Client SC only
• Professional
• Operator
• Base
•
The DeltaV System Interface must be configured on a licensed AMS Device
Manager station that is on the DeltaV network.
To install AMS Device Manager on a DeltaV network, see the procedures in “Installing
AMS Device Manager 12.5 on DeltaV stations” on page 68.
30
•
For HART support only, AMS Device Manager 12.5 can be installed on a
separate PC connected to a DeltaV 9.3.1 or 10.3.1 ProfessionalPLUS Station
through a separate Ethernet connection. Contact your local Emerson Process
Management Sales/Service Office for more information.
•
AMS Device Manager 12.5 supports DeltaV version 11.3 and later in codeployed installations only.
•
If the Server Plus software is not on a DeltaV station, the SI and Simulate
dongles cannot be used to license AMS Device Manager — a license.dat file is
required.
Installation Guide
AMS Suite: Intelligent Device Manager
NOVEMBER 2013
•
•
•
Supported HART I/O hardware and software revision:
—
Analog Input HART Module, 8-channel, Series 1, Revision 2.21 or higher
—
Analog Input HART Module, 8-channel, Series 2, Revision 1.26 or higher
—
Analog Input HART Module, 16-channel, Revision 1.17 or higher
—
Analog Output HART Module, Series 1, Revision 2.25 or higher
—
Analog Output HART Module, Series 2, Revision 1.26 or higher
—
HART AI 8 Channel Card, S-Series, Revision 1.26 or higher
—
HART AI 16 Channel Card, S-Series, Revision 1.17 or higher
—
HART AO Card, S-Series, Revision 1.26 or higher
Supported Intrinsically Safe HART I/O hardware and software revision:
—
Analog Input HART Module, 8-channel, Revision 2.39 or higher
—
Analog Output HART Module, 8-channel, Revision 2.00 or higher
Supported Zone I/O hardware and software revision:
—
•
Analog Input or Analog Output, Revision 1.14 or higher
Supported FOUNDATION fieldbus I/O hardware and software revision:
—
Fieldbus H1, Series 1, Revision 1.8 or higher (does not support fieldbus
alerts)
•
—
Fieldbus H1, Series 2, Revision 2.2 or higher
—
Fieldbus H1 S-Series Integrated Power, Revision 4.87 or higher
—
Fieldbus H1 S-Series, Revision 2.2 or higher
Supported CHARM I/O hardware and software revision:
—
CHARM I/O Carrier (CIOC), Revision 11.3.1 or higher
—
AI 4-20 mA HART CHARM, Revision 1.18 or higher
—
AO 4-20 mA HART CHARM, Revision 1.18 or higher
—
AI 4-20 mA HART (Intrinsically Safe) IS, Revision TBD (Contact your local
Emerson Process Management Sales/Service Office for more
information.)
—
AO 4-20 mA HART (Intrinsically Safe) IS, Revision TBD (Contact your local
Emerson Process Management Sales/Service Office for more
information.)
31
AMS Suite: Intelligent Device Manager
Installation Guide
NOVEMBER 2013
•
•
•
Supported PROFIBUS DP I/O hardware and software revision:
—
PROFIBUS Series 2+, Revision 1.36 or higher
—
PROFIBUS S-Series, Revision 1.36 or higher
Supported Wireless I/O:
—
Wireless I/O card (WIOC), Revision 11.3.1 or higher
—
Smart Wireless Gateway, Revision 3.95 or higher
Security–The DeltaV password (if not using the default password) must be
entered in the AMS Device Manager Network Configuration utility (see
“Configuring AMS Device Manager for a DeltaV System Interface” on page 87).
DeltaV supports:
•
FOUNDATION fieldbus devices
•
Wired HART Rev. 5, Rev. 6, and Rev. 7 devices
•
WirelessHART Rev. 7 devices
•
PROFIBUS DP devices
•
PROFIBUS PA devices (supported on DeltaV 11.3 or higher with an S-Series
PROFIBUS DP I/O card and a PROFIBUS DP/PA Coupler on a PROFIBUS DP
segment. See Release Notes for supported couplers.)
•
HART safety devices connected to DeltaV Safety Instrumented System (SIS)
logic solvers
•
HART safety devices connected to DeltaV 12.3 (SIS) CHARMs logic solvers
Note
Some HART Rev. 6 and Rev. 7 commands are not supported by the DeltaV system.
Although AMS Device Manager recognizes additional revisions of HART devices when using
other HART communication devices, it will not recognize them when they are connected to
DeltaV.
DeltaV versions 9.3.1 and later can access devices connected to RS3 and PROVOX I/O
systems through the DeltaV Interface for RS3 I/O and DeltaV Interface for PROVOX I/
O, respectively. The devices are displayed in the DeltaV network hierarchy in AMS
Device Manager. For installation and setup information, refer to the DeltaV Books
Online.
To receive alerts from devices connected to PROVOX and RS3 Migration Controllers in
your DeltaV network hierarchy, you must run a utility to properly set the DeltaV alert
capability.
32
Installation Guide
AMS Suite: Intelligent Device Manager
NOVEMBER 2013
To run the utility:
1.
Select Start > Run from the Windows taskbar.
2.
In the text box, type C:\AMS\BIN\DELTAVFASTSCANUTILITY.EXE (where C is the
drive containing the AMS folder).
3.
Uncheck the box for the appropriate DeltaV network.
4.
Click Save Changes.
The AMS ValveLink SNAP-ON application is supported for DeltaV I/O and PROVOX I/O
cards, but not for RS3 cards. See “PROVOX” on page 36 for I/O requirements.
The DeltaV System Interface supports AMS ValveLink Diagnostics. Analog output
modules configured for HART are required on the DeltaV substation for
communication with HART FIELDVUE digital valve controllers. FOUNDATION fieldbus
FIELDVUE digital valve controllers need only be commissioned and ports
downloaded.
33
AMS Suite: Intelligent Device Manager
Installation Guide
NOVEMBER 2013
Ovation
Ovation System Interface station software requirements:
•
AMS Device Manager 12.5 can be installed on the following Ovation 3.3.1, 3.4,
and 3.5 stations:
Ovation Workstations
AMS Device Manager Software
Operator Station
Server Plus or Client SC
Database Server
Client SC
Note
To use AMS Device Manager 12.5 with Ovation 3.2 or earlier, contact your Emerson Process
Management Sales/Service Office.
If you have FOUNDATION fieldbus devices, it is recommended that a licensed AMS
Device Manager Client SC Station be installed on the Ovation Database Server (see
“Preparing the Ovation system” on page 92).
To install AMS Device Manager on an Ovation network, see the procedures in
“Installing AMS Device Manager 12.5 on Ovation stations” on page 70.
For device support, you can configure AMS Device Manager with an Ovation system
as follows:
•
•
34
For HART devices:
—
If you want to access HART devices on your Ovation system, AMS Device
Manager Server Plus software and the Ovation System Interface can be
installed on any Ovation Station or on a standalone PC.
—
AMS Device Manager supports burst mode messages from HART devices
on Ovation Stations using analog output card 5X000167 only.
For FOUNDATION fieldbus devices:
—
For Ovation 3.3.1 and 3.4, the AMS Device Manager Server Plus Station
must be co-deployed on any Ovation Station with the Ovation fieldbus
engineering software installed. Configure the Ovation System Interface
on this station.
—
For Ovation 3.5 and later, a licensed Client SC must be installed on the
Ovation Database Server. Configure the AMS Device Manager Ovation
System Interface with FOUNDATION fieldbus selected on the Ovation
Database server to take advantage of the Ovation HSE Server. The AMS
Device Manager Server Plus Station can be co-deployed on an Ovation
Operator Station but not the Ovation Database Server.
Installation Guide
AMS Suite: Intelligent Device Manager
NOVEMBER 2013
—
To receive FOUNDATION fieldbus device alerts in AMS Device Manager, the
Ovation OPC Alarm and Event Server package must be installed on your
co-deployed Ovation/AMS Device Manager station. The AMS Device
Manager Ovation System Interface must also be installed on this station.
Note
Some FOUNDATION fieldbus devices have a feature known as “reannunciation” (or
“multibit”). This feature must be disabled for devices on an Ovation 3.5 system so that AMS
Device Manager can receive alerts from these devices. This feature is typically enabled/
disabled in the AMS Device Manager device Configure/Setup properties screens (the exact
location varies by device).
•
For WirelessHART devices:
—
•
•
If you want to access information for WirelessHART devices on an Ovation
system, configure an Ovation System Interface in AMS Device Manager
with WirelessHART support enabled and a connection to a Smart Wireless
Gateway configured.
For PROFIBUS DP devices:
—
If you want to access information for PROFIBUS DP devices on an Ovation
3.3.1 or later system, configure an Ovation System Interface in AMS
Device Manager with PROFIBUS DP support enabled.
—
PROFIBUS DP devices will only be supported on Ovation 3.3.1 or later
networks. A PROFIBUS DP module can contain up to 2 ports. Each port
can be connected to up to 124 PROFIBUS DP devices. For Ovation 3.3.1, a
patch (OVA331027) is required.
For SIS devices:
—
If you want to access SIS HART device information on your Ovation system
through AMS Device Manager, AMS Device Manager can be configured on
an Ovation Station or on a non-Ovation Station. Use the AMS Device
Manager Network Configuration utility to set up an Ovation System
Interface.
Note
If you install AMS Device Manager and configure an Ovation System Interface on a PC that
is not an Ovation Station and try to access HART devices, performance will be significantly
impacted if the hosts file on the AMS Device Manager station is missing specific entries. To
improve performance, add the IP address and hostname for each configured Ovation
Safety Data Server to the C:\WINDOWS\SYSTEM32\DRIVERS\ETC\HOSTS file on the AMS
Device Manager Station.
35
AMS Suite: Intelligent Device Manager
Installation Guide
NOVEMBER 2013
Each Ovation controller uses a unique TCP/IP address. AMS Device Manager
communicates with HART devices, WirelessHART devices, FOUNDATION fieldbus
devices, and devices connected to Ovation Safety Instrumented System (SIS) logic
solvers through I/O modules contained in the Ovation controller chassis, or in remote
nodes connected to the Ovation controller.
•
•
•
Supported HART I/O hardware:
—
Analog Input, 5X00058/5X00059, Version 9 or higher
—
Analog Input High Performance, 5X00106/5X00109, Version 6 or higher
—
Analog Output, 5X00062/5X00063, Version 8 or higher
—
Analog Output High Performance, 5X00167, Version 1 or higher
Supported FOUNDATION fieldbus I/O:
—
Gateway 5X00151G01 and H1 Series 2 Module 5X00152G01, Version 1
or higher
—
Module 5X00301 with cavity insert 1X00458H01 or Module 5X00301
with Personality Module 5X00327, Version 1 or higher (two each of
5X00301 and 5X00327 may also be configured to provide redundancy)
Supported Intrinsically Safe controller:
—
•
Supported PROFIBUS DP I/O (Ovation 3.3.1 and later, with the correct Ovation
patch):
—
•
Ovation SIS Logic Solver, KJ2201X1-PW1, Version 1 or higher
PROFIBUS module 5X00300/5X00321, Version 1 or higher (two each of
5X00300 and 5X00321 may also be configured to provide redundancy)
Supported Wireless Gateway (Ovation 3.3.1 and later) with Smart WirelessHART
adapter (Ovation 3.4 and later):
—
1X00693H01 through 1X00693H04
PROVOX
The PROVOX System Interface requires:
36
•
I/O type (inputs)–CL6822, CL6825, or CL6827
•
I/O type (outputs)–CL6826 (will only support standard HART messaging, it will
not support AMS ValveLink Diagnostics); CL6828, P3.1 or greater (will support
standard HART messaging and AMS ValveLink Diagnostics)
•
Controller options–SR90 P5.4 with I/O Driver P5.5 or higher or SRx P5.5 or
higher
Installation Guide
AMS Suite: Intelligent Device Manager
NOVEMBER 2013
•
System software options–OWP with P1.2 or higher, PROVUE P5.5 or higher,
and ENVOX 3.4 or higher; I/O must be configured as “digital” or “hybrid”
•
Dedicated HDL with Ethernet connection (TCP/IP) to AMS Device Manager PC
FF HSE
The FF HSE interface requires:
•
One or more (up to 64) commissioned FF HSE Linking Devices that conform to
the FOUNDATION fieldbus HSE and H1 specifications (for a list of supported
linking devices, see the Release Notes). The Remote Operations Controller for
FOUNDATION fieldbus (ROC FF) and the ControlWave linking devices are
displayed in AMS Device Manager in the FF HSE hierarchy. For setup and
configuration of ROC FF and ControlWave linking devices, refer to the
documentation supplied with them.
Note
All linking devices on the same network must have unique tag names. If duplicate tag
names are used, the hierarchy will not build properly.
•
Commissioning using the device manufacturer’s commissioning/
decommissioning utility.
•
FF HSE Linking Device configuration with unique TCP/IP addresses.
•
An AMS Device Manager station with 1 or 2 Ethernet network interface cards
(NIC). A NIC dedicated to the FF HSE segment is recommended to reduce the
amount of competing network communications.
NOTICE
If you have an Ovation network installed, use a different TCP/IP address for the FF HSE
network.
37
AMS Suite: Intelligent Device Manager
Installation Guide
NOVEMBER 2013
RS3
The RS3 System Interface requires:
•
I/O hardware–FIC 4.8 or higher I/O cards with smart daughterboard and boot
revision supplied with P1R1.4 or MAIO FIM with 2.6 or higher
•
Controller hardware–MPC II Controller Processor or higher, CP-IV Coordinator
Processor or higher
•
System software–P1R3.4 or higher with controller image P1.10 or higher
•
Dedicated RNI–The RNI needs to be either version 4.1 (NT) or version 5.0 (XP or
Server 2003/2008). A single RNI will support multiple AMS Device Manager
connections.
Note
AMS Device Manager and RS3 Operator Station (ROS), or DeltaV Operate for RS3 (DOR)
cannot be installed on the same PC.
STAHL
The STAHL HART interface requires:
•
RS-232/RS-485 converter for each network (see the Release Notes for
supported models)
•
STAHL ICS Module–9148 Multiplexer Module installed on a 9161 Module Board
with up to 16 HART Transmitter Supply Units (module 9103)
•
I.S.1 System–Central Unit Module 9440, Multiplexer Module 9461 (HART
analog input) or 9466 (HART analog output)
•
IS PAC 9192 HART multiplexer
Note
You may not be able to use AMS Device Manager to communicate with HART devices
through a STAHL IS PAC multiplexer at the same time a handheld communicator is
communicating with the device loop. See your STAHL representative for details.
The ICS Module is a single HART multiplexer that supports HART transmitter supply
units connected to field devices. The I.S.1 System routes messages to their
multiplexers with attached HART field devices. For additional information on
supported STAHL equipment, see the Release Notes and the manufacturer’s
documentation.
38
Installation Guide
AMS Suite: Intelligent Device Manager
NOVEMBER 2013
HART Multiplexer Network
A HART multiplexer network requires:
•
One serial communication port for each HART multiplexer network.
•
An RS-485 converter (see the Release Notes for supported models).
•
One of the following types of multiplexers or I/O:
—
Arcom
—
Elcon
—
8000 BIM
—
Pepperl+Fuchs
—
Spectrum Controls I/O (this is an I/O module that connects to an AllenBradley Programmable Logic Controller - displays as a multiplexer in AMS
Device Manager)
See the Release Notes for additional requirements for specific types of multiplexers.
For more information about multiplexer networks, refer to KBA NA-0400-0084.
8000 BIM
The physical connection between your AMS Device Manager PC and the 8000 BIM
system requires one of the following:
•
A serial connection using an RS-485 converter (BIM)
•
An Ethernet connection using TCP/IP addressing (eBIM)
Supported analog input modules:
•
8101-HI-TX — 4-20mA, 8 channel, Div. 2/2
•
8201-HI-IS — 4-20mA, 8 channel, Div. 2/1
•
8301-HI-IS — 4-20mA, 8 channel, Div. 1/1
Supported analog output modules:
•
8102-HO-IP — 4-20mA, 8 channel, Div. 2/2
•
8202-HO-IS — 4-20mA, 8 channel, Div. 2/1
39
AMS Suite: Intelligent Device Manager
Installation Guide
NOVEMBER 2013
HART Over PROFIBUS
Note
Prior to moving to AMS Device Manager 12.5 from previous versions supporting HART
Over PROFIBUS, contact your Emerson Process Management Sales/Service Office to ensure
your system is fully supported. Additional testing may be required.
The HART Over PROFIBUS System Interface requires that:
•
AMS Device Manager is installed on a PC running a supported operating
system.
•
A control system that supports PROFIBUS DP V1 is configured and operational.
•
At least one Trebing & Himstedt (T+H) PROFIBUS Gateway for communications
is configured and the current version of the T+H AMS Device Manager
Communications Components (TACC) software is installed.
•
At least one PROFIBUS DP remote I/O subsystem that supports HART
communications is connected to the control system. Contact your Emerson
Process Management Sales/Service Office for a list of supported I/O
subsystems.
•
At least one HART I/O module is installed in the remote I/O subsystem. See the
Release Notes for a list of supported HART I/O modules.
•
At least one HART instrument is present on a module channel.
Refer to the TH AMS Device Manager Communication Components HART Over PROFIBUS
User Guide downloaded from T+H for more information.
Kongsberg
The Kongsberg System Interface requires that:
40
•
The version of the Kongsberg Control System is AIM v8.3.
•
The Kongsberg System is set up and the Automation Server is accessible from
the AMS Device Manager station.
•
The URL for the Kongsberg Automation Server is known.
•
One or more Remote Control Units (RCUs) are available on the Kongsberg
Network where PROFIBUS Masters or HART Masters may be configured.
—
PROFIBUS Masters allow the connection of HART DP Slave and I/O
Modules, which connect HART instruments to the network.
—
HART Masters allow the connection of HART Multiplexers, which connect
HART instruments to the network.
Installation Guide
AMS Suite: Intelligent Device Manager
NOVEMBER 2013
Only the following PROFIBUS DP and HART I/O modules are supported:
Manufacturer
Description / Module Type
Notes
STAHL
PROFIBUS DP I.S.1 type 9440
Supports up to 16 connected I/O
modules
STAHL
HART Analog Input type 9461
Supports up to 8 connected HART
instruments
HART Analog Output type
9466
STAHL
ISpac HART Multiplexer type
9192
Configurations possible for up to 32
connected HART devices. Up to 128
RS485 addresses (ISpac multiplexers)
are possible on a single RS485
segment
Siemens
The Siemens System Interface lets you use AMS Device Manager to communicate
with HART devices on a Siemens PCS 7 Control Network. An AMS Device Manager
Server Plus or Client SC station must be installed on the same station as the Siemens
PCS 7 ES/MS Station. The AMS Device Manager Network Configuration utility is used
to configure the Siemens System Interface.
The Siemens System Interface requires that:
•
The Siemens Network is licensed.
•
A Siemens System v7 with SP1 or higher is installed on the ES / MS Station and
the DeviceCom interface is accessible from the AMS Device Manager.
•
Siemens PCS 7 project file is copied from the live system.
41
AMS Suite: Intelligent Device Manager
Installation Guide
NOVEMBER 2013
ABB
The ABB System Interface lets you use AMS Device Manager to view and configure
HART devices connected to I/O modules supported by the ABB System 800xA control
system.
AMS Device Manager Client SC or Server Plus software can be installed on an ABB
Station assuming PC hardware and software requirements are met, or on a separate
PC. The ABB Station must have the 800xA station software installed and configured
for AMS Device Manager to communicate with HART instruments connected using
the ABB Controller. The ABB System Interface requires:
•
That the ABB Network is licensed in AMS Device Manager.
•
That the ABB Station software version is 5.1 along with the “Performance Pack”
enhancement release from ABB.
•
Use of the AC 800M series controllers.
•
Use of the following supported HART IO modules
•
42
—
AO815
—
AI815
—
AO895
—
AI895
—
AI880
—
AO845
—
AI845
Use of the following supported multiplexers:
—
Pepperl+Fuchs KFD2-HMM-16
—
MTL4840
—
Elcon Series 2700-F
—
Elcon Series 2700-G
Installation Guide
AMS Suite: Intelligent Device Manager
NOVEMBER 2013
Det-Tronics
The Det-Tronics System Interface is used to monitor fire and gas detectors on the DetTronics Eagle Quantum Premier (EQP) fire and gas Safety System with the S3 software
application (version 8.6.0.1). To install the this system interface, refer to “DetTronics” on page 106. Refer to Det-Tronics documentation for EQP setup information.
PROFIBUS
The PROFIBUS System Interface lets you use AMS Device Manager to view and
configure PROFIBUS DP or PROFIBUS PA devices connected to a Softing PROFIBUS
Ethernet Gateway or a Softing PROFlusb Modem.
Softing FG-100 and FG-300 Ethernet Gateways are supported. The FG-100 supports
one PROFIBUS segment while the FG-300 supports up to 3 PROFIBUS DP segments.
Each PROFIBUS DP segment can support up to 32 devices.
The Softing PROFlusb Modem is a USB device that can be used as a master in a
PROFIBUS segment. It also offers DP-V0 and DP-V1 capabilities.
43
AMS Suite: Intelligent Device Manager
NOVEMBER 2013
44
Installation Guide
Installation Guide
AMS Suite: Intelligent Device Manager
NOVEMBER 2013
3
Installing AMS Device Manager
AMS Device Manager can be installed as a single-station system or as a multi-station,
distributed system. The single-station system is a Server Plus Station that maintains
the AMS Device Manager database, with no associated Client SC Stations. A
distributed AMS Device Manager system is a client/server deployment of AMS Device
Manager Stations. It allows multiple AMS Device Manager Stations access to a
common database and all connected devices in the distributed system.
A distributed system contains a Server Plus Station and one or more Client SC
Stations. Each station has access to a common database located on the Server Plus
Station.
The procedures in this section are for installing and configuring AMS Device Manager
on the following types of stations:
•
Server Plus Station
•
Client SC Station
For a distributed system to function as intended, all Client SC Stations must have
network access to the Server Plus Station. You can install a Client SC Station first if
that is required for your network configuration (for example, if installing on domain
controllers and non-domain controllers). Otherwise, it is recommended that AMS
Device Manager software be installed in the following order:
1.
On the PC to be the Server Plus Station, install the Server Plus Station Software
(see “Installing Server Plus Station software” on page 51).
2.
On each PC to be used as a Client SC Station, install the Client SC Station
software (see “Installing Client SC Station software” on page 54).
If you are installing an AMS Device Manager distributed system on domain controller
PCs or a mix of domain controllers and non-domain controller PCs, do all the domain
controller installations first (see “Installing AMS Device Manager on domain
controllers” on page 65.)
If you are installing AMS Device Manager on a DeltaV station, see “Installing AMS
Device Manager 12.5 on DeltaV stations” on page 68.
If you are installing AMS Device Manager on an Ovation station, see “Installing AMS
Device Manager 12.5 on Ovation stations” on page 70.
If you are installing an AMS Device Manager distributed system and the Server Plus
Station is separated from the Client SC Station(s) by a firewall, refer to KBA NA-04000046.
If you are installing AMS Device Manager on a PC that has AMS Wireless Configurator
installed, refer to “Upgrading from AMS Wireless Configurator” on page 15.
45
AMS Suite: Intelligent Device Manager
Installation Guide
NOVEMBER 2013
Requirements and constraints
Ensure that all the system requirements specified in Section 2, “System
requirements” and stated below are met prior to installing an AMS Device Manager
distributed system. If you are installing a distributed system using a domain
controller, there are other requirements. See “Installing AMS Device Manager on
domain controllers” on page 65.
•
Named IP services (how PCs identify each other on a network) must be
functioning correctly for stations in an AMS Device Manager distributed system
to communicate.
•
A user with Windows system administrator rights is required to install and
configure a distributed system.
•
AMS Device Manager supports deployment within a single domain or
workgroup or across multiple domains or across multiple workgroups. For more
information, refer to KBA NA-0800-0113.
•
All stations must be connected to the network before beginning AMS Device
Manager installation. This ensures that all stations can access the AMS Device
Manager database. All stations’ computer names should be recorded. See
“Determining computer names” on page 50.
•
After all station installations are complete, all Windows users that log in to an
AMS Device Manager PC must be added to the AMSDeviceManager Windows
user group on all AMS Device Manager stations in a distributed system (see
“Adding a user to the AMSDeviceManager group” on page 56).
•
All stations’ PC clocks must be synchronized (many third-party tools are
available for this purpose). Clock synchronization is important because the date
and time of an event recorded in the database are based on the clock in the PC
that generated that event.
•
All stations must use like operating systems. That is, you can pair stations using
Windows XP Professional and Windows Server 2003; Windows 7 and Windows
Server 2008; or Windows 8 and Windows Server 2012. No other configurations
are supported.
•
All stations must use the same application and version for entering Drawings/
Notes (such as Microsoft Word 2003, 2007, and 2010 or Microsoft Excel 2003,
2007, and 2010).
•
Be sure you have the correct version of SQL Server for your Server Plus Station
(based on your database size–see page 25).
•
All stations must use the same revision of AMS Device Manager software.
Note
Consult with your network/system administrator about security issues and any other
network operation issues or special requirements for your LAN.
46
Installation Guide
AMS Suite: Intelligent Device Manager
NOVEMBER 2013
During installation, the AMSDeviceManager Windows user group is created and given
write access to the AMS folder, subfolders, and files with all the permissions necessary
to start and operate AMS Device Manager. An administrator is required to add
Windows User IDs to this group to allow operation of AMS Device Manager (see
“Adding a user to the AMSDeviceManager group” on page 56).
The installation creates a share of the AMS folder which grants the Everyone Windows
group Full Control permissions. It also allows connected Client SC Stations to use the
Drawings/Notes feature of AMS Device Manager. If your situation makes this security
configuration undesirable, consult your operating system documentation or your
system administrator.
For information on installing AMS Device Manager on domain controllers, see
“Installing AMS Device Manager on domain controllers” on page 65.
Upgrading from a previous version of AMS
Device Manager
Before you install version 12.5, refer to Table 1 on page 13.
AMS Device Manager version 12.5 supports automatic upgrading from version 10.x
and later.
If you are upgrading from version 10.x and later:
1.
Back up your database.
2.
Install version 12.5.
3.
Restore your database, if necessary.
There is no automatic upgrade to AMS Device Manager 12.5 from any versions older
than 10.x. If you have a pre-10.x version of AMS Device Manager, one of the following
options may be used.
If you are upgrading from version 7.x, 8.x, or 9.x:
1.
Back up your database.
2.
Uninstall your version 7.x, 8.x,or 9.x application.
3.
Install version 12.5.
4.
Restore your database.
If you are upgrading from an AMS Device Manager version older than 7.x, or you want
to restore a pre-7.x database:
1.
Back up your database.
2.
Uninstall your old version of AMS Device Manager.
47
AMS Suite: Intelligent Device Manager
Installation Guide
NOVEMBER 2013
3.
Install a newer version of AMS Device Manager that supports both your
database and an automatic upgrade to 12.5 (refer to the AMS Device Manager
installation guide in a given version for upgrade support).
4.
Restore the older database in this AMS Device Manager version.
5.
Upgrade to AMS Device Manager 12.5.
If you have any questions or encounter any unexpected issues, contact customer
support.
Prior to upgrading your AMS Device Manager application, you should uninstall any
SNAP-ON applications on the AMS Device Manager station. After upgrading AMS
Device Manager, install the latest versions of any licensed SNAP-ON applications, see
“Installing SNAP-ON applications” on page 58.
Configure any required system interface networks and then open AMS Device
Manager. Right-click each of the network icons and select Rebuild Hierarchy followed
by Scan > New Devices. If you are using the Alert Monitor feature, click the Alert
Monitor button on the AMS Device Manager toolbar to open the Alert List. Click the
Station Monitoring button in the toolbar and ensure that the station you are
monitoring is checked.
Consolidating databases
If you have multiple Server Plus Stations and are consolidating their databases for use
in a distributed system, use the following procedures.
To consolidate databases:
1.
Back up the current database on all stations containing a database you want to
consolidate (see Table 1 on page 13).
2.
Select one of the Server Plus Stations to hold the consolidated database. Import
the database information from the other Server Plus Stations one at a time. This
may be done using one of the following methods.
Method 1
Use this method when all the stations are connected to the same network and
domain and at the same AMS Device Manager revision level.
48
Installation Guide
AMS Suite: Intelligent Device Manager
NOVEMBER 2013
•
Right-click the Plant Database icon on the designated consolidation
Server Plus Station, select Import > From Remote to import the database
from the other stations one at a time. Click Help on the Import From
Remote System dialog for instructions.
Note
To Import > From Remote, you must have AMS Device Manager System Administration
permissions.
Method 2
Use this method when the stations are not connected to a common network.
•
From the Plant Database icon on all of the non-consolidation Server Plus
Stations, select Export > To <type> Export File to prepare a database
merge file. Click Help on the AMS Device Manager Export dialog for
instructions.
3.
When the databases have been consolidated, perform a database backup of the
consolidated database.
4.
The AMS Device Manager 12.5 Server Plus Station can be installed using one of
the following methods (see “Installing Server Plus Station software” on page
51).
Method 1
Install AMS Device Manager 12.5 as a station upgrade, if upgrading from
version 10.0 or later which automatically migrates the consolidated database.
Method 2
Uninstall the current 9.x or earlier station software and install version 12.5 as a
new Server Plus Station. Restore the consolidated database.
Consolidating Service Notes
The database backup operation also creates a backup file of service notes. If you
would like to consolidate the service notes from multiple AMS Device Manager
stations, follow the relevant instructions in the readme file for the Drawings and
Notes Management Utility. This information is included in the SNAP-ONS And
Tools\Tech_Support_Utilities\DrawingsAndNotesUtility folder on the AMS Device
Manager installation DVD.
49
AMS Suite: Intelligent Device Manager
Installation Guide
NOVEMBER 2013
Determining computer names
Computer names are needed to identify the Server Plus Station and the connected
Client SC Stations during distributed system installation and configuration (see
“Configuring a Distributed System” on page 58). Due to a Windows networking
requirement, station names must be 15 bytes or less. Please note that some
languages have characters that use more than 1 byte.
To find and record a computer name (do not use IP addresses):
1.
Right-click the Windows desktop My Computer icon and select Properties.
2.
Record the name of each computer that will be part of your distributed system
(see the Computer Name Log Example below).
Note
Computer names and DNS names must be the same. “Localhost” cannot be used in a
distributed system. Do not include “\\” in any computer names.
Table 1: Computer name log example
Station
Server Plus Station
Client SC Station # 1
Client SC Station # 2
Client SC Station # 3
Client SC Station # ...
Client SC Station # n
50
Computer Name
Installation Guide
AMS Suite: Intelligent Device Manager
NOVEMBER 2013
Installing Server Plus Station software
If you are installing an AMS Device Manager distributed system using a domain
controller, there are other requirements. See “Installing AMS Device Manager on
domain controllers” on page 65.
Note
If you are upgrading your software and changing the station type, you must uninstall the
earlier version of AMS Device Manager before upgrading to 12.5. (See Table 1 on
page 13.)
To install software on the Server Plus Station:
1.
Exit/close all Windows programs, including any running in the background
(including virus scan software).
2.
Insert the AMS Device Manager program DVD in the DVD drive of the PC to be
used as the Server Plus Station.
3.
When the AMS Device Manager setup starts, click Install AMS Device Manager.
Note
If the autorun function is disabled on your PC, double-click
D:\AMSDEVICEMANAGER_SETUP.EXE (where D is the DVD drive letter) and click OK.
4.
Click Server Plus Station.
5.
Follow the prompts.
NOTICE
Do not interrupt the installation process, or the software will not be fully installed
and will malfunction. The installation process includes some system restarts. Do not
remove the program DVD until the installation is complete.
51
AMS Suite: Intelligent Device Manager
Installation Guide
NOVEMBER 2013
Note
If you are installing on a Windows 7 or Windows Server 2008 PC, and User Account Control
(UAC) is enabled, the User Account Control dialog (similar to below) displays after
rebooting the PC. Select Yes to continue with the AMS Device Manager installation.
If you do not click Yes within 2 minutes, the dialog closes and to complete the installation
you must select Start > All Programs > AMS Device Manager > Continue the AMS Device
Manager installation.
Note
All licensing for a distributed system is done on the Server Plus Station (see “Licensing a
Distributed System” on page 57).
52
6.
Configure the Server Plus Station to recognize each station connected in the
system (see “Configuring a Distributed System” on page 58). This step is
essential for the other stations to access the Server Plus Station.
7.
Set up and configure the system interfaces needed on this station (see
“Configuring communication interfaces” on page 73).
8.
Install the latest versions of any licensed SNAP-ON applications, if appropriate
(see “Installing SNAP-ON applications” on page 58).
9.
Open AMS Device Manager, right-click each of the network icons and select
Rebuild Hierarchy followed by Scan > New Devices.
10.
If you are using the Alert Monitor feature, click the Alert Monitor button on the
AMS Device Manager toolbar to open the Alert List. Click the Station
Monitoring button in the toolbar and ensure that the station you are
monitoring is checked.
Installation Guide
AMS Suite: Intelligent Device Manager
NOVEMBER 2013
During installation, the AMSDeviceManager Windows user group is given write
access to the AMS folder, subfolders, and files with all the permissions necessary to
start and operate AMS Device Manager. An administrator is required to add Windows
User IDs to this group to allow operation of AMS Device Manager (see “Adding a user
to the AMSDeviceManager group” on page 56).
The installation creates a share of the AMS folder which grants the Everyone Windows
group Full Control permissions. This allows connected Client SC Stations to access the
Server Plus Station. It also allows connected Client SC Stations to use the Drawings/
Notes feature of AMS Device Manager. If your situation makes this security
configuration undesirable, consult your operating system documentation or your
system administrator.
Note
The AMS Device Manager installation program turns off Windows Automatic Updates.
After AMS Device Manager is installed, check to see that the Windows Automatic Updates
function is set as desired.
53
AMS Suite: Intelligent Device Manager
Installation Guide
NOVEMBER 2013
Installing Client SC Station software
The following steps install the Client SC Station software.
Verifying Client SC Station connectivity
Use the ping command to verify that the designated Client SC Station PC responds to
communications sent to it by the Server Plus Station:
1.
At the AMS Device Manager Server Plus Station, select Start > Run from the
Windows taskbar.
2.
In the text box, type CMD and click OK to open a command prompt.
3.
At the command prompt, type PING <Client SC Station Computer Name>.
4.
Press ENTER.
5.
Verify that the Client SC Station PC responds to the ping command.
The ping command should return a reply message. If the ping command fails,
verify that you typed the correct PC name in the command line. Also verify that
your network is functioning properly. Contact your IT department if you cannot
establish connectivity.
To install software on a Client SC Station:
1.
Clear all applications from the Windows Startup folder until after installation is
finished. Exit/close all Windows programs including any running in the
background (such as virus scan software).
2.
Insert the AMS Device Manager program DVD in the DVD drive of the PC to be
used as a Client SC Station.
3.
When the AMS Device Manager setup starts, click Install AMS Device Manager.
Note
If the autorun function is disabled on your PC, double-click
D:\AMSDEVICEMANAGER_SETUP.EXE (where D is the DVD drive letter) and click OK.
4.
Click Client SC Station.
5.
Follow the prompts.
NOTICE
Do not interrupt the installation process, otherwise the software will not be fully
installed and will malfunction. The installation process includes some system
restarts. Do not remove the program DVD until the installation is complete.
54
Installation Guide
AMS Suite: Intelligent Device Manager
NOVEMBER 2013
Note
If you are installing on a Windows 7 or Windows Server 2008 PC, and User Account Control
(UAC) is enabled, the User Account Control dialog (similar to below) displays after
rebooting the PC. Select Yes to continue with the AMS Device Manager installation.
If you do not click Yes within 2 minutes, the dialog closes and to complete the installation
you must select Start > All Programs > AMS Device Manager > Continue the AMS Device
Manager installation.
6.
Set up and configure the communication interfaces needed on this station (see
“Configuring communication interfaces” on page 73).
7.
Install the latest versions of any licensed SNAP-ON applications, if appropriate
(see “Installing SNAP-ON applications” on page 58).
8.
Open AMS Device Manager, right-click each locally configured network icon
and select Rebuild Hierarchy and then Scan > New Devices.
9.
If you are using the Alert Monitor feature, click the Alert Monitor button on the
AMS Device Manager toolbar to open the Alert List. Click the Station
Monitoring button in the toolbar and ensure that the station you are
monitoring is checked.
Note
The AMS Device Manager installation program turns off Windows Automatic Updates.
After AMS Device Manager is installed, check to see that the Windows Automatic Updates
function is set as desired.
55
AMS Suite: Intelligent Device Manager
Installation Guide
NOVEMBER 2013
Adding a user to the AMSDeviceManager
group
To launch and run AMS Device Manager, you must be a member of the
AMSDeviceManager user group.
Note
The following procedure requires Local or Domain Administrator permissions.
To add a user to the AMSDeviceManager group:
1.
(XP) Click Start and right-click Computer and select Manage from the context
menu.
(Windows 7) Click Start and right-click Computer select Manage from the
context menu.
(Windows 8) On the Start screen, enter COM, right-click the Computer tile, and
then click Manage.
2.
Select Computer Management (Local) > System Tools > Local Users and Groups
> Groups.
3.
Double-click the AMSDeviceManager group.
4.
Click Add.
5.
Enter the Windows User ID you want to add to the group and click OK. Note
whether this is a local or domain user.
6.
Click OK.
7.
You may have to log out of Windows and log back in to make the change
effective.
This process is different when using a domain controller (see “Adding a user to the
AMSDeviceManager group on a domain controller” on page 66).
56
Installation Guide
AMS Suite: Intelligent Device Manager
NOVEMBER 2013
Licensing a Distributed System
All licensing for an AMS Device Manager Distributed System is done on the Server Plus
Station. After installation, start the Licensing Wizard and follow the prompts to
gather registration information.
Note
To gather the registration information, you need to know your Customer Access Code
(supplied with your AMS Device Manager software).
After you register your software, the Registration Center returns your license codes
and checksums by downloading from the AMS Device Manager registration website
at:
http://www.emersonprocess.com/systems/support/ams_register/
10.c.survey.login.asp
When you receive your license codes, run the Licensing Wizard on the Server Plus
Station to enter your license codes and checksums, which enables your system.
Note
During the licensing process, you must have read access to the PC disk drive you installed
on (C: drive by default) so that the Licensing Wizard can verify the hard disk serial number.
To run the Licensing Wizard:
1.
Select Start > All Programs > AMS Device Manager > Licensing > Licensing
Wizard.
2.
Follow the instructions in the Licensing Wizard.
3.
If you are installing new license information on an existing station, start AMS
Device Manager to see the changes.
57
AMS Suite: Intelligent Device Manager
Installation Guide
NOVEMBER 2013
Configuring a Distributed System
Before you can use your distributed system, you must configure the Server Plus
Station so the Client SC Stations can access the Server Plus Station.
To configure your distributed system:
1.
On the Server Plus Station, select Start > All Programs > AMS Device Manager >
Station Configuration from the Windows taskbar.
2.
In the Station Configuration dialog,
click Add.
3.
Enter the computer name of the
Client SC Station PC (see
“Determining computer names” on
page 50), and click OK. The station
name is not case-sensitive. Do not
include a domain name or any
other characters that are not part
of the computer name. Use station
names of 15 ISO Latin-1 characters
or less.
4.
Repeat steps 2 and 3 for each
licensed Client SC Station, and click Close when done.
Installing SNAP-ON applications
After you have installed and licensed your AMS Device Manager software, you can
install SNAP-ON applications. Each SNAP-ON application is licensed separately and
will not run if your station is not licensed for it.
Additional installation requirements may apply to a SNAP-ON application. Before you
install a SNAP-ON application, check its documentation to confirm that all installation
requirements are satisfied.
To install a SNAP-ON application:
58
1.
Make sure the Windows Control Panel is not open and exit all Windows
programs, including any programs that may be running in the background such
as antivirus software.
2.
Insert the AMS Device Manager program DVD in the DVD drive of the PC.
3.
Browse to D:\SNAP-ONS And Tools\SNAP-ONS\Installs\<Folder Name> (where D
is the DVD drive letter and <Folder Name> is the name of the folder for the SNAPON application to be installed).
4.
Double-click the appropriate setup file.
Installation Guide
AMS Suite: Intelligent Device Manager
NOVEMBER 2013
5.
Follow the prompts.
Note
Most SNAP-ON applications need to be installed on each station in a distributed system.
Calibration Assistant is enabled through licensing–no separate installation is required.
Note
All SNAP-ON applications, with the exception of AMS ValveLink and AMS Wireless, use the
Windows user account name to determine the user privileges. Therefore, the AMS Device
Manager user must have a user account configured with the same name as the Windows
user account. For all SNAP-ON applications except AMS ValveLink and AMS Wireless, this
user must also have Device Write permission (see “Logging in to User Manager” on page
112).
AMS ValveLink SNAP-ON application user privileges must be enabled in AMS Device
Manager User Manager.
Note
If a SNAP-ON application is not installed in the C:\Program Files folder, the
AMSDeviceManager Windows user group must be given access to the location.
Modifying a Distributed System
Once your distributed system is installed, any changes to its physical configuration
may require special procedures in AMS Device Manager. To change station types in an
existing system, see “Changing station types” on page 59. For other types of
changes, see the following:
•
Changing station types (page 59).
•
Changing a Client SC Station to access a different Server Plus Station (page 60).
•
Adding a PC (Client SC Station) to an existing distributed system (page 61).
•
Replacing a PC (page 61).
•
Renaming a PC (page 63).
•
Adding a new communication interface (page 64).
•
Adding more tags than currently licensed (page 65).
•
Installing on domain controllers (page 65).
59
AMS Suite: Intelligent Device Manager
Installation Guide
NOVEMBER 2013
Changing station types
If you are changing station types, perform the following appropriate procedures. You
may also need to reset your users’ permissions (see “Changing rights and
permissions” on page 114).
To change an AMS Device Manager Server Plus Station to a Client SC Station:
1.
Back up the database (page 16).
2.
Uninstall the previous Server Plus Station software (page 18).
3.
Ensure that a connection can be made to an available Server Plus Station.
4.
Install the Client SC Station software (page 54).
5.
Restore or combine the database on another Server Plus Station (page 16).
To change an AMS Device Manager Client SC Station to a Server Plus Station:
1.
Get new license codes (page 57).
2.
Uninstall the previous Client SC Station software (page 18).
3.
Install the Server Plus Station software (page 51).
Changing a Client SC Station to access a different
Server Plus Station
To change a Client SC Station to access a different Server Plus Station:
1.
In Network Configuration on the Client SC Station, remove any configured
system interfaces (other than HART Modem).
2.
Select Start > All Programs > AMS Device Manager > Server Plus Connect.
3.
In the Server Plus Connect dialog, select a Server Plus Station PC from the dropdown list or enter the name of the PC where the desired Server Plus Station is
installed.
4.
Click Connect.
Note
For more information about the Server Plus Connect utility, refer to AMS Device Manager
Books Online.
60
Installation Guide
AMS Suite: Intelligent Device Manager
NOVEMBER 2013
The Server Plus Connect utility cannot be used on Client SC Stations installed on
DeltaV or Ovation workstations. In these configurations, to change a Client SC Station
to access a different Server Plus Station:
1.
Uninstall AMS Device Manager on the Client SC Station (see page 18).
2.
Reinstall AMS Device Manager on the Client SC Station and indicate the new
Server Plus Station, see “Installing Client SC Station software” on page 54.
Adding Client SC Stations
To expand an existing distributed system:
1.
Determine the number of stations covered by your current license (select
Help > About from the AMS Device Manager toolbar).
•
To add stations that will be covered by your current license, continue with
step 2.
•
To add more stations than currently licensed, obtain new license codes.
After you receive your new license codes, run the Licensing Wizard on the
Server Plus Station (see “Licensing a Distributed System” on page 57) and
then continue with step 2.
2.
To install AMS Device Manager on the added Client SC Stations, see “Installing
Client SC Station software” on page 54.
3.
Update the Client SC Station configuration on the Server Plus Station (see
“Configuring a Distributed System” on page 58).
4.
To enable the stations in the distributed system to recognize the added Client
SC Station, shut down and restart AMS Device Manager on all the stations.
Replacing an AMS Device Manager Station PC
Replacing a Server Plus Station PC
To replace a Server Plus Station PC:
1.
Obtain new license codes, see “Licensing a Distributed System” on page 57.
(License codes are assigned to a single hard disk serial number.)
2.
Back up the database (see page 16) and save the backup file in a secure
location.
3.
Uninstall AMS Device Manager from the old PC (see page 18). Rename or
disconnect the PC from the network.
61
AMS Suite: Intelligent Device Manager
Installation Guide
NOVEMBER 2013
4.
Connect the new PC to the network and give it the same computer name as the
old PC.
Note
If the new Server Plus Station PC has a different computer name, all active alerts that were
in the Alert Viewer on the old PC will be lost. In addition, you will be required to run the
Server Plus Connect utility on all Client SC Stations to connect to the new Server Plus
Station (see “Changing a Client SC Station to access a different Server Plus Station” on page
60).
5.
Install Server Plus Station software on the new PC (see “Installing Server Plus
Station software” on page 51).
6.
Launch the License Wizard (Start > All Programs > AMS Device Manager >
Licensing > Licensing Wizard) and enter the new license codes.
7.
Set up the server configuration to recognize each Client SC Station connected
in the system (see “Configuring a Distributed System” on page 58).
8.
Restore the database using the backup file you saved in step 2 (see “Restoring a
database” on page 16).
Replacing a Client SC Station PC
To replace a Client SC Station with a new PC:
62
1.
Uninstall AMS Device Manager from the old PC (see “Uninstalling AMS Device
Manager” on page 18). Disconnect the PC from the network, if appropriate.
2.
Connect the new PC to the network.
3.
On the Server Plus Station, select Start > All Programs > AMS Device Manager >
Station Configuration from the Windows taskbar.
4.
In the Station Configuration dialog, select the name of the old PC and click
Remove.
5.
In the Station Configuration dialog, click Add.
6.
Enter the computer name of the new Client SC Station PC (see “Determining
computer names” on page 50), and click OK. The station name is not casesensitive. Do not include a domain name or any other characters that are not
part of the computer name.
7.
On the new Client SC Station PC, install the Client SC Station software (see
“Installing Client SC Station software” on page 54).
Installation Guide
AMS Suite: Intelligent Device Manager
NOVEMBER 2013
Renaming an AMS Device Manager PC
To rename a Server Plus Station PC:
1.
Back up your AMS Device Manager database (see “Backing up a database” on
page 16).
2.
Renaming the PC clears the Device Monitor List, so record all devices contained
in the Device Monitor List. Uninstall AMS Device Manager on the Server Plus
Station and all Client SC Stations in a distributed system (see “Uninstalling AMS
Device Manager” on page 18).
3.
Rename the Server Plus Station PC:
—
Right-click the Windows desktop My Computer icon.
—
Select Properties.
—
Click Change Settings (Windows 7 only).
—
On the Computer Name tab, click Change.
—
Enter a new computer name and click OK.
—
Click OK.
4.
Install AMS Device Manager on the Server Plus Station and all Client SC Stations
in a distributed system (see “Installing Server Plus Station software” on page 51
and “Installing Client SC Station software” on page 54).
5.
Restore the database backed up in step 1 (see “Restoring a database” on page
16).
6.
Reinstall the required system interfaces (see “Configuring communication
interfaces” on page 73) and SNAP-ON applications (see “Installing SNAP-ON
applications” on page 58).
7.
Open AMS Device Manager, right-click each network icon and select Rebuild
Hierarchy and then Scan > New Devices.
8.
Add the devices recorded in step 2 to the Device Monitor List (refer to AMS
Device Manager Books Online).
To rename a Client SC Station PC:
1.
Renaming the PC clears the Device Monitor List, so record all devices contained
in the Device Monitor List.
2.
Uninstall AMS Device Manager on the Client SC Station PC (see “Uninstalling
AMS Device Manager” on page 18).
63
AMS Suite: Intelligent Device Manager
Installation Guide
NOVEMBER 2013
3.
Rename the Client SC Station PC:
—
Right-click the Windows desktop My Computer icon.
—
Select Properties.
—
Click Change Settings (Windows 7 only).
—
On the Computer Name tab, click Change.
—
Enter a new Computer Name and click OK.
—
Click OK.
4.
On the Server Plus Station, open Station Configuration and remove the old
name of the Client SC Station PC and add the new name (see “Configuring a
Distributed System” on page 58).
5.
Install AMS Device Manager on the Client SC Station PC (see “Installing Client
SC Station software” on page 54).
6.
Reinstall the required system interfaces (see “Configuring communication
interfaces” on page 73) and SNAP-ON applications (see “Installing SNAP-ON
applications” on page 58).
7.
Open AMS Device Manager, right-click each network icon and select Rebuild
Hierarchy and then Scan > New Devices.
8.
Add the devices recorded in step 1 to the Device Monitor List on the Client SC
Station (refer to AMS Device Manager Books Online).
Adding a new communication interface
To add a new communication interface (for example, an additional system interface):
64
1.
Contact your Emerson Process Management Sales/Service Office to obtain a
new license code for the desired communication interface.
2.
Run the Licensing Wizard on the Server Plus Station (see “Licensing a
Distributed System” on page 57).
3.
Configure the new communication interface (see “Configuring communication
interfaces” on page 73).
Installation Guide
AMS Suite: Intelligent Device Manager
NOVEMBER 2013
Adding more tags than currently licensed
To add more tags than currently licensed:
1.
Contact your Emerson Process Management Sales/Service Office to obtain new
license codes to cover the number of tags needed.
2.
Run the Licensing Wizard on the Server Plus Station (see “Licensing a
Distributed System” on page 57).
3.
Start AMS Device Manager.
4.
Install and configure the additional devices.
Installing AMS Device Manager on domain
controllers
AMS Device Manager creates a Windows user account (AmsServiceUser) on each
station in a distributed system. When AMS Device Manager is installed on a domain
controller, this account is created as a domain user. Communication failures will result
if installation is not done correctly as follows:
•
If Windows domain controllers are used in a distributed network, AMS Device
Manager must be installed on one of these stations first, followed by any other
domain controller stations and non-domain controller stations. If AMS Device
Manager is installed on a domain controller, all other stations that are part of
that domain use the domain account, not a local account.
Note
If a Server Plus is installed on a domain controller, all Client SC Stations that are part of that
domain must be clients of this Server Plus. Only one AMS Device Manager distributed
system is allowed on a single domain.
•
If AMS Device Manager will be used in a cross-domain configuration and AMS
Device Manager will not be installed on a domain controller, create the
AmsServiceUser account on any domain-resident PCs prior to installing AMS
Device Manager on them. Refer to KBA NA-0800-0113.
Note
AMS Device Manager is not supported on a Windows Server 2008 read-only domain
controller.
65
AMS Suite: Intelligent Device Manager
Installation Guide
NOVEMBER 2013
Domain controller security requirements
To launch and run AMS Device Manager, you must be a member of the
AMSDeviceManager user group.
Adding a user to the AMSDeviceManager group on a
domain controller
Note
The following procedure requires network administrator permissions.
To add a user to the AMSDeviceManager group:
1.
Select Start > Settings > Control Panel > Administrative Tools > Active Directory
Users and Computers.
2.
Select <Domain Name> > Users.
3.
Double-click the AMSDeviceManager group.
4.
Click Add.
5.
Enter the Windows User ID you want to add to the group and click OK.
6.
Click OK.
Mobile workstation
A mobile workstation is an AMS Device Manager Client SC Station connected
wirelessly to a LAN. As long as the PC meets the AMS Device Manager requirements
(see “Hardware requirements” on page 19), it functions like a station connected to a
wired Ethernet LAN. However, no system interfaces should be configured on a mobile
workstation, as this can cause database issues regarding the path of the connected
device. If at any time the mobile workstation wireless network connection is lost, you
may have to restart AMS Device Manager to reestablish network connectivity.
66
Installation Guide
AMS Suite: Intelligent Device Manager
NOVEMBER 2013
Licensing AMS Device Manager 12.5 on DeltaV
stations
If you have licensed your AMS Device Manager 12.5 software, you see a full-function
application when you launch the product. If not licensed, you can use a limited AMS
Device Manager feature set provided with each DeltaV installation. If this is your
situation, refer to the DeltaV Books Online for information.
When you install AMS Device Manager on a DeltaV Simulate Multi-node system, the
installation program checks for the presence of a DeltaV Simulate ID key (VX dongle).
If the Simulate ID key is found, AMS Device Manager licensing is enabled. Otherwise,
the installation program looks for an AMS Device Manager license.dat file. If the
license.dat file is found, you are granted the permissions associated with the license.
If no license.dat file is found, a subset of AMS Device Manager functionality is
available.
There are a number of licensing considerations when you install AMS Device Manager
on a DeltaV station. To ensure that your installation functions as you expect, please
contact your Emerson Process Management Sales/Service Office. After you have
received the appropriate licensing information and AMS Device Manager setup
instructions for your situation, install AMS Device Manager as described beginning on
page 68.
67
AMS Suite: Intelligent Device Manager
Installation Guide
NOVEMBER 2013
Installing AMS Device Manager 12.5 on DeltaV
stations
AMS Device Manager 12.5 can only be co-deployed on DeltaV 9.3.1 and newer
stations. To ensure a proper installation, DeltaV must be installed before AMS Device
Manager.
Note
Any AMS Device Manager station (either Server Plus or Client SC) installed on a DeltaV 11.3
or later ProfessionalPLUS workstation must be licensed to ensure proper licensing
functionality, proper security, proper user synchronization between DeltaV and AMS
Device Manager, and proper Device Description (DD) installation.
Before you install AMS Device Manager on your DeltaV stations, ensure that you have
all the proper AMS Device Manager and DeltaV licensing and installation instructions
(see “Licensing AMS Device Manager 12.5 on DeltaV stations” on page 67. In
addition, ensure that USB has been enabled in DeltaV Easy Security (see your DeltaV
documentation for more information).
Note
If you are installing AMS Device Manager on any domain controller stations, refer to
“Installing AMS Device Manager on domain controllers” on page 65.
To install Server Plus software on a supported DeltaV station, see“Installing Server
Plus Station software” on page 51. To install Client SC software on a supported
DeltaV station, see “Installing Client SC Station software” on page 54.
DeltaV actions
Note
Do not configure a DeltaV Network System Interface for the same DeltaV system on more
than one AMS Device Manager station.
After installing AMS Device Manager on a DeltaV Station, you must perform a
download of the DeltaV workstation (refer to DeltaV Books Online). Downloading a
DeltaV 10.x or later workstation adds DeltaV database account users to the AMS
Device Manager database. Creating a new Windows user in DeltaV User Manager also
adds that user to the AMSDeviceManager Windows user group.
68
Installation Guide
AMS Suite: Intelligent Device Manager
NOVEMBER 2013
Downloading a DeltaV 9.x workstation adds DeltaV users to the AMS Device Manager
database, but the users must be manually added to the AMSDeviceManager
Windows group. Contact your IT department for assistance.
Note
Each time a ProfessionalPLUS Station is downloaded, some DeltaV user permissions
overwrite AMS Device Manager user permissions (System Administrator, Device Write,
Device SIS Write, Device Assignment).
DeltaV Upgrade Wizard
The DeltaV Upgrade Wizard automates the process of upgrading a DeltaV Station
from an earlier version and ensures that crucial steps are performed. Do not run the
DeltaV Upgrade Wizard before uninstalling AMS Device Manager. If you run the
DeltaV Upgrade Wizard first, AMS Device Manager will not function as expected and
a PC restart may be needed before AMS Device Manager can be uninstalled.
Uninstalling DeltaV software
To uninstall DeltaV on a station that has AMS Device Manager co-deployed, you must
uninstall AMS Device Manager first and then DeltaV. You can then reinstall AMS
Device Manager. If you uninstall DeltaV first, AMS Device Manager will not function as
expected.
If you have co-deployed AMS Device Manager on domain controllers and non-domain
controllers, you must remove AMS Device Manager from all non-domain controllers
first, then from all backup/secondary domain controllers, and then from the primary
domain controller. Uninstall DeltaV only after AMS Device Manager has been
uninstalled on all PCs.
69
AMS Suite: Intelligent Device Manager
Installation Guide
NOVEMBER 2013
Licensing AMS Device Manager 12.5 on
Ovation stations
When you install AMS Device Manager on an Ovation station, the installation
program checks for the presence of an AMS Device Manager license.dat file. If the
license.dat file is found, you are granted all the permissions associated with the
license. If you do not have a license.dat file, see “Licensing a Distributed System” on
page 57. After you have received the appropriate licensing information, install AMS
Device Manager as described beginning on page 70.
Installing AMS Device Manager 12.5 on
Ovation stations
AMS Device Manager 12.5 can be installed on Ovation 3.3.1 and newer stations as
outlined on page 34. AMS Device Manager stations can also be installed on separate
PCs and access Ovation information through the Ovation System Interface. To ensure
a properly co-deployed installation, Ovation must be installed before AMS Device
Manager.
In a typical Ovation 3.3.1 or 3.4 deployment using FOUNDATION fieldbus devices, the
AMS Device Manager Server Plus software would be installed on the Ovation station
that also has the fieldbus engineering software installed. AMS Device Manager Client
SC software would be installed on other supported Ovation station types in the
network. This deployment gives all connected stations access to both AMS Device
Manager and Ovation databases.
In a typical Ovation 3.5 deployment using FOUNDATION fieldbus devices, the AMS
Device Manager Client SC software would be installed on the Ovation Database
Server. Other AMS Device Manager Client SC station and the Server Plus station
software would be installed on Ovation Operator stations in the network. This
deployment gives all connected stations access to both AMS Device Manager and
Ovation databases.
Before you install AMS Device Manager on your Ovation stations, ensure that you
have all the proper AMS Device Manager and Ovation licensing and installation
instructions (see “Licensing AMS Device Manager 12.5 on Ovation stations” on page
70).
Note
If you are installing AMS Device Manager on any domain controller stations, refer to
“Installing AMS Device Manager on domain controllers” on page 65.
To install Server Plus software on a supported Ovation station, see“Installing Server
Plus Station software” on page 51. To install Client SC software on a supported
Ovation station, see “Installing Client SC Station software” on page 54.
70
Installation Guide
AMS Suite: Intelligent Device Manager
NOVEMBER 2013
Configure the Ovation Network System Interface (see “Configuring AMS Device
Manager for an Ovation System Interface” on page 90) so that AMS Device Manager
can detect and work with devices on the Ovation network.
Note
Do not configure an Ovation Network System Interface for the same Ovation system on
more than one AMS Device Manager station.
Note
If you install a Client SC Station on an Ovation station running on a Windows Server PC, add
the Client SC Station PC name to the DNS forward lookup zones list. Contact your IT
department for assistance.
Configure any other required communication interfaces (see “Configuring
communication interfaces” on page 73).
Uninstalling Ovation software
To uninstall Ovation on a station that has AMS Device Manager co-deployed, you
must uninstall AMS Device Manager first and then Ovation. You can then reinstall
AMS Device Manager. If you uninstall Ovation first, AMS Device Manager will not
function as expected.
If you have co-deployed AMS Device Manager on domain controllers and non-domain
controllers, you must remove AMS Device Manager from all non-domain controllers
first, then from all backup/secondary domain controllers, and then from the primary
domain controller. Uninstall Ovation only after AMS Device Manager has been
uninstalled on all PCs.
71
AMS Suite: Intelligent Device Manager
NOVEMBER 2013
72
Installation Guide
Installation Guide
AMS Suite: Intelligent Device Manager
NOVEMBER 2013
4
Configuring communication
interfaces
AMS Device Manager communicates with HART, WirelessHART, FOUNDATION fieldbus,
PROFIBUS DP and PROFIBUS PA devices through various communication interfaces. If
this is a new installation or you are adding interfaces to an existing system, you need
to configure the network after you have installed the software.
You need to configure the network interfaces that are relevant to each station. You
should only configure a particular physical network on one station within the
distributed network to avoid the potential for simultaneous device configuration.
This section describes how to configure for:
•
HART modems (page 73)
•
Field Communicators (page 77)
•
Documenting calibrators (page 79)
•
HART multiplexer networks (page 80)
•
System interfaces (page 83)
This section provides general information about installing these interfaces. For
specific information, refer to the manufacturers’ documentation.
HART modems
HART modems let AMS Device Manager communicate with HART devices using a PC
serial port, PC USB port, or Bluetooth connectivity. Serial and USB HART modems
attach directly to a PC or laptop computer and do not require an external power
supply. Bluetooth HART modems require a self-contained power source (AAA
batteries) as well as a Bluetooth-ready workstation PC. The PC can have Bluetooth
capability built-in or use a Bluetooth adapter and Microsoft Bluetooth software
components. HART modems are not supported with USB to RS-232 converters or
with Ethernet converters.
Note
If your USB or Bluetooth HART modem manufacturer provided supporting driver software,
install it prior to configuring the modem for use with AMS Device Manager.
You must configure AMS Device Manager to send and receive data to and from the PC
serial communications port or USB port (USB HART modem software is required). If a
Bluetooth HART modem is used, you must prepare the PC for its use. Contact your IT
department for assistance. HART modems also allow multidropping up to 16 HART
devices (see “Configuration notes” below).
73
AMS Suite: Intelligent Device Manager
Installation Guide
NOVEMBER 2013
Configuring AMS Device Manager for a HART
modem
To configure for a HART modem:
1.
Select Start > All Programs > AMS Device Manager > Network Configuration
from the Windows taskbar.
2.
In the Network Configuration dialog, click Add.
3.
In the Select Network Component Type dialog, select HART Modem and click
Install.
4.
Follow the prompts in the Add HART Modem Wizard.
5.
Connect a HART modem, see “Connecting a HART modem” on page 74.
6.
See “After a modem is installed” on page 76.
Configuration notes
•
If you select a multidrop installation, you can connect up to 16 devices on the
same modem. However, if you intend to use only one device at a time, it will
speed performance if you do not select the multidrop option and if you set all
devices to a configurable polling address of 0.
•
If any devices use a WirelessHART adapter, select the checkbox and enter the
polling address of the adapter.
•
Changes will take effect when AMS Device Manager is started.
Connecting a HART modem
NOTICE
If you are working with a modem on a workbench, ground your device to avoid
possible damage to your PC.
To connect a HART modem:
1.
74
Establish a communication connection between the HART modem and your
PC. Be sure you attach it to the port that you configured for it (see page 74).
Installation Guide
AMS Suite: Intelligent Device Manager
NOVEMBER 2013
2.
Attach the HART devices. For many HART input devices (such as transmitters),
you need to connect a 250 to 300 resistor in series with the power source.
Be very careful when connecting an output device in a non-DCS loop
configuration to avoid device damage. Always consult the device product
manual for detailed connection information.
Note
Follow output device manufacturers’ recommendations for loop wiring.
3.
Attach the modem leads across the resistor, if required.
4.
Attach a power supply to the HART device, if necessary. Figure 1 shows how a
HART device should typically be wired to a modem.
5.
Verify that the transmitter has power.
6.
After configuring the modem, reboot the PC to complete the installation.
Note
If a device is connected to the modem but its icon is not displayed, see “After a modem is
installed” on page 76.
75
AMS Suite: Intelligent Device Manager
Installation Guide
NOVEMBER 2013
Figure 1. Device Wiring Diagram
A
B
C
E
D
+
+ -
-
F
A
To PC COMM port connection
B
HART modem
C
250 ohm resistor
D
24vDC power source
E
Transmitter
F
Optional ground connection
After a modem is installed
AMS Device Manager continuously polls the modem connection and automatically
recognizes a device once the device and modem are installed.
AMS Device Manager shows the installed device connected to the modem after you
have completed the procedure on page 74. If you do not see the device, do the
following:
76
•
Check your connections again.
•
Make sure the modem is properly installed.
Installation Guide
AMS Suite: Intelligent Device Manager
NOVEMBER 2013
•
Make sure the modem is properly configured in AMS Device Manager.
•
Make sure the device loop wiring is correct with the required resistance for
input devices (nominal 250 - 300 ohms).
•
Verify that the field device is working.
•
Verify polling address.
Field Communicators
The 475 and 375 Field Communicators are portable, handheld communicators from
Emerson Process Management used in the field or in the shop to configure, test, and
diagnose HART and FOUNDATION fieldbus devices. For information on using the 475 or
375, refer to the user’s manual that came with your Field Communicator.
The Handheld Communicator Interface is a licensable option that lets you use a Field
Communicator and AMS Device Manager together to transfer HART and FOUNDATION
fieldbus data. The 475 communicates with an AMS Device Manager station using a
USB IrDA adapter (ordered separately) or the Microsoft Windows Bluetooth interface
on a Bluetooth-enabled PC. The 375 communicates with an AMS Device Manager
station using a USB IrDA adapter (ordered separately). You can communicate with
only one Field Communicator at a time on a PC. Communication between AMS
Device Manager and a connected Field Communicator is initiated by the AMS Device
Manager software. Once the Field Communicator is configured in the network, you
can see its icon (Figure 2).
Figure 2. Field Communicator icon in Device Connection View
AMS Device Manager
Field Communicator 1
Plant Database
Multiplexer Network 1
77
AMS Suite: Intelligent Device Manager
Installation Guide
NOVEMBER 2013
Configuring AMS Device Manager for a Field
Communicator
To configure AMS Device Manager for a Field Communicator:
1.
Close AMS Device Manager if it is running.
2.
Select Start > All Programs > AMS Device Manager > Network Configuration
from the Windows taskbar.
3.
In the Network Configuration dialog, click Add.
4.
In the Select Network Component dialog, select Field Communicator and click
Install.
5.
Follow the prompts in the Add Field Communicator Network Wizard.
6.
In the Connection dialog, select the appropriate Field Communicator
connection option.
The IrDA adapter is a plug-and-play interface, so you do not need to specify a
communications port. The Bluetooth interface requires use of the Microsoft
Bluetooth components and an adapter if your PC is not Bluetooth-ready (see the
Release Notes for a list of supported Bluetooth adapters). If you have Bluetooth
components from another provider installed, you will be instructed to use Microsoft
Bluetooth components. For more information, refer to AMS Device Manager Books
Online. Bluetooth is not natively supported in Windows Server 2003/2008.
Connecting a Field Communicator
To connect a Field Communicator:
78
1.
Ensure that your network has been configured for a Field Communicator (see
page 78).
2.
Ensure that an IrDA adapter (and drivers, if necessary) or Bluetooth
components (and adapter, if necessary) are installed on the PC. Refer to your
IrDA interface operating instructions. See the Release Notes for a list of
supported IrDA and Bluetooth adapters.
3.
If using an IrDA adapter align it with the IrDA interface on the field
communicator. If using Bluetooth connectivity, follow the instructions supplied
with your PC or Bluetooth adapter hardware.
4.
Turn on the Field Communicator.
Installation Guide
AMS Suite: Intelligent Device Manager
NOVEMBER 2013
5.
From the Field Communicator Main Menu, select Listen For PC mode and the
correct connection type and tap OK. After making these selections, AMS
Device Manager will conduct all interaction between the Field Communicator
and the PC.
6.
Launch AMS Device Manager.
7.
Double-click the Field Communicator icon in AMS Device Manager or right-click
the icon and select Open from the context menu.
Note
You cannot access live device data through a Field Communicator connected to AMS
Device Manager.
Refer to AMS Device Manager Books Online for more information about connecting
and using a Field Communicator with AMS Device Manager. For general information
on using the 375 or 475 Field Communicators, refer to the user’s manual that came
with your Field Communicator.
Documenting calibrators
With the optional Calibration Assistant SNAP-ON application, a documenting
calibrator can be used to automate the collection of device calibration data.
When the documenting calibrator is connected to AMS Device Manager, test
definitions can be checked out (downloaded) to the calibrator. The calibrator is then
attached to the corresponding field device, tests are run, and data is collected. This
data can then be checked in (uploaded) to AMS Device Manager for electronic record
keeping and report generation.
Refer to the current Release Notes for a list of supported documenting calibrators and
pertinent information about individual calibrators. Refer to the AMS Device Manager
Supported Device List to determine if a device supports calibration.
Configuring AMS Device Manager for a
documenting calibrator
To configure AMS Device Manager for a documenting calibrator:
1.
Select Start > All Programs > AMS Device Manager > Network Configuration
from the Windows taskbar.
2.
In the Network Configuration dialog, click Add.
3.
In the Select Network Component Type dialog, select Calibrator and click
Install.
79
AMS Suite: Intelligent Device Manager
Installation Guide
NOVEMBER 2013
4.
Follow the prompts in the Add Calibrator Wizard.
5.
When finished, verify that the correct COM port is assigned by selecting the
calibrator name in the Network Configuration dialog and clicking Properties. If
necessary, change the COM Port on the Properties for the Calibrator dialog.
Connecting a documenting calibrator
For instructions on how to connect the calibrator to the PC, see the calibrator
documentation.
Connecting devices to a documenting calibrator
For instructions on how to connect devices to the documenting calibrator, see the
calibrator documentation.
HART Multiplexer Network Interface
With the optional HART Multiplexer Network Interface, AMS Device Manager can
communicate with HART devices through a HART multiplexer. HART multiplexers can
link many installed HART field devices to an AMS Device Manager PC, providing the
capability to remotely configure, troubleshoot, and monitor those devices. A typical
HART multiplexer network enables one PC COM port to communicate with up to 63
addressable HART multiplexers.
AMS Device Manager supports a variety of multiplexers, each with different
capabilities and requirements. Supported multiplexer types can have between 32
and 256 device connections. For a list of supported multiplexers, see the Release
Notes. For specific information about a supported multiplexer, see the
manufacturer’s documentation.
Note
This information refers to Arcom, Elcon, 8000 BIM, Spectrum Controls, Honeywell, and
Pepperl+Fuchs multiplexers. STAHL multiplexer interfaces are described on page 38.
NOTICE
For the PC to communicate with a HART multiplexer, you must place either an RS-232
to RS-485 converter or a supported Ethernet serial hub between the multiplexer and
the PC. For supported peripherals, see the Release Notes.
80
Installation Guide
AMS Suite: Intelligent Device Manager
NOVEMBER 2013
Preparing a HART Multiplexer Network Interface
Preparing a HART multiplexer interface includes:
•
Connecting the multiplexer(s) to the PC
•
Configuring AMS Device Manager for a multiplexer network
•
Setting the HART master mode and the multiplexer gender settings
•
Connecting the field devices to the multiplexers
Connecting a HART multiplexer to a PC
To connect a HART multiplexer to AMS Device Manager, refer to the multiplexer
documentation.
Configuring AMS Device Manager for a HART
Multiplexer Network
To configure AMS Device Manager for a HART multiplexer network:
1.
Select Start > All Programs > AMS Device Manager > Network Configuration
from the Windows taskbar.
2.
In the Network Configuration dialog, click Add.
3.
In the Select Network Component Type dialog, select Multiplexer Network and
click Install.
4.
Follow the Multiplexer Network Wizard instructions to add the HART
multiplexer network.
Configuration notes
•
Select the appropriate PC communications port.
•
If necessary, adjust the Baud Rate, Network Timeout, Communication Retries,
HART Busy Retries, and Multiplexer address range. Refer to AMS Device
Manager Books Online for the Connection dialog for more information.
81
AMS Suite: Intelligent Device Manager
Installation Guide
NOVEMBER 2013
•
Select the appropriate HART Master Mode setting. This parameter setting must
be the same for all multiplexers on the network.
Note
You can connect up to 63 multiplexers on the same network. You can improve network
performance by limiting the range to the minimum value that includes the multiplexer
addresses and configuring the multiplexers to use a range of consecutive addresses.
NOTICE
After completing the configuration, verify that the baud rates match in AMS Device
Manager, the multiplexer, and the RS-232 to RS-485 converter. To change the baud
rate for a multiplexer network in AMS Device Manager, select its name in the
Network Configuration dialog and click Properties. Enter the correct baud rate and
click Apply.
For more information about multiplexer networks, refer to KBA NA-0400-0084.
82
Installation Guide
AMS Suite: Intelligent Device Manager
NOVEMBER 2013
System interfaces
With an optional system interface, AMS Device Manager can communicate with
devices through existing plant wiring. Each system interface is licensed and installed
separately, and each has unique characteristics and works somewhat differently with
AMS Device Manager.
AMS Device Manager provides system interfaces for the following systems:
•
Wireless (see page 84)
•
DeltaV™ (see page 86)
•
Ovation™ (see page 89)
•
FF HSE (see page 92)
•
PROVOX (see page 93)
•
RS3™ (see page 95)
•
STAHL (see page 98)
•
8000 BIM (see page 100)
•
HART Over PROFIBUS (see page 101)
•
Kongsberg Maritime (see page 103)
•
Siemens (see page 104)
•
ABB (see page 104)
•
Det-Tronics (see page 106)
•
PROFIBUS (see page 107)
83
AMS Suite: Intelligent Device Manager
Installation Guide
NOVEMBER 2013
Wireless
The Wireless System Interface allows you to view and configure WirelessHART devices
in a Wireless Network. A Wireless Network is made up of one or more wireless
gateways and WirelessHART devices.
Configuring AMS Device Manager for a Wireless Network
To configure AMS Device Manager for a Wireless Network:
Note
Before installing a Wireless System Interface, ensure that the Security Setup Utility is not
running.
84
1.
Select Start > All Programs > AMS Device Manager > Network Configuration
from the Windows taskbar.
2.
In the Network Configuration dialog, click Add.
3.
In the Select Network Component Type dialog, select Wireless Network and
click Install.
4.
Follow the Add Wireless Network Wizard instructions. Enter the DNS Name or
IP address of a gateway and click Add.
5.
If this is the first time a gateway has been configured, a Certificate Form is
displayed. The Certificate Form is required to set up SSL secure
communications. After the Certificate Form is completed, the gateway will be
added to the Connections Properties page.
6.
If required, enter the username and password to access the gateway setup
utility. Enter information to allow the gateway and AMS Device Manager to
exchange encrypted data.
7.
Start AMS Device Manager. See “Determining the system interface structure
and device data” on page 108.
8.
For more information about using a Wireless Network, refer to AMS Device
Manager Books Online.
Installation Guide
AMS Suite: Intelligent Device Manager
NOVEMBER 2013
Adding a gateway
For a list of supported wireless gateways, refer to the AMS Device Manager Release
Notes. Do not configure a Wireless System Interface if a DeltaV or Ovation System
Interface will be using the same wireless gateway.
Note
The same wireless gateway cannot be configured in two different Wireless Networks on a
single workstation.
To add a wireless gateway to a Wireless Network:
1.
Select Start > All Programs > AMS Device Manager > Network Configuration
from the Windows taskbar.
2.
Select a Wireless Network and click Properties.
3.
Click the Connection tab.
4.
Enter the name or IP address of the gateway and click Add.
5.
If required, enter the username and password to access the gateway’s setup
utility. Then enter information to allow the gateway and AMS Device Manager
to exchange encrypted data.
6.
Click OK.
7.
Click Close.
8.
Start AMS Device Manager. See “Determining the system interface structure
and device data” on page 108.
Note
Optional SSL encryption software is available from Emerson to secure wireless
communication with the gateway.
Removing a gateway
To remove a wireless gateway from a Wireless Network:
1.
Select Start > All Programs > AMS Device Manager > Network Configuration
from the Windows taskbar.
2.
Select a Wireless Network and click Properties.
3.
Click the Connection tab.
4.
Select the appropriate gateway in the list and click Delete.
85
AMS Suite: Intelligent Device Manager
Installation Guide
NOVEMBER 2013
5.
Click Yes.
6.
Click Close.
7.
Start AMS Device Manager. See “Determining the system interface structure
and device data” on page 108.
DeltaV
A DeltaV control network is an isolated Ethernet local area network (LAN) that
provides communication between the controllers and the stations. It uses one or
more Ethernet hubs for communication.
Note
Do not configure an AMS Device Manager Wireless System Interface if a DeltaV System
Interface will be using the same wireless gateway.
For information about AMS Device Manager compatibility with DeltaV, refer to
page 30.
DeltaV can access devices in RS3 and PROVOX I/O systems through the DeltaV
Interface for RS3 I/O and DeltaV Interface for PROVOX I/O, respectively. The devices
are displayed in the DeltaV network hierarchy in AMS Device Manager. For more
information, refer to the DeltaV Books Online and documentation.
To receive alerts from devices connected to PROVOX and RS3 Migration Controllers in
your DeltaV network hierarchy, you must run a utility to properly set the DeltaV alert
capability.
To run the utility:
1.
Select Start > Run from the Windows taskbar.
2.
In the text box, type C:\AMS\BIN\DELTAVFASTSCANUTILITY.EXE (where C is the
drive containing the AMS folder).
3.
Uncheck the box for the appropriate DeltaV network.
4.
Click Save Changes.
The AMS ValveLink SNAP-ON application is supported for DeltaV and PROVOX I/O
cards, but not for RS3 I/O cards.
86
Installation Guide
AMS Suite: Intelligent Device Manager
NOVEMBER 2013
Preparing the DeltaV system
To prepare a DeltaV control system to communicate with a standalone AMS Device
Manager station, you need to:
•
Know the node name of the DeltaV ProfessionalPLUS Station you are
connecting to. If you do not know this name, see your system administrator.
•
Know the password associated with the DeltaVAdmin account on the
ProfessionalPLUS Station, if it has been changed from the default password.
•
Configure a HART-Enabled Channel so that AMS Device Manager knows where
to look for a HART field device. If an I/O channel is enabled for HART but it does
not have an associated DeltaV device signal tag, it will not appear in AMS Device
Manager.
•
Commission any FOUNDATION fieldbus devices you want to be displayed in AMS
Device Manager.
Configuring AMS Device Manager for a DeltaV System
Interface
To configure AMS Device Manager for a DeltaV System Interface:
Note
You must only configure the DeltaV Interface on a licensed AMS Device Manager station.
Computer administrator privileges are required to install a DeltaV Interface.
Do not configure a DeltaV Interface to the same DeltaV ProfessionalPLUS on more than one
AMS Device Manager station in a distributed system.
Ensure that all stations in the AMS Device Manager distributed system are running when
you configure the DeltaV System Interface.
1.
Select Start > All Programs > AMS Device Manager > Network Configuration
from the Windows taskbar.
2.
In the Network Configuration dialog, click Add.
3.
In the Select Network Component Type dialog, select DeltaV Network and click
Install.
4.
Click Next.
5.
On the General dialog, enter a name for the DeltaV Network. Click Next.
6.
On the Connection dialog, enter the computer name of the DeltaV
ProfessionalPLUS Station.
87
AMS Suite: Intelligent Device Manager
Installation Guide
NOVEMBER 2013
7.
Enter the DeltaVAdmin password and password confirmation, if it has been
changed from the default.
Note
The DeltaVAdmin password is an administrative password given to each DeltaV system.
The same password must be used to access all DeltaV networks configured on this station.
If no password is entered, a connection will be attempted using the default DeltaV
password.
8.
Select the options to enable HART, FOUNDATION fieldbus, WirelessHART and
PROFIBUS DP device support, as needed.
9.
Click Next.
10.
On the Advanced tab, enter a high address for the PROVOX I/O Scan Range if
your DeltaV system uses a PROVOX migration controller.
11.
Click Finish to save the configuration.
12.
Click Close.
13.
Start AMS Device Manager to set up the network structure. See “Determining
the system interface structure and device data” on page 108.
If you have multiple DeltaV Zones or networks which include additional Server Plus
Stations, the Server Plus Connect utility lets you access those other Server Plus
Stations from a Client SC Station. For more information, refer to AMS Device Manager
Books Online.
To install AMS Device Manager on a DeltaV network, refer to “Installing AMS Device
Manager 12.5 on DeltaV stations” on page 68.
88
Installation Guide
AMS Suite: Intelligent Device Manager
NOVEMBER 2013
Ovation
The Ovation System Interface lets AMS Device Manager communicate with HART,
FOUNDATION fieldbus, PROFIBUS DP, and WirelessHART devices through an existing
Ovation network. The Ovation network communicates with devices through one or
more Ovation controllers. HART devices communicate with the Ovation controller
through I/O modules specifically designed to communicate with HART equipment.
FOUNDATION fieldbus devices communicate with the Ovation controller through I/O
modules designed to communicate with FOUNDATION fieldbus devices. PROFIBUS DP
devices communicate using I/O modules designed for PROFIBUS. WirelessHART
devices communicate through the Smart Wireless Gateway. Device information is
passed through the Ovation controller to a Windows-based Ovation Station from
which AMS Device Manager accesses device data. See “Ovation” on page 34 for
supported I/O modules.
FOUNDATION fieldbus device commissioning and decommissioning is accomplished
through the Ovation fieldbus engineering software used by the Ovation system. AMS
Device Manager is not part of this process. A FOUNDATION fieldbus device must be
commissioned before AMS Device Manager can communicate with it.
Preparing the Ovation system
Refer to your Ovation documentation for device connection and network setup
instructions.
For Ovation 3.3.1 and 3.4, the AMS Device Manager Server Plus Station must be codeployed on an Ovation Station with the Ovation fieldbus engineering software
installed for FOUNDATION fieldbus device support. Configure the Ovation System
Interface on this station.
For Ovation 3.5, the fieldbus engineering software is located on the Ovation
Database Server. Therefore, it is recommended to install AMS Device Manager Client
SC software on this station type. To install and register this software on an Ovation
Operator station type, you must run an Ovation batch file on the Ovation Operator
station.
To run the batch file on the Ovation Operator station:
1.
Select Start > Run from the Windows taskbar.
2.
In the text box, type CMD and click OK to open a command prompt.
3.
At the command prompt, type:
CD C:\OVATION\OVATIONBASE
4.
Press ENTER.
89
AMS Suite: Intelligent Device Manager
Installation Guide
NOVEMBER 2013
5.
At the command prompt, type:
INSTALLHSESERVER -I
6.
Press ENTER.
Configuring AMS Device Manager for an Ovation
System Interface
At least 1 AMS Device Manager station must installed on the Ovation network,
though not necessarily on an Ovation station. To access HART and PROFIBUS DP
devices, you can configure the AMS Device Manager Ovation System Interface on a
standalone AMS Device Manager station (that is, without Ovation software). For all
device protocols, you can install AMS Device Manager Client SC software on an
Ovation Database Server and set up the Ovation System Interface using AMS Device
Manager Network Configuration utility. If AMS Device Manager is installed on an
Ovation Station that also has fieldbus engineering software installed, you can rightclick a HART or FOUNDATION fieldbus device and select from a set of AMS Device
Manager commands. See “Ovation” on page 34 for station and version compatibility
information. Your Ovation username must also be an AMS Device Manager user with
Device Write and Device SIS Write permissions.
When you configure the Ovation System Interface on an AMS Device Manager Client
SC station co-deployed on an Ovation Database Server, HART, WirelessHART,
PROFIBUS DP, and FOUNDATION fieldbus devices are supported. You must use the
Ovation Database Server as your network gateway to access HART devices.
Communication with WirelessHART devices is enabled through a Smart Wireless
Gateway. For communicating with FOUNDATION fieldbus devices, the fieldbus
engineering software must be installed locally on the same machine as AMS Device
Manager (see “Preparing the Ovation system” on page 89).
To configure AMS Device Manager for an Ovation interface:
90
1.
Select Start > All Programs > AMS Device Manager > Network Configuration
from the Windows taskbar.
2.
In the Network Configuration dialog, click Add.
3.
In the Select Network Component Type dialog, select Ovation Network and
click Install.
4.
Click Next.
5.
In the General dialog, enter a name for the Ovation Network. Click Next.
6.
In the Connection dialog, enter the name of the computer on the Ovation
Network that contains the Ovation system Oracle database.
Installation Guide
AMS Suite: Intelligent Device Manager
NOVEMBER 2013
7.
In the Connection Properties dialog, select the Ovation System Parameters you
will be using.
•
FOUNDATION fieldbus device support
•
FOUNDATION fieldbus device alert support
•
PROFIBUS DP device support
•
WirelessHART device support
If you select WirelessHART device support, you must also identify the Smart
Wireless Gateway name and IP address, as well as enable secure
communications with the Wireless Gateway if you have installed the Security
Setup utility for the Smart Wireless Gateway.
Note
Do not configure an AMS Device Manager Wireless System Interface if an Ovation System
Interface will be using the same wireless gateway.
8.
The data fields in the Timings dialog contain default values which you cannot
change. Click Help for more information about the fields on this dialog.
9.
Click Finish to complete the Ovation Network interface setup.
10.
Click Close.
11.
Start AMS Device Manager to set up the network structure. See “Determining
the system interface structure and device data” on page 108.
Note
You must have computer administrator privileges to install an Ovation network.
Note
If you install both the Ovation System Interface and the FF HSE Interface on the same PC,
you must configure each on a unique IP address.
NOTICE
If an Ovation System Interface is removed and later re-added, any PROFIBUS DP
devices will need to be reidentified. To avoid this, back up your database before
removing the Ovation System Interface. After re-adding the interface, import the
backed up database.
91
AMS Suite: Intelligent Device Manager
Installation Guide
NOVEMBER 2013
FF HSE
The FF HSE Interface lets you use AMS Device Manager to configure and view alerts
for FOUNDATION fieldbus devices connected to FOUNDATION fieldbus linking devices.
Your AMS Device Manager distributed system can be configured to access FF HSE
linking devices in a dedicated network environment. This configuration is
recommended and requires a dedicated network interface card (NIC) for connecting
to the FF HSE linking devices. This arrangement provides best performance because
the FF HSE linking devices are not required to share the network with other network
traffic. In this case, you manually assign the TCP/IP address of the linking device.
The alternative is to configure your AMS Device Manager distributed system to access
FF HSE linking devices from an Ethernet network that assigns TCP/IP addresses using
DHCP.
Note
If you assign a static TCP/IP address to a linking device, a valid gateway address must also
be provided. The gateway address is usually the TCP/IP address of the dedicated NIC. If the
gateway address is invalid, you will see a delay in AMS Device Manager when rebuilding the
hierarchy. In addition, no links or FOUNDATION fieldbus devices will be displayed after
performing the Rebuild Hierarchy operation.
Configuring AMS Device Manager for an FF HSE
Interface
To configure AMS Device Manager for an FF HSE Interface:
92
1.
Select Start > All Programs > AMS Device Manager > Network Configuration
from the Windows taskbar.
2.
In the Network Configuration dialog, click Add.
3.
In the Select Network Component Type dialog, select FF HSE Network and click
Install.
4.
Click Next.
5.
Follow the HSE Network Wizard instructions. Choose the network interface
card that will be connected to the same network as the HSE linking device.
6.
Select the Enable processing and acknowledgement of FF device alerts
checkbox to display device alerts in Alert Monitor and record alerts in Audit
Trail.
7.
Click Finish to save the configuration.
8.
Click Close.
Installation Guide
AMS Suite: Intelligent Device Manager
NOVEMBER 2013
Start AMS Device Manager. See “Determining the system interface structure and
device data” on page 108.
Note
If you install both the FF HSE Interface and the Ovation System Interface (with fieldbus
devices enabled) on the same PC, you must configure each interface on a separate NIC on a
unique IP address.
PROVOX
A PROVOX system controls field devices linked together by a communication
network called a highway. All communicating PROVOX field devices, including the
SRx Controller Family products, are connected to this network.
Field devices are grouped into communication highways in the PROVOX Data
Highway or PROVOX Highway II. Both systems are multi-drop, half-duplex type. A
traffic controller supervises the communication on a PROVOX Data Highway; a tokenpassing technique controls communication on a PROVOX Highway II.
Preparing the PROVOX system
To prepare a PROVOX control system to communicate with AMS Device Manager, you
need to:
•
Know the TCP/IP address and DNS name of your dedicated HDL (Highway Data
Link). If you do not know these, see your system administrator.
•
Generate and transfer the PROVOX hierarchy information to AMS Device
Manager (see below).
•
Verify that the HDL responds (see page 94).
Generating and transferring the HLT file
The PROVOX system uses the HART Instrument Locator Tool (HILT) to create a
comma-delimited value (CDV) file that defines the addresses of field devices
connected to the SRx/SR90 controller. The file name can be anything that is
meaningful, as long as it uses an “hlt” extension (such as Provox1.hlt). After you
create the HLT file, transfer it to the AMS folder on the AMS Device Manager PC and
identify the HLT file in the Connection tab of Network Configuration Properties (see
“Configuring AMS Device Manager for a PROVOX Interface” on page 95).
93
AMS Suite: Intelligent Device Manager
Installation Guide
NOVEMBER 2013
AMS Device Manager reads the HLT file and attempts to communicate with devices at
every defined address, which can cause unpredictable results if the file is built using
“all devices” as the default setting. The HLT file should hold only the device addresses
that are relevant to AMS Device Manager.
Note
For AMS Device Manager to recognize the change when you add or delete a device in
PROVOX, you must regenerate the HLT file on the ENVOX PC and transfer it to the AMS
folder on the AMS Device Manager PC, replacing the old HLT file.
To provide AMS Device Manager with the PROVOX HLT file information:
1.
At the ENVOX PC, generate the HLT file by running the HART Instrument
Locator Tool (HILT) utility.
For information about using the HILT utility, see “Using the HART Instrument
Locator Tool (HILT) Version P3.0” (Readhilt.rtf). This RTF file is located in the
HILT folder on the AMS Device Manager program DVD.
2.
Copy the HLT file from the ENVOX PC to the AMS folder on your AMS Device
Manager PC, using file transfer protocol (FTP).
Verifying HDL response
Use the ping command to verify that the HDL responds to communications sent to it
by AMS Device Manager:
1.
At the AMS Device Manager PC, select Start > Run from the Windows taskbar.
2.
In the text box, type CMD and click OK to open a command prompt.
3.
At the command prompt, type PING <HDL DNS Name>.
If your network does not support DNS, replace the DNS name with the IP
address of your HDL in the ping command.
4.
Press ENTER.
5.
Verify that the HDL responds to the ping command.
The ping command should return a reply message. If the ping command fails,
verify that you typed the correct address in the command line. Also verify that
your network is functioning properly.
Installation is complete only after you receive a valid ping reply.
94
Installation Guide
AMS Suite: Intelligent Device Manager
NOVEMBER 2013
Configuring AMS Device Manager for a PROVOX
Interface
To configure AMS Device Manager for a PROVOX network interface:
1.
Select Start > All Programs > AMS Device Manager > Network Configuration
from the Windows taskbar.
2.
In the Network Configuration dialog, click Add.
3.
In the Select Network Component Type dialog, select PROVOX Network and
click Install.
4.
Follow the PROVOX Network Wizard instructions.
5.
Start AMS Device Manager to set up the network structure. See “Determining
the system interface structure and device data” on page 108.
RS3
A Rosemount System 3 (RS3) system controls field devices linked together through
Controller cards connected to a PeerWay through ControlFiles. A PeerWay can
accommodate up to 32 system devices, called nodes, to allow each control system
device to communicate through the PeerWay and the RS3 Network Interface (RNI).
Preparing the RS3 system
To prepare an RS3 control system to communicate with AMS Device Manager, you
must:
•
Know the TCP/IP address and DNS name of your RNI. If you do not know these,
see your system administrator.
•
Set up a username and password for the system interface on your RNI (see
“Verifying communication with the RNI” on page 97).
•
Verify that the RNI responds.
Setting RNI username and password
To set up a username and password for the system interface on your RNI:
1.
On your RNI, open the RNI user configuration file,
\\RNIBOOT\CONFIG\USERFILE.CFG. You can open it with the Notepad utility, or
any other text editor.
95
AMS Suite: Intelligent Device Manager
Installation Guide
NOVEMBER 2013
2.
Create a user account for AMS Device Manager, ensuring that FMSPassthrough is
enabled and that KeyLevel is set to Console.
The following example shows the system interface user entry in the
USERFILE.CFG file. The user entry in bold is an example of an RS3 user entry. You
can create the system interface user entry by copying and pasting an existing
user entry in USERFILE.CFG and editing the entry for system interface.
<User
<Name RS3OpStation>
<Password RS3Performance>
<KeyLevel CONSOLE>
<Attributes
<ReadUsers ON>
<SendAlarms ON>
<FMSPassthrough ON>
<RemoteBoot ON>
>
>
<User
<Name AMS>
<Password Passthrough>
<KeyLevel CONSOLE>
<Attributes
<ReadUsers ON>
<SendAlarms ON>
<FMSPassthrough ON>
<RemoteBoot ON>
>
>
Note
The username and password are case-sensitive in the USERFILE.CFG file. When entering
them in the AMS Device Manager Network Configuration utility, be sure to match the case.
Note
AMS ValveLink SNAP-ON application is not supported.
3.
96
Save and close USERFILE.CFG.
Installation Guide
AMS Suite: Intelligent Device Manager
NOVEMBER 2013
Verifying communication with the RNI
Use the ping command to verify that the RNI is responding:
1.
At the AMS Device Manager PC, open a command prompt (Start > All Programs
> Accessories > Command Prompt).
2.
At the command prompt, type PING <RNI DNS Name>. (If your network does
not support DNS, replace the DNS name with the IP address of your RNI in the
ping command.)
3.
Press ENTER.
4.
Verify that the RNI responds to the ping command. The ping command should
return a reply message.
5.
If the ping command fails, verify that you typed the correct address in the
command line. Also verify that your network is functioning properly.
Note
Your installation is complete only after you receive a valid ping reply.
Configuring AMS Device Manager for an RS3 Interface
To configure AMS Device Manager for an RS3 interface:
1.
Select Start > All Programs > AMS Device Manager > Network Configuration
from the Windows taskbar.
2.
In the Network Configuration dialog, click Add.
3.
In the Select Network Component Type dialog, select RS3 Network and click
Install.
4.
Follow the RS3 Network Wizard instructions.
5.
Start AMS Device Manager to set up the network structure. See “Determining
the system interface structure and device data” on page 108.
97
AMS Suite: Intelligent Device Manager
Installation Guide
NOVEMBER 2013
STAHL HART
A STAHL HART Interface supports STAHL systems that communicate with HART field
devices. AMS Device Manager can read and write device information through existing
plant wiring by communicating with multiple devices through the STAHL network.
Various STAHL systems can coexist on a single STAHL network.
Preparing the STAHL system
No additional steps are needed to prepare the STAHL network for communication
with AMS Device Manager. After configuring the STAHL HART interface, AMS Device
Manager scans the STAHL network to determine its configuration and connected
HART devices. Refer to the STAHL documentation for device connection and network
setup instructions.
Configuring AMS Device Manager for a STAHL HART
Interface
To configure AMS Device Manager for a STAHL network interface:
1.
Select Start > All Programs > AMS Device Manager > Network Configuration
from the Windows taskbar.
2.
In the Network Configuration dialog, click Add.
3.
In the Select Network Component Type dialog, select Stahl Network and click
Install.
4.
Follow the prompts in the Add Stahl Network Wizard (see “Configuration
notes” on page 98).
5.
Start AMS Device Manager to determine the network structure. See
“Determining the system interface structure and device data” on page 108.
Configuration notes
•
The STAHL network may need to be set to Secondary HART Master if the control
system is set to Primary HART Master.
Note
The HART master selection for HART multiplexers, as shown in their Configuration
Properties, must match this setting.
98
Installation Guide
AMS Suite: Intelligent Device Manager
NOVEMBER 2013
NOTICE
Do not configure two HART primary masters (such as AMS Device Manager and a
control system)–this is an invalid setting and can produce unpredictable results.
•
In the Connection dialog, select the communications port of the PC to which
you are going to attach the STAHL Network. If necessary, adjust the Baud Rate
and Device timeout value. Refer to AMS Device Manager Books Online for
details. Click Next.
•
In the Advanced dialog, adjust the RS-485 scan address range. To optimize
performance, set the address range to include only the addresses where
systems are located.
•
To verify the baud rate or other information, select the STAHL Network name in
the Network Configuration dialog and click Properties. If necessary, change the
information shown on the three tabs.
•
Changes will take effect when AMS Device Manager is restarted.
99
AMS Suite: Intelligent Device Manager
Installation Guide
NOVEMBER 2013
8000 BIM
The 8000 BIM interface displays HART field devices connected to an 8000 BIM by
means of either:
•
A serial connection using an RS-485 converter (BIM)
•
An Ethernet connection using TCP/IP addressing (eBIM)
Configuring AMS Device Manager for an 8000 BIM
Interface
To configure AMS Device Manager for an 8000 BIM interface:
1.
Select Start > All Programs > AMS Device Manager > Network Configuration
from the Windows taskbar.
2.
In the Network Configuration dialog, click Add.
3.
In the Select Network Component Type dialog, select 8000 BIM Network and
click Install.
4.
Follow the 8000 BIM Network Wizard instructions.
5.
Start AMS Device Manager to set up the network structure. See “Determining
the system interface structure and device data” on page 108.
If no icons are displayed under the 8000 BIM network icon after a Rebuild Hierarchy
operation, perform the appropriate procedure for your operating system:
From the Windows Control Panel:
100
1.
(XP/2003) Open Network Connections.
(Windows 7 or 8/Server 2008 or 2012) Select Network and Sharing Center >
Change adapter settings.
2.
Select Advanced > Advanced Settings from the Network Connections toolbar
menu.
3.
Under Connections, move the Ethernet card connected to the 8000 BIM
network to the first spot in the network connection order.
4.
Click OK.
5.
Restart the PC.
Installation Guide
AMS Suite: Intelligent Device Manager
NOVEMBER 2013
Note
If AMS Device Manager is unable to detect the eBIMs, change the order of the network
adapters in the station Network Properties so the Network Interface Card (NIC) connected
to the 8000 BIM system is listed first. Then restart the PC.
HART Over PROFIBUS
The HART Over PROFIBUS System Interface lets you use AMS Device Manager to view
and configure HART Rev. 5 or HART Rev. 6 field devices that are connected to
PROFIBUS remote I/O subsystems via the T+H Ethernet PROFIBUS Interface (xEPI)
PROFIBUS Gateway. The interface addresses the gateway by either its DNS or IP
address.
The HART Over PROFIBUS System Interface supports the AMS ValveLink SNAP-ON
application if using a compatible PROFIBUS remote I/O subsystem.
Preparing the PROFIBUS remote system
Refer to the documentation specific to your PROFIBUS remote I/O subsystem for
device connection and network setup instructions.
Configuring AMS Device Manager for a HART Over
PROFIBUS Interface
To configure AMS Device Manager for a HART Over PROFIBUS Interface:
1.
Close AMS Device Manager if it is running.
2.
Download and install the TACC components from T+H (http://www.t-h.de/en/
support-and-service/industrial-communication/products/tacc/downloads/
software-documentation.html).
3.
Select Start > All Programs > AMS Device Manager > Network Configuration
from the Windows taskbar.
4.
Click Add.
5.
From the Select Network Component Type dialog, select HART Over PROFIBUS
and click Install.
6.
Follow the HART Over PROFIBUS Network Wizard instructions.
101
AMS Suite: Intelligent Device Manager
Installation Guide
NOVEMBER 2013
7.
Start AMS Device Manager to set up the network structure. See “Determining
the system interface structure and device data” on page 108.
Note
Refer to the Release Notes if all your devices are not displayed after performing a Rebuild
Hierarchy and Scan New/All operation.
Refer to the TH AMS Device Manager Communication Components HART Over PROFIBUS
User Guide downloaded from T+H for more information.
102
Installation Guide
AMS Suite: Intelligent Device Manager
NOVEMBER 2013
Kongsberg Maritime
The Kongsberg System Interface lets you use AMS Device Manager to communicate
with HART devices using I/O modules supported by the Kongsberg Maritime System.
The Kongsberg Network communicates with HART devices using the Kongsberg
Automation Server which is an application with a Web Service interface.
The Kongsberg Network is deployed where there is access to the Kongsberg
Automation Server with IIS. It is not necessary to install the Kongsberg Automation
Server on an AMS Device Manager station, however, communications performance is
better with this deployment type. For deployment scenarios that require AMS Device
Manager Client Stations to cross External Firewalls, refer to KBA NA-0400-0046.
If you install additional Kongsberg Networks, they must be linked to unique
Automation Server URLs. The Kongsberg Network supports communications with
HART instruments connected to STAHL ISPac HART Multiplexers and STAHL
PROFIBUS DP Remote I/O modules for HART. The Kongsberg Interface supports
Advanced Valve Diagnostics using the AMS ValveLink SNAP-ON application.
Configuring AMS Device Manager for a Kongsberg
System Interface
To configure AMS Device Manager for a Kongsberg System Interface:
1.
Select Start > All Programs > AMS Device Manager > Network Configuration
from the Windows taskbar.
2.
Click Add.
3.
In the Select Network Component Type dialog, select Kongsberg Network and
click Install.
4.
Follow the Kongsberg Network Wizard instructions.
5.
Choose the Kongsberg Automation Server URL. The URL connection to the
Automation Server is tested and if not found, a corresponding message is
displayed.
6.
If the URL connection is found, click Finish.
7.
Close the Network Configuration dialog.
8.
Start AMS Device Manager. See “Determining the system interface structure
and device data” on page 108.
Preparing the Kongsberg control system
Refer to the Kongsberg Maritime system documentation for setup instructions.
103
AMS Suite: Intelligent Device Manager
Installation Guide
NOVEMBER 2013
Siemens
The Siemens System Interface lets you use AMS Device Manager to communicate
with HART devices on a Siemens PCS 7 Control Network. An AMS Device Manager
Server Plus Station or Client SC Station must be installed on the same station as the
Siemens PCS 7 ES/MS Station. The AMS Device Manager Network Configuration
utility is used to configure the Siemens network interface.
Configuring AMS Device Manager for a Siemens
System Interface
To configure AMS Device Manager for a Siemens System Interface:
1.
Select Start > All Programs > AMS Device Manager > Network Configuration
from the Windows taskbar.
2.
Click Add.
3.
In the Select Network Component Type dialog, select Siemens Network and
click Install.
4.
Follow the Siemens Network Wizard instructions.
5.
Choose the Rebuild Hierarchy Timeout and HART Response Timeout values.
6.
Close the Network Configuration dialog.
7.
Start AMS Device Manager. See “Determining the system interface structure
and device data” on page 108.
For additional information, refer to the Siemens Control Network documentation.
ABB
The ABB System Interface lets you use AMS Device Manager to view and configure
HART devices connected to I/O modules supported by the ABB System 800xA control
system.
Note
When configuring the ABB System Interface, the AMS Device Manager user must be the
same as the ABB user on the station that runs the “ABB HART Pass Though Service”.
104
Installation Guide
AMS Suite: Intelligent Device Manager
NOVEMBER 2013
Configuring AMS Device Manager for an ABB System
Interface
To configure AMS Device Manager for an ABB System Interface:
Note
If you are configuring the ABB System Interface on a Windows XP or Server 2003 PC, you
must install the ABB security certificate on your AMS Device Manager station before
performing the following steps. The certificate installation procedure is in the
ABBSystemInterface-WindowsXP2003-Readme.txt file located in the SNAP-ONS And
Tools/ABB HPT Certificate folder on the AMS Device Manager installation DVD.
1.
Select Start > All Programs > AMS Device Manager > Network Configuration
from the Windows taskbar.
2.
Click Add.
3.
In the Select Network Component Type dialog, select ABB Network and click
Install.
4.
Follow the ABB Network Wizard instructions.
5.
Enter the computer name or IP address of the ABB Station.
6.
Enter the User name and Password for the ABB Station.
7.
Enter a HART Response Timeout value in the range of 5000 to 60000
milliseconds.
8.
Select the Local IP Address from the drop-down list. This is where messages
from the ABB Station will be sent. The address selected must be accessible from
the ABB Station.
9.
Select Enable Diagnostic Logging to evaluate performance and verify
communications. If Enable Diagnostic Logging is enabled, the appropriate log
files for Hierarchy and Communications are created and uniquely named for the
network when AMS Device Manager is running. The log files are located in the
AMS\Log folder.
10.
Click Finish to save the changes and close the Network Configuration dialog.
11.
Start AMS Device Manager. See “Determining the system interface structure
and device data” on page 108.
For additional information, refer to the ABB system documentation.
105
AMS Suite: Intelligent Device Manager
Installation Guide
NOVEMBER 2013
Det-Tronics
The Det-Tronics System Interface is used to monitor fire and gas detectors on the DetTronics Eagle Quantum Premier system. Like other system interfaces, you use
Network Configuration to install it on your AMS Device Manager Server Plus Station.
You must install the Det-Tronics Safety System Software application (version 8.6.0.1)
prior to configuring the system interface. For additional information about the DetTronics System Interface, refer to AMS Device Manager Books Online.
Configuring AMS Device Manager for a Det-Tronics
System Interface
To configure AMS Device Manager for a Det-Tronics System Interface:
1.
Select Start > All Programs > AMS Device Manager > Network Configuration
from the Windows taskbar.
2.
Click Add.
3.
In the Select Network Component Type dialog, select Det-Tronics Network and
click Install.
4.
Follow the Det-Tronics Network Wizard instructions.
5.
Click Finish to save the changes and close the Network Configuration dialog.
6.
Start AMS Device Manager. See “Determining the system interface structure
and device data” on page 108.
For additional information, refer to the Det-Tronics system documentation.
106
Installation Guide
AMS Suite: Intelligent Device Manager
NOVEMBER 2013
PROFIBUS
The PROFIBUS System Interface lets you use AMS Device Manager to view and
configure PROFIBUS DP or PROFIBUS PA devices connected to a Softing
PROFIBUS Ethernet Gateway or a Softing PROFlusb Modem.
Note
Ensure that you have installed and configured the Softing device drivers prior to
configuring the AMS Device Manager PROFIBUS System Interface.
Configuring AMS Device Manager for a PROFIBUS
System Interface
To configure AMS Device Manager for a PROFIBUS System Interface:
1.
Select Start > All Programs > AMS Device Manager > Network Configuration
from the Windows taskbar.
2.
Click Add.
3.
Select PROFIBUS Network from the list of networks in the Select Network
Component Type dialog, and click Install.
4.
Follow the instructions on the PROFIBUS Network wizard.
5.
Start the AMS Device Manager application by selecting Start > All Programs >
AMS Device Manager > AMS Device Manager.
6.
Start AMS Device Manager. See “Determining the system interface structure
and device data” on page 108. Perform a Rebuild Hierarchy operation on the
network by right-clicking the PROFIBUS network icon in Device Connection
View or Device Explorer and selecting Rebuild Hierarchy.
107
AMS Suite: Intelligent Device Manager
Installation Guide
NOVEMBER 2013
Determining the system interface structure and
device data
Rebuilding the hierarchy
At the first AMS Device Manager startup following the addition of a system interface,
AMS Device Manager displays an icon representing the highest level of the system
network hierarchy. When you double-click this icon, AMS Device Manager will direct
you to initiate a Rebuild Hierarchy operation to populate the hierarchy with the
appropriate levels and icons.
Reading device parameter data
After the initial Rebuild Hierarchy operation, AMS Device Manager displays the
system interface hierarchy. The structure, however, does not yet contain parameter
data for the connected devices. You must manually initiate a Scan > New Devices
operation to read the device parameter data into the database.
To initiate a scan for device data:
1.
Right-click the top-level icon of the system interface hierarchy.
2.
Select Scan > New Devices from the context menu.
Note
The scan operation can take a long time, especially when performed at the highest level of
the hierarchy.
During the initial Scan > New Devices operation, AMS Device Manager surveys the
network to identify the devices it can communicate with. The operation also reads
parameter data and updates the database.
108
Installation Guide
AMS Suite: Intelligent Device Manager
NOVEMBER 2013
AMS Device Manager Web Services
AMS Device Manager Web Services provide the ability to import AMS Device Manager
data, in XML format, into business applications such as Microsoft Excel. In addition,
Computerized Maintenance Management Systems (CMMS) and Enterprise Resource
Planning (ERP) systems can use AMS Device Manager Web Services to retrieve data
from AMS Device Manager. AMS Device Manager Web Services can only be installed
on a Server Plus Station. For more information, refer to AMS Device Manager Books
Online.
Installing AMS Device Manager Web Services on a
station
Note
Microsoft Internet Information Services (IIS) and AMS Device Manager 12.5 must be
installed on your system before you can install AMS Device Manager Web Services. Some
control systems do not allow IIS to be installed on the same PC. Check your control system
documentation to determine IIS compatibility.
Note
If you want to install AMS Device Manager Web Services on a DeltaV station, it must be a
DeltaV Application or ProfessionalPLUS station.
To install AMS Device Manager Web Services (installation is only supported on a
Server Plus Station):
Note
Local administrator permission is required for installation of AMS Device Manager Web
Services.
1.
Ensure that appropriate Windows Firewall security settings have been made
according to “Changing Windows Firewall settings” on page 111.
2.
Exit/close all Windows programs, including any running in the background
(including antivirus software).
3.
Insert the AMS Device Manager program DVD in the DVD drive of the PC.
4.
Browse to D:\AMSWEBSERVICES.
(where D is the DVD drive letter)
5.
Double-click SETUP.EXE.
6.
Follow the prompts.
109
AMS Suite: Intelligent Device Manager
Installation Guide
NOVEMBER 2013
AMS Device Manager Web Services and AMS Asset
Portal 3.2
AMS Asset Portal acquires device data as it is connecting to AMS Device Manager
Web Services. To use AMS Device Manager Web Services with AMS Asset Portal for
devices, the following requirements must be met:
•
Server Plus software must be installed on the PC.
•
Microsoft Internet Information Services (IIS) must be installed on the PC prior to
installing AMS Device Manager Web Services. Use the Windows Add or Remove
Programs and Add/Remove Windows Components functions to install IIS (see
the Windows operating system documentation or Windows online Help for
more information).
•
The Data Provider Web Service is required to use AMS Asset Portal. The URL to
find the Web Service is: http://<PCname>/amsdevicemanagerws/
amsdataproviderservice.asmx
AMS Suite: Asset Performance Management
AMS Suite: Asset Performance Management is a product offering that replaces AMS
Asset Portal. The AMS Suite: Asset Performance Management Client Framework can
be installed on an AMS Device Manager 12.5 station. Other components of AMS Suite
APM must be installed on additional non-AMS Device Manager PCs.
Microsoft IIS must be installed and configured on the PC prior to installing AMS Suite
APM. To enable the SQL reporting service in AMS Suite APM, the following IIS features
must to be added to the IIS defaults (if you are unsure how to do this, contact your IT
department):
•
ASP.NET
•
NET Extensibility
•
Request Filtering
•
ISAPI
•
ISAPI Extensions
•
IIS 6 Management Compatibility
For more information about AMS Suite APM, contact your Emerson Process
Management Sales/Service Office.
110
Installation Guide
AMS Suite: Intelligent Device Manager
NOVEMBER 2013
5
Starting to Use AMS Device Manager
After installation
There are several configuration steps you must take prior to using AMS Device
Manager. If you do not configure your PC as described, AMS Device Manager will not
function as expected.
Changing Windows Firewall settings
When operating AMS Device Manager on a Windows PC, some changes to Windows
Firewall settings may be required. If your PC is adequately protected by a corporate
firewall, you may be able to turn off the Windows Firewall protection on your AMS
Device Manager PC.
If your AMS Device Manager PC is not protected by a corporate firewall and you have
enabled the Windows Firewall, you must change the firewall settings on your PC to
allow program and port exceptions that enable AMS Device Manager operation. For
more information, refer to KBA NA-0500-0085 and KBA NA-0400-0046. For
assistance configuring your Windows Firewall, contact your IT department.
Note
On a Windows 7 PC, all entered firewall exceptions display as “AMS Suite: Intelligent Device
Manager” in the firewall exceptions list. You must view the properties of each entry to see
what was added.
Usernames and passwords
Each user needs a unique login consisting of a username and a password. Ask your
system administrator for your login. The User Login dialog appears when you start
AMS Device Manager. You must enter a valid username and password and select the
appropriate Login Type from the drop-down list. For more information about the User
Login dialog, refer to AMS Device Manager Books Online.
Note
When AMS Device Manager is co-deployed with DeltaV, your DeltaV username and
password also provide AMS Device Manager access.
111
AMS Suite: Intelligent Device Manager
Installation Guide
NOVEMBER 2013
The AMS Device Manager application allows an initial login with the username
“admin” and no password, which has AMS Device Manager System Administration
rights.
NOTICE
To protect your data, assign a password to the admin username after you install AMS
Device Manager. See “Assigning an “admin” password” on page 112.
User permissions are set up and maintained in User Manager. You need AMS Device
Manager System Administration rights to log in to User Manager. The sections that
follow provide guidance in managing usernames and passwords.
Logging in to User Manager
To log in to the User Manager:
1.
From the Windows taskbar, select Start > All Programs > AMS Device Manager >
User Manager.
2.
In the User Manager Login dialog, enter the “admin” username (or any other
username with AMS Device Manager System Administration rights) and
password.
3.
Select a Login Type from the drop-down list.
4.
Click OK.
Assigning an “admin” password
To assign a password to the admin username:
1.
Log in to User Manager.
2.
Select admin and click Edit User.
3.
Enter a password and confirm it.
4.
Click OK.
Note
The admin username cannot be deleted or disabled, but the password can be changed.
112
Installation Guide
AMS Suite: Intelligent Device Manager
NOVEMBER 2013
Adding a username
To add a username at any time:
For a Standard User (see below for a Windows User):
1.
Log in to AMS Device Manager User Manager (see above) and click Add User.
2.
Select the Standard User option and click Next.
3.
Enter a username and password and confirm the password.
4.
Select the appropriate General and AMS ValveLink SNAP-ON application
permissions for this user. Refer to AMS Device Manager Books Online for more
information.
5.
Click Next.
6.
Verify the new user information and click Finish to add the new username to the
list of users.
7.
Repeat for each additional Standard User.
8.
Click Close.
For a Windows User:
1.
Add the Windows Username to the AMSDeviceManager group (see your
network administrator).
2.
Log in to AMS Device Manager User Manager (see above) and click Add User.
3.
Select the Windows User option and click Next.
4.
Select the username from the list of users, and click Next.
5.
Select the appropriate General and AMS ValveLink SNAP-ON application
permissions for this user. Refer to AMS Device Manager Books Online for more
information.
6.
Click Next.
7.
Verify the new user information and click Finish to add the new username to the
list of users.
8.
Repeat for each additional Windows User.
Note
Once added, usernames cannot be deleted, but they can be disabled and the users’
permissions can be changed (see “Changing rights and permissions” on page 114).
113
AMS Suite: Intelligent Device Manager
Installation Guide
NOVEMBER 2013
9.
Click Close.
Changing passwords
To change the password for a Standard User:
1.
Launch AMS Device Manager.
2.
On the User Login dialog, enter a valid username and password.
3.
Click the Change Password button.
4.
Enter a new password, confirm it, and click OK.
Note
You can also change the password of a Standard User in User Manager.
To change the password for a Windows User:
1.
Simultaneously press the CTRL, ALT, and DEL keys.
2.
In the Windows Security dialog, click Change Password.
3.
Enter your existing password and a new password with confirmation.
4.
Click OK.
Changing rights and permissions
NOTICE
If you upgraded your system from AMS Device Manager 10.0 or later, the previous
usernames, passwords, and permissions were migrated but the new AMS Device
Manager 12.5 user permissions are not set. You may need to reset the user
permissions.
To change user rights and permissions:
114
1.
Log in to User Manager.
2.
Select the desired username.
3.
Click Edit User.
4.
Select or clear the rights and permissions for this user as desired.
5.
To enable or disable the username, click Enable/Disable User.
Installation Guide
AMS Suite: Intelligent Device Manager
NOVEMBER 2013
6.
Click OK.
7.
Click Close.
Using AMS Device Manager
After AMS Device Manager is installed, the following user information tools are
available to you by selecting Start > All Programs > AMS Device Manager > Help:
•
AMS Device Manager Books Online
•
AMS Suite: Intelligent Device Manager Installation Guide
•
Work Processes Guide
•
Release Notes
These files are copied to your PC during AMS Device Manager installation.
AMS Device Manager Books Online
AMS Device Manager Books Online provides detailed reference and procedural
information for using AMS Device Manager. AMS Device Manager Books Online
explains the features and functions of AMS Device Manager. You should become
familiar with AMS Device Manager Books Online and refer to it regularly as you use
AMS Device Manager.
AMS Device Manager Books Online is accessed in two ways:
•
Click the Help menu on the AMS Device Manager toolbar and select AMS Device
Manager Books Online.
-OR-
•
Select Start > All Programs > AMS Device Manager > Help > Books Online.
Use the Contents, Index, or Search tab in the left pane to locate specific topics. You
can save shortcuts to frequently used topics and access them on the Favorites tab.
What’s This? Help
You can get help for device parameters on most AMS Device Manager supported
devices by clicking the
button and then clicking on a field. The help is displayed in
a window that you can dismiss by simply clicking anywhere on the screen. This help is
provided by the device manufacturer and can also be viewed by clicking in a field and
pressing the F1 key.
115
AMS Suite: Intelligent Device Manager
Installation Guide
NOVEMBER 2013
Electronic documentation
Two user documents are placed on your station when AMS Device Manager is
installed. These documents are available as Portable Document Format (PDF) files,
and include the AMS Suite: Intelligent Device Manager Installation Guide and the Work
Processes Guide.
You need Adobe® Reader® to view these files. If you do not have a compatible version
of Adobe Reader on your PC already, you can download Adobe Reader from
www.adobe.com.
To access an electronic document after Adobe Reader is installed:
•
Select Start > All Programs > AMS Device Manager > Help > <document> from
the Windows taskbar.
Release Notes
The Release Notes provide the most up-to-date information about the current release
of AMS Device Manager, including supported devices, compatibility issues, and
known discrepancies and workarounds.
The Release Notes are provided in text (.TXT) format. You can access the Release
Notes in two ways:
•
From the Start menu (Start > All Programs > AMS Device Manager > Help >
Release Notes)
•
By double-clicking the RELNOTES.TXT file located in the AMS folder after
installation or on DVD
We recommend that you read the Release Notes prior to using AMS Device Manager
and print a copy for future reference.
Device manuals
Many device manufacturers provide manuals for their devices in PDF format. Run the
AMS_PDF_Installer utility to copy relevant manuals to your hard drive. The utility is
located in the Device Documentation Installer folder on the AMS Device Manager
installation DVD. After installing device manuals, you access them in AMS Device
Manager by right-clicking a device and selecting Help from the context menu. If a
device manual is available, it opens in Adobe Reader. If no manual exists for the
selected device, AMS Device Manager Books Online opens. To see a list of device
manuals installed on your station, select Help > Device from the AMS Device Manager
toolbar. Double-click a device to open the associated manual.
116
Installation Guide
AMS Suite: Intelligent Device Manager
NOVEMBER 2013
Adding devices to an AMS Device Manager
installation
All available information for supported field devices (other than device manuals) is
included and installed with the AMS Device Manager application. If it is necessary to
install additional devices after the initial installation, refer to Device Type Installation
in AMS Device Manager Books Online. Additional device descriptions can be
downloaded from the Internet. Copy this URL into your Internet browser: http://
www2.emersonprocess.com/en-US/documentation/deviceinstallkits/Pages/
deviceinstallkitsearch.aspx and enter device search information.
DTM Launcher
The DTM Launcher application is an AMS Device Manager application installed as part
of the AMS Device Manager installation. It enables users to install and use certain
HART, WirelessHART, and FOUNDATION fieldbus Device Type Manager (DTM) drivers
with AMS Device Manager. DTMs are an alternative to the traditional Device
Descriptions (DDs) supported in AMS Device Manager. DTMs are provided by various
device manufacturers and are configured using the DTM Catalog Manager. For more
information, refer to AMS Device Manager Books Online.
AMS Suite Calibration Connector
AMS Suite Calibration Connector is a separately licensed and installed application
that integrates with Beamex CMX or AMS Suite APM/Meridium software to provide
full-featured calibration management capabilities beyond the basic features available
in AMS Device Manager calibration management. AMS Suite Calibration Connector
provides a solution for users to take advantage of the functionality of other
calibration management applications while maintaining the benefits of device
configuration and calibration management data synchronization.
AMS Suite Calibration Connector supports:
•
AMS Suite APM version 3.5.1
•
Beamex CMX version 3.0.414
AMS Suite Calibration Connector can only be installed on a Server Plus Station. You
must have Windows Administrator permissions to install AMS Suite Calibration
Connector.
To install AMS Suite Calibration Connector:
1.
Insert the AMS Device Manager DVD in the DVD drive of your PC.
2.
Double-click AMSSuiteCalibrationConnector_Setup.exe.
117
AMS Suite: Intelligent Device Manager
Installation Guide
NOVEMBER 2013
3.
Follow the prompts on the installation window.
4.
Click Finish when done.
For additional information about using AMS Suite Calibration Connector, refer to
AMS Device Manager Books Online. Also, refer to your AMS Suite APM or Beamex
CMX documentation for more information on these products.
Note
Refer to the AMS Device Manager Supported Device List to determine if a device supports
calibration.
Device Description Update Manager
The purpose of Device Description Update Manager is to automate the installation of
device descriptions from Guardian Support into AMS Device Manager, DeltaV, and
Ovation through the Add Device Type utility. These device descriptions can be new or
updates to previously installed devices.The Device Description Update Manager
provides 2 ways to install device descriptions:
Scheduled/fully automated
•
User-initiated/interactive
There are 3 ways that this feature can be installed:
•
Server Station
•
Client Station
•
Server/Client Station
The Server Station can be installed with or without an AMS Device Manager station
already installed but it must be installed on the same PC as the Guardian Software
Update Delivery Service download folder.
•
The Client Station must be installed on an AMS Device Manager 12.5 Server Plus
Station that can access the Server Station to initiate Guardian downloads. The Client
Station will be supported on an AMS Device Manager 12.5 Server Plus Station codeployed on either a DeltaV 9.3 or later or an Ovation 3.5 workstation.
In a Server/Client Station installation, both the Server Station and Client Station are
installed on the same Server Plus Station.
To install Device Description Update Manager:
118
1.
Insert the AMS Device Manager DVD in the DVD drive of your PC.
2.
In the Device Description Update Manager folder, double-click
DDUMInstall_Setup.exe.
3.
Follow the prompts on the installation window.
Installation Guide
AMS Suite: Intelligent Device Manager
NOVEMBER 2013
4.
Click Finish when done.
Device Configuration Reports installation
The Device Configuration Reports tool works with the Bulk Transfer Utility on the
AMS Device Manager Server Plus Station. It allows you to verify that FOUNDATION
fieldbus devices are configured according to a specified user configuration. The
Device Configuration Reports tool allows you to check the device configurations of
multiple devices and quickly identify any incorrect settings. For more information
about user configurations and the Bulk Transfer Utility, refer to AMS Device Manager
Books Online.
The Device Configuration Reports tool requires Microsoft SQL Server 2008 R2,
Service Pack 2, Standard or Enterprise edition. If you do not have one of these, they
can be purchased from Microsoft.
Note
It is best to install one of these SQL Server versions before installing AMS Device Manager.
To install SQL Server, follow the instructions in the SQL Server installation materials.
Be sure you install the following SQL Server options at a minimum.
On the Feature Selection screen, select:
•
•
•
•
Database Engine Services
Reporting Services
Business Intelligence Development Studio
Integration Services
On the Instance Configuration screen:
•
If you haven’t already installed AMS Device Manager, create an “Emerson2008”
instance, otherwise create a new instance.
On the Server Configuration/Service Accounts screen, configure:
•
•
•
•
SQL Server Agent | NT Authority\System
SQL Server Database Engine | NT Authority\System
SQL Server Reporting Services | NT Authority\System
SQL Server Integration Services| NT Authority\Network Services
On the Database Engine Configuration/ Account Provisioning screen, select/enter:
•
•
•
Mixed Mode (SQL Server authentication and Windows authentication)
If you used the Emerson 2008 instance above, enter and confirm
42Emerson42Eme as the SA password
Enter 1 or more SQL Server administrators
119
AMS Suite: Intelligent Device Manager
Installation Guide
NOVEMBER 2013
Use default settings for other parameters.
The Device Configuration Reports tool uses AMS Generic Export to get device
parameter data. If you have a large AMS Device Manager system, a large number of
devices, or a large number of device parameters to return, the Generic Export process
can take several hours.
To install the Device Configuration Reports tool:
1.
Insert the AMS Device Manager DVD in the DVD drive of your PC.
2.
In the SNAP-ONS And Tools\Device Configuration Reports folder, double-click
DEVCONFIGREPORTSINSTALL.EXE.
3.
Follow the prompts on the installation window.
4.
Open Internet Explorer and select Tools > Internet Options.
5.
On the Security tab, click Local Intranet, and uncheck Enable Protected Mode.
6.
Click OK.
After installation, start the Device Configuration Reports tool in Windows XP or
Windows 7 by selecting Start > All Programs > AMS Device Manager > Device
Configuration Reports. In Windows 8, enter DEV on the Start screen and click the
Device Configuration Reports tile.
Attaching a Roving Station to a Server Plus Station
A Roving Station is a portable PC (laptop or notebook computer) with AMS Device
Manager Server Plus Station software installed. A Roving Station is configured as such
in the Options for AMS Device Manager dialog (Tools > Options). A Roving Station can
be temporarily connected to a stationary Server Plus Station to enable uploading of
AMS Device Manager information from the Roving Station. For more information
about Roving Stations, refer to AMS Device Manager Books Online.
120
Installation Guide
AMS Suite: Intelligent Device Manager
NOVEMBER 2013
6
Troubleshooting installation
If you get error messages during the installation or startup of AMS Device Manager,
you may be able to resolve these errors using the troubleshooting procedures in this
section.
If you are unable to resolve installation problems after carefully following the
installation steps outlined in this guide and using these troubleshooting suggestions,
contact your local Emerson Process Management Sales/Service Office. Additional
Support Center Contact Information can be found on the Internet at:
http://www.emersonprocess.com/systems/support/ratecard.htm
For more information about multiplexer networks, refer to KBA NA-0400-0084.
Error messages
ERROR MESSAGE /
INDICATION:
Bluetooth adapter stops working.
POSSIBLE
SOLUTION:
If an approved USB Bluetooth adapter is removed or disabled while
AMS Device Manager is running, reinsert the adapter and reboot your
workstation. After your PC restarts, try to re-establish Bluetooth
communications with your Field Communicator.
ERROR MESSAGE /
INDICATION:
If the SQL Server installation fails.
POSSIBLE
SOLUTION:
Manually install the required SQL Server version and/or service pack
(SP) located on the AMS Device Manager DVD in the SQL2008Express
folder as follows:
• If SQL 2008 with the Emerson2008 named instance is not installed
on your PC, install SQL2008.
The SQL Server manual installation process requires user input that
you must provide. After you install SQL Server, restart the AMS
Device Manager installation process.
POSSIBLE
SOLUTION:
There could be a mismatch between versions of SQL and Windows
XP. If your PC is running Windows XP SP2 or earlier, upgrade it to
Windows XP SP3 before running the SQL Server installation.
121
AMS Suite: Intelligent Device Manager
Installation Guide
NOVEMBER 2013
ERROR MESSAGE /
INDICATION:
AMS Device Manager has detected an incorrect version of the
database.
The version detected is x.x, the correct version should be y.y.
POSSIBLE CAUSE:
Database Verify/Repair was not run prior to upgrading AMS Device
Manager to the current release or AMS Device Manager has detected
a fault that occurred during the Verify/Repair operation.
POSSIBLE
SOLUTION:
Run the database conversion utility (AmsConvertDb.exe) from the
AMS\Bin folder:
• Open the AMS\Bin folder
• Double-click AmsConvertDb.exe.
If the database conversion utility does not complete successfully,
contact your local Emerson Process Management Sales/Service
Office.
122
ERROR MESSAGE /
INDICATION:
Cannot find server or DNS Error.
POSSIBLE
SOLUTION:
Open port 80 on the Server Plus Station where AMS Device Manager
Web Services is configured. See “Changing Windows Firewall
settings” on page 111.
ERROR MESSAGE /
INDICATION:
Unable to connect to live device.
POSSIBLE
SOLUTION:
Add AmsFFServer.exe to the exception list. See “Changing Windows
Firewall settings” on page 111.
ERROR MESSAGE /
INDICATION:
Unable to launch the AMS Device Manager application from the
Client SC Station.
POSSIBLE
SOLUTION:
Open port 135. See “Changing Windows Firewall settings” on page
111.
ERROR MESSAGE /
INDICATION:
“Connecting to OPC Server Failed” when attempting to launch the
OPC Client application.
POSSIBLE
SOLUTION:
Add AMSOPC.exe to the exception list. See “Changing Windows
Firewall settings” on page 111.
Installation Guide
AMS Suite: Intelligent Device Manager
NOVEMBER 2013
ERROR MESSAGE /
INDICATION:
Unable to launch the AMS Device Manager application from the
Client SC Station.
POSSIBLE
SOLUTION:
Add sqlserver.exe and sqlbrowser.exe to the exception list. See
“Changing Windows Firewall settings” on page 111.
ERROR MESSAGE /
INDICATION:
AMS Device Manager may be slow to start when launched from the
Windows Start menu. The following messages are displayed in the
Application event log:
Unable to retrieve the current configuration information for server,
<PC name>.
Error calling GetServersAsXml.
POSSIBLE
SOLUTION:
Add AMSServicesHoster.exe to the exception list. See “Changing
Windows Firewall settings” on page 111.
123
AMS Suite: Intelligent Device Manager
NOVEMBER 2013
124
Installation Guide
Installation Guide
AMS Suite: Intelligent Device Manager
NOVEMBER 2013
Index
Numerics
8000 BIM System Interface 100—101
requirements 39
A
ABB System Interface 42, 104—105
adding field devices 117
admin password 112
admin password, assign 112
administrator rights 27, 112
Adobe Reader 116
AMS Device Manager
distributed system 9
standalone station 9
Starting to use 111—120
uninstalling 18
upgrading 47
AMS Device Manager database
backing up 16
consolidating 48
restoring 16
AMS Device Manager Web Services
description 109
installing 10
requirements 24
AMS Device Manager Web Services and AMS Asset
Portal 110
AMS Suite
Asset Performance Management 110
AMSDeviceManager user group
adding users 56
adding users on a domain controller 66
B
Bluetooth HART modem 73
Books Online, AMS Device Manager 115
C
Client SC Station
requirements 19
clock synchronization 46
communication interfaces, configuring 73
communications port, modem 73
computer name 50
configuring AMS Device Manager for
8000 BIM System Interface 100
DeltaV 87
documenting calibrator 79
FF HSE System Interface 92
HART modem 74
HART Over PROFIBUS 101
modems 73
multiplexer network 81
Ovation System Interface 90
PROVOX System Interface 95
RS3 System Interface 97
STAHL network 98
Wireless Network 84
consolidating databases 48
D
database
backup 16
consolidating 48
conversion utility 122
export 49
import 49
migrating 48
moving 48
restore 16
sharing 58
DeltaV System Interface 86
configuring 87
configuring AMS Device Manager for 87
requirements 30
Det-Tronics System Interface 43, 106
Device Configuration Reports 119
Device Description Update Manager 118
Device manual installation 116
Device manuals 116
devices, adding 117
disk space requirements 19
distributed AMS Device Manager system
configuring 58
installing 9, 45
licensing 57
modifying 59—65
requirements/constraints 46
upgrading 47
DNS name 50
documentation, AMS Device Manager 116
documentation, electronic 116
documenting calibrator 79
domain 27
domain controller
125
AMS Suite: Intelligent Device Manager
Installation Guide
NOVEMBER 2013
security requirements 66
domain controllers
installing AMS Device Manager on 65
Drawings/Notes 46
DTM Launcher 117
E
electronic documentation 116
Ethernet 20, 30, 39, 100
export database 49
F
FF HSE interface
requirements 37
FF HSE System Interface 92—93
Field Communicator 77—79
connecting to AMS Device Manager 78
Listen for PC setting 79
field devices, installation 117
firewall settings, changing 111
G
gateway
adding 85
H
hardware requirements 19—20
serial interfaces 20
USB interfaces 20
HART Instrument Locator Tool (HILT) 93
HART modem 20
Bluetooth 73
serial 73
USB 73
HART multiplexer
network interface 81
requirements 39
HART Over PROFIBUS System Interface 101—102
requirements 40
Help, AMS Device Manager
Books Online 115
What’s This? Help 115
HILT 93
host system interfaces, see system interfaces
HSE System Interface, see FF HSE System Interface
I
import database 49
installation
ABB 42, 104
AMS Device Manager Client SC Station 54
AMS Device Manager Server Plus Station 51
AMS Device Manager Web Services 110
Det-Tronics 43, 106
distributed AMS Device Manager system 45
HART Over PROFIBUS 101
Kongsberg 40, 103
PROFIBUS 43, 107
Siemens 41, 104
troubleshooting 121
Web Services 109
on an AMS Device Manager station 109
installing devices
manually 117
Internet Explorer 24
ISA bus 20
K
Kongsberg System Interface 40, 103
L
laptop computer 73, 120
licensing AMS Device Manager
distributed system 57
login, User Manager 112
M
memory requirements 19
Microsoft SQL Server, see SQL Server
migrating databases 48
mobile workstation 66
modem, see HART modem
moving databases 48
multidrop installation, multiplexer 74
multiplexer network 80
multiplexer, see HART multiplexer
N
network structure 108
O
Online Help, see Books Online
operating system, AMS Device Manager 21
126
Installation Guide
AMS Suite: Intelligent Device Manager
NOVEMBER 2013
Ovation System Interface 89—91
requirements 34
P
passwords 46, 95, 111
PC requirements 19
PDF Installer utility 116
permissions 112, 114
polling address 74
PROFIBUS System Interface 43, 107, 107
PROVOX System Interface 93
HLT file 93
requirements 36
R
Rebuild Hierarchy 108
Release Notes 116
Remote Desktop 22
Renaming an AMS Device Manager PC 63
requirements 19—43
8000 BIM System Interface 39
AMS Device Manager system 19
DeltaV System Interface 30
FF HSE System Interface 37
HART multiplexer 39
HART Over PROFIBUS System Interface 40
network 20
Ovation System Interface 34
PROVOX System Interface 36
RS3 System Interface 38
security 27
software 21
SQL Server 25
STAHL HART System Interface 38
system interfaces 29
Web browser 24
Wireless Network 29
Roving Station
attaching 120
RS-232 to RS-485 converter 82
RS3 System Interface 95
communication with RNI 97
configuring 95
requirements 38
RS-485 converter 39, 100
S
scan new devices 108
security requirements 47, 53, 111
serial HART modem 73
serial interfaces 20
serial link 39, 100
Server Plus Station
requirements 19
service notes, see Drawings/Notes
Siemens System Interface 41, 104
simple file sharing 27
Simulate ID key (VX dongle) 67
SNAP-ON applications, installing 58
on AMS Device Manager Client SC Station 55
on AMS Device Manager Server Plus Station 52
software requirements 21—26
operating systems 21
SQL Server 25
Web browser 24
SQL Server 25
account password 25, 27
STAHL HART System Interface 98
requirements 38
standalone station
installing 9
Standard User, add 113
Station Configuration dialog 58, 62
support, AMS Device Manager 121
synchronization, clock 46
System 57
system administration 112
system interfaces 83—110
ABB 42, 104
additional requirements 29—43
AMS Device Manager Web Services 110
DeltaV 86
determining structure of 108
Det-Tronics 43, 106
FF HSE 92
HART Over PROFIBUS 101
Kongsberg 40, 103
multiplexer network 80
Ovation 89
PROFIBUS 43, 107
PROVOX 93
reading parameter data 108
RS3 95, 97
Siemens 41, 104
STAHL HART 98
system requirements, see requirements, AMS Device
Manager system
T
TCP/IP 93
127
AMS Suite: Intelligent Device Manager
NOVEMBER 2013
requirements 20
Terminal Services 22
troubleshooting 121—123
error messages 121
modem connections 76
using database conversion utility 122
U
uninstalling
AMS Device Manager 18
upgrading
an AMS Device Manager system 11
distributed AMS Device Manager system 47
from AMS Device Configurator 16
from AMS Wireless Configurator 15
upgrading AMS Device Manager 12
USB HART modem 73
USB interfaces 20
Use simple file sharing 27
User Manager 112—115
username 46
username, add 113
V
virtual memory size 19
virus scan software 51
VX Dongle, see Simulate ID key
W
Web browser 24
Web Services, see AMS Device Manager Web Services
Windows 7 21
Windows Firewall 111
Windows operating systems 21
Windows security requirements 27
Windows Server 21
Windows User, add 113
Windows XP 21
Wireless Network
requirements 29
WirelessHART adapter 74
128
Installation Guide
Comment Form
AMS Suite: Intelligent Device Manager Installation Guide
The AMS Suite: Intelligent Device Manager Installation Guide is intended to provide the basic information
you need to install AMS Device Manager software and configure your system. Detailed information about
AMS Device Manager is provided in AMS Device Manager Books Online.
Please give us your feedback to help us improve this manual.
Did you use this manual to:
Yes
No
Help you install AMS Device Manager?
____
____
Help you configure AMS Device Manager?
____
____
Troubleshoot your AMS Device Manager installation?
____
____
Can you easily find answers to your questions about AMS
Device Manager installation in this manual?
____
____
If “No,” can you easily find the answers to your questions
in AMS Device Manager Books Online?
____
____
Yes ____
No ____
How could we make this manual more useful to
you?____________________________________________
Identify any errors you found in this manual:
Identify any areas that you found difficult to understand:
Other comments:
May we contact you about your comments?
Name ______________________________________________________
Company ____________________________________________________
Phone ______________________________________________________
Date ________________________________________________________
Thank you for your comments.
Fold and mail this form to Emerson Process Management or fax it to 1-952-828-3006.
Name ____________________________________
Place
Stamp
Here
Company _________________________________
Address ___________________________________
__________________________________________
__________________________________________
Emerson Process Management
AMS Device Manager User Documentation
Mail Station AN03
12001 Technology Drive
Eden Prairie, MN 55344
USA
(Seal with tape)