1
Physical Installation
Installation begins by connecting the speaker loads and
input signal cables to the rear of the unit. The PM3180 and
input sources are then turned on and the AUX Trim Controls
are adjusted to provide the correct signal level.
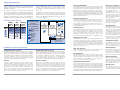
ProMatrix 3180 Front Panel
With these steps completed, you are now ready to set the
system configuration. All selections and adjustments will be
made through the push button controls of the front panel
System Configuration
To begin system configuration, enter the password to
begin programming mode. Once entered, you can scroll
through 10 different system configuration menus.
on the same amplifier channel to have different volumes.
For example, the background music in the bar area plays
at a low level until the higher priority jukebox comes on.
This source then overrides the background music and the
volume level increases significantly. When the jukebox finishes playing, background music returns, playing at its
original level. The bass and treble functions work in a similar way and allow different equalization to be applied to
the different input sources. These settings are also made
through the PRESET function.
The first function to be configured is the microphone input.
The MICROPHONE menu allows the page activation
method to be selected (VOX triggered, N.O. or N.C. contact
closure). It also allows the Automatic Level Control and
Phantom Power for the input to be enabled or disabled. For
MIC B only, two different types of inputs (microphone or
600-ohm telephone) can also selected through this menu.
The adjustments are made while the PM3180 is playing
the input source through the particular amp being configured. This makes it a simple matter to evaluate if the setting is producing the desired results.
This application uses a push-to-talk condenser mic connected to the MIC B input terminal strip. MIC B is configured for normally opened contact closure activation, ALC
enabled, and Phantom Power enabled. MIC A is not used
so no changes are made to the factory settings.
One thing to be aware of is how the preset levels react
when the user changes the volume, bass, or treble. When
the user makes a change, it effects all the assigned inputs
equally. Therefore increasing the level of the CD player by
3 volume steps will also make the jukebox 3 steps louder
when it becomes active. Bass and treble respond in a
similar fashion. In this way, the relative level differences
that were preset between inputs remain intact.
The priorities of the different input sources are assigned
using the ASSIGNMENT menu function. For the autoswitching ability of the ProMatrix to be of use to the system, some order of priority must be given to the different
input sources. This will determine when one input overrides another. Because different zones have different
requirements, each amplifier can have different input priority assignments. The Coverage Zone Priority (on page 4)
defines the order of priority for the input sources for each
speaker zone. An amplifier and input combination can
also be assigned no priority, which effectively disconnects
that input from the specific amplifier channel.
In this application the CD player and background music
feeds are set to play at the same low level on all amplifier
channels. However, in the bar area, the TV is to be somewhat louder than the CD and the jukebox is to be set at a
reasonable level for foreground music.
Infrared Remote
Control Window
LED Level Meters:
Amp Channels 1, 2, and 3
Control Panel
Connections
ProMatrix 3180 Relocatable Control Panel
Audio Level Control Buttons
and Position Pointer:
10 Character
Alphanumeric
Display Area
Adjusts Level of Selected
Function: VOL, BASS, TREB;
Pointer Shows Approximate
Level Setting
MIC Input Select Buttons
for Manual Input Selection
AUX Input Select Buttons
for Manual Input Selection
Audio Function Select
Determines Type of Audio
Level to be Adjusted
Selects Manual of Automatic
Input Switching Mode
Power Button
MIC A Input
Connector (XLR)
Programming Buttons:
Amplifier Selection Buttons:
Entering Password, Menu Selection,
and Parameter Setting
Selects the Amplifier
to be Adjusted
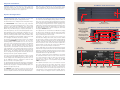
ProMatrix 3180 Rear Panel
Amplifier Channel
Output Terminals
One of the requirements of this installation is to provide
the bartender limited control over the volume in the bar
area. This provision is made to ensure the volume levels
can never be made so high as to annoy the patrons.
Limiting output volume is accomplished using the VOL
LIMIT menu feature.
One note on priority setting: Microphone inputs can only
be assigned the two highest priorities (1 or 2), AUX inputs
can be assigned the 4 remaining lower priorities (3 to 6).
So the PM3180 cannot be configured to allow an AUX
input to override a microphone input.
For this application the desired amp/input combinations
are given priorities that conform to the data in Coverage
Zone Priority (on page 4). All unspecified amp/input combinations are given no priority.
The amplifier and input source to be limited is selected.
The source will play at full volume when first selected
because the factory set limit is full volume. As a precaution, because the input source can come on at full volume,
the level ramps up over 2 seconds to give anyone close to
a speaker time to react and protect their hearing. Now it’s
a simple matter of using the volume control buttons to
The PRESETS menu provides a means to set the turn on
levels for the volume, bass, and treble of the input sources
for each amplifier channel. It also allows different inputs
6
MIC B / TEL B
Input
Contact Closure AUX Input
MIC Page
Connections
Terminals
(RCA)
AUX Input
Source Level
Attenuators
3
Connectors for
External Signal
Processing
Data Cable Connection
for Remote Mounting
of Front Control Panel