1
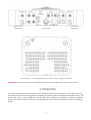
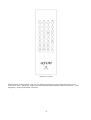
CD-5
Top Loading
Vacuum Tube Class-A CD-Player
Owner’s Operating Manual
Ayon Audio – Hart 18 – 8101 Gratkorn – Austria – Phone: +43 3124 24954
www.ayonaudio.com
WARNING
PRECAUTION AND SAFETY
To prevent shock or fire hazard do not open the unit or expose to rain or moisture.
Refer all service to Ayon audio or an Ayon audio authorized service facility. There are no
user serviceable parts inside the CD-5. Refer all internal service, updates, or modifications
to qualified service personnel.
High voltage is present inside an operating CD-5.
Do not remove bottom plate or insert any objects through openings in the case.
The laser pick-up is located behind the spindle. Never look directly into the laser beam!
OPERATING VOLTAGE
The operating voltage is factory set for the destination country and is not user adjustable.
Unauthorized attempts to modify the operating voltage may damage the unit and will void
the manufacturer warranty.
FUSE
The AC power line fuse is located in a snap-out receptacle on the underside of the power inlet
(rear panel). The correct value of Slow-Blow fuse is 1A. Do not replace the fuse with a higher
than indicated. Disconnect the power cord before changing fuse. A blown fuse in your unit
can be an indication of a serious problem. If a replacement fuse fails as well, no further
attempts should be undertaken. Please contact the factory for professional service.
Serial Number:
Voltage:
Ayon Audio Distributor:
Ayon Audio – Hart 18 – 8101 Gratkorn – Austria – Phone: +43 3124 24954
www.ayonaudio.com
-1-
INTRODUCTION
Thank you for your purchase of the Ayon Audio CD-5 Class A vacuum tube CD-Player.
Please read this owner’s manual to obtain the full benefit of the CD-5 in your system. This
manual provides you with necessary safety information and operation procedures for this unit.
With this CD-Player, you have entered into the world of exclusive design which will give you
great satisfaction and privilege of enjoying the advanced technology of Ayon Audio
products. It is designed to serve as a high standard of truthful real musical performance. The
care in engineering and manufacturing of this product anticipates a long time of enjoyment.
We also encourage you to enlist the aid of the dealer from whom you purchased this Ayon
CD-Player. Your dealer is an excellent source of information on compatibility, installation, and
troubleshooting, and should be capable of helping ensure that your overall music system
provides you with maximum performance and satisfaction.
WHY VACUUM TUBES
The output level of studio microphones under typical recording conditions contain peaks far in
excess of what VU meters display. Everyone knows that, but the peaks, as measured with an
oscilloscope, are really quite high, easily exceeding 1 volt! The tube or transistor used in a
condenser microphone, or in a microphone preamplifier, often will be driven into severe
overload by these peaks. The peaks are short, so the sound isn't grossly distorted-sounding; but
the distorted peaks do affect what we hear. All preamps (and condenser microphone
electronics) are overloaded by these peaks, but tubes handle it differently than solid-state
devices. When transistors overload (in a discrete circuit or in an OP amp), the dominant
distortion product is the third harmonic. The third harmonic "produces a sound many musicians
refer to as blanketed”. Instead of making the tone fuller, a strong third actually makes the tone
thin and hard. On the other hand, with tubes (particularly triodes) the dominant distortion
product is the second harmonic: “Musically, the second is an octave above the fundamental
and is almost inaudible, yet it adds body to the sound, making it fuller”. Tubes sound better
because their distortion products are more musical. Tubes provide a more appropriate load to
transducers. These are the fundamental reasons why tubes simply sound better.
BREAK-IN PERIOD
Your new Ayon Audio CD-5 tube CD- Player has an initial break–in period. The unit will not
perform to its full sonic potential when first installed in your system. This is partially due to a
residual polarization of the dielectric materials used in the PCB, like resistors, capacitors,
chokes, transformers and internal wiring. As music is played through the unit, the electrical
signal will gradually anneal these materials. Only after the break-in period will the full
performance of your Ayon Audio CD-5 is fully realized. The break-in process will occur naturally
as music is played through the system.
During the break-in period, the sonic properties of your electronics may undergo several
gradual shifts as the various components break–in at different rates. It is therefore suggested
that the fine tuning of the system be delayed until after the break–in period is completed.
However, during the final phases of the break–in period, the sonic image will open up, the
sound stage will bloom to perfection, the bass control and impact will increase and the overall
sound will have a more involving soundstage presentation.
° Break- in: 30 to 50 hours
-2-
SECURITY CAUTION & HANDLING TIPS
1. Always make sure your hands are clean and free of any dirt or oils before carrying.
2. Carry the CD-Player with both hands by gripping the sides of the unit.
3. Never hold the face plate against your clothing as coarse materials such as stitching,
belts, and the rivets from denim pants can mar the surfaces.
4. Never put any objects directly on top of the unit.
5. Use a soft cloth with non-abrasive cleaning product to clean your CD-Player.
6. Take care of the precision toggle switch selectors at the rear panel when moving or
transporting the CD-5.
7. The unit should be put on an adequate ventilated place; it is normal for a vacuum tube
CD-Player to runs very warm if used for prolonged periods.
8. Avoid prolonged exposure of the appliance to direct sunlight!
9. Under normal circumstances the laser needs no cleaning. Do not use cleaning CDs.
10. Never touch power plug with wet hands.
11. Disconnect from power before removing top plate is mandatory.
12. Important: Never open the bottom plate; all electronic components are mounted on it!
13. Please pull out the AC power cord by the plug instead of dragging it.
14. For best performance, place the CD-5 on a solid, non-resonant shelf that will minimize
vibration.
15. The CD-5 should not be left running when not in use. If you will not be listening to the CDPlayer for more than an hour, it is advised that the player be turned off. Unlike solid state
players, tube output stage players should be shut down when not being used. This will
greatly prolong tube life.
16. Reseating Tubes: Normally, reseating tubes upon delivery is not required. However, if any
tubes have noticeably drifted out of position due to high transportation stress, it will be
advisable to reseat the tubes.
TABLE OF CONTENTS – INDEX
1. Unpacking
2. Connection
3. Operation
4. Remote control
5. Specifications
6. Vacuum tube
7. Warranty and Service
1. UNPACKING
Inspect your CD-Player for any shipping damage and call your dealer immediately if any is
found. Note: Do not plug your CD-Player into an AC outlet if you find shipping damage.
Use care in unpacking your CD-Player, open the box and remove the top layer of foam.
You will see these items:
1
1
1
2
1
1
x
x
x
x
x
x
CD-Player
AC power cord
Remote control
Batteries for RC
Magnetic integral CD-clamp system combined with dark acrylic CD-cover
Owner’s manual
We advise saving all packing materials so that the unit can be easily and safely shipped if the
need arises.
-3-
2. CONNECTION
When making any connections to this component or any other device, make sure the power
amplifier and the preamplifier are OFF and disconnected from the AC current. Switch off the
CD-5 whenever you need to connect or disconnect any cables!
Rear panel
- All input and output connectors are clearly marked on the rear panel -
Plug the CD-5 into a standard wall AC receptacle.
Note: If the phase control indicator glow red, the phase polarity is wrong. Reverse the AC plug!
(This function is operating for 230V and Schucko plug version only - EU).
Analog output
Connect the CD-5 analog output to the appropriate preamplifier or integrated amplifier input
or directly to a power amplifier.
Important: If you use the CD-5 directly to amp(s), caution must be exercised that the volume is
down to the “Min” setting. Note: On the player’s display -60 is mute and 0 is maximum volume.
The CD-5 is equipped with two analog output configurations:
- Single-ended via RCA connectors and balanced via XLR connectors.
- Select via toggle switch between RCA or XLR mode.
- Select via toggle switch between low, mid and high gain.
The XLR pin configuration is:
Pin 1 Ground Pin 2 Non-inverting ( plus + )
Pin 3 Inverting ( minus - )
The left and right channel RCA and XLR outputs are labelled on the rear panel. When you
have a RCA connection you must put the analog-output-toggle switch ( analog selector ) on
position RCA. When you have a XLR-connection you must put the analog-output-toggle
switch ( analog selector ) on position XLR.
Analog input
The CD-5 is equipped with 2 pair (Line 1 and Line 2) analog inputs ( RCA) to connect analog
sources to Line 1 or Line 2.
Digital output
The CD-5 is equipped with one S/PDIF ( 75 Ω ) coaxial digital output, I2S and a AES/EBU (110Ω )
in order to send digital signals to a digital recording device or external D/A processor.
Digital input
The CD-5 is equipped with one S/PDIF ( 75 Ω ) coaxial digital input, Toslink, USB and AES/EBU to
receive digital signals from separate digital components.
All digital inputs automatically adjust to any of the standard digital-audio data-rates from
16/44.1 kHz to 24/192 kHz. (Except USB & TosLink).
The internal DAC also up sample any digital-audio input signal to 24/192 kHz when this function
is activated. (24/192 symbol – illuminate red)
Note: Never connect the digital input or output on a non-digital input of an amplifier, such as
AUX, CD, TAPE, PHONO, etc. Damage may occur!
-4-
Rear Panel
Bottom plate - power switch (left-front on the bottom plate mounted)
Important: Never open the bottom plate; all electronic components are mounted on it!
3. OPERATION
Turn on the power switch (left-front on the bottom plate mounted), insert a CD, label side up
and affix the CD with the Magnetic integral CD-clamp system combined with dark acrylic CDcover. The “ayon” logo will light up, followed by the “Warm Up” message on the front display
panel. Then the total track number and playback time will be indicated on the front display
panel.
-5-
HOW TO PLAY A CD
Remove the Magnetic integral CD-clamp system combined with dark acrylic CD-cover.
Carefully, place the CD on the CD Spindle and replace the Magnetic integral CD-clamp
system combined with dark acrylic CD-cover on the top of the CD.
The total track number and playback time for the entire disc is shown on the front display
panel.
Press PLAY* to activate playback from the beginning of the CD. ( PLAY/PAUSE* button )
Press PAUSE* to temporarily suspend playing the current track. To resume playing at the point
pause was engaged, press PLAY again.
To STOP the CD, press the STOP button.
Press TRACK BACKWARD once to select and begin playing the track that precedes the current
track.
Press TRACK FORWARD once to select and begin playing the track that follows the current
track.
Volume buttons
Whenever the volume control buttons are pressed, the volume for both channels will be
increased ( + ) or decreased ( - ) by an increment of 1 on the display screen. The range of
the volume control is from 0 ( Volume max. ) to -60 ( Volume min. ).
Input button
This button is for digital and analog input selection.
Note: Never play without Magnetic integral CD-clamp system combined with dark acrylic CDcover affixed to the CD.
Top view
-6-
Turn OFF procedure
When powering down your system always turn the amplifier off first.
Important: If the CD-5 was turned OFF even for a short period of time, you should wait at least
30 seconds before turning it back ON. Do not turn it ON then OFF and then ON again in quick
succession. This precaution will minimize the stress (high voltages) on internal components.
Follow this procedure each time you turn your CD-5 OFF/ON.
4. REMOTE CONTROL
1. The Remote Control can be used also for other Ayon equipment.
“PREAMP” (only Volume and Mute function)
“DAC” (only Volume, Input, Display, 24/192 and Mute function)
“AMP” (only Volume and Mute function)
- If you use your CD-5 Player please press “CD” button first.
2. Display button
Set the display brightness.
3. NUMERIC button (0-9, total ten buttons)
Press 1-9 buttons to select a specific sound track you want to play. For the track number
greater than 9, press the corresponding numeric buttons for the track number desired.
4. REPEAT button
During normal playback: Press this button once, the system will play the current track
repeatedly. Press this button again; the system will play all tracks repeatedly.
5. A-B button
For repeated playback of a specified passage (A-B): During normal playback: Press this
button once at the starting point (A) of the passage you want to repeat. If do not press the
button again to mark the stopping point (B) before the next track starts, the starting point A
will be cleared during the track change. Press this key again at the end of the passage (B)
you want to repeat, the designated passage A-B will be played repeatedly.
6. TRACK BACK/FORWARD buttons
Pressing these buttons allows access to the previous or next track on a CD.
7. SEARCH BACK/FORWARD buttons
Pressing these buttons allows fast reverse or fast forward access through a track.
8. STOP button
Pressing this button while a CD is playing stops PLAY.
9. PLAY button
After a CD has been loaded, pressing this button plays the CD beginning with the first
track.
-7-
10. PAUSE button
Pressing this button, while a CD is playing, suspends PLAY. Pressing the PLAY button will
resume play at the point where the pause button was pressed.
11. RANDOM Playback button
When the system is at stop mode: Press this button once, the system will enter random play
back mode. After all tracks are played once, the system will stop and display the total
track number and playback time for the entire disc. Press this button again, the system will
return to normal playback.
12. INPUT button
This button is for digital and analog input selection.
13. TIME button
This button switches between the various time modes on the display. Before play, the total
time on the CD is shown. Once a CD starts to play the elapsed time of that track will be
shown. Pressing the button on the remote control once will cause the display to indicate
the remaining time in that track (remain). Pressing this button on the remote control again
will cause the display to indicate the total time elapsed for the entire CD.
Pressing the button another time will cause the display to show the total time remaining for
the entire CD. Finally, pressing the button again will cycle back to the original default
setting. The remaining time of the song can be checked and when you press the button
again the remaining time of the whole CD can be checked.
14. MUTE button
Press this button, mute all outputs, press again to unmute.
If the output is muted, the display will indicate this by showing, “MUTING”.
15. VOLUME buttons
Whenever the volume control buttons are pressed, the volume for both channels will be
increased ( + ) or decreased ( - ) by an increment of 1 on the display screen. The range of
the volume control is from 0 ( Volume max. ) to -60 ( Volume min. ).
16. 24/192 button
This button enables you to increase the CD sampling rate to 24 bit/192 KHz and
simultaneously lights up the 24/192 symbol in the display.
19. SCAN button
It plays 10 second of each track.
-8-
REMOTE CONTROL
The Batteries of the remote unit can be easily changed by removing the back cover.
Insert two “AAA” batteries. Make sure the batteries are installed with their positive + and
negative – poles positioned correctly.
-9-
5. SPECIFICATIONS
CD-Player
Conversation rate
CD-Transport
Tube complement – Analog output stage
Tube complement - Power supply
Dynamic range
Output level @1 kHz / Rms - LOW
Output level @1 kHz / Rms - HIGH
Output impedance / Single-Ended-RCA
Output impedance / Balanced-XLR
Digital output
Digital input
Analog input
Analog output
S/N ratio
Frequency response
Total harmonic distortion @ 1kHz
Remote control
Dimension (WxDxH) cm
Weight
Ayon CD-5
192kHz / 24 bit
Philips CD-Pro 2
4 x 6H30
4 x 6X4
> 110dB
0-4V variable
0-8V variable to drive a power amp directly
~ 300 Ohms
~ 300 Ohms
S/PDIF (RCA), I2S, AES/EBU
USB, AES/EBU, SPDIF, I2S, TosLink
2 x Line In (RCA)
RCA & XLR
> 110 dB
20Hz - 20kHz +/- 0.2dB
< 0.002%
Yes
50x41x13 cm
18 kg
Specifications subject to change without notice
6. VACUUM TUBES
Ayon Audio strongly discourages changing tubes (tube rolling) for the purpose of “improving
sonic performance”. Tubes of the same part number from different manufacturer’s and lots
generally vary considerably in many operating parameters. The Ayon Audio Class-A CD-5
CD-Player has been sonically and precisely optimized for the tubes installed at the factory in
Austria, by Ayon Audio. The 6H30 tubes are highly selected and matched tubes by our experts
at Ayon Audio. The original signal tubes will provide for many years of excellent audio
performance.
Tube Life Expectancy
When tubes are new they are at slightly greater risk of going bad during there break in period.
This is called infant mortality. After the break in time period the tubes will stabilize and last for
the several thousand hours of operation unless traumatized by being jarred or dropped.
The vacuum tubes used in the CD-5 are high quality 6H30 tubes rated for approximately 10,000
hours of use. For maximum audio quality however we recommend replacing the tubes after
5000 – 7000 hrs of operation.
ayon
®
is a registered trademark
Ayon Audio – Hart 18 – 8101 Gratkorn – Austria – Phone: +43 3124 24954
www.ayonaudio.com
-10-
7. WARRANTY & SERVICE
LIMITED WARRANTY
Ayon Audio electronic components are warranted by the manufacturer to be free of defects
in materials production for a period starting 2 years (except all types of signal, rectifier and
power tubes, CD-mechanism and laser pick up), from the date of purchase. Under this
warranty defects are repaired free of charge. The purchaser is responsible for transportation
from their location to the original sales agent, national distributor, or international distributor,
whoever is closest. This warranty applies to the original purchaser only and it is non-transferable
to subsequent purchasers within the original 2 year period. Contact your dealer or Ayon Audio
for commercial warranty policies. Request for repair under this warranty must be
accompanied by an unaltered copy of the original purchase receipt.
IN THE EVENT OF A PROBLEM
In the unlikely event of a problem with any Ayon Audio product, if any replacement part is
required, you must contact your Ayon Audio dealer first. Ensuring continued operation at the
highest level of performance, the defective parts must then be returned to the factory for
inspection to determine the status of the warranty claim. This on-site replacement of the parts
eliminates the time and expense of shipping the entire unit to the factory for repair. All
warranty claims must be made through an authorized Ayon Audio dealer, distributor or Ayon
Audio.
CONDITIONS
This warranty is subject to the following conditions and limitations. The warranty is void and
inapplicable if the product has been used or handled other than in accordance with the
instructions contained within the Owner’s Manual. Units which are abused, misused, suffer
electrical damage from lightning, overloaded wall power outlets, serial identification plate
and serial number defacing, damage by accident or neglect during transport, tampering or
unauthorized repair by anyone other than Ayon Audio or an authorized service center will void
all warranties offered by Ayon Audio.
Ayon Audio reserves the right to modify the design of any product without obligation to
purchasers of previously manufactured products and to change the price or specifications of
any product without notice or obligation to anyone.
ayon®
is a registered trademark
Ayon Audio – Hart 18 – 8101 Gratkorn – Austria – Phone: +43 3124 24954
www.ayonaudio.com
-11-