1
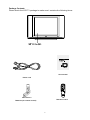
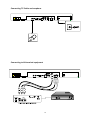
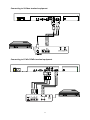
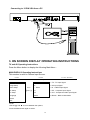
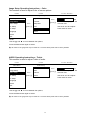
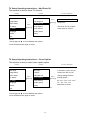
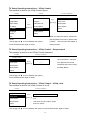
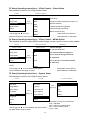
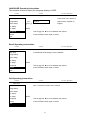
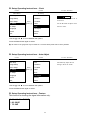
CONTENTS
CONTENTS....................................................................................................................................... 1
Safety Instructions.............................................................................................................................. 2
Important Safety Instructions:............................................................................................................ 2
1. INTRODUCTION ......................................................................................................................... 5
Product Description.................................................................................................................... 5
Product Features......................................................................................................................... 5
Package Contents ....................................................................................................................... 6
2. SYSTEM SETUP........................................................................................................................... 7
Top Panel & Remote Control Function...................................................................................... 7
Remote Control Buttons............................................................................................................. 8
Remote Control Battery Installation / Removal......................................................................... 8
Remote control operating instruction......................................................................................... 9
Input/Output Signal Connections............................................................................................... 9
Connecting TV Cable and earphone ................................................................................ 10
Connecting to AV-terminal equipment............................................................................. 10
Connecting to S-Video terminal equipment..................................................................... 11
Connecting to YCbCr/YPbPr terminal equipment........................................................... 11
Connecting to 15-PIN VGA from a PC............................................................................ 12
3. ON SCREEN DISPLAY OPERATING INSTRUCTIONS ......................................................... 12
TV and AV Operating Instructions........................................................................................... 12
Using the LCD as a Computer Monitor ................................................................................... 22
4. REFERENCE............................................................................................................................... 25
About VChip Control............................................................................................................... 25
MPAA option ........................................................................................................................... 26
PC Display Modes ................................................................................................................... 26
Cleaning LCD Monitor ............................................................................................................ 26
Troubleshooting ....................................................................................................................... 27
5. APPENDIX .................................................................................................................................. 28
Specifications:.......................................................................................................................... 28
6. WARRANTY ............................................................................................................................... 29
1
Safety Instructions
The Lightning flash with the arrowhead symbol within an equilateral triangle
is intended to alert the user to the presence of un-insulated "DANGEROUS
VOLTAGE " within the product's enclosure that may be of sufficient
magnitude to constitute a risk or electric shock to persons.
The Exclamation point within an equilateral triangle is intended to alert the
user to the presence of important operating and maintenance (servicing
instructions in the literature accompanying the product).
Important Safety Instructions:
Read Instructions - All the safety and operating instructions should be read before the
product is operated.
Retain Instructions - The safety and operating instructions should be retained for future
references.
Heed Warnings - All Warnings on the product and in the operation instructions should be
adhered to.
Follow Instructions - All Operating and user instructions should be followed.
Cleaning - Unplug this product from the wall outlet before cleaning. DO NOT use liquid
cleaners or aerosol cleaners. Use damp Cloth for cleaning.
Attachments - DO NOT use attachments not recommended by the product manufacturer
they may cause hazards.
Keep Away From Heated Areas – Do not place the LCD TV near heat; for example, near
a radiator, stove, or other heating device.
Water - DO NOT use this product near water. For example: Avoid placing it near bathtub,
washbowl, kitchen sink, or laundry tub, in a wet basement, or near a swimming pool, etc.
Cabinet Slots - NEVER push objects or any kind into the unit through the cabinet slots as
they may touch dangerous voltage points or short out parts that could result in a fire or
electric shock. NEVER spill liquid of any kind on the product.
2
Important Safety Instructions Continued
Ventilation - DO NOT block any ventilation openings. Install in accordance with
manufacture's instructions. Slots and openings in the cabinet and the back and bottom are
provided for ventilation, and to ensure reliable operation of the product and to protect it
from Overheating. These openings must NOT be blocked or covered. There should be at
least 10cm of space from these openings. The openings should never be blocked by
placing the unit on a bed, rug or other similar surface.
This product should NOT be placed in a built-in installation such as a bookcase unless
proper ventilation is provided.
Grounding or Polarization - This product may be equipped with a polarized alternating
current line plug (a plug having one blade wider then the other). This plug will fit the power
outlet only one way. This is a safety feature. If you are unable to insert the plug fully into
the outlet, try reversing the plug. If the plug should still fail to fit, contact your electrician to
replace your obsolete outlet.
DO NOT defeat the safety purpose of the polarized plug.
Power Cord Protection - Power supply cords should be routed so that they are not likely
to be walked on or pinched by items placed upon or against them. Pay particular attention
to cords at plugs, convenience receptacles, and the point where they exit from the product.
Power Sources - This product should be operated only from the type of power source
indicated on. the rear panel. If you are not sure of the type of power supply to your home
consult your product dealer or local power company.
Lightning - For added protection for this product during a lightning storm, or when it is left
unattended and unused for a long period of time, unplug it from the outlet and disconnect
the antenna or cable system. This will prevent damage to the product due to lightning and
power-line surges.
Power Lines - An outside antenna system should not be located in the vicinity of
overhead power lines or other electric light or power circuits, or where it can fall into such
power lines or circuits.
When installing an outside antenna system, extreme care should be taken to keep from
touching such power lines or circuits as contact with them might be fatal.
Overload - DO NOT overload wall outlets, extension cords or integral convenience
receptacles as this can result in a risk of fire or electric shock.
3
Important Safety Instructions Continued
Damages Requiring Service - Unplug this product from the wall outlet and refer servicing
to qualified service personnel under the following conditions :
1.When the power-supply cord or plug is damaged.
2.If liquid has been spilled, or objects have fallen into the product.
3.If the product has been exposed to rain or water.
4.If the product does not operate normally after following the operating instructions.
Adjust only those controls that are covered by the operating instructions as an improper
adjustment of other controls may result in damage and will often require extensive work
by a qualified technician to restore the product to its normal operation.
5.If the product has been dropped or damaged in any way.
6.When the product exhibits a distinct change in performance - this indicates a need for
service.
Replacement parts - When replacement parts are required, be sure the service
technician has used replacement parts specified by the manufacturer or have the same
characteristics as the original part.
UNAUTHORIZED substitution may result in fire, electric shock or other hazards.
Safety Check - Upon completion of any service or repair to this product, ask the service
technician to perform safety checks to determine that the product is in proper operating
condition.
Heat - The Product should be situated away from heat source such as radiators, heat
registers, stoves or other products (including amplifiers) that produce heat.
Mounting - DO NOT place this product on an unstable cart, stand, tripod, bracket, or
table.
The product may fall, causing serious injury to a child or adult, and serious damage to the
product. Use only with a cart, stand, tripod, bracket, or table recommended by the
manufacturer or sold with the product. Any mounting of this product should follow the
manufacture's instructions, and should use a mounting accessory recommended by the
manufacturer.
Operate - Do not apply excessive force to operate the switch, control key and connector.
Disconnect the power plug from the AC outlet before you move the unit.
Screen care - Do not touch the screen directly with your fingers. You may damage the
screen, oil from your skin is difficult to remove.
Do not apply pressure to screen. The LCD is very delicate.
Installation - Please install the LCD in a cool, dry and clean area, avoid heat, or excessive
vibration, dust, humidity, extreme cold and magnetic devices.
Recycling - This product utilizes tin-lead solder, and has a fluorescent lamp containing a
small amount of mercury. Disposal of these materials may be regulated in your community
due to environmental considerations. For disposal or recycling information please contact
you local authorities, or the Electronics Industries Alliance: http://www.eiae.org/
4
1. INTRODUCTION
Product Description
Thank you for choosing the LCD Color TV/Monitor and for your continued support and use
of our products.
The LCD combines the features of a TV/MONITOR with a THIN FILM TRANSISTOR liquid
crystal display (TFT-LCD).This new generation of TFT-LCD incorporates a high quality
display in a lightweight module.
As such the unit has power-saving capabilities and emits no X-ray radiation. There are
many benefits from this TFT-LCD namely comfort, safety, and environmental protection.
The LCD features a color-active matrix, Thin-Film-Transistor (TFT) Liquid Crystal Display
(LCD) to provide superior display performance. A maximum resolution of 1280×1024
SXGA for displaying complex graphics and high definition images. Other outstanding
features include freedom from video oscillations and selection of various choices of digital
video and audio signal inputs.
You will get the feeling that the large-sized surface of operation with the high-quality stereo
speakers and remote high-level amplifiers connections, provides a coherent,
top-of-the-line Audio and Video systems for viewing pleasure. In addition the TFT-LCD
display allows On Screen Display (OSD) functions that can operate from the convenience
of a remote control.
Product Features
●
Wide viewing angel: Horizontal 160° /Vertical 160° (CR>=10)
●
High brightness (250 nits, Typ)
High contrast ratio (800:1, Typ)
Fast response time 20 ms (Typ)
●
SXGA (1280x1024 pixels) resolution
●
●
●
●
●
●
●
●
●
●
16.7 millions colors
Auto-tune image optimization for VGA
2D De-interlace function
Support YCbCr/YPbPr up to 1080i, 720P.
Easy access top keypad controls (Menu, Volume up/down, CH up/down, Power)
Built-in audio amplifier (2W×2)
Bundled 2W(max) x 2 stereo speaker
Wall-mountable design.
5
Package Contents
Please check the LCD TV package to make sure it contains the following items:
User manual
Power cord
AAA size x 2
Remote Control
Batteries (for remote control)
6
2. SYSTEM SETUP
Top Panel & Remote Control Function
78
1
2
1. VOL 2. MENU
3
4
Decrease Volume / Left navigation key
a. ENTER –Confirm Function
b. MENU –Display Main Menu
3. VOL +
Increase volume / Right navigation key
4. Power
Power standby on or off
5. CH -
Decrease TV channel / Down navigation key
6. CH +
Increase TV channel/Up navigation key
7. IR
IR sensor
8. LED
Red-Stand by。
Green-On。
7
5
6
Remote Control Buttons
No
Description
Key name
Remote Control Unit
1
MUTE
Turn off volume
2
POWER
Power standby on or off
3
NUMBER
KEYS
To select items
4
CH+
Increase TV channel/Up navigation key
5
VOL +
Increase volume/Right navigation key
6
ENTER
Confirm Function
7
TV/VIDEO
8
SLEEP
9
INFO
Change main display to TV, AV, SV, PC,
CVI
Set timer to turn off the machine
(30/60/90/120/OFF min)
To show Channel information and Input
signal’s source
10 CH-
Decrease TV channel/Down navigation key
11 MENU
Display Main Menu
12 VOL-
Decrease Volume/ Left navigation key
13 MTS
Select audio Sub/Stereo/Mono in TV mode
Remote Control Battery Installation / Removal
Change the batteries if the remote control doesn't operate.
8
CAUTION !!
Avoid damaging the Remote Control by:
Applying excessive pressure when pressing buttons
Exposing to extreme Low or High temperatures
Exposing to excessive moisture
Remote control operating instruction
The remote control transmission consists of an infrared signal (IR)
Make sure the line-of-sight between remote control and LCD TV is clear of objects that
could interferes with the remote IR signal.
Always point the remote control directly to the LCD TV sensor.
Input/Output Signal Connections
1 POWER SWITCH
2 POWER AC INPUT
3 EARPHONE OUTPUT
4 PC AUDIO IN
5 PC VGA INPUT
6 YCbCr/ YPbPr INPUT
7
LEFT AUDIO INPUT FOR YCbCr/ YPbPr
RIGHT AUDIO INPUT FOR YCbCr/ YPbPr
8 VIDEO INPUT
9 S-VIDEO INPUT
10
LEFT AUDIO INPUT FOR AV AND S-VIDEO
RIGHT AUDIO INPUT FOR AV AND S-VIDEO
11 ANT. CABLE INPUT
9
Connecting TV Cable and earphone
Connecting to AV-terminal equipment
10
Connecting to S-Video terminal equipment
Connecting to YCbCr/YPbPr terminal equipment
11
Connecting to 15-PIN VGA from a PC
3. ON SCREEN DISPLAY OPERATING INSTRUCTIONS
TV and AV Operating Instructions
Press the Menu button to display the following Main Menu:
MAIN DISPLAY Operating Instructions
This session is used to Choose Input Source.
Level1
Level2
Main Menu
Main Disp
Level3 / Function
Main Disp
TV
1. TV - TV Input Signal
Image Setup
AV
2. AV Input Signal
S-Video
3. S-VIDEO Input Signal
Audio Setup
Press
PC Setup
【Enter】 PC
4. PC - Computer Input Signal
TV Setup
CVI
5. CVI - Component Video Input Signal
Language
Return
6. Return - Back to Main Menu
Recall
Quit
NOTE:
Use the ▲ and ▼ to move between the options,
Press the Menu button again to select.
12
Image Setup Operating Instructions – Brightness
This session is used to adjust brightness of screen picture.
Level1
Level2
Main Menu
Image Setup
Main Disp
Brightness
Image Setup
Contrast
Audio Setup
PC Setup
Press
Level3 / Function
50
Press
【Enter】 It will show the progress bar
at screen foot.
Sharpness
【Enter】 Tint
Use the e and f to adjust.
Press enter for return.
TV Setup
Color
Language
Return
Recall
Quit
NOTE:
Use the ▲ and ▼ to move between the options,
Press the Menu button again to select.
★
All values on the gauge bar only for reference. For actual values please refer to factory defaults.
Image Setup Operating Instructions – Contrast
This session is used to adjust contrast of screen picture.
Level1
Level2
Main Menu
Image Setup
Main Disp
Brightness
Image Setup
Contrast
Audio Setup
PC Setup
Press
Level3 / Function
【Enter】 It will show the progress bar
at screen foot.
Sharpness
【Enter】 Tint
TV Setup
Color
Language
Return
50
Press
Use the e and f to adjust.
Press enter for return.
Recall
Quit
NOTE:
Use the ▲ and ▼ to move between the options,
Press the Menu button again to select.
★
All values on the gauge bar only for reference. For actual values please refer to factory defaults.
13
Image Setup Operating Instructions – Sharpness
This session is used to adjust sharpness of screen picture.
Level1
Level2
Main Menu
Image Setup
Main Disp
Brightness
Image Setup
Contrast
Audio Setup
PC Setup
Press
Level3 / Function
Press
【Enter】
Sharpness
【Enter】 Tint
1
It will show the progress bar
at screen foot.
Use the e and f to adjust.
Press enter for return.
TV Setup
Color
Language
Return
Recall
Quit
NOTE:
Use the ▲ and ▼ to move between the options,
Press the Menu button again to select.
★
All values on the gauge bar only for reference. For actual values please refer to factory defaults.
Image Setup Operating Instructions – Tint
This session is used to adjust TINT of screen picture.
Level1
Level2
Main Menu
Image Setup
Main Disp
Brightness
Image Setup
Contrast
Audio Setup
PC Setup
Press
Level3 / Function
【Enter】 It will show the progress bar
at screen foot.
Sharpness
【Enter】 Tint
TV Setup
Color
Language
Return
0
Press
Use the e and f to adjust.
Press enter for return.
Recall
Quit
NOTE:
Use the ▲ and ▼ to move between the options,
Press the Menu button again to select.
★
All values on the gauge bar only for reference. For actual values please refer to factory defaults.
14
Image Setup Operating Instructions – Color
This session is used to adjust Color of screen picture.
Level1
Level2
Main Menu
Image Setup
Main Disp
Brightness
Image Setup
Contrast
Audio Setup
Press
Level3 / Function
【Enter】 It will show the progress bar
at screen foot.
Sharpness
PC Setup
【Enter】 TINT
TV Setup
Color
Language
Return
50
Press
Use the e and f to adjust.
Press enter for return.
Recall
Quit
NOTE:
Use the ▲ and ▼ to move between the options,
Press the Menu button again to select.
★
All values on the gauge bar only for reference. For actual values please refer to factory defaults.
AUDIO Operating Instructions – Treble
This session is used to adjust Treble of audio.
Level1
Level2
Main Menu
Audio Setup
Main Disp
Treble
Image Setup
Bass
Audio Setup
PC Setup
Press
Level3 / Function
3
Press
【Enter】
Balance
【Enter】 Return
It will show the progress bar
at screen foot.
Use the e and f to adjust.
Press enter for return.
TV Setup
Language
Recall
Quit
NOTE:
Use the ▲ and ▼ to move between the options,
Press the Menu button again to select.
★
All values on the gauge bar only for reference. For actual values please refer to factory defaults.
15
AUDIO Operating Instructions – Bass
This session is used to adjust Bass of audio.
Level1
Level2
Main Menu
Audio Setup
Main Disp
Treble
Image Setup
Bass
Audio Setup
PC Setup
Press
Level3 / Function
1
Press
【Enter】 It will show the progress bar
at screen foot.
Balance
【Enter】 Return
Use the e and f to adjust.
Press enter for return.
TV Setup
Language
Recall
Quit
NOTE:
Use the ▲ and ▼ to move between the options,
Press the Menu button again to select.
★
All values on the gauge bar only for reference. For actual values please refer to factory defaults.
AUDIO Operating Instructions – Balance
This session is used to adjust Balance of audio.
Level1
Level2
Main Menu
Audio Setup
Main Disp
Treble
Image Setup
Bass
Audio Setup
PC Setup
Press
Level3 / Function
0
Press
【Enter】
Balance
【Enter】 Return
It will show the progress bar
at screen foot.
Use the e and f to adjust.
Press enter for return.
TV Setup
Language
Recall
Quit
NOTE:
Use the ▲ and ▼ to move between the options,
Press the Menu button again to select.
★
All values on the gauge bar only for reference. For actual values please refer to factory defaults.
16
TV Setup Operating Instructions – AIR CATV
This session is used to select TV source.
Level1
Level2
Main Menu
TV Setup
Main Disp
AIR CATV
Image Setup
Auto Program
Audio Setup
PC Setup
TV Setup
Press
【Enter】
Level3 / Function
Press
AIRTV
CATV
【Enter】 It will show 2 options at
screen foot.
Add Erase CH
Close Caption
Use the e and f to select.
VChip Control
Press enter for confirm.
Language
System Setup
Recall
Return
P.S:
AIRTV means Antenna.
CATV means Cable TV.
Quit
NOTE:
Use the ▲ and ▼ to move between the options,
Press the Menu button again to select.
TV Setup Operating Instructions – Auto Program
This session is used to scan TV channel and memory.
Level1
Level2
Main Menu
TV Setup
Main Disp
AIR CATV
Image Setup
Auto Program
Audio Setup
PC Setup
TV Setup
Press
【Enter】
Level3 / Function
Press
No
Yes
It will show 2 options at screen
【Enter】
foot..
Add Erase CH
Close Caption
Use the e and f to select.
VChip Control
Press enter for confirm.
Language
System Setup
Recall
Return
P.S:
“No” means return.
“Yes” means scan and memory.
Quit
NOTE:
Use the ▲ and ▼ to move between the options,
Press the Menu button again to select.
17
TV Setup Operating Instructions – Add Erase CH
This session is used to erase TV channel.
Level1
Level2
Main Menu
TV Setup
Main Disp
AIR CATV
Image Setup
Auto Program
Audio Setup
PC Setup
TV Setup
Press
【Enter】
Level3 / Function
Add
Erase
Exit.
It will show 3 options at
【Enter】
screen foot.
Press
Add Erase CH
Close Caption
Use the e and f to select.
VChip Control
Press enter for confirm.
Language
System Setup
Recall
Return
Quit
NOTE:
Use the ▲ and ▼ to move between the options,
Press the Menu button again to select.
TV Setup Operating Instructions – Close Caption
This session is used to select close caption option.
Level1
Level2
Main Menu
TV Setup
Level3 / Function
Main Disp
AIR CATV
It will show 1 option only at
Image Setup
Program
screen foot. But you can
Audio Setup
PC Setup
TV Setup
Press
【Enter】
Add Erase CH
Press
Close Caption
【Enter】
VChip Control
change setting between
flowing options.
Off→CC1→CC2→CC3→CC4→
Language
System Setup
TT1→TT2→TT3→TT4
Recall
Return
Press enter to select.
P.S:
Quit
NOTE:
Use the ▲ and ▼ to move between the options,
Press the Menu button again to select.
18
TV Setup Operating Instructions – VChip Control
This session is used to set VChip Control option.
Level1
Level2
Level3 / Function
Main Menu
TV Setup
VChip Control
Main Disp
AIR CATV
Image Setup
Program
Audio Setup
PC Setup
TV Setup
Press
【Enter】
Press
【Enter】
Add Erase CH
Set password
VChip Lock
Class Option
Close Caption
MPAA Option
VChip Control
Return
Language
System Setup
Recall
Return
Quit
When you select this option, system will
NOTE:
request password for entry.( default code
Use the ▲ and ▼ to move between the options,
is 3308) - Above function will explain at
Press the Menu button again to select.
flowing session.
TV Setup Operating Instructions – VChip Control – Set password
This session is used to re-set VChip Control password.
Level3
Level4 / Function
VChip Control
Set password
VChip Lock
Class Option
Press
SET PASSWORD
four digits Parent Control
----
【Enter】
Re-set password - Input the
Password and Confirm using
the Enter Button.
MPAA Option
Return
NOTE:
Use the ▲ and ▼ to move between the options,
Press the Menu button again to select.
TV Setup Operating Instructions – VChip Control – VChip Lock
This session is used to set VChip Control on or off.
Level3
Level4 / Function
VChip Control
Set password
VChip Lock
Class Option
Off
On
It will show 2 options at screen
【Enter】
foot..
Press
MPAA Option
Use the e and f to select. Press
Return
enter for confirm.
NOTE:
Use the ▲ and ▼ to move between the options, Press the Menu button again to select.
19
TV Setup Operating Instructions – VChip Control – Class Option
This session is used to set VChip Control class.
Level3
Level4 / Function
VChip Control
Class Option
Set password
VChip Lock
Class Option
Press
TV-Y
All Children
TV-Y7
Directed to Older Children (above age of 7)
General Audience
【Enter】 TV-G
MPAA Option
TV-PG
Parental Guidance Suggested
Return
TV-14
Parents Strongly Cautioned
NOTE:
TV-MA
Mature Audience Only
Use the ▲ and ▼ to move
Return
Press Enter menu button to
select Blocked or Unblocked.
between the options, Press the Menu button again to select.
TV Setup Operating Instructions – VChip Control – MPAA Option
This session is used to select MPAA movie ratings. P.S: Motion Picture Association of America (MPAA)
Level3
Level4 / Function
VChip Control
MPAA Option
Reference
Movie ratings:
Set password
G
G: General Audiences.
VChip Lock
PG
PG: Parental Guidance Suggested.
PG-13
PG-13: Parents Strongly Cautioned.
Class Option
MPAA Option
Press
R: Restricted
【Enter】 R
Return
NC-17
NC-17: No One 17 and Under admitted
X
X: Adult only.
NOTE:
Return
Use the ▲ and ▼ to move between the options,
Press Enter menu button to
Press the Menu button again to select.
select Blocked or Unblocked.
TV Setup Operating Instructions – System Setup
This session is used to set VChip Control option.
Level1
Level2
Level3 / Function
Main Menu
TV Setup
System Setup
Main Disp
AIR CATV
Image Setup
Program
Audio Setup
PC Setup
TV Setup
Press
【Enter】
Press
【Enter】
Add Erase CH
STD
HRC
IRC
Close Caption
AUTO
VChip Control
Return
Language
System Setup
Recall
Return
Quit
NOTE:
Use the ▲ and ▼ to move between the options,Press
the Menu button again to select.
20
Broadcast TV Frequency Allocations:
STD = Standard
HRC = Harmonic related carrier
IRC = Interval related carrier
AUTO = Auto
LANGUAGE Operating Instructions
This session is used to select the language display of OSD.
Level1
Level2
Main Menu
Language
Level3 / Function
Main Disp
Press Enter menu button to
Image Setup
Press
Audio Setup
【Enter】
select French, Spanish or
English
English.
PC Setup
TV Setup
NOTE:
Language
Use the ▲ and ▼ to move between the options,
Recall
Press the Menu button again to select.
Quit
Recall Operating Instructions
Level1
Level2
Level3 / Function
Main Menu
Main Disp
Automatically reset setting to factory defaults.
Image Setup
Audio Setup
PC Setup
TV Setup
NOTE:
Language
Use the ▲ and ▼ to move between the options,
Recall
Press the Menu button again to select.
Quit
Quit Operating Instructions
Level1
Level2
Level3 / Function
Main Menu
Main Disp
Quit – Exit the on-screen-menu controls
Image Setup
Audio Setup
PC Setup
TV Setup
NOTE :
Language
Use the ▲ and ▼ to move between the options,
Recall
Press the Menu button again to select.
Quit
21
Using the LCD as a Computer Monitor
Press and release the Menu button to display the following Main Menu:
MAIN DISPLAY Operating Instructions - PC
Level1
Level2
Main Menu
Main Disp
Level3 / Function
Main Disp
TV
1. TV - TV Input Signal
Image Setup
AV
2. AV Input Signal
S-Video
3. S-VIDEO Input Signal
Audio Setup
Press
PC Setup
【Enter】 PC
4. PC - Computer Input Signal
TV Setup
CVI
5. CVI - Component Video Input Signal
Language
Return
6. Return - Back to Main Menu
Recall
NOTE:
Quit
Use the ▲ and ▼ to move between the options, Press the
Menu button again to select.
PC Setup Operating Instructions – Color
Level1
Level2
Level3 / Function
Main Menu
PC Setup
Color
Main Disp
Color
Image Setup
H Position
Audio Setup
PC Setup
Press
6500K
Press
V Position
【Enter】
【Enter】 Phase
TV Setup
Clock
Language
Auto Adjust
Recall
Feature
Quit
Return
7500K
9300K
User Color
Return
NOTE:
Use the ▲ and ▼ to move between the options, Press the Menu button again to select.
PC Setup Operating Instructions – Color – User Color
Level3
Level4 / Function
Color
User Color
6500K
7500K
9300K
Press
Red
Red
125
Green
Green
125
Blue
125
【Enter】 Blue
User Color
Return
Return
NOTE: Use the ▲ and ▼ to move between the options, Press
the Menu button again to select. Use the e and f to select. Press
enter for confirm.
★
All values on the gauge bar only for reference. For actual values please refer to factory defaults.
22
PC Setup Operating Instructions – H Position
Level1
Level2
Main Menu
PC Setup
Main Disp
Color
Image Setup
H Position
Audio Setup
PC Setup
Press
Level3 / Function
50
It will show the progress bar at
screen foot.
V Position
【Enter】 Phase
Use the e and f to adjust. Press
TV Setup
Clock
Language
Auto Adjust
Recall
Feature
Quit
Return
enter for return.
NOTE: Use the ▲ and ▼ to move between the options, Press the Menu button again to select.
★
All values on the gauge bar only for reference. For actual values please refer to factory defaults.
PC Setup Operating Instructions – V Position
Level1
Level2
Main Menu
PC Setup
Main Disp
Color
Image Setup
H Position
Audio Setup
PC Setup
Press
Level3 / Function
50
It will show the progress bar at
screen foot.
V Position
【Enter】 Phase
Use the e and f to adjust. Press
TV Setup
Clock
Language
Auto Adjust
Recall
Feature
Quit
Return
enter for return.
NOTE: Use the ▲ and ▼ to move between the options, Press the Menu button again to select.
★
All values on the gauge bar only for reference. For actual values please refer to factory defaults.
PC Setup Operating Instructions – Phase
Level1
Level2
Main Menu
PC Setup
Main Disp
Color
Image Setup
H Position
Audio Setup
PC Setup
Press
Level3 / Function
50
It will show the progress bar at
screen foot.
V Position
【Enter】 Phase
Use the e and f to adjust. Press
TV Setup
Clock
enter for return.
Language
Auto Adjust
Recall
Feature
Quit
Return
★ All values on the gauge bar
only for reference. For actual
values please refer to factory
defaults.
NOTE: Use the ▲ and ▼ to move between the options, Press the Menu button again to select.
23
PC Setup Operating Instructions – Clock
Level1
Level2
Main Menu
PC Setup
Main Disp
Color
Image Setup
H Position
Audio Setup
PC Setup
Press
Level3 / Function
50
It will show the progress bar at
screen foot.
V Position
【Enter】 Phase
Use the e and f to adjust. Press
TV Setup
Clock
Language
Auto Adjust
Recall
Feature
Quit
Return
enter for return.
NOTE:
Use the ▲ and ▼ to move between the options,
Press the Menu button again to select.
★
All values on the gauge bar only for reference. For actual values please refer to factory defaults.
PC Setup Operating Instructions – Auto Adjust
Level1
Level2
Main Menu
PC Setup
Level3 / Function
Main Disp
Color
Automatically adjust the TV
Image Setup
H Position
setting to fit for PC mode.
Audio Setup
PC Setup
Press
V Position
【Enter】 Phase
TV Setup
Clock
Language
Auto Adjust
Recall
Feature
Quit
Return
NOTE:
Use the ▲ and ▼ to move between the options,
Press the Menu button again to select.
PC Setup Operating Instructions – Feature
This function is showing the signal information only.
1280*1024 75HZ
H : 80. 0KHZ
V : 75. 0HZ
24
4. REFERENCE
About VChip Control
Class option
The following categories apply to programs designed for the entire audience.
TVY All Children.
This program is designed to be appropriate for all children. Whether animated or live-action, the
themes and elements in this program are specifically designed for a very young audience,
including children from ages 2 - 6. This program is not expected to frighten younger children.
TVY7 Directed to Older Children.
This program is designed for children age 7 and above. It may be more appropriate for children
who have acquired the developmental skills needed to distinguish between make-believe and
reality. Themes and elements in this program may include mild fantasy violence or comedic
violence, or may frighten children under the age of 7. Therefore, parents may wish to consider the
suitability of this program for their very young children. Note: For those programs where fantasy
violence may be more intense or more combative than other programs in this category, such
programs will be designated TV-Y7-FV.
The following categories apply to programs designed for the entire audience.
TVG General Audience.
Most parents would find this program suitable for all ages. Although this rating does not signify a
program designed specifically for children, most parents may let younger children watch this
program unattended. It contains little or no violence, no strong language and little or no sexual
dialogue or situations.
TVPG Parental Guidance Suggested.
This program contains material that parents may find unsuitable for younger children. Many
parents may want to watch it with their younger children. The theme itself may call for parental
guidance and/or the program contains one or more of the following: moderate violence (V), some
sexual situations (S), infrequent coarse language (L), or some suggestive dialogue (D).
TV14 Parents Strongly Cautioned.
This program contains some material that many parents would find unsuitable for children under
14 years of age. Parents are strongly urged to exercise greater care in monitoring this program
and are cautioned against letting children under the age of 14 watch unattended. This program
contains one or more of the following: intense violence (V), intense sexual situations (S), strong
coarse language (L), or intensely suggestive dialogue (D).
TVMA Mature Audience Only.
This program is specifically designed to be viewed by adults and therefore may be unsuitable for
children under 17. This program contains one or more of the following: graphic violence (V),
explicit sexual activity (S), or crude indecent language (L).
25
MPAA option
G: General Audiences -- All ages permitted.
PG: Parental Guidance Suggested -- Some material may not be suitable for children.
PG-13: Parents Strongly Cautioned -- Some material may be inappropriate for children under 13.
R: Restricted -- Under 17 requires accompanying parent or adult guardian.
NC-17: No One 17 and Under admitted.
(Reference to http://www.mpaa.org/)
PC Display Modes
Mode
Resolution
Horizontal frequency(KHz) Vertical frequency(Hz)
1
640 x 480
31.5 KHz
60.00Hz
2
800 x 600
37.88 KHz
60.30Hz
3
1024 x 768
48.3 KHz
59.90Hz
4
1280 x 1024
60.00 KHz
60.00Hz
Please note that the recommended vertical frequency for this television is 60Hz.
Cleaning LCD Monitor
1. Please make sure that you have turned off this machine.
2. Don't put any liquid on LCD Monitor or plastic box directly.
Please NOTE when cleaning the LCD monitor.
1. Gently wipe screen with a clean, soft, lint-free cloth to remove dust and other particles that can scratch the
screen.
2. To clean the tough areas, use a soft, lint-free cloth with a few drops of water to remove the stubborn dirt.
3. Do not apply pressure to the surface of the TFT-LCD
When you clean the housing:
1. Use a soft, dry cloth to clean housing.
2. To clean tough areas, use a soft, lint-free cloth with a few drops of water to remove the stubborn dirt.
26
Troubleshooting
Please use the following table to resolve the most common possible causes of the
problem before calling service personnel. A minor adjustment may eliminate the problem
and restore your TV reception.
Symptom
Corrective Actions
1. Check that power is turned on, or that power adapter lamp is lit.
2. Adjust brightness and contrast.
No picture screen
3. Check input signal of TFT-LCD.
4. Check the power connection to the unit with screen.
5. Check Main Display selection.
Picture is not clear
1. Check that Video cable is plugged in.
2. Refer to the Picture Adjustments Menu in the OPERATING INSTRUCTIONS.
1. The power could be failing, try connecting the unit to another power outlet.
Image is fuzzy
2. Move unit a way from the magnetic equipment, such as Wireless Receiver, AC
Transformer …etc.
3. Refer to the Picture Adjustment Procedure Menu in the OPERATING INSTRUCTIONS.
Colors are distorted
Check that the Video cable is plugged in securely.
Screen bounces or has 1.Check Video input range(V-sync:Max. 75Hz, H-sync:Max.48.08KHz )
wavy oscillations
No sound
Only one speaker operates
2. Make sure Video cable connections are secure.
1. Check speaker line connections.
2. Sound might be muted, try adjusting the volume.
1. Check audio wire connections with source device.
2. Check the unit’s speaker wires are securely connected.
1. Check for light or obstacle interference with remote control signal and move unit to
Remote Control inoperative another location.
2. Batteries are dead; replace batteries with new ones.
Poor Picture Reception and
/ or Poor Sound Quality
From TV SETUP mode, select the appropriate setting and Rerun AUTO PROGRAM.
When all else fails Reset Turn on power. Press and hold the VOL+ button and VOL- on the top of the unit and hit
the MENU button at the same time. For five seconds and release.
the firmware
If the unit does not operate normally, after the operating instructions were followed. And
the troubleshooting section did not help refer to dealer or qualified service personnel.
27
5. APPENDIX
Specifications:
Specifications
Model No.
LT1960
LCD Panel
19" TFT-LCD Color Display
Total Display Color
16.7 millions
Contrast Ratio
800:1
TV System
RF NTSC System Only
TV CCIR Standard System – NTSC-M
TV Auto-install Channel
TV Function
Stereo Audio
TV Remote Control
Auto-install in advance Auto-scanning
CATV 1~125CH, AIR 2~69CH
Brightness
250 nits
Scanning Backlight Life
50,000 hr
Viewing Angle
Audio Amplifier
H-Position 160°, V-Position 160°
(CR >= 10)
2W × 2
Terminal Input AV,
Input Terminal AV Input
S-Video, 15Pin D-sub(VGA),
Component(YCbCr/ YPbPr)
ANT
DIN
H/P(earphone)
3.5Φ Hole
Display Language
English , French , Spanish
Power Adapter
AC Input 100 – 240V 50/60 HZ
Enclosure
Remote Control, Batteries.
Power Cord, User’s Manual
28
6. WARRANTY
29
warranty service may be obtained upon delivery of the Citizen product
together with proof of purchase and a copy of this LIMITED WARRANTY
statement to an Authorized Citizen Service Centre. In-home warranty service
may be provided at Citizen Electronics’ discretion on any Citizen television
with the screen size of 27” or larger. This warranty constitutes the entire
express warranty granted by Citizen Electronics and no other dealer, service
centre or their agent or employee is authorized to extend, enlarge or transfer
this warranty on behalf of Citizen Electronics. To the extent the law permits,
Citizen Electronics disclaims any and all liability for direct or indirect damages
or losses or for any incidental, special or consequential damages or loss of
profits resulting from a defect in material or workmanship relating to the
product, including damages for the loss of time or use of this Citizen product
or the loss of information. The purchaser will be responsible for any removal,
reinstallation, transportation and insurance costs incurred. Correction of
defects, in the manner and period of time described herein, constitute
complete fulfillment of all obligations and responsibilities of Citizen Electronics
to the purchaser with respect to the product and shall constitute full
satisfaction of all claims, whether based on contract, negligence, strict liability
or otherwise.
WARRANTY PERIODS: Parts & Labour (exceptions noted)
Audio Products: 1 Year (Remote Control, if applicable – 90 Days)
DVD Products: 1 Year (Remote Control – 90 Days)
LCD & Plasma Display TV: 1 Year (Remote Control – 90 Days)
Microwave Ovens: 1 Year
Television Products: 1 Year (Remote Control – 90 Days)
VCR Products: 1 Year (Remote Control – 90 Days, Video Heads – 6
Months)
To obtain the name and address of the nearest Authorized Citizen Service
Centre or Dealer, please contact:
Citizen Electronics, 455 Gordon Baker Road, Toronto, Ontario M2H 4H2 or visit
our web site: www.citizen-electronics.com
For more information on this Warranty or Service Locations, please call (416)
499-5611 or toll free 1-800-663-5954, Monday to Friday 9:00am – 5:00pm
Eastern Standard Time.
30