1
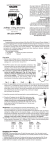
GPS Picture Tracker
USER MANUAL
Version. 1.5.0
Da
t
Tim e: 20
e
: 09 07-0
:50 4-12
:35
WARNING
To avoid any unpredictable reason cause the malfunction of the Photo Finder, GPS
Picture Tracker and damage your pictures while operating, please backup any valued
data on your computer or hard drive first.
© 2007 ATP Electronics Taiwan Inc.
WARNING
Before operating the Photo Finder, GPS Picture Tracker, please read this manual thoroughly,
and retain it for future reference.
Before operating the GPS mapping function, please backup you file to avoid the potential
data loss.
To reduce fire or shock hazard, do not expose the device to rain, water or moisture.
Trademarks
Google is a registered trademark or trademark of Google Inc. in the U.S.A. and/or other countries.
Google Earth is a registered trademark or trademark of Google Inc. in the U.S.A. and/or other countries.
Google Map is a registered trademark or trademark of Google Inc. in the U.S.A. and/or other countries.
Picasa2 is a registered trademark or trademark of Google Inc. in the U.S.A. and/or other countries.
All trade names and trademarks are the properties of their respective companies.
In additional, system and product names used in the manual are, in general, trademarks or registered
trademarks of their respective developers or manufacturers.
Safety Information
Please read the following safety instructions, and keep the user manual for later reference.
• Only use AAA batteries that are specified in this user manual.
• Do not place the device near any source of heat or expose it to direct sunlight.
• Do not attempt to connect to any computer accessories or electronic products unless as specified in this
instruction manual.
• Do not expose the device to moisture or liquids.
• Do not expose the device to environments with extreme temperatures.
2
Copyright© 2007. All Rights Reserved by ATP Electronics Taiwan Inc.
Contents
What is GPS?
Precautions
Product Features
Product features
- Function keys description
- Led status description
- LCD screen status description
Attaching the carabiner and hang on your bag
Inserting battery
How to use the OTG GPS Picture Tracker
Simple operation
Easy to carry
Store data up to two month
High sensitive GPS antenna and high performance
OTG mode data transferring and GPS coordinates mapping
Built-in SD/MMC/MS Card Socket and USB Host function
Using the OTG GPS Picture Tracker
How to create GPS tags
Apply position information to pictures
Using the software
Compatible to Google Earth and Picasa2 software
How to use the pictures and manage your pictures
- Personal photo management application
- Photo navigation application
- Commercial Business application
Additional information
Product specifications
Digital camera compatibility list of OTG mode
Trouble shooting
3
Copyright© 2007. All Rights Reserved by ATP Electronics Taiwan Inc.
What is GPS?
GPS (Global Positioning System) is a global navigation satellite system that calculates position from a network
orbiting satellites and essentially allows you to track down your exact location on Earth. This network of GPS
satellites consists of 24 total satellites in six orbits, with four satellites in each orbit. These 24 satellites are
about 20 kilometers (about 12.4 miles) above us and using at least three of them a GPS receiver can receive
radio signals and triangulate your exact position via a series of calculations. This is called “tracking” and a
GPS receiver logs your location by latitude and longitude numbers. The ATP Photo Finder utilizes an internal
GPS receiver and stores your location data for use in photos taken with your digital camera.
4
Copyright© 2007. All Rights Reserved by ATP Electronics Taiwan Inc.
Precautions
The positioning of GPS satellites varies depending on the location and time you are using a GPS
receiver and there may be a delay in tracking or no tracking available at all.
Due to the fact that a GPS receiver needs to communicate to orbiting satellites with a direct line of
sight, avoid using the device in areas where radio signals would be obscured. If possible, use the device
in open sky environments. A few examples of areas where a GPS receiver might be obscured:
- In tunnels, indoor or under shades of buildings.
- Between tall buildings or narrow streets surrounded by buildings.
- At underground locations, surrounded by dense trees, under an elevated bridge or at the
locations where magnetic fields are generated such as near high voltage cables.
- Near the devices that generate the radio signals of the same frequency band as the Photo
Finder, GPS Picture Tracker: near the 1.5GHz band mobile telephones, etc.
- The Photo Finder may also not be able to track when you are moving at the speed of
500km/hr (300 miles/hr) or faster.
Margin of Error caused by the positioning of GPS satellites
The ATP Photo Finder automatically tracks your present location when radio signals from three or more
GPS satellites are received. The margin of error for the location calculated by the Photo Finder is about
10m and does vary on the environment.
Tracking Interpolation
The ATP Photo Finder, when activated, records your position information every 5 seconds. When a
picture is taken while the Photo Finder is switched off, your position can still be interpolated using
software such as Google Earth or Picasa2. A rough position can be calculated by measuring the
distances between the location before and after the picture is taken. In this case, the actual position
may not match completely with the location on the map based on GPS information.
On error due to incorrect clock setting on a camera
When the clock setting on your digital camera is set incorrectly, the correct position information from the
Photo Finder cannot be applied towards your pictures. Adjust the clock setting of your camera as
accurately as possible in order to ensure the accuracy of the position information. In order to for this
setting to be synchronized with your Photo Finger, refer to the GPS screen “UTC current time”*(1) and
adjust your camera to the same time.
Remark
(1) UTC: Coordinated Universal Time, from Universal Time/Temps Cordonn.
(2) Adjust your camera clock setting same as the UTC time. You won’t have to re-adjust
time clock of your camera when you go beyond a time zone.
(3) If you did not refer to the GPS UTC time, you will not get the correct GPS information
and cannot map the correct data to pictures.
5
Copyright© 2007. All Rights Reserved by ATP Electronics Taiwan Inc.
Product Features
The ATP Photo Finder calculates and records GPS position data and allows you to precisely track the exact
location and time of where your pictures were taken. Make sure that the Photo Finder is activated while
you’re taking pictures with your digital camera. After you finish taking pictures, simply insert your SD card or
Memory Stick Pro Duo card into the Photo Finder card slot and the GPS data will be synchronized and added to
all pictures on the card. Even more convenient is the fact that this is all performed “on the go” without a PC.
All you need to carry with you is your digital camera to take the pictures and the ATP Photo Finder to log your
location.
Photos GPS tagged by the ATP Photo Finger can be used with any GPS compatible photo software. For
example, when used with the Google supplied software “Picasa2”, “Google Earth”, or “Google Map”, your
photos will be shown on an online map, giving you a whole new way to organize, enjoy and share your
pictures. Share your pictures and trip route with your friends and family. More importantly, never forget
where you took a picture again. You can also use your GPS tagged photos in a compatible GPS navigation
system, allowing for features such as choosing your destination and landmarks visually.
1. Function and keys description
1
2
3
4
5
6
7
8
9
10
11
1
LED 1: Yellow
Flash memory status
7
Carabiner loop
2
3
Attachment loop
LED 2: Blue
GPS status
8
Power/Status button
Power ON/Off, status select
LED 3: Green/Red
Power status
9
Select key 1
UI function select “ NO ”
4
LCD Screen
Status display
10
Select key 2
UI function select “ YES “
5
Mini USB connector
Connect to camera/Card reader
11
Battery cover
AAA battery cover
6
Memory card slot
SD/MMC/MS cards slot
P.S. For detailed function descriptions, please see below.
6
Copyright© 2007. All Rights Reserved by ATP Electronics Taiwan Inc.
2. LED status description
2.1. LED 1: Power Status in Light Green/Red
LED1 Power Status: Green light
Date: 2007-04-12
Time: 09:50:35
Power Status: Red light
2.1.1: Power ON/OFF: Green Light will turn on for 2~3 seconds
2.1.2. Remaining Power Status:
70% or more power -> Continuous green light
70%~20% power -> Flashes in Green
~
Under 20% power -> Light in Red
Low Power -> Auto Power Off
~
2.2. LED 2: GPS Status
Date: 2007-04-12
Time: 09:50:35
LED2 GPS Status: Blue light
2.2.1. While GPS Signal is Active: Blue light flashes
--- 5 seconds ---
2.3. LED 3: Memory Status/”On the Go” (OTG) Operating Mode Status
Date: 2007-04-12
Time: 09:50:35
2.3.1. OTG data sync -> Flashes in Yellow while syncing data
LED3 Memory Status: Yellow light
7
Copyright© 2007. All Rights Reserved by ATP Electronics Taiwan Inc.
3. LCD screen status description
LCD screen status
Key action
PWR
N/A
N/A
Push 3 seconds
Flash Memory
Status
GPS Signal
Description/Action
Power ON and OFF
Show Flash Memory Capacity
Search GPS Signals
UTC Time/Date Information , Refer to
L
UTC Time
This UTC and Adjust Digital Camera Time
Clock Setting Accordingly
R
PWR
N/A
L/R
L/R
L/R
N/A
N/A
N/A
N/A
GPS Information
Low Battery
Internal Memory
Full
Format System
Syncing GPS Map
Data Selection
Mapping
GPS/JPG files
Show Current Location Information
Auto Power OFF, Change New Battery
and Power ON Again
Please Save the Data or Format System
Select to Format The GPS System
Select to Sync The GPS Data to JPG Files
Show The JPG Files Amount
GPS Data Sync in
Please DO NOT Remove Any Card or USB
Progress
Device
GPS Data Sync
Please remove the memory card or the
Complete
USB device
GPS/JPG Files
Sync Status
Device/Card
Support Status
Show the JPG files Sync Result
Remove Attached Device or Memory Card
8
Copyright© 2007. All Rights Reserved by ATP Electronics Taiwan Inc.
Attaching the Carabiner
1. Detach the looped string from the main device body of the carabiner as illustrated below (1) and pull the
loop through the carabiner attachment hole on the device (2)
1
2
2. The carabiner can be used to hang the Photo Finder externally for maximum direct exposure to satellite
coverage. This can, for example, be on a bag, backpack, or clothing.
3. When the Photo Finder is activated and tracking, ideal orientation for GPS reception is to have the antenna
area pointed up.
GPS Antenna area
4. For more operating detailed operating instructions, please continue to read this manual.
Date: 2007-04-12
Time: 09:50:35
9
Copyright© 2007. All Rights Reserved by ATP Electronics Taiwan Inc.
Inserting Batteries
1. The following batteries are acceptable.
LR03 (size AAA) alkaline battery x 2
R03 (size AAA) Nickel-Metal Hydride battery x 2
2. Carefully slide down the rear battery cover and insert 2 AAA batteries into the device in the orientation
displayed inside.
3. Replace the battery cover.
4. Power ON the device and the LED will flash Green for 2~3 seconds.
5. After usage, be sure to first turn OFF the power before removing the battery. (Based on 1000mA)
LR03 (size AAA) alkaline battery
R03 (size AAA) Nickel-Metal Hydride battery
About 8 hours
About 7.5 hours
WARNING
There is a danger of leakage or explosion if batteries are mishandled. Please be sure to observe
the following:
Insert batteries with the correct polarity +/-.
Do not attempt to charge a dry battery.
Remove the batteries when not using the device for a prolonged period of time.
Do not break disrupt or switch off power when the device is transferring data to a memory card.
10
Copyright© 2007. All Rights Reserved by ATP Electronics Taiwan Inc.
Photo Finder Basic Usage Instructions and Features
The ATP Photo Finder records GPS log files of your position and time in 5 second intervals and stores this
information in internal memory. Simply turn ON the power and the tracking/logging automatically starts. With
an internal memory capacity of 32/128 MB (optional), the device can log your position information for over
130/550 hours.
Basic Features:
Simple operation
There’s no need for a complex set-up or installation process. Turn on the Photo Finder to begin tracking
and logging as you’re taking pictures. Then sync the logged position information to your memory card.
You now have GPS position tagged photos!
Easy to carry
With a compact and lightweight (only about 60 grams) design, the ATP Photo Finder is convenient for
travel and outdoor use.
Store data for up to 150/600* hours; logging interval Approx. 5 seconds
The ATP Photo Finder records approximately 150/600* hours of GPS data, equivalent to about 150/600*
hours of continuous non-stop tracking. The logging interval is Approx. 5 seconds and you can get the
detail GPS information. The number of log entries and recording time may differ depending on satellite
coverage and signal strength.
(*) Optional Flash memory capacity: store data for 150 hours is 32MB; 600 hours is 128MB.
High Performance GPS Receiver
The built-in high performance GPS antenna module can search and communicate with 20
channels/satellites simultaneously.
“On The Go” mode data sync and GPS coordinates mapping
Sync your pictures with GPS positioning data without the need for a PC environment.
Card reader
Digital camera
Built-in SD/MMC/MS Card Slot and direct USB Connectivity
The ATP Photo Finder is compatible out of the box with most digital cameras, supporting SD/MMC/MS
memory cards. CF/xD memory cards can also be synced with position data with use of a card reader.
SD/MMC/MS cards
11
Copyright© 2007. All Rights Reserved by ATP Electronics Taiwan Inc.
Photo Finder Detailed Usage Instructions
1. Install the AAA batteries with the correct polarity +/-.
2. Push the Power button for 2~3 seconds to start the system.
2.1. The LED light flashes green for 2~3 seconds.
2.2. The LCD screen will display ‘OTG GPS Data Recorder V.1.0’
3. The ATP Photo Finder automatically begins to search for satellite signals.
3.1. The LCD screen will display ‘Searching GPS’ and the LED light will flash twice rapidly for 1 second.
3.2. As the device starts to receive radio signals from satellites, the LCD screen will display ‘Current Date
and UTC time’ The LED light will flash once slowly for 2~3 seconds.
3.3. Adjust the clock setting of your camera accordingly. The ‘current time’ and ‘UTC time’ displays can
be used as a reference.
4. Position the Photo Finder correctly so that the GPS antenna is facing up.
5. You can now being to take pictures as you normally would with your digital camera.
6. Sync the GPS position data to your pictures on a memory card.
6.1. Remove the memory card form your digital camera.
6.2. Open the bottom rubber cover on the Photo Finder and plug in your memory card into
the card slot. (*1)
6.3. The Photo Finder will begin writing the GPS information to your pictures automatically.
6.4. DO NOT remove the memory card or batteries when the device is writing data or else
data corruption can occur. (*2)
6.5. After the Photo Finder finishes writing the data, you can remove the memory card.
7. Using the pictures with GPS tag information:
7.1. Personal picture management applications. (*3)
7.2. Commercial business applications.
7.3. Photo navigation applications. (*4)
Remark
(*1) The ATP Photo Finder has a built in SD/MMC/MS memory card slot.
Other memory cards such as CF, xD, or MicroDrives can be synced with ATP Photo Finder logged GPS data with use of
a card reader and connection to the PC via USB connection.
(*2) When the available remaining power falls under 20%, the Power LED will begin flashing RED.
(*3) Using the Google Earth application, you can manage your personal pictures with GPS tags by location and share them.
(*4) GPS tagged photos can also be used in navigation devices with GPS photo support. Pictures can be used as
landmarks and destinations, allowing for visual selection rather than by address.
12
Copyright© 2007. All Rights Reserved by ATP Electronics Taiwan Inc.
Using GPS Photo Compatible Software
1. Picasa2 and Google Earth software can be downloaded from www.google.com for use on your PC.
2. Picasa2 is personal picture management software used for many functions such as editing, viewing and
organizing your pictures.
3. Upon importing pictures with GPS tagging information into Picasa2, you will find a “crossmark” symbol in
the lower right corner. This signifies that the picture has GPS position information included. Using your
mouse, ‘Right click’ on the screen and the GPS longitude and latitude information can be viewed.
Cross mark
4. Using Picasa2, pictures can also be viewed and organized using Google Earth. Google Earth can visually
organize your pictures geographically and can be shared with friends and family.
13
Copyright© 2007. All Rights Reserved by ATP Electronics Taiwan Inc.
Additional Information
1.
Brief Specifications
Display
128x32 Dot Matrix FSTN with backlight
English (Default )
UI Language
Japanese ( Optional )
Traditional Chinese ( Optional )
Simply Chinese ( Optional )
GPS Frequency Response
1575.42 MHz (L1 Band, C/A code)
Operating Temperature
-20 to +60 degrees C (-4 to +140 degrees F)
Storage Temperature
-20 to +60 degrees C (-4 to +140 degrees F)
Operating Time
More than 8 Hours
Complies with Compact Flash Specification Revision 4.0
Connectivity Card
Complies with SD 2.0 SDHC
Complies with MMC 4.2
Complies with Memory Stick PRO/Duo
OTG Interface
Mini USB
Embedded Memory
128MB NAND Flash
Battery
AAA x 2
USB cable
Mini USB to Type A female connector cable
GPS Module
Chipset
Frequency
Code
Channels
Sensitivity (Tracking)
Cold start
Warm start
Hot start
Reacquisition
Position accuracy
Maximum altitude
Maximum velocity
Trickle power mode
Update rate
Testability
Protocol setup
SiRF Star III
L1 1575.42MHz.
C.A. Code.
20
-155dBm.
45 sec
35 sec
1 sec
0.1sec typical
≦25m CEP.
18000 m
514 m/s
Duty cycle ≦34%. (Variable) Default: disable (option: enable)
Continuous operation: 1Hz
It shall be able to be tested by SiRF test mode 4 and single channel
simulator.
It shall store the protocol setup in the SRAM memory.
Interface
I/O Pin
30pin stamp holes
Power consumption
Vcc
Current
Trickle power mode
DC 3.3 ±5%
GPSM-013: Current [email protected] typical (w/o ext. antenna)
Average current ≦[email protected] typical (w/o ext. Antenna)
Environment
Operating temperature
Humidity
-30 ~ 85℃
℃
≦95%
14
Copyright© 2007. All Rights Reserved by ATP Electronics Taiwan Inc.
2. Partial Digital Camera Compatibility List
When you use the OTG mode function, please check the compatibility list of digital camera.
The OTG function is compatible to most digital cameras in the market.
If your digital camera model is not on the list, please try the card reader to transfer the GPS data to
memory cards.
2.1. Casio series:
CASIO
CASIO
CASIO
CASIO
CASIO
CASIO
CASIO
CASIO
CASIO
CASIO
CASIO
CASIO
CASIO
CASIO
CASIO
Device
Device ID
QV-3500EX
EXILIM EX-S3
EXILIM PRO EX-P600
EX-S500
EX-Z110
EX-Z57
EX-Z750
EX-P700
QV-R4
EXILIM EX-S20
EX-S100
QV-R51
QV-R61
ZOOM EX-Z40
EXILIM EX-M2
240-0000476
240-0000476
240-0000476
240-0000476
240-0000476
240-0000477
240-0000476
240-0000477
240-0000477
240-0000476
240-0000476
240-0000477
240-0000476
240-0000476
240-0000476
2.2. Fujifilm FinePix series
Fujifilm
Fujifilm
Fujifilm
Fujifilm
Fujifilm
Fujifilm
Device
Device ID
FinePix 40i
FinePix F420
FinePix A310
FinePix FX-2300
FinePix FX-1300
FinePix FX-4700Z
240-0000477
240-0000478
240-0000477
240-0000476
240-0000476
240-0000476
2.3. HP Photosmart series:
Device
HP
HP
HP
HP
Device ID
Photosmart 945
Photosmart 935XI
Photosmart R707
Photosmart 850
240-0000477
240-0000476
240-0000477
240-0000477
2.4. Konica series:
Device
Konica
Konica
Konica
Konica
Konica
Konica
Konica
Konica
Konica
Konica
Device ID
Digital Revio KD-500Z
Minolta Dimage Xi
Minolta DiMAGE Z1
Minolta DiMAGE X31
Minolta DiMAGE Xg
Minolta DiMAGE Z2
Minolta DiMAGE G600
Minolta DiMAGE X50
Minolta DiMAGE Z3
Minolta DiMAGE E323
240-0000476
240-0000477
240-0000476
240-0000476
240-0000478
240-0000476
240-0000476
240-0000476
240-0000476
240-0000476
15
Copyright© 2007. All Rights Reserved by ATP Electronics Taiwan Inc.
Konica
Konica
Konica
Konica
Konica
Konica
Konica
Konica
Minolta
Minolta
Minolta
Minolta
Minolta
Minolta
Minolta
Minolta
DiMAGE Xt
Dimage A2
DiMAGE Z20
Revio KD-510Z
DiMAGE Z10
Dimage G400
DiMAGE G530
DiMAGE X1
240-0000476
240-0000478
240-0000476
240-0000476
240-0000477
240-0000476
240-0000476
240-0000476
2.5. Kyocera FineCam series
Kyocera
Kyocera
Kyocera
Kyocera
Kyocera
Kyocera
Kyocera
Kyocera
Kyocera
Kyocera
Kyocera
Kyocera
Device
Device ID
Finecam S3L
Finecam L30
FineCam S5R
Finecam S5
Finecam L3
Finecam M400R
Finecam M410R
Finecam S3R
Contax SL300R T
Finecam SL300R
Finecam SL400R
Finecam L3v
240-0000477
240-0000476
240-0000477
240-0000477
240-0000477
240-0000477
240-0000477
240-0000477
240-0000477
240-0000476
240-0000477
240-0000477
2.6. Nikon Coolpix series
Device
Device ID
Nikon COOLPIX 4500
Nikon COOLPIX 4100
Nikon COOLPIX 4200
Nikon COOLPIX 5200
Nikon COOLPIX 3200
Nikon COOLPIX 2200
Nikon COOLPIX 5900
Nikon COOLPIX 7600
Nikon COOLPIX 7900
Nikon COOLPIX S4
Nikon COOLPIX S3
Nikon COOLPIX S2
Nikon COOLPIX S1
Nikon COOLPIX P1
Nikon COOLPIX P2
Nikon COOLPIX S9
Nikon D50
240-0000478
240-0000476
240-0000476
240-0000476
240-0000476
240-0000476
240-0000476
240-0000476
240-0000476
240-0000478
240-0000476
240-0000476
240-0000476
240-0000476
240-0000478
240-0000476
240-0000477
2.7. Olympus series:
Device
Device ID
OLYMPUS CMEDIA C-4040 Zoom
OLYMPUS CMEDIA C-3100 Zoom
OLYMPUS Camedia 5050Z
OLYMPUS u-300
OLYMPUS CMEDIA C-730 Ultra Zoom
OLYMPUS CMEDIA C-770 Ultra Zoom
OLYMPUS CMEDIA C-2 Zoom
240-0000477
240-0000477
240-0000477
240-0000477
240-0000477
240-0000477
240-0000477
16
Copyright© 2007. All Rights Reserved by ATP Electronics Taiwan Inc.
2.8. Panasonic series:
Device
Device ID
Panasonic LUMIX DMC-FX2
Panasonic DMC-LC70
Panasonic LUMIX DMC-FZ20
Panasonic LUMIX DMC-FZ3
Panasonic LUMIX DMC-FX7
Panasonic DMC-FZ15
Panasonic DMC-FX9
Panasonic DMC-FX8
Panasonic DMC-LZ2
Panasonic DMC-LZ1
Panasonic DMC-FX50
Panasonic DMC-LC1-K
Panasonic LUMIX DMC-FZ10
Panasonic DMC-F7
Panasonic DMC-LC5
Panasonic D-snap SV-AS3
Panasonic D-snap SV-AS30
Panasonic D-snap SV-AS10
240-0000476
240-0000477
240-0000477
240-0000477
240-0000476
240-0000477
240-0000476
240-0000477
240-0000476
240-0000476
240-0000477
240-0000477
240-0000477
240-0000477
240-0000477
240-0000477
240-0000477
240-0000477
2.9. Pentax series
Device
PENTAX Optio
PENTAX Optio
PENTAX Optio
PENTAX Optio
PENTAX Optio
PENTAX Optio
PENTAX Optio
PENTAX Optio
PENTAX Optio
PENTAX Optio
PENTAX Optio
Device ID
555
43WR
750Z
33LF
S30
X
S40
SV
MX
WP
S5n
240-0000476
240-0000477
240-0000476
240-0000477
240-0000477
240-0000476
240-0000476
240-0000476
240-0000476
240-0000477
240-0000476
2.10. Sanyo series:
Device
Sanyo
Sanyo
Sanyo
Sanyo
Sanyo
Sanyo
Sanyo
Sanyo
Sanyo
Sanyo
Sanyo
Device ID
VPC-AZ1
Xacti DSC-S3
Xacti DSC-S4
Xacti DSC-J4
Xacti DSC-S1
VPC-E6
VPC-A5
DSC-MZ3
ES5
Xacti VPC C4
Xacti VPC C1
240-0000477
240-0000478
240-0000478
240-0000478
240-0000478
240-0000477
240-0000477
240-0000476
240-0000477
240-0000476
240-0000476
2.11. Samsung series:
Device
Device ID
SamSung DigiMax V4
SamSung Digimax V50
SamSung Digimax V5
SamSung D-3100 (D-3000)
SamSung Digimax V6
SamSung Digimax i5
SamSung Digimax V700
SamSung Digimax 410
240-0000478
240-0000477
240-0000476
240-0000476
240-0000476
240-0000477
240-0000477
240-0000477
17
Copyright© 2007. All Rights Reserved by ATP Electronics Taiwan Inc.
3. Backing up the GPS data from the Photo Finder
By connecting the ATP Photo Finder directly to your PC via USB connection, you can back up all the
logged GPS position information. The Photo Finder will show up as a USB removable drive and you
can directly view the internal log information. You can copy this data anywhere on your PC’s
harddrive.
4. Trouble shooting
If you run into any problems using the Photo Finder, please see the troubleshooting
information table below. If the problem persists, please contact your local dealer or
retailer.
The GPS data is not being synced to my pictures
Ensure that the clock/time setting of your camera is set the same as the Photo Finder GPS time.
Ensure that your camera time clock setting is turned ON.
The Photo Finder is unable to acquire a GPS signal
You may have used the Photo Finder in areas where the GPS device cannot receive a signal, for
instance in obscured areas such as in tunnels, underground or under tall buildings.
Inside a car there is a chance that the GPS signals will be reflected by glass.
It takes a long time to acquire a signal from the GPS satellites
It may take a long time to track a location depending on the positioning of the GPS satellites.
The Photo Finder will not power on.
Open the battery cover and re-insert the battery.
The battery may not be inserted properly.
The Photo Finder cannot transfer GPS data to my memory card.
You may be running on low power battery. Please replace the battery with a new one.
You may have used a memory card that the Photo Finder cannot support.
18
Copyright© 2007. All Rights Reserved by ATP Electronics Taiwan Inc.
The Photo Finder cannot connect with my PC and card reader.
You may be running on low power battery. Please replace the battery with a new one.
Please check the USB cable.
The Photo Finder cannot recognize my digital camera.
You may be running on low power battery. Please replace the battery with a new one.
You may be using a digital camera that the device cannot support.
Please check the power status of the digital camera.
19
Copyright© 2007. All Rights Reserved by ATP Electronics Taiwan Inc.