1
ii
© 2002 MedioStream, Inc. All rights reserved.
This manual, as well as the software described in it, is published under license and may
only be used or copied in accordance with the terms of such license. The information in
this manual is supplied for informational purposes only, is subject to change without
notice, and should not be interpreted as a commitment by MedioStream. MedioStream
assumes no liability or responsibility for any inaccuracies or errors that may appear in
this manual. Except permitted by license, no part of this publication may be reproduced
or retransmitted in any form by any means, electronic, mechanical, or otherwise, without
the prior written permission of MedioStream, Inc.
MEDIOSTREAM, INC ("MEDIOSTREAM") MAKES NO WARRANTIES, EXPRESS OR
IMPLIED, INCLUDING WITHOUT LIMITATION THE IMPLIED WARRANTIES OF
MERCHANTABILITY AND FITNESS FOR A PARTICULAR PURPOSE, REGARDING
THE SOFTWARE. MEDIOSTREAM DOES NOT GUARANTEE, WARRANT, OR MAKE
ANY REPRESENTATIONS REGARDING THE USE OR THE RESULTS OF THE USE
OF THE MEDIOSTREAM SOFTWARE IN TERMS OF ITS ACCURACY, RELIABILITY,
CURRENTNESS, OR OTHERWISE. YOU ASSUME THE ENTIRE RISK AS TO THE
RESULTS AND PERFORMANCE OF THE MEDIOSTREAM SOFTWARE. SOME
STATES PERMIT THE EXCLUSION OF IMPLIED WARRANTIES. THE ABOVE
EXCLUSION MAY NOT APPLY TO YOU.
IN NO EVENT WILL MEDIOSTREAM, ITS DIRECTORS, OFFICERS, EMPLOYEES,
OR AGENTS BE LIABLE TO YOU FOR ANY INCIDENTAL, INDIRECT, OR
CONSEQUENTIAL DAMAGES (INCLUDING DAMAGES FOR LOSS OF BUSINESS
PROFITS, INTERRUPTIONS, LOSS OF BUSINESS INFORMATION, AND THE LIKE)
ARISING OUT OF THE USE OR INABILITY TO USE THE SOFTWARE EVEN IF
MEDIOSTREAM HAS BEEN ADVISED OF THE POSSIBILITIES OF SUCH DAMAGES.
BECAUSE SOME STATES DO NOT ALLOW THE LIMITATIONS OR EXCLUSION OF
LIABILITY FOR INCIDENTAL OR CONSEQUENTIAL DAMAGES, THE ABOVE
LIMITATIONS MAY NOT APPLY TO YOU.
Information in this document, including URL and other Internet Website references, is
subject to change without notice.
MedioStream, the MedioStream logo, the tagline "Video In, DVD Out, It's That Simple,"
Smart Buffering, Direct-to-Disc Recording, Quick Eject, neoDVD, NEO TaskBar, the
neoDVD logo, are trademarks or registered trademarks of MedioStream, Inc.
"Dolby" and the double-D symbol are trademarks of Dolby Laboratories. All other
company or product names are either trademarks or registered trademarks of their
respective owners.
Written and designed by:
MedioStream, Inc.
2107 North First Street, Suite 530, San Jose, California 95131
P/N 633900-400
iii
Table of Contents
Page
1
Introduction
1.1
2
3
Printing Help . . . . . . . . . . . . . . . . . . . . . . . . . . . . . . . . . . . . . . . . . . 2
2.2
Updating Help
neoDVD Support
7
................................... ...
MedioStream Online Support
...................................3
.......................... 4
Minimum System Requirements
Optional Hardware
..................... 5
.................................. 6
. . . . . . . . . .. . . . . . . . . . . . . . . . . . . . . . . . . . . . . . . . . . . .. . 6
6.1
Installing neoDVDplus
................................. 7
6.2
Removing neoDVDplus
.................................. 7
Before Starting neoDVDplus
.................................. 8
7.1
Connecting Your DV Capture Device
.................... 8
7.2
Connecting Your Analog Capture Device
.................... 9
7.3
Setting Up Your Camcorder in the Proper Mode
8
Getting Started
9
Using the CAPTURE Module
9.1
10
............................. 3
neoDVDplus 4.0 Enhancements
Installation
2
.......................................... 2
What is New in neoDVDplus ?
5.1
6
..................................... 1
2.1
4.1
5
About This Manual
Using neoDVDplus Help . . . . . . . . . . . . . . . . . . . . . . . . . . . . . . . . . . . . . . . . . 1
3.1
4
. . . . . . . .. . . . . . . . . . . . . . . . . . . . . . . . . . . . . . . . . . . . . . . . 1
. . . . . . . . . . . . 10
. . . . . . . . . . . . . . . . . . . . . . . . . . . . . . . . . . . . . . . . . . . . . 11
. . . . . . . . . . . . . . . . . . . . . . . . 13
Creating a Video File Using the CAPTURE Module
Using the CREATE Module
. . . . . . . . . . . 14
. . . . . . . . . . . . . . . . . . . . . . . . . . . . . . . . . . . . 17
10.1
Creating Video Files Using the CREATE Module . . . . . . . . . . . . . . . 18
10.2
Adding Video Content . . . . . . . . . . . . . . . . . . . . . . . . . . . . . . . . . . . 18
10.2.1
Adding Video Files From a Hard Disk Drive
10.2.2
Adding Video Clips From a Videotape or Live Camera
Source
10.3
. . . . . . . . . . 18
. . . . . . . . . . . . . . . . . . . . . . . . . . . . . . . . . . . . 19
10.2.3
Adding Video Using a TV Tuner Card . . . . . . . . . . . . . . . . 20
10.2.4
Video Quality . . . . . . . . . . . . . . . . . . . . . . . . . . . . . . . .
Creating Hierarchical DVD Menus
10.3.1
22
. . . . . . . . . . . . . . . . . . . . . . . . 23
Moving Menus . . . . . . . . . . . . . . . . . . . . . . . . . . . . . . . . 24
iv
10.4
Working in the Edit Mode
. . . . . . . . . . . . . . . . . . . . . . . . . . . . . . . 24
10.4.1
Video Frame Capture (Background Snapshot)
.......
25
10.4.2
Video Trimming
10.4.3
Multiple Chapter Insertion
10.4.4
Video Transitions
10.4.5
Audio Overlay
10.4.6
Record Narrative Overlay
10.4.7
Using DVD Recordable Discs With the +VR Feature . . . . 29
. . . . . . . . . . . . . . . . . . . . . . . . . . . . . . 25
. . . . . . . . . . . . . . . . . . . . . . . 26
. . . . . . . . . . . . . . . . . . . . . . . . . . . . . 27
. . . . . . . . . . . . . . . . . . . . . . . . . . . . . . . 27
. . . . . . . . . . . . . . . . . . . . . . . 28
10.4.7.1 Creating a DVD+VR Disc . . . . . . . . . . . . . . . . . . . . . . . . . 29
10.4.7.2 Editing an Existing DVD+VR Disc
11
. . . . . . . . . . . . . . . . . 30
10.5
Thumbnail Image Selection . . . . . . . . . . . . . . . . . . . . . . . . . . . . . . 31
10.6
Slide Show
10.7
Customizing Your DVD or VCD Project
. . . . . . . . . . . . . . . . . . . . . . . . . . . . . . . . . .. . . . . . . . 31
. . . . . . . . . . . . . . . . . . . . 32
10.7.1
Selecting Menu Backgrounds . . . . . . . . . . . . . . . . . . . . . 32
10.7.2
Selecting Frames
10.7.3
Selecting Thumbnail Layouts
10.8
Previewing Your Project
10.9
Burning Your Disc
. . . . . . . . . . . . . . . . . . . . . . . . . . . . . 33
. . . . . . . . . . . . . . . . . . . . . 33
. . . . . . . . . . . . . . . . . . . . . . . . . . . . . . . . 34
. . . . . . . . . . . . . . . . . . . . . . . . . . . . . . . . . . . 34
Making DVD or VCD Copies Using the COPY Module . . . . . . . . . . . . . . . 36
11.1
Copying a DVD Video File or Disc
11.2
Copying a VCD File or Disc
. . . . . . . . . . . . . . . . . . . . . . . . 38
. . . . . . . . . . . . . . . . . . . . . . . . . . . . . 38
12
Optional neoDVDplus Settings
13
DVD, VCD, and miniDVD Playback . . . . . . . . . . . . . . . . . . . . . . . . . . . . . . 41
13.1
. . . . . . . . . . . . . . . . . . . . . . . . . . . . . . . 39
Playing Back DVD FIles From the Hard Disk Drive
. . . . . . . . . . . 42
14
Optimizing Your Computer for Best Results . . . . . . . . . . . . . . . . . . . . . . 43
15
Recommended Computer Upgrade
16
Compatibility
17
Troubleshooting
18
. . . . . . . . . . . . . . . . . . . . . . . . . . . . 45
. . . . . . . . . . . . . . . . . . . . . . . . . . . . . . . . . . . . . . . . . . . . . 46
. . . . . . . . . . . . . . . . . . . . . . . . . . . . . . . . . . . . . . . . . . . 47
17.1
Hardware and Software Checklist
17.2
Support FAQs . . . . . . . . . . . . . . . . . . . . . . . . . . . . . . . . . . . . . . . . 49
Helpful Hints
. . . . . . . . . . . . . . . . . . . . . . . . . 47
. . . . . . . . . . . . . . . . . . . . . . . . . . . . . . 52
1
1
Introduction
Welcome to a new world of sight and sound! Designed specifically for the home
camcorder user, neoDVDplus is an innovative, easy-to-use software solution that makes
creating DVD or VCD on desktop PCs as easy as audio cassette recording. neoDVDplus
will instantly transform the home PC into a digital studio, allowing you to turn any video
into a DVD or VCD-ready file.
For general information about neoDVDplus, go to the What is New in neoDVDplus
section of this manual.
1.1
About This Manual
This manual is based on the neoDVDplus Help file. Some sections may be
modified for organizational flow. We strongly encourage you to use the Help function
within the application/product; it is structured with links to provide immediate access to
the information you need.
2
Using neoDVD plus Help
The Help function provides you with easy access to topics encompassing all aspects of
using neoDVDplus . Structured in the familiar HTML Help style, the Help file has
navigational and search features for locating information.
To launch the Help file while using neoDVDplus, click on the
button in the top right-
hand corner of the application window.
Links to related topics or sections are embedded in the text. Click on the underlined
words in the text to view the linked topic. To go back to a previous topic, just click on the
Back button.
2
There are three ways to navigate through the Help file:
Contents: This is the default mode, displaying Help topics in a "Table of Contents"
format. To view a particular topic, click on the topic name or the question mark
icon at the end of the text. A book icon indicates a section containing several topics.
Click on the "+" icon or double-click the section name to open the section contents
and display the section topic hierarchy.
Index: The index is made up of the common terms associated with the use of the
software. As you enter a keyword, the Help file scrolls to the closest matching topic
name. To open the desired topic, double-click on the index entry.
Search: This option is used to find topics that contain a specific word or phrase.
This can be helpful when you are unable to find what you are looking for using the
Index and Contents navigation modes. Type the words or phrase you are looking
for and click on List Topics. This displays all topics containing the word/phrase in
the lower window. To view a topic, double-click on it. The words or phrases searched
for are usually highlighted, making them easier to locate.
2.1
Printing Help
You can print Help topics by clicking on the Print icon of the Help window's toolbar.
2.2
Updating Help
For periodic Help updates, visit the Support section of our Website at:
http://www.mediostream.com/support
3
neoDVD Support
If you need more information beyond what is covered in this manual or the Help file, we
provide 24-hour Online Support Resources free to all users.
3
3.1
MedioStream Online Support
For the most up-to-date technical information about neoDVDplus, including:
Troubleshooting Tips covering the latest known problems and solutions
FAQs covering the most frequently asked questions about neoDVDplus
Tutorial describing how to use the various aspects of neoDVDplus
Latest revisions of the neoDVDplus User Manual and other documentation
please visit the Support section of our Website at http://www.mediostream.com/support.
4
What is New in neoDVDplus?
There have been several significant upgrades, feature additions, and other changes from
neoDVDplus 3.0. We have implemented a new user interface, designed to make
neoDVDplus the accepted DVD and VCD authoring market industry-standard. The
enhancements also provide a more focused, video-centric solution for video enthusiasts.
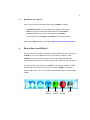
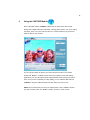
One of the first things you will notice in neoDVDplus 4.0 is the NEO TaskBar. The NEO
TaskBar allows you to launch any of the three modules in neoDVDplus: CAPTURE,
CREATE, AND COPY. You can also access the MedioStream online store from the NEO
TaskBar.
Capture
Module
Create
Module
Copy
Module
Store
4
4.1
neoDVDplus 4.0 Enhancements
Capabilities
neoDVD 3.0
neoDVD 4.0
Create DVD or VCD files
x
x
Create MPEG-1, MPEG-2, and AVI files
x
x
Automatic PAL/NTSC conversion
x
x
Burn DVD or VCD videos onto CD discs*
x
x
Burn DVD videos onto DVD discs*
x
x
Re-edit DVD discs using +VR*
x
Set video quality with respect to length of playback
x
Create DVD or VCD slideshow with still photos
(.bmp and .jpg)
x
Option to set moving menus
x
Wide selection of backgrounds, frames, layouts,
audio, and transitional effects included
Enhanced
Option to set automatic chapter breaks
x
x
Editing features
x
x
Add audio overlay (.mp3 and .wav files)
x
Record live voice-over/narration for audio overlay
x
Go directly from VCR to DVD*
x
x
Go directly from digital or analog camcorder to DVD*
x
x
Go directly from TV to DVD
x
x
Preview video before burning to CD or DVD
x
x
* Requires appropriate hardware, not included.
For DVD-authoring novices, neoDVDplus offers an application Wizard to walk you
through the steps necessary to create a DVD or VCD.
5
5
Minimum System Requirements
To ensure optimal performance from neoDVDplus, your system MUST meet the minimum
requirements. If your PC does not meet these requirements, you CANNOT use the
application successfully. We recommend that your system configuration exceed the
minimum requirements.
Operating System. neoDVDplus supports Microsoft Windows 98 (SE), Windows
Me, Windows 2000, and Windows XP. We suggest that you install the latest service
pack for your operating system. Visit Microsoft's Website at
http://windowsupdate.microsoft.com to download the latest Windows update for
your system.
Processor (CPU). To run properly, neoDVDplus requires a processor with a
minimum speed of 700MHz. neoDVDplus is compatible with Intel Pentium 4, Intel
Pentium III, Intel Celeron, and AMD Athlon processors. For real-time performance
and optimum Analog Input processing, a 1.1GHz processor is required.
Computer Memory (RAM). A minimum of 128MB of RAM is recommended to run
neoDVDplus.
Graphics Card. An AGP graphics card with a minimum of 8MB of RAM is required.
The monitor display size should be a minimum of 800 x 600 pixels using a minimum
color depth of 24 bits (True Color) or higher.
Hard Disk Space. A minimum of 5GB free disk space is required on the partition
where neoDVDplus will be installed.
Removable Media Drives. neoDVDplus can directly export to most commercially
available CD-R/RW and DVD recordable drives, including DVD+R, DVD+RW, DVDRAM, DVD-RW, and DVD-R.
6
5.1
Optional Hardware
Digital Video (DV) or Analog Camcorder. This is required if you want to perform a
Live Capture session with neoDVDplus . The application supports both PAL and
NTSC camcorders.
OHCI-Compliant IEEE-1394 Card. This is required if you want to allow neoDVDplus
to communicate directly with your Digital Video (DV) camcorder.
Analog Capture/TV Tuner Card. This is required if you want to allow neoDVDplus
to communicate directly with your analog camcorder, VCR, or TV signals.
neoDVDplus supports some, but not all, analog capture cards. For detailed
information and updates on which analog capture cards neoDVDplus supports,
please visit the Support section of our Website at
http://www.mediostream.com/support.
DirectX 8.1 or Higher. If you do not have the latest version of DirectX, download it
for free from Microsoft’s Website at
http://www.microsoft.com/directx/homeuser/downloads/default.asp
Windows Media Player Version 7.1 or Higher. If you do not have Windows Media
Player installed on your computer, download it for free from Microsoft’s Website at
http://www.microsoft.com/windows/windowsmedia/en/download/default.asp
and then follow the instructions provided in the same link. If you already have
Windows Media Player installed on your computer, verify that it is the latest version.
6
Installation
The neoDVDplus installation program runs from within the Windows Operating System
and contains complete instructions on the installation process.
7
6.1
Installing neoDVDplus
To install neoDVDplus:
1.
Insert the neoDVDplus CD into your CD-ROM drive. Windows should detect the
installation CD and automatically run the installation program. If the automatic disc
detection feature is turned off, use Windows Explorer to browse through the contents
of the CD and click on the file named Setup to run the installation.
2.
Read the End User License Agreement and click “I Accept” if you agree to
continue the installation.
3.
Follow the installation program instructions.
NOTE: If you have an installation CD and did not install the necessary Microsoft
components before you installed the neoDVDplus application (refer to the Minimum
System Requirements section for details), we have included them on the installation
CD. Please note, however, that you might need to restart your PC each time you install a
component.
We encourage you to register your neoDVDplus. This will enable you to gain access to
the latest product updates, technical support, and special offers. To register your product,
simply follow the instructions provided in the Registration section of the installation, or
register online at the MedioStream Website:
http://www.mediostream.com/products/registration_form.html
6.2
Removing neoDVDplus
To remove neoDVDplus from your computer:
1.
Close all programs running on your computer.
2.
Click the Windows Start button, and then choose Settings > Control Panel.
8
3.
Double-click on the Add/Remove Programs icon.
4.
Click on neoDVDplus, and then click Add/Remove.
5.
Follow the instructions on the screen.
NOTE: This process only removes the neoDVDplus application files. It does not delete
any imported media files, project files, or DVD builds in the neoDVD folder. To delete
these files, you will have to use Windows Explorer.
7
Before Starting neoDVD plus
After installing neoDVDplus, you need to connect your video capture device. You can
connect any Digital Video (DV) or analog capture device (camcorder or VCR deck) with a
video capture card. To connect a capture device:
1.
Make sure your capture device and your computer are switched off.
2.
Properly connect your digital video or analog capture device to the computer with a
FireWire or analog capture card cable.
3.
Start your computer, and wait for Windows to finish initializing.
4.
Turn on your digital video or analog capture device. WAIT A FEW SECONDS as the
computer detects the capture device and loads the appropriate software to
communicate with it.
5.
7.1
The following sections describe how to connect the different capture devices.
Connecting Your DV Capture Device
If you have a DV capture device, you need to install an OHCI-compliant IEEE-1394 card.
9
To connect your DV capture device, analog camcorder, or VCR deck to your computer:
1.
Connect the IEEE-1394 DV cable connector to one of the external IEEE-1394 data
ports on your computer.
2.
Connect the other end of the IEEE-1394 cable to the DV IN/OUT or the DV OUT
connector of your DV camcorder/VCR. Make sure the DV capture device is switched
off while connecting the IEEE-1394 cable.
7.2
3.
Turn on your capture device.
4.
Launch the neoDVDplus application.
Connecting Your Analog Capture Device
For analog capture devices (VHS camcorders or VCRs), you need to install an analog
video capture card. neoDVDplus currently supports the following analog capture cards:
ATI All-In-Wonder 128 Pro
ATI Rage Fury Pro
ATI All-In-Wonder Radeon
AverMedia AverTV Studio
AverMedia EZ Capture
COMpro Personal Cinema
Hauppauge WinTV 401
Conexant Fusion 878A
Dazzle DV Bridge
While these cards have been fully tested and verified to be compatible with neoDVDplus ,
other analog capture cards may work with the software. Please check the Support
section of our Website at http://www.mediostream.com/support for updates on new
information regarding analog capture card support.
10
To connect your analog capture device:
1.
Connect the analog capture card connector to one of the external data ports on your
computer.
2.
Connect your analog capture device to the capture card using either Composite or
S-Video cables.
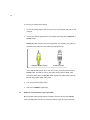
Composite cable connector pins are usually yellow, red, and white. The yellow pin
represents video, while the red and white pins represent audio.
Composite (RCA) connector
S-Video connector
If your capture card supports it, you can also connect your analog device using an
S-Video cable. This cable is used in conjunction with the Red and White audio
connectors. Most people use S-Video cables instead of the Yellow video connector
because they produce better video quality.
7.3
3.
Turn on your analog capture device.
4.
Launch the neoDVDplus application.
Setting up Your Camcorder in the Proper Mode
Most camcorders have two basic modes of operation. The first is known as the Camera
mode. This setting allows the user to record a live session to tape. The other mode is the
11
VTR or VCR mode. This allows for playback of pre-recorded tape.
Use the Camera mode setting to capture and create DVD or VCD files from live
video
Use the VTR or VCR mode setting to create DVD or VCD files from tape
Both Camera and VTR/VCR modes can be used with neoDVDplus . To change modes
while running neoDVDplus, switch off your camcorder, WAIT FOR A FEW SECONDS,
then switch your camcorder to the desired mode. On most camcorders, the mode switch
also controls the power, and the Off setting is between the Camcorder and VCR/VTR
settings. It is best to switch the camcorder off for a few seconds before resetting the
operation mode.
8
Getting Started
To launch neoDVDplus , double-click on the neoDVDplus icon on your desktop, or follow
Windows convention: click on the Start button in the lower left-hand corner of the
Windows desktop and select > Program > MedioStream > neoDVDplus.
The neoDVDplus Welcome window appears. It contains launch icons for the CAPTURE,
CREATE, AND COPY modules, as well as brief descriptions of what you can do within
each module. You can access the neoDVDplus modules from the Welcome window each
time you launch the application, or use the NEO TaskBar to access a module. Click on
the Don’t show me again checkbox if you want the NEO TaskBar to appear each time
you launch neoDVDplus instead of the Welcome screen. You can perform three activities
with the neoDVDplus application:
CAPTURE: This module allows you to transfer your videotape or live video
from your camcorder or VCR and save it on your computer’s Hard Disk
Drive in an editable format. Once saved, you can perform video editing (using a
third-party application) and other functions before authoring and burning the video to
disc using the CREATE module. You can capture live input and save it in MPEG-1,
MPEG-2, or AVI formats.
12
CREATE: This module allows you to import video files, perform basic video
editing such as video trimming and video menu layout; and burn your DVD
or VCD project onto a CD or DVD disc . You can import video files into the CREATE
module from a variety of sources, including: files stored on your computer’s Hard
Disk Drive, TV tuner, live video, or on a network .
The neoDVDplus Create Wizard walks you through each step required to create a
DVD or VCD. The neoDVDplus Create Wizard is a quick and easy way to work with
neoDVDplus. You can specify when the Wizard appears:
each time you launch the CREATE module
when you create a new project
do not display the Wizard
To specify when the Wizard appears, click on the Options button located in the
lower left-hand corner of the CREATE module window.
NOTE: To exit the Create Wizard, select the Cancel
button.
COPY: This module allows you to make copies of your homemade DVD or
VCD videos.
NOTE: It is illegal to duplicate copyright-protected commercial DVD or VCD video.
The COPY module of the neoDVDplus application should be used ONLY to duplicate
your own homemade movies and content.
We recommend that first time users view the self-paced Tutorial to get a better
understanding of what you can do with neoDVDplus.
13
9
Using the CAPTURE Module
In the CAPTURE module, neoDVDplus allows users to capture their video content
directly from a Digital Video (DV) camcorder or analog capture device, such as an analog
camcorder, VCR, or TV Tuner card, and save it in a video format that can be stored or
edited for DVD or VCD creation.
You can use this module to capture your content and save the file in one of these
formats: AVI, MPEG-1, or MPEG-2 (all of which are accepted by most video editing
applications). You can also perform video editing activities before creating your DVD or
VCD. Once you have completed your video editing, you can add these files back into
neoDVDplus using the CREATE module, and then make your DVD or VCD.
NOTE: We recommend that you save your captured video in AVI or MPEG-2 format if
you want to create a DVD, or in MPEG-1 format if you want to create a VCD.
14
9.1
Creating a Video File Using the CAPTURE Module
You can create a video file to store and use later using the neoDVDplus CAPTURE
module:
1.
Select your Video Source. Select the appropriate source from where the video you
want to capture is stored. You can use neoDVDplus with the following devices:
Analog/Digital Camcorders, VCRs, and TV Tuner cards.
If you started your camcorder in the Camera mode, you see live video in the
neoDVDplus Preview window. If you started the camcorder in the VTR/VCR mode,
you need to play the video tape in order to see it in the Preview window. If you have
connected a DV camcorder, the camcorder controls (i.e., Rewind, Fast Forward,
Play, and Stop buttons) on the neoDVDplus interface are activated.
NOTE: If you have an analog capture device, the control buttons on the
neoDVDplus user interface are not activated. If you need to navigate through your
video content, use the control buttons on your analog capture device.
Once your capture device has been switched on, it automatically appears in the
Video Source drop-down box. If you have multiple capture devices connected to
your PC, they are listed in the Video Source window. Select the appropriate source.
2.
Select your Input. If you have an analog capture device (such as an analog
camcorder or a VCR) connected to your PC, neoDVDplus gives you the option of
adding your video into the application using a Composite connection (with standard
RCA cables) or with an S-Video cable. Click on the Video Connector button, then
select the desired input device from the drop-down list.
If you are using a TV Tuner Card as your capture device, be sure to perform the
following tasks:
a.
Click on the Video Selector button and select the TV Tuner option from the
drop-down list.
15
b.
Click on the TV Setting button. Select your desired TV channel from the
Channel Index, and click OK. You can also change any channel name by
clicking in the index table and typing a new name. If you do not have any
channels listed in the index, you should perform the following tasks:
Select the Country You Reside In. This ensures your channel listing
corresponds to the region you reside in.
Select the Appropriate TV Signal. This can either be an Antenna signal or a
Cable TV signal.
Click on the Auto Tune Button. This allows your TV Tuner Card to search
for all available channels in your area. Once the Auto Tune function is
completed, all of the available TV channels are listed in the Channel Index.
You can also rename the channel listing by double-clicking on the Channel
Name field.
3.
Select your Audio Source. neoDVDplus displays all the available audio sources for
your content in the AUDIO SOURCE drop-down box. If you have more than one
audio source connected to your PC, click on the Audio Selector button and select
the desired audio input for your content. To increase or decrease the volume of your
selected audio input, click on the Input Gain button and select your desired volume
from the Input Gain window.
4.
Select the file format in which you want to save your content. neoDVDplus allows
you to save your captured content in three formats: AVI, MPEG-1, and MPEG-2.
Once the files are saved in these formats, you can perform video editing or store
them on your PC's Hard Disk Drive for other uses.
NOTE: If you want to create a DVD, it is recommended that you save your video clip
as an AVI or MPEG-2 file. If you want to create a VCD from your video footage, it is
recommended that you save it as an MPEG-1 file.
16
5.
Select your video capture options. If you are capturing your content from video tape,
you can capture the complete contents of the tape or just a section of the tape.
To capture a section of your video tape, enter the desired capture time in the TOTAL
TIME field. Position your tape to the correct start location using the camcorder
controls on the neoDVDplus user interface (if you have a DV capture device), or by
using the controls on your analog capture device.
6.
Select the video format in which you want to save your live capture. With
neoDVDplus, you can save your live capture content in the following video formats:
AVI, MPEG-1, or MPEG-2. Saving your video content in these formats allows you to
perform video editing before creating your DVD or VCD.
7.
Select the video viewing format of your content. neoDVDplus allows you to output
your captured content in either the PAL or NTSC video format. A listing of all
countries and their corresponding video formats are provided. Click on the down
arrow next to the Viewable In option to scroll through the list and locate the
appropriate country.
NOTE: neoDVDplus allows you to create a PAL DVD or VCD from an NTSC source
file, and vice versa (i.e., direct PAL/NTSC conversion).
8.
Click on the Capture Button to create your file. The progress of your capture
session is shown via the progress indicator.
NOTE: If you have an analog capture device, you cannot control it using the neoDVDplus
navigational controls. This means that if, for example, you want to capture your LIVE
content as a file, you need to hit the PLAY button on your analog capture device, then
click on the Capture button on the neoDVDplus user interface.
17
10
Using the CREATE Module
In the CREATE module, you can work with video files stored on your PC's Hard Disk
Drive, DVD+VR disc, DVD video disc, as well as video directly from your camcorder, TV
Tuner card, or other capture device.
NOTE: neoDVDplus accepts the following video file formats: Digital Video (DV), AVI,
QuickTime, .ifo, .vob, and MPEG-1 and MPEG-2 compliant files. Refer to the Helpful
Hints section to learn about MPEG-2 compliance.
Once you have imported your selected video content, you can customize the DVD or
VCD menu layout by adding backgrounds, frames, and video transitional effects. In this
mode, you can also create hierarchical menus (i.e., a main DVD or VCD menu that
consists of several sub menus) and then save your content directly to your Hard Disk
Drive, or burn onto a CD or a DVD.
NOTE: A video chapter contains the video file that is imported into the application to
create a DVD or VCD, and neoDVDplus automatically uses the source file name as the
chapter title. A menu displays the "look and feel" of the DVD or VCD clip upon playback
18
(i.e., backgrounds, frames, layouts, etc.). You have the option of customizing the chapter
and menu titles by highlighting them and renaming them. You can also select the font
type and font color for the chapter and menu titles.
10.1
Creating Video Files Using the CREATE Module
When you are in the CREATE module, you can open up a new project by clicking on the
New Project
button located above the Preview window. Creating a project enables
you to save all the settings and selections you make for later use.
Once you have created a project, you can save it on your PC by clicking on the Save
or Save As
buttons located above the Preview window. Your DVD or VCD
project is saved on your PC with a *.dsc file extension and display a create marble icon
next to the file name.
You can drag and drop the saved project files from your desktop or from Windows
Explorer into the CREATE module window to open the project.
10.2
Adding Video Content
In the CREATE module of neoDVDplus, you can add your video content into the
application to create a DVD or VCD.
There are five main ways of adding your video content into the neoDVDplus application:
From video files stored on your PC's Hard Disk Drive or on a network
Directly from a camcorder (live or tape) or VCR
From a live television feed (using your TV Tuner card)
From a DVD+VR disc
From a DVD-Video Disc (using the .ifo and .vob file formats)
10.2.1
Adding Video Files From a Hard Disk Drive
To import video files stored on your Hard Disk Drive into the application:
19
1.
Click on the New File
button located above the Preview window. A standard
Windows Explorer window opens to allow you to browse for video files stored on
your PC.
2.
Select your desired video file and click on the Open button, or you can double-click
on the video name to add it to your file.
neoDVDplus supports the following video file formats: DVD-Video files (.ifo and .vob
format), DVD+VR disc file, AVI, QuickTime, and MPEG video files. Refer to the Helpful
Hints section to learn about MPEG compliance.
10.2.2
Adding Video Clips From a Videotape or Live Camera Source
You can add video content directly from a capture device into the CREATE module of
neoDVDplus. This means that if, for example, you have some content stored on a tape
that you want to include as a chapter in your DVD or VCD project, you can import the
tape contents directly into neoDVDplus .
To add video clips from a videotape or live camera source:
1.
Click on the New Capture
button.
2.
Select the Live Video Capture thumbnail in the Preview window and click on the
Edit button, or double-click on the Live Capture thumbnail.
3.
The Edit mode Preview window opens and displays the navigational buttons to
control your DV camcorder.
Using the Fast Forward and Rewind controls, position the videotape to the desired
section of the tape you want to transfer onto your disc.
NOTE: If you have an analog camcorder or VCR, you will not be able to control it
using the neoDVDplus navigational controls. You will need to use the controls on
your analog camcorder or VCR to position the videotape to your desired location.
20
4.
You can create multiple chapters from the videotape or live video clip. Indicate how
frequently you want the chapters created by entering a specific time interval (i.e.,
every 30 seconds) in the Every box located in the Settings panel on the right-hand
side of the user interface, under the Set Chapter Interval option. Chapter points are
automatically inserted at the specified minute-intervals.
5.
You can also indicate whether you want the disc to automatically playback each
chapter, one after the other, or go back to the main menu after each chapter. To
specify the end of clip setting:
a.
Click on the Select button located in the Settings panel on the right-hand side
of the interface, under the End of Clip option.
b.
The Select end of clip dialog box appears. Click on the Go on to the next clip
radio button to automatically play the next clip, or click on the Go back to the
menu radio button to return to the main menu after the clip plays.
c.
To apply the changes to all the video clips in your project, click on the Apply
selection to all video clips checkbox.
NOTE: In order for these options to take affect, you must set these options before
burning your disc.
6.
Indicate how much of the videotape content you want to record. neoDVDplus allows
you to preset how much of the clip you want to record by entering the time in the
Total Time box.
10.2.3
Adding Video Using a TV Tuner Card
To add live TV feed using your analog TV Tuner card:
1.
Click on the New Capture button.
2.
Double-click on the Live Capture thumbnail in the Preview window.
21
3.
Click on the Video Connector button and select the TV Tuner option from the drop
down list.
4.
Click on the TV Setting button and select your desired TV channel from the
Channel Index.
5.
Click OK. If you do not have any channels listed in the index::
Select the Viewing Region You Reside In. This ensures your channel listing
corresponds to the region you reside in.
Select the Appropriate TV Signal. This can either be an Antenna signal or a
Cable TV signal.
Click on the Auto Tune Button. This allows your TV Tuner Card to search for all
available channels in your area. After the Auto Tune function is finished, all the
available TV channels are listed in the Channel Index. You can also rename the
channel listing by double-clicking on the Channel Name field.
6.
Click on the Video Format button to open the Video Format dialog window. Click on
the NTSC or PAL radio button and click OK.
7.
Click on the Audio Connector button and choose your desired audio input from the
available listing drop-down box.
8.
You can create multiple chapters from the TV signal. Indicate how frequently you
want the chapters created by entering a specific time interval (i.e., every 30
seconds) in the Every option box located in the Settings panel on the right side of
the interface, under the Chapter Interval option. Chapter points are automatically
inserted at the specified minute-intervals.
9.
You can also indicate if you want the disc to automatically playback each chapter,
one after the other, by clicking on the Next Clip radio button located in the Settings
panel on the right-hand side of the interface, under the End of Clip option.
22
10. If you want the disc to go back to the main DVD or VCD menu after playing back
each chapter, click on the Back to Menu radio button.
11. Indicate how much of the TV signal you want to record. neoDVDplus allows you to
preset how much of the clip you want to record by entering the time in the Total
Time box.
10.2.4
Video Quality Settings
This option allows you to select the video quality of your DVD or VCD project.
neoDVDplus supports three video quality settings: Good (lowest quality), Better (medium
quality), Best (high quality). The video quality settings allow you to trade off video quality
with the amount of data you can save on your disc. The lowest quality setting allows you
to save the largest amount of data to a disc as the highest video compression is used.
NOTE: The audio portion of a DVD project also takes up a large amount of space on the
final disc. So if you want to store more DVD-video on your DVD or CD media, we
recommend that you select a lower video quality setting in conjunction with an audio
output stream that will take up less space on your disc. neoDVDplus currently allows you
to output the audio portion of your DVD project into two formats: Dolby® Digital (which
takes up less data space on your disc) and LPCM (which is an uncompressed audio
format, and therefore takes more data space on your disc). To select your desired audio
output stream, simply click on the options button.
You can currently record approximately10 - 15 minutes of DVD video onto a CD. If you
choose the Good (lowest quality, highest compression) setting in conjunction with
selecting Dolby® Digital audio format, you can record approximately 50 minutes of a DVD
video onto a CD. The Good setting produces a small file size of lower quality video (i.e.,
VCR tape quality).
23
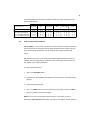
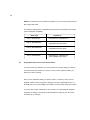
The following table lists the amount of video hours that fit on a disc, depending on the
quality setting selected.
Good
Better
Audio Output Stream
Dolby ® Digital
LPCM
Bit rate audio + video (Kbps)
1845
Hr Mn Sec
5 39 3 9
3122
Hr Mn Sec
3
2 0 43
3382
Hr Mn Sec
3
5
17
4509
Hr Mn Sec
2
1 8 58
6764
Hr Mn Sec
1
3 2 38
8117
Hr Mn Sec
1
1 7 12
0
0
0
0
0
0
0
0
0
0
DVD 4.7GB 37600000000 bits
DVD on CD 650MB 5452595200 bits 0
DVD on CD 700MB 5872025600 bits 0
10.3
49
53
15
2
29
31
Dolby® Digital
Best
6
20
26
28
52
56
LPCM
20
21
9
42
Dolby ® Digital
13
14
26
28
LPCM
11
12
11
3
Creating Hierarchical DVD Menus
With neoDVDplus, you can create a main DVD or VCD menu that consists of several sub
menus (also known as hierarchical menus). Each hierarchical menu consists of its own
set of video chapters (thumbnails). You can create up to two layers of hierarchical
menus.
With hierarchical menus, you can create a disc that has different thematic content (for
example, one menu might consist of chapters of your vacation trip, while the other one
has chapters of your child's graduation).
To create a hierarchical menu:
1.
Click on the New Menu button.
2.
Double-click on the New Menu thumbnail in the Preview window. A new menu page
appears.
3.
Add your desired video clips.
4.
Click on the Back button to return to the previous menu page, or click on the Main
button to go back to the main menu page.
NOTE: You can view your hierarchical menu structure, or see where you are, by
selecting the Video Structure button within your DVD or VCD project. The Disc Structure
24
window opens. This window can be opened or closed at any time.
10.3.1
Moving Menus
The CREATE module lets you preview your video clips within the main DVD menu when
the finished disc is inserted into a PC or set-top player. With the moving menu feature
turned on, each thumbnail video clip in the main DVD menu plays for approximately
fifteen seconds to give you a preview of what is in each video clip. To turn on the moving
menu feature, simply import your video into the CREATE module. Next, go into the Edit
mode and click on the On radio button located under the Moving Menu option on the
right-hand side of the user interface.
10.4
Working in the Edit Mode
After you add all your video files into the neoDVDplus application, you can perform
additional editing functions to customize your DVD or VCD project.
To get to the Edit mode of neoDVDplus , you first need to add a video clip. Click on any
thumbnail to select it, then click on the Edit button.
25
In the Edit mode, you can perform the following functions:
Video Frame Capture (Background Snapshot)
Video Trimming
Multiple Chapter Insertion
Video Transitions
Audio Overlay
Record Narrative for Overlay
10.4.1
Video Frame Capture (Background Snapshot)
A Menu Background refers to the backdrop design on your DVD or VCD menu. With
neoDVDplus, you can select from a group of template menu backgrounds provided with
neoDVDplus, import your own menu background, or create your own menu background.
To capture a frame in your video to use as a menu background in your project:
1.
Click on the Snapshot
button. neoDVDplus captures the video frame.
2.
A standard Windows Save dialog box opens. Navigate to the folder where you want
to save your file. neoDVDplus saves the picture in .bmp format on your Hard Disk
Drive. You can now use this picture as a menu background for any of your projects.
10.4.2
Video Trimming
neoDVDplus provides a trim editing feature that lets you select a section of your video
clip to transfer onto a disc. To select a portion of your video clip:
1.
Add your desired video clips into the neoDVDplus application.
2.
Double-click on the thumbnail of the desired video clip, or select the thumbnail of the
video clip, then click on the Edit button. The video clip opens in the Edit mode.
3.
Click on the Play button to play the clip. While the clip is playing, use the Mark-In
26
and Mark-Out buttons to mark the section of the clip you want to export onto your
disc. You can also use the Video Slider Bar to get to your desired section by
scrolling through the video clip instead of playing the entire footage.
10.4.3
Multiple Chapter Insertion
If you have a long video clip and you want to insert several chapter points (for example, if
you want to create five different chapters in a one-hour clip), perform the following tasks:
1.
Add the desired video clips into the neoDVDplus application.
2.
Double-click on the thumbnail of the video clip, or select the thumbnail of the video
clip from which you want to create multiple chapters and click on the Edit button.
The video clip opens in the Edit mode.
3.
If working with a video file input, click on the Play button. The video begins to play in
the Preview window. Click on the Chapter
button to insert a new chapter at
each desired section of the clip. To remove the chapter point insertions you have
made in neoDVDplus, click on the Chapter
button.
NOTE: As you add each chapter point, marked areas are automatically indicated on
the Video Slider Bar.
4.
If working with live video input, set the timer to specify the total time (how much
footage) you want to capture onto a disc, unless you want to capture the entire
contents of the tape.
5.
Indicate how frequently you want to insert chapter points in the clip by entering a
number in the Every box, located in the Settings panel under the Set Chapter
Interval option. Chapter points are automatically inserted at the minute-intervals that
you specified.
27
10.4.4
Video Transitions
neoDVDplus allows you to add transitional effects to video clips to further customize the
look and feel of your DVD or VCD project.
To add video transitions to your DVD or VCD project:
1.
Add your desired video clips into the neoDVDplus application.
2.
Double-click on the thumbnail of the video clip or select the thumbnail of the video
clip you want, then click on the Edit button. The video clip opens in Edit mode.
3.
From the Settings panel on the right-hand side of the neoDVDplus interface, click on
the Select button under the Transitional Effects option to open the Select
Transition Effects window. Double-click on any of the effect thumbnails in the Effect
In or Effect Out area to choose transition styles for your video clip.
4.
The default color for the transitional effects is black. Change the color by clicking on
the Color drop-down box and selecting your desired color.
5.
Click in the Apply to all video clips box to apply the selected transitional effects to
all the video clips in this project.
10.4.5
Audio Overlay
With neoDVDplus, you can add audio tracks over video clips to further enhance your DVD
or VCD project. neoDVDplus includes a variety of audio clips, from music to sound effects,
that you can use for your project.
NOTE: Adding audio overlay does not replace the existing audio that comes with the
source video. The audio overlay is an additional layer on top of the source audio/video.
To choose an audio file from the selection provided by neoDVDplus:
28
1.
Add your desired video clips into the neoDVDplus application.
2.
Double-click on the thumbnail of the video clip, or select the thumbnail of the video
clip you want to work on, then click on the Edit button. This video clip opens in the
Edit mode.
3.
From the Settings Panel on the right-hand side of the neoDVDplus interface, click on
the Select button under the Audio Overlay option. The Audio File window opens.
4.
Select your desired audio tracks from the templates provided with neoDVDplus.
You also have the option to add or remove audio tracks by clicking on the Add or
Remove button. neoDVDplus supports WAV and MP3 audio file formats. To hear a
sample of the audio track, select the track from the drop-down list and click on the Play
button.
NOTE: neoDVDplus adds the audio track to the beginning of the video clip by default. If
you want to insert your audio in the middle or end of the video clip, create an audio file
without any sound until it gets to the section where you want the audio inserted. For
example, if you have a 10-minute clip, but you do not want the audio to begin until the
fifth minute, create an audio file whose first four minutes are blank.
10.4.6
Record Narrative for Overlay
To use a microphone connected to your PC to record voice commentary as an overlay
on your DVD or VCD clip:
1.
From the Settings Panel on the right-hand side of the neoDVDplus interface, click on
the Select button under the Voice Narration option. A dialog window opens.
2.
Select your desired audio settings.
3.
Click on the Record button to begin your recording session.
29
10.4.7
Using DVD Recordable Discs With the +VR Feature
The DVD +RW Video Format, also known as +VR or +RW VR, an industry standard
supported by companies such as Sony, Philips, Ricoh, Dell, Yamaha, and HP, is an
editable DVD video format. Discs created using the +VR format can be modified after
they have been created.
Editing examples include:
correcting a spelling error on a menu title
changing the menu background
adding or removing video clips
In fact, you can record over information stored on a +VR formatted disc as you would
with a VHS tape. Since the +VR format uses the same specification as the DVD-Video
format (the format used on commercial DVDs), it is fully compatible with all DVD players.
Because the +VR format is an industry standard, you can modify a +VR formatted disc
that was created with third-party DVD authoring software or DVD recorders.
NOTE: In order to use the +VR feature, you MUST have a DVD+RW media and
recorder.
10.4.7.1 Creating a DVD+VR Disc
To create a +VR disc with neoDVDplus:
1.
Click on the New File button located beneath the Preview window. A standard
Windows Explorer window opens that allows you to browse for video files on your
PC.
2.
Select your desired video file and click Open, or you can double-click on the video
name to add it to your file.
30
3.
Edit the video files as desired. For information on basic editing functions in
neoDVDplus, refer to the Working in the Edit Mode section of the Help file.
4.
Click on the Make Disc button to display the disc writing options.
5.
Select the DVD+VR option from the Disc Format drop-down box.
6.
Select other desired disc writing options, then click on the Make Disc button to
record the modifications onto the DVD+VR disc.
10.4.7.2 Editing an Existing DVD+VR Disc
To edit or modify an existing DVD+VR disc:
1.
Insert your DVD+VR disc into your DVD recordable drive.
2.
Click on the button located beneath the Preview window. A standard Windows
Explorer window opens to allow you to browse for video files stored on your PC.
3.
Navigate to the drive where your DVD+VR disc is located, and click Open.
neoDVDplus opens up the DVD+VR disc and displays the menus and contents
(as they would appear when playing back on a set-top box).
4.
Add and/or remove video files, change menu backgrounds, frames, and trim video
as desired.
5.
When you are finished editing, click on the Make Disc button to record the
modifications onto the DVD+VR disc.
NOTE: When you make modifications to your existing DVD+VR disc, neoDVDplus
only transfers the modifications onto your disc. It does not re-record or re-encode any
content that has not been modified onto the disc. This makes it quicker and easier to
make changes to your existing DVD+VR disc.
31
10.5
Thumbnail Image Selection
By default, neoDVDplus automatically assigns the first non-black picture in the video clip
as the thumbnail for each chapter. However, you can select a different video frame of the
video clip to use as the chapter thumbnail. To select a video frame thumbnail:
1.
Add your video clip into neoDVDplus.
2.
Right-click on the thumbnail that you want to change.
3.
Click on the Set Thumbnail option from the pop-up menu. A Video Slider Bar
appears under the selected thumbnail.
4.
Using the Video Slider Bar, scroll to the desired section you want to use as the
chapter thumbnail.
4.
A dialog box appears asking if you want to use this frame as the thumbnail for this
chapter. Click on the Yes button.
10.6
Slide Show
You can import still images into neoDVDplus to create a photo slide show, and then burn
the images onto a CD or DVD disc. You can also mix your photo slide show with video
on a single disc. By simply clicking on the New Slide Show button in the CREATE
module, you can import images (neoDVDplus accepts bitmap or JPEG image files),
modify the layout of the image thumbnails, set a timer for how often you want the photo
slides to be displayed during playback, and click on the Make Disk button to burn your
project onto a disk.
NOTE: you can also use images from your video files as part of the photo slide show by
simply taking a snapshot from your video file, saving it as a JPEG or bitmap file, and
then adding it into your photo slide show project. (For more information on how to
capture and save images from a video file, please refer to section 10.4.1 - Video Frame
Capture)
32
10.7
Customizing Your DVD or VCD Project
After you insert and edit the video clips for your DVD or VCD project, click on the Main
button to go back to the main menu page. Now you can customize the look and
feel of the DVD or VCD menu by changing backgrounds, frames, and layouts. Using the
+VR feature allows you to edit your recordable DVD discs after they have been created.
For more detailed information about editing DVD+VR discs, refer to the Using DVD
Recordable Discs With the +VR Feature section.
NOTE: If you have created hierarchical menus, you can customize the look and feel of
each menu page.
10.7.1
Selecting Menu Backgrounds
A Menu Background refers to the backdrop design on your DVD or VCD menu. With
neoDVDplus, you can select a different menu background that best suits your DVD or
VCD thumbnail menu.
neoDVDplus includes some template menu backgrounds that you can use to customize
the look and feel of your project. To use any one of the provided templates:
1.
Click on the Modify button located in the Settings panel on the right-hand side of the
user interface, under the Menu Background option. The Select Background window
opens.
2.
Select the desired menu background. The selected menu background automatically
shows in the Preview window.
neoDVDplus also allows you to import your own menu background for your project. Your
imported menu backgrounds are automatically rescaled by neoDVDplus (regardless of
the size) to fit the application window.
33
To import your own menu background:
1.
Click on the Modify button located in the Settings panel on the right-hand side of the
user interface, under the Select Background option. The Select Background
window opens.
2.
Locate and select the desired menu background. If you want to add or remove a
menu background from this window, click on the Add or Remove button.
NOTE: If you want to add your own background image to neoDVDplus, it MUST be in
Bitmap (.bmp) or JPEG (.jpg) file format.
10.7.2
Selecting Frames
A Frame refers to the outer design that encompasses each thumbnail picture in a DVD
or VCD menu (similar to a picture frame that holds a photograph). With neoDVDplus, you
can select the frame design that best suits your DVD or VCD thumbnail menu.
neoDVDplus includes several template frame designs you can use to customize the look
and feel of your project.
To use any of the provided templates:
1.
Click on the Modify button located in the Settings panel on the right-hand side of the
user interface, under the Frame option. The Select Frame window opens.
2.
10.7.3
Select the desired frame design.
Selecting Thumbnail Layouts
A thumbnail layout lets you arrange your video thumbnails the way you want them to
appear on your finished DVD or VCD menu.
34
neoDVDplus allows you to arrange your thumbnails in four different ways. To use any
one of the thumbnail layouts:
1.
Click on the Modify button under the Menu Layout option in the Settings panel on
the right-hand side of the user interface. The Select Menu Layout window opens.
2.
Select the desired layout.
NOTE: You can also drag and drop the chapter thumbnails to change the ordering of the
thumbnails in the project menu.
10.8
Previewing Your Project
Once you have completed your editing tasks, click on the Preview button to view what
the project will look like.
The neoDVDplus Preview feature allows you to view a simulated playback of your DVD
or VCD content before burning a disc. This is especially useful if you want to make sure
that your project looks the way you want it to before transferring it onto a disc.
Using the remote control for navigation, you can navigate through the video content.
Once you have finished previewing your DVD or VCD project, close the Preview window
by clicking on the
10.9
at the top right-hand corner of the Preview window.
Burning Your Disc
After you are finished with your editing and are ready to transfer your DVD or VCD
project onto a dis, perform the following tasks:
1.
Click on the Make Disc button. A dialog box opens.
35
2.
Select the format you want your video output to be. You may select DVD+VR, DVDVideo, or VCD file output from the Disc Format drop-down menu.
NOTE: You can also make your file format selection from within the CREATE
module. This allows you to see the estimated disc size.
NOTE: Using the DVD+VR format allows you to modify the disc contents at a later
time. You can record over information stored on a +VR formatted recordable DVD
disc as you would a VHS tape.
3.
Select which video format (PAL or NTSC) you want your final DVD or VCD files to
be viewed in. Select where your video will be viewed in the Viewable In drop-down
box. neoDVDplus automatically converts it to the appropriate format. neoDVDplus
allows you to create a PAL DVD/VCD from an NTSC source file and vice versa (i.e.,
direct PAL/NTSC conversion).
4.
Select a target drive in which to create your DVD or VCD. Click on the Write To
drop-down box. The available drives (CD or DVD-Recordable drive, or Hard Disk
Drive) on your PC are listed.
NOTE: If you want to write your DVD project to your Hard Disk Drive, you need to
create a new folder for each project. The default folder name for all DVD projects is
VIDEO_TS. Therefore, if you do not create a new folder to save your DVD project,
each DVD project you save overwrites the previous one. The Folder option allows
you to select the folder to file your DVD.
5.
If you are writing to a recordable drive, you can create your own disc label by
entering your desired text in the Disc Label box.
6.
Select a write speed that is appropriate to your CD or DVD-recordable drive. By
default, your CD or DVD-recordable drive is set to the MAX write speed. If the write
speed of the media (disc) is lower than the write speed of the recordable drive,
select the lower write speed from the Speed drop-down menu.
36
7.
Select the number of copies you want to make. If you want to make more than one
copy, click on the Up arrow to increase the number of copies you want to make by
one. To reduce the number of copies you want to make, click on the Down arrow to
decrease the number of copies you want to make by one.
8.
Click on the OK button to begin making your disc. Click on the End button to stop
the disc creation process, or wait for neoDVDplus to stop automatically when it
reaches the disc's maximum capacity. The disc is ready when you see the Disc
created successfully message.
11
Making DVD or VCD Copies Using the COPY Module
NOTE: It is illegal to duplicate copyright-protected commercial DVD or VCD video. The
COPY module of the neoDVDplus application should be used ONLY to duplicate your
own homemade movies and content. If you insert a commercial DVD, a window appears
indicating that you cannot copy the disc. Click OK to return to the COPY module window.
37
1.
Click on the Copy icon from the NEO TaskBar. The COPY Module window opens.
2.
Click on the Copy From drop-down menu and select the location of the DVD or
VCD content which you want to copy. Content may be copied from any of the
available drives (CD or DVD-recordable drive, or your computer’s Hard Disk Drive).
3.
Select the destination to where the copied content is to be stored from the Write To
drop-down menu.
4.
If you want to create more than one disc copy, enter the number of copies you need
in the Copies field. You can also increase/decrease the number of copies by clicking
on the up and down arrow buttons.
5.
Click on the down arrow beneath Write Speed and choose an appropriate write
speed setting for your CD or DVD burner. The default write speed is the write speed
of the drive, but if the write speed of the media is lower than the write speed of the
38
drive, select the lower write speed.
11.1
6.
You can create your own disc label by typing it in the Disc Label text box.
7.
Click on the Copy button to create your disc.
Copying a DVD Video File or Disc
DVD files are always saved to a folder named VIDEO_TS. To copy your DVD files from
the Copy Module, you must select the folder that contains the VIDEO_TS folder.
For example, if you want to copy the DVD files of a recent vacation that you saved in a
folder called "Fishing Trip," select the "Fishing Trip" folder, not the VIDEO_TS folder in
C:\DVD\Fishing Trip\VIDEO_TS.
To copy a DVD from another DVD using the Copy Module, insert the content disc into
the DVD-ROM drive. Next, insert the blank media into the recordable drive. In the Copy
From drop-down menu, select the location of your content disc (e.g. D:\). Refer to the
Making DVD or VCD Copies Using the Copy Module section for more information.
NOTE: If you insert a commercial DVD, a window appears indicating that you cannot
copy the disc. Click OK to return to the COPY module.
11.2
Copying a VCD File or Disc
VCD files are always saved across five separate folders named CDI, EXT, MPEGAV,
SEGMENT, and VCD. To copy your VCD files, you must select the folder that contains
these five folders.
For example, if you want to copy the VCD files of a recent vacation that you saved in a
folder called "Fishing Trip," select the "Fishing Trip" folder, not any of the other folders in
C:\VCD\Fishing Trip\.
To copy a VCD from another VCD using the Copy Module, insert the content disc into
39
the CD-ROM or DVD-ROM drive. Next, insert the blank media into the CD recordable
drive. In the Copy From drop-down menu, select the location of your content disc (e.g.
D:\). Refer to the Making a DVD or VCD Copy Using the Copy Module section for
more information.
12
Optional neoDVDplus Settings
neoDVDplus offers optional software settings for users. To access these settings, click on
the Options button under the Preview window.
The Option pop-up window features the optional settings. These settings include:
1.
Temporary Files: Allows you to specify where neoDVDplus stores temporary files.
For example, you can change the Temporary Files Directory to one with adequate
disk space, so you can convert a long session of DVD or VCD without running low
on temporary disk space.
2.
Wizard: Allows you to determine whether the neoDVDplus Wizard appears when
creating a new project. The neoDVDplus Wizard is a great tool for beginners who
are not yet familiar with neoDVDplus . It guides you through each step of creating a
DVD or VCD.
To specify when the Wizard appears, click on the Options button located in the
lower left-hand corner of the Create window.
3.
Disc Options: Allows you to write content to a disc using different methods. These
disc-writing options allow you to create their discs in the most efficient way:
Direct-To-Disc RecordingTM: This feature allows users to write DVDs using a
one-step process, instead of having to save a disc image to the PC first as a
buffer before burning. Direct-To-Disc Recording reduces space needed on
your Hard Disk Drive. The Direct-To-Disc Recording writing method is
compatible with all commercially available DVD+R and DVD+RW drives.
40
Quick EjectTM: The Quick Eject function can greatly reduce the time it takes to
create a short DVD. It usually takes some time to close the DVD creating
session (approximately 15 minutes) regardless of how long or short your
footage is. The Quick Eject feature eliminates the wait time. The Quick Eject
feature is compatible with all commercially available DVD+R and DVD+RW
drives.
TM
Direct-to-Disc Copying : This feature lets you copy a DVD from one disc to
another on the fly. This eliminates the need to create a disc image which can
consume substantial Hard Disk space. Direct-To-Disc Copying also increases
the disc copy speed.
4.
Video: Allows you to include an overlay title for each chapter. When you enable this
feature, the title of the clip being played back appears on the screen for
approximately five seconds, and then disappears.
5.
Start Playing:
Automatically start playing: Select this checkbox if you wish for your viewer
to see the first video segment prior to viewing the menu.
6.
Automatically Save Project: Select this checkbox to automatically save your
project whenever you exit neoDVDplus 4.0. The default name and location where
neoDVDplus 4.0 saves your project is: My documents\NeoDVDAutoSave.dsc
7.
Audio Stream: neoDVDplus supports two types of audio stream formats; LPCM and
Dolby® Digital. With this option you can set the type of Audio Stream you would like
to output with your DVD video.
Note: neoDVDplus will automatically accept both LPCM and Dolby ® Digital audio streams;
you do not need to make a selection for the type of audio stream you are inputting.
LPCM: Linear Pulse Code Modulation (LPCM) is a non-compressed audio
stream format.
41
Dolby® Digital: This audio stream format, developed by Dolby Laboratories,
saves space by transmitting only the data that is necessary to portray the
original sound minimizing the space allotted on a DVD for audio soundtracks.
NOTE: neoDVDplus also includes a Smart Buffering TM feature that is compatible with all
commercially available DVD-R, DVD-RW, DVD+R, and DVD+RW drives. Smart
Buffering allows users to reduce the minimum Hard Disk Drive requirements for PCs
that are too slow to achieve real-time DV to DVD transcoding, or where system
resources are being used for a number of different tasks. Typically, when a PC lacks the
minimum processing speed required for real-time performance, the software buffers the
incoming video on the Hard Disk Drive while waiting for the CPU to finish its current task.
With Smart Buffering, neoDVDplus pauses the camcorder instead of buffering the video
onto the hard drive. By automatically controlling the camcorder when using a DVD+RW
drive, neoDVDplus can transcode DV to DVD on PCs with as little as 400MB of Hard
Disk space.
13
DVD, VCD, and miniDVD Playback
You MUST have DVD player software installed on your PC in order to play back DVD
files from your Hard Disk Drive.
Your PC will probably have DVD playback software already installed, in which case it will
automatically detect the disc and begin playing. If you do not have DVD playback
software installed on your machine, you will have to purchase the software from your
local retailer.
You can also play back DVDs and VCDs created with neoDVDplus on your DVD set-top
box. You need to verify that your box supports the playback of the recordable media. If
you are not sure what recordable media your set-top box plays back, contact your settop box manufacturer.
neoDVDplus also allows you to create a miniDVD, which is a DVD video created on a
CD. A miniDVD allows you to store approximately ten to fifteen minutes of DVD quality
video.
42
NOTE: The miniDVD format is intended for playback on your PC. Most set-top boxes DO
NOT support this format.
The following media playback compatibility table provides more information about media
types and playback compatibility.
Media Type
13.1
Playback On
DVD on CD-R/RW disc
DVD-ROM drive, CD-R/RW drive
DVD on DVD-R/RW disc
DVD-ROM drive, DVD-R/RWcompatible DVD set-top player
DVD on DVD+R/RW disc
DVD-ROM drive, DVD+R/RWcompatible DVD set-top player
DVD on DVD-RAM disc
DVD-RAM drive
VCD on CD-R/RW disc
DVD-ROM drive, CD-R/RW drive,
VCD-compatible set-top player.
Playing Back DVD Files From the Hard Disk Drive
If you have stored your DVD files on your hard drive, first copy the VIDEO_TS directory
from the directory that contains the content you want to watch. Paste the VIDEO_TS
directory into the C:/ directory.
After you have pasted the VIDEO_TS directory into the C:/ directory, start your DVD
playback software. Select 'Properties' or 'Settings' and set the default DVD drive to 'C:'.
Click OK. Now you can select Play on the software menu and begin watching your DVD.
If you now want to watch a DVD from a disc, go back to your DVD playback software’s
'Properties' or 'Settings' and change the default DVD drive setting to your CD or DVD
drive letter (G: for example).
43
14
Optimizing Your Computer for Best Results
The following tips will help you to get the most out of neoDVDplus:
Defragment Disk (for Hard Disk Drives). Before a long recording session, it is
recommended that you defragment the Hard Disk Drive on which you want to save
your video file. A defragmented Hard Disk Drive reduces the number of read/write
accesses necessary to run neoDVDplus and as a result increases the encoding
speed. To defragment your Hard Disk Drive(s), use the Windows Disk
Defragmenter.
To start the Disk Defragmenter, click:
Start > Programs > Accessories > System Tools > Disk Defragmenter
Hard Disk DMA Transfer Mode Enabled. Most Hard Disk Drives support DMA
(Direct Memory Access) transfer. Enabling this feature guarantees that you use your
Hard Disk Drive at optimum speed. Please make sure that DMA is enabled.
To check if the DMA capability of your Hard Disk Drive is enabled, right-click on the
My Computer icon on your computer desktop and then click on Properties:
−
For Windows 98 (SE) and Windows Me:
1.
Click on Start > Settings > Control Panel.
2.
Double-click on the System icon.
3.
Go to the Device Manager option and double-click on the Disk Drives entry.
4.
Right-click on the list item corresponding to your drive, e.g. "Generic IDE disk
type 01".
5.
Click on Properties and select the Settings tab.
6.
Check the DMA box to enable DMA on your Hard Disk Drive.
−
For Windows 2000:
1.
Click on Start > Settings > Control Panel.
2.
Double-click on the System icon.
44
3.
Click on the Hardware tab and select Device Manager.
4.
Double-click on IDE ATA/ATAPI controller in the Device Manager window.
5.
Right-click and select the Properties option on the available channels
corresponding to your drive, e.g. "Primary or Secondary IDE Channel".
6.
Select the Advanced Settings tab and then select DMA if available from the
drop down box next to the Transfer Mode option.
−
For Windows XP:
1.
Click on Start > Control Panel > Performance & Maintenance.
2.
Double-click on the System option.
3.
Click on the Hardware tab and then select Device Manager.
4.
Double-click on IDE ATA/ATAPI controller in the Device Manager window.
5.
Right-click and select the Properties option on the available channels
corresponding to your drive, e.g. "Primary or Secondary IDE Channel".
6.
Select the Advanced Settings tab, and then select DMA if available from the
drop down box next to the Transfer Mode option.
Close Applications. Opened applications consume available memory and CPU
processing power. For the best performance, close all applications before starting
neoDVDplus.
To gain even more processing power, disable the application shortcuts on the
taskbar. Some shortcuts, like the volume control, do not take any processing power
and can be left. Other shortcuts, however, may be active applications that run in the
background and use processing power and memory.
Power Issues. Before running a long neoDVDplus recording session, make sure
that the automatic power standby features of your computer are disabled. This
ensures that your computer does not go into sleep mode during encoding. To
disable the automatic power standby mode, click on Start on the lower left-hand
corner of your desktop:
−
For Windows 98 (SE):
1.
Click on Start > Settings > Control Panel.
45
2.
Double-click on the Power Management entry.
3.
In the Power Schemes tab, go to the System Standby entry and select Never
from the drop-down box.
−
For Window ME and Windows 2000:
1.
Click on Start > Settings > Control Panel.
2.
Double-click on the Power Options entry.
3.
In the Power Schemes tab, go to the System Standby entry and select Never
from the drop-down box.
−
For Windows XP:
1.
Click on Start > Control Panel > Performance & Maintenance.
2.
Double-click on the Power Options entry.
3.
In the Power Schemes tab, go to the System Standby entry and select Never
from the drop-down box.
Laptop users should run them with the AC adapter for better performance. Running
your laptop on battery power reduces the overall performance.
15
Recommended Computer Upgrade
If you plan to upgrade your computer, you can optimize the neoDVDplus performance by
paying special attention to the following component specification considerations:
Hard Disk Drive. Select a Hard Disk Drive with the shortest seek time and the
fastest data transfer rate. For example, ATA100 or UDMA100 and higher.
Processor. Select AMD Athlon, or Intel's Celeron,Pentium III or Pentium 4, with the
fastest CPU clock speed (700MHz or higher) that is compatible with your
motherboard requirements. For optimal and real-time performance, a 1.1GHz or
higher system is required.
4X AGP Card with YUV 4:2:2 Rendering. Select a graphics card that supports
hardware YUV 4:2:2 rendering.
46
Motherboard. Be sure that your motherboard supports fast speed buses so it can
take advantage of high-speed peripherals, such as your computer's 133-memory or
UDMA100 (and higher) hard drives.
16
Compatibility
Analog and Digital Camcorders. neoDVDplus supports Mini-DV, DV8, DVCAM,
DVC Pro, analog and digital VCRs (a list of the analog capture cards supported by
MedioStream can be found later in this section), and VHS camcorders or tape decks
in both the NTSC and PAL video formats.
IEEE-1394 Cards (iLink, FireWire). Any OHCI-compliant IEEE-1394 card should
work properly. Please refer to the Troubleshooting section to learn how to check if
your FireWire port is OHCI compliant. MedioStream has successfully tested OHCI
cards from the following chips or cards manufacturers: ADS, Advansys, NEC, SIIG,
Soyo, Texas Instrument, and Western Digital.
Analog Capture Cards. For analog devices (VHS camcorders or VCRs), you will
need to install an analog video capture card. The following analog capture cards
have been fully tested and verified to be compatible with neoDVDplus:
−
ATI All-In-Wonder 128 Pro
−
ATI Rage Fury Pro
−
ATI All-In-Wonder Radeon
−
AverMedia EZ Capture
−
AverMedia AverTV Studio
−
COMpro Personal Cinema
−
Hauppauge WinTV 401
−
Conexant Fusion 878A
−
Dazzle DV Bridge
Other analog capture cards may work with neoDVDplus . Please check the Support
section of our Website for updates regarding analog capture card support.
47
17
Troubleshooting
Our goal is to try to ensure your experience with neoDVDplus is successful and
productive. We have created this section of the manual to assist you in case you run into
any problems using our product. We have provided three levels of support in this
manual:
Hardware and Software Checklist helps you quickly identify the most common
hardware and software setup and configuration issues quickly and easily
Support FAQs provide answers to frequently asked questions about using
neoDVDplus
Helpful Hints provide information that has proven successful for other neoDVDplus
users.
If you do not find the information you are looking for in this document, please check
http://www.mediostream.com/support for updates.
17.1
Hardware and Software Checklist
For the fastest resolution, go through the following list to verify you have the correct
system setup. If your problem is not addressed, continue through the Troubleshooting
section.
___
Check processor type (Intel Celeron, Pentium III, Pentium 4, or AMD Athlon with a
minimum 700MHz clock speed).
___
Check DirectX version (8.1 or Higher).
___
Disable automatic power standby mode.
___
Check available memory (128MB).
48
___
Check IEEE-1394 card type (must be OHCI compliant).
___
Verify that your analog capture card is supported by neoDVDplus.
___
Verify that you have the latest updates for your PC's Operating Systems.
___
Check graphics cards type and memory (AGP, 8MB).
___
Check available disk space on the disk where neoDVDplus is installed (5GB
minimum).
___
Verify that your audio card is properly installed and running.
___
Check color depth (True Color 24-bit or higher).
___
Check to see that the camcorder has adequate battery or AC power.
___
Check to see that the FireWire cable is firmly attached to the camcorder and
computer end. Do not bend or kink the FireWire cable; a damaged cable will need
replacement.
___
Close unnecessary applications before running neoDVDplus. This will allow
neoDVDplus to utilize all the system resources on your computer.
___
If you are using MPEG-2 Compliance, verify the following:
General:
Program stream
Video:
Frame picture
Bottom field first
29.97 frames per second (NTSC) or 25 frames per second (PAL)
Max bit rate: 7.0Mbps
Average bit rate: 5Mbps
Audio:
PCM Audio
16-bit
Sampling rate: 48KHz
Stereo: 2 channels
49
17.2
Support FAQs
How do I determine what version of DirectX is running on my PC?
To work properly, neoDVDplus requires DirectX 8.1 or higher. You can determine the
DirectX version installed on your computer by using the DirectX diagnostic tool. Click
on Start on the lower left-hand corner:
Start > Programs > Accessories > System Tools > System Information >Tools >
DirectX Diagnostics
The DirectX diagnostic tool lists all DirectX files and their versions; it also has some
audio video test features. The DirectX diagnostic tools may not be available for
earlier versions of DirectX. This means that you need to upgrade your computer with
a recent version of DirectX.
How do I install DirectX?
If you do not have DirectX 8.1 or higher, you can download the latest DirectX version
from:
http://www.microsoft.com/directx/homeuser/downloads/default.asp
Select the version of DirectX 8.1 that corresponds to your version of Windows
(Windows 98 SE, Windows Me or Windows 2000). To install DirectX 8.1, follow the
instructions provided on the same link. This installation includes the Video Capture
Update for DirectX 8.1.
NOTE: DirectX 8.1 is already pre-installed with Windows XP Operating Systems.
How can I check that my Capture Device is properly connected?
50
Click on Start on the lower left-hand corner:
−
For Windows 98 (SE) and Windows Me: Start > Settings > Control Panel >
System > Device Manager.
−
For Windows 2000: Start > Settings > Control Panel > System > Hardware >
Device Manager.
−
For Windows XP: Start > Control Panel > Performance and Maintenance >
System. Click on the Hardware tab and then select Device Manager.
If your computer has detected a capture device, you should see it listed under the
"Imaging Device" entry. NOTE: Your camcorder should be in Camcorder or VCR
mode for a few seconds before the computer can detect it.
How do I determine and change the color depth on my computer?
The color depth needs to be set to "True Color (24-bit)" or higher to effectively run
neoDVDplus.
−
For Windows 98 (SE), Windows Me, and Windows 2000: Start > Settings >
Control Panel > Display > Settings > Colors
−
For Windows XP: Start > Control Panel > Appearance and Themes >
Settings
How do I determine the type and memory capacity of the graphics card
installed on my computer?
Right-click on the My Computer icon on your computer desktop and select the
Properties option.
−
For Windows 98 (SE) and Windows Me: Select the Device Manager tab on the
System Properties dialog box. Click on the Display Adapters icon to show
51
what type of graphics card is installed on your computer.
−
For Windows 2000: Select the Hardware tab under System Properties. Select
Device Manager, and click on the Display Adapters icon.
−
For Windows XP: Click on Start on the lower left-hand corner,
Start > Control Panel > Performance and Maintenance > System
Click on the Hardware tab and then select Device Manager. Next, double-click
on Display Adapters.
How do I determine what version of Windows is installed on my computer?
neoDVDplus supports the Windows 98 (SE), Windows Me, Windows 2000, and
Windows XP.
−
For Windows 98 (SE), Windows Me, and Windows 2000: Right-click on the My
Computer icon on your computer desktop and select the Properties option.
Select the General tab, which is the default tab. The System section lists the
version of the operating system running on your computer.
−
For Windows XP: Click on Start on the lower left-hand corner,
Start > Control Panel > Performance and Maintenance > System
Click on the General tab. The System section lists the version of the operating
system running on your computer.
How do I determine what version of neoDVD is installed on my computer?
Start the neoDVDplus application. Click on the ? button, and select the About
option. This displays the version of neoDVDplus installed on your computer.
52
18
Helpful Hints
If you experience problems connecting your camcorder, make sure the camcorder is
attached properly.
Make sure the FireWire adapter card is seated properly in the computer.
To prevent damage to your camcorder, make sure the camcorder is powered off
when connecting or disconnecting it from the computer.
Do not switch the camcorder's mode (Camcorder or VTR/VCR) while running
neoDVDplus. Exit the application and then switch the mode. Keep the camcorder in
the Off state for a few seconds when switching, then restart neoDVDplus.
Do not click on the VTR controls in rapid succession. This could possibly damage
the tape. Some of the controls, such as Fast Forward and Rewind, require some
time to start and stop the tape. The transport response delay varies between
camcorder models and depends on your operating system.
Try defragmenting your Hard Disk Drive before recording long video clips. Rebooting
your machine may also improve performance.
MedioStream, Inc.
2107 North First Street
Suite 530
San Jose, CA 95131
www.mediostream.com