1
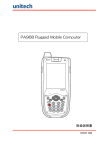
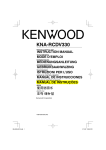
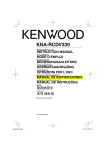
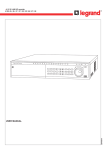
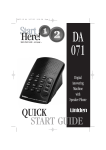
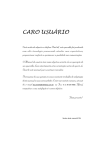
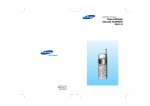
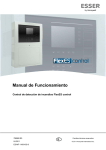
PA968 Rugged Mobile Computer
H1
H2
Enter
ESC
1
2 abc
4 ghi
5
7pqrs
8 tuv
alpha
0
jkl
TAB
3 def
6 mno
9wxyz
FUNC
Unitech is a member of the Oracle Embedded Software Licensing Program
Quick Reference Guide
400649G Version 1.0
Copyright 2009 Unitech Electronics Co., Ltd. All rights reserved. Unitech is a registered trademark of Unitech Electronics Co., Ltd.
Package Contents
H1
H2
Enter
ESC
1
4 ghi
2 abc
5
jkl
TAB
7pqrs
8 tuv
alpha
0
3 def
6 mno
9wxyz
FUNC
PA968
Battery Pack
Stylus and Elastic Bungee
AC Adapter and Cable
Unitech CD-ROM
(User’s Manual)
USB Communication Cable
Copyright 2009 Unitech Electronics Co., Ltd. All rights reserved. Unitech is a registered trademark of Unitech Electronics Co., Ltd.
English
Make sure the following items are in the PA968 box. Please contact a
regional Unitech representative if anything is missing or damaged.
Front View
English
1
5
2
6
7
3
4
8
9
1
2
3
4
5
Status Indicator.
LCD Touch-screen.
Microphone.
Power Button
6
7
8
9
Receiver.
Scanner Trigger Button.
Keypad.
Universal Connector.
Fingerprint Reader.
Copyright 2009 Unitech Electronics Co., Ltd. All rights reserved. Unitech is a registered trademark of Unitech Electronics Co., Ltd.
Rear View
3
English
1
5
2
8
6
7
4
9
10
1
2
3
4
5
Earphone Jack.
RESET Button.
Speaker.
Battery Compartment.
Barcode Scanner Window.
6
7
8
9
10
Antenna.
Digital Camera.
LED Flashlight.
Memory Card Slot.
Battery Compartment Tab.
Installing the Battery
1
Open the PA968’s Battery Compartment Cover by sliding the Battery Compartment Tabs in the direction as shown
in the illustration to the right.
Battery
Compartment
Tab
Copyright 2009 Unitech Electronics Co., Ltd. All rights reserved. Unitech is a registered trademark of Unitech Electronics Co., Ltd.
2
Turn the Backup Battery Switch to the
left in the ON position.
English
Backup Battery
Switch
3
Position the Battery so the Battery Contacts align with the Battery Compartment Contacts. Place the Battery on top
of the Plastic Tab.
Battery
Compartment
Contacts
4
Simultaneously slide the Battery Pack
into the Battery Compartment while
pulling up on the Plastic Tab, until the
Battery snaps into place.
Plastic Tab
5
Replace the Battery Compartment
Cover. Push the Battery Compartment
Tabs down and slide them in the direction as shown on the illustration to the
right.
NOTE: Make sure the Battery Compartment closes securely, or the PA968 may
not start.
Copyright 2009 Unitech Electronics Co., Ltd. All rights reserved. Unitech is a registered trademark of Unitech Electronics Co., Ltd.
Charging the Battery
CAUTION! Turn the Backup Battery Switch to the ON position before charging
the Battery.
1
2
3
Press and hold the USB Charging Cable’s release buttons and connect it to the
PA968 (1).
Plug the AC Adapter Cable into the USB Charging Cable’s power jack (2).
Plug the other end of the AC Adapter Cable into an electrical outlet (3).
2
3
1
Using the SD/MMC memory card
1
2
Rotate the screws counterclockwise
with a screwdriver to remove the SD
Card Slot Cover.
Insert the SD Card with the notched end
facing up and in, as shown in the illustration to the right.
Copyright 2009 Unitech Electronics Co., Ltd. All rights reserved. Unitech is a registered trademark of Unitech Electronics Co., Ltd.
Using the SIM card
CAUTION! Please backup data to prevent data loss before installing the SIM
Card.
1
2
3
4
5
Remove the Battery Compartment
Cover and the Main Battery.
To open the SIM Card Slot, move the
Slot Cover to the left.
Lift the cover up, and insert the SIM
Card inside the slot with the notched
end facing up.
Place the cover down, and slide it to the
right in the lock position.
Put the Battery back into the Battery
Compartment and replace the Battery
Compartment Cover.
Copyright 2009 Unitech Electronics Co., Ltd. All rights reserved. Unitech is a registered trademark of Unitech Electronics Co., Ltd.
English
The PA968’s GPRS SIM Card Slot is inside the Battery Compartment.
Keypads and Function Buttons
English
H1
H2
Enter
ESC
1
2 abc
4 ghi
5
7pqrs
8 tuv
alpha
0
jkl
TAB
3 def
6 mno
9wxyz
FUNC
Key
Description
Power button.
ESC
Escape key.
Enter
Enter key.
Backspace key.
Tab key.
TAB
FUNC
Function key.
alpha
Alpha key, toggle between numeric and alphabetic entry modes.
Four way cursor keys.
~
0
9wxyz
Alphanumeric keys.
Punctuation key.
H1
~
H2
Hotkeys.
“Numeric mode on” is the PA968’s default condition. But, “CAPS mode off” is
the default condition in Alpha mode. Use the Alpha key to toggle into CAPS
mode.
Copyright 2009 Unitech Electronics Co., Ltd. All rights reserved. Unitech is a registered trademark of Unitech Electronics Co., Ltd.
Using Function keys
FUNC
FUNC
FUNC
FUNC
FUNC
FUNC
FUNC
Description
+
Toggle LCD backlight on and off.
+
Toggle keypad LED backlight on and off.
+
Increase screen brightness.
+
Decrease screen brightness.
+
6 mno
Bring up Task Manager.
+
7pqrs
Bring up Scanner Control Panel.
+
8 tuv
Bring up Power Properties.
+
9wxyz
Bring up Device Setting.
English
Key
FUNC
Using Alpha keys
Key
Alpha Off
Alpha On
CAPS Off
CAPS On
0
0
Space, @, $, “, 0
Space, @, $, “, 0
1
1
+, -, \, %, 1
+, -, \, %, 1
2 abc
2
a, b, c, 2
A, B, C, 2
3 def
3
d, e, f, 3
D, E, F, 3
4
ghi
4
g, h, i, 4
G, H, I, 4
5
jkl
5
j, k, l, 5
J, K, L, 5
mno
6
m, n, o, 6
M, N, O, 6
7pqrs
7
p, q, r, 7
P, Q, R, 7
8 tuv
8
t, u, v, 8
T, U, V, 8
9wxyz
9
w, x, y, z, 9
W, X, Y, Z, 9
.
,;!./
,;!./
6
Copyright 2009 Unitech Electronics Co., Ltd. All rights reserved. Unitech is a registered trademark of Unitech Electronics Co., Ltd.
Turning the PA968 on for the First Time
Charge the PA968 for at least 16 hours before initial use.
Powering On
1. Press the Power Button on the PA968’s front panel.
Calibrate Screen
The Calibration screen automatically appears when the PA968 powers on for
the first time, or after the system is reset.
Use the stylus to tap a sequence of target marks on the PA968’s screen.
Firmly hold the stylus on top of the target mark for a moment, and then
remove. Continue to tap the target mark as it stops along the corners of the
screen.
After the calibration is complete, press Enter to confirm the calibration setting, or press ESC to cancel the setting.
Copyright 2009 Unitech Electronics Co., Ltd. All rights reserved. Unitech is a registered trademark of Unitech Electronics Co., Ltd.
Set Date and Time
The Date/Time Properties Window automatically appears after confirming
the calibration settings. Use the stylus to select the current date/time, time
zone and automatically adjust the clock for daylight saving time.
1
2
3
4
5
Tap the left or right arrows to scroll to the correct month and year, or tap the
month and year to set the date.
Tap the Hr/Min/Sec/AM/PM to set the time.
Tap the arrow in the Time Zone box to set the time zone.
Check the box to Automatically adjust for daylight saving to account for
daylight saving time.
Tap OK to save the settings and exit the Date/Time Properties Window, or tap
X to exit without saving.
Set Date
Set Time
Set Time
Zone
Set Daylight
Saving Time
Copyright 2009 Unitech Electronics Co., Ltd. All rights reserved. Unitech is a registered trademark of Unitech Electronics Co., Ltd.