1
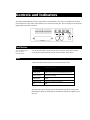
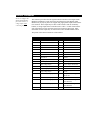
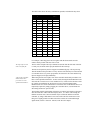
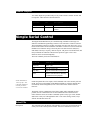
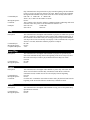
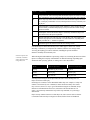
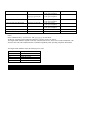
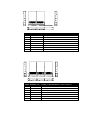
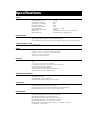
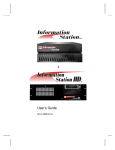
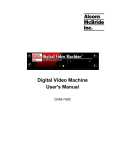
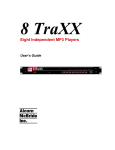
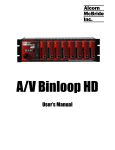
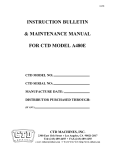
$0 Every effort has been made to assure the accuracy of the information contained in this manual, and the reliability of the Alcorn McBride Digital Audio Machine hardware and software. Errors can sometimes go undetected, however. If you find one, please bring it to our attention so that we can correct it for others. Alcorn McBride welcomes comments and suggestions on the content and layout of its documentation. Applications described herein are for illustrative purposes only. Alcorn McBride Inc. assumes no responsibility or liability for the use of these products, and makes no representation or warranty that the use of these products for specific applications will be suitable without further testing or modification. Alcorn McBride products are not intended for use in applications where a malfunction can reasonably be expected to result in personal injury. Customers using or selling Alcorn McBride products for use in such applications do so at their own risk, and agree to fully indemnify Alcorn McBride for any damages resulting from such improper use or sale. This publication was created using Doc-To-Help 2.0 and Microsoft Word for Windows 95, Version 7.0. Camera-ready art and illustrations were produced using Corel DRAW!, Version 6.0. Digital Audio Machine™ is a trademark of Alcorn McBride Inc., all rights reserved. Copyright 1997 Alcorn McBride, Inc. All rights reserved. Hardware Design: Jim Carstensen and Steve Alcorn Firmware Design: Jim Carstensen Software Design: Jason Crew Mechanical Design: Martin Chaney Document Number 110-100358 Rev E Alcorn McBride Inc. 3300 S. Hiawassee, Suite 105 Orlando, Florida 32835 (407) 296-5800 FAX: (407) 296-5801 Internet: http://www.alcorn.com e-mail: [email protected] 7DEOHRI&RQWHQWV 2YHUYLHZ :HOFRPH )HDWXUHV &RQWUROV DQG ,QGLFDWRUV 7HVW %XWWRQ /(' *URXQG /LIW 9ROWDJH &RQWDFW &ORVXUH 6HOHFW 6ZLWFK 3RZHU 56& 3URJUDPPLQJ &RQQHFWRU &RQWURO &RQQHFWRU 3OD\ /LVW &RPPDQG 6XPPDU\ ([DPSOH 3OD\ /LVW 3RZHU 8S 2SHUDWLRQ &RPPDQG )LOHV $GYDQFHG 6HULDO 3URWRFRO 7URXEOHVKRRWLQJ *XLGH 0HFKDQLFDO ,QIRUPDWLRQ 3DUDOOHO &RQWURO 6WUDLQ 5HOLHI 3DUDOOHO ,QSXWV 6XUIDFH 0RXQWLQJ 5DFN 0RXQWLQJ 3DUDOOHO 2XWSXWV 6LPSOH 6HULDO &RQWURO 6HOHFW )LOH 3OD\ /RRS 3OD\ 3DXVH 5HVHW )LOH 1DPHV 3OD\ /LVWV 6SHFLILFDWLRQV $XGLR 3OD\EDFN 7LPH 7ULJJHU 5HVSRQVH 7LPH 3RZHU 3K\VLFDO 6ZLWFKHV DQG ,QGLFDWRUV &RQQHFWRUV 3DUW 1XPEHUV ,QGH[ :HOFRPH Thanks for purchasing The Alcorn McBride Digital Audio Machine™. The Digital Audio Machine replaces tape machines, CDs and solid state audio players in permanent audio playback installations, providing hours of high-quality, maintenance-free digital audio. Any 16-bit 44.1 Khz WAV file, stereo or mono, may be played. This format is not compatible with the MPEG Layer-2 Audio format of the Model AM-2. A shareware utility, CoolEdit (available on our website), may be used to convert between the two formats. The 16-bit linear PCM format provides higher quality audio playback than the MPEG format, but consumes about ten times as much storage space per minute. With the falling price of Flash Memory, the incentive for MPEG audio compression has disappeared, and the Digital Audio Machine has been re-cast as a highperformance audio source with the introduction of the AM-3. Editing your audio files is easy with the software included with your unit. Then just copy the file to a PC-Card, plug it into the Digital Audio Machine, and you’re ready to go. You can even transfer files from the PC-Card to the optional internal hard drive to provide hours of playback time. Where vibration is a concern, Flash Cards are the best choice. For data storage, the unit provides a socket for installing removable PC-Card (PCMCIA) media, either Flash Card or hard drive. The Digital Audio Machine can be serially controlled using standard, ASCII-based Pioneer Laser Disc protocol. Parallel control is also possible through the use of contact-closures or voltage inputs. )HDWXUHV The Digital Audio Machine offers a wide range of features including: • Plays from PC-Card Storage or internal hard drive. • Uses Both Flash Cards and PC-Card (PCMCIA) Hard Drives. • Stores over 500 Tracks. • Sophisticated Play List Capabilities. • Serial RS-232 Control is Pioneer LDP compatible. • Parallel Contact Closures provide push-button control of 15 tracks. • Audio Editing Software Included. &RQWUROVDQG,QGLFDWRUV The Digital Audio Machine provides controls that can accommodate a wide variety of installations. The front panel incorporates a test switch, status indicator, PC-Card slot and serial port. The rear panel provides the audio, digital audio and control connectors: P ow er 15 VD C M in 1 A M ax - R igh t + C o ntro l Le ft Test Button The Test Button always plays the lowest numbered track. A recessed push-button is located on the front of the unit. This button is used to “test” play the unit and will play the lowest track number on the media. LED A dual-color LED located on the front of the unit indicates status. LED Behavior LED Meaning Steady green Drive access or serial communication activity. Steady orange Paused or Waiting. Flashing red Fault. Flashing green Copying or power-on self test. Off Idle. The LED flashes green during power-up initialization, then glows steadily while initializing the media. Do not attempt to communicate with the unit until the LED goes out. Ground Lift Be sure to configure the Digital Audio Machine’s switches before rack mounting the units, or the switches may be inaccessible. In the event of AC hum or noise, this switch, located at the rear of the left side of the Digital Audio Machine, may be opened to isolate the Digital Audio Machine’s ground from its chassis. Voltage / Contact Closure Select Switch This switch, located on the side of the unit next to the DB-37 Control Connector selects between voltage inputs or contact closures for the discrete controls. More information on these inputs may be found in the section entitled Rear Panel Connectors. Power The power input is a 2.5x5.5x10mm barrel connector with center pin (+) and the outer rim (-). The Digital Audio Machine requires 15.0 VDC to 27.0 VDC at 1 Amp. DO NOT EXCEED THE SPECIFIED INPUT VOLTAGE RANGE. An external 115 or 230 VAC power supply is provided with the unit. If the optional internal IDE drive is not installed, the Digital Audio Machine can be powered from as little as 8 VDC. This is useful for mobile applications where an automotive battery is used to power a Flash Card or PC-Card hard drive. RS-232C Programming Connector A serial cable is provided with each Digital Audio Machine. This input is a standard DB-9 male RS-232C connector, intended to be connected to a PC using a straight-through (not null-modem) 9-pin cable. Usually this connector is used only during programming, and not once the unit is permanently installed. The pinout appears below. Pin Function 2 TXD (data from Digital Audio Machine) 3 RXD (data to Digital Audio Machine) 5 GND For convenience of rack wiring, these signals are duplicated on the rear DB-37 connector. This eliminates the need for front panel cabling in rack mount installations. Only one serial connection should be attached at a time. Control Connector Be sure to configure the Digital Audio Machine for contact closures or voltage inputs before connecting any wires. This connector provides all of the signals needed to interface to the Digital Audio Machine. In addition to serial control, the first fifteen files of the Digital Audio Machine may be played, paused or stopped using eight parallel inputs located on the rear connector. These inputs may be either contact closures such as momentary buttons, or voltage inputs from a controller such as a PLC. A switch located on the side of the unit next to the connector selects between the two input types. More information on these inputs may be found in the section entitled Parallel Control. The pinout of the Control Connector is shown below: Pin Function Pin Function 1 Mute 20 Ground 2 Pause 21 Ground 3 Stop 22 Ground 4 Loop 23 Ground 5 File Select 1 24 Ground 6 File Select 2 25 Ground 7 File Select 4 26 Ground 8 File Select 8 27 Ground 9 Playing Output (contact 1) 28 Playing Output (contact 2) 10 Fault Output (contact 1) 29 Fault Output (contact 2) 11 Mute (voltage input) 30 5 VDC output, 100 ma max. 12 Pause (voltage input) 31 Ground 13 Stop (voltage input) 32 n. c. 14 Loop (voltage input) 33 Ground 15 File Select 1 (voltage input) 34 Input power feedthrough, 100 ma max. 16 File Select 2 (voltage input) 35 Ground 17 File Select 4 (voltage input) 36 RS-232 TXD (from Digital Audio Machine) 18 File Select 8 (voltage input) 37 RS-232 RXD (to Digital Audio Machine) 19 Ground 3DUDOOHO&RQWURO Parallel Inputs Be sure to configure the slide switch before connecting any wires. The Digital Audio Machine can be controlled using either contact closures or voltage inputs on the female DB-37 Control Connector. A switch located on the side of the unit next to the connector selects between the two input types. Voltage inputs are rated for 24 VDC. Consult factory for other voltage options. The table below describes the function of each input. Function Voltage Input Pins Contact Closure Pins Description Mute 11(+),1(-) 1,20 Ramps the audio to zero volume and maintains it there as long as Mute is asserted. When Mute is released, audio returns to full volume. Pause 12(+),2(-) 2,21 Pauses the file currently playing. Pause is maintained as long as it is asserted. Play will resume once it is released. Stop 13(+),3(-) 3,22 Stops the file currently playing. If the file is a Play List, it is aborted. Loop 14(+),4(-) 4,23 Causes the selected file to loop indefinitely from beginning to end. If the file is a Play List, all tracks will be played and then the file will loop. The state of this input is examined at the end of each file. File Select 1 15(+),5(-) 5,24 Binary-encoded input plays files 1-15. File Select 2 16(+),6(-) 6,25 Binary-encoded input plays files 1-15. File Select 4 17(+),7(-) 7,26 Binary-encoded input plays files 1-15. File Select 8 18(+),8(-) 8,27 Binary-encoded input plays files 1-15. The binary file select inputs are used to play the first 15 files. These inputs may be contact closures or voltages, depending upon the input select slide switch described in the previous section. The inputs are change sensitive; that is, when a change is detected, the new file will be played. It is therefore important that the four bits change at about the same time. If the same file number is selected repeatedly it will normally interrupt itself and begin again. When processing a play list, if the Play List is selected repeatedly it advances from entry to entry within the list – unless the “Uninterruptible” flag has been set (see the Play List section for more information). The table below shows the binary combinations possible, and what file they select: 8 4 2 1 File Off Off Off Off None Off Off Off On 1 Off Off On Off 2 Off Off On On 3 Off On Off Off 4 Off On Off On 5 Off On On Off 6 Off On On On 7 On Off Off Off 8 On Off Off On 9 On Off On Off 10 On Off On On 11 On On Off Off 12 On On Off On 13 On On On Off 14 On On On On 15 For example, connecting pins 8 and 27 together with the slide switch set in the contact closure position will cause file 8 to run. The loop input is read at the end of the file. The file will be looped if the loop command is asserted when the file ends. If the file is a Play List, all tracks will be played and then the file will loop. The file select inputs may also be strapped to automatically play a file on powerup. That file number takes precedence over any autoexec files that may be on the internal or removable drives (see power up operation). If an autoexec file exists and the loop input is strapped, it will play indefinitely. A file on the removable media always takes precedence over the optional internal drive. When using the file select inputs, files on the removable media take precedence over those on the optional internal drive. In other words, the Digital Audio Machine looks first at the PC-Card slot to see if it is installed. If it is, it looks for the file there. If the PC-Card is not installed or the file doesn’t exist on it, then the Digital Audio Machine looks for it on the internal drive. This allows files on the internal drive to be temporarily replaced by simply plugging in a removable drive, a useful feature for advertising insertion or special events. The simplest possible configuration is therefore to connect four switches to the unit’s four file select lines. These switches will play files 1, 2, 4 and 8. (The missing file numbers need not exist.) Sixteen switches may be connected without an external controller, by using a diode matrix. One side of each switch is connected to a wire that goes to signal ground. The other sides of the switches are connected through signal diodes, such as a 1N914 or 1N4148, to the file select inputs. Using a terminal block to hold the diodes makes the wiring neater. For example, the following circuit allows switches to select files 3 and 5: 2 1 1 20 2 21 3 22 4 23 5 24 6 25 7 26 8 27 9 28 10 29 11 30 12 31 13 32 14 33 15 34 16 35 17 36 18 37 19 1 2 SWITCH I/O CONNECTOR 1N4148 2 1 File 3 1 1 1N4148 2 2 SWITCH 1N4148 2 1 File 5 1N4148 Ground Contacts Voltage CONNECTOR DB37 Voltage inputs, such as from a PLC, could be wired this way: I/O CONNECTOR 1 20 2 21 3 22 4 23 5 24 6 25 7 26 8 27 9 28 10 29 11 30 12 31 13 32 14 33 15 34 16 35 17 36 18 37 19 Contacts Voltage PLC 24 Volt Output 1 24 Volt Output 2 24 Volt Output 4 24 Volt Output 8 Ground Reference CONNECTOR DB37 Diodes are not needed, since the PLC can actuate any combination of lines desired. Parallel Outputs Two status outputs are provided. They are dry contact closures rated at 24 VDC and 0.9 amp max. Their function is described below. Function Pins Description Playing 9,28 Closed when the unit is playing. Fault 10,29 Closed when the unit detects a fault condition. 6LPSOH6HULDO&RQWURO The Digital Audio Machine may be controlled using serial RS-232 messages via either the front DB-9 Programming Connector or the rear DB-37 Control Connector. The programming connector is usually used during one-time setup from a PC, or in a kiosk or other surface mount installation. The DB-37 connector is used in rack mount installations to eliminate wiring to the front panel. The data format is 9600,N,8,1: 9600 baud, 8 bits/byte, no parity, with one stop bit. The protocol is ASCII-based, and many commands are identical to Pioneer Disc protocol. Upper or lower case characters can be used interchangeably. The most commonly used serial commands are: Command Serial commands are “drive specific”. The removable media does not take precedence over the internal drive. Function Select File Select a file Play Play the selected file Loop Play Play the selected file over and over Pause Pause at current location. The Play Command resumes playback. Unlike the parallel file select inputs, serial commands refer to the currently selected media. On power up the Digital Audio Machine defaults to select the internal drive (if installed). In this configuration, refer to the section titled “Advanced Serial Protocol”. The details of these commands are listed below. Many other commands are also possible, and are summarized in the section entitled Advanced Serial Protocol. Unless otherwise noted, all of these commands operate on any type of file, whether audio track or Play List. Throughout the table <CR> means carriage return, a byte with the hexadecimal value 0D. Select File Description: This command causes the Digital Audio Machine to select the specified audio track or Play List on the currently selected media. Once this command is sent, the next Command Bytes: Message Response: Comments: Examples: Play command causes the specified file to play from the beginning. The unit defaults to file #1 at power-up, unless an autoexec file exists. When receiving this command, the Digital Audio Machine always looks for the file on the currently selected drive. nSE<CR> or nnSE<CR> or nnnSE<CR> where n, nn, or nnn is the file number in ASCII. R<CR> This is similar to the “Search to Address” command in chapter addressing mode used in Pioneer Laser Disc protocol. The maximum file number is 511. Select file 215. 215SE<CR> Select file 4. 4SE<CR> Play Description: Command bytes: Message Response: Completion Response: This command causes the Digital Audio Machine to play the file which was specified with the “Select File” command. If a track is paused, this command resumes play. If this command is issued while a Play List is being played, the Digital Audio Machine will skip to the next track in the Play List and play it. This command sends a response when it is executed, and another when the playback is complete. PL<CR> R<CR> <CR> Loop Play Description: Command bytes: Message Response: This command causes the Digital Audio Machine to play the file specified by the Select File command and loop back to the beginning. If the file is a Play List, all of the tracks in the Play List will be played and then the entire Play List will be restarted. LP<CR> R<CR> Pause Description: Command bytes: Message Response: Comments: This command causes the Digital Audio Machine to pause. Play will resume from where it left off whenever another Play command is issued unless a Select File command is issued, in which case the new file will play from the beginning. PA<CR> R<CR> If a Select File command is issued while in Pause mode, playback will start from the beginning of the selected file whenever another Play command is issued. Reset Description: Command bytes: Message Response: This command causes the Digital Audio Machine to stop, just as if the parallel Stop input had been activated. RJ<CR> R<CR> )LOH1DPHV File names are represented in simple DOS 8.3 format – in other words, an eight character name, a period, and then a three character extension. The name is made up of eight characters specifying the type (SND for sound file, PLY for Play List, CMD for command), and the number of the file (5 digits from 00000 to 00511). The three character extension is used to tell the Digital Audio Machine the data format of the file. The Digital Audio Machine AM-3 supports WAV files which contain 16-bit mono or stereo linear PCM data sampled at 44.1 KHz. This format is not compatible with the MPEG Layer-2 Audio format of the Model AM-2. A shareware utility, CoolEdit (available on our website), may be used to convert between the two formats. The 16-bit linear PCM format provides higher quality audio playback than the MPEG format, but consumes about ten times as much storage space per minute. With the falling price of Flash Memory, the incentive for MPEG audio compression has disappeared, and the Digital Audio Machine has been re-cast as a high-performance audio source with the introduction of the AM-3. Any type of file may be stored in the Digital Audio Machine, but only those listed in the table may be played. Although any file name may be copied to the Digital Audio Machine’s media, only .WAV file formats may be played back. This allows archiving of ANY information on the drive: CAD drawings, spreadsheets, documentation, etc. Some example file names: File Name Description SND00020.WAV Track number 20 Audio file PLY00002.LST Play List Number 2 To avoid confusion, don’t duplicate file numbers. File numbers are used to identify which file is to be played in response to Select File serial commands or rear panel file selection parallel inputs. File numbers contained on a drive should be unique, regardless of the file type. In other words, you shouldn’t have PLY00002.LST and SND00002.WAV on the same drive. The two files should have different numbers. If more than one file has the same number, the first file found in the directory will be used. Autoexec files are invaluable in standalone applications. File 00000 is an autoexec file. A file numbered 00000 is automatically executed on power up. For example, Play List PLY00000.LST will start as soon as the Digital Audio Machine is turned on. If the loop input is strapped on, or if the Play List is designed to repeat, playback will continue indefinitely. ,PSRUWDQW 1RWH :KHQ XVLQJ D 3& WR FRS\ \RXU DXGLR ILOHV WR WKH PHGLD DYRLG FRS\LQJ ILOHV DIWHU SHUIRUPLQJ GHOHWH RSHUDWLRQV 7KLV ZLOO FDXVH WKH PHGLD WR EHFRPH IUDJPHQWHG DQG WKH $XGLR 0DFKLQH ZLOO PDOIXQFWLRQ GXULQJ SOD\EDFN $OZD\V IRUPDW WKH PHGLD LQ WKH $XGLR 0DFKLQH ILUVW DQG WKHQ FRS\ ILOHV WR LW DOO DW RQFH 3OD\/LVWV Play Lists provide a mechanism for the Digital Audio Machine to automatically play a collection of tracks in a predefined sequence. Play Lists often allow the Digital Audio Machine to be used to perform complex functions that would normally require an external controller. Play Lists can perform functions as simple as looping a single track, or as complex as user prompted pacing of the playback. Overview Play Lists hold the key to the power of the Digital Audio Machine. A Play List file contains a list of numbers which refer to audio tracks (or other Play Lists) on the media in the Digital Audio Machine. When a Play List is being used, the tracks are played back in the order in which they appear in the list. The Play List is an ASCII text file and can be made using any ASCII editor. (In the future, Play Lists will be constructed by selecting files from the Digital Audio Machine program’s file list). The maximum Play List file size is 64 KBytes (or about 16,000 tracks, if no comments are used). A Play List can be started by serial or parallel commands, in exactly the same way as an audio track. For example, the serial message 2SE<CR>PL<CR> causes Play List PLY00002.LST on the currently selected drive to start. Discrete File Select Input 2 will also start PLY00002.LST , looking first on the removable media, then the internal drive. If Play List 0 (PLY00000.LST ) exists, it will be automatically executed on power up. If a Play List contains the number of another Play List, execution of the first Play List will be terminated at that point, and the new Play List will begin. A Play List with a .RND extension will cause the Audio Machine to randomly select clips from the list for play. Play List Command Summary The Play List is mainly a list of the track numbers that are to be played. If the same file number exists on both the internal and removable media, the removable media takes precedence. Track numbers are entered as one to three ASCII digits, and are separated by any “white space” characters or punctuation (other than the command characters listed below). Special command characters further modify the behavior of the Digital Audio Machine. These characters are: Char Meaning L Loop next track. The track loops until the Resume input is activated or a serial play command is received, whereupon the next entry in the Play List is played. W Wait. Play stops at the end of current track until the Resume input is activated or a serial play command is received, whereupon the next entry in the Play List is played. U Uninterruptible. Causes the Digital Audio Machine to ignore the Resume input and serial Play command while playing. It still processes them when waiting, paused or stilled. I Interruptible. Allows the Resume input or serial Play command to skip to the next track. This is the power-up default. < Repeat entire Play List. The only way to stop the Play List from looping is to use the Stop input or serial command, or to start another file. Anything in the Play List after the ‘<’ character is ignored. ; Comment. Ignore all characters until the next carriage return. Commands may be entered into the Play List in either upper or lower case. All text following a semicolon (;) is interpreted as comments, until the next carriage return. You may put anything you want in comments, including the special command characters normally used in the Play List. File Select inputs and serial Play command change functions when using a Play List. When the Digital Audio Machine is processing a Play List, reactivating the same File Select inputs or sending the serial play command take on different meanings, depending upon whether the unit is playing, paused, or waiting. Here is how they behave: Mode Interruptible Uninterruptible Playing Immediately play next file Ignored Paused Resume play Resume play Waiting Play next file Play next file Asserting and releasing the Pause input while the unit is in the Waiting state of a Play List will also resume play. One thing to be cautious of is the unintended endless loop. For example, if a Play List contains a U followed by an L command, it doesn’t matter how many more tracks may occur in it, there is no way to get to them! When using the U command, always include an I command before the next L, unless this is the desired behavior. Of course, you can always terminate the loop with a stop command, or by selecting a different file. Play Lists may contain references to other Play Lists, but as soon as such a reference is encountered the new Play List begins execution, and the old one is abandoned. Example Play List i,1,L6,37,w,415,5,60 < The Play List is a list of numbers representing the file numbers of audio tracks. The list can also contain special control codes or symbols to govern playback. The list can be arranged all on the same line, as shown above, or vertically as shown below. i 1 L6 37 w 5 60 < ;You can comment your Play List file by using ;semicolons. All text after a semicolon is ;ignored until the end of the line where a ;carriage return is encountered. The “i” character places the Digital Audio Machine into “interruptible” mode, which means that the unit will respond to discrete Select inputs and serial play commands by jumping immediately to the next entry in the list. The unit remains in interruptible mode until a “u” character is encountered, which in this example is never - the entire list is interruptible. Track numbers may be 1, 2 or 3 digits long. Leading zeroes are ignored. Next, the unit plays track #1 on the removable media, unless it cannot find a track #1 there, in which case it plays track #1 on the internal hard drive (when installed). This track will be interrupted by track #6 if the user issues a new Play command. When track #1 is done, the unit loops track #6 continuously until the user issues a Play command. Then, track #37 plays. When the track is complete, the “w” causes the Digital Audio Machine to wait for another Resume input or Play command. The unit continues straight into track #5 followed by track #60, at which point the list loops back to the beginning, continuing straight into track #1. 3RZHU8S2SHUDWLRQ The order of power up execution allows the Digital Audio Machine to use the removable drive to update itself, either temporarily or permanently. When power is first applied to the Digital Audio Machine, it flashes the front panel LED green while performing a self test. It then checks to see if a track or Play List should be played, according to the following priority: • If the test button is depressed, process command file COMMAND0.BAT on the removable media. • Play any track or Play List that is hardwired at the Control Connector. • Play track or Play List number 0 from the removable drive. • Play track or Play List 0 from the internal drive. The first condition detected will be processed. Successive conditions are ignored. If more than one file has the same number, the first file found will be used. &RPPDQG)LOHV Command files are used only in units equipped with the optional internal drive. To permanently update the contents of the internal drive from the PC-Card slot, use a Command File. Command Files are a simple yet powerful way to automatically update the contents of one or many Digital Audio Machines in the field, without using a laptop or other external device. Just insert an appropriately prepared PC-Card and the Digital Audio Machine updates itself. Here’s how it works: Command files are only processed if the test button is depressed on power up or when the removable media is changed. If the test button is depressed when power is first applied to the Digital Audio Machine or when the removable media is changed, the Digital Audio Machine checks for the presence of a command file named COMMAND0.BAT on the removable media. If found, this file will be processed. Currently the command file supports only the inclusion of an update all command, of the form: *U If these characters appear at the beginning of the file, the Digital Audio Machine will automatically search for and delete any file numbers on the internal drive that match those on the external drive. It then compacts the internal drive, and copies all files (except COMMAND0.BAT) from the removable drive to the internal drive. The LED blinks during the entire update process. Once the LED is extinguished it is safe to remove the PC-Card. $GYDQFHG6HULDO3URWRFRO The table below shows the complete Digital Audio Machine serial protocol, including the Pioneer LDP compatible commands and our extensions. Using these commands, an external controller or PC can accomplish extremely complex tasks. Throughout the following table <CR> means carriage return, a byte with the hexadecimal value of 0D. Description Play Command Bytes PL<CR> Pause Select File Audio Control PA<CR> nSE<CR> nnSE<CR> nnnSE<CR> nAD<CR> Play and loop at end of file Select Drive Drive Directory Request LP<CR> nSL<CR> ?D<CR> Response R<CR> upon receipt <CR> upon completion R<CR> R<CR> R<CR> R<CR> R<CR> ASCII dump Comments Automatically stops at end of track Only file number addressing is supported (not frames or time) 0=Mute 1=Unmute 0=internal, 1=Removable Delete File "xxxxxxxx.xxx"DL<CR> Rename File "xxxxxxxx.xxx" "yyyyyyyy.yyy"RN<CR> Copy File, Removable to Internal "xxxxxxxx.xxx"CI<CR> Copy File, Internal to Removable "xxxxxxxx.xxx"CR<CR> Format Drive FO<CR> Total Storage Request Firmware Version Request ?TS<CR> ?V<CR> R<CR> upon receipt R<CR> upon completion R<CR> upon receipt R<CR> upon completion R<CR> upon receipt R<CR> upon completion R<CR> upon receipt R<CR> upon completion R<CR> upon receipt R<CR> upon completion nnnnnnn<CR> ASCII dump number of bytes (hex) Notes: In the commands above, xxxxxxxx.xxx and yyyyyyyy.yyy are file names. All R<CR> responses can be replaced by Enn<CR> if an error occurs (see below). The Digital Audio Machine responds to the Play command with R<CR> when received, and an additional <CR> when the track ends. This maintains Pioneer command compatibility while providing completion information. The Digital Audio Machine returns the following error codes: Error Code E00 E04 E11 E12 E20 Description Communication Error Feature Not Available Yet Media Not Present Search Error Drive Not Formatted 7URXEOHVKRRWLQJ*XLGH Q: I’ve copied several files from my PC onto a PCMCIA drive, but they do not appear in DVM Explorer. A: The PCMCIA drive may have been pre-formatted in a way which is incompatible with the AM-3 operating system. Use DVM Explorer to format the media, and then re-copy the files. Q: DVM Explorer shows a red circle in front of the file name. What does this mean? A: The file name does not follow the naming conventions outlined in this manual for video files. It may not be a valid video file. Q: I have several files on my AM-3. When I try to play one of them using DVM Explorer, a different file plays. A: All file names and numbers must be unique. You cannot have, for instance, two files named SND00005.WAV, or have a file named SND00003.WAV along with a PLY00003.LST. Q: I have created a playlist using Windows 95, but it doesn’t work on the AM-3. A: Windows 95 sometimes uses its own extensions, or adds extensions that are hidden when viewed in Windows Explorer. Try using a DOS shell, and renaming the file, or use a DOS editor. Q: When using DVM Explorer on a Windows NT machine, communication with the AM-3 is intermittent, or the program crashes. A: DVM Explorer is designed to operate with Windows 95 only. It has not been certified for use on NT machines. Q: When playing back files, the audio seems to jump from one file to the next, interrupting the currently playing file in the middle. A: The media has become fragmented. Format the media in the AM-3 and them recopy all the files to it. 0HFKDQLFDO,QIRUPDWLRQ Strain Relief The rear panel of the Digital Audio Machine incorporates four threaded PEM nuts, which can be used to secure strain reliefs to prevent cables from being dislodged from their connectors. The PEM nuts accept 4-40 screws, with a length not to exceed 3/8 inches. Surface Mounting 6XUIDFH0RXQW.LW3DUW1XPEHU Qty 2 6 Part Number 306-100079 500-000566 Description Mounting Flange Screw, 6-32 x 3/8, Pan Head, Black Ox, CRES Rack Mounting Rack mounting the Digital Audio Machine is as simple as attaching top and bottom connecting plates to the sides (if more than one unit is to be connected together) and then adding the appropriate length rack mount ears, as shown in the drawings that follow. 5DFN0RXQW.LW8QLW3DUW1XPEHU Qty 1 1 8 Part Number 306-100007 306-100083 500-000540 Description Mounting Ear, Short Mounting Ear, Long Screw, 10-32 x ¼, Pan Head, Black Ox, CRES 5DFN0RXQW.LW8QLW3DUW1XPEHU Qty 1 1 1 1 2 6 8 Part Number 306-100007 306-100082 306-100080 306-100081 500-000565 500-000564 500-000540 Description Mounting Ear, Short Mounting Ear, Medium Connecting Plate, Top Connecting Plate, Bottom Screw, 4-40 x 1, Pan Head, Black Ox, CRES Screw, 6-32 x 3/8, Flat Head, Black Ox, CRES Screw, 10-32 x ¼, Pan Head, Black Ox, CRES 5DFN0RXQW.LW8QLW3DUW1XPEHU Qty 2 2 2 4 12 8 Part Number 306-100007 306-100080 306-100081 500-000565 500-000564 500-000540 Description Mounting Ear, Short Connecting Plate, Top Connecting Plate, Bottom Screw, 4-40 x 1, Pan Head, Black Ox, CRES Screw, 6-32 x 3/8, Flat Head, Black Ox, CRES Screw, 10-32 x ¼, Pan Head, Black Ox, CRES 6SHFLILFDWLRQV Audio DAC Resolution: Deviation from Linear phase: Total Harmonic Distortion: Dynamic Range (A-weighted): Inter-channel Isolation: Interchannel Gain Mismatch: Frequency Response: Maximum Phase Non-Linearity: Output Level: Analog Output Load: 16 bits +/-0.5dB 0.003% 94dB 90dB 0.1dB 10 to 20 Khz +/- 0.1 dB 5 degrees Unbalanced, 4.07V P-P max (3.70 typical) into 20K 10K Ohm Minimum, 100pF Maximum Playback Time Approximately 3 hours stereo from an optional internal 2GB drive. Approximately 6 hours mono from an optional internal 2GB drive. PC-Card Playback Times: Stereo WAV files require 10Mbytes/minute, mono require 5 Mbytes/minute. Trigger Response Time Less than 33 msec. Power 15.0 VDC to 27.0 VDC at 1 Amp max using internal IDE hard drive. 8 VDC to 27.0 VDC at 1 Amp max using removable PC-Card. Connector: 2.5 mm I. D., 5.5 mm O. D., 10 mm shaft length. Adapter for 115 or 230 volts provided. 115/230 volts, 50/60 Hz, 30 W max. Physical 5.5” x 1.75” x 11” 4 lbs 0oC (32oF) to 38oC (100oF), free air circulation. PC-Card hard discs used above 27 oC (80oF) require an external fan. 0-90% relative humidity, non-condensing 1g max Vibration (with internal IDE drive) 10 g max Vibration (with removable PC-Card Hard Disc) 20 g max Vibration (with removable Flash Card) Switches and Indicators Front panel test button. Front panel bi-color LED. Side mounted slide switch for ground lift. Side mounted slide switch for input type: contact/voltage. Connectors Front Panel DB-9M serial I/O connector. Rear Panel DB-37F parallel and serial I/O connector. Rear Panel RCA type Phono connectors for S/PDIF output, left and right audio. Rear Panel Barrel connector (2.5 mm x 5.5 mm x 10 mm) for power. Part Numbers Digital Audio Machine, 115 VAC, Part Number 320-100116 Digital Audio Machine, 230 VAC, Part Number 320-100421 Flush Mounting Bracket Kit, Part Number 320-100375 Rack Mounting Bracket Kit, 1 Unit, Part Number 320-100372 Rack Mounting Bracket Kit, 2 Unit, Part Number 320-100373 Rack Mounting Bracket Kit, 3 Unit, Part Number 320-100374 Mating Connector and Housing for DB-37F, Solder Cup, Part Number 320-100376 PC-Card Media – contact factory ,QGH[ Advertising, 9 autoexec, 9, 12, 13 baud, 11 Command Bytes, 12, 18 Command File, 17 comments, 12, 18 Connectors, 6, 22 contact closures, 10, 11 Contact Closures, 7–8 copy, 18 DAC, 22 DB-37, 8, 11 DB-9, 6, 11 Delete, 18 Directory, 18 Distortion, 22 DOS, 13 Dynamic Range, 22 error codes, 18 Fault, 5, 7, 11 file extension, 13 File names, 13 File Select, 7 Firmware Version, 18 Format, 18 Frequency Response, 22 Gain, 22 hum, 6 internal, 6, 9 Interruptible, 15 laser disc, 12 LED, 5 LED Meaning, 5 Loop, 7–9, 11–12, 15–16, 18 noise, 6 Non-Linearity, 22 Parallel Control, 7 Parallel Outputs, 11 parity, 11 Pause, 11–12, 18 PC-Card, 4–5, 9, 17 Phase Non-Linearity, 22 Pioneer, 11–12, 18 Play, 11–18 Play List, 14, 16 Playing, 7–8, 11 PLC, 7, 10 Power, 22 Power Up, 9, 17 power-up, 5, 12 protocol, 11–12 Rack Mounting, 6, 20, 22 RCA, 22 removable, 9, 11–13, 17, 18 removable drive, 17 Rename, 18 Repeat, 15–16 Response Time, 22 Resume, 12, 15–16 RS-232, 7, 11 RXD, 6–7 sample rate, 22 Search, 12 Select Drive, 18 Serial Control, 7, 11 Serial Protocol, 18 SND, 13 Specifications, 22 Still, 7 Storage, 18 strain relief, 19 Surface Mount, 19 TXD, 6–7 Uninterruptible, 15 Vibration, 4, 22 Video Control, 18 voltage inputs, 7–8, 10