1
Remote Insight Lights-Out Edition
User Guide
Fifth Edition (July 2001)
Part Number 159206-005
Compaq Computer Corporation
Compaq Confidential – Need to Know Required
Writer: James Parish Project: Compaq Remote Insight Lights-Out Edition User Guide Comments:
Part Number: 159206-005 File Name: a-frnt-x1.doc Last Saved On: 7/13/01 8:55 AM
Notice
© 2001 Compaq Computer Corporation
Compaq, the Compaq logo, Compaq Insight Manager, ProLiant, Prosignia, ROMPaq, SmartStart, and
iPAQ are trademarks of Compaq Information Technologies L.P.
Microsoft, MS-DOS, Windows, and Windows NT are trademarks of Microsoft Corporation.
Intel, Pentium, and Xeon are trademarks of Intel Corporation.
The Open Group and UNIX are trademarks of The Open Group.
All other product names mentioned herein may be trademarks of their respective companies.
Compaq shall not be liable for technical or editorial errors or omissions contained herein. The
information in this document is provided “as is” without warranty of any kind and is subject to change
without notice. The warranties for Compaq products are set forth in the express limited warranty
statements accompanying such products. Nothing herein should be construed as constituting an
additional warranty.
Compaq Remote Insight Lights-Out Edition User Guide
Fifth Edition (July 2001)
Part Number 159206-005
www.compaq.com
Compaq Confidential – Need to Know Required
Writer: James Parish Project: Compaq Remote Insight Lights-Out Edition User Guide Comments:
Part Number: 159206-005 File Name: a-frnt-x1.doc Last Saved On: 7/13/01 8:55 AM
Contents
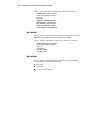
About This Guide
Text Conventions.......................................................................................................xi
Symbols in Text........................................................................................................xii
Symbols on Equipment.............................................................................................xii
Rack Stability ..........................................................................................................xiii
Getting Help ............................................................................................................xiv
Compaq Technical Support ..............................................................................xiv
Compaq Website ...............................................................................................xv
Compaq Authorized Reseller.............................................................................xv
Chapter 1
Features of the Remote Insight Lights-Out Edition
Features.................................................................................................................... 1-2
Supported Hardware and Software .......................................................................... 1-8
Remote Insight Lights-Out Edition Kit Contents .................................................... 1-9
Operation Overview............................................................................................... 1-10
Chapter 2
Installing the Remote Insight Lights-Out Edition
Preparing the Remote Insight Lights-Out Edition Board......................................... 2-2
Installing the PCI Extender Bracket ................................................................. 2-2
Disassembling the Server ........................................................................................ 2-3
Determining an Available Slot ................................................................................ 2-3
Installing the Remote Insight Lights-Out Edition Board in the Server.................... 2-6
Installing the Virtual Power Button Cable............................................................... 2-7
Installing Virtual Power Button Cable P/N 162816-001 .................................. 2-7
Installing Virtual Power Button Cable P/N 160011-001 .................................. 2-8
Installing Virtual Power Button Cable P/N 177634-001 .................................. 2-9
Reassembling the Server.......................................................................................... 2-9
Compaq Confidential – Need to Know Required
Writer: James Parish Project: Compaq Remote Insight Lights-Out Edition User Guide Comments:
Part Number: 159206-005 File Name: a-frnt-x1.doc Last Saved On: 7/13/01 8:55 AM
iv
Compaq Remote Insight Lights-Out Edition User Guide
Installing the Remote Insight Lights-Out Edition
continued
Connecting External Cables to the Remote Insight Lights-Out Edition Board...... 2-10
Keyboard/Mouse Adapter Cable Connection ................................................. 2-11
Monitor Cable Connection.............................................................................. 2-12
LAN Cable Connection .................................................................................. 2-13
AC Power Adapter Connection ...................................................................... 2-14
Server Power Cable Connection ..................................................................... 2-15
Chapter 3
Remote Insight Lights-Out Edition Configuration Parameters
Server Identification................................................................................................. 3-4
PCI Resources................................................................................................... 3-4
Server Name ..................................................................................................... 3-4
Server ID........................................................................................................... 3-4
Serial Number ................................................................................................... 3-4
Firmware Version ............................................................................................. 3-4
Firmware Date .................................................................................................. 3-5
Network Interface .................................................................................................... 3-5
Status ................................................................................................................ 3-5
Transceiver Speed Autoselect........................................................................... 3-5
Speed ................................................................................................................ 3-5
Duplex............................................................................................................... 3-6
IP Address......................................................................................................... 3-6
HTTP Port......................................................................................................... 3-6
Remote Console Port ........................................................................................ 3-6
Default Gateway ............................................................................................... 3-6
Subnet Mask ..................................................................................................... 3-6
MAC Address ................................................................................................... 3-7
DNS Name........................................................................................................ 3-7
DNS/DHCP....................................................................................................... 3-7
Register with WINS Server .............................................................................. 3-7
Board Name ...................................................................................................... 3-7
Domain Name ................................................................................................... 3-8
DHCP Server .................................................................................................... 3-8
Primary, Secondary, and Tertiary DNS Servers ............................................... 3-8
Primary, Secondary, and Tertiary WINS Servers ............................................. 3-8
Static Routes #1, #2, #3 .................................................................................... 3-8
IP Address for Web Agents .............................................................................. 3-8
Compaq Confidential – Need to Know Required
Writer: James Parish Project: Compaq Remote Insight Lights-Out Edition User Guide Comments:
Part Number: 159206-005 File Name: a-frnt-x1.doc Last Saved On: 7/13/01 8:55 AM
Contents
Remote Insight Lights-Out Edition Configuration Parameters
continued
Configure Users ....................................................................................................... 3-8
User Name ........................................................................................................ 3-9
Login Name ...................................................................................................... 3-9
Password........................................................................................................... 3-9
Enforced Client IP Address .............................................................................. 3-9
SNMP IP Address............................................................................................. 3-9
Receive Host OS Generated SNMP Traps ....................................................... 3-9
Receive Remote Insight Board Alerts ............................................................ 3-10
Supervisor Access .......................................................................................... 3-10
Login Access .................................................................................................. 3-10
Remote Console Access ................................................................................. 3-10
Remote Server Reset Access and Power Button Access ................................ 3-11
Other Parameters ................................................................................................... 3-11
Keyboard ........................................................................................................ 3-11
Language ........................................................................................................ 3-11
Chapter 4
Configuring the Remote Insight Lights-Out Edition
Installing and Configuring Software........................................................................ 4-1
Remote Setup.................................................................................................... 4-3
SmartStart Setup ............................................................................................... 4-4
ROM-Based Setup Utility Using the F8 Key ................................................... 4-5
System Configuration Utility Setup Using the F10 Key .................................. 4-6
ROM-Based Setup Utility Using the F9 Key ................................................... 4-6
Preinstalled Operating System Configuration Setup ............................................... 4-7
Windows NT .................................................................................................... 4-7
Windows 2000.................................................................................................. 4-7
Novell NetWare 4.2.......................................................................................... 4-8
Novell NetWare 5............................................................................................. 4-8
Red Hat Linux 6.2 and 7.0................................................................................ 4-9
Installing Remote Insight Lights-Out Edition Device Drivers............................... 4-10
Windows NT Driver Support.......................................................................... 4-10
Windows 2000 Driver Support....................................................................... 4-12
NetWare Driver Support................................................................................. 4-12
OS/2 Driver Support....................................................................................... 4-14
SCO Driver Support ....................................................................................... 4-15
Red Hat Linux Driver Support ....................................................................... 4-15
Optimized Performance for Remote Console ........................................................ 4-17
Browser Settings............................................................................................. 4-17
Recommended Server Settings ....................................................................... 4-19
Single and 2-Cursor Modes for Remote Console ........................................... 4-21
Compaq Confidential – Need to Know Required
Writer: James Parish Project: Compaq Remote Insight Lights-Out Edition User Guide Comments:
Part Number: 159206-005 File Name: a-frnt-x1.doc Last Saved On: 7/13/01 8:55 AM
v
vi
Compaq Remote Insight Lights-Out Edition User Guide
Chapter 5
Using the Remote Insight Lights-Out Edition
Accessing the Remote Insight Lights-Out Edition Board for the First Time ........... 5-2
Accessing the Features of the Remote Insight Lights-Out Edition .......................... 5-4
Using the Graphical Remote Console to Manage the Remote Host Server ............. 5-5
Enhanced Features of the Remote Console....................................................... 5-7
Remote Console Views..................................................................................... 5-9
Remote Console Hot Keys................................................................................ 5-9
Troubleshooting the Remote Host Server .............................................................. 5-11
Obtaining Additional Information Concerning the State of the Remote
Host Server ..................................................................................................... 5-11
Video Replays of Prior Server Reset Sequences............................................. 5-11
Survey Information ......................................................................................... 5-12
Information Logs ............................................................................................ 5-14
Progressive Delays for Failed Browser Login Attempts................................. 5-15
Restarting the Remote Host Server................................................................. 5-15
Using the Virtual Floppy Drive.............................................................................. 5-16
Uploading a Diskette Image to the Remote Server ......................................... 5-17
Changing Virtual Floppy Drive Settings ........................................................ 5-19
Copying Files on the Remote Server to the Virtual Floppy Drive.................. 5-19
Making a Local Copy of the Diskette Image in the Virtual Floppy Drive...... 5-20
Using the Compaq Diskette Image Utility ...................................................... 5-20
Managing the User and Configuration Settings of the Remote Insight LightsOut Edition Board .................................................................................................. 5-23
Adding Authorized Users ............................................................................... 5-23
Change an Existing User’s Profile .................................................................. 5-24
Lockout Capability for Remote Console Port................................................. 5-25
Enabling SNMP Alerts ................................................................................... 5-28
Generating Test Alerts .................................................................................... 5-30
Disabling Alerts .............................................................................................. 5-30
Modifying Network Settings for the Remote Insight Lights-Out Edition
Board .............................................................................................................. 5-31
Security Settings ............................................................................................. 5-32
Keeping the Remote Insight Lights-Out Edition Board Firmware Current .... 5-32
Resetting the Remote Insight Lights-Out Edition to the Factory Default
Settings................................................................................................................... 5-33
Getting Additional Help......................................................................................... 5-34
Integrating the Remote Insight Lights-Out Edition Board with
Compaq Insight Manager XE ................................................................................ 5-34
Receiving SNMP Alerts in Compaq Insight Manager XE.............................. 5-35
Web Browser Launching ................................................................................ 5-37
Remote Insight Lights-Out Edition Board Health Statistics ........................... 5-38
Using Compaq Insight Manager XE............................................................... 5-39
Pocket PC Access .................................................................................................. 5-39
Compaq Confidential – Need to Know Required
Writer: James Parish Project: Compaq Remote Insight Lights-Out Edition User Guide Comments:
Part Number: 159206-005 File Name: a-frnt-x1.doc Last Saved On: 7/13/01 8:55 AM
Contents
Chapter 6
Group Administration
Features.................................................................................................................... 6-2
Compaq Insight Manager XE .................................................................................. 6-2
Remote Insight Board Command Language..................................................... 6-3
Compaq Lights-Out Configuration Utility ....................................................... 6-3
Query Definition in Compaq Insight Manager XE........................................... 6-4
Application Launch .......................................................................................... 6-9
Batch Processing.................................................................................................... 6-15
Compaq Lights-Out Configuration Utility ..................................................... 6-15
Chapter 7
Troubleshooting the Remote Insight Lights-Out Edition
Resetting the Remote Insight Lights-Out Edition Board ......................................... 7-2
Login Name and Password Not Accepted ............................................................... 7-2
Troubleshooting Video and Monitor Problems ....................................................... 7-3
No Video after Installing the Remote Insight Lights-Out Edition Board and
Powering On the Server.................................................................................... 7-3
Inability to Connect to the Board through the NIC........................................... 7-4
Inability to Get SNMP Information from Compaq Insight Manager XE
when Connected to the Remote Insight Network Interface .............................. 7-5
Inability of Web Browser to Connect to the Remote Insight Lights-Out
Edition IP Address............................................................................................ 7-5
Troubleshooting Alert and Trap Problems .............................................................. 7-6
Inability to Receive Compaq Insight Manager XE Alarms (SNMP Traps)
from the Remote Insight Lights-Out Edition .................................................... 7-6
Troubleshooting NetWare Driver Problems ............................................................ 7-6
Troubleshooting Miscellaneous Problems ............................................................... 7-7
Incorrect Time or Date of Entries in the Event Log ......................................... 7-7
Inability to Reboot the Server........................................................................... 7-7
Inability to Upgrade the Board’s Firmware...................................................... 7-8
Interpreting LED Error Codes ................................................................................. 7-8
Event Log Entries .................................................................................................... 7-9
Appendix A
Regulatory Compliance Notices
Federal Communications Commission Notice ........................................................A-1
Class A Equipment ...........................................................................................A-2
Class B Equipment ...........................................................................................A-2
Modifications....................................................................................................A-2
Cables ...............................................................................................................A-3
Declaration of Conformity for Products Marked with FCC Logo, United
States Only .......................................................................................................A-3
Compaq Confidential – Need to Know Required
Writer: James Parish Project: Compaq Remote Insight Lights-Out Edition User Guide Comments:
Part Number: 159206-005 File Name: a-frnt-x1.doc Last Saved On: 7/13/01 8:55 AM
vii
viii
Compaq Remote Insight Lights-Out Edition User Guide
Regulatory Compliance Notices
continued
Canadian Notice (Avis Canadien)........................................................................... A-4
Class A Equipment .......................................................................................... A-4
Class B Equipment........................................................................................... A-4
European Union Notice........................................................................................... A-4
Appendix B
Electrostatic Discharge
Grounding Methods .................................................................................................B-2
Appendix C
Remote Insight Board Command Language
Remote Insight Board Command Language ............................................................C-1
RIBCL Guidelines ............................................................................................C-2
Data Types ........................................................................................................C-2
RIBCL...............................................................................................................C-3
LOGIN..............................................................................................................C-4
USER_INFO.....................................................................................................C-5
ADD_USER .....................................................................................................C-6
DELETE_USER ...............................................................................................C-9
MOD_USER.....................................................................................................C-9
GET_USER ....................................................................................................C-13
GET_ALL_USERS ........................................................................................C-14
RIB_INFO ......................................................................................................C-15
MOD_NETWORK_SETTINGS ....................................................................C-16
MOD_GLOBAL_SETTINGS ........................................................................C-19
CLEAR_EVENTLOG ....................................................................................C-20
UPDATE_RIB_FIRMWARE.........................................................................C-21
GET_FW_VERSION .....................................................................................C-22
INSERT_VIRTUAL_FLOPPY ......................................................................C-22
EJECT_VIRTUAL_FLOPPY.........................................................................C-23
COPY_VIRTUAL_FLOPPY .........................................................................C-24
GET_VF_STATUS ........................................................................................C-24
SET_VF_STATUS .........................................................................................C-25
HOTKEY_CONFIG .......................................................................................C-26
SERVER_INFO..............................................................................................C-27
SERVER_INFO Parameters ...........................................................................C-28
SET_HOST_POWER .....................................................................................C-28
GET_VPB_CABLE_STATUS.......................................................................C-29
GET_HOST_POWER_STATUS ...................................................................C-29
RESET_SERVER...........................................................................................C-30
Compaq Confidential – Need to Know Required
Writer: James Parish Project: Compaq Remote Insight Lights-Out Edition User Guide Comments:
Part Number: 159206-005 File Name: a-frnt-x1.doc Last Saved On: 7/13/01 8:55 AM
Contents
Appendix D
Compaq Lights-Out DOS Utility
Prerequisites.............................................................................................................D-2
Features....................................................................................................................D-2
Important Information .............................................................................................D-2
Operating System Requirements ......................................................................D-2
CPQLODOS Utility..........................................................................................D-3
Output Logging ................................................................................................D-3
Reset to Factory Defaults .................................................................................D-4
Minimum Firmware..........................................................................................D-4
Command Line Parameters......................................................................................D-4
/help ..................................................................................................................D-4
/detect ...............................................................................................................D-5
/get_status .........................................................................................................D-5
/get_hostinfo .....................................................................................................D-6
/get_userinfo .....................................................................................................D-6
/get_nicconfig ...................................................................................................D-7
/get_dhcpconfig ................................................................................................D-8
/write_xml ........................................................................................................D-9
/load_xml..........................................................................................................D-9
/verify_xml .....................................................................................................D-10
/p.....................................................................................................................D-10
/min_fw ..........................................................................................................D-10
/reset_riloe ......................................................................................................D-10
/log..................................................................................................................D-11
Supported XML Syntax .........................................................................................D-11
CPQLODOS ...................................................................................................D-11
ADD_USER ...................................................................................................D-12
MOD_NETWORK_SETTINGS ....................................................................D-13
RESET_RIB ...................................................................................................D-16
Index
Compaq Confidential – Need to Know Required
Writer: James Parish Project: Compaq Remote Insight Lights-Out Edition User Guide Comments:
Part Number: 159206-005 File Name: a-frnt-x1.doc Last Saved On: 7/13/01 8:55 AM
ix
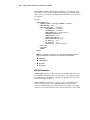
About This Guide
This guide is designed to be used as step-by-step instructions for installation
and as a reference for operation and troubleshooting.
Text Conventions
This document uses the following conventions to distinguish elements of text:
Keys
Keys appear in boldface. A plus sign (+) between
two keys indicates that they should be pressed
simultaneously.
USER INPUT
User input appears in a different typeface and in
uppercase.
FILENAMES
File names appear in uppercase italics.
Menu Options,
Command Names,
Dialog Box Names
These elements appear in initial capital letters and
bold.
COMMANDS,
DIRECTORY NAMES,
and DRIVE NAMES
These elements appear in uppercase.
Type
When you are instructed to type information, type
the information without pressing the Enter key.
Enter
When you are instructed to enter information, type
the information and then press the Enter key.
Compaq Confidential – Need to Know Required
Writer: James Parish Project: Compaq Remote Insight Lights-Out Edition User Guide Comments:
Part Number: 159206-005 File Name: afront-x2.doc Last Saved On: 7/13/01 8:45 AM
About This Guide
xii
Symbols in Text
These symbols may be found in the text of this guide. They have the following
meanings.
WARNING: Text set off in this manner indicates that failure to follow directions
in the warning could result in bodily harm or loss of life.
CAUTION: Text set off in this manner indicates that failure to follow directions
could result in damage to equipment or loss of information.
IMPORTANT: Text set off in this manner presents clarifying information or specific
instructions.
NOTE: Text set off in this manner presents commentary, sidelights, or interesting points
of information.
Symbols on Equipment
These icons may be located on equipment in areas where hazardous conditions
may exist.
Any surface or area of the equipment marked with these symbols
indicates the presence of electrical shock hazards. Enclosed area
contains no operator-serviceable parts.
WARNING: To reduce the risk of injury from electrical shock hazards,
do not open this enclosure.
Any RJ-45 receptacle marked with these symbols indicates a Network
Interface Connection.
WARNING: To reduce the risk of electrical shock, fire, or damage to
the equipment, do not plug telephone or telecommunications
connectors into this receptacle.
Compaq Confidential – Need to Know Required
Writer: James Parish Project: Compaq Remote Insight Lights-Out Edition User Guide Comments:
Part Number: 159206-005 File Name: afront-x2.doc Last Saved On: 7/13/01 8:45 AM
About This Guide
Any surface or area of the equipment marked with these symbols
indicates the presence of a hot surface or hot component. If this
surface is contacted, the potential for injury exists.
WARNING: To reduce the risk of injury from a hot component, allow
the surface to cool before touching it.
Power supplies or systems marked with these symbols indicate
the equipment is supplied by multiple sources of power.
WARNING: To reduce the risk of injury from electrical shock,
remove all power cords to completely disconnect power from
the system.
Rack Stability
WARNING: To reduce the risk of personal injury or damage to the equipment,
ensure that:
■
The leveling jacks are extended to the floor.
■
The full weight of the rack rests on the leveling jacks.
■
The stabilizing feet are attached to the rack if it is a single rack installation.
■
The racks are coupled together in multiple rack installations.
■
Only one component is extended at a time. A rack may become unstable if
more than one component is extended for any reason.
Compaq Confidential – Need to Know Required
Writer: James Parish Project: Compaq Remote Insight Lights-Out Edition User Guide Comments:
Part Number: 159206-005 File Name: afront-x2.doc Last Saved On: 7/13/01 8:45 AM
xiii
About This Guide
xiv
WARNING: To reduce the risk of personal injury or damage to the equipment,
consult the safety information and user documentation provided with your
computer before attempting this installation.
Many personal computers are capable of producing energy levels that are
considered hazardous. These computers are intended to be serviced by qualified
personnel trained to deal with these hazards. Do not remove enclosures or
attempt to bypass any interlocks that may be provided for the purpose of
removing these hazardous conditions.
Getting Help
If you have a problem and have exhausted the information in this guide, you
can get further information and other help in the following locations.
Compaq Technical Support
You are entitled to free hardware technical telephone support for your product
for as long as you own the product. A technical support specialist will help
you diagnose the problem or guide you to the next step in the warranty
process.
In North America, call the Compaq Technical Phone Support Center at
1-800-OK-COMPAQ. This service is available 24 hours a day, 7 days a week.
Outside North America, call the nearest Compaq Technical Support Phone
Center. Telephone numbers for worldwide technical support centers are listed
on the Compaq website. Access the Compaq website by logging on to the
Internet:
www.compaq.com
Be sure to have the following information available before you call Compaq:
■
Technical support registration number (if applicable)
■
Product serial numbers
■
Product model names and numbers
■
Applicable error messages
■
Add-on boards or hardware
■
Third-party hardware or software
Compaq Confidential – Need to Know Required
Writer: James Parish Project: Compaq Remote Insight Lights-Out Edition User Guide Comments:
Part Number: 159206-005 File Name: afront-x2.doc Last Saved On: 7/13/01 8:45 AM
About This Guide
■
Operating system type and revision level
■
Detailed, specific questions
Compaq Website
The Compaq website has information on this product including translated
documentation, the latest drivers and Flash ROM images, and other System
Management help. You can obtain more information on the Remote Insight
Lights-Out Edition by accessing the Compaq website:
www.compaq.com/lights-out
Compaq Authorized Reseller
For the name of your nearest Compaq authorized reseller:
■
In the United States, call 1-800-345-1518.
■
In Canada, call 1-800-263-5868.
■
Elsewhere, see the Compaq website for locations and telephone
numbers.
Compaq Confidential – Need to Know Required
Writer: James Parish Project: Compaq Remote Insight Lights-Out Edition User Guide Comments:
Part Number: 159206-005 File Name: afront-x2.doc Last Saved On: 7/13/01 8:45 AM
xv
Chapter
1
Features of the Remote Insight
Lights-Out Edition
The Compaq Remote Insight Lights-Out Edition board is a PCI board installed
in a Compaq ProLiant™ server to provide remote server manageability. It can
be accessed from a network client using a standard Web browser. The Remote
Insight Lights-Out Edition board provides keyboard, mouse, and video
capability for a server, regardless of the state of the host operating system or
host server.
A built-in processor, memory, Network Interface Card (NIC), ROM, and
standard external power supply make the Remote Insight Lights-Out Edition
board independent of the host server and its operating system. This design
allows the Remote Insight Lights-Out Edition to provide remote access to any
authorized network client, to send alerts, and to perform other management
functions.
Using any standard Web browser, you can:
■
Remotely access the console of the host server, including all text mode
and graphics mode screens with full keyboard and mouse controls.
■
Remotely power up, power down, or reboot the host server.
■
Remotely boot a host server to a virtual floppy image to perform a ROM
upgrade or to install an operating system.
■
Access the Compaq Insight Manager™ XE agents on a host server
through the Remote Insight Lights-Out Edition.
■
Send alerts from the Remote Insight Lights-Out Edition board regardless
of the state of the host server.
Compaq Confidential – Need to Know Required
Writer: James Parish Project: Compaq Remote Insight Lights-Out Edition User Guide Comments:
Part Number: 159206-005 File Name: b-ch1 Introducing the Remote Insight Lights-Out Edition.doc Last Saved On: 7/12/01 8:20 AM
1-2
Compaq Remote Insight Lights-Out Edition User Guide
■
Access advanced troubleshooting features provided by the Remote
Insight Lights-Out Edition.
■
Launch a Web browser, use Simple Network Management Protocol
(SNMP) alerting, and diagnose the Remote Insight Lights-Out Edition
board using Compaq Insight Manager XE.
Features
The Remote Insight Lights-Out Edition board offers the following features:
■
Virtual Graphical Remote Console
The Remote Insight Lights-Out Edition provides embedded hardware
graphical remote console capabilities that turn any standard browser into
a virtual desktop, giving the user full control over the host server’s
display, keyboard, and mouse. The operating system independent
console supports text and graphic modes, displaying remote host server
activities, such as shutdown and startup operations.
■
Power Cycle (Reset)
If the remote host server is not responding, this feature allows an
administrator to initiate a cold reboot to bring the server back online.
This feature is available on all ProLiant servers that the Remote Insight
Lights-Out Edition board supports.
■
Virtual Floppy Drive
With the Virtual Floppy Drive, an administrator can easily direct a
remote host server to boot and use a standard 1.44 MB diskette from
anywhere on the network, thus saving time and increasing efficiency by
eliminating the need to visit a remote server just to insert and use a
diskette. This feature allows administrators to carry out any of the
following functions remotely:
GRunning
Compaq User Diagnostics on remote host servers
GApplying
ROMPaq™ upgrades to remote servers
GDeploying
an operating system on remote servers from network
drives
GPerforming
disaster recovery of failed operating systems
Compaq Confidential – Need to Know Required
Writer: James Parish Project: Compaq Remote Insight Lights-Out Edition User Guide Comments:
Part Number: 159206-005 File Name: b-ch1 Introducing the Remote Insight Lights-Out Edition.doc Last Saved On: 7/12/01 8:20 AM
Features of the Remote Insight Lights-Out Edition 1-3
■
Virtual Power Button
Using any standard browser interface, the Remote Insight Lights-Out
Edition board can be used to remotely operate a host server’s power
button. For example, if the host server is off, you can turn it on from a
remote console. This feature requires a cable between the Remote
Insight Lights-Out Edition board and the server power button.
The Virtual Power Button feature works on the ProLiant CL, DL, ML,
1850R, 8000, 8500, and all TaskSmart™ servers.
■
Remote Firmware Update
This feature ensures that the Remote Insight Lights-Out Edition board is
always up-to-date with the latest firmware available from Compaq.
Updates to the ROM code on the Remote Insight Lights-Out Edition
board is accomplished through the browser interface.
■
Integration with Compaq Insight Manager and
Compaq Insight Manager XE 2.0 and newer
The Remote Insight Lights-Out Edition board provides full integration
with Compaq Insight Manager and Compaq Insight Manager XE 2.0
and newer under key operating environments. This integration provides:
GSupport
for SNMP trap delivery to a Compaq Insight Manager XE
console
GSupport
for SNMP management
This allows Compaq Insight Manager XE to access the
Insight Management Agent information through the Remote Insight
Lights-Out Edition board.
GRemote
Insight Lights-Out Edition Board hyperlinks
Compaq Insight Manager XE 2.0 and newer provides a Remote
Insight hyperlink on the server device page to launch and connect to
the Remote Insight Lights-Out Edition boards easily.
GCompaq
Web-based agents
The Remote Insight Lights-Out Edition board also integrates with
Compaq Web-Based Management agents, providing remote access
to system management information through the Web browser
interface of the Remote Insight Lights-Out Edition board.
Compaq Confidential – Need to Know Required
Writer: James Parish Project: Compaq Remote Insight Lights-Out Edition User Guide Comments:
Part Number: 159206-005 File Name: b-ch1 Introducing the Remote Insight Lights-Out Edition.doc Last Saved On: 7/12/01 8:20 AM
1-4
Compaq Remote Insight Lights-Out Edition User Guide
GManagement
processor
Compaq Insight Manager XE 2.0 and newer adds support for a new
device type, the management processor. All Remote Insight LightsOut Edition boards installed on the network are discovered in
Compaq Insight Manager XE as management processors.
GGrouping
of Remote Insight Lights-Out Edition boards
All Remote Insight Lights-Out Edition boards can be grouped
together logically and displayed on one page. This capability
provides access to multiple Remote Insight Lights-Out Edition
boards from one point in Compaq Insight Manager XE 2.0 and
newer.
GApplication
launch task
In Compaq Insight Manager XE 2.0 and newer, an application
launch task can be set up to start the Group Administration Utility on
all the Remote Insight Lights-Out Edition boards listed on the device
query page. The application launch can be executed on demand or
scheduled to run automatically at a certain date and time.
■
Dedicated LAN network connectivity
A 10/100MB Intel Ethernet chip on the Remote Insight Lights-Out
Edition board provides administrators with a dedicated network
connection to the Remote Insight Lights-Out Edition board. The board
provides in-band SNMP notification of server problems on a real-time
basis without separate telephone connections or modem sharing devices.
The NIC can autoselect speeds between 10 MB and 100 MB.
■
Dial-up support
The Remote Insight Lights-Out Edition supports dial-up access when
using a modem router or external Remote Access Service (RAS)
connection to log on to the network.
■
Browser accessibility
The Remote Insight Lights-Out Edition board is fully accessible by
means of Microsoft Internet Explorer 4.01 or later, Netscape
Communicator 4.08 or later, or any other Java 1.1 or later compliant
browser software. This capability allows easy access to the features of
the Remote Insight Lights-Out Edition board, giving administrators full
control of the remote host server’s display, keyboard, and mouse,
regardless of the state of the host server or operating system. Using a
familiar Web browser interface, administrators can easily perform all
remote management tasks.
Compaq Confidential – Need to Know Required
Writer: James Parish Project: Compaq Remote Insight Lights-Out Edition User Guide Comments:
Part Number: 159206-005 File Name: b-ch1 Introducing the Remote Insight Lights-Out Edition.doc Last Saved On: 7/12/01 8:20 AM
Features of the Remote Insight Lights-Out Edition 1-5
■
Reset and failure sequence replay
Video text sequences stored on the Remote Insight Lights-Out Edition
board allow an administrator to replay server startup and shutdown
sequences. You can view the last two server resets and the last server
failure. These sequences include all system and operating system error
messages and fatal error screens such as Novell NetWare Abnormal End
(Abend) screens and Microsoft Windows NT blue screens.
■
SNMP alerts from the Remote Insight Lights-Out Edition to a
management console
Using a management console you can access certain server alerts, such
as SNMP alerts and unauthorized access alerts, through the Remote
Insight Lights-Out Edition board.
■
User administration and security
The Remote Insight Lights-Out Edition supports up to 12 users with
customizable access rights, login names, client IP address restrictions
and advanced password encryption. A user can have supervisor status
with the ability to create, modify, or delete other users. Users with status
other than supervisor can be denied access to the Remote Insight LightsOut Edition login, to the server’s Remote Console, and to the remote
reboot features of the Remote Insight Lights-Out Edition board.
The Remote Insight Lights-Out Edition board provides secure password
encryption, tracking all login attempts and maintaining a record of all
login failures. When login attempts fail, the board also generates alerts
and sends them to a remote management console. The Remote Insight
Lights-Out Edition also provides the following security features:
GOptional
GUser
lockout capability for remote console port
actions logged in Remote Insight Event Log
GProgressive
GLogin
delays for failed login attempts
legal warning
G128-bit
encryption
The Remote Insight Lights-Out Edition board provides strong
security for remote management in distributed IT environments by
using industry-standard Secure Sockets Layer (SSL) encryption of
HTTP data transmitted across the network. SSL encryption (up to
128-bits) ensures that the HTTP information is secure as it travels
across the network.
Compaq Confidential – Need to Know Required
Writer: James Parish Project: Compaq Remote Insight Lights-Out Edition User Guide Comments:
Part Number: 159206-005 File Name: b-ch1 Introducing the Remote Insight Lights-Out Edition.doc Last Saved On: 7/12/01 8:20 AM
1-6
Compaq Remote Insight Lights-Out Edition User Guide
SSL is a network protocol layer, located directly under the
application layer, with responsibility for the management of a secure
(encrypted) communication channel between the client and server.
NOTE: The Remote Insight Lights-Out Edition board is shipped with 40-bit encryption.
The 128-bit encryption can be downloaded from the Compaq website at
www.compaq.com/lights-out
■
External power
An external power connector provides continuous power to the Remote
Insight Lights-Out Edition board, allowing continuous access to the
remote host server, even when there is a remote server power failure or
the server has been turned off.
■
Auto configuration of IP address by means of DNS/DHCP
The Remote Insight Lights-Out Edition board provides automatic
network configuration and can be used straight out of the box. The
board comes with a default name and Dynamic Host Configuration
Protocol (DHCP) client that leases an IP address from the DHCP server
on the network. For systems that do not use Domain Name Service
(DNS)/DHCP, the Remote Insight Lights-Out Edition board allows
static IP configuration.
The default user name, password, and DNS name are:
GUser
name: Administrator
GPassword:
The last four digits of the serial number
GDNS
name: RIBXXXXXXXXXXXX where the 12 Xs are the
Medium Access Control (MAC) address of the Remote Insight
Lights-Out Edition board
IMPORTANT: User names and passwords are case sensitive.
■
Compaq SmartStart™
The Remote Insight Lights-Out Edition board is fully configurable
through the Compaq SmartStart interview process.
■
Survey
Using Survey Utility, you can access the Compaq survey configuration
file, which provides the latest server configuration information to assist
in the diagnostic process. Survey is supported on Windows NT,
Windows 2000, and NetWare.
Compaq Confidential – Need to Know Required
Writer: James Parish Project: Compaq Remote Insight Lights-Out Edition User Guide Comments:
Part Number: 159206-005 File Name: b-ch1 Introducing the Remote Insight Lights-Out Edition.doc Last Saved On: 7/12/01 8:20 AM
Features of the Remote Insight Lights-Out Edition 1-7
■
Integrated Management Log
The Remote Insight Lights-Out Edition maintains a copy of the server’s
Integrated Management log that can be accessed using a standard
browser, even when the server is not operational. This capability can be
helpful when troubleshooting remote host server problems.
■
ROM-Based Configuration Utility F8
This versatile, system-independent ROM-Based Configuration Utility
enables fast and easy setup of the Remote Insight Lights-Out Edition
board.
■
Single mouse cursor mode
The Remote Insight Lights-Out Edition can be set to use single cursor
mode in remote console. It (requires Java 1.3.0_01 VM).
■
Enabled Pocket PC Access
Firmware version 2.31 and newer provides a preview of Remote Insight
Lights-Out Edition board support for wireless and dial-up access from
the Compaq iPAQ™ H3600 Series Pocket PC handheld devices. The
Remote Insight Lights-Out Edition board provides a special user
interface when connecting from the Compaq iPAQ Pocket PC.
NOTE: The Pocket PC access is a technology preview enhancement only. Compaq
Technical Phone Support Center can only verify whether the devise is configured
correctly.
■
Group Administration
Compaq Remote Insight Configuration Language can be used for
writing group administration procedural scripts for the Compaq Remote
Insight Lights-Out Edition. Remote Insight Configuration Language
uses Extensible Markup Language (XML). Detailed instructions and a
sample file on how to write a user configuration script are available in
this user guide. Group administration for the Remote Insight Lights-Out
Edition board can be done independently of Compaq Insight Manager
XE by using batch processing.
Compaq Confidential – Need to Know Required
Writer: James Parish Project: Compaq Remote Insight Lights-Out Edition User Guide Comments:
Part Number: 159206-005 File Name: b-ch1 Introducing the Remote Insight Lights-Out Edition.doc Last Saved On: 7/12/01 8:20 AM
1-8
Compaq Remote Insight Lights-Out Edition User Guide
Supported Hardware and Software
You can use the Remote Insight Lights-Out Edition board in the following
Compaq PCI-based servers:
■
Compaq ProLiant servers
■
Compaq Prosignia™ servers
You can use the Remote Insight Lights-Out Edition board with the following
network operating systems:
■
■
Microsoft
GWindows
NT 4.0 Server
GWindows
NT 4.0, Enterprise Edition
GWindows
2000 Server
GWindows
2000 Advanced Server
GWindows
2000 Datacenter (certified versions only)
Novell
GNetWare
5.1
GNetWare
4.20
GNovell
intraNetWare for Small Business
■
OS/2 Warp Server 4.0
■
SCO
■
GOpenServer
5.0.4
GOpenServer
5.0.5
GUnixWare
7.0.1
GUnixWare
7.1.0
Linux
GRed
Hat 6.2
GRed
Hat 7.0
Compaq Confidential – Need to Know Required
Writer: James Parish Project: Compaq Remote Insight Lights-Out Edition User Guide Comments:
Part Number: 159206-005 File Name: b-ch1 Introducing the Remote Insight Lights-Out Edition.doc Last Saved On: 7/12/01 8:20 AM
Features of the Remote Insight Lights-Out Edition 1-9
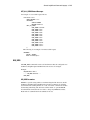
Remote Insight Lights-Out Edition Kit
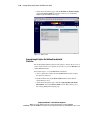
Contents
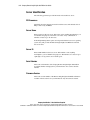
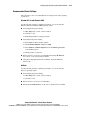
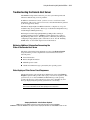
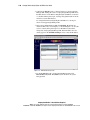
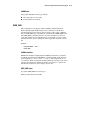
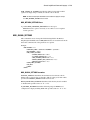
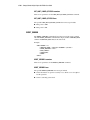
The Remote Insight Lights-Out Edition kit contains the items shown
in Figure 1-1.
3
1
10
2
9
4
5
7
8
6
Figure 1-1. Contents of the Remote Insight Lights-Out Edition kit
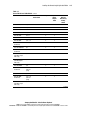
Table 1-1
Contents of the Remote Insight Lights-Out Edition Kit
Item Number
Item
Power cord
Remote Insight LightsOut Edition board
Keyboard/mouse
adapter cable
PCI extender bracket
Virtual power button
cable (4 pin)
Item Number
Item
Network settings tag
Internal virtual power
button, keyboard,
mouse, and power cable
(16 pin)
AC power adapter
Virtual power button
cable (for ProLiant
1850R and ProLiant
8000 servers)
System documentation
and support software
CDs
Compaq Confidential – Need to Know Required
Writer: James Parish Project: Compaq Remote Insight Lights-Out Edition User Guide Comments:
Part Number: 159206-005 File Name: b-ch1 Introducing the Remote Insight Lights-Out Edition.doc Last Saved On: 7/12/01 8:20 AM
1-10
Compaq Remote Insight Lights-Out Edition User Guide
Operation Overview
During normal operation, the Remote Insight Lights-Out Edition board passes
the keyboard and mouse signals to the server and functions as the server’s
primary video controller. This configuration allows the following operations to
occur:
■
Transparently substitute a remote keyboard and mouse for the server’s
keyboard and mouse
■
Save video captures in the Remote Insight Lights-Out Edition board
memory for later replay
■
Simultaneously send video to the server’s monitor and to a Remote
Console monitor
Compaq Confidential – Need to Know Required
Writer: James Parish Project: Compaq Remote Insight Lights-Out Edition User Guide Comments:
Part Number: 159206-005 File Name: b-ch1 Introducing the Remote Insight Lights-Out Edition.doc Last Saved On: 7/12/01 8:20 AM
Features of the Remote Insight Lights-Out Edition 1-11
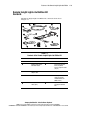
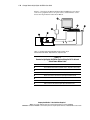
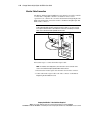
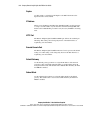
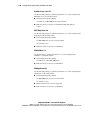
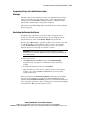
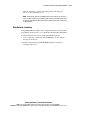
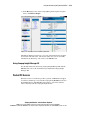
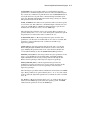
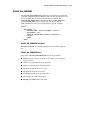
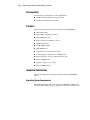
Figure 1-2 shows how the Remote Insight Lights-Out Edition board connects
to the server, peripheral devices, the power source, and the local area network
(LAN) for servers that use the keyboard/mouse adapter cable.
3
4
2
1
6
LAN
Figure 1-2. Remote Insight Lights-Out Edition system using the
keyboard/mouse adapter cable
Table 1-2
Remote Insight Lights-Out Edition System Using the Keyboard/Mouse
Cable
Item Number
Item
Remote Insight Lights-Out Edition board installed in a server
AC adapter connected to the Remote Insight Lights-Out Edition board
Monitor connected to the Remote Insight Lights-Out Edition board
Keyboard connected to the Remote Insight Lights-Out Edition board
Mouse connected to the Remote Insight Lights-Out Edition board
LAN connected to the Remote Insight Lights-Out Edition board
Compaq Confidential – Need to Know Required
Writer: James Parish Project: Compaq Remote Insight Lights-Out Edition User Guide Comments:
Part Number: 159206-005 File Name: b-ch1 Introducing the Remote Insight Lights-Out Edition.doc Last Saved On: 7/12/01 8:20 AM
5
1-12
Compaq Remote Insight Lights-Out Edition User Guide
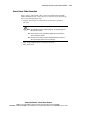
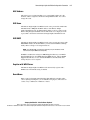
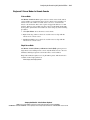
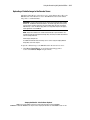
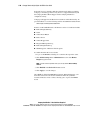
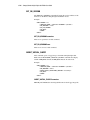
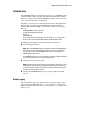
Figure 1-3 shows how the Remote Insight Lights-Out Edition board connects
to the server, peripheral devices, the power source, and the LAN for servers
that use the 16-pin internal Virtual Power Button.
4
5
3
2
1
7
LAN
Figure 1-3. Remote Insight Lights-Out Edition system using the 16 pin
internal Virtual Power Button, keyboard/mouse, and power cable
Table 1-3
Remote Insight Lights-Out Edition System Using the 16 Pin Internal
Virtual Power Button Cable
Item Number
Item
Internal Virtual Power Button, keyboard, mouse, and power cable (16 pin)
Remote Insight Lights-Out Edition board installed in a server
AC adapter connected to the Remote Insight Lights-Out Edition board
Monitor connected to the Remote Insight Lights-Out Edition board
Keyboard connected to the Remote Insight Lights-Out Edition board
Mouse connected to the Remote Insight Lights-Out Edition board
LAN connected to the Remote Insight Lights-Out Edition board
Compaq Confidential – Need to Know Required
Writer: James Parish Project: Compaq Remote Insight Lights-Out Edition User Guide Comments:
Part Number: 159206-005 File Name: b-ch1 Introducing the Remote Insight Lights-Out Edition.doc Last Saved On: 7/12/01 8:20 AM
6
Chapter
2
Installing the Remote Insight
Lights-Out Edition
The following sections guide you through the process of installing a Remote
Insight Lights-Out Edition board in your server:
■
Preparing the Remote Insight Lights-Out Edition board
■
Disassembling the Server
■
Determining an Available Slot
■
Installing the Remote Insight Lights-Out Edition Board in the Server
■
Installing the Virtual Power Button Cable
■
Reassembling the Server
■
Connecting External Cables to the Remote Insight Lights-Out
Edition Board
WARNING: Some Compaq ProLiant servers are capable of producing energy
levels that are considered hazardous. Do not remove enclosures or bypass the
interlocks provided to protect against these hazardous conditions. Installation of
accessories and options in areas other than front hot-plug bays should be
performed by individuals who are both qualified in the servicing of computer
equipment and trained in the hazards associated with products capable of
producing hazardous energy levels. Refer to the documentation provided with
the server for additional information on installing options in the server.
Compaq Confidential – Need to Know Required
Writer: James Parish Project: Compaq Remote Insight Lights-Out Edition User Guide Comments:
Part Number: 159206-005 File Name: c-ch2 Installing the Remote Insight Lights-Out Edition.doc Last Saved On: 7/12/01 8:22 AM
2-2
Compaq Remote Insight Lights-Out Edition User Guide
Preparing the Remote Insight Lights-Out
Edition Board
Before installing the Remote Insight Lights-Out Edition board, ensure that you
have the documentation provided with your server, the correct parts needed to
install the board, and the correct cables for your server.
IMPORTANT: Before you install the Remote Insight Lights-Out Edition board, remove the
Network settings tag from the board and set it aside. You will use the information on this
tag during configuration of the board.
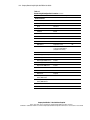
Installing the PCI Extender Bracket
If you are installing the Remote Insight Lights-Out Edition board in a shared
EISA/PCI slot, attach the PCI extender bracket to the board before installing
the board in the server. This bracket is not needed when installing the board in
PCI-only slots.
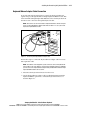
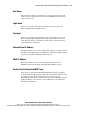
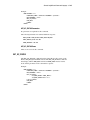
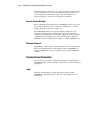
CAUTION: The screws shown in Figure 2-1 are self-tapping and some amount
of force is required for installation. Caution is required to prevent damage to the
Remote Insight Lights-Out Edition board.
Figure 2-1. Installing the PCI board extender bracket
To install the PCI board extender bracket:
1. Hold the board so the side connector bracket is to your left and the
board edge connector is down, as shown in Figure 2-1.
Compaq Confidential – Need to Know Required
Writer: James Parish Project: Compaq Remote Insight Lights-Out Edition User Guide Comments:
Part Number: 159206-005 File Name: c-ch2 Installing the Remote Insight Lights-Out Edition.doc Last Saved On: 7/12/01 8:22 AM
Installing the Remote Insight Lights-Out Edition
2. Align the extender so that the screw holes line up with the holes at the
right edge of the board. The extender should extend out past the right
edge of the board. Insert the screws from the bottom side of the board
and tighten.
Disassembling the Server
Follow the directions in your server documentation for disassembling the
server to install an option board.
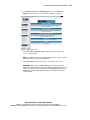
Determining an Available Slot
Before installing the Remote Insight Lights-Out Edition board, refer to
Table 2-1 to select an unused PCI slot, the cables used, and the video switch
settings for your server. If your server is not listed in Table 2-1, an updated
version of this table is available on the Compaq website:
www.compaq.com/lights-out
Your server should have the latest system ROM revision that is available for
your server. For instructions on updating the system ROM of your server,
refer to your server’s documentation and to the instructions on using the
Virtual Floppy Drive of the Remote Insight Lights-Out Edition in Chapter 4.
To download the latest ROMPaq upgrade for your server, go to the Compaq
website:
www.compaq.com/support/files
Table 2-1
Server PCI Slot and Cable Matrix
Servers
PCI Slot
Virtual Power
Button Cable
AC Adapter
Keyboard
Mouse
Adapter
Cable
Prosignia 200
any PCI
Y
Y
Prosignia 300
any PCI
Y
Y
Prosignia 500
any PCI
Y
Y
Prosignia 720
any PCI
Y
Y
Disable
Onboard
Video Using
the Dip
Switch
Y
continued
Compaq Confidential – Need to Know Required
Writer: James Parish Project: Compaq Remote Insight Lights-Out Edition User Guide Comments:
Part Number: 159206-005 File Name: c-ch2 Installing the Remote Insight Lights-Out Edition.doc Last Saved On: 7/12/01 8:22 AM
2-3
2-4
Compaq Remote Insight Lights-Out Edition User Guide
Table 2-1
Server PCI Slot and Cable Matrix continued
Servers
PCI Slot
Virtual Power
Button Cable
AC Adapter
Keyboard
Mouse
Adapter
Cable
Y
Y
Disable
Onboard
Video Using
the Dip
Switch
Prosignia 740
any PCI
ProLiant CL380
1
A
Y
Y
ProLiant CL1850
any PCI
E
Y
Y
ProLiant DL320
2
B
N
N
ProLiant DL360
1
C
N
N
ProLiant DL380
1
A
Y
Y
ProLiant DL380 G2
1
F
N
N
ProLiant DL580
6
A
Y
Y
ProLiant DL760
9
D
Y
N
ProLiant ML330
4
B
Y
N
Y
ProLiant ML350
4
A
Y
Y
Y
ProLiant ML350,
1GHz
4
A
N
Y
Y
ProLiant ML370
1, 2
A
Y
Y
ProLiant ML370 G2
6
B
N
N
ProLiant ML530
1
A
Y
Y
ProLiant ML570
6
A
Y
Y
ProLiant ML750
1, 2, 3, 4
E
Y
Y
ProLiant 400
any PCI
Y
Y
ProLiant 800
any PCI
Y
Y
ProLiant 800 350e,
400, 450
1, 2
Y
Y
ProLiant 800
6/350e, 6/400
1, 2
Y
Y
ProLiant 850R
any PCI
Y
Y
ProLiant 1200
4, 5, 6
Y
Y
Y
continued
Compaq Confidential – Need to Know Required
Writer: James Parish Project: Compaq Remote Insight Lights-Out Edition User Guide Comments:
Part Number: 159206-005 File Name: c-ch2 Installing the Remote Insight Lights-Out Edition.doc Last Saved On: 7/12/01 8:22 AM
Installing the Remote Insight Lights-Out Edition
Table 2-1
Server PCI Slot and Cable Matrix continued
Servers
PCI Slot
Virtual Power
Button Cable
AC Adapter
Keyboard
Mouse
Adapter
Cable
ProLiant 1500
any PCI
Y
Y
ProLiant 1500R
any PCI
Y
Y
ProLiant 1600
4, 5, 6
Y
Y
ProLiant 1850R
any PCI
Y
Y
ProLiant 2500
4, 5, 6
Y
Y
ProLiant 3000
1, 2, 3, 4
Y
Y
ProLiant 5000
5, 6, 7, 8
Y
Y
ProLiant 5500
Pentium Pro
1, 2, 3, 4
Y
Y
ProLiant 5500 Xeon
6, 7
Y
Y
ProLiant 6000
Pentium Pro
3, 4, 5, 6
Y
Y
ProLiant 6000 Xeon
(with Cirrus Logic
video chip)
3, 4
Y
Y
ProLiant 6000 Xeon
(with ATI Rage IIc
video chip)
3, 4
Y
Y
ProLiant 6400R
5, 6
Y
Y
ProLiant 6500
Pentium Pro
1, 2
(non-hot
-plug)
Y
Y
ProLiant 6500 Xeon
5, 6
Y
Y
ProLiant 7000
Pentium Pro
3, 4, 5, 6
(non-hot
-plug)
Y
Y
ProLiant 7000 Xeon
(with Cirrus Logic
video chip)
3, 4
Y
Y
E
Disable
Onboard
Video Using
the Dip
Switch
continued
Compaq Confidential – Need to Know Required
Writer: James Parish Project: Compaq Remote Insight Lights-Out Edition User Guide Comments:
Part Number: 159206-005 File Name: c-ch2 Installing the Remote Insight Lights-Out Edition.doc Last Saved On: 7/12/01 8:22 AM
2-5
2-6
Compaq Remote Insight Lights-Out Edition User Guide
Table 2-1
Server PCI Slot and Cable Matrix continued
Servers
PCI Slot
Virtual Power
Button Cable
AC Adapter
Keyboard
Mouse
Adapter
Cable
Y
Y
ProLiant 7000 Xeon
(with ATI Rage IIc
video chip)
1, 2
ProLiant 8000 Xeon
1, 2, 3, 4
E
Y
Y
ProLiant 8500 Xeon
(servers shipped
with 550 MHz
processors with
configuration codes
CL61, CL64, BX71,
or BX72)
7, 8, 9
D
Y
Y
ProLiant 8500 Xeon
(server shipped
with 700 MHz and
higher processors)
7, 8, 9
A
Y
Y
Disable
Onboard
Video Using
the Dip
Switch
Note: Virtual power button cables description and part numbers
A = P/N 160011-001 (4-pin cable) ships with RILOE kit.
B = P/N 177634-001 (16-pin cable) ships with the RILOE kit.
C = P/N 177634-002 (16-pin cable) ships with ProLiant DL 360 servers.
D = P/N 195254-B21 (4-pin cable) available as a spare kit P/N 195724-001.
E = P/N 162816-001 (split 4-pin cable) ships with the RILOE kit.
F = P/N 233763-001 (split 16 to 30-pin cable) ships with the DL380 G2 server.
Installing the Remote Insight Lights-Out
Edition Board in the Server
CAUTION: Electrostatic discharge (ESD) can damage electronic components. Be
sure you are properly grounded before beginning this procedure. See Appendix
B for ESD information.
Compaq Confidential – Need to Know Required
Writer: James Parish Project: Compaq Remote Insight Lights-Out Edition User Guide Comments:
Part Number: 159206-005 File Name: c-ch2 Installing the Remote Insight Lights-Out Edition.doc Last Saved On: 7/12/01 8:22 AM
Installing the Remote Insight Lights-Out Edition
Follow these steps to install the Remote Insight Lights-Out Edition board in
the server:
1. Refer to Table 2-1 and select an available supported slot.
2. Loosen the retaining screw and remove the slot cover. If the Remote
Insight Lights-Out Edition board is being installed into a hot-plug slot,
release the slot lever and then remove the slot cover.
3. Press the Remote Insight Lights-Out Edition board firmly into the slot.
4. Secure the board in place with the retaining screw, or close the hot-plug
slot lever, as appropriate.
5. Some Compaq servers, such as the Prosignia 200 and the ProLiant 800,
contain PCI-based VGA controllers. These controllers must be removed
to configure the VGA controller on the Remote Insight Lights-Out
Edition board.
Some servers may require the onboard video to be disabled. See
Table 2-1 for details on your server.
IMPORTANT: The ProLiant ML330 server requires the special 16-pin internal Virtual
Power Button cable, and power adapter included in the Remote Insight Lights-Out Edition
kit. This cable connects the Remote Insight Lights-Out Edition board to the ML330 system
board by means of a 16-pin connector located on the rear of the Remote Insight
Lights-Out Edition next to the PCI extender bracket. Refer to the documentation provided
with your server for more information.
Installing the Virtual Power Button Cable
The Virtual Power Button feature is available for the Compaq ProLiant CL,
DL, ML, 1850R, 8000, 8500 servers, and future Compaq ProLiant servers. To
use the Virtual Power Button feature, a Virtual Power Button cable must be
installed.
Installing Virtual Power Button Cable
P/N 162816-001
For the Compaq ProLiant servers that do not have a four-pin connector on the
system board, use a retrofit cable, Compaq part number 162816-001. The
retrofit cable has a four-pin connector on one end, two wires connecting the
two ends, and four connectors (two male and two female) on the other end.
NOTE: For a list of servers that use this cable see Table 2-1.
Compaq Confidential – Need to Know Required
Writer: James Parish Project: Compaq Remote Insight Lights-Out Edition User Guide Comments:
Part Number: 159206-005 File Name: c-ch2 Installing the Remote Insight Lights-Out Edition.doc Last Saved On: 7/12/01 8:22 AM
2-7
2-8
Compaq Remote Insight Lights-Out Edition User Guide
To install the Virtual Power Button cable:
1. Power down your server and disconnect all power cords to remove the
power from the server.
2. Connect the four-pin connector on the Virtual Power Button cable to the
Virtual Power Button cable connector on the Remote Insight Lights-Out
Edition board. This four-pin connector is located on the rear of the
Remote Insight Lights-Out Edition board next to the PCI extender
bracket.
3. Disconnect the two cables that plug into the momentary power
pushbutton switch on the server.
4. Connect two connectors from the Virtual Power Button cable to the
momentary power pushbutton switch on the server.
NOTE: The orientation of the two power connectors does not matter.
5. Connect the server momentary power pushbutton switch cables to the
two remaining connectors on the virtual power switch cable.
NOTE: For detailed instructions on the location of the momentary power pushbutton
switch on the server, refer to the documentation provided with your server.
Installing Virtual Power Button Cable
P/N 160011-001
For Compaq servers that use a four-pin connector on the server system board
use the cable (Compaq part number 160011-001) to enable the Virtual Power
Button feature of the Remote Lights-Out Edition board. This cable has a keyed
four-pin connector on both ends.
NOTE: For a list of servers that use this cable see Table 2-1.
To install the Virtual Power Button cable:
1. Power down your server and disconnect all power cords to remove the
power from the server.
2. Connect the four-pin connector on the cable to the Virtual Power Button
cable connector on the Remote Insight Lights-Out Edition board. This is
a four-pin connector located on the rear of the Remote Insight
Lights-Out Edition board next to the PCI extender bracket.
Compaq Confidential – Need to Know Required
Writer: James Parish Project: Compaq Remote Insight Lights-Out Edition User Guide Comments:
Part Number: 159206-005 File Name: c-ch2 Installing the Remote Insight Lights-Out Edition.doc Last Saved On: 7/12/01 8:22 AM
Installing the Remote Insight Lights-Out Edition
3. Connect the four-pin connector on the other end of the cable into the
four-pin connector on the server system board.
NOTE: For detailed instructions on the location of the four-pin connector on the server
system board, refer to the documentation provided with your server.
Installing Virtual Power Button Cable
P/N 177634-001
For Compaq servers that use a 16-pin cable on the server system board, use the
cable (Compaq part number 177634-001) enable the Virtual Power Button
feature of the Remote Lights-Out Edition board.
NOTE: For a list of servers that use this cable see Table 2-1.
To install the Virtual Power Button cable:
1. Power down your server and disconnect all power cords to remove the
power from the server.
2. Connect the 16-pin connector on the cable to the 16-pin Virtual Power
Button cable connector on the Remote Insight Lights-out Edition board.
This is located on the edge of the board.
3. Connect the 16-pin connector on the other end of the cable to the 16-pin
header on the server system board.
NOTE: For detailed instructions on the location of the 16-pin connector on the server
system board, refer to the documentation provided with your server.
Reassembling the Server
Follow the directions in your server documentation to reassemble the server.
Compaq Confidential – Need to Know Required
Writer: James Parish Project: Compaq Remote Insight Lights-Out Edition User Guide Comments:
Part Number: 159206-005 File Name: c-ch2 Installing the Remote Insight Lights-Out Edition.doc Last Saved On: 7/12/01 8:22 AM
2-9
2-10
Compaq Remote Insight Lights-Out Edition User Guide
Connecting External Cables to the
Remote Insight Lights-Out Edition Board
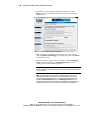
After you have installed the Compaq Remote Insight Lights-Out Edition board
in your server, you must make external cable connections. The connectors on
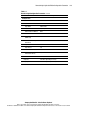
the Remote Insight Lights-Out Edition board are shown in Figure 2-2.
1
2
3
4
Figure 2-2. Remote Insight Lights-Out Edition connectors
Table 2-2
Remote Insight Lights-Out Edition Connectors
Item
Connector
AC adapter connector
Video connector
Keyboard/mouse connector
LAN connector
Compaq Confidential – Need to Know Required
Writer: James Parish Project: Compaq Remote Insight Lights-Out Edition User Guide Comments:
Part Number: 159206-005 File Name: c-ch2 Installing the Remote Insight Lights-Out Edition.doc Last Saved On: 7/12/01 8:22 AM
Installing the Remote Insight Lights-Out Edition
Keyboard/Mouse Adapter Cable Connection
To provide remote keyboard and mouse control, the keyboard and mouse
signals must pass through the Remote Insight Lights-Out Edition board. This
allows the Remote Insight Lights-Out Edition board to send keystrokes from
the remote user to the server through the keyboard cable.
NOTE: Some servers use an internal cable for keyboard and mouse and do not require
you to use the keyboard/mouse adapter cable. Refer to Table 2-1 to see if your server
requires the keyboard/mouse cable.
Figure 2-3. Connecting the keyboard/mouse adapter cable
Follow these steps to connect the keyboard/mouse adapter cable for servers
that require this cable:
NOTE: For headless server deployment, you do not have to connect the keyboard and
mouse cables to the server. However, to have remote keyboard and mouse capabilities,
you must connect the keyboard/mouse adapter cable provided with the Remote Insight
Lights-Out Edition board to the host server.
1. Disconnect the keyboard and mouse from the server.
2. Use the keyboard/mouse adapter cable provided in the Remote Insight
Lights-Out Edition option kit to connect the keyboard and mouse, as
shown in Figure 2-3.
Compaq Confidential – Need to Know Required
Writer: James Parish Project: Compaq Remote Insight Lights-Out Edition User Guide Comments:
Part Number: 159206-005 File Name: c-ch2 Installing the Remote Insight Lights-Out Edition.doc Last Saved On: 7/12/01 8:22 AM
2-11
2-12
Compaq Remote Insight Lights-Out Edition User Guide
Monitor Cable Connection
The Remote Insight Lights-Out Edition board contains its own VGA controller
to ensure that a compatible controller is available for remote console
operation. To use a monitor in a server that has the Remote Insight Lights-Out
Edition board installed, connect the monitor to the Remote Insight Lights-Out
Edition video connector.
IMPORTANT: Some servers require the onboard video to be disabled for the Remote
Insight Lights-Out Edition board to work properly. Refer to Table 2-1 for a list of servers
that require the Onboard video to be disabled. For instructions on disabling the onboard
video, refer to the documentation provided with the server.
Figure 2-4. Connecting the monitor cable
Follow these steps to connect the monitor signal cable:
NOTE: For headless server deployment, you do not have to connect a monitor to the
server or to the Remote Insight Lights-Out Edition video connector.
1. Disconnect the monitor signal cable from the server monitor connector.
2. Connect the monitor signal cable to the video connector on the Remote
Insight Lights-Out Edition board.
Compaq Confidential – Need to Know Required
Writer: James Parish Project: Compaq Remote Insight Lights-Out Edition User Guide Comments:
Part Number: 159206-005 File Name: c-ch2 Installing the Remote Insight Lights-Out Edition.doc Last Saved On: 7/12/01 8:22 AM
Installing the Remote Insight Lights-Out Edition
LAN Cable Connection
To access the Remote Insight Lights-Out Edition board using TCP/IP across a
10-MB or 100-MB Ethernet network, connect the LAN cable from the LAN
connector on the Remote Insight Lights-Out Edition board to the LAN jack of
a network hub or network switch.
Figure 2-5. Connecting the LAN cable
The two LED indicators located adjacent to the RJ-45 connector on the
Remote Insight Lights-Out Edition board indicate network connectivity while
the server is on.
The green LED indicator is lit when a link is present from the Ethernet hub,
and the LED indicator blinks to indicate network traffic.
The amber LED indicator is lit to indicate a 100-MB network connection. If
the LED is not lit, the board is connected at 10-MB.
Compaq Confidential – Need to Know Required
Writer: James Parish Project: Compaq Remote Insight Lights-Out Edition User Guide Comments:
Part Number: 159206-005 File Name: c-ch2 Installing the Remote Insight Lights-Out Edition.doc Last Saved On: 7/12/01 8:22 AM
2-13
2-14
Compaq Remote Insight Lights-Out Edition User Guide
AC Power Adapter Connection
The Remote Insight Lights-Out Edition board is equipped with an external
power supply to allow for independent operation from the server. With the AC
power adapter connected you can access alerts from the server indicating
server power supply problems, the power state of the server, and temperature
alerts that may have turned the server off. To increase server manageability,
Compaq recommends connecting the AC power adapter to a separate power
circuit than the server. Connect the AC power adapter cable as shown in
Figure 2-6.
IMPORTANT: The AC power adapter cable is not necessary if you are installing the
Remote Insight Lights-Out Edition board in a Compaq ProLiant CL, DL, and ML server that
uses the 16-pin Virtual Power Button cable. This cable connects the Remote Insight
Lights-Out Edition board to the server system board, enabling auxiliary power, remote
keyboard and mouse control, and the Virtual Power Button feature of the Remote Insight
Lights-Out Edition board. For additional information on installing the Remote Insight
Lights-Out Edition board in a Compaq ProLiant CL, DL, and ML server, refer to the
documentation provided with your server.
IMPORTANT: The Compaq ProLiant ML330 server requires the installation of the power
adapter, included in the Remote Insight Lights-Out Edition kit. For detailed information
refer to the documentation provided with your server.
NOTE: The Remote Insight Lights-Out Edition board will work without the AC power
adapter connected when the server is on. The AC power adapter is a feature intended to
provide power to the Remote Insight Lights-Out Edition board if the server loses power. If
you do not use the AC power adapter and the server loses power, then you will not be
able to access the Remote Insight Lights-Out Edition board from a remote console.
Figure 2-6. Connecting the AC power adapter cable
Compaq Confidential – Need to Know Required
Writer: James Parish Project: Compaq Remote Insight Lights-Out Edition User Guide Comments:
Part Number: 159206-005 File Name: c-ch2 Installing the Remote Insight Lights-Out Edition.doc Last Saved On: 7/12/01 8:22 AM
Installing the Remote Insight Lights-Out Edition
Server Power Cable Connection
After you have connected the cables you will use with the Remote Insight
Lights-Out Edition board, connect the power cord to the server and power up
the server by following these steps:
1. Plug the AC main power cord into the server, then into a grounded
AC outlet.
WARNING: To reduce the risk of electric shock or damage to the equipment:
■
Do not disable the power cord grounding plug. The grounding plug is an
important safety feature.
■
Plug the power cord into a grounded (earthed) electrical outlet that is
easily accessible at all times.
■
Disconnect power from the server by unplugging the power cord from
either the electrical outlet or the server’s AC input.
2. Turn on any peripheral devices attached to the server.
3. Turn on the server.
Compaq Confidential – Need to Know Required
Writer: James Parish Project: Compaq Remote Insight Lights-Out Edition User Guide Comments:
Part Number: 159206-005 File Name: c-ch2 Installing the Remote Insight Lights-Out Edition.doc Last Saved On: 7/12/01 8:22 AM
2-15
Chapter
3
Remote Insight Lights-Out Edition
Configuration Parameters
This chapter describes the Remote Insight Lights-Out Edition configuration
parameters. Each of the parameters discussed in this chapter is listed in Table
3-1. You can record your settings in the “Your Value” column of the table.
Table 3-1
Remote Insight Configuration Parameters
Parameters
Default Value or Setting
Your Value
Server Identification
PCI Resources
IRQ5 (set by the BIOS)
Server Name
Server ID
Serial Number
xxxxxx-xxx
NA
Firmware Version
xx.xx
NA
Firmware Date
mm/dd/yyyy
NA
continued
Compaq Confidential – Need to Know Required
Writer: James Parish Project: Compaq Remote Insight Lights-Out Edition User Guide Comments:
Part Number: 159206-005 File Name: d-ch3 Remote Insight Lights-Out Edition Configuration Parameters.doc Last Saved On: 7/12/01 8:24 AM
3-2
Compaq Remote Insight Lights-Out Edition User Guide
Table 3-1
Remote Insight Configuration Parameters continued
Parameters
Default Value or Setting
Your Value
Network Interface
Status
Enabled
Transceiver Speed Autoselect
Enabled
Speed
Autoselect
Duplex
Autoselect
IP Address
0.0.0.0
HTTP Port
80
Remote Console Port
23
Default Gateway
0.0.0.0
Subnet Mask
255.255.255.0
MAC Address
Assigned at factory
DNS Name
RIBXXXXXXXXXXXX, where the
12 Xs are the MAC address
(assigned at the factory)
DNS/DHCP
Enabled
DHCP Supplied Gateway
Enabled
DHCP Supplied DNS Servers
Enabled
DHCP Supplied WINS Servers
Enabled
DHCP Supplied Static Routes
Enabled
Register with WINS Server
Enabled
NA
Board Name
Domain Name
DHCP Server
Assigned
Primary, Secondary, and
Tertiary DNS Servers
0.0.0.0
Primary, Secondary, and
Tertiary WINS Servers
0.0.0.0
Static Routes #1, #2, #3
0.0.0.0, 0.0.0.0
IP Address for Web Agents
continued
Compaq Confidential – Need to Know Required
Writer: James Parish Project: Compaq Remote Insight Lights-Out Edition User Guide Comments:
Part Number: 159206-005 File Name: d-ch3 Remote Insight Lights-Out Edition Configuration Parameters.doc Last Saved On: 7/12/01 8:24 AM
Remote Insight Lights-Out Edition Configuration Parameters
3-3
Table 3-1
Remote Insight Configuration Parameters continued
Parameters
Default Value or Setting
Your Value
Configure Users
User 1
User Name
Login Name
Administrator
Password
Last 4 digits of the serial number
Enforced Client IP Address
None
SNMP IP Address
Receive Host OS Generated
SNMP Traps
No
Receive Remote Insight
Board Alerts
No
Supervisor Access
No
Login Access
Yes
Remote Console Access
Yes
Remote Server Reset and
Power Button Access
Yes
Other Parameters
Keyboard
Selectable depending on country
Language
Selectable depending on country
Compaq Confidential – Need to Know Required
Writer: James Parish Project: Compaq Remote Insight Lights-Out Edition User Guide Comments:
Part Number: 159206-005 File Name: d-ch3 Remote Insight Lights-Out Edition Configuration Parameters.doc Last Saved On: 7/12/01 8:24 AM
3-4
Compaq Remote Insight Lights-Out Edition User Guide
Server Identification
The following parameters provide information about the host server.
PCI Resources
This field shows the interrupt reserved for PCI resources. The default value is
IRQ 5 and is set by the BIOS.
Server Name
Enter a name for the host server. This name can be anything meaningful to you
for identification purposes. The name can consist of any combination of
numbers or letters up to 48 characters.
If the Insight Management agents are being used with the host server operating
system, they will provide the Remote Insight Lights-Out Edition board with
the server name.
Server ID
Enter an ID number for the host server. This number can be anything
meaningful to you for identification purposes. The number can consist of up to
eight digits as long as there are no blank spaces.
Serial Number
This is the serial number of the Compaq Remote Insight Lights-Out Edition
board. The number is displayed for your information. You cannot alter this
number.
Firmware Version
This is the version number of the Remote Insight Lights-Out Edition firmware
resident on the board. It is for your information only and cannot be altered.
Compaq Confidential – Need to Know Required
Writer: James Parish Project: Compaq Remote Insight Lights-Out Edition User Guide Comments:
Part Number: 159206-005 File Name: d-ch3 Remote Insight Lights-Out Edition Configuration Parameters.doc Last Saved On: 7/12/01 8:24 AM
Remote Insight Lights-Out Edition Configuration Parameters
3-5
Firmware Date
This is the date of the firmware version resident on the Remote Insight
Lights-Out Edition board. It is displayed for your information only and cannot
be altered. The date format is:
mm/dd/yyyy
where
mm is the month
dd is the day
yyyy is the year
Network Interface
The following parameters provide information about the Remote Insight
Lights-Out Edition LAN settings.
Status
Status reflects the state of the Remote Insight Lights-Out Edition NIC. The
default setting for the NIC is enabled. If DHCP is turned off, you will need to
assign a static IP address to the Remote Insight Lights-Out Edition NIC.
Assign the IP address using the IP Address parameter described in this section.
Transceiver Speed Autoselect
Autoselect detects the interface speed and sets the interface to operate at 10
MB or 100 MB and at half or full duplex. If necessary, this parameter can be
set to manual to allow manual adjustment of speed and duplex settings.
Speed
Use this setting to assign 10-MB or 100-MB connect speeds if the Transceiver
Speed Autoselect is not enabled.
Compaq Confidential – Need to Know Required
Writer: James Parish Project: Compaq Remote Insight Lights-Out Edition User Guide Comments:
Part Number: 159206-005 File Name: d-ch3 Remote Insight Lights-Out Edition Configuration Parameters.doc Last Saved On: 7/12/01 8:24 AM
3-6
Compaq Remote Insight Lights-Out Edition User Guide
Duplex
Use this setting to assign half or full duplex to the NIC if the Transceiver
Speed Autoselect is not enabled.
IP Address
When you use the Remote Insight Lights-Out Edition NIC, use this parameter
to assign a static IP address on your network to the Remote Insight NIC. The
default value is 0.0.0.0. This procedure is only necessary if DHCP is not being
used.
HTTP Port
The Remote Insight Lights-Out Edition HTTP port will use the standard port
80 setting. This setting can be changed by means of the Web interface as
required by your environment.
Remote Console Port
The Remote Insight Lights-Out Edition Remote Console port uses the default
setting of 23. This setting can be changed by means of the Web interface as
required by your environment.
Default Gateway
Use the default gateway parameter to assign the IP address of the network
router that connects the Remote Insight subnet to another subnet where the
management PC resides. The default value is 0.0.0.0. This field may be filled
in if DHCP is enabled.
Subnet Mask
Use the subnet mask parameter to assign the subnet mask for the default
gateway. The default value is 255.255.255.0. This field may be filled in if
DHCP is enabled.
Compaq Confidential – Need to Know Required
Writer: James Parish Project: Compaq Remote Insight Lights-Out Edition User Guide Comments:
Part Number: 159206-005 File Name: d-ch3 Remote Insight Lights-Out Edition Configuration Parameters.doc Last Saved On: 7/12/01 8:24 AM
Remote Insight Lights-Out Edition Configuration Parameters
3-7
MAC Address
This is the factory-assigned medium access control MAC address. It is the
hardware address assigned to the Remote Insight Ethernet NIC. You cannot
change this value.
DNS Name
The Remote Insight Lights-Out Edition board comes preset with a DNS name.
The DNS name is RIB plus the MAC address of the Remote Insight
Lights-Out Edition board. To find the MAC address, look for a sticker on the
Remote Insight Lights-Out Edition board. This name also is displayed on the
tag attached to the bracket of the Remote Insight Lights-Out Edition board.
DNS/DHCP
The Remote Insight Lights-Out Edition board comes preset from Compaq with
DNS/DHCP enabled. To disable DHCP, you must use the ROM-based Setup
Utility. Refer to Chapter 4 for setup instructions.
NOTE: If you disable DHCP, you will have to manually set up the IP address and the
subnet mask using the ROM-based Setup Utility.
If DHCP is enabled, the settings Use DHCP Supplied Gateway, Use DHCP
Supplied DNS Servers, Use DHCP Supplied WINS Servers, and Use DHCP
Supplied Static Routes are also enabled. If DHCP has been disabled, these
settings may have to be assigned.
Register with WINS Server
The Remote Insight Lights-Out Edition will automatically register with a
WINS server. The default setting is enabled.
Board Name
Enter a name for the Remote Insight Lights-Out Edition board. This setting
can be anything meaningful to you for identification purposes. The name can
consist of any combination of numbers or letters.
Compaq Confidential – Need to Know Required
Writer: James Parish Project: Compaq Remote Insight Lights-Out Edition User Guide Comments:
Part Number: 159206-005 File Name: d-ch3 Remote Insight Lights-Out Edition Configuration Parameters.doc Last Saved On: 7/12/01 8:24 AM
3-8
Compaq Remote Insight Lights-Out Edition User Guide
Domain Name
Enter the name of the domain that the Remote Insight Lights-Out Edition
board will participate in.
DHCP Server
This setting is automatically detected if DHCP is enabled. You will not be able
to change this setting.
Primary, Secondary, and Tertiary DNS Servers
Use this parameter to assign a unique DNS server IP address on your network.
The default value is 0.0.0.0.
Primary, Secondary, and Tertiary WINS Servers
Use this parameter to assign a unique WINS server IP address on your
network. The default value is 0.0.0.0.
Static Routes #1, #2, #3
Use this parameter to assign a unique Static Route destination and gateway
IP address on your network. The default IP values are 0.0.0.0 and 0.0.0.0. The
first IP address corresponds to the destination IP, and the second IP address
corresponds to the gateway IP.
IP Address for Web Agents
Use this setting to specify the IP address for the Web agents that the
Remote Insight Lights-Out Edition board will be configured to use.
Configure Users
The Configure Users section allows you to define the users currently
configured for access to the Remote Insight Lights-Out Edition. Up to 12 users
can be specified. User configurations can be added, deleted, or modified by
using the Web interface.
Compaq Confidential – Need to Know Required
Writer: James Parish Project: Compaq Remote Insight Lights-Out Edition User Guide Comments:
Part Number: 159206-005 File Name: d-ch3 Remote Insight Lights-Out Edition Configuration Parameters.doc Last Saved On: 7/12/01 8:24 AM
Remote Insight Lights-Out Edition Configuration Parameters
3-9
User Name
This parameter is the user’s real name as it is to display in the user list and
event log. It is not the name used to log in. The maximum length of the user
name is 48 characters.
Login Name
This is a case-sensitive name that the user must provide to log in to the
Remote Insight Lights-Out Edition board.
Password
This is a case-sensitive password that the user must provide to log in to the
Remote Insight Lights-Out Edition board. The password must be at least 8
characters long and up to a maximum of 48 characters. You must enter the
password twice for verification.
Enforced Client IP Address
The default setting is none. You can change this setting by assigning a specific
IP address, an IP address range, or a DNS name. Client logon attempts that do
not meet the specified requirements will be rejected.
SNMP IP Address
Enter the IP address of the remote management PC that will receive
SNMP trap alerts from the Remote Insight Lights-Out Edition board.
Receive Host OS Generated SNMP Traps
These alerts are generated by the Insight Management agents provided for
each supported network operating system. The agents must be installed on the
host server to receive these alerts. These alerts are sent to Compaq
Insight Manager XE clients on the network and are forwarded asynchronously
by Remote Insight to users that have been configured to receive them. The
default for this field is No.
Compaq Confidential – Need to Know Required
Writer: James Parish Project: Compaq Remote Insight Lights-Out Edition User Guide Comments:
Part Number: 159206-005 File Name: d-ch3 Remote Insight Lights-Out Edition Configuration Parameters.doc Last Saved On: 7/12/01 8:24 AM
3-10
Compaq Remote Insight Lights-Out Edition User Guide
Receive Remote Insight Board Alerts
These alert conditions are detected by Remote Insight and are independent of
the host server operating system. These alerts can be Compaq Insight Manager
XE SNMP traps or pager alerts. These alerts include major events such as
remote server power outages or server resets. They also include Remote
Insight Lights-Out Edition events, such as a disconnected keyboard cable or a
failed login attempt. The alerts are forwarded by the Remote Insight
Lights-Out Edition board to a Compaq Insight Manager XE console. The
default for this field is No.
Select the access rights for each configured user. The allowed choices are
described in the following sections.
Supervisor Access
If you set a user to supervisor mode, the login access, remote console access,
and remote server reset access rights are automatically set to On. If you turn
off any access right, the supervisor status is automatically turned off.
A user with supervisor status can remotely add, delete, and modify the
configurations of other Remote Insight users.
Login Access
If you have login access turned off, you may still receive alerts on a Compaq
Insight Manager XE console if you enable the alerts features. Login access can
be used to create a user who is a service provider and who will receive alerts
from the board but does not have login access to the Remote Insight LightsOut Edition board. If a user is in supervisor mode, you cannot turn off the
user’s login access.
Remote Console Access
Users may have login access, but no access to the remote host server console.
If the user is in supervisor mode, you cannot turn off the user’s Remote
Console access.
Compaq Confidential – Need to Know Required
Writer: James Parish Project: Compaq Remote Insight Lights-Out Edition User Guide Comments:
Part Number: 159206-005 File Name: d-ch3 Remote Insight Lights-Out Edition Configuration Parameters.doc Last Saved On: 7/12/01 8:24 AM
Remote Insight Lights-Out Edition Configuration Parameters
3-11
Remote Server Reset Access and Power Button
Access
Users may have login access, but no access to remote server reset. If the user
is in supervisor mode, you cannot turn off the user’s remote server reset
access.
Other Parameters
Keyboard
This parameter indicates which country-specific keyboard is attached to the
remote host server. The default is US.
Language
This parameter indicates which country-specific code page needs to be used
for the keyboard and console on the remote host server. The default is English.
Compaq Confidential – Need to Know Required
Writer: James Parish Project: Compaq Remote Insight Lights-Out Edition User Guide Comments:
Part Number: 159206-005 File Name: d-ch3 Remote Insight Lights-Out Edition Configuration Parameters.doc Last Saved On: 7/12/01 8:24 AM
Chapter
4
Configuring the Remote Insight
Lights-Out Edition
After you have installed the Remote Insight Lights-Out Edition board in your
server, as instructed in Chapter 2, and have made all necessary peripheral
connections, you must configure the Remote Insight Lights-Out Edition board.
Installing and Configuring Software
The Remote Insight Lights-Out Edition board offers several versatile
configuration options:
■
Remote Setup
Use this method on a server with the operating system already installed
and the server NIC configured. Installation and setup are done at a
remote console.
■
SmartStart Setup
Use this method to set up a new server that contains a Remote Insight
Lights-Out Edition board. Installation and setup are done at the host
server using SmartStart. Servers running Microsoft Windows NT also
require the Remote Insight drivers and Service Pack 3 or later.
Compaq Confidential – Need to Know Required
Writer: James Parish Project: Compaq Remote Insight Lights-Out Edition User Guide Comments:
Part Number: 159206-005 File Name: e-ch4 Configuring the Remote Insight Lights-Out Edition.doc Last Saved On: 7/10/01 4:16 PM
4-2
Compaq Remote Insight Lights-Out Edition User Guide
■
ROM-Based Setup Utility using the F8 key
ROM-Based Setup Utility (F8) is the recommended method to initially
set up the Remote Insight Lights-Out Edition board. The ROM-Based
Setup Utility is useful for setting up servers that do not use DNS/DHCP.
The ROM-Based Setup Utility is available every time the server is
booted and may be run remotely using the Remote Insight Lights-Out
Edition Remote Console.
■
System Configuration Utility Setup using the F10 key
Use this method for servers that use the System Configuration Utility
(F10) to configure the server. After using the System Configuration
Utility at the host server, install the Remote Insight drivers and agents
for your operating system.
■
ROM-Based Setup Utility using the F9 key
Newer Compaq servers use the ROM-Based Setup Utility (F9) to
configure the server. Servers that use the ROM-Based Setup Utility (F9)
do not use the System Configuration Utility. The ROM-Based Setup
Utility (F9) does not provide configuration for the Remote Insight
Lights-Out Edition board. Servers that use the ROM-Based Setup Utility
(F9) to configure the server need to use the ROM-Based Setup Utility
(F8) to configure the Remote Insight Lights-Out Edition board.
■
Preinstalled Operating System Configuration Setup
Use this method if you have purchased a new server equipped with a
Remote Insight Lights-Out Edition board and an operating system that
was preinstalled by Compaq.
Compaq Confidential – Need to Know Required
Writer: James Parish Project: Compaq Remote Insight Lights-Out Edition User Guide Comments:
Part Number: 159206-005 File Name: e-ch4 Configuring the Remote Insight Lights-Out Edition.doc Last Saved On: 7/10/01 4:16 PM
Configuring the Remote Insight Lights-Out Edition 4-3
To install the appropriate device drivers for your server’s operating system,
refer to the following sections:
■
Windows NT Driver Support
■
Windows 2000 Driver Support
■
NetWare Driver Support
■
OS/2 Driver Support
■
SCO Driver Support
■
Red Hat Linux Support
NOTE: Some Compaq servers contain DIP switches on the system board to control
certain security settings. Before beginning configuration, if the server is equipped with a
Configuration Lock Switch, set this switch to off (unlocked). See the documentation or
hood labels that shipped with the server for more information about the Configuration
Lock Switch. When configuration is complete, return the switch to the on (locked)
position.
Regardless of the configuration method used, be aware of the configuration
parameters that are involved. Use chapter 3 to determine what parameters you
need set up the board. Leave parameters set to their default values unless you
know that they should be changed for your environment. Before starting
SmartStart, ROM-Based Setup Utility (F8), or the System Configuration
Utility (F10), record the values for your installation on the Table 3-1 in
Chapter 3.
Remote Setup
Use this method on a server with the operating system already installed and
the server NIC configured. Installation and setup are done at a remote console.
1. Using a standard Web browser, access the Remote Insight Lights-Out
Edition board from a remote network client, providing the default DNS
name, user name, and password on the Network settings tag supplied
with the board.
2. When you successfully log on to the Remote Insight Lights-Out Edition
board, you will be able to change the default values of the network, user,
and SNMP alerting settings through the Web browser interface of the
Remote Insight Lights-Out Edition. You will also be able to install
operating system drivers and Compaq Insight Manager XE agents on the
remote host server using the graphical Remote Console.
Compaq Confidential – Need to Know Required
Writer: James Parish Project: Compaq Remote Insight Lights-Out Edition User Guide Comments:
Part Number: 159206-005 File Name: e-ch4 Configuring the Remote Insight Lights-Out Edition.doc Last Saved On: 7/10/01 4:16 PM
4-4
Compaq Remote Insight Lights-Out Edition User Guide
SmartStart Setup
Use the following SmartStart setup method to set up a new server that contains
a Remote Insight Lights-Out Edition board:
1. Insert the SmartStart and Support Software CD into the server CD-ROM
drive and power up the server.
2. Navigate through the language, country, keyboard, and time and date
screens to get to the SmartStart Roadmap screen (three-path screen).
3. Click Assisted Integration Path and click Begin.
4. Follow the instructions on the screen to configure the server.
5. Use the parameters from Table 3-1 to complete the configuration
screens when you get to the Remote Insight Lights-Out Edition screen.
Press the F1 key to receive context-sensitive help for the current screen.
6. When the Configuration Complete dialog box displays, select
Summary to review your configuration parameters for Automatic
Server Recovery (ASR) and the Remote Insight Lights-Out Edition
board. Click Back to return to any screen that needs to be changed.
7. Click Finish when you are satisfied that ASR and Remote Insight are
set up correctly for your configuration (see Table 3-1).
IMPORTANT: During a Windows NT installation of the Remote Insight Lights-Out Edition
board using SmartStart, do not select to install Compaq Remote Insight WAN Driver
(RIBWAN.SYS). The Remote Insight Lights-Out Edition board does not use or support
RIBWAN.SYS. Installing RIBWAN.SYS may cause server performance problems.
Your server and Remote Insight Lights-Out Edition will be operational after
the SmartStart process completes. For information about using the features of
the Remote Insight Lights-Out Edition board, refer to Chapter 5 or the online
help for the Remote Insight Lights-Out Edition board on the Compaq
Management CD.
Compaq Confidential – Need to Know Required
Writer: James Parish Project: Compaq Remote Insight Lights-Out Edition User Guide Comments:
Part Number: 159206-005 File Name: e-ch4 Configuring the Remote Insight Lights-Out Edition.doc Last Saved On: 7/10/01 4:16 PM
Configuring the Remote Insight Lights-Out Edition 4-5
ROM-Based Setup Utility Using the F8 Key
ROM-Based Setup Utility (F8) is the recommended method to set up your
Remote Insight Lights-Out Edition board. The ROM-Based Setup Utility is a
feature of the Remote Insight Lights-Out Edition bOard.
1. Restart or power up the server.
2. Press the F8 key to enter the ROM-Based Setup Utility when the cursor
flashes and the Remote Insight Lights-Out Edition prompt displays on
the screen.
3. Make and save any necessary changes to the Remote Insight Lights-Out
Edition board.
4. Exit the ROM-Based Setup Utility when finished.
Disabling DNS/DHCP
Compaq recommends using DNS/DHCP with the Remote Insight Lights-Out
Edition board to simplify installation. In the event that DNS/DHCP cannot be
used, use the following procedure to disable DNS/DHCP and to configure the
IP address and the subnet mask:
1. Restart or power up the server.
2. Press the F8 key to enter the ROM-Based Setup Utility when the cursor
flashes and the Remote Insight Lights-Out Edition prompt displays on
the screen.
NOTE: Use the arrow keys to highlight selections.
3. Select Network, DNS/DHCP, and press the Enter key. The Network
Autoconfiguration screen will open.
4. Select DHCP Enable and press the spacebar to turn off DHCP. Ensure
that DHCP Enable is set to off and press the Enter key to save the
changes.
NOTE: It will take a few minutes for the board to save the network changes and to reset.
5. Select Network, NIC and TCP/IP, and press the Enter key. The
Network Configuration screen opens.
6. Select the IP Address field, delete the address in the field, and type the
IP address.
7. Select the Subnet Mask field, delete the address in the field, and type
the subnet mask.
Compaq Confidential – Need to Know Required
Writer: James Parish Project: Compaq Remote Insight Lights-Out Edition User Guide Comments:
Part Number: 159206-005 File Name: e-ch4 Configuring the Remote Insight Lights-Out Edition.doc Last Saved On: 7/10/01 4:16 PM
4-6
Compaq Remote Insight Lights-Out Edition User Guide
8. Press the Enter key to save the changes.
NOTE: It will take a few seconds for the board to save the network changes and to reset.
9. To exit the ROM-Based Setup Utility, select File, Exit, and press the
Enter key.
System Configuration Utility Setup Using the F10
Key
For existing servers that have been configured previously and that use the
System Configuration Utility, use the following setup method to install a
Remote Insight Lights-Out Edition board:
1. Restart or power up the server.
2. Press the F10 key to enter the System Configuration Utility when the
cursor flashes at the top right corner of the screen.
3. Select System Configuration, Configure Hardware, Review or
Modify Hardware Settings, and View or Edit Details. Locate the
Compaq Remote Insight Lights-Out Edition section in the list of boards.
4. Make any necessary changes and press the F10 key until you reach the
Steps in Configuring Your Computer menu.
5. Highlight the Save and Exit option and press the Enter key.
6. Answer YES to reset the board. This process may take a few minutes.
After adding the Remote Insight Lights-Out Edition board to your server using
the System Configuration Utility, you must install the Remote Insight drivers
for your operating system. See the following section for instructions on
installing the drivers for your operating system.
ROM-Based Setup Utility Using the F9 Key
Servers that use the ROM-Based Setup Utility (F9) to configure the server
need to use ROM-Based Setup Utility (F8) to configure the Remote Insight
Lights-Out Edition board. Refer to the section, “ROM-Based Setup Utility
Using the F8 Key” earlier in this chapter.
Compaq Confidential – Need to Know Required
Writer: James Parish Project: Compaq Remote Insight Lights-Out Edition User Guide Comments:
Part Number: 159206-005 File Name: e-ch4 Configuring the Remote Insight Lights-Out Edition.doc Last Saved On: 7/10/01 4:16 PM
Configuring the Remote Insight Lights-Out Edition 4-7
Preinstalled Operating System
Configuration Setup
Use one of the following preinstalled operating system configuration setup
methods if you have purchased a new server equipped with a Remote Insight
Lights-Out Edition board and an operating system preinstalled from Compaq.
Windows NT
1. Open Windows Explorer from the Start menu.
2. Look in the root directory for directory \CPQRIB and double-click the
directory.
3. After the directory opens, click RIBINST.EXE to install the Remote
Insight Lights-Out Edition software.
4. Install CPQRIB.SYS and the Setup Utility.
IMPORTANT: If RIBWAN.SYS is shown as an option, do not select RIBWAN.SYS to be
installed. The Remote Insight Lights-Out Edition board does not use or support
RIBWAN.SYS. Installing RIBWAN.SYS may cause server performance problems.
5. To access the setup utility after the software has been installed, click the
Remote Insight Setup applet in the Control Panel.
Windows 2000
The server will reboot three times during the operating system installation
process. After the last reboot, the Found New Hardware Wizard displays. At
this time, proceed through the following steps to install the driver for the
Compaq Remote Insight Board.
1. On the first screen of the Found New Hardware wizard, click Next.
2. Select Search for a suitable driver for my device, then click Next.
3. Select Specify a Location, and deselect the Floppy Drive and CD-ROM
check boxes, then click Next.
4. Type the following path in the text box, then click OK.
C:\CPQDRVRS
5. On the Driver Files Search Results screen, click Next.
6. To complete the Found New Hardware wizard, click Finish.
Compaq Confidential – Need to Know Required
Writer: James Parish Project: Compaq Remote Insight Lights-Out Edition User Guide Comments:
Part Number: 159206-005 File Name: e-ch4 Configuring the Remote Insight Lights-Out Edition.doc Last Saved On: 7/10/01 4:16 PM
4-8
Compaq Remote Insight Lights-Out Edition User Guide
Novell NetWare 4.2
1. During the post-installation process, the NetWare installation incorrectly
attempts to load the MEGA4_XX.HAM driver.
2. Remove the MEGA4_XX.HAM driver from the disk and CD-ROM
drivers list during the Choose the Server Drivers interview.
3. If you missed the opportunity to remove the driver, ignore the error
statement when the install program tries to install the driver and edit the
STARTUP.NCF file and remove MEGA4_XX.HAM driver when the
installation is complete.
4. After the installation of NetWare completes, add the following lines to
the AUTOEXEC.NCF file:
LOAD CPQHLTH.NLM
LOAD CPQRI.NLM
NOTE: The cpqhlth.nlm driver should come before cpqri.nlm in the load order. This will
ensure that the appropriate server error log will be copied to the Remote Insight
Lights-Out Edition board during initialization.
5. At the end of the installation, refer to the instructions in the “System
Configuration Utility Setup Using the F10 Key” section in this chapter
to configure the Remote Insight Lights-Out Edition board.
Novell NetWare 5
1. During the post-installation process, the NetWare installation incorrectly
attempts to load the MEGA4_XX.HAM or I20PCI.HAM driver.
2. Select F10=Continue-no selection to continue the installation without
loading either driver.
3. If you missed the opportunity to remove the driver, edit the
STARTUP.NCF file and remove MEGA4_XX.HAM driver when the
installation is complete.
4. During the post-installation interview, install the Compaq Management
Agent for Servers on the Additional Products and Services screen.
5. Select Compaq Remote Insight Management Agents on the NSSD
Options screen.
6. At the end of the installation, refer to the instructions in the “System
Configuration Utility Setup using the F10 key” section in this chapter to
configure the Remote Insight Lights-Out Edition board.
Compaq Confidential – Need to Know Required
Writer: James Parish Project: Compaq Remote Insight Lights-Out Edition User Guide Comments:
Part Number: 159206-005 File Name: e-ch4 Configuring the Remote Insight Lights-Out Edition.doc Last Saved On: 7/10/01 4:16 PM
Configuring the Remote Insight Lights-Out Edition 4-9
Red Hat Linux 6.2 and 7.0
The step sequence for both installations is the same.
1. Install the UCD source, health driver, and agents using the following
commands:
rpm -ivh ucd-snmp-4.1.1-2-src.rpm for Red Hat Linux 6.2 or
rpm -ivh ucd-snmp-4.1.1-8-src.rpm for Red Hat Linux 7.0
rpm -ivh cpqhealth-1.2.0-1.i386.rpm
rpm -ivh cmafdtn-4.90-1.i386.rpm
rpm -ivh cmasvr-4.90-1.i386.rpm
rpm -ivh cmastor-4.90-1.i386.rpm
rpm -ivh cmanic-4.90-1.i386.rpm
rpm -ivh cpqrid-1.0.0-7.i386.rpm
2. Configure the SNMP using the following commands:
cp /opt/compaq/foundation/etc/snmpd.conf.cma /usr/share/snmp/snmpd.conf
cd /usr/share/snmp
vi /usr/share/snmp/snmpd.conf
NOTE: The vi /usr/share/snmp/snmpd.conf command is used so that the 'trapsink' line
has the IP address of the Compaq Insight Manager XE console at which you want to
receive traps. The following is an example:
Rwcommunity rwcomm 127.0.0.1
Rwcommunity public
Trapsink ×××.×××.×××.××× public
cd /usr/src/redhat/SOURCES
tar -xzvf ./ucd-snmp-4.1.1.tar.gz for Red Hat Linux 6.2 or
tar -xzvf ./ucd-snmp-4.1.2.tar.gz for Red Hat Linux 7.0
cd /usr/src/redhat/SOURCES/ucd-snmp-4.1.1
for Red Hat Linux 6.2 or
cd /usr/src/redhat/SOURCES/ucd-snmp-4.1.2
for Red Hat Linux 7.0
/opt/Compaq/foundation/etc/snmpdbld
Compaq Confidential – Need to Know Required
Writer: James Parish Project: Compaq Remote Insight Lights-Out Edition User Guide Comments:
Part Number: 159206-005 File Name: e-ch4 Configuring the Remote Insight Lights-Out Edition.doc Last Saved On: 7/10/01 4:16 PM
4-10
Compaq Remote Insight Lights-Out Edition User Guide
3. Start SNMP and agent processes using the following commands:
/etc/rc.d/init.d/snmpd start
/etc/rc.d/init.d/cmafdtn start
/etc/rc.d/init.d/cmasvr start
/etc/rc.d/init.d/cmastor start
/etc/rc.d/init.d/cmanic start
Installing Remote Insight Lights-Out
Edition Device Drivers
A Remote Insight device driver allows system software and SNMP Insight
Agents to communicate with the Remote Insight Lights-Out Edition board.
The following sections provide instructions for installing the Remote Insight
drivers for Novell NetWare, Microsoft Windows NT, Windows 2000,
IBM OS/2, SCO OpenServer Release 5, UnixWare, and Red Hat Linux. The
SmartStart and Support Software CD contains the latest versions of these
drivers.
The latest drivers can also be found in the Remote Insight Lights-Out Edition
area of the Compaq website:
www.compaq.com/lights-out
Windows NT Driver Support
The device drivers required to support the Compaq Remote Insight Lights-Out
Edition board and ASR features are located on the SmartStart and Support
Software CD. Before you begin to install the Windows NT drivers, gather your
Windows NT documentation and the latest Windows NT Service Pack.
From the Compaq website, you can download a SoftPaq that contains the
Remote Insight Lights-Out Edition Installation Wizard. This wizard simplifies
installation of the additional drivers needed for Windows NT servers. The
Compaq website address is
www.compaq.com/lights-out
If you do not have access to the Internet, use the steps in the following sections
to install the necessary drivers without using the installation wizard.
Compaq Confidential – Need to Know Required
Writer: James Parish Project: Compaq Remote Insight Lights-Out Edition User Guide Comments:
Part Number: 159206-005 File Name: e-ch4 Configuring the Remote Insight Lights-Out Edition.doc Last Saved On: 7/10/01 4:16 PM
Configuring the Remote Insight Lights-Out Edition 4-11
Relevant Files
The following file supports the Remote Insight Lights-Out Edition board:
CPQRIB.SYS
You can install or update the Compaq Remote Insight Lights-Out Edition
driver by following the instructions in the next section.
Installing or Updating the Compaq Remote
Insight Lights-Out Edition Drivers
The setup program in the \CPQSUPSW\NTSSD subdirectory of the SmartStart
and Support Software CD installs, updates, or removes Windows NT device
drivers. When installing or updating drivers, the setup program copies the
appropriate driver to the system and configures the system to use that driver.
The setup program also provides current driver status and version information.
If you are updating the Remote Insight drivers, ensure that the Remote Insight
Lights-Out Edition board is running the latest version of the Remote Insight
Lights-Out Edition firmware. The latest firmware can be obtained through
ROMPaq from the Compaq website:
www.compaq.com/lights-out
Follow the Setup menu through the following levels: Support, Compaq
SoftPaqs, and Servers, then select your operating system.
Follow these steps to install or update the drivers needed for the Remote
Insight Lights-Out Edition board:
1. Start Windows NT and log in to an account with administrative
privileges.
2. Insert the SmartStart and Support Software CD into the CD-ROM drive.
3. Select Run and enter the following command:
[CD Drive]:\CPQSUPSW\NTSSD\SETUP
4. Select the Express option. The Setup program presents a list of drivers
that can be installed, such as:
GCompaq
Remote Insight Lights-Out Edition Driver
GCompaq
Systems Management Driver
GATI
Video Controller
Compaq Confidential – Need to Know Required
Writer: James Parish Project: Compaq Remote Insight Lights-Out Edition User Guide Comments:
Part Number: 159206-005 File Name: e-ch4 Configuring the Remote Insight Lights-Out Edition.doc Last Saved On: 7/10/01 4:16 PM
4-12
Compaq Remote Insight Lights-Out Edition User Guide
5. Select Systems Management Driver to install or update the driver.
Ensure that the Remote Insight driver is selected.
IMPORTANT: During a Windows NT installation of the Remote Insight Lights-Out Edition
board using SmartStart, do not select Compaq Remote Insight WAN Driver
(RIBWAN.SYS) for installation. The Remote Insight Lights-Out Edition board does not use
or support RIBWAN.SYS. Installation of RIBWAN.SYS may cause server performance
problems.
6. If a Remote Insight Lights-Out Edition board is present in the system,
Remote Insight Lights-Out Edition drivers will be installed when you
click OK.
7. Exit the setup program and restart the system to load the drivers you
installed.
NOTE: You must also install the ATI video controller driver for correct video operation
through the Remote Insight Lights-Out Edition board. This driver is on the SmartStart and
Support Software CD.
Windows 2000 Driver Support
The device drivers for Windows 2000 can be obtained from the SmartStart and
Support Software CD, 4.70 or later. You also can download the Compaq
Support Paq for Windows 2000 from the Compaq website:
www.compaq.com/support/files
To install the Support Paq, run the SETUP.EXE file included in the download
and follow the installation instructions. For additional information about the
Support Paq installation, read the text file included in the Support Paq
download.
NetWare Driver Support
The Remote Insight Lights-Out Edition driver for NetWare is CPQRI.NLM.
This driver enables you to access the Remote Insight copy of the Integrated
Management Log or Critical Error Log remotely, even when the server is
down. CPQRI.NLM is notified if any subsequent events occur and then
updates this copy of the log.
NOTE: If you load the Server Health driver, CPQHLTH.NLM, before the Remote Insight
driver, CPQRI will copy the contents of the Integrated Management Log or the Critical
Error Log (based on the support provided by the server) to the Remote Insight Lights-Out
Edition board during initialization.
Compaq Confidential – Need to Know Required
Writer: James Parish Project: Compaq Remote Insight Lights-Out Edition User Guide Comments:
Part Number: 159206-005 File Name: e-ch4 Configuring the Remote Insight Lights-Out Edition.doc Last Saved On: 7/10/01 4:16 PM
Configuring the Remote Insight Lights-Out Edition 4-13
To install CPQRI.NLM :
1. Insert the Compaq Management CD into the CD-ROM drive of the
server. NetWare 5 will automatically mount the CD as a volume. For
NetWare 4.x servers, use the following command at the server console:
LOAD CDROM.NLM
CD MOUNT volume name
2. Load NWCONFIG.NLM for NetWare 5 or INSTALL.NLM for NetWare
4.x.
3. Select Product Options. Install a Product Not Listed and enter the
following path to the driver:
VOL NAME: CPQSUPSW\NSSD
4. The Compaq Software Support Utility will load and the Remote Insight
Lights-Out Edition driver can be installed from the menu.
The following is an alternate installation method:
5. Insert the SmartStart and Support Software CD into the CD-ROM drive
of the workstation.
6. Execute a MAP command, similar to the following example, to ensure
that you have a path to the server.
MAP G:=SYS:SYSTEM
7. Copy the NetWare Remote Insight driver to the server, using the
following path.
COPY D:\CPQSUPSW\NSSD\SRV_MGMT\CPQRI.NLM G:
8. Return to the server console to complete the installation of the Remote
Insight driver support for NetWare.
9. Use the NetWare INSTALL program or NWCONFIG for NetWare 5 to
modify the AUTOEXEC.NCF file. Add the following LOAD commands
so the driver is loaded each time the NetWare server is restarted. It is not
necessary to load the Server Health driver if it is not supported on your
server.
LOAD CPQHLTH
LOAD CPQRI
For a description of CPQRI initialization errors and remedies, refer to the
online help for the Remote Insight Lights-Out Edition board on the Compaq
Management CD.
Compaq Confidential – Need to Know Required
Writer: James Parish Project: Compaq Remote Insight Lights-Out Edition User Guide Comments:
Part Number: 159206-005 File Name: e-ch4 Configuring the Remote Insight Lights-Out Edition.doc Last Saved On: 7/10/01 4:16 PM
4-14
Compaq Remote Insight Lights-Out Edition User Guide
OS/2 Driver Support
The device drivers for IBM OS/2 can be obtained from the SmartStart and
Support Software CD by using the Diskette Builder utility.
The Remote Insight Lights-Out Edition driver for OS/2 is CPQRIB.SYS. If the
Compaq Wellness driver for OS/2, CPQHLTH.SYS, is loaded, then
CPQRIB.SYS is notified of any critical events, and the driver updates its copy
of the critical error log. CPQRIB.SYS also updates its critical error log every
time the board is reset.
If the Compaq BIOS32 support driver for OS/2, CPQB32.SYS, is loaded, then
CPQRIB.SYS is notified of any updates to the Integrated Management
Log (IML), and the driver updates its copy of the IML. CPQRIB.SYS also
updates its copy of the IML every time the board is reset.
NOTE: The Remote Insight Lights-Out Edition driver for OS/2, CPQRIB.SYS, 2.0 and later,
supports the Integrated Management Log and requires the use of the Compaq BIOS32
support driver, CPQB32.SYS.
To install CPQRIB.SYS:
1. Insert the diskette labeled “System and Storage Drivers” in the diskette
drive of the server.
2. From the command prompt, type DDINSTAL and press the Enter key.
Alternatively, on the OS/2 Desktop, open the folders OS/2 System,
System Setup, and Install/Remove. Double-click Device Driver
Install. Change the Source Path to \CPQRIB.
3. Select the Compaq Remote Insight Lights-Out Edition entry and
click Install.
4. In the Install/Remove folder, double-click Device Driver Install and
change the Source Path to \CPQB32.
5. Select the Compaq 32-Bit Helper Driver entry and click Install.
6. Perform an orderly shutdown and reboot the server for the driver
installation to take effect.
Compaq Confidential – Need to Know Required
Writer: James Parish Project: Compaq Remote Insight Lights-Out Edition User Guide Comments:
Part Number: 159206-005 File Name: e-ch4 Configuring the Remote Insight Lights-Out Edition.doc Last Saved On: 7/10/01 4:16 PM
Configuring the Remote Insight Lights-Out Edition 4-15
SCO Driver Support
The Remote Insight Lights-Out Edition drivers for both SCO OpenServer
Release 5 and SCO UnixWare 7 are named CRID. These drivers are located
on the SmartStart and Support Software CD. Use the Diskette Builder utility to
create the necessary Extended Feature Supplement (EFS) diskettes for
SCO OpenServer Release 5, SCO UnixWare 7. To install the CRID drivers,
follow the instructions provided on the documentation diskette of the EFS.
IMPORTANT: When using a SCO system, you must install the ATI video controller driver
for correct video operation through the Remote Insight Lights-Out Edition board. This
driver is on the SmartStart and Support Software CD.
Red Hat Linux Driver Support
You can download the SoftPAQ containing the Remote Insight Driver, the
health driver, and agents included in the version 2.31 upgrade for a Linux
system at
ftp.compaq.com/pub/softpaq/sp14001-14500/sp14467.tgz
IMPORTANT: The downloaded file is presented as a compressed file. The file needs to be
expanded using the uncompress utility. The uncompressed file will be identified as
sp14467.tgz. Unpack the file using the following command:
tar xzvf sp14467.tgz
The following section lists the installation process for Red Hat Linux 6.2 and
7.0. These steps assume a new installation. On servers with previously
installed agents and drivers, the agents and drivers must be uninstalled using
the following commands:
rpm -e cpqrid
rpm -e cmanic
rpm -e cmastor
rpm -e cmasvr
rpm -e cmafdtn
rpm -e cpqhealth
rm -fr /opt/compaq
rm -fr /usr/src/redhat/SOURCES/ucd-snmp-4.1.1 for Red Hat Linux 6.2 or
rm -fr /usr/src/redhat/SOURCES/ucd-snmp-4.1.2 for Red Hat Linux 7.0
Compaq Confidential – Need to Know Required
Writer: James Parish Project: Compaq Remote Insight Lights-Out Edition User Guide Comments:
Part Number: 159206-005 File Name: e-ch4 Configuring the Remote Insight Lights-Out Edition.doc Last Saved On: 7/10/01 4:16 PM
4-16
Compaq Remote Insight Lights-Out Edition User Guide
The step sequence for both installations is the same.
1. Install the UCD source, health driver, and agents using the following
commands:
rpm -ivh ucd-snmp-4.1.1-2-src.rpm for Red Hat Linux 6.2 or
rpm -ivh ucd-snmp-4.1.1-8-src.rpm for Red Hat Linux 7.0
rpm -ivh cpqhealth-1.2.0-1.i386.rpm
rpm -ivh cmafdtn-4.90-1.i386.rpm
rpm -ivh cmasvr-4.90-1.i386.rpm
rpm -ivh cmastor-4.90-1.i386.rpm
rpm -ivh cmanic-4.90-1.i386.rpm
rpm -ivh cpqrid-1.0.0-7.i386.rpm
2. Configure the SNMP using the following commands:
cp /opt/compaq/foundation/etc/snmpd.conf.cma /usr/share/snmp/snmpd.conf
cd /usr/share/snmp
vi /usr/share/snmp/snmpd.conf
NOTE: The vi /usr/share/snmp/snmpd.conf command is used so that the 'trapsink' line
has the IP address of the Compaq Insight Manager XE console at which you want to
receive traps. The following is an example:
Rwcommunity rwcomm 127.0.0.1
Rwcommunity public
Trapsink ×××.×××.×××.××× public
cd /usr/src/redhat/SOURCES
tar -xzvf ./ucd-snmp-4.1.1.tar.gz for Red Hat Linux 6.2 or
tar -xzvf ./ucd-snmp-4.1.2.tar.gz for Red Hat Linux 7.0
cd /usr/src/redhat/SOURCES/ucd-snmp-4.1.1
for Red Hat Linux 6.2 or
cd /usr/src/redhat/SOURCES/ucd-snmp-4.1.2
for Red Hat Linux 7.0
/opt/Compaq/foundation/etc/snmpdbld
Compaq Confidential – Need to Know Required
Writer: James Parish Project: Compaq Remote Insight Lights-Out Edition User Guide Comments:
Part Number: 159206-005 File Name: e-ch4 Configuring the Remote Insight Lights-Out Edition.doc Last Saved On: 7/10/01 4:16 PM
Configuring the Remote Insight Lights-Out Edition 4-17
3. Start SNMP and agent processes using the following commands:
/etc/rc.d/init.d/snmpd start
/etc/rc.d/init.d/cmafdtn start
/etc/rc.d/init.d/cmasvr start
/etc/rc.d/init.d/cmastor start
/etc/rc.d/init.d/cmanic start
Optimized Performance for Remote
Console
Starting with firmware version 2.31, the remote console application has been
optimized for greater performance.
The remote console will operate with greater or lesser success depending on
the settings of the remote server. Ideally, the remote server operating system
resolution should be the same resolution, or smaller, than the browser
computer. The higher the resolution of the remote server, the slower the
overall performance. For best results, use the following settings.
Browser Settings
Use the following browser settings to optimize performance:
■
Display Properties Setting
GSelect
an option greater than 256 video colors.
GSelect
a greater screen resolution than the remote server’s screen
resolution.
■
Remote Console
GSelect
Remote Console (Full) to maximize the viewable area.
GIn
Settings, select the operating system to match the server’s
operating system and the character set to match the remote server’s
character set. For Red Hat Linux 6.2 and 7.0, SCO UnixWare 7.x,
and SCO OpenServer 5.x, you would select the Unix operating
system.
Compaq Confidential – Need to Know Required
Writer: James Parish Project: Compaq Remote Insight Lights-Out Edition User Guide Comments:
Part Number: 159206-005 File Name: e-ch4 Configuring the Remote Insight Lights-Out Edition.doc Last Saved On: 7/10/01 4:16 PM
4-18
Compaq Remote Insight Lights-Out Edition User Guide
■
Mouse Properties Setting
GSet
the Mouse Pointer speed to the middle setting.
GSet
Mouse Pointer Acceleration to low or disable the pointer
acceleration.
■
The speed of the remote console depends on the processing power of the
client machine. Use a 400 MHz or faster client with 64 MB or more of
memory.
■
Use a single processor client. Remote Console’s Java applet tends to
execute more slowly on multiprocessor workstations.
The following browsers are supported:
■
Microsoft Internet Explorer
GMinimum:
Microsoft Internet Explorer 4.01 (version 4.72.2106.8 or
newer) for Windows 95, Windows 98, Windows NT 4.0 and
Windows 2000.
GRecommended:
Microsoft Internet Explorer 5.0 or later
IMPORTANT: Internet Explorer 4.01 requires service pack 3 on Windows NT 4.0.
■
Netscape
GMinimum:
Netscape Communicator 4.08
GRecommended:
Netscape Communicator 4.76 or later
NOTE: Netscape Communicator 6 is not supported.
Additional browsers, or the browsers mentioned, used with different operating
systems, may or may not work correctly, depending upon their specific
implementations of the required browser technologies.
Compaq Confidential – Need to Know Required
Writer: James Parish Project: Compaq Remote Insight Lights-Out Edition User Guide Comments:
Part Number: 159206-005 File Name: e-ch4 Configuring the Remote Insight Lights-Out Edition.doc Last Saved On: 7/10/01 4:16 PM
Configuring the Remote Insight Lights-Out Edition 4-19
Recommended Server Settings
The following is a list of recommended server settings based on the operating
system used.
Windows NT 4.0 and Windows 2000
Use the following settings to optimize performance on a server using the
Windows NT 4.0 or Windows 2000 operating system:
■
Server Display Properties Setting
G800
x 600 pixels or lower screen resolution
G256
video colors
GPlain
■
Background (no wallpaper pattern)
Server Mouse Properties Setting
GSelect
none for Mouse Pointer Scheme.
GDisable
Pointer Shadow in Windows 2000.
GSelect
Motion or Pointer Options and set the Pointer speed slider
to the middle position.
GDisable
pointer acceleration.
■
Remote Console (2-cursor) is recommended when using F8, F10, full
text console, or the system partition utilities.
■
Using the Compaq SmartStart CD or CSP file, install the Windows
drivers 4.90.
NetWare
Use the following settings to optimize performance on a server using the
Netware operating system:
■
Server Display Properties Setting
G800
x 600 pixels or lower screen resolution
G256
video colors
■
Remote Console (2-cursor) is recommended.
■
Ensure that the Num Lock key on the server’s keyboard is not enabled.
Compaq Confidential – Need to Know Required
Writer: James Parish Project: Compaq Remote Insight Lights-Out Edition User Guide Comments:
Part Number: 159206-005 File Name: e-ch4 Configuring the Remote Insight Lights-Out Edition.doc Last Saved On: 7/10/01 4:16 PM
4-20
Compaq Remote Insight Lights-Out Edition User Guide
Red Hat Linux 6.2 and 7.0
Use the following settings to optimize performance on a server using the Red
Hat Linux 6.2 or 7.0 operating system:
■
Server Display Properties Setting
G16-bit
■
color, 800 x 600 pixels screen resolution
Remote Console (2-cursor) is recommended when using full text
console.
OS/2 Warp Server 4.0
Use the following settings to optimize performance on a server using the OS/2
Warp Server 4.0 operating system:
■
■
Server Display Properties Setting
G800
x 600 pixels or lower screen resolution
G256
video colors
Remote Console (2-cursor) is recommended.
SCO UnixWare 7.x
Use the following to optimize performance on a server using the SCO
UnixWare 7.x operating system:
■
Server Display Properties Setting
G64K
■
colors, select 800 x 600 pixels
Remote Console (2-cursor) is recommended.
SCO OpenServer 5.x
Use the following settings to optimize performance on a server using the SCO
OpenServer 5.x operating system:
■
Server Display Properties Setting
G800
x 600 pixels or lower screen resolution
G256
video colors
■
Full text mode remote console is supported.
■
Remote Console (2-cursor) is recommended.
Compaq Confidential – Need to Know Required
Writer: James Parish Project: Compaq Remote Insight Lights-Out Edition User Guide Comments:
Part Number: 159206-005 File Name: e-ch4 Configuring the Remote Insight Lights-Out Edition.doc Last Saved On: 7/10/01 4:16 PM
Configuring the Remote Insight Lights-Out Edition 4-21
Single and 2-Cursor Modes for Remote Console
2-Cursor Mode
The Remote Console 2 cursor option uses two mouse cursors in the remote
console window to represent the remote server’s mouse cursor and the local
client's mouse cursor. The local client cursor is seen as a crosshair in the
remote console window. The 2-cursor option is supported with Java 1.1 VM
and later. If the two cursors drift apart, they can be synchronized and brought
back together. Synchronize remote and local cursor using any of the following
procedures:
1. Click Sync Mouse above the remote console frame.
2. Right-click, drag, and move the local crosshair cursor to align with the
remote server’s mouse cursor.
3. Holding the Ctrl key, move the local crosshair cursor to align with the
remote server’s mouse cursor.
Single Cursor Mode
The Remote Console (Frame) and Remote Console (Full) options present a
single mouse cursor during remote console. Synchronization of two cursors is
eliminated, making navigation easier in the remote console window.
Single Cursor Mode requires Java 1.3.0_01 VM or greater. This download is
available on the Compaq website at
www.compaq.com/manage/jvm.html
Compaq Confidential – Need to Know Required
Writer: James Parish Project: Compaq Remote Insight Lights-Out Edition User Guide Comments:
Part Number: 159206-005 File Name: e-ch4 Configuring the Remote Insight Lights-Out Edition.doc Last Saved On: 7/10/01 4:16 PM
Chapter
5
Using the Remote Insight
Lights-Out Edition
This chapter addresses common questions about how to use the features of the
Remote Insight Lights-Out Edition (RILOE) board.
Compaq Confidential – Need to Know Required
Writer: James Parish Project: Compaq Remote Insight Lights-Out Edition User Guide Comments:
Part Number: 159206-005 File Name: f-ch5 Using the Remote Insight Lights-Out Edition.doc Last Saved On: 7/10/01 4:17 PM
5-2
Compaq Remote Insight Lights-Out Edition User Guide
Accessing the Remote Insight Lights-Out
Edition Board for the First Time
The RILOE board is configured with a default user name, password, and DNS
name. A Network settings tag with the preconfigured values is attached to the
board. Use these values to access the board remotely from a network client
using a standard Web browser.
IMPORTANT: For security reasons, Compaq recommends that you change these default
settings after accessing the Remote Insight Lights-Out Edition for the first time.
The default values are:
■
User name: Administrator
■
Password: The last four digits of the serial number
■
DNS name: RIBXXXXXXXXXXXX, where the 12 Xs are the
MAC address of the RILOE board
IMPORTANT: User names and passwords are case sensitive.
Steps to access the RILOE board for the first time:
1. Enter the RILOE board IP address or DNS name in the address bar of
the Web browser.
2. When connecting to the Compaq RILOE board in a browser for the first
time, you will receive a security alert.
■
If Yes is selected, the browser continues to the login screen of the
RILOE board. The message displays each time the user accesses the
board in a browser.
■
If No is selected, the user is returned to the Welcome screen of the
RILOE board.
■
If View Certificate is selected, a popup window displays showing
the certificate information. Installing the certificate to your browser
prevents the security alert message from displaying in the future.
To install the certificate, proceed to step 3. If you choose not to install
the certificate, proceed to step 4.
NOTE: If the certificate is removed from your browser, or if you have upgraded the
firmware, or if the board is rebooted, the security alert messages display again.
Compaq Confidential – Need to Know Required
Writer: James Parish Project: Compaq Remote Insight Lights-Out Edition User Guide Comments:
Part Number: 159206-005 File Name: f-ch5 Using the Remote Insight Lights-Out Edition.doc Last Saved On: 7/10/01 4:17 PM
Using the Remote Insight Lights-Out Edition 5-3
NOTE: The group administration function and access to the RILOE board’s Web interface
are encrypted using SSL security. However, the keystrokes used during access to the
Remote Console are obscured and not SSL encrypted.
1. To install the certificate to your browser:
a. Click Install Certificate. The Certificate Manager Import Wizard
starts.
b. Click Next.
c. Click Next to allow the browser to automatically select the
certificate store when the Certificate Store window displays.
d. Click Finish when the Completing the Certificate Manager
Import Manager Wizard displays.
e. Click Yes to confirm the installation of the certificate when the
confirmation window displays.
2. When the RILOE board has been detected, the screen will prompt you
for a user name and password. Use the default user name and password
from the Network settings tag and click OK.
Figure 5-1. Account Login screen
3. After the default user name and password have been verified, the
Remote Insight navigation frame and summary home page open.
Compaq Confidential – Need to Know Required
Writer: James Parish Project: Compaq Remote Insight Lights-Out Edition User Guide Comments:
Part Number: 159206-005 File Name: f-ch5 Using the Remote Insight Lights-Out Edition.doc Last Saved On: 7/10/01 4:17 PM
5-4
Compaq Remote Insight Lights-Out Edition User Guide
The Remote Insight summary home page provides general information about
the RILOE board such as the user currently logged on, server name and status,
Remote Insight IP address and name, and latest log entry data. The summary
home page also shows whether the RILOE board has been configured to use
Compaq Web-Based Management and Insight Management Web agents.
Accessing the Features of the Remote
Insight Lights-Out Edition
All of the capabilities of the RILOE board are listed on the Remote Insight
navigation frame. The following browsers are supported:
■
Microsoft Internet Explorer
GMinimum:
Microsoft Internet Explorer 4.01 (version 4.72.2106.8 or
newer) for Windows 95, Windows 98, Windows NT 4.0, and
Windows 2000
GRecommended:
Microsoft Internet Explorer 5.0 or newer
IMPORTANT: Internet Explorer 4.01 requires Service Pack 3 on Windows NT 4.0.
■
Netscape browser
GMinimum:
Netscape Communicator 4.08
GRecommended:
Netscape Communicator 4.76 or newer
NOTE: Netscape Communicator 6 is not supported at this time.
The Remote Insight navigation frame displays the following sections:
■
Remote Console
This section gives you access to different views of the Remote Console
and allows you to define keystroke sequences that will be transmitted to
the remote host server at the press of a hot key.
■
Server Information
The Server Information section provides general server status
information and video replays of prior server reset sequences. Data from
the Compaq Survey utility is also available in this section.
Compaq Confidential – Need to Know Required
Writer: James Parish Project: Compaq Remote Insight Lights-Out Edition User Guide Comments:
Part Number: 159206-005 File Name: f-ch5 Using the Remote Insight Lights-Out Edition.doc Last Saved On: 7/10/01 4:17 PM
Using the Remote Insight Lights-Out Edition 5-5
■
Logs
The Logs section displays and manages the Remote Insight Event Log
and the Integrated Management Log. Both of these logs are useful for
server troubleshooting and proactive system management.
■
Power
This section provides remote Virtual Power Button and power cycle
“remote reset” capabilities by means of a hardware-level cold boot.
■
Virtual Floppy Drive
Options pertaining to the use of the Virtual Floppy Drive feature are
found in this section.
■
Administration
The Administration section allows you to manage individualized
settings for users, SNMP alerts, the network environment, and global
security. This section also includes an option that enables easy upgrades
of the RILOE board firmware.
■
Help
Help for the Remote Insight Lights-Out Edition along with tips and
tricks for optimum usage are included in this last section.
Using the Graphical Remote Console to
Manage the Remote Host Server
The Remote Console feature of the RILOE board redirects the host server
console to the network client browser, providing full text and graphical mode
video, keyboard, and mouse access to the remote host server.
With the Remote Console, you have complete control over a remote host
server as if you were in front of it. You can access the remote file system and
the network drives. The Remote Console allows you to change hardware and
software settings of the remote host server, install applications and drivers,
change remote server screen resolution, and gracefully shut down the remote
system.
Compaq Confidential – Need to Know Required
Writer: James Parish Project: Compaq Remote Insight Lights-Out Edition User Guide Comments:
Part Number: 159206-005 File Name: f-ch5 Using the Remote Insight Lights-Out Edition.doc Last Saved On: 7/10/01 4:17 PM
5-6
Compaq Remote Insight Lights-Out Edition User Guide
With the Remote Console, you can observe POST boot messages as the
remote host server restarts and initiate ROM-based setup routines to configure
the remote host server’s hardware. When installing operating systems
remotely, the graphical Remote Console lets you view and control the host
server screen seamlessly throughout the installation process.
NOTE: Whenever the Remote Insight Lights-Out Edition resets the Remote Console
settings will change back to the default settings.
NOTE: While using 2 cursor mode, when you move the network client’s mouse pointer
over the remote host server screen displayed in the Remote Console, the local mouse
pointer will turn into a crosshair and the remote host server’s mouse pointer will remain
unchanged.
NOTE: If the colors displayed on the Remote Console screen do not appear to be correct,
you can adjust the color palette by clicking Settings and selecting the correct operating
system.
Figure 5-2. Remote Console session in 2 cursor mode
Compaq Confidential – Need to Know Required
Writer: James Parish Project: Compaq Remote Insight Lights-Out Edition User Guide Comments:
Part Number: 159206-005 File Name: f-ch5 Using the Remote Insight Lights-Out Edition.doc Last Saved On: 7/10/01 4:17 PM
Using the Remote Insight Lights-Out Edition 5-7
Enhanced Features of the Remote Console
The four buttons at the top of the Remote Console provide the RILOE board
with enhanced features. Each button has the following functions.
Refresh
There may be instances when the Remote Console screen is not
displaying the latest data. Click Refresh to force the RILOE board to
repaint the screen.
Sync Mouse
While using 2-cursor mode, Sync Mouse attempts to synchronize the
cursor movement of the local mouse with the cursor movement of the
remote mouse. To synchronize the movement of both cursors, click
Sync Mouse and wait until the local mouse pointer stops moving.
IMPORTANT: Mouse speed synchronization will fail if you move the mouse while syncing
is in progress.
NOTE: Compaq recommends that you routinely synchronize the remote and local cursor.
When the local and remote mouse cursors move at the same speed, the
cursors can be automatically aligned by moving the local arrow cursor
outside the Remote Console frame, pausing for a moment, then moving
the local mouse cursor back into the Remote Console frame.
Compaq recommends that you try different mouse speed settings on the
remote host server to achieve the best mouse cursor synchronization.
For example, in Microsoft Windows NT Server 3.51 or 4.0, the slowest
mouse setting is the easiest to control. In Microsoft Windows 2000, the
average mouse speed setting is the easiest to control. Also, cursor
shadowing must be disabled.
Ctrl-Alt-Del
Use this button to enter the key sequence Ctrl+Alt+Del into the Remote
Console. You would use this key sequence to log on to Windows NT.
Compaq Confidential – Need to Know Required
Writer: James Parish Project: Compaq Remote Insight Lights-Out Edition User Guide Comments:
Part Number: 159206-005 File Name: f-ch5 Using the Remote Insight Lights-Out Edition.doc Last Saved On: 7/10/01 4:17 PM
5-8
Compaq Remote Insight Lights-Out Edition User Guide
Settings
Use this button to change the default character set used by the Remote
Console and the type of operating system the Remote Console is
connecting to. Modifying the Remote Console settings ensures proper
operation of the Remote Console and correct display of colors and
characters.
Single Mouse Pointer in Remote Console
In the firmware releases prior to version 2.32, the mouse position in Remote
Console was indicated by a crosshair for the local mouse and an arrow
(typically) for the remote one. There has always been the need to synchronize
the two using methods such as clicking Sync Mouse above the remote console
screen or lining up the cursors using the CTRL key. For some operating
systems, it is recommended to use the 2-cursor mode for remote console. See
the “Optimized Performance for Remote Console” section in Chapter 4 for
specific operating system recommendations.
In version 2.32 and later, synchronization of cursors has been simplified with a
single-cursor mode for some operating systems, which means the local cursor
does not display when the mouse is over the remote console screen. This
feature removes the need to synchronize multiple cursors.
To enable the single mouse cursor mode in the remote console window, you
must download the Java 1.3.0_01 VM or later and install it on the client
machine. The remote server does not require any software to obtain a single
mouse pointer. You can download Java 1.3.0_01 VM from
www.compaq.com/manage/jvm.html
After the firmware is upgraded on the RILOE board and the Java 1.3.0_01 VM
is installed on the client machine, a single mouse cursor will be visible in the
remote console window. When the cursor is moved away from the remote
server screen, focus is transferred back to the client screen and the server’s
mouse cursor will display again.
The Java 1.3.0_01 VM must be plugged into the browser for the single-cursor
mode to work. If you do not want to download the updated JVM, there is an
option to use the browser’s 1.1 JVM and have two mouse cursors, as in
previous firmware releases.
The two mouse cursors option is available by selecting the Remote Console
(2-cursor) option in the Remote Console section of the Remote Insight
navigation frame.
Compaq Confidential – Need to Know Required
Writer: James Parish Project: Compaq Remote Insight Lights-Out Edition User Guide Comments:
Part Number: 159206-005 File Name: f-ch5 Using the Remote Insight Lights-Out Edition.doc Last Saved On: 7/10/01 4:17 PM
Using the Remote Insight Lights-Out Edition 5-9
You implicitly select single-cursor mode when selecting Remote Console
(Frame) or Remote Console (Full). If the 1.3.0_01 JVM is not loaded, you
will be prompted to download the latest JVM. If the latest JVM can not be
loaded, a blank remote console screen is shown. You are still able to use the
2-cursor mode option, which supports 1.1 JVM.
Remote Console Views
The Remote Console provides two options for viewing the host server’s
screen: Frame View and Full Screen View.
Both views offer full control of the host server, but only the Frame View
feature allows the Remote Insight navigation frame to be displayed alongside
the Remote Console, which offers maximum control (see Figure 5-2). The
Full Screen View allows for optimum local display of higher screen
resolutions on the remote host server without having to scroll the local image
in the Remote Console. Hyperlinks at the top of the Remote Console screen
let you switch between viewing modes.
NOTE: High host server screen resolutions decrease the screen refresh rate of the
Remote Console. To improve the screen refresh rate of the Remote Console, Compaq
recommends lowering the remote host server screen resolution.
Remote Console Hot Keys
The Remote Console hot keys feature allows you to define up to six multiple
key combinations to be assigned to each hot key. When a hot key is pressed in
the Remote Console, the defined key combination (all keys pressed at the
same time) will be transmitted in place of the hot key to the remote host
server.
Compaq Confidential – Need to Know Required
Writer: James Parish Project: Compaq Remote Insight Lights-Out Edition User Guide Comments:
Part Number: 159206-005 File Name: f-ch5 Using the Remote Insight Lights-Out Edition.doc Last Saved On: 7/10/01 4:17 PM
5-10
Compaq Remote Insight Lights-Out Edition User Guide
To define a Remote Console hot key:
1. Click Remote Console Hot Keys, located in the Remote Console
section of the Remote Insight navigation frame. A screen similar to
Figure 5-3 displays.
Figure 5-3. Remote Console Hot Keys definitions
2. Select the hot key you want to define and use the drop boxes to select
the key sequence to be transmitted to the host server at the press of the
hot key.
3. Click Save Hot Keys when you have finished defining the key
sequences.
NOTE: For additional tips about using the Remote Console, refer to the Tips and Tricks
screen.
Compaq Confidential – Need to Know Required
Writer: James Parish Project: Compaq Remote Insight Lights-Out Edition User Guide Comments:
Part Number: 159206-005 File Name: f-ch5 Using the Remote Insight Lights-Out Edition.doc Last Saved On: 7/10/01 4:17 PM
Using the Remote Insight Lights-Out Edition 5-11
Troubleshooting the Remote Host Server
The RILOE board provides features for proactive system management and
efficient troubleshooting of server problems.
In addition to the Remote Console, you have access to overall server status
information, video replay of prior server resets, and other information gathered
by the Compaq Survey utility.
The Remote Insight Lights-Out Edition maintains a complete set of logs for
troubleshooting server problems. These logs are the Remote Insight Event Log
and the Integrated Management Log.
Full integration with Compaq Insight Manager XE provides warning of
potential problems by means of SNMP trap alerts displayed on a Compaq
Insight Manager XE console. This integration is achieved by installing and
configuring Compaq Insight agents on the remote server. See the “Enabling
SNMP Alerts” section in this chapter for more information.
Obtaining Additional Information Concerning the
State of the Remote Host Server
The Status option in the Server Information section of the Remote Insight
navigation frame provides comprehensive status information about the
following items:
■
Server information
■
Remote Insight information
■
POST diagnostic results
■
Abend environment messages generated by the operating system
Video Replays of Prior Server Reset Sequences
The Reset Sequences option in the Server Information section of the Remote
Insight navigation frame provides video replay of server reset sequences. This
option allows you to observe ROM-based POST messages and operating
system load messages of prior remote host server resets, including any error
messages displayed by the operating system before a server hang.
IMPORTANT: Reset Sequences require the use of the Remote Console. You will not be
able to access the Remote Console while replaying the reset sequences.
Compaq Confidential – Need to Know Required
Writer: James Parish Project: Compaq Remote Insight Lights-Out Edition User Guide Comments:
Part Number: 159206-005 File Name: f-ch5 Using the Remote Insight Lights-Out Edition.doc Last Saved On: 7/10/01 4:17 PM
5-12
Compaq Remote Insight Lights-Out Edition User Guide
To access video replays of the remote host server reset sequences:
1. Click Reset Sequences, located in the Server Information section of
the Remote Insight navigation frame.
2. Select the desired sequence replay from the following options:
GPrevious
Reset Sequence Replay— This option lets you replay the
video sequence prior to the most recent host server reset. The video
replay displays ROM-based messages and operating system load
messages that occurred while starting the remote host server.
GCurrent
Reset Sequence Replay— This option lets you replay the
video sequence of the most recent host server reset. The video replay
displays ROM-based messages and operating system load messages
that occurred while starting the remote host server.
GFailure
Sequence— This option lets you replay the video sequence
leading up to the most recent host server reset resulting from a
system problem. This video replay includes any error information
generated by the operating system prior to the remote host server
problem and subsequent reset.
Survey Information
The Survey Information option allows you to view the troubleshooting
information collected by the Compaq Survey utility. The Survey utility can be
installed on the remote host server to gather hardware and software
configuration information.
NOTE: Linux does not support the Survey feature.
The Survey utility is included on the Compaq Management CD. You can also
obtain the Survey utility in a SoftPaq from the Compaq website:
www.compaq.com/support
To view Survey information gathered by the utility on the host server, click
Survey and then Download Survey Information. The browser will download
the SURVEY.IDI file to your local machine.
Compaq Confidential – Need to Know Required
Writer: James Parish Project: Compaq Remote Insight Lights-Out Edition User Guide Comments:
Part Number: 159206-005 File Name: f-ch5 Using the Remote Insight Lights-Out Edition.doc Last Saved On: 7/10/01 4:17 PM
Using the Remote Insight Lights-Out Edition 5-13
To read the SURVEY.IDI file using the Web-enabled Survey Utility:
1. Place the SURVEY.IDI file in the COMPAQ\SURVEY\IDIFILES folder
of the local machine.
IMPORTANT: You must have installed the Survey utility on the local machine in order to
use this feature. The folder named IDIFILES is created manually.
2. Point the browser to the files on the local machine. To do this, enter the
URL for the local host, http://127.0.0.1:2301 or http://machine:2301,
where machine is the IP address or DNS name of the local host.
3. Select the Survey Utility and click the Options link. Click Select
Current Report Session or Primary/Compare Session Selection
Tables. The Configuration History Files screen displays the available
files.
4. Click the IDI file you downloaded from the Remote Insight board.
5. Select the Primary and Compare sessions to be included in the report.
NOTE: Each Survey Utility Report can compare two sessions. You can specify the Primary
and Compare sessions to be included in the report. The Compare session is compared to
the Primary session. If you select View Primary Session Only, no Compare session will be
included in the report.
6. Select the Report Type. Use the list box to select the type of report you
want to view. The types of reports offered are:
GShow
Only Major Differences—Generates a comparison output,
only showing information that caused a checkpoint. A checkpoint is
determined programmatically as an item that was “significantly
different” from the previous session.
GShow
All Differences—Generates a comparison output, only
showing information that was different between sessions. In most
cases, information exists in the sessions that is transient in nature, for
example, number and type of processes running. This level of report
generation displays these differences in addition to those reported by
the checkpoint level.
GShow
Standard Detail and Differences—Generates a comparison
output, showing summary level information. Summary information
is most appropriate for configuration management because it shows
the system configuration in abbreviated form.
Compaq Confidential – Need to Know Required
Writer: James Parish Project: Compaq Remote Insight Lights-Out Edition User Guide Comments:
Part Number: 159206-005 File Name: f-ch5 Using the Remote Insight Lights-Out Edition.doc Last Saved On: 7/10/01 4:17 PM
5-14
Compaq Remote Insight Lights-Out Edition User Guide
GShow
More Detail and Differences—Generates a comparison
output, showing advanced level information (default). Advanced
information is considered expert level and is most appropriate for
problem resolution, because it is considerably more detailed than
summary information.
GShow
All Detail and Differences—Generates a comparison output,
showing expert level information. The expert level is the most
extensive user level of information available. In typical situations, it
is not necessary to provide this level of information. In some cases,
however, the information contained in this level may not have been
interpreted for a lower report level.
7. Click New Report to generate and display a Survey Utility Report
based on the selected sessions and report type.
For more information on using the Survey Utility, refer to the Survey Utility
Online Help User Guide available at
www.compaq.com/support
Information Logs
The Remote Insight navigation frame gives you access to two types of
information logs that are useful when troubleshooting host server problems:
■
Integrated Management Log
The Integrated Management Log allows you to view logged remote
server events. Logged events include all server-specific events recorded
by the Compaq system health driver, including operating system
information and ROM-based POST codes.
■
Remote Insight Event Log
The Remote Insight Event Log is an operating system-independent log
that maintains a record of events by date and time. Logged events
include major server events, such as a server power outage or a server
reset, and Remote Insight events, such as a loose cable or an
unauthorized login attempt. For a complete list of logged events, see
table 7-3 in Chapter 7.
Compaq Confidential – Need to Know Required
Writer: James Parish Project: Compaq Remote Insight Lights-Out Edition User Guide Comments:
Part Number: 159206-005 File Name: f-ch5 Using the Remote Insight Lights-Out Edition.doc Last Saved On: 7/10/01 4:17 PM
Using the Remote Insight Lights-Out Edition 5-15
Progressive Delays for Failed Browser Login
Attempts
Another security feature of firmware version 2.32 and later is the progressive
delays for failed browser login attempts. After a series of three failed login
attempts by a user, the RILOE board imposes delays to subsequent logins.
This scenario continues until a valid login is completed.
This feature assists in defending against possible dictionary attacks against the
browser login port.
Restarting the Remote Host Server
Troubleshooting a remote host server may require restarting the remote
system. You can easily restart the remote host server by using the options
listed in the Power section of the Remote Insight navigation frame.
The first option, Reset Server,, performs a hardware-level cold boot reset and
is available regardless of the condition of the host server or the operating
system. The Reset Server feature allows the host server to be restarted
whenever the server is locked up or is in need of a reboot.
IMPORTANT: This type of reboot does not gracefully shut down the host server’s
operating system. For a graceful shutdown of a server, use Compaq Insight Manager XE
or the Remote Console.
To restart a host server:
1. Click Reset Server in the Power section of the Remote Insight
navigation frame. You will see a confirmation screen followed by a
warning.
2. To begin rebooting the host server, click Confirm.
3. After the remote host server reboots, a Remote Console session begins,
allowing you to observe ROM-based POST messages and operating
system load messages.
The second option is the Virtual Power Button, which will only work if the
host server was configured to use this device when the RILOE board was
installed. If the Virtual Power Button option has not been installed in the host
server, using this option has no effect. See Chapter 2 for details about enabling
the Virtual Power Button feature in the host server.
Compaq Confidential – Need to Know Required
Writer: James Parish Project: Compaq Remote Insight Lights-Out Edition User Guide Comments:
Part Number: 159206-005 File Name: f-ch5 Using the Remote Insight Lights-Out Edition.doc Last Saved On: 7/10/01 4:17 PM
5-16
Compaq Remote Insight Lights-Out Edition User Guide
Clicking Virtual Power Button in the Power section of the Remote Insight
navigation frame is analogous to pressing the physical power button of the
host server. The Virtual Power Button turns the host server’s power on or off,
depending on the power state of the host server.
IMPORTANT: Using the Virtual Power Button option does not gracefully shut down the
host server’s operating system. For a graceful shutdown of a server’s operating system,
use Compaq Insight Manager XE or the Remote Console before using the Virtual Power
Button option.
Using the Virtual Floppy Drive
With the Virtual Floppy Drive, an administrator can easily direct a host server
to boot and use a standard 1.44-MB diskette from anywhere on the network by
means of a standard Web browser. The Virtual Floppy Drive eliminates the
need to visit a remote host server to insert and use a diskette, enabling remote
operating system installation from a network drive and remote host server
ROM updates.
Use the Virtual Floppy Drive options to carry out any of the following
functions:
■
Running Compaq User Diagnostics by booting remote host servers from
a diagnostic diskette
NOTE: Compaq recommends that you first delete the SYSMON2.TM file before using
Compaq User Diagnostics with the Virtual Floppy Drive.
■
Applying ROMPaq upgrades to remote host servers
■
Deploying an operating system on remote host servers from network
drives
■
Performing disaster recovery of failed operating systems
IMPORTANT: If the Virtual Floppy Drive feature is not present, flash the Remote Insight
Lights-Out Edition option ROM. RILOE boards with a firmware 2.11 or earlier will require a
ROM update for this feature. The ROM update can be obtained from the following website:
www.compaq.com/lights-out
NOTE: The Virtual Floppy Drive feature does not support Remote Insight Lights-Out
Edition firmware upgrade. To upgrade the firmware, use the firmware upgrade feature in
the Remote Insight Lights-Out Edition.
Compaq Confidential – Need to Know Required
Writer: James Parish Project: Compaq Remote Insight Lights-Out Edition User Guide Comments:
Part Number: 159206-005 File Name: f-ch5 Using the Remote Insight Lights-Out Edition.doc Last Saved On: 7/10/01 4:17 PM
Using the Remote Insight Lights-Out Edition 5-17
Uploading a Diskette Image to the Remote Server
The Insert Virtual Floppy option allows you to send a diskette image file to the
RILOE board in the remote host server. The RILOE board treats the diskette
image file as a standard diskette.
IMPORTANT: The Virtual Floppy Drive has been designed and tested with Microsoft DOS,
Windows 95, and Windows 98 bootable diskettes. The Virtual Floppy Drive will only work
correctly with an operating system that accesses diskette drives by means of standard
BIOS Interrupt 13 calls. The Virtual Floppy Drive is not compatible with protected-paging
mode applications such as EMM386.
NOTE: Image files of diskettes are created and stored locally on your hard drive or on a
network drive with the Compaq Diskette Image Utility. This utility is available for download
from the Compaq website at
www.compaq.com/lights-out
For additional information about this utility, see the section “Using the Compaq Diskette
Image Utility” later in this chapter.
To upload a diskette image to the RILOE board in the remote host server:
1. Click Insert Virtual Floppy, located in the Virtual Floppy Drive
section of the Remote Insight navigation frame.
Compaq Confidential – Need to Know Required
Writer: James Parish Project: Compaq Remote Insight Lights-Out Edition User Guide Comments:
Part Number: 159206-005 File Name: f-ch5 Using the Remote Insight Lights-Out Edition.doc Last Saved On: 7/10/01 4:17 PM
5-18
Compaq Remote Insight Lights-Out Edition User Guide
2. Type in the location and name of the diskette image file, or click
Browse and choose the diskette image file you want to transfer to the
RILOE board.
Figure 5-4. Location and name of the diskette image file
3. When the full path and diskette image file name are in the text entry
field, click Insert Virtual Floppy to upload the image file to the RILOE
board in the host server.
4. When the upload is complete, the screen changes to the Virtual Floppy
Status screen. If needed, use the Virtual Floppy Status screen to
modify options for the Virtual Floppy Drive.
IMPORTANT: The external power of the internal 16-pin cable (on supported servers)
must be installed when booting to a virtual floppy, otherwise the image will be lost when
the server is reset.
NOTE: The Virtual Floppy Drive can hold only one diskette image file at a time. The
uploaded diskette image file will remain in the Virtual Floppy Drive until it is either
replaced with another diskette image file or erased from the Virtual Floppy Drive by
clicking the Eject Virtual Floppy button on the Virtual Floppy Status screen. The
diskette image file will also be erased if power to the RILOE board is lost. Logging out of
the RILOE board will not erase the diskette image file from the Virtual Floppy Drive.
Compaq Confidential – Need to Know Required
Writer: James Parish Project: Compaq Remote Insight Lights-Out Edition User Guide Comments:
Part Number: 159206-005 File Name: f-ch5 Using the Remote Insight Lights-Out Edition.doc Last Saved On: 7/10/01 4:17 PM
Using the Remote Insight Lights-Out Edition 5-19
Changing Virtual Floppy Drive Settings
The Virtual Floppy Status screen allows you to view and change current
settings for the Virtual Floppy Drive. Changes you make to the virtual diskette
drive boot and write-protect options take effect when you click Submit
Changes.
IMPORTANT: A remote host server can use files uploaded to a Virtual Floppy Drive only if
the Virtual Floppy Drive is active. The Virtual Floppy Drive will be active when the RILOE
board has restarted the host server using a diskette image file uploaded to the Virtual
Floppy Drive. The Virtual Floppy Drive will remain active until the remote host server is
restarted with its own operating system.
NOTE: Although the Virtual Floppy Drive is active, the remote host server’s physical
diskette drive will be temporarily disabled. The host server’s diskette drive will be reenabled when the host server is restarted with its own operating system and the Virtual
Floppy Drive is not active.
The Virtual Floppy Boot option has three settings:
■
Boot Always— This setting instructs the RILOE board to always boot
the host server from the diskette image file in the Virtual Floppy Drive.
If this setting is checked, Virtual Floppy Status shows the virtual drive
as active after the server has restarted.
■
Boot Once—This setting instructs the RILOE board to boot the host
server one time from the diskette image file in the Virtual Floppy Drive.
If this setting is checked, Virtual Floppy Status shows the virtual drive
as active after the server has restarted.
■
No Boot— This is the default setting for the Virtual Floppy Drive. It
instructs the RILOE board not to boot the host server from the diskette
image file in the Virtual Floppy Drive. This setting has no effect on the
Virtual Floppy Drive status.
Copying Files on the Remote Server to the Virtual
Floppy Drive
The Write Protect Virtual Floppy option in the Virtual Floppy Status
screen specifies whether data on the host server can be copied to the Virtual
Floppy Drive. If this option is checked, the Virtual Floppy Drive is writeprotected and no data from the host server can be copied to it.
Compaq Confidential – Need to Know Required
Writer: James Parish Project: Compaq Remote Insight Lights-Out Edition User Guide Comments:
Part Number: 159206-005 File Name: f-ch5 Using the Remote Insight Lights-Out Edition.doc Last Saved On: 7/10/01 4:17 PM
5-20
Compaq Remote Insight Lights-Out Edition User Guide
Ensure that the Write Protect Virtual Floppy option is unchecked to copy
remote files to the Virtual Floppy Drive using standard operating system
commands typed in at the Remote Console. The Virtual Floppy option cannot
be used to upgrade the Remote Insight Light-Out Edition firmware.
Making a Local Copy of the Diskette Image in the
Virtual Floppy Drive
The Copy Virtual Floppy option in the Virtual Floppy Drive section of the
Remote Insight navigation frame allows you to make a local copy of the
diskette image file present in the Virtual Floppy Drive of the host server.
NOTE: Diskette image files that have been copied from remote servers can be used to
recreate hardcopy diskettes by means of the Compaq Diskette Image Utility. For additional
information about this utility, see the section “Using the Compaq Diskette Image Utility”
later in this chapter.
To copy a remote diskette image file in the Virtual Floppy Drive:
1. In the Virtual Floppy Drive section of the Remote Insight navigation
frame, Click theCopy Virtual Floppy menu option.
2. Click Copy Virtual Floppy. An operating system screen will display
and prompt you to save the file locally.
3. Navigate to the location on the hard drive or network drive where you
want to save the diskette image file and click OK.
4. After a few seconds, a local copy of the remote diskette image file will
be created in the location you specified.
5. If necessary, use the Compaq Diskette Image Utility to create a
duplicate of the Virtual Floppy image on a diskette.
Using the Compaq Diskette Image Utility
The Compaq Diskette Image Utility has three functions:
■
Creating an image file from a standard 1.44-MB diskette suitable for use
with the Virtual Floppy Drive
■
Creating a standard 1.44-MB diskette from an image file copied from
the Virtual Floppy Drive
■
Comparing a diskette image file with a standard 1.44-MB diskette
Compaq Confidential – Need to Know Required
Writer: James Parish Project: Compaq Remote Insight Lights-Out Edition User Guide Comments:
Part Number: 159206-005 File Name: f-ch5 Using the Remote Insight Lights-Out Edition.doc Last Saved On: 7/10/01 4:17 PM
Using the Remote Insight Lights-Out Edition 5-21
Creating an Image File from a Diskette
To create an image file from a standard 1.44 MB diskette:
1. Launch the Compaq Diskette Image Utility and click the Create Image
File tab.
2. Insert the diskette you want to make an image of into your diskette
drive.
3. Provide the source drive, a path where you want to save the image along
with the file name the image will have, and an image file description.
Your screen should be similar to Figure 5-5.
NOTE: The path can be a local or a network path. If you do not provide a path, the image
file will be saved on the Desktop.
Figure 5-5. Create Image File screen
4. Click Create to generate the image file in the location you specified.
Creating a Diskette from an Image File
To create a standard 1.44-MB diskette from an image file:
1. Launch the Compaq Diskette Image Utility and click the Create
Diskette tab.
Compaq Confidential – Need to Know Required
Writer: James Parish Project: Compaq Remote Insight Lights-Out Edition User Guide Comments:
Part Number: 159206-005 File Name: f-ch5 Using the Remote Insight Lights-Out Edition.doc Last Saved On: 7/10/01 4:17 PM
5-22
Compaq Remote Insight Lights-Out Edition User Guide
2. Insert a blank diskette into your diskette drive.
CAUTION: If the diskette is not blank, all data on the diskette will be erased.
3. Provide the location and name of the image file and the target diskette
drive. You can navigate to the location of the image file by clicking
Browse.
4. Click Create to generate the diskette from the image file.
Comparing an Image File with a Diskette
To compare an existing image file with a diskette:
1. Launch the Compaq Diskette Image Utility and click the Verify Image
File tab.
2. Insert the diskette that needs to be compared with an image file into
your diskette drive.
3. Provide the location and name of the image file and the target diskette
drive. You can navigate to the location of the image file by clicking
Browse. Your screen should be similar to Figure 5-6.
Figure 5-6. Verify Image File screen
Compaq Confidential – Need to Know Required
Writer: James Parish Project: Compaq Remote Insight Lights-Out Edition User Guide Comments:
Part Number: 159206-005 File Name: f-ch5 Using the Remote Insight Lights-Out Edition.doc Last Saved On: 7/10/01 4:17 PM
Using the Remote Insight Lights-Out Edition 5-23
4. Click Verify to start comparing the image file with the diskette. When
the verification completes, a popup screen displays the results.
Managing the User and Configuration
Settings of the Remote Insight Lights-Out
Edition Board
The options available in the Administration section of the navigation frame let
you manage user settings, SNMP alerting through integration with Compaq
Insight Manager XE, security settings, and network environment settings. This
section also provides a firmware upgrade option that lets you keep the Remote
Insight Lights-Out Edition current.
Adding Authorized Users
The Administration section of the Remote Insight navigation frame lets you
manage users of the RILOE board.
NOTE: Only users with supervisor access can manage other users on the RILOE board.
You can assign a different access level to each user. A user can have
supervisor status with the ability to create, modify, or delete other users.
Conversely, a user can be denied supervisor status and access to other features
of the RILOE board.
The RILOE board supports up to 12 users. Login attempts are tracked and
login failures are logged. You have the option of generating alerts on a remote
management PC running Compaq Insight Manager XE when login attempts
fail. The Remote Insight Lights-Out Edition will support all LAN-oriented
security features and dynamic password encryption.
To add a new user to the RILOE board:
1. Log on to the RILOE board using an account that has supervisor status.
2. Click Manage Users in the Administration section of the Remote
Insight navigation frame.
Compaq Confidential – Need to Know Required
Writer: James Parish Project: Compaq Remote Insight Lights-Out Edition User Guide Comments:
Part Number: 159206-005 File Name: f-ch5 Using the Remote Insight Lights-Out Edition.doc Last Saved On: 7/10/01 4:17 PM
5-24
Compaq Remote Insight Lights-Out Edition User Guide
3. Click Add New User and complete the fields with the necessary
information for the user being added.
Figure 5-7. Add New User profile screen
NOTE: For detailed information about what is required for each field, click the hyperlink
attached to each field name.
4. When the user profile is complete, click Save User Information to
return to the Manage Users screen.
NOTE: To clear the user profile form while entering a new user, click Restore User
Information.
Change an Existing User’s Profile
Changing an existing user’s information is also accomplished with the
Manage Users option in the Administration section of the Remote Insight
navigation frame.
IMPORTANT: Only users with supervisor access can manage other users on the RILOE
board.
Compaq Confidential – Need to Know Required
Writer: James Parish Project: Compaq Remote Insight Lights-Out Edition User Guide Comments:
Part Number: 159206-005 File Name: f-ch5 Using the Remote Insight Lights-Out Edition.doc Last Saved On: 7/10/01 4:17 PM
Using the Remote Insight Lights-Out Edition 5-25
To change an existing user’s information:
1. Log on to the RILOE board using an account that has supervisor status.
2. Click Manage Users and select from the list the name of the user whose
information you want to change.
3. Click Modify User.
4. Change the user information in the fields that require modification.
Click Save User Information to return to the Manage Users screen.
IMPORTANT: To recover the user’s original information, click Restore User Information.
All changes made to the profile will be lost.
NOTE: For detailed information about what can be entered in each field, click the
hyperlink attached to each field name.
Lockout Capability for Remote Console Port
With version 2.32 and later, you are able to configure how visible the remote
console port is on the network. The optional remote console port lockout
capability allows you to control the remote console access port, allowing
tighter security from unauthorized access. This option can only be configured
by a user with supervisor access.
Compaq Confidential – Need to Know Required
Writer: James Parish Project: Compaq Remote Insight Lights-Out Edition User Guide Comments:
Part Number: 159206-005 File Name: f-ch5 Using the Remote Insight Lights-Out Edition.doc Last Saved On: 7/10/01 4:17 PM
5-26
Compaq Remote Insight Lights-Out Edition User Guide
The Remote Console session port can be configured to be always enabled,
always disabled, or auto-enabled when a Remote Console session is initiated
by an authorized user. The configuration settings are controlled in the Global
Settings window, as shown in Figure 5-8.
Figure 5-8. Global Settings window
With supervisor access, you can configure the Remote Console port
availability using the options available in the Remote Console Port
Configuration section. The Remote Console Port Configuration options
are:
■
Enabled—The Remote Console port is always available. This is the
default setting. When the Remote Console port is available, with the
correct login name and password, you can establish a text-based Remote
Console session with the server.
■
Disabled—The Remote Console port is always disabled. When the
Remote Console port is unavailable, the socket is closed so that the port
does not show up when ports are scanned.
■
Auto—The Remote Console port becomes available only after a user
with Remote Console privileges logs in to the RILOE board and initiates
a Remote Console session. The Remote Console port becomes
unavailable after the Remote Console session has ended.
Compaq Confidential – Need to Know Required
Writer: James Parish Project: Compaq Remote Insight Lights-Out Edition User Guide Comments:
Part Number: 159206-005 File Name: f-ch5 Using the Remote Insight Lights-Out Edition.doc Last Saved On: 7/10/01 4:17 PM
Using the Remote Insight Lights-Out Edition 5-27
Using a text-based terminal emulator program, such as HyperTerminal, a textbased remote console can be initiated through the remote console port using an
authorized login name and password. To avoid unauthorized access in this
manner, set the Remote Console Port Configuration to Auto.
If you choose to set the Remote Console Port Configuration to Auto,
Compaq Insight Manager XE users will be unable to initiate a Remote Console
session by right-clicking the server in the Compaq Insight Manager XE device
list.
NOTE: This is only affected when managing the server through the Remote Insight
Lights-Out Edition NIC.
For Compaq Insight Manager XE users set the Remote Console Port
Configuration to Auto and initiate Remote Console session through the
browser interface.
To configure remote console availability:
1. Log on to the RILOE board using an account that has supervisor status.
NOTE: If you do not have supervisor status, you will be able to view only the Global
Settings window.
2. Click Global Settings in the Administration section of the Remote
Insight navigation frame.
3. Configure the remote console availability as needed by clicking the
appropriate option in the Remote Console Port Configuration section.
4. Click Apply to complete the changes.
When you click Apply, the RILOE board restarts. When this happens, your
browser’s connection to the board will be terminated. After the RILOE board
has restarted, it will initiate an auto-connect, allowing you to log in to the
RILOE board.
Compaq Confidential – Need to Know Required
Writer: James Parish Project: Compaq Remote Insight Lights-Out Edition User Guide Comments:
Part Number: 159206-005 File Name: f-ch5 Using the Remote Insight Lights-Out Edition.doc Last Saved On: 7/10/01 4:17 PM
5-28
Compaq Remote Insight Lights-Out Edition User Guide
Enabling SNMP Alerts
The Manage Alerts option in the Administration section of the Remote
Insight navigation frame allows you to specify which type of alert messages
will be forwarded from the host server and RILOE board to a Compaq
Insight Manager XE console. The Manage Alerts option also allows you to
send test alerts and to clear pending alerts. In both instances, the alerts will be
displayed on a Compaq Insight Manager XE console.
NOTE: Users with supervisor status can configure alerts for all users, but this status is
not a requirement for alert configuration. Any user with login access to the RILOE board
can configure how alerts will be received by modifying the logged-on user profile.
There are two types of alerts that can be received:
■
Host OS Generated SNMP Traps—The Insight Management agents
provided for each supported network operating system generate these
alerts. These agents must be installed on the host server to receive these
alerts. Alerts are sent to Compaq Insight Manager XE clients on the
network and forwarded asynchronously by the RILOE board to users
that have been configured to receive them.
■
Compaq Remote Insight Board Alerts—These alert the RILOE board
detects conditions, and they are independent of the host server operating
system. These alerts can be Compaq Insight Manager XE SNMP traps
or pager alerts. Alerts include major events, such as host server power
outage or host server reset and RILOE board events, such as a
disconnected keyboard cable or an unauthorized login attempt.
To configure alerts:
1. Log on to the RILOE board using an account that has supervisor status.
NOTE: Users with supervisor status can configure alerts for all users. While logged on,
users without supervisor status can configure alerts only for their user account.
Compaq Confidential – Need to Know Required
Writer: James Parish Project: Compaq Remote Insight Lights-Out Edition User Guide Comments:
Part Number: 159206-005 File Name: f-ch5 Using the Remote Insight Lights-Out Edition.doc Last Saved On: 7/10/01 4:17 PM
Using the Remote Insight Lights-Out Edition 5-29
2. Click Manage Alerts in the Administration section of the Remote
Insight navigation frame. A screen similar to Figure 5-9 displays.
Figure 5-9. Manage Alerts screen
3. Click Select Alert Types Received and select the user for whom you
want to configure alerts.
NOTE: If you logged on using an account without supervisor status, you will see only the
information for the account that is currently logged on.
4. Click View Alerts and select the type of alerts the user is to receive.
IMPORTANT: Alerting requires an SNMP IP address. Ensure that you provide the IP
address of the remote management system in the SNMP Trap IP Address field for the user
configured to receive the alerts. If the user will be receiving SNMP trap alerts from the
RILOE board at a Compaq Insight Manager XE console, the IP address of that console
must be provided.
Compaq Confidential – Need to Know Required
Writer: James Parish Project: Compaq Remote Insight Lights-Out Edition User Guide Comments:
Part Number: 159206-005 File Name: f-ch5 Using the Remote Insight Lights-Out Edition.doc Last Saved On: 7/10/01 4:17 PM
5-30
Compaq Remote Insight Lights-Out Edition User Guide
5. When done, click Save Alert Information to return to the
Manage Alerts screen.
IMPORTANT: To recover the user’s original alert information, click Restore Alert
Information. All changes made to the configuration will be lost.
NOTE: For detailed information about what can be entered in each field, click the
hyperlink attached to each field name.
Generating Test Alerts
Test alerts are generated by means of the Manage Alerts option in the
Administration section of the Remote Insight navigation frame. These alerts
include a Compaq Insight Manager XE SNMP trap and are used to verify the
network connectivity of the RILOE board in Compaq Insight Manager XE.
Test alerts can either be Global Test Alerts that are sent to all configured users
of the RILOE board or Individual Test Alerts that are sent only to the user
currently logged on.
NOTE: Only users with supervisor status can send Global Test Alerts.
To send out a test alert:
1. Click Manage Alerts in the Administration section of the Remote
Insight navigation frame.
2. If you have supervisor status and want to send a Global Test Alert to all
configured users, click Generate a Global Test Alert. If you do not
have supervisor status, you can only send an alert to yourself by clicking
on Generate an Individual Test Alert for: User Name.
3. After generating the alert, the message ‘Global test trap alerts sent’
displays.
4. Click Manage Alerts to return to the previous screen.
5. If the alert system is working correctly, an Alarm screen advising you
that an alert has been received. For more information, see the
“Receiving SNMP Alerts in Compaq Insight Manager XE” section in
this chapter.
Disabling Alerts
The Enable Alerts/Disable Alerts feature on the Manage Alerts screen
allows every user to enable or disable alerts globally.
Compaq Confidential – Need to Know Required
Writer: James Parish Project: Compaq Remote Insight Lights-Out Edition User Guide Comments:
Part Number: 159206-005 File Name: f-ch5 Using the Remote Insight Lights-Out Edition.doc Last Saved On: 7/10/01 4:17 PM
Using the Remote Insight Lights-Out Edition 5-31
To enable alerts or disable alerts, click Enable Alerts or Disable Alerts.
If alerts are enabled, then the Disable Alerts option displays. If alerts are
disabled, then the Enable Alerts option displays.
Modifying Network Settings for the Remote Insight
Lights-Out Edition Board
The Network Settings option in the Administration menu allows you to view
and modify the NIC IP address, subnet mask, and other TCP/IP-related
settings. From this screen you can enable or disable DHCP and, for servers not
using DHCP, you can configure a static IP address. The Network Settings
option is also the location where you specify the IP address or DNS name for
Compaq Web-based Management agents.
Figure 5-10. Network Settings screen
Compaq Confidential – Need to Know Required
Writer: James Parish Project: Compaq Remote Insight Lights-Out Edition User Guide Comments:
Part Number: 159206-005 File Name: f-ch5 Using the Remote Insight Lights-Out Edition.doc Last Saved On: 7/10/01 4:17 PM
5-32
Compaq Remote Insight Lights-Out Edition User Guide
To change network settings for the RILOE board:
1. Log on to the Remote Insight Lights-Out Edition using an account that
has supervisor status.
NOTE: Users that do not have supervisor status will be able to view only assigned
network settings.
2. Click Network Settings in the Administration section of the Remote
Insight navigation frame.
3. Change the network settings as needed by typing in the fields. After the
parameter changes have been made, click Apply to complete the
changes.
4. When you click Apply, the RILOE board restarts. When this happens,
your browser’s connection to the board is terminated. To reestablish a
connection, wait 60 seconds before launching another Web browser
session and logging in to the RILOE board.
Security Settings
The Global Settings option in the Administration section allows you to view
and modify security and keyboard settings for the RILOE board. The Security
Settings option allows the Remote Console session on the network client to
end automatically after the set amount of time selected. The Keyboard
Settings option allows you to enable or disable the remote server’s keyboard.
NOTE: Global Settings can be changed only by users with supervisor status. All other
users can only view the settings.
Keeping the Remote Insight Lights-Out Edition
Board Firmware Current
Firmware upgrades enhance the functionality of the RILOE board. The
firmware upgrade can be done from any network client using a standard Web
browser. However, only users with supervisor status can upgrade the firmware
on the RILOE board.
Compaq Confidential – Need to Know Required
Writer: James Parish Project: Compaq Remote Insight Lights-Out Edition User Guide Comments:
Part Number: 159206-005 File Name: f-ch5 Using the Remote Insight Lights-Out Edition.doc Last Saved On: 7/10/01 4:17 PM
Using the Remote Insight Lights-Out Edition 5-33
To upgrade the board’s firmware, you need a diskette containing the firmware
version to which you want to upgrade the RILOE board. The most recent
firmware for the Remote Insight Lights-Out Edition is available on the
Compaq website at
www.compaq.com/lights-out
To upgrade the RILOE board firmware using a standard Web browser:
1. Log on to the Remote Insight Lights-Out Edition using an account that
has supervisor status.
2. Click Upgrade Firmware in the Administration section of the
Remote Insight navigation frame.
3. Follow the instructions on the firmware upgrade screen. If you need
additional assistance, click Firmware Upgrade Help.
4. When the firmware update is complete, restart the Compaq Insight
Management agents if they are older than those included on the
Compaq Management CD 4.70.
Resetting the Remote Insight Lights-Out
Edition to the Factory Default Settings
The RILOE board can be reset to the factory default settings by using the
ROM-Based Setup Utility (F8). To reset the board to the factory settings:
1. Restart or power up the server.
2. Press the F8 key to enter the ROM-Based Setup Utility when the cursor
flashes and the Remote Insight Lights-Out Edition prompt displays on
the screen.
3. Select File, then select Set Defaults.
4. Select Enter, when the screen displays Set to Factory Defaults.
5. Select File, then select Exit.
Compaq Confidential – Need to Know Required
Writer: James Parish Project: Compaq Remote Insight Lights-Out Edition User Guide Comments:
Part Number: 159206-005 File Name: f-ch5 Using the Remote Insight Lights-Out Edition.doc Last Saved On: 7/10/01 4:17 PM
5-34
Compaq Remote Insight Lights-Out Edition User Guide
Getting Additional Help
Additional assistance for all Remote Insight Lights-Out Edition options is
available by means of the Remote Insight Help and Tips and Tricks hyperlinks
on the Remote Insight navigation frame. These links provide summary
information about the features of the board and helpful information for
optimizing the operation of the RILOE board.
You can also click the hyperlinks attached to field names throughout most of
the configuration screens. These hyperlinks will provide specific information
about the topic to which they are linked.
Integrating the Remote Insight
Lights-Out Edition Board with
Compaq Insight Manager XE
The Remote Insight Lights-Out Edition fully integrates with Compaq
Insight Manager XE in key operating environments, providing access to
Insight Management agents and support for full SNMP management. The
RILOE board supports SNMP trap delivery to an Insight Manager XE
Console, which can be configured to forward SNMP traps to a pager or email.
Full integration with Compaq Insight Manager XE also provides a single
management console for launching a standard Web browser to access the
RILOE board and for providing diagnostic information about the operation of
the board. While the operating system is running, you can establish a
connection to the Remote Insight Lights-Out Edition using Compaq
Insight Manager XE.
Compaq Confidential – Need to Know Required
Writer: James Parish Project: Compaq Remote Insight Lights-Out Edition User Guide Comments:
Part Number: 159206-005 File Name: f-ch5 Using the Remote Insight Lights-Out Edition.doc Last Saved On: 7/10/01 4:17 PM
Using the Remote Insight Lights-Out Edition 5-35
Receiving SNMP Alerts in Compaq
Insight Manager XE
Compaq Insight Manager XE provides support for full SNMP management,
and the RILOE board supports SNMP trap delivery to a Compaq Insight
Manager XE console. You can view the event log, select the event, and view
the additional information about the alert, as shown in Figure 5-11.
Figure 5-11. SNMP event screen
Configuring receipt of SNMP alerts in Compaq Insight Manager XE is a twostep process. The process requires configuring the RILOE board to enable
SNMP alerts and configuring Compaq Insight Manager XE to receive SNMP
alerts from a managed RILOE board.
To configure receipt of SNMP alerts in Compaq Insight Manager XE:
1. Use the Manage Users option in the Administration section of the
Remote Insight navigation frame to enable SNMP alerting and to
provide an SNMP trap IP address to the RILOE board. See the
“Enabling SNMP Alerts” section earlier in this chapter for details.
Compaq Confidential – Need to Know Required
Writer: James Parish Project: Compaq Remote Insight Lights-Out Edition User Guide Comments:
Part Number: 159206-005 File Name: f-ch5 Using the Remote Insight Lights-Out Edition.doc Last Saved On: 7/10/01 4:17 PM
5-36
Compaq Remote Insight Lights-Out Edition User Guide
2. Configure the RILOE board as a managed device for Compaq Insight
Manager XE. Adding the board to Compaq Insight Manager XE allows
the NIC interface on the Remote Insight Lights-Out Edition to function
as a dedicated management port, isolating management traffic from the
remote host server NIC interface.
To configure the Remote Insight Lights-Out Edition as a managed
device in Compaq Insight Manager XE:
1. Start Compaq Insight Manager XE. Click Settings. By default, the
Automatic Discovery screen displays, as shown in Figure 5-12. Use this
screen to add any management processor IP addresses that will be
managed by Compaq Insight Manager XE. If the IP address does not
already appear in the IP Address Ranges section, enter the IP address.
Figure 5-12. Automatic discovery screen
2. To add the RILOE board to Compaq Insight Manager XE, click
Execute Discovery Now. The Status section will show the system
being updated.
Compaq Confidential – Need to Know Required
Writer: James Parish Project: Compaq Remote Insight Lights-Out Edition User Guide Comments:
Part Number: 159206-005 File Name: f-ch5 Using the Remote Insight Lights-Out Edition.doc Last Saved On: 7/10/01 4:17 PM
Using the Remote Insight Lights-Out Edition 5-37
3. After the discovery is complete, subsequent queries will display the
device as a management processor.
NOTE: Compaq Insight agents for the RILOE board must be installed on the remote host
server to enable management of the RILOE board by Compaq Insight Manager XE. Refer to
the Compaq Insight Manager XE documentation for additional details about installing and
configuring agents.
Web Browser Launching
Compaq Insight Manager XE provides a single management console platform
for launching a Web browser to access the Remote Insight Lights-Out Edition.
To launch a Web browser from the Compaq Insight Manager XE:
1. Access a query that contains the managed RILOE board. For example,
the query for all devices.
2. Double-click the entry in the Device Name field that is the desired
management processor.
Compaq Confidential – Need to Know Required
Writer: James Parish Project: Compaq Remote Insight Lights-Out Edition User Guide Comments:
Part Number: 159206-005 File Name: f-ch5 Using the Remote Insight Lights-Out Edition.doc Last Saved On: 7/10/01 4:17 PM
5-38
Compaq Remote Insight Lights-Out Edition User Guide
3. At the device information page, click the Web Server: Remote Insight
option in the Device Links section. This connects you to the Remote
Insight Lights-Out Edition home page.
Figure 5-13. Device screen
Remote Insight Lights-Out Edition Board Health
Statistics
The Compaq Management Agents provide options to manage the recovery of
remote servers. The recovery options also provide access to the RILOE board
and key RILOE statistics.
Follow these steps to access the RILOE board statistics:
1. Access a query that contains the managed RILOE board. For example,
the query for all devices.
2. Double-click the entry in the Device Name field that is the desired
management processor.
3. At the device information page, click the Compaq Subsystem Status
Information option in the Device Links section. This connects you to
the Compaq Management Agents page.
Compaq Confidential – Need to Know Required
Writer: James Parish Project: Compaq Remote Insight Lights-Out Edition User Guide Comments:
Part Number: 159206-005 File Name: f-ch5 Using the Remote Insight Lights-Out Edition.doc Last Saved On: 7/10/01 4:17 PM
Using the Remote Insight Lights-Out Edition 5-39
4. In the Recovery section of the Compaq Management Agents navigation
frame, click Remote Insight.
Figure 5-14. Recovery screen for a Remote Insight board
The Remote Insight option allows you to view general information about the
board, alarm and cable status, and self-test results. You can also view NIC
information, the Event Log, and connect to the RILOE board.
Using Compaq Insight Manager XE
For detailed instructions about using Compaq Insight Manager XE with the
RILOE board, refer to the documentation provided with Compaq Insight
Manager XE.
Pocket PC Access
Firmware version 2.32 and later provides a preview of RILOE board support
for wireless and dial-up access from the Compaq iPAQ H3600 Series Pocket
PC handheld devices. The RILOE board provides a special user-interface
when connecting from the Compaq iPAQ Pocket PC.
Compaq Confidential – Need to Know Required
Writer: James Parish Project: Compaq Remote Insight Lights-Out Edition User Guide Comments:
Part Number: 159206-005 File Name: f-ch5 Using the Remote Insight Lights-Out Edition.doc Last Saved On: 7/10/01 4:17 PM
5-40
Compaq Remote Insight Lights-Out Edition User Guide
Pocket PC Access is currently under development and is being provided by
Compaq as a Technology Preview only. It is not a supported feature beyond
the Compaq Technical Phone Support Center verifying whether it is
configured correctly.
Compaq would appreciate feedback from customers on this functionality. To
provide feedback, access the following website and submit the feedback form:
www.compaq.com/manage/riloe/feedback.html
Features on the handheld interface in firmware version 2.32 and later include:
■
Remote Insight Summary
■
Status
■
Virtual Power Button
■
Reboot Server
■
Virtual Floppy Status
■
Integrated Management Log
■
Remote Insight Event Log
■
SSL Encryption—40-bit and 128-bit options
To enable the Pocket PC Access feature:
1. Log on to the RILOE board using an account that has supervisor status.
2. Click Global Settings in the Administration section of the Remote
Insight navigation frame.
NOTE: If you do not have supervisor status, you can only view the Global Settings
window.
3. Click Enabled in the Pocket PC Access section.
4. Click Apply to save the changes.
After Apply is clicked, the RILOE board restarts. When this happens, your
browser’s connection to the board is terminated. After the system has
restarted, it initiates an auto-connect, allowing you to log in to the RILOE
board.
Compaq Confidential – Need to Know Required
Writer: James Parish Project: Compaq Remote Insight Lights-Out Edition User Guide Comments:
Part Number: 159206-005 File Name: f-ch5 Using the Remote Insight Lights-Out Edition.doc Last Saved On: 7/10/01 4:17 PM
Using the Remote Insight Lights-Out Edition 5-41
The following is an example of accessing the Remote Insight Light-Out
Edition built-in website with the Compaq iPAQ H3600 Pocket PC:
1. When the Remote Insight Lights-Out Edition built-in website is
accessed, the client browser is detected. If the client is an iPAQ running
Pocket Internet Explorer, specific content is provided that has been
optimized for display on the small form factor screen. The initial Web
page, as shown in Figure 5-15, is not encrypted. You must tap Tap here
to login to RILOE name.
Figure 5-15. Initial display window for iPAQ
Compaq Confidential – Need to Know Required
Writer: James Parish Project: Compaq Remote Insight Lights-Out Edition User Guide Comments:
Part Number: 159206-005 File Name: f-ch5 Using the Remote Insight Lights-Out Edition.doc Last Saved On: 7/10/01 4:17 PM
5-42
Compaq Remote Insight Lights-Out Edition User Guide
2. An SSL session is negotiated and a certificate warning is displayed, as
shown in Figure 5-16. Tap Yes to proceed to the login screen.
Figure 5-16. Security certificate for iPAQ
Compaq Confidential – Need to Know Required
Writer: James Parish Project: Compaq Remote Insight Lights-Out Edition User Guide Comments:
Part Number: 159206-005 File Name: f-ch5 Using the Remote Insight Lights-Out Edition.doc Last Saved On: 7/10/01 4:17 PM
Using the Remote Insight Lights-Out Edition 5-43
3. In the login window, Figure 5-17, enter a valid user ID and password
and tap Go. Do not enable the Save Password option.
NOTE: The user ID and password are case sensitive. The password must be at least eight
characters in length.
Figure 5-17. Login window for iPAQ
Compaq Confidential – Need to Know Required
Writer: James Parish Project: Compaq Remote Insight Lights-Out Edition User Guide Comments:
Part Number: 159206-005 File Name: f-ch5 Using the Remote Insight Lights-Out Edition.doc Last Saved On: 7/10/01 4:17 PM
5-44
Compaq Remote Insight Lights-Out Edition User Guide
4. If your user ID and password are valid, you are logged in to the RILOE
board and a Web page similar to that shown in Figure 5-18 displays.
Figure 5-18. Web page for iPAQ
At a minimum, the iPAQ browser interface supports a way to exercise the
Virtual Power Button, reboot the server, change the Virtual Floppy status,
view the logs, and show status information.
NOTE: If you attempt to browse any unsupported Web page, you are redirected to the
Web page shown in Figure 5-18, which is the initial display window.
Browsing an unsupported Web page would be considered any attempt to
utilize the iPAQ browser interface for functionality beyond the scope of the
functions listed. For example, attempting to access Global Settings from the
iPAQ would result in being redirected to the initial display window.
In this case, because you are already logged in, tapping the Tap here to login
to RILOE name option at the initial display window bypasses the login screen
and takes you to the home page.
Compaq Confidential – Need to Know Required
Writer: James Parish Project: Compaq Remote Insight Lights-Out Edition User Guide Comments:
Part Number: 159206-005 File Name: f-ch5 Using the Remote Insight Lights-Out Edition.doc Last Saved On: 7/10/01 4:17 PM
Using the Remote Insight Lights-Out Edition 5-45
You can enable or disable the iPAQ browser interface in Global Settings only
from a desktop browser. If access has been disabled, the iPAQ user will be
notified by the Web page message, “Handheld access to sample_rib has been
DISABLED.”
Trying the Pocket PC feature, note the following:
■
User authentication is required for access to the RILOE board. After
authentication, the Pocket PC user remains logged in until the session is
ended by closing the Pocket PC browser. To close the browser, tap the
Q key, tap Close active task, and stop the browser.
■
When logging in to the RILOE board with the Pocket PC browser, do
not select the Save Password option. Otherwise, the next time the
browser is used to connect to the same RILOE board, the browser will
automatically authenticate by presenting the saved user ID and
password. Consequently, the Pocket PC user cannot log on as a different
user.
Save Password is not enabled by default. In the case where Save
Password was enabled by the user and a different user cannot log in
through the Pocket PC, you must log on to the RILOE board using the
Windows desktop browser and change or delete the user ID or change
the password, so automatic authentication by the Pocket PC will no
longer match.
■
Pocket PC users may be unable to establish a connection to a RILOE
board with version 2.32 (128-bit SSL) because of insufficient security
software in the Pocket PC browser. The error that displays is
“A connection cannot be established,” however, the issue is that the
browser requires 128-bit encryption. To resolve this issue, the user must
download the Microsoft 128-bit Encryption Pack for Pocket PCs from
Microsoft. This scenario does not occur with version 2.32 (40-bit SSL).
The encryption pack can be downloaded from Microsoft at
www.microsoft.com/mobile/pocketpc/downloads/ssl128.asp
Compaq Confidential – Need to Know Required
Writer: James Parish Project: Compaq Remote Insight Lights-Out Edition User Guide Comments:
Part Number: 159206-005 File Name: f-ch5 Using the Remote Insight Lights-Out Edition.doc Last Saved On: 7/10/01 4:17 PM
Chapter
6
Group Administration
This chapter discusses administration for a group of Remote Insight
Lights-Out Edition boards by using the Compaq Lights-Out Configuration
Utility executable file, CPQLOCFG.EXE. This executable can be utilized
through either Compaq Insight Manager XE or batch processing.
NOTE: The commands listed in this document are based on the 2.40 firmware update. If
you have not done so already, download the 2.40 update from the Compaq website at
www.compaq.com/lights-out
NOTE: Due to functional changes and the expansion of the command language, the 2.40
update is not backwards compatible with earlier versions of firmware. To update a RILOE
board that is on firmware version 2.32 or earlier, you must use a browser or ROMPaq.
NOTE: The commands for firmware version 2.40 should not be used on a RILOE board
containing the firmware version 2.32 or prior. The commands for firmware version 2.32 or
prior should not be used on a RILOE board containing the 2.40 firmware update.
6-2
Compaq Remote Insight Lights-Out Edition User Guide
Features
The Compaq Lights-Out Configuration Utility allows you to perform the
following functions.
■
Add, modify, or delete a user.
■
Obtain individual or all users’ configuration information.
■
Modify network settings.
■
Modify global settings.
■
Clear the RILOE Event Log
■
Obtain the firmware version of the RILOE board.
■
Update the RILOE board firmware.
■
Obtain and set the Virtual Floppy status.
■
Insert, copy, and eject a Virtual Floppy image.
■
Configure Remote Console hotkey settings.
■
Obtain and set the Virtual Power Button status.
■
Obtain the server power status.
■
Reset the server.
Compaq Insight Manager XE
After the firmware has been updated, the IT administrator can manage
multiple Remote Insight boards through Compaq Insight Manager XE. The
four components of group administration are Remote Insight board Command
Language (RIBCL), the Compaq Lights-Out Configuration Utility, Query
Definition in Compaq Insight Manager XE, and Application Launch.
Compaq Insight Manager XE discovers the Compaq Remote Insight
Lights-Out Edition boards as management processors. During this process, it
also discovers Remote Insight board/PCI as management processors. When
group administration is performed, the Remote Insight boards/PCI generates
an error. Exclude these boards during the Query Definition process.
Compaq Insight Manager XE uses the Compaq Lights-Out Configuration
Utility to send an RIBCL file to a group of Remote Insight Lights-Out Edition
boards to manage the user accounts for those boards. The boards then perform
the action designated by the RIBCL file and send a response to the log file.
Group Administration 6-3
Remote Insight Board Command Language
The RIBCL is a dialect of XML. The information presented in the XML file is
not designed to display information in a Web browser but is designed to
enable secure communication between the Remote Insight Lights-Out Edition
board and the host application.
See Appendix C for a complete listing of RIBCL tags and error messages.
See Appendix C for a sample script used for adding, modifying, or deleting a
user on a Remote Insight Lights-Out Edition board.
Compaq Lights-Out Configuration Utility
The Compaq Lights-Out Configuration Utility is used to execute the RIBCL
on the Remote Insight Lights-Out Edition boards. The executable file for the
utility is CPQLOCFG.EXE. This file can be downloaded from the Compaq
website:
www.compaq.com/lights-out
The Compaq Lights-Out Configuration Utility must reside on the same server
as Compaq Insight Manager XE. The Compaq Lights-Out Configuration
Utility generates two types of error messages: runtime and syntax. A runtime
error occurs when an invalid action is requested.
NOTE: Runtime errors are logged to the following directory:
C:\PROJ FILES\COMPAQ\COMPAQ INSIGHT MANAGER XE
A syntax error occurs when an invalid XML tag is encountered. When a
syntax error occurs, the Compaq Lights-Out Configuration Utility stops
running and logs the error in the runtime script and output log file.
NOTE: Syntax errors take the format of “Syntax error: expected ‘x’ but found ‘y’” as
shown in the following example:
Syntax error: expected USER_LOGIN=userlogin but found USER_NAME=username
See Appendix C for a complete listing of errors.
6-4
Compaq Remote Insight Lights-Out Edition User Guide
Query Definition in Compaq Insight Manager XE
To group all of the Remote Insight Lights-Out Edition boards, log on to
Compaq Insight Manager XE and create a query.
To create the query:
1. Log on to Compaq Insight Manager XE.
2. Click Device Queries in the navigation bar on the left side of the screen.
Figure 6-1. Starting the Device Queries in Compaq Insight Manager XE
Group Administration 6-5
3. Locate the Personal Queries section in the main window. If a query
category exists, proceed to step 6, otherwise proceed to step 4.
Figure 6-2. Finding Personal Queries
6-6
Compaq Remote Insight Lights-Out Edition User Guide
4. Click New to create a new category. For this example, the name of the
new category is RIB Cards. Click Create Category.
Figure 6-3. Creating a new query category
Group Administration 6-7
5. Click Queries page to return to the Device Queries screen.
6. Click New, within the appropriate query category, to open the
Create/Edit Query screen where the query definition is created.
Figure 6-4. Creating the query definition
7. Define your query name, for example Mgmt Processors.
8. Select Device(s) of type within the Query Criteria Selection frame to
create a query definition.
6-8
Compaq Remote Insight Lights-Out Edition User Guide
9. Click type in the Query Description frame, which opens a pop-up
window where you define the device type.
Figure 6-5. Selecting the device type
10. Check Management Processor and click OK.
11. Click Save to return to the Device Query screen.
12. Find the newly created query in the appropriate query category and click
the query name to run it for verification.
13. Click Overview on the left side of the screen after the verification has
taken place. The initial page for Compaq Insight Manager XE opens.
Group Administration 6-9
Application Launch
The application launch combines the RIBCL, the Compaq Lights-Out
Configuration Utility, and the query definition to manage the group
administration for the Remote Insight Lights-Out Edition boards.
To create an Application Launch Task:
1. Click Tasks in the navigation bar on the left side of the screen to open
the Tasks screen.
Figure 6-6. Opening the Tasks page
6-10
Compaq Remote Insight Lights-Out Edition User Guide
2. Click New Control Task. A drop-down menu displays.
Figure 6-7. Initiating the application launch
3. Click Application Launch from the drop-down menu to open the
Create/Edit Task screen.
4. Type the full path and name for the Compaq Lights-Out Configuration
Utility in the area provided. If the CPQLOCFG.EXE file is in the root
directory of Compaq Insight Manager XE on the C:\ drive, then the path
is:
C:\CIMXE20\CPQLOCFG.EXE
Group Administration 6-11
5. Type the parameters in the area provided. Compaq Insight Manager XE
requires the following parameters for the Compaq Lights-Out
Configuration Utility:
■
-F—Full path of the RIBCL file name
■
-V—Verbose message (optional)
If the RIBCL file is in the root directory of
Compaq Insight Manager XE on the C:\ drive the parameters are:
-F C:\CIMXE20\MANAGEUSERS.TXT -V
Figure 6-8. Creating a new task
NOTE: Compaq Insight Manager XE 2.0 does not send all the required environment
variables when launching an application. CPQLOCFG.EXE requires that the “systemroot”
variable be set. This usually points to the Windows NT directory. Check your settings by
typing “SET” at a command prompt. An example:
SYSTEMROOT=C:\WINNT
Compaq Insight Manager XE 2.1b and later do not require you to set the environment
variable.
NOTE: Compaq Insight Manager XE does not allow the -L parameter to designate an
output log file. A default log file named with the DNS name or the IP address is created in
the same directory where CPQLOCFG is launched.
6-12
Compaq Remote Insight Lights-Out Edition User Guide
6. Click Next. A screen displays with options for naming the task, defining
the query association, and setting a schedule for the task.
Figure 6-9. Defining the task
7. Enter a task name in the Enter a name for this task field.
8. Select the query that had been created earlier, for example Mgmt
Processors.
Group Administration 6-13
9. Click Schedule to define when the Application Launch Task will run. A
schedule configuration window displays.
Figure 6-10. Defining the schedule
10. Click OK to set the schedule.
NOTE: The default schedule for a control task is Now.
11. Click Finish to save the Application Launch Task.
6-14
Compaq Remote Insight Lights-Out Edition User Guide
12. Click Execute Now, which is to the right of the newly created control
task, to execute the group administration.
Figure 6-11. Running the Control Task
Group Administration 6-15
Batch Processing
Group administration can also be delivered to the Compaq Remote Insight
Lights-Out Edition boards through batch processing. The components used by
batch processing are the Compaq Lights-Out Configuration Utility, an RIBCL
file, and a batch file.
Compaq Lights-Out Configuration Utility
The Compaq Lights-Out Configuration Utility is used to execute the RIBCL
on the Compaq Remote Insight Lights-Out Edition boards. The executable for
the Compaq Lights-Out Configuration Utility is CPQLOCFG.EXE. This file
can be downloaded from the Compaq website at
www.compaq.com/lights-out
The following is an example of the Compaq Lights-Out Configuration Utility
command line and explanations of the switches:
CPQLOCFG.EXE –S SERVER_NAME –F C:\RIBCLFILE.TXT –L C:\LOGFILE.TXT –V
where:
■
-S is the switch that determines the Compaq Remote Insight Lights-Out
Edition board that is to be updated. This switch is either the DNS name
or IP address of the target server.
Do not use this switch if launching from Compaq Insight Manager XE.
■
-F is the switch that gives the location and name of the RIBCL file that
contains the actions to be performed on the board.
■
-L is the switch that defines where the log file will be generated and what
the file name will be. If this switch is omitted, a default log file named
with the DNS name or the IP address is created in the same directory
where CPQLOCFG is launched.
Do not use this switch if launching from Compaq Insight Manager XE.
■
-V is the optional switch that turns on the verbose message return. The
resulting log file will contain all commands sent to the RIB board, all
responses from the RIB board, and any errors. By default, only errors
and responses from GET commands will be logged without this switch.
■
-C will cause CPQLOCFG to check the syntax of the XML, but not open
a connection to the RIB.
6-16
Compaq Remote Insight Lights-Out Edition User Guide
The following example shows a sample batch file that can be used to perform
the Group Administration for the Compaq Remote Insight Lights-Out Edition
board:
REM Updating the Compaq Remote Insight Lights-Out Edition board
REM Repeat line for each board to be updated
REM
CPQLOCFG -S RIB1 -F C:\CIMXE20\USERS.TXT -L RIB1LOG.TXT -V
CPQLOCFG -S RIB2 -F C:\CIMXE20\USERS.TXT -L RIB2LOG.TXT -V
CPQLOCFG -S RIB3 -F C:\CIMXE20\USERS.TXT -L RIB3LOG.TXT -V
.
.
.
CPQLOCFG -S RIBN -F C:\CIMXE20\USERS.TXT -L RIBNLOG.TXT -V
The switches -L and -V may or may not be set depending on the
IT administrator’s preferences.
If it is not in the same directory, be sure that the Compaq Lights-Out
Configuration Utility is in a directory referenced by the PATH environment
variable. Any log files generated will be placed in the same directory as the
Compaq Lights-Out Configuration Utility executable.
NOTE: The Compaq Lights-Out Configuration Utility overwrites any existing log files.
Compaq Lights-Out DOS Utility
Compaq Lights-Out DOS Utility (CPQLODOS) is a subset of the
CPQLOCFG utility. CPQLODOS provides a command-line utility that a user
can use to bootstrap a Remote Insight Lights-Out Edition configuration into a
new server.
The CPQLODOS utility allows the user to configure a subset of the
configuration parameters exposed through:
■
F8 configuration
■
The Remote Insight Lights-Out Edition GUI
CPQLODOS is not intended for continued administration. The Compaq
Lights-Out Configuration Utility should be use for administration purposes.
For more information on the CPQLODOS utility, refer to Appendix D.
Chapter
7
Troubleshooting the Remote Insight
Lights-Out Edition
This chapter contains the following troubleshooting sections:
■
Resetting the Remote Insight Lights-Out Edition Board
■
Login Name and Password Not Accepted
■
Troubleshooting Video and Monitor Problems
■
Troubleshooting Alert and Trap Problems
■
Troubleshooting NetWare Driver Problems
■
Troubleshooting Miscellaneous Problems
■
Interpreting LED Error Codes
■
Event Log Entries
Compaq Confidential – Need to Know Required
Writer: James Parish Project: Compaq Remote Insight Lights-Out Edition User Guide Comments:
Part Number: 159206-005 File Name: h-ch7 Troubleshooting the Remote Insight Lights-Out Edition.doc Last Saved On: 7/10/01 4:30 PM
7-2
Compaq Remote Insight Lights-Out Edition User Guide
Resetting the Remote Insight Lights-Out
Edition Board
There are various times when you may need to reset the Remote Insight
Lights-Out Edition board. Follow the instructions for your server’s operating
system to reset the board.
NOTE: Resetting the Remote Insight Lights-Out Edition board will reset the Remote
Console settings to the default values.
NOTE: Resetting the Remote Insight Lights-Out Edition board in a Novell NetWare server
at the command line is not supported.
To reset the Remote Insight Lights-Out Edition in a Windows NT server,
follow these steps:
1. In Control Panel, select Services and stop the Insight Agents.
2. In Control Panel, select Insight Agents.
3. Select Remote Insight and click Reset.
4. Restart the Insight Agents.
Login Name and Password Not Accepted
If you have connected to the board but it does not accept your login name and
password, you must verify that your login information is configured correctly.
Connect to the Remote Insight Lights-Out Edition using your browser, log in
with a user name that has supervisor status, and reenter the login name and
password that are not being accepted.
NOTE: The login name and password are case sensitive.
You also can reenter the login name and password using the System
Configuration Utility.
1. On the server, run the System Configuration Utility.
2. Scroll down to the Configure Users field and press the Enter key.
Compaq Confidential – Need to Know Required
Writer: James Parish Project: Compaq Remote Insight Lights-Out Edition User Guide Comments:
Part Number: 159206-005 File Name: h-ch7 Troubleshooting the Remote Insight Lights-Out Edition.doc Last Saved On: 7/10/01 4:30 PM
Troubleshooting the Remote Insight Lights-Out Edition 7-3
3. Select the user having trouble, and verify the login name. The user’s
password will not be visible, but it can be entered again on this screen.
4. Check the Security Access field to verify that this user has login access.
NOTE: The ROM-Based Setup Utility can also be used to correct login problems.
Troubleshooting Video and Monitor
Problems
No Video after Installing the Remote Insight
Lights-Out Edition Board and Powering On the
Server
The Remote Insight Lights-Out Edition contains an integrated VGA controller.
When the controller board is first installed, the server detects this controller
and attempts to use it by switching video from the server’s integrated video
controller. Therefore, your monitor must be connected to the Remote Insight
Lights-Out Edition board. See the “Monitor Cable Connection” section in
Chapter 2.
If you have a PCI-based VGA controller installed in a server slot, you must
remove it for the VGA controller on the Remote Insight Lights-Out Edition to
work.
IMPORTANT: Some Compaq servers, such as the Prosignia 200 and the ProLiant 800,
contain PCI-based VGA controllers. These controllers must be removed to configure the
VGA controller on the Remote Insight Lights-Out Edition board.
The Remote Insight Lights-Out Edition board must be installed in a PCI slot
that is connected to the primary bus. See the “Determining an Available Slot”
section in Chapter 2 to ensure that the board is installed in an appropriate slot.
If your server is not listed in Table 2-1, refer to the Compaq website for an
updated table:
www.compaq.com/lights-out
Compaq Confidential – Need to Know Required
Writer: James Parish Project: Compaq Remote Insight Lights-Out Edition User Guide Comments:
Part Number: 159206-005 File Name: h-ch7 Troubleshooting the Remote Insight Lights-Out Edition.doc Last Saved On: 7/10/01 4:30 PM
7-4
Compaq Remote Insight Lights-Out Edition User Guide
Some Compaq servers require disabling of the embedded video before
installing the Remote Insight Lights-Out Edition board. The embedded video
controller can be disabled by powering off the server and setting system
configuration maintenance switch 1 to ON.
The following servers require the embedded video to be disabled:
■
ProLiant 400
■
ProLiant ML330
■
ProLiant ML350
■
Prosignia 720
Inability to Connect to the Board through the NIC
If you cannot connect to the board through the NIC, try any or all of the
following troubleshooting methods:
■
Confirm that the green LED indicator (link status) on the board’s
connector bracket is on. This condition indicates a good connection
between the PCI NIC and the network hub.
■
Look for intermittent flashes of the green LED indicator, indicating
normal network traffic.
■
Run the System Configuration Utility to confirm that the NIC is enabled
and to verify the assigned IP address and subnet mask.
■
From another workstation on the same network, ping the IP address of
the NIC.
■
Attempt to connect with browser software by typing the IP address of
the NIC as the URL. You can see the Remote Insight home page from
this address.
■
Reset the Remote Insight Lights-Out Edition.
To reset the Remote Insight Lights-Out Edition in a NetWare server, at the
command line enter:
RIB Reset
To reset the Remote Insight Lights-Out Edition in a Windows NT server,
follow these steps:
1. In Control Panel, select Services and stop the Insight Agents.
2. In Control Panel, select Insight Agents.
Compaq Confidential – Need to Know Required
Writer: James Parish Project: Compaq Remote Insight Lights-Out Edition User Guide Comments:
Part Number: 159206-005 File Name: h-ch7 Troubleshooting the Remote Insight Lights-Out Edition.doc Last Saved On: 7/10/01 4:30 PM
Troubleshooting the Remote Insight Lights-Out Edition 7-5
3. Select Remote Insight and click Reset.
4. Restart the Insight Agents.
Inability to Get SNMP Information from Compaq
Insight Manager XE when Connected to the Remote
Insight Network Interface
The agents running on the managed server supply the SNMP information
provided to Compaq Insight Manager XE. For those agents to pass information
through the Remote Insight Lights-Out Edition, the Remote Insight device
drivers must be installed. See the “Installing Remote Insight Lights-Out
Edition Device Drivers” section in Chapter 3 for installation instructions.
If you have installed the drivers and agents for the Remote Insight Lights-Out
Edition, verify that the Remote Insight Lights-Out Edition and the
management PC are on the same subnet. You can verify this quickly by
pinging the Remote Insight board from your management PC. See your
network administrator for proper routes to access the network interface of the
Remote Insight Lights-Out Edition.
Inability of Web Browser to Connect to the Remote
Insight Lights-Out Edition IP Address
If your Web browser software is configured to use a proxy server, it will not
connect to the Remote Insight Lights-Out Edition IP address. To resolve this
issue, configure your browser not to use the proxy server for the IP address of
the Remote Insight Lights-Out Edition. For example, in Internet Explorer,
select View, Options, Connection Settings, and then enter the IP address in
the Exceptions field.
NOTE: If your Remote Insight Lights-Out Edition is using 128-bit encryption, ensure that
your client browser supports 128-bit encryption.
Compaq Confidential – Need to Know Required
Writer: James Parish Project: Compaq Remote Insight Lights-Out Edition User Guide Comments:
Part Number: 159206-005 File Name: h-ch7 Troubleshooting the Remote Insight Lights-Out Edition.doc Last Saved On: 7/10/01 4:30 PM
7-6
Compaq Remote Insight Lights-Out Edition User Guide
Troubleshooting Alert and Trap Problems
Inability to Receive Compaq Insight Manager XE
Alarms (SNMP Traps) from the Remote Insight
Lights-Out Edition
A user with supervisor access must connect to the Remote Insight Lights-Out
Edition or run the System Configuration Utility to configure SNMP trap
parameters.
1. Ensure that the correct alert types are enabled, either in the Manage
Alert Information screen of the Remote Insight console application or
in the Alerts Received field on the User Information screen in the
System Configuration Utility.
2. On the server, run the System Configuration Utility and verify that the
Alerts field is set to Enabled. This field globally enables or disables
alerts for all Remote Insight Lights-Out Edition users.
Troubleshooting NetWare Driver
Problems
When a NetWare server is started, each driver loaded in the AUTOEXEC.NCF
is executed. If a problem is found during execution, an initialization error is
displayed. Table 7-1 shows potential initialization error messages and
suggested courses of action.
Table 7-1
NetWare Error Messages
Error Message
Action
Adapter IRQ or memory settings not set
Run the Compaq System Configuration
Utility.
Unable to allocate resource tag
Apply any relevant NetWare patches.
Contact your service provider.
Unable to register NetWare hardware
options
Apply any relevant NetWare patches. Run
Compaq Diagnostics on the Remote Insight
Lights-Out Edition.
continued
Compaq Confidential – Need to Know Required
Writer: James Parish Project: Compaq Remote Insight Lights-Out Edition User Guide Comments:
Part Number: 159206-005 File Name: h-ch7 Troubleshooting the Remote Insight Lights-Out Edition.doc Last Saved On: 7/10/01 4:30 PM
Troubleshooting the Remote Insight Lights-Out Edition 7-7
Table 7-1
NetWare Error Messages continued
Error Message
Action
Remote Insight interface type unknown
Upgrade CPQRI.NLM to a newer version.
Unable to initialize the Remote Insight
Lights-Out Edition
Run Compaq Diagnostics on the Remote
Insight Lights-Out Edition.
Unable to allocate memory
Check available NetWare resources.
Remote Insight Lights-Out Edition not found
The Remote Insight Lights-Out Edition
board is not installed in the server. The
board must be installed before loading the
device driver.
Troubleshooting Miscellaneous Problems
Incorrect Time or Date of Entries in the Event Log
You can update the time and date on the Remote Insight Lights-Out Edition by
running the System Configuration Utility. This utility automatically sets the
time and date on the board using the server time and date. The time and date
are also updated by Insight Management agents on supported network
operating systems.
Inability to Reboot the Server
If you have added the Remote Insight Lights-Out Edition board to a server that
was already up and running, run the System Configuration Utility to properly
configure the Remote Insight Lights-Out Edition board with information about
that server. See Chapter 3 for the steps to configure your Remote Insight
Lights-Out Edition using the System Configuration Utility.
The Remote Insight Lights-Out Edition must be installed in a PCI slot that is
connected to the primary bus. See the “Determining an Available Slot” section
in Chapter 2 to ensure that the board is installed in an appropriate slot. If your
server is not listed, refer to the Compaq website for an updated table:
www.compaq.com
NOTE: If you are using the Virtual Power Button feature, verify that the Virtual Power
Button cable has been installed correctly.
Compaq Confidential – Need to Know Required
Writer: James Parish Project: Compaq Remote Insight Lights-Out Edition User Guide Comments:
Part Number: 159206-005 File Name: h-ch7 Troubleshooting the Remote Insight Lights-Out Edition.doc Last Saved On: 7/10/01 4:30 PM
7-8
Compaq Remote Insight Lights-Out Edition User Guide
Inability to Upgrade the Board’s Firmware
If you attempt to upgrade the firmware of the Remote Insight Lights-Out
Edition and the board does not respond or does not accept the firmware
upgrade, you must force the ROM upgrade procedure by changing the default
switch settings of SW3 as shown in Table 7-2.
Table 7-2
Switch Settings (SW3)
Switch
Default
Force ROM Upgrade
1
OFF
ON
2
OFF
ON
3
OFF
OFF
4
OFF
OFF
Upgrade the firmware of the Remote Insight Lights-Out Edition using a
ROMPaq diskette. When the firmware upgrade is complete, return the
switches to the default position.
Interpreting LED Error Codes
The LED indicators on the front of the Remote Insight Lights-Out Edition
board (with the LED indicators on top) have the following assignments:
FB
7
6
5
4
3
2
1
0
During the initial boot of the Remote Insight Lights-Out Edition, the LED
indicators will flash randomly. After the board has booted, the FB LED will
flash every second. The LED indicators (1 through 7) will light up after the
system has booted to indicate a hardware failure. If a hardware failure is
detected, reset the Remote Insight Lights-Out Edition board. See the
“Resetting the Remote Insight Lights-Out Edition Board” section of this
chapter.
Compaq Confidential – Need to Know Required
Writer: James Parish Project: Compaq Remote Insight Lights-Out Edition User Guide Comments:
Part Number: 159206-005 File Name: h-ch7 Troubleshooting the Remote Insight Lights-Out Edition.doc Last Saved On: 7/10/01 4:30 PM
Troubleshooting the Remote Insight Lights-Out Edition 7-9
Event Log Entries
Table 7-3 lists Event Log Entries and explanations to help you troubleshoot
the Remote Insight Lights-Out Edition board. In the table, USER, #, and IP
ADDRESS are used to designate that a specific user, number, or IP address is
displayed, as appropriate.
Table 7-3
Event Log Entries
Event Log Display
Event Log Explanation
Server power failed
Displays when the server power fails
Browser login: IP address
Displays the IP address for the browser that
logged in
Server power restored
Displays when the server power is restored
Browser logout: IP address
Displays the IP address for the browser that
logged out
Server reset
Displays when the server is reset
Failed Browser login - IP Address: IP
address
Displays when a browser login fails
Remote Insight Self Test Error: #
The Remote Insight board has failed an
internal test. The probable cause is a
critical component has failed. Further use
of this board is not recommended.
Remote Insight Board reset
Displays when the board is reset
On-board clock set; was #:#:#:#:#:#
Displays when the on board clock is set
Server logged critical error(s)
Displays when the server logs critical
errors
Event log cleared by: USER
Displays when a user clears the event log
Keyboard cable disconnected
Displays when the keyboard cable is
disconnected
Keyboard cable connected
Displays when the keyboard cable is
connected
Remote Insight Board reset to factory
defaults
Displays when the board is reset to the
default settings
Remote Insight Board reset
Displays when the board is reset
continued
Compaq Confidential – Need to Know Required
Writer: James Parish Project: Compaq Remote Insight Lights-Out Edition User Guide Comments:
Part Number: 159206-005 File Name: h-ch7 Troubleshooting the Remote Insight Lights-Out Edition.doc Last Saved On: 7/10/01 4:30 PM
7-10
Compaq Remote Insight Lights-Out Edition User Guide
Table 7-3
Event Log Entries continued
Event Log Display
Event Log Explanation
Remote Insight ROM upgrade to #
Displays when the ROM has been upgraded
Remote Insight Board reset for ROM
upgrade
Displays when the board is rest for the
ROM upgrade
Remote Insight Board reset by user
diagnostics
Displays when the board is reset by a user
diagnostics
Power restored to Remote Insight Board
Displays when the power is restored to the
board
Remote Insight Board reset by watchdog
A non-critical error has occurred in the
Remote Insight board and the board has
covered by resetting itself. If this persists
call customer support.
Remote Insight Board reset by host
Displays when the board is reset by the
server
Recoverable Remote Insight Error, code #
A non-critical error has occurred in the
Remote Insight board and the board has
covered by resetting itself. If this persists
call customer support.
SNMP trap delivery failure : IP address
Displays when the SMNP trap does not
connect to the specified IP address
Test SNMP trap alert failed for: IP address
Displays when the SNMP trap does not
connect to the specified IP address
Power outage SNMP trap alert failed for: IP
address
Displays when the SNMP trap does not
connect to the specified IP address
Server reset SNMP trap alert failed for: IP
address
Displays when the SNMP trap does not
connect to the specified IP address
Illegal login SNMP trap alert failed for: IP
address
Displays when the SNMP trap does not
connect to the specified IP address
Keyboard cable SNMP trap alert failed for:
IP address
Displays when the SNMP trap does not
connect to the specified IP address
Diagnostic error SNMP trap alert failed for:
IP address
Displays when the SNMP trap does not
connect to the specified IP address
Host generated SNMP trap alert failed for:
IP address
Displays when the SNMP trap does not
connect to the specified IP address
continued
Compaq Confidential – Need to Know Required
Writer: James Parish Project: Compaq Remote Insight Lights-Out Edition User Guide Comments:
Part Number: 159206-005 File Name: h-ch7 Troubleshooting the Remote Insight Lights-Out Edition.doc Last Saved On: 7/10/01 4:30 PM
Troubleshooting the Remote Insight Lights-Out Edition 7-11
Table 7-3
Event Log Entries continued
Event Log Display
Event Log Explanation
Network resource shortage SNMP trap alert
failed for: IP address
Displays when the SNMP trap does not
connect to the specified IP address
Mouse cable SNMP trap alert failed for: IP
address
Displays when the SNMP trap does not
connect to the specified IP address
Remote Insight network link up
Displays when the network is connected to
the board
Remote Insight network link down
Displays when the network is not
connected to the board
Mouse cable connected
Displays when the mouse cable is
connected
Mouse cable disconnected
Displays when the mouse cable is
disconnected
External power adapter connected
Displays when the external power adapter
is connected
External power adapter disconnected
Displays when the external power adapter
is disconnected
Remote Insight Firmware upgrade started
by: USER
Displays when a user starts a firmware
upgrade
Remote Floppy Inserted by: USER
Displays when a user inserts the remote
floppy
Host server reset by: USER
Displays when a user resets the host server
Host server powered OFF by: USER
Displays when a user powers off a host
server
Host server powered ON by: USER
Displays when a user powers on a host
server
Virtual Floppy Inserted by: USER
Displays when a user inserts a virtual
floppy
Remote Console login: USER
Displays when a user logs on a remote
console
Remote Console Closed
Displays when a remote console is closed
Failed Console login - IP Address: IP
address
Displays a failed console login and IP
address
continued
Compaq Confidential – Need to Know Required
Writer: James Parish Project: Compaq Remote Insight Lights-Out Edition User Guide Comments:
Part Number: 159206-005 File Name: h-ch7 Troubleshooting the Remote Insight Lights-Out Edition.doc Last Saved On: 7/10/01 4:30 PM
7-12
Compaq Remote Insight Lights-Out Edition User Guide
Table 7-3
Event Log Entries continued
Event Log Display
Event Log Explanation
Handheld login: IP address
Displays when a handheld logs in
Handheld logout: IP address
Displays when a handheld logs out
Failed Handheld login - IP Address: IP
ADDRESS
Displays a failed handheld login and IP
address
Added User: User
Displays when a user adds a user
User Deleted by: User
Displays when a user deletes a user
Modified User: User
Displays when a user modifies a user
Browser login: USER
Displays when a valid user logs on to the
RILOE using a non-handheld Internet
browser.
Browser logout: USER
Displays when a valid user logs off the
RILOE using a non-handheld Internet
browser.
Failed Browser login – IP Address: IP
ADDRESS
Displays when a browser login attempt
fails.
Remote Console login: USER
Displays when an authorized user logs on
using the remote console port.
Remote Console Closed
Displays when an authorized remote
console user is logged out or when the
remote console port is closed following a
failed login attempt.
Failed Console login – IP Address: IP
ADDRESS
Displays when an unauthorized user has
failed three login attempts using the
remote console port.
Handheld login: USER
Displays when an authorized user logs on
using a handheld browser.
Handheld logout: USER
Displays when an authorized user logs off
from a handheld browser session.
Failed Handheld login – IP Address: IP
ADDRESS
Displays when a wireless handheld login
attempt fails.
continued
Compaq Confidential – Need to Know Required
Writer: James Parish Project: Compaq Remote Insight Lights-Out Edition User Guide Comments:
Part Number: 159206-005 File Name: h-ch7 Troubleshooting the Remote Insight Lights-Out Edition.doc Last Saved On: 7/10/01 4:30 PM
Troubleshooting the Remote Insight Lights-Out Edition 7-13
Table 7-3
Event Log Entries continued
Event Log Display
Event Log Explanation
Added User: USER
Displays when a new entry is made to the
authorized user list.
User Deleted by: USER
Displays when an entry is removed from
the authorized user list. The USER section
displays the user who requested the
removal.
Event Log Cleared: USER
Displays when the USER clears the Event
Log.
Power Cycle (Reset): USER
Displays when the power has been reset.
Virtual Power Event: USER
Displays when the Virtual Power Button is
used.
XML Login
Displays when a user has logged in and
executed an XML script.
XML Logout
Displays when a user has terminated an
XML script.
Compaq Confidential – Need to Know Required
Writer: James Parish Project: Compaq Remote Insight Lights-Out Edition User Guide Comments:
Part Number: 159206-005 File Name: h-ch7 Troubleshooting the Remote Insight Lights-Out Edition.doc Last Saved On: 7/10/01 4:30 PM
Appendix
A
Regulatory Compliance Notices
Federal Communications Commission
Notice
Part 15 of the Federal Communications Commission (FCC) Rules and
Regulations has established Radio Frequency (RF) emission limits to provide
an interference-free radio frequency spectrum. Many electronic devices,
including computers, generate RF energy incidental to their intended function
and are, therefore, covered by these rules. These rules place computers and
related peripheral devices into two classes, A and B, depending upon their
intended installation. Class A devices are those that may reasonably be
expected to be installed in a business or commercial environment. Class B
devices are those that may reasonably be expected to be installed in a
residential environment (that is, personal computers). The FCC requires
devices in both classes to bear a label indicating the interference potential of
the device as well as additional operating instructions for the user.
The rating label on the device shows which class (A or B) the equipment falls
into. Class B devices have an FCC Logo or FCC ID on the label. Class A
devices do not have an FCC Logo or FCC ID on the label. Once the class of
the device is determined, refer to the following corresponding statement.
Compaq Confidential – Need to Know Required
Writer: James Parish Project: Compaq Remote Insight Lights-Out Edition User Guide Comments:
Part Number: 159206-005 File Name: i-appa Regulatory Compliance Notices.doc Last Saved On: 7/10/01 4:18 PM
A-2
Compaq Remote Insight Lights-Out Edition User Guide
Class A Equipment
This equipment has been tested and found to comply with the limits for a
Class A digital device, pursuant to Part 15 of the FCC Rules. These limits are
designed to provide reasonable protection against harmful interference when
the equipment is operated in a commercial environment. This equipment
generates, uses, and can radiate radio frequency energy and, if not installed
and used in accordance with the instructions, may cause harmful interference
to radio communications. Operation of this equipment in a residential area is
likely to cause harmful interference, in which case the user will be required to
correct the interference at personal expense.
Class B Equipment
This equipment has been tested and found to comply with the limits for a
Class B digital device, pursuant to Part 15 of the FCC Rules. These limits are
designed to provide reasonable protection against harmful interference in a
residential installation. This equipment generates, uses, and can radiate radio
frequency energy and, if not installed and used in accordance with the
instructions, may cause harmful interference to radio communications.
However, there is no guarantee that interference will not occur in a particular
installation. If this equipment does cause harmful interference to radio or
television reception, which can be determined by turning the equipment off
and on, the user is encouraged to try to correct the interference by one or more
of the following measures:
■
Reorient or relocate the receiving antenna.
■
Increase the separation between the equipment and receiver.
■
Connect the equipment into an outlet on a circuit different from that to
which the receiver is connected.
■
Consult the dealer or an experienced radio or television technician for
help.
Modifications
The FCC requires the user to be notified that any changes or modifications
made to this device that are not expressly approved by Compaq Computer
Corporation may void the user’s authority to operate the equipment.
Compaq Confidential – Need to Know Required
Writer: James Parish Project: Compaq Remote Insight Lights-Out Edition User Guide Comments:
Part Number: 159206-005 File Name: i-appa Regulatory Compliance Notices.doc Last Saved On: 7/10/01 4:18 PM
Regulatory Compliance Notices
Cables
Connections to this device must be made with shielded cables with metallic
RFI/EMI connector hoods in order to maintain compliance with FCC Rules
and Regulations.
Declaration of Conformity for Products Marked
with FCC Logo, United States Only
This device complies with Part 15 of the FCC Rules. Operation is subject to
the following two conditions: (1) this device may not cause harmful
interference, and (2) this device must accept any interference received,
including interference that may cause undesired operation.
For questions regarding your product, contact:
Compaq Computer Corporation
P. O. Box 692000, Mail Stop 530113
Houston, Texas 77269-2000
Or call 1-800-652-6672 (1-800-OK COMPAQ). For continuous quality
improvement, calls may be recorded or monitored.
For questions regarding this FCC declaration, contact:
Compaq Computer Corporation
P. O. Box 692000, Mail Stop 510101
Houston, Texas 77269-2000
Or call 281-514-3333.
To identify this product, refer to the part, series, or model number found on the
product.
Compaq Confidential – Need to Know Required
Writer: James Parish Project: Compaq Remote Insight Lights-Out Edition User Guide Comments:
Part Number: 159206-005 File Name: i-appa Regulatory Compliance Notices.doc Last Saved On: 7/10/01 4:18 PM
A-3
A-4
Compaq Remote Insight Lights-Out Edition User Guide
Canadian Notice (Avis Canadien)
Class A Equipment
This Class A digital apparatus meets all requirements of the Canadian
Interference-Causing Equipment Regulations.
Cet appareil numérique de la classe A respecte toutes les exigences du
Règlement sur le matériel brouilleur du Canada.
Class B Equipment
This Class B digital apparatus meets all requirements of the Canadian
Interference-Causing Equipment Regulations.
Cet appareil numérique de la classe B respecte toutes les exigences du
Règlement sur le matériel brouilleur du Canada.
European Union Notice
Products with the CE Marking comply with both the EMC Directive
(89/336/EEC) and the Low Voltage Directive (73/23/EEC) issued by the
Commission of the European Community.
Compliance with these directives implies conformity to the following
European Norms (in parenthesis are the equivalent international standards):
■
EN55022 (CISPR 22) - Electromagnetic Interference
■
EN50082-1 (IEC801-2, IEC801-3, IEC801-4) - Electromagnetic
Immunity
■
EN60950 (IEC950) - Product Safety
Compaq Confidential – Need to Know Required
Writer: James Parish Project: Compaq Remote Insight Lights-Out Edition User Guide Comments:
Part Number: 159206-005 File Name: i-appa Regulatory Compliance Notices.doc Last Saved On: 7/10/01 4:18 PM
Appendix
B
Electrostatic Discharge
To prevent damage to the system, be aware of the precautions to follow when
setting up the system or when handling parts. A discharge of static electricity
from a finger or other conductor can damage system boards or other staticsensitive devices. This type of damage can reduce the life expectancy of the
device.
To prevent electrostatic damage, observe the following precautions:
■
Avoid hand contact by transporting and storing products in static-safe
containers.
■
Keep electrostatic-sensitive parts in their containers until they arrive at
static-free workstations.
■
Place parts on a grounded surface before removing them from their
containers.
■
Avoid touching pins, leads, or circuitry.
■
Always be properly grounded when touching a static-sensitive
component or assembly.
Compaq Confidential – Need to Know Required
Writer: James Parish Project: Compaq Remote Insight Lights-Out Edition User Guide Comments:
Part Number: 159206-005 File Name: j-appb Electrostatic Discharge.doc Last Saved On: 7/10/01 4:18 PM
B-2
Compaq Remote Insight Lights-Out Edition User Guide
Grounding Methods
There are several methods for grounding. Use one or more of the following
methods when handling or installing electrostatic-sensitive parts:
■
Use a wrist strap connected by a ground cord to a grounded workstation
or computer chassis. Wrist straps are flexible straps with a minimum of
1 megaohm ± 10 percent resistance in the ground cords. To provide
proper grounding, wear the strap snug against the skin.
■
Use heel straps, toe straps, or boot straps at standing workstations. Wear
the straps on both feet when standing on conductive floors or dissipating
floor mats.
■
Use conductive field service tools.
■
Use a portable field service kit with a folding, static-dissipating work
mat.
If you do not have any of the suggested equipment for proper grounding, have
a Compaq authorized reseller install the part.
NOTE: For more information about static electricity, or for assistance with product
installation, contact your Compaq authorized reseller.
Compaq Confidential – Need to Know Required
Writer: James Parish Project: Compaq Remote Insight Lights-Out Edition User Guide Comments:
Part Number: 159206-005 File Name: j-appb Electrostatic Discharge.doc Last Saved On: 7/10/01 4:18 PM
Appendix
C
Remote Insight Board Command
Language
Remote Insight Board
Command Language
This section describes the Remote Insight Board Command Language
(RIBCL) tags, the parameters associated with the tags, and the errors that
might occur if an invalid action is requested. Each of the tags, along with their
respective parameters and error codes, are discussed in this guide and are
listed in the following sections.
IMPORTANT: Comments should not interrupt a command. An error message will be
generated in this case.
NOTE: The commands listed in this document are based on the 2.40 firmware update. If
you have not done so already, download the 2.40 update from the Compaq website at
www.compaq.com/lights-out
NOTE: Due to functional changes and the expansion of the command language, the 2.40
update is not backwards compatible with earlier versions of firmware. To update a RILOE
board that is on firmware version 2.32 or earlier, you must use a browser or ROMPaq.
NOTE: The commands for firmware version 2.40 should not be used on a RILOE board
containing the firmware version 2.32 or prior. The commands for firmware version 2.32 or
prior should not be used on a RILOE board containing the 2.40 firmware update.
C-2
Compaq Remote Insight Lights-Out Edition User Guide
RIBCL Guidelines
The following sections describe some general guidelines when utilizing
RIBCL.
XML Header
The XML header must be the first item that is not white space to be sent to the
Remote Insight Lights-Out Edition board. It tells the Remote Insight
Lights-Out Edition board that the connection is supposed to be an XML
connection, not an HTTP connection. The XML header is built into the utility
and has the following format:
<?xml version=”1.0”?>
General Guidelines
All of the commands are grouped by functionality. All commands that
manipulate user information are grouped together. This allows the firmware to
view the data to be manipulated as a block of information, similar to a text
document, allowing for multi-threaded access of the different kinds of
information.
An opening command opens a database. The database remains open until the
matching closing command is sent. All changes made within a single
command block are applied simultaneously when the database is closed. Any
errors within the block will cause the enclosed changes to be discarded.
An example of an opening and its matching closing command are as follows:
<USER_INFO>
</USER_INFO>
In the following sections, the opening and closing commands will be displayed
in the example.
Data Types
There are three data types that are allowed in the parameter. They are:
■
String
■
Specific string
■
Boolean string
Remote Insight Board Command Language
String
A string is any text enclosed in quotes. It can include spaces, numbers, or any
printable character. A string may start with either a double or single quote and
it must end with the same type of quote. The string may contain a quote if it is
different from the string delimiter quotes.
For example, if a string is started with a double quote, a single quote can be
used within the string and the string must be closed with a double quote.
Specific String
A specific string is one that is required to contain certain characters. In
general, you will have a choice of words that are accepted as correct syntax
and all other words will produce an error.
Boolean String
A Boolean string is a specific string that specifies a “yes” or “no” condition.
Acceptable boolean strings are “yes,” “y,” “no,” “n,” “true,” “t,” “false,” and
“f.” These strings are not case sensitive.
RIBCL
This command is used to start and end an RIBCL session. You can use it only
once to start an RIBCL session, and it must be the first command to display in
the script. The RIBCL tags are required to mark the beginning and the end of
the RIBCL document.
Example:
<RIBCL VERSION=“1.2”>
</RIBCL>
RIBCL Parameters
VERSION is a string that indicates the version of the RIBCL that the client
application is expecting to use. The VERSION string is compared to the
version of the RIBCL that the Remote Insight Lights-Out Edition board is
expecting, and an error is returned if the string and the version do not match.
The only acceptable string value for the VERSION parameter is “1.2.” The
VERSION parameter can never be blank.
C-3
C-4
Compaq Remote Insight Lights-Out Edition User Guide
RIBCL Errors
The possible RIBCL error messages include:
■
Unsupported RIBCL version. The supported version is 1.2.
■
Version must not be blank.
LOGIN
The LOGIN command provides the Remote Insight Lights-Out Edition board
with the information that will be used to authenticate the user who will
perform the RIBCL actions. The specified user must have supervisor
privileges. If the user does not have supervisor permission or is not a valid
user, then an error message will be returned. The application that sent the login
name is then expected to send a new LOGIN command or to send the /RIBCL
command to terminate the connection.
Example:
<LOGIN
USER_LOGIN = “username”
PASSWORD = “password”>
</LOGIN>
NOTE: If using firmware version 2.40 or later, users with user-only privileges are able to
change some of their own user settings. The user settings that can be changed are:
■
PASSWORD
■
SNMP_ADDRESS
■
OS_TRAPS
■
RIB_TRAPS
LOGIN Parameters
USER_LOGIN is the login name of the user during the session and has a
maximum length of 48 characters. The user must exist as a valid user with
supervisor privileges in the Remote Insight Lights-Out Edition board. This
data string is case sensitive and can never be blank.
PASSWORD is the password of the user that will log in to the Remote Insight
Lights-Out Edition board. The password has a minimum length of 8 characters
and a maximum length of 48 characters. The password is case sensitive and
can never be blank.
Remote Insight Board Command Language
LOGIN Errors
The possible LOGIN error messages include:
■
User login name was not found.
■
Password must not be blank.
USER_INFO
This command may only display within a LOGIN command. When the
Remote Insight Lights-Out Board parses this command, it reads the user
information database into memory and gets ready to edit it. Only commands
that are USER_INFO type commands are valid inside the USER_INFO block.
The USER_INFO command generates a response that indicates to the host
application whether the user information was successfully read or not. If the
user information is open for writing by another application, then this call will
fail.
Example:
<USER_INFO MODE = “write”>
</USER_INFO>
LOGIN Parameters
MODE tells the Remote Insight Lights-Out Edition board what you intend to
do with the user information. MODE has a maximum length of 10 characters.
Valid arguments are “read,” “write,” “r,” and “w.” These arguments are not
case sensitive. Write mode enables reading and writing, and other users cannot
open the user information. Read mode enables several users to open the user
information, but the users cannot change any user data.
USER_INFO Errors
A possible USER_INFO error message is:
Mode parameter must not be blank.
C-5
C-6
Compaq Remote Insight Lights-Out Edition User Guide
ADD_USER
The ADD_USER command is used to add a user to the Remote Insight
Lights-Out Edition board. All of the attributes that pertain to the user are set
using the parameters described below. For this command to work, the user
must not already exist. Use the MOD_USER command to change an existing
user’s information instead. The ADD_USER command must display within a
USER_INFO element and USER_INFO must be in write mode.
Example:
<RIBCL VERSION=“1.2”>
<LOGIN USER_LOGIN = “adminname” PASSWORD = “password”>
<USER_INFO MODE = “write”>
<ADD_USER
USER_NAME
=“Admin User”
USER_LOGIN
=“username”
PASSWORD
=“password”>
<SNMP_ADDRESS value =”255.255.255.255”/>
<SUPERVISOR_PRIV value =“N”/>
<LOGIN_PRIV value =“Y”/>
<REMOTE_CONS_PRIV value =“Y”/>
<RESET_SERVER_PRIV value =“Y”/>
<OS_TRAPS value =“N”/>
<RIB_TRAPS value =“N”/>
<CLIENT_IP value =”255.255.255.255”/>
</ADD_USER>
</USER_INFO>
</LOGIN>
</RIBCL>
ADD_USER Parameters
USER_NAME is the actual name of the user to be added. The USER_NAME
parameter has a maximum length of 48 characters and can be any ASCII string
containing printable characters, including white spaces. This string is used for
display only and must never be blank.
USER_LOGIN is the name that the user will type to log into the Remote
Insight Lights-Out Edition board. The USER_LOGIN parameter has a
maximum length of 48 characters, can be an ASCII string containing any
combination of printable characters, and is case sensitive. This parameter must
never be blank.
Remote Insight Board Command Language
PASSWORD is the password that will be associated with the user. This
parameter has a maximum length of 48 characters and is an ASCII string that
may contain any combination of printable characters. PASSWORD must be at
least eight characters long and cannot contain both single and double quote
characters. The Remote Insight Board treats this string as being case sensitive.
This parameter must never be blank.
SNMP_ADDRESS is the address of the system that will receive the traps that
are sent to the user. This address has a maximum length of 50 characters and
can be any valid IP address or DNS name. This parameter is optional and
should be left out if the user is not to receive SNMP traps.
The following four parameters control a user’s rights. These parameters are
optional and may have a “Y” or “N” value, which grants or denies the right. If
the parameter is not entered, the value is assumed to be “N.”
SUPERVISOR_PRIV is a Boolean parameter that grants all of the other
permissions, even those that are marked with an “N” value or are blank. This
parameter is optional and must be left out if the user should not get
supervisory privileges.
LOGIN_PRIV is a Boolean parameter that allows the user to log into the
Remote Insight Lights-Out Edition board and use resources such as Web
pages. Marking this parameter with an “N” value effectively disables the
account without deleting it. (See the SUPERVISOR_PRIV parameter.)
REMOTE_CONS_PRIV is a Boolean parameter that gives permission for the
user to access the Remote Console functionality of the Remote Insight
Lights-Out Edition board. Leaving out this parameter will deny the user
Remote Console privileges, unless they have supervisory privileges.
RESET_SERVER_PRIV is a Boolean parameter that gives the user
permission to remotely reset the server or power it down. Leaving out this
parameter will deny the user server reset privileges, unless they have
supervisory privileges.
The following two parameters indicate whether the user should receive SNMP
traps. These parameters are optional and may have a “Y” or “N” value, which
grants or denies the right. If the parameter is not entered, the value is assumed
to be “N.”
OS_TRAPS is a Boolean parameter that, if set to “Y,” indicates that this user
will receive the SNMP traps generated by the operating system. An SNMP
address must be specified to receive the SNMP traps.
C-7
C-8
Compaq Remote Insight Lights-Out Edition User Guide
RIB_TRAPS is a Boolean parameter that, if set to “Y,” indicates that this user
will receive SNMP traps generated by the Remote Insight Lights-Out Edition
board. An SNMP address must be specified to receive the SNMP traps.
IMPORTANT: The following parameters limit the address from which the user may log in.
If the user attempts to log in from other addresses, the request will be refused as though
the user has typed an incorrect password. Exactly one of the following parameters must
be present but should not be entered if you want to indicate that there is no limit. If the
parameter is not blank, then the client addresses will be limited as indicated.
CLIENT_IP specifies a single IP address to connect with the Remote Insight
Lights-Out Edition board. CLIENT_IP has a maximum length of 50 characters
and must be a complete numerical IP address. This data parameter is mutually
exclusive to the CLIENT_RANGE and the DNS_NAME data parameters.
CLIENT_RANGE specifies a range of addresses from which the user is
allowed to access the Remote Insight Lights-Out Edition board.
CLIENT_RANGE has a maximum length of 50 characters. Two addresses are
specified with a dash (-) between them. Both addresses must be valid and
complete TCP/IP numerical addresses. Any address that falls between them
numerically will be accepted. This data parameter is mutually exclusive to the
CLIENT_IP and the DNS_NAME data parameters.
DNS_NAME specifies a DNS name with which the user logs in to the Remote
Insight Lights-Out Edition board. DNS_NAME has a maximum length of 50
characters. This parameter is mutually exclusive to the CLIENT_IP and the
CLIENT_RANGE data parameters.
ADD_USER Errors
The possible ADD_USER error messages include:
■
Login name is too long. Maximum length is 48 characters.
■
User name is too long. Maximum length is 48 characters.
■
Password is too short. Minimum length is 8 characters.
■
Password is too long. Maximum length is 48 characters.
■
User table is full. No room for new user.
■
Cannot add user. The user name already exists.
■
User information is open for read-only access. Write access is required
for this operation.
■
User name cannot be blank.
■
User login ID cannot be blank.
■
Password must not be blank.
Remote Insight Board Command Language
DELETE_USER
The DELETE_USER command is used to remove an existing user’s
information from the Remote Insight Lights-Out Edition board. Before this
command is used, the USER_INFO command must have been issued with the
mode set to “write.”
Example:
<RIBCL VERSION=“1.2”>
<LOGIN USER_LOGIN = “adminname” PASSWORD = “password”>
<USER_INFO MODE = “write”>
<DELETE_USER USER_LOGIN = “username”/>
</USER_INFO>
</LOGIN>
</RIBCL>
DELETE_USER Parameters
USER_LOGIN is the login name of the user that you want to delete. This
parameter has a maximum length of 48 characters and must be an ASCII string
containing any combination of printable characters. The Remote Insight
Lights-Out Edition board treats this string as case sensitive.
DELETE_USER Errors
The possible DELETE_USER errors include:
■
User information is open for read-only access. Write access is required
for this operation.
■
Cannot delete user information for currently logged in user.
■
User login name was not found.
■
User login name must not be blank.
MOD_USER
This command is used to modify an existing user’s information. It is not
required to enter any of the fields except for the first one, which specifies
which user to modify. If any parameter does not need to be modified, it should
be omitted. MOD_USER must display within a USER_INFO parameter and
USER_INFO must be in write mode.
C-9
C-10
Compaq Remote Insight Lights-Out Edition User Guide
With the MOD_USER command, the IT administrator can modify the user’s
login name. It is not possible to modify the user name that is currently being
used to gain access to the Remote Insight Lights-Out Edition board, if the user
is a supervisor.
Example:
<RIBCL VERSION=“1.2”>
<LOGIN USER_LOGIN = “adminname” PASSWORD = “password”>
<USER_INFO MODE = “write”>
<MOD_USER USER_LOGIN
=“loginname”>
<USER_NAME value =”username”/>
<PASSWORD value =”password”/>
<SNMP_ADDRESS value =“255.255.255.255”/>
<SUPERVISOR_PRIV value =“N” />
<LOGIN_PRIV value =“Y” />
<REMOTE_CONS_PRIV value =“Y” />
<RESET_SERVER_PRIV value =“N” />
<OS_TRAPS value =“N” />
<RIB_TRAPS value =“N” />
<CLIENT_IP value =”255.255.255.255”/>
</MOD_USER>
</USER_INFO>
</LOGIN>
</RIBCL>
NOTE: If using firmware version 2.40 or later, users with user-only privileges are able to
change some of their own user settings. The user settings that can be changed are:
■
PASSWORD
■
SNMP_ADDRESS
■
OS_TRAPS
■
RIB_TRAPS
MOD_USER Parameters
USER_LOGIN is the login name of the user to be modified. This login name
has a maximum length of 48 characters. The name is case sensitive and must
be an ASCII string containing any combination of printable characters. This
parameter must never be blank.
USER_NAME is the actual name of the user and has a maximum length of
48 characters. This name can be any ASCII string containing printable
characters, including white space. This string is used for display only. If this
parameter is not specified, then the value for the specified user is not changed.
Remote Insight Board Command Language
USER_LOGIN is the login name of the user and has a maximum length of
48 characters. This name is case sensitive and must be an ASCII string
containing any combination of printable characters. If this parameter is not
specified, then the value for the specified user is not changed.
PASSWORD is the password that will be associated with the user. This
parameter has a maximum length of 48 characters and is an ASCII string that
may contain any combination of printable characters. The password must be at
least eight characters long and cannot contain both single and double quote
characters. The Remote Insight Lights-Out Edition board treats this string as
case sensitive. If this parameter is not specified, then the value for the
specified user is not changed.
SNMP_ADDRESS is the address of the system that will receive the traps for
the user. This address has a maximum length of 50 characters and can be any
valid IP address or DNS name. If this parameter currently exists for the
specified user, change the value to blank by using an empty string instead of a
valid IP address. If this parameter is left not specified, then the current value is
not changed.
SUPERVISOR_PRIV is a Boolean parameter that grants all of the other
permissions, even those that are marked with an “N” value or are blank. If this
parameter is left not specified, then the current value is not changed.
LOGIN_PRIV is a Boolean parameter that allows the user to log in to the
Remote Insight Lights-Out Edition board and use resources such as Web
pages. Marking this with an “N” value disables the account without deleting it.
(See the SUPERVISOR_PRIV parameter.) If this parameter is left not
specified, then the current value is not changed.
REMOTE_CONS_PRIV is a Boolean parameter that gives permission for the
user to access the remote console functionality of the Remote Insight
Lights-Out Edition board. Note that the SUPERVISOR_PRIV parameter
overrides REMOTE_CONS_PRIV if it is specified as being on. If this
parameter is not specified, then the current value is not changed.
RESET_SERVER_PRIV is a Boolean parameter that gives the user
permission to remotely reset the server or power it down. Note that the
SUPERVISOR_Priv parameter overrides RESET_SERVER_PRIV if the value
is specified as being on. If this parameter is not specified, then the current
value is not changed.
OS_TRAPS is Boolean parameter that, if set to “Y”, indicates that this user
will receive the SNMP traps generated by the operating system. If the
OS_TRAPS parameter is left not specified, then the current value is not
changed. An SNMP address must be specified to receive the SNMP traps.
C-11
C-12
Compaq Remote Insight Lights-Out Edition User Guide
RIB_TRAPS is a Boolean parameter that, if set to “Y”, indicates that this user
will receive the SNMP traps generated by the Remote Insight Lights-Out
Edition board. If the RIB_TRAPS parameter is left not specified, then the
current value is not changed. An SNMP address must be specified to receive
the SNMP traps.
IMPORTANT: The following parameters limit the address from which the user may log in.
If the user attempts to log in from another address, the address will be refused as though
the user has typed an incorrect password. Exactly one of the following parameters may be
present but may be blank to indicate that there is no limit. (See the example for
MOD_USER.) If the parameter is not blank, then the client addresses will be limited as
indicated. If the parameter is not specified, the current value is not changed.
CLIENT_IP specifies a single IP address that the user may use to connect with
the Remote Insight Lights-Out Edition board. CLIENT_IP has a maximum
length of 50 characters and must be a complete numerical IP address. This data
parameter is mutually exclusive to the CLIENT_RANGE and the
DNS_NAME data parameters.
CLIENT_RANGE specifies a range of addresses from which the user is
allowed to access the Remote Insight Lights-Out Edition board.
CLIENT_RANGE has a maximum length of 50 characters. Two addresses are
separated by a dash (-), and both addresses must be valid and complete TCP/IP
numerical addresses. Any address that falls between them numerically will be
accepted. This data parameter is mutually exclusive to the CLIENT_IP and the
DNS_NAME data parameters.
DNS_NAME specifies a DNS name with which the user logs into the Remote
Insight Lights-Out Edition board. DNS_NAME has a maximum length of 50
characters and is mutually exclusive to the CLIENT_IP and the
CLIENT_RANGE data parameters.
MOD_USER Errors
The possible MOD_USER error messages include:
■
Login name is too long. Maximum length is 48 characters.
■
User name is too long. Maximum length is 48 characters.
■
Password is too short. Minimum length is 8 characters.
■
Password is too long. Maximum length is 48 characters.
■
User information is open for read-only access. Write access is required
for this operation.
■
User login ID cannot be blank.
■
Cannot modify user information for currently logged user.
Remote Insight Board Command Language
■
This user is not logged in.
■
User login name was not found.
GET_USER
The GET_USER command returns the user’s information, excluding the
password.
Example:
<RIBCL VERSION=“1.2”>
<LOGIN USER_LOGIN = “adminname” PASSWORD = “password”>
<USER_INFO MODE = “read”>
<GET_USER USER_LOGIN = “username”/>
</USER_INFO>
</LOGIN>
</RIBCL>
GET_USER Parameters
USER_LOGIN is the name that a user would type to log in to the Remote
Insight Lights-Out Edition board. It has a maximum length of 48 characters
and can be an ASCII string containing any combination of printable
characters. The USER_LOGIN parameter is case sensitive and must never be
blank.
GET_USER Errors
The possible GET_USER error messages include:
■
User login name was not found.
■
User login ID cannot be blank.
C-13
C-14
Compaq Remote Insight Lights-Out Edition User Guide
GET_USER Return Messages
A possible GET_USER return message would be:
<?xml version=“1.0”?>
<RIBCL VERSION=“1.2”/>
<RESPONSE
STATUS = “0x0000”
MSG = “No Errors”
/>
<GET_USER
USER_NAME = “Admin User”
USER_LOGIN = “username”
SNMP_ADDRESS = “”
SUPERVISOR_PRIV = “N”
LOGIN_PRIV = “Y”
REMOTE_CONS_PRIV = “Y”
RESET_SERVER_PRIV = “N”
OS_TRAPS = “N”
RIB_TRAPS = “N”
CLIENT_IP = “”
/>
GET_ALL_USERS
The GET_ALL_USERS command requests that the Remote Insight
Lights-Out Edition board return a list of all of the valid user names that are
currently in the user database. The user database must have been successfully
opened with the USER_INFO command and must have been opened in read or
write mode for this command to work.
Example:
<RIBCL VERSION=“1.2”>
<LOGIN USER_LOGIN = “adminname” PASSWORD = “password”>
<USER_INFO MODE = “read”>
<GET_ALL_USERS/>
</USER_INFO>
</LOGIN>
</RIBCL>
GET_ALL_USERS Errors
The possible GET_ALL_USERS error messages include:
■
No user is currently logged in.
■
User information has not been opened yet.
Remote Insight Board Command Language
GET_ALL_USERS Return Messages
An example of a successful request follows:
<?xml version=“1.0”?>
<RIBCL VERSION=“1.2”/>
<RESPONSE
STATUS=“0x0000”
MESSAGE='No Error'/>
<GET_ALL_USERS
USER_LOGIN=“username”
USER_LOGIN=“user2”
USER_LOGIN=“user3”
USER_LOGIN=“user4”
USER_LOGIN=“user5”
USER_LOGIN=“user6”
USER_LOGIN=“user7”
USER_LOGIN=“user8”
USER_LOGIN=“user9”
USER_LOGIN=“user10”
USER_LOGIN=“user11”
USER_LOGIN=“user12”
/>
The following is an example of an unsuccessful request:
<RESPONSE
STATUS = “0x0001”
MSG = “Error Message”/>
RIB_INFO
The RIB_INFO command is used to tell the firmware that the configuration of
the Remote Insight Lights-Out Edition board is about to be changed.
Example:
<RIB_INFO mode=”write”>
……… RIB_INFO commands ……
</RIB_INFO>
RIB_INFO Parameters
MODE is a specific string and has a maximum length of 10 characters. It tells
the Remote Insight Lights-Out Edition board what you intend to do with the
user information. Valid arguments are “read” and “write”. Write mode enables
both reading and writing and other users will be unable to open the RILOE
board information. Read mode is not able to change any RILOE board data.
Read mode is assumed if the mode attribute is left out.
C-15
C-16
Compaq Remote Insight Lights-Out Edition User Guide
RIB_INFO Errors
There are no RIB_INFO errors.
MOD_NETWORK_SETTINGS
This command will modify certain network settings. This command is only
valid inside a RIB_INFO block. The logged in user needs to have supervisory
privilege and the mode of the containing RIB_INFO block must be “write”.
All of these elements are optional, and may be left out. If an element is left
out, then the current setting is preserved.
Example:
<RIBCL VERSION=“1.2”>
<LOGIN USER_LOGIN = “adminname” PASSWORD = “password”>
<RIB_INFO MODE = “write”>
<MOD_NETWORK_SETTINGS>
<ENABLE_NIC value = ”Y”/>
<SPEED_AUTOSELECT value = ”N”/>
<FULL_DUPLEX value = ”Y”/>
<NIC_SPEED value = ”100”/>
<DHCP_ENABLE value = ”Y”/>
<IP_ADDRESS value = ”255.255.255.255”/>
<SUBNET_MASK value = ”255.255.0.0”/>
<GATEWAY_IP_ADDRESS value = ”255.255.255.255”/>
<DNS_NAME value = ”demorib.internal.net”/>
<DOMAIN_NAME value = ”internal.net”/>
<DHCP_GATEWAY value = ”N”/>
<DHCP_DNS_SERVER value = ”N”/>
<DHCP_STATIC_ROUTE value = ”N”/>
<REG_WINS_SERVER value = ”N”/>
<HTTPS_PORT value = ”443”/>
<HTTP_PORT value = ”80”/>
<REMOTE_CONSOLE_PORT value = ”23”/>
<PRIM_DNS_SERVER value = ”255.255.255.255”/>
<SEC_DNS_SERVER value = ”255.255.255.255”/>
<STATIC_ROUTE_1 DEST=”255.255.0.0” GATEWAY=”255.0.0.0”/>
<STATIC_ROUTE_2 DEST=”255.255.0.0” GATEWAY=”255.0.0.0”/>
<WEB_AGENT_IP_ADDRESS value = ”255.255.255.255”/>
</MOD_NETWORK_SETTINGS>
</RIB_INFO>
</LOGIN>
</RIBCL>
Remote Insight Board Command Language
MOD_NETWORK_SETTINGS Parameters
ENABLE_NIC is used to enable or disable the NIC. The possible values are
“Y” or “N.” It is case-insensitive.
SPEED_AUTOSELECT is used to automatically select the transceiver speed.
The possible values are “Y” or “N.”
FULL_DUPLEX is used to select if the RIB is to support full-duplex or halfduplex mode. It is only applicable if SPEED_AUTOSELECT was set to “N.”
The possible values are “Y” or “N.”
NIC_SPEED is used to set the transceiver speed if SPEED_AUTOSELECT
was set to NO. The possible values are 10 or 100.
DHCP_ENABLE is used to select if DHCP is enabled. The possible values are
“Y” or “N.”
IP_ADDRESS is used to select the IP address for the Remote Insight
Lights-Out Edition board if DHCP is not enabled. If an empty string is
entered, the current value is deleted.
SUBNET_MASK is used to select the subnet mask for the Remote Insight
Lights-Out Edition board if DHCP is not enabled. If an empty string is
entered, the current value is deleted.
GATEWAY_IP_ADDRESS is used to select the default gateway IP address
for the Remote Insight Lights-Out Edition board if DHCP is not enabled. If an
empty string is entered, the current value is deleted.
DNS_NAME is used to specify the DNS name for the Remote Insight
Lights-Out Edition board. If an empty string is entered, the current value is
deleted.
DOMAIN_NAME is used to specify the domain name for the network where
the Remote Insight Lights-Out Edition board resides. If an empty string is
entered, the current value is deleted.
DHCP_GATEWAY specifies if the DHCP assigned gateway address is to be
used. The possible values are “Y” or “N.” This selection is only valid if DHCP
is enabled.
DHCP_DNS_SERVER specifies if the DHCP assigned DNS server is to be
used. The possible values are “Y” or “N.” This selection is only valid if DHCP
is enabled.
DHCP_WINS_SERVER specifies if the DHCP assigned WINS server is to be
used. The possible values are “Y” or “N.” This selection is only valid if DHCP
is enabled.
C-17
C-18
Compaq Remote Insight Lights-Out Edition User Guide
DHCP_STATIC_ROUTE specifies if the DHCP assigned static routes are to
be used. The possible values are “Y” or “N.” This selection is only valid if
DHCP is enabled.
REG_WINS_SERVER specifies if the Remote Insight Lights-Out Edition
board needs to register with the WINS server. The possible values are “Y” or
“N.” This selection is only valid if DHCP is enabled.
HTTPS_PORT specifies the HTTPS (SSL) port number for the Remote
Insight Lights-Out Edition board.
HTTP_PORT specifies the HTTP port number for the Remote Insight
Lights-Out Edition board.
REMOTE_CONSOLE_PORT specifies the remote console port for the
Remote Insight Lights-Out Edition board.
PRIM_DNS_SERVER specifies the IP address of the primary DNS server.
This is only relevant if DHCP assigned DNS server address feature is disabled.
If an empty string is entered, the current value is deleted.
SEC_DNS_SERVER specifies the IP address of the secondary DNS server.
This is only relevant if DHCP assigned DNS server address feature is disabled.
If an empty string is entered, the current value is deleted.
TER_DNS_SERVER specifies the IP address of the tertiary DNS server. This
is only relevant if DHCP assigned DNS server address feature is disabled. If
an empty string is entered, the current value is deleted.
PRIM_WINS_SERVER specifies the IP address of the primary WINS server.
This is only relevant if DHCP assigned WINS server address feature is
disabled. If an empty string is entered, the current value is deleted.
SEC_WINS_SERVER specifies the IP address of the secondary WINS server.
This is only relevant if DHCP assigned WINS server address feature is
disabled. If an empty string is entered, the current value is deleted.
STATIC_ROUTE_1, STATIC_ROUTE_2, and STATIC_ROUTE_3 are used
to specify the destination and gateway IP addresses of the static routes. The
following two parameters are used within the static route commands. If an
empty string is entered, the current value is deleted.
DEST specifies the destination IP addresses of the static route. This is only
relevant if the DHCP assigned static route feature is disabled. If an empty
string is entered, the current value is deleted.
GATEWAY specifies the gateway IP addresses of the static route. This is only
relevant if the DHCP assigned static route feature is disabled. If an empty
string is entered, the current value is deleted.
Remote Insight Board Command Language
WEB_AGENT_IP_ADDRESS specifies the address for the Web-enabled
agents. If an empty string is entered, the current value is deleted.
NOTE: The Remote Insight Lights-Out Edition board is rebooted to apply the changes
once MOD_NETWORK_SETTINGS has been closed.
MOD_NETWORK_SETTINGS Errors
A possible MOD_NETWORK_SETTINGS error message is:
RIB information is open for read-only access. Write access is required
for this operation.
MOD_GLOBAL_SETTINGS
This command is used to change the Global Settings field in the Remote
Insight Lights-Out Edition board. RIB_INFO needs to be issued in write mode
before this command. All of the parameters are optional.
Example:
<RIBCL VERSION=“1.2”>
<LOGIN USER_LOGIN = “adminname” PASSWORD = “password”>
<RIB_INFO MODE = “write”>
<MOD_ GLOBAL_SETTINGS>
<SESSION_TIMEOUT value = ”60”/>
<F8_PROMPT_ENABLED value = “Y”/>
<HOST_KEYBOARD_ENABLED value = “Y”/>
<REMOTE_CONSOLE_PORT_STATUS value = “0”/>
<POCKETPC_ACCESS value = “Y”/>
</MOD_GLOBAL_SETTINGS>
</RIB_INFO>
</LOGIN>
</RIBCL>
MOD_GLOBAL_SETTINGS Parameters
SESSION_TIMEOUT determines the maximum session timeout value in
minutes. The accepted values are from 0 to 120. If a value greater than 120 is
specified, the SESSION_TIMEOUT will return an error.
HOST_KEYBOARD_ENABLED determines if the host keyboard is enabled
or disabled. The possible values are “Y” or “N.”
F8_PROMPT_ENABLED determines if the F8 prompt for ROM based
configuration is displayed during POST. The possible values are “Y” or “N.”
C-19
C-20
Compaq Remote Insight Lights-Out Edition User Guide
REMOTE_CONSOLE_PORT_STATUS determines the configuration for the
Remote Console port. The valid values for this setting are “0,” “1,” “2,” or
“3,” which correspond to the port being set as No Change, Disabled,
Automatic, or Enabled. In the Automatic setting, the Remote Console port is
only enabled when a Remote Console session through a browser is in progress
and is disabled otherwise.
POCKETPC_ACCESS determines if the PocketPC access is allowed or not.
The possible values are “Y” or “N,”which enable and disable the access.
MOD_GLOBAL_SETTINGS Errors
The possible MOD_GLOBAL_SETTINGS error messages include:
■
RIB information is open for read-only access. Write access is required
for this operation.
■
The remote console port status value specified is invalid. It needs to be
either 0, 1, 2 or 3.
CLEAR_EVENTLOG
This command will clear the RIB event log. The CLEAR_EVENTLOG
command must display within a RIB_INFO element and RIB_INFO must be
in write mode.
Example:
<RIBCL VERSION=“1.2”>
<LOGIN USER_LOGIN = “adminname” PASSWORD = “password”>
<RIB_INFO MODE = “write”>
<CLEAR_ EVENT_LOG/>
</RIB_INFO>
</LOGIN>
</RIBCL>
CLEAR_EVENTLOG Parameters
There are no parameters for this command.
CLEAR_EVENTLOG Errors
A possible CLEAR_EVENTLOG error message is:
RIB information is open for read-only access. Write access is required
for this operation.
Remote Insight Board Command Language
UPDATE_RIB_FIRMWARE
The UPDATE_RIB_FIRMWARE command copies the firmware upgrade file
to the Remote Insight Lights-Out Edition board, starts the upgrade process and
reboots the board after the image has been flashed successfully. The
UPDATE_RIB_FIRMWARE command must display within a RIB_INFO
element and RIB_INFO must be in write mode. The Remote Insight
Lights-Out Edition board is reset after the firmware upgrade completes.
Example:
<RIBCL VERSION=“1.2”>
<LOGIN USER_LOGIN = “adminname” PASSWORD = “password”>
<RIB_INFO MODE = “write”>
<UPDATE_RIB_FIRMWARE IMAGE_LOCATION = “C:\cpqrb240.bin”/>
</RIB_INFO>
</LOGIN>
</RIBCL>
UPDATE_RIB_FIRMWARE Parameters
IMAGE_LOCATION takes the full path filename of the firmware upgrade
file.
UPDATE_RIB_FIRMWARE Errors
The possible UPDATE_RIB_FIRMWARE error messages include:
■
RIB information is open for read-only access. Write access is required
for this operation.
■
Unable to open the firmware image update file.
■
Unable to read the firmware image update file.
■
The firmware upgrade file size is too big.
■
The firmware image file is not valid.
■
A valid firmware image has not been loaded.
■
The flash process could not be started.
■
IMAGE_LOCATION must not be blank.
C-21
C-22
Compaq Remote Insight Lights-Out Edition User Guide
GET_FW_VERSION
The GET_FW_VERSION command will return the version and date of the
firmware on the Remote Insight Lights-Out Edition board.
Example:
<RIBCL VERSION=“1.2”>
<LOGIN USER_LOGIN = “adminname” PASSWORD = “password”>
<RIB_INFO MODE = “read”>
<GET_ FW_VERSION/>
</RIB_INFO>
</LOGIN>
</RIBCL>
GET_FW_VERSION Parameters
There are no parameters for this command.
GET_FW_VERSION Errors
There are no errors for this command.
INSERT_VIRTUAL_FLOPPY
This command copies a floppy image to the Remote Insight Lights-Out
Edition board The INSERT_VIRTUAL_FLOPPY command must display
within a RIB_INFO element and RIB_INFO must be in write mode.
Example:
<RIBCL VERSION=“1.2”>
<LOGIN USER_LOGIN = “adminname” PASSWORD = “password”>
<RIB_INFO MODE = “write”>
<INSERT_VIRTUAL_FLOPPY IMAGE_LOCATION = “C:\test.img”/>
</RIB_INFO>
</LOGIN>
</RIBCL>
INSERT_VIRTUAL_FLOPPY Parameters
IMAGE_LOCATION takes the full path filename for the floppy image file.
Remote Insight Board Command Language
INSERT_VIRTUAL_FLOPPY Errors
The possible INSERT_VIRTUAL_FLOPPY error messages include:
■
RIB information is open for read-only access. Write access is required
for this operation.
■
IMAGE_LOCATION must not be blank.
■
The Virtual Floppy image is invalid.
■
Unable to open the virtual floppy image file.
■
Unable to read the virtual floppy image file.
■
The virtual floppy image file size is too big.
■
No image present in the Virtual Floppy drive.
■
Failed to allocate virtual floppy image space.
EJECT_VIRTUAL_FLOPPY
This command ejects the virtual floppy image if one is inserted. The
EJECT_VIRTUAL_FLOPPY command must display within a RIB_INFO
element and RIB_INFO must be in write mode.
Example:
<RIBCL VERSION=“1.2”>
<LOGIN USER_LOGIN = “adminname” PASSWORD = “password”>
<RIB_INFO MODE = “write”>
<EJECT_VIRTUAL_FLOPPY/>
</RIB_INFO>
</LOGIN>
</RIBCL>
EJECT_VIRTUAL_FLOPPY Parameters
There are no parameters for this command.
EJECT_VIRTUAL_FLOPPY Errors
The possible EJECT_VIRTUAL_FLOPPY error messages include:
■
RIB information is open for read-only access. Write access is required
for this operation.
■
No image present in the Virtual Floppy drive.
C-23
C-24
Compaq Remote Insight Lights-Out Edition User Guide
COPY_VIRTUAL_FLOPPY
The COPY_VIRTUAL_FLOPPY command copies a floppy image from the
Remote Insight Lights-Out Edition board to the local system. The
COPY_VIRTUAL_FLOPPY command must display within a RIB_INFO
element and RIB_INFO must be in write mode.
Example:
<RIBCL VERSION=“1.2”>
<LOGIN USER_LOGIN = “adminname” PASSWORD = “password”>
<RIB_INFO MODE = “write”>
<COPY_VIRTUAL_FLOPPY IMAGE_LOCATION = “C:\test.img”/>
</RIB_INFO>
</LOGIN>
</RIBCL>
COPY_VIRTUAL_FLOPPY Parameters
IMAGE_LOCATION takes the full path filename for the location where the
floppy image file needs to be copied.
COPY_VIRTUAL_FLOPPY Errors
The possible COPY_VIRTUAL_FLOPPY error messages include:
■
RIB information is open for read-only access. Write access is required
for this operation.
■
IMAGE_LOCATION must not be blank.
■
Unable to open the virtual floppy image file.
■
Unable to write the virtual floppy image file.
■
No image present in the Virtual Floppy drive.
GET_VF_STATUS
The GET_VF_STATUS command gets the Virtual Floppy drive status from
the Remote Insight Lights-Out Edition board. The GET_VF_STATUS
command must display within a RIB_INFO element and RIB_INFO must be
in write mode.
Remote Insight Board Command Language
Example:
<RIBCL VERSION=“1.2”>
<LOGIN USER_LOGIN = “adminname” PASSWORD = “password”>
<RIB_INFO MODE = “read”>
<GET_VF_STATUS/>
</RIB_INFO>
</LOGIN>
</RIBCL>
GET_VF_STATUS Parameters
No parameters are required for this command.
The following information is returned within the response:
BOOT_OPTION = BOOT_ALWAYS | BOOT_ONCE | NO_BOOT
WRITE_PROTECT_FLAG = YES | NO
IMAGE_INSERTED = YES | NO
GET_VF_STATUS Errors
There are no errors for this command.
SET_VF_STATUS
The SET_VF_STATUS command sets the Virtual Floppy drive status on the
Remote Insight Lights-Out Edition board. The SET_VF_STATUS command
must display within a RIB_INFO element and RIB_INFO must be in write
mode. All the parameters in the command are optional.
Example:
<RIBCL VERSION=“1.2”>
<LOGIN USER_LOGIN = “adminname” PASSWORD = “password”>
<RIB_INFO MODE = “write”>
<SET_VF_STATUS>
<VF_BOOT_OPTION = “BOOT_ONCE”/>
<VF_WRITE_PROTECT value = “Y”/>
</ SET_VF_STATUS>
</RIB_INFO>
</LOGIN>
</RIBCL>
C-25
C-26
Compaq Remote Insight Lights-Out Edition User Guide
SET_VF_STATUS Parameters
VF_BOOT_OPTION specifies the boot option parameter for the virtual
floppy. The possible values are BOOT_ALWAYS, BOOT_ONCE or
NO_BOOT. The value is case-sensitive.
VF_WRITE_PROTECT sets the write protect flag value for the virtual floppy.
The possible values are “Y” or “N”.
SET_VF_STATUS Errors
The possible SET_VF_STATUS error messages include:
■
RIB information is open for read-only access. Write access is required
for this operation.
■
An invalid virtual floppy option has been given.
HOTKEY_CONFIG
The HOTKEY_CONFIG command configures the remote console hotkey
settings on the Remote Insight Lights-Out Edition board. The
HOTKEY_CONFIG command must display within a RIB_INFO element and
RIB_INFO must be in write mode. All of the sub-elements of the command
are optional.
Upper case letters are not supported and they will be converted automatically
to lower case. If either a double quote or a single quote is used, it must be
different from the delimiter. CTRL sub-elements that are not present will not
be modified. Specifying a blank string will remove the current value.
Example:
<RIBCL VERSION=“1.2”>
<LOGIN USER_LOGIN = “adminname” PASSWORD = “password”>
<RIB_INFO MODE = “write”>
<HOTKEY_CONFIG>
<CTRL_W value = ”CTRL,ALT,ESC”/>
<CTRL_V value = ”L_SHIFT,F10,F12”/>
</HOTKEY_CONFIG>
</RIB_INFO>
</LOGIN>
</RIBCL>
Remote Insight Board Command Language
HOTKEY_CONFIG Parameters
CTRL_W specifies settings for the CTRL_X hotkey. The settings need to be
separated by commas. For example, CTRL_X=“CTRL,ALT,ESC”. Up to
five keystrokes can be configured for each hotkey.
CTRL_X specifies settings for the CTRL_X hotkey. The settings need to be
separated by commas. For example, CTRL_X=“CTRL,ALT,ESC”. Up to
five keystrokes can be configured for each hotkey.
CTRL_Y specifies settings for the CTRL_Y hotkey. The settings need to be
separated by commas. For example, CTRL_Y=“CTRL,ALT,ESC”. Up to
five keystrokes can be configured for each hotkey.
CTRL_T specifies settings for the CTRL_T hotkey. The settings need to be
separated by commas. For example, CTRL_T=“CTRL,ALT,ESC”. Up to
five keystrokes can be configured for each hotkey.
CTRL_U specifies settings for the CTRL_U hotkey. The settings need to be
separated by commas. For example, CTRL_U=“CTRL,ALT,ESC”. Up to
five keystrokes can be configured for each hotkey.
CTRL_V specifies settings for the CTRL_V hotkey. The settings need to be
separated by commas. For example, CTRL_V=“CTRL,ALT,ESC”. Up to
five keystrokes can be configured for each hotkey.
HOTKEY_CONFIG Errors
The possible HOTKEY_CONFIG error messages include:
■
RIB information is open for read-only access. Write access is required
for this operation.
■
The hotkey parameter specified is not valid.
SERVER_INFO
The SERVER_INFO command is used to tell the firmware that the
configuration of the Remote Insight Lights-Out Edition board is about to be
changed.
Example:
<SERVER_INFO mode = ”write”>
……… SERVER_INFO commands …….
</SERVER_INFO>
C-27
C-28
Compaq Remote Insight Lights-Out Edition User Guide
SERVER_INFO Parameters
MODE is a specific string parameter has a maximum length of ten characters.
It tells the Remote Insight Lights-Out Edition board what you intend to do
with the server information. Valid arguments are “read” and “write”. If it is
open in write mode, then both reading and writing are enabled. If it is open is
read mode then this instance will not be able to perform any server actions.
SERVER_INFO Errors
A possible SERVER_INFO error is:
Mode parameter must not be blank.
SET_HOST_POWER
The SET_HOST_POWER command sets the Virtual Power Button feature on
the Remote Insight Lights-Out Edition board. This is used to turn the server on
or off, if the feature is supported. The SET_HOST_POWER command must
display within a SERVER_INFO element and SERVER_INFO must be in
write mode.
Example:
<RIBCL VERSION=“1.2”>
<LOGIN USER_LOGIN = “adminname” PASSWORD = “password”>
<SERVER_INFO MODE = “write”>
<SET_HOST_POWER HOST_POWER = “Y”/>
</SERVER_INFO>
</LOGIN>
</RIBCL>
SET_HOST_POWER Parameters
HOST_POWER sets the value to “Y” or “N” to power on or power off the
server.
SET_HOST_POWER Errors
The possible SET_HOST_POWER error messages include:
■
Server information is open for read-only access. Write access is required
for this operation.
■
Virtual Power Button feature is not supported on this server.
Remote Insight Board Command Language
GET_VPB_CABLE_STATUS
The GET_VPB_CABLE_STATUS command gets the Virtual Power Button
cable status on the Remote Insight Lights-Out Edition board. The
GET_VPB_CABLE_STATUS command must display within a
SERVER_INFO element and SERVER_INFO must be in write mode.
Example:
<RIBCL VERSION=“1.2”>
<LOGIN USER_LOGIN = “adminname” PASSWORD = “password”>
<SERVER_INFO MODE = “read”>
<GET_VPB_CABLE_STATUS/>
</SERVER_INFO>
</LOGIN>
</RIBCL>
GET_VPB_CABLE_STATUS Parameters
There are no parameters for GET_VPB_CABLE_STATUS command.
GET_VPB_CABLE_STATUS Errors
The possible GET_VPB_CABLE_STATUS error messages include:
■
Virtual Power Button cable is attached.
■
Virtual Power Button cable is not attached.
GET_HOST_POWER_STATUS
The GET_HOST_POWER_STATUS command gets the server power state
from the Virtual Power Button cable on the Remote Insight Lights-Out Edition
board. The GET_HOST_POWER_STATUS command must display within a
SERVER_INFO element and SERVER_INFO must be in write mode.
Example:
<RIBCL VERSION=“1.2”>
<LOGIN USER_LOGIN = “adminname” PASSWORD = “password”>
<SERVER_INFO MODE = “read”>
<GET_HOST_POWER_STATUS/>
</SERVER_INFO>
</LOGIN>
</RIBCL>
C-29
C-30
Compaq Remote Insight Lights-Out Edition User Guide
GET_HOST_POWER_STATUS Parameters
There are no parameters for the GET_HOST_POWER_STATUS command.
GET_HOST_POWER_STATUS Errors
The possible GET_HOST_POWER_STATUS error messages include:
■
Host power is OFF.
■
Host power is ON.
RESET_SERVER
The RESET_SERVER command will reset the server if the server is turned
ON. The RESET_SERVER command must display within a SERVER_INFO
element and SERVER_INFO must be in write mode.
Example:
<RIBCL VERSION=“1.2”>
<LOGIN USER_LOGIN = “adminname” PASSWORD = “password”>
<SERVER_INFO MODE = “write”>
<RESET_SERVER/>
</SERVER_INFO>
</LOGIN>
</RIBCL>
RESET_SERVER Parameters
There are no parameters for the RESET_SERVER command.
RESET_SERVER Errors
The possible RESET_SERVER error messages include:
■
Server information is open for read-only access. Write access is required
for this operation.
■
Server is currently powered off.
Appendix
D
Compaq Lights-Out DOS Utility
The purpose of the Compaq Lights-Out DOS Utility (CPQLODOS) is to
provide a command line utility that a user can use to bootstrap a Remote
Insight Lights-Out Edition configuration into a new server.
CPQLODOS allows the user to configure a subset of the configuration
parameters exposed through:
■
F8 configuration
■
The Remote Insight Lights-Out Edition GUI
CPQLODOS is not intended for continued administration. The Compaq
Lights-Out Configuration Utility (CPQLOCFG) should be used for
administration purposes. See Appendix C in this guide for more information.
D-2
Compaq Remote Insight Lights-Out Edition User Guide
Prerequisites
The following are prerequisites for using CPQLODOS:
■
Familiarity with Compaq remote option boards
■
Familiarity with DOS batch scripting
Features
The following list details the features available through CPQLODOS:
■
Query NIC settings
■
Query DHCP configuration settings
■
Query RILOE user list
■
Query board type and firmware version
■
Modify NIC settings
■
Modify DHCP settings
■
Add a RILOE user
■
Capture the board configuration to a file
■
Load and apply a configuration to a RILOE board
■
Reload and apply a board’s configuration from a file
■
Detect a RILOE board
■
Support a ‘pause on error’ mode
■
Reset the RILOE board
Important Information
The following information should be read before using the CPQLODOS
utility.
Operating System Requirements
The CPQLODOS utility will only work under real MS-DOS or Windows 95
DOS (not a DOS window). It is not supported on any other operating system.
Compaq Lights-Out DOS Utility
CPQLODOS Utility
The CPQLODOS utility has been designed to fit on to a 1.44-MB floppy disk
with other utilities, DOS, and scripts. The utility runs under DOS 6, and the
Windows 95 floppy generated by the ROMPAQ software. It is not necessary
to use a memory expander to use this utility.
The utility is to be used only in a DOS environment (not a DOS shell under
Windows NT). If attempting to run CPQLODOS in a DOS shell under
Windows NT or Windows 2000, an error message similar to the following
displays:
CPQLODOS: RILOE bootstrap config utility.
(C) 2001 Compaq Computer Corporation
Version 1.0
No PCI BIOS found.
This is common under NT and other OSs where raw memory access is not permitted.
Please run this only under real MS-DOS or Windows 95 DOS (not DOS window).
The utility performs updates except in the following circumstances:
■
A virtual floppy is inserted.
NOTE: When using CPQLODOS, applying a configuration involves resetting RILOE board,
which will wipe out the Virtual Floppy image and leave the server in an indeterminate
state. For any scenario in which CPQLODOS would be used on a virtual floppy, the
CPQLOCFG utility should be used.
The CPQLODOS utility will not run if a virtual floppy is detected in the RILOE. A message is
sent to the console telling the user to eject the floppy and retry.
■
A Remote Console session is active.
NOTE: If a Remote Console session is detected, and the operation would cause a reset of
the RILOE board, a warning message is displayed at the Remote Console informing the
user that the operation is going to reset the board and that the Remote Console session
needs to be re-established after 2 minutes.
■
A flash of the RILOE ROM is in progress. The program aborts in this
instance.
Output Logging
The command line option, /log, must be used to capture the output to a file
instead of using the DOS redirection “>” arrow. Using the “>” changes the
DOS environment sufficiently enough to cause problems accessing the 32-bit
memory space.
D-3
D-4
Compaq Remote Insight Lights-Out Edition User Guide
When the output is not redirected to a log file, the output is paginated (screenat-a-time with pause) for ease of viewing. When the output is redirected to a
log file using the /log command line option, only critical (lethal) error
messages will appear on the console and pagination is disabled.
Reset to Factory Defaults
Before configuring specific information to the RILOE board, it is reset to the
factory defaults. Because of this, a single user, “Administrator,” is created
with the default network settings tag password.
Since CPQLODOS 1.0 does not support modifying existing users, and
attempting to add an existing user will cause an error, the user should not
attempt to add “Administrator” in their XML scripting. If you have captured a
configuration file by using the /write_xml command, be sure to delete the
Administrator user from this file before using it to configure a RILOE board.
Minimum Firmware
CPQLODOS is coded to require a minimum firmware level of 2.30 by default.
This can be modified using the command line parameter. CPQLODOS also
requires a SMIF header of at least 2.0 and will not run against old SMIF 1.0
interfaces.
Command Line Parameters
The following sections list the command line parameters available with the
CPQLODOS utility, as well as examples, return messages, and error messages
if applicable.
/help
The /help command displays a simple help message listing available
CPQLODOS commands and return codes. The /? command has the same
functionality.
Compaq Lights-Out DOS Utility
The /help command has a return message similar to the following:
CPQLODOS: RILOE bootstrap config utility.
(C) 2001 Compaq Computer Corporation
Version 1.0
CPQLODOS {cmds}
where cmds are:
/detect
- Detect the RIB card.
/help
- Display this message.
/reset_riloe
- Reset the RILOE card.
/get_status
- Get RILOE status.
/get_hostinfo
- Discover RILOE host info.
/get_nicconfig - Discover RILOE network config.
/get_dhcpconfig - Discover DHCP config.
/write_xml =
- Write settings to an XML file.
/load_xml =
- Read settings from an XML file.
/verify_xml = - Validate an XML file syntax.
/p
- Pause on error.
/log =
- Capture output to a log file.
/min_fw =
- Do not run on a firmware less than (default is 2.30).
Return Codes:
0 - Success
1 - Failure
/detect
The /detect command determines if a RILOE board is installed and returns a
success or failure error code. The /detect command returns a code of “0” if the
detection is successful, or a “1” if the detection was unsuccessful.
/get_status
The /get_status command obtains the RILOE board status displays the
following information:
■
Firmware version and date
■
RILOE board serial number
■
Current RILOE board time and date
■
RILOE board type
■
Remote Console session warning, if one is in progress
D-5
D-6
Compaq Remote Insight Lights-Out Edition User Guide
The /get_status command has a return message similar to the following:
CPQLODOS: RILOE bootstrap config utility.
(C) 2001 Compaq Computer Corporation
Version 1.0
SMIF STATUS:
FIRMWARE: 2.32 00:00:00 04/04/2001
BOARD SERIAL NUM: P432A0CBFKI958
RILOE TIME/DATE: 13:26:32 05/08/2021
BOARD TYPE: THUNDERCHILD+i960RD
A REMOTE CONSOLE IS NOT CONNECTED
/get_hostinfo
The /get_hostinfo command obtains the current host information stored in the
RILOE board and displays the server name and server number.
The /get_hostinfo command has a return message similar to the following:
CPQLODOS: RILOE bootstrap config utility.
(C) 2001 Compaq Computer Corporation
Version 1.0
Host Information:
Server Name: 'MTEST'
Server Num: '1234'
/get_userinfo
The /get_userinfo command obtains the current users stored in the RILOE
board and displays the following information:
■
User name
■
Login name
■
Security mask information
Compaq Lights-Out DOS Utility
The /get_userinfo command has a return message similar to the following:
CPQLODOS: RILOE bootstrap config utility.
(C) 2001 Compaq Computer Corporation
Version 1.0
User Information:
0: --------------------------------User Number: 1
Login: 'Administrator'
Username: 'Administrator'
Login: True
Remote Cons: True
Reset Server: True
1: --------------------------------User Number: 2
Login: 'test'
Username: 'test'
Login: True
Remote Cons: True
Reset Server: True
2: --------------------------------User Number: 3
Login: 'admin'
Username: 'admin'
Login: True
Remote Cons: True
Reset Server: True
/get_nicconfig
The /get_nicconfig command obtains the current NIC settings stored in the
RILOE board and displays the following information:
■
MAC address
■
Option settings (speed, duplex)
■
NIC condition
■
MTU setting
■
IP address
■
Subnet mask
■
Gateway IP address
■
DNS server IP address
■
DNS name of RILOE card
■
HTTP port number
D-7
D-8
Compaq Remote Insight Lights-Out Edition User Guide
■
HTTPS port number
■
Remote Console port number
■
Remote Console port mode (enabled/disabled/enabled with console)
The /get_nicconfig command has a return message similar to the following:
CPQLODOS: RILOE bootstrap config utility.
(C) 2001 Compaq Computer Corporation
Version 1.0
NIC Config:
DNS NAME:
TESTRIB
IP ADDRESS:
192.22.23.24
SUBNET MASK: 255.255.255.0
MAC: 00:02:a5:61:71:73
REMOTE CONSOLE PORT: 23
HTTP PORT:
80
HTTPS PORT: 443
DNS IP:
0.0.0.0
GATEWAY IP:
0.0.0.0
NIC OPT:
ENABLED,AUTOSEL
/get_dhcpconfig
The /get_dhcpconfig command obtains the current DHCP settings stored in the
RILOE board and displays the following:
■
DHCP negotiation settings
■
DHCP negotiation results
■
Lease information
■
DHCP server IP address
■
WINS #1’s IP address
■
WINS #2’s IP address
■
DNS server #2’s IP address
■
DNS server #3’s IP address
■
0-3 fixed routes
■
Domain name for RILOE card
Compaq Lights-Out DOS Utility
The /get_dhcpconfig command has a return message similar to the following:
CPQLODOS: RILOE bootstrap config utility.
(C) 2001 Compaq Computer Corporation
Version 1.0
DHCP CONFIG:
RILOE NAME:
DHCP SERVER: 0.0.0.0
WINS: 0.0.0.0,172.25.55.3
DNS: 0.0.0.0,0.0.0.0
ROUTES:
0.0.0.0:0.0.0.0,0.0.0.0:0.0.0.0,0.0.0.0:0.0.0.0
LEASE:
21:48:37 03/21/203721:48:37 03/21/2037
DHCP OPT:
GATEWAY,DNS,ROUTES,WINS,REGWINS,
DHCP RESULT: IP GOTTEN
/write_xml
The /write_xml command writes the current SMIF settings to a file in XML
format. The following information is written to the file:
■
NIC configuration
■
DHCP configuration
■
User configuration
The name of the file to be written to is specified in the command line
parameter, as shown in the following example:
/write_xml = C:\configsettings
A captured configuration contains all users, including the Administrator. The
passwords will be blank in the file. Prior to reloading the information in this
file to a RILOE board, delete the Administrator user and supply the valid
passwords for the remaining user accounts.
/load_xml
The /load_xml command loads an XML formatted file and applies its changes
to the current configuration. This command is used to modify NIC settings,
DHCP settings, and add users. For more information on creating an XML file
to change configuration settings, see the “Supported XML Syntax” section in
this appendix.
The file name to be used to change settings is specified in the command line
parameter, as shown in the following example:
/load_xml = C:\configsettings
D-9
D-10
Compaq Remote Insight Lights-Out Edition User Guide
Modifying the NIC settings, DHCP settings, and adding users is available only
when specified in the configuration file and loaded in that manner. It is not
available as a separate command line action.
/verify_xml
The /verify_xml command allows you to verify the XML script of a specified
file for accuracy. This command reviews the script and gives a message for
any incorrect script.
For example, in a CPQLODOS script, “Administrator” cannot be one of the
users to be added in a configuration file. If “Administrator” is in the file being
verified, a message will be given stating to remove “Administrator” from the
file.
Example:
/verify_xml = C:\scriptfile
/p
The /p command enables the system to display an error message and pause
before exiting.
/min_fw
The /min_fw command allows you to set the minimum firmware version that
the board will run on.
Example:
/min_fw = 2.30
/reset_riloe
The /reset_riloe command resets the RILOE board, which is recommended
after performing configuration changes. A reset of the RILOE board can also
be achieved by using the RESET_RIB command in an XML script file. For
more information, see the RESET_RIB section of this appendix.
Compaq Lights-Out DOS Utility
/log
The /log command captures all output to a designated log file instead of the
console. The file name to be used as the designated output file is specified in
the command line parameter, as shown in the following example:
Example:
/log = C:\riloelogfile
The /log command must be used to capture the output to a file instead of using
the DOS redirection arrow, “>”. Using the redirection arrow changes the DOS
environment sufficiently enough to cause problems accessing the 32-bit
memory space.
Supported XML Syntax
The CPQLODOS utility is intended as a subset of CPQLOCFG utility.
Therefore, the XML syntax used in the CPQLODOS utility closely parallels
the syntax used to command the CPQLOCFG utility. However, there are a
number of syntax parameters within CPQLOCFG utility that have no meaning
within the CPQLODOS utility and were removed for simplicity.
Administration functionality should be handled through CPQLOCFG utility.
The following sections discuss the commands and parameters that are
supported for CPQLODOS. Review these sections before creating an XML
file to be used by CPQLODOS utility.
CPQLODOS
CPQLODOS is always used at the beginning of a session and is displayed with
the current version. The version should be “1.0.”
D-11
D-12
Compaq Remote Insight Lights-Out Edition User Guide
ADD_USER
The ADD_USER command is used to add a user to the Remote Insight
Lights-Out Edition board. The only parameters that are set through
CPQLODOS are the USER_NAME, USER_LOGIN, and PASSWORD. If any
CPQLOCFG parameter is entered that is not supported by CPQLODOS, it will
cause an error.
NOTE: The RILOE board is reset to factory defaults before configuring specific
information. Because of this, a single user, “Administrator,” is created with the default
network settings tag password. Since CPQLODOS 1.0 does not support modifying existing
users, the user should not attempt to add “Administrator” in their XML scripting. If you
have captured a configuration file by using the /write_xml command, be sure to delete the
Administrator user from this file before using to configure a RILOE board.
Since there are only three parameters within the ADD_USER command, each
user added will have all privileges, including supervisor privileges. Use the
MOD_USER command in CPQLOCFG to change the added user’s privileges.
For more information on using the MOD_USER command, see Appendix C.
Example:
<CPQLODOS VERSION=“1.0”>
<ADD_USER
USER_NAME
USER_LOGIN
PASSWORD
</ADD_USER>
</CPQLODOS>
=“Admin User”
=“username”
=“password”>
ADD_USER Parameters
USER_NAME is the actual name of the user to be added. The USER_NAME
parameter has a maximum length of 48 characters and can be any ASCII string
containing printable characters, including white spaces. This string is used for
display only and may be blank.
USER_LOGIN is the name that the user will type to log into the Remote
Insight Lights-Out Edition board. The USER_LOGIN parameter has a
maximum length of 48 characters, can be an ASCII string containing any
combination of printable characters, and is case sensitive. This parameter must
never be blank.
Compaq Lights-Out DOS Utility
PASSWORD is the password that will be associated with the user. This
parameter has a maximum length of 48 characters and is an ASCII string that
may contain any combination of printable characters. PASSWORD must be at
least eight characters long and cannot contain both single and double quote
characters. The Remote Insight Board treats this string as being case sensitive.
This parameter must never be blank.
ADD_USER Runtime Errors
The possible ADD_USER runtime error messages include:
■
Login name is too long. Maximum length is 48 characters.
■
Password is too short. Minimum length is 8 characters.
■
Password is too long. Maximum length is 48 characters.
■
User name cannot be blank.
■
User login ID cannot be blank.
■
Password must not be blank.
MOD_NETWORK_SETTINGS
The following NIC/DHCP settings can be modified using the
MOD_NETWORK_SETTINGS command:
■
NIC Settings
GOption
GIP
settings (speed, duplex)
address
GSubnet
mask
GGateway
■
IP address
GDNS
server IP address
GDNS
name of RILOE board
DHCP Settings
GDHCP
negotiation settings
GWINS
#1’s IP address
G0-3
fixed routes
GDomain
name for RILOE board
D-13
D-14
Compaq Remote Insight Lights-Out Edition User Guide
The MOD_NETWORK_SETTINGS command will modify certain network
settings. All of these elements are optional, and may be left out. If an element
is left out, then the board default is preserved.
Not all parameters are available to modify network settings within the
CPQLODOS utility. Use the MOD_NETWORK_SETTINGS command in
CPQLOCFG to be able to modify all existing network settings. If any
CPQLOCFG parameter is entered that is not supported by CPQLODOS, an
error will be generated.
For more information on using the MOD_NETWORK_SETTINGS command,
see appendix C.
Example:
<CPQLODOS VERSION=“1.0”>
<MOD_NETWORK_SETTINGS>
<SPEED_AUTOSELECT value = ”N”/>
<FULL_DUPLEX value = ”Y”/>
<DHCP_ENABLE value = ”Y”/>
<NIC_SPEED value = ”100”/>
<IP_ADDRESS value = ”255.255.255.255”/>
<SUBNET_MASK value = ”255.255.0.0”/>
<GATEWAY_IP_ADDRESS value = ”255.255.255.255”/>
<DNS_NAME value = ”demorib.internal.net”/>
<DOMAIN_NAME value = ”internal.net”/>
<DHCP_GATEWAY value = ”N”/>
<DHCP_DNS_SERVER value = ”N”/>
<DHCP_WINS_SERVER value = ”N”/>
<DHCP_STATIC_ROUTE value = ”N”/>
<REG_WINS_SERVER value = ”N”/>
<PRIM_DNS_SERVER value = ”255.255.255.255”/>
<PRIM_WINS_SERVER value = ”255.255.255.255”/>
<STATIC_ROUTE_1 DEST=”255.255.0.0” GATEWAY=”255.0.0.0”/>
<STATIC_ROUTE_2 DEST=”255.255.0.0” GATEWAY=”255.0.0.0”/>
<STATIC_ROUTE_3 DEST=”255.255.0.0” GATEWAY=”255.0.0.0”/>
</MOD_NETWORK_SETTINGS>
<RESET_RIB value = ”Y”/>
</CPQLODOS>
MOD_NETWORK_SETTINGS Parameters
SPEED_AUTOSELECT is used to automatically select the transceiver speed.
The possible values are “Y” or “N.”
FULL_DUPLEX is used to select if the RILOE board is to support full-duplex
or half-duplex mode. It is only applicable if SPEED_AUTOSELECT was set
to “N.” The possible values are “Y” or “N.”
Compaq Lights-Out DOS Utility
DHCP_ENABLE is used to select if DHCP is enabled. The possible values are
“Y” or “N.”
NIC_SPEED is used to set the transceiver speed if SPEED_AUTOSELECT
was set to NO. The possible values are 10 or 100.
IP_ADDRESS is used to select the IP address for the Remote Insight
Lights-Out Edition board if DHCP is not enabled. If an empty string is
entered, the current value is deleted.
SUBNET_MASK is used to select the subnet mask for the Remote Insight
Lights-Out Edition board if DHCP is not enabled.
GATEWAY_IP_ADDRESS is used to select the default gateway IP address
for the Remote Insight Lights-Out Edition board if DHCP is not enabled. If an
empty string is entered, the current value is deleted.
DNS_NAME is used to specify the DNS name for the Remote Insight
Lights-Out Edition board. If an empty string is entered, the current value is
deleted.
DOMAIN_NAME is used to specify the domain name for the network where
the Remote Insight Lights-Out Edition board resides. If an empty string is
entered, the current value is deleted.
DHCP_GATEWAY specifies if the DHCP assigned gateway address is to be
used. The possible values are “Y” or “N.” This selection is only valid if DHCP
is enabled.
DHCP_DNS_SERVER specifies if the DHCP assigned DNS server is to be
used. The possible values are “Y” or “N.” This selection is only valid if DHCP
is enabled.
DHCP_WINS_SERVER specifies if the DHCP assigned WINS server is to be
used. The possible values are “Y” or “N.” This selection is only valid if DHCP
is enabled.
DHCP_STATIC_ROUTE specifies if the DHCP assigned static routes are to
be used. The possible values are “Y” or “N.” This selection is only valid if
DHCP is enabled.
REG_WINS_SERVER specifies if the Remote Insight Lights-Out Edition
board needs to register with the WINS server. The possible values are “Y” or
“N.” This selection is only valid if DHCP is enabled.
PRIM_DNS_SERVER specifies the IP address of the primary DNS server.
This is only relevant if DHCP assigned DNS server address feature is disabled.
If an empty string is entered, the current value is deleted.
D-15
D-16
Compaq Remote Insight Lights-Out Edition User Guide
PRIM_WINS_SERVER specifies the IP address of the primary WINS server.
This is only relevant if DHCP assigned WINS server address feature is
disabled. If an empty string is entered, the current value is deleted.
STATIC_ROUTE_1, STATIC_ROUTE_2, and STATIC_ROUTE_3 are used
to specify the destination and gateway IP addresses of the static routes. The
following two parameters are used within the static route commands. If an
empty string is entered, the current value is deleted.
DEST specifies the destination IP addresses of the static route. This is only
relevant if the DHCP assigned static route feature is disabled. If an empty
string is entered, the current value is deleted.
GATEWAY specifies the gateway IP addresses of the static route. This is only
relevant if the DHCP assigned static route feature is disabled. If an empty
string is entered, the current value is deleted.
NOTE: The Remote Insight Lights-Out Edition board should be rebooted using the
RESET_RIB command to apply the MOD_NETWORK_SETTINGS changes. The network
settings will not be applied until the RILOE board is reset.
MOD_NETWORK_SETTINGS Runtime Errors
There are no MOD_NETWORK_SETTINGS runtime errors.
RESET_RIB
The RESET_RIB command is used to reset the Remote Insight Lights-Out
Edition board. It is typically used to apply the settings after using the
MOD_NETWORK_SETTINGS command.
Example:
<CPQLODOS VERSION=“1.0”>
<RESET_RIB value = ”Y”/>
</CPQLODOS>
RESET_RIB Parameters
There are no RESET_RIB parameters.
RESET_RIB Runtime Errors
There are no RESET_RIB runtime errors.
Index
/
/detect D-5
/get dhcpconfig D-8
/get hostinfo D-6
/get nicconfig D-7
/get userinfo D-6
/help D-4
/load xml D-9
/log D-11
/min fw D-10
/p D-10
/reset riloe D-10
/verify xml D-10
/write xml D-9
Symbols & Numbers
128-bit encryption 1-5
2-cursor mode 4-21
40-bit encryption 1-6
A
AC power adapter
connector location 2-10
features 2-14
ADD_USER D-12
alerts See also SNMP
configuring 5-28
disabling 5-30
host OS generated 5-28
Remote Insight 5-28
SNMP 5-35
test 5-30
application launch task 6-9
automatic server recovery (ASR)
SmartStart setup 4-4
B
batch processing 6-15
board name parameter 3-7
boot straps B-2
bootstrapping Remote Insight to
server D-1
browsers
launching 1-2, 5-37
Remote Console 4-17
supported 1-4, 5-4
C
cables
connecting 2-10
keyboard/mouse 2-11
LAN 2-13
monitor 2-12
power 2-14, 2-15
Virtual Power Button 1-9, 2-6
CLEAR_EVENTLOG C-20
CLIENT_IP C-8, C-12
CLIENT_RANGE C-8, C-12
Compaq Confidential – Need to Know Required
Writer: James Parish Project: Compaq Remote Insight Lights-Out Edition User Guide Comments:
Part Number: 159206-005 File Name: l-index Compaq Remote Insight Lights-Out Edition User Guide.doc Last Saved On: 7/12/01 8:47 AM
2
Compaq Remote Insight Lights-Out Edition User Guide
command language See Remote
Insight Board Command
Language
command line parameters,
CPQLODOS D-4
Compaq authorized reseller xv
Compaq Diskette Image Utility
creating image files 5-17
image files vs. diskettes 5-22
Compaq Insight Manager XE
browser launching 5-37
compatibility 1-3
integration 5-11, 5-34
role of 6-2
troubleshooting 7-5
Compaq Lights-Out Configuration
Utility See Lights-Out
Configuration Utility
Compaq Lights-Out DOS
Utility See Lights-Out DOS
Utility
Compaq Management Agents 5-38
Compaq SmartStart
setup procedure 4-4
supported 1-6
Compaq Survey Utility 1-6, 5-4
Compaq Web-based Agents 1-3
Compaq website xv
configuration
parameters for 3-1
preinstalled operating
system 4-7
connections
keyboard/mouse 2-11
LAN 2-13
monitor 2-12
power 2-15
connectors, identifying
external 2-10
COPY VIRTUAL FLOPPY C-24
CPQLOCFG utility
See Lights-Out Configuration
Utility
CPQLODOS utility
See Lights-Out DOS Utility
D
data types in RIBCL C-2
default gateway parameter 3-6
default settings D-4
DELETE_USER C-9
DEST C-18, D-16
device drivers, installing 4-10
Device Queries 6-4
DHCLP_ENABLE C-17
DHCP
CPQLODOS D-8, D-13
disabling 4-5, 5-31
server setting 3-8
DHCP_DNS_SERVER C-17,
D-15
DHCP_ENABLE D-15
DHCP_GATEWAY C-17, D-15
DHCP_STATIC_ROUTE C-18,
D-15
DHCP_WINS_SERVER C-17,
D-15
dial-up support 1-4
Diskette Image Utility
image files vs. diskettes 5-22
DNS
disabling 4-5
server settings 3-8
DNS_NAME C-8, C-12, C-17,
D-15
domain name parameter 3-8
DOMAIN_NAME C-17, D-15
DOS requirements for
CPQLODOS D-3
driver installation
OS/2 4-14
Red Hat Linux 4-15
SCO 4-15
Windows 4-10, 4-12
duplexing of NIC 3-6
Compaq Confidential – Need to Know Required
Writer: James Parish Project: Compaq Remote Insight Lights-Out Edition User Guide Comments:
Part Number: 159206-005 File Name: l-index Compaq Remote Insight Lights-Out Edition User Guide.doc Last Saved On: 7/12/01 8:47 AM
Index
E
EISA Configuration Utility 4-6
EJECT VIRTUAL FLOPPY C-23
electrostatic discharge (ESD)
precautions 2-6, B-1
ENABLE_NIC C-17
encryption 1-5. See also security
enforced client IP address 3-9
error messages, types of See also
runtime errors
event log
clearing C-20
entries 7-9
extender bracket, installing 2-2
Extensible Markup Language
(XML)
CPQLODOS D-9
CPQLODOS commands D-11
RIBCL 6-3, C-2
external power 1-6
F
F8_PROMPT_ENABLED C-19
factory default settings D-4
features
accessing 5-4
CPQLODOS D-2
Lights-Out Configuration
Utility 6-2
Remote Console 5-5
Remote Insight overview 1-1
firmware
CPQLODOS D-10
CPQLODOS minimums D-4
inability to upgrade 7-8
updating 1-3, 5-32, C-21
version C-22
FULL_DUPLEX C-17, D-14
GET HOST POWER
STATUS C-29
get status D-5
GET VF STATUS C-24
GET VPB CABLE STATUS C-29
GET_ALL_USERS C-14
GET_FW_VERSION C-22
GET_USER C-13
global settings, changing C-19
graceful shutdown 5-15
graphical Remote Console 1-2, 5-5
grounding methods B-2
Group Administration
group administration 6-3
grouping feature 1-4
H
hardware, supported 1-8
health statistics 5-38
heel straps, using B-2
help
additional 5-34
Compaq website xv
telephone numbers xv
tips and tricks 5-34
home page 5-3
host server, identification
parameters 3-4
HOST_KEYBOARD_ENABLED
C-19
HOST_POWER C-28
hot keys, defining 5-4, 5-9
HOTKEY CONFIG C-26
HTTP port 3-6
HTTP_PORT C-18
HTTPS_PORT C-18
hyperlink feature 1-3
G
GATEWAY C-18, D-16
GATEWAY_IP_ADDRESS C-17,
D-15
Compaq Confidential – Need to Know Required
Writer: James Parish Project: Compaq Remote Insight Lights-Out Edition User Guide Comments:
Part Number: 159206-005 File Name: l-index Compaq Remote Insight Lights-Out Edition User Guide.doc Last Saved On: 7/12/01 8:47 AM
3
4
Compaq Remote Insight Lights-Out Edition User Guide
I
IBM OS/2 support 4-20
icons, symbols on equipment xii
identification, server 3-1, 3-4
image files
creating 5-17
vs. diskette 5-22
IMAGE_LOCATION C-21, C-22,
C-24
INSERT VIRTUAL
FLOPPY C-22
installation
connecting cables 2-10
main procedure 2-7
operating systems 5-16
preinstallation 2-2
reassembling server 2-9
slot locations 2-3
software 4-1
Virtual Power Button
cable 2-7
Integrated Management Log
accessing 1-7
location 5-5
IP address
network parameters 3-5, 3-6
troubleshooting 7-5
user 3-9
Web agents 3-8
IP_ADDRESS C-17, D-15
iPAQ H3600 Pocket PC 5-41
connector location 2-10
language parameter 3-3, 3-11
LED indicators
error codes 7-8
location 2-13
troubleshooting 7-4
Lights-Out Configuration Utility
Compaq Insight Manager
XE 6-2
features 6-2
Lights-Out DOS Utility
command line parameters D-4
default settings D-4
features D-2
firmware minimums D-4
output logging D-3
overview D-1
prerequisites D-2
XML syntax D-11
Linux
configuration 4-9
device driver installation 4-15
server settings 4-20
supported 1-8
lockout capability 5-25
log file, CPQLODOS D-11. See
also event log
LOGIN C-4
login name 3-9, 7-2
login procedures
access parameter 3-10
RIBCL command C-4
LOGIN_PRIV C-7, C-11
K
keyboard
configuration parameter 3-3,
3-11
connecting 2-11
connector location 2-10
L
LAN (Local Area Network)
access 1-4
connecting 2-13
M
MAC address 3-7
management processor 1-4, 6-2
Microsoft Windows 2000
configuration 4-7
CPQLODOS D-3
device driver installation 4-12
server settings 4-19
supported 1-8
Compaq Confidential – Need to Know Required
Writer: James Parish Project: Compaq Remote Insight Lights-Out Edition User Guide Comments:
Part Number: 159206-005 File Name: l-index Compaq Remote Insight Lights-Out Edition User Guide.doc Last Saved On: 7/12/01 8:47 AM
Index
Microsoft Windows NT
CPQLODOS D-3
device driver installation 4-10
server settings 4-19
supported 1-8
MOD GLOBAL SETTINGS C-19
MOD NETWORK
SETTINGS C-16
MOD_NETWORK_SETTINGS
D-13
MOD_USER C-9
MODE C-5, C-28
monitor
connection 2-12
troubleshooting 7-3
mouse
connecting 2-11
connector location 2-10
single cursor mode 5-8
synchronizing 4-21, 5-6, 5-7
N
NetWare
configuration 4-8
device driver installation 4-12
server settings 4-19
troubleshooting 7-6
network
connecting 2-13
interface parameters 3-2, 3-5
modifying settings C-16
settings 5-31
troubleshooting 7-4
network settings tag 2-2, 5-2
NIC (Network Interface Card)
CPQLODOS D-7
CPQLODOS D-13
integrated 1-4
troubleshooting 7-4
NIC_SPEED C-17, D-15
O
operating systems
setup procedures 4-7
supported 1-8, 4-3
option kit contents 1-9
OS/2 support 1-8, 4-14, 4-20
OS_TRAPS C-7, C-11
output logging in
CPQLODOS D-3
P
parameters
ADD_USER C-6
batch processing 6-15
Compaq Insight Manager
XE 6-11
COPY_VIRTUAL_FLOPPY
C-24
CPQLODOS D-4
DELETE_USER C-9
GET_USER C-13
INSERT_VIRTUAL_FLOPPY
C-22
LOGIN C-4, C-5
MOD_NETWORK_SETTING
S C-17
MOD_USER C-10
network interface 3-5
overview 3-1
RIB_INFO C-15
RIBCL C-3
server identification 3-4
SERVER INFO C-28
SET_HOST_POWER C-28
SET_VF_STATUS C-26
UPDATE_RIB_FIRMWARE
C-21
user configuration 3-8
parts, handling of B-1
password
troubleshooting 7-2
PASSWORD parameter C-4, C-7,
C-11, D-13
PCI extender bracket,
installing 2-2
PCI resources 3-4
Personal Queries 6-5
Pocket PC access 5-39
Compaq Confidential – Need to Know Required
Writer: James Parish Project: Compaq Remote Insight Lights-Out Edition User Guide Comments:
Part Number: 159206-005 File Name: l-index Compaq Remote Insight Lights-Out Edition User Guide.doc Last Saved On: 7/12/01 8:47 AM
5
6
Compaq Remote Insight Lights-Out Edition User Guide
POCKETPC_ACCESS C-20
power
AC adapter 2-14
connecting 2-15
external sources 1-6
RIBCL command C-29
preinstalled operating system
setup 4-2, 4-7
PRIM_DNS_SERVER C-18,
D-15
PRIM_WINS_SERVER C-18,
D-16
Q
queries, defined 6-4
R
rack stability xiii
reboot
remote 1-1, 1-2
troubleshooting 7-7
Red Hat Linux
configuration 4-9
device driver installation 4-15
server settings 4-20
REG_WINS_SERVER C-18,
D-15
regulatory compliance notices A-1
remote access 1-1
Remote Console
access parameter 3-10
CPQLODOS D-3
features 5-5
hardware-based 1-2
hot keys 5-4, 5-10
lockout capability 5-25
mouse pointer 5-6, 5-8
parameters 3-6
troubleshooting 5-11
views 5-9
remote firmware update 1-3
Remote Insight Board Command
Language
ADD USER C-6
CLEAR EVENTLOG C-20
COPY VIRTUAL
FLOPPY C-24
DELETE USER C-9
EJECT VIRTUAL
FLOPPY C-23
GET FW VERSION C-22
GET HOST POWER
STATUS C-29
GET VF STATUS C-24
GET VPB CABLE
STATUS C-29
GET_ALL_USERS C-14
GET_USER C-13
HOTKEY CONFIG C-26
INSERT VIRTUAL
FLOPPY C-22
LOGIN C-4
MOD GLOBAL
SETTINGS C-19
MOD NETWORK
SETTINGS C-16
MOD USER C-9
MODE C-5
RESET SERVER C-30
RIB INFO C-15
SERVER INFO C-27
SET HOST POWER C-28
SET VF STATUS C-25
UPDATE RIB
FIRMWARE C-21
USER INFO C-5
Remote Insight Event Log 5-14
Remote Insight kit contents 1-9
Remote Insight Lights-Out Edition
accessing 5-2
configuration 3-1, 4-6, 4-10
CPQLODOS D-1
features 1-1
installation 2-2, 4-1
Lights-Out Configuration
Utility 6-1
Pocket PC 5-39
Remote Console 5-5
troubleshooting 5-11
Virtual Floppy Drive 5-16
Compaq Confidential – Need to Know Required
Writer: James Parish Project: Compaq Remote Insight Lights-Out Edition User Guide Comments:
Part Number: 159206-005 File Name: l-index Compaq Remote Insight Lights-Out Edition User Guide.doc Last Saved On: 7/12/01 8:47 AM
Index
Remote Insight navigation frame
event log 5-14
help 5-5
Integrated Management
Log 5-5
Remote Console 5-4
reset sequences 5-11
reset server 5-5, 5-15
survey information 5-12
Virtual Floppy Drive 5-5
Virtual Power Button 5-15
remote reboot 1-1, 1-2
remote server reset 3-11
REMOTE_CONS_PRIV C-7,
C-11
REMOTE_CONSOLE_PORT C-1
8
REMOTE_CONSOLE_PORT_ST
ATUS C-20
reset sequences
video replays 5-11
RESET SERVER C-30
RESET_RIB D-16
RESET_SERVER_PRIV C-7,
C-11
resetting board 7-2
resetting server 5-5, 5-15
restarting remote host server 5-15
return messages
CPQLODOS D-5
RIBCL C-15
RIB INFO C-15
RIB_TRAPS C-8, C-12
RIBCL C-3
RIBWAN.SYS 4-4, 4-7
RJ-45 receptacle xii
ROM system D-3
ROMPaq 2-3, 5-16
runtime errors
ADD_USER C-8, D-13
COPY_VIRTUAL_FLOPPY
C-24
EJECT_VIRTUAL_FLOPPY
C-23
GET_HOST_POWER_STATU
S C-30
GET_USER C-13
GET_VPB_CABLE_STATUS
C-29
HOTKEY_CONFIG C-27
INSERT_VIRTUAL_FLOPPY
C-23
LOGIN C-5, C-9, C-12, C-13,
C-14
MOD_GLOBAL_SETTINGS
C-20
MOD_NETWORK_SETTING
S C-19
MOD_USERS C-12
RESET SERVER C-30
RIBCL C-4
SET_HOST_POWER C-28
SET_VF_STATUS C-26
UPDATE_RIB_FIRMWARE
C-21
S
SCO support 1-8, 4-15, 4-20
SEC_DNS_SERVER C-18
SEC_WINS_SERVER C-18
security
access levels 3-10
login C-4
settings 5-32
serial number 3-4
server identification
parameters 3-1, 3-4
SERVER INFO C-27
servers
compatibility 1-8
determining available
slots 2-3
disassembling 2-3
installation 2-6
reassembling 2-9
resetting 5-5, 5-15
settings 4-19
supported 1-8
SESSION_TIMEOUT C-19
SET HOST POWER C-28
SET VF STATUS C-25
Compaq Confidential – Need to Know Required
Writer: James Parish Project: Compaq Remote Insight Lights-Out Edition User Guide Comments:
Part Number: 159206-005 File Name: l-index Compaq Remote Insight Lights-Out Edition User Guide.doc Last Saved On: 7/12/01 8:47 AM
7
8
Compaq Remote Insight Lights-Out Edition User Guide
setup procedures
disabling DNS/DHCP 4-5
preinstalled operating
system 4-2, 4-7
SmartStart 4-4
System Configuration
Utility 4-6
shutdown, graceful 5-15
single cursor mode 4-21
slots, determining available 2-3
SmartStart
setup procedure 4-4
supported 1-6
SNMP
trap delivery 1-3, 5-28
troubleshooting 7-5
user IP address 3-9
SNMP_ADDRESS C-7, C-11
software
device drivers 4-10
installation 4-1
preinstalled operating
system 4-2, 4-7
supported 1-8
speed of NIC 3-5
SPEED_AUTOSELECT C-17,
D-14
static routes parameters 3-8
STATIC_ROUTE
parameters C-18, D-16
static-safe containers B-1
subnet mask 3-6
SUBNET_MASK C-17, D-15
supervisor access 3-10
SUPERVISOR_PRIV C-7, C-11
survey information 1-6, 5-12
switches
definitions 6-15
symbols in text xii
symbols on equipment xii
System Configuration Utility 4-6
TER_DNS_SERVER C-18
text conventions xi
tools, conductive field service B-2
transceiver speed autoselect 3-5
trap IP address 5-35
traps See also alerts
troubleshooting
event log date and time 7-7
firmware upgrade 7-8
LED error codes 7-8
logged events 5-14
login name 7-2
NetWare driver 7-6
NIC connection 7-4
password 7-2
reboot failure 7-7
remote host server 5-11
resetting Remote Insight
board 7-2
SNMP information 7-5
traps 7-6
video 7-3
U
UnixWare support 4-15, 4-20
UPDATE RIB FIRMWARE C-21
USER_INFO C-5
USER_LOGIN C-6, C-10, C-11,
C-13, D-12
USER_NAME C-6, C-9, C-10,
D-12
users
account management 6-2
configuration parameters 3-3,
3-8
CPQLODOS D-6
IP address 3-9
modifying D-4
RIBCL commands C-5
T
technical support xiv
telephone numbers xv
Compaq Confidential – Need to Know Required
Writer: James Parish Project: Compaq Remote Insight Lights-Out Edition User Guide Comments:
Part Number: 159206-005 File Name: l-index Compaq Remote Insight Lights-Out Edition User Guide.doc Last Saved On: 7/12/01 8:47 AM
Index
VF_BOOT_OPTION C-26
VF_WRITE_PROTECT C-26
VGA controllers, disabling 2-7,
2-12
video display
connector location 2-10
disabling 2-7, 2-12
troubleshooting 7-3
Viritual Floppy Drive
CPQLODOS issues D-3
Virtual Floppy Drive
benefits 5-16
copying files to 5-19
options 5-5
overview 1-2
parameters C-22
settings 5-19
Virtual Power Button
cable installation 2-7
RIBCL command C-28
Web-based Agents 1-4
websites
Compaq xiv, 6-15
lights-out 2-3
support files 2-3
Windows 2000
configuration 4-7
CPQLODOS D-3
device driver installation 4-12
server settings 4-19
supported 1-8
Windows NT
CPQLODOS D-3
device driver installation 4-10
server settings 4-19
supported 1-8
WINS
CPQLODOS D-16
server registration 3-7
server settings 3-8
wrist straps B-2
write protection 5-19
W
X
warnings
electrical shock xiii, 2-1
rack stability xiii
Web browsers
launching 1-2, 5-37
Remote Console 4-17
supported 5-4
WEB_AGENT_IP_ADDRESS
C-19
XML (Extensible Markup
Language)
CPQLODOS D-9
CPQLODOS commands D-11
RIBCL 6-3, C-2
V
Compaq Confidential – Need to Know Required
Writer: James Parish Project: Compaq Remote Insight Lights-Out Edition User Guide Comments:
Part Number: 159206-005 File Name: l-index Compaq Remote Insight Lights-Out Edition User Guide.doc Last Saved On: 7/12/01 8:47 AM
9