1
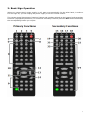
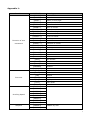
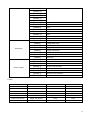
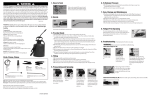
Moving Message Display
User Manual
Item Ref: 153.110, 153.111, 153.112, 153.114
Version 2.0
1
1: General Information
Thank you for purchasing the QTX Light moving message display. This manual will show you how to
program and operate your device using the supplied hand-held remote control.
Versions:
153.110:
153.111:
153.112:
153.113:
7
7
7
7
x
x
x
x
80 RED
80 Multi colour
120 RED
120 Multi colour
Spec:
Item
153.110
Power
LED Colour
153.111
153.112
5Vdc, 3A
Red
Multi Colour
153.113
5Vdc, 6A
Red
Multi Colour
Display
7 x 80 LEDs
7 x 120 LEDs
Dimensions
660 x 98 x 35mm
965 x 98 x 35mm
Weight
1.5kg
2.2kg
Supplied in the Box
1
1
2
1
1
1
1
1
x
x
x
x
x
x
x
x
Moving Message Display
Remote control
AAA batteries
Instruction manual
Power supply
UK power lead
EU Power lead
Set of mounting brackets.
1.1: Attaching your sign to a surface
1.
2.
2.
Ensure the sign is fully working before you attempt any fixed installation.
Attach the mounting brackets to the wall or surface.
Attach the sign to mounting brackets using hardware as shown below.
3.
Plug the power cord into the sign and into an outlet.
2
2: Basic Sign Operation
When you connect sign’s power supply, it will start up automatically. On the other hand, in order to
turn the sign off, you can unplug the power supply or use the remote control.
The remote control has primary functions (letters and numbers printed on the buttons) and secondary
functions (highlighted just above). To access the secondary functions press the ALT button followed by
the corresponding button you require
3
2.1 Button Explanation
The first part of this chapter explains what each primary function (printed on the button) does and
the meaning for each.
Item
Key
1
ESC
2
PROG
3
CPW
Description
Takes you back to the previous option or to escape editing and run the
program
Enter the Edit Program Mode. Select file numbers 01 to 99 to enter
message. (see section 3.1)
Use for edit or reset password (see reset password section 3.3)
(1)
4
RUN
In edit program mode, press RUN to save and run the current
message
(2)
In display mode, press RUN and enter 01 to 99 to select other
messages for display
To select the display type mode. Choose up to 24 different modes (See
5
MET
6
TIME
7
ENT
Confirm the selected option
8
CLR
Erase option for individual program
9
Appendix 1) Press PREV and NEXT to select option 1 to 24
To select time option. (see section 3.4)
Letters and numbers to type in message
10
INS
Insert key
11
CAP
Toggle between Capital letter and lower case characters
12
DEL
Deletes a selected option
PREV
13
NEXT
<=
Use to scroll through different options or letters
>=
14
SPA
Insert space in message.
The second part of this chapter explains what each secondary function (printed above the button)
does and the meaning for each. To activate the secondary functions press the ALT (green) button
once followed by your selection.
Item
Key
15
SYM
16
FONT
Description
Select from 24 symbols to display on the message. (see section 3.2 &
Appendix 1)
Select the font type of the message. (see Section 3.2 & Appendix 1)
COL
17
(NOTE: Multi colour
Select the Colour display of the message. (see Section 3.2 & Appendix 1)
version only)
18
ON/OFF
Power On / Off. It will always display the last file which ran on the display
19
PAU
Generate a pause within the programmed message. (see Section 3.2 &
4
Appendix 1)
20
SPE
Select the display speed of the message. (see Section 3.2 & Appendix 1)
21
GRA
22
PHR
23
BEEP
Select graphic option, Use to Make, Edit or use a current Graphic already
stored in the Memory (see Section 3.5)
Select a programmed animation in the message. (see Section 3.2 &
Appendix 1)
24
Select beep sound in the message. (Use PREV and NEXT to select BEEP
1 to BEEP 3)
Secondary Letters and Characters
3: Beginning a Message
The sign can store up to 100 messages in numbered data files. These files are numbered from 00 to
99. File 00 is a default message.
Points to note:
•
Every time you press a button that is received by the unit a beep is heard to indicate successful
button press.
•
The default color for messages is Red and the default font size is 7*6
•
All letters are set to default CAPS. Press the CAP button to use small letters
•
In order to use international characters first key in the English equivalent EG: for “ë” press
CAPS to use small letters then type in “e” use the PREV and NEXT button to find the
international character of you need.
•
You have the option to save your message at the end of your programming
3.1 A Simple Program:
Step
Keys to
press
Display
Explanation
1
PROG
PASSWORD:***
Begin the edit program mode
2
000
PASSWORD:***
Default Password “000”
3
ENT
OPEN: ??
Enter into editing mode
The
first
(01-99)
4
01 ENT
[CYCLIC]
two
digit
file
number
are allowed for naming
message files [CYCLIC] is the
default method of display code which
means to cycle through at random
5
WELCOME
WELCOME
6
RUN
SAVE? (Y/N)
7
Y
Message begins to be
displayed
Type the text you wish to display in
you message
End the edit program mode
Save the message as data file number
01
5
NOTE: You can change the Font Style, Speed, Pause time and Colour by simply
pressing ALT and the selected option before you type you message EG:
[CYCLIC][5x11][GREEN][PAUSE1]WELCOME[CYCLIC]
To make words display in different frames or one after the other press ENT to display
type as follows:
[CYCLIC][5x11][GREEN]WELCOME[CYCLIC][5x11][RED]TO[CYCLIC]SHOP
NAME[CYCLIC]
This will display the three words differently one after another
To erase a program press CLR then ENT to delete the program and start again
3.2 Inserting text, time, date, symbol, graphics or characters:
Step
Keys to press
Display
Explanation
1
PROG
PASSWORD:***
Begin the edit program mode
2
000
PASSWORD:***
Default Password “000”
3
ENT
OPEN:??
Enter into editing mode
The first two digit file number (01-99)are
allowed for naming message
4
01 ENT
[CYCLIC]
files[CYCLIC]
Is the default method of display code
which means to cycle through at random
5
ALT SYM
6
ALT FONT
7
ALT COL
8
ALT PAU
9
ALT SPE
10
ALT GRA
11
TIME
12
RUN
Y ENT
Use PREV / NEXT to
select the pre option
you want. More
details of these can
be found in
Appendix A
SAVE Y / N
Add a Symbol
Change the font size
Change the colour of the font
Add a pause on each section
Slow the scroll speed
Add a graphic to the text.
ADD TIME / ADD DATE
Confirm selection
For more details of what each option has to offer is available see Appendix 1
6
3.3 Changing the password:
Step
Keys to press
Display
Explanation
1
PROG
PASSWORD:***
Begin the edit program mode
2
000
PASSWORD:***
Default Password “000”
3
ENT
OPEN:??
Enter into editing mode
The first two digit file number (01-99)are
4
01 ENT
[CYCLIC]
allowed for naming message files[CYCLIC]
Is the default method of display code which
means to cycle through at random
CPW
UNUSE PASS
PREV / NEXT
RES PASS
PREV / NEXT
USE PASS
PREV / NEXT
CHANGE ***
XXX ENT
CHANGE ***
6
XXX ENT
AGAIN ***
7
PROG
PASSWORD:***
5
6
Press ENT to turn password off
Reset password to DEFAULT 000
If you are currently not using the password
feature use this option to turn it on
Use this option to enter a new 3 digit
password
Enter new password
Confirm new password
Next time you enter in to program mode use
your new set password
3.4 Setting the Date, Time or Alarm:
Step
Keys to press
Display
1
PROG
PASSWORD:***
Begin the edit program mode
2
000
PASSWORD:***
Default Password “000”
3
ENT
OPEN:??
Enter into editing mode
TIME
SET TIME
PREV / NEXT
SET DATE
5
Explanation
Press ENT and use the arrow keys to set
the correct time
Press ENT and use the arrow keys to set
the correct date
Set number of times for Alarm to be
PREV / NEXT
ALARM
activated “C” and the time interval between
each alarm.
6
PREV / NEXT
ONE HOUR
Alarm will go off every hour
PREV / NEXT
12H Mode 1
Displayed as EG: WED 06:00 PM
PREV / NEXT
12H Mode 2
Displayed as EG: WED 06:00
PREV / NEXT
24H Mode
Displayed as EG: WED 18:00
PREV / NEXT
ADD TIME
Add the current time
PREV / NEXT
ADD DATE
Add the current date DD-MM-YYYY
PREV / NEXT
ON TIME
PREV / NEXT
OFF TIME
Set a time when the sign turns on
automatically
Set a Time when the sign turns off
automatically
7
3.5 Making Custom Graphics:
You can make your own style graphics to suit your needs by selecting individual pixels
and adding them within a sequence.
Step
Keys to press
Display
Explanation
1
PROG
PASSWORD:***
Begin the edit program mode
2
000
PASSWORD:***
Default Password “000”
3
ENT
OPEN:??
Enter into editing mode
The first two digit file number (01-99)are
4
01 ENT
[CYCLIC]
allowed for naming message files[CYCLIC]
Is the default method of display code which
means to cycle through at random
5
ALT GRA
GET GRAPHIC
Access a graphic already in the memory
6
PREV / NEXT
EDIT GRAPHIC
Edit a graphic already in the memory
PREV / NEXT
MAKE GRAPHIC
Make a new graphic from scratch
ENT
NUMBER A
PREV / NEXT
EDIT GRAPHIC
7
Use PREV and NEXT to select a file
You can now highlight each pixel individually
and change the colour
K
Turns pixel ON/OFF
J
Moves 1 pixel left
L
Moves 1 pixel right
O
Moves 1 pixel down
S
Moves 1 pixel up
H
Moves pixel up and to the right
F
Moves pixel up and to the left
P
Moves pixel down and to the right
N
Moves pixel down and to the left
PREV / NEXT
ENT
Change the colour (Multi colour version only)
Save file
8
Appendix 1:
Function
DISPLAY
Meaning
[CYCLIC]
Random effect
[IMMED]
Immediate
[OPEN←]
Slides in from Right
[OPEN→]
Open from Left
[OPEN<>]
Open from Center
[OPEN><]
Open to Center
[COVER<>]
Cover from Center
[COVER←]
Cover from Right
[COVER→]
Cover to Left
[COVER><]
Cover to Center
[SCROLL↑]
Scroll Up
Direction of text
[SCROLL↓]
Scroll Down
movement
[INTER><]
Interlace to Center
[INCOVER><]
Interlace to Cover
[COVER↑]
Cover Up
[COVER↓]
Cover Down
[SCANLN]
Scan Line
[EXPLOED]
Explode
[PACMAN]
Pac Man
[FALL]
[SHOOT]
Shoot
[FLASH]
Flash
[RANDOM]
Random
[SLIDE IN]
Slide in
[5x6]
[5x11]
[7x6]
Font size
Pall & Stack
[7x11]
[7x9]
Short
Short & Wide
Default
Wide
Slightly Wide
[7x17]
Extra Wide
[SMALL]
Small font
[SPEED 1]
Fastest
[SPEED 2]
[SPEED 3]
Scrolling Speed
[SPEED 4]
[SPEED 5]
[SPEED 6]
[SPEED 7]
Graphics
[SPEED 8]
Slowest
[GRAPH A]
Editable by User
[GRAPH B]
9
[GRAPH C]
[GRAPH D]
[GRAPH E]
[GRAPH F]
[GRAPH G]
[GRAPH H]
Animation
Pause Length
[GRAPH I]
City
[GRAPH J]
Car
[GRAPH K]
Ship
[GRAPH L]
Telephone
[GRAPH M]
Birds
[GRAPH N]
Ship
[GRAPH O]
Swim
[GRAPH P]
Cat
[ANIM1]
Merry X'Mas
[ANIM2]
Happy New Year
[ANIM3]
4th July
[ANIM4]
Happy Easter
[ANIM5]
Happy Halloween
[ANIM6]
Don't Drink & Drive
[ANIM7]
No Smoking
[ANIM8]
Welcome
[PAUSE 1]
Pause for 2 seconds
[PAUSE 2]
Pause for 3 seconds
[PAUSE 3]
Pause for 4 seconds
[PAUSE 4]
Pause for 6 seconds
[PAUSE 5]
Pause for 10 seconds
[PAUSE 6]
Pause for 20 seconds
[PAUSE 7]
Pause for 30 seconds
[PAUSE 8]
Pause for 60 seconds
Cont:
Sunny
Cloudy
Rain
Clock
Phone
Glasses
Faucet
Rocket
Alien
Key
Sweater
Helicopter
Car
Tank
House
Teapot
Trees
Duck
Motorcycle
Bike
Crown
Hearts
Right Arrow
Left Arrow
Lower Left Arrow
Upper left Arrow
Mug
Chair
Show
Martini Glass
10
TROUBLESHOOTING:
No display:
Check if the power socket located at the back is connected
Ensure AC power plug is plugged in to the wall outlet
Check to see if the mains power in to the external power
supply is connected
No response to remote control:
Check that the batteries in the remote have enough energy
Ensure the batteries are installed at the correct polarity
Ensure a clean line of sight between the remote and the
sign
No display but response
to the remote:
Check if the AUTO ON/AUTO OFF time setting is correct
Check you have information in the file RUN ??
Memory loss on the Sign
Replace the internal memory battery (CR2032)
If the above does not help you then contact your local dealer.
COPYRIGHT PROTECTED by QTX Light Ltd UK
WWW.QTXLIGHT.COM
11