1
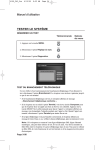
9200_Ch2_eng
5/18/05
2
2:03 PM
Page 1
Satellite
Receiver
ABOUT YOUR SATELLITE RECEIVER
This chapter gives you an overview and a description of your satellite receiver.
• SATELLITE RECEIVER OVERVIEW
• SINGLE AND DUAL MODES
• REMOTE CONTROL
• SATELLITE RECEIVER FRONT PANEL
• SATELLITE RECEIVER BACK PANEL
• USING THE MENUS
• USING TEXT FIELDS
Page 2-1
9200_Ch2_eng
5/18/05
2:03 PM
Page 2
User Guide
SATELLITE RECEIVER OVERVIEW
This section gives you an overview of your Bell ExpressVu satellite TV receiver system.
SATELLITE RECEIVER
This receiver is a dual-tuner satellite receiver that allows you to watch different programs
in two locations:
• Nearby HDTV (TV1) - Programming from the receiver is delivered to the nearby
HDTV using short audio/video cables.
• Remote TV(s) (TV2) - Programming from the receiver is delivered to the remote
TV(s) using existing in-home coaxial cable.
REMOTE CONTROLS
Two remote controls come with your receiver:
• Remote Control 1 - An Infrared (IR) remote to control programming for the nearby
HDTV (TV1). This remote is labeled with a green number 1, which matches similar
markings on the receiver output connections and the menus for the nearby HDTV.
• Remote Control 2 - An Ultra-High Frequency Pro (UHF Pro) remote to control
programming to a remote TV (TV2). This remote is labeled with blue number 2,
which matches the similar markings on the receiver output connections and the menus
for the remote TV.
Page 2-2
9200_Ch2_eng
5/18/05
2:03 PM
Page 3
Satellite Receiver
Single And Dual Modes
2
SINGLE AND DUAL MODES
Your Bell ExpressVu satellite receiver includes two modes of operation: Single and
Dual. These modes increase your entertainment options because you’ll be able to choose
how you watch and record your favourite programs.
SINGLE MODE
Single Mode provides dual-tuner receiver features—like Picture-in-Picture (PIP) and the
ability to watch one live program while recording another—to all connected TVs.
Single Mode delivers the same programming to all of the TVs connected to the satellite
receiver and allows this programming to be controlled by either remote control. The
format of the programming shown on the remote TV(s) is in standard definition (SD)
and high definition (HD) is shown only on the nearby HDTV. You can tell you are in
Single Mode because the Single front panel indicator will light and the menus and other
screens will display Single Mode (as shown below).
Page 2-3
9200_Ch2_eng
5/18/05
2:03 PM
Page 4
User Guide
DUAL MODE
While in Dual Mode, you can use this dual-tuner satellite receiver to watch different
programming in two separate locations:
• Nearby HDTV - Programming from the receiver is delivered to the HDTV near the
receiver using short audio/video cables and is controlled using Remote Control 1. The
HDTV is also referred to as “TV1.”
• Remote TV - Programming from the receiver is delivered to a TV located in another
room using existing in-home coaxial cable and is controlled using Remote Control 2.
The video displayed on the remote TV is always in SD. The Remote TV is also
referred to as “TV2.”
You can tell your receiver is in Dual Mode because the Dual front panel indicator will
light and the menu and other screens will display Dual Mode (as shown below).
Page 2-4
9200_Ch2_eng
5/18/05
2:03 PM
Page 5
Satellite Receiver
Single And Dual Modes
2
SWITCHING BETWEEN SINGLE AND DUAL MODE
Put the satellite receiver in Single or Dual Mode by pressing the front panel MODE
button. Keep the following items in mind when switching the satellite receiver between
Single and Dual Mode:
Single Mode
Dual Mode
Indications
Single Mode front panel
indicator lights.
Dual Mode front panel
indicator lights.
Recording
The TV1 Recording front
panel indicator lights
when you are recording
from one or both tuners.
The Recording front panel
indicator lights to show
whether TV1, TV2, or both
are currently recording.
Favourites Lists
Only Favourites Lists set
up for TV1 are available.
The lists for TV2 are not
lost, they are simply
unavailable in Single
Mode.
Favourites Lists set up for
both outputs (TV1 and
TV2) are available.
Locks
Locks set up for only
TV1 are available. The
locks for TV2 are not lost,
they are simply
unavailable in Single
Mode.
Locks set up for both
outputs (TV1 and TV2)
are available.
Note: If someone is using the TV2 outputs in Dual Mode, you will see a popup on the
nearby TV warning you that you are about to disrupt the use of the TV2 outputs.
Page 2-5
9200_Ch2_eng
5/18/05
2:03 PM
Page 6
User Guide
REMOTE CONTROL
The two remote controls give you easy access to all the features of your satellite
receiver. You can set up each remote to control the satellite receiver and up to three
other devices (see page 10-6). These devices can be a TV, a VCR or DVD player, and a
third device.
This section describes how to use the various features on the two types of remote
controls that were delivered with your satellite TV system.
TYPES OF REMOTE CONTROLS
Remote Control 1 uses infrared (IR) light
signals to:
• Control TV1 menus for the nearby
HDTV in Dual Mode.
• Control the satellite receiver in
Single Mode.
Remote Control 2 uses UHF Pro
signals to:
• Control TV2 menus for the remote TVs
in Dual Mode.
• Control the satellite receiver in
Single Mode.
IR signals travel only short distances (40
feet or less), and cannot go through walls or
other solid objects.You must point the
remote control directly at the device, with
no objects blocking the line of sight.
UHF Pro signals travel long distances and
go through walls and other solid objects.
Remote Control 1 uses IR signals to control
both the receiver and other devices that the
remote is programmed to control.
This remote control is identified by the
green number 1 at the bottom of the remote
control.
To use Remote Control 2 to control the
receiver, you must attach the UHF antenna
to the receiver back panel (see page 2-7).
Remote Control 2 uses IR signals to control
other devices that the remote is
programmed to control. You must point the
remote control directly at these devices,
with no objects blocking the line of sight.
This remote control is identified by the blue
number 2 at the bottom of the remote
control.
Page 2-6
9200_Ch2_eng
5/18/05
2:03 PM
Page 7
Satellite Receiver
Remote Control
2
REMOTE CONTROL BATTERIES
The remote control comes with AAA batteries.
When you replace old batteries, you should replace
all of the batteries. Use batteries of the same kind,
for example, alkaline or carbon zinc. Don’t mix
batteries of different kinds. Alkaline batteries
last longer.
1. Press down on the top of the battery cover and
slide the cover off.
2. Take out all of the old batteries.
3. Put the new batteries in. Make sure you match
the plus (“+”) ends with the plus markings on the
battery case.
4. Slide the cover back into place.
LOW BATTERY WARNING
When you see a low battery warning message on your screen below the Program Banner,
the batteries in your remote control are weak and need to be replaced.
ATTACH THE REMOTE ANTENNA
You need to attach the UHF remote antenna to the receiver's back panel Remote Antenna
input so you can use your UHF Pro Remote Control 2. If you don’t attach the UHF
antenna, you cannot use the remote to control the receiver. See Adjusting the Remote
Antenna on page 10-4 for more detailed information about improving the performance
of your UHF Pro remote control.
Page 2-7
9200_Ch2_eng
5/18/05
2:03 PM
Page 8
User Guide
REMOTE CONTROL BUTTONS
The following describes how the buttons work in SAT mode. For information on
controlling other components, see Using the Remote Control with Other Components
on page 10-14.
Button
Description
1
The remote control’s MODE buttons are used to set the remote
control to operate one of four devices: SAT (satellite receiver),
TV (for a TV), VCR (for a VCR or a DVD player), and AUX
(“auxiliary,” for a second TV, a VCR, a tuner, an audio
amplifier, or a second satellite receiver). Press the button for the
device you want the remote to control. The mode button lights
for two seconds to show you’ve set the remote to that mode. Be
sure to program the remote to control the other components as
described on page 10-6.
2
Press POWER to turn the receiver on or off.
3
Press TV POWER to turn the TV on or off. Be sure to program
the remote to control a TV to use this button. See Controlling
Other Components on page 10-6.
4
Press MENU to open the Main Menu.
5
Press MUTE to turn off the TV sound. Press it again to restore
the TV sound to the previous level. Be sure to program the
remote to control a TV to use this button. See Controlling Other
Components on page 10-6.
6
Press PAGE UP or PAGE DOWN to move, page by page,
through the Program Guide, a Theme list, a Favourites List, an
Event Timers list, a PVR Events list, or a list of channels.
Page 2-8
9200_Ch2_eng
5/18/05
2:03 PM
Page 9
Satellite Receiver
Remote Control
7
2
Press VOLUME to raise and lower the volume of the TV. Be
sure to program the remote to control a TV to use this button.
See Controlling Other Components on page 10-6.
Button
Description
1
Press RECALL to go back to the last satellite receiver channel
you were watching. Press it again to switch between the last
two satellite receiver channels you were watching.
2
Press INFO for more information about a program you are
watching, or when you have the Program Guide, Browse
Banner, or Themes list open. This button also opens help
screens, when help is available.
3
Press GUIDE to open the Program Guide. When the Program
Guide is open, press GUIDE again to switch among your
Favourites Lists.
4
Press SELECT to select the option you highlight in a menu.
Press the ARROWS (UP, DOWN, LEFT, RIGHT) to:
• Change channels while watching TV - Press UP or
DOWN ARROW.
• Open the Browse Banner - Press RIGHT ARROW.
• Show Themes - Press LEFT ARROW.
• Move around within the Program Guide, menus, and Browse
Banner - Press UP, DOWN, LEFT, and RIGHT ARROW.
• Delete - Press LEFT ARROW to delete characters while
using screens with changeable inputs (for example, Search
and Favourites).
5
Press CANCEL to cancel and go back to the previous menu or
to watch a program.
Page 2-9
9200_Ch2_eng
5/18/05
2:03 PM
Page 10
User Guide
6
Press VIEW TV to close all menus and go to watching a
program. Press the VIEW TV to briefly display the Program
Banner while watching a program.
Button
Description
1
Press PVR to open the PVR Events menu, which shows all of
the PVR Events recorded on the receiver. Press PVR again to
open the Daily Schedule.
2
Press SKIP BACK to skip back about ten seconds in a recorded
program. While in the Program Guide, press this button to move
back 24 hours.
3
Press BACK to reverse the program. Press this button again to
reverse the program faster.
4
Press STOP to stop the playback or recording.
5
Press RECORD to record a program.
6
Press SKIP FORWARD to skip ahead about 30 seconds in the
program. While in the Program Guide, press this button to move
ahead 24 hours.
7
Press PAUSE to pause the program. Press this button again to
restart the program from where it paused.
Page 2-10
9200_Ch2_eng
5/18/05
2:03 PM
Page 11
Satellite Receiver
Remote Control
2
8
Press FWD to forward the program. Press this button again to
forward the program faster.
9
Press PLAY to watch the program at normal speed.
Button
Description
1
Press RECOVER if you accidentally change the channel or
input on your TV or VCR (see page 10-17 to program and use
RECOVER).
2
Use PIP open the PIP window. To make the PIP window larger,
press this button again. Press it a third time, and the PIP
window will close. This button is used only in Single Mode.
3
Press SWAP to switch the video in the main display with
the video in the PIP window. This button is used only in
Single Mode.
4
Press FORMAT/* to change the aspect ratio of the HDTV
screen. Press the button repeatedly to cycle through all of the
available aspect ratios.
5
Press ITV to go to Interactive TV for interactive games, news,
weather, and more.
6
Use POSITION to move the PIP window to different positions
on the screen. This button is used only in Single Mode.
Page 2-11
9200_Ch2_eng
5/18/05
2:03 PM
Page 12
User Guide
Numbers
7
8
Use the NUMBER PAD to change the channel or to select a
menu option. Use the letters above the NUMBER PAD on the
remote control while the highlight is in a field (for example,
while using Search).
Press SEARCH/# to display the Search screen.
SATELLITE RECEIVER FRONT PANEL
9200
Feature
Description
1
Behind this door is a slot for a future smart card. No smart card
is included with this receiver.
2
The Mode lights indicate if the receiver is in Single or Dual
mode (see page 2-3 for details).
3
The green TV1 light indicates that the receiver is providing
programming to the nearby HDTV through the TV1 output
connections. The red Record light indicates that the receiver is
recording using TV1.
4
The blue TV2 light indicates that the receiver is providing
programming to the remote TVs through the TV2 output
connections. The red Record light indicates that the receiver is
recording using TV2.
5
Use ARROWS to navigate and select TV1 menu items and to
change satellite channels displayed on the nearby HDTV. Press
SELECT to choose TV1 menu items.
Page 2-12
9200_Ch2_eng
5/18/05
2:03 PM
Page 13
Satellite Receiver
Satellite Receiver Front Panel
2
6
Press INFO to display information about a TV1 program you
are watching, or when you have the Program Guide, Browse
Banner, or Themes list open.
7
Press POWER to turn the TV1 programming on or off to the
nearby HDTV.
8
Press MENU to Display the TV1 Main Menu.
9
Press SYSTEM INFO to display the System Info screen on the
nearby HDTV.
10
The Infrared (IR) Sensor receives IR signals from Remote
Control 1.
11
The USB Port is reserved for future use.
12
Press MODE to switch between Single and Dual mode
(see page 2-3 for details).
Page 2-13
9200_Ch2_eng
5/18/05
2:03 PM
Page 14
User Guide
SATELLITE RECEIVER BACK PANEL
Feature
Description
1
Connect the UHF antenna to this port to receive UHF Pro
signals from the Remote Control 2 so that it can control TV2
menus from another room. See page 2-7 for more information.
The Remote Antenna port is colour coded green.
2
Connect an off-air antenna to this port using a coaxial cable to
enable TV1 to receive digital and analog broadcasts from your
offair antenna. You can also connect analog cable service to this
port for display on TV1. The 8VSB TV ANTENNA/CABLE IN
port is colour coded black.
3
The YPbPr connection provides a high-quality video output for
high definition viewing. Use a YPbPr cable to make this
connection to your HDTV or HD monitor. The cable is colour
coded to match the connections on your receiver and your TV.
If you use this output for video, you must still connect the audio
with the Audio Outputs or the Digital Audio Output.
4
The HDTV Digital A/V OUTPUT provides digital audio and
video signal to a compatible HDTV or HD monitor.
5
The USB Port is reserved for future use.
6
Both Satellite IN connections are used to receive satellite TV
signals from the dish antenna. The connection is made using
RG-6 coaxial cable. The Satellite In connections are colour
coded blue.
Page 2-14
9200_Ch2_eng
5/18/05
2:03 PM
Page 15
Satellite Receiver
Satellite Receiver Back Panel
2
7
The CH 21–69 OUT connection provides good quality video
and stereo audio for the remote TV(s). Use a coaxial cable to
make this connection to your home cable system. Remote TVs
connected to the home cable system can receive programming
from this receiver output. The CH 21–69 OUT connection is
colour coded yellow.
8
The TV2 AUDIO and VIDEO outputs provide high picture
quality and stereo sound to your TV (if your TV has these
connections). These outputs can be used to provide TV2 menus
and programming to a wireless audio/video transmitter or to a
second input on a nearby HDTV. Use an RCA-type cable
assembly to make the connection. If the TV has only one input
for this type of audio, connect it to the left (L) phono (RCA)
audio output on the receiver.
9
These TV1 audio outputs provide stereo sound to your nearby
HDTV (if your TV has these connections). Use RCA-type
cables to make the connection.
10
The TV1 Digital Audio OUTPUT is for use with high-quality
digital sound decoding systems. Connect the Digital Audio
Output with a Digital Audio Optical cable (available at
consumer electronics stores).
11
The PHONE jack is used to connect the receiver to an active
telephone line. Use a standard RJ-11 telephone cable to make
the connection. You must keep the receiver connected to an
active telephone line to use all of the Interactive TV features,
or certain other services from Bell ExpressVu.
Page 2-15
9200_Ch2_eng
5/18/05
2:03 PM
Page 16
User Guide
USING THE MENUS
The menus make using the receiver and selecting programs quick and easy. Use the
menus to control the receiver and to use its features, such as setting locks, choosing a
program, or creating a favourites list.
OPEN AND CLOSE MENUS
You can open the menus in either of two ways:
• Press MENU to open the Main Menu, then open any of the other menus from the
Main Menu.
• Use the following buttons on the remote control:
– Press GUIDE to open the Program Guide.
– Press THEMES (LEFT ARROW) when watching a program to open the Themes
and Search menu.
– Press BROWSE (RIGHT ARROW) to display the Browse Banner.
To close a menu and return to watching a program, press either VIEW TV or CANCEL.
HIGHLIGHTING MENU OPTIONS
To highlight a menu option, use the remote control ARROWS to move the on-screen
highlight to the menu option. When you do move the on-screen highlight, the option
becomes amber.
SELECTING MENU OPTIONS
When you select a menu option, that option takes effect right away. You can select a
menu option in either of two ways:
• If the option has a number next to it, press the number on
the NUMBER PAD button that matches this number. When
you use the NUMBER PAD, you do not need to highlight
the option first.
• Move the highlight to the menu option using the remote
control ARROWS. Then press SELECT. In the example,
Program Guide is highlighted.
Page 2-16
9200_Ch2_eng
5/18/05
2:03 PM
Page 17
Satellite Receiver
Using The Menus
2
LIST OF CHOICES IN THE MENUS
When you make a choice in a list, the receiver does not apply the change until you select
Save or OK. If you do not want to save any changes, select Cancel to discard all the
changes made in the menu.
There are two types of lists:
• A single choice list allows you to select only one choice at a
time. If you select another choice, your previous choice is
deselected.
• A multiple choice list allows you to select more than one choice
at one time. If you select another choice, your previous
choice(s) stays selected.
CANCELING A PROCEDURE
You can cancel a procedure in any of three ways:
• If you want to return to watching a program, press VIEW TV.
• If you want to return to the previous menu, press CANCEL.
• Wait a few moments and the menu will close automatically, discarding any changes
you have made.
Page 2-17
9200_Ch2_eng
5/18/05
2:03 PM
Page 18
User Guide
USING TEXT FIELDS
There are several screens that require you to enter information into areas known as
fields. Your receiver has two basic ways to enter the information:
• Virtual Keyboard
• Remote Control NUMBER PAD
USING THE VIRTUAL KEYBOARD
Use the virtual keyboard letters to type the
information. Use the LEFT, RIGHT, UP, and DOWN
ARROWS to navigate around the keyboard. Select
the characters you want.
USING THE NUMBER PAD
Use the letters above the NUMBER PAD on the
remote control while the highlight is in the field. For
example, when looking for the channel and times to
watch Rudy Fremmel Presents, you press 7 three
times for an R, 8 two times for a U, 3 one time for a
D, and 9 three times for a Y to spell the word
“Rudy.”
WHILE IN THE FIELD
When the cursor is in the field:
• Press the LEFT ARROW to delete characters.
• Press FORMAT/* to backspace without deleting characters.
• Press 0 to enter a blank space, such as between words.
• Use the RIGHT ARROW to forward space without deleting characters.
Page 2-18
9200_Ch2_eng
5/18/05
2:03 PM
Page 19
Satellite Receiver
Tips
2
TIPS
• You can use the Front Panel Locks to prevent the mode from being changed
accidentally. See page 6-8 for instructions.
• The only way to turn off the TV2 outputs is by using POWER on Remote Control 2.
• In Dual Mode, Remote Control 1 is used to control TV1 menus on the nearby HDTV.
Remote Control 2 is used to control TV2 menus on the remote TV(s).
• If you do not do anything in a menu for several minutes, the menu automatically
closes. This will discard any changes you made, and display the program you were
watching.
• Remote Control 2 requires that you attach the UHF Remote Antenna. See page 2-7
for details.
QUESTIONS
• Why put the receiver in Single Mode? When the receiver is in Single Mode, not
only can you use the PIP functions, but you can also record two programs at once
while watching a previously recorded program.
• How can I watch and use the PVR functions on the same program on all
of the TVs in my house? Put the receiver in Single Mode (page 2-5) and then
enable Shared View (page 11-2).
Page 2-19
9200_Ch2_eng
5/18/05
2:03 PM
Page 20
User Guide
Notes
Page 2-20