1
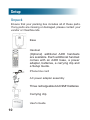
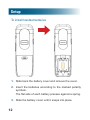
A400 DECT 6.0
Amplified Cordless Phone
User’s Guide
*
* Instructions are included for
optional additional handsets.
Welcome
Thank you for purchasing the ClearSounds A400 amplified
cordless telephone.
If you purchased additional A400E expandable handsets:
This guide also applies to your expandable handsets.
We hope that you enjoy the robust feature set of your new phone!
• Handset carrying clip
• Headset-compatible
• Large, backlit keys
• Four languages, with voice prompt while dialing,
scrolling lists and receiving incoming calls
• Large, backlit display shows time, number of unheard
messages, missed call notification and the number
being called
• Alarm clock with snooze function
• Multiple ringtones, personalized ringtones and five
selectable ringtone volumes
• Bright strobe-light ringing notification
• Silence ringing with one touch
• Handset volume control, amplification and tone equalizer
• Handset speakerphone with volume control
• One-touch calling via four handset memory keys
• Last number redial
• Mute
1
Welcome
•
•
•
•
•
Transfer calls and conference calling
Dialed calls list (last ten calls)
Personal phonebook (200 entries)
Compatible with hearing aid T-coil feature and audio
neckloops
If contracted with your service provider:
Voicemail (message waiting indication)
Call waiting
Caller ID (last 30 calls), talking caller ID
Non-viewed calls indication
Contact information
Please contact us with any questions that you might have.
We are happy to assist you!
ClearSounds Communications, Inc.
1743 Quincy Avenue, Suite 155
Naperville, IL 60540 USA
800-965-9043 (toll-free)
www.clearsounds.com
2
Safety precautions
Carefully read and observe the warnings and cautions in
this manual and on the equipment.
Warnings
Warnings must be observed to prevent bodily injury.
WARNING: Use the phone only in the described
manner to avoid bodily injury or damage to the
equipment.
WARNING: Locate and use the phone away from
water and damp areas, such as swimming pools,
bathtubs, sinks and damp basements, and do not
use the phone when you are wet, to avoid electrical
shock. If the phone is submerged, unplug the base
from AC power before you retrieve the phone.
WARNING: Do not overload extension cords or
power strips. This can result in electric shock.
WARNING: Use this phone only with the supplied
AC power adapter assembly. Other types of power
adapter assemblies can damage the phone and
cause personal injury.
WARNING: Avoid using the phone during an
electrical storm. There is a slight risk of electrical
shock from lightning during a storm.
3
WARNING: This equipment complies with FCC
radiation exposure limits set forth for an uncontrolled
environment. This equipment should be installed and
operated with a minimum distance of 20 centimeters
(8 inches) between the phone base and your body.
This transmitter must not be co-located with or
operating in conjunction with any other antenna or
transmitter. Privacy of communication may not be
ensured when using this telephone!
CAUTION:
expressly approved by the party responsible for
compliance could void the user's authority to operate
the equipment.
Contents
Setup........................................................................ 10
Unpack............................................................... 10
Install handset batteries.......................................11
Connect the cords.............................................. 13
Charge the batteries........................................... 14
Carrying clip (optional)........................................ 15
Important concepts................................................... 16
Personalize your phone...................................... 16
Register additional handsets.............................. 16
Let's begin!............................................................... 17
Place a call......................................................... 17
Answer a call...................................................... 17
Handset.................................................................... 18
Backlighting........................................................ 19
Home screen...................................................... 19
Icons................................................................... 19
Let’s navigate..................................................... 21
Handset keys...................................................... 23
Area settings............................................................ 26
Language............................................................ 26
Call storage: local area code.............................. 26
Dialing mode....................................................... 28
Display adjustments................................................. 29
Handset name.................................................... 29
Screen contrast.................................................. 30
Backlight-on time................................................ 31
Date and time..................................................... 32
Audio adjustments.................................................... 34
6
Consistently amplified volume............................ 34
Tone equalizer.................................................... 35
Keypad beep...................................................... 36
Confirmation beep.............................................. 36
Handset voice prompt......................................... 37
Alarm........................................................................ 40
Assistive listening..................................................... 42
T-Coil.................................................................. 42
Neckloops........................................................... 42
Call notification adjustment...................................... 43
Ringtones........................................................... 43
Ringer volume.................................................... 44
Memory keys............................................................ 46
Manually store or edit a memory-key entry........ 46
Delete a memory-key entry................................ 50
Keypad tips............................................................... 51
Using the keypad .............................................. 51
Inserting a pause...................................................... 52
What is a pause?................................................ 52
For example........................................................ 52
Insert pauses while storing a number................. 53
Phonebook............................................................... 54
Manually store phonebook entries...................... 54
Store entries from lists........................................ 56
Copy entries from one handset to another......... 59
Edit a phonebook entry....................................... 61
Delete one or all phonebook entries................... 64
Answering and calling.............................................. 65
7
Contents
Auto answering................................................... 65
Answer, place or end a call................................. 67
Silence a ringing handset................................... 68
Place a one-touch call........................................ 68
Redial a number................................................. 69
Call from your phonebook.................................. 70
Call from the inbound calls list............................ 71
Call other handsets in your home (intercom)...... 72
During calls............................................................... 73
Adjust sound....................................................... 73
Use the speakerphone....................................... 74
Mute the microphone.......................................... 75
Transfer a call..................................................... 75
Use a headset.................................................... 76
Set up a conference call..................................... 77
Voicemail and inbox................................................. 78
Screen a call....................................................... 78
Intercept a call waiting call.................................. 78
Visual indicators of calls and voicemail.............. 79
Review inbound calls.......................................... 80
Listen to voicemail messages............................. 80
List maintenance...................................................... 81
Delete entries from lists...................................... 81
Security.................................................................... 82
Personalize the system PIN............................... 82
Restoring defaults.................................................... 84
Restore handset default settings........................ 84
Additional handsets.................................................. 86
8
Register additional handsets to the base........... 86
Delete a handset registration.............................. 87
Troubleshooting........................................................ 88
Compliance.............................................................. 94
Warranty................................................................. 100
Accessories............................................................ 102
Service................................................................... 103
9
Setup
Unpack
Ensure that your packing box includes all of these parts.
If any parts are missing or damaged, please contact your
vendor or ClearSounds.
Base
Handset
(Optional) additional A400 handsets
are available. Each additional handset
comes with an A400 base, a power
adapter, batteries, a carrying clip and
a Setup Guide.
Phone line cord
AC power adapter assembly
Three rechargeable AAA NiMH batteries
Carrying clip
User's Guide
10
IMPORTANT: YOUR RECEIPT IS REQUIRED FOR
WARRANTY. PLEASE RETAIN YOUR RECEIPT.
Install handset batteries
Follow these warnings to avoid explosive or caustic reactions.
WARNING: Insert batteries according to the marked
polarity symbols.
WARNING: Use only rechargeable AAA NiMH
batteries. Other types of batteries can damage
the phone and cause personal injury. Do not mix
battery brands, battery types (chemistries) or
exhausted/full batteries.
WARNING: Do not attempt to recharge a battery
unless it is marked “rechargeable.”
WARNING: Immediately remove exhausted
batteries, and dispose of them properly.
WARNING: Do not burn exhausted batteries.
WARNING: Do not dispose of batteries with
household waste. Recycle or dispose of batteries
according to regulations of your local municipality.
11
Setup
To install handset batteries
1. Slide back the battery cover and remove the cover.
2. Insert the batteries according to the marked polarity
symbols.
The flat side of each battery presses against a spring.
3. Slide the battery cover until it snaps into place.
12
Connect the cords
To avoid potential interference, place the phone away
from electronic equipment.
On the underside of the base, thread the cord(s) between
the guides.
To connect the cords
To AC outlet
To phone jack
To AC outlet
Guide
A 400 base (Optional) A400E charger
If you subscribe to DSL service
If you hear noise during conversations or if the caller ID
function does not work properly, please obtain and attach
a DSL noise filter.
Attach the filter between the telephone cord and the
telephone communication jack in the wall.
13
Setup
Charge the batteries
Before you use the phone for the first time, fully charge
the batteries for approximately 24 hours.
Recharge the batteries regularly.
Note: If
or
appears on the screen, the battery
charge is low or depleted. If you attempt to fully recharge
the batteries and the battery icon does not return to
,
insert fresh batteries.
To charge the batteries
14
1. Place
the
telephone
handset on the base.
A beep occurs and
flashes as the phone
charges.
Carrying clip (optional)
If you want to converse using a headset while keeping your
hands free, you can attach the handset to a belt and use the
handset speakerphone.
To install the carrying clip
To install a handset carrying clip
1. On the back of the phone, align the arms of the
carrying clip above the slots on the sides of the phone.
2. Gently press the arm clips into the slots.
15
Important concepts
Personalize your phone
The ClearSounds A400 phone is feature-rich.
This manual describes all available features. Scan the
topics, and if you see an interesting feature, follow the
instructions to personalize your phone.
Register additional handsets
Your telephone handset is registered to the base (Base 1).
If you purchased additional ClearSounds A400E
handsets, you must register each additional
handset to the base. For registration instructions, see
page 86.
16
Let's begin!
Place a call
Note: You can reverse Step 1 and Step 2, but you can
make corrections only if you dial in Step 1.
1. Press the alphanumeric keys.
If you make a mistake, press
the screen.
beneath Clear on
2. Press
and speak.
Call duration appears on the handset screen.
3. To end the call, press
.
Answer a call
1. Lift the handset from the base.
2. Press
and speak.
Call duration appears on the handset screen.
3. To end the call, press
.
17
Handset
White ringer indicator
Earphone
Display
Alpha-numeric keypad
Microphone
Carrying clip
Speaker
Battery compartment
18
Backlighting
The display and keys light when you lift the handset from
the base or when you press handset keys.
After 20 seconds, the backlighting turns off. To turn it on
again, press
.
Home screen
The home screen is the phone display that you see when
the phone is at rest or when you press
.
Icons
Display icons appear here.
Signal strength
Blinks if the handset is out
of range of the base.
Battery strength
Black = fully charged
White = depleted.
19
Handset
Incoming call
(toggles)
An incoming
occurring.
call
is
Line in Use
The phone line is engaged.
Speakerphone on The handsfree
speakerphone is on.
Amplification is on Phone amplification is on.
To turn it off, press on
the handset side.
Missed calls
(flashes)
There are one or more
unreviewed missed calls.
Messages
One or more unprocessed
(Voicemail service) voicemail messages.
Intercom
Alarm clock set
Ringer off
20
The internal
communication phone line
is engaged.
The alarm is set to ring.
The handset ringer is set
to off.
Let’s navigate
Take these steps to practice basic navigation through the
menus.
All instructions in this manual begin from the
home screen.
To begin steps from the home screen, press
Select keys
.
When you press
beneath a
command on the screen, you select or
implement the command.
For example, if you press
beneath
Back, you return to the previous screen.
If you press
beneath Select, you
select the highlighted menu item.
1. Press
beneath Menu.
The main menu appears on the
screen.
21
Handset
When a menu list is present on the
screen, you can scroll through the list by
pressing the top and bottom pads on the
scroll pad.
Scroll padOK key
2. Press
and scroll down the
list. Now press
and scroll
up the list.
You can also select a highlighted menu
item by pressing
as pressing
. This is the same
beneath Select.
Because
is convenient, throughout
the manual we instruct you to press it to
select highlighted menu items.
Home key
3. Press
.
No matter where you are in the menus,
you can always press this key to return
to the home screen.
4. Press
.
The Home screen appears.
22
Handset keys
Most keys have several functions. Take a few minutes to
explore all of the keys.
This is a good time to become familiar with the keys. Later,
you can refer to these diagrams, as necessary.
A. Memory keys
B. Scroll pad/OK
select/Individual keys
G. Select
F. Dial/Answer/
Speakerphone
C.
• End Call
• Home
• Backlight
E. Ringer off-on/
Uppercaselowercase letter
entry/Add a 1
D. Add a space
or pause while
storing entries.
23
Handset
A.
B.
Memory keys For one-touch calling,
you can store one commonly called
number in each of the four memory
keys.
Scroll pad
• If the screen shows a menu
list:
scrolls up the list
and
scrolls down the list.
•
If no menu list is present on the
screen:
Enters the inbound calls list.
Enters the dialed calls list.
Toggles between callers (call
waiting service required).
Places an internal call to
another handset that is
registered to your ClearSounds
A400 base.
Selects a highlighted menu
item or the text that appears above
on the left side of the screen.
24
C.
End call key Ends a call.
Home key No matter where you are
in the menu structure, returns you to
the home screen.
Backlighting key From the home
screen, turns on the backlighting.
D.
Inserts a space: While storing letters.
Inserts a pause: While storing
numbers: (For further information, see
"What is a pause?" on page 52).
E.
Ringer: Turns it on or off
Uppercase/lowercase letters:
While storing letters, switches
between case.
Adds a 1: While dialing from a stored
number.
F.
Dial/Answer Places a call or answers
a call.
Speakerphone During a call,
activates the speakerphone for
handsfree conversation.
G.
Select keys Implement the command
that appears directly above on the
screen. The commands change as
you scroll through menus.
25
Area settings
Language
The default display and prompt language on the handset
is English.
You can select from English, French, Spanish and Chinese.
To change the handset language
1. Press
beneath Menu on the screen.
2. Press
and scroll to the third item in the list,
and then press
.
3. Press
to select the first item in the list.
4. Press
and scroll to the language of your
choice, and then press
.
A confirmation tone occurs and Saved appears on
the screen.
5. Press
.
Call storage: local area code
If you subscribe to caller ID service, you can quickly place
a call, without dialing, by selecting a call in the incoming
calls list and pressing
.
The A400 phone stores all incoming calls with their area
codes.
26
If an area code is not required for local dialing in your
region, you might prefer that the A400 store local incoming
calls without the area code, so that you can call out from
the incoming call list.
If you take these steps to specify your area code, the phone
stores local calls without the area code, and it continues
to store long-distance calls with their area codes.
Note: To undo this function, take all of the same steps, but
delete the area code in Step 4.
To specify local call storage without the area code
1. Press
beneath Menu on the screen.
2. Press
3. Press
press
and scroll to Setting, and then press
.
.
and scroll to Area Code, and then
4. Press numeric keys to enter your area code, and then
press
.
5. Press
.
27
Area settings
Dialing mode
When you place a call, the phone generates numbers by
tone or by pulse. By default, your phone is set to the tone
dialing mode.
Should you need to change this setting based on your
telephone service, use Tone for touch-tone service, or use
Pulse for rotary dialing.
To set the dialing mode
1. Press
beneath Menu on the screen.
2. Press
.
and scroll to Setting, and then press
3. Press
press
and scroll to Dial Mode, and then
.
4. Press
and scroll to your choice, and then
press
.
A confirmation tone occurs and Saved appears on
the screen.
5. Press
28
.
Display adjustments
Handset name
By default, the handset is named HS1. You can re-name
the handset, and the name displays on the screen.
To rename the handset
1. Press
beneath Menu on the screen.
2. Press
.
3. Press
press
and scroll to Display, and then press
.
and scroll to Handset Name, and then
4. Remove the current name by repeatedly pressing
beneath Clear on the screen.
5. Enter the new name by pressing alphanumeric keys,
and then press
.
To scroll through multiple letters on a key: Press rapidly.
To enter a space: Press
.
To enter the same letter twice: Pause between pressing.
A confirmation tone occurs and Saved appears on
the screen.
6. Press
.
29
Display adjustments
Screen contrast
You can adjust the contrast of the handset screen to
optimize visibility in different environmental conditions.
Five contrast levels are available.
To adjust the screen contrast
1. Press
beneath Menu on the screen.
2. Press
.
and scroll to Display, and then press
3. Press
4. Press
press
to select Contrast.
and scroll to your choice, and then
.
A confirmation tone occurs and Saved appears on
the screen.
5. Press
30
.
Backlight-on time
When you lift the handset from the base or when you
press handset keys, the display and keys light.
By default, the backlighting turns off after 20 seconds. You
can set the backlight time to 10, 20, 30 or 40 seconds.
To adjust the backlight-on time
1. Press
beneath Menu on the screen.
2. Press
.
and scroll to Display, and then press
3. Press
press
.
and scroll to Backlight Time, and then
4. Press
press
.
and scroll to your choice, and then
A confirmation tone occurs and Saved appears on
the screen.
5. Press
.
31
Display adjustments
Date and time
You can manually set the handset date and time and the
time format.
However, if you subscribe to caller ID service, your phone
automatically sets the date and time when the first call
arrives after phone setup or after a time change.
If you unplug the base, you must reset the time and date.
To set the date and time display
If you do not subscribe to caller ID service, you must set
the date and time.
1. Press
beneath Menu on the screen.
2. Press
3. Press
press
and scroll to Setting, and then press
.
.
and scroll to Date and time, and then
4. Enter the last two digits of the year by pressing
alphanumeric keys, and then press
.
5. Repeat Step 4 for Month, Day, Hour (you must use
24-hour format) and Minute.
A confirmation tone occurs and Saved appears on
the screen.
6. Press
32
.
To set the time format
You can select the 12-hour format or the 24-hour format.
1. Press
beneath Menu on the screen.
2. Press
.
3. Press
press
and scroll to Setting, and then press
.
and scroll to Time format, and then
4. Press
and scroll to your choice, and then
press
.
A confirmation tone occurs and Saved appears on
the screen.
5. Press
.
33
Audio adjustments
Consistently amplified volume
By default, when you end a call during which you amplified
the volume, the amplification turns off for the next call.
If you prefer amplified volume consistently, you can set it
to automatically turn on each time that a call begins.
During conversation, you can still temporarily turn off the
amplification.
WARNING: Consider the hearing levels of other
phone users before you set amplification consistently
ON. The phone can emit excessive volume and
amplification that can cause hearing loss.
To turn on or off consistently amplified volume
1. Press
beneath Menu on the screen.
2. Press
to select Sound.
3. Press
4. Press
press
and scroll to Boost, and then press
.
and scroll to your choice, and then
.
A confirmation tone occurs and Saved appears on
the screen.
5. Press
.
If you turned on amplification, BOOST
remains on the screen.
34
IS
ON
Tone equalizer
You can set the handset earpiece to equalize treble, flat
or base tones.
You can also adjust this setting during a call, which enables
you to hear the results as you adjust. For instructions to
adjust during a call, see page 73.
To adjust the tone equalizer
1. Press
beneath Menu on the screen.
2. Press
to select Sound.
3. Press
.
and scroll to Equalizer, and then press
A graph appears on the screen.
4. Press
press
and scroll to your choice, and then
.
A confirmation tone occurs and Saved appears on
the screen.
5. Press
.
35
Audio adjustments
Keypad beep
When you press a key, a tone sounds. If you prefer silent
key presses, you can turn off keypad beep.
To turn off or on keypad beep
1. Press
beneath Menu on the screen.
2. Press
to select Sound.
3. Press
press
.
and scroll to Keypad Beep, and then
4. Press
and scroll to your choice, and then
press
.
A confirmation tone occurs and Saved appears on
the screen.
5. Press
.
Confirmation beep
When you save a menu selection, a confirmation tone
occurs and Saved appears on the screen.
You can turn off or turn on the confirmation beep.
36
To turn off or turn on the confirmation beep
1. Press
beneath Menu on the screen.
2. Press
to select Sound.
3. Press
press
.
and scroll to Confirm Beep, and then
4. Press
and scroll to your choice, and then
press
.
A confirmation tone occurs and Saved appears on
the screen.
5. Press
.
Handset voice prompt
If you turn on the voice prompt feature, the handset
"speaks" numbers under these circumstances:
• While dialing, as you press the alphanumeric keys
• While scrolling your Phonebook list or Memory key
entries.
If you subscribe to caller ID service, the handset
"announces" callers during incoming calls, in these ways:
• If the caller makes the number available, the handset
announces the caller's number.
37
Audio adjustments
•
If you entered the caller's number in your phonebook
or a memory key, and you recorded an identifier for
the caller, the handset also plays the identifier. For
identifier recording instructions, see "To manually store
a phonebook entry" on page 54 or "To manually
store a memory-key number" on page 46.
To turn on or off voice prompt
1. Press
beneath Menu on the screen.
2. Press
.
3. Press
press
and scroll to Setting, and then press
.
and scroll to Voice Prompt, and then
4. Press
and scroll to your choice, and then
press
.
A confirmation tone occurs and Saved appears on
the screen.
5. Press
38
.
To adjust the handset voice prompt volume
1. Press
beneath Menu on the screen.
2. Press
to select Sound.
3. Press
press
4. Press
press
.
and scroll to Voice volume, and then
and scroll to your choice, and then
.
A confirmation tone occurs and Saved appears on
the screen.
5. Press
.
39
Alarm
You can use the handset as an alarm. The alarm also has
a snooze function.
You can set the alarm to ring once, every day at the same,
time or Monday through Friday at the same time.
The alarm rings only at the handset that you set (not at
other handsets that are registered to the base).
To set the handset alarm
1. Press
beneath Menu on the screen.
2. Press
press
.
3. Press
and scroll to Organizer, and then
to select to Set Alarm.
4. Press
and scroll to the frequency of your
choice, and then press
.
If you selected Off, proceed to Step 7.
5. Press numeric keys to enter the alarm time in the 24hour format (HH:MM), including an initial zero when
appropriate, and then press
.
40
6. Press
and scroll to the tone of your choice,
and then press
.
A confirmation tone occurs, and Saved appears on
the screen.
7. Press
.
If you turned on the alarm,
appears on the screen.
To turn off a ringing handset alarm
1. Stop the alarm by taking one of these steps:
• To turn off the alarm entirely for this session: Press
beneath Stop on the screen.
• To turn off the alarm for five minutes: Press
beneath Snooze on the screen.
You can press Snooze five times. After the fifth time,
the alarm turns off permanently for the session.
41
Assistive listening
The ClearSounds A400 DECT 6 phone is compatible with
these assistive listening devices:
• Hearing aids that are equipped with telecoil (T-coil)
• Audio neckloops with built-in microphones and 2.5
mm connectors
T-Coil
Some hearing aids are equipped with telecoil (T-coil).
To use the phone with T-coil-equipped hearing aids
1. Move your hearing aid T-switch to the T position.
2. Hold the handset close to your hearing aid.
Neckloops
Neckloops amplify phone sound in T-coil-equipped
hearing aids.
You can speak handsfree through neckloops that
include built-in microphones.
To use a neckloop
1. Before or during a call, connect the neckloop to the
jack on the side of the handset.
2. Position the neckloop around your neck.
3. Accomplish these tasks as usual:
• Answer or place calls
• Adjust and amplify volume
• Equalize tone
• End calls
42
Call notification adjustment
Your phone can notify you of incoming calls in several
ways.
• Ringer (selectable)
• Handset light and toggling
icon
•
Caller ID displays (if you subscribe)
Ringtones
Three tones are available for the handset.
You can also choose a unique handset tone for internal
calls from other handsets that are registered to the
ClearSounds A400 base.
To select a ringtone for the handset
1. Press
beneath Menu on the screen.
2. Press
to select Sound.
3. Press
to select HS Ringtone.
43
Call notification adjustment
4. Press
and scroll to one of these listings, and
then press
.
• External: To set the ringtone for external calls
• Internal: To set the ringtone for internal calls from
other handsets registered to the base.
5. Press
press
and scroll to your choice, and then
.
A confirmation tone occurs and Saved appears on
the screen.
6. Press
.
Ringer volume
You can adjust the ringer volume for the handset. There
are five volume levels.
To turn off or on the handset ringer
1. Press and hold
.
A confirmation tone occurs.
when the ringer is off.
44
appears on the screen
To adjust the handset ringer volume
1. Press
beneath Menu on the screen.
2. Press
to select Sound.
3. Press
then press
4. Press
press
and scroll to Hs Ringer Volume, and
.
and scroll to your choice, and then
.
A confirmation tone occurs and Saved appears on
the screen.
5. Press
.
45
Memory keys
Memory keys
You can store important numbers and associate them with
memory keys.
When you press and hold a memory key, the phone calls
the number.
You can store memory-key entries in these ways:
• Manually, by using the keyboard to type the entries
• Quickly, by using numbers that are that are stored
in the inbound calls list and the dialed calls lists. For
quick-method instructions, see "To store a phonebook
or memory key entry, from lists" on page 56.
Manually store or edit a memory-key entry
Tip: To easily access your voicemail messages, you can
store your voicemail access number in a memory key by
inserting pauses. For further information, see page 52.
To manually store a memory-key number
1. Press one of the
keys.
Empty appears on the screen.
46
2. Press
to select Option.
3. Press
to select Edit Entry.
4. Press alphanumeric keys to enter the name that you
wish to store, and then press
.
To scroll through multiple letters on a key: Press rapidly.
To enter a space: Press
.
To enter the same letter twice: Pause between pressing
5. Press all alphanumeric keys that are required to place
the call (1 and area code when required), and then
press
.
Default Ringtone, Record or Scroll
appears on the screen.
6. Save now or specify unique notification by taking one
of these steps:
• To save the information now and assign a default
ringtone: Press
.
• To record or personal identifier to indicate calls
from this person (Caller ID service required): Press
and scroll to Record or scroll, and then
press
. Press
to select Start, record an
identifier, and then press
.
47
Memory keys
Your recording plays, and Ring Tone Save?
appears on the screen. Press
to save the
recording.
• To select a ringtone to help indicate calls from this
person (Caller ID service required): Press
and scroll to the tone of your choice, and then press
.
7. Press
.
To manually edit a memory-key number
1. Press the
key that you wish to edit.
The currently stored information appears on the
screen.
2. Press
to select Option.
3. Press
to select Edit Entry.
4. Keep or edit the name by taking one of these steps:
• To keep the current name exactly the same, press
.
48
• To edit the name, press
beneath Clear on the
screen, and then press alphanumeric keys to enter
the name that you wish to store, and then press
.
Note: You can press and hold to clear all letters at
once.
5. Keep or edit the number by taking one of these steps:
• To keep the current number exactly the same, press
.
• To edit the number, press
beneath Clear on
the screen, press all alphanumeric keys that are
required to place the call (1 and area code when
required), and then press
.
Note: You can press and hold to clear all numbers
at once.
Default Ringtone, Record or Scroll
appears on the screen, and the current ringtone or
personal identifier plays.
6. Save now or specify unique notification by taking one
of these steps:
• To save the information now and assign a default
ringtone: Press
.
• To record or re-record a personal identifier to
indicate calls from this person (Caller ID service
required): Press
and scroll to Record or
scroll, and then press
. Press
to select
Start, record an identifier, and then press
.
Your recording plays, and Ring Tone Save?
appears on the screen. Press
to save the
recording.
49
Memory keys
• To select a ringtone to help indicate calls from this
person (Caller ID service required): Press
and scroll to the tone of your choice, and then press
.
7. Press
.
Delete a memory-key entry
1. Press the
key that you wish to delete.
The currently stored information appears on the
screen.
2. Press
3. Press
press
to select Option.
and scroll to Delete Entry, and then
.
Delete Entry? appears on the screen
4. Press
.
5. Press
.
50
Keypad tips
Using the keypad
•
•
•
•
•
•
•
Letter or number: When you press an alphanumeric
key on a keypad, the number is selected (for tasks
where numbers are appropriate) or a letter is selected
(for tasks where letters are appropriate).
Which letter?: Each key has more than one letter
available, and you find a letter by repeatedly pressing
the key until you see it.
Case: To change the case of a letter, press
before
you press the letter.
Enter the next character: Press the next key. If the
next character resides on the same key, wait until the
cursor moves to the next position before you press the
key again.
Enter spaces: Press
.
Corrections: To erase the last character that you
entered, press
beneath Clear. Hold it for two
seconds to delete all characters.
Special characters: Press these numeric keys
repeatedly until you see these special characters:
Key
Special characters
. , ' ? ! "- (
)@/:
;=
+&_$₤€¥<>#*
51
Inserting a pause
What is a pause?
Do you frequently call an automated service number that
includes interactive voice prompts? A service that requests
passwords or steps you through menu choices, like your
bank or your voicemail?
If so, you can save time by storing the service number and
all of the required responses into a memory key. It takes a
little patience to set up, but once it is stored, whenever you
press the memory key, the phone does all of the work for
you!
Automated service messages always include a few
seconds before each prompt begins. So when you
program the memory key, you must insert one or more
pauses to wait for each prompt to begin. After pauses, you
enter the additional numbers that the prompt requires.
In the ClearSounds A400 phone, a pause is three seconds
long. To insert a pause while storing a number, you press
and hold
.
For example
To store your voicemail number in a memory key, you
would store a series of numbers, as follows:
• Your voicemail access number
•
52
Two pauses (
) to wait for your recorded
voicemail message to begin
•
•
•
to enter the voicemail menu
One pause (
) to wait for the passcode prompt
Your passcode and
.
Insert pauses while storing a number
A pause is 3 seconds long. While storing an automated
service number and all of its required responses into a
memory key, you must enter pauses before each automated
prompt.
To store an automated service number and responses
1. Jot down the automated service number.
2. Call the number, and jot down the following, until you
reach the destination:
a. The number of seconds between the last number
dialed and the first prompt
b.The next required response
3. Using your notes, follow the instructions for storing a
memory-key number (for instructions, see page 46).
While storing the number and required responses,
press and hold
one or more times in sequence,
to equal the number of seconds before each prompt.
P appears on the screen for each pause.
53
Phonebook
You can build a personal phonebook so that you can
easily make calls with a few key presses. You must store
phonebook entries separately for each handset, but you
can copy entries from one handset to another. Each
handset can hold 200 phonebook entries.
You can store phonebook entries in these ways:
• Manually, by using the keyboard to type the entries.
• Re-using numbers that are that are stored in the
inbound calls list and the dialed calls list
• Copying one or all entries from one handset to another
Manually store phonebook entries
Note: Enter long distance codes and area codes that
are required for dialing, so that you can simply select the
phonebook entry and pick up the handset to call. You can
enter up to 24 digits and pauses.
To manually store a phonebook entry
1. Press
beneath Phnbk on the screen.
2. Press
to select Option.
3. Press
to select New Entry.
4. Press alphanumeric keys to enter the name that you
wish to store, and then press
.
54
To scroll through multiple letters on a key: Press rapidly.
To enter a space: Press
.
To enter the same letter twice: Pause between pressing.
5. Press all alphanumeric keys that are required to make the
call (area code and 1 when required), and then press
.
Default Ringtone, Record or Scroll
appears on the screen.
6. Save now or specify unique notification by taking one
of these steps:
• To save the information now and assign a default
ringtone: Press
.
• To record a personal identifier to indicate calls
from this person (Caller ID service required): Press
and scroll to Record or scroll, and then
press
. Press
to select Start, record an
identifier, and then press
.
Your recording plays, and Ring Tone Save?
appears on the screen. Press
to save the
recording.
• To select a ringtone to help indicate calls from this
person (Caller ID service required): Press
and scroll to the tone of your choice, and then press
.
7. Press
.
55
Phonebook
Store entries from lists
You can quickly add a number to your phonebook or
memory key, from these lists:
• The dialed calls list
• If you subscribe to caller ID service, the inbound calls list
Note: As you store entries, be sure to add long-distance
codes as necessary, so that your phone can dial the
numbers directly. If area codes are not required for local
calls in your region, see page 26 for instructions on
specifying that the phone not save the area code in lists.
To store a phonebook or memory key entry, from lists
1. Search a list by taking one of these steps:
• To store a number from the dialed calls list: press
repeatedly until you see the call that you
want to store.
• To store a number from the inbound calls list: Press
repeatedly until you see the call that you
want to store.
2. Press
to select Option.
3. Specify save location by taking one of these steps:
Note: If you save to a memory key with a stored entry,
the new entry replaces the entry.
56
• To save to the phonebook, press
Number.
to select Save
• To save to a memory key, press
repeatedly
until you see the memory key (M1-M4), and then
press
.
4. Keep or edit the name by taking one of these steps:
• To keep the current name exactly as it appears on
the screen, press
.
• To edit the name, press
beneath Clear on the
screen, press alphanumeric keys to enter the name
that you wish to store, and then press
.
Note: You can press and hold to clear all letters at
once.
5. Keep or edit the number by taking one of these steps:
• To keep the current number exactly the same, press
.
• To edit the number, press
beneath Clear on the
screen, press all alphanumeric keys that are required
to place the call (1 and area code when required),
and then press
.
Note: You can press and hold to clear all numbers
at once.
57
Phonebook
Default Ringtone, Record or Scroll
appears on the screen, and the current ringtone or
personal identifier plays.
6. Save now or specify unique notification by taking one
of these steps:
• To save the information now and assign a default
ringtone: Press
.
• To record or re-record a personal identifier to
indicate calls from this person (Caller ID service
required): Press
and scroll to Record or
scroll, and then press
. Press
to select
Start, record an identifier, and then press
.
Your recording plays, and Ring Tone Save?
appears on the screen. Press
to save the
recording.
• To select a ringtone to help indicate calls from this
person (Caller ID service required): Press
and scroll to the tone of your choice, and then press
.
7. Press
58
.
Copy entries from one handset to another
You can copy phonebook entries from one handset to
another, in these ways:
• Copy individual entries
• Copy all entries: You can copy all and replace or you
can copy all and add.
To copy one phonebook entry from one handset to
another
1. Press
beneath Phnbk on the screen.
2. Press the first alphanumeric key of the name that
you wish to edit, and if necessary, press
and
scroll to the name.
3. Press
4. Press
press
to select Option.
.
and scroll to Copy Entry, and then
A list of handsets that are connected to the base
appears on the screen.
5. Press
and scroll to the handset to which you want
to copy the entry, and then press
.
59
Phonebook
Copying to Hs (number) appears on
the screen. On the destination handset, Receive
Record? appears on the screen.
6. On the destination handset, press
Select.
7. Press
to choose
.
To copy all phonebook entries from one handset to another
1. Press
beneath Phnbk on the screen.
2. Press
to select Option.
3. Copy all entries by taking one of these steps:
• To copy all entries and replace existing entries: Press
and scroll to Copy All, and then press
.
• To copy all entries and add to existing entries: Press
and scroll to Copy Append, and then press
.
A list of handsets that are connected to the base
appears on the screen.
60
4. Press
and scroll to the handset to which you want
to copy the entry, and then press
.
Copying to Hs (number) appears on the
screen.
On the destination handset, Replace
All
Records? or Receive Record? appears on
the screen.
5. On the destination handset, press
6. Press
to select Select.
.
Edit a phonebook entry
1. Press
beneath Phnbk on the screen.
2. Press the first alphanumeric key of the name that you
wish to edit, and if necessary, press
and scroll
to the name.
3. Press
4. Press
to select Option.
and scroll to Edit Entry, and then press
.
61
Phonebook
5. Keep or edit the name by taking one of these steps:
• To keep the current name exactly the same, press
.
• To edit the name, press
beneath Clear on the
screen, press alphanumeric keys to enter the name
that you wish to store, and then press
.
Note: You can press and hold to clear all letters at
once.
6. Keep or edit the number by taking one of these steps:
• To keep the current number exactly the same, press
.
• To edit the number, press
beneath Clear on
the screen, press all alphanumeric keys that are
required to place the call (1 and area code when
required), and then press
.
Note: You can press and hold to clear all numbers
at once.
Default Ringtone, Record or Scroll
appears on the screen, and the current ringtone or
personal identifier plays.
7. Save now or specify unique notification by taking one
of these steps:
62
• To save the information now and assign a default
ringtone: Press
.
• To record or re-record a personal identifier to
indicate calls from this person (Caller ID service
required): Press
and scroll to Record or
scroll, and then press
. Press
to select
Start, record an identifier, and then press
.
Your recording plays, and Ring Tone Save?
appears on the screen. Press
to save the
recording.
• To select a ringtone to help indicate calls from this
person (Caller ID service required): Press
and scroll to the tone of your choice, and then press
.
8. Press
.
63
Phonebook
Delete one or all phonebook entries
1. Press
beneath Phnbk on the screen.
2. Press the first alphanumeric key of the name that
you wish to edit, and if necessary, press
and
scroll to the name.
3. Press
to select Option.
4. Delete one or all entries by taking one of these steps:
• To delete one entry: Press
Delete Entry, and then press
• To delete all entries: Press
Delete All, and then press
and scroll to
.
and scroll to
.
Delete Entry? or Delete All Entries?
appears on the screen.
5. Press
to confirm.
6. Entry Deleted or All Entries Deleted
appears on the screen.
7. Press
64
.
Answering and calling
Auto answering
By default, you answer calls by removing the handset
from the base and pressing
.
If you prefer to answer calls by simply removing the
handset from the base, you can turn on the auto answer
feature for the handset. If the handset rings when it is off
of the base, you must still press
to answer the call.
To turn on or off auto answering
1. Press
beneath Menu on the screen.
2. Press
.
and scroll to Setting, and then press
3. Press
press
and scroll to Auto Answer, and then
.
4. Press
.
5. Press
and scroll to On or Off, and then press
.
65
Answering and calling
To turn on or off auto answering for internal (intercom) calls
You can set auto answering for calls from other handsets
that are registered to your ClearSounds A400 base.
If Internal Auto Answer is on, intercom call recipients
simply hear the caller through the speakerphone while the
handset rests on the base. The phone does not ring.
1. Press
beneath Menu on the screen.
2. Press
.
and scroll to Setting, and then press
3. Press
then press
and scroll to Int auto answer, and
4. Press
.
5. Press
66
.
and scroll to On or Off, and then press
.
Answer, place or end a call
These instructions also apply under these conditions:
• Using a handset connected to a headset.
• Answering and ending an intercom call. A handset
display indicates an incoming intercom call with
and the caller's handset number. For instructions on
placing an intercom call, see page 72.
To answer, place or end a call
Answer
Place
End
1.
1.
1. Press
Lift.
2. Press
.
Note: If you set the
handset to auto
answer, simply
lift the handset
from the base. For
instructions to set
auto answer, see
page 65.
Lift.
2. Dial
.
3. Press
.
.
Call duration
appears on
the screen.
appears on
the screen.
67
Answering and calling
Silence a ringing handset
You can stop a handset from ringing during an incoming
call.
To silence a ringing handset
•
beneath Silent on the screen
Press
Place a one-touch call
If you have stored numbers in the memory keys, you can
call these numbers with one touch.
If you need instructions for storing one-touch numbers,
see page 53.
To place a one-touch call
1. Lift
.
2. Press and hold the
that you wish to call.
The memory information appears on the screen, and
the phone dials.
68
Redial a number
You can quickly redial any of the last ten numbers that
were dialed from your handset.
To redial the last-dialed number
1. Lift
.
2. Press
.
The last-dialed number appears on the screen.
3. Press
.
The phone dials.
To redial a recently dialed number
1. Lift
.
2. Press
.
The last-dialed number appears on the screen.
3. Press
press
and scroll to your selection, and then
.
The phone dials.
69
Answering and calling
Call from your phonebook
If you have stored a number in your phonebook, you can
call it quickly.
If you need instructions for storing phonebook numbers,
see page 54.
To call a phonebook number
1. Lift
.
2. Press
beneath Phnbk on the screen.
The first alphabetic listing appears on the screen.
3. Find the desired name by taking one of these steps:
• Press the key for the first letter of the first name
shown in the listing, and if necessary, press
and scroll to your selection.
• Press
4. Press
.
The phone dials.
70
and scroll to your selection.
Call from the inbound calls list
If you subscribe to caller ID service with your telephone
service provider, the handset stores the last 30 calls made
to your telephone. You can quickly dial any of the numbers
stored in the list.
The inbound calls list includes these entries:
• Received calls
• Missed calls
• Voicemail messages (voicemail service required)
Note: If area codes are not required for local calls in your
region, see page 26 for instructions on specifying that
the phone not save the area code in lists.
To call from the inbound calls list
1. Lift
.
2. Press
.
The most recent inbound call appears on the screen.
3. Press
and scroll to your selection.
4. (Optional) To add your local area code, press
To add or remove a 1, press
.
5. Press
.
The phone dials.
.
71
Answering and calling
Call other handsets in your home (intercom)
If additional handsets are registered to your ClearSounds
A400 base, you can place internal calls among the
handsets.
Note: If an external call comes in while you converse on
an internal call, press
to end the internal call before
you answer the external call.
To place an intercom call
1. Lift
.
2. Press
.
Internal_ appears on the screen.
3. Press the handset number of the phone that you wish
to call.
4. To end the call, press
72
.
During calls
Adjust sound
Use these controls to adjust earpiece sound during a call.
After you hang up, volume and tone equalizer settings
remain set for the next call.
Amplification resets to off when a call ends. If you prefer to
set amplification always on, see page 34.
To adjust the handset volume and tone during a call
Volume
Amplify
Equalize tone
1. Press
.
2. Press
•
•
Press + or -.
Press to turn
on or off.
to
select Treble,
Flat or Bass.
As you
select, a
graph
appears on
the screen.
73
During calls
Use the speakerphone
If you remain close to the handset, you can converse
handsfree and listen over the handset speakerphone.
To enjoy optimal speakerphone performance, locate the
handset away from areas with high background noise.
Note:
does not work in the speakerphone mode.
To turn on the handset speakerphone during a call
1. Press
.
The handset speakerphone is on, and
the screen.
appears on
2. Place the handset on a nearby surface, standing up.
3. (Optional) Accomplish these tasks as usual:
• Adjust volume
• Equalize tone
• Mute the microphone
4. To turn off the speakerphone: Press
5. To end the call, press
74
.
.
Mute the microphone
You can mute the handset so that the other party cannot
hear any noise or conversation on your end of the line. You
can still hear the other party.
Muting also works when you use a speakerphone or headset.
To mute and unmute the handset microphone
1. Press
beneath Mute on the screen.
Mute On flashes on the screen.
2. To turn off muting and return to conversation, press
beneath Off.
Transfer a call
You can transfer a call to another handset that is registered
to the same base.
To transfer a call to another handset
1. During a conversation with an outside caller, press .
The caller with whom you were speaking is on hold.
2. Press the numeric key that indicates the number of
the handset that you wish to call.
and your handset number appear on the
recipient's display.
3. After the recipient answers the call, press
beneath
CONF on the screen.
The three parties are connected.
4. Press
to leave the call.
The other parties remain connected.
75
During calls
Use a headset
You can plug in a headset to the handset and converse
handsfree while listening discretely through the headset.
You can connect the headset before or during a call.
To use a headset
If the headset includes a microphone, you can attach the
handset clip to your belt or clothing: you are mobile!
Headset jack
1.
On the side of the handset, connect the
headset to the jack.
2. Place the headset on your head.
3. (Optional): Clip the handset to your belt or clothing.
4. Accomplish these tasks as usual:
• Answer or place calls
• Adjust and amplify volume
• Equalize tone
• Mute the microphone
• End calls
76
Set up a conference call
You can set up a three-party call with an external caller
and a person using an A400 handset that is registered to
your base.
To set up a conference call
1. During a conversation with an outside caller, press
The caller with whom you were speaking is on hold.
.
2. Press the numeric key that indicates the number of
the handset that you wish to call.
and your handset number appear on the
recipient's display.
3. After the recipient answers the call, start the conference
or return to the external caller.
• To start the conference, press
beneath CONF
on the screen.
The three parties are connected.
• To return to the external caller without starting a
conference call, press
.
To leave a conference call
•
Press
.
The other parties remain connected until they press
.
77
Voicemail and inbox
If you subscribe to Voicemail and Caller ID services with
your telephone service provider, the handset stores the last
30 calls made to your telephone in the inbound calls list.
Screen a call
To visually screen during a voicemail message
If you subscribe to caller ID, you see the caller's name
and number on the handset screen under either of these
conditions:
• If your phonebook contains an entry for the caller
• If the caller and telephone service make them available
Intercept a call waiting call
If you subscribe to call waiting service and you are having
a phone conversation, you can intercept an incoming call
and switch between the two parties. The waiting party
remains on hold until he or she disconnects.
To intercept an incoming call waiting call
1. Tell the first caller that you are putting him or her on hold.
2. Press
(call waiting), and speak to the new caller.
3. To reconnect with the first caller, press
78
.
Visual indicators of calls and voicemail
The handset provides these visual indicators.
Handset call and voicemail indicators
Visual indicator Meaning
X New Calls
The number o f
n o n - viewed calls
If the same person
calls more than
once, the number
lists the caller only
once, and the call
is marked "rep" for
"repeat.".
Clear it
Scroll
through all
Caller ID
entries
that are
marked
" n e w. "
One or more nonviewed, missed calls
Flashes
One or more
unprocessed
voicemail
messages
Listen to
all unheard
voicemail
messages,
and delete
or save
them.
79
Voicemail and inbox
Review inbound calls
The handset lists most recent calls first.
To scroll through missed calls
1. Press
.
2. Repeat for the next listing.
Each listing shows this information:
• Caller name and number (when available)
• Date and time of the call
• new (non-reviewed calls), old (previously
reviewed calls) or rep (repeated calls)
Listen to voicemail messages
If you have unheard voicemail messages, when you open the
line to make a call, you hear a stutter dial tone.
To listen to voicemail messages
•
80
Call your voicemail access number, as specified by
your telephone service provider.
If you are interested in storing your voicemail access
number for one-touch calling, see page 58 for
instructions.
List maintenance
The ClearSounds A400 phone stores two lists:
• Dialed calls list: The last 10 numbers that were called
from your handsets.
• Inbound calls list (Caller ID service required) The last
callers who called you. Each handset stores 30 calls.
Delete entries from lists
The oldest call automatically drops from the list when the
list is full. You can remove calls manually if you wish.
To delete calls from dialed or inbound calls lists
1. Search a list by taking one of these steps:
• To delete numbers from the dialed calls list: press
repeatedly until you see a call that you
want to delete.
• To delete numbers from the inbound calls list: press
repeatedly until you see a call that you
want to delete.
2. Press
to select Option.
3. Delete one or all entries in the list:
• To delete only the selected entry, press
scroll to Delete, and then press
.
• To delete all entries in the list, press
press
to select Delete All. Press
4. Press
.
and
and the
to confirm.
81
Security
Personalize the system PIN
You must enter the system personal identifier number
(PIN) to restore handset default settings or to register and
unregister an additional handset to the base.
This section instructs you on how to change from the
default system PIN to a personalized PIN. The factory
default system PIN is 0000.
Note: Carefully consider whether a personalized system
PIN is necessary. If you are concerned that you might
forget your personalized system PIN, store a record of
it in a secure location. If you cannot recall or find your
personalized system PIN, you cannot perform functions
that require it.
To personalize the system PIN
1. Press
beneath Menu on the screen.
2. Press
.
3. Press
press
and scroll to Setting, and then press
.
and scroll to System PIN, and then
Old PIN: appears on the screen.
82
4. Press numeric keys to enter the present PIN, and then
press
.
Note: The factory default PIN is 0000.
New PIN: appears on the screen.
5. Press numeric keys to enter the new PIN, and then
press
.
Again: appears on the screen.
6. Press numeric keys to re-enter the new PIN, and then
press
.
A confirmation tone occurs and PIN
appears on the screen.
7. Press
Changed
.
83
Restoring defaults
Restore handset default settings
You can reset your handset to factory default settings.
These settings are saved (they do not reset):
• Incoming calls list (Caller ID)
• Dialed calls list
• Phonebook entries
You must enter the system PIN to reset the defaults. The
PIN is 0000.
To restore handset default settings
1. Press
beneath Menu on the screen.
2. Press
.
and scroll to Setting, and then press
3. Press
press
and scroll to Handset Reset, and then
.
Handset Reset? appears on the screen.
4. Press
.
Note: The factory default PIN is 0000.
New PIN: appears on the screen.
84
5. Press numeric keys to enter the new PIN, and then
press
.
Again: appears.
6. Press numeric keys to re-enter the new PIN, and then
press
.
A confirmation tone occurs and PIN
appears on the screen.
7. Press
Changed
.
85
Additional handsets
Register additional handsets to the base
Your telephone handset (Handset 1) is registered to the base.
If you purchased additional ClearSounds A400E
handsets, you must register each additional handset to
the ClearSounds A400 base. The base can accommodate
a total of five handsets.
Each handset’s registration number appears on the
handset’s home screen.
To register an additional handset to the base
1. On the unregistered A400E handset, press and hold
beneath Menu on the screen, until Press and
hold base Page key appears, and then
release the handset key.
2. On the A400 base, under the handset, press and hold
for 10 seconds, and then release the key.
When the handset is registered to the base, the
handset number appears on the handset screen.
86
Delete a handset registration
You can delete a handset registration from the base.
Note: To accomplish this task, you cannot use the handset
that you are deleting. You must use an alternate handset.
To delete a handset registration
1. Press
beneath Menu on the screen.
2. Press
.
and scroll to Setting, and then press
3. Press
press
and scroll to Unregister, and then
.
4. Press numeric keys to enter the system PIN code
(0000 is the factory default code), and then press
.
5. Press numeric keys to enter the number of the handset
that you wish to unregister, and then press
.
6. Press
.
87
Troubleshooting
General operation
Symptom
Solutions
• Secure the power adapter
connection in the AC wall outlet
and in the handset jack.
• Secure the phone line cord in the
wall jack and in the handset jack.
• Fully charge the handset batteries
and install them properly.
• Plug in another phone to the
same wall jack to ensure that the
phone service is operational.
Handset batteries
• Use only AAA NiMH
seem to have short
rechargeable batteries.
lives.
Never use alkaline batteries!
• Clean the charging contacts.
When I lift the
• Turn on the auto answer feature
handset from the
(page 65).
base, the line does
not open.
Phone is
non-operational.
88
Symptom
Solutions
There is noise,
static or
interference.
• If you subscribe to DSL service,
install a DSL filter (page 16).
• Plug in the power adapter to the
wall outlet and securely connect it
to the phone.
• Do not plug in other appliances to
the same wall outlet.
• Move the phone to a location
that is free of interference.
• If you are located near radio
towers, install a filter.
• The handset is out of range of
the base. Move the handset
closer to the base.
On the handset,
is blinking,
Searching
appears and a tone
is sounding.
I cannot recall my
• The factory default system
personal identifier number (PIN)
system PIN.
is 0000. If you personalized it,
you must enter the personalized
number. See page 82.
89
Troubleshooting
Voicemail and call waiting services
Symptom
Solutions
Call waiting does • Confirm with your service
not work.
provider that you subscribe to
call waiting service.
• If another handset is engaged on
the line, call waiting information
doesn't show.
There is no caller
• Confirm that you subscribe to caller
ID information on
ID service.
the screen.
• For information while you are
conversing, confirm that you
subscribe to caller ID on call
waiting service.
• Some callers or providers withhold
details.
• ID information can be delayed:
Check after the phone rings a
few times.
90
Call notification
Symptom
Solutions
There is no
audible ringer.
• Turn on the ringer and turn up
the ringer volume (page 44).
• Plug in the power adapter to the
wall outlet and securely connect it
to the phone.
• Unplug one or more devices that
share the phone line.
91
Troubleshooting
Dialing
Symptom
Solutions
A memory button
does not function.
Area codes or the
long distance code
are missing from
lists, or they are
there and I don't
need them for local
calls.
• Program the number (page 53).
The phone dials the exact number
that you see on the screen.
• If you are calling from a memory
key or the phonebook, be sure
that you have stored required area
codes and long distance codes
See page 46 and page 54.
• When dialing out using a number
from the inbound calls list, press
to add or delete a 1, and press
to add the local area code.
• If local calls do not require an area
code in your region, see "Call
storage: local area code" on page
26.
92
Audio
Symptom
Solutions
Low handset
earpiece or
speakerphone
volume, or poor
tone
• Plug in the power adapter to the
wall outlet and securely connect
it to the phone.
• Turn up the volume and
amplification settings (page 34)
• By default, amplification turns
off after each call. If you prefer it
on consistently, turn it on (page
34).
• Adjust bass, flat and treble tone
equalizer (page 73).
Phonebook
I have two handsets
• You selected Copy
registered to the base, and
All instead of Copy
each one has unique stored
Append. See page
phonebook entries. I wanted
60.
to add entries from Handset
1 to Handset 2, so I copied
phonebook entries, but the
original entries on Handset
2 were lost.
93
requirements adopted by the ACTA. A compliant
telephone cord and modular plug are provided with
this product. It is designed to be connected to a
compatible modular jack that is also compliant. See
installation instruction for details.
3. If the ClearSounds® A400 DECT 6.0 Amplified
Phone causes harm to the phone network, the phone
company will notify you in advance that temporary
discontinuance of service may be required. But if
advance notice isn’t practical, the phone company will
notify the customer as soon as possible. Also, you will
be advised of your right to file a complaint with the
FCC if you believe that it is necessary.
4. The phone company may make changes in its facilities,
equipment, operations or procedures that could affect
the operation of the equipment. If this happens, the
phone company will provide advance notice in order
for you to make necessary modifications to maintain
uninterrupted service.
5. If you experience trouble with the ClearSounds A400
DECT 6.0, you should disconnect it from the network
until the problem has been corrected or until you are
sure that the equipment is not malfunctioning.
6. Please follow instructions for repair, if any (e.g. battery
replacement section); otherwise do not alter or repair
any parts of the device, except as specified. For repair
procedures, follow the instructions outlined under the
limited warranty.
95
Compliance
7. Connection to party line service is subject to state
tariffs. Contact the state public utility commission,
public service commission or corporation commission
for information.
8. If your home has specially wired alarm equipment
connected to the phone line, ensure that the installation
of the ClearSounds A400 DECT 6.0 does not disable
alarm equipment. If you have questions about what
will disable alarm equipment, consult your phone
provider or a qualified installer.
9. If the phone company requests information on what
equipment is connected to their lines, inform them of
the following:
a. Phone number to which this unit is connected
b.Ringer equivalence number (REN) [0.0]
c. USOC jack required [RJ11C]
d.Facility interface codes (FIC) [02LS2]
e. Service order codes (SOC) [9.0Y]
f. FCC Registration Number [US:CLSW400BA400]
10.The ringer equivalence number (REN) is used to
determine how many devices can be connected to your
phone line. If too many devices are attached, they may
not ring in response to an incoming call. In most but not
all areas, the sum of the RENs of all devices on any
one line should not exceed five (5.0). To be certain of
the number of devices that may be connected to your
line, as determined by the total RENs, contact your
local telephone company. The REN for this product
is part of the product identifier that has the format
96
US:AAAEQ##TXXXX. The digits represented by ##
are the REN without a decimal point. For this product
the FCC registration number is US:CLSW400BA400,
which indicates the REN would be 0.0.
Service Requirements
In the event of ClearSounds A400 DECT 6.0 equipment
malfunction, all repairs should be performed by
ClearSounds or an authorized agent. It is the responsibility
of users requiring service to report the need for service to
ClearSounds or to one of our authorized agents. If the
equipment is causing harm to the telephone network, the
telephone company may request that you disconnect the
equipment until the problem is resolved.
Service can be facilitated through our office at:
ClearSounds Communications, Inc.
1743 Quincy Avenue, Suite 155
Naperville, IL 60540
Tel: 1-800-965-9043
Fax: 1-630-654-9219
Industry Canada
This device IC is 7800A-CSA400.
CS03 Statement
This product meets the applicable Industry Canada
technical specifications. This is confirmed by the registration
number. The abbreviation, IC before the registration
97
Compliance
number signifies that registration was performed based
on a Declaration of Conformity indicating that Industry
Canada technical specifications were met. It does not
imply that Industry Canada approved the equipment.
Before installing this equipment, users should ensure that
it is permissible to be connected to the facilities of the local
telecommunications company. The equipment must also
be installed using an acceptable method of connection.
The customer should be aware that compliance with the
above conditions may not prevent degradation of service
in some situations.
Repairs to certified equipment should be made by an
authorized Canadian maintenance facility designated by
the supplier. Any repairs or alterations made by the user
of this equipment, or equipment malfunctions, may give
the telecommunication company cause to request the
user to disconnect the equipment.
WARNING: Users should not attempt to make
such connections themselves, but should contact
the appropriate electric inspection authority, or an
electrician, as appropriate.
CAUTION: The Ringer Equivalence Number (REN)
assigned to each terminal device provides an
indication of the maximum number of terminals
allowed to be connected to a phone interface.
The termination on an interface may consist of any
combination of devices subject only to the requirement that
the sum of the Ringer Equivalence Numbers of all the devices
98
does not exceed 5. An alternative indication of the REN is
the Load Number (LN); this number should be divided by 20
to approximate the equivalent REN. The REN of this unit is
indicated on the bottom of your phone.
RSS (category 1 equipment)
This device complies with Industry Canada licenseexempt RSS standard(s). Operation is subject to the
following two conditions:
1. This device may not cause interference.
2. This device must accept any interference that may
cause undesired operation of the device.
Under Industry Canada regulations, this radio transmitter
may only operate using an antenna of a type and maximum
(or lesser) gain approved for the transmitter by Industry
Canada. To reduce potential radio interference to other
users, the antenna type and its gain should be so chosen
that the equivalent isotropically radiated power (e.i.r.p.) is
not more than that necessary for successful communication.
Important note
Radiation Exposure Statement:
This equipment complies with radiation exposure limits
set forth for an uncontrolled environment. This equipment
should be installed and operated with minimum distance
of 20cm between the base and your body. This transmitter
must not be co-located or operating in conjunction with any
other antenna or transmitter. Privacy of communications
man not be ensured when using this telephone.
99
Warranty
Be sure to save your sales receipt as the proof of purchase
date should you need warranty service. The serial number
for this product is on the underside of the base.
Your ClearSounds A400 DECT phone and A400E
phone come with a (1) year limited warranty from the
date of purchase. These products are warranted by
ClearSounds against manufacturing defect in material
and workmanship under normal use. In the event that
this product fails to function properly due to defects in
materials or workmanship within one year of the original
purchase, return the unit (freight prepaid) with proof of
purchase (sales receipt or packing slip, no exceptions)
to
ClearSounds
Communications.
ClearSounds
Communications will either repair or replace the unit (with
a refurbished unit or unit of equal condition) and return it
you (using UPS/USPS ground shipping) at no cost to you.
The warranty replacement or repair will be warranted for a
period of 90 days or the remainder of the original warranty
period (from original purchase date), whichever is longer.
The warranty does not cover accidents, negligence or
breakage to any parts. This includes shipping damage,
failure to follow instructions, misuse, fire, floods, use of
incompatible accessories, acts of God or failure in your
phone service carrier’s line service. The product must
not be tampered with or taken apart by anyone who
is not an authorized ClearSounds Communications®
representative. Tampering with the phone will void any
written or implied warranties.
100
If a defect covered by this warranty should occur, promptly
contact a Customer Service representative by phone,
or log on to www.clearsounds.com to obtain a Return
Merchandise Authorization (RMA) number and shipping
instructions before shipping the product to us. Any
shipment without an RMA number will not be accepted
and will be returned to you at your expense. All authorized
returned products must be accompanied with proof of
purchase and a brief explanation of the problem.
For out-of-warranty repairs and service, please contact
our Customer Service department for instructions. The
repair shall be warranted for 90 days.
IMPORTANT: YOUR RECEIPT IS PART OF YOUR
WARRANTY AND MUST BE RETAINED AND
PRODUCED IN THE EVENT OF A WARRANTY CLAIM.
101
Accessories
Please visit the ClearSounds website or call ClearSounds
for additional accessories.
CS-CLA7V2 neckloop connects to
your phone’s 2.5 mm
hands-free conversation.
jack for
Requires hearing aid(s) or cochlear
implant(s) with t-coil(s).
CS-HD-500 headset connects to
your phone’s 2.5 mm
hands-free conversation.
102
jack for
Service
Customer Service in United States and Canada
Do you need some help? Please call, we are happy to
assist you!
ClearSounds Communications
Attention: Repair Center
1743 Quincy Avenue, Suite 155
Naperville, IL 60540
USA
1-800-965-9043 (Toll-free)
www.ClearSounds.com
103
© 2013 ClearSounds
CS-A400/400EUG Ver 1