1
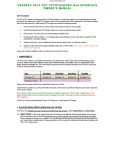
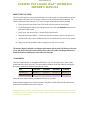
Discountcarstereo.com
U
USSA
ASSPPEEC
C PPA
A1111--G
GM
M4455 iiPPoodd™™ IIN
NTTEERRFFA
AC
CEE
O
OW
WN
NEERR’’SS M
MA
AN
NU
UA
ALL
ABOUT THE PA11-GM45
The PA11-GM45 interface connects the iPod directly to GM audio system. Its on-board software translates
commands from either your GM CD Changer controls into commands that the iPod understands. This
interface enables the iPod to take place of a GM CD Changer and provides the following benefits:
1. Direct connection of the iPod to GM vehicle audio system for optimum sound quality
2. Control iPod playback with the CD Changer buttons on the GM radio AND/OR directly from the
iPod buttons (direct mode)
3. Direct access and control of up to 5 favorite playlist (playlist mode)
4. Charge the iPod internal battery --- includes auto-shut down features to prevent car battery-drain
5. Auxiliary audio input (connect additional audio devices and listed to them on the factory system)
6. Plug-n-play: includes installation cable, mounting screws and owner’s manual.
This interface adapter is designed as an alternate replacement to the GM 6 disc CD Changer or slave unit
in your GM vehicle. Therefore it is not possible to have a slave CD or 6-disc CD Changer and the PA11GM45 iPod interface simultaneously connected to your GM radio.
COMPATIBILITY
The PA11-GM45 interface is compatible with iPod (G3, G4, G5) iPod Mini, Nano, Photo, Video
models featuring a dock connector. The functionality and features of the iPod interface described in
this owner’s manual are confirmed with software version:
iPod
Firmware v2..3
iPod Nano
iPod Photo
iPod Video
iPod Mini
firmware 1.0
Firmware 1.2
firmware 1.0
firmware v1.4
firmware v3.1 (G4)
Please visit www.apple.com/iPod and update the firmware on your iPod.
Future firmware updates for your iPod, iPod Mini, iPod photo or iPod video may affect the features
and functions described in this owner’s manual.
Important: Display of artist, song title information, track search and artist, song title, album or genre is
not displayed on the GM radio. Only the Playlist number and track number are displayed on the radio.
(CD Changer display mode)
DiscountCarStereo.com
APPLICATIONS
The PA11-GM45 is applicable to the following GM vehicles /Radios with external CD changer controls.
MAKE
Cadillac
CHEVY
GMC
MODEL
Connecting notes and radio requirements
Catera†
1997-01
Prewired in right-rear trunk
Seville/Deville
1997-01
1997-99 in right rear trunk or center console.
2000-01 behind glove-box or console and will require the CASGCAD7i cable
Escalade
1999-02
Connector at radio or slave CD/Cassette player
Astro/Cargo Van
1997-05
AM/FM/Tape radio with AUX only. Slave CD must be disconnected
Avalanche
2002
Connect behind radio
Blazer
1997-01
9-pin at radio or slave tape unit, works with On-Star system
Camaro
2000-02
1997-99 AM/FM/Tape radio with AUX only. Slave CD must be
disconnected
2000-02 9-pin at radio or slave unit. Works with On-Star system
Impala/Monte
Carlo
1997-99
AM/FM/Tape radio with AUX only. Slave CD must be disconnected
Malibu
1997-00
AM/FM/Tape radio with AUX only. Slave CD must be disconnected
S-10 Truck
2000-01
9-pin at radio or slave tape unit, works with On-Star system
Silverado
1997-02
9-pin at radio or slave unit, work with On-Star system
Suburban/Tahoe
1997-02
1997-99 AM/FM/Tape radio with AUX only. Slave CD must be
disconnected
2000-02 9-pin at radio or slave unit. Works with On-Star system
Venture
1997-99
Jimmy
2000-01
9-pin at radio or slave tape unit, works with On-Star system
Sonoma
2000-01
9-pin at radio or slave tape unit, works with On-Star system
Safari
1997-05
AM/FM/Tape radio with AUX only. Slave CD must be disconnected
Cargo Van
1997-05
AM/FM/Tape radio with AUX only. Slave CD must be disconnected
Sierra
1997-02
9-pin at radio or slave tape unit, works with On-Star system
Yukon/Denali
1997-02
Aux button. Works with On-Star System
1997-99
AM/FM/Tape radio with AUX only.
Silhouette
1997-99
AM/FM/Tape radio with AUX only.
Bonneville
1997-99
AM/FM/Tape radio with AUX only. Slave CD must be disconnected
Firebird
1997-02
AM/FM/Tape radio with AUX only. Slave CD must be disconnected
Grand Prix
1997-02
AM/FM/Tape radio with AUX only. Slave CD must be disconnected
Grand AM
1997-00
AM/FM/Tape radio with AUX only. Slave CD must be disconnected
Montana
1998-99
AM/FM/Tape radio with AUX only. Slave CD must be disconnected
Oldsmobile Bravada
Pontiac
YEAR
† Vehicles must be pre-wired in right-rear trunk. If not, data cable (GM p/n 12484910) must be purchased from a
dealer
Discountcarstereo.com
1. PLAYLIST MODE, DIRECT MODE AND AUX. OPTION
The PA11-GM45 provides two ways to control your iPod through the car radio, namely Playlist Mode and
Direct Mode.
1-1 DIRECT MODE: Search and select music on the iPod directly just as you would in portable use. Use
the track up/down, fast forward and reverse buttons on your radio to control music playback. All control
functions on the iPod will still be available. In other words, direct mode lets you have limited control
from the radio and full iPod control using the iPod buttons. Please see section 2 of this manual for
additional information. Music will playback through your car stereo.
1-2 PLAYLIST MODE: Operate and control the iPod as if it was a CD Changer. This mode allows you to
access up to five playlist on the iPod. This is also referred to as External Control Mode. (See Playlist
Naming in section 3 of this manual).
1-3 Dip switch #2 on the PA11-GM45 interface is for mode selection. The “ON” position is for Playlist
Mode and the “OFF” position is for Direct Mode. It is preset to “ON” (Playlist Mode) at the factory.
When in Playlist Mode the iPod is switched to External Control Mode and neither the controls
on the iPod nor the display are active—the iPod will displays “GM, OK TO DISCONNECT”.
Note: Disconnect the iPod from the PA11-GM before switching DIP switch #2 from one mode to the
other.
1-4 AUX ADDITIONAL “AUX INPUT OPTION” SELECTION
PA11-GM45 interface adapter is also capable of connecting an Auxiliary audio source to your GM
radio, including the iPod. The additional audio source connects to the RCA input jack marked “AUX
AUDIO INPUT”. If you choose to use the “AUX AUDIO INPUT”, DIP switch #1 and #2 at the side of
the interface box must be set to the “OFF” position (it is preset to “ON” at the factory).
The audio source (XM radio, DVD player, MP3 Player, Game system etc.) connected to the “AUX
AUDIO INPUT” can be accessed by selecting CD Changer mode, then CD 6 button on the GM radio.
CD 1 to CD4 are for accessing Playlist and CD 5 is for accessing all songs on the iPod.
1-4 OPERATION OF THE AUXILIARY INPUT
If the “AUX AUDIO INPUT” option is selected, the radio will display “CD 6 Track 1” when DISC 6
button is pressed. Use “CD 6 Track 1” to access the audio source connected the “AUX AUDIO
INPUT” port. Adjust VOLUME, BASS, and TREBLE etc. as you would normally do for the other
program sources on the radio.
2. CONNECTING & PLAYING THE iPod IN DIRECT MODE
When the iPod is connected to the PA11-GM45, the iPod’s screen will go blank for a few seconds
before returning to the normal screen display mode. The audio from the iPod will be played back at DISC 1
Track1. Adjust VOLUME, BASS, TREBLE etc as you normally do for the other programs sources on the radio.
WARNING!!
Use only the iPod connection cable (part no. CB-PA14) included with the PA11-GM interface. IPod
connection cables from other sources may look similar, but using them may damage your iPod.
DiscountCarStereo.com
3. CONNECTING & PLAYING THE iPod IN PLAYLIST MODE
3.1 CONNECTING THE iPod TO THE INTERFACE.
Turn on your GM radio before connecting the iPod. After connection, the iPod will take a few
minutes to change to EXTERNAL CONTROL MODE. The iPod screen will then show:
You are now able to select iPod mode.
3.2 SELECTING iPod MODE ON GM RADIOS
Press the “AUX” or “SOURCE” button on the radio repeatedly until “CD1-x” appears on the radio
display (x is the track number for “NOW PLAYING” song on the iPod). This display confirms that iPod
mode has been completely synchronized and activated. Synchronization timing varies according to the
number of playlist on your iPod. If the iPod was playing previous to turning the Radio’s ACC power OFF,
and the iPod was not disconnected, playback resumes from where it stopped.
3-3. DISCONNECTING THE iPod FROM THE INTERFACE
If your iPod is disconnected during playback, the radio will automatically switch to AM/FM mode.
After disconnecting the iPod from the interface, wait until the iPod screen changes from External Control
Mode screen back to the normal menu before attempting to reconnect to the interface.
TIP: Press and hold the Play/Pause button on the iPod to get the normal menu back faster.
3-4. PLAYING SONGS ON THE iPod
All audio tracks on your iPod will be played (All Play) at DISC 1. Track order is determined by the
default order on your iPod. If the AUX. option is not selected, selecting DISC 2 to DISC 6 on your GM radio
will allow playback of 5 playlist on the iPod. Every time the iPod is connected to the interface, playback
begins at the “Now Playing” song at DISC 1 by default.
If the iPod was playing any of its playlist right before connection, the same playlist will continue to play and
repeated at DISC 1 but the iPod will switch to “ALL” as soon as the FF (►) button is pressed.
DiscountCarStereo.com
3-5 SELECTING A PLAYLIST
Press “PROG” or “5” (DISC UP) to select a playlist. The selected playlist will begin playing and the
playlist number and track number will be displayed. In rare cases, this may take up to a few seconds to
complete synchronization. After playing the last song in the current playlist, playback will start again from
the first track in the current playlist.
3-6 PLAYLIST NAMING
Once the iPod™ is connected to your GM radio via the PA11-GM45, the interface will scan
all available playlist on the iPod™ and looks for designated “GM” playlists which are created for
direct access using the “DISC” buttons on the GM radio. The designated “GM” playlist are
related to “DISC” number in the following manner:
Preset #’s
DISC1
DISC2
DISC3
DISC4
DISC5
DISC6
Playlist(s) names
“All Songs on the iPod”
“GM2”
“GM3”
“GM4”
“GM5”
“GM6”
Naming a playlist in iTunes™ for the PA11-GM45 iPod interface must be exactly as shown. “GM” must
be in Capital letters and there can be no spaces between “GM” text and the “DISC” number. However,
you may add any text after the correct name and number has been assigned. The following is an
example of correct playlist naming with additional text:
DISC2
DISC3
DISC4
DISC5
DISC6
“GM2_Love”
“GM3_Discount”
“GM4_Car”
“GM5_Stereo”
“GM6_Customer Service”
Note: If no designated “GM” playlist were created, the PA11-GM45 interface automatically relate the first five
playlist on the iPod to DISC number 2 to 6 regardless of playlist naming.
If less than five designated “GM” playlist were created, the PA11-GM45 interface automatically fills up the
rest of the DISC numbers beginning with the first available playlist on the iPod.
Example: If only three designated “GM2”, “GM4” and “GM6” playlists were created, the DISC numbers on
the radio would be:
DISC1
DISC2
DISC3
DISC4
DISC5
“GM2”
(1st available playlist on the iPod)
“GM4”
(2nd available playlist on the iPod)
“GM6”
Note: The PA11-GM45 does not recognize a playlist that contains no audio tracks regardless of playlist
naming. The PA11-GM45 does not recognize the “On-The-Go” playlist on your iPod.
DiscountCarStereo.com
4. PLAYBACK FUNCTION CONTROLS
You can control playback with several functions. These functions are generally cancelled when you
press select radio buttons; disconnect the iPod, or POWER OFF the radio or ACC.
SCAN
Press the “SCAN” button, each track in the current playlist will play for 10 seconds. If
“SCAN” is pressed at DISC 6, all songs on the iPod will be scanned.
RANDOM (Shuffle)
Press the "RDM” button on the radio; songs within a playlist will playback in random
order. The track number display will change to start from 1 as it does on the iPod. The radio will
continue to play this way until “RDM” is deactivated.
REPEAT
Repeating a song is NOT supported.
TRACK UP/DOWN
Press the “NEXT” button to advance to the next track in the playlist. Press the PREV
button to move to the beginning of the track being played. Press the track down button twice to
return to the previous track. If the Track ►► and /or Track ◄◄ buttons are pressed quickly in
repetition, the track numbers display may change unevenly. You may also hear short bits of
audio during repeated presses of the track up/down buttons.
Note: GM radios currently display a maximum of two digits for track number, Track number
100 will be displayed as 01, track 101 displayed as 02, track 102 as 03…
FAST TRACK SEARCH (x10)
Press the “FWD” (fast forward) or “REV” (fast reverse button) to advance or retreat
through the track in the playlist in increments of 10 (i.e. 04, 14, 24…). When the end of the
playlist is reached, the search will stop at track 1, and then continue by increments of 10 (i.e. 19,
29, 1, 11…).
Press and hold the fast forward or fast reverse button for more than 4 seconds; the search will
jump to the last track or the first track of the playlist. If you are in scan mode, the mode will be
cancelled.
FAST FORWARD/FAST REVERSE PLAY
This function applies only in RANDOM mode. Since engaging or disengaging the
random mode does not stop playback of the current song, you must go in or out of Random
mode to do the fast track search (x10) function, or the fast forward/fast backward play function.
Press and hold the fast forward or fast reverse button causes the current track to skip through at
high speed. During fast forward, when the end of the current track is reached, the iPod will start
playing the next random track at normal speed. During fast backward, when the start of the
current track is reached, the track will start playing again at normal speed. To continue fast
forward or fast reverse play, release the button and press it again.
DiscountCarStereo.com
CHANGING SOURCE TO AM/FM/CD/CASSETTE
When a source other than the iPod (i.e. Radio, Cassette etc) is selected on the radio, the
iPod will pause.
5. INSTALLATION INSTRUCTIONS
1. Remove radio from dash
2. Disconnect existing CD Changer from the radio if there is one.
3. Unplug the 9-pin connectors from the radio and connect them to the white connector of
the CAS-GSOS cable
4. Connect the black 9-pin connector of the CAS-GCOS cable to the back of the radio and
connect the other end of the CAS-F12 cable
5. If using the CAS-GCAD7i adapter cable: Connect the prewired 10-pin connector to the
10-pin end and connect the round DIN connector to the PA11-GM45 “Radio”
connector) and proceed to step 7.
6. Connect the round DIN connector on the CAS-F12 cable to the PA11-GM45 “Radio”
connector. ( Only connect your iPod to the PA11-GM45 after this installation step is
completed)
7. If AUX. is required, set DIP Switch #1 to the “OFF” position and connect the audio
output of you auxiliary device to the interface “AUX input jack
8. Set DIP switch #2 to “OFF” only if Direct Mode is preferred
9. Connect the CB-PA14 cable to the PA11-GM45 “iPod” connector
10. Reinstall radio to the dash
More installation details are available here:
www.discountcarstereo.com/gm_ipod_installation.htm
Revised 5/19/06
iPod™ iPod™ Mini and iTune™ are trademarks of Apple Computers Inc. registered in the USA and other countries.
GM is a registered trade mark of General Motors Corporation.
Design and specifications are subject to change without notice.
© 1995-06 Discount Car Stereo, Inc. All rights reserved© Information contained in this document is based of the latest
information available at the time of printing and is subject to the copyright and other intellectual property rights of Discount
Car Stereo Inc., its affiliated companies and its licensors. All rights are reserved to make changes as any time without
notice. No part of this document may be reproduced, stored in a retrieval system, or transmitted in any form or by any
means, electronic, mechanical, photocopy, recording or otherwise, nor may these materials be modified or reposted to
other internet sites, without expressed written permission of the publisher.