1
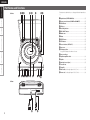
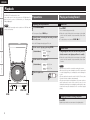
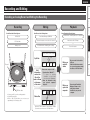
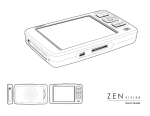
FULLY AUTOMATIC TURNTABLE SYSTEM
DP-200USB
Owner’s Manual
Manuel de l’Utilisateur
ENGLISH
ENGLISH FRANCAIS
nSAFETY PRECAUTIONS
CAUTION
RISK OF ELECTRIC SHOCK
DO NOT OPEN
CAUTION:
TO REDUCE THE RISK OF ELECTRIC SHOCK, DO NOT REMOVE
COVER (OR BACK). NO USER-SERVICEABLE PARTS INSIDE.
REFER SERVICING TO QUALIFIED SERVICE PERSONNEL.
The lightning flash with arrowhead symbol, within an equilateral
triangle, is intended to alert the user to the presence of
uninsulated “dangerous voltage” within the product’s enclosure
that may be of sufficient magnitude to constitute a risk of electric
shock to persons.
The exclamation point within an equilateral triangle is intended
to alert the user to the presence of important operating
and maintenance (servicing) instructions in the literature
accompanying the appliance.
WARNING:
TO REDUCE THE RISK OF FIRE OR ELECTRIC SHOCK, DO NOT
EXPOSE THIS APPLIANCE TO RAIN OR MOISTURE.
• Location of Caution Labels: Bottom
1.
2.
3.
4.
5.
6.
7.
8.
9.
10.
11.
12.
13.
IMPOTANT SAFETY
INSTRUCTIONS
Read these instructions.
Keep these instructions.
Heed all warnings.
Follow all instructions.
Do not use this apparatus near water.
Clean only with dry cloth.
Do not block any ventilation openings.
Install in accordance with the manufacturer's instructions.
Do not install near any heat sources such as radiators, heat registers, stoves,
or other apparatus (including amplifiers) that produce heat.
Do not defeat the safety purpose of the polarized or grounding-type plug. A
polarized plug has two blades with one wider than the other. A grounding
type plug has two blades and a third grounding prong. The wide blade or the
third prong are provided for your safety. If the provided plug does not fit into
your outlet, consult an electrician for replacement of the obsolete outlet.
Protect the power cord from being walked on or pinched particularly at
plugs, convenience receptacles, and the point where they exit from the
apparatus.
Only use attachments/accessories specified by the manufacturer.
Use only with the cart, stand, tripod, bracket, or table
specified by the manufacturer, or sold with the apparatus.
When a cart is used, use caution when moving the cart/
apparatus combination to avoid injury from tip-over.
Unplug this apparatus during lightning storms or when
unused for long periods of time.
14. Refer all servicing to qualified service personnel.
Servicing is required when the apparatus has been damaged in any way,
such as power-supply cord or plug is damaged, liquid has been spilled or
objects have fallen into the apparatus, the apparatus has been exposed to
rain or moisture, does not operate normally, or has been dropped.
CAUTION
RISK OF ELECTRIC SHOCK
DO NOT OPEN
AVIS :RISQUE DE CHOC ELECTRIQUE NE PAS
OUVRIR.
CAUTION:TO REDUCE THE RISK OF ELECTRIC
SHOCK. DO NOT REMOVE COVER (ORBACK).
NO USER-SERVICEABLE PARTS INSIDE REFER
SERVICING TO QUALIFIED SERVICE PRESONNEL
WARNING : TO PREVENT FIRE OR ELECTRIC
SHOCK, DO NOT EXPOSE THIS APPLIANCE
TO RAIN OR MOISTURE.
DISCONNECT THE MAINS PLUG FROM THE
SUPPLY SOCKET WHEN NOT IN USE.
I
FCC INFORMATION (For US customers)
1. PRODUCT
This product complies with Part 15 of the FCC Rules. Operation is subject
to the following two conditions: (1) this product may not cause harmful
interference, and (2) this product must accept any interference received,
including interference that may cause undesired operation.
2. IMPORTANT NOTICE: DO NOT MODIFY THIS PRODUCT
This product, when installed as indicated in the instructions contained
in this manual, meets FCC requirements. Modification not expressly
approved by DENON may void your authority, granted by the FCC, to use
the product.
3. NOTE
This product has been tested and found to comply with the limits for
a Class B digital device, pursuant to Part 15 of the FCC Rules. These
limits are designed to provide reasonable protection against harmful
interference in a residential installation.
This product generates, uses and can radiate radio frequency energy and,
if not installed and used in accordance with the instructions, may cause
harmful interference to radio communications. However, there is no
guarantee that interference will not occur in a particular installation. If this
product does cause harmful interference to radio or television reception,
which can be determined by turning the product OFF and ON, the user
is encouraged to try to correct the interference by one or more of the
following measures:
•Reorient or relocate the receiving antenna.
•Increase the separation between the equipment and receiver.
•Connect the product into an outlet on a circuit different from that to
which the receiver is connected.
•Consult the local retailer authorized to distribute this type of product or
an experienced radio/TV technician for help.
This Class B digital apparatus complies with Canadian ICES-003.
Cet appareil numérique de la classe B est conforme à la norme NMB-003 du
Canada.
FRANCAIS ENGLISH
CAUTION:
nNOTE ON USE / OBSERVATIONS RELATIVES A L’UTILISATION
•The ventilation should not be impeded by covering the ventilation openings with items, such as
newspapers, tablecloths, curtains, etc.
•No naked flame sources, such as lighted candles, should be placed on the unit.
•Do not expose the unit to dripping or splashing fluids.
•Do not place objects filled with liquids, such as vases, on the unit.
ATTENTION:
•La ventilation ne doit pas être gênée en recouvrant les ouvertures de la ventilation avec des objets tels
que journaux, rideaux, tissus, etc.
•Aucune flamme nue, par exemple une bougie, ne doit être placée sur l’appareil.
•L’appareil ne doit pas être exposé à l’eau ou à l’humidité.
•Ne pas poser d’objet contenant du liquide, par exemple un vase, sur l’appareil.
• Do not let foreign objects into the unit.
• Ne pas laisser des objets étrangers dans
• Keep the unit free from moisture, water,
l’appareil.
and dust.
• Protéger l’appareil contre l’humidité, l’eau
et la poussière.
CAUTION:
To completely disconnect this product from the mains, disconnect the plug from the wall socket
outlet.
The mains plug is used to completely interrupt the power supply to the unit and must be within easy
access by the user.
PRECAUTION:
Pour déconnecter complètement ce produit du courant secteur, débranchez la prise de la prise murale.
La prise secteur est utilisée pour couper complètement l’alimentation de l’appareil et l’utilisateur doit
pouvoir y accéder facilement.
• Avoid high temperatures.
Allow for sufficient heat dispersion when
installed in a rack.
• Eviter des températures élevées.
Tenir compte d’une dispersion de chaleur
suffisante lors de l’installation sur une
étagère.
• Do not let insecticides, benzene, and
thinner come in contact with the unit.
• Unplug the power cord when not using the • Ne pas mettre en contact des insecticides,
du benzène et un diluant avec l’appareil.
unit for long periods of time.
• Débrancher le cordon d’alimentation
lorsque l’appareil n’est pas utilisé pendant
de longues périodes.
• Handle the power cord carefully.
Hold the plug when unplugging the cord.
• Manipuler le cordon d’alimentation avec
précaution.
Tenir la prise lors du débranchement du
cordon.
* (For apparatuses with ventilation holes)
• Do not obstruct the ventilation holes.
• Ne pas obstruer les trous d’aération.
• Never disassemble or modify the unit in
any way.
• Ne jamais démonter ou modifier l’appareil
d’une manière ou d’une autre.
II
ENGLISH
Getting Started
nContents
Getting Started
Connections
Playback
Accessories······················································································1
Special Features of This Device·····················································1
Cautions on Handlings····································································1
Cleaning··························································································1
Assembly··························································································2
Changing the Stylus········································································2
Removing the Replaceable Stylus···················································2
Mounting the Replaceable Stylus···················································2
Part Names and Functions······························································3
Recording and Editing
Connections
Connections·····················································································4
Connecting the Power Cord···························································4
Playback
Troubleshooting
Preparations·····················································································5
Preparing to Play a Record······························································5
Playing an Analog Record·······························································5
Auto Start························································································5
Manual Start···················································································5
Stopping a Record During Playback················································5
Specifications
Recording and Editing
Recording an Analog Record and Editing the Recording·············6
Cautions to Observe When Recording or Editing···························7
Recording·························································································8
Recording to a USB Flash Drive······················································8
Editing······························································································8
Shall be Enabled by Trans Music Manager for DENON···················8
Recommended System Requirements for Using Trans Music
Manager··························································································8
Installing “Trans Music Manager”···················································8
Editing with Trans Music Manager··················································8
Troubleshooting··································································9
Specifications·····································································10
Special Features of This Device
Getting Started
Thank you for purchasing this DENON product. To ensure proper
operation, please read this owner’s manual carefully before using the
product.
After reading them, be sure to keep them for future reference.
2. Easy-to-operate, fully automatic player
Simply press the START button to start playing an analog record.
When the record is finished the tone arm automatically returns to
its original position and the turntable stops.
Accessories
Check that the following parts are supplied with the product.
q Owner’s manual....................................................................... 1
w Warranty (for North America model only)................................. 1
e Service station list.................................................................... 1
r Platter....................................................................................... 1
t Rubber mat............................................................................... 1
y EP adapter................................................................................ 1
u Trans Music Manager (for DENON) disk (CD-ROM)................ 1
r
t
1. Record analog records to a USB flash drive
•You can play back the tracks recorded on the USB flash drive on
any audio device with USB playback.
•The “Trans Music Manager” software supplied with the DP200USB enables you to edit music files and titles on your PC.
y
u
Note that the illustrations in this instructions may differ from the actual
set for explanation purposes.
3. Equalizer switch provided
The equalizer switch enables you to connect to a variety of audio
devices such as pre-main amplifiers and radio cassette players.
4. Lightweight, compact design
The lightweight, compact design makes it easy to use anywhere.
Cautions on Handling
Cleaning
•Use a wiping cloth and wipe lightly to remove dirt from the cabinet
and operation panel.
When using chemically treated cloths, follow the precautions that
have been written for them.
•Do not use benzene, thinners, or other organic solvents or insecticides
on the unit since they may cause a change in quality or color.
•Moving the unit
To prevent short-circuits or damaged wires in the connection cables,
always unplug the power supply cord and disconnect the connection
cables between all other audio components when moving the unit.
ENGLISH
2
Rubber mat
Platter
Assembly
Before assembly, remove all packaging material except for the plastic
tie securing the tone arm and open the dust cover. Leave the plastic
tie securing the tone arm until assembly is complete.
for the type of input terminal on the device connected
to the DP-200USB.
terminal other than “PHONO” (default setting at time of
purchase).
2
Unplug the player at the wall socket.
Removing the Replaceable Stylus
Hold the cartridge steady with one hand, grasp the stylus
with the other hand, push down in the direction of arrow
q and then gently pull the stylus off in the direction of
arrow w.
Mount the platter on the center spindle.
3
Turn the platter so that the drive roller is visible through the
opening in the platter.
Cartridge
1
Take hold of the ribbon tape attached to the drive belt
•Remove the ribbon tape after hooking the belt onto the roller.
•Turn the platter by hand until the drive belt is positioned at the
center of the driving roller.
Place the rubber mat on the platter.
1
Center spindle
NOTE
Equalizer switch
ON
3
OFF
If the equalizer switch is not set correctly, the sound will be extremely
weak or distorted.
Stylus
2
Stylus cover
Mounting the Replaceable Stylus
Hold the cartridge steady with one hand, grasp the stylus
with the other hand, point the catch on the stylus in the
direction of arrow q and insert it fully into the long
opening in the cartridge, then push up in the direction of
arrow w until it clicks.
2
Ribbon tape
Driving roller
Drive belt
1
Cartridge
Stylus
Stylus cover
Platter
n Cleaning the tip of the stylus
The tip of the stylus is extremely delicate and should be handled with
great care. Use a soft brush to gently remove any dust from the tip.
Specifications
4
Troubleshooting
on the underside of the platter and hook the drive belt
onto the driving roller.
Recording and Editing
OFF :When connecting to a PHONO input terminal.
n Before replacing the stylus
Playback
ON :When connecting to an AUX input terminal or an input
The stylus supplied with the DP-200USB has a life of approximately
400 hours. Be sure to replace it in good time to avoid damaging your
precious records.
Connections
1
Set the equalizer switch to the appropriate position
Changing the Stylus
Getting Started
4
ENGLISH
Getting Started
Part Names and Functions
Q2 Q3 Q4
<Front>
Q5 Q6
Q7
Q8 Q9
For buttons not explained here, see the page indicated in parentheses
( ).
Connections
qSpeed button (SPEED 33j/45h)············································· (5)
wPower operation button (POWER hON/jOFF)····················· (5)
eUSB indicator·············································································· (8)
rUSB port······················································································ (8)
tRecording indicator···································································· (8)
yREC ON/OFF button··································································· (8)
uRubber mat················································································· (2)
iPlatter·························································································· (2)
oSTART button············································································· (5)
Q0STOP button··············································································· (5)
Q1Record size lever (SIZE 30/17)··················································· (5)
Q2Dust cover··················································································· (5)
Q3EP adapter holder······································································· (5)
Playback
Recording and Editing
Troubleshooting
Keep your EP adapter here when not in use.
Specifications
Q4Dust cover hinge
Q5Equalizer amplifier switch························································· (2)
Q6Spindle························································································ (2)
Q7Cartridge (record stylus)···························································· (5)
Q8Tone arm rest
Q9Finger lift····················································································· (5)
W0Audio cable (Cord length: Approx. 3.3 ft / 1 m)··························· (4)
W1Power cord (Cord length: Approx. 5.9 ft / 1.8 m)························ (4)
q
w er ty u
i
o Q0 Q1
<Rear>
W0
W1
ENGLISH
Getting Started
Connections
NOTE
Connecting the Power Cord
Wait until all connections have been completed before connecting
the power cord.
Playback
Connections
Recording and Editing
NOTE
Set the equalizer switch to the correct setting for the type of input terminal on the device to which the DP-200USB is being
connected.
For details, refer to “Assembly” (vpage 2).
nWhen connecting to a PHONO input terminal
1)0/0
3
To household power outlet
(AC 120 V, 60 Hz)
"69
NOTE
3
Insert the AC plugs securely. Incomplete connections could cause
noise.
Equalizer switch: OFF
ON
OFF
Equalizer switch: ON
ON
OFF
Specifications
-
Troubleshooting
nWhen connecting to an AUX input terminal or an
input terminal other than “PHONO”
Radio cassette
player / Mini
stereo system
Amplifier
アンプ
-
Connections
•Do not plug in the power cord until all connections have been completed.
•When making connections, also refer to the operating instructions of the other components.
•Be sure to connect the left and right channels properly (left with left, right with right).
•Do not bundle power cords together with connection cables. Doing so can result in humming or noise.
ENGLISH
Getting Started
Playback
Connections
The DP-200USB can play analog records.
It also enables you to record your records onto a USB flash drive. For
details on how to record to a USB flash drive, see “Recording and
Editing” (vpage 6).
NOTE
Playback
The DP-200USB cannot play music recorded on a USB flash drive
connected to the player.
Preparations
Playing an Analog Record
Preparing to Play a Record
Auto Start
1
Press POWER
(hON).
Press START.
The record starts playing automatically.
b To turn power off, press POWER again.
Recording and Editing
2
Open the dust cover and place an analog record on
the rubber mat.
bWhen the record is finished, the tone arm returns to its original
position and the turntable stops automatically. (Auto return
function)
bTo stop playing a record, turn the POWER “jOFF”.
b Use the EP adapter when playing an EP record.
3
Set the record’s playing speed using SPEED.
Troubleshooting
[Settable Items]
j 33 : 33-1/3 rpm
h 45 : 45 rpm
4
Set the record’s size using SIZE.
Specifications
5
[Settable Items]
30
: 0.98 ft / 30 cm
17
: 0.56 ft / 17 cm
Raise the stylus cover.
POWER
SPEED
REC
START STOP
SIZE
Manual Start
Using the finger lift, move the tone arm to the position at
which you want to start playing and lower it carefully.
bWhen the record is finished, the tone arm returns to its original
position and the turntable stops automatically. (Auto return
function)
NOTE
•Be careful not to scratch the record when moving the tone arm.
•Do not touch the tone arm or turntable or turn off the power while
a record is playing. Doing so can disrupt the sound or damage the
record.
•The auto start function cannot be used for 0.82 ft / 25 cm records.
Records of this size should be started manually.
•The auto return function is activated when the tone arm reaches a
specific point near the center of the record. In the case of a nonstandard record with grooves extending beyond this point, the auto
return function may be activated before the record has stopped
playing.
Stopping a Record During Playback
Press STOP.
Playback stops and the tone arm returns to its original position.
ENGLISH
Getting Started
Recording and Editing
You will need the following items:
Editing
Playback
You will need the following items:
Playback
Recording
Connections
Recording an Analog Record and Editing the Recording
You will need the following items:
Trans Music Manager (CD-ROM)
USB flash drive containing edited (or recorded) files
USB flash drive
A personal computer connected to the Internet
Audio device with USB input
Analog record
A USB flash drive containing your recording
Recording and Editing
DP-200USB
or
Personal computer
Troubleshooting
Track 1 / Track 2 / Track 3 / Track 4
Split files
Split
Add
information
such as the
title of the
track or album
or the name
of the artist
USB flash drive
•Create a new file for each recording operation.
•Create MP3 music files.
•With a 1 GB USB flash drive, you can store up to
approximately 30 LP analog records.
There are two ways to do this.
qDownload from “MusicIDz”.
zA
system
for
retrieving
information on music tracks
from Gracenote’s CD database.
wEnter the information using
your personal computer’s
keyboard.
Track 1 Track 2 Track 3 Track 4
Delete files
Play on an audio device with a
USB port.
(When the file has been edited
on a personal computer, transfer
the data to a USB flash drive.)
Specifications
Track 1 Track 2 Track 3 Track 4
Record
Playing on
an audio
device
Playing on
a personal
computer
Play using the Trans Music
Manager software or the
audio player software
installed on your personal
computer.
Delete Track 2
Track 1 Track 3 Track 4
Edited files can be saved on your personal computer.
(You can also save them onto a USB flash drive.)
ENGLISH
Getting Started
Cautions to Observe When Recording or
Editing
Cautions When Recording
Connections
Playback
Recording and Editing
•Do not remove the USB flash drive during recording.
Doing so will prevent recording from taking place. Make sure that
recording has finished before removing the USB flash drive.
•If the USB flash drive becomes full during recording, the recording
operation will stop and the USB indicator will turn off.
•Although the tone arm will return to its original position at the end of
the record, the USB flash drive does not stop recording automatically.
To stop recording, press the REC button.
•The recording level of the USB flash drive is fixed. To adjust the
volume when playing the music, use the volume controls on the
audio device being used.
•If the REC button is turned on and then off again in less than one
second, no recording will take place.
•If you record both sides of an analog record without stopping, the
recording will contain a long period of silence while changing from
side A to side B. To prevent this, you should stop recording after side
A and start again to record side B.
Troubleshooting
Notes on Downloading Track Information
Specifications
You can use the “Trans Music Manager” software included with the
DP-200USB to download information on the recorded track (the title of
the track or album or the name of the artist, etc.) from the Gracenote
website.
•Downloading with Trans Music Manager.
q Read out the opening few seconds of the recorded track’s audio
waveform.
w Search for a matching waveform in Gracenote®’s CD database.
∙If a match is found, the title of the track is displayed in the
download list.
e Download the information.
•Track information cannot be downloaded in the following cases. In
such cases, you should enter the information yourself.
∙When the recorded record has not been released as a CD.
∙When the recording contains excessive noise due to use of a
worn stylus or a similar problem with recording quality.
∙When the sound quality of the CD version of the record has been
enhanced by remastering, etc.
About USB Flash drive
•Only use a USB flash drive. Do not connect any other USB device.
•When a USB flash drive is connected to DP-200USB, DENON
accepts no liability in the event of the USB flash drive’s data loss or
damage. Be sure to back up important data.
•The USB flash drive does not operate via a USB hub.
•Operation and power supply are not guaranteed for all USB flash
drives.
•The main unit’s USB port cannot be connected to a PC using a USB
cable.
•Insert the USB flash drive straight and fully into the USB port. Avoid
inserting at an angle as this can cause damage.
•You cannot use USB flash drives that are copyright protected.
•You cannot record on an external hard disk drive.
•You cannot record via a USB cable (including extension cable).
About Compatible OS and Personal Computers
•The following OS are compatible. Windows 2000 / Windows XP /
Windows Vista (The display screen may differ in part depending on
the personal computer.)
•You cannot output information to a personal computer by connecting
the main unit to a personal computer.
•Operations such as system suspend, sleep (standby mode),
hibernation, etc., cannot be guaranteed for all PCs.
ENGLISH
Press REC.
•The Recording indicator lights red (preparing to record).
•The Recording indicator blinks red and recording starts.
Press START.
b If you are starting the record manually, use the finger lift to move
the tone arm to the position at which you want to start playing
and lower it carefully.
About Gracenote MusicIDSM Music Recognition
Service
NOTE
•When removing the USB flash drive, gently hold the DP-200USB
with your other hand to keep it steady.
•Do not remove the USB flash drive during recording.
nTo Stop Recording
USB port
REC
START
q Create a single track from the section to be deleted.
“Manual MP3 Splitter” (vBrief manual (CD-ROM) page 11)
w Delete the track created in step q.
“Deleting tracks” (vBrief manual (CD-ROM) page 28)
Recording to a USB Flash Drive
1
Prepare the analog record you want to record for
playing (vpage 5 “Preparing to Play a Record”).
q Place the record on the rubber mat.
w Set the record’s playing speed.
e Set the record’s size.
r Turn the power on.
2
Insert a USB flash drive into the USB port.
The USB indicator lights green.
b If the USB flash drive has a write protection switch, make sure
that it is in the unlocked position.
Editing
Shall be Enabled by Trans Music Manager
for DENON
You can use Trans Music Manager to perform the following
functions.
n File Splitter
• Auto MP3 Splitter
• Manual MP3 Splitter
Installing “Trans Music Manager”
1
Insert the included CD-ROM (Trans Music Manager)
in your PC.
The top menu screen is displayed.
b If the top menu screen is not displayed, open the CD-ROM drive
under “My Computer” and start “TMMLaunch.exe”.
2
3
4
Click on “Trans Music Manager installation”.
The InstallShield Wizard screen is displayed.
Operate while reading the screen explanations.
Installation starts.
Click on “Finish”.
Installation finishes.
n MusicID (Addition of track information)
• Track name, Artist name, Album name, etc.
• Access Gracenote® on the internet
• Character Entry
n File deletion
Editing with Trans Music Manager
For details of the editing operation, refer to the “Simple User’s Guide”
which is included on the CD-ROM supplied with the DP-200USB.
Specifications
Recording
The included “Trans Music Manager” can be used to delete silent
sections recorded before and after a track.
• A personal computer running Windows 2000/Windows XP/
Windows Vista
• An HDD with a minimum of 30 MB free space
• A USB 2.0 port
Troubleshooting
Press REC.
•The Recording indicator turns off.
Recommended System Requirements
for Using Trans Music Manager
Recording and Editing
“Gracenote MusicIDSM music recognition service” is a service offered
by Gracenote® that is commonly known as CDDB®.
The service lets you automatically obtain CD titles, artist names, track
names, etc., in text format by connecting to the Gracenote® server
on the Internet.
Playback
4
Trans Music Manager is a trademark and registered trademark of
Trans Technology, Inc.
Information concerning music identification technology is offered
by Gracenote, Inc.
Gracenote® and CDDB® are registered trademarks of Gracenote.
Connections
b The time from pressing REC (the recording indicator lights red) to
when recording starts (the red light blinks) varies with the USB
flash drive capacity and type. Check the time to start of recording
beforehand.
Getting Started
3
ENGLISH
Getting Started
GUSB flash driveH
Troubleshooting
Status
Connections
If a problem should arise, first check the following:
1. Are the connections correct?
2. Is the set being operated as described in the owner’s manual?
If this unit does not operate properly, check the items listed in the table below. Should the problem persist,
there may be a malfunction.
In this case, disconnect the power immediately and contact your store of purchase.
Playback
GPlaying recordsH
Status
Recording and Editing
Power does not
turn on.
The turntable
does not turn.
Troubleshooting
No sound is
produced
Check
Page
•Is the DP-200USB’s power cord plugged into the wall socket
properly?
•Is the power button “hON”?
4
•Is the DP-200USB’s power cord plugged into the
wall socket properly?
•Is the drive belt attached properly to both the
platter and the driving roller? If the drive belt has
become detached, reattach it to the platter first
and then hook it onto the driving roller.
For details, refer to “Assembly” (vpage 2).
4
Platter
(Underside)
Belt
Page
•Is the USB flash drive inserted fully into the port?
•Is the USB flash drive full?
8
8
Nothing is
recorded on the
USB flash drive.
•Is the USB flash drive inserted fully into the port?
•Is the USB flash drive full?
•The USB flash drive is incompatible with the personal computer.
•Was the USB flash drive removed during recording (without stopping
recording)?
8
8
8
8
The USB flash
drive cannot be
formatted.
•You cannot format a USB flash drive with the DP-200USB. To format
the flash drive, use your personal computer.
–
GEditingH
5
2
Specifications
•Is the audio cable connected properly?
•Has the amplifier been set correctly for use with the DP-200USB
audio cable?
•Is the replaceable stylus mounted in the cartridge properly?
4
4
The sound is
scratchy, the
stylus skips or
the sound is
distorted.
•Is the stylus or the record dirty?
•Is the stylus worn or the record scratched?
2
2
The tone arm
does not move
even when the
START button is
pressed.
•Is the DP-200USB’s power cord plugged into the wall socket
properly?
•Is the power button “h ON”?
•Is the tone arm secured to the armrest?
4
Check
The USB flash
drive is not
recognized.
2
5
3
Status
Check
Page
•Have you installed the CD-ROM supplied with the DP-200USB on
your personal computer?
•Has the file been recorded on the USB flash drive properly? (Has the
file of the track been created in the folder properly?)
•Is your personal computer connected to the Internet?
(Track information cannot be downloaded if you are not connected to
the internet.)
8
•Change the batch split setting menu and try the batch splitting
operation again.
•Batch splitting of files is not possible under certain recording
conditions. In such cases, the files can be split manually.
8
•Is your personal computer connected to the Internet?
•Track information cannot be downloaded in the following cases.
∙ When the record concerned has not been released as a CD (it is not
in the CD database).
∙ When the sound has not been recorded properly due to a worn
stylus.
∙ When the sound quality of the CD version of the record concerned
has been enhanced by remastering, etc.
6
7
Track information •Select “Identify tracks as albums” when searching MusicID.
is acquired only
•Even if the search finds only one matching track in the album, you can
for some of the
obtain the track information from the album list manually.
files of a recorded
album
8
8
Files cannot be
edited
Files cannot be
batch split
Track information
does not
download
–
6
8
ENGLISH
Getting Started
Specifications
nTurntable
3.5 g
DSN-84
USB recording, compatible with USB A and USB 1.1
Recording and Editing
Optimal stylus pressure:
Replaceable stylus number:
USB port :
Belt drive
DC servo motor
33-1/3, 45 rpm
0.15 % WRMS
Dynamic balanced type
195 mm
MM type
Equalizer OFF: 2.5 mV
Equalizer ON : 150 mV
Playback
Drive system:
Motor:
Speed:
Wow & flutter:
Tone arm:
Effective arm length:
Cartridge:
Output voltage:
Connections
nGeneral
Power supply:
AC 120 V, 60 Hz
Troubleshooting
Power consumption:
12 W
Maximum external dimensions:
With dust cover closed:360 (W) × 98 (H) × 358 (D) mm
(14-11/64” x 3-55/64” x 14-3/32”)
With dust cover open: 360 (W) × 415 (H) × 363 (D) mm
(14-11/64” x 16-11/32” x 14-19/64”)
Weight:
3.2 kg (7 lbs 0.9 oz)
z For purposes of improvement, specifications and design are subject to change without notice.
Specifications
10
www.denon.com
D&M Holdings Inc.
Printed in China 5411 10166 100D