1
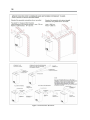
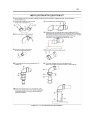
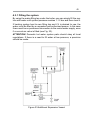
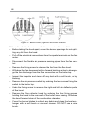
67
ATTENTION!
Manometer is fixed to the front panel. Dismount the front panel, as it is
stated below:
• Loosen the two screws, under the panel. Pull the panel slightly and
loosen the nut. Take out the manometer from the panel. By pushing
the front panel upwards, it can be easily taken apart.
• Disconnect the electric supply and isolate the boiler from gas and
water installations.
• Release the two front casing panel screws located underneath the
panel. Lift the front panel slightly to clear the 2 pins at the top and
remove.
• Undo the 6 fixing screws of front sealing panel and remove.
• Undo the 4 fixing screws of combustion chamber front panel and burner box skirt and remove.
• Pull off the plug connections to the flame sensing and ignition electrodes.
• Remove the 4 burner fixing screws located at the rear of the burner
and the 2 at the front. Pull the burner forward clear of the combustion
chamber.
• Check that the combustion chamber insulation panels are not worn
out, replace if needed.
• Clean the burner blades with a soft brush.
• Check that the injectors are free from dirt and debris. If necessary
clean each injector orifice using a soft brush or vacuum cleaner. Do
not use a wire brush or any abrasive material. It is not necessary to
remove the injectors unless there is evidence of debris in the orifice.
• Inspect the ignition and flame detection electrodes in situ. If necessary clean with a soft brush. If either the electrodes or the ceramic
insulation show signs of damage or wear, replace the electrode(s).
• Replace the burner and electrodes in reverse order, taking care not
to damage the lining of the combustion chamber. Check that the position of the electrodes is as shown in Fig. 28. Adjust if necessary by
carefully bending the tip of the electrode rod taking extreme care not
to put any pressure on the ceramic insulation.