1
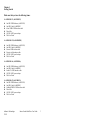
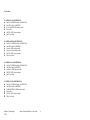
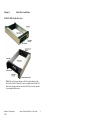
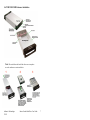
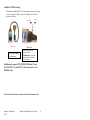
Addonics
T E C H N O L O G I E S
Saturn Combo Hard Drive
(SCHD)
For Following Models:
SCHD IDE-U2 (AESCHDIU2)
SCHD IDE-FW (AESCHDIFW)
SCHD IDE-SA (AESCHDISA)
SCHD IDE-CB (AECHDICB)
SCHD SA-U2 (AESCHDSAU2)
SCHD SA-FW (AESCHDSAFW)
SCHD SA-SA (AESCHDSASA)
SCHD SA-CB (AESCHDSACB)
Users Guide
Revision 1.0
FCC Warning Statement
This equipment has been tested and found to comply with the limits for a class
B digital device pursuant to Part 15 of the FCC rules. These limits are
designed to provide reasonable protection against harmful interference in a
residential installation. This equipment generates, uses and can radiate radio
frequency energy. If not installed and used in accordance with the in structions,
it may cause harmful interference to radio communications. However, there is
no guarantee that interference will not occur in a particular installation. If the
equipment does cause harmful interference to radio or television reception,
which can be determined by turning the equipment on and off, the user is
encouraged to try and correct the interference by one or more of the following
suggestions.
• Reorient or relocate the receiving antenna
• Increase the distance between the equipment and the receiver
• Connect the equipment to a different power outlet other than the
one where receiver is connected
• Consult a certified television or radio technician
Addonics Technologies
2/2/05
Saturn Combo Hard Drive User Guide
1
Contents
FCC Warning ................................................................................... 1
Contents............................................................................................ 2
Chapter 1 Getting started ...............................................................3-4
Chapter 2 Hard Drive Installatio .................................................... 5-8
Chapter 3 USB Interface Cable Installation ...................................... 9
Serial ATA Interface Cable Installation ......................... 10
Firewire Interface Cable Installation .............................. 11
CardBus/PCMCIA Interface Cable Installation ......... 12-15
Technical Support & Contact Information .................................... …16
Addonics Technologies
2/2/05
Saturn Combo Hard Drive User Guide
2
Chapter 1
Getting Started
Make sure that you have the following items:
For SCHD IDE-U2 (AESCHDIU2)
l
l
l
l
l
l
One IDE-USIB Enclosure (AASIUSCS)
One IDE Cradle (AASIDEBY)
6-foot USB2.0 USIB interface cable
Driver Disc
110/220 AC/DC power adapter
This User Guide
For SCHD IDE-FW (AESCHDIFW)
l
l
l
l
l
l
One IDE-USIB Enclosure (AASIUSCS)
One IDE Cradle (AASIDEBY)
Firewire USIB interface cable
Firewire to iLink adapter cable
110/220 AC/DC power adapter
This User Guide
For SCHD IDE-SA (AESCHDISA)
l
l
l
l
l
One IDE-USIB Enclosure (AASIUSCS)
One IDE Cradle (AASIDEBY)
Serial ATA USIB interface cable
110/220 AC/DC power adapter
This User Guide
For SCHD IDE-CB (AECHDICB)
l One IDE-USIB Enclosure (AASIUSCS)
l One IDE Cradle (AASIDEBY)
l CardBus/PCMCIA USIB interface cable
l Driver Disc
l 110/220 AC/DC power adapter
l This User Guide
Addonics Technologies
2/2/05
Saturn Combo Hard Drive User Guide
3
Continuation:
For SCHD SA-U2 (AESCHDSAU2)
l One SATA-USIB Enclosure (AASSAUSCS)
l One IDE Cradle (AASIDEBY)
l 6 –foot USB2.0 USIB interface cable
l Driver Disc
l 110/220 AC/DC power adapter
l This User Guide
For SCHD SA-FW (AESCHDSAFW))
l One SATA-USIB Enclosure (AASSAUSCS)
l One IDE Cradle (AASIDEBY)
l Firewire USIB interface cable
l Firewire to iLink adapter cable
l 110/220 AC/DC power adapter
l This User Guide
For SCHD SA-SA (AESCHDSASA)
l One SATA-USIB Enclosure (AASSAUSCS)
l One IDE Cradle (AASIDEBY)
l Serial ATA USIB interface cable
l 110/220 AC/DC power adapter
l This User Guide
For SCHD SA-CB (AESCHDSACB)
l One SATA-USIB Enclosure (AASSAUSCS)
l One IDE Cradle (AASIDEBY)
l CardBus/PCMCIA USIB interface cable
l Driver Disc
l 110/220 AC/DC power adapter
l This User Guide
Addonics Technologies
2/2/05
Saturn Combo Hard Drive User Guide
4
Chapter 2
Hard Drive installation
SATURN IDE Cradle Overview
Note: The key lock must be turn to the left to lock and power the
drive on the Cradle. There will be no access light when a Serial ATA
hard drive is being used since the Serial ATA drive does not provide
access signal from the drive.
Addonics Technologies
2/2/05
Saturn Combo Hard Drive User Guide
5
SATURN SATA//USIB Enclosure Installation
Note: The switch from the back of the drive can set anywhere
to use the enclosure as an internal drive.
Addonics Technologies
2/2/05
Saturn Combo Hard Drive User Guide
6
SATURN IDE/USIB Enclosure Installation
Note: The switch from the back of the drive can set anywhere
to use the enclosure as an internal drive.
Addonics Technologies
2/2/05
Saturn Combo Hard Drive User Guide
7
Connecting the Drive Enclosure as external Hard Drive
Addonics Technologies
2/2/05
Saturn Combo Hard Drive User Guide
8
Chapter 3
USB 2.0 interface cable installation
Ø Since USB 2.0 Hi-Speed is an evolution of the existing USB 1.1
specification, it is fully forward and backward compatible with current
USB systems.
Ø If you do not have an USB2.0 port, you may install an optional
USB2.0 adapter or controller
USB driver installation
For Win98 and Win98SE
1.
2.
3.
4.
5.
6.
7.
Make sure your computer is up and running.
Insert the USB cable to the USB Port.
A "New Hardware Found" message shall pops up.
Follow wizard and point to the location of the driver. (Follow the steps
from the Driver Disc to where you saved the driver files)
Let Windows finish the installation and that’s it.
Double click My Computer icon and there should be an extra drive
letter for the Combo Hard Drive.
You may now access the drive.
Note: USB Combo Drive is Plug and Play under Windows XP, and Me,
2000. There is no third party driver needed.
Brand New Hard drive must be Partitioned and Formatted first.
Addonics Technologies
2/2/05
Saturn Combo Hard Drive User Guide
9
Serial ATA interface cable installation
Serial ATA Combo Hard Drive Installation
For Win98SE, Me, 2000 and XP
Note: There no drivers needed to use the Serial ATA cable as long as the
drivers are installed for the Serial ATA Controller card/chip. It is plug and
play.
1.
2.
3.
4.
5.
6.
Make sure the Serial ATA cable is securely attach to the back of the drive.
(For Addonics Pocket drives such as Pocket CDROM, Exdrive etc. you
may attach the USB connector to the USB port of the computer to provide
power for the pocket drives). May vary from system’s USB port power
output.
Make sure that power is attach to the drive and turned on.
Power on the system or you may hot plug while system is on.
On the Window Desktop, double click on the MY COMPUTER icon.
Plug the Serial ATA connector into your computer’s Serial ATA port.
Wait for a few seconds, your computer may blink for a moment as well.
Double Click on the “My Computer” icon if not open yet.
You are now ready to use the Combo hard drive kit.
Note: Brand New Hard drive must be Partitioned and Formatted first.
Addonics Technologies
2/2/05
Saturn Combo Hard Drive User Guide
10
Firewire interface cable installation
Firewire Combo Hard Drive Installation
For Win98SE, Me, 2000 and XP
Note for Win98SE only: After plugging in the cable some system might
prompt you for Win98SE CD, in case you don’t have The Win98SE CD and
the wizard prompt you for:
NTMAP.SYS please type C:\WINDOWS\SYSTEM32\DRIVERS
NTMAPHLP.PDR please type C:\WINDOWS\SYSTEM\IOSUBSYS
IF the system did not prompt you for anything just follow the steps below
7. Make sure the Firewire cable is securely attach from the back of the drive.
8. Make sure that power is attached and turned on.
9. Power on the system. On the Window Desktop, double click on the MY
COMPUTER icon.
10. Plug the Addonics Six Pin FIREWIRE-IDE cable into your computer’s
FIREWIRE
11. Wait for a few seconds, your computer may blink for a moment as well.
Double Click on the “My Computer” icon if not open yet.
You are now ready to use the Combo hard drive kit.
Note: Brand New Hard drive must be Partitioned and Formatted first.
Addonics Technologies
2/2/05
Saturn Combo Hard Drive User Guide
11
CardBus / PCMCIA setting
The Addonics CardBus PCMCIA card has an option switch can allow you
to choose using either PCMCIA mode or CardBus mode. The switch
position is as follows:
CardBus
Front view
Factory default setting
is CardBus mode
PCMCIA
Side View
Cardbus and PCMCIA
selection switch.
CardBus mode – move the
switch to the side with the
DOT indicator
CardBus mode supports WIN 95/98/ME/2000 and XP only.
For DOS, WIN 3.1x and WIN NT, the switch must be set in
PCMCIA mode.
Note: Brand New Hard drive must be Partitioned and Formatted first.
Addonics Technologies
2/2/05
Saturn Combo Hard Drive User Guide
12
CardBus/PCMCIA driver Installation
For Windows 95, 98, 98SE and Me
(Do not run the SETUP program from the driver disk, SETUP
Is for DOS or WIN 3.1 using PCMCIA mode only)
1. Power on your system and wait for the Desktop screen.
2. Connect the CardBus/PCMCIA cable and external AC/DC adapter into
the back of your Combo hard drive kit.
3. Plug the CardBus / PCMCIA card end of the cable into the PCMCIA
slot on the side of your computer.
4. The system will automatically identify the new card and ask to load the
driver.
5. Insert the driver diskette in “A” drive and follow the instruction on the
screen to load “Addonics CardBus IDE Controller”. Follow wizard
and point to the location of the driver. (Follow the steps from the
Driver Disc to where you saved the driver files)
6. When installation is finished, a PCMCIA card icon will appear in the
lower right-hand of the Window’s system tray.
7. Double Click on the “My Computer” icon. You are now ready to use the
Combo hard drive kit.
Note: Brand New Hard drive must be Partitioned and Formatted first.
Addonics Technologies
2/2/05
Saturn Combo Hard Drive User Guide
13
PCMCIA Installation for Windows NT
1.
2.
3.
4.
5.
6.
7.
8.
9.
Go to Start\Settings\Control Panel
Double Click SCSI adapter icon
Click on the Driver Tab
Click Add to add new driver
Follow wizard and point to the location of the driver. (Follow the steps
from the Driver Disc to where you saved the driver files)
Select “Addonics PCMCIA…” then click ok.
Windows will prompt you for driver location again, to continue
Type in A:\NT then click continue.
Click YES to restart your computer.
Double Click on the “My Computer” icon. You are now ready to use
the Combo hard drive kit.
Note: You must use the PCMCIA mode for Windows NT.
CardBus/PCMCIA Installation for Windows 2000
1.
2.
3.
4.
5.
6.
7.
Make sure your computer is up and running
Verify that all cables are connected and there is power to the drive.
Insert the PCMCIA cable to the PCMCIA socket.
A "New Hardware Found" message shall pops up.
Select "Next" to continue installation.
Select "Search for a suitable driver...." button and select "Next".
In "select a Device Driver page", select "Have Disk" to specify
location. Follow wizard and point to the location of the driver. (Follow
the steps from the Driver Disc to where you saved the driver files)
Select "Addonics CardBus...." click YES for the Windows warning
message and let Win2000 to finish the Installation and that's it.
8. Double Click on the “My Computer” icon. You are now ready to use
the
Combo hard drive kit.
Note: Brand New Hard drive must be Partitioned and Formatted first.
Addonics Technologies
2/2/05
Saturn Combo Hard Drive User Guide
14
CardBus/PCMCIA Driver Installation
(Windows XP PCMCIA Installation Guide)
1.
2.
3.
4.
5.
6.
7.
8.
9.
10.
11.
12.
13.
Make sure that all cables are properly connected and the drive has
power.
If you are using the Combo drives, make sure that the power brick has
a steady green light.
Boot your computer to Windows.
Plug in the Cardbus/PCMCIA cable to the Computer's PCMCIA
Socket/Port then insert the card to the Computer.
Windows should now find a new hardware and ask for the driver
location.
Follow the Wizard. Click next to Continue .
Follow wizard and point to the location of the driver. (Follow the steps
from the Driver Disc to where you saved the driver files) example
browse to your floppy drive and go to the A:\Win2kXp folder.
Click the second radio button or select the ADVANCED button then
Click Next.
Select the "Search for best driver in this location”. Check the “include
this Location in the search” option only then click Browse.
Browse to your floppy drive and go to the A:\Win2kXp folder.
Select the WinXP driver then click OK, Click next to continue.
Click the "Continue Anyway" to proceed.
Let the OS install the Driver and that's it. Click Finish.
Click YES to restart the Computer if prompted and that's it.
Note: Brand New Hard drive must be Partitioned and Formatted first.
Addonics Technologies
2/2/05
Saturn Combo Hard Drive User Guide
15
Technical Support
If you need assistance to get your unit functioning properly, please call
Addonics Technical Support. Our technical staff will be happy to assist you,
but they will need your help to do so. Calling the technical support staff
without all the proper information can be both time consuming and frustrating.
Here are some tips to help you out:
(1)
(2)
(3)
(4)
MODEL NUMBER – Please have this number on hand.
SYSTEM INFORMATION – Type of computer, peripherals, etc.
OPERATING SYSTEM – What version of Windows
WHAT’S THE TROUBLE? – Give enough information
About your problem so that we can recreate and diagnose it.
FREE Software Drivers for all Addonics Technologies
Products are available 24 hours per day at the
World Wide Web Site: www.addonics.com.
Contact Information
Addonics Technologies
2466 Kruse Drive
San Jose CA, 95131
Phone:
408-433-3899
Fax:
408-433-3898
Email:
[email protected]
Internet: http://www.addonics.com
TECHNICAL SUPPORT
Phone:
Hours:
Email:
408-433-3855
8:30-6:00 PST
[email protected]
Please visit our web site www.addonics.com to register your warranty online.
Addonics Technologies
2/2/05
Saturn Combo Hard Drive User Guide
16