1
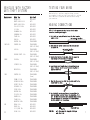
LOCATING & MAKING CONNECTIONS
ACCESSORY WIRE(S) THAT POWER THE HEATER/BLOWER MOTOR
(+12V in run or on positions) This wire is also in the main ignition
switch harness usually located in the steering column. Make all connections
as close to the ignition switch harness as possible.
Most vehicles will have (1) accessory wire; however some Fords, newer
GM vehicles and Chrysler 94 and up will have (2) or more accessory
wires. To locate these wire(s) probe for wire(s) that only show +12V
when the ignition switch is in the RUN or ON positions. This wire(s)
will not show +12V when the ignition switch is in any other position.
1. If your vehicle has only (1) accessory wire connect the
WHITE WITH BLACK STRIPE wire from the 4-relay harness
to this wire.
2. If your vehicle has 2 Accessory wires (some GMs and most
Fords), connect the WHITE WITH BLACK STRIPE wire to both
the Accessory #1 and Accessory #2 wires. At this time,
if you do not use the second WHITE wire from the 4-relay
harness (your vehicle does not have an Ignition #2 wire)
you can take that second WHITE wire and attach it to
the Accessory #2 wire, this way you do not have to tie
both the Accessory #1 wire and Accessory #2 wires together
on the WHITE WITH BLACK STRIPE wire from the 4-relay
harness.
STARTER/CRANK WIRE (+12V in the start position only)
Make all connections as close to the ignition switch harness as possible.
The starter/crank wire is also in the main harness. Locate the wire
that shows +12V only in the crank position. This wire will not show
+12V in any other position. Attach the YELLOW WITH BLACK STRIPE wire
from the 4-relay harness to this wire. NOTE: Some vehicles use 2
Starter/Crank wires (mostly Nissan and Audi) in this case connect BOTH
of the Starter/Crank wires from the ignition switch harness to the
YELLOW WITH BLACK STRIPE wire from the 4-relay harness.
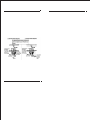
CHASSIS GROUND (-)
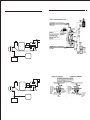
Locate an easy to get to bolt or screw located under the driver’s side
of the dash and attach the BLACK ground wire from the 18-pin harness
securely as pictured.
Factory Bolt
Black Ground Wire
Spade Connector
PARKING LIGHTS (+12V only with
parking lights on)
Turn the parking lights to the
ON position. (NOT YOUR
HEADLAMPS). Probe the wire(s)
coming from your headlamp control
switch. Find a wire that will
show +12V only when the parking
lights are ON, then switch the
controller to the headlight
position and test the same wire.
It should have power in the
parking light position and the
headlight position. Turn the
light switch OFF, the +12v should
then turn OFF also. This is the
correct wire. Connect the BROWN
wire from the 18-pin harness to
this wire. If this wire tests
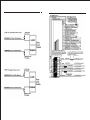
as a (-) negative, see diagram.
10
Note: Remove any paint below
the spade connector.
OPERATOR PROGRAMMING INSTRUCTIONS
Adding Additional Remotes without a Working Remote Control
To program a NEW (Replacement) Remote without a working remote, you will
need to CLEAR the E-PROM first. Follow the steps for CLEARING the E-PROM
are at the BOTTOM of this page. After the unit is cleared, you will need
to follow the procedure on Page 13, "INITIALIZATION OF THE CONTROL MODULE"
this procedure will initialize the NEW Remote Control to the RS-700 Module.
Cold Start On and Off (Degree Select)
Press and hold brake. Press and hold Button #2 until the parking lights flash
twice. Release. Press and hold Button #2. Each parking light flash is a
progression in degrees. Flash #1 is -40ºF, flash #2 is -30ºF, flash #3 is 20ºF, flash #4 is -10ºF, flash #5 is 0ºF, flash #6 is +10ºF, flash #7 is +20ºF.
Two quick flash parking light flashes is Cold Start Off. Release the brake,
the parking lights will flash three (3) times. NOTE: Factory setting is OFF.
Door Lock Pulse Length (Long and Short)
Press and hold brake. Next, press and hold Button #3, the parking lights will
flash three (3) times. Release. Press and release Button #1.
LONG: The parking lights will flash once, the door lock pulse length will be
3.5 seconds of output. Release the brake, the parking lights will flash three
(3) times. (For European type door locks)
SHORT: The parking lights will flash twice, the door lock pulse length will be
0.7 seconds of output. Release the brake, the parking lights will flash three
(3) times. NOTE: Factory setting is SHORT pulse length.
Dual Pulse Door Lock and Unlock
Press and Hold the Brake, with the brake held, press and hold Button
#4, until the Parking Lights flash (4) times. Release Button #4 and press
and release Button #3, the Parking Lights will flash (1) time, the unit
is set for DUAL PULSE UNLOCK, press and release Button # 3 again, the
Parking lights will flash (2) times, the unit is set for DUAL PULSE LOCK,
press and release Button #3 again, the parking lights will flash (3)
times, the unit is set for both DUAL PULSE LOCK and UNLOCK, press and
release Button #3 again, the parking lights will flash (4) times and the
unit is set for DUAL PULSE OFF. Factory setting is DUAL PULSE OFF.
Tach/Tachless Mode
Press and hodl the Brake, with the brake held, press and hold Button #3 on the
remote until the Parking Lights flash (3) times, release Button #3, press and
release Button #4, the Parking Lights will flash (1) time, release the brake
and the Parking Lights will flash (3) times, the unit is now programmed for Tach
Mode.To return to Tachless Mode, press and hod the brake, with the brake held,
press and hold Button #3 on the remote until the Parking Lights flash (3) times,
release Button #3, press and release Button #4, the Parking Lights will flash
(2) times, release the brake, the Parking Lights will flash (3) times, the unit
is now programmed for Tachless Mode. Factory setting is TACHLESS Mode ON.
Tach Learn
To program your unit to learn your Tach Signal, Press and hold the brake, with
the brake held, press and hold Button #2, on the remote until the Parking Lights
flash (2) times, release Button #2, within 10 seconds of releasing Button #2,
Start the vehicle using the Ignition Key, with the vehicle running, press and
release Button #4 the Parking Lights will flash (1) time, within 5 seconds the
Parkinmg Lights will again flash (3) more times, (if the Parking Lights do not
flash (3) times See Note Below) The (3) flashes tells you the Tach Signal has
been learned, turn off the Ignition Key and release the brake, again the arking
Lights will flash (3) more times. NOTE* If the Parking Lights do not flash
the (3) times, start this procedure over again, check the connections to the
Tach wire on the vehicle, make sure the BLACK/WHITE wire from the 18-Pin harness
is connected to the proper Tach wire in the vehicle.
Programming Runtime with Brake not Pressed
Press and hold Button #4. The parking lights will flash once for every five
(5) minutes you want to program. Release button at desired runtime. Maximum
length, 15 minutes.
Clearing the E-Prom
Press and hold the brake, now cycle the ignition key in the switch, from
OFF to RUN (Not Start) (7) times within (5) Seconds. If you cannot
physically do this in the proper amount of time, then
REMOVE the YELLOW IGNITION Input wire from the 18-Pin harness that is connected
to Ignition #1 and touch this YELLOW wire to (+) Positive 12 Volts constant
(7) times within (5) Seconds, then release the brake. Now try the remote
control, the should not respond to the remote control, if the unit does, repeat
the above steps until there is no response from the remote. Unplug the remote
start from both the 18-Pin Harness and the 3-Pin Plug, wait 1 minute. Plug
the 18-Pin harness into the module and the Parking Lights will begin to flash.
You will need to follow the procedure on Page 13, "INITIALIZATION OF THE CONTROL
MODULE" this procedure will initialize the Remote Control to the RS-700 Module.
19