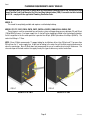
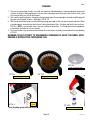
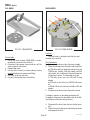
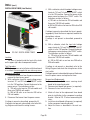
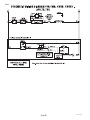
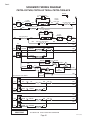
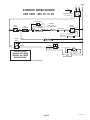
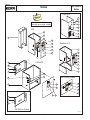
1
S6163-AK-FSE-010
0910-LP-110-4363
REVISION 2
TECHNICAL MANUAL
FOR
COFFEE BREWER, BUNN-O-MATIC,
MODELS C, CS, CRT, CRTF, CT, CTF, CW, CWTF,
SINGLE CW AND SINGLE CWF
INSTALLATION, OPERATION, AND
MAINTENANCE
SUPERSEDURE NOTICE: THIS MANUAL SUPERSEDES AND CANCELS S6163-AK-FSE-010, REV
1, DATED 30 SEPTEMBER 2008, AND ALL CHANGES THERETO.
DISTRIBUTION STATEMENT B:
DISTRIBUTION AUTHORIZED TO U. S. GOVERNMENT
AGENCIES ONLY, ADMINISTRATIVE OR OPERATIONAL USE, 31 AUGUST 2010. OTHER
REQUESTS FOR THIS DOCUMENT SHALL BE REFERRED TO NSWC, PHILADELPHIA CODE 944.
WARNING: THIS DOCUMENT CONTAINS TECHNICAL DATA WHOSE EXPORT IS RESTRICTED
BY THE ARMS EXPORT CONTROL ACT (TITLE 22, U.S.C., SEC. 2751 ET. SEQ.) OR THE EXPORT
ADMINISTRATIONS ACT OF 1979, AS AMENDED, TITLE 50, U.S.C., APP 2401, ET SEQ.
VIOLATIONS OF THESE EXPORT LAWS ARE SUBJECT TO SEVERE CRIMINAL PENALTIES.
DISSEMINATE IN ACCORDANCE WITH PROVISIONS OF DOD DIRECTIVE 5230.25(D).
DESTRUCTION NOTICE: DESTROY BY ANY METHOD THAT WILL PREVENT DISCLOSURE OF
CONTENTS OR RECONSTRUCTION OF THE DOCUMENT.
PUBLISHED BY DIRECTION OF COMMANDER, NAVAL SEA SYSTEMS COMMAND
'&! # '
0910-LP-110-4363
31 AUG 2010
S6163-AK-FSE-010
0910-LP-110-4363
REVISION 2
TECHNICAL MANUAL
FOR
COFFEE BREWER, BUNN-O-MATIC,
MODELS C, CS, CRT, CRTF, CT, CTF, CW, CWTF,
SINGLE CW AND SINGLE CWF
INSTALLATION, OPERATION, AND
MAINTENANCE
SUPERSEDURE NOTICE: THIS MANUAL SUPERSEDES AND CANCELS S6163-AK-FSE-010, REV
1, DATED 30 SEPTEMBER 2008, AND ALL CHANGES THERETO.
DISTRIBUTION STATEMENT B:
DISTRIBUTION AUTHORIZED TO U. S. GOVERNMENT
AGENCIES ONLY, ADMINISTRATIVE OR OPERATIONAL USE, 31 AUGUST 2010. OTHER
REQUESTS FOR THIS DOCUMENT SHALL BE REFERRED TO NSWC, PHILADELPHIA CODE 944.
WARNING: THIS DOCUMENT CONTAINS TECHNICAL DATA WHOSE EXPORT IS RESTRICTED
BY THE ARMS EXPORT CONTROL ACT (TITLE 22, U.S.C., SEC. 2751 ET. SEQ.) OR THE EXPORT
ADMINISTRATIONS ACT OF 1979, AS AMENDED, TITLE 50, U.S.C., APP 2401, ET SEQ.
VIOLATIONS OF THESE EXPORT LAWS ARE SUBJECT TO SEVERE CRIMINAL PENALTIES.
DISSEMINATE IN ACCORDANCE WITH PROVISIONS OF DOD DIRECTIVE 5230.25(D).
DESTRUCTION NOTICE: DESTROY BY ANY METHOD THAT WILL PREVENT DISCLOSURE OF
CONTENTS OR RECONSTRUCTION OF THE DOCUMENT.
PUBLISHED BY DIRECTION OF COMMANDER, NAVAL SEA SYSTEMS COMMAND
31 AUG 2010
TITLE-2
Change A
@@FIpgtype@@BLANK@@!FIpgtype@@
S6163-AK-FSE-010, Rev 2
31 Aug 2010
IDENTIFYING TECHNICAL PUBLICATION SHEET FOR
COMMERCIAL MANUAL
This manual supersedes S6163-AK-FSE-010, Rev 1, dated 30 September 2008, and all changes thereto.
1. PURPOSE: This technical publication sheet is issued for the purpose of identifying and authorizing
the following commercial manual for Navy use.
Manufacturer:
Bunn-O-Matic Corporation
Post Office Box 3227
Springfield, Il 62708-3227
Cage 25628
Purchase Order or Contract No.: N00024-09-C-2107
Requisition No.: N/A
Equipment: Coffee Brewer, Bunn-O-Matic
National Stock Number: 0910-LP-110-4363
Title: Coffee brewer, Bunn-O-Matic, Models C, CS, CRT, CRTF, CT, CTF, CW, CWTF, Single CW
and Single CWF; Installation, Operation, and Maintenance
Additional Identification: N/A
Date: N/A
2. ADDITIONAL COPIES: Additional copies are available from the Naval Logistics Library (NLL).
3. FILE LOCATION: The above-described commercial manual is filed in ________________________.
4. AUTHORITY NOTICE AND DISTRIBUTION STATEMENT:
Published by direction of Commander, Naval Sea Systems Command.
Distribution Statement B: Distribution authorized to U.S. Government Agencies only, administrative
or operational use, 31 August 2010. Other requests for this document shall be referred to NSWC,
Philadelphia Code 944.
FOR UNCLASSIFIED MANUALS
NOTICE: Reproduction for non-military use of the information or illustration in this publication is not
permitted. The policy for military use reproduction is established in OPNAVINST 5510.1B.
This material may be reproduced by or for the U.S. Government pursuant to the rights acquired under
Article 42 of Newport News Shipbuilding Purchase Order DoD Contracts Appendix A dated December
2009.
This document contains copyright or proprietary materials. Infringement of copyright or proprietary
material may violate existing Federal laws and statutes and result in criminal penalties, imprisonment, or
removal from office.
TITLE-2
Change A
@@FIpgtype@@BLANK@@!FIpgtype@@
TABLE OF CONTENTS
PART
TITLE
I
Installation and Operating Guide
II
Service and Repair Manual
III
Illustrated Parts Catalog
TITLE-2
Change A
@@FIpgtype@@BLANK@@!FIpgtype@@
PART I
Installation and Operating Guide
TITLE-2
Change A
@@FIpgtype@@BLANK@@!FIpgtype@@
Part I
C, CT, CWTF Series
Including DV, APS/TC/TS,
Single CW & Twins
Supercedes Operating Manuals:
10690.####; 10737.####; 10841.0000;
28182.0000; 36102.0000
INSTALLATION & OPERATING GUIDE
BUNN-O-MATIC CORPORATION
POST OFFICE BOX 3227
SPRINGFIELD, ILLINOIS 62708-3227
PHONE: (217) 529-6601 FAX: (217) 529-6644
To ensure you have the latest revision of the Operating Manual, or to view the Illustrated Parts
Catalog, Programming Manual, or Service Manual, please visit the Bunn-O-Matic website, at
www.bunn.com. This is absolutely FREE, and the quickest way to obtain the latest catalog and
manual updates. For Technical Service, contact Bunn-O-Matic Corporation at 1-800-286-6070.
41721.0000A 11/08 ©2008 Bunn-O-Matic Corporation
Part I
BUNN-O-MATIC COMMERCIAL PRODUCT WARRANTY
Bunn-O-Matic Corp. (“BUNN”) warrants equipment manufactured by it as follows:
1) All equipment other than as specified below: 2 years parts and 1 year labor.
2) Electronic circuit and/or control boards: parts and labor for 3 years.
3) Compressors on refrigeration equipment: 5 years parts and 1 year labor.
4) Grinding burrs on coffee grinding equipment to grind coffee to meet original factory screen sieve analysis:
parts and labor for 3 years or 30,000 pounds of coffee, whichever comes first.
These warranty periods run from the date of installation BUNN warrants that the equipment manufactured by
it will be commercially free of defects in material and workmanship existing at the time of manufacture and
appearing within the applicable warranty period. This warranty does not apply to any equipment, component or
part that was not manufactured by BUNN or that, in BUNN’s judgment, has been affected by misuse, neglect,
alteration, improper installation or operation, improper maintenance or repair, damage or casualty. This warranty is
conditioned on the Buyer 1) giving BUNN prompt notice of any claim to be made under this warranty by telephone
at (217) 529-6601 or by writing to Post Office Box 3227, Springfield, Illinois 62708-3227; 2) if requested by
BUNN, shipping the defective equipment prepaid to an authorized BUNN service location; and 3) receiving prior
authorization from BUNN that the defective equipment is under warranty.
THE FOREGOING WARRANTY IS EXCLUSIVE AND IS IN LIEU OF ANY OTHER WARRANTY, WRITTEN OR
ORAL, EXPRESS OR IMPLIED, INCLUDING, BUT NOT LIMITED TO, ANY IMPLIED WARRANTY OF EITHER
MERCHANTABILITY OR FITNESS FOR A PARTICULAR PURPOSE. The agents, dealers or employees of BUNN
are not authorized to make modifications to this warranty or to make additional warranties that are binding on
BUNN. Accordingly, statements by such individuals, whether oral or written, do not constitute warranties and
should not be relied upon.
If BUNN determines in its sole discretion that the equipment does not conform to the warranty, BUNN, at its
exclusive option while the equipment is under warranty, shall either 1) provide at no charge replacement parts
and/or labor (during the applicable parts and labor warranty periods specified above) to repair the defective
components, provided that this repair is done by a BUNN Authorized Service Representative; or 2) shall replace
the equipment or refund the purchase price for the equipment.
THE BUYER’S REMEDY AGAINST BUNN FOR THE BREACH OF ANY OBLIGATION ARISING OUT OF THE SALE OF
THIS EQUIPMENT, WHETHER DERIVED FROM WARRANTY OR OTHERWISE, SHALL BE LIMITED, AT BUNN’S
SOLE OPTION AS SPECIFIED HEREIN, TO REPAIR, REPLACEMENT OR REFUND.
In no event shall BUNN be liable for any other damage or loss, including, but not limited to, lost profits, lost sales,
loss of use of equipment, claims of Buyer’s customers, cost of capital, cost of down time, cost of substitute
equipment, facilities or services, or any other special, incidental or consequential damages.
BrewWISE, BrewLOGIC, BrewWIZARD, BUNN Gourmet Ice, BUNN Pour-O-Matic, BUNN, Bunn-OMatic, Bunn-OMatic, BUNNlink, BUNNserve, BUNN Espress, DBC, Dr. Brew, Dual, EasyClear, EasyGard, Easy Pour, FlavorGard,
Gourmet Ice, Gourmet Juice, High Intensity, IMIX, Infusion Series, Quality Beverage Equipment Worldwide,
The Mark of Quality in Beverage Equipment Worldwide, My Café, PowerLogic, Safety-Fresh, Scale-Pro, Single,
Smart Funnel, Smart Hopper, SmartWAVE, Soft Heat, SplashGard, System III, ThermoFresh, 392, AutoPOD,
AXIOM, Beverage Profit Calculator, Beverage Bar Creator, BrewMETER, BUNNSERVE, BUNNsource, Coffee At Its
Best, Cool Froth, Digital Brewer Control, Intellisteam, Nothing Brews Like a BUNN, Pouring Profits, Pulse Wave,
Signature Series, Silver Series, Smart Heat, Tea At Its Best, The Horizontal Red Line, Titan, Ultra, are either
trademarks or registered trademarks of Bunn-O-Matic Corporation.
Page 2
41721 100908
INTRODUCTION
Part I
This equipment will brew one or two half-gallon batches of coffee simultaneously into awaiting dispensers
(with just the press of a button). One side may include a hot water faucet for allied beverage use. It is only for
indoor use on a sturdy counter.
USER NOTICES ............................................................................................................................................ 4
ELECTRICAL REQUIREMENTS.......................................................................................................................5
PLUMBING REQUIREMENTS (CURRENT SINGLES)......................................................................................6
PLUMBING REQUIREMENTS (CURRENT TWINS).........................................................................................7
PLUMBING REQUIREMENTS (EARLY SINGLES)...........................................................................................8
PLUMBING REQUIREMENTS (EARLY TWINS)...............................................................................................9
INITIAL SET-UP...........................................................................................................................................10
ADJUSTING BREW VOLUMES ................................................................................................................... 11
OPERATING CONTROLS ............................................................................................................................ 12
BREWING .................................................................................................................................................. 14
CLEANING ................................................................................................................................................. 15
TROUBLESHOOTING ................................................................................................................................. 12
Explanation of codes:
15 - All components in machine are rated for 120 Volts ac, (15 Amps)
20 - All components in machine are rated for 120 Volts ac, (20 Amps)
35 (120/240V) - Tank heater rated for 240 volts ac, all other components rated for 120 volts ac (20 Amps)
DV - Dual Voltage. 2 tank heaters with toggle switch
MV - Multi Voltage. 2 tank heaters with terminal block. (Replaced by DV)
A - All components in machine are rated for 240 volts ac.
B - All components are rated for either 100 volts ac, or 200 volts ac.
C - Canadian models only
CE - European models only.
TWIN - 2 brewers in 1 chassis.
APS - Airpot Server (No warmers)
TC - Thermal Carafe (No warmers)
TS - Thermal Server (No warmers)
Page 3
41721 111308
Part I
USER NOTICES
Carefully read and follow all notices in this manual and on the equipment. All labels on the equipment should
be kept in good condition. Replace any unreadable or damaged labels.
This equipment must be installed to comply
with the International Plumbing Code o the
International Code Council and the Food
Code Manual o the Food and Drug Administration (FDA). For models installed outside
the U.S.A., comply with the applicable
Plumbing /Sanitation Code.
! WARNING
Fill water tank before turning - on thermostat or connecting appliance
to power source.
Use only on a properly protected
circuit capable of the rated load.
Electrically ground the chassis.
Follow national/local electrical codes.
Do not use near combustibles.
#00656.0000
FAILURE TO COMPLY RISKS EQUIPMENT
DAMAGE, FIRE, OR SHOCK HAZARD
READ THE ENTIRE OPERATING MANUAL
BEFORE BUYING OR USING THIS PRODUCT
#00658.0000
THIS APPLIANCE IS HEATED WHENEVER
CONNECTED TO A POWER SOURCE
00831 0000F 3/98 ©1998 BUNN O MATIC CORPORATION
#00831.0000
#03408.0002
#03409.0002
To reduce the risk o electric shock,
do not remove or open cover.
No user-serviceable parts inside.
Authorized service personnel only.
Disconnect power be ore servicing.
CAUTION
WA R M E R S A N D S U R FAC E S A R E H OT
#02765.0000
#37881.0000
Optional Field Wiring
Optional Field Wiring
120/208-240 V, 11.4-13.1 A, 2340-3100 W
1PH, 3-Wire + GND, 60HZ
120/208-240 V, 12.25-13.9 A, 2440-3200 W
1PH, 3-Wire + GND, 60HZ
#34955.0000
APS MODELS
#34955.0001
ONE WARMER MODELS
Optional Field Wiring
Optional Field Wiring
120/208-240 V, 13.0-14.8 A, 2540-3300 W
1PH, 3-Wire + GND, 60HZ
120/208-240 V, 13.9-15.6 A, 2640-3400 W
1PH, 3-Wire + GND, 60HZ
#34955.0002
TWO WARMER BREWERS
#34955.0003
THREE WARMER BREWERS
120V
120/208-240V
#34056.0000
VOLTAGE SELECTOR SWITCH
#12364.0000
Page 4
41721 111308
Part I
ELECTRICAL REQUIREMENTS
CAUTION - The brewer must be disconnected from the power source until specified in Initial Set-Up.
Model 15 has an attached cordset and requires 2-wire grounded service rated 120 volts ac, 15 amp, single
phase, 60 Hz.
BLK
WHI
RED
L1
N
120V. A.C.
WHI
BLK
L2
N
BLU
120V. A.C.
208 or 240V. A.C.
120V. A.C.
RED
BLK
L1
BLK
L3
L2
230V. A.C.
230V. A.C.
230V. A.C.
RED
L1
200 or 230V. A.C.
L2
L1
P3516
Earth Ground
Chassis Ground
P1841
Earth Ground
Chassis Ground
Earth Ground
Model 35
Model 20
Requires 2-wire,
grounded service rated Note: This electrical service
120 volts ac, 20 amp, consists of 3 current carrying
single phase, 60 Hz. conductors (Neutral, L1 and
L2) and a separate conductor
Proceed as follows:
for earth ground.
P1843
Chassis Ground
Earth Ground
P1842
Chassis Ground
230V ac
3 phase models
200 or 230V ac
single phase models
Note: This electrical service
consists of 3 current carrying conductors (L1, L2 and
L3) and a separate conductor for earth ground.
Note: This electrical service
consists of 2 current carrying conductors (L1 and L2)
and a separate conductor
for earth ground.
P1842
NOTE: Some Twins require two individual power cords.
CE REQUIREMENTS:
• This appliance must be installed in locations where it can be overseen by trained personnel.
• For proper operation, this appliance must be installed where the temperature is between 10°C to 30°C.
• Appliance shall not be tilted more than 10° for safe operation.
• An electrician must provide electrical service as specified in conformance with all local and national codes.
• This appliance must not be cleaned by water jet.
• This appliance is not intended for use by persons (including children) with reduced physical, sensory or mental
capabilities, or lack of experience and knowledge, unless they have been given instructions concerning use of
this appliance by a person responsible for its safety.
ELECTRICAL HOOK-UP
CAUTION – Improper electrical installation will damage electronic components.
1. An electrician must provide electrical service as specified.
2. Using a voltmeter, check the voltage and color coding of each conductor at the electrical source.
3. Place the heater switche(s) at the rear of the brewer in the "OFF"
lower position.
4. Remove the front panel beneath the sprayheads. (On Dual Volt
models, place the voltage select toggle switch to the corresponding voltage position being used. FIG 5-1).
5. Feed the cord through the strain relief(s) and connect it to the
terminal block(s).
6. Connect the brewer to the power source and verify the voltage at
the terminal block before proceeding. Replace the front panel.
7. If plumbing is to be hooked up later be sure the brewer is disconnected from the power source. If plumbing has been hooked up,
the brewer is ready for Initial Set-Up.
FIG. 5-1 Dual Volt Switch Position
Page 5
41721 111308
Part I
PLUMBING REQUIREMENTS-CURRENT SINGLES
This equipment must be installed to comply with the International Plumbing Code of the International
Code Council and the Food Code Manual of the Food and Drug Administration (FDA). For models installed
outside the U.S.A., comply with the applicable Plumbing /Sanitation Code.
MODEL C:
This model is completely portable and requires no attached plumbing.
MODELS CT, CTF, CWT, CWTA, CWTB, CWTF, CWTFA & CWTFB, SINGLE CW & SINGLE CWF
These brewers must be connected to a cold water system with operating pressure between 20 and 90 psi
(138 to 620kPa) from a 1⁄2" or larger supply line. A shut-off valve should be installed in the line before the brewer.
Install a regulator in the line when pressure is greater than 90 psi (620kPa)to reduce it to 50 psi (345kPa). The
water inlet fitting is 1⁄4" flare.
NOTE - Bunn-O-Matic recommends 1⁄4" copper tubing for installations of less than 25 feet and 3⁄8" for more than
25 feet from the 1⁄2" water supply line. A tight coil of tubing in the water line will facilitate moving the brewer to
clean the countertop. Bunn-O-Matic does not recommend the use of a saddle valve to install the brewer. The
size and shape of the hole made in the supply line by this type of device may restrict water flow.
FIG 6-1
FIG 6-2
Models CTF & CWTF
Models CT & CWT
Page 6
41721 111308
PLUMBING REQUIREMENTS-CURRENT TWINS
Part I
TWINS
These brewers must be connected to a cold water system with operating pressure between 20 and 90 psi
(138 and 620 kPa) from a 1⁄2" or larger supply line. A shut-off valve should be installed in the line before the
brewer. Install a regulator in the line when pressure is greater than 90 psi (620 kPa) to reduce it to 50 psi (345
kPa) . The water inlet fitting is 3⁄8" flare.
1.
2.
3.
4.
5.
6.
Remove six screws securing rear utility cover (if
equipped). FIG 7-1
Remove cap from the flared fitting on the bottom
of the center tube assembly.
Flush the water line and securely attach it to the
flare fitting on the center tube assembly. FIG
7-2
Turn on the water supply.
Re-install rear utility cover. FIG 7-3
On models with faucet, place an empty vessel
beneath the faucet and lift the handle until water
is dispensed.
FIG 7-1
FIG 7-2
FIG 7-3
Page 7
41721 111308
Part I
PLUMBING REQUIREMENTS-EARLY SINGLES
This equipment must be installed to comply with the International Plumbing Code of the International Code
Council and the Food Code Manual of the Food and Drug Administration (FDA). For models installed outside
the U.S.A., comply with the applicable Plumbing /Sanitation Code.
MODEL C:
This model is completely portable and requires no attached plumbing.
MODELS CT, CTF, CWT, CWTA, CWTB, CWTF, CWTFA & CWTFB, SINGLE CW & SINGLE CWF
These brewers must be connected to a cold water system with operating pressure between 20 and 90 psi
(138 to 620kPa) from a 1⁄2" or larger supply line. A shut-off valve should be installed in the line before the brewer.
Install a regulator in the line when pressure is greater than 90 psi (620kPa)to reduce it to 50 psi (345kPa). The
water inlet fitting is 1⁄4" flare.
NOTE - Bunn-O-Matic recommends 1⁄4" copper tubing for installations of less than 25 feet and 3⁄8" for more than
25 feet from the 1⁄2" water supply line. A tight coil of tubing in the water line will facilitate moving the brewer to
clean the countertop. Bunn-O-Matic does not recommend the use of a saddle valve to install the brewer. The
size and shape of the hole made in the supply line by this type of device may restrict water flow.
FIG 8-1
FIG 8-2
Models CTF & CWTF
Models CT & CWT
Page 8
41721 111308
PLUMBING REQUIREMENTS-EARLY TWINS
Part I
TWINS
These brewers must be connected to a cold water system with operating pressure between 20 and 90 psi
(138 and 620 kPa) from a 1⁄2" or larger supply line. A shut-off valve should be installed in the line before the
brewer. Install a regulator in the line when pressure is greater than 90 psi (620 kPa) to reduce it to 50 psi (345
kPa) . The water inlet fitting is 3⁄8" flare.
TWINS
1.
2.
3.
4.
5.
6.
Remove six screws securing rear utility cover (if
equipped). FIG 9-1
Remove cap from the flared fitting on the bottom
of the center tube assembly.
Flush the water line and securely attach it to the
flare fitting on the center tube assembly. FIG
9-2
Turn on the water supply.
Re-install rear utility cover. FIG 9-3
On models with faucet, place an empty vessel
beneath the faucet and lift the handle until water
is dispensed.
FIG 9-2
P1241
Page 9
FIG 9-1
P1241
FIG 9-3
P1241
41721 111308
Part I
INITIAL SET-UP
CAUTION - The brewer must be disconnected from the power source throughout the initial set-up, except
when specified in the instructions.
1.
2.
3.
Insert an empty funnel into the funnel rails.
Place an empty dispenser under the funnel.
Place the heater switch at the rear of the brewer in the “OFF” lower position and connect the brewer to the
power source.
4. Fill the tank with water as directed:
4A. Model C
Pour three pitchers of tap water into the screened area on top of the brewer. Allow approximately two
minutes between pitchers for water to flow into the tank. While the third pitcher of water is entering the
tank, the tank will fill to capacity and the excess will flow from the sprayhead, out of the funnel, and into the
dispenser.
4B. Models CT, CTF, CWT, CWTA, CWTB, CWTF, CWTFA, CWTFB, SINGLE CW & SINGLE CWF
Connect the brewer to the power source, place the "ON/OFF" switch in the "ON" upper position, and momentarily press and release the start switch. Water will begin flowing into the tank. When water stops flowing
into the tank, initiate a second and a third brew cycle. During the third brew cycle the tank will fill to its
capacity and the excess will flow from the sprayhead, out of the funnel, and into the dispenser.
5. When the flow of water from the funnel stops, place the heater switch at the rear of the brewer in the “ON”
upper position and wait approximately twenty minutes for the water in the tank to heat to the proper temperature. Some water will drip from the funnel during this time; this is due to expansion and should not
occur thereafter.
6. Empty the dispenser and initiate another brew cycle as directed:
6A. Model C
Pour one pitcher of tap water into the screened area on top of the brewer.
6B. Models CT, CTF, CWT, CWTA, CWTB, CWTF, CWTFA, CWTFB, SINGLE CW & SINGLE CWF
Place the "ON/OFF" switch in the "ON" upper position, and on models SINGLE CW and SINGLE CWF place
the batch selector switch in the "1 GAL" position. Momentarily press and release the start switch.
7. Place the "ON/OFF" switch in the lower “OFF” position after water has stopped flowing from the funnel, and
let the water in the tank reheat to the proper temperature.
8. Empty the dispenser; place the "ON/OFF" switch in the "ON" upper position, and momentarily press and release
the start switch. Check the water volume in the dispenser after water has stopped flowing from the funnel.
It should be 64 ounces for all models except SINGLE CW and SINGLE CWF should be 128 ounces.
9. Models SINGLE CW and SINGLE CWF only, place the batch selector switch in the "1/2 GAL" position, and
momentarily press and release the start switch. Check the water volume in the dispenser after water has
stopped flowing from the funnel. It should be 64 ounces.
10. If water volumes are not correct, adjust the brew timer as required. See Adjusting Brew Volumes. Allow
the water to reheat. Start, and measure another brew cycle.
11. Repeat step 10 until correct water volume is achieved.
NOTE: For all Twins, repeat steps 1 through 10 for the other side.
12.The brewer is now ready for use in accordance with the coffee brewing instructions.
Page 10
41721 111308
Part I
ADJUSTING BREW VOLUMES
CAUTION - Disconnect the power source from the brewer prior to the removal of any panel for the replacement
or adjustment of any component.
NOTE: Prior to setting or modifying batch sizes, check that the brewer is connected to water supply, the tank is
properly filled, and a funnel and server are in place.
1. Modifying batch sizes. To modify a batch volume, first check that the SET/LOCK switch is in the "SET" position on the circuit board.
To increase a batch size. Press and hold the START or BREW switch until three clicks are heard. Release
the switch (Failure to release the switch within two seconds after the third click causes the volume setting to
be aborted and previous volume setting will remain in memory) and press it again one or more times. Each
time the switch is pressed, two seconds are added to the brew time period. Allow the brew cycle to finish in
order to verify that the desired volume has been achieved.
To decrease a batch size. Press and release the START or BREW switch once for every two-second interval
to be removed from the total brew time period; then immediately press and hold down the START or BREW
switch until three clicks are heard. Release the switch. (Failure to release the switch within two seconds after
the third click causes the volume setting to be aborted and previous volume setting will remain in memory).
Allow the brew cycle to finish in order to verify that the desired volume has been achieved.
THERMOSTAT
In most locations the thermostat should be turned to the full clockwise postion (200° F) for optimum brewing
temperature. In areas of high altitude you may have to turn it down (counterclockwise) to prevent boiling.
NOTICE
Brew water temperature is factory set at 200° F (93.3° C)
Areas of high altitude will require lowering this temperature to prevent boiling. This chart should be used as a
guide when readjusting the brew water temperature.
(Feet)
Boiling point
of water
°F
°C
-1000
-500
0
500
1000
1500
2000
2500
3000
3500
4000
4500
5000
5500
6000
6500
7000
7500
8000
8500
9000
9500
10000
213.8
212.9
212.0
211.1
210.2
209.3
208.4
207.4
206.5
205.6
204.7
203.8
202.9
201.9
201.0
200.1
199.2
198.3
197.4
196.5
195.5
194.6
193.7
Altitude
SET
THERMOSTAT KNOB
LOCK
SET/LOCK SWITCH
FIG 11-1
Page 11
101.0
100.5
100.0
99.5
99.0
98.5
98.0
97.4
96.9
96.4
95.9
95.4
94.9
94.4
93.9
93.4
92.9
92.4
91.9
91.4
90.8
90.3
89.8
35665.0000A 05/04 © 2004 Bunn-O-Matic Corporation
Recommended
water temperature
°F
°C
200
200
200
200
200
200
200
200
199
198
197
196
195
195
194
193
192
191
190
189
188
187
186
93.3
93.3
93.3
93.3
93.3
93.3
93.3
93.3
92.8
92.2
91.7
91.1
90.6
90.6
90.0
89.4
88.9
88.3
87.8
87.2
86.7
86.1
85.6
41721 111308
Part I
OPERATING CONTROLS
ON/LOWER SWITCH
Placing the "ON/LOWER" switch in the "OFF" (lower) position stops brewing. Stopping a brew cycle after it
has been started, will not stop the flow of water into the funnel until the tank siphons down to its proper level.
Placing the switch in the "ON" (upper) position enables the brew circuit and on all (except APS/TC models) supplies power to the brew station warmer.
START SWITCH
Momentarily pressing and releasing the switch starts a brew cycle. DO NOT HOLD START SWITCH.
NOTE – The "ON/OFF" switch must be in the "ON" upper position to initiate and complete a brew cycle.
NOTE – Some TWINS are equiped with auxiliary brew start switches on each side of brewer. Use care not to
place other items too close to start switches so they don't block or accidently start a brew cycle! FIG 11-1
FLIP LID (POUR IN FEATURE)
Place server under brew funnel. Open flip lid to pour in (water only). DO NOT POUR IN COFFEE!
WARNING: DO NOT USE THE POUR IN FEATURE AND START SWITCH SIMULTANEOUSLY, OVER FLOWING
OF HOT WATER WILL OCCUR!
FLIP LID (POUR IN FEATURE)
HOT WATER FAUCET
WARMER SWITCHES
ON/LOWER SWITCH
BREW START SWITCH
BREW FUNNEL
AUXILIARY BREW START SWITCH
BREW STATION WARMER
FIGURE 12-1
FIGURE 12-2
Page 12
41721 111308
Part I
OPERATING CONTROLS
MASTER ON/OFF SWITCH(S)
The master ON/OFF switch disables power the entire brewer (including tank heaters).
NOTE – TWINS with 2 power cords will have 2 power switches, (one left, one right).
TANK HEATER ON/OFF SWITCH(S)
The tank heater ON/OFF switch disables power to the tank heater circuits only. Power to brew timer and warmer circuits are not affected. All Twins have 2 tank heater switches. NOTE: Leaving the tank heater switch(s) off
will result in brewing with cold water.
LATE MODEL SWITCHS
FIGURE 13-1
FIGURE 13-2
EARLY MODEL SWITCHS
FIGURE 13-3
FIGURE 13-4
Page 13
41721 111308
Part I
1.
2.
3.
4.
5.
6.
COFFEE BREWING
Insert a BUNN® filter into the funnel.
Pour the fresh coffee into the filter and level the bed of grounds by gently shaking.
Slide the funnel into the funnel rails.
Place an empty dispenser beneath the funnel.
Place the "ON/OFF" switch in the "ON" upper position. Momentarily press and release the start switch.
When brewing is completed, simply discard the grounds and filter.
HOT WATER FAUCET
The hot water faucet may be used to dispense a cup of hot water at any time. Not intended for filling carafes,
pitchers, etc. Attempting to dispense more than 8-10 ounces will result in cool water. NOTE – Faucet will not
work with the pour in feature, brewer must be plumbed to a working water supply line.
Page 14
41721 111308
Part I
CLEANING
1. The use of a damp cloth rinsed in any mild, non-abrasive, liquid detergent is recommended for cleaning all
surfaces on Bunn-O-Matic equipment. Use care when cleaning around the heater switch with a cloth, so as
not to accidentally turn off the tank heater!
2. Clean out the sprayhead holes. A properly cleaned sprayhead will leave a dimple in the bed of coffee grounds
for each hole. Example: 6 holes = 6 dimples. FIG 15-1/2
3. With the sprayhead removed, insert the deliming spring (provided) all the way into the sprayhead tube. When
inserted properly, no more than two inches of spring should be visible. Saw back and forth five or six times.
FIG 15-3. NOTE – In hard water areas, this may need to be done daily. It will help prevent liming problems
in the brewer and takes less than a minute.
4. The faucet aerator may be removed for cleaning. Unscrew aerator assembly (counterclockwise from bottom)
FIG 15-5
WARNING: DO NOT ATTEMPT TO DISASSEMBLE REMAINDER OF FAUCET ASSEMBLY UNTIL
BREWER IS DISCONECTED FROM WATER LINE.
FIG 15-3
Clean Sprayhead Holes
FIG 15-1
FIG 15-2
Normal pattern
FIG 15-4
Plugged Sprayhead Hole
Deliming
Spring
FIG 15-5
Twist deliming spring while pushing in
Aerator disassembly
Page 15
41721 111308
Part I
TROUBLESHOOTING
A troubleshooting guide is provided to suggest probable causes and remedies for the most likely problems
encountered. If the problem remains after exhausting the troubleshooting steps, contact the Bunn-O-Matic
Technical Service Department.
• Inspection, testing, and repair of electrical equipment should be performed only by qualified service personnel.
• All electronic components have 120 volt ac and low voltage dc potential on their terminals. Shorting of
terminals or the application of external voltages may result in board failure.
• Intermittent operation of electronic circuit boards is unlikely. Board failure will normally be permanent. If
an intermittent condition is encountered, the cause will likely be a switch contact or a loose connection at a
terminal or crimp.
• Solenoid removal requires interrupting the water supply to the valve. Damage may result if solenoids are
energized for more than ten minutes without a supply of water.
• The use of two wrenches is recommended whenever plumbing fittings are tightened or loosened. This will
help to avoid twists and kinks in the tubing.
• Make certain that all plumbing connections are sealed and electrical connections tight and isolated.
• This brewer is heated at all times. Keep away from combustibles.
WARNING –
•
•
•
•
Exercise extreme caution when servicing electrical equipment.
Unplug the brewer when servicing, except when electrical tests are specified.
Follow recommended service procedures
Replace all protective shields or safety notices
PROBLEM
PROBABLE CAUSE
REMEDY
Brew cycle will not start
1. ON/LOWER Switch is off.
Turn on switch.
2. No power
(A) Turn on main power switch.
(B) Check that the power cord is
securely plugged into outlet.
(C) Check circuit breakers or
fuses.
3. No water
(A) Water lines and valves to the
brewer must be open.
(B) Check for plugged water filter
Water is not hot
1. Heater switch turned off.
Turn on switch
Inconsistent beverage level
1. Lime Build-up
(A) Use deliming spring.
(B) Clean sprayhead. (Page 11)
2. Water Pressure fluctuating.
Have a pressure regulator Installed.
1. Timer adjustment.
Adjust timer (Page 10)
Consistently low or high beverage level.
Page 16
41721 111308
Part I
TROUBLESHOOTING (cont.)
PROBLEM
PROBABLE CAUSE
REMEDY
Spitting or excessive steaming
1. Lime Build-up
(A) Use deliming spring.
(B) Clean sprayhead. (Page 11)
Dripping from sprayhead
1. Syphon System
The brewer must be level or
slightly lower in front to syphon
properly.
Brew cycle starts when ON/
LOWER Switch is turned on.
Auxiliary brew start switch on
TWINS inadvertently activated.
Move objects away from brewer.
Weak beverage
1. Filter Type
BUNN® paper filters must be used
for proper extraction.
2. Coffee Grind
A fine or drip grind must be used
for proper extraction.
3. Sprayhead
A clean spray-head must be used
for proper extraction.
4. Funnel Loading
The BUNN® paper filter must be
centered in the funnel and the
bed of ground leveled by gentle
shaking.
5. Water Temperature
Place an empty funnel on an empty
dispenser beneath the sprayhead.
Initiate a brew cycle and check the
water temperature immediately
below the sprayhead with a thermometer. The reading should not
be less than 195°F (76°C). Adjust
the control thermostat to increase
the water temperature. Replace if
necessary.
1. Funnel Loading
The BUNN® paper filter must be
centered in the funnel and the
bed of grounds leveled by gently
shaking.
2. Sprayhead
A clean spray-head must be used
for proper extraction.
Dry coffee grounds remain in
the funnel
Page 17
41721 111308
TITLE-2
Change A
@@FIpgtype@@BLANK@@!FIpgtype@@
PART II
Service and Repair Manual
TITLE-2
Change A
@@FIpgtype@@BLANK@@!FIpgtype@@
Part II
C, CS, CT, CWTF,
CRT, CRTF Series
Including
DV, MV, APS/TC/TS,
Single CW & Twins
Supercedes Service Manual: 41711.0000
SERVICE & REPAIR MANUAL
BUNN-O-MATIC CORPORATION
POST OFFICE BOX 3227
SPRINGFIELD, ILLINOIS 62708-3227
PHONE: (217) 529-6601 FAX: (217) 529-6644
41711.0001A+ 02/10 ©2009 Bunn-O-Matic Corporation
Part II
BUNN-O-MATIC COMMERCIAL PRODUCT WARRANTY
Bunn-O-Matic Corp. (“BUNN”) warrants equipment manufactured by it as follows:
1) All equipment other than as specified below: 2 years parts and 1 year labor.
2) Electronic circuit and/or control boards: parts and labor for 3 years.
3) Compressors on refrigeration equipment: 5 years parts and 1 year labor.
4) Grinding burrs on coffee grinding equipment to grind coffee to meet original factory screen sieve analysis:
parts and labor for 3 years or 30,000 pounds of coffee, whichever comes first.
These warranty periods run from the date of installation BUNN warrants that the equipment manufactured by
it will be commercially free of defects in material and workmanship existing at the time of manufacture and
appearing within the applicable warranty period. This warranty does not apply to any equipment, component or
part that was not manufactured by BUNN or that, in BUNN’s judgment, has been affected by misuse, neglect,
alteration, improper installation or operation, improper maintenance or repair, damage or casualty. This warranty is
conditioned on the Buyer 1) giving BUNN prompt notice of any claim to be made under this warranty by telephone
at (217) 529-6601 or by writing to Post Office Box 3227, Springfield, Illinois 62708-3227; 2) if requested by
BUNN, shipping the defective equipment prepaid to an authorized BUNN service location; and 3) receiving prior
authorization from BUNN that the defective equipment is under warranty.
THE FOREGOING WARRANTY IS EXCLUSIVE AND IS IN LIEU OF ANY OTHER WARRANTY, WRITTEN OR
ORAL, EXPRESS OR IMPLIED, INCLUDING, BUT NOT LIMITED TO, ANY IMPLIED WARRANTY OF EITHER
MERCHANTABILITY OR FITNESS FOR A PARTICULAR PURPOSE. The agents, dealers or employees of BUNN
are not authorized to make modifications to this warranty or to make additional warranties that are binding on
BUNN. Accordingly, statements by such individuals, whether oral or written, do not constitute warranties and
should not be relied upon.
If BUNN determines in its sole discretion that the equipment does not conform to the warranty, BUNN, at its
exclusive option while the equipment is under warranty, shall either 1) provide at no charge replacement parts
and/or labor (during the applicable parts and labor warranty periods specified above) to repair the defective
components, provided that this repair is done by a BUNN Authorized Service Representative; or 2) shall replace
the equipment or refund the purchase price for the equipment.
THE BUYER’S REMEDY AGAINST BUNN FOR THE BREACH OF ANY OBLIGATION ARISING OUT OF THE SALE OF
THIS EQUIPMENT, WHETHER DERIVED FROM WARRANTY OR OTHERWISE, SHALL BE LIMITED, AT BUNN’S
SOLE OPTION AS SPECIFIED HEREIN, TO REPAIR, REPLACEMENT OR REFUND.
In no event shall BUNN be liable for any other damage or loss, including, but not limited to, lost profits, lost sales,
loss of use of equipment, claims of Buyer’s customers, cost of capital, cost of down time, cost of substitute
equipment, facilities or services, or any other special, incidental or consequential damages.
AutoPOD, AXIOM, BrewLOGIC, BrewMETER, Brew Better Not Bitter, BrewWISE, BrewWIZARD, BUNN Espress,
BUNN Family Gourmet, BUNN Gourmet, BUNN Pour-O-Matic, BUNN, BUNN with the stylized red line, BUNNlink,
Bunn-OMatic, Bunn-O-Matic, BUNNserve, BUNNSERVE with the stylized wrench design, Cool Froth, DBC, Dr.
Brew stylized Dr. design, Dual, Easy Pour, EasyClear, EasyGard, FlavorGard, Gourmet Ice, Gourmet Juice, High
Intensity, iMIX, Infusion Series, Intellisteam, My Café, PowerLogic, Quality Beverage Equipment Worldwide,
Safety-Fresh, savemycoffee.com, Scale-Pro, Silver Series, Single, Smart Funnel, Smart Hopper, SmartWAVE,
Soft Heat, SplashGard, The Mark of Quality in Beverage Equipment Worldwide, ThermoFresh, 392, Beverage Bar
Creator, Beverage Profit Calculator, BUNNSource, Coffee At Its Best, Digital Brewer Control, Nothing Brews Like
a BUNN, Pouring Profits, Respect Earth, Respect Earth with the stylized leaf and coffee cherry design, Signature
Series, Tea At Its Best, The Horizontal Red Line, Titan, Ultra are either trademarks or registered trademarks of
Bunn-O-Matic Corporation.
Page 2
41711.1 110909
Part II
Contents
Trouble Shooting.............................................................................................................. 4
Component Access ........................................................................................................ 10
Control Thermostat ........................................................................................................ 10
Electronic Thermostat .................................................................................................... 11
ON/OFF Switch ............................................................................................................... 12
Start Switch (Brew)........................................................................................................ 13
Solenoid (Inlet) .............................................................................................................. 14
Tank Heater .................................................................................................................... 16
Fill Basin ........................................................................................................................ 16
Tank Heater Switch ........................................................................................................ 18
Thermal Cut-Off ............................................................................................................. 20
Coil/Faucet ..................................................................................................................... 21
Limit Thermostat............................................................................................................ 22
Recovery Booster........................................................................................................... 23
Timer (Early Model) ....................................................................................................... 24
Freshness Timer (Early Models)..................................................................................... 25
Digital Brew Timer (Late Model) .................................................................................... 26
Warmer Elements........................................................................................................... 28
Schematic Wiring Diagrams.......................................................................................... 29
Page 3
41711.1 052009
Part II
TROUBLESHOOTING
A troubleshooting guide is provided to suggest probable causes and remedies for the most likely problems
encountered. If the problem remains after exhausting the troubleshooting steps, contact the Bunn-O-Matic
Technical Service Department.
•
•
•
•
•
•
•
Inspection, testing, and repair of electrical equipment should be performed only by qualified service personnel.
All electronic components have 120 volt ac and low voltage dc potential on their terminals. Shorting of
terminals or the application of external voltages may result in board failure.
Intermittent operation of electronic circuit boards is unlikely. Board failure will normally be permanent. If
an intermittent condition is encountered, the cause will likely be a switch contact or a loose connection at a
terminal or crimp.
Solenoid removal requires interrupting the water supply to the valve. Damage may result if solenoids are
energized for more than ten minutes without a supply of water.
The use of two wrenches is recommended whenever plumbing fittings are tightened or loosened. This will
help to avoid twists and kinks in the tubing.
Make certain that all plumbing connections are sealed and electrical connections tight and isolated.
This brewer is heated at all times. Keep away from combustibles.
WARNING – •
•
•
•
Exercise extreme caution when servicing electrical equipment.
Unplug the brewer when servicing, except when electrical tests are specified.
Follow recommended service procedures
Replace all protective shields or safety notices
PROBLEM
PROBABLE CAUSE
REMEDY
Brew cycle will not start
1. No water
Water lines and valves to the
brewer must be open.
2. No power or incorrect voltage
to the brewer
(A1) Check the terminal block for
120 volts across the black and
white terminals on two wire 120
volt brewers.
(A2) Check the terminal block
for 120 volts across the red and
white terminals and the black
and white terminal on three wire
120/240 volt brewers.
(A3) Check the terminal block for
200 volts on "B Series" brewers
or 240 volts on "A Series" brewers across the red and black
terminals.
(B) Check circuit breakers or
fuses.
Page 4
41711.1 052009
Part II
TROUBLESHOOTING (cont.)
PROBLEM
PROBABLE CAUSE
REMEDY
Brew cycle will not start (cont.)
3. ON/OFF Switch
Refer to Service - ON/OFF
Switch for testing.
4. Start Switch
Refer to Service - Start Switch
for testing procedures.
5. Timer
Refer to Service - Timer for testing procedures.
6. Solenoid Valve
Refer to Service - Solenoid Valve
for testing procedures.
7. Water strainer/flow control
(.222 GPM) Early models
(A) Direction of flow arrow must
be pointing towards brewer.
(B) Remove the strainer/flow
control and check for obstructions. Clear or replace.
Water is not hot
1. Tank Heater Switch
Refer to Service - Tank Heater
Switch for testing procedures.
2. (A) Limit Thermostat
(B) Thermal Cut-Off (Brewers
with Faucet)
CAUTION - Do not eliminate
or bypass limit thermostat or
thermal cut-off. Use only BOM
replacement parts.
Refer to Service - Limit Thermostat for testing procedures.
Thermal Cut-Off for testing
procedures.
3. Control Thermostat
Refer to Service - Control Thermostat for testing procedures.
4. Tank Heater
Refer to Service - Tank Heater
for testing procedures.
Page 5
41711.1 052009
Part II
TROUBLESHOOTING (cont.)
PROBLEM
PROBABLE CAUSE
REMEDY
Inconsistent beverage level in
dispenser
1. Strainer /flow control (.222
GPM) Early models.
(A) Direction of flow arrow must
be pointing towards the brewer.
(B) Remove the strainer/flow
control and check for obstruction. Clear or replace.
Consistently low beverage level
in the dispenser
2. Syphon System
The brewer must be level or
slightly lower in front to syphon
properly.
3. Lime Build-up
CAUTION - Tank and tank
components should be delimed
regularly depending on local water conditions. Excessive mineral build-up on stainless steel
surfaces can initiate corrosive
reactions resulting in serious
leaks.
Inspect the tank assembly for
excessive lime deposits. Delime
as required.
4. Water Pressure
The water pressure to the
brewer must be at least 20 psi
(138 kPa).
1. Timer
Timer must be set for at least
two minutes and fifteen seconds.
2. Strainer/flow Control (.222
GPM)
(A) Direction of flow arrow must
be pointing towards brewer.
(B) Remove the strainer/flow
control and check for obstructions. Clear or replace.
Spitting or excessive steaming
1. Lime Build-up
CAUTION - Tank and tank
components should be delimed
regularly depending on local water conditions. Excessive mineral build-up on stainless steel
surfaces can initiate corrosive
reactions resulting in serious
leaks.
Page 6
Inspect tank assembly for excessive lime deposits. Delime as
required.
41711.1 052009
Part II
TROUBLESHOOTING (cont.)
PROBLEM
PROBABLE CAUSE
REMEDY
Spitting or excessive steaming
(cont.)
2. Control Thermostat
Refer to Service - Control Thermostat for testing procedures.
Dripping from sprayhead
1. Syphon System
The brewer must be level or
slightly lower in front to syphon
properly.
2. Lime Build-up
CAUTION - Tank and tank components should be delimed
regularly depending on local
water conditions. Excessive mineral build-up on stainless steel
surfaces can initiate corrosive
reactions resulting in serious
leaks.
Inspect the tank assembly for
excessive lime deposits. Delime
as required.
3. Solenoid Valve
Remove the solenoid valve and
clear any obstructions. Rebuild
or replace the valve if necessary.
Water flows into tank continuously (ON/OFF Switch "ON")
1. Timer
Refer to Service - Timer for testing procedures.
Water flows into tank continuously (ON/OFF Switch "OFF")
1. Solenoid Valve
Remove the Solenoid Valve and
clean any obstruction. Rebuild
or replace the valve if necessary.
Beverage overflows dispenser
1.Dispenser
The dispenser must be completely empty before starting a
brew cycle.
2. Timer
Refer to Service - Timer for testing procedures.
3. Solenoid Valve
Remove the Solenoid Valve and
clean any obstruction. Rebuild
or replace the valve if necessary.
Page 7
41711.1 052009
Part II
TROUBLESHOOTING (cont.)
PROBLEM
PROBABLE CAUSE
REMEDY
Weak beverage
1. Filter Type
BUNN® paper filters must be used
for proper extraction.
2. Coffee Grind
A fine or drip grind must be used
for proper extraction.
3. Sprayhead
A six-hole stainless steel sprayhead must be used for proper
extraction.
4. Funnel Loading
The BUNN® paper filter must be
centered in the funnel and the
bed of ground leveled by gentle
shaking.
5. Water Temperature
Place an empty funnel on an empty
dispenser beneath the sprayhead.
Initiate a brew cycle and check the
water temperature immediately
below the sprayhead with a thermometer. The reading should not
be less than 195°F (76°C). Adjust
the control thermostat to increase
the water temperature. Replace if
necessary.
Dry coffee grounds remain in
the funnel
1. Funnel Loading
The BUNN® paper filter must be
centered in the funnel and the
bed of grounds leveled by gently
shaking.
Brewer is making unusal noises
1. Solenoid
The nut on the solenoid must
be tight or it will vibrate during
operation.
2. Plumbing Lines
Plumbing lines should not resting
on the counter top.
3. Water Supply
(A) The brewer must be connected
to a cold water line.
(B) Water pressure to the brewer
must not exceed 90 psi (620 kPa).
Install a regulator if necessary to
lower the working pressure to approximately 50 psi (345 kPa).
Page 8
41711.1 052009
TROUBLESHOOTING (cont.)
PROBLEM
Part II
PROBABLE CAUSE
REMEDY
Brewer is making unusal noises
(cont.)
4. Tank Heater
Remove and clean lime off the
tank heater.
Low beverage serving temperature
1. Warmer
Refer to Service - Warmer element for testing procedures.
2. ON/OFF Switch
Refer to Service - ON/OFF
Switch for testing procedures.
Page 9
41711.1 052009
Part II
SERVICE
This section provides procedures for testing and
replacing various major components used in this
brewer should service become necessary. Refer to
Troubleshooting for assistance in determining the
cause of any problem.
WARNING - Inspection, testing, and repair of electrical equipment should be performed only by qualified
service personnel. The brewer should be unplugged
when servicing, except when electrical tests are required and the test procedure specifically states to
plug-in the brewer.
COMPONENT ACCESS
WARNING - Disconnect the brewer from the power
source before the removal of any panel or the replacement of any component.
All components are accessible by the removal of
the top cover, front inspection panel, warmer plate(s)
and rear utility cover (Twins only).
CONTROL THERMOSTAT
3. Gently remove the capillary bulb and grommet
from the tank.
4. Check for continuity across the thermostat terminals. The indication must be:
a) Continuity with knob rotated fully clockwise.
b) No continuity with knob rotated fully counterclockwise. NOTE: First style does not have the ON/
OFF feature, simply check continuity.
If continuity is not present as described, replace control
thermostat.
If continuity is present as described, refer to the wiring
diagrams and check the brewer wiring harness.
Removal and Replacement:
1. Disconnect the control thermostat wires.
2. Remove the thermostat capillary bulb by firmly
pulling up on the capillary at the tank lid. This will
disengage the grommet from the tank lid.
3. Remove the one #8-32 screw securing the control
thermostat to the component bracket inside the
trunk.
4. Slide the grommet to the line 4.5" above the bulb
on the new capillary tube.
5. Insert the capillary bulb through the hole in the
tank lid and press the grommet firmly and evenly
so that the groove in the grommet fits into the tank
lid.
6. Carefully bend the capillary tube so that the tube
and bulb inside the tank are in the vertical position.
NOTE - The capillary tube must be clear of any electrical termination and not kinked.
7. Using #8-32 screw(s), secure the control thermostat to the component bracket inside the trunk.
8. For first type thermostat, refer to Wiring Diagrams
when reconnecting thermostat wires.
9. Adjust the control thermostat as required.
FIG. 10-1 CONTROL THERMOSTAT
Location:
The control thermostat is located inside the trunk
on the upper left side of the component bracket.
Test Procedures:
1. Disconnect the brewer from the power source.
2. Disconnect the leads from control thermostat.
NOTE: First type will only turn approximately one
turn. Clockwise to the stopper is approximately
180° F, maximum counterclockwise to stopper is
approximately 200° F.
Later types will be approximately 200° F when
turned maximum clockwise. Turning it counterclockwise until it clicks will turn off (open contacts).
Page 10
41711.1 052009
Part II
SERVICE (cont.)
OPTIONAL ELECTRONIC THERMOSTAT (ERT):
The ERT is located inside the trunk on the upper left
side of the component bracket.
Test Procedures:
1. Disconnect the brewer from the power source.
2. Gently remove the temperature sensor and grommet from the tank.
3. Check voltage across the blue wire from limit
thermostat and the white wire at the terminal
block. Connect the brewer to the power source.
The indication must be: 120Vac.
If voltage is not present as described, refer to the wiring
diagrams and check the brewer wiring harness
If voltage is present as described, proceed to #4.
First Type
Second Type
4. Disconnect the brewer from the power source.
5. With the temperature sensor and grommet still out
of the tank, check voltage across the black wire
to the heater and the white wire at the terminal
block. Connect the brewer to the power source.
The indication must be: 120Vac.
If voltage is not present as described, replace ERT.
If voltage is present as described, the ERT is functioning properly.
Removal and Replacement:
1. Disconnect the control thermostat wires.
2. Remove the temperature sensor by firmly pullingup on the metal sheath at the tank lid. This will
disengage the grommet from the tank lid.
3. Remove the one #8-32 screw securing the ERT to
the component bracket inside the trunk.
4. Slide the grommet to the top of the sheath.
5. Insert the temperature sensor through the hole
in the tank lid and press the grommet firmly and
evenly so that the groove in the grommet fits into
the tank lid.
6. Using the #8-32 screw, secure the ERT to the
component bracket inside the trunk.
7. For first type thermostat, refer to Wiring Diagrams
when reconnecting ERT wires.
8. Adjust the ERT as required.
Third Type
ERT
FIG 11-1 THERMOSTAT TERMINALS
NOTE: The ERT has a range of 170° - 210°F. Use care
not to set it too high or boiling could occur.
Page 11
41711.1 052009
Part II
SERVICE (cont.)
ON/OFF WARMER SWITCH
Removal and Replacement:
1. Remove the wires from the switch terminals.
2. Compress the clips inside the hood and gently
push the switch through the opening.
3. Push the new switch into the opening and spread
the clips to hold switch in the hood.
4. Refer to Fig.7 when reconnecting the wires.
FIG. 12-1 ON/OFF WARMER SWITCHES
Location:
The ON/OFF switch(s) are located on the front of
the hood.
(3) WHI to Neutral or RED to L2
(2) BLK to L1
Test Procedure:
1. Disconnect the brewer from the power source.
2. Viewing the switch from the back remove the white
or red wire from the upper terminal and the black
wire from the center terminal.
3. Check the voltage across the white wire or red wire
and the black wire with a voltmeter. Connect the
brewer to the power source. The indication must
be:
a) 120 volts ac for two wire 120 volt models and
three wire 120/240 volt models.
b) 200 to 240 volts ac for two wire 200 or 240 volt
models.
4. Disconnect the brewer from the power source.
(1) To Warmer
WARMER SWITCH
(1) LOAD (WARMER)
(2) LINE (L1)
(3) NEUTRAL (L2)
FIG. 12-2 WARMER SWITCH TERMINALS
If voltage is present as described, reconnect the white
or red wire and proceed to #5.
If voltage is not present as described, refer to the Wiring
Diagrams and check the brewer wiring harness.
5. With the black wire removed, remove the wire from
the lower terminal.
6. Check for continuity across the center and lower
terminal with the switch in the "ON" position.
Continuity must not be present when the switch
is in the "OFF" position.
If continuity is present as described, reconnect the
black wire to the center terminal and the remaining
wire to the lower terminal.
If continuity is not present as described, replace the
switch.
Page 12
41711.1 052009
Part II
SERVICE (cont.)
START SWITCHES
Test Procedure:
1. Disconnect the brewer from the power supply.
2. Disconnect the blue wire and the white/red wire
from the switch terminals.
3. Check for continuity across the two terminals on
the switch when it is held in the "pressed-in" position. Continuity must not be present across these
terminals in the released position.
CT SERIES
CRT/CRTF
If continuity is present as described, reconnect the blue
wire and the white/red to the switch terminals.
If continuity is not present as described, replace the
switch.
Removal and Replacement:
1. Remove the blue wire and white/red from the start
switch.
2. Remove round retaining nut from the front of
the switch and remove switch and internal tooth
lockwasher from the inside of the hood.
3. Push new switch with internal tooth lockwasher
through the hole in the hood and secure with round
retaining nut.
4. Refer to Fig. 11 when reconnecting the wires.
CRT/CRTF
FIG. 13-1 START SWITCH
WHI/RED to
Timer P3
BLU to Timer P1
Location: CRT/CRTF
On brewers w/out fresh light, the start switch is
located in the right front of the hood.
On brewers w/fresh light, the start switch is located
on the right side of the hood.
Location: CT/CWT/CWTF/TWINS
On most "CT" series brewers, the start switch is
located in the front of the hood.
On some "convertible" or "CS" brewers, the start
switch is located on either the right or left side of the
hood.
NOTE: Optional on the left and right side warmer
housings on 0/6 TWINS, connected in parallel to front
mounted start switches.
Page 13
CT/CWT/CWTF/TWINS
(3) WHI to Neutral or RED to L2
(2) BLK to L1
START SWITCH
FIG. 13-2 START SWITCH TERMINALS
41711.1 052009
Part II
SERVICE (cont.)
SOLENOID VALVES
6. Check the solenoid valve for coil action. Connect
the brewer to the power source. With "ON/OFF"
switch in the "ON' upper position press start switch
and listen carefully in the vicinity of the solenoid
valve for a" clicking" sound as the coil magnet
attracts.
7. Disconnect the brewer from the power source.
If the sound is heard as described and water will not
pass through the solenoid valve, there may be a blockage in the water line before the solenoid valve or, the
solenoid valve may require inspection for wear, and
removal of waterborne particles.
If the sound is not heard as described, replace the
solenoid valve.
EARLY MODELS
LATE MODELS
FIG. 14-1 SOLENOID VALVE
Location:
The solenoid valve is located inside the trunk on
the lower center part of the component bracket.
Test Procedures:
1. Disconnect the brewer from the power source.
2. Disconnect the white and black wires from the
solenoid valve. With the "ON/OFF" switch in the
"ON" upper position press the start switch.
3. Check the voltage across the white and black wires
with a voltmeter. Connect the brewer to the power
source. The indication must be:
a) 120 volts ac for two wire 120 volt models and
three wire 120/240 volt models.
b) 200 to 240 volts ac for two wire 200 or 240 volt
models.
4. Disconnect the brewer from the power source,
Removal and Replacement:
1. Remove the white and black from the solenoid
valve.
2. Turn off the water supply to the brewer.
3. Disconnect the water lines to and from the solenoid
valve.
4. Remove the two #8-32 screws securing the solenoid mounting bracket to the component bracket.
Remove solenoid bracket and solenoid valve as an
assembly.
5. Remove the two #10-32 screws and lockwashers securing the solenoid valve to the solenoid
bracket.
6. Using two #10-32 screws and lockwashers install new solenoid valve on solenoid mounting
bracket.
7. Using two #8-32 screws install solenoid valve and
bracket to the component bracket.
8. Securely fasten the water lines to and from the
solenoid valve.
9. Refer to Fig. 9 when reconnecting the wires.
If voltage is present as described, proceed to #5
If voltage is not present as described, refer to Wiring
Diagrams and check brewer wiring harness.
5. Check for resistance across the solenoid valve coil
terminals.
If resistance is present as described, reconnect the
white and black wire from the timer.
If resistance is not present as described, replace the
solenoid valve.
Page 14
WHI from Timer
BLK from Timer
FIG. 14-2 SOLENOID VALVE TERMINALS
41711.1 052009
Part II
SERVICE (cont.)
SOLENOID VALVES
Disassembly:
1. Use of the basin wrench 01060.0000 is recommended for disassembly of early style valves as
illustrated below.
2. Disconnect from power source and turn off the
water supply to the brewer.
3. Disconnect the water lines to and from the solenoid
valve.
4. Remove the two #8-32 screws securing the solenoid mounting bracket to the component bracket.
Remove solenoid bracket and solenoid valve as an
assembly.
5. Remove the two #10-32 screws and lock washers securing the solenoid valve to the solenoid
bracket.
6. Disassemble the valve according to the illustrations
that correspond to the particular valve you have.
7. On early style valves, leave the fittings installed
in the base to use as leverage. DO NOT CLAMP
THE BASE WITH LOCKING PLIERS AS THIS CAN
CAUSE DAMAGE!
8. Refer to Illustrated Parts Catalogs for replacement
solenoids and repair/rebuild kits.
120VAC - 334
FIG. 15-2 SECOND STYLE
120VAC - 247
240VAC - 757
120VAC - 1.18K
240VAC - 3.76K
FIG. 15-1 FIRST STYLE
FIG. 15-2 THIRD STYLE
Page 15
41711.1 052009
Part II
SERVICE (cont.)
FILL BASIN
TANK HEATER
FIG. 16-1 TANK HEATER
FIG. 16-2 TANK HEATER
Disassembly:
1. Use of the basin wrench 01060.0000 is recommended for removal of the fill basin.
2. Disconnect from power source and turn off the
water supply to the brewer.
3. Remove top cover.
4. Use the basin wrench (as shown above) turning
counterclockwise to remove inlet fitting.
5. Lift basin off of the tank inlet.
6. Use new inlet gasket when reinstalling.
Location:
The tank heater is located inside the tank and
secured to the tank lid.
Test Procedures:
1. Disconnect the brewer from the power supply.
2. Check the voltage across the black and white wires
on 120 volt models or the black and red wires for
120/240 volt models, 200 volt models and 240
volt models with a voltmeter. Connect the brewer
to the power source. The indication must be:
a) 120 volts ac for two wire 120 volt 20 amp
models .
b) 240 volts ac for three wire 120/240 volt models.
c) 200 to 240 volts ac for two wire 200 or 240 volt
models.
3. Disconnect the brewer from the power source.
If voltage is present as described, proceed to #4
If voltage is not present as described, refer to the Wiring Diagrams and check wiring harness.
4. Disconnect the wires from the tank heater terminals.
5. Check resistance value across tank heater terminals
and compare to chart.
Page 16
41711.1 052009
Part II
SERVICE (cont.)
TANK HEATER (Cont.)
HEATER
1800W-120V
1850W-220V
3500W-200V
3500W-240V
RESISTANCE
7.40 - 8.70
24.40 -28.40
10.70
15.36
-12.36
-17.90
TERMINAL TO SHEATH - INFINITE (OPEN)
FIG. 17-1 TANK HEATER RESISTANCE
If resistance is present as described, reconnect the
wires, the tank heater is ok.
If resistance is not present as described, replace the
tank heater.
NOTE- If any resistance is read between sheath and
either terminal, remove and inspect heater for cracks
in the sheath.
11. Install tank lid with limit thermostat, sprayhead
tube, tank heater, coil assembly (brewers with
faucet) and control thermostat with bracket (early
brewers only) using eight #8-32 hex nut.
12. Reconnect the inlet and outlet water lines to the
faucet coil assembly.
13. Secure sprayhead tube to hood using a hex nut.
14. Install sprayhead.
15. Reconnect the wires to the limit thermostat, tank
heater and control thermostat. See limit thermostat
and control thermostat sections in this manual
when reconnecting wires.
16. Install fill basin, secure with tank inlet fitting and
gasket. Insert water supply line through grommet
in fill basin.
17. Refer to Fig.13 when reconnecting the tank heater
wires.
Removal and Replacement:
1. Disconnect the water supply tube from the fill
BLK to Control Therbasin.
WHI to Terminal Block
mostat (Brewers W/
(White Insert on 230V
2. Remove the tank inlet fitting securing the fill basin
Out Faucet)
Two Wire Models)
Thermal Cut-Off to BLK
to the tank lid, remove fill basin and tank inlet
RED to Terminal Block
from Control Thergasket. Set all three parts aside for reassembly.
(Red Insert on 120/240V
mostat (Brewers W/
3. On brewers with faucet, shut-off water supply
Three Wire Models or
Faucet)
to the brewer and disconnect the inlet and outlet
200V and 240V Two
Wire Models
water lines to the faucet coil assembly.
4. Disconnect the black wire on the limit thermostat
from the tank heater switch. On late model brewers also disconnect the blue wire from the limit
thermostat to the control thermostat.
5. Disconnect the black wire and the white or red
wire from the tank heater terminals.
6. Remove sprayhead and the hex nut securing the
sprayhead tube to the hood. Set aside for reassembly.
FIG. 17-2 TANK HEATER TERMINALS
7. Remove the eight #8-32 nuts securing the tank lid
to the tank.
8. Remove the tank lid with limit thermostat, sprayhead tube, tank heater, coil assembly and control
thermostat w/bracket (early models only).
9 Remove the two hex nuts securing the tank heater
to the tank lid. Remove tank heater with gaskets
and discard.
10. Install new tank heater with gaskets on the tank
lid and secure with two hex nuts.
41711.1 052009
Page 17
Part II
SERVICE (cont.)
TANK HEATER SWITCH
5. With the tank heater switch in the "ON" upper position, check for continuity between the black wire
removed from the limit thermostat and the black
insert on the terminal block. Continuity should
not be present in the "OFF" lower position.
If continuity is present as described, the tank heater
switch is operating properly.
If continuity is not present as described, replace the
tank heater switch.
FIG 18-1 TANK HEATER SWITCH
Location:
The tank heater switch is located on the rear of
the brewer on the upper left side of the trunk.
Test Procedure:
1. Disconnect the brewer from the power source.
2. Disconnect the black wire from the limit thermostat.
3. With the tank heater switch in the "ON" position
and with a voltmeter, check the voltage between
the black wire removed from the limit thermostat
and the white wire or red wire on the tank heater.
Connect the brewer to the power source. The
indication must be:
a) 120 volts ac on two wire 120 volt models.
b) 240 volts ac on three wire 120/240 volt models.
c) 200 to 240 volts ac on 200 volt or 240 volt
models.
4. Disconnect the brewer from the power source.
If voltage is not present as described, proceed to
#5.
If voltage is present as described, the switch is working properly.
Removal and Replacement:
1. Shut off and disconnect the incoming water supply
to the brewer.
2. On automatic brewers gently remove the fill tube
from back of fill basin.
3. Remove the tank inlet fitting securing fill basin the
tank lid. Remove fill basin and gasket. Set all three
parts aside for reassembly.
4. On brewers with faucets, disconnect the water
supply to coil assembly and remove the tube from
the tank to the faucet.
5. Remove sprayhead and hex nut securing sprayhead
tube to the hood. Set aside for reassembly.
6. Disconnect the wires on the limit thermostat and
the tank heater and the control thermostat (early
models).
7. Gently pull the thermostat sensor and grommet
from the tank lid.
8. Insert a tube to the bottom of the tank and syphon
ALL of the water out.
9. Remove the two #8-32 screws securing the tank
assembly to the hood.
10. Lift tank and components out as an assembly and
set aside for reassembly.
11. Disconnect the two black wires from the tank heater
switch.
12. Remove the plastic facenut, hex facenut and the
switch indicator/guard bracket that secures tank
heater switch to the rear of the brewer. Remove
switch and discard.
13. Insert new tank heater switch through the hole in
the upper left rear of the trunk and secure with
switch indicator/guard bracket, hex facenut and
plastic facenut.
14. Reconnect the two black wires to the tank heater
switch terminals.
Page 18
41711.1 052009
Part II
SERVICE (cont.)
TANK HEATER SWITCH (cont.)
15. Set tank assembly inside the hood on mounting
brackets and secure with two #8-32 screws.
16. Reconnect the wires to the limit thermostat, tank
heater and the control thermostat. Refer to limit
thermostat, tank heater and control thermostat sections in this manual when reconnecting wires.
17. Brewers with faucet reinstall the faucet tube and
reconnect the water supply tube to the coil assembly.
18. Secure the sprayhead tube to the hood using hex
nut.
19. Install sprayhead.
20. Install fill basin, inlet gasket and secure to tank lid
with tank inlet fitting.
21. Carefully install water fill tube into the back of
the fill basin.
22. Reconnect and turn on the incoming water supply.
23. Refer to Fig. 15 when reconnecting the wires.
BLK to Limit Thermostat
BLK to Terminal Block
(Black Insert)
FIG. 19-1 TANK HEATER SWITCH TERMINALS
Page 19
41711.1 052009
Part II
SERVICE (cont.)
THERMAL CUT-OFF (Brewers W/Faucet)
Removal and Replacement:
1. Disconnect both ends of the TCO.
2. Install new thermal cut-off.
3. Refer to Fig. 17 when reconnecting wires.
Thermal Cut-Off from Tank
Heater to BLK Lead from
Control Thermostat
WHI or RED to
Terminal Block
Fig. 20-1 THERMAL CUT-OFF
Location:
The thermal cut-off (TCO) is a thermal fuse located
above the tank lid, connected to the tank heater.
NOTE: Installed only on tanks with coil faucet.
CE models have an additional TCO connected to the
other heater terminal.
Test Procedures:
1. Disconnect the brewer from the power source.
2. Disconnect both ends of the TCO.
3. Check for continuity across TCO with an ohmmeter.
120V, 120/240V
FIG. 20-3 TCO TERMINALS
RED to
Heater Switch
If continuity is present as described, the TCO is operating properly.
If continuity is not present as described, replace the
TCO.
Thermal Cut-Off from Tank
Heater to BLK Lead from
Control Thermostat
230V CE
FIG. 20-4 TCO TERMINALS
FIG. 20-2 TESTING TCO
Page 20
41711.1 052009
Part II
SERVICE (cont.)
COIL/FAUCET
Location:
The coil for the faucet is located in the tank.
Operation:
Water inside the coil is separate from the brewing water
and is always under line pressure. Brewing water in
the tank heats the submerged coil. Use of a coil faucet
during a brew cycle will not cause short potting, but is
limited to 8-10 ounces of hot water before the cooler
water is passed through coil.
Removal and Replacement:
1. Disconnect the brewer from the power and water
sources.
2. Turn and remove aerator assembly from bottom of
faucet. Clean parts of any mineral buildup. Install
new gasket when reassembling.
3. Remove the bonnet nut and remove handle assembly.
4. Remove the seat cup. Clean inside the faucet body
and install new seat cup.
BONNET NUT
SEAT CUP
FAUCET BODY
AERATOR
Fig. 21-1 COIL/FAUCET
Page 21
41711.1 052009
Part II
SERVICE (cont.)
LIMIT THERMOSTAT
If continuity is present as described, the limit thermostat
is operating properly.
If continuity is not present as described, replace the
limit thermostat.
Removal and Replacement:
1. Remove all wires from limit thermostat terminals.
2. Carefully slide the limit thermostat out from under
the retaining clip and remove limit thermostat.
3. Carefully slide the new limit thermostat into the
retaining clip.
4. Refer to the Fig. 5 when reconnecting the wires.
to Tank
Heater Switch
Lead from
Control Thermostat
FIG. 22-1 LIMIT THERMOSTAT
Location:
The limit thermostat is located inside the rear of
the hood on the tank lid.
Test Procedures:
1. Disconnect the brewer from the power source.
2. Disconnect the blue and black wires from the limit
thermostat.
3. Check for continuity across the limit thermostat
terminals with a ohmmeter.
Page 22
FIG. 22-2 LIMIT THERMOSTAT TERMINALS
41711.1 052009
Part II
contact terminals. Connect the brewer to the power
source. With the "ON/OFF" switch in the "ON" position and the start switch pressed and released,
check for continuity across relay terminals.
7. Disconnect the brewer from the power source.
RECOVERY BOOSTER RELAY (OPTIONAL)
If continuity is present as described, reconnect the blue
and black wires to the relay contact terminals.
If continuity is not present as described replace the
relay.
B = COIL to TIMER
6-9 = N.O. spare
A = COIL to TIMER
4-7 = N.O. to THERMOSTAT
4
7
Location
The recovery booster(s) are located inside the trunk
on the center of the component brackets just above
the solenoid valve. The coil is activated by the timer/
solenoid circuit. The contacts then close, bypassing
the mechanical thermostat, thereby allowing faster
heating of the incoming water in the tank.
A
FIG. 23-1 RECOVERY BOOSTER RELAY
Removal and Replacement:
1. Remove all wires from the relay.
2. Remove the two #8-32 screws securing the relay
mounting bracket to the component bracket. Remove relay bracket and relay as an assembly.
3. Remove the screw securing the relay to the relay
mounting bracket.
4. Install new relay to the component bracket.
5. Refer to Fig. 9 when reconnecting the wires.
EARLY MODELS
6
9
B
Test Procedures
1. Disconnect the brewer from the power source.
2. Disconnect the white and black wires from the coil
of the recovery booster relay.
3. With a voltmeter, check the voltage across the
white and the black wires. Connect the brewer
to the power source and initate a brew cycle. The
indication must be 120 volts ac.
4. Disconnect the brewer from the power source.
LATER MODELS
If voltage is present as described, proceed to #5.
If voltage is not present as described, refer to Wiring
Diagrams and check the brewer wiring harness.
1 = COIL to TIMER
8
5. Check the resistance across the coil's terminals.
If resistance is present as described in FIG 9, reconnect
the white and black wires to the coil.
If resistance is not present as described, replace the
relay.
6. Disconnect the blue and black wires from the relay
Page 23
1
6
6-8 = N.O. not used
4
2
0
2-4 = N.O. to THERMOSTAT
0 = COIL to TIMER
FIG. 23-2 BOOSTER RELAY TERMINALS
41711.1 052009
Part II
SERVICE (cont.)
TIMER (Early Models)
To Main Wiring Harness
To Solenoid Valve
EARLY STYLE
FIG. 24-1 TIMER TERMINALS
Location:
The timer is located inside the front of the trunk
on the upper right side of component bracket.
Test Procedure.
1. Disconnect the brewer from the power source.
2. Disconnect the polarized, three pin connector from
the brewer wiring harness.
3. With a voltmeter, check the voltage across sockets
P2 & P3 (white and white/red wires) of the female
connector when the "ON/OFF" switch is in the "ON"
position (upper). Connect the brewer to the power
source. The indication must be:
a) 120 volts ac for two wire 120 volt models and
three wire 120/240 volt models.
b) 200 to 240 volts ac on two wire 200 volt or 240
volt models.
4. Disconnect the brewer from the power source.
If voltage is present as described, proceed to #5.
If voltage is not present as described, refer to the
Wiring Diagrams and check the brewer wiring harness.
Connect the brewer to the power source. The
indication must be:
a) 120 volts ac for two wire 120 volt models and
three wire 120/240 volt models.
b) 200 to 240 volts ac for two wire 200 volt or 240
volt models.
6. Disconnect the brewer from the power source.
7. Reconnect the three pin connector from main
wiring harness to the timer.
If voltage is present as described, proceed to #8
If voltage is not present as described, refer to Wiring
Diagrams and check the start switch and brewer wiring harness.
8. With a voltmeter, check the voltage across the
black and white wires when the "ON/OFF" switch
is in the "ON" position (upper) and the "START"
switch is pressed to the "START" position and
released. Connect the brewer to the power source.
The indication must be:
a) 120 volts ac for approximately 20 seconds for
two wire 120 volt models and three wire 120/240
volt models.
b) 200 to 240 volts ac for approximately 20 seconds
for two wire 200 volt or 240 volt models.
If voltage is present as described, the brew timer is
operating properly. Reconnect the polarized, three
pin connector.
If voltage is not present as described, replace the
timer.
Removal and Replacement:
1. Separate all connectors between the brewer wiring
harness and the timer.
2. Remove the one #8-32 screw securing timer to
component bracket.
3 Install new timer circuit board as described in Late
Model Timer section on the following pages.
4. Refer to Fig. 21 when reconnecting the wires.
5. Install the Timer Setting decal provided with the
replacement timer kit, below the schematic on the
inside of the front access panel.
6. Adjust the timer as required. Refer to Late Model
Timer section on the following pages.
5. Check the voltage across the sockets P1 & P2
(blue and white wires) of the female connector
with a voltmeter when the "ON/OFF" switch is in the
"ON" position (upper) and start switch pressed.
Page 24
41711.1 052009
Part II
SERVICE (cont.)
FRESHNESS TIMER (Early Models)
If voltage is present as described, proceed to #4.
If voltage is not present as described, refer to the
Wiring Diagrams and check the brewer wiring harness.
4. Check the voltage across the T3 and T4 (white/
orange and white/blue wires) of the fresh timer
with a voltmeter when the "ON/OFF" switch is in
the "ON" position (upper) and start switch pressed.
Connect the brewer to the power source. The
indication must be: (when solenoid is activated)
a) 120 volts ac for two wire 120 volt models and
three wire 120/240 volt models.
b) 200 to 240 volts ac for two wire 200 volt or 240
volt models.
5. Disconnect the brewer from the power source.
6. Reconnect the three pin connector from main
wiring harness to the timer.
FIG. 25-1 TIMER TERMINALS
Location:
The freshness timer is located inside the front of
the trunk on the component bracket.
If voltage is present as described, proceed to #7
If voltage is not present as described, refer to Wiring
Diagrams and check the start switch and brewer wiring harness.
7. With a voltmeter, check the voltage across connector P1 after the delay period (JP1 set to "STEADY",
and JP2 set to "ON"). The indication must be:
3-5 volts dc (when solenoid is activated).
Operation:
The freshness timer activates an LED on the
control panel after a predetermined amount of time
(after the brew cycle) to indicate carafe on warmer
too long.
Settings: Default settings underlined
JP1: Choose between flashing LED or steady.
JP2: Choose whether the LED stays ON, then
turns off; or is off, then turns on at the end of delay.
R4: Delay time adjustment, 20-60 minutes.
Test Procedure.
1. Disconnect the brewer from the power source.
2. With a voltmeter, check the voltage across T1 & T2
(black & white wires) of the fresh timer. Connect
the brewer to the power source. The indication
must be:
a) 120 volts ac for two wire 120 volt models and
three wire 120/240 volt models.
b) 200 to 240 volts ac on two wire 200 volt or 240
volt models.
3. Disconnect the brewer from the power source.
If voltage is present as described, the fresh timer
is operating properly. If voltage is not present as
described, replace the timer. NOTE: The freshness
timer is no longer available.
Removal and Replacement:
1. Disconnect the brewer from the power source.
2. Disconnect all four connectors from the timer.
2. Remove the two #8-32 screws securing timer to
component bracket.
6. Adjust the timer as required. Refer to Late Model
Timer section on the following pages.
Page 25
41711.1 052009
Part II
SERVICE (cont.)
DIGITAL BREW TIMER (Late Models)
4. With a voltmeter, check the output voltage across
terminals TL2 and TL4 when the "ON/OFF" switch
is in the "ON" position. Connect the brewer to the
power source and press the "START" switch. The
indication must be as follows:
a) 120 volts ac for two wire 120 volt models and
three wire 120/240 volt models.
b) 200 to 240 volts ac for two wire 200 volt or 240
volt models.
If voltage is present as described, the timer is operating properly. Reset the timer as required, to obtain the
desired brew volume.
If voltage is not present as described, proceed to
#6.
FIG. 26-1 DIGITAL BREW TIMER
Location:
The timer is located inside the front of the trunk
on the upper right side of component bracket.
Test Procedure
NOTE: Do not remove or install wires while timer board
is installed. Pressure applied to one side may cause
damage to the board.
1. Disconnect the brewer from the power source and
remove the front access panel.
2. With a voltmeter, check the supply voltage across
terminals TL1 and TL2 when the "ON/OFF" switch
is in the "ON" position. Connect the brewer to the
power source. The indication must be:
a) 120 volts ac for two wire 120 volt models and
three wire 120/240 volt models.
b) 200 to 240 volts ac on two wire 200 volt or
240 volt models.
3. Disconnect the brewer from the power source.
If voltage is present as described, proceed to #4.
If voltage is not present as described, refer to the Wiring Diagrams and check the wiring harness.
6. With a voltmeter, check the input start voltage
across terminals TL2 and TL5 when the "ON/OFF"
switch is in the "ON" position. Connect the brewer
to the power source and press the "START" switch.
The indication must be as follows:
a) 120 volts ac for two wire 120 volt models and
three wire 120/240 volt models.
b) 200 to 240 volts ac on two wire 200 volt or
240 volt models.
If voltage is not present as described, refer to the
Wiring Diagrams and check the wiring harness to the
start switch.
If voltage is present as described, disconnect the brewer
from the power source and replace the timer.
Removal and Replacement:
1. Remove the two #8-32 screws securing circuit
board to the mounting bracket.
2. Remove circuit board and spacers (as required).
3. Remove all wires from the timer.
4. Attach all wires to the replacement timer board
prior to installation to the component mounting
bracket. Refer to FIG. 21 when reconnecting the
wires.
5. Install new circuit board with spacers (as required)
to the component mounting bracket.
6. Adjust the timer as described in the next section.
Page 26
41711.1 052009
Part II
SERVICE (cont.)
DIGITAL BREW TIMER (Late Models)(cont.)
Timer Setting:
NOTE: Prior to setting or modifying volumes, check
that the brewer is connected to water supply, the
tank is properly filled, and a funnel and server are in
place.
NOTE: All volume settings must be done with the
sprayhead installed.
1. Modifying brew volumes. To modify a brew volume, first check that the SET/LOCK switch is in the
“SET” position on the circuit board.
To increase a brew volume, place the ON/OFF
switch in the “ON” position, press and hold the START
switch until three clicks are heard. Release the switch
and press it again one or more times. (Failure to release the switch within two seconds after the third click
causes the volume setting to be aborted and previous
volume setting will remain in memory) Each time the
switch is pressed, two seconds are added to the brew
time period. Allow the brew cycle to finish in order to
verify that the desired volume has been achieved.
NOTE: Several ounces of water will continue to syphon from the tank after turning the switch “OFF”.
The brewer remembers this volume and will continue
to brew batches of this size until the volume setting
procedure is repeated.
NOTE: When brewing coffee, volume will decrease
due to absorption by the coffee grounds.
3. Setting programming disable feature. If it becomes necessary to prevent anyone from changing
brew time once programmed, you can set the SET/
LOCK switch to the “LOCK” position. This will prevent
any further programming until switch is once again
put into the “SET” position.
To decrease a brew volume, place the ON/OFF
switch in the “ON” position, press and release the
START switch once for every two-second interval to
be removed from the total brew time period; then immediately press and hold down the START switch until
three clicks are heard. Release the switch. (Failure to
release the switch within two seconds after the third
click causes the volume setting to be aborted and
previous volume setting will remain in memory). Allow the brew cycle to finish in order to verify that the
desired volume has been achieved.
2. Setting brew volumes. To set a brew volume,
first check that the SET/LOCK switch is in the “SET”
position on the circuit board. Place the ON/OFF switch
in the “ON” position, press and hold the START switch
until three distinct clicks are heard and then release
the switch. (Failure to release the switch within two
seconds after the third click causes the volume setting
to be aborted and previous volume setting will remain
in memory.
View the level of the liquid being dispensed. When
the desired level is reached, turn the ON/OFF switch
to “OFF”.
Page 27
BLU wire to TL5 from start switch
WHI/GRN wire to TL4 from solenoid
WHI/BLU wire to TL3 from solenoid
WHI wire to TL2 from N/L2
WHI/RED wire to TL1 from on/off switch
FIG. 27-1 DIGITAL TIMER WIRING
41711.1 052009
Part II
SERVICE (cont.)
WARMER ELEMENT(S)
4. Check the resistance across the two terminals on
the warmer element. NOTE: There should be no
resistance reading between the heater sheath and
either terminal. Refer to the following chart.
If resistance is to specification, reconnect the two
wires to the warmer element.
If resistance is not to specification, replace the warmer
element.
FIG. 28-1 WARMER ELEMENTS
Location:
The warmer element(s) is located under the warmer
plate.
Test Procedures:
1. Disconnect the brewer from the power source.
2. With a voltmeter, check voltage across the two
wires at the warmer element with the "ON/OFF"
switch in the "ON" position. Connect the brewer
to the power source. The indication must be 120
volts ac for two wire 120 volt models and three
wire 120/208 and 120/240 volt models, or 230
volts ac for two wire 230 volt models.
3. Disconnect the brewer from the power source.
Removal and Replacement:
1. Remove the three #4-40 screws securing the
warmer assembly to the brewer.
2. Lift the warmer assembly from the brewer.
3. Disconnect the two wires from the warmer element
terminals.
4. Remove the two #8-32 nuts securing the warmer
element to the warmer plate.
5. Securely install new warmer element.
6. Reconnect the two wires to warmer element terminals.
7. Securely install warmer assembly on the brewer.
WHI/RED to ON/OFF Switch (Center Warmer)
YEL to ON/OFF Switch (Left Front Warmer)
WHI/VIO to ON/OFF Switch (Left Rear Warmer)
BRN/BLk to ON/OFF Switch (Right Front Warmer)
VIO to ON/OFF Switch (Right Rear Warmer)
WHI to Terminal Block (120V or
120/240V Brewers)
RED to Terminal Block (200V or
240V Brewers
If voltage is present as described, proceed to #4.
If voltage is not present as described, refer to Wiring
Diagrams and check wiring harness.
FIG. 28-3 WARMER ELEMENT TERMINALS
WARMER
100W-120V
100W-220V
100W-200V
RESISTANCE
132 - 152
450 - 532
372 - 432
TERMINAL TO SHEATH - INFINITE (OPEN)
FIG. 28-2 WARMER ELEMENTS
Page 28
41711.1 052009
Part II
SCHEMATIC WIRING DIAGRAM
CRT5, & CRTF5
L1
HEATER
SWITCH
BLK
LIMIT
THERMOSTAT
BLK
BLU
SWITCH AND
THERMOSTAT
N
GREEN
(FAUCET OPTION
ONLY)
THERMAL
CUT-OFF
TANK HEATER
BLK
L2
WHI (MODEL 20)
RED (MODEL 35)
WHI
WHI
"KEEP WARM" HEATER
ON/OFF SWITCH
WHI
WHI
WHI/RED
BLK
LOWER CENTER WARMER
START SWITCH
WHI/RED
BLU
SOL
WHI/RED
WHI/BLU
T1 T5 T3
BREW
TIMER
ON/OFF SWITCH
BLK
T4
T2
WHI/GRN
WHI
WHI
YEL
LEFT FRONT
WARMER
ON/OFF SWITCH
WHI
WHI
WHI/VIO
BLK
LEFT REAR
WARMER
ON/OFF SWITCH
WHI
BRN/BLK
BLK
RIGHT FRONT
WARMER
ON/OFF SWITCH
BLK
WHI
WHI
VIO
RIGHT REAR
WARMER
120/240 VOLTS AC 3 WIRE
120 VOLTS AC 2 WIRE
SINGLE PHASE
10476.0000G 07/03 © 1990 BUNN-O-MATIC CORPORATION
Page 29
41711.1 052009
Part II
SCHEMATIC WIRING DIAGRAM
CRT5A, & CRTF5A
L1
L2
GRN/YEL
HEATER
SWITCH
BLK
LIMIT
THERMOSTAT
BLU
BLK
(MODEL CRTF5A ONLY)
THERMAL
CUT-OFF
BLK
SWITCH AND
THERMOSTAT
TANK HEATER
WHI
RED
WHI
"KEEP WARM" HEATER
ON/OFF SWITCH
RED
WHI/RED
BLK
RED
LOWER CENTER WARMER
START SWITCH
WHI/RED
SOL
BLU
WHI/RED
WHI/BLU
T1 T5 T3
T4
BREW T2
TIMER
ON/OFF SWITCH
BLK
WHI/GRN
RED
RED
YEL
LEFT FRONT
WARMER
ON/OFF SWITCH
RED
RED
WHI/VIO
BLK
LEFT REAR
WARMER
ON/OFF SWITCH
BLK
RED
BRN/BLK
RIGHT FRONT
WARMER
ON/OFF SWITCH
BLK
RED
RED
VIO
RIGHT REAR
WARMER
240 VOLTS AC 2 WIRE
SINGLE PHASE
10477.0000H 07/03 © 1990 BUNN-O-MATIC CORPORATION
Page 30
41711.1 052009
Part II
SCHEMATIC WIRING DIAGRAM
CRT5B, & CRTF5B
L1
L2
GREEN
HEATER
SWITCH
BLK
LIMIT
THERMOSTAT
BLU
BLK
(MODEL CRTF5B ONLY)
THERMAL
CUT-OFF
BLK
SWITCH AND
THERMOSTAT
TANK HEATER
ON/OFF SWITCH
BLK
WHI
WHI
WHI/RED
WHI
LOWER CENTER WARMER
START SWITCH
WHI/RED
SOL
BLU
WHI/RED
WHI/BLU
T1 T5 T3 T4
BREW
T2
TIMER
ON/OFF SWITCH
WHI/GRN
WHI
WHI
YEL
BLK
LEFT FRONT
WARMER
ON/OFF SWITCH
BLK
WHI
WHI
WHI/VIO
LEFT REAR
WARMER
ON/OFF SWITCH
BLK
WHI
BRN/BLK
RIGHT FRONT
WARMER
ON/OFF SWITCH
BLK
WHI
WHI
VIO
RIGHT REAR
WARMER
200 VOLTS AC 2 WIRE
SINGLE PHASE
10477.0001H 07/03 © 1993 BUNN-O-MATIC CORPORATION
Page 31
41711.1 052009
Part II
RED Model 35
WHI Model 20
WHI Model 15 & 35
MAIN ON/OFF SWITCH
(Late 20 & 35
Models only)
BLK Model 20 & 35
READY INDICATOR
BLU
BLK
HEATER
SWITCH
LIMIT
THERMOSTAT
BLK
BLK
SW. & THERMOSTAT
(FAUCET OPTION ONLY)
THERMAL
FUSE
BLK
BLK
N
L2
WHI Model 20
BLK Model 15
GREEN
BLK-14
BLK
BLK
L1
SCHEMATIC WIRING DIAGRAM
CW/CWT/CWTF - APS/TS/TSR/TC
WHI-14 Model 20
RED-14 Model 35
TANK HEATER
WHI Model 15
WHI
WHI
"KEEP WARM" HEATER
OPTIONAL AUTOMATIC BREW CIRCUIT
ON/OFF
SWITCH
WHI
START SWITCH
WHI/BLU
BLK
BLU
WHI/RED
SOL
WHI/RED
T1 T5 T3
BREW
TIMER
120/240 VOLTS AC 3 WIRE
120 VOLTS AC 2 WIRE
SINGLE PHASE
T4 WHI/GRN
T2
WHI
10693.0000G 02/07 © 1993 BUNN-O-MATIC CORPORATION
Page 32
41711.1 052009
Part II
SCHEMATIC WIRING DIAGRAM CW-TS & CW-APS ERT
THERMOSTAT
SWITCH
GRN
TAN
L1
E.R.T
ASSY.
HEATER
SWITCH
BLK
WHI
LIMIT
THERMOSTAT
BLK
(FAUCET OPTION ONLY)
THERMAL FUSE
BLU
N L2
TAN
BLU
BLK
TANK HEATER
RED (3-WIRE MODELS)
WHI (2-WIRE MODELS)
READY INDICATOR
BLU
BLK
50W
WHI
WHI
"KEEP WARM" HEATER
AUXILIARY OUTLET
BLK
WHI
(200 WATT MAXIMUM)
OPTIONAL AUTOMATIC BREW CIRCUIT
ON/OFF
SWITCH
WHI
START SWITCH
BLK
P1 BLU
BLU
WHI/RED
WHI/RED
P3
P1, P2, & P3 ARE PINS OF A
POLARIZED THREE-PIN
CONNECTOR.
120/240 VOLTS AC 3 WIRE
120 VOLTS AC 2 WIRE
SINGLE PHASE
BLK
BLK
BREW
TIMER
SOL
WHI
WHI P2
WHI
10693.0001C 9/96 © 1996 BUNN-O-MATIC CORPORATION
Page 33
41711.1 052009
Part II
SCHEMATIC WIRING DIAGRAM FOR CWT-APS MV,
CWTF-APS MV, CWTF-TS MV, CWTF-TSR MV
Page 34
41711.1 052009
Part II
Page 35
41711.1 052009
Part II
Page 36
41711.1 052009
Part II
Page 37
41711.1 052009
Part II
BLK
Page 38
41711.1 052009
Part II
Page 39
41711.1 052009
Part II
GRN
LT. READY INDICATOR
BLK
BLK
BLU
LT. SW. & THERMOSTAT
BLU
LT.LIMIT
THERMOSTAT
SW1
MAIN ON/OFF SWITCH
(Late Models only)
BLK
(FAUCET)
THERMAL
SAFETY FUSE
BLK
RED
BLK
LEFT TANK HEATER
BLK
RED
WHI
WHI
LEFT "KEEP WARM" HEATER
RT. READY INDICATOR
RED
BLK
BLK
BLU
BLK
BLK
RT. SW. & THERMOSTAT
BLU
RT. LIMIT
THERMOSTAT
SW2
RIGHT TANK HEATER
BLK
RED
WHI
WHI
RIGHT "KEEP WARM" HEATER
RED
SW3
RED
WHI
WHI/RED
WHI/RED
LEFT LOWER WARMER
WHI
WHI
WHI
P1-1
P1-2
SW4
BLK
N
L2
WHI
BLK
L1
RED
SCHEMATIC WIRING DIAGRAM
CWT/CWTF TWIN 0/2, 2/2, 4/2 & CWT TWIN-APS
WHI
WHI/GRN
WHI/GRN
RIGHT LOWER WARMER
WHI
P1-3
SW5
BLU
WHI/RED
WHI/BLU
WHI/RED
SW6
BLU
WHI/GRN
WHI/BLU
BLK
RT
SOL
T1 T5 T3 T4
LEFT T2
LT
SOL
WHI/GRN
WHI
BREW TIMER
T1 T5 T3 T4 WHI/GRN
RIGHT T2
MODELS 2/2 & 4/2 ONLY
(NOT AVAILABLE ON CWT TWIN-APS)
WHI
BREW TIMER
RED
SW7
RED
WHI
YEL
P4-2
YEL
WHI
WHI
LEFT TOP FRONT
WARMER
SW8
WHI/YEL P4-3
BLK
WHI P4-1
WHI/YEL
WHI
WHI
RIGHT TOP FRONT WARMER
MODEL 4/2 ONLY
RED
SW9
RED
WHI
WHI/VIO
WHI
WHI P5-1
WHI
LEFT TOP REAR WARMER
SW10
BLK
P5-3 WHI/VIO
WHI
WHI/BRN P5-2 WHI/BRN
WHI
RIGHT TOP REAR WARMER
120/240 VOLTS AC
3 WIRE + GND
SINGLE PHASE
10736.0000L 03/07 © 1993 BUNN-O-MATIC CORPORATION
Page 40
41711.1 052009
Part II
GRN
LT. READY INDICATOR
BLK
BLK
BLU
LT. SW. & THERMOSTAT
BLU
LT.LIMIT
THERMOSTAT
SW1
MAIN ON/OFF SWITCH
(Late Models only)
BLK
(FAUCET)
THERMAL
SAFETY FUSE
BLK
RED
BLK
LEFT TANK HEATER
BLK
RED
WHI
WHI
LEFT "KEEP WARM" HEATER
RT. READY INDICATOR
BLK
BLK
BLU
RT. SW. & THERMOSTAT
BLU
RT. LIMIT
THERMOSTAT
BLK
BLK
RED
SW2
RIGHT TANK HEATER
BLK
RED
WHI
WHI
Models after 2/210
RIGHT "KEEP WARM" HEATER
SW3
BLK
WHI
WHI/RED
WHI/RED
LEFT LOWER WARMER
WHI
WHI
WHI
P1-1
P1-2
SW4
BLK
N
L2
WHI
BLK
L1
RED
SCHEMATIC WIRING DIAGRAM
CWT/CWTF TWIN 0/2, 2/2, 4/2 & CWT TWIN-APS
WHI
WHI/GRN
WHI/GRN
RIGHT LOWER WARMER
WHI
P1-3
SW5
BLU
WHI/RED
WHI/BLU
WHI/RED
SW6
BLU
WHI/GRN
WHI/BLU
BLK
RT
SOL
T1 T5 T3 T4
LEFT T2
LT
SOL
WHI/GRN
WHI
BREW TIMER
T1 T5 T3 T4 WHI/GRN
RIGHT T2
MODELS 2/2 & 4/2 ONLY
(NOT AVAILABLE ON CWT TWIN-APS)
WHI
BREW TIMER
RED
SW7
RED
WHI
YEL
P4-2
YEL
WHI
WHI
LEFT TOP FRONT
WARMER
SW8
WHI/YEL P4-3
BLK
WHI P4-1
WHI/YEL
WHI
WHI
RIGHT TOP FRONT WARMER
MODEL 4/2 ONLY
RED
SW9
RED
WHI
WHI/VIO
WHI
WHI P5-1
WHI
LEFT TOP REAR WARMER
SW10
BLK
P5-3 WHI/VIO
WHI
WHI/BRN P5-2 WHI/BRN
WHI
RIGHT TOP REAR WARMER
120/240 VOLTS AC
3 WIRE + GND
SINGLE PHASE
10736.0000M 01/10 © 1993 BUNN-O-MATIC CORPORATION
Page 41
41711.1 020410
Part II
SCHEMATIC WIRING DIAGRAM CWTFA
TWIN 2/2 & 4/2
L1
LEFT TANK HEATER
BLK
L3
RED
LT. SW. & THERMOSTAT
BLU
(FAUCET)
THERMAL
SAFETY FUSE
BLK
BLK
L2
GRN/YEL
LT. READY INDICATOR
LT. LIMIT
THERMOSTAT
BLU
SW1
BLU
BLU
RED
WHI
WHI
LEFT "KEEP WARM" HEATER
RT. READY INDICATOR
BLK
BLK
BLK
RIGHT TANK HEATER
RED
RT. SW. & THERMOSTAT
BLU
BLK
BLK
RT. LIMIT
THERMOSTAT
BLU
WHI
WHI
RED
RED P1-1
RED
WHI/GRN P1-3 WHI/GRN
RED
SW5
RIGHT LOWER WARMER
BLU P2-1BLU/BLK
WHI/RED
P2-3 BLK
WHI/RED
SW6
BLU P3-1BLU/BLK
WHI/GRN
P3-3 BLK
WHI/GRN
WHI/BLU
WHI/BLU
YEL
P4-2
YEL
P3-2
RED P4-1
LEFT TOP FRONT
WARMER
WHI/YEL P4-3
WHI/YEL
BLK
RED
RED
RED
SW9
RED
WHI/VIO
SW10
RED
RIGHT TOP FRONT WARMER
MODEL 4/2 ONLY
BLK
RED
RED
RED
SW8
P2-2
BREW TIMER
BREW TIMER
SW7
LT
SOL
T1 T5 T3 T4 WHI/GRN
WHI
LEFT T2
RT
SOL
T1 T5 T3 T4 WHI/GRN
RIGHT T2 WHI
BLK
RED
LEFT LOWER WARMER
SW4
BLK
RED
RED
WHI/RED P1-2 WHI/RED
BLK
BLU
RIGHT "KEEP WARM" HEATER
SW3
BLK
SW2
BLU
P5-3 WHI/VIO
RED
LEFT TOP REAR WARMER
RED P5-1
RED
RED
WHI/BRN P5-2 WHI/BRN
RED
RIGHT TOP REAR WARMER
230 VOLTS AC 3 WIRE
THREE PHASE
10736.0001G 12/00 © 1993 BUNN-O-MATIC CORPORATION
Page 42
41711.1 052009
Part II
SCHEMATIC WIRING DIAGRAM
CWTFA & CWTFB TWIN 2/2 & 4/2
L1
L2
LT. READY INDICATOR
RED
BLK
BLK
(FAUCET)
THERMAL
FUSE
BLK
LT. SW. & THERMOSTAT
BLU
LT.LIMIT
THERMOSTAT
SW1
GRN/YEL
BLK
BLU
BLK
LEFT TANK HEATER
RED
RIGHT TANK HEATER
RED
RT. READY INDICATOR
RED
BLK
BLK
BLK
RT. SW. & THERMOSTAT
BLU
RT. LIMIT
THERMOSTAT
SW2
BLK
BLU
BLK
SW3
RED
WHI/RED P1-2 WHI/RED
BLK
RED
RED
LEFT LOWER WARMER
SW4
RED
WHI/GRN P1-3 WHI/GRN
BLK
RED P1-1
RED
SW5
RIGHT LOWER WARMER
SW6
P2-1
WHI/RED
BLU
WHI/RED
P2-3
BLU P3-1BLU/BLK
WHI/GRN
P3-3
WHI/GRN
BLK
BLU/BLK
BLK
WHI/BLU
T1 T5 T3
WHI/BLU
RT
SOL
LT
SOL
WHI/GRN
T4
WHI
T2
P2-2
RED
LEFT
BREW TIMER
T1 T5 T3 T4 WHI/GRN
RIGHT T2 WHI
P3-2
RED
BREW TIMER
SW7
BLK
RED
YEL
P4-2
YEL
RED P4-1
RED
WHI/YEL P4-3
WHI/YEL
RED
RIGHT TOP FRONT WARMER
MODEL 4/2 ONLY
SW9
BLK
RED
WHI/VIO
P5-3
WHI/VIO
RED
RED P5-1
RED
LEFT TOP REAR WARMER
SW10
BLK
RED
LEFT TOP FRONT WARMER
SW8
BLK
RED
RED
WHI/BRN P5-2 WHI/BRN
RED
RIGHT TOP REAR WARMER
200 OR 240 VOLTS AC 2 WIRE
SINGLE PHASE
10736.0002J 12/00 © 1993 BUNN-O-MATIC CORPORATION
Page 43
41711.1 052009
Part II
SCHEMATIC WIRING DIAGRAM
CWTFA 2/2 TWIN, CWTFA 4/2 TWIN & CWTFA TWIN-APS
GRN/YEL
LT. READY INDICATOR
BLK
SW1
BLK
BLK
BLK
BLU
LT. LIMIT
THERMOSTAT
L2
BLK
LT. SW. & THERMOSTAT
LEFT TANK HEATER
BLK
BLU
LEFT "KEEP WARM" HEATER
WHI
(FAUCET)
THERMAL
SAFETY FUSE
BLK
L1
RED
WHI
RT. READY INDICATOR
RIGHT TANK HEATER
BLK
BLK
RT. SW. & THERMOSTAT
BLU
BLK
BLK
BLK
RT. LIMIT
THERMOSTAT
SW2
BLU
RIGHT "KEEP WARM" HEATER
WHI
BLK
RED
RED
WHI
SW3
RED
NOT APPLICABLE TO APS MODELS
WHI/RED P1-2 WHI/RED
BLK
RED
LEFT LOWER WARMER
SW4
RED
WHI/GRN P1-3 WHI/GRN
BLK
RED P1-1
RED
RED
RIGHT LOWER WARMER
SW5
P3-3
WHI/GRN
BLK
T1 T5 T3
WHI/BLU
T1 T5 T3
YEL
P4-2
T4 WHI/GRN
WHI/YEL
P4-3
LT
SOL
WHI/GRN
T4
WHI
T2
P2-2 RED
LEFT
BREW TIMER
P3-2
RED
RED
YEL
RED
RED P4-1
LEFT TOP FRONT WARMER
SW8
BLK
RT
SOL
RIGHT T2 WHI
BREW TIMER
NOT APPLICABLE TO APS MODELS
SW7
WHI/BLU
BLK
BLU P3-1 BLU/BLK
WHI/GRN
BLK
BLU/BLK
P2-3
WHI/RED
SW6
P2-1
BLU
WHI/RED
WHI/YEL
RED
RED
RED
RIGHT TOP FRONT WARMER
MODEL 4/2 ONLY
SW9
BLK
RED
WHI/VIO
P5-3
RED
RED P5-1
LEFT TOP REAR WARMER
SW10
BLK
WHI/VIO
WHI/BRN
P5-2
WHI/BRN
RED
RED
RED
RIGHT TOP REAR WARMER
230 VOLTS AC 2 WIRE
SINGLE PHASE
10736.0004A 02/06 © 2006 BUNN-O-MATIC CORPORATION
Page 44
41711.1 052009
Part II
SCHEMATIC WIRING DIAGRAM
CWTFA TWIN-APS CE
L1
LT. READY INDICATOR
BLK
LT. SW. & THERMOSTAT
SW1
BLK
BLU
NC
BLK
BLU
RED
L2
GRN/YEL
LT. TANK HEATER
BLK
LT. LIMIT
THERMOSTAT
RED
RED
NC
BLK
WHI
LEFT "KEEP WARM" HEATER
WHI
LT. READY INDICATOR
BLK
LT. SW. & THERMOSTAT
SW2
BLK
BLU
NC
BLK
BLU
RED
RT. TANK HEATER
BLK
RT. LIMIT
THERMOSTAT
RED
RED
NC
BLK
WHI
RIGHT "KEEP WARM" HEATER
WHI
SW3
RED
SW5
BLK
WHI/RED
BLU
WHI/RED
WHI/BLU
WHI/RED
LT
SOL
T1 T5 T3 T4 WHI/GRN
LEFT
T2
RED
BREW TIMER
SW4
RED
SW6
BLK
WHI/RED
WHI/RED
BLU
WHI/BLU
WHI/RED
RT
SOL
T1 T5 T3 T4 WHI/GRN
RIGHT T2
RED
BREW TIMER
230 VOLTS AC
2 WIRE + GND
SINGLE PHASE
10736.0005B 08/07 © 2007 BUNN-O-MATIC CORPORATION
Page 45
41711.1 052009
Part II
L1
LT. READY INDICATOR
BLU
BLK
BLK
MAIN ON/OFF SWITCH
(Late Models only)
BLK
(FAUCET)
THERMAL
SAFETY FUSE
LT. SW. & THERMOSTAT
LT.LIMIT
THERMOSTAT
SW1
BLU
BLK
BLK
LEFT TANK HEATER
BLK
WHI
RED
BLK
WHI
LEFT "KEEP WARM" HEATER
BLK
RT. SW. & THERMOSTAT
RT. LIMIT
THERMOSTAT
BLK
RED
WHI
RT. READY INDICATOR
SW2
RED
BLK
GRN
N
L2
WHI
SCHEMATIC WIRING DIAGRAM CWTF TWIN 0/6
BLU
RIGHT TANK HEATER
BLK
WHI
RED
WHI
WHI
RIGHT "KEEP WARM" HEATER
RED
RED
SW3
WHI
P1-2 WHI/RED
WHI/RED
WHI/RED
SW4
WHI
P1-1
WHI
WHI
LEFT BREW WARMER
WHI
SW5
WHI/GRN P1-3 WHI/GRN
BLK
WHI
RIGHT BREW WARMER
SW7
BLK
SW6
WHI/ORA
P2-1
BLU
WHI/RED
SW8
P2-3 BLK
WHI/RED
BLU P3-1BLU/BLK
WHI/GRN
P3-3 BLK
WHI/GRN
BLU/BLK
WHI/BLU
WHI/ORA
WHI/BLU
LT
SOL
WHI
WHI/GRN
T1 T5 T3 T4
T2 WHI
LEFT
BREW TIMER
RT
SOL
P2-2
WHI/ORA
WHI/GRN
GRY
T1 T5 T3 T4
WHI
RIGHT T2
BREW TIMER
GRY
L.E.D.
L.E.D.
PIN
GRY
PIN PIN
WHI
P3-2
OPTIONAL INDICATOR
TIMER
WHI/ORA
WHI
WHI
BLK
SW9
SW10
BLK
WHI
WHI
BRN/BLK P5-3 BRN/BLK
BLK
WHI
P5-1
P4-1
RIGHT FRONT WARMER
P5-2
VIO
WHI
SW11
RED
YEL
WHI
WHI/VIO P4-3 WHI/VIO
WHI
SW12
RED
LEFT REAR WARMER
RIGHT REAR WARMER
120/240 VOLTS AC
3 WIRE + GND
SINGLE PHASE
YEL P4-2
WHI
LEFT FRONT WARMER
WHI
VIO
WHI
10741.0000H 01/07 © 1993 BUNN-O-MATIC CORPORATION
Page 46
41711.1 052009
Part II
MAIN ON/OFF SWITCH
(Late 20 & 35
Models only)
BLK-14
HEATER
SWITCH
BLK
LIMIT
THERMOSTAT
BLK
BLU
SW. & THERMOSTAT
(FAUCET OPTION ONLY)
THERMAL
FUSE
BLK
BLK
WHI Model 20
BLK Model 20 & 35
READY INDICATOR
BLU
BLK
N
L2
RED Model 35
WHI Model 20
WHI Model 15 & 35
GREEN
SCHEMATIC WIRING DIAGRAM C, CT & CWT
BLK Model 15
BLK
L1
WHI-14 Model 20
RED-14 Model 35
TANK HEATER
WHI Model 15
WHI
WHI
ON/OFF
SWITCH
"KEEP WARM" HEATER
WHI
3
BLK 2
1 WHI/RED
WHI/RED
WHI
LOWER WARMER
WHI/ORA
WHI/BLU
OPTIONAL AUTOMATIC BREW CIRCUIT
START SWITCH
OPTIONAL FRESH LIGHT SYSTEM (EARLY MODELS)
GRY
L.E.D.
PNK
4
INDICATOR 3
TIMER 2
1
WHI/RED
BLU
P3
WHI/RED
P1
L1
BLK
P1, P2, & P3 ARE PINS OF A
POLARIZED THREE-PIN
CONNECTOR.
N
SOL
BLU/BLK
WHI/BLU
T1 T5 T3
BREW T4
TIMER T2
WHI/GRN
WHI
P2
WHI
WHI
OPTIONAL DUAL WARMER ASSY (TOP OR SIDE)
WHI
3
1 BRN/BLK P2 BRN/BLK
BLK 2
FRONT
WHI P1 WHI
WHI
3
BLK 2
1
VIO
P3
VIO
REAR
OPTIONAL SINGLE TOP WARMER ASSY
120/240 VOLTS AC 3 WIRE
120 VOLTS AC 2 WIRE
SINGLE PHASE
WHI
3
BLK 2
1
VIO
P3
VIO
WHI
P1
WHI
REAR
10836.0000H 05/09 ©1995 BUNN-O-MATIC CORPORATION
Page 47
41711.1 052009
Part II
SCHEMATIC WIRING DIAGRAM CWTB
L1
BLU
HEATER
SWITCH
BLK
LIMIT
THERMOSTAT
BLK
L2
GRN/YEL
READY
BLK
SW. & THERMOSTAT
(FAUCET
OPTION ONLY)
THERMAL
FUSE
BLK
BLU
BLK
TANK HEATER
RED
ON/OFF SWITCH
RED
3
BLK 2
1 WHI/RED
WHI/RED
RED
LOWER WARMER
OPTIONAL AUTOMATIC BREW CIRCUIT
START SWITCH
BLU
WHI/RED
P1
BLU/BLK
P3
WHI/RED
BLK
P1, P2, & P3 ARE PINS OF A
POLARIZED THREE-PIN
CONNECTOR.
SOL
WHI/BLU
T1 T5 T3
BREW T4
TIMER T2
WHI/GRN
WHI
P2
RED
OPTIONAL DUAL WARMER ASSY (TOP OR SIDE)
RED
3
BLK 2
1 BRN/BLK P2 BRN/BLK
FRONT
RED P1 RED
RED
3
BLK 2
1
VIO
P3
VIO
REAR
OPTIONAL SINGLE TOP WARMER ASSY
RED
3
200 VOLTS AC 2 WIRE
SINGLE PHASE
BLK 2
1
VIO
P3
VIO
RED
P1
RED
REAR
10836.0002E 07/00 ©1995 BUNN-O-MATIC CORPORATION
Page 48
41711.1 052009
Part II
SCHEMATIC WIRING DIAGRAM CWTA
L1
BLU
HEATER
SWITCH
BLK
LIMIT
THERMOSTAT
ON/OFF
SWITCH
(FAUCET
OPTION ONLY)
THERMAL
FUSE
BLK
SW. & THERMOSTAT
BLK
BLU
BLK
L2
GRN/YEL
READY
TANK HEATER
BLK
RED
WHI
WHI
"KEEP WARM"
RED
3
BLK 2
1 WHI/RED
WHI/RED
RED
LOWER WARMER
OPTIONAL AUTOMATIC BREW CIRCUIT
START SWITCH
BLU
WHI/RED
P1
P3
WHI/RED
SOL
BLU/BLK
BLK
P1, P2, & P3 ARE PINS OF A
POLARIZED THREE-PIN
CONNECTOR.
WHI/BLU
T1 T5 T3
BREW T4
TIMER T2
WHI/GRN
WHI
P2
RED
OPTIONAL DUAL WARMER ASSY (TOP OR SIDE)
RED
3
BLK 2
1 BRN/BLK P2 BRN/BLK
FRONT
RED P1 RED
RED
3
BLK 2
1
VIO
P3
VIO
REAR
OPTIONAL SINGLE TOP WARMER ASSY
220-240 VOLTS AC
2 WIRE
SINGLE PHASE
RED
3
BLK 2
1
VIO
P3
VIO
RED
P1
RED
REAR
10836.0003E 07/00 ©1995 BUNN-O-MATIC CORPORATION
Page 49
41711.1 052009
Part II
SCHEMATIC WIRING DIAGRAM CWTA - CE
READY INDICATOR
BLU
BLK
L1
HEATER
SWITCH
LIMIT
THERMOSTAT
BLK
SW. & THERMOSTAT
GRN/YEL
L2
THERMAL
FUSE
BLK
BLK
BLU
THERMAL
FUSE
RED
RED
TANK HEATER
BLK
RED
"KEEP WARM" HEATER
WHI
WHI
BLK
RED
BLK
ON/OFF
SWITCH
LOWER WARMER
WHI/RED
WHI/RED
RED
SOL
OPTIONAL GRINDER INTERFACE
BATCH
SELECTION
SWITCH
1
2
3
BREW 4
TIMER 5
P1, P2, & P3 ARE PINS OF A
POLARIZED THREE-PIN
CONNECTOR.
WHI/RED
RED
WHI/ORN
WHI/GRN
WHI/YEL
START
SWITCH
OPTIONAL DUAL WARMER ASSY (TOP OR SIDE)
RED
4
GRY
3 GRINDER
INTERFACE
PNK
2 CONNECTOR
1
BLK
BRN/BLK
P2 BRN/BLK
FRONT WARMER
BLK
VIO
P3
RED P1
RED
RED
VIO
REAR WARMER
OPTIONAL SINGLE TOP WARMER ASSY
RED
230 VOLTS AC
2 WIRE
SINGLE PHASE
BLK
VIO
P3
VIO
RED
P1
RED
REAR WARMER
10836.0004H 10/02 ©1997 BUNN-O-MATIC CORPORATION
Page 50
41711.1 052009
Part II
20
AMP
T1
Page 51
T5 T3
T4
T2
41711.1 052009
Part II
GREEN
BLK Model 15
SCHEMATIC WIRING DIAGRAM
CWTF, CWTFB NO WARMER
MAIN ON/OFF SWITCH
(Late 20 & 35
Models only)
BLK-14
N
L2
RED Model 35
WHI Model 20
WHI Model 15 & 35
BLK
L1
BLK Model 20 & 35
BLU
HEATER
SWITCH
LIMIT
THERMOSTAT
BLK
BLK
BLK (FAUCET OPTION ONLY)
THERMAL
FUSE
SW. & THERMOSTAT
BLU
BLK
TANK HEATER
BLK
WHI-14 Model 20
RED-14 Model 35
WHI Model 15
WHI
WHI
ON/OFF
SWITCH
WHI Model 20
READY INDICATOR
"KEEP WARM" HEATER
WHI
WHI/RED
BLK
WHI/ORA
OPTIONAL FRESH LIGHT SYSTEM
OPTIONAL AUTOMATIC BREW CIRCUIT
START SWITCH
GRY
L.E.D.
PNK
4
INDICATOR 3
2
TIMER
BLK
120/240 VOLTS AC 3 WIRE
100-120 VOLTS AC 2 WIRE
SINGLE PHASE
1
WHI/RED
WHI/RED
BLU P1 BLU
P3
P1, P2, & P3 ARE PINS OF A
POLARIZED THREE-PIN
CONNECTOR.
BLK
BLK
BREW
TIMER
SOL
WHI
WHI
P2
WHI
WHI
10836.0006M 02/07 ©1995 BUNN-O-MATIC CORPORATION
Page 52
41711.1 052009
Part II
SCHEMATIC WIRING DIAGRAM
CWTFA NO WARMER
L1
READY INDICATOR
BLU
BLK
LIMIT
THERMOSTAT
BLK
BLU
HEATER
SWITCH
THERMAL
FUSE
BLK
BLK
SW. & THERMOSTAT
L2
GRN
TANK HEATER
THERMAL
FUSE
RED
RED
BLK
RED
BLK
WHI
WHI
ON/OFF
SWITCH
BLK
"KEEP WARM" HEATER
RED
WHI/RED
WHI/ORA
OPTIONAL AUTOMATIC BREW CIRCUIT
START SWITCH
OPTIONAL FRESH LIGHT SYSTEM
GRY
L.E.D.
PNK
BLK
4
WHI/RED
INDICATOR 3
2
TIMER
WHI/RED
BLU
P3
P1 BLU
BLK
BLK
SOL
1
P1, P2, & P3 ARE PINS OF A
POLARIZED THREE-PIN
CONNECTOR.
BREW
TIMER
WHI
WHI
P2 WHI
WHI
230 VOLTS AC
2 WIRE
SINGLE PHASE
10836.0008A 12/99 ©1999 BUNN-O-MATIC CORPORATION
Page 53
41711.1 052009
Part II
WHI
GRN
N
L2
RED
SCHEMATIC WIRING DIAGRAM
CT-DV, CTF-DV, CWT-DV & CWTF-DV
BLK
L1
MAIN ON/OFF SWITCH
(Late Models only)
BLK
READY INDICATOR
BLU
HEATER
SWITCH
LIMIT
THERMOSTAT
BLK
BLK
BLK
SW. & THERMOSTAT
(FAUCET OPTION ONLY)
THERMAL
SAFETY FUSE
BLK-14
BLU
BLK-14
SELECTOR
SWITCH
TANK HEATER
BLU-14
WHI-14
WHI
1320 W
WHI
"KEEP WARM" HEATER
ON/OFF
SWITCH
BLK
WHI/VIO-14
TANK HEATER
RED-14
1800 W
WHI
WHI/RED
WHI/RED
WHI
LOWER WARMER
OPTIONAL AUTOMATIC BREW CIRCUIT
START SWITCH
BLU
WHI/RED
WHI/BLU
WHI/RED
P1, P2, & P3 ARE PINS OF A
POLARIZED THREE PIN
CONNECTOR
T5 T3
T1 BREW
TIMER
T4
T2
SOL
WHI/GRN
WHI
OPTIONAL DUAL WARMER ASSY (TOP OR SIDE)
WHI
BLK
BRN/BLK
P2
BRN/BLK
FRONT WARMER
WHI
P1
WHI
WHI
VIO
BLK
P3
VIO
REAR WARMER
120V AC 2 WIRE
120/208V AC 3 WIRE
120/240V AC 3 WIRE
SINGLE PHASE
OPTIONAL SINGLE TOP WARMER ASSY
WHI
VIO
BLK
P3
VIO
WHI
P1
WHI
REAR WARMER
10836.0009C 02/07 ©2003 BUNN-O-MATIC CORPORATION
Page 54
41711.1 052009
Part II
WHI
GRN
SCHEMATIC WIRING DIAGRAM
CWT, CWTF - APS, TS, TC DV
N
L2
RED
BLK
L1
MAIN ON/OFF SWITCH
(Late Models only)
BLK
READY INDICATOR
BLU
HEATER
SWITCH
BLK
LIMIT
THERMOSTAT
BLK
BLK
SW. & THERMOSTAT
BLU
THERMAL
SAFETY FUSE
(Faucet models only)
BLK-14
BLK-14
SELECTOR
SWITCH
TANK HEATER
WHI/VIO-14
ON/OFF
SWITCH
WHI-14
BLU-14
TANK HEATER
RED-14
WHI
WHI
"KEEP WARM" HEATER
WHI
START SWITCH
BLK
WHI/RED
WHI/RED
WHI/RED
120V AC 2 WIRE
120/208V AC 3 WIRE
120/240V AC 3 WIRE
SINGLE PHASE
BLU
WHI/BLU
T5 T3
T1 BREW
TIMER
T4
T2
SOL
WHI/GRN
WHI
10836.0010B 02/07 ©2001 BUNN-O-MATIC CORPORATION
Page 55
41711.1 052009
Part II
SCHEMATIC WIRING DIAGRAM
SINGLE CW
L1
READY
HEATER
SWITCH
BLK
LIMIT
THERMOSTAT
BLK
(FAUCET
OPTION ONLY)
THERMAL
FUSE
BLK
BLK
N
GRN
SW. & THERMOSTAT
BLK
BLU
BLK
WHI (MODELS 15 & 20)
TANK HEATER
RED (MODEL 35)
WHI
WHI
ON/OFF
SWITCH
L2
"KEEP WARM" HEATER
WHI
3
BLK 2
1 WHI/RED
WHI/RED
WHI
LOWER WARMER
START SWITCH
SOL
BLU
WHI/RED
WHI/RED
WHI/BLU
PNK
TAN
T1 T5 T3
BREW T4
TIMER T2
WHI/GRN
WHI
HALF/FULL
SWITCH
WHI
3
BLK 2
120/240 VOLTS AC 3 WIRE
120 VOLTS AC 2 WIRE
SINGLE PHASE
1 BRN/BLK
P2
3
BLK 2
1
P1, P2, &
P3 ARE
PINS OF A
POLARIZED
THREE-PIN
CONNECTOR.
WHI
VIO
P3
P1
WHI
NO CONNECTION THIS APPLICATION
10836.0011B 01/03 ©2003 BUNN-O-MATIC CORPORATION
Page 56
41711.1 052009
Part II
L1
BLK
GRN
GRN
RIGHT
N
L2
RED
N
WHI
SCHEMATIC WIRING DIAGRAM
CWTF TWIN 4/2 & 0/6 TWO-CIRCUIT
WHI
RED
BLK
LEFT
L1 L2
READY INDICATOR
TANK HEATER
BLK
BLK
BLU
WHI
WHI
"KEEP WARM" HEATER
RED
READY INDICATOR
RED
SW. & THERMOSTAT
LIMIT
THERMOSTAT
SW1-R
BLK
BLU
BLK
TANK HEATER
BLK
"KEEP WARM" HEATER
WHI
RED
WHI
WHI
BLK
WHI
SW3-L
SW2-L
WHI/BLU
P1-3L BLK
WHI/RED
BLK
P1-1L BLU/BLK
BLU
WHI/RED
SOL
LEFT BREW WARMER
WHI/RED
WHI/GRN
T1 T5 T3
T4
T2 WHI
BREW TIMER
SW2-R
P1-2L
WHI
SW3-R
P1-1R BLU/BLK
BLU
WHI/RED
P1-3R
WHI/RED
BLK
WHI/BLU
WHI/RED RIGHT BREW WARMER
SOL
WHI/GRN
T4
T2 WHI
BREW TIMER
T1 T5 T3
P1-2R
WHI
BLK
WHI
SW4-L
WHI
BLK
SW4-R
WHI
WHI
WHI
P2-1L
P2-2L
BLK
SW5-L
BLK
LEFT FRONT WARMER
WHI
VIO
BLK
BRN/BLK
P2-3L
VIO
BRN/BLK
SW5-R
WHI
BLK
BLK
BLK
MAIN ON/OFF SWITCH
(Late Models only)
(FAUCET SIDE)
THERMAL
SAFETY FUSE
SW. & THERMOSTAT
LIMIT
THERMOSTAT
SW1-L
BLK
BLK
RED
MAIN ON/OFF SWITCH
(Late Models only)
BLK
P2-2R
P2-1R
BRN/BLK
WHI
VIO
WHI
RIGHT FRONT WARMER
P2-3R
VIO
WHI
RIGHT REAR WARMER
LEFT REAR WARMER
TWO INDIVIDUAL BRANCH
CIRCUITS REQUIRED
EACH RATED
120/240 VOLTS AC
3 WIRE + GND
SINGLE PHASE
10847.0000D 01/07 ©1994 BUNN-O-MATIC CORPORATION
Page 57
41711.1 052009
Part II
GRN
BLK
BLK
BLU
BLU
K1 N.O.
RT. SW. & THERMOSTAT
RT. LIMIT
THERMOSTAT
BLK
RED
BLK
WHI
SW2
BLK
LEFT TANK HEATER
BLK
BLU
MAIN ON/OFF SWITCH
(Late Models only)
(FAUCET)
THERMAL
FUSE
LT. SW. & THERMOSTAT
LT. LIMIT
THERMOSTAT
SW1
BLK
BLU
WHI
LEFT "KEEP WARM" HEATER
BLU
BLK
BLU
N
L2
WHI
BLK
L1
RED
SCHEMATIC WIRING DIAGRAM CWT TWIN 2/2 & 4/2
W/RECOVERY BOOSTER
BLK
RIGHT TANK HEATER
RED
BLK
K2 N.O.
WHI
WHI
RIGHT "KEEP WARM" HEATER
RED
SW3
WHI
WHI/RED P1-2 WHI/RED
RED
WHI P1-1
WHI
WHI
LEFT LOWER WARMER
SW4
WHI
WHI/GRN P1-3 WHI/GRN
BLK
WHI
RIGHT LOWER WARMER
SW5
BLK
P2-1
BLU
WHI/RED
P2-3
WHI/RED
SW6
BLK
K2
P3-1
WHI/GRN
BLU
WHI/GRN
P3-3
WHI
BLU/BLK
BLK
BLK
RT
SOL
WHI
WHI/BLU
T1 T5 T3 T4 WHI/GRN
WHI
RIGHT T2
K1
WHI
BLU/BLK
BLK
BLK
LT
SOL
WHI/BLU
T1 T5 T3
WHI/GRN
T4
WHI
LEFT T2
WHI
P2-2
WHI
BREW TIMER
P3-2
WHI
BREW TIMER
MODELS 2/2 & 4/2 ONLY
RED
SW7
WHI
RED
YEL
P4-2
YEL
SW8
WHI P4-1
WHI
WHI
WHI/YEL P4-3
BLK
WHI
LEFT TOP WARMER
WHI
WHI/YEL
RIGHT TOP WARMER
MODELS 4/2 ONLY
RED
SW9
WHI
WHI/VIO P5-3 WHI/VIO
RED
WHI P5-1
WHI
LEFT TOP WARMER
SW10
BLK
WHI
WHI
WHI/BRN P5-2 WHI/BRN
WHI
RIGHT TOP WARMER
120/240 VOLTS AC
3 WIRE + GND
SINGLE PHASE
10867.0000F 01/07 © 1995 BUNN-O-MATIC CORPORATION
Page 58
41711.1 052009
Part II
SCHEMATIC WIRING DIAGRAM CWTF TWIN 0/6 WITH
RECOVERY BOOSTER
L1
BLK
BLK
BLU
LT. SW. & THERMOSTAT
BLU
BLK
BLU
WHI
L2
BLK
BLK
BLU
LT.LIMIT
THERMOSTAT
SW1
N
GREEN
LT. READY INDICATOR
RED
(FAUCET)
THERMAL
SAFETY FUSE
BLK
BLK LEFT TANK HEATER
RED
BLK
K.1. N.O.
WHI
BLK
RT. LIMIT
THERMOSTAT
BLK
BLU
BLU
SW2
RT. SW. & THERMOSTAT
BLK
RT. READY INDICATOR
LEFT "KEEP WARM" HEATER
RED
BLK
BLU
BLK
BLU
RIGHT TANK HEATER
BLK
RED
BLK
K.2. N.O.
WHI
WHI
RIGHT "KEEP WARM" HEATER
RED
SW3
WHI
RED
P1-2 WHI/RED
WHI/RED
WHI/RED
SW4
WHI
WHI
LEFT BREW WARMER
P1-1
WHI
WHI
SW5
WHI/GRN
BLK
P1-3 WHI/GRN
SW7
WHI
RIGHT BREW WARMER
BLK
SW8
WHI/GRN
P3-1
BLU BLU/BLK
WHI/GRN
P3-3 BLK
GRY
GRY
BLK
SW6
K2
WHI
P2-1
BLU BLU/BLK
BLK
BLK
WHI/RED
WHI/RED
P2-3
WHI/ORA
RT
WHI
SOL
WHI/BLU WHI/GRN
T1 T5 T3
T4
RIGHT
T2 WHI
BREW TIMER
BLK
K1
WHI
BLK
WHI/ORA
LT WHI
SOL
WHI/BLU
WHI/GRN
T1 T5 T3
T4
LEFT
T2 WHI
BREW TIMER
PNK GRY
PNK
PNK
P2-2 WHI
WHI/ORA
WHI
P3-2
4
L.E.D.
L.E.D.
WHI
WHI/ORA
WHI
OPTIONAL 3
INDICATOR 2
TIMER
1
WHI
BLK
SW9
BLK
BRN/BLK
SW10
BLK
WHI
WHI
P5-2 BRN/BLK
WHI
P5-1
P4-1
WHI
RIGHT FRONT WARMER
YEL
YEL
LEFT FRONT WARMER
WHI
VIO
P4-2
WHI
P5-3
VIO
120/240 VOLTS AC 3 WIRE
SINGLE PHASE
WHI
RIGHT REAR WARMER
WHI
SW11
WHI/VIO P4-3 WHI/VIO
LEFT REAR WARMER
RED
SW12
RED
27693.0000D 07/03 © 1996 BUNN-O-MATIC CORPORATION
Page 59
41711.1 052009
TITLE-2
Change A
@@FIpgtype@@BLANK@@!FIpgtype@@
PART III
Illustrated Parts Catalog
TITLE-2
Change A
@@FIpgtype@@BLANK@@!FIpgtype@@
Part III
C, CT, CW, CWTF Series
Including DV, MV, Pourover,
APS/TC/TS, Twins & Single CW
Supercedes Illustrated Parts Catalogs:
10716.####; 10789.####; 10790.0000;
10834.0000; 10895.0000; 33175.0000; 35279.0000
ILLUSTRATED PARTS CATALOG
Designs, materials, weights, specifications, and dimensions for equipment or replacement parts
are subject to change without notice.
BUNN-O-MATIC CORPORATION
POST OFFICE BOX 3227
SPRINGFIELD, ILLINOIS 62708-3227
PHONE: (217) 529-6601 FAX: (217) 529-6644
40566.0000E+
12/09 ©2006 Bunn-O-Matic Corporation
Part III
BUNN-O-MATIC COMMERCIAL PRODUCT WARRANTY
Bunn-O-Matic Corp. (“BUNN”) warrants equipment manufactured by it as follows:
1) All equipment other than as specified below: 2 years parts and 1 year labor.
2) Electronic circuit and/or control boards: parts and labor for 3 years.
3) Compressors on refrigeration equipment: 5 years parts and 1 year labor.
4) Grinding burrs on coffee grinding equipment to grind coffee to meet original factory screen sieve analysis:
parts and labor for 3 years or 30,000 pounds of coffee, whichever comes first.
These warranty periods run from the date of installation BUNN warrants that the equipment manufactured by
it will be commercially free of defects in material and workmanship existing at the time of manufacture and
appearing within the applicable warranty period. This warranty does not apply to any equipment, component or
part that was not manufactured by BUNN or that, in BUNN’s judgment, has been affected by misuse, neglect,
alteration, improper installation or operation, improper maintenance or repair, damage or casualty. This warranty is
conditioned on the Buyer 1) giving BUNN prompt notice of any claim to be made under this warranty by telephone
at (217) 529-6601 or by writing to Post Office Box 3227, Springfield, Illinois 62708-3227; 2) if requested by
BUNN, shipping the defective equipment prepaid to an authorized BUNN service location; and 3) receiving prior
authorization from BUNN that the defective equipment is under warranty.
THE FOREGOING WARRANTY IS EXCLUSIVE AND IS IN LIEU OF ANY OTHER WARRANTY, WRITTEN OR
ORAL, EXPRESS OR IMPLIED, INCLUDING, BUT NOT LIMITED TO, ANY IMPLIED WARRANTY OF EITHER
MERCHANTABILITY OR FITNESS FOR A PARTICULAR PURPOSE. The agents, dealers or employees of BUNN
are not authorized to make modifications to this warranty or to make additional warranties that are binding on
BUNN. Accordingly, statements by such individuals, whether oral or written, do not constitute warranties and
should not be relied upon.
If BUNN determines in its sole discretion that the equipment does not conform to the warranty, BUNN, at its
exclusive option while the equipment is under warranty, shall either 1) provide at no charge replacement parts
and/or labor (during the applicable parts and labor warranty periods specified above) to repair the defective
components, provided that this repair is done by a BUNN Authorized Service Representative; or 2) shall replace
the equipment or refund the purchase price for the equipment.
THE BUYER’S REMEDY AGAINST BUNN FOR THE BREACH OF ANY OBLIGATION ARISING OUT OF THE SALE OF
THIS EQUIPMENT, WHETHER DERIVED FROM WARRANTY OR OTHERWISE, SHALL BE LIMITED, AT BUNN’S
SOLE OPTION AS SPECIFIED HEREIN, TO REPAIR, REPLACEMENT OR REFUND.
In no event shall BUNN be liable for any other damage or loss, including, but not limited to, lost profits, lost sales,
loss of use of equipment, claims of Buyer’s customers, cost of capital, cost of down time, cost of substitute
equipment, facilities or services, or any other special, incidental or consequential damages.
AutoPOD, AXIOM, BrewLOGIC, BrewMETER, Brew Better Not Bitter, BrewWISE, BrewWIZARD, BUNN Espress,
BUNN Family Gourmet, BUNN Gourmet, BUNN Pour-O-Matic, BUNN, BUNN with the stylized red line, BUNNlink,
Bunn-OMatic, Bunn-O-Matic, BUNNserve, BUNNSERVE with the stylized wrench design, Cool Froth, DBC, Dr.
Brew stylized Dr. design, Dual, Easy Pour, EasyClear, EasyGard, FlavorGard, Gourmet Ice, Gourmet Juice, High
Intensity, iMIX, Infusion Series, Intellisteam, My Café, PowerLogic, Quality Beverage Equipment Worldwide,
Safety-Fresh, savemycoffee.com, Scale-Pro, Silver Series, Single, Smart Funnel, Smart Hopper, SmartWAVE,
Soft Heat, SplashGard, The Mark of Quality in Beverage Equipment Worldwide, ThermoFresh, 392, Beverage Bar
Creator, Beverage Profit Calculator, BUNNSource, Coffee At Its Best, Digital Brewer Control, Nothing Brews Like
a BUNN, Pouring Profits, Respect Earth, Respect Earth with the stylized leaf and coffee cherry design, Signature
Series, Tea At Its Best, The Horizontal Red Line, Titan, Ultra are either trademarks or registered trademarks of
Bunn-O-Matic Corporation.
40566 110909
Part III
TABLE OF CONTENTS
TOP Covers ............................................................................................................................................... 4
HOOD ASSEMBLIES......................................................................................................................................8
TRUNKS.......................................................................................................................................................10
BASES..........................................................................................................................................................16
Tank and Components ......................................................................................................................... 20
Fill Basin..................................................................................................................................................24
MANIFOLDS-LATER TWINS.........................................................................................................................26
Strainer/Flow Controls-EARLY TWINS..............................................................................................28
MANIFOLDS-LATER SINGLES.....................................................................................................................30
Strainer/Flow Controls-SECOND STYLE SINGLES............................................................................32
Strainer/Flow Controls-FIRST STYLE SINGLES................................................................................34
FILL SolenoidS ........................................................................................................................................36
Faucet .......................................................................................................................................................38
Warmer Assemblies...............................................................................................................................40
Electrical and Operating Controls . ..............................................................................................42
Funnels ....................................................................................................................................................52
Numerical Index ....................................................................................................................................54
Explanation of codes:
15 - All components in machine are rated for 120 Volts ac, (15 Amps)
20 - All components in machine are rated for 120 Volts ac, (20 Amps)
35 (120/240V) - Tank heater rated for 240 volts ac, all other components rated for 120 volts ac (20 Amps)
DV - Dual Voltage. 2 tank heaters with toggle switch
MV - Multi Voltage. 2 tank heaters with terminal block. (Replaced by DV)
A - All components in machine are rated for 240 volts ac.
B - All components are rated for either 100 volts ac, or 200 volts ac.
C - Canadian models only
CE - European models only.
Fraction Decimal
Fraction
Decimal
TWIN - 2 brewers in 1 chassis.
1/16
0.063
9/16
0.563
APS - Airpot Server (No warmers)
1/8
0.125
5/8
0.625
TC - Thermal Carafe (No warmers)
3/16
0.188
11/16
0.688
TS - Thermal Server (No warmers)
3
1/4
0.250
3/4
0.750
5/16
0.313
13/16
0.813
3/8
0.375
7/8
0.875
7/16
0.438
15/16
0.938
1/2
0.500
1
1.000
40566 111308
Part III
TOP COVER ASSEMBLIES-SINGLES
C/CT/CWTF
Series
Pour in lids for earlier models
1
2
3
7
5
4
6
8
All models with brass covers/
panels are no longer available
9
11
18
14
17
12
20
21
10
19
13
15
16
Single CW
P3908.5
4
40566 021109
QTY.
TWIN
Part III
TOP COVER ASSEMBLIES-SINGLES
ITEM
PART NO.
QTY.
SINGLE
1
02999.0000
-
1
Plug, SST 1.19” Dia.
2
13110.0000
-
1
Lid
3
12978.0000
-
1
Chain Assembly
4
12981.0001
-
1
Lid/Chain Kit (Includes # 2-3)
5
02722.0000
02722.0001
01319.0000
01319.0000
00912.0000
2
2
2
2
2
1
1
1
1
1
Lid, Pour-in SST
Lid, Pour-in BLK
SST thumbscrew # 8-32 x .75"
BLK thumbscrew # 8-32 x .75"
Fastener, “J” Type # 8-32
6
02763.0000
-
1
Decal, Caution-Warmers and Surfaces are Hot - Pour in Water Only
7
04831.0000
01315.0000
00908.0000
02332.0002
1
1
1
1
1
1
1
1
Clamp
Screw, Truss Head #8-32 x .375"
Nut #8-32
Screw, Hex-crimptite #6-32 X .375”
8
00833.0000
-
1
Decal, Pour in Water Only
9
41760.0000
01326.0007
00971.0000
2
2
4
1
1
2
Clip, Cable - SST
Screw, TRH SLTD 10-32x.75LG
Nut, Keps #10-32 Zinc Pl
10
37881.0000
1
1
Decal, No User Serviceable Parts
11
37881.0002
-
1
Decal, No User Serviceable Parts
12
01592.0000
01592.0001
2
1
1
1
Bushing, Snap 1" Dia.
Bushing, Snap 1.188" Dia.
13
38498.1000
2
1
Flip Lid Assembly w/Clip
14
02765.0000
1
-
Decal, Caution-Warmers are Hot
15
01303.0000
01303.0002
00916.0000
2
2
2
1
1
1
Screw, SST Panhead #4-40 x .5"
Screw, BLK Panhead #4-40 x .5"
Fastener, “J” Type # 4-40
16
28180.0000
-
1
Decal, Multi Volt Heater Terminal Block Wiring Diagram
17
38496.1002
40085.1000
-
-
1
1
Top Cover Assy. 2 Warmer SST (Includes # 11-14)
Top Cover Assy. 2 Warmer BLK
18
38496.1000
-
1
Top Cover Assy. 1 Warmer Rear SST (Includes # 11-14)
19
25633.0002
-
1
Top Cover Assy. 1 Warmer Front SST (Includes # 10, 12, 14)
20
02732.0000
01315.0000
-
-
1
1
Panel, Rear SST
Screw, Truss Head #8-32 x .375"
21
38503.1000
38504.1000
-
-
1
1
Top Cover Assy. No Warmer SST (Includes # 10, 13)
Top Cover Assy. No Warmer BLK (Includes # 10, 13)
* Indicates the part number listed is for reference only.
DESCRIPTION
5
First Style
Second Style
Later Models
40566 021109
Part III
TOP COVER ASSEMBLIES-TWINS
All covers/housings include flip
lids &/or decals as required.
4/2
C/CT/CWTF
Series
2
APS/TC & 0/6
8
12
3
9
1
10
6
4
2/2 Rear
2/2 Front
11
7
5
P3909.5
6
40566 101507
QTY.
TWIN
TOP COVER ASSEMBLIES-TWINS
ITEM
PART NO.
QTY.
SINGLE
1
38707.1000
38707.1003
1
1
2
24254.0001
01347.0000
1
-
10
Housing Assembly, SST 4/2 (Incl # 11)
Screw, Truss Head #6-32 x .375"
3
38707.1001
1
-
Cover Assembly SST 4/2 (Incl # 9, 10)
4
24254.0000
01347.0000
1
6
-
-
Housing Assembly, SST 2/2 Rear (Incl # 11)
Screw, Truss Head #6-32 x .375"
5
38707.1002
1
-
Cover Assembly SST 2/2 Rear (Incl # 8, 10)
6
24254.0002
01347.0000
1
10
-
-
Housing Assembly, SST 2/2 Front (Incl # 11)
Screw, Truss Head #6-32 x .375"
7
25864.0000
1
-
Cover Assembly SST 2/2 Front (Incl # 8)
8
37881.0000
1
1
Decal, No User Serviceable Parts
9
37881.0002
1
1
Decal, No User Serviceable Parts
10
38498.1000
2
1
Flip Lid Assembly w/Clip
11
12364.0000
1
-
Decal, Caution-Warmers Are Hot
12
41760.0000
01326.0007
00971.0000
2
2
4
1
1
2
Clip, Cable - SST
Screw, TRH SLTD 10-32x.75LG
Nut, Keps #10-32 Zinc Pl
-
-
Part III
DESCRIPTION
Cover Assembly SST No Warmers (Incl # 8, 10)
Cover Assembly BLK No Warmers (Incl # 8, 10)
* Indicates the part number listed is for reference only.
7
40566 101507
Part III
C/CT/CWTF
Series
HOOD ASSEMBLIES
4
5
1
6
6
7
3
8
2
2
P3910.5
8
40566 101507
QTY.
TWIN
HOOD ASSEMBLIES
ITEM
PART NO.
QTY.
SINGLE
1
13350.0008*
02308.0000
-
-
1
6
Housing, Hood SST (Early Style No Longer Available, Order # 2)
Screw #8-32 x .375" (Hood to Trunk)
2
13350.0006
13350.0016
13350.0011
23232.0000 *
23232.0002 *
23232.0004
23232.0005
02308.0000
01303.0000
00916.0000
-
-
-
1
1
1
1
6
2
2
1
1
1
-
-
-
-
6
1
1
Housing, Hood SST (7.125" Narrow Funnel) CWTF, Single CW
Housing, Hood BLK (7.125" Narrow Funnel)
Housing, Hood SST (7.625" Wide Funnel)
Housing, Hood SST (7.125" Narrow Funnel)
Housing, Hood BLK (7.125" Narrow Funnel)
Housing, Hood BLK (7.625" Wide Funnel)
Housing, Hood SST (7.625" Wide Funnel)
Screw #8-32 x .375" PNHD (Hood to Trunk)
Screw #4-40 x .50" PNHD (Cover to Hood)
Clip J-Type #4-40
3
00670.0000
1
-
Plug BLK Nylon .437" Dia. (Brewers w/o Faucet)
4
00462.0001
-
1
Plug, Slotted Head .125" NPT (Early Models w/Vent Tube)
5
03263.0002
-
1
Sponge Pad w/Adhesive (First Type w/Top Mount Thermostat)
6
12683.0000*
12683.0002*
02371.0000*
00973.0000
-
-
-
-
2
1
8
8
Cover, Blank (No Longer Available)
Cover, w/Faucet Hole (No Longer Available)
Nut, Thumb #6-32 (No Longer Available)
Nut, Keps #6-32 (Later Models)
7
13354.0000
-
1
Swivel Plate w/Funnel Rails
8
01315.0000
00912.0000
4
4
2
2
Screw #8-32 x .375" TRSHD (Tank Mount)
Clip, J-Type #8-32
* Indicates the part number listed is for reference only.
Part III
DESCRIPTION
9
40566 103007
Part III
C/CT/CWTF
Series
TRUNKS
Early APS
8
22
All models with receptacle and/or
fuse (MV) are no longer available
24
20
APS
15
1
6
18
3
7
4
14
Standard & TC
12
10
11
1
13
12
14
5
10
11
TWIN-APS
3
19
13
6
9
2
7
18
4
21
0/6 TWIN w/ 2 cords
1
10
11
11
16
10
17
12
3
13
19
23
0/6 TWIN w/ 2 cords
P3911.3
10
40566 111308
QTY.
TWIN
TRUNKS
QTY.
SINGLE
Part III
ITEM
PART NO.
DESCRIPTION
1
34061.1006
34061.1000
25352.0007
34208.1002
23320.1004
34061.0013
34061.1004
26285.0000
26285.0001
26285.0002
23294.0000
23294.0002
23294.0001
-
-
-
-
-
-
-
1
1
1
1
1
1
1
1
1
1
1
1
1
-
-
-
-
-
-
Trunk, SST,
Trunk, BLK,
Trunk, SST,
Trunk, SST,
Trunk, BLK,
Trunk, BLK,
Trunk, SST,
Trunk, SST,
Trunk, BLK,
Trunk, SST,
Trunk, SST,
Trunk, BLK,
Trunk, SST,
11.69" Standard
11.69" Standard
12.39" TC
18.15" APS
18.15" APS
22.16" TS
All trunks include decals
22.16" TS
00656.0000 & 00831.0000
TWIN APS
except 0/6 w/ 2 cords.
TWIN APS
TWIN TC
All Other TWINS w/1 Power Cord
All Other TWINS w/1 Power Cord
0/6 TWINS (w/2 Power Cords Only)
34061.1022
34061.1035
34061.1023
34061.1025
34061.1003
34208.1011
23320.1012
34061.0026
26285.0006
26285.0008
26285.0007
23294.0011
23294.0008
-
-
-
-
-
-
-
-
1
1
1
1
1
1
1
1
1
1
1
1
1
-
-
-
-
-
Trunk, SST,
Trunk, SST,
Trunk, BLK,
Trunk, SST,
Trunk, SST,
Trunk, SST,
Trunk, BLK,
Trunk, BLK,
Trunk, SST,
Trunk, BLK,
Trunk, SST,
Trunk, SST,
Trunk, SST,
11.69" Standard (Left Mounted Switch)
11.69" Standard (Right Mounted Switch)
11.69" Standard
12.39" TC
16.69" Single CW
With Side Mounted Rocker
18.15" APS
Type Master ON/OFF Switch
18.15" APS
22.16" TS
TWIN APS
TWIN APS
TWIN TC
All Other TWINS w/1 Power Cord
0/6 TWINS (w/2 Power Cords Only) (2 Switches)
41402.1000
41402.1001
41402.1003
41402.1008
41417.1000
41417.1001
41417.1002
23294.1010
-
-
-
-
-
-
-
1
1
1
1
1
1
1
1
-
Trunk, SST,
Trunk, BLK,
Trunk, SST,
Trunk, SST,
Trunk, SST,
Trunk, SST,
Trunk, BLK,
Trunk, SST,
11.69" Standard
11.69" Standard
With Rear Mounted Master
12.39" TC
ON/OFF Toggle Switch
16.69" Single CW
18.15" APS (120V)
18.15" APS (230V CE)
18.15" APS (Domestic)
0/6 TWINS (Includes # 21) (w/2 Cords Only) (4 Switches)
02308.0000
00970.0000
00988.0000
12
8
7
9
-
6
2
22748.0000
22748.0001
22748.0002
-
-
-
1
1
1
Extension, SST, 6.5"
Extension, SST, 10.5"
Extension, BLK, 10.5"
3
28233.0000
23270.0000
41426.1000
-
1
1
1
-
-
Optional Utility Cover (Fits 18.15" APS Trunks Only)
Utility Cover w/Decals (All Short Twins) (Includes # 6,7,19)
Utility Cover w/Decals ( 0/6 Twins w/ 2 cords) (Includes # 6,7,19, 23)
02332.0002
6
-
Screw, Hex-Crimptite #6 x .38”
4
26287.0000
22733.0000
02308.0000
1
-
2
-
1
4
Bracket, Support (APS Only)
Bracket, Support (APS Only)
Screw #8-32 x .375"
No Master
ON/OFF
Switch
Screw, PNHD #8-32 x .375" (Trunk to Base)
Nut, Keps #8-32 (Trunk to Base) (TWIN - APS Only)
Fastener, (Tinnerman) “U” Type #6-32
Continued on next page
11
* Indicates the part number listed is for reference only.
40566 111308
Part III
C/CT/CWTF
Series
TRUNKS
Early APS
8
22
All models with receptacle and/or
fuse (MV) are no longer available
24
20
APS
15
1
6
18
3
7
4
14
Standard & TC
12
10
11
1
13
12
14
5
10
11
TWIN-APS
3
19
13
6
9
2
7
18
4
21
0/6 TWIN w/ 2 cords
1
10
11
11
16
10
17
12
3
13
19
23
0/6 TWIN w/ 2 cords
P3911.3
12
40566 111308
QTY.
TWIN
TRUNKS
QTY.
SINGLE
Part III
ITEM
PART NO.
DESCRIPTION
5
27929.0000
02308.0000
-
-
2
4
Bracket, (APS Only)
Screw #8-32 x .375"
6
00656.0000
1
1
Decal, Compliance To Plumbing Code
7
00831.0000
1
1
Decal, Warning-Electrical
8
00669.0003
-
2
Plug
9
11408.1002
11408.1005
11408.1006
22730.1007
22730.1002
22730.1005
22730.1003
22730.1009
01382.0000
01382.0002
26283.1000
26283.1001
23267.1000
24249.0003
23267.1001
01315.0000
01315.0005
-
-
-
-
-
-
-
-
-
-
1
1
1
1
1
5-7
5-7
1
1
1
1
1
1
1
1
4-6
4-6
-
-
-
-
-
-
-
Panel, SST, 11.625" Standard (Includes # 10-11)
Panel, BLK, 11.625" Standard (Includes # 10-11)
Panel, SST, 12.375" TC (Includes # 10-11)
Panel, SST, 15.63" Single CW (Includes # 10-11)
Panel, SST, 18.125" APS (Includes # 10-11)
Panel, BLK, 18.125" APS (Includes # 10-11)
Panel, SST, 22.125" TS (Includes # 10-11)
Panel, BLK, 22.125" TS (Includes # 10-11)
All front panels include decals
Screw, SST #6-32 x .375"
00658.0000 & 37881.0000
Screw, BLK #6-32 x .375"
Panel, SST, TWIN APS (Includes # 10-11)
Panel, BLK, TWIN APS (Includes # 10-11)
Panel, SST, All Other TWINS w/One Power Cord (Includes # 10-11)
Panel, SST, All 0/6 TWINS w/Two Power Cords (Includes # 10-12,16,17)
Panel, BLK, All Other TWINS (Includes # 10-11)
Screw, SST #8-32 x .375"
Screw, BLK #8-32 x .375"
10
00658.0000
1
1
Decal, Warning-Decanter/Funnel
11
37881.0000
1
1
Decal, No User Serviceable Parts
12
10836.0000
10836.0005
10836.0009
10836.0010
10836.0011
10693.0000
10693.0001
10693.0002
10867.0000
27693.0000
10847.0000
10736.0000
-
-
-
-
-
-
-
-
1
1
1
1
1
1
1
1
1
1
1
1
-
-
-
-
Schematic, C, CWT, CWTF-15, 20, 35, 120V, 120/208-240V
Schematic, C, CWT, CWTF-MV
Schematic, C, CWT, CWTF-DV
Schematic, APS/TC/TS-DV
Schematic, Single CW
Schematic, APS/TC/TS-12, 20, 35 (Mechanical T’Stat)
Schematic, APS/TC/TS-12, 20, 35 (Electronic T’Stat)
Schematic, APS/TC/TS-MV
Schematic, 2/2,4/2 Twins w/Optional Recovery Booster
Schematic, 0/6 Twins (Mechanical T’Stat, Fresh Timer & Booster)
Schematic, 0/6 Twins w/Two Power Cords
Schematic, All Other Twins
13
32540.0000
1
1
Decal, Digital Timer Setting
14
28181.0000
28181.0001
28181.0002
34955.0000
34955.0001
34955.0002
34955.0003
-
-
-
-
-
-
-
1
1
1
1
1
1
1
Decal, Optional Field Wiring (3 Warmer) (MV Only)
Decal, Optional Field Wiring (1 Warmer) (MV Only)
Decal, Optional Field Wiring (APS-MV Only)
Decal, Optional Field Wiring (TC/APS-DV Only)
Decal, Optional Field Wiring (1 Warmer) (DV Only)
Decal, Optional Field Wiring (2 Warmer) (DV Only)
Decal, Optional Field Wiring (3 Warmer) (DV Only)
15
02822.0000
-
1
Decal, 200 Watts Maximum
16
12183.0002
1
-
Decal, 20 amp Electrical Circuit (Brewers with two Power Cords Only)
(1st type) separate
Strainer & Flow
Control
Continued on next page
13
* Indicates the part number listed is for reference only.
40566 111308
Part III
C/CT/CWTF
Series
TRUNKS
Early APS
8
22
All models with receptacle and/or
fuse (MV) are no longer available
24
20
APS
15
1
6
18
3
7
4
14
Standard & TC
12
10
11
1
13
12
14
5
10
11
TWIN-APS
3
19
13
6
9
2
7
18
4
21
0/6 TWIN w/ 2 cords
1
10
11
11
16
10
17
12
3
13
19
23
0/6 TWIN w/ 2 cords
P3911.3
14
40566 111308
QTY.
TWIN
TRUNKS
QTY.
SINGLE
Part III
ITEM
PART NO.
17
12104.0000
1
-
Decal, Warning-Power Supply (Brewers with two Power Cords Only)
18
38820.0000
01308.0002
01308.0003
1
2
2
1
2
2
Plate, Switch Cover (Models w/out Power Switch)
Screw SST #6-32 x .25"
Screw BLK #6-32 x .25"
19
24213.0000
1
-
Decal, Tank Heater (Includes Left & Right Decals)
20
10165.0000
10447.0000
24540.0000
26225.0000
-
-
-
-
1
1
1
1
Decal, Strainer/Flow Control (w/o Needle Valve
Decal, Strainer/Flow Control (w/Needle Valve)
Decal, Strainer/Flow Control 2nd Type (Center Tap & Needle Valve)
Decal, Strainer/Flow Control 3rd type (One Piece Strainer/Flow Control)
21
40124.0000
(2)
-
Decal, Warning-ON/OFF Switch x 2 (0/6 Twins with two Power Cords Only)
22
39806.0000
-
1
Decal, Tank Heater
23
41427.0000
2
-
Decal, Master ON/OFF (Includes Left & Right Decals)
24
41405.0000
-
1
Decal, Master ON/OFF
15
* Indicates the part number listed is for reference only.
DESCRIPTION
40566 111308
Part III
C/CT/CWTF
Series
BASES
4
12
3
1
7
2
10
8
5
6
9
1 Lower Warmer
APS/TC/TS
3 Lower Warmers
12
10
13
12
11
Single CW
27
10
28
8
14
23
6
15
5
TWIN-APS/TC
17
3
TWIN-0/6
19
18
26
16
19
6
11
15
5
20
21
17
11
22
24
6
15
23
25
TWIN-2/2 & 4/2
5
P3912.25
16
40566 101507
QTY.
TWIN
BASES
QTY.
SINGLE
Part III
ITEM
PART NO.
DESCRIPTION
1
23321.0000
23321.0001
23321.0002
23321.0003
23321.0004
-
-
-
-
-
1
1
1
1
1
Base W/decals, Sst (Includes Item 6) Aps
Base W/decals, Sst (Includes Item 6) Ts
Base W/decals, Sst (Includes Item 6) Aps (Ce)
Base W/decals, Sst (Includes Item 6) Ts (Ce)
Base W/decals, Blk (Includes Item 6) Aps
2
22999.0000
02332.0002
-
-
1
8
Plate, Base APS/TC/TS
Screw, Hex-crimptite #6-32 X .375”
3
00754.0001
4
2
Locator
4
22740.0000
-
1
Drip Shield, (Early Models Only)
5
25137.0001
24600.0000
-
-
4
-
Foot .75od X .48ht X .25thd
Set Of 4 Feet
6
22306.0000
2
1
Decal, Red Decorative Stripe
7
25351.0000
25351.0001
25351.0002
-
-
-
1
1
1
Base, 1 Warmer W/decals, Sst (Includes Items 6 & 10)
Base, 1 Warmer W/decals, Sst (Includes Items 6 & 10) (Ce)
Base, 1 Warmer W/decals, Blk (Includes Items 6 & 10)
8
24805.0000
24805.0002
02332.0002
-
-
-
1
1
6
Plate, Base 1 Warmer
Plate, Base 1 Warmer (Single CW)
Screw, Hex-crimptite #6-32 X .375”
9
25137.0000
35712.0000
-
-
4
-
Foot .75od X .25ht X .25thd
Set Of 4 Feet
10
12364.0000
#
#
Decal, Caution-warmers/surfaces Are Hot (Refer To Illustration For Qty.)
11
01592.0000
#
#
Bushing, Snap 1” (Refer To Illustration For Qty.)
12
01593.0000
#
#
Bushing, Snap 1.5” (Refer To Illustration For Qty.)
13
25658.0000
25658.0002
02308.0000
-
-
-
1
1
7
Housing, Side Warmer Sst (Includes Item 10)
Housing, Side Warmer Blk (Includes Item 10)
Screw, #8-32 X .375”
14
25657.0000
25657.0001
25657.0002
-
-
-
1
1
1
Base, 3 Warmers W/decals, Sst (Includes Items 6 & 10)
Base, 3 Warmers W/decals, Sst (Includes Items 6 & 10) Ce
Base, 3 Warmers W/decals, Blk (Includes Items 6 & 10)
15
12667.0001
-
1
Plate, Base 3 Warmers
16
26413.0000
26413.0001
1
1
-
-
Base W/decals, Sst (Includes Item 6) Twin-aps
Base W/decals, Blk (Includes Item 6) Twin-aps
17
26953.0000
02308.0000
2
4
-
-
Guard, Wiring
Screw, #8-32 X .375”
18
23698.1000
23698.1001
02308.0000
2
2
14
-
-
-
Housing, Side Warmer Sst (Includes Item 10)
Housing, Side Warmer Blk (Includes Item 10)
Screw, #8-32 X .375”
19
12921.0000
2
-
Switch Blank
Continued on next page
17
* Indicates the part number listed is for reference only.
40566 101507
Part III
C/CT/CWTF
Series
BASES
4
12
3
1
7
2
10
8
5
6
9
1 Lower Warmer
APS/TC/TS
3 Lower Warmers
12
10
13
12
11
Single CW
27
10
28
8
14
23
6
15
5
TWIN-APS/TC
17
3
TWIN-0/6
19
18
26
16
19
6
11
15
5
20
21
17
11
22
24
6
15
23
25
TWIN-2/2 & 4/2
5
P3912.25
18
40566 101507
QTY.
TWIN
BASES
QTY.
SINGLE
Part III
ITEM
PART NO.
20
24253.0001
24253.0002
02308.0000
1
1
12
-
-
-
Base W/decals, Sst (Includes # 10 & 21) Twin 0/6
Base W/decals, Blk (Includes # 10 & 21) Twin 0/6
Screw, #8-32 X .375”
21
24230.0000
2
1
Decal, Red Decorative Stripe
22
23329.0000
02332.0002
1
18
-
-
Plate, Base, Twin 0/6
Screw, Hex-crimptite #6-32 X .375”
23
00511.1000
13255.0005
26528.0001
1 Set
1 Set
-
-
-
4
Legs, 4” Adjustable, Satin Nickel, .25”-20 (Includes # 25)
Legs, 4” Adjustable, Black Plastic, .25”-20 (Includes # 25)
Legs, 4” Adjustable, Black Plastic, .25”-20 (Single CW)
24
24253.0000
24253.0003
02308.0000
1
1
12
-
-
-
Base W/decals, Sst (Includes Items 6 & 10) Twin 2/2 & 4/2
Base W/decals, Blk (Includes Items 6 & 10) Twin 2/2 & 4/2
Screw, #8-32 X .375”
25
03996.0000
03993.0000
4
4
-
-
Pad, 1.25”
Pad, .70”
26
27623.0000
02308.0000
1
2
-
-
Guard, Wiring - Right (Brewers with two Power Cords Only)
Screw, #8-32 X .375”
27
34065.1001
-
1
Base W/decals, Sst (Includes # 10 & 28) Single CW
28
21104.0003
01347.0000
-
-
1
2
Server Stop (Single CW Only)
Screw, Truss Head #6-32 x .375”
19
* Indicates the part number listed is for reference only.
DESCRIPTION
40566 101507
Part III
C/CT/CWTF
Series
TANK AND COMPONENTS
15
8
11
9
10
22
21
10
23
4
11
16
3
17
4
12
14
19
7
20
Multi-Volt
18
6
13
Dual-Volt
1320W
5
4
1
1800W
1800W
2
1320W
3500W
P3913.5
20
40566 101507
QTY.
TWIN
Part III
TANK AND COMPONENTS
ITEM
PART NO.
QTY.
SINGLE
DESCRIPTION
1
04118.0000
20201.3000
01315.0000
00912.0000
2
-
4
4
1
1
2
2
Tank
Tank (Single CW)
Screw #8-32 x .375˝ TRSHD
Clip, J-Type #8-32
2
04260.0000
01927.0000
2
2
1
1
Blanket Warmer 50W, 120V
Blanket Warmer 50W, 220V
3
29329.1000
2
1
Thermostat, Limit
4
25158.0000
25158.0001
25158.0002
25158.0004
00908.0000
1
1
-
-
16
1
1
1
1
8
Tank Lid (1 HTR, No Faucet) (Twin Right)
Tank Lid (1 HTR, w/Faucet) (Twin Left) (Single CW)
Tank Lid (1 HTR, No Faucet) (Single CW)
Tank Lid (DV/MV, w/Faucet)
Nut, Hex #8-32
5
04221.0000
2
1
Gasket, Tank Lid
6
12689.1000
1
1
Coil Assy, Faucet (Includes # 7)
7
12688.0000
2
2
Gasket, Water Coil
8
12687.0000
2
2
Nut, Hex Brass .562˝-24 (Water Coil)
9
20211.0100
23769.0000
1
1
1
1
Thermal Cut Off (TCO) (Thermostat to Heater) w/Faucet
Lead, Electrical BLK (Thermostat to Heater) w/o Faucet
10
23768.0000
2
1
Lead, Electrical BLU (Thermostat to Limit)
11
00400.0001
4
2
Elbow, Male .250˝ Flare x .125˝ MPT
12
--------------
-
-
(See Electrical Section)
13
03070.1001
04236.1000
04636.1000
01925.1000
04637.1000
20201.0750
20941.1000
23929.1000
24217.1000
23930.1000
-
-
-
-
2
-
-
2
2
2
1
1
1
1
1
1
1
-
-
-
Tank Heater, 1500W 120V (Single CW-15)
Tank Heater, 1320W 120V (CWTF-15 & MV/DV)
Tank Heater, 1800W 120V (CWTF-20 & MV/DV)
Tank Heater, 1850W 220V (CWTFA-20)
Tank Heater, 3500W 240V (CWTF-35 & Twins)
Tank Heater, 3500W 240V (Single CW-35)
Tank Heater, 3500W 200V (CWTFB-35)
Tank Heater, 1600W 200V (CWTFB-2/2 Twin)
Tank Heater, 1800W 230V (CWTFA-2/2 Twin)
Tank Heater, 3000W 240V (Twins-CE)
14
00943.0000
4
2
Gasket, Tank Heater
15
00942.0000
4
2
Nut, Brass .5"-20 (Tank Heater)
16
11431.0002
00908.0000
2
6
1
3
Sprayhead Tube Kit (Includes 3 mounting nuts below & # 17 & 18)
Nut, Hex #8-32
17
05515.0000
2
1
Gasket, Sprayhead tube
18
05518.0000
2
1
Hub, Syphon
19
01075.0000
2
1
Nut, Hex .438”-20, Sprayhead tube
Includes # 14
Continued on next page
21
* Indicates the part number listed is for reference only.
40566 101507
Part III
C/CT/CWTF
Series
TANK AND COMPONENTS
15
8
11
9
10
22
21
10
23
4
11
16
3
17
4
12
14
19
7
20
Multi-Volt
18
6
13
Dual-Volt
1320W
5
4
1
1800W
1800W
2
1320W
3500W
P3913.5
22
40566 101507
QTY.
TWIN
Part III
TANK AND COMPONENTS
ITEM
PART NO.
QTY.
SINGLE
DESCRIPTION
20
01082.0000
01082.1000
01082.0004
01082.0005
01082.0007
2
#
2
2
2
1
#
1
1
1
Sprayhead, 6-Hole (6-.078 Standard)
3 Pack, 6-Hole (6-.078 Standard)
Sprayhead, 5-Hole (5-.070 Optional)
Sprayhead, 5-Hole (5-.057 Optional)
Sprayhead, 1-Hole (1-.182 Pouch-Pack Funnel)
21
28242.0000
-
1
Lead, Electrical WHI (Tank Heater Jumper)
22
28173.0000
-
1
Thermal Cut Off (Tank Heater to Upper Terminal Block)
23
28174.0000
-
1
Thermal Cut Off Harness (Tank Heater to Upper Terminal Block)
The Following Items Are Not Illustrated
24
22918.0000
22918.0001
-
-
1
1
TCO 128°C Male - Female (CE)
TCO 291°C Male - Female (CE)
25
04776.0000
20211.0100
-
-
1
1
TCO 128°C Male - Female (CE)
TCO 167°C Female - Female BLK (CE)
26
04119.0000
04133.0000
1
1
1
1
Tank W/Blanket Warmer, 120V
Tank W/Blanket Warmer, 220V
27
25319.1000
25319.1001
25319.1002
25319.1010
--------------*
--------------*
25320.1000
25320.1001
25320.1002
25320.1007
25320.1012
25320.1017
-
-
1
1
-
1
-
-
1
1
-
-
1
1
1
-
1
1
1
1
1
1
1
1
Tank Assy, 1320W 120V (Includes # 1-5,9,10,13-18) w/o Faucet
Tank Assy, 1800W 120V (Includes # 1-5,9,10,13-18) w/o Faucet
Tank Assy, 3500W 120/240V (Includes # 1-5,9,10,13-18) w/o Faucet
Tank Assy, 3000W 120/240V (Includes # 1-5,9,10,13-18) w/o Faucet
Tank Assy, 1850W 220V (Includes # 1-5,9,10,13-18) w/o Faucet
Tank Assy, 3500W 240V (Includes # 1-5,9,13-18) w/o Faucet
Tank Assy, 1320W 120V (Includes # 1-11,13-18) w/Faucet
Tank Assy, 1800W 120V (Includes # 1-11,13-18) w/Faucet
Tank Assy, 3500W 240V (Includes # 1-11,13-18) w/Faucet
Tank Assy, 3000W 120/240V (Includes # 1-11,13-18) w/Faucet
Tank Assy, 3500W 240V (Includes # 1-11,13-18) w/Faucet
Tank Assy, 1320/1800W DV (Includes # 1-11,13-18, 24-25) w/Faucet
23
* Indicates the part number listed is for reference only.
Includes # 1 & 2
40566 120809
Part III
C/CT/CWTF
Series
FILL BASIN AND LINES
7
5
13
9
14
5
13
12
Second Style
Fitting
15
2
1
11
First Style
5
2
4
1
3
7
8
9
6
10
8
P3914
24
40566 101507
QTY.
TWIN
FILL BASIN AND LINES
QTY.
SINGLE
Part III
ITEM
PART NO.
DESCRIPTION
1
04270.0002
04270.0000
2
-
1
1
Fill Basin (Automatics)
Fill Basin (Pour Overs)
2
27514.0000
11424.0000
2
-
1
1
Plate, Splash Guard (Automatics and Early Model Pour Overs)
Plate, Splash Guard (Late Model Pour Overs)
3
01201.0000
2
1
Gasket, Tank Inlet
4
12928.0000
2
1
Grommet, Pour-In Basin (Automatics and Early Model Pour Overs)
5
01200.0000
32063.0000
01212.0000
01212.0001
2
2
2
2
1
1
1
1
Fitting, Tank Inlet .562˝ Opening (First Style) (Order 01212.0001)
Fitting, Tank Inlet .312˝ Opening (Second Style) (Order 01212.0001)
Fitting, Tank Inlet .382˝ Opening (Third Style) (Order 01212.0001)
Fitting, Tank Inlet Tapered Opening (Fourth Style)
6
12914.0002
2
1
Tube Assy. Fill 21.5˝ Second Style (Includes # 4, 7-10)
7
11707.0003*
2
1
Tube, .25˝ Dia. x 21.5˝ (Order # 16)
8
12422.0000
4
2
Clamp, SNP - 6
9
12913.0000
2
1
Tube
10
22397.0001
2
1
Fitting, .25˝ Barb x .125˝ MPT (Late Models)
11
00402.0001
2
1
Fitting, .25˝ Flare x .125˝ MPT (Early Modeels)
12
00425.1000
2
1
Fitting, Swivel Nut
13
00419.0000
4
2
Ferrule, Crimp Type .25˝
14
01426.0000*
-
1
Weld Pin, .25˝ Dia. (Early Model Pour Overs Only)
15
28526.0021*
2
1
Tube, .313˝ Dia. x 4.0˝ (Order 17 )
The Following Items Are Not Illustrated
16
11707.1000
11707.1001
11707.1002
-
-
-
-
-
-
Tube, .25˝ Dia. x 12˝
Tube, .25˝ Dia. x 36˝
Tube, .25˝ Dia. x 120˝
17
28526.1000
28526.1001
28526.1002
28526.1003
-
-
-
-
-
-
-
-
Tube, .313˝ Dia. x 12˝
Tube, .313˝ Dia. x 36˝
Tube, .313˝ Dia. x 60˝
Tube, .313˝ Dia. x 120˝
25
* Indicates the part number listed is for reference only.
40566 101507
Part III
MANIFOLD AND LINES - LATER TWINS
C/CT/CWTF
Series
9
7
6
5
3
4
2
1
5
6
7
8
P4036.50
26
40566 040109
QTY.
TWIN
MANIFOLD AND LINES - LATER TWINS
ITEM
PART NO.
QTY.
SINGLE
1
33643.0000
2
-
Tube, Manifold to Bulkhead
2
00436.0001
2
-
Union, Tn Pl-.250 Flare Male
3
41268.0000*
1
-
Tube Assy, Manifold (Not available, order item 4)
4
41267.0000
1
-
Tube Assy, Manifold (Late Models)
5
00459.0000
3
-
Fitting, Bulkhead .250˝ Flare
6
01532.0000
3
-
Lockwasher, Internal Tooth .438˝ I.D.
7
00463.0000
3
-
Nut, Hex .438˝-20
8
41281.0000
2
-
Tube, Bulkhead to Solenoid
9
23413.0000
1
-
Tube Assy, Bulkhead to Coil (Faucet)
Part III
DESCRIPTION
27
* Indicates the part number listed is for reference only.
40566 111308
Part III
C/CT/CWTF
Series
STRAINER/FLOW CONTROL AND LINES - EARLY TWINS
9
19
14
11
20
10
16
9
1
21
17
18
1
15
22
20
13
15
9
10
EARLY MODELS
11
1
8
9
10
11
12
2
3
4
5
6
7
P3915.5
28
40566 101507
STRAINER/FLOW CONTROL AND LINES - EARLY TWINS
QTY.
TWIN
QTY.
SINGLE
Part III
ITEM
PART NO.
DESCRIPTION
1
22300.0222
2
1
Strainer/Flow Control Assy .222 GPM (Includes # 2 - 7)
2
22249.0000
2
1
Cap
3
23721.0000
2
1
Screen
4
22312.0000*
2
1
Housing (Order # 1)
5
20526.1222
2
1
Flow Washer/Gasket Set, .222 GPM (Includes # 6)
6
01155.0000
2
1
Gasket
7
01154.0000
2
1
Fitting, Flow Control Outlet
8
33643.0000
2
-
Tube, Strainer/Flow Control to Bulkhead (Late Models)
9
00459.0000
3
1
Fitting, Bulkhead .250˝ Flare
10
01532.0000
3
1
Lockwasher, Internal Tooth .438˝ I.D.
11
00463.0000
3
1
Nut, Hex .438˝-20
12
41281.0000
2
-
Tube, Bulkhead to Solenoid
13
33637.0000
1
-
Tube Assy, Manifold (Late Models)
14
23413.0000
1
-
Tube Assy, Bulkhead to Coil (Late Models)
15
21814.0011
2
-
Tube Assy, Strainer/Flow Control to Bulkhead Fittings (Early Models)
16
26318.0000
1
-
Tube Assy, Tee to Left Strainer/Flow Control (Early Models)
17
20577.0001
1
-
Tee .25˝ Flare (Early Models)
18
24220.0000
1
-
Tube Assy (Early Models)
19
26301.0000
1
-
Tube Assy, Tee to Bulkhead (Early Models)
20
23924.0000
2
-
Fitting Assy, 90° Bulkhead .250” Flare (Early Models)
21
23925.0000
2
-
Elbow, 90° Tube .25˝OD to .25˝ Fem Flare
22
24684.0000
2
-
Gasket, .25˝ Flare (Copper)
29
* Indicates the part number listed is for reference only.
40566 101507
Part III
C/CT/CWTF
Series
MANIFOLD ASSEMBLIES - LATER SINGLES
W/O Faucet (Optional)
1
10
2
9
8
3
4
7
6
5
P4037
30
40566 040109
MANIFOLD ASSEMBLIES - LATER SINGLES
ITEM
PART NO.
QTY.
TWIN
QTY.
SINGLE
1
00310.0000
-
1
Tube Assy.
2
00459.0001
-
2
Fitting, Bulkhead .250˝ Flare
3
01532.0000
-
2
Lockwasher, Internal Tooth .438˝ I.D.
4
00463.0000
-
2
Nut, Hex .438˝-20
5
41252.0000
-
1
Tube, Bulkhead to Solenoid
6
21814.0016
-
1
Tube
7
20690.0000
-
1
Tube Assy, Bulkhead to Coil
8
20577.0001
-
1
Tee .25˝ Flare
9
41257.0000
-
1
Tube Assy,
10
41254.0000
-
1
Tube Assy,
Part III
DESCRIPTION
31
* Indicates the part number listed is for reference only.
(Optional)
40566 111308
Part III
C/CT/CWTF
Series
STRAINER/FLOW CONTROL - SECOND STYLE SINGLES
W/O Faucet
2
3
8
1
1
19
4
5
6
15
7
18
17
1
16
13
9
10
11
14
12
P3916
32
40566 081508
STRAINER/FLOW CONTROL - SECOND STYLE SINGLES
ITEM
PART NO.
QTY.
TWIN
QTY.
SINGLE
1
22300.0222
2
1
Strainer/Flow Control Assy .222 GPM (Includes # 2 - 7)
2
22249.0000
2
1
Cap
3
23721.0000
2
1
Screen
4
22312.0000*
2
1
Housing (Order # 1)
5
01155.0000
2
1
Gasket
6
20526.1222
2
1
Flow Washer/Gasket Set, .222 GPM (Includes # 5)
7
01154.0000
2
1
Fitting, Flow Control Outlet
8
00310.0000
-
1
Tube, Strainer/Flow Control to Bulkhead
9
00459.0000
3
1
Fitting, Bulkhead .250˝ Flare
10
01532.0000
3
1
Lockwasher, Internal Tooth .438˝ I.D.
11
00463.0000
3
1
Nut, Hex .438˝-20
12
41252.0000
-
1
Tube, Bulkhead to Solenoid
13
21814.0016
1
-
Tube
14
20690.0000
-
1
Tube Assy, Bulkhead to Coil
15
26216.0000
-
1
Tube Assy,
16
26217.0000
-
1
Tube Assy
17
20577.0001
1
-
Tee .25˝ Flare
18
24394.0222
1
-
Manifold Assy (With Faucet)
19
24356.0222
1
-
Manifold Assy (W/O Faucet)
Part III
DESCRIPTION
33
* Indicates the part number listed is for reference only.
40566 081508
Part III
STRAINER/FLOW CONTROL - FIRST STYLE SINGLES
15
C/CT/CWTF
Series
14
13
13
16
10
16
20
12
9
5
3
17
11
6
7
2
18
8
19
FIRST TYPE W/FAUCET
21
FIRST TYPE W/O FAUCET
SECOND TYPE W/FAUCET
2
24
3
22
16
23
27
1
4
5
6
9
7
10
11
26
25
29
Internal Strainer/Flow Control
6
30
28
P3917
34
40566 101507
STRAINER/FLOW CONTROL - FIRST STYLE SINGLES
QTY.
TWIN
QTY.
SINGLE
Part III
ITEM
PART NO.
DESCRIPTION
1
22300.0222
2
1
Strainer/Flow Control Assy. .222 GPM (Includes # 2 - 7)
2
22249.0000
2
1
Cap
3
23721.0000
2
1
Screen
4
22312.0000*
2
1
Housing (Order # 1)
5
01155.0000
2
1
Gasket
6
20526.1222
2
1
Flow Washer/Gasket Set, .222 GPM (Includes # 5)
7
01154.0000
2
1
Fitting, Flow Control Outlet
8
00310.0000
-
1
Tube Assy. Strainer/Flow Control to Bulkhead
9
23820.1000
-
1
Strainer Assy. .250˝ Flare (Includes # 2,3,10)
10
23819.0000*
-
1
Housing (Order # 9)
11
20528.1222
-
1
Flow Control Assy. .222 GPM (Includes # 5,6,7,12)
12
20527.0001*
-
1
Housing (Order # 11)
13
00445.0001
-
1
Connector, .250˝ Flare x .125˝ FPT
14
04572.0000
-
1
Tube Assy.
15
12909.0000
-
1
Tube Assy. Manifold
16
00484.0001
-
1
Needle Valve, .25˝ Flare
17
21812.0002
-
2
Tube Assy.
18
00310.0002
-
1
Tube Assy.
19
12908.0000
-
1
Tube Assy.
20
24393.0000
-
1
Tube Assy.
21
22312.0001*
-
1
Strainer/Flow Control Assy. NOT AVAILABLE (Refer to # 24394.0222)
22
20785.0000
-
1
Tube Assy. Manifold
23
21812.1006
-
1
Tube Assy.
24
20784.0000
-
1
Manifold/ Needle Valve Assy.
25
20786.1000
-
1
Tube Assy.
26
20782.1000
-
1
Tube Assy.
27
20690.0000
-
1
Tube Assy, Bulkhead to Coil
28
01148.0001
-
1
Strainer/Flow Control Assy. .222 GPM
29
01148.0000
-
1
Strainer/Flow Control Assy. .175 GPM
30
20783.0000
-
1
Strainer/Flow Control Assy. .222 GPM (Includes # 25,26,28)
35
* Indicates the part number listed is for reference only.
40566 101507
Part III
C/CT/CWTF
Series
FILL SOLENOIDS
1
2
18
20
2
21
3
22
19
ASCO
17
14
ELTEK
15
16
KIP
SKINNER
9
4
5
10
11
12
6
13
7
8
P3918
36
40566 040109
ITEM
PART NO.
1
07441.0000
02308.0000
01327.0000
01502.0000
2
4
4
4
1
2
2
2
Bracket, Solenoid Mounting
Screw, #8-32 X .375˝ (Bracket - Bracket)
Screw, Pan Head #10-32 x .375˝ (Bracket - Solenoid)
Lockwasher, Split #10 (Bracket - Solenoid)
2
00402.0001
2
1
Connector, Male .25˝ Flare x .125˝ MPT (2 Used On Early Models)
3
22397.0001
2
1
Fitting, .25˝ Barb x .125˝ MPT (Current Models)
4
01085.0000
01975.0000
21180.0000
2
2
2
1
1
1
Solenoid Valve, 120V - 1.48” Dia Coil
Solenoid Valve, 240V - 1.48” Dia Coil
Solenoid Valve, 200V - 1.48” Dia Coil
5
01100.0000
01101.0000
21181.0000
2
2
2
1
1
1
Coil - 240V
Coil - 120V
Coil - 200V
6
01079.0000
2
1
Base
7
01111.0000
2
1
Repair Kit
8
01116.0000
-
1
Guide
9
01085.0002
2
1
Solenoid Valve, 120V - 1.0” Dia Coil
10
28480.0000
2
1
Coil - 120V
11
28479.0000
1
1
Solenoid Valve Base Kit - 1” Dia Coil (Includes O-ring)
12
01111.0002
1
1
Repair Kit - 1” Dia Coil (Includes Plunger, Spring and O-ring)
13
28481.0000
1
1
Guide Kit - 1” Dia Coil (Includes Washer & O-ring)
14
28005.0000
2
1
Solenoid Valve, 240V
15
28021.0000
2
1
Repair Kit
16
28020.0000
2
1
Coil - 240V
17
42025.0000
42025.0001
41255.0002
41255.0003
32283.0000
41935.0000
41935.0001
2
2
-
-
4
2
2
1
1
1
1
2
1
1
Kit, Universal Replacement Solenoid, 120V
Kit, Universal Replacement Solenoid, 230V
Solenoid Valve 200V
Solenoid Valve 100V
Screw, Sst Sltd Pnh M4 X 6MM
Kit, Solenoid Retrofit, 120V (Includes 17 - 22)
Kit, Solenoid Retrofit, 230V (Includes 17 - 22)
18
20976.0006*
2
1
Tube, Silicone .38ID x .62OD x 4.50 (Order # 23)
19
41256.0000
02308.0000
2
4
1
2
Bracket
Screw, #8-32 X .375˝ (Bracket - Bracket)
20
37297.0002
2
1
Fitting, ¼˝ Flare X ¾˝ Fthrd
21
12422.0001
4
2
Clamp, SNP - 10
22
26443.0000
2
The Following Items Are Not Illustrated
1
Reducer, Nyl Hose Barb .38X.25
23
-
-
-
Tube, .375” ID x 12” (Use as required)
Tube, .375” ID x 36” (Use as required)
Tube, .375” ID x 120” (Use as required)
37
20976.1000
20976.1001
20976.1002
QTY.
TWIN
FILL SOLENOIDS
-
-
-
QTY.
SINGLE
* Indicates the part number listed is for reference only.
Part III
DESCRIPTION
40566 082709
Part III
C/CT/CWTF
Series
FAUCET AND TUBING
1
Early Models
4
5
11
10
9
8
6
14
12
1
13
7
4
2
3
P3919
38
40566 101507
QTY.
TWIN
FAUCET AND TUBING
ITEM
PART NO.
QTY.
SINGLE
1
20691.0001
20691.0000
1
1
1
1
Tube Assembly, Coil to Faucet (Early Models)
Tube Assembly, Coil to Faucet (Late Models)
2
13059.0000
1
1
Faucet Jam Nut
3
01532.0000
1
1
Lockwasher, Internal Tooth .438” I.D.
4
12915.0000
1
1
Faucet, Hot Water (Includes items 5 thru 14)
5
13061.0000
1
1
Faucet Handle/Stem Assembly (Includes items 6 thru 11)
6
13053.0000
1
1
Faucet Handle Kit (Includes item 7)
7
02858.0000
1
1
Pin, Spring .125” Dia x .50”
8
13060.0000
1
1
Faucet Bonnet Nut
9
13055.0000
1
1
Faucet Spring
10
13054.0000
1
1
Faucet Stem
11
13056.0000
1
1
Faucet Seat Cup
12
13057.0000
1
1
Faucet Safety Clip
13
13058.0000
1
1
Faucet Aerator Kit
14
35129.0000
1
1
Body, Faucet (Not available. Order item 4)
Part III
DESCRIPTION
39
* Indicates the part number listed is for reference only.
40566 101507
Part III
C/CT/CWTF
Series
WARMER ASSEMBLIES
UPPER & SIDE HOUSING WARMERS
A
3
1
4
5
6
120V & 120/240V MODELS ONLY
‘A” &”B” MODELS ONLY
BASE WARMERS
B
7
7
3
2
4
5
6
‘A” &”B” MODELS ONLY
120V & 120/240V MODELS ONLY
P3701.7
40
40566 101507
ITEM
PART NO.
A
03652.0000
11440.0009
11440.0011
01303.0000
00916.0000
WARMER ASSEMBLIES
QTY.
TWIN
QTY.
SINGLE
Part III
DESCRIPTION
1
Warmer Assembly 120V, Top & Side Warmers (Includes items 1, & 3 - 6)
1
Warmer Assembly 220V, Top & Side Warmers (Includes items 1, 3, 5, & 6)
1
Warmer Assembly 200V, Top & Side Warmers (Includes items 1, 3, 5, & 6)
3
Screw, Pan Head - SST #4-40 x .5˝
3
Fastener, J-Type #4-40
1
01227.0000
1
Warmer Element 120V Top & Side Warmers
01951.0000
1
Warmer Element 220V Top & Side Warmers (“A” Models)
01951.0001
1
Warmer Element 200V Top & Side Warmers (“B” Models)
B
11440.0005
11440.0008
11440.0010
01303.0000
00916.0000
1
Warmer Assembly 120V, Base Warmers (Includes items 2-7) (Single CW)
1
Warmer Assembly 220V, Base Warmers (Includes items 2, 3, 5, & 6)
1
Warmer Assembly 200V, Base Warmers (Includes items 2, 3, 5, & 6)
3
Screw, Pan Head - SST #4-40 x .5˝
3
Fastener, J-Type #4-40
2
11442.0000
11438.0000
11438.0001
1
1
1
Warmer Element 120V Base Warmers (Single CW)
Warmer Element 220V Base Warmers (“A” Models)
Warmer Element 200V Base Warmers (“B” Models)
3
03656.0000
1
Warmer Dish, Blk 45 Hole
4
13042.0001
1
Spacer, (120V Models Only)
5
05212.0000
1
Plate, Element Retaining
6
00970.0000
2
Nut, Keps #8-32
7
04828.0001*
2
Tube, Silicone .25˝ Dia x 1.875˝ LG. (Order Item 8)
The Following Items Are Not Illustrated
8
04828.1001 -
Tube, Silicone .25˝ Dia. x 24˝ LG (Use as required)
9
24785.0002
1
Galley Kit, “C” Series, 3 Warmers
10
21016.0011
1
Ground Wire, 15.0˝ LG.- Lower Warmer to Ground Screw
11
21016.0012
1
Ground Wire, 10.0˝ LG.- Upper Warmer to Upper Warmer
12
21016.0027
1
Ground Wire, 26.0˝ LG.- Lower Warmer to Ground Screw
All warmers listed above are rated @ 100 watts
41
* Indicates the part number listed is for reference only.
40566 031208
Part III
C/CT/CWTF
Series
ELECTRICAL AND OPERATING CONTROLS
1
Later Twins
w/Two Cords
3
4
5
6
Later Twins
w/One Cord
9
Early Twins w/One Cord
7
8
13
18
17
10
41
42
11
43
12
26
20
27
28
22
34
35
36
2
14
21
Brewers w/Switch Cover
40
23
19
16
20
38
28
39
37
15
13
25
31
29
Brewers w/Fresh Timer
30
Electronic
Thermostat
20
28
24
32
P3920.40
42
33
Brewers w/Ready Light
40566 111308
ELECTRICAL AND OPERATING CONTROLS
QTY.
TWIN
QTY.
SINGLE
Part III
ITEM
PART NO.
DESCRIPTION
1
28004.0000
40763.0001
-
-
2
2
Toggle Switch, (DPST) (Includes Hex Nut) (A Models)
Toggle Switch, (DPST) (Includes Hex Nut) (4 Used on 0/6 Twin w/2 Cords)
2
23522.0001
-
1
Toggle Switch, (Dual Volt, SPDT) (Includes Hex Nut)
3
25102.0000
25102.0001
-
-
1
1
Bracket, Switch Guard (ON/OFF)
Bracket, Switch Guard (I/0)
4
23696.0000
2
1
Hex Nut (2 Used on DV)
5
23697.0000
2
1
Plastic Face Nut
6
03628.0000
-
1
Receptacle, Grounded
7
28176.0000
02308.0000
-
-
1
2
Fuse Holder
Screw, Pan Head #8-32 x .375"
8
22012.0002
-
1
Fuse, 20 amp
9
01686.0000
-
1
Bushing, Strain Relief (15A Models only)
10
01685.0000
-
1
Bushing, Strain Relief (20/35 & MV/DV Models)
11
01590.0000
1
-
Bushing, Strain Relief (2 Used on 2 Cord TWIN’s)
12
05746.0000
1
1
Bushing, Strain Relief (A Models)
13
12698.0005
12698.0004
12698.0003
02308.0000
02332.0001
2
2
-
2
2
1
-
-
1
1
Bracket, Component Mounting (All Models Except 2 Cord Twins)
Bracket, Component Mounting (2 Cord Twins Only)
Bracket, Component Mounting (Single CW Only)
Screw, Pan Head #8-32 x .375"
Screw, Hex Crimptite #6-32 x .25"
14
00606.0000
2
1
Bushing .875 Dia.
15
01106.0000
01106.0001
01106.0003
07038.0000
01317.0000
-
-
-
3
4
1
1
1
1
2
Terminal Block, 2-pole 120V (Black-White)
Terminal Block, 2-pole 240V (Black-Red)
Terminal Block, 2-pole 230V (Brown-Blue) (CE)
Terminal Block, 3-pole 120/240V (Black-White-Red)
Screw #8-32 x .5"
16
00824.0000
1
1
Decal, Ground (One Additional w/Two Cords)
17
27705.0000
01327.0000
-
-
1
1
Terminal Lug (CE)
Screw, PNH 10-32 x .375"
18
00824.0001
1
1
Decal, Equipotentiality (CE Only)
19
02337.0001
01309.0000
2
2
1
1
Ground Screw, Hex Head #10 x .375" (Self Tap)
Ground Screw, Pan Head #10-32 x .5" (Square Washer)
20
13352.0008
13352.0011
02301.0000
00973.0000
2
2
8
8
1
1
4
4
Control Panel
Control Panel (w/Switch Cover)
Screw, Phillips Pan Head #6-32 x .625"
Nut, KEPS #6-32
21
27429.0000
27429.0002
01308.0000
2
2
4
1
1
2
Switch Cover (Brass)
Switch Cover (SST)
Screw, SST Truss Head #6-32 x .25" (Brass Screw No Longer Available)
22
12148.0000
01308.0000
01510.0000
2
4
4
1
2
2
Spacer, Hinged
Screw, SST Truss Head #6-32 x .25"
Lockwasher, #6 External Tooth
23
38894.0001
01308.0002
1
2
1
2
Switch, On/Off (One Additional w/ Two Power Cord Twins)
Screw, TRH #6-32 x .25"
Continued on next page
43
* Indicates the part number listed is for reference only.
40566 111308
Part III
C/CT/CWTF
Series
ELECTRICAL AND OPERATING CONTROLS
1
Later Twins
w/Two Cords
3
4
5
6
Later Twins
w/One Cord
9
Early Twins w/One Cord
7
8
13
18
17
10
41
42
11
43
12
26
20
27
28
22
34
35
36
2
14
21
Brewers w/Switch Cover
40
23
19
16
20
38
28
39
37
15
13
25
31
29
Brewers w/Fresh Timer
30
Electronic
Thermostat
20
28
24
32
P3920.40
44
33
Brewers w/Ready Light
40566 111308
Part III
ELECTRICAL AND OPERATING CONTROLS
ITEM
PART NO.
QTY.
TWIN
QTY.
SINGLE
DESCRIPTION
24
12984.0002
12984.0004
04243.0000
-
2
4
1
1
2
Ready Light, 120V Green Neon (Includes Hardware as Shown)
Ready Light, 240V Green Neon (Includes Hardware as Shown)
Terminal Housing, Plastic
25
12517.0003
25292.0000
34130.0000
03851.0000
2
2
2
4
1
1
1
2
LED, Fresh Timer (Includes Hardware as Shown)
Lock Washer, M6
Nut, M6
Wire Nut
26
28177.0000
01317.0004
-
-
1
2
Terminal Block
Screw, Truss Head #8-32 x .625"
27
28179.0000
-
1
Bracket, Term. Block Mounting
28
22289.0000
22289.0001
22289.0002
22289.0003
22289.0005
22289.0006
22289.0012
22289.0013
2
1
-
1
1
1
1
1
1
1
1
1
-
1
-
1
Decal, Control Panel (No Faucet, No Light)
Decal, Control Panel (No Faucet, w/Ready Light)
Decal, Control Panel (w/Faucet, No Light)
Decal, Control Panel (w/Faucet, w/Ready Light)
Decal, Control Panel (No Faucet, w/Fresh LED)
Decal, Control Panel (w/Faucet, w/Fresh LED)
Decal, Control Panel (No Faucet, w/Ready Light & Switch Cover)
Decal, Control Panel (w/Faucet, w/Ready Light & Switch Cover)
29
04314.0001
28319.0000
02308.0000
20762.0000
2
2
2
4
1
1
1
2
Mechanical Thermostat Kit, w/Leads (Includes Knob & Grommet)
Mechanical Thermostat Kit, w/o Leads (Includes Knob & Grommet)
Screw, Pan Head #8-32 x .375"
Terminal Screws, Brass #8-32 x .25"
30
07073.1000
2
1
Grommet, Mechanical Thermostat (Includes 1ea, early/new style)
31
00720.0000
2
1
Knob
32
26527.1000
2
1
Electronic Thermostat Kit, 120V (Includes Grommet)
33
12570.0000
2
1
Grommet, Electronic Thermostat
34
12920.0000
12920.0002
27727.0000
20637.0000
#
#
#
-
#
#
#
1
Warmer Switch, 120V
Warmer Switch, 240V
Warmer Switch, 230V (A Models)
½ Batch Switch (Single CW Only)
35
01063.0000
27904.0000
2
2
1
1
Start Switch, Momentary
Start Switch, Momentary (A Models)
36
12921.0000
27691.0001
#
-
#
1
Switch Blank
Ready Light (A Models Only)
37
22295.0000
22295.0001
22295.0002
22295.0003
22295.0004
22295.0005
22295.0006
22295.0007
22295.0010
22295.0011
22295.0012
28010.0000
28010.0001
28010.0002
28010.0003
28010.0004
28010.0005
20603.0001
-
-
-
-
2
2
2
-
2
2
-
-
-
-
-
-
-
-
1
1
1
1
1
1
1
1
1
1
1
1
1
1
1
1
1
1
Decal, Pour In (No Warmers)
Decal, Pour In (One Top Warmer)
Decal, Pour In (Three Lower Warmers)
Decal, Pour In (One Top, Three Lower Warmers)
Decal, Automatic (One Lower Warmer)
Decal, Automatic (One Lower, One Top Warmer)
Decal, Automatic (Three Lower Warmers)
Decal, Automatic (One Top, Three Lower Warmers)
Decal, Automatic (One Lower, Two Top Warmers)
Decal, Automatic (No Warmwers) APS, TC, TS
Decal, Pour In (One Lower, Two Top Warmers)
Decal, Automatic (One Lower Warmer) (CE Only)
Decal, Automatic (One Lower, One Top Warmer) (CE Only)
Decal, Automatic (Three Lower Warmers) (CE Only)
Decal, Automatic (One Lower, Two Top Warmers) (CE Only)
Decal, Automatic (No Warmwers) APS, TC (CE Only)
Decal, Pour In (No Warmers) (CE Only)
Decal, Switches 1 Gal. - ½ Batch (Single CW Only)
45
* Indicates the part number listed is for reference only.
Continued on next page
40566 103009
Part III
C/CT/CWTF
Series
ELECTRICAL AND OPERATING CONTROLS
1
Later Twins
w/Two Cords
3
4
5
6
Later Twins
w/One Cord
9
Early Twins w/One Cord
7
8
13
18
17
10
41
42
11
43
12
26
20
27
28
22
34
35
36
2
14
21
Brewers w/Switch Cover
40
23
19
16
20
38
28
39
37
15
13
25
31
29
Brewers w/Fresh Timer
30
Electronic
Thermostat
20
28
24
32
P3920.40
46
33
Brewers w/Ready Light
40566 111308
ELECTRICAL AND OPERATING CONTROLS
ITEM
PART NO.
QTY.
TWIN
QTY.
SINGLE
38
34056.0000
-
1
Decal, Dual Volt
39
32400.0000
32400.0001
01320.0000
2
2
2
1
1
1
Digital Timer Kit, 120V
Digital Timer Kit, 240V
Screw, Round Head #8-32 x 1.0" (Late Models)
40
32530.0001
2
1
Spacer
41
37711.0000
37711.0001
02308.0000
2
2
4
1
1
2
Relay, 120V
Relay, 240V
Screw, Pan Head #8-32 x .375"
42
36256.0000
02308.0000
2
2
1
1
Bracket
Screw, Pan Head #8-32 x .375"
43
38326.0000
38326.0001
2
2
1
1
Kit, Recovery Booster Relay w/Hardware 120V
Kit, Recovery Booster Relay w/Hardware 240V
1
1
1
1
-
1
Power Cord, 120V 15A (Model 15 Only)
Power Cord, 120V 20A (Model 20 Only)
Power Cord, 230V 13A Plug (UK) CWA-APS
Power Cord, 230V 16A (CE Only) CWTF35A No Plug
Power Cord, 230V (CE Only) CWTFA Twin-APS No Plug
Power Cord, 230V 10A Euro Plug (CE Only) CWA/CWTFA-APS
Part III
DESCRIPTION
The Following Items Are Not Illustrated
44
01719.1000
23799.0001
28111.0007
27728.0011
32832.0000
33529.0002
-
-
-
-
1
-
Models without Master ON/OFF Switch
45
12985.0000
12985.0003
2
2
1
1
Wiring Harness, Thermostat to Ready Light (CWTF & Single CW)
Wiring Harness, Thermostat to Ready Light (A Models)
46
25347.0000
2
1
Wiring Harness, Thermostat to Tank
47
29445.1000
2
1
Wiring Harness, Digital Timer Adaptor (Early Models)
48
27018.0000
25907.0000
25907.0001
2
2
2
1
1
1
Wiring Harness, Thermostat to Relay
Lead Assembly, Black (Relay to Solenoid)
Lead Assembly, White (Relay to Solenoid)
49
21002.9000
-
1
Lead Assembly, Blue (T. Stat. to Upper Term. Block) MV Models
50
28175.0000
-
1
Wiring Harness, (T. Stat. to Upper Term. Block) MV Models
51
24204.0000
24204.0000
1
1
-
-
Wiring Harness, Left Side Warmer to Main Harness (Early 0/6 Twin)
Wiring Harness, Right Side Warmer to Main Harness (Early 0/6 Twin)
52
25326.0000
25326.0001
-
-
1
1
Wiring Harness, One Top Warmer to Main Harness 120V
Wiring Harness, One Top Warmer to Main Harness 240V
53
23331.0002
-
1
Wiring Harness, Main APS/TC/TSR 240V & CE
54
23953.0000
1
-
Wiring Harness, Main 0/6 Twin 120/240V
55
23989.0000
23989.0001
1
1
-
-
Wiring Harness, Main 4/2, 2/2, 0/2 Twin-APS 120/240V
Wiring Harness, Main 4/2 - 2/2 Twin 200V
56
23990.0000
23990.0001
1
1
-
-
Wiring Harness, Main 4/2, 2/2, Twin 230V (3 Phase)
Wiring Harness, Main 2/2 Twin 240V & CE
57
25328.0001
-
1
Wiring Harness, Main (3 Warmers) 240V
58
25329.0000
25329.0002
2
-
1
1
Wiring Harness, Main (3 Warmers) & 0/6 Twin 120/240V
Wiring Harness, Main APS/TC 120/240V
Continued on next page
47
* Indicates the part number listed is for reference only.
40566 111308
Part III
C/CT/CWTF
Series
ELECTRICAL AND OPERATING CONTROLS
1
Later Twins
w/Two Cords
3
4
5
6
Later Twins
w/One Cord
9
Early Twins w/One Cord
7
8
13
18
17
10
41
42
11
43
12
26
20
27
28
22
34
35
36
2
14
21
Brewers w/Switch Cover
40
23
19
16
20
38
28
39
37
15
13
25
31
29
Brewers w/Fresh Timer
30
Electronic
Thermostat
20
28
24
32
P3920.40
48
33
Brewers w/Ready Light
40566 111308
Part III
ELECTRICAL AND OPERATING CONTROLS
ITEM
PART NO.
QTY.
TWIN
QTY.
SINGLE
DESCRIPTION
59
27946.0000
-
1
Wiring Harness, Main (2 Warmers) 240V
60
28051.0000
-
1
Wiring Harness, Main APS/TC 240V & CE
61
33985.0000
-
1
Wiring Harness, Main (3 Warmers) 120V & Single CW-15
62
34005.0000
-
1
Wiring Harness, Main APS/TC (Pour In Only) 120V
63
34023.0000
34023.0002
-
-
1
1
Wiring Harness, Main (Single CW-15) 120/240V
Wiring Harness, Main (4 Warmers) 120/240V
64
34023.0008
1
-
Wiring Harness, Main Twin-APS (CE) 230V
65
34026.0002
34026.0003
-
-
1
1
Wiring Harness, Main APS-DV
Wiring Harness, Main APS 120/240V
66
34111.0000
-
1
Wiring Harness, Main (MV Models)
67
34981.0001
-
1
Wiring Harness, Main APS/TC 120V
68
34602.0000
-
1
Wiring Harness, Selector Switch (Single CW Only)
Models with ON/OFF Rocker Switch
69
23331.0009
-
1
Wiring Harness, Main APS/TS 120V
70
23953.0003
1
-
Wiring Harness, Main 0/6 Twin 120/240V
71
23989.0004
23989.0005
23989.0006
1
1
1
-
-
-
Wiring Harness, Main Twin-APS 120/240V
Wiring Harness, Main 2/2 Twin 120/240V
Wiring Harness, Main 4/2 Twin 120/240V
72
28051.0001
-
1
Wiring Harness, Main APS/TC 240V
73
38920.0000
38920.0002
38920.0004
-
(1)
-
1
-
1
Wiring Harness, Switch to Terminal Block 240V
Wiring Harness, Switch to Terminal Block 240V (1 Per Power Cord)
Wiring Harness, Switch to Terminal Block 120V
74
34023.0004
2
-
Wiring Harness, Main 0/6 Twin (2 Power Cords)
75
34023.0005
-
1
Wiring Harness, Main (3 Lower Warmers) 120/240V
76
34023.0006
-
1
Wiring Harness, Main (1 Lower, 2 Top Warmers) 120/240V & Sngl CW-35
77
34023.0007
-
1
Wiring Harness, Main (1 Top, 3 Lower Warmers) 120/240V
Models with ON/OFF Toggle Switch
78
41390.0009
-
1
WIRING HARN, Main CWTF -35 3 lwr
79
41390.0010
-
1
WIRING HARN, Main CWTF -20 3 lwr
80
41390.0011
-
1
WIRING HARN, Main CWTF -35 1 lwr/2 upr & SINGLE CWTF35 1 lwr
81
41390.0012
-
1
WIRING HARN, Main CWTF -35 3 lwr left
82
41390.0014
-
1
WIRING HARN, Main CWTF-20 1 lwr/2 upr
83
41390.0015
-
1
WIRING HARN, Main CWTF-35 TC
84
41390.0016
-
1
WIRING HARN, Main CWTF-20 TC/APS
85
41390.0017
-
1
WIRING HARN, Main CWTF–DV 1 lwr/2 upr
86
41390.0018
-
1
WIRING HARN, Main CWTF–DV 3 lwr
Continued on next page
49
* Indicates the part number listed is for reference only.
40566 111308
Part III
C/CT/CWTF
Series
1
Later Twins
w/Two Cords
3
4
5
6
Later Twins
w/One Cord
9
Early Twins w/One Cord
7
8
13
18
17
10
41
42
11
43
12
26
20
27
28
22
34
35
36
2
14
21
Brewers w/Switch Cover
40
23
19
16
20
38
28
39
37
15
13
25
31
29
Brewers w/Fresh Timer
30
Electronic
Thermostat
20
28
24
32
P3920.40
50
33
Brewers w/Ready Light
40566 111308
Part III
ITEM
PART NO.
QTY.
TWIN
QTY.
SINGLE
DESCRIPTION
87
41390.0019
-
1
WIRING HARN, Main CWTF–DV 1 lwr
88
41390.0020
-
1
WIRING HARN, Main CWTF-35 TS/APS
89
41390.0021
-
1
WIRING HARN, Main CWTF-20 TS/APS
90
41390.0022
-
1
WIRING HARN, Main CWTF – APS 230v CE
91
41390.0023
-
1
WIRING HARN, Main CW-20 APS
92
41390.0024
-
1
WIRING HARN, Main CWTF -DV TC/APS
93
41390.0028
-
1
WIRING HARN, Main CWTF35A 230V 3LOWER/1UPPER
94
34023.0009
2
-
Wiring Harness, Main 0/6 Twin (2 Power Cords)
95
40081.0003
2
-
Wiring Harness, Switch to Term Block 0/6 Twin (2 Power Cords)
51
* Indicates the part number listed is for reference only.
40566 111308
Part III
C/CT/CWTF
Series
FUNNELS
A
B
2
5
1
3
14
15
4
14
15
6
16
Pouch Pack Funnel
Plastic ‘C’ Funnel
C
9
D
11
14
10
15
14
8
13
13
12
16
SST ‘C’ Funnel
SST Gourmet ‘C’ Funnel
15
P3703
52
40566 101507
QTY.
TWIN
FUNNELS
QTY.
SINGLE
Part III
ITEM
PART NO.
DESCRIPTION
A
1
1
2
2
20583.0003
29351.0001
20583.0006
33119.0000*
33127.0000*
32964.0000
32966.0000
-
2
-
-
-
-
2
1
1
1
1
1
1
1
Funnel Assy, 7.125"Black Plastic (Includes items 2, 14, & 15)
Funnel Assy, 7.625"Black Plastic (Includes items 2, 14, & 15)
Funnel Assy, 7.125" Orange Plastic (Includes items 2, 14, & 15)
Funnel Body, 7.125" Black Plastic (Order item A)
Funnel Body, 7.125" Orange Plastic (Order item A)
Splashgard, Black Plastic, 7.125"
Splashgard, Black Plastic, 7.625"
B
3
4
5
6
29151.0000
29151.0001
04274.0010
04274.0012
29150.0000*
29152.1000
29152.1001
01331.0002
29845.0000
35302.0000
01331.0000
2
2
2
2
2
2
2
2
2
2
2
1
1
1
1
1
1
1
1
1
1
1
Funnel Assy, Pouch Pack Blk Handle (Includes items 3-6 & 14-16)
Funnel Assy, Pouch Pack Orn Handle (Includes items 3-6 & 14-16)
Funnel Assy, Pouch Pack Brown Plastic (Includes item 16)
Funnel Assy, Pouch Pack Black Plastic (Includes item 16)
Funnel Body, Pouch Pack ‘C Series’ SST (Order item B)
Handle Kit, Pouch Pack, Black (Includes mounting screw below)
Handle Kit, Pouch Pack, Orange (Includes mounting screw below)
Screw, Round Head 10-32 x 1.5"
Insert, Pouch Pack Funnel
Keeper, Insert
Screw, Round Head 10-32 x .5"
C
8
9
34559.0000
34559.0001
34558.0000*
34546.0000
-
2
2
2
1
1
1
1
Funnel Assy, Gourmet 7.125" SST (Includes items 8, 9, & 13-16)
Funnel Assy, Gourmet 7.625" SST (Includes items 8, 9, & 13-16)
Funnel Body, Gourmet SST (Order item C)
Filter Basket, Gourmet ‘C’
D
20216.0000
-
1
Funnel Assy, 7.125" SST Blk Handle (Includes items 10, 11 & 13-16)
20216.0001
-
1
Funnel Assy, 7.125" SST Orn Handle (Includes items 10, 11 & 13-16)
20217.0000
2
1
Funnel Assy, 7.625" SST Blk Handle (Includes items 10, 11 & 13-16)
20217.0001
2
1
Funnel Assy, 7.625" SST Orn Handle (Includes items 10, 11 & 13-16)
10
28553.0000
-
1
Funnel Body, W/Decals, 7.125" SST (Includes items 14 & 15)
28554.0000
2
1
Funnel Body, W/Decals, 7.625" SST (Includes items 14 & 15)
11
33088.0000
-
1
Filter Basket, 7.125" SST
D does not include tip kit
33090.0000
2
1
Filter Basket, 7.625" SST
12
01031.0000
2
1
Funnel Tip Kit
13
20244.1000
20244.1001
01331.0002
2
2
2
1
1
1
Handle Kit, Black (Includes mounting screw below)
Handle Kit, Orange (Includes mounting screw below)
Screw, Round Head 10-32 x 1.5"
14
03408.0002
2
1
Decal, Warning - Remove Funnel
15
03409.0002
2
1
Decal, Warning - Hot Liquid
16
28694.0000
2
1
Decal, Warning - Hot Liquid/Remove Funnel
53
* Indicates the part number listed is for reference only.
40566 101507
Part III
NUMERICAL INDEX
PART NO. PAGE NO.
00310.0000............... 31,33,35
00310.0002......................... 35
00400.0001......................... 21
00402.0001.................... 25,37
00419.0000......................... 25
00425.1000......................... 25
00436.0001......................... 27
00445.0001......................... 35
00459.0000............... 27,29,33
00459.0001......................... 31
00462.0001........................... 9
00463.0000.................... 27,29
00463.0000.................... 31,33
00484.0001......................... 35
00511.1000......................... 19
00606.0000......................... 43
00656.0000......................... 13
00658.0000......................... 13
00669.0003......................... 13
00670.0000........................... 9
00720.0000......................... 45
00754.0001......................... 17
00824.0000......................... 43
00824.0001......................... 43
00831.0000......................... 13
00833.0000........................... 5
00908.0000...................... 5,21
00912.0000................... 5,9,21
00916.0000................... 5,9,41
00942.0000......................... 21
00943.0000......................... 21
00970.0000.................... 11,41
00971.0000........................ 5,7
00973.0000......................... 43
00973.0000........................... 9
00988.0000......................... 11
01031.0000......................... 53
01063.0000......................... 45
01075.0000......................... 21
01079.0000......................... 37
01082.0000......................... 23
01082.0004......................... 23
01082.0005......................... 23
01082.0007......................... 23
01082.1000......................... 23
01085.0000......................... 37
01085.0002......................... 37
01100.0000......................... 37
01101.0000......................... 37
01106.0000......................... 43
01106.0001......................... 43
01106.0003......................... 43
01111.0000......................... 37
01111.0002......................... 37
PART NO.
PAGE NO.
PART NO.
PAGE NO.
02332.0002.................... 17,19
02337.0001......................... 43
02371.0000........................... 9
02722.0000........................... 5
02722.0001........................... 5
02732.0000........................... 5
02763.0000........................... 5
02765.0000........................... 5
02822.0000......................... 13
02858.0000......................... 39
02999.0000........................... 5
03070.1001......................... 21
03263.0002........................... 9
03408.0002......................... 53
03409.0002......................... 53
03628.0000......................... 43
03652.0000......................... 41
03656.0000......................... 41
03851.0000......................... 45
03993.0000......................... 19
03996.0000......................... 19
04118.0000......................... 21
04119.0000......................... 23
04133.0000......................... 23
04221.0000......................... 21
04236.1000......................... 21
04243.0000......................... 45
04260.0000......................... 21
04270.0000......................... 25
04270.0002......................... 25
04274.0010......................... 53
04274.0012......................... 53
04314.0001......................... 45
04572.0000......................... 35
04636.1000......................... 21
04637.1000......................... 21
04776.0000......................... 23
04828.0001......................... 41
04828.1001......................... 41
04831.0000........................... 5
05212.0000......................... 41
05515.0000......................... 21
05518.0000......................... 21
05746.0000......................... 43
07038.0000......................... 43
07073.0001......................... 45
07073.0003......................... 45
07441.0000......................... 37
10165.0000......................... 15
10447.0000......................... 15
10693.0000......................... 13
10693.0001......................... 13
10693.0002......................... 13
10736.0000......................... 13
01116.0000......................... 37
01148.0000......................... 35
01148.0001......................... 35
01154.0000............... 29,33,35
01155.0000............... 29,33,35
01200.0000......................... 25
01201.0000......................... 25
01212.0000......................... 25
01212.0001......................... 25
01227.0000......................... 41
01303.0000................... 5,9,41
01303.0002........................... 5
01308.0000......................... 43
01308.0002.................... 15,43
01308.0003......................... 15
01309.0000......................... 43
01315.0000........................ 5,9
01315.0000.................... 13,21
01315.0005......................... 13
01317.0000......................... 43
01317.0004......................... 45
01319.0000........................... 5
01320.0000......................... 47
01326.0007........................ 5,7
01327.0000......................... 37
01327.0000......................... 43
01331.0000......................... 53
01331.0002......................... 53
01347.0000...................... 7,19
01382.0000......................... 13
01382.0002......................... 13
01426.0000......................... 25
01502.0000......................... 37
01510.0000......................... 43
01532.0000............... 27,29,31
01532.0000.................... 33,39
01590.0000......................... 43
01592.0000...................... 5,17
01592.0001........................... 5
01593.0000......................... 17
01685.0000......................... 43
01686.0000......................... 43
01719.1000......................... 47
01925.1000......................... 21
01927.0000......................... 21
01951.0000......................... 41
01951.0001......................... 41
01975.0000......................... 37
02301.0000......................... 43
02308.0000................. 9,11,13
02308.0000............... 17,19,37
02308.0000............... 43,45,47
02332.0001......................... 43
02332.0002...................... 5,11
54
PART NO. PAGE NO.
10836.0000......................... 13
10836.0005......................... 13
10836.0009......................... 13
10836.0010......................... 13
10836.0011......................... 13
10847.0000......................... 13
10867.0000......................... 13
11408.1002......................... 13
11408.1005......................... 13
11408.1006......................... 13
11424.0000......................... 25
11431.0002......................... 21
11438.0000......................... 41
11438.0001......................... 41
11440.0005......................... 41
11440.0008......................... 41
11440.0009......................... 41
11440.0010......................... 41
11440.0011......................... 41
11442.0000......................... 41
11707.0003......................... 25
11707.1000......................... 25
11707.1001......................... 25
11707.1002......................... 25
12104.0000......................... 15
12148.0000......................... 43
12183.0002......................... 13
12364.0000......................... 17
12364.0000........................... 7
12422.0000......................... 25
12422.0001......................... 37
12517.0003......................... 45
12570.0000......................... 45
12667.0001......................... 17
12683.0000........................... 9
12683.0002........................... 9
12687.0000......................... 21
12688.0000......................... 21
12689.1000......................... 21
12698.0003......................... 43
12698.0004......................... 43
12698.0005......................... 43
12908.0000......................... 35
12909.0000......................... 35
12913.0000......................... 25
12914.0002......................... 25
12915.0000......................... 39
12920.0000......................... 45
12920.0002......................... 45
12921.0000.................... 17,45
12928.0000......................... 25
12978.0000........................... 5
12981.0001........................... 5
12984.0002......................... 45
40566 082709
Part III
NUMERICAL INDEX
12984.0004......................... 45
12985.0000......................... 47
12985.0003......................... 47
13042.0001......................... 41
13053.0000......................... 39
13054.0000......................... 39
13055.0000......................... 39
13056.0000......................... 39
13057.0000......................... 39
13058.0000......................... 39
13059.0000......................... 39
13060.0000......................... 39
13061.0000......................... 39
13110.0000........................... 5
13255.0005......................... 19
13350.0006........................... 9
13350.0008........................... 9
13350.0011........................... 9
13350.0016........................... 9
13352.0008......................... 43
13352.0011......................... 43
13354.0000........................... 9
20201.0750......................... 21
20201.3000......................... 21
20211.0100.................... 21,23
20216.0000......................... 53
20216.0001......................... 53
20217.0000......................... 53
20217.0001......................... 53
20244.1000......................... 53
20244.1001......................... 53
20526.1222............... 29,33,35
20527.0001......................... 35
20528.1222......................... 35
20577.0001............... 29,31,33
20583.0003......................... 53
20583.0006......................... 53
20603.0001......................... 45
20637.0000......................... 45
20690.0000............... 31,33,35
20691.0000......................... 39
20691.0001......................... 39
20762.0000......................... 45
20782.1000......................... 35
20783.0000......................... 35
20784.0000......................... 35
20785.0000......................... 35
20786.1000......................... 35
20941.1000......................... 21
20976.0006......................... 37
20976.1000......................... 37
20976.1001......................... 37
20976.1002......................... 37
21002.9000......................... 47
21016.0011......................... 41
21016.0012......................... 41
21016.0027......................... 41
21104.0003......................... 19
21180.0000......................... 37
21181.0000......................... 37
21812.0002......................... 35
21812.1006......................... 35
21814.0011......................... 29
21814.0016.................... 31,33
22012.0002......................... 43
22249.0000............... 29,33,35
22289.0000......................... 45
22289.0001......................... 45
22289.0002......................... 45
22289.0003......................... 45
22289.0005......................... 45
22289.0006......................... 45
22289.0012......................... 45
22289.0013......................... 45
22295.0000......................... 45
22295.0001......................... 45
22295.0002......................... 45
22295.0003......................... 45
22295.0004......................... 45
22295.0005......................... 45
22295.0006......................... 45
22295.0007......................... 45
22295.0010......................... 45
22295.0011......................... 45
22295.0012......................... 45
22300.0222............... 29,33,35
22306.0000......................... 17
22312.0000............... 29,33,35
22312.0001......................... 35
22397.0001.................... 25,37
22730.1002......................... 13
22730.1003......................... 13
22730.1005......................... 13
22730.1007......................... 13
22730.1009......................... 13
22733.0000......................... 11
22740.0000......................... 17
22748.0000......................... 11
22748.0001......................... 11
22748.0002......................... 11
22918.0000......................... 23
22918.0001......................... 23
22999.0000......................... 17
23232.0000........................... 9
23232.0002........................... 9
23232.0004........................... 9
23232.0005........................... 9
23267.1000......................... 13
23267.1001......................... 13
23270.0000......................... 11
23294.0000......................... 11
23294.0001......................... 11
23294.0002......................... 11
23294.0008......................... 11
23294.0011......................... 11
23294.1010......................... 11
23320.1004......................... 11
23320.1012......................... 11
23321.0000......................... 17
23321.0001......................... 17
23321.0002......................... 17
23321.0003......................... 17
23321.0004......................... 17
23329.0000......................... 19
23331.0002......................... 47
23331.0009......................... 49
23413.0000.................... 27,29
23522.0001......................... 43
23696.0000......................... 43
23697.0000......................... 43
23698.1000......................... 17
23698.1001......................... 17
23721.0000............... 29,33,35
23768.0000......................... 21
23769.0000......................... 21
23799.0001......................... 47
23819.0000......................... 35
23820.1000......................... 35
23924.0000......................... 29
23925.0000......................... 29
23929.1000......................... 21
23930.1000......................... 21
23953.0000......................... 47
23953.0003......................... 49
23989.0000......................... 47
23989.0001......................... 47
23989.0004......................... 49
23989.0005......................... 49
23989.0006......................... 49
23990.0000......................... 47
23990.0001......................... 47
24204.0000......................... 47
24213.0000......................... 15
24217.1000......................... 21
24220.0000......................... 29
24230.0000......................... 19
24249.0003......................... 13
24253.0000......................... 19
24253.0001......................... 19
24253.0002......................... 19
24253.0003......................... 19
24254.0000........................... 7
55
24254.0001........................... 7
24254.0002........................... 7
24356.0222......................... 33
24393.0000......................... 35
24394.0222......................... 33
24540.0000......................... 15
24600.0000......................... 17
24684.0000......................... 29
24785.0002......................... 41
24805.0000......................... 17
24805.0002......................... 17
25102.0000......................... 43
25102.0001......................... 43
25137.0000......................... 17
25137.0001......................... 17
25158.0000......................... 21
25158.0001......................... 21
25158.0002......................... 21
25158.0004......................... 21
25292.0000......................... 45
25319.1000......................... 23
25319.1001......................... 23
25319.1002......................... 23
25319.1010......................... 23
25320.1000......................... 23
25320.1001......................... 23
25320.1002......................... 23
25320.1007......................... 23
25320.1012......................... 23
25320.1017......................... 23
25326.0000......................... 47
25326.0001......................... 47
25328.0001......................... 47
25329.0000......................... 47
25329.0002......................... 47
25347.0000......................... 47
25351.0000......................... 17
25351.0001......................... 17
25351.0002......................... 17
25352.0007......................... 11
25633.0002........................... 5
25657.0000......................... 17
25657.0001......................... 17
25657.0002......................... 17
25658.0000......................... 17
25658.0002......................... 17
25864.0000........................... 7
25907.0000......................... 47
25907.0001......................... 47
26216.0000......................... 33
26217.0000......................... 33
26225.0000......................... 15
26283.1000......................... 13
26283.1001......................... 13
40566 103009
Part III
NUMERICAL INDEX
PART NO. PAGE NO.
26285.0000......................... 11
26285.0001......................... 11
26285.0002......................... 11
26285.0006......................... 11
26285.0007......................... 11
26285.0008......................... 11
26287.0000......................... 11
26301.0000......................... 29
26318.0000......................... 29
26413.0000......................... 17
26413.0001......................... 17
26443.0000......................... 37
26527.1000......................... 45
26528.0001......................... 19
26953.0000......................... 17
27018.0000......................... 47
27429.0000......................... 43
27429.0002......................... 43
27514.0000......................... 25
27623.0000......................... 19
27691.0001......................... 45
27693.0000......................... 13
27705.0000......................... 43
27727.0000......................... 45
27728.0011......................... 47
27904.0000......................... 45
27929.0000......................... 13
27946.0000......................... 49
28004.0000......................... 43
28005.0000......................... 37
28010.0000......................... 45
28010.0001......................... 45
28010.0002......................... 45
28010.0003......................... 45
28010.0004......................... 45
28010.0005......................... 45
28020.0000......................... 37
28021.0000......................... 37
28051.0000......................... 49
28051.0001......................... 49
28111.0007......................... 47
28173.0000......................... 23
28174.0000......................... 23
28175.0000......................... 47
28176.0000......................... 43
28177.0000......................... 45
28179.0000......................... 45
28180.0000........................... 5
28181.0000......................... 13
28181.0001......................... 13
28181.0002......................... 13
28233.0000......................... 11
28242.0000......................... 23
28319.0000......................... 45
PART NO.
PAGE NO.
PART NO.
PAGE NO.
34061.1006......................... 11
34061.1022......................... 11
34061.1023......................... 11
34061.1025......................... 11
34061.1035......................... 11
34065.1001......................... 19
34111.0000......................... 49
34130.0000......................... 45
34208.1002......................... 11
34208.1011......................... 11
34546.0000......................... 53
34558.0000......................... 53
34559.0000......................... 53
34559.0001......................... 53
34602.0000......................... 49
34955.0000......................... 13
34955.0001......................... 13
34955.0002......................... 13
34955.0003......................... 13
34981.0001......................... 49
35129.0000......................... 39
35302.0000......................... 53
35712.0000......................... 17
36256.0000......................... 47
37297.0002......................... 37
37711.0000......................... 47
37711.0001......................... 47
37881.0000................... 5,7,13
37881.0002........................ 5,7
38326.0000......................... 47
38326.0001......................... 47
38496.1000........................... 5
38496.1002........................... 5
38498.1000........................ 5,7
38503.1000........................... 5
38504.1000........................... 5
38707.1000........................... 7
38707.1001........................... 7
38707.1002........................... 7
38707.1003........................... 7
38820.0000......................... 15
38894.0001......................... 43
38920.0000......................... 49
38920.0002......................... 49
38920.0004......................... 49
39806.0000......................... 15
40081.0003......................... 51
40085.1000........................... 5
40124.0000......................... 15
40763.0001......................... 43
41252.0000.................... 31,33
41254.0000......................... 31
41255.0002......................... 37
41255.0003......................... 37
28479.0000......................... 37
28480.0000......................... 37
28481.0000......................... 37
28526.0021......................... 25
28526.1000......................... 25
28526.1001......................... 25
28526.1002......................... 25
28526.1003......................... 25
28553.0000......................... 53
28554.0000......................... 53
28694.0000......................... 53
29150.0000......................... 53
29151.0000......................... 53
29151.0001......................... 53
29152.1000......................... 53
29152.1001......................... 53
29329.1000......................... 21
29351.0001......................... 53
29445.1000......................... 47
29845.0000......................... 53
32063.0000......................... 25
32283.0000......................... 37
32400.0000......................... 47
32400.0001......................... 47
32530.0001......................... 47
32540.0000......................... 13
32832.0000......................... 47
32964.0000......................... 53
32966.0000......................... 53
33088.0000......................... 53
33090.0000......................... 53
33119.0000......................... 53
33127.0000......................... 53
33529.0002......................... 47
33637.0000......................... 29
33643.0000.................... 27,29
33985.0000......................... 49
34005.0000......................... 49
34023.0000......................... 49
34023.0002......................... 49
34023.0004......................... 49
34023.0005......................... 49
34023.0006......................... 49
34023.0007......................... 49
34023.0008......................... 49
34023.0009......................... 51
34026.0002......................... 49
34026.0003......................... 49
34056.0000......................... 47
34061.0013......................... 11
34061.0026......................... 11
34061.1000......................... 11
34061.1003......................... 11
34061.1004......................... 11
56
PART NO. PAGE NO.
41256.0000......................... 37
41257.0000......................... 31
41267.0000......................... 27
41268.0000......................... 27
41281.0000.................... 27,29
41390.0009......................... 49
41390.0010......................... 49
41390.0011......................... 49
41390.0012......................... 49
41390.0014......................... 49
41390.0015......................... 49
41390.0016......................... 49
41390.0017......................... 49
41390.0018......................... 49
41390.0019......................... 51
41390.0020......................... 51
41390.0021......................... 51
41390.0022......................... 51
41390.0023......................... 51
41390.0024......................... 51
41390.0028......................... 51
41402.1000......................... 11
41402.1001......................... 11
41402.1003......................... 11
41402.1008......................... 11
41405.0000......................... 15
41417.1000......................... 11
41417.1001......................... 11
41417.1002......................... 11
41426.1000......................... 11
41427.0000......................... 15
41760.0000........................ 5,7
41935.0000......................... 37
41935.0001......................... 37
42025.0000......................... 37
42025.0001......................... 37
40566 082709
Ref: NAVSEAINST 4160.3A NAVSEA S0005-AA-GYD-030/TMMP
NAVSEA/SPAWAR TECHNICAL MANUAL DEFICIENCY/EVALUATION REPORT (TMDER)
INSTRUCTIONS: Continue on 8 ½” x 11” page if additional space is needed.
1. Use this report to indicate deficiencies, problems and recommendations relating to publications.
2. For CLASSIFIED TMDERs see OPNAVINST 5510H for mailing requirements.
3. For TMDERs that affect more than one publication, submit a separate TMDER for each.
4. Submit TMDERs at web site https://nsdsa.nmci.navy.mil or mail to: COMMANDER, CODE 310 TMDERs, NAVSURFWARCENDIV
NSDSA, 4363 MISSILE WAY BLDG 1389, PORT HUENEME CA 93043-4307
1. PUBLICATION NUMBER
2. VOL/PART
3. REV/DATE OR CHG/DATE
5. TITLE OF PUBLICATION
4. SYSTEM/EQUIPMENT ID
6. REPORT CONTROL NUMBER
(6 digit UIC-YY-any four: xxxxxx-03-xxxx)
7. RECOMMEND CHANGES TO PUBLICATION
7a. Page #
7b. Para #
7c. RECOMMENDED CHANGES AND REASONS
8. ORIGINATOR’S NAME AND WORK CENTER
9. DATE
10. ORIGINATOR’S E-MAIL ADDRESS
11. TMMA of Manual
(NSDSA will complete)
12. SHIP OR ACTIVITY Name and Address (Include UIC/CAGE/HULL)
13. Phone Numbers:
Commercial
(
)
FAX
NAVSEA 4160/1 (Rev. 7-2003)
S/N 0116-lf-985-4100
-
DSN
(
)
-
FOLD HERE AND TAPE SECURELY
PLEASE DO NOT STAPLE
INCLUDE COMPLETE ADDRESS
USE
PROPER
POSTAGE
FOR OFFICIAL USE ONLY
COMMANDER
CODE 310 TMDERs
NAVSURFWARCENDIV NSDSA
4363 MISSILE WAY BLDG 1389
PORT HUENEME CA 93043-4307
FOLD HERE AND TAPE SECURELY
PLEASE DO NOT STAPLE
S6163-AK-FSE-010