1
Owner's
Important!
Re_:urn
Card
Downloaded From Disc-Player.com Philips Manuals
within
I0 days.
Manual
Once your PHILIPS purchase is registered, you're eligible to receive all the privileges of owning a
PHILIPS product. So complete and return the Warranty Registration Card enclosed with your purchase at once.And take advantage of these important benefits.
Warranty
Verification
Owner
Confirmation
Model
Registration
Registeringyour productwithin
Your completedWarranty
Returningyour Warranty
I0 daysconfirmsyour right to maximum protection under the
RegistrationCard servesas
RegistrationCard right awayguaran-
verification of ownership in the
tees you'll receiveall the information
terms and conditionsof your
event of product theft or loss.
and specialoffers which youqualify
PHILIPSwarranty.
for as the owner of your model.
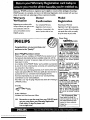
Know these
PHILIPS
safetysymbols
Congratulations on your purchase, and
welcome to the "family!"
Dear PHlUPS
product
owner:
Thank you for your confidence in PHILIPS.You've selected one of
the best-built, best-backed products availabletoday.And we'll do
everything in our power to keep you happywith your purchasefor
many years to come.
As a member of the PHILIPS "family;' you're entitled to protection
by one of the most comprehensive warranties and outstanding service networks in the industry.
What's
more, your purchase guarantees
you'll receive all the information and specialoffers for which you qualify,plus easy access to
accessoriesfrom our convenient home shoppingnetwork.
And most importantly you can count on our uncompromising
commitment to your total satisfaction.
All of this is our way of sayingwelcome-and thanks for investingin
a PHILIPS product.
Sincerely,
Robert Minkhorst
President and Chief Executive Officer
RS.
Remember, to get the most from your PHILIPS product, you must return yourWarranty
Registration
Card within 10 days.So please mail
it to us right now]
Downloaded From Disc-Player.com Philips Manuals
_,
This
of lightning"
indicates"bolt
uninsulated
material
within your unit may cause an
electrical shock. For the safety
of everyone in your household,
please clo not remove product
covering.
_l, The "exclamation
point"
calls attention to features
for which you should read the
enclosed hterature closely to
prevent operating and maintenance problems.
WARNING:
TO PREVENT
FIRE OR SHOCK HAZARD,
DO
NOT
EXPOSE THIS
EQUIPMENT TO RAIN OR
MOISTURE.
CAUTION:
To prevent electric shock, match wide blade of
plug to wide slot, fully insert.
ATTENTION:
Pour _viter les
choc _lectriques, introduire la
lame la plus"large de la fiche
dans la borne correspondante
de la prise et pousser jusqu'au
fond.
For Customer
Use
Enter belowthe Serial No.
whichislocatedon the rear of
the cabinet.Retainthis information for future reference.
Model No.
Serial No.
SafetyInformation
3
Safety Precautions
Warning: To preventfire or shockhazard,do not exposethis equipment to rain or moisture•
Federal Communications Commission (FCC)Warning:
Any unauthorized changesor
modifications to this equipment void the user'sauthority to operate it.
Laser Safety
This unit employs a lase_Only a qualified service person should remove the cover or attempt to
service this device, due to possible eye injury.
CAUTION: USEOF CONTROLS OR ADJUSTMENTSOR PERFORMANCEOF PROCEDURES OTHERTHAN THOSE SPECIFIEDHEREIN MAY RESULTIN HAZARDOUS RADIATION EXPOSURE.
CAUTION:VISIBLE AND INVISIBLELASERRADIATION WHEN OPEN AND INTERLOCK
DEFEATED.DO NOT STAREINTO BEAM.THE BEAM IS LOCATED INSIDE,NEARTHE
DECK MECHANISM.
Special Information
for Canadian Users
This Class B digital apparatus complies with CanadianICES-003.
Cet appareil num_rique de la ctasseB est conforme _ la norme NMB-003 du Canada.
Radio/TV
Interference
Thusequipmenthasbeen tested andfound to complywith the limitsfor a Class B digitaldevice,
pursuant to Part 15 of the FCC Rules.Theselimits are designedto provide reasonableprotection against harmfulinterference in a residential installation.This equipment generates,uses,and
can radiate radio frequency energy and,if not installed and used in accordancewith the instructions, may cause harmful interference to radio communications.However, there is no guarantee
that interferencewill not occur in a particular installation. If this equipment does cause harmful
interference to radio or television reception, which can be determined by turning the equipment
off and on,the user is encouragedto try to correct the interference by one or more of the following measures:
I) Reorient or relocate the receiving antenna•
2) Increasethe separation between the equipment and the receiver.
3) Connect the equipment into an outlet on a circuit different from that to which the receiver
is connected.
4) Consult the dealer or an experienced radio/TV technicianfor help.
Copyright
Protection
Unauthorized copying,broadcasting,public performance and lending of Discs are prohibited.This
product incorporates copyright protection technology that is protected by method claimsof
certain U.S.patentsand other intellectualproperty rights owned by Macrovision Corporation
and other rights owners. Use of this copyright protection technology must be authorized by
Macrovision Corporation and is intendedfor home and other limited viewing usesonly unless
otherwise authorized by Macrovision Corporation. Reverseengineeringor disassemblyis
prohibited.
Declaration
of Conformity
Model Number:
DVD78 ICH
Trade Name:
Philips
ResponsibleParty:
PhilipsConsumer Electronics
RO. Box 14810
Knoxville,TN 37914-1810
(865) 521-4316
As an ENERGY
STAR
® I_rtner, PhilipsConsumer Electronicshasdetermined that this product meets the
® is U.S,
mark.
with
STAR
® guidelinesfor energy efficiency,ENERGY STAR
ENERGY
a
registered
Using products
__
the ENERGY
STAR
® label can saveenergy.Savingenergy reduces air pollution and lowers utilit'/bills•
Manufactured under license from Dolby Laboratories. "Dolby" and the double-D symbolare trademarks of Dolby
Laboratories. ConfidentialUnpublished Works. (© 1992-1997 Dolby Laboratories, Inc. All rights reserved.)
DTS is a trademark of Digital Theater Systems Inc. in the United States of America.
Copyright 2000 Philips Consumer Electronics. All rights reserved.
Downloaded From Disc-Player.com Philips Manuals
4 TableofContents
• JJ,lg.feotDoQQg
l•,•
General
•o•,l
1•
• oo•••
O•°•g
••co•
• •o•••
• ,to••
•BtOO
• •o•°•
Joo••
• 1°1
• •o••••w°°•
ioo•••.•
,•,•,•°o•,,e,•,•l
Information
Safety Information
......................................................
Table of Contents
......................................................
Introduction
...........................................................
3
4
S
Playable Discs ..........................................................
6
Getting
Started
Remote Control
Setup ...................................................
Hookups
...........................................................
DVD Player Display ....................................................
Front Panel ..........................................................
Rear Panel ...........................................................
Remote Control
Buttons .............................................
Disc Playback and Features
Playing a Disc .........................................................
Disc Menus ..........................................................
Padding Playback .......................................................
Step by Step Playback ...................................................
Fast Forward/Reverse Search .............................................
Slow Motion ..........................................................
Track Playback ........................................................
TitlelChapter Playback ..................................................
Specific Time Playback ..................................................
Repeat Playback .......................................................
A-B Repeat Playback ...................................................
Programmed Playback ..................................................
Random Playback ......................................................
Audio Language/SoundMode .............................................
Subtitle Language ......................................................
Camera Angles ........................................................
Parental Lock Password .................................................
Parental Lock Levels ....................................................
DVD
Player
Setup
7
8-12
13
14
15
16-17
18
19
20
2I
22
23
24
25
26
27
28
29
30
31
32
33
34
35
and Features
Status Display .........................................................
Video Settings
........................................................
Audio Settings ......................................................
Language Settings
...................................................
Other Menu Settings ...................................................
36
37
38-39
40-42
43
InformationYou
May Need
Helpful Hints .......................................................
Care and Maintenance
..................................................
44-45
46
Glossary .............................................................
Specifications
.........................................................
Limited Warranty
......................................................
Index ...............................................................
47
48
49
50
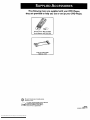
Supplied Accessories
52
Downloaded From Disc-Player.com Philips Manuals
...................................................
Introduction
5
Welcome!
This DigitalVideo Disc Player will allow you to enjoy better picture quality,clearer
sound,and endlessplaybackfeatures availableon Digit.IV,de. Discs (DVDs).
Expandingtechnology allows you to add options to your viewing - watch a director's cut of a movie, listen to the producer's comments, or play your favorite scene
over and over again.Hear a movie in different languages,or listen only to the
soundtrack.The possibilities are limited only by your choices and the materials available on the DVD.
Of course, you can listen to your favorite Audio Compact Discs on this DVD Player
as well. Determine the order in which you want to hear the songs,or play the Disc
repeatedly - all while seeing the status of the CD on your television.
We hope you enjoy this DVD Playerand learn to use all of its features.To get the
most out of the DVD Player,read this owner's manual carefully. It will describe how
you can access all the features listed below.
Features
• Audio Language/SoundMode Choices
• Automatic Detection of Disc Type
(Au_LioCD or DVD)
• DVDMenus in a Desired Language*
• On-Screen Display for DVD Player
• Parental Lock
• Program Playback (Audio CD only)
• Random Playback (Audio CD only)
• Screen Saver
• Paused/Fast/Slow/Step-by-StepPlayback
* If availableon the Disc
When
[_
A['_
referring
to this manual,
• Selecting a Camera Angle *
• Subtitles in a Desired Language *
remember...
Indicatesthat the feature describedis availableon some DigitalVideo Discs.
(3D Discs.
Indicatesthat the feature described isavailableon someAudio Compact
Disc Menus,.,
Someexplanationsin this manual are intended to describe the Disc Menus.These
menus are set by the movie producers or by the music industry,and the menus will
vary among Discs.Furthermore, not all Discs are guaranteed to havemenus.However,
if the Disc hasa menu,you can accessthe Disc Menu by pressing the MENU button
on the remote control.
DVD Player Menus...
Some instructions explain how to usethe DVD Player'smenu to set up features of
the DVD Playeror the Disc.You get to the DVD PlayerMenu by pressingthe SETUP
button on the remote control when playbackis stopped. Evenifa feature is set up in
the DVD Player'smenu, it may not be availableif the current Disc does not include
that feature.
Not all of the features describedin this manualmay be availableon every
DVD or Audio CD. If the feature is not availableon the Disc,you cannot
_
Available
Disc Features...
usethe DVD Playerto make these features available.The
"No feature"
symbol will appear on the'IV screen if you try to set up a feature that is
not availableon the current Disc or not availableat the current time.
Downloaded From Disc-Player.com Philips Manuals
6 Playable
Discs
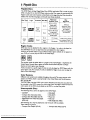
Playable Discs
This DVD Playerwitt prayDigitaIVideo Discs (DVDs) andAudio CDs. In order to playa
DVD or AudiQ CD on this DVD Player,make sure the Disc meets the requirements for
RegionCodes and Color Systemsas described on this page.Also,the Discs should be
labelled with the following Iogos and should meet these standards.
Disc Type
Logo
Digital
Video
Disc
_ Contents
Disc Size
Maximum
Playback Time
12 cm
Approx. 4 hours
(single-sided)
Approx. 8 hours
(double-sided)
8 cm
Approx. 80 minutes
(single-sided)
Approx. 160 minutes
(double-sided)
and
I Sound
Pictures
12 cm
Audio
CD
8 ¢m
DIG_IU.
AUD_
(singles)
74 minutes
Disc
Segments
DVDs are
divided into Titles,
whichare divided
into Chapters.
Titles and Chapters
are numbered.
Audio CDs are divided
into _umber_d
20 minutes
Tracks, i.e.,
a track may be one song,
Region Codes
DVDs also mustbe labelledforALL regionsor for Region I in order to be playedon
this DVD Playe_Youcannot playDiscs that are labelledfor other regions.
Look for the symbols below on your DVDs. If these region symbols do not appear on
your DVD, you cannot play the DVD in this DVD Player.
The number insidethe globe refers to a region of the world. Region I representsthe
United States,Canada,upper regions of North America, Bermuda,the U.S.Virgin
Islands,and small regions near Australia.
A Disc encoded in a specific region format can only be playedon DVD Playerswith the
same region code. For example,if a Disc is labelledfor Region2, you can not playthe
DVD on this DVD Player.
Color
Systems
Different color systems are availablethroughout the worldThe most common color
systems are NTSC, which is used primarilyin the United Statesand North America,
PAL,and SECAM.
This DVD Playerusesthe NTSC color system.Therefore,the Discs that you playmust
be recorded in the NTSC system.Youcannot play Discs recorded in other formats.The
color system of the DVD may be listed on the DVD or on the Disc iacket_
Unacceptable
Discs
The following Discs cannot be playedon this DVD Player,
• CD-ROM
• DVD-RAM
• DVD-ROM
• Compact Disc-Interactive(CD-I)
• Photo CD
• Compact Disc-Recordable(CD-R)
• Video CD
• DigitalVideo Disc-Video Recordable
• Video Single Disc (VSD)
(DVD-VR)
The following discs may be played,but only the audio will be available.
There will be no picture.
• Compact Disc-Graphic (CD-G)
• Compact Disc-Video (CD-V)
Downloaded From Disc-Player.com Philips Manuals
Remote
Control
Setup7
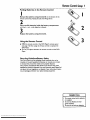
Putting
Batteries
in the Remote
Control
I
I
Remove the battery compartment lid on the bottom of the
remote control by pressingthe tab, then liftingthe lid.
2
Place two _
batteries inside the battery compartment
with their + and - ends alignedas indicated.
2
3
Replace the battery compartment
Using the Remote
lid.
Control
•
Point the remote control at the DVD Player's remote sensor
(see page 14) when usingthe remote control to operate the
DVD Player.
• Do not put objectsbetween the remote control and the DVD
Player.
Recycling Guidelines/Battery
Safety
Your new productand its packaging
containmaterials that can be
recycled and reused.Specializedcompaniescanrecycle your product
to increasethe amountthat needsto be properlydisposed.
Your productusesbatteriesthat shouldnot be thrown awaywhen
depletedbut shouldbe disposedof as smallchemicalwaste. Pleasefind
out aboutthe localregulations on disposalof your old product,batteries,and packaging
wheneveryou replaceexistingequipment
Helpful
Hints
The remote control and itsbatteries
are supplied.
Do not mix alkaline and manganesebatteries.
Do not mix old and new batteries.
Downloaded From Disc-Player.com Philips Manuals
8 Hookups
oo*oo,leoeo.o6o
itoo
,oo,i
D0OQOO
,O66°Og
OOeOOe°
,OOQ,_
_totQ,_
_o6tl
O,OO_
I OO_ • _O60g
• oeott
• _°t,o
_t°ttol
Ot,O,OtO°_eOOI_
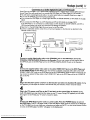
You mayconnectthe DVD Playerseveraldifferentways,dependingon your exisUngequipmentand your preferences for soundand picturequality.Todeterminewhich hookupis bestfor you,examinethe optionson the followingpages,then seewhich bestmatchesyour situation.Beforeyou hook up the DVD Player,remember:
• Connect the DVD Playerdirectlyto aTM If you connectthe DVD Playerto aVCR, then connecttheVCR to
the'iV, the picturemay be distortedby the copyrightprotection system.
• Turn off the power of all equipmentbeforemakingany connections.
• Referto the owner'smanualsof your other equipmentfor additionalinformation.
• Dependingon your connection,you may need to purchaseadditionalcables.
• If you do not connect the DVD Playerto a Dolby Digital or DTS Decoder,set DOLBY DIGITAL and DTS to
OFF on the DVD Player.Detailsare on pages I I and 38-39. If you playa DVD when the settings are wrong,
the sound will be distorted or you may damagethe speakers.
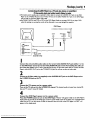
Connecting
the DVD
TV has AUDIO
Player
to a TV only (no stereo or amplifier)
(red and white)
and VIDEO
_
©
00,
000'
i
O
VIOEO IN
O
LEFT AUDIO IN
(yellow)
IN jacks
O_
00",
DVD Player
I
"O'°"TAUD'°'"
ofTV
(example only)
Connect the red and white audio cables to the red and white AUDIO OUT jacks on the OVD
Player (either I or 2) and to the red and white AUDIO IN jacks on the TV, matching the cable
colors to the jack colors. If the'l-V hasa singleAUDIO IN jack,use the white audio cableto connectthe
DVD Player'swhite AUDIO OUT jackto the'l-V's AUDIO IN jack,Youwill not usethe red audio cable.
2
Connect the yellow video cable to theVIDEO
jack on theTV.
OUT jack on the DVD Player and to theVIDEO
IN
3
Connect the TV'$ power cord to a power outlet.
Turn on the'IV and set it to the Audio/Video In channel, whichalso may be referred to asA/V In or
Auxiliary In.Thischannelusuallyis locatednear channel00.Seeyour'IV owner'smanualfor details.
4
Connect the DVD Player's power cord to a power outlet.
Press the POWER button to turn on the DVD Player. "HELLO" will appearbrieflyon the DVD Player's
displaypanel.Youshouldsee the DYD logoon the'iV screen briefly.If you do not, checkyour connectionsand
makesure the'IV isset to the correctAudio/Video In channel.If there is no disc in the DVD player,"noDISC"
will appear on the display panel.
Downloaded From Disc-Player.com Philips Manuals
Hookups
(cont'd)9
O0,100eOOQOQg
IOQ.,60_
IQQQQOOOOOOeOI
IO_OOOeO,OJ_O
tOO6gW.OfOa
DOO0_
_00QO
I_OOOOgOOeQtQ_DtO_
_00t
• ,000_I,Q_,O_QOQOI
,
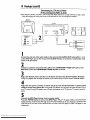
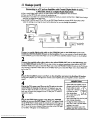
Connectinu the DVD Player to a TV only (no stereo or amplifier)
TV has audio (.red and white_) and S-Video In jacks
• For better picture quality,use an optionalS-Videocableto connect the S-VIDEO OUT jack on the DVD
Playerto the S-VIDEO IN jack on your'l'_.You will not use the yellowVIDEO OUT jack on the DVD Player,
and you will not need the yellow video cable.
• Set DOLBY DIGITAL and DTS to OFF on the DVD Player.Detailsare on pages38-39. If you playa DVD
when the settings are wrong, the sound will be distorted or you may damagethe speakers.
DVD Player
O
_
S-VIDEOIN
(_
LEFTAUDIO IN
_
RIGHT AUDIOIN
OO_
ooo,
zl ,il
Back of'IV
(example only)
I
Connect the red and white audio cables to the red and whiteAUDIO
OUT jacks (either I or 2)
on the DVD Player and to the red and white AUDIO IN jacks on the TV, matching the cable colors to the jack colors. If the TV hasa singleAUDIO IN jack,usethe white audio cable to connectthe DVD
Player'swhite AUDIO OUT jackto theTV's AUDIO IN jack.Youwill not usethe red audio cable.
2
Connect an S-Video cable (not supplied) to the S-VIDEO OUT jack on the DVD Player and to
the S-VIDEO IN jack on theTV.
3
Connect the TV's power cord to a power outlet.
Turn on theTV and set it to the S-VIDEO
IN channel.This
See your'iV owner's manual for details.
channel usuallyis located near channel 00.
4
Connect the DVD Player's power cord to a power outlet.
Press the POWER button to turn on the DVD Player. "HELLO" will appearbriefly on the DVD Player's
displaypanel.Youshouldsee the DVD logo on the'IV screenbriefly.If you do not, checkyour connectionsand
makesuretheTV is on the correct S-VideoIn channel.If there isno discin the DVD player,"noDISC" will
appear on the displaypanel.
Downloaded From Disc-Player.com Philips Manuals
Connecting_ to a TV and a Stereo
TV has Com__onent Video In Jacks
• Set DOLBY DIGITAL and DTS to OFF on the DVD Player.Detailsare on pages38-39. If you play a DVD
when the settingsare wrong,the sound will be distorted or you may damagethe speakers.
Back O(T_/
(exar_ple on/y)
DVD Player
©
_y
°._
2
i
Ir=-Y
I_
@
AUDIO(LEFT)IN J
B_ckof S_reo
(e_mple only)
I
Connect the red and white audio cables to the red and white AUDIO OUT jacks (either I or 2)
on the DVD Player and to the red and white AUDIO IN jacks on the Stereo, matching the cable
colors to the jack colors.
2
Connect an optional component video cable to the COMPONENTVIDEO
DVD Player and to the COMPONENTVIDEO
IN jacks on the'IV.
OUT jacks on the
3
Plug in the Stereo's power cord.Turn on the Stereo and select the Stereo's Auxiliary IN station.
During Disc playback,you will adjustthe volumeat your Stereo.Seeyour Stereoowner'smanualfor details.
4
Plug in the TV's power cord.Turn on theTV and set it to the ComponentVideo In channel, which
usually is located near channel 00. DuringAudio CD playback,you may checkthe statusofAudio CDs on
yourTV screen.During DVD playback,you will watchthe programon the TV. SeeyourTV owner'smanualfor
details.
5
Connect
the DVD Player's power cord to a power outlet.
Press the POWER button to turn on the DVD Player. "HELLO" will appear briefly on the DVD Player's
display panel.You should see the DVD logo on theTV screen briefly.If you do not_check your connections and
make sure the TV is on the correct channel, if there is no disc in the DVD player,"no DISC" will appear on the
displaypanel.
Downloaded From Disc-Player.com Philips Manuals
Hookups
(cont'd)II
•
•
•
•
••,°••
°
•
Connecting to a Dolby Digital Decoder or DTS Decoder
Some Discs are recorded in a S.I channelDo_by Digital Surround or DigitalTheater System (DTS) Surround
format.These Discs will sound best if you connect the DVD Playerto a Dolby Digital or DTS Decoder.
• You will need a coaxial digital audio cable or an audio optical cable (not supplied).Detailsare on page 12.
• If you usethe OPTICAL jack,remove the protective cap.
• If you connect the DVD Playerto a Dolby Digital Decoder, set DOLBY DIGITAL to ON. Detailsare on pages
38-39.
• If you connect the DVD Playerto a DTS Decoder, set DTS to ON. Detailsare on pages38-39.
If the DVD Playeris not connected to a Dolby Digital or DTS decoder,set DOLBY DIGITAL and DTS to
OFE Incorrect settings may causenoise distortion and damagethe speakers.
• Select the 5.1 channel Dolby Digital Surround sound in the Disc menu.
• Connect a subwoofer and the center,front, and surround speakerscothe Decoder as described in the
Decoder owner'smanual.
DVD Player
Do
(example only)
Back of TV
2
©
I,,,,,,1©
_
(example only)
Back ofDecoder
I
Connect a coaxial digital audio cable to the COAXIAL jack on the DVD Player and to the
COAXIAL DIGITAL AUDIO IN jack on the Decoder. (Or, you may connect an audioopticalcableto
the OPTICAL jack on the DVD Playerand to the OPTICAL DIGITAL AUDIO IN jack on the Decoder.)
2
Connect the supplied yellow video cable to the yellowVIDEO OUT jack on the DVD Player and
to the VIDEO IN jack on the TV. (Or, you may connect an optionalcomponent video cableto the COMPONENTVIDEO OUT jacks on the DVD Playerand to the COMPONENTVIDEO IN jacks on the'l-_. Or, you
may connect an optional S-Video cable to the S-VIDEO OUT jack on the DVD Playerand to the S-VIDEO IN
jack on the TV..)
3
Plug in the Decoder's power cord.Turn on the Decoder and select the Auxiliary IN station. During
Disc playback,you will adjustthe volumeat the Decoder. Seeyour Decoder owner'smanualfor details.
4
Plug in theTV's power cord.Turn on theTV and set it to the correctVideo
In channel. During
Audio CD playback,you may check the Disc status on your'IV screen. During DVD playback, you will watch
the program on the'l'V. See yourTV owner's manual for details.
5
Connect the DVD Player's power cord to a power outlet. Press the POWER button to turn on
the DVD Player. "HELLO" will appearbrieflyon the DVD Player'sdisplaypanel.Youshouldsee the DVD logo
on the"IV briefly.If you do not, check your connections and make sure the TV ison the correct channel.If there
is no disc in the DVD player,"no DISC" wiII appear on the displaypanel.
Downloaded From Disc-Player.com Philips Manuals
12 Hookups
(cont'd)
ot
• o61oi,,
iooooeetl
to611
o_tQo
• oeett
• io_i
i ooQoo
• io661oloQI
_ooll
B,tQO
• tOOOl
IBtOQO0
• OOOII*I
I llOtQ610°l_ltilltl
_1._
Connecting to a TV and an Amplifier with Coaxial Digital Audio In jack_
a Mini-Disc
Deck or a Digital Audio Tape Deck
• Use a coaxialdigitalaudio cableor an audioopticalcable(not supplied)for thisconnection.
• If you usethe OPTICAL jack,remove the protective cap.
• If the Disc is recorded in 5.1 channel Dolby Digital Surround, you cannot dub the Disc in digital sound usinga
Mini-Disc or Digital AudioTape Deck.
• Set DOLBY DIGITAL and DTS to OFF on the DVD Player.Detailsare on pages38-39. If you playa DVD
when the settings are wrong, the sound will be distorted or you may damagethe speakers.
DVD Player
(example only)
Back
of
TV
_'T_
O
_
0
_
000
_L
l
_
(example only)
Back of Amplifier
_
I
Connect a coaxial digital audio cable to the COAXIAL jack on the DVD Player and to the
COAXIAL DIGITALAUDIO
IN jack on the Amplifier. (Or, you may connect an audio optical cable
to the OPTICAL jack on the DVD Player and to the OPTICAL DIGITALAUDIO IN jack on theAmplifier.)
2
Connect the supplied yellow video cable to the yellowVIDEO OUT jack on the DVD Player and
to theVIDEO IN jack on theTV. (Or, you may connectan optionalcomponent videocable to the COMPONENTVIDEO OUT jacks on the DVD Playerand to the COMPONENTVIDEO iN jacks on the'l'V. Or, you
may connect an optional S-Video cable to the S-VIDEO OUT jack on the DVD Playerand to the S-VIDEO IN
jack on theT_)
3
Plug in the Amplifier's power cord.Turn on the Amplifier and select the Auxiliary IN station.
During Disc playback,you will adjustthe volume at the Amplifier. See your Amplifier owner's manualfor
details.
4
Plug in theTV's power cord.Turn on theTV and set it to the
correctVideo In channel. During Audio CD playback,you may
check the status of the Disc on your'iV screen. During DVD playback,you will watch the programon the T_. See yourTV owner's
manualfor details.
5
Plug in the DVD Player's power cord. Press the POWER
button to turn on the DVD Player. "HELLO" will appear briefly
on the DVD Player'sdisplaypanel.Youshouldsee the DVD logo on
the "IV briefly.If you do not, checkyour connections and make sure
the'iV is on the correct channel.If there isno discin the DVD player,"no DISC" will appearon the displaypanel.
Downloaded From Disc-Player.com Philips Manuals
Helpful
Hints
Op_calcable(not supplied)may be
damagedwhenbentat acute angles.
Ensurecablesare coiled
in loopswith a diameter ((i.li._Ira,_'_
of 6 inchesor more
\\ i.<_')l
whenstoringthem.
Usea cablewhichis 9.8
feet or shorte_
Insertcableplugsfirmlyinto thejacks
whenmaking connectJons.
If a plug has minorscratchesor is
dirty,cleanit with a soft cloth before
insertingit into a jack.
Replacethe protectivecap on the
OPTICAL
jack whenit is not in use.
DVDPlayerDisplay13
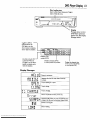
Disc loading tray
Insert a Disc here. Keep your fingers
clear of the disc tray.
[_
PHILIPS
Display
Messages about current
DVD Player operations
appear here. See Display
Messages below.
Lit_hen a DVD is
inserted,When the
DVD light is on, the
disc is loaded completely
andis ready for playback.
Displays a title
number (DVD)
Lit when anAudio CD
is inserted.When the
CD light is on, the disc is
loaded completely and is
ready for playback.
Display
Displays a chapter (DVD)
or track (Audio CD) number
Displaysthe elapsed time
of the current title (DVD)
or track (Audio CD)
Messages
UCl
| I L- II
in
0__IIJ
I--I I"I TIT C I-I I I,.I _11_1 _1 I..
Power is turning on.
Appears after the disc tray closes if the tray
isempty,
I--I Ol __ I--I
Tray is openingor is open.
I--I I-II_ I_
Tray is closing.
U;
;_;o
L 0_0_0_-00_0-- --
0-- 0o0CO 0--00--0_--
L_0
L ; I 0 00 00_00_
I----I-
0- Of-
Tray ischanging.
Disc is not placedcorrectly in the tray,
C !_ O.C I 0-- 0.0 Appears briefly when you press the SKIPbuttons
--0 L- 0 01_ 0.. II I to search for the next or previous chapter/track,
illOo..jI
I_
TO
I I-t 0_-0
L U i'i !1
Downloaded From Disc-Player.com Philips Manuals
Power is turning off.
Disc is loading.
14 FrontPanel
OPENICLOSE
Button
Press to open or close the Disc tray.
Detailsare on page 18.
DISC Number (I-5) Buttons
Pressto directly select your desired Disc
tray when the tray isopen. Press to select
and playyour desired Disc when the tray is
dosed. Detailsare on page 18.
Remote Sensor
Receives a signalfrom your remote
control so you can operate your
DVD Playerfrom a distance.
STOP Button
Press tostopDisc playback.
Details areon page 18.
PLAY Button
Press to start or resume Disc playback. Details are on page 18.
PHILIPS
VDICD 5-DISC CHANGER
-I;-°/
I
U
uUlJ
I
I
I__.
J
_'_!
0 fit'
- _="_/
¢
SKIP Buttons
Press to go to subsequent or previous Tracks
or Chapters. Details are on pages 24-25.
POWER Button
Pressto turn the power on and off.
Detailsare on page 18.
DISC SELECT Button
Press to selectthe Disc tray or a Disc
for playback.Details are on page 18.
Downloaded From Disc-Player.com Philips Manuals
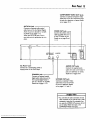
RearPanel15
COMPONENTVIDEO
OUT Jacks
Connect an optional component video
cable here and to the componentVideo
In jacks of a television or stereo. Details
are on pages 10-12.
OPTICAL Jack
Connect an optional audio optical
cable here and to the Optical Digital
Audio In jack of a decoder or amplifier. Detailsare on pages I/-12.
When the OPTICAL jack is not in
use,make sure its protective cap is in
place.
VIDEO OUT Jack
Connect the yellow video
cable (supplied)here and
to the TV'sVideo In jack.
Details are on pages8 and
11-12.
/
@
_UDIO OUT
OPTICAL
AC Power Cord
Connect to a standard AC outlet to
supply power to the DVD Player.
COAXIAL Jack
Connect an optional coaxial
digital audio cable here and to
the Coaxial Digital Audio In
jack of a decoder or amplifier.
Details are on pages 11-12.
C
?
0_,
()00
0 _,
AUDIO OUT Jacks
Connect the supplied audio
cables here and to the Audio In
jacks of a television or stereo.
Detailsare on pages8-10.
S-VIDEO OUT Jack
Connect an optional S-Video
cable here and to the S-Video
In jack of a television. Details
are on pages9, I I, and 12.
Helpful
Hint
Youonly need one audio connection and one
video connection, so you will not have a cable
connected to every jack. For example, if you
are using the S-VIDEO OUT jack, you will not
use the yellow VIDEO OUT jack or the
COMPONENT VIDEO OUT jacks.
Downloaded From Disc-Player.com Philips Manuals
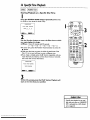
16 Remote
Control
Buttons
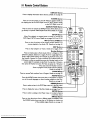
DISPLAY Button
Pressto display information aboutthe disc. Details are on page 36.
POWER Button,
Press to turn the power on and off."HELLO" appearsbriefly on
the display panel as the DVD Player turns on."BYE" appears briefly
as the DVD Player turns off.
SEARCH
MODE
Button_
Press to access or remove the SEARCH menu, which allows you to
go directly to a specificTitle/Chapter/TracldTime.
Details are on pages
24-26.
SETUP Button
When Disc playback is stopped, press to access or remove the
DVD Player's SETUP menu. Details are on pages 34-35 and 37-43.
REV (reverse) _Button
Press to view the picture in fast reverse motion (DVD) or to
reverse playback of an Audio CD. Details are on page 22.
SKIP Buttons-Press to skip Chapters orTracks. Details are on pages24-25.
Number Buttons_
Pressto directlyselectattack (AudioCD) or a Chapter or Title
(DVD) for playback.Detailsare on pages24-25. For single-digitTracks,
press a single number button. For example,to ptayTrack three, press
the Number 3 button. For Tracks numbered I0 and above, press the
+10 button asoften as needed,then press the Number button of the
second digit. For example,to playTrack 12,press the +10 button,
then press the Number 2 button. For Track 22, press the + I0 button
twice, then press the Number 2 button.
Press to program Tracks (Audio CD) for playback.
Detailsare an page 29.
CLEAR ButtonPressto remove Track numbers from a Program. Detailsare on page 29.
AUDIO Button_
Press the AUDIO button,then pressthe A/v
buttonsto choose
one of the audio languagesor soundmodes availableon the Disc.
Detailsare on page 3 I.
ARROW
Pressto selectan itemin the DVD Playermenu or in the Disc menu.
MENU Button
Pressto displaythe menu of the Disc. Detailsare onpages5 and 19.
ENTER Button,
Pressto select a settingin the Playermenu or to selecta feature
in the Disc menu.
ANGLE Button
Pressto view the picture from a different angle(if available).Press
the ANGLE button,then press the A/v buttons to chooseone
of the availableangles.Details are on page 33.
Downloaded From Disc-Player.com Philips Manuals
_ow
J
Remote
Control
Buttons
(cant'd)17
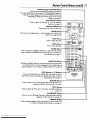
FWD (forward) I_/SLOW
Button
Press to fast forward the Disc. Detailsare onpage 22.
Pressthe PAUSEbutton, then press the FWD I_-/SLOW button to
begin slow motion playback.Pressthe FWD I,_I_/SLOW button
repeatedly to changethe forward speed of slow motion.
Detailsare on page 23.
DISC SELECT Button
Press to select the Disc tray or a Disc for playback.
Detailsare on page 18.
OPENICLOSE Button
Press to open or close the Disc tray.
SEARCH MODE
DISPLAY
DISC SELEC1
MOOE
MODE
Press to set up programmed
SETUP
Button--
or random playback for an Audio CD.
Details are on pages 29-30.
PLAY Button
Press to begin Disc play.
_SLOW
S_
J
_
pAUS E
STOP Button
Press to stop Disc play.
PAUSE Button
Pressto pause Disc playback.Details are on page 20. Pressrepeatedly to advance the DVD picture step by step (or one frame at a
time). Detailsare on page 2 I.
K3QG
CLEAR
SUBTITLE
During disc playback, press to accessthe subtitle menu, then press
the A/v buttons to select a languagefor the subtitles (among
those available) or to turn off the subtitles. Detailsare on page 32.
DISC Number (I-5) Buttons_
Pressto directly selectyour desiredDisc tray when the tray is
open.Pressto selectand playyour desired Disc when the tray is
closed. Details are on page 18.
RETURN Button,
Press to return to the previousDVD Player SETUP menu or to
remove the SETUP menu from the'IV screen.
TITLE
Button
Press to display the Title menu of the Disc, if available. Details are
on page 19.
A-B REPEAT
Button,
Press to set up A-B Repeat Play,which repeatedly plays a specific
segment of a Disc. Details are on page 28.
REPEAT
Button,
Press to repeat playback of the current Disc orTrack (Audio CD)
or a Title or Chapter (DVD). Details are on page 27.
Downloaded From Disc-Player.com Philips Manuals
_
Button
MENU
T_TLE
ENTER
RETURN
OCt,
Io o o o Ol
PHILIPS
OVOID
5.0_C
J
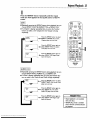
18 Playinga Disc
IAUDIO
CDI
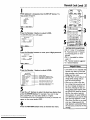
Playing a DVD or an Audio CD
Before you begin...
Turn on the power of the TV, amplifier and any other equipment
connected to the DVD Player.Make sure the "iV and the stereo or
amplifier (if applicable) are set to the correct channel. Details are
on pages8-12.
I
I
Press the POWER button to turn on the DVD Player.
"HELLO" will appear briefly on the display panel.
2
Press the OPENICLOSE
button to open the Disc tray.
3_
Press the DISC SELECT button or the DISC Number
buttons to move the disc tray (Disc I, Disc 2, etc.) to the
front position.
4
Place a Disc into the tray. Make sure the Disc is sitting properly in the correct recess.
Some DVDs are recorded on both sides.Make sure the side you
want to play is facing up. Or, if the DVD is recorded on only one
side, place the Disc in the tray with the label facing up.
• Repeat steps 3 and 4 to load more discs.
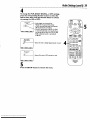
5
Press the OPEN/CLOSE
button or the
_
PLAY button. The tray will rotate and close
automatically,and playback will begin at the first
Chapter or Track of the Disc placed in the left
Leftside tray
side tray.
_Y
Or, you may close the tray by gently pressingthe Disc tray toward
the DVD Player; DVD playbackwill start automatically.
If the DVD in the tray has a menu, the menu may appear on the
screen instead. Detailsare on page 19.
With some Audio CDs, playbackwill not begin unless you press the
PLAY button.
6
Press the STOP button to stop playback.
Remember,
this DVD Player
will play only certain
Discs.
See page six for details.
Downloaded From Disc-Player.com Philips Manuals
Helpful
Hints
i
i
A "No Feature"symbol _ may appear
at the bottom right of the TV screen.
This symbolmeans either the feature
you tried is not availableon the Disc,or
the DVD Playercon not accessthe feature at this time.This does not indicate
o problem with the DVD Player.
If a Disc is dirty or hasscratches,the
pictures may appear distorted and
playback may stop. In such cases,
remove the Disc and turn o_'the DVD
Player.Disconnectthe power cord,then
reconnectit. Clean the Disc,then rum
on the DVD Playeragain and roinsert
the Disc for playback.
When the DVD or CD light appears on
the display panel, the Disc is loaded
coropletelyand is ready for playback.
Playbackwill end when the current disc
stops playback.
If the dischas not been set on the tray,
the DVD Playerwill play the disc which
is set on the right side tray.
When you want to select another disc,
press the DISC SELECTbutton repeatedlyor the DISC Number button for
your desireddisc.
Be careful to keep your fingersclear of
the disctray.
DiscMenus
19
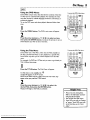
Using the DVD Menus
Toaccessthe DVD'sMain Menu..,
Some DVDs contain menus that describe the contents of the Disc
C]3C 3C 3
CZ)CD C33.....
or allow you to customize Disc playback. For example, the menu
may offer choices for subtitle languages,director's commentary, or
soundtrack playback.
To use the DVD menu and select playback features, follow these
steps.
I
2
m
Press the MENU
button.
The DVD's main menu will appear.
PHILIPS
DVOCD__l_C
_HA_E_
Press the arrow buttons (A/v/_1/•
) to select an item,
then press the ENTER button. Continue this process to set up
all the features you wish to see on the Disc.
Using
theTitle
Menu
Some DVDs have a Title Menu, which lists the Titles available on
the Disc. Use the Title Menu to start playback at a specific Title.
Some DVDs may allow you to choose Chapters from theTitle
menu.
For example, if a DVD has 10Titles and you want to go directly to
Title 5, follow these steps.
I
Press the TITLE button. The Title Menu will appear.
If aTide menu is not available,the
symbol will appearon the TV screen.
NOTE: If the DVD only hasa main menu, the main menu may
appearwhen you pressthe TITLE button.
2
Press the arrow buttons (_/_/_1/•
) to select the
desired Title, then press the ENTER button.
Playback will begin at the Title you selected.
Helpful Hints
• Menus may vary among Discs.
Refer to the information accompanying the Disc for details.
• Not all DVDs have Title menus.
• Some DVDs may refer to Chapters
as "scenes." Some DVDs may refer
to the Title Menu as the "scene
index."
Downloaded From Disc-Player.com Philips Manuals
20 Pausing
Playback
[Auo coDI
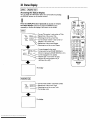
PausingPlayback...
Pausing Playback
I
s_
uoo_
OISPLA¥
C:ZD _
1
2
G3CDCD _
ODODCD......
Press the PLAY button to resume playback.
PLAY
SELECT
C_)
6
During playback, press the PAUSE button. Playbackwill
_auseand the sound will be muted.
PAUSE
Ol_
!
Memory On...
Memory On:
Resuming playback from the point
where
playback
Q
stopped
I
Press the STOP button during playback. Playbackwill stop,
_EAP_H MO0_
®
DISPLAy
DISC SELEC_
2
-I
and STOP will appear at the top right corner of the TV screen. In a
few seconds, MEMO ON (Memory On) will appear in the top left
corner of the TV screen.
Helpful Hints
2
Press the PLAY button. Playback will resume from the
point where playback stopped last.
PLAY
Downloaded From Disc-Player.com Philips Manuals
1
Memory On canbe erasedbypressing the STOPbutton a secondtime
whileplaybackisstopped.MEMO
OFFwill appear brieflyat the top left
cornerof theTVscreen.
Memory On is not availablewith
AudioCDs.
The DVDplayerwill turn itselfoff
automaticallyafter beingin Pause
mode for 30 minutes.Thishelpsavoid
the possibleburningof the still image
into theTVscreen.
Toseethe an-screeadisplaymessages,
suchasPLAY,
STOP,
or PAUSE,
set OSD
MESSAGE
to ON. Detailsare on page
43.
StepbyStepPlayback21
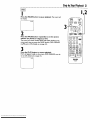
I
1,2
Press the PAUSE button to pause playback. The sound will
be muted.
PAUSE
1
2
Press the PAUSE button repeatedly to see the picture
advance one frame (or step) at a time.
The sound will remain muted. PAUSEwill appear brieflyon the
screen each time you press the PAUSEbutton. (OSD MESSAGE
must_oeset to ON. Details are on page 43.)
123 _3 E? ......
CD_
3
Press the PLAY button to resume playback.
PLAY will appearbriefly on the screen. (OSD MESSAGEmust be
set to ON. Details are on page 43.)
E_ITER
RE_R_
FO6--6--6--@
PHILIPS
CHANGER
J
PLAY
Downloaded From Disc-Player.com Philips Manuals
1
22 FaxForward/Reverse
Search
I
During playback, press the FWDI_I_ISLOW
REV_I_I button on the remote control,
button or the
• On a DVD, pressingthe FVVDIM_/SLOW or REV_t_I button
repeatedly will forward or reverse the picture at twice, eight
times, or 32 times the normal playbackspeed.Sound will be
muted during searching.The search speed will show in the corner
of the screen briefly.
• Use the FVVD I=,-I_/SLOW button for a forward search.Press the
REV_I_I button for a reverse search.
V
I
press the REV _
_,_X8
humeri _gain
Press Ihe FWO I_lp/SLOW
bulton sgain
I_re_s the pWD I_-/SLOW
button again_
Press lh_ REV _1 butLon again.
_X32
*°1
_×32
I_1_
pres _ the FWD _-/SLOW
bu_e_ _a_n_
• On anAudio CD, you may search forward or backward at 16
times the normal playbackspeed (_I_IXI6 or I_I_XI6). Pressing
the F'VVDI_"_/SLOW or REV_I_I button repeatedly will not
affect the speed of the search.Sound will be intermittent during
searchingon an Audio CD.
• Use the FVVD I_/SLOW
button for a forward search.Press the
REV_I_I button for a reverse search.
Press the REV _
button during Audio CD playback.
Press the FWD I_,/SLOW button during Audio CD playback.
2
Press the PLAY button to return to normal
playback.
Helpful
o
Downloaded From Disc-Player.com Philips Manuals
Hint
Tosee the search speed on the
screen,OSD MESSAGEmust be set
to ON. Details are on page 43.
SlowMotion23
I
Press the PAUSE
button
during
_H_OE
playback.
2
DtSpLAY
_LECT
3
2
Press the FWD I_I_ISLOW button. Slow motion playbackwill
begin.
Press the FWD I_/SLOW
button repeatedly during slow motion
playback to vary the speed of slow motion playback.You may play
the DVD at 1/16, I/8, or I/2 the normal playback speed.
3
CS3_
_3 ......
Press the PLAY button to return to normal playback.
_C_O
MENU
nTLE
_-6_ o-o7
PHILIPS
Helpful
Hints
The sound will be muted when
playback is paused and during
slow motion playback.
You can not play the DVD in
reverseslow motion.
Downloaded From Disc-Player.com Philips Manuals
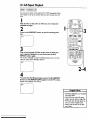
24 TrackPlayback
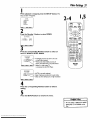
Starting
Playback at a Specific Track
There are three waysto begin playbackon anAudio CD at a specific
Track.Youmay use the Number buttons, the SEARCH MODE button, or the SKIP 14141
_
buttons. For details,read the information
below.
A
Using the Number Buttons to Select a Track
Press the Number buttons to enter the desired Track number. The selected Track will be located, and playbackwill start.You
may select aTrack with the Number buttons during playback or
when playback is stopped.
For single-digitTracks, press a single Number button. For example, to
playTrack three, press the Number 3 button.
For Tracks numbered I0 and above, press the + I0 button (repeatedly,if necessary), then press the Number button of the second digit.
For e_mple, to playTrack 12, press the + I0 button, then press the
Number 2 button. For Track 22, press the + I 0 button twice, then
press the Number 2 button.
If you enter aTrack number that is not availableon the Disc, playback
will not begin (or the current Track will continue to play).
B
Using the SEARCH MODE Button to Select aTrack
Press the SEARCH MODE button once, then press the A/_
buttons to select the Track number you desire. Finally, press
the PLAY button to begin playback at the selected Track.
If you press the SEARCH MODE button once during playback,the
current Track number will be displayedinsidethe brackets.
TOTAL
TRACKS:07
TRACK:[
I
_]
SEARCH_RACK
_Sta_
_Exit
C
Using the SKIP 1441_ Buttons to Select a Track
Press the SKIP I_ button during playback to skip the current Track and move to the nextTrack. Press the SKIP I_
button repeatedly to skip subsequent Tracks. The Track number
will appearbrieflyon theTV screen.
Press the SKIPI_I button during playback to return to the
beginning of the currantTrack. Press the SKIP _
button
repeatedly to go to previous Tracks. The Track number will
appearbrieflyon the'iV screen.
If you pressa SKIP button when playbackis paused,you must press
the PLAY button to resume playbacl_
If you pressa SKIP button when playbackis stopped,the selected
Trackwill beginplayingautomatically.
Downloaded From Disc-Player.com Philips Manuals
Title/Chapter
Playback25
Starting
Playback at a Specific Title/Chapter
There are two waysto begin DVD playbackat a specific Title or
Chapter.You may use the Number buttons or the SEARCH MODE
button.
A
Using the Number Buttons to Select aTitle/Chapter
During playback, press the Number
buttons to select a
Chapter. The Chapter will be located and playback will start.
When playback is stopped, press the Number buttons to
select aTitle. TheTitle will be located and playback will begin.
For single-digit Chapters or Titles. press a single Number button. For
example, to play Chapter three, press the Number 3 button during
playback.To playTitle two, press the Number 2 button while playback is stopped.
SI_ARCH_
DIS=LAy
c:::_ (_:)
OtS¢ S,_LECT
c::::D
For Chapters/Titles numbered 10 and above, press the +10 button
(repeatedly, if necessary), then press the Number button of the second digit. For example, to play Chapter 12, press the +10 button,
then press the Number 2 button during playback.For Title 22, press
the +10 button twice, then press the Number 2 button when playback is stopped.
B
Using the SEARCH MODE Button to Select a Title/Chapter
To start playback at a specific Chapter, press the SEARCH
MODE button once, then press the Number buttons or the
buttons to enter the Chapter number. Press the PLAY
button to begin playback at the selected Chapter.
TOTAL
PHILIPS
CHAPTERS:027
CHAPTER:
[ 15]
SI_ARCH/CHAPTER
E_
_
Exit
To start playback at a specificTitle, press the SEARCH MODE
button twice, then press the Number buttons or the _
buttons to enter theTitle
number. Press the PlAY button to
begin playback at the selected Title•
TOTAL
TITLES:
TITLE:
I
[
07
Helpful Hint
5]
SEARCH/TITLE
Start
_
Exit
During DVD playback, press the
SKIPbuttons to go to the next
chapter, return to the beginning af
the current chapter, or go to a previous chapter.
Downloaded From Disc-Player.com Philips Manuals
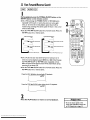
26 Specific
TimePlayback
Starting
Playback
I
at a Specific
Disc Time
Press the SEARCH
MODE button repeatedly
for DVDs or two times for Audio CDs).
(three times
O
SEARCH/TIME
®
SFJ_aCHh_OE
TOTAL
TIME:
lh23m45$
I
__
--tc:_
D_S_J_¥
c:_
_SCSE_.ECl'
_*,¢OE
TIME
{ _h_ _rn
Start
s
-3
]
_
c::3
Exil
2
Use the Number
buttons
to enter
the Disc time
you want playback to begin.
• Example: I hour, 23 minutes and 30 seconds
I -_ +10 _ +10 _ 3 -* +10 _ +10 _ +10-*
• To enter zero, press the Number
I_ button.
at which
0
0 (zero) button or press the
• Make sure the time you enter is within the total time of the
Disc. If it is not, you will have to enter a different time.
• If you make a mistake, press the I_ button repeatedly until you
reach the item you need to correct (hour, minute, or second),
then enter the correct information•
TOTAL
TIME
I
ooo
oego
.2
,Fo6F1,6--6--61
PHILIPS
TIME:1h23m45s
[lh05m30s]
SEARCH/TIME
1
3
Within 30 seconds, press the PLAY button. Playback will
start at the time that you specified.
Specific tJme playback is not available with same discs or if MEMORY
OFF is activated for a DVD. Details
are on page 20.
Downloaded From Disc-Player.com Philips Manuals
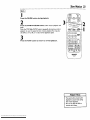
RepeatPlayback27
I
Press the REPEAT button repeatedly
until the repeat
mode you want appears in the top left corner of the TV
screen.
• Repeatedly pressing the REPEAT button during playback lets you
choose REPEAT CHAPTER, REPEAT TITLE, or REPEAT OFE
• If a Chapter is playing repeatedly, then you press the Number
buttons to select a new Chapter, the new Chapter will play
repeatedly.
f REPEAT
Pressthe REPEATbutton to select
_J[CHAPTER]
__
[
REPEAT
mTLEI
J4_---REPEAT CHAPTER.The current
Chapter plays over and over.
Pressthe REPEATbutton again to
| _._select REPEATTITLE.The entire
-]
Title plays over and over.
REPEAT
IOF_I
JAUDIO
Pressthe REPEATbutton againto
/ _---select REPEATOFE Regular playback wi resume.
CD l
• Repeatedly pressing the REPEAT button during playback lets you
choose REPEAT TRACK, REPEAT ALL and REPEAT OFF.
• If a Track is playing repeatedly, then you press the Number buttons to select a new Track, the newTrack will play repeatedly.
I_[
"_J
f
_TEn_EcAK_
] _1_
J
_
Press the REPEATbutton to select
REPEATTRACK.The current Track
playsover andover.
REPEAT
_)
Pressthe REPEATbutton againto
[ _
select REPEATALL.The entire
[ [ALL]
Audio CD playsover and over.
REPEAT
I
[oF_
Downloaded From Disc-Player.com Philips Manuals
Pressthe REPEATbutton againto
I
_
select REPEATOFF.Regular playback wi resume
Helpful
Hints
Repeatplayback is not available
with some discs.
REPEAT[ALL] mode isavailable
only on the disc currently selected
for playback.
28 A.BRepeatPlayback
You can play a sectionof anAudio CD or DVD repeatedly. Follow
these steps to set up the section that you want to play over and
over.
I
Play the Disc to the point at which you want repeated
playback to begin.
2
Press the A-B REPEAT
(A).
button
to set the starting
point
3
Play or fast forward the Disc to the point at which you
want repeated
playback to end, then press the A-B
REPEAT button again.
The section will begin to play immediately, playing over and over
until you cancel the A-B Repeat feature.
4
To cancel the A-B Repeat feature, press the A-B REPEAT
button so that REPEAT [OFF] appears on theTV screen.
Regular Disc playback will resume.
Helf_ful Hints
A-B Repeat playback is not available
with same DVDs.
With DVDs, the entire A-B repeat
section must be within a single Title.
With Audio CDs, the A-B repeat section can contain multiple Tracks.
Point B must be later on the Disc
than Point A.
Downloaded From Disc-Player.com Philips Manuals
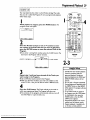
Programmed
Playback29
You may determine the order in which Tracks will play.The order
that you set is called the Program.To set up programmed playback,
follow these steps.
I
SEAF_H_X_0_
OlSPLA¥
DISCSELECT
I
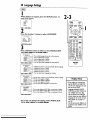
While playback is stopped, press the MODE button, The
programscreen will appear.
PROGRAM
T L.
_,_
]/14
TOTAL
StaM,_0elele
0h00m00s
_
CD
-K3GG
Exit
2
CLE_
Press the Number buttons or the A/v buttons to enter
the number of the first Track that you want to play.Then,
press the ENTER button to store the selected Track in the
Program.
• If you enter a wrong Track number, press the CLEAR button.The
last Track in the Program will be removed.
position in program__L_
• [
]/14
PROGRAM
TOTAL
O_07m46s
1
_
Effr_l
PHILIPS
Helpful
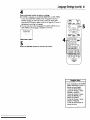
Repeat step 2 until you have selected all theTracks you
wish to play in the Program.
• Up to 20 Tracks may be stored in the Program.
• Make sure the Track numbers you enter are availableon the
Audio CD. If it is not, you will have to enter a different track.
4
the PLAY button. The Tracks will play in the order in
you programmed them.The Program will play once.
contents of the program will be stored until you turn off
DVD Player or open the Disc tray.
Downloaded From Disc-Player.com Philips Manuals
RETUn_
track number
3
Press
which
• The
the
....
Hints
SpecificTrackand random playback
cannot be combinedwith programmed playback.During programmed playback,the MODE and
SEARCHMODE buttons will not
operate.
Youmay play a Programrepeatedly.
During programmedplayback,press
the REPEATbutton so that REPEAT
[ON] appears.Theprogram will play
over and over.
Tosee whichTracksyoustored in
the Program,press the STOPbutton
to stop playback,then pressthe
MODE button so that the PROGRAMscreen appears.
Programmedplayback can only be
started from the programscreen.
Programplaybackis availableonly
on the disc currentlyselected.
30 Random
Playback
I
While playback is stopped, press the MODE button
repeatedly
so that the RANDOM
screen appears.
I_
RANDOM
2
While the RANDOM screen appears, press the PLAY button. The Trackswill playin random order.After all the Tracks on
the dischaveplayedonce,playbackwill stop.Or, you canpress the
STOP bu_conat anytime to stop playback.
G3C_C_ _
_U
_OCD
_ENU
TITLE
ENTER
RETUnN
FO 6_6_--61
PHILIPS
• Randomplaybackis availableonly
on the disc currently selectedfor
J
Helpful Hint
t
playback.
Downloaded From Disc-Player.com Philips Manuals
AudioLanguage/Sound
Mode31
The DVD Player allows you to select a Languagefor DVDs or a
Sound Mode for Audio CDs.
[_
O
Language
_H
I
_
®
_
C_SPLAY
_
DI_,CSEUE_
MO_-
CZ2_
SETUp
o
O
Press the AUDIO button during playback.Within 15 seconds, press the Air buttons to select the desired language.
• The languagecan be changed only if multiple languagesare available on the DVD.
E3 CZ3_3
I__Press
the A/v buttons.
_CD_
_Press
the A/v buttonsagain.
_Press
the _/v
buttons again.
...
AUDIO I
JAUDIO
CD]
.....
C3 C_3G
C_ZD
ENTER _R_
C_ O
PHILIPS
_,:_¢D s olsc
AUDIO 2
Sound
Mode
I
Press the AUDIO button during playback, then press the
A/_ buttons until the sound mode you want appears.
• When producers record anAudio CD, they record the sound
on two channels- the left and the right.You can chooseto hear
the sound on the left channel,the sound on the right channel,or
the sound on both channels(Stereo).Youwill select L-CH, ECH, or STEREO.
_
Only the right
---_
Downloaded From Disc-Player.com Philips Manuals
channel
is active.
Only the left channel is active,
Helpful
Hints
If a desired language is not shown
after pressing the A/v buttons several times, the DVD does not have
that language.
The display will disappear after about
15 seconds. Or, press the AUDIO button a second t_meand the display
will disappear automatically
Some DVDs only allow you to change
the language in the Disc menu.
When you use the DIGITAL AUDIO
OUT COAXIAL jack, the sound mode
of audio CDs cannot be changed.
32 Subtitle
Language
I
Press the SUBTITLE button during playback. The subtitle
menu will appear on the TV screen.
2
Within 15 seconds, press the A/v buttons to select a subtitle language. Selecta languagefrom those availableon the
DVD.
I___'_
Press the A/v
J_
, SUBTITLEFOTOv__
SUBTITLE I
18
_
buttons.
select another language.
Subtitle 2
I
To turn off subtitles, press
the A/v buttons repeatedly
until OFF appears in the
subtitle menu.
No subtitles
SUBTITLE 2
3
Helpful
The subtitle menu will disappear after about 15 seconds.
Hints
With some DVDs,you may selecta
subtitlelanguagein the Disc menu.
If the desiredlanguageis not shown
after pressingthe _/_ buttonsseveral times, the Discdoesnot have
subtitlesin that language.
The subtit/esmay be delayedfor a
few seconds.
• Yoursubtitle selectionwill be cancelledif you open the Disc tray or
turn off the powerThe default setting of the DVD will be selected
again.
Downloaded From Disc-Player.com Philips Manuals
Camera
Angles33
• ooo66ae
°°°
o°
,iooo,o_oootet6oolo
.ioooo_Qtooo..
° ,oQootoo*,l
• oo,oo_oo*llm,,i,*,oeoett*lovllootol*,,e6ootl,,,_6,,o
Some DVDs contain scenesthat were recorded from different
angles.You may select a camera angle with the DVD Player.
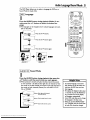
I
Press the ANGLE button during playback.
_E
__DI_P_Y
C_SC_LECT
2
SET_
Within 15 seconds, press the _/v
ferent angle.
_
_NGLE [_IIB
buttons to select a dif-
CB
Angle I (default) of eight
C9
• -_
_J
_
possible angles
Press the &iv buttons to
select another angle.
Angle 2
"
__
2
Press the _/_
ME_
I
ENTER RETURN
buttons again.
PHILIP$
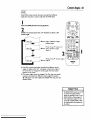
• If the Disc containssequencesrecorded from different camera
angles,the angle symbol _] will appear at the bottom-right of
the screen.You can change the camera angle when the symbol
appears on the screen.
• The camera angle cannot be changed if the Disc does not contain
sequences recorded from different camera angles.Thesymbol
will appear if no other anglesare availablewhen you press the
ANGLE button.
,11 ii
Helpful
Hints
TheANGLEICON mustbe set toON
in orderfor the anglesymbolto
appear as describedin step 2.Toset
ANGLEICONto ON,seepage43.
If the anglestatusappearson the
screen(for example,ANGLE[I]/8),
the anglesymbolwill not appear on
the screen.
Downloaded From Disc-Player.com Philips Manuals
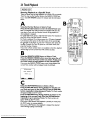
34 ParentalLockPassword
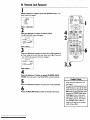
I
While playback is stopped,
setup screen will appear.
press the SETUP
button.
The
1 LANGUAGE
2 VIDEO
3 AUDIO
4
LOCK
5. OTHERS
En_r
_t_Ex_
2
Press the Number
The SETUP/LOCK
PASSWORD
{ -_
1 LEVEL
[NONE]
2 _ANGE
!_
4 button
to select
LOCK.
menu will appear.
]
PASSWORD
SETUP/LOCK
Er_er _Ba_
3
Press the Number
buttons to enter the 4-digit password.
• When doing this for the first time, enter any 4 digits.That number will be the password until you change it.
PASSWORD
[ • _ t_l[
1 LEVEL
2 CHANGE
[NONE]
PASSWORD
}
SETUP/LOCK
_Ente_
_
1
P,art
4
Press the Number
WORD.
to select CHANGE
PASS-
The first space in the PASSWORD will start flashing.
5
6
Press the Number
Press the RETURN
Downloaded From Disc-Player.com Philips Manuals
2 button
Helpful Hints
buttons
button
to enter
your new password.
twice to remove
the menu,
Write down the password in case
you forget it.
To erase the old password, press the
POWER button to turn off the DVD
Player.Then, press and hold the SKIP
button on the DVD Player while
pressing the POWER button on the
DVD P_to
turn on the power
again. When "HELLO" appears on
the display panel, you may release
the SKIP _
button. Follow the
steps on this page to set the password that you desire.
ParentalLockLevels35
I
While playback is stopped,
setup screen will appear.
press the SETUP
button,
The
LANGUAGE
2 VIDEO
3 AUDIO
4 LOCK
5 OTHERS
[_B
SETUP
2
Press the Number
The SETUP/LOCK
PASSWORD(
2
LOCK.
menu will appear.
[NONE[
pASSWOF_D
SETUP/LOCK
_Enler
to select
}
1 LEVEL
2 CHANGE
4 button
_
1
e_:_
3
RATING EXPLANATIONS
NC-17 - Under 17 not admitted
Press the Number
buttons
to enter
your 4-digit
password.
SETUP_OCK
PASSWORD
1LEVEL
2CHANGE
[*_}
[NONE]
PASSWORD
R - Restricted; under 17 requires
accompanyingparent or adult
guardian
PG 13 - Unsuitable for children
under 13
PG - ParentalGuidancesuggested
G - GeneralAudience
Helpful
Press the Number
Some DVDs are not compatible with
Parental Lock. Make sure the DVD
I button to select LEVEL.
SETUP/LOCK
PARENTALLOCK
parental
Lock is off
[PLAYALL}
[NC-171
[R]
All DVOs
will play, regardleSS
OVDS rated
DMDS rat_
NC-17 or higher wll_ POt play
R or h_er
will not play¸
{PG13]
[PG]
OV_
PG13 or higher _111not play
{G]
DVDS rated G or higher will not play. Only
NONE
LEVEL8
LEVEL7
LEVEL6
LEVELS
LEVEL4
LEVEL3
LEVEL2
LEVEL1
_En_r
rated
DVOs tared
DVDs
of rating
PG or higher will not play
that are not rated will play
5
Press the &/_ buttons to select the level you desire, then
press the ENTER button. For example, if you want to play
Discs rated PG 13, you must select LEVEL 5 or higher.
The SETUP/LOCK menu will reappear.The level you selected will
appear on the screen beside LEVEL.
6
Press the RETURN
button
twice to remove
the menu.
plays according to the Parental Lock
settings you have made.
The DVD Player will not allow you to
change LEVEL settings until you
enter the correct password.
When you try to play a Disc that
has a rating that exceeds the level
you set, a message will appear on
the screen, indicating the Disc cannot be played. If this happens, press
the OPEN/CLOSE button to remove
the Disc, then select a level that
allows playback. Or select NONE to
turn off Parental Lock. Load the Disc
again and begin playback as usual
Some Discs may allow you to simply
enter your 4-digit password, then
begin playback automatically. Follow
the instru_ons provided by the Disc
message,
Downloaded From Disc-Player.com Philips Manuals
Hints
36 Status
Display
Accessing the Status Display
You can check the information about the current Disc by pressing
the DISPLAY button on the remote control.
I
Press the DISPLAY button repeatedly to access or remove
the status displays.If you do not press the DISPLAYbutton
repeatedly to remove the display,it will remain on the screen.
: 0_/0,_
TIME Oh24rn14,
_
REMAIN
0h05rn25s
CHAPTER
: 00_/0,0 .
TITLE
I
_DE
sETUp
O
O
" Current Title number / total number of Titles
" Elapsedtime of the current Title
" Remaining time of the current T t e
TIMERE_A,N
0_0_,'X_I
Current Chapter number / total number of
"X_j;_
Chapters in the current Title
_•
Elapsedtime of the current Chapter
" ", Remaining time of the current Chapter
_
• Current
_
J
•
_OLB,_D_,TAL....-L'_"
Current
AUDIO
I ENGLISH
_?E
_0_. _
language for the sound
audio format (DOLBY DIGITAL 5.1
Chanoel
isdisplayed
asDOLBY
DIGITAL
6 CH.)
Vr_TUAL
30_..,._M._
'_'" Current language for the subtitles
"_.....L _. Selected angle / total number of angles
] _ • VIRTUAL 3D setting (appears only if
VIRTUAL 3D is ON)
PHILIPS
J
No display
IAUDIO
TRACK
CD
I
01/04_.1._1 • Current Track number / total Track number
OhOSm25s
_
TIME 0h01m31e
_
REMAIN
P_OG.AU _
•
• Elapsed time of the current Track
Remainingtime of the current Track
• Current
play mode
No display
Downloaded From Disc-Player.com Philips Manuals
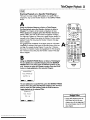
Video
Settings
37
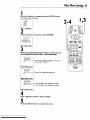
I
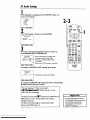
When playback is stopped,
setup screen will appear.
press the SETUP
button.
The
2-4
LANGUAGE
1,5
2 VIDEO
3 AUDIO
4 LOCK
O
5 OTHERS
[(_E!l_
SETUP
Er_r
_E_i_
J_
®
Ex_
MODE
2
0
J
Press the Number 2 button to selectVIDEO.
SETUPNIDEO
1 TV MODE
[4:3LB]
2 STILL
[AUTO]
MODE
GQ_
3
Press the corresponding
Number
item:TV
MODE or STILL MOOE.
button
to select an
ENTER RE_N
1I:_T_L_!O_ON
._.
" Full-height pictures are shown, wit h one
24:3L_rrERBOX-__ I or both sidestrimmed.
3 18:9WIOE
_
t_m_E.,_0k
_"
_
SETUPNIDEO
STILL MODE
Wide screen (full-width) pictures are
shown, with black bars at top and bottom.
E*_)" Select if a wide screen'iV
is connected to the DVD Player.
PHILIPS
1
1 AUTO
2 FIELD
_FO6--6_6 6])
•
AUTO
"
Select If pictures
I
3 FRAME-_-"---_-.--I
.
is normally
selected.
.
.
are
blurred =nauto mode.
o Select to show Still pictures in high resolution.
4
Press the corresponding
setting.
Number
button
to select a
5
Press the SETUP
button
to remove
the menu.
Helpful Hint
I
• YOUmay select a different *IV MODE I
settingDisc,
only if it is available on the
Downloaded From Disc-Player.com Philips Manuals
I
38 AudioSettings
I
While playback is stopped,
setup screen will appear.
press the SETUP
button.
The
1 LANGUAGE
2 VIDEO
3
I_
AUDIO
4 LOCK
50THEAS
SETUP
Erder
(_B_
I ImE!_)
E_
2
Press the Number
3 button
to select AUDIO.
SETUP/AUDIO
1 DIGITAL
OUT
2 VlRTUAL3D
[OFF]
C_3C3 C_)
3
C_3C_ C_ ......
Press the corresponding
Number
item: DIGITAL
OUT orVIRTUAL
button
3D.
to select an
I 1pCMOGTALOU_kH
SETUP/AUDIO
Sets the sample
ratesound
for playinga
_"_1"" recorded
with high
quality disc
/ 2._OL_Y
O_G_TAL
[ON]--.
Select when a Dolby Digital decoder
|
[ON}_
3DTS
.|
_T_R
RETUnN
,F0--6--6--6--63
is connected.
J • Select when a DTS decoder is connected.
PHILIPS
To change the DIGITAL
VIRTUAL
I
1 OFF
SETUP/AUDI
OUT
settings, go to step 4.
30
O
!
• Select ON to activatethe 3D effect.
L--.---EJ
2. ON
--
To change theVIRTUAL
3D setting, press the corresponding
Number button, then go to step 5.
This unit employs TruSurround system
(_)"Jtj_$1Jrrol_/ll_"
of SRS Labs, Inc. as the
VIRTUAL
3D technology.
TruSurround and the(_"
symbol are trademarks
SRS Labs, Inc. in the United States and selected
foreign countries.
TruSurround technology is incorporated
license from SRS Labs, Inc.
Downloaded From Disc-Player.com Philips Manuals
under
of
Helpful
Hint
• ToenjoyDolbyDigitalSurroundor
DTSSurroundsound,you must have
the DVD Playerconnectedto a
Dolby Digital or DTS decoder.
Details are on page I h
AudioSettings
(cont'd)39
4
To change the PCM, DOLBY DIGITAL, or DTS settings,
press the corresponding Number button to select the
desired item, then press the Number button to choose
the setting (i.e. ON or OFF).
SETUP/AUDIO
PCM
_
"_
I _.Hz _
2 _.Hz _
_1
_E0,0,_E_,)
DOLBY
Q
•Audiosi nalsare
t d
conver e to
I 48 kHz/I 6 bit signalswhen playing
t a DVD recordedwith highsound quality
(48 kHz/20 bit/24 bit, 96 kHz).
• Sound is reproduced at 96 kHz if a DVD
is recorded with high sound quality. If you
are playing 48 kHz discs or if4:3 LETTER
BOX is selected, sound is reproduced
at 48 kHz.
®
S_AnC_E
g
01S?_¥
_SCSELECT
-5
_
SKI? ----_
pAUSE
DIGITAL
SETUP/AUDIO
1.OFF
2 ON
C_QC_
1
• Select ON when a Dolby Digital decoder is used.
_
.....
4_
0
_z_
SETUP/AUDIO
DTS
1 OFF
2 ON
56
ENTER RETUnt
• Select ON when a DTS decoder is used.
PHILIPS
5
Press the SETUP
Downloaded From Disc-Player.com Philips Manuals
J
button
to remove
the
menu.
40 Language
Settings
I
While playback is stopped, press the SETUP button. The
setup screen appears.
i
_
3
4
LANGUAGE
VIDEO
AUDIO
L_CK
S
OTHERS
-,
2
Press the Number
i ,_,u DIO
2 SUBTITC_
3 DISC MENU
I button
to select LANGUAGE.
[ORIG]
[AUTO]
[AUTO]
4 PLAYER MENU [ENG]
SETUp_NGUAGE
¢11
3
CD 153153......
Press a Number
button to select an item:AUDIO,
TLE, DISC MENU, or PLAYER MENU.
I
SUBTI-
CL_R
_
SETUp/LANGUAGE
AUDIO
_-
1 ORIGINAL
/
3 SPANISH
• The or g hal language of each disc will be selected.
I
2 EN_USH _
V_
....
"olce
_
•
4. FRENCH
5 OTHER_
L._o_e_L=)
C0--6
ts played back m Enghsh.
Voice is played back in Spanish.
" Voice is played back in French.
" You can select other languages for audio playback.
PHILIPS
I OETU NOUAOE
1
SUB_
AUTO
/
/
• Subtitles
are shown in the automatically
.
I
2. ENGLIS H _
•
Subutlesare shown _n Enghsh.
3" SPANISH _
4 FRENCH
5 OTHER _
"
Subtitles are shown in Spanish.
"
Subtitles are shown in French.
L_mmm_e_
_=_
' You can select other
selected language.
languages for subtitles.
SETUP/LANGUAGE
DfSCMENtJ
AUTO_
3 SPANISH
-4 FRENCH
"
selected language
1"ENGLISH
_
SPANISH
_
_/j
I "" The
=ne disc
msc menu
menu appears
appears In
in French.
English.
YOU can se ect other anguages for the disc menu.
_
If the original or automatJc sett_ngsfor AUDIO and SUBTITLE
are the same language, the subtitles will not be shown.
" The on-screen display and DVD Player menus appear in English
• The on-screen display and DVD Player menus appear in Spanish,
" The on-screen display and DVD Player menus appear in French.
Go to step 4 to change the settings within AUDIO,
TITLE, DISC MENU or PLAYER MENU.
Downloaded From Disc-Player.com Philips Manuals
Helpful Hints
The disc menu appears in Spanish.
SETUp_LANGtJAGE
PLAYER MENU
3 FRENCH
'
_
5
_ OTHER'_=_'_
E_L_SH_
E._ _"
l
.The disc menu s shown n the automatically
....
SUB-
Language settings for AUDIO,
SUBTITLE,and DISC MENU are
not available with some discs.
Use the AUDIO and SUBTITLE
buttons instead to select different
languages for the audio and subtitles. Details are on pages 3 I
and 32.
Not all discs provide different languages for audio, subtit/es, or disc
menus.
Language
Settings
(cont'd)41
4
Press a Number
button to select a setting.
• If OTHER is selected on the AUDIO, SUBTITLE or DISC MENU
screen, the COUNTRY CODE screen will appear. Press four
Number buttons to enter the country code you desire, then
press the ENTER button. Refer to the list on page 42. (The list is
alphabetized according to language.)
• You can only select other languagesfor AUDIO, SUBTITLE, and
DISC MENU if the language is available on the Disc.
SETUp/LANGUAGE
COUNTRYCODE
[--_
_i_E_Enler _
]
Back_
E
5
Press the SETUP
button
to remove
the menu,
Helpful
Hint
• If you acadentafly set the PLAYER
MENU LANGUAGE to French or
Spanish and need English:
I) Pressthe SETUP button.
2) Pressthe Number I button
(IDIOMA or LANGUE).
3) Pressthe Number 4 button
(MENU EN PANTALLAor
MENU SUR _CRAN).
4) Pressthe Number I button
(INGLES or ANGLAIS).
5) Pressthe SETUP button to
remove
Downloaded From Disc-Player.com Philips Manuals
the menu.
42 Language
Settings
(cont'd)
Country
Code
A-B
Abkhazian
Afar
Afrikaans
Albanian
Amharic
Arabic
Armenian
Assamese
Aymara
Azerbaijani
Bangla
Bashkir
Basque
Bengali
Bhutani
Bihar_
Bislama
Breton
Bulgarian
Burmese
Byelorussian
C-E
5759
4947
7254
4961
5464
4965
5047
6058
5160
5161
5166
F-H
Faroese
Fiji
Finnish
French (FRE)
Frisian
Gaelic (Scots)
Galician
Georgian
German (GER)
Greek
Greenlandic
Guarani
Gujarati
Hausa
Hebrew
Hindi
Hungarian
Downloaded From Disc-Player.com Philips Manuals
Country
Code
Lanu_g__g_
I-K
4748
4747
4752
6563
4759
4764
5471
4765
4771
4772
4860
4847
5167
4860
5072
4854
4855
4864
4853
5971
4851
Cambodian
Catalan
Chinese (CHI)
Corsican
Croatian
Czech
Danish
Dutch (DUT)
English (ENG)
Esperanto
Estonian
Lan ug_ge
5261
5256
5255
5264
5271
5350
5358
5747
5051
5158
5758
5360
5367
5447
5569
5455
5467
Icelandic
Indonesian
Interlingua
Interlingue
Inupiak
Irish
Italian (ITA)
Japanese(JPN)
Javanese
Kannada
Kashmiri
Kazakh
Kinyarwanda
Kirghiz
Kirundi
Korean (KOR)
Kurdish
L-N
Laothian
Latin
Latvian
Lettish
Lingala
Lithuanian
Macedonian
Malagasy
Malay
Malayalam
Maltese
Maori
Marathi
Moldavian
Mongolian
Nauru
Nepali
Norwegian
O-R
Occitan
Oriya
Oromo (Afan)
Panjabi
Pashto
Persian
Polish
Portugese
Pushto
Quechua
Rhaeto-Romance
Romanian
Russian
S
5565
5560
5547
5551
5557
5347
5566
5647
5669
5760
5765
5757
6469
5771
6460
5761
5767
5861
5847
5868
5868
5860
5866
5957
5953
5965
5958
5966
5955
5964
5961
5960
6047
6051
6061
6149
6164
6159
6247
6265
5247
6258
6266
6265
6367
6459
646 I
6467
Samoan
Sangho
Sanskrit
Serbian
Serbo-Croatian
Sesotho
Setswana
Shona
Sindhi
Singhalese
Siswat
Slovak
Slovenian
Somali
Spanish(SPA)
Sundanese
Swahili
Swedish
6559
6553
6457
6564
6554
6566
6660
6560
6550
6555
6565
6557
6558
656 I
5165
6567
6569
6568
T
Tagalog
Tajik
Tamil
Tatar
Telugu
Thai
Tibetan
Tigrinya
Tonga
Tsonga
Turkish
Turkmen
Twi
6658
6653
6647
6666
6652
6654
486 I
6655
666 I
6665
6664
6657
6669
• "
U-Z
Ukrainian
Urdu
Uzbek
Vietnamese
Volapuk
Welsh
Wolof
Xhosa
Yiddish
Yoruba
Zulu
6757
6764
6772
6855
696 I
497 I
696 I
7054
5655
7161
7267
OtherMenuSettings
43
I
When disc playback is stopped, press the SETUP button.
The setup screen will appear.
1 LANGUAGE
2 VIDEO
3 AUDIO
4 LOCK
5 OTHERS
2
Press the Number
10SD
MESSAGE
to select
OTHERS.
[ON]
2 ANGLE ICON
3 BACKGNOUN[3
[ON]
IBLUEI
SETUP/OTHERS
_r_r
5 button
_ck
1
I_iED
EK
3
Press the corresponding Number button to select an item:
OSD MESSAGE,ANGLE ICON, or BACKGROUND.
OSDMESSAGE
SETUP/OTHERS
1ON
• Select ONto display messageson the screen,
such as PLAY, STOP, etc.
2OFF
m_DEr_e"
_
Ba_:k
_
ANGLEICON
SETUPIOTHERS
1ON
EXll
1
• Select ON to display the angle icon.
2OFF
I_Enter_B_mck_
SETUPIOTHERS
BACKGROUND
1" BLUE
Turns the Player menu
backgroundto blue
• Turns the Player menu background to gray
--
_Enler._
•
BaCk_Exd
4
Press a Number button to select a setting.
5
Press the SETUP
Downloaded From Disc-Player.com Philips Manuals
button
to remove
the menu.
44 HelpfulHints
iool,
Ioog
oeo•
• o•*
i DOIg.
OQQ•
•to••
• 401_00QO
• •O•••
IOtO0
• DO0•
•t••o,
OOQO•
• tO••o
t,tOQO•
•tO•••
If you are havingproblems with your product,checkthis list of problemsand possible solutions before requesting service.You may be able to solve the problem yourself.
If you need to call a customer service representative, please know the model number and serial number of your product before you call.This information is displayed
on the back of the product. Also, pleasetake a moment to identify the problem you
are having,and be prepared to explain this to the representative. If you believe the
representative will need to help you with operations, pleasestay near the product.
Our representatives will be happy to assist you.
The DVD Player has no power.
• Make sure the power cord is connected completely to an AC (alternating current)
outlet.
• Press the POWER button to turn on the DVD Player."HELLO" will appear briefly
on the display panel as the power is turning on.
The remote control will not operate the DVD Player.
• Aim the remote control directly at the DVD Player's remote sensor.Details are on
page 14.
• Remove all obstacles between the remote control and the DVD Player.
• Inspect and/or replace the batteries in the remote control. Details are on page
seven.
• Use the remote control within 23 feet of the DVD Player.
No picture
• Make sure the video cable is connected correctly.You may connect either the yellow video cable (supplied), an optional S-Video cable, or optional component
video cables. Details are on pages 8-12.
• Make sure the'iV is set to the correctVideo channel (usually theAUX
IN,AN IN,
Auxiliary In, ComponentVideo
In or S-Video In channel). Check your'IV owner's
manual for details.
• Insert a Disc that is playable on this DVD Player.Details are on page six.
Disc cannot be played.
• Insert a playable Disc. Detailsare on page six.
• Place the Disc correctly in the recesses in the Disc tray. If the Disc is one-sided,
place the Disc in the tray with the labelfacing up.If the Disc is two-sided, make
sure the side you want to play isfacing up.
• Clean the Disc.
• Cancel the parental lock,enter the password,or changethe control level.Details
are on pages34-35.
• Make sure the Disc is labelled for use in Region I orALL regions. Details are on
page six.
No sound
• Connect the audio cablesfirmly.Make sure the cablesare connectedto the
AUDIO IN jacks on the'IV or audio equipment. Details are on pages8-12.
• Check the audio settings of the DVD Player.Details are an pages38-39.
• Turn on the power of the audio equipment and make sure it is set to the correct
channel, usuallyAuxiliary IN. Refer to the owner's manual of the audio equipment
for details.
• Check the audio settings of the Disc. For example, you may have selected "soundtrack" playback on a DVD. Only the music of the movie will play,not the characters' dialog; music might not be recorded throughout the entire DVD.
Downloaded From Disc-Player.com Philips Manuals
.OQ••
• • •IO,,,e•,,O••
t • • •
HelpfulHints(cont'd)45
Distorted
picture
• Connect the DVD Player directly to the'l'_.
• There are some.cases where the picture may be distorted slightly; this is not a
malfunction of the DVD Player.
The camera angle cannot be changed.
• The DVD might not contain segments recorded from different camera angles.See
if multiple anglesare available.Detailsare on page 33.
The audio or subtitle language cannot be changed.
• The DVD does not contain audio or subtitles in the desiredlanguage.Not all
DVDs contain audio or subtitlesin multiple languages.
See if other languages
are
available.Details are on pages31-32.
"No feature" symbol appears on the screen, prohibiting an operation.
• That operation is currently prohibited by the DVD Player or is not availableon
the Disc. Details are on page five.
The
_IVD
Player turns
off after
30 minutes.
• The power is turned off automatically if playback is paused or stopped for more
than 30 minutes (and no buttons are pressed on the remote control or the DVD
Player).
A screen
saver appears
on theTV
screen.
• The DVD whale will appear on the'iV screen if Disc playback is stopped for
more than one minute (and no buttons are pressed on the remote control or the
DVD Player).The DVD whale moves around on the screen to prevent damage to
your TV's picture tube,A prolonged still image, including'IV station identification
Iogos or video games, may damage the picture tube.
Downloaded From Disc-Player.com Philips Manuals
46 CareandMaintenance
1*61•ltO
Oe,O
OOOI
ItO0
_00,0
Io°OIO,OQtO
tOOIO0_
_to6,ogg
OOettQmOQ,
OOQO_QOtOQ
• ,Oeetl
tOtOeO
• tO,,O
I ,I,060,*O_
i,_,6oo
• ,e
Cleaning the DVD Player
• Wipe the front panel and other exterior surfaces of the DVD
Player with a soft, slightly damp cloth.
• Never use a solvent, thinner, benzene or alcohol to clean the
DVD Player.Do not spray insecticide liquid near the DVD Player.
Such chemicals may discolor the surface or damage the DVD
Player.
Cleaning
a Disc
• Use a soft, dry cloth to wipe the Disc.
• Wipe the Disc in a straight line from the center to the edge.
Never wipe the Disc in a circular motion.
• Do not use detergent or abrasive cleaning agents.
• Handle the Discs so that fingerprints and dust do not adhere to
the surfaces of the Discs.
• Always store the Disc in its protective
Don't use cleaners.
Wipe Discs from the
center to the edge.
case when it is not in use.
Checking the Laser
• If the DVD Playerdoes not operate as describedin this owner's
manual,the laser may be dirty.Consult anAuthorized Service
Center for inspectionand cleaningof the laser,
Handle Discs
by the edges.
Keep the Disc in its case.
Downloaded From Disc-Player.com Philips Manuals
Glossary
47
• i tBOQO.OtO
Ioetl
_.tQg
OeQt
I061,
OtOI
,tOJO
* ,0°,
,,gQO_
,,61,
J,Q_
• ,60O,
,OQ,
• ,0,°,
Ito
• ,O0_
• • .°to
AUDIO OUT lacks: jacks locatedon the back of the DVD Playerwhich are used
to send audio to another system ('1"_,decoder,or amplifier).
CD: Compact Disc (audio)
Coaxial !ack: Used to send digital audio to a decoder or amplifier,allowingyou to
adjustthe volumeat the decoder or amplifier.Thisconnectionprovidesthe 5.1
channelsurround sound as heard in movie theaters.
COMPONENTVIDEO
OUT Jacks: jacks located on the back of the DVD
Player which are used to send high-quality video to a'iV with Component Video In
jacks.
Dolby Digital: A surround
in movie theaters.
sound system that provides 5.1 channel sound as used
DTS:_bDigitalTheater Systems.This is a surround sound system, but it is different
from Dolby Digital.The formats were developed by different companies.
DVD:
Digital Video Disc.
OPTICAL Jack: Converts electrical signals into optical signalsbefore sending the
audio to the amplifier.Optical audio is not prone to external electrical influences
and has less noise, which reduces adverse effects on external equipment. Be sure to
keep the protective cap on the jack when the jack is not being used.This keeps dust
out of the jack.
Remote Control: the small unit that came with your DVD Player;allowsyou to
operate your DVD Player from a distance,
Produces a clearer picture by sending separate signalsfor the luminance
and the color, If you connect an optional S-Video cable,you will not need to use the
supplied yellow video cable.
VIDEO OUT lack: jack located on the back of the DVD Playerwhich is used to
send video to aTM
Downloaded From Disc-Player.com Philips Manuals
,,66.1
• "',,,,O,
• • I,,tl
48 Specifications
oo.,o6o,Qoool16*.I°°.
JBt
ol,
ooo
o_eQ_
• _oo,_
ot6o,
• _.o°°
.°t,_
• _4_,
• oo6o°
..°°°,
Product Type
DigitalVideo Disc Player with 5-Disc Changer
Playable Discs
DVD-Video
Audio CD
Color System
NTSC
Frequency Response
DVD (linear sound): 20 Hz to 22 kHz (sample rate: 48 kHz)
20 Hz to 44 kHz (sample rate: 96 kHz)
Audio CD: 20 Hz to 20 kHz
Signal-to-Noise Ratio (SIN Ratio)
Audio CD: II 0 dB EIAJ(Electronic Industries Association of Japan)
Dynamic Range
DVD (linear sound): 95 dB
Aud_ CD: 94 dB (EIAJ)
Total Distortion Factor
Audio CD: 0.007% (EIAJ)
Wow and Flutter
Below the measurement limitation (+0.001%W PEAK) (EIAJ)
Power Requirement
120VAC ± 10%,60 Hz + 0.5%
Connections
S-Video output
Video output
Coaxial digital output
Analog audio output
Mini DIN 4-pin jack (75 D)
One pin jack, I Vpp (75 D)
One pin jack, 500m Vpp (75D)
Four pin jacks
(two left channels,two right channels)
2Vrms (47 k.Q)
Component video output One pin jack (Y), I Vpp (75D)
Two pin jacks (CB)/(CR), 700m Vpp (75D)
Optical digital output
Optical connector
Power Consumption
Power on: 22 W
Standby (power
off): 2.7W
Operating Temperature
41°F (5°C) to 104°F (40°C)
Relative Humidity
30% to 80%
Dimensions
16-15/16" (W) x 4-1/8" (H) x 14-5/16" (D)
(430mm x 104ram x 363mm)
Weight
8.38Ibs.(3.8kg.)
NOTE"Designsand specificationsare subjectto changesVrLhOUt
notice.
Downloaded From Disc-Player.com Philips Manuals
Jttlo
oto_
• _,,o
• .oto°ot°o
•_
io,,6,oo
• o_
Limited
Warranty
49
DVD
PLAYER
90 DaysFreeLabor/OneYearParts Exchange.This product must be carried in for repair.
WHO IS COVERED?
You must haveproof of purchaseto receive
warranty service.A sales receipt or other document
showing that you purchased the product is considered proof of purchase.
WHAT IS COVERED?
Warranty coverage begins the day you buy your
product. For 90 days thereafter,all parts wilt be
repaired or replaced, and labor is free. From 90 days
to one year from the day of purchase,all parts will be
repaired or replaced, but you pay for all labor
charges.After one year from the day of purchase,you
pay for the replacement or repair of all parts, and
for all labor charges.
All parts, including repaired and replaced parts, are
covered only for the original warranty period.When
the warranty on the product expires, the warranty
on allreplaced and repaired parts also expires.
manual(s) are not readily available).
MAKE SURE YOU KEER..
Pleasekeep your sales receipt or other document
showing proof of purchase.Attachit to this owner's
manual and keep both nearby.Also keep the original
box and packing material in case you need to return
your product.
BEFORE REQUESTING SERVICE...
Pleasecheck your owner's manual before
requesting service. Adjustments of the controls
discussed there may save you a service call.
TO GET WARRANTY SERVICE IN U.S.A.,
PUERTO RICO OR U.S. VIRGIN ISLANDS...
Take the productto a Philips factory service center
(see enclosed list) or authorized service center for
repair.When the product has been repaired, you
must pick up the unit at the center. Centers may
keep defective parts.
WHAT IS EXCLUDED?
Your warranty does not cover:
(In U.S.A.,Puerto Rico and U.S.Virgin Islands,all
• labor charges for installationor setup of the
implied warranties, including implied warranties of
product, adjustment of customer controls on the
merchantability and fitnessfor a particular purpose,
are limited in duration to the duration of this
product, and installation or repair of antenna
systems outside of the product.
express warranty. Because some states do not allow
• product repair and/or part replacement because
limitations on how long an implied warranty may
of misuse, accident, unauthorized repair or other
last, this limitation may not apply to you.)
cause not within the control of Philips Consumer
Electronics.
TO GET WARRANTY SERVICE IN CANADA...
• reception problems caused by signalconditions
Pleasecontact Philips at:
or cable or antenna systems outside the unit.
1-800-661-6162 (French Speaking)
• a product that requires modification or adapta1-800-363-7278 (EnglishSpeaking)
tion to enable it to operate in any country other
than the country for which it was designed,man(In Canada,this warranty isgivenin lieuof all other
ufactured, approved and/or authorized, or repair
warranties.No other warranties are expressed or
of products damaged by these modifications.
implied, including any implied warranties of merincidental or consequential damagesresulting
chantability or fitnessfor a particular purpose.
from the product. (Some states do not allow the
Philips is not liable under any circumstances for any
exclusion of incidentalor consequential damages, direct, indirect, special,incidental, or consequential
so the above exclusion may not apply to you.This
damages,howsoever incurred, even if notified of the
includes,but is not limited to, prerecorded matepossibility of such damages.)
rial, whether copyrighted or not copyrighted.)
damagecaused by the use of non-VHS tapes or
REMEMBER...
tapes that havenot been tested and labeled for
Please record below the model and serial numbers
use in two, four, six, and eight hour VHS
found on the product.Also, please fill out and mail
recorders.
your warranty registration card promptly. It will be
• a product that is used for commercial or institueasier for us to notify you if necessary.
tional purposes (including but not limited to
rental purposes).
MODEL#
WHERE IS SERVICE AVAILABLE?
Warranty service is available in all countries where
the product is officially distributed by Philips
Consumer Electronics. In countries where Philips
Consumer Electronics does not distribute the product, the local Philips service organization will
attempt to provide service (although there may be a
delay if the appropriate spare parts and technical
SERIAL#
This warranty gives you specific legal rights.You may
have other rights which vary from state to state.
Philips Service Solutions Group, RO. Box 2976, Longvlew,Texas 75606,
(903) 242-4800
EL623SE004 / MAC6183 / 3-00
Downloaded From Disc-Player.com Philips Manuals
50 Index
ac power cord ..........................................................
I5
accessories
.................................................................
52
angle button ........................................................
16,33
arrow buttons ...........................................................
16
audio button .......................................................
16,3t
audio cd..................................................................
6, 18
audio out jacks...............................................
8-10, 15
a-b repeat...................................................................
28
a-b repeat button ..............................................
17,28
on-screen display...............................................
36, 43
open/close button .......................................
14, 17-18
optical jack ..............................................
11-12, 15,47
enter button .......................................................
16,29
safety precautions ......................................................
3
search mode button ...................................
16,24-26
setting
audio .................................................................
38-39
language...............................................
31-32, 40-42
other .......................................................................
43
video .......................................................................
37
setup button .....................................
16,34-35, 37-43
skip buttons ..................................................
14, 16,24
slow motion ..............................................................
23
sound mode ..............................................................
3I
still picture .................................................................
20
stop button .........................................................
14, 17
subtitle button ....................................................
17,32
s-video out jack....................................................
9, 15
parental tock........................................................
34-35
password....................................................................
34
pause button .................................................
17,20-2 I
play button ..........................................................
14, 17
playing.........................................................................
18
power
batteries ........................................................................
7
button ........................................................
14, 16, 18
bit rate ........................................................................
39
cord .........................................................................
15
program ......................................................................
29
camera angle .............................................................
33
chapters ....................................................................
25
random .......................................................................
30
clear button ........................................................
16,29
rear panel...................................................................
15
coaxial jack ....................................................
11-12, 15
remote
component video out jacks................IO-12, 15,47
control
connections ...........................................................
8-12
buttons .....................................................
16-17
contents, table of........................................................
4
sensor ......................................................
14,44
controls, remote .................................................
16-17
using............................................................
7, 44
repeat button .....................................................
17,27
disc number buttons ..................................
14, 17, 18
repeat playback.........................................................
27
disc select button ........................................
14, 17, 18
resuming ptay............................................................
20
display button .....................................................
16,36
return button ............................................................
17
display panel ..............................................................
13
rev button ...........................................................
16,22
dvd video ......................................................................
6
reverse ........................................................................
22
front panel .................................................................
14
fwd/slow button ..........................................
17,22, 23
glossary.......................................................................
47
helpful hints .........................................................
44-45
hookups
amplifier with digital in jacks/
md deck/dat deck ...............................................
12
dolby digital decoder/
dts decoder ...........................................................
II
dolby surround
compatible amplifier .............................................
II
s-video ......................................................................
9
stereo ......................................................................
I0
table of contents ........................................................
4
tv ..........................................................................
8-12
title button..........................................................
17, 19
titles ..................................................................
6, 19,25
language...................................................
31-32, 40-42
tracks ......................................................................
6, 24
menu button .......................................................
16,19
menus .....................................................................
5,19
mode button .................................................
17,29-30
number buttons .....................................
16,24-25,29
Downloaded From Disc-Player.com Philips Manuals
video out jack ..........................................
8, I I- 12, 15
warranty .....................................................................
49
The following items are supplied with your DVD Player;
they are provided to help you use or set up your DVD Player.
Remote Control
4835 218 37296
TwoAA Batteries 4835 138 17012
Audio and Video Cables
4835 321 17148
This _mer'| tomanual
I_m_nber
recycle!is made of r_/clable
materi_ds.
As an ENERGYSTA_
j Parmer. F_l_ps Consumer Elec_eonlcs
hasdet_rnin_l
ENERGY
$T;_R
I guidelinesfor
that this product
efl_ rn_ts
_mc)__he
[-NEP.GY
STARI iS a U_. n_is_ered mark.
Downloaded From Disc-Player.com Philips Manuals
_231JE001
F_-_d In China
0W4N02553/ E71!IOUO• * • • *